

Nec VT660 IMPORTANT INFO IMPORTANT INFO

Portable Projector
VT660/VT560/VT460
Important Information
CONTENTS [English]
Safety Cautions ......................................................................... E-1
What’s in the Box? ................................................................... E-4
Replacing the Lamp .................................................................. E-4
Cleaning or Replacing the Filter ................................................ E-5
Specifications ............................................................................E-6
INHALT [Deutsch]
Sicherheitshinweise ................................................................. G-1
Lieferumfang ............................................................................ G-4
Austausch der Projektionslampe ............................................. G-4
Reinigung oder Austausch des Filters ..................................... G-5
Technische Daten .................................................................... G-6
CONTENU [Français]
Consignes de sécurité .............................................................. F-1
Que contient la boîte? ............................................................... F-4
Remplacement de la lampe ...................................................... F-4
Nettoyer ou remplacer le filtre ................................................... F-5
Caractéristiques Techniques ..................................................... F-6
INDICE [Italiano]
Precauzioni di sicurezza ............................................................ I-1
Cosa contiene la scatola? .......................................................... I-4
Sostituzione della lampada ........................................................ I-4
Pulizia o sostituzione del filtro .................................................... I-5
Specifiche .................................................................................. I-6
ÍNDICE [Español]
Precauciónes ............................................................................ S-1
¿Cuál es el contenido de la caja? .............................................S-4
Reemplazo de la lámpara ......................................................... S-4
Limpieza o reemplazo del filtro ................................................. S-5
Especificaciones ....................................................................... S-6
INNEHÅLL [Svenska]
Säkerhetsforeskrifter ................................................................W-1
Vad finns i förpackningen? ....................................................... W-4
Lampbyte ................................................................................. W-4
Rengöra eller byta filtret ...........................................................W-5
Specifikationer ......................................................................... W-6
Portable Projector
VT660/VT560/VT460
Important Information
Safety Cautions
Precautions
Please read this manual carefully before using your NEC VT660/VT560/VT460 Projector and keep the
manual handy for future reference. Your serial number is located on the bottom of your projector. Record
it here:
CAUTION
To turn off main power, be sure to remove the plug from power outlet.
The power outlet socket should be installed as near to the equipment as possible, and
should be easily accessible.
CAUTION
TO PREVENT SHOCK, DO NOT OPEN THE CABINET.
NO USER-SERVICEABLE PARTS INSIDE.
REFER SERVICING TO QUALIFIED NEC SERVICE PERSONNEL.
This symbol warns the user that uninsulated voltage within the unit may be sufficient to
cause electrical shock. Therefore, it is dangerous to make any kind of contact with any
part inside of the unit.
This symbol alerts the user that important information concerning the operation and
maintenance of this unit has been provided.
The information should be read carefully to avoid problems.
WARNING
TO PREVENT FIRE OR SHOCK, DO NOT EXPOSE THIS UNIT TO RAIN OR MOISTURE.
DO NOT USE THIS UNIT’S PLUG WITH AN EXTENSION CORD OR IN AN OUTLET UNLESS ALL
TWO PRONGS CAN BE FULLY INSERTED.
DO NOT OPEN THE CABINET. THERE ARE HIGH-VOLTAGE COMPONENTS INSIDE. ALL SERVICING MUST BE DONE BY QUALIFIED NEC SERVICE PERSONNEL.
DOC Compliance Notice
This Class B digital apparatus meets all requirements of the Canadian Interference-Causing Equipment
Regulations.
Acoustic Noise Information Ordinance-3. GSGV:
The sound pressure level is less than 70 dB (A) according
to ISO 3744 or ISO 7779.
E-1
CAUTION
•Avoid displaying stationary images for a prolonged period of time.
Doing so can result in these images being temporarily sustained on the surface of the LCD
panel.
If this should happen, continue to use your projector. The static background from previous
images will disappear.
• Do not put the projector on its side when the lamp is turned on.
Doing so may cause damage to the projector.
RF Interference
WARNING
The Federal Communications Commission does not allow any modifications or changes to
the unit EXCEPT those specified by NEC Soluctions (America), Inc. in this manual. Failure to
comply with this government regulation could void your right to operate this equipment. This
equipment has been tested and found to comply with the limits for a Class B digital device,
pursuant to Part 15 of the FCC Rules. These limits are designed to provide reasonable protection against harmful interference in a residential installation. This equipment generates, uses,
and can radiate radio frequency energy and, if not installed and used in accordance with the
instructions, may cause harmful interference to radio communications. However, there is no
guarantee that interference will not occur in a particular installation. If this equipment does
cause harmful interference to radio or television reception, which can be determined by turning the equipment off and on, the user is encouraged to try to correct the interference by one
or more of the following measures:
• Reorient or relocate the receiving antenna.
• Increase the separation between the equipment and receiver.
• Connect the equipment into an outlet on a circuit different from that to which the receiver is connected.
• Consult the dealer or an experienced radio / TV technician for help.
In UK, a BS approved power cable with moulded plug has a Black (five Amps) fuse installed for use with
this equipment. If a power cable is not supplied with this equipment please contact your supplier.
Important Safeguards
These safety instructions are to ensure the long life of your projector and to prevent fire and shock.
Please read them carefully and heed all warnings.
Installation
1. For best results, use your projector in a darkened room.
2. Place the projector on a flat, level surface in a dry area away from dust and moisture.
3. Do not place your projector in direct sunlight, near heaters or heat radiating appliances.
4. Exposure to direct sunlight, smoke or steam can harm internal components.
5. Handle your projector carefully. Dropping or jarring can damage internal components.
6. Do not place heavy objects on top of the projector.
7. If you wish to have the projector installed on the ceiling:
a. Do not attempt to install the projector yourself.
b. The projector must be installed by qualified technicians in order to ensure proper operation and
reduce the risk of bodily injury.
c. In addition, the ceiling must be strong enough to support the projector and the installation must be
in accordance with any local building codes.
d. Please consult your dealer for more information.
E-2

Fire and Shock Precautions
1. Ensure that there is sufficient ventilation and that vents are unobstructed to prevent the build-up of heat inside your
projector. Allow at least 3 inches (10 cm) of space between your projector and a wall.
2. Prevent foreign objects such as paper clips and bits of paper from falling into your projector.
Do not attempt to retrieve any objects that might fall into your projector. Do not insert any metal objects such as a
wire or screwdriver into your projector. If something should fall into your projector, disconnect it immediately and
have the object removed by a qualified NEC service personnel.
3. Do not place any liquids on top of your projector.
4. Do not look into the lens while the projector is on. Serious damage to your eyes could result.
5. Keep any items such as magnifying glass out of the light path of the projector. The light being projected from the lens
is extensive, therefore any kind of abnormal objects that can redirect light coming out of the lens, can cause unpredictable outcome such as fire or injury to the eyes.
6. Do not cover the lens with the supplied lens cap or equivalent while the projector is on. Doing so can lead to melting
of the cap and possibly burning your hands due to the heat emitted from the light output.
7. The projector is designed to operate on a power supply of 100-120 or 200-240 V 50/60 Hz AC. Ensure that your
power supply fits this requirement before attempting to use your projector.
8. Handle the power cable carefully and avoid excessive bending.
A damaged cord can cause electric shock or fire.
9. If the projector is not to be used for an extended period of time, disconnect the plug from the power outlet.
10. Do not touch the power plug during a thunderstorm. Doing so can cause electrical shock or fire.
CAUTION
1. Do not try to touch the ventilation outlet on the front as it can become heated while the projector is turned on.
2. Do no use the tilt-foot for purposes other than originally intended. Misuses such as gripping the tilt-foot or hanging
on the wall can cause damage to the projector.
3. When carrying the projector by the carrying handle, make sure the two screws that attach the carrying handle to the
projector cabinet are tight.
Insufficient tightening of the two screws could result in the projector falling and causing injury.
4. Enable High-Speed Fan mode if you continue to use the projector for consecutive days. (From the menu, select
[Advanced] → [High Speed Fan Mode].)
5. Do not unplug the power cable from the wall outlet under any one of the following circumstances.
Doing so can cause damage to the projector:
* While the Hour Glass icon appears.
* While the cooling fans are running. (The cooling fans continue to work for 60 seconds after the projector is
turned off).
Lamp Replacement
•To replace the lamp, follow all instructions provided in pages E-4 and E-5.
• Be sure to replace the lamp when the message "The lamp has reached the end of its usable life. Please replace
the lamp." appears. If you continue to use the lamp after the lamp has reached the end of its usable life, the lamp
bulb may shatter, and pieces of glass may be scattered in the lamp case. Do not touch them as the pieces of glass
may cause injury.
If this happens, contact your NEC dealer for lamp replacement.
• Allow a minimum of 60 seconds to elapse after turning off the projector. Then turn off the main power switch,
disconnect the power cable and allow 60 minutes to cool the projector before replacing the lamp.
E-3
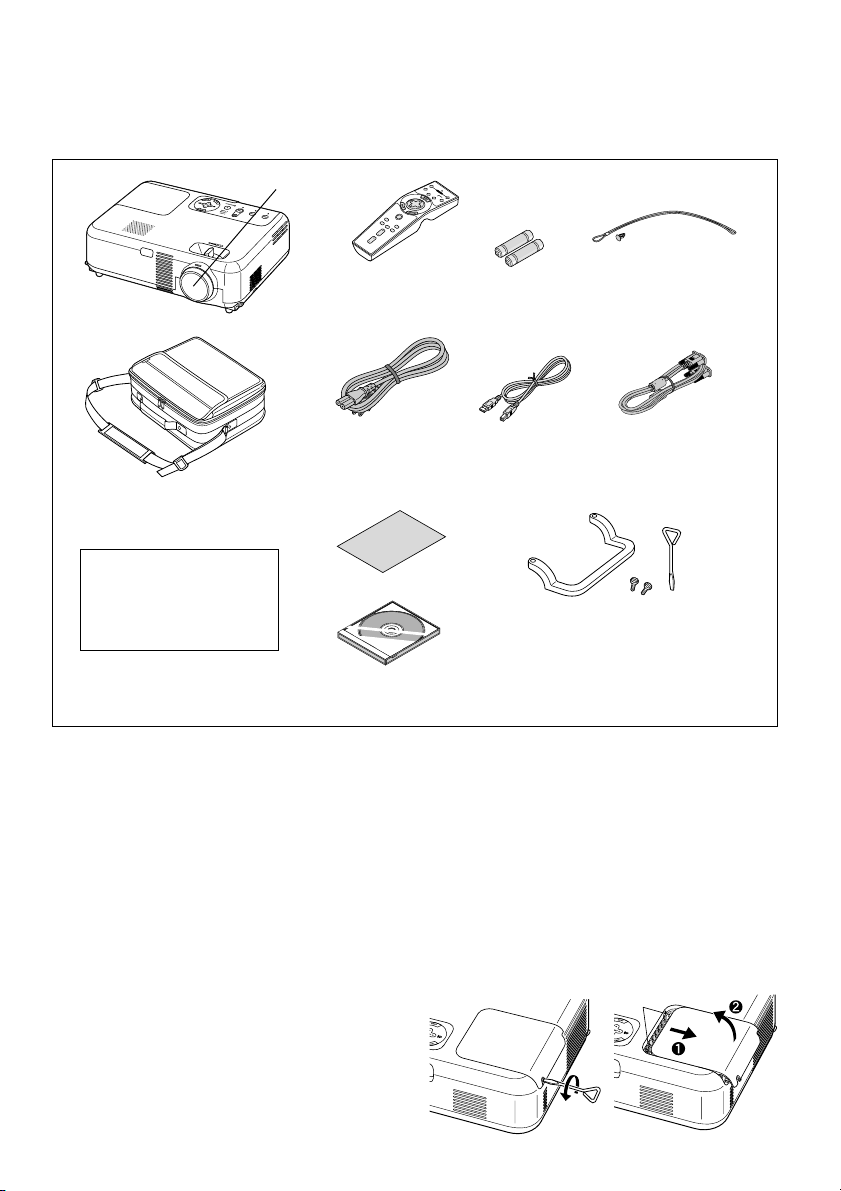
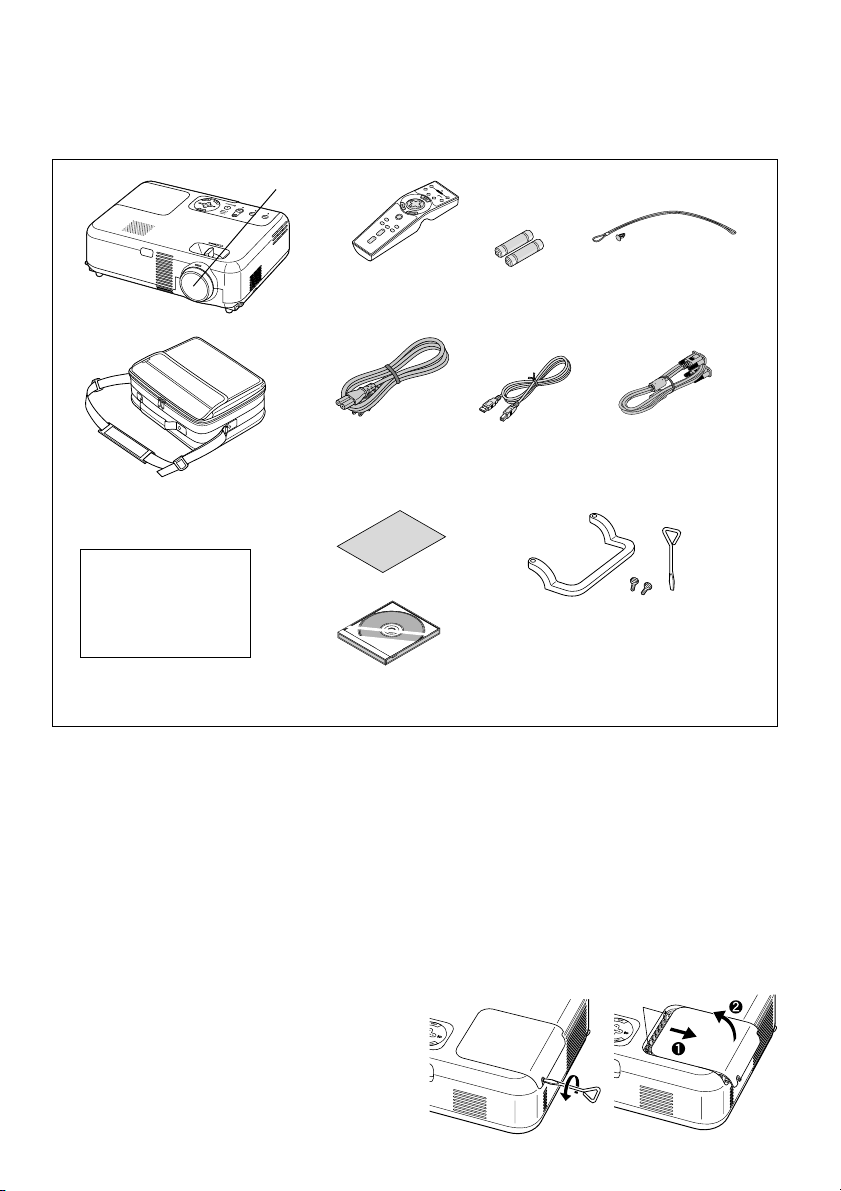
What's in the Box?
Make sure your box contains everything listed. If any pieces are missing, contact your dealer.
Please save the original box and packing materials if you ever need to ship your VT660/VT560/VT460 Projector.
Lens cap
(24F38091)
H
E
LP
M
AG
NI
FY
V
O
L
U
M
E
Remote control
Projector
(7N900381)
Power cable
(US: 7N080206)
(EU: 7N080005)
Soft carrying case
(24BS7201)
Guide
For North America only
Registration card
Limited warranty
For Europe only
Guarantee policy
CD-ROM
User’s manual
Replacing the Lamp
After your lamp has been operating for 2000 hours (up to
3000 hours in Eco mode) or longer, the LAMP indicator in
the cabinet will blink red and the message will appear.
Even though the lamp may still be working, replace it at
2000 (up to 3000 hours in Eco mode) hours to maintain
optimal projector performance.
CAUTION
• DO NOT TOUCH THE LAMP immediately after it has
been used. It will be extremely hot. Turn the projector off, wait 60 seconds, turn off the main power
switch and then disconnect the power cable. Allow
at least one hour for the lamp to cool before handling.
• DO NOT REMOVE ANY SCREWS except the lamp
cover screw and two lamp case screws. You could
receive an electric shock.
O
F
F
V
ID
E
O
P
O
S
W
-V
E
ID
R
E
OR
O
N
G
B
AUTO ADJ.
S
E
L
E
C
T
P
J
P
IC
T
U
R
E
A
F
S
R
P
EEZ
E
C
E
T
P
IC
-MU
TE
Batteries
String and rivet
(24C05051) (24C04531)
RGB signal cable
(7N520012)
Quick
Connect
USB cable
(7N520013)
Carrying handle, Screw (M4⳯2)
Flathead screwdriver
(Handle: 24F38031)
(Screw: 24N06281)
(Screwdriver: 24C07231)
• The projector will turn off and go into stand by mode
after 2100 (up to 3100 hours in Eco mode) hours of
service. If this happens, be sure to replace the lamp.
If you continue to use the lamp after 2000 hours
(up to 3000 hours in Eco mode) of use, the lamp
bulb may shatter, and pieces of glass may be scattered in the lamp case. Do not touch them as the
pieces of glass may cause injury. If this happens,
contact your NEC dealer for lamp replacement.
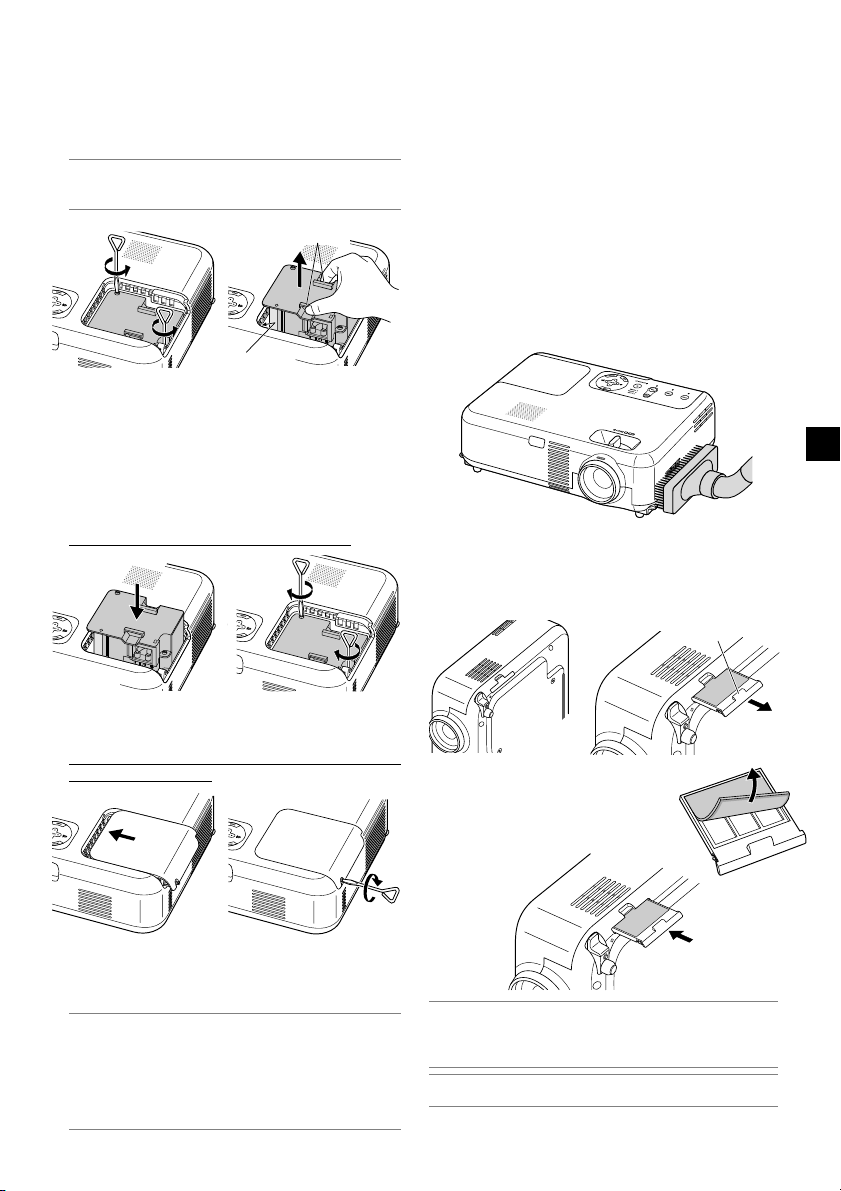
To replace the lamp:
1. Loosen the lamp cover screw until the screwdriver goes
into a freewheeling condition and remove the lamp
cover. The lamp cover screw is not removable.
Catch
E-4
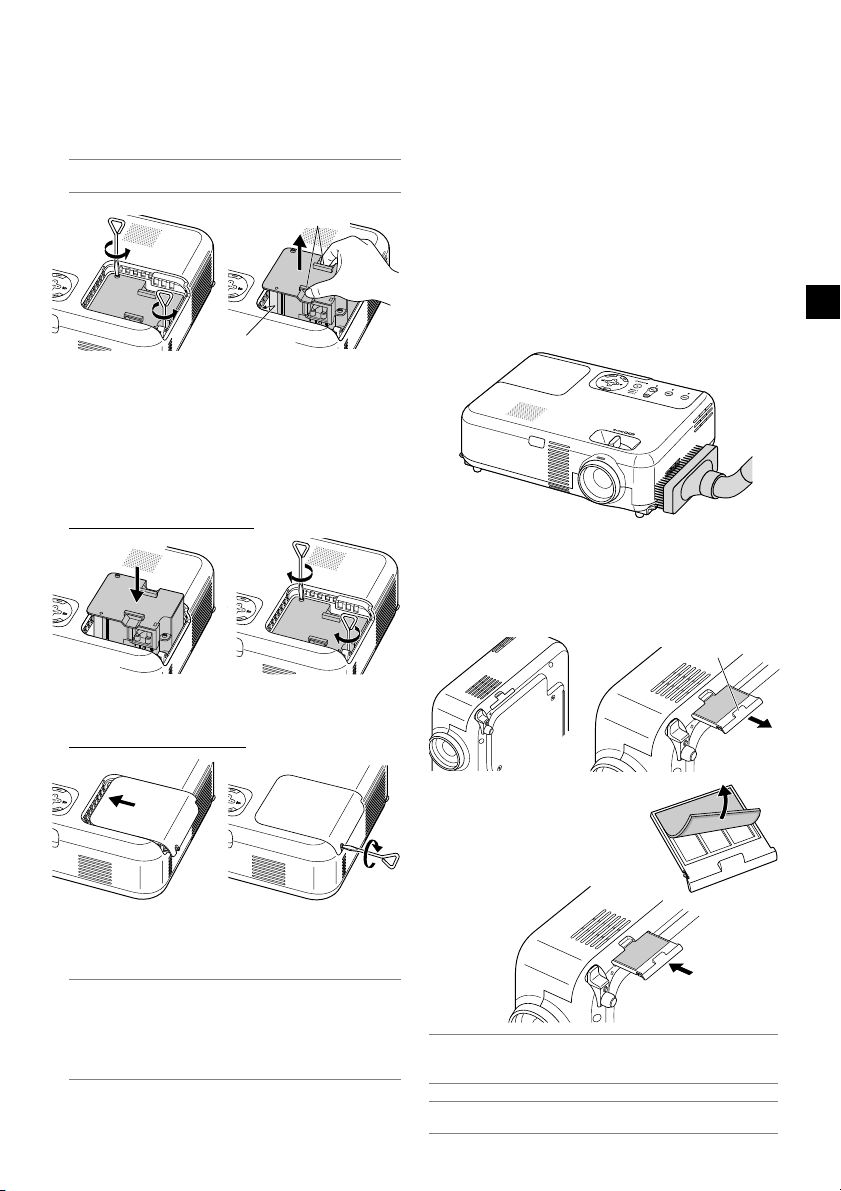
2. Loosen the two screws securing the lamp housing until
the screwdriver goes into a freewheeling condition. The
two screws are not removable.
Remove the lamp housing by holding it.
NOTE: There is an interlock on this case to prevent the risk of
electrical shock. Do not attempt to circumvent this interlock.
Catch
Interlock
3. Insert a new lamp housing until the lamp housing is
plugged into the socket.
CAUTION
Do not use a lamp other than the NEC replacement
lamp (VT60LP).
Order this from your NEC dealer.
Secure it in place with the two screws.
Be sure to tighten the screws.
Cleaning or Replacing the Filter
The air-filter sponge keeps the inside of the projector from
dust or dirt and should be cleaned after every 100 hours
of operation (more often in dusty conditions). If the filter is
dirty or clogged, your projector may overheat.
CAUTION
•
Turn off the projector, turn off the main power switch
and unplug the projector before replacing the filter.
• Only clean the outside of the filter cover with a
vacuum cleaner.
• Do not attempt to operate the projector without the
filter cover.
To clean the air-filter:
Vacuum the filter-through the filter cover.
To reset the filter usage time, from the menu, select [Default] → [Clear Filter Usage].
To replace the filter (sponge):
1. Remove the filter cover by pushing up on the catch of
the cover until you feel it detach.
Catch
4. Reattach the lamp cover.
Tighten the lamp cover screw.
Be sure to tighten the screw.
5. After you install a new lamp, select the menu → [Default] → [Clear Lamp Hour Meter] to reset the lamp
usage hours.
NOTE: When the lamp exceeds 2100 hours (up to 3100 hours
in Eco mode) of service, the projector cannot turn on and the
menu is not displayed. If this happens, press the Help button
on the remote control for a minimum of 10 seconds while in
standby mode. When the lamp time clock is reset to zero, the
LAMP indicator goes out.
2. Gently peel off the filter
(sponge) and replace it
with the new one.
3. Reinstall the new filter cover.
NOTE:
Do not wash the filter with soap and water. Soap and water will
damage the filter membrane. Before replacing the filter, remove dust and
dirt from the projector cabinet. Keep out dust and during filter replacement.
NOTE:
When you replace the lamp, it is also wise to replace the filter.
The filter comes in the same package with your replacement lamp.
E-5

Specifications
This section provides technical information about the VT660/VT560/VT460 Projector's performance
Model Number VT660/VT560/VT460
Optical
LCD Panel VT660: 0.7" p-Si TFT active-matrix with Micro Lens Array
Resolution VT660/VT560: 1024⳯768 pixels native, up to UXGA with Advanced AccuBlend
Lens Manual zoom and focus:
Lamp 200 W, 160 W Eco mode
Image Size 21 - 300 inches (0.5 - 7.6 m) diagonal
Projection Distance 2.38 - 35.8 ft / 7.3 (Tele) - 10.9 m (Tele)
Projection Angle Tele : 9.5° - 10.0° Wide : 11.3° - 11.8°
Keystone Correction +/- 30 degrees electronic (auto)
Electrical
Inputs 1 RGB/Component (D-Sub 15 Pin), 1 S-Video (DIN 4 Pin), 1 Video (RCA),
Outputs 1 RGB (D-Sub 15 Pin), 1 Stereo Mini Audio
USB Port 1 B Type
Video Compatibility NTSC, NTSC4.43, PAL, PAL-60, PAL-N, PAL-M, SECAM, HDTV: 1080i, 1080i/50Hz, 720p, 576p,
Scan Rate Horizontal: 15 kHz to 100 kHz (RGB: 24 kHz or over) / Vertical: 50 Hz to 120 Hz
Video Bandwidth RGB: 80 MHz (-3dB)
Color Reproduction 16.7 million colors simultaneously, Full color
Horizontal Resolution NTSC / NTSC4.43/PAL/PAL-M/PAL-N/PAL60: 550 TV lines
External Control RS232, IR
Sync Compatibility Separate Sync / Composite Sync / Sync on G
Built-in Speaker 1W (monaural)
Power Requirement 100 - 120V AC / 200 - 240V AC, 50 / 60 Hz
Input Current 2.9A (100 - 120V AC) / 1.4A (200 - 240V AC)
Power Consumption 7.5W in Standby mode / 260 W in Lamp Normal mode / 220 W in Lamp Eco mode
Mechanical
Installation Orientation Desktop/Front, Desktop/Rear, Ceiling/Front, Ceiling/Rear
Dimensions 12.2" (W)⳯3.5" (H)⳯9.1" (D)
Net Weight 6.5 lbs / 2.9 kg
Environmental Considerations
Regulations UL Approved (UL 60950, CSA 60950)
VT560/VT460: 0.7" p-Si TFT active-matrix
VT460: 800⳯600 pixels native, up to UXGA with Advanced AccuBlend
F1.7 - 2.0 f=21.6 - 25.9mm
1 Stereo Mini Audio, 2 (L/R) RCA Audio, 1 PC Control (DIN 8 Pin)
480p, 480i/60Hz
SECAM: 350 TV lines
YCbCr: 800 TV lines
RGB: VT660/VT560 / 1024 dots (H)⳯768 dots (V), VT460 / 800 dots (H)⳯600 dots (V)
310mm (W)⳯89mm (H)⳯230mm (D)
(not including protrusions)
Operational Temperatures : 32° to 95°F (0° to 35°C), 20% to 80% humidity (non-condensing)
Storage Temperatures : 14° to 122°F (-10° to 50°C), 20% to 80% humidity (non-condensing)
Meets DOC Canada Class B requirements
Meets FCC Class B requirements
Meets AS/NZS3548 Class B
Meets EMC Directive (EN55022:1998, EN55024-1998, EN61000-3-2, EN61000-3-3)
Meets Low Voltage Directive (EN60950, TUV GS Approved)
For additional information visit:
US : http://www.necvisualsystems.com
Europe : http://www.nec-europe.com/
Global : http://www.nec-pj.com/
LCD panels are inherently susceptible to pixel defects.
For additional information regarding pixel data, please contact your local NEC sales office.
The specifications are subject to change without notice.
E-6
Tragbarer Projektor
VT660/VT560/VT460
Wichtige Informationen
Sicherheitshinweise
Vorsichtsmaßnahmen
Lesen Sie sich dieses Handbuch bitte sorgfältig durch, bevor Sie den NEC VT660/VT560/VT460 Projektor
benutzen, und bewahren Sie das Bedienungshandbuch in greifbarer Nähe als spätere Referenz auf.
Die Seriennummer Ihres Projektors befindet sich auf der Unterseite. Tragen Sie sie hier ein:
VORSICHT
Zum Ausschalten der Hauptspannung müssen Sie unbedingt den Netzstecker von der
Netzsteckdose abziehen.
Die Netzsteckdose sollte so nahe wie möglich am Gerät installiert werden und jederzeit
leicht zugänglich sein.
VORSICHT
UM EINEN ELEKTRISCHEN SCHLAG ZU VERMEIDEN, SOLLTEN SIE DAS
GEHÄUSE NICHT ÖFFNEN.
IM INNEREN DES GERÄTES BEFINDEN SICH KEINE BAUTEILE, DIE VOM
BENUTZER SELBST GEWARTET WERDEN KÖNNTEN. ÜBERLASSEN SIE
SÄMTLICHE SERVICEARBEITEN QUALIFIZIERTEM NEC-SERVICEPERSONAL.
Dieses Symbol warnt den Benutzer vor unisolierter Spannung im Inneren des Gerätes,
die einen elektrischen Schlag verursachen kann. Daher ist der Kontakt mit sämtlichen
inneren Geräte-Bauteilen gefährlich.
Dieses Symbol macht den Benutzer darauf aufmerksam, daß dem Gerät wichtige den
Betrieb und die Wartung betreffende Informationen beigefügt sind. Diese Informationen
sollten zur Vermeidung von Störungen unbedingt sorgfältig gelesen und beachtet werden.
WARNUNG
UM EINE BRANDGEFAHR BZW. DIE GEFAHR EINES ELEKTRISCHEN SCHLAGES ZU
VERMEIDEN, DARF DIESES GERÄT WEDER REGEN NOCH FEUCHTIGKEIT AUSGESETZT
WERDEN. VERWENDEN SIE NICHT DEN STECKER DIESER EINHEIT MIT EINEM
VERLÄNGERUNGSKABEL ODER EINER STECKDOSE, IN DIE NICHT ALLE STIFTE
VOLLSTÄNDIG EINGESTECKT WERDEN KÖNNEN. ÖFFNEN SIE NICHT DAS GEHÄUSE. IM
INNEREN BEFINDEN SICH HOCHSPANNUNGSFÜHRENDE BAUTEILE. ÜBERLASSEN SIE
SÄMTLICHE SERVICEARBEITEN QUALIFIZIERTEM NEC-SERVICEPERSONAL.
3. GSGV Geräuschemissionsverordnung:
Der Schalldruckpegel beträgt entsprechend ISO 3744 oder ISO 7779 weniger als 70 dB (A).
G-1

ACHTUNG
•Vermeiden Sie die Wiedergabe von Standbildern über eine längere Zeitspanne. Dies könnte
dazu führen, dass diese Standbilder vorübergehend auf der Oberfläche der LCD-Anzeigetafel
sichtbar bleiben.
Geschieht dies, den Projektor ganz einfach weiterbenutzen. Der Statik-Hintergrund des
vorherigen Bildes erlischt.
• Den Projektor bei eingeschalteter Lampe nicht auf die Seite legen.
Dies könnte den Projektor beschädigen.
Wichtige Sicherheitshinweise
Diese Sicherheitshinweise sollen eine lange Lebensdauer Ihres Projektors sicherstellen und vor Feuer
und elektrischen Schlägen schützen. Lesen Sie diese Hinweise sorgfältig durch und beachten Sie alle
Warnungen.
Installation
1. Um beste Resultate zu erreichen, empfielt es sich, den Projektor in einem abgedunkelten Raum zu
betreiben.
2. Stellen Sie den Projektor auf eine flache, waagerechte Fläche in einer trockenen Umgebung; frei von
Staub und Feuchtigkeit.
3. Stellen Sie den Projektor weder in direktes Sonnenlicht noch in die Nähe einer Heizung oder sonstiger
Hitze abstrahlender Einrichtungen.
4. Wenn das Gerät direktem Sonnenlicht, Rauch oder Dampf ausgesetzt wird, können interne
Komponenten beschädigt werden.
5. Behandeln Sie Ihren Projektor vorsichtig. Fallenlassen oder starkes Schütteln kann interne
Komponenten beschädigen.
6. Legen Sie keine schweren Gegenstände auf den Projektor.
7. Wenn der Projektor an der Decke installiert werden soll:
a. Versuchen Sie nicht, den Projektor selbst zu installieren.
b. Der Projektor muß von qualifiziertem NEC-Servicepersonal installiert werden, um einen
ordnungsgemäßen Betrieb sicherzustellen und die Verletzungsgefahr zu reduzieren.
c. Die Decke muß für das Gewicht des Projektors ausreichende Festigkeit aufweisen und die Instal-
lation muß entsprechend den örtlichen Bauvorschriften ausgeführt werden.
d. Weitere Informationen erhalten Sie von Ihrem Fachhändler.
G-2

Vorsichtsmaßnahmen zum Schutz vor Brand und Stoß
1. Achten Sie auf ausreichende Ventilation und freie Luftzirkulation über die Belüftungsschlitze, damit es nicht zu
Hitzestau im Projektor kommt. Halten Sie einen Mindestabstand von 10 cm zwischen Wänden und Projektor.
2. Achten Sie darauf, dass keine Fremdkörper wie Büroklammern oder Papierschnipsel in den Projektor eindringen
können.
Versuchen Sie niemals selbst, in den Projektor gefallene Gegenstände zu entfernen.
Keinesfalls Metallobjekte wie Drähte oder Schrauben in den Projektor einführen. Schalten Sie den Projektor sofort
aus, falls ein Gegenstand hineingerutscht ist, und lassen Sie den Gegenstand vom NEC-Kundendienst entfernen.
3. Platzieren Sie keine Behälter mit Flüssigkeiten auf den Projektor.
4. Blicken Sie bei eingeschaltetem Projektor keinesfalls direkt in die Linse. Anderenfalls können Augenschäden
resultieren.
5. Halten Sie Gegenstände wie Lupen vom Lichtstrahlweg des Projektors entfernt. Der von der Linse projizierte Lichtstrahl
ist äußerst intensiv, weshalb reflektierende Gegenstände ihn umleiten und Gefahren wie Brand oder Augenschäden
verursachen können.
6. Decken Sie niemals bei eingeschaltetem Gerät die Linse mit der beiliegenden Kappe o. Ä. ab. Dies kann aufgrund
der von der Lichtquelle abgestrahlten Wärme zum Schmelzen der Kappe und zu Verbrennungen der Hände führen.
7.
Der Projektor ist auf eine Betriebsspannung von 100 – 120 V bzw. 200 – 240 V mit 50/60 Hz ausgelegt. Vergewissern Sie
sich vor der Inbetriebnahmen, dass die Netzspannung diesen Vorgaben entspricht.
8. Netzkabel vorsichtig handhaben und keinesfalls übermäßig biegen. Ein beschädigtes Kabel kann elektrischen Schläge
oder Feuer verursachen.
9. Falls der Projektor für längere Zeit nicht verwendet wird, den Netzstecker von der Steckdose trennen.
10.
Berühren Sie während eines Gewitters den Netzstecker auf keinen Fall.
Wenn Sie dies nicht beachten, kann dies zu einem elektrischen Schlag führen.
VORSICHT
1. Fassen Sie bei eingeschaltetem Projektor nicht an den Belüftungsgrill auf der Vorderseite, da er heiß werden kann.
2. Verwenden Sie den Kippfuß keinesfalls anders als angegeben. Transportieren oder Aufhängen am Kippfuß kann zu
Schäden am Projektor führen.
3.
Stellen Sie beim Tragen des Projektors am Tragegriff sicher, dass die beiden Befestigungsschrauben des Tragegriffs am Projektorgehäuse
festgezogen sind.
Bei ungenügend festgezogenen Schrauben kann der Projektor herabfallen und Verletzungen verursachen.
4.
Aktivieren Sie den Hochgeschwindigkeits-Lüftermodus, wenn der Projektor mehrere Tage durchgehend gebraucht
wird. (Wählen Sie vom Menü [Erweiterter] → [Hochgeschw.-Ventilation].)
5.
Vermeiden Sie unter folgenden Umständen ein Ziehen des Netzsteckers.
Der Projektor kann dadurch beschädigt werden.
* Während das Sanduhr-Symbol zu sehen ist.
* Während die Lüfter laufen. (Die Lüfter laufen nach dem Ausschalten des Projektors noch 60 Sekunden lang
nach.)
Lampenaustausch
•
Folgen Sie zum Austauschen der Lampe den Anweisungen auf Seiten G-4 und G-5.
• Die Lampe muss ausgetauscht werden, wenn die Meldung "Das Ende der Lampenlebensdauer ist erreicht.
Bitte ersetzen Sie die Lampe." angezeigt wird. Wenn die Lampe bis über das Ende ihrer Lebensdauer hinaus
weiterverwendet wird, kann die Birne platzen, wobei Glassplitter im Lampengehäuse verstreut werden. Berühren
Sie die Splitter nicht, da Sie sich dabei verletzen können.
Sollte dies vorkommen, beauftragen Sie Ihren NEC-Fachhändler mit dem Lampenaustausch.
• Lassen Sie nach dem Ausschalten des Projektors mindestens 60 Sekunden verstreichen. Schalten Sie dann den
Hauptnetzschalter aus und ziehen Sie den Netzstecker, um den Projektor dann weitere 60 Minuten abkühlen zu
lassen, bevor Sie die Lampe austauschen.
G-3
Lieferumfang
Vergewissern Sie sich, dass der Karton alle aufgeführten Teile enthält. Sollte ein Teil fehlen, wenden Sie sich an Ihren
Händler.
Heben Sie den Originalkarton und das Verpackungsmaterial für einen eventuellen Versand des Projektors VT660/
VT560/VT460 gut auf.
Linsenkappe
(24F38091)
O
F
F
V
ID
E
O
P
O
S
W
-V
E
ID
R
E
OR
O
N
G
B
AUTO ADJ.
S
E
L
E
C
T
P
J
P
IC
T
U
R
E
H
E
LP
A
F
S
R
P
EEZ
E
C
E
T
P
M
IC
AG
-MU
NI
FY
TE
V
O
L
U
M
E
Fernbedienung
Projektor
(7N900381)
Netzkabel
(US: 7N080206)
(EU: 7N080005)
Softtragetasche
(24BS7201)
Connect
Guide
Quick
Nur Nordamerika
Registrierungskarte
Befristete Garantie
Nur Europa
Garantieschein
CD-ROM
Bedienungshandbuch
Austausch der Projektionslampe
Nach ca. 2000 Betriebsstunden (3000 Stunden im Eco
Modus) die LAMP-Anzeige am Gehäuse blinkt rot und eine
Meldung wird angezeigt. Selbst wenn die
Projektionslampe noch arbeitet, sollte sie nach 2000
Betriebsstunden (3000 Stunden im Eco Modus)
ausgewechselt werden, um eine optimale Leistung des
Projektors sicherzustellen.
VORSICHT
• BERÜHREN SIE DIE LAMPE NICHT unmittelbar
nachdem Sie in Betrieb war. Sie wird extrem heiß
sein. Schalten Sie den Projektor aus, warten Sie 60
Sekunden, schalten Sie den Hauptnetzschalter aus
und trennen Sie dann das Netzkabel ab. Lassen
Sie die Lampe mindestens eine Stunde lang
abkühlen, bevor Sie sie anfassen.
• ENTFERNEN SIE KEINE SCHRAUBEN außer der
Schraube der Lampenabdeckung und den zwei
Lampengehäuse-Schrauben. Sie könnten einen
elektrischen Schlag erleiden.
Batterien Schnur und Niete
(24C05051) (24C04531)
USB-Kabel
(7N520013)
RGB-Signalkabel
(7N520012)
Tragegriff, Schraube (M4⳯2)
Schlitzschraubendreher
(Tragegriff: 24F38031)
(Schraube: 24N06281)
(Schraubendreher: 24C07231)
Nach 2100 Betriebsstunden (3100 Stunden im Eco Modus)
•
schaltet sich der Projektor in den Standby-Betrieb ab. In diesem
Fall muß die Projektionslampe unbedingt ausgetauscht werden.
Wenn die Projektionslampe über 2000 Betriebsstunden (3000
Stunden im Eco Modus) benutzt wird, kann die Glühbirne platzen
und die einzelnen Glasstücke werden im Lampengehäuse
verstreut. Berühren Sie die Glasstücke nicht, um Verletzungen
zu vermeiden. Beauftragen Sie im Falle einer zerplatzten Lampe
Ihren NEC-Fachhändler mit dem Lampenaustausch.
Austausch der Projektionslampe:
1.
Lösen Sie die Befestigungsschraube der Lampenabdeckung bis
der Schraubendreher frei läuft und nehmen Sie die
Lampenabdeckung ab. Die Schraube für die Lampenabdeckung
kann nicht entfernt werden.
Arretierhebel
G-4
2. Lösen Sie die zwei Befestigungsschrauben des
Lampengehäuses bis der Schraubendreher frei läuft.
Die zwei Schrauben können nicht entfernt werden.
Umfassen Sie das Lampengehäuse und entfernen Sie es.
HINWEIS: Auf dem Lampengehäuse befindet sich zur
Vermeidung eines elektrischen Schlages eine Verriegelung.
Versuchen Sie nicht, diese Verriegelung zu umgehen.
Arretierhebel
Verriegelung
3. Setzen Sie das neue Lampengehäuse ein bis es in der
Fassung einrastet.
VORSICHT
Verwenden Sie ausschließlich die NEC-Austauschlampe
(VT60LP). Bestellen Sie die Lampe bei Ihrem NEC-Fachhändler.
Befestigen Sie das Lampengehäuse mit den zwei
Befestigungsschrauben.
Ziehen Sie die zwei Schrauben unbedingt an.
Reinigung oder Austausch des Filters
Der Luftfilter-Schwamm hält das Innere des Projektors frei
von Staub oder Schmutz und sollte alle 100 Betriebsstunden
gereinigt werden (in einer staubigen Umgebung häufiger).
Wenn der Filter verschmutzt oder verstopft ist, kann dies zu
einer Überhitzung Ihres Projektor führen.
ACHTUNG
•
•
*Versuchen Sie nicht, den Projektor ohne
Wie der Luftfilter gereinigt wird:
Saugen Sie den Filter durch die Filterabdeckung hindurch ab.
Wählen Sie zur Rückstellung der Filterbetriebszeit im
Menü [Stand.] → [Filterstundenzähler zurücksetzen] aus.
Wie der Luftfilter ausgetauscht wird:
1.
Schalten Sie den Projektor aus, schalten Sie den
Hauptnetzschalter aus und trennen Sie das Netzkabel
des Projektors ab, bevor Sie den Filter austauschen.
Reinigen Sie nur das Äußere des Filters mit einem Staubsauger.
Filterabdeckung zu bedienen.
Entfernen Sie die Filterabdeckung, indem Sie die Lasche der
Abdeckung nach oben schieben, bis sie fühlen, dass sie sich löst.
Arretierhebel
4. Setzen Sie die Lampenabdeckung wieder auf.
Ziehen Sie die Schraube für die Lampenabdeckung fest.
Ziehen Sie unbedingt die Schraube für die
Lampenabdeckung an.
5. Wählen Sie nach der Installation einer neuen Lampe
im Menü [Stand.]
lösch], um die Lampenbetriebsstunden zurückzustellen.
HINWEIS: Wenn die Lampe 2100 Betriebsstunden (3100
Stunden im Eco Modus) überschreitet, kann der Projektor nicht
eingeschaltet und das Menü nicht angezeigt werden. Wenn
dies geschieht, drücken Sie im aktivierten Bereitschaftsmodus
für mindestens 10 Sekunden die Hilfe-Taste auf der
Fernbedienung. Wenn der Lampenbetriebszähler auf Null
rückgesetzt ist, erlischt die LAMP-Anzeige.
→
[Lampenbetriebsstunden-Zähler
2. Lösen Sie den Schwamm
vorsichtig ab und tauschen Sie
ihn durch einen neuen aus.
Setzen Sie die neue Filterabdeckung auf.
3.
HINWEIS:
und Wasser führen zu einer Beschädigung der Filtermembran. Entfernen Sie
eventuell vorhandenen Staub und Schmutz vom Projektorgehäuse, bevor Sie den
Filter austauschen. Halten Sie Staub und Schmutz beim Austausch des Filters fern.
HINWEIS:
auszutauschen. Der Filter befindet sich in der selben Packung wie Ihre Ersatzlampe.
Waschen Sie die Filterabdeckung nicht mit Seife und Wasser. Seife
Es ist ratsam beim Austausch der Lampe gleichzeitig auch den Filter
G-5
 Loading...