

Page 1

NEC Versa® LXi/SXi
NEC VersaBay III CD-RW/DVD Drive
Congratulations on purchasing the NEC VersaBay III CD-RW/DVD drive! The NEC
VersaBay III CD-RW/DVD drive features the latest in CD-ROM and DVD-ROM technology. It
is fully compatible with Kodak Multisession Photo CDs™ and standard audio CDs. You can use
your drive to load and start progra ms from compact discs and DVDs, or play audio CDs while
you work or rela x. Wit h Microsoft
Additionally, with the included ap plicat ion softwar e, you can write inform ation to a C D.
Contents
NEC VersaBay III CD-RW/DVD Drive Features .................................................................. 2
Removing a Device from the NEC VersaBay III ................................................................... 2
Installing the NEC VersaBay III CD-RW/DVD Drive...........................................................4
Installing the NEC CD-RW Software....................................................................................5
Installing Easy CD Creator............................................................................................5
Installing DirectCD.......................................................................................................6
BIOS and Driver Requirements............................................................................................6
Running under the Windows NT Operating System..............................................................6
Recommended Media........................................................................................................... 7
Installing the MGI SoftDVD MAX Software........................................................................ 7
Uninstallin g th e MGI SoftDVD MAX Software............................................................. 8
Using the MGI SoftDVD MAX Software ............................................................................. 8
Starting the MGI SoftDVD MAX Software .................................................................... 8
Condition s Affectin g DVD Per forman ce........................................................................ 9
Configuring AC Power Management for Playing Movies............................................... 9
Diagnosing Incorrect Power Management Settings....................................................... 10
Using the Password Feature......................................................................................... 10
Displaying Movies on a Television Set........................................................................ 10
Using a Retail Version of the Windows 2000 Operating System.......................................... 11
Specifications.....................................................................................................................11
®
Windows®, you can also play full-length CD-i movies.
NEC VersaBay III CD-RW/DVD Drive 1
Page 2
NEC VersaBay III CD-RW/DVD Drive Featu r e s
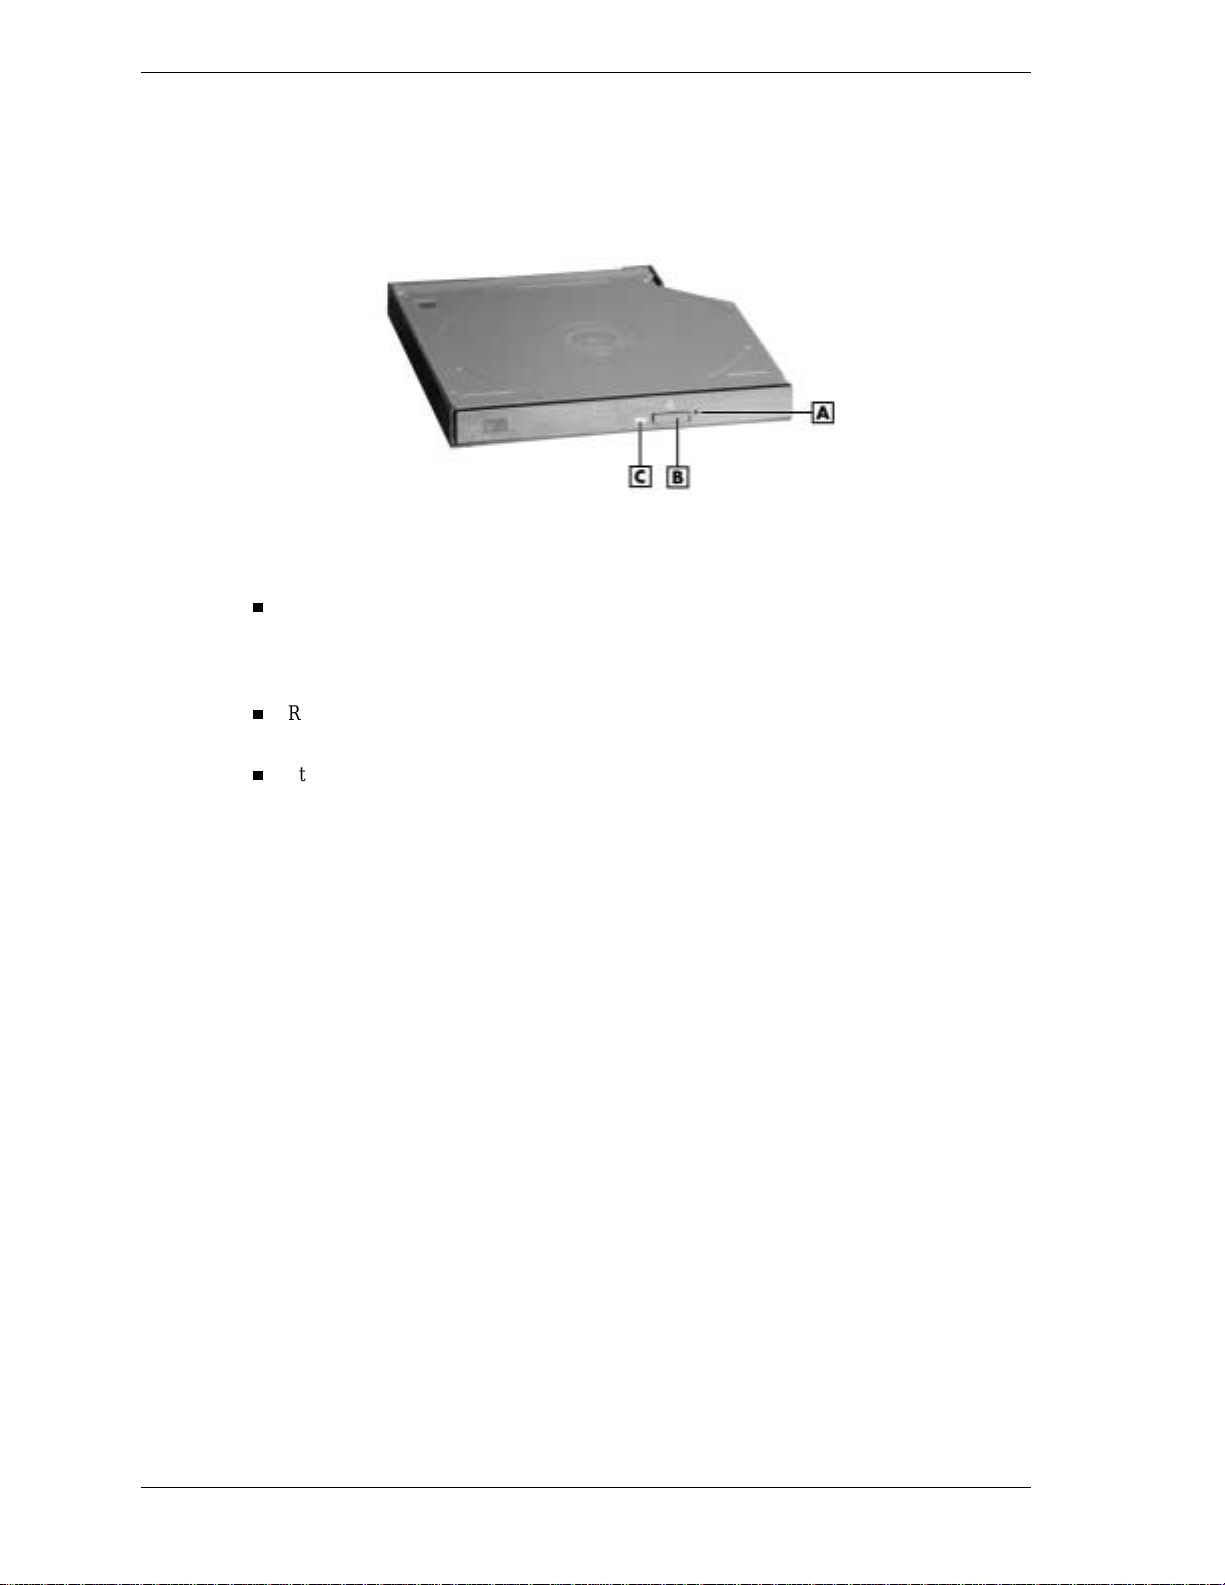
The NEC VersaBay III CD-RW/DVD drive offers the features shown in the following figure.
NEC VersaBay III CD-RW/ DVD drive features
A
- Emergency Eject Hole
B
- Release ButtonC - Status LED
These features of fer the followin g function s :
Emergency Eject Hole — allows you to manually re move a CD or vi deodi s c from t he NEC
VersaBay III CD-RW/DVD drive if the eject function is disabled by software or a power
failure. To rem ove the disc, insert the end of a paper clip into the eject hole and push in
until you hear a click. Manua lly open the drawer and remove th e CD.
Release Button — ejects the disc tray. Press this button when the power is on to insert a disc
into or remove a disc from the drive.
Status LED — light s during data r ead operati ons. Do not eject the dis c or turn off the N EC
Versa when the in dicator is lit.
Removing a Device from the NEC VersaBay III
Follow these steps to remove a device from the NEC VersaBay III.
1.
Save you r fil e s.
2.
Either shut down Windows and power off the NEC Versa, or use warm or hot swapping,
which is available with the NEC VersaBay III Swapping utility. The Swapping utility is
provid ed on the Ap pl ication an d Driver CD th at ships with the system.
3.
Close the LCD panel and locate the NEC VersaBay III on your system.
2 NEC VersaBay III CD-RW/DVD Drive
Page 3
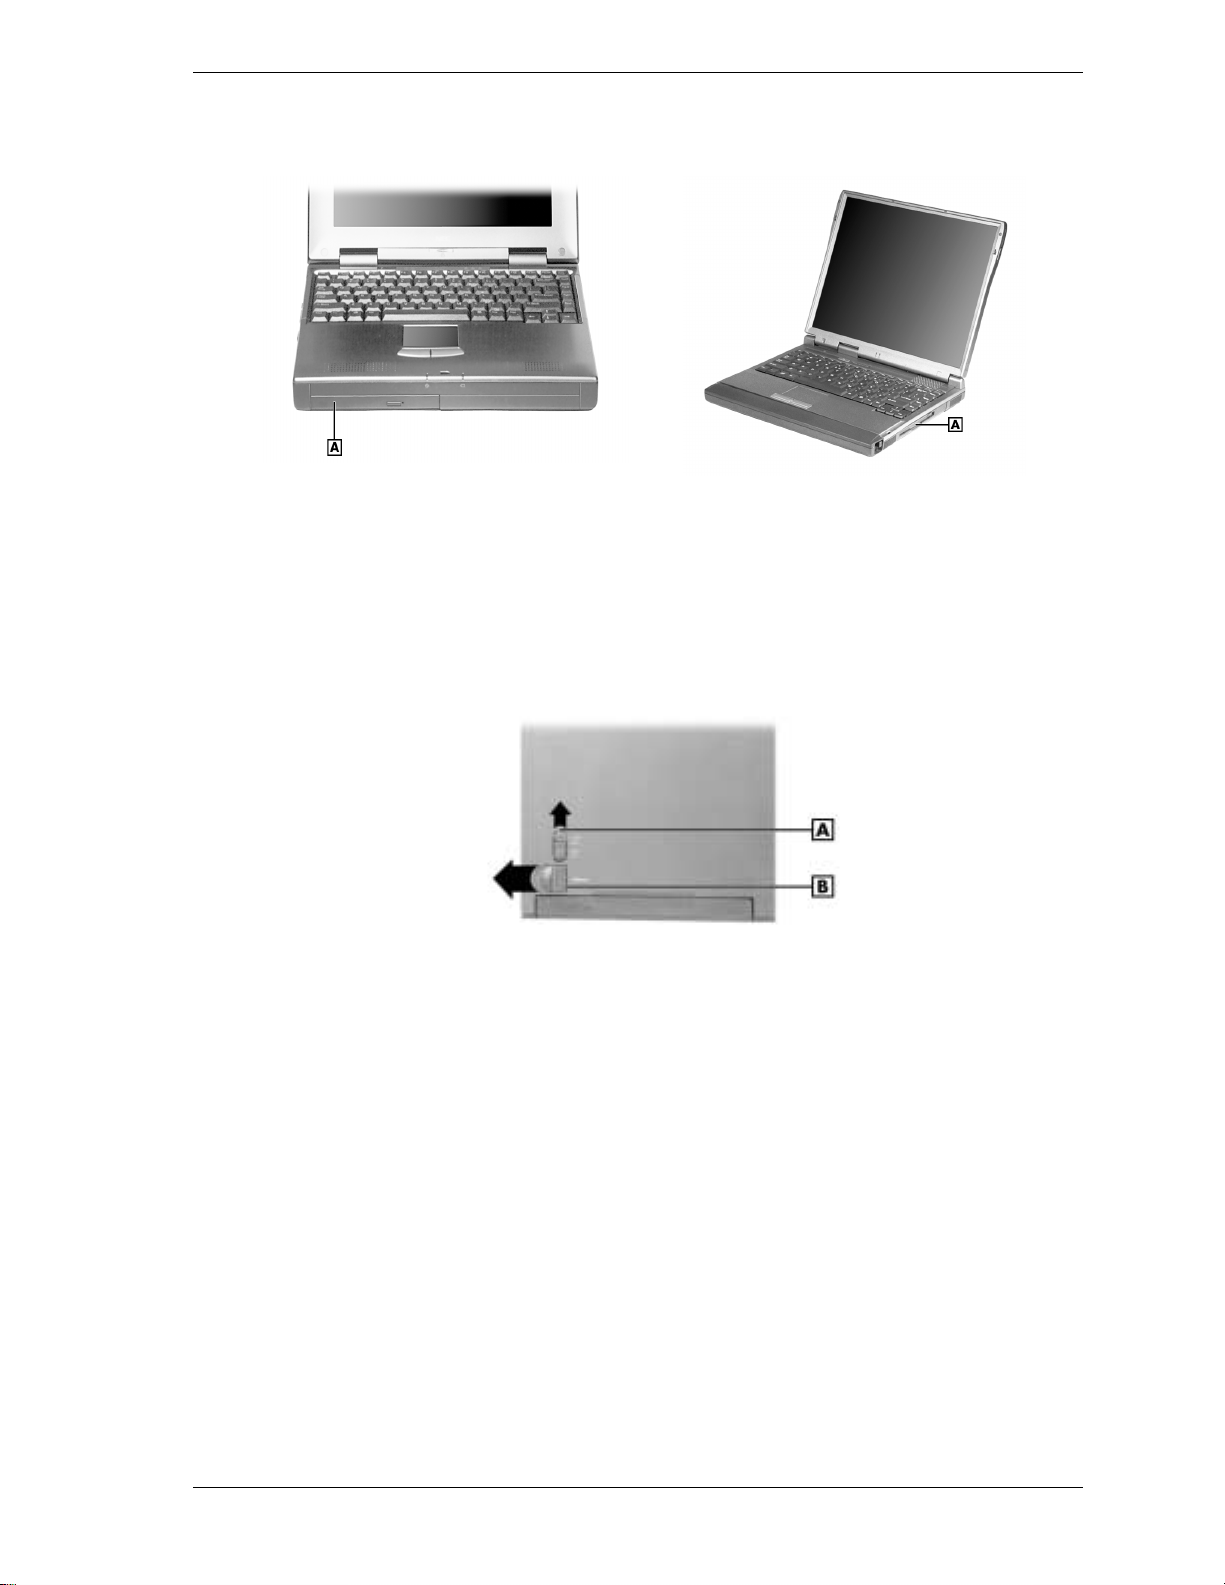
Locating the VersaBay III
NEC Versa LXi systems NEC Versa SXi systems
A
– VersaBay III
4.
Turn the NEC Versa upside down an d locate the release lock (see th e fi gure that fol lows).
Slide the release lock to the unlocked position.
5.
Locate the release latch. Slide the release latch to the unlocked position.
NEC VersaBay III release lock and latch
A
- Release Lock
6.
Slide the device out of the NEC VersaBay III.
B
- Release Latch
NEC VersaBay III CD-RW/DVD Drive 3
Page 4
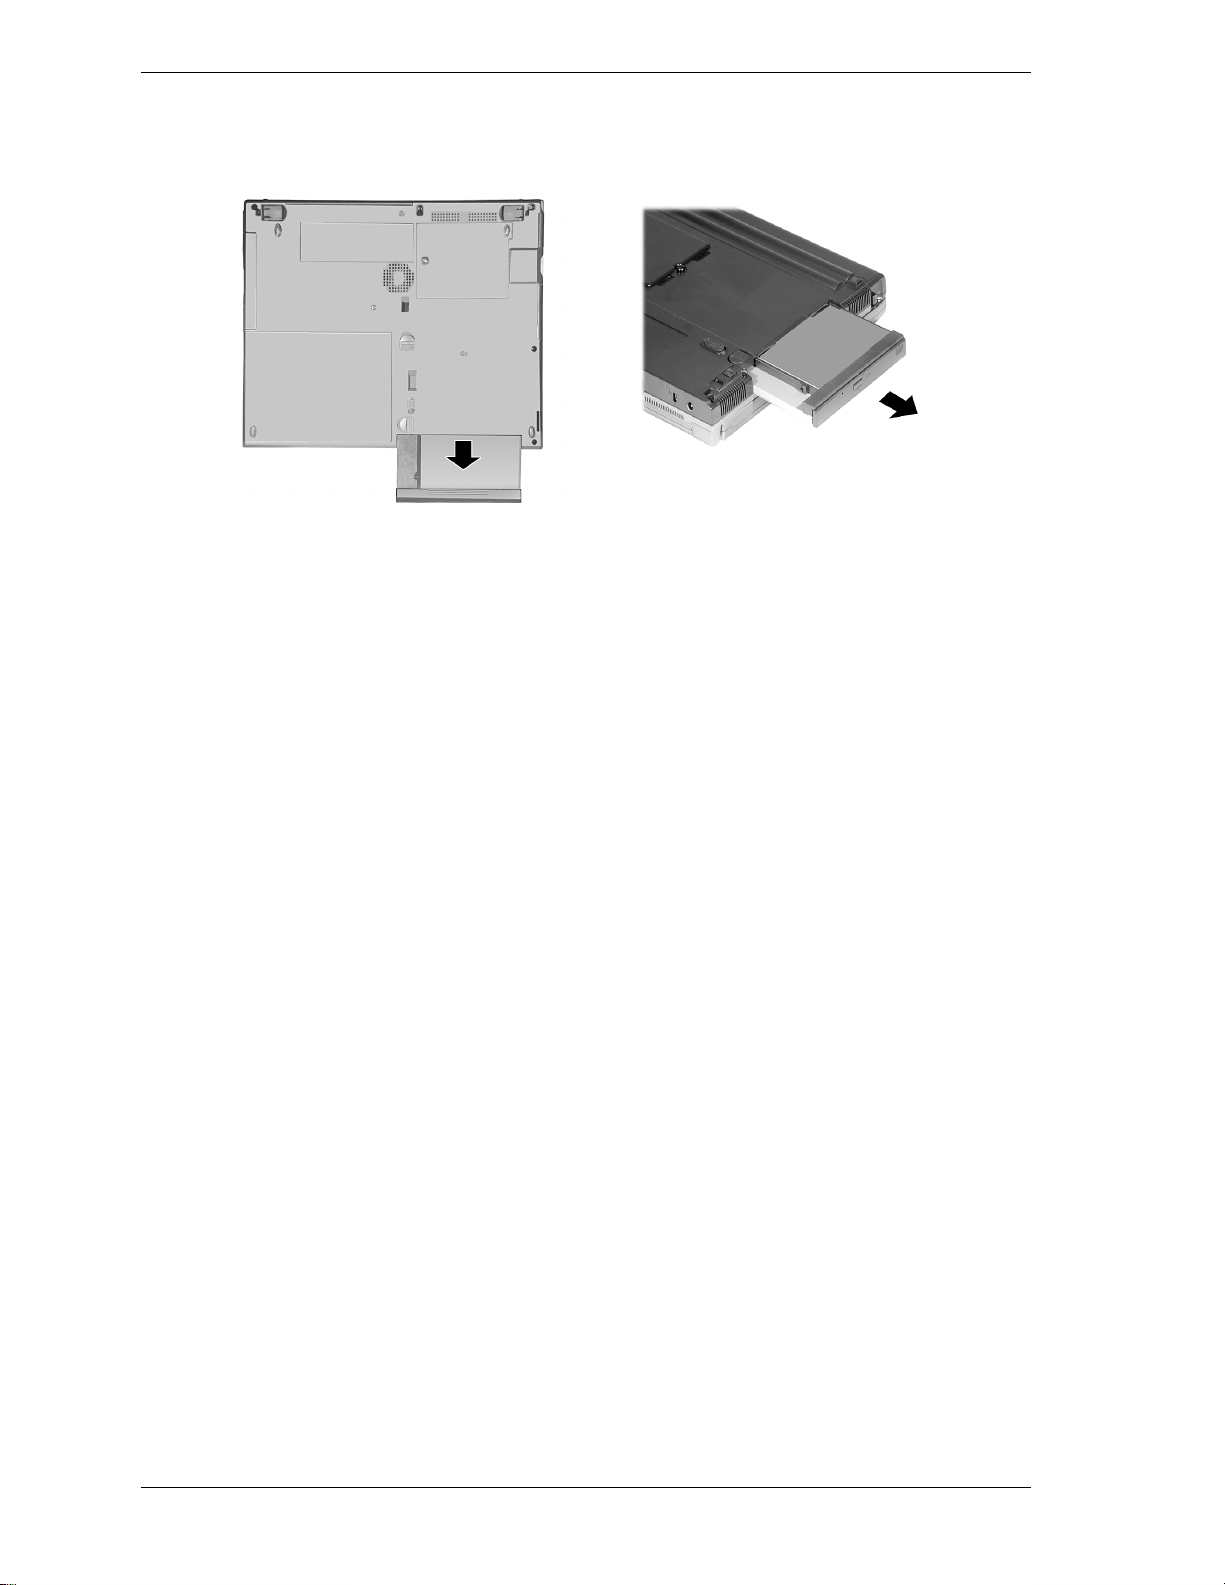
Sliding a device out of the NEC VersaBay III
NEC Versa LXi NEC Versa SXi
Installi n g the NEC VersaBay III CD-RW/DVD Drive
Follow these steps to install the NEC VersaBay III CD-RW/DVD drive in the
NEC VersaBay III.
1.
Save you r fil e s.
2.
Shut down Windows and power off the NEC Versa.
3.
Close the LCD panel and locate the VersaBay III on your system. For NEC VersaBay III
locations, see the previous section, “Removing a Device from the NEC VersaBay III.”
4.
If there is an NEC VersaBay III device in the NEC VersaBay III, refer to the instructions in
the pr evi ou s s ection, “Removing a Device from the NEC VersaBay III.”
5.
Turn the NEC Versa upside down an d locate the relea se lock and the release latch (see the
figure on the previous page).
6.
Slide the release lock to the unlocked position. Slide and hold the release latch in the
unlocked position.
7.
Align and install the device into the NEC VersaBay III.
4 NEC VersaBay III CD-RW/DVD Drive
Page 5
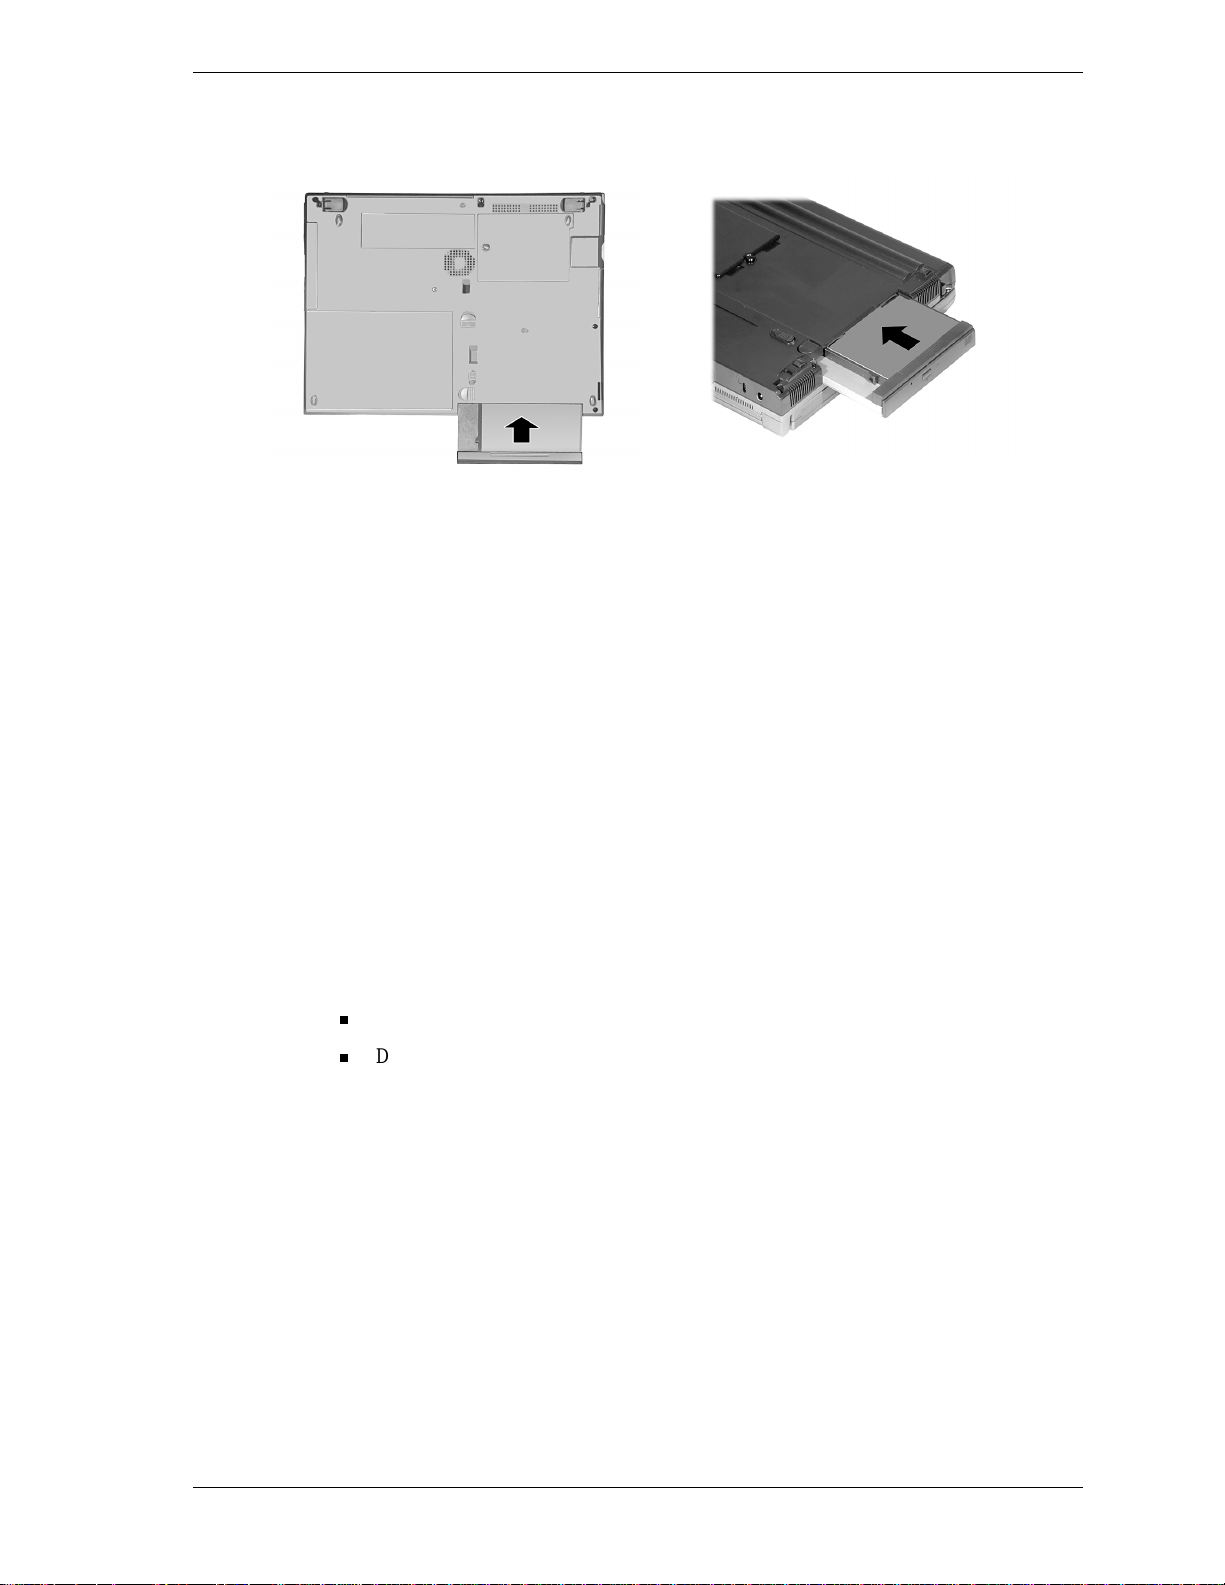
Sliding the CD RW/DVD drive into the NEC VersaBay III
NEC Versa LXi NEC Versa SXi
8.
Slide the release lock to the locked position.
9.
Turn the system over, open the LCD panel , an d power on the s ystem.
Installing the NEC CD-RW Software
The NEC CD-RW software CD contains two applications that must be installed after installing
the CD-RW/DVD drive into the NEC VersaBay III. The following sections provide the
inst allation instructions for the appli cations.
Installing Easy CD Creator
Easy CD Creator is an application that allows you to create data and audio CDs. Follow these
steps to install Easy CD Creat or.
1.
In Windows 98, double click on My Computer, then insert the NEC CD-RW software
CD into the drive.
In Windows 2000 and Windows NT, insert the NEC CD-RW software CD into the drive.
The Adap tec Mast er Setup screen appears. If the CD does not load au tomati cally, do th e
following.
Double click on My Computer on the Windows desktop.
Double cl ick on th e C D dri ve. The Ada p tec Master S etup screen ap pears. Go t o step 3.
2.
In Windows 98, the Ch oos e an Option dialog box appea rs. S e lect ‘Run Adapt ec C D - R/ RW
software installation program’ and cl ick OK. The A da p tec Master S et up screen appears.
3.
Click Easy CD Creator.
4.
The Adaptec Easy CD Creator Setup app ears. Cli ck Nex t.
5.
The Soft wa re License Agreement app ears. Click Yes .
6.
The Choose Destination Location dialog box appears. Click Next.
7.
Easy CD Creator is installed. When the installation completes, click Finish.
8.
A dialog box appear s a s king if you want t o install Ad obe Acrobat Re ader to acc ess th e
online help provided by Adobe. Click No if Acrobat Reader is installed. Click Yes to install
Acrobat Reader. If you click Yes, Acrobat Reader will be installed after you restart the
syste m. Follo w the on-screen prompts to insta l l Acrobat Reader.
9.
The Adap tec Mast er Setup screen appears. Click E xi t. Proceed to the next sect ion.
NEC VersaBay III CD-RW/DVD Drive 5
Page 6

Installing DirectCD
DirectCD lets you wri t e fil es directly to the CD in the CD-RW/DVD drive. Use the following
procedu re to install DirectCD.
1.
If necessary, insert the N EC CD-RW softwa re CD, then click DirectCD on th e A da ptec
Master Setup screen.
2.
The DirectCD Not e dialog box ap p ears. Cli ck Yes.
3.
The DirectCD Wel come screen appears. Click Nex t.
4.
The Soft wa re License Agreement app ears. Click Yes .
5.
The Choose Destination Location dialog box appears. Click Next.
6.
The Sel ect Progra m F ol d er dialog box appear s . Cl ick Next t o in stall DirectCD.
7.
When th e install ation comp letes, th e A da p tec Master s creen app ears. Cli ck Exi t.
8.
Click Finish to restart the system.
BIOS and Driver Requirements
It is like ly that the necessar y BIO S , audio drivers, an d vide o drive rs for the N E C Vers aBay II I
CD-RW/DVD drive are alread y insta lled on your system. Ch eck th e following ta ble for th e
minimum version required for each.
Minimum BIOS and Driver Requirements for
NEC VersaBay III CD-RW/DVD Drive
BIOS/Driver NEC Versa LXi NEC Ver s a SXi
BIOS BIOS 04 BIOS 13
Audio Driver s:
—Windows 98
—Windows 2000
Video Drivers:
—Windows 98
—Windows 2000
ESS Sound Driver 5.12.01.2045
ESS Sound Driver 5.12.01.2037
S3 Video Drivers 7.13.33
S3 Video Drivers 7.31.16
ESS Sound Driver 5.12.01.2045
ESS Sound Driver 5.12.01.2037
ATI Video Driver Build M6.11.31
ATI Video Driver Build M6.11.53
Running under the Windows NT Operating System
NEC Computers recommends that you disable the Save-to-File power management feature
before writing to a CD. The CD-RW software running under Windows NT does not support
ACPI functions, and the system may go into a Save-to-File state even though the drive is busy.
Note
If the system goes into a Save-to-File state during CD creation, the resulting CD will have
errors, and will ha ve t o be created ag ain.
While the CD creation does r es u me once th e syst em comes out o f the Save-to-File s tate, th e
message, “Errors reported by output device” app ears, and th e resulting CD does not function
properly.
Disable the Save-to-File feature before creating CDs under Windows NT.
For information on disabling the Save-to-File setting in Windows NT systems, see the BIOS
Setup sections of you r us er’s guide.
6 NEC VersaBay III CD-RW/DVD Drive
Page 7

Recommended Media
NEC Computers recommends the following media branding for best read and write
performance:
Read:
3M Corporation
Hitachi
IMATION
Kao
Memorex
Mitsub is h i Chemica l Corporation
Panasonic
Phillips
Ricoh Co. L td.
SONY
Taiyo Yude n Co., Ltd.
TDK Corporation
Teijin
Yamaha
Read/Write:
Kao
Mitsub is h i Chemica l Corporation
Ricoh Co. L td.
Memorex
With other media, the sensitivity settings are not configurable so only default settings can be
used during CD creation. As a result, the CD being created may not be readable.
Installing the MGI SoftDVD MAX Software
Once you have installed the NEC VersaBay III CD-RW/DVD drive, and (if necessary) ch eck ed
your BIOS, audio driver, and video dr i ver versi on s, inst al l th e MGI SoftDVD MAX software.
Note
The NEC Versa
software. Use the NEC SoftDVD solut ion with th e NEC Versa
The MGI SoftDVD MAX software allows you to play DVD movies and is provided on th e
“MGI SoftDVD MAX for NEC Versa Notebook Computers” CD included with your
CD-RW/DVD drive.
Install the MGI SoftDVD MAX softwar e according to the following steps.
1.
This document is provided with option kit # OP-260-69004, and applies to the following
systems:
NEC Versa
any NEC Versa
LXi
LXi
systems wi th
SXi
system
system with
16-MB video RAM
8-M B video RAM
does not support the MGI SoftDVD MAX
LXi
Insert the MGI SoftDVD MAX CD in the CD-RW/DVD drive.
8-MB video RAM.
with
2.
If you have auto-insert notification enabled, the installation program launches
automatically.
If you do not have auto-insert notification enabled, click the Start button and select Run.
Browse for the dri ve letter representing th e dr ive containing the CD, and double cl ick Setup.
3.
Several MGI SoftDVD MAX screen s app ear, followed b y a License Agreement window.
NEC VersaBay III CD-RW/DVD Drive 7
Page 8

4.
Click Y es to a ccep t the con ditions in the licens e agreement . The Welcome window app ears.
5.
Click Next. The Choose Destination Location window appears.
6.
Click Next. The ins tallation be gins and a stat us bar appears on the scr e e n showing t he
pr ogress of the insta llation.
7.
The MGI Registrati on window appear s.
To regi ster by email, click th e S en d button.
To regi ster from the MGI web sit e, click Register Now.
To skip registration for now, click Register Later.
8.
If you clicked either Send or Register Now you’ll be prompted for information. Follow the
on-screen prompts to complete the registration.
9.
An Information window appears when the installation is complete. Click OK.
10.
Remove t he CD from the drive.
Uninstalling the MGI SoftDVD MAX Software
To uninstall the MGI SoftDVD MAX softwar e fr om your system, cli ck Star t, Settings, and
Control Panel. Double click the Add/Remove Programs icon. Double click the
MAX
entry in th e A dd/Remove Programs window and follow the prompts.
MGI SoftDVD
Using the MGI SoftDVD MAX Software
The following sections describe how to launch the MGI SoftDVD MAX software, and how to
access online help. They also describe:
conditions that can affect playback
configuring power management settings for playing movies
diagnosing incorrect power management settings
the password feature
settings you should use when displaying movies on a television set connected to your
computer.
Note
smoothly. Be sure to configure power management settings before playing movies.
Starting the MGI SoftDVD MAX Software
MGI SoftDVD MAX is easy to use, with self-explana tory buttons and detailed online help.
Power management must be turned off for the MGI SoftDVD MAX software to function
To start the DVD Player you can either:
— select Start, Pr ogram s, MGI SoftDVD MAX, and MGI SoftDVD MAX; or
— double click the MGI SoftDVD MAX icon on the Windows desktop.
Note
You will be prompted with a Warnin g message if:
you try to launch MGI SoftDVD MAX if other applications are already running. Click OK to
clear the message, and then exit all other applications for optimal performance.
you try to launch MGI SoftDVD MAX if your system is configured for power management.
Click OK to clear the message, and then change your power management settings.
8 NEC VersaBay III CD-RW/DVD Drive
Page 9

To chan g e your system’s po wer man a g em ent settin g s for playing DVD movies, see the
section, “Configuri ng AC P ower Management for Pl ayin g Movies.”
To access t he online help you can either:
— click the question mark jus t below the movie screen (locat ed about an inch from the
right edge of the window); or
— Press
F1
.
NEC Computers does
SoftDVD MAX while the system is running on battery power.
Conditions Affecting DVD Performance
The following con diti on s can affect DVD movie pl a yback:
a damaged or dusty DVD
a processor that is too slow to support DVD movie playback
playing a DVD movie while the system is running on battery power
AC power management setti ngs that are enabled.
Performing the following activities during playback can impede DVD playback:
chang ing screen r es ol u tion
changing the world region setting.
Some DVD movie titles are not configured to tap all the features of the CD-RW/DVD drive or
MGI SoftDVD MAX. Some DVD titles:
not
recom mend playing DV D movies with MGI
cannot be ejected during play (you must stop the movie, and then eject the DVD)
do not enforce their advertised parental control ratings
do not display chapter number information
do not display the current DVD time
do not allow audio track selection thr ough the MGI SoftDVD MAX control panel (although
they do allow it from the MGI SoftDVD MAX menu)
do not allow navigation with the mouse (you must use the arrow keys instead).
Configuring AC Power Management for Playing Movies
You must turn off most of the power management settings in the Power Schemes window for
MGI SoftDVD MAX to play DVD movies properly. To a ccess these settings open the Contr ol
Panel, and double click the Power Management icon.
Set th e followin g fields in the ‘Plugged in’ column to ‘Ne ver’:
System standby
Turn off monitor
Turn off hard disks
System hibernates (ex cep t Windows 98SE systems )
NEC VersaBay III CD-RW/DVD Drive 9
Page 10

Note
playing. If the LCD panel is lowered during movie play, systems may hibernate, recording system
state to RAM (Save- to-R am) or a disk (Save-to-File).
NEC Computers recommends that you
not
close the LCD panel while a DVD movie is
If you alter these AC power management settings, be sure to change them back before playing a
movie with MGI SoftDVD MAX.
For complete information on configuring power management, see your NEC Versa user’s guide.
Diagnosing Incorrect Power Management Settings
If your system goes into a timeout during a movie, one of the following conditions may occur
when you bring the system out of the timeout:
if you are playing a movie on your te levis ion s e t, the system might go into ‘Simultaneous
mode’ (in which the movie displays on the television set and your comp uter ’s LCD pan el)
the movi e might restart fr om the beginn ing
the aud io might cu t out
the syst em might hang.
See “C onfiguring AC Power M a nage ment for Pla yi ng M ovies” for instructions on configuring
AC power management correctl y for playing DVD movies.
For detailed information on power management, see your NEC Versa user’s guide.
Using the Passwor d Fea tur e
The pass word feature allows you to set parental c ontrols for playin g rated videodisc s . You c an
set prote ction leve ls ac cording t o M ovie Industry standa rds, so you can control whic h vide odiscs
can be played.
Protection levels are password-protected. Note that if the protection level is changed, that level
is main tained even after the system is r ebooted, un til the pas s wor d is enter ed again and the level
is changed back.
For more information on sett ing and using passwords, see the MGI SoftDVD MAX onlin e help.
Note
advertised rating. This is not related to MGI SoftDVD MAX password protection.
Some DVD movies do not enforce the par ental cont rols that are design ated i n their
Displaying Movies on a Television Set
If you c onn e c t a tel evision set to your system so you ca n watc h the movie on i t instead of your
system’s LCD screen, set TV Out to Primary in the Display Properties window.
To configure th e televisi on s et as the primary disp lay do the following:
1.
Connect t he vi deo cable fr om your tel e vision set to the TV Out connec tor on your
computer.
2.
Right click the Windows desktop and click Properties. The Display Properties window
appears.
3.
Click the Settings tab and click the Advanced button. Click the Displays tab.
4.
Select the Television display field. Click the Primary button. Click OK twice.
10 NEC VersaBay III CD-RW/DVD Drive
Page 11

Using a Retail Version of the Windows 2000 Operating
System
NEC Com pu ters confi g ures your computer at the factory with th e correct IDE Controller mode
settings for opt imal CD-RW/DVD dr ive audio and video performance. These sett ing s are
pr e s e rved if you rein s t all your operat ing system using the Product Recovery CD pr ovided by
NEC Computers.
These settings are not the default in retail versions of the Windows 2000 operating system.
Should you install a retail version of Windows 2000 operating system instead of the version
provided by NEC Computers, the correct settings are overwritten. You can manually change
them back to optimize CD- RW/DVD drive per formance by following these steps.
1.
From the Windows Desktop, right click My Computer. Click Properties. In the System
Properties window, click the Hard wa re tab. In th e D evi ce Manag er ar ea, click the Device
Manager button.
2.
In the Device Manager window, if necessary, double click the IDE ATA/ATAPI controllers
icon to display its sub-items.
3.
Double cl ick either Primary IDE Channel, or Secondar y IDE Channel (accordin g to wh ich
one your DVD-ROM drive is on). The IDE Channel Propert i es dialog box open s.
4.
Click the Advanced S ettings tab. In the Devi ce 0 area, ch an ge Transfer Mode: to “DMA if
available.”
5.
In th e Device 1 area, change Trans fer Mode: t o “DMA if availa ble.”
6.
Click O K. A dialog box ap pears indicatin g that your system settings are ch anged and
pr ompting you to res t a rt your com puter.
7.
Click Y es to restart your computer to initiate the s ettings cha n ge.
Specifications
NEC VersaBay III CD-RW/DVD drive specifications follow and are standard unless stated
otherwise.
Power
Supply : +5 V, single source
Speed
Read: max 24X
Write: max 4X
Data Tr ansfer Rat e
DVD: 3,357-8,112 KB/s
DVD-VIDEO: 2,163-3,2 45 KB/s
CD: Mode 1: 1,552-3,600 KB/s, Mode 2: 1,769-4,104 KB/s
Operating and Stor age Con di tions
Shoc k: 1. 5 G (14.7ms)/read, 1.5 G (14.7 ms)/write
Vibration: 0.25G/read, 0.25 G/write
Temperature:
Humidity:
41° – 113° F (5° – 45° C) operating
14° – 140° F (-10° – 60° C) storage
8 – 80% RH operating
5 – 90% RH storage
NEC VersaBay III CD-RW/DVD Drive 11
Page 12

12 NEC VersaBay III CD-RW/DVD Drive
819-200738-000
02/2001
'%&($ %('
 Loading...