

Page 1
Manual
Page 2

The information in this document is subject to change without notice and does not represent a commitment on the part of Native Instruments GmbH. The software described by
this document is subject to a License Agreement and may not be copied to other media.
No part of this publication may be copied, reproduced or otherwise transmitted or recorded, for any purpose, without prior written permission by Native Instruments GmbH, hereinafter referred to as Native Instruments.
“Native Instruments”, “NI” and associated logos are (registered) trademarks of Native Instruments GmbH.
Mac, Mac OS, GarageBand, Logic, iTunes and iPod are registered trademarks of Apple
Inc., registered in the U.S. and other countries.
Windows, Windows Vista and DirectSound are registered trademarks of Microsoft Corporation in the United States and/or other countries.
All other trade marks are the property of their respective owners and use of them does not
imply any affiliation with or endorsement by them.
Document authored by: Native Instruments GmbH
Document version: 1.0 (08/2011)
Special thanks to the Beta Test Team, who were invaluable not just in tracking down bugs,
but in making this a better product.
Disclaimer
Page 3

Germany
Native Instruments GmbH
Schlesische Str. 29-30
D-10997 Berlin
Germany
www.native-instruments.de
USA
Native Instruments North America, Inc.
6725 Sunset Boulevard
5th Floor
Los Angeles, CA 90028
USA
www.native-instruments.com
Contact
© Native Instruments GmbH, 2011. All rights reserved.
Page 4

Table of Contents
Table of Contents
1 Welcome to the TRAKTOR KONTROL X1! ......................................................................
2 Safety Considerations ................................................................................................
2.1 Warning ...................................................................................................................................... 7
2.2 Caution .......................................................................................................................................7
2.3 Important Notes .......................................................................................................................... 7
3 The TRAKTOR KONTROL X1 Hardware .........................................................................
3.1 TRAKTOR KONTROL X1 Hardware Overview ................................................................................. 10
3.2 TRAKTOR KONTROL X1 Modes ..................................................................................................... 11
3.1.1 Top View .................................................................................................................... 10
3.1.2 Back Side View .......................................................................................................... 11
3.2.1 Native NHL Mode ....................................................................................................... 11
3.2.2 MIDI Mode .................................................................................................................. 12
4 Using the TRAKTOR KONTROL X1 with TRAKTOR PRO 2 ................................................
4.1 EFFECTS Section ......................................................................................................................... 13
4.2 BROWSE Section ......................................................................................................................... 15
4.3 LOOP Section .............................................................................................................................. 16
4.4 TRANSPORT Section .................................................................................................................... 18
4.5 Hotcue Mode ............................................................................................................................... 19
4.1.1 FX Assign Buttons ..................................................................................................... 14
4.3.1 Primary Function: Setting Loops ................................................................................ 16
4.3.2 Secondary Function (SHIFT): Activating Loops ........................................................... 17
4.3.3 FINE LOOP Adjustments ............................................................................................. 17
4.5.1 Advanced Hotcues and Hotloops ................................................................................ 20
5 Using Two TRAKTOR KONTROL X1 Units Simultaneously ..............................................
6 TRAKTOR KONTROL X1 Preferences ............................................................................
6.1 Sample Deck Mapping ................................................................................................................ 23
6
7
9
13
21
22
TRAKTOR KONTROL X1 - Manual - 4
Page 5

Table of Contents
6.1.1 Top FX Buttons and Knobs ......................................................................................... 24
6.1.2 FX Assign Buttons ..................................................................................................... 25
6.1.3 Volume Section .......................................................................................................... 25
6.1.4 Loop Section .............................................................................................................. 26
6.1.5 Sample Playback Section ........................................................................................... 27
7 Troubleshooting ........................................................................................................
7.1 Solving Hardware-related Problems ........................................................................................... 28
7.2 USB Troubleshooting .................................................................................................................. 28
7.3 TRAKTOR KONTROL X1 Software Troubleshooting ....................................................................... 29
7.2.1 USB 2.0 required ....................................................................................................... 29
7.2.2 Try another USB cable ............................................................................................... 29
7.2.3 Using a powered USB 2.0 hub ................................................................................... 29
7.3.1 Driver Installation Note in Windows ........................................................................... 29
7.3.2 Update the Driver ...................................................................................................... 30
7.3.3 Disable USB Energy Saving Mode (Windows only) ...................................................... 30
8 Getting Help ..............................................................................................................
8.1 Readme/Knowledge Base/Online Support ................................................................................... 31
8.1.1 Readme ..................................................................................................................... 31
8.1.2 Knowledge Base ........................................................................................................ 31
8.1.3 Online Support ........................................................................................................... 31
9 Appendix ..................................................................................................................
9.1 TRAKTOR PRO/SCRATCH PRO Default Mapping Table ................................................................. 32
9.2 TRAKTOR DUO/SCRATCH DUO Default Mapping Table ................................................................ 33
9.3 TRAKTOR LE 2 Default Mapping Table ........................................................................................ 35
9.4 TRAKTOR KONTROL X1 Default MIDI Mapping Table ................................................................... 36
9.4.1 Basic MIDI Mapping .................................................................................................. 37
9.4.2 MIDI Mapping with SHIFT Button ............................................................................... 38
28
31
32
TRAKTOR KONTROL X1 - Manual - 5
Page 6

Welcome to the TRAKTOR KONTROL X1!
1 Welcome to the TRAKTOR KONTROL X1!
Dear Native Instruments Customer,
Thank you for purchasing the TRAKTOR KONTROL X1, and for your continued trust in Native Instruments products.
The TRAKTOR KONTROL X1 is a dedicated TRAKTOR software controller for DJ's and was
designed by the creators of TRAKTOR for perfect software integration. These are:
▪ Superior buttons and knobs provide the feeling of high-end hardware.
▪ Software controlled backlit buttons for comprehensive visual feedback.
▪ High resolution proprietary TRAKTOR NHL protocol, superior to MIDI.
▪ MIDI functionality for control of earlier TRAKTOR versions and any other hardware or
software that supports the MIDI standard.
▪ Lightweight, robust housing with slim, ultra-portable form factor – fits perfectly along-
side a standard club mixer.
▪ Expandable – connect two TRAKTOR KONTROL X1s to control four Decks and four
effects units.
▪ Compatible – includes templates for controlling other DJ and performance software.
TRAKTOR KONTROL X1 - Manual - 6
Page 7

Safety Considerations
2 Safety Considerations
The following sections contain important information regarding the use of the TRAKTOR
KONTROL X1 hardware. Please read them thoroughly before you start to use the TRAKTOR
KONTROL X1.
2.1 Warning
▪ The TRAKTOR KONTROL X1 hardware contains no user-serviceable parts. Do not
open it, or attempt to disassemble or modify any internal hardware. If there appears
to be a hardware malfunction, immediately stop using the hardware and contact Native Instruments.
▪ Do not expose the TRAKTOR KONTROL X1 to liquids, and do not use it near water or
in damp conditions. Also, never place anything on top of the controller, and be very
careful that no objects or liquids of any kind enter the unit.
2.2 Caution
▪ Do not use excessive force on the buttons, knobs, or connectors.
▪ Never subject the unit to extreme temperatures (e.g. direct sunlight in an enclosed
vehicle or near a heat source), or extreme levels of vibration.
▪ When cleaning the TRAKTOR KONTROL X1, use a soft, dry cloth. Do not use sol-
vents, cleaning fluids, or chemically-impregnated wiping cloths.
▪ Operating the TRAKTOR KONTROL X1 may cause intense joy and instant exuberance
in you or your audience. Use with caution and beware of flying drinks.
Warning
2.3 Important Notes
▪ Disclaimer: Native Instruments GmbH cannot be held responsible for damage or data
loss caused by improper use of, or modification to, the TRAKTOR KONTROL X1 hardware or software.
▪ Specifications subject to change: The information contained in this manual is be-
lieved to be correct at the time of printing. However, Native Instruments GmbH reserves the right to make changes to the specifications of software and/or hardware at
any time without notice or obligation to update existing units.
TRAKTOR KONTROL X1 - Manual - 7
Page 8

Safety Considerations
Important Notes
▪ Serial number location: The TRAKTOR KONTROL X1 serial number is located on the
bottom of the TRAKTOR KONTROL X1 hardware.
▪ Disposal notice: Should this product become damaged beyond repair, or for some oth-
er reason come to the end of its useful life, please observe all regulations of your
country that relate to the disposal of electronic products.
▪ Copyright: Native Instruments GmbH 2011. All rights reserved. This publication may
not be reproduced in whole or in part, summarized, transmitted, transcribed, stored in
a retrieval system, or translated into any language, in any form or by any means without the prior written permission of Native Instruments GmbH.
▪ All product and company names are trademarks or registered trademarks of their re-
spective owners.
TRAKTOR KONTROL X1 - Manual - 8
Page 9

The TRAKTOR KONTROL X1 Hardware
3 The TRAKTOR KONTROL X1 Hardware
The TRAKTOR KONTROL X1 provides the following features:
▪ Professional quality construction for years of flawless use in demanding conditions.
▪ Highest quality buttons, encoders, and knobs with tactile feedback.
▪ Color coded LED status lights for instant visual monitoring of status and functions.
▪ Seamless configuration-free integration with TRAKTOR software.
▪ Configurable MIDI control of any hardware or software system that utilizes the MIDI
protocol.
▪ Optional TRAKTOR KONTROL X1 carrying case/performance stand and MIDI control
overlays are available at your favorite retailer or the Native Instruments web shop:
www.native-instruments.com/en/shop/
TRAKTOR KONTROL X1 - Manual - 9
Page 10
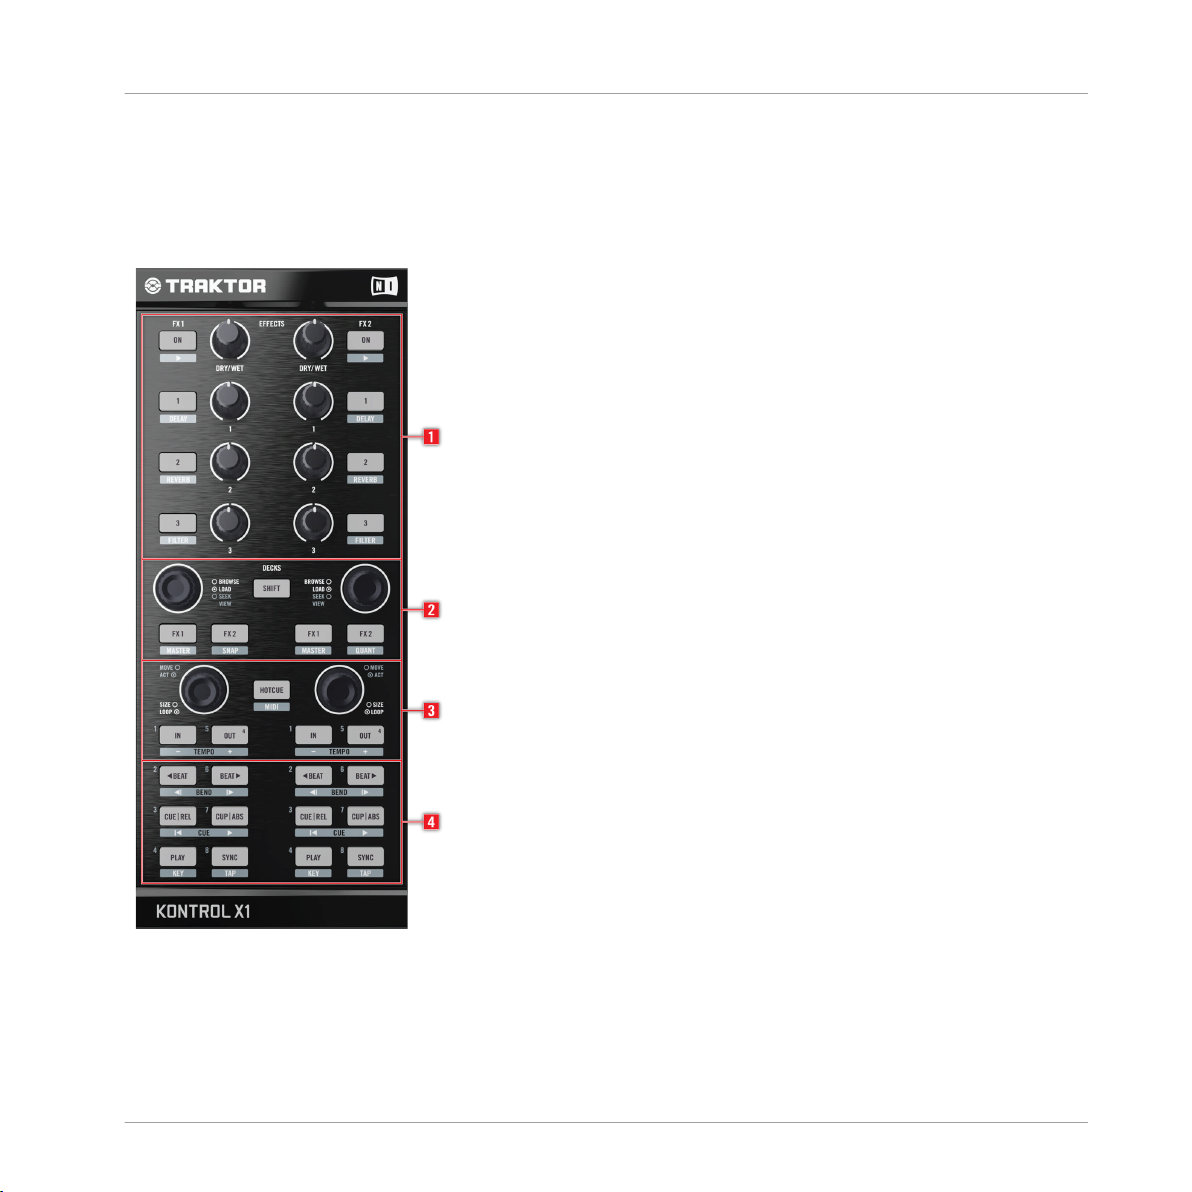
3.1 TRAKTOR KONTROL X1 Hardware Overview
3.1.1 Top View
The TRAKTOR KONTROL X1 Hardware
TRAKTOR KONTROL X1 Hardware Overview
Top view of the TRAKTOR KONTROL X1
(1) FX Control section
(2) Browse and Load section
(3) Loop section
TRAKTOR KONTROL X1 - Manual - 10
Page 11
The TRAKTOR KONTROL X1 Hardware
TRAKTOR KONTROL X1 Hardware Overview
(4) Transport section
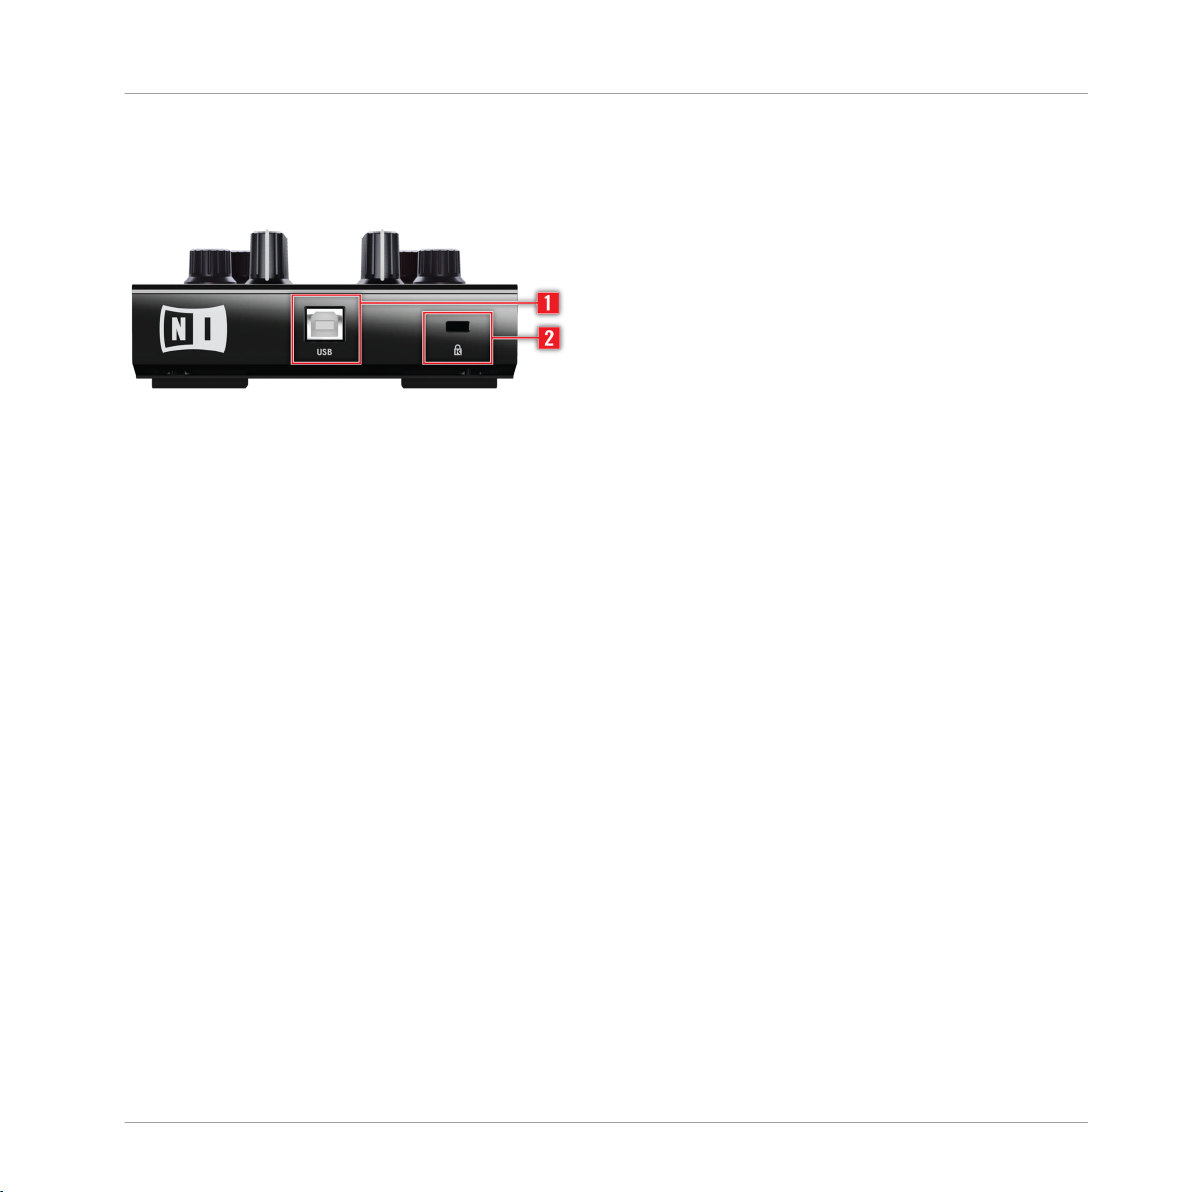
3.1.2 Back Side View
Back Side view of the TRAKTOR KONTROL X1
(1) USB input
(2) Kensington Lock slot
3.2 TRAKTOR KONTROL X1 Modes
When using the TRAKTOR KONTROL X1 with TRAKTOR, the default configuration of
TRAKTOR KONTROL X1 has two modes as described below.
3.2.1 Native NHL Mode
▪ In this mode TRAKTOR KONTROL X1 will communicate directly with TRAKTOR over
USB using the Native Instruments proprietary NHL protocol, which features high resolution translation of the TRAKTOR KONTROL X1 knobs superior to MIDI. For normal
TRAKTOR control, you will use this mode.
▪ In native NHL mode, the HOTCUE button will not be lit (or will be lit in white while in
HOTCUE mode), and each button and encoder on the TRAKTOR KONTROL X1 will
directly control its respective TRAKTOR parameter.
▪ TRAKTOR's default TRAKTOR KONTROL X1 mappings are stored within a TSI config-
uration file (*.tsi suffix), and can be customized to your preference using TRAKTOR's
Controller Manager settings (Preferences > Controller Manager).
◦ A TRAKTOR KONTROL X1 native mapping customization guide is available online
at our website: www.native-instruments.com/x1
◦ For a detailed overview of default TRAKTOR KONTROL X1 mappings, please refer
to section ↑9.3, TRAKTOR LE 2 Default Mapping Table.
TRAKTOR KONTROL X1 - Manual - 11
Page 12
The TRAKTOR KONTROL X1 Hardware
TRAKTOR KONTROL X1 Modes
3.2.2 MIDI Mode
The TRAKTOR KONTROL X1 is preconfigured to also be used as a standard MIDI controller and can control any hardware or software that supports the MIDI standard.
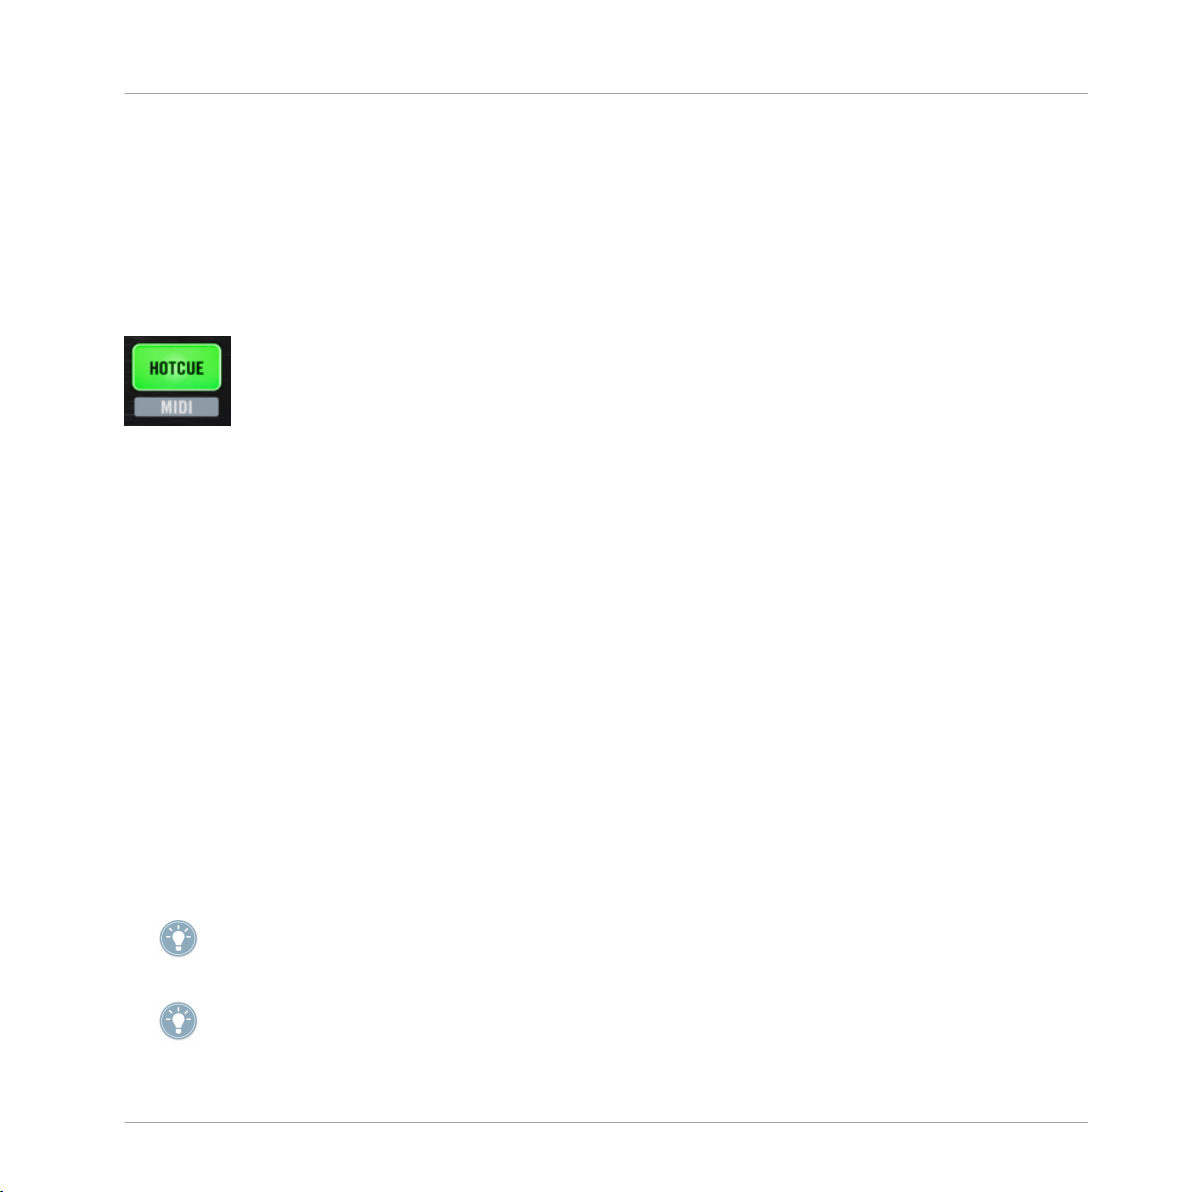
► To access MIDI mode, hold SHIFT and press HOTCUE. In MIDI mode the HOTCUE button will always be lit green. The TRAKTOR KONTROL X1 will then transmit MIDI data like
a normal MIDI controller.
The HOTCUE/MIDI button
1. Hold SHIFT and press HOTCUE again to leave MIDI mode and return to native TRAKTOR control.
2. You can switch back and forth from native TRAKTOR control mode to MIDI mode at
anytime while using TRAKTOR.
The TRAKTOR KONTROL X1's MIDI mode is required for use with earlier TRAKTOR versions , which do not support the NHL protocol.
TRAKTOR KONTROL X1 MIDI mappings for previous TRAKTOR versions will be provided
for download on the Native Instruments TRAKTOR website at: www.native-instruments.com/x1
▪ To customize the TRAKTOR KONTROL X1's MIDI mappings for previous TRAKTOR ver-
sions, use TRAKTOR's CONTROLLER MANAGER (Preferences > Controller Manager).
▪ To customize the TRAKTOR KONTROL X1's MIDI properties, such as MIDI channel or
CC numbers of its individual controls, Native Instruments has included the Controller
Editor. For more information, please refer to the Controller Editor manual provided
with the TRAKTOR KONTROL X1 or available on the Native Instruments website at
www.native-instruments.com.
These two modes may be used simultaneously, for example you can control TRAKTOR in native NHL mode, then hold SHIFT and press HOTCUE to switch to MIDI mode to control other
software or hardware over MIDI.
MIDI mode can be switched off completely using the option Preferences > Traktor Kontrol X1 >
MIDI Mode > Uncheck Enable MIDI mode via Shift+Hotcue.
TRAKTOR KONTROL X1 - Manual - 12
Page 13

Using the TRAKTOR KONTROL X1 with TRAKTOR PRO 2
EFFECTS Section
4 Using the TRAKTOR KONTROL X1 with TRAKTOR PRO 2
This chapter details the use of the TRAKTOR KONTROL X1 with TRAKTOR PRO 2 software and offers in-depth explanations of the TRAKTOR KONTROL X1's default mappings.
Accessing Primary and Secondary Functions
Each TRAKTOR KONTROL X1 button has a primary and secondary function, as labeled directly on the TRAKTOR KONTROL X1. Primary functions are direct, just press the desired
button. To access the secondary functions, hold the SHIFT button while pressing the desired button. For example:
1. Press FX 1 ON button (top right) to turn TRAKTOR's FX 1 effects unit ON. Pressing
the button again will turn the effect off.
2. Hold SHIFT and press FX1 ON (top right) to switch the effect unit to the next FX.
When using the Sample Deck mapping, not all TRAKTOR KONTROL X1 buttons have a sec-
ondary (SHIFT) function. For further information, please refer to section ↑6.1, Sample Deck
Mapping.
4.1 EFFECTS Section
Eight high resolution knobs and eight buttons make up the effects section allowing control
of two TRAKTOR PRO 2 effect units simultaneously.
TRAKTOR KONTROL X1 - Manual - 13
Page 14

The Effects section
Using the TRAKTOR KONTROL X1 with TRAKTOR PRO 2
EFFECTS Section
Primary Function
▪ The top buttons and knobs of the TRAKTOR KONTROL X1 are mapped directly to
TRAKTOR's effects units.
Secondary Function (SHIFT)
▪ Holding SHIFT and pressing FX1 ON, you can step though TRAKTOR's pre-selected
effects.
▪ Holding SHIFT and pressing FX buttons 1-3 will directly select the effect that is map-
ped to that FX button.
4.1.1
The FX Assign buttons
FX Assign Buttons
TRAKTOR KONTROL X1 - Manual - 14
Page 15

Using the TRAKTOR KONTROL X1 with TRAKTOR PRO 2
BROWSE Section
Primary Function
▪ Pressing either the left or right FX assign buttons will assign that TRAKTOR Deck to
the corresponding effects unit.
Secondary Function (SHIFT): LEFT FX Assign Pair
▪ Holding SHIFT and pressing the left FX assign button will set the corresponding
TRAKTOR Deck to clock MASTER.
▪ Holding SHIFT and pressing the right FX assign button will toggle TRAKTOR's SNAP
mode.
Secondary Function (SHIFT): RIGHT FX Assign Pair
▪ Holding SHIFT and pressing the left FX assign button will set the corresponding
TRAKTOR Deck to clock MASTER.
▪ Holding SHIFT and pressing the right FX assign button will toggle TRAKTOR's QUANT
mode.
4.2 BROWSE Section
One push encoder per Deck is dedicated to BROWSE playlists and LOAD tracks. Once a
track is loaded, the same encoder can be used to SEEK through a track.
The Browse section
These 2 knobs are used to control TRAKTOR's Browser.
Note that the BROWSE knobs have 2 levels of control: Push and Turn.
Primary Function
▪ Turning the BROWSE knob will scroll through your currently open playlist.
TRAKTOR KONTROL X1 - Manual - 15
Page 16

Using the TRAKTOR KONTROL X1 with TRAKTOR PRO 2
▪ Pressing the BROWSE knob will load the currently selected track into its respective
TRAKTOR Deck.
Secondary Function (SHIFT)
▪ Holding SHIFT and turning the BROWSE knob will quickly SEEK through the current-
ly loaded track.
▪ Holding SHIFT and pressing the BROWSE knob will switch TRAKTOR's layout (VIEW)
to hide the DECKs and maximize the BROWSE window.
4.3 LOOP Section
LOOP Section
The Loop section
The LOOP section allows intuitive control of TRAKTOR's loop functions and provides visual
feedback of loop status via the buttons' LEDs.
Note that the LOOP knobs have 2 levels of control, Push and Turn.
4.3.1 Primary Function: Setting Loops
LOOP Knob – Push
▪ Pressing the LOOP knob will directly set an active loop with a length that is currently
selected in TRAKTOR's Deck. The two LOOP IN and OUT buttons below the LOOP
knob will light indicating that a loop is active.
▪ Pressing the LOOP knob again will deactivate the current loop and the LOOP IN and
OUT buttons lights will turn off.
TRAKTOR KONTROL X1 - Manual - 16
Page 17

Using the TRAKTOR KONTROL X1 with TRAKTOR PRO 2
LOOP Knob – Turn
▪ Turning the LOOP knob while no loop is active will change the currently selected loop
length.
▪ Turning the LOOP knob while a loop is active will change the length of the active loop
by moving its end point.
LOOP IN Button (labeled IN)
▪ Pressing LOOP IN will set a manual Loop In point. The LOOP IN button will light, in-
dicating that TRAKTOR is waiting for a Loop Out point.
▪ Pressing LOOP IN again without setting a Loop Out point will exit manual Loop set-
ting and the LOOP IN light will turn off.
LOOP OUT Button (labeled OUT)
▪ When pressed alone, LOOP OUT will automatically set a 4 bar loop.
▪ When pressed after LOOP IN, LOOP OUT will set a manual Loop Out point.
Pressing the LOOP knob while a loop is active will always deactivate any manual or Auto
loop.
LOOP Section
4.3.2 Secondary Function (SHIFT): Activating Loops
LOOP Knob – Push
▪ Holding SHIFT and pushing the LOOP knob will cause TRAKTOR to loop the next
stored Loop point it comes across in that track.
LOOP Knob – Turn
▪ Holding SHIFT and turning the LOOP knob will move the entire loop by 1 beat steps
left or right.
4.3.3 FINE LOOP Adjustments
▪ To move a Loop in non-quantized steps, hold the LOOP IN button and turn the LOOP
knob.
▪ To move a Loop Out point in non-quantized steps, hold the LOOP OUT button and
turn the LOOP knob.
TRAKTOR KONTROL X1 - Manual - 17
Page 18

Using the TRAKTOR KONTROL X1 with TRAKTOR PRO 2
TRANSPORT Section
4.4 TRANSPORT Section
The TRAKTOR KONTROL X1's bottom set of buttons is dedicated to TRAKTOR's transport
control. In addition to direct access to TRAKTOR's functions, the button's lights also indicate the status of several of those functions.
The Transport section
Primary Functions: Transport Control
▪ PLAY: Activates the playback of the corresponding TRAKTOR Deck.
▪ SYNC: Will activate the Sync function of the corresponding TRAKTOR Deck.
▪ CUE│REL: Will set a Floating (temporary) Cue Point and the button will light up indi-
cating that the Cue Point is set. Pressing it again will return the track back to that
Cue Point and stop playback.
▪ CUP│ABS: Functions same as CUE│REL but will start playback from the last Floating
Cue Point.
As the track plays, this button will flash in tempo with the beat.
▪ ◄ BEAT ►: Will move the current playback position left or right by 1 beat.
TRAKTOR KONTROL X1 - Manual - 18
Page 19

Using the TRAKTOR KONTROL X1 with TRAKTOR PRO 2
The BEAT JUMP buttons will light up mimicking TRAKTOR's Phase Meter, regardless of
whether the Phase Meter display option is selected or not.
Secondary Functions (SHIFT): Transport Control and Tempo
▪ KEY: Will activate the corresponding Deck's key lock function.
▪ TAP: Allows you to tap in the tempo for guiding TRAKTOR's Autogrid function in a
loaded Deck.
▪ |◄ CUE ►: The left button will force TRAKTOR's Deck back to the beginning of the
currently loaded track. The right button will skip through the following stored Cue
points of the track.
▪ ◄│ BEND │►: Activates the corresponding Deck's Pitch Bend, temporarily speeding
up or slowing down the track.
▪ - TEMPO +: Will manually increase or decrease the tempo of the corresponding Deck.
4.5 Hotcue Mode
Pressing the HOTCUE button alone will activate TRAKTOR KONTROL X1's Hotcue mode.
When in this mode, the HOTCUE button will be lit in white and the bottom set of the
TRAKTOR KONTROL X1's transport buttons will switch to Hotcue control.
Hotcue Mode
Only the bottom 16 buttons will be switched to HOTCUE mode.
▪ The HOTCUE buttons are labeled to the left of the buttons themselves, 1 through 8,
which indicates their Hotcue number.
▪ By default, the LOOP IN (HOTCUE 1) button is mapped to a track's first stored Cue
point, which is usually the automatically set grid marker when a track is analyzed by
TRAKTOR. While a track is playing, pressing any of the remaining 7 buttons in the
HOTCUE group will set a new Cue point. The button will light, indicating that a Hotcue has been set.
Activating TRAKTOR's Snap mode will force Cue Points to always be set on-beat.
▪ Pressing LOOP IN button again while a track is playing will cause TRAKTOR to imme-
diately skip to that Cue point.
TRAKTOR KONTROL X1 - Manual - 19
Page 20

Using the TRAKTOR KONTROL X1 with TRAKTOR PRO 2
▪ Once the Hotcue is set, holding SHIFT and one of the lit Hotcue buttons (while still
in Hotcue Mode) will delete that Cue point. The button will no longer be lit indicating
that the Cue point has been deleted.
▪ DECK BROWSE, EFFECTS, LOOP KNOB, SNAP, and QUANT are unaffected and can
be used simultaneously with Hotcue mode.
When in HOTCUE mode, LOOP knob (Turn and Push) must be used to set and change loops.
4.5.1 Advanced Hotcues and Hotloops
▪ Utilizing the TRAKTOR KONTROL X1's and TRAKTOR's Hotcue functionality, it is
possible to remix tracks live by skipping though stored Cue points. With TRAKTOR's
Quant function on, Hotcue skips will always be seamless.
▪ Since TRAKTOR does not differentiate between Cue points and Loop points, a Hotcue
may also be a Hotloop.
▪ Hotcues and Hotloops can be mixed together when mapped to individual HOTCUE
buttons.
▪ This advanced functionality can open up a world of live interaction with your tracks
never before realized, directly out of the box with the TRAKTOR KONTROL X1 and
TRAKTOR!
Hotcue Mode
TRAKTOR KONTROL X1 - Manual - 20
Page 21

Using Two TRAKTOR KONTROL X1 Units Simultaneously
5 Using Two TRAKTOR KONTROL X1 Units Simultaneously
With TRAKTOR PRO 2/TRAKTOR SCRATCH PRO 2, things really get interesting as four
Decks and effects are available:
▪ For TRAKTOR PRO 2 versions, two TRAKTOR KONTROL X1 units are required to con-
trol all of TRAKTOR PRO 2's four available Decks and effects simultaneously.
▪ Plug and play functionality allows you to simply connect the second TRAKTOR KON-
TROL X1 unit and it's instantly ready for use.
▪ Two TRAKTOR KONTROL X1 units' modes may also be mixed, with one unit control-
ling TRAKTOR PRO 2 natively and the other controlling another hardware or software
device in MIDI mode.
▪ Two TRAKTOR KONTROL X1 units may operate in MIDI mode and at any time be
switched back to native TRAKTOR mode.
Two TRAKTOR KONTROL X1 Unit Mappings in TRAKTOR
In TRAKTOR, each TRAKTOR KONTROL X1 unit is identified by its serial number.
▪ Whichever configuration is selected in the TRAKTOR Preferences > Traktor Kontrol X1 >
Default Setups panel, that configuration will persist.
▪ You can label your TRAKTOR KONTROL X1s (e.g. "Left" and "Right"). Every time you
connect the two TRAKTOR KONTROL X1 units and start TRAKTOR, that configuration
will correspond to the same physical TRAKTOR KONTROL X1 units.
For example if you select A+B / C+D in the Default Setups preferences, then the first physical TRAKTOR KONTROL X1 will always control TRAKTOR Decks A+B and the second
physical TRAKTOR KONTROL X1 will control Decks C+D.
Linking the TRAKTOR mappings to identified hardware allows customized mappings and
configurations to be restored regardless of which order the TRAKTOR KONTROL X1 units
are connected to your computer over USB.
Additionally TRAKTOR KONTROL X1 modes may be mixed across two different units. For
example, one TRAKTOR KONTROL X1 can be controlling TRAKTOR in native NHL mode
while a second TRAKTOR KONTROL X1 controls another software device in MIDI mode.
TRAKTOR KONTROL X1 - Manual - 21
Page 22

TRAKTOR KONTROL X1 Preferences
6 TRAKTOR KONTROL X1 Preferences
For more creativity while mixing your tracks, the TRAKTOR PRO 2 Preferences page has
been updated. New options in the Traktor Kontrol X1 page are available.
The TRAKTOR KONTROL X1 Preferences page
TRAKTOR KONTROL X1 - Manual - 22
Page 23

TRAKTOR KONTROL X1 Preferences
Sample Deck Mapping
▪ Effect Knobs – Recalibrate Button: Over the course of a product's lifetime, the top eight
analog knobs may acquire a certain amount of drift. Clicking on this button will start
a routine that will calibrate the TRAKTOR KONTROL X1 knob's absolute range and
position to TRAKTOR. TRAKTOR will prompt you to turn all of the knobs left, right,
and center.
▪ LEDs – On-State/Off-State Brightness: Adjusts the intensity of the TRAKTOR KON-
TROL X1's LEDs. On- and Off-state brightness can be adjusted individually.
▪ Page/Layer Switches: Adjusts the behavior of the SHIFT and HOTCUE buttons from a
Hold (Gate) action to a Toggle action.
▪ MIDI Mode: Checking this box will enable the TRAKTOR KONTROL X1 to switch to
MIDI mode when simultaneously pressing Shift + Hotcue.
The former sections Single Controller and Two Controllers have been replaced by one section called Default Setups.
The Default Setups section
▪ Mapping: This option will allow you to choose which TRAKTOR Deck pairs will be con-
trolled by each TRAKTOR KONTROL X1, whether you use one or two controllers.
Choose the desired Deck pairs and click Restore to restore their mappings back to default.
▪ Swap Sides: The Swap command will execute a 1:1 mapping exchange of the two
TRAKTOR KONTROL X1 controllers, regardless if the mappings are as default or have
been changed.
6.1
Sample Deck Mapping
With this version of TRAKTOR PRO 2, a new Sample Deck mapping for the TRAKTOR
KONTROL X1 is available. It allows you to fully control your Sample Decks with the TRAKTOR KONTROL X1 controller.
TRAKTOR KONTROL X1 - Manual - 23
Page 24

TRAKTOR KONTROL X1 Preferences
Sample Deck Mapping
► To activate the Sample Deck mapping, open TRAKTOR’s Preferences and go to the
Decks page. In the Deck Flavor section, choose Sample Deck from the drop-down menu.
Still in Preferences, go to the Traktor Kontrol X1 page. In the Default Setups section, choose C
+D (Smp) from the drop-down menu, then click Restore.
The following sections explain the new Sample Deck mapping. If at any time you are unsure
about the new mapping, please refer to the PDF named Traktor Kontrol X1 Sample Decks,
which you will find in the TRAKTOR Documentation folder under Controller mappings.
6.1.1 Top FX Buttons and Knobs
The eight high resolution knobs and eight buttons control the filters of the Sample Decks.
The Effects section mapped to Sample Decks
▪ By pressing the buttons, you switch the corresponding filter On and Off.
▪ Turning the knobs increases/decreases the amount of each filter individually.
TRAKTOR KONTROL X1 - Manual - 24
Page 25

TRAKTOR KONTROL X1 Preferences
Sample Deck Mapping
6.1.2 FX Assign Buttons
The FX Assign buttons
▪ Pressing either the left or the right FX assign buttons will assign that FX unit to the
corresponding Sample Deck.
6.1.3 Volume Section
The Volume section
Primary Function
▪ Turning the BROWSE knob will turn the volume of the selected slots up and down.
▪ Pressing the BROWSE knob will RESET the volume of the selected slots to their de-
fault setting.
Note that by default all four sample slots are selected, so changing the volume affects the
whole deck.
Secondary Function (SHIFT)
▪ Holding SHIFT and turning the BROWSE knob will turn the GAIN of the selected slots
up and down.
▪ Holding SHIFT and pressing the BROWSE knob will RESET the GAIN of the selected
slots to 0 dB.
TRAKTOR KONTROL X1 - Manual - 25
Page 26

TRAKTOR KONTROL X1 Preferences
Sample Deck Mapping
6.1.4 Loop Section
This section allows you to change the SIZE of a loop or change the tempo of the track temporarily.
The Loop section
Primary Function
▪ Turning the SIZE knob will double or half the loopsize of the selected sample slots.
▪ Pressing the SIZE knob will RESET the loopsize of the selected slots to its original
size.
Secondary Function (SHIFT)
▪ Holding SHIFT and turning the SIZE knob will speed up or slow down the selected
slots temporarily.
▪ Holding SHIFT and pressing the SIZE knob will SYNC the selected slots to Master
tempo.
TRAKTOR KONTROL X1 - Manual - 26
Page 27

TRAKTOR KONTROL X1 Preferences
Sample Deck Mapping
6.1.5 Sample Playback Section
The Sample Playback section
The TRAKTOR KONTROL X1’s bottom set of buttons is directly dedicated to TRAKTOR’s
four slots of each Sample Deck.
Primary Function
▪ Pressing buttons 1-4 will start the playback of the respective sample slot.
▪ Pressing buttons 5-8 will RETRIGGER the playback of the respective sample slot from
its starting point.
Secondary Function (SHIFT)
▪ Holding SHIFT and pressing buttons 1-4 will STOP a running sample and CLEAR a
stopped sample slot.
▪ Holding SHIFT and pressing buttons 5-8 will SELECT the respective sample slot.
TRAKTOR KONTROL X1 - Manual - 27
Page 28

Troubleshooting
Solving Hardware-related Problems
7 Troubleshooting
The information provided in this chapter should help you to solve most of the problems
that you may encounter while you are using the TRAKTOR KONTROL X1.
7.1 Solving Hardware-related Problems
Native Instruments hardware products meet the highest professional standards. All products are tested extensively in real life situations during the development phase. However,
if you encounter any problems with your hardware, please follow these steps for troubleshooting:
▪ Verify that you have installed the latest driver and the latest software update.
▪ Check the Native Instruments website for information.
▪ Make sure that the TRAKTOR KONTROL X1 hardware is connected to an USB 2.0
port of your computer.
▪ Make sure you are connecting directly to an USB port of the computer and not
through an USB hub.
▪ Try another USB cable.
▪ Disconnect any other USB devices from the computer (except keyboard/mouse).
▪ Try using any other USB ports on your computer.
If none of these tips helps, please contact our Technical Support team. The contact information is available under the following URL: www.native-instruments.com/contactinfo.
In case the TRAKTOR KONTROL X1 needs to be returned, the Technical Support team at
Native Instruments will assign you an RA (Return Authorization) number, which is required
to handle your return.
Packages returned without this RA number will not be correctly identified and as such
might not be processed properly.
Please contact our Technical Support team prior to returning any item.
7.2 USB Troubleshooting
If you experience problems that may be caused by the USB connection between the
TRAKTOR KONTROL X1 and your computer, check the following first; several possible
sources for USB issues are covered here.
TRAKTOR KONTROL X1 - Manual - 28
Page 29

Troubleshooting
USB Troubleshooting
7.2.1 USB 2.0 required
The TRAKTOR KONTROL X1 is an USB 2.0 device and will not work at all on an USB
1.0/1.1 port. Please consult your computers manual in order to ensure that it features
USB 2.0 (or later) ports.
7.2.2 Try another USB cable
A defective USB cable can be responsible for audio connectivity problems. It is highly recommended that you try using a different cable if you are experiencing difficulties. Make
sure to use a cable bearing the official USB logo.
7.2.3 Using a powered USB 2.0 hub
It is best to connect the TRAKTOR KONTROL X1 directly to a USB 2.0 port on your computer. However, in certain situations a powered USB hub can also be a solution if you are
having problems connecting your TRAKTOR KONTROL X1 to an onboard USB port. In this
case you should avoid connecting other devices to the hub if possible, as each bus-powered device takes its share from the total amount of power available.
7.3 TRAKTOR KONTROL X1 Software Troubleshooting
Always make sure that you are using the latest available software, as most issues can be
solved with updated software and/or drivers.
A simple test to check if TRAKTOR KONTROL X1 software is working properly is to simply
plug the unit into your computer, and hold SHIFT and press HOTCUE (to switch to MIDI
mode). The HOTCUE button should light green, indicating that MIDI mode is currently active. If that works as described, the TRAKTOR KONTROL X1 software is functioning correctly, as both the TRAKTOR KONTROL X1 Driver and Controller Editor must be working
correctly to enter MIDI mode.
7.3.1 Driver Installation Note in Windows
As any other USB device, the driver installs exactly for one USB port. If you connect the
TRAKTOR KONTROL X1 to another port, a standard Windows dialog opens in which you
can install the driver to that port.
▪ If you have previously installed the driver on your computer once, Windows will find
the right drivers itself.
TRAKTOR KONTROL X1 - Manual - 29
Page 30

Troubleshooting
TRAKTOR KONTROL X1 Software Troubleshooting
▪ If you did not install the drivers on your computer, Windows will install the wrong
drivers.
▪ If you do not know whether or not you have previously installed the drivers of the
TRAKTOR KONTROL X1 to your computer, it is advisable to start the stand-alone installation (setup) program of the TRAKTOR KONTROL X1. If the setup program states
that it will first uninstall the drivers, you already have installed the drivers on your
computer. In this case you can connect the device to any other USB port, and Windows will find the right driver when it installs the TRAKTOR KONTROL X1 on another
USB port.
7.3.2 Update the Driver
▪ Check the Native Instruments website regularly for updates of the TRAKTOR KON-
TROL X1 driver.
7.3.3 Disable USB Energy Saving Mode (Windows only)
If the TRAKTOR KONTROL X1 is performing poorly on a Windows machine, disable power
management to the USB hubs first; Windows XP turns this on by default.
To disable power management for USB hubs:
1. Open the device manager (Control Panel > System > Hardware).
2. Right-click a USB hub from the USB controller list to bring up its properties.
3. On the power management page, uncheck all boxes.
4. Repeat for each hub and reboot.
TRAKTOR KONTROL X1 - Manual - 30
Page 31

Readme/Knowledge Base/Online Support
8 Getting Help
8.1 Readme/Knowledge Base/Online Support
8.1.1 Readme
Always read the Readme file found on the installation DVD or included with downloaded
updates. It contains important information and all last minute changes that could not be
included in this manual.
8.1.2 Knowledge Base
You can access the Knowledge Base at:
www.native-instruments.com/knowledgebase
To search the Knowledge Base you have to log into your user account first.
8.1.3 Online Support
You can reach the Online Support via
www.native-instruments.com/productsupport
The following form will ask you for all information about your hardware and software environment, to better facilitate the information to our support team. The entries you make are
furnished with cookies, so they should automatically be reproduced when you enter a second support request.
Getting Help
TRAKTOR KONTROL X1 - Manual - 31
Page 32

TRAKTOR PRO/SCRATCH PRO Default Mapping Table
9 Appendix
9.1 TRAKTOR PRO/SCRATCH PRO Default Mapping Table
Number Label Type Primary Function Secondary Function (SHIFT)
1 PLAY Button Starts Deck playback. Toggles the Deck's key lock on and
off.
Appendix
2 SYNC Button Syncs currently loaded track to the
master tempo.
3 CUE |
REL
4 CUP |
ABS
5 < > BEAT Button Jumps one beat (default) back or
6 IN Button Sets Floating (temporary) Cue/
7 OUT Button If Loop In Point was set, sets Loop
8 Loop En-
coder
9 HOTCUE Button Activates the Hotcue page and
Button In Internal Playback mode: Hold to
play from active Cue point. Sets
Cue when Deck is not playing.
In Timecode mode: Switches to
relative mode.
Button In Internal Playback mode: Starts
playback from active Cue point.
In Timecode mode: Switches to
absolute mode.
forward in the Deck's track.
Loop In Point.
Out Point. If no Loop In Point was
set, activates a 4 beat loop.
Button Turn encoder: Select loop size.
Push encoder: Set loop in selected
size.
turns all lower 8 buttons per Deck
into 8 Hotcue buttons. Hotcues
can be stored on the fly into unlit
(empty) slots.
Allows rhythmic tapping to detect
track tempo.
Jumps to track's start point.
Jumps to next Cue point.
Switches to pitchbend instead of
beat jump.
Decreases track's tempo.
Increases track's tempo.
Turn encoder: Move loop. Push encoder: Toggle loop active/inactive.
Deletes selected Hotcue slot; the
button switches from lit to unlit.
TRAKTOR KONTROL X1 - Manual - 32
Page 33

TRAKTOR DUO/SCRATCH DUO Default Mapping Table
Number Label Type Primary Function Secondary Function (SHIFT)
10 Browse
Encoder
Encoder Turn encoder: Browses selected
playlist. Push encoder: Load selected track to Deck.
Turn encoder: Seek through loaded
track. Push encoder: Open/close
Browser view.
Appendix
11 SHIFT Button Activates secondary "SHIFT" func-
tionality. For details see this table's corresponding column.
12 FX 1 Button Assigns effects slot 1 to the Deck. Switches the Deck to "Master".
13 FX 2 Button Assigns effect slot 2 to the Deck. Left Deck's button activates Global
14 A 1 / 2 / 3 Button In Chained FX mode: Activates/de-
activates the corresponding effect.
In Advanced FX mode: Controls
the corresponding FX parameters.
14 B 1 / 2 / 3 Knob In Chained FX mode: Controls cor-
responding effect. In Advanced FX
mode: Controls corresponding effect parameters.
15 ON Button In Chained FX mode: Not as-
signed.
In Advanced FX mode: Activates/
deactivates effect.
16 DRY /
WET
Knob Controls effect's dry/wet ratio. Not assigned.
Not assigned.
Snap. Right Deck's button activates Global Quantized mode.
In Chained FX mode: Selects next
effect in the FX list.
In Advanced FX mode: Selects FX
as labeled on the unit's control
panel (default, can be re-assigned).
Not assigned.
In Chained FX mode: Not assigned.
In Advanced FX mode: Selects
next effect in the FX list.
9.2 TRAKTOR DUO/SCRATCH DUO Default Mapping Table
Number Label Type Primary Function Secondary Function (SHIFT)
1 PLAY Button Starts Deck playback. Toggles the Deck's key lock on
and off.
2 SYNC Button Syncs currently loaded track to the
master tempo.
Allows rhythmic tapping to detect
track tempo.
TRAKTOR KONTROL X1 - Manual - 33
Page 34

TRAKTOR DUO/SCRATCH DUO Default Mapping Table
Number Label Type Primary Function Secondary Function (SHIFT)
3 CUE |
REL
Button In Internal Playback mode: Hold to
play from ACTIVE cue point. Sets
cue when Deck is not playing. In
Timecode mode: Switches to relative mode.
Jumps to track's start point.
Appendix
4 CUP |
ABS
5 < > BEAT Button Jumps one beat (default) back or
6 IN Button Sets temporary cue / loop in point. Decreases track's tempo.
7 OUT Button If loop in point was set, sets loop
8 Loop En-
coder
9 HOTCUE Button Activates the Hotcue page and
10 Browse
Encoder
11 SHIFT Button Activates secondary "SHIFT" func-
Button In Internal Playback mode: Starts
playback from active cue point. In
Timecode mode: Switches to absolute mode.
forward in the Deck's track.
out point. If no loop in point was
set, activates a 4 beat loop.
Encoder Turn encoder: Select loop size.
Push encoder: Set loop in selected
size.
turns all lower 8 buttons per Deck
into 8 Hotcue buttons. Hotcues can
be stored on the fly into unlit (empty) slots.
Encoder Turn encoder: Browses selected
playlist. Push encoder: Load selected track to Deck.
tionality. For details see this table's
Secondary Function (SHIFT) column.
Jumps to next cue point.
Switches to pitchbend instead of
beat jump.
Increases track's tempo.
Turn encoder: Move loop. Push
encoder: Toggle loop active/inactive.
Deletes selected Hotcue slot; button switches from lit to unlit.
Turn encoder: Seek through loaded track. Push encoder: Open/
close Browser view.
Not assigned.
12 FX 1 Button Not assigned. Not assigned.
13 FX 2 Button Not assigned. Not assigned.
14 A 1 / 2 / 3 Button Activates / deactivates the corre-
sponding effect.
Selects next effect in the FX list.
TRAKTOR KONTROL X1 - Manual - 34
Page 35

TRAKTOR LE 2 Default Mapping Table
Number Label Type Primary Function Secondary Function (SHIFT)
14 B 1 / 2 / 3 Knob Controls corresponding effect. n/a
15 ON Button Not assigned. Not assigned.
Appendix
16 DRY /
WET
9.3 TRAKTOR LE 2 Default Mapping Table
Number Label Type Primary Function Secondary Function (SHIFT)
1 PLAY Button Starts Deck playback. Toggles the Deck's key lock on and
2 SYNC Button Syncs currently loaded track to
3 CUE | REL Button Hold to play from active Cue
4 CUP | ABS Button Starts playback from active Cue
5 < > BEAT Button Pitchbends current track. Not assigned.
6 IN Button Sets Floating (temporary) Cue/
7 OUT Button If Loop In Point was set, sets
Knob Controls effect's dry/wet ratio. Not assigned.
off.
Allows rhythmic tapping to detect
the master tempo.
point. Sets Cue when Deck is not
playing.
point.
Loop In Point.
Loop Out Point. If no Loop In
Point was set, activates a 4 beat
loop.
track tempo.
Jumps to track start.
Not assigned.
Decreases track's tempo.
Increases track's tempo.
8 Loop En-
coder
9 HOTCUE Button Not assigned. Not assigned.
10 Browse En-
coder
Encoder Turn encoder: Select loop size.
Push encoder: Set loop in selected size.
Encoder Turn encoder: Browses selected
playlist.
Push encoder: Load selected track
to Deck.
Toggle loop active/inactive.
Turn encoder: Seek through loaded
track.
Push encoder: Open/close Browser
view.
TRAKTOR KONTROL X1 - Manual - 35
Page 36

TRAKTOR KONTROL X1 Default MIDI Mapping Table
Number Label Type Primary Function Secondary Function (SHIFT)
11 SHIFT Button Activates secondary "SHIFT" func-
tionality. For details see this table's Secondary Function (SHIFT)
column.
Not assigned.
Appendix
12 FX 1 Button Selects previous FX into corre-
sponding FX slot.
13 FX 2 Button Selects next FX into correspond-
ing FX slot.
14 Pot 3 Knob Controls the Filter of the corre-
sponding Deck.
15 Button 3 Button Activates/deactivates the Filter of
the corresponding Deck.
16 Pot 2 Knob Controls the Panorama of the cor-
responding Deck.
17 Button 2 Button Not assigned. Loads Reverb effect.
18 Pot 1 Knob Controls corresponding effect Not assigned.
19 Button 1 Button Activates/deactivates assigned ef-
fect (toggle).
20 Dry/Wet Knob Controls effect's dry/wet ratio. Not assigned.
21 ON Button Button Activates assigned effect (hold). Loads Flanger effect.
9.4 TRAKTOR KONTROL X1 Default MIDI Mapping Table
Switches the Deck to "Master."
Not assigned.
Not assigned.
Not assigned.
Not assigned.
Loads Delay effect.
This section provides a detailed overview of default TRAKTOR KONTROL X1 mappings.
TRAKTOR KONTROL X1 - Manual - 36
Page 37

9.4.1 Basic MIDI Mapping
Appendix
TRAKTOR KONTROL X1 Default MIDI Mapping Table
The Basic MIDI mapping
TRAKTOR KONTROL X1 - Manual - 37
Page 38

9.4.2 MIDI Mapping with SHIFT Button
Appendix
TRAKTOR KONTROL X1 Default MIDI Mapping Table
The MIDI mapping with Shift button
TRAKTOR KONTROL X1 - Manual - 38
 Loading...