

Page 1
Manual
Page 2

The information in this document is subject to change without notice and does not represent a
commitment on the part of Native Instruments GmbH. The software described by this document is subject to a License Agreement and may not be copied to other media. No part of this
publication may be copied, reproduced or otherwise transmitted or recorded, for any purpose,
without prior written permission by Native Instruments GmbH, hereinafter referred to as Native
Instruments.
“Native Instruments”, “NI” and associated logos are (registered) trademarks of Native Instruments GmbH.
Mac, Mac OS, GarageBand, Logic, iTunes and iPod are registered trademarks of Apple Inc.,
registered in the U.S. and other countries.
Windows, Windows Vista and DirectSound are registered trademarks of Microsoft Corporation
in the United States and/or other countries.
All other trade marks are the property of their respective owners and use of them does not imply any affiliation with or endorsement by them.
Document authored by: Native Instruments GmbH
Software version: 2.7 (11/2014)
Disclaimer
Special thanks to the Beta Test Team, who were invaluable not just in tracking down bugs, but
in making this a better product.
Page 3
NATIVE INSTRUMENTS GmbH
Schlesische Str. 29-30
D-10997 Berlin
Germany
www.native-instruments.de
NATIVE INSTRUMENTS North America, Inc.
6725 Sunset Boulevard
5th Floor
Los Angeles, CA 90028
USA
www.native-instruments.com
NATIVE INSTRUMENTS K.K.
YO Building 3F
Jingumae 6-7-15, Shibuya-ku,
Tokyo 150-0001
Japan
www.native-instruments.co.jp
Contact
NATIVE INSTRUMENTS UK Limited
18 Phipp Street
London EC2A 4NU
UK
www.native-instruments.com
© NATIVE INSTRUMENTS GmbH, 2015. All rights reserved.
Page 4

Table of Contents
Table of Contents
1 Welcome to the World of TRAKTOR KONTROL S8! ........................................................
1.1 Where to Start .............................................................................................................................12
1.2 Manual Conventions .................................................................................................................. 14
2 Using Your S8—Getting Started .................................................................................
2.1 Overview of TRAKTOR KONTROL S8 ............................................................................................. 19
2.2 Enabling Decks ...........................................................................................................................20
2.3 Browsing with Your S8 ................................................................................................................ 23
2.4 Switching Deck Focus ................................................................................................................. 26
2.5 Switching Deck View and Zooming ............................................................................................. 29
2.6 Playing Your First Track .............................................................................................................. 32
2.7 Mixing In a Second Track ............................................................................................................ 42
2.8 Adjusting Levels ......................................................................................................................... 55
2.9 Using Cue Points ........................................................................................................................ 58
2.3.1 Browse using Regular Interactions ............................................................................ 23
2.3.2 Browse using Touch Interactions ............................................................................... 25
2.6.1 Loading a Track ......................................................................................................... 34
2.6.2 Playing the Track ....................................................................................................... 36
2.6.3 If You Don’t Hear the Track ........................................................................................ 39
2.7.1 Loading a Second Track ............................................................................................. 43
2.7.2 Playing the Second Track ........................................................................................... 45
2.7.3 Using Headphones to Prepare the Mix ....................................................................... 47
2.7.4 Synchronizing the Second Track ................................................................................ 48
2.7.5 Interlude: In case the Left Track has finished ............................................................ 50
2.7.6 Mixing In the Track by Using the Channel EQ and Filter ............................................ 50
2.8.1 The Theory ................................................................................................................. 55
2.8.2 In Practice ................................................................................................................. 55
12
18
TRAKTOR KONTROL S8 - Manual - 4
Page 5

Table of Contents
2.10 Adjusting Tempo .........................................................................................................................62
2.11 Using Keylock ............................................................................................................................. 67
2.9.1 Setting and Deleting Cue Points (HotCues) ............................................................... 59
2.9.2 Aligning Tracks using HotCues .................................................................................. 61
2.10.1 Global Tempo Adjustments ........................................................................................ 62
2.10.2 Deck-specific tempo adjustments ............................................................................. 64
3 Using Your S8—Getting Advanced .............................................................................
3.1 Using Touch Strip ....................................................................................................................... 72
3.2 Playing with Loops in HOTCUE Mode ........................................................................................... 82
3.3 Playing with Loops in LOOP Mode ............................................................................................... 88
3.4 Using FREEZE Mode ....................................................................................................................91
3.5 Using FLUX Mode ........................................................................................................................ 100
3.6 Remixing with Remix Decks ........................................................................................................ 101
3.1.1 Using the Touch Strip to Seek .................................................................................... 72
3.1.2 Using the Touch Strip to Nudge/Pitchbend ................................................................ 77
3.1.3 Using the Touch Strip to Scratch ............................................................................... 79
3.2.1 Engaging and Disengaging a Loop ............................................................................ 83
3.2.2 Moving a Loop ........................................................................................................... 86
3.2.3 Storing a Loop ........................................................................................................... 87
3.3.1 Looping by Pre-defined Sizes ..................................................................................... 89
3.3.2 Beatjumping .............................................................................................................. 90
3.4.1 Engaging Freeze mode on a track .............................................................................. 93
3.4.2 Adjusting the Freeze Slice Size .................................................................................. 94
3.4.3 Slicer Mode ................................................................................................................ 96
3.6.1 Loading a Remix Set .................................................................................................. 102
3.6.2 Triggering Samples ................................................................................................... 104
3.6.3 Triggering Samples using Different Quantize Sizes ................................................... 109
3.6.4 Adjusting Levels and using Filters of Remix Slots ..................................................... 111
72
TRAKTOR KONTROL S8 - Manual - 5
Page 6

Table of Contents
3.7 Capturing Samples from Track Decks (Using Remix Mode) ........................................................ 112
3.8 Adding FX ................................................................................................................................... 119
3.9 Using Performance Modes on Remix Decks ................................................................................. 132
3.10 Working with Beatgrids .............................................................................................................. 145
3.6.5 Using the Touch Strip on a Remix Deck ..................................................................... 111
3.8.1 Assigning Decks to the FX Units ................................................................................ 119
3.8.2 Setting up an FX Unit to Group FX Mode .................................................................... 120
3.8.3 Exchanging effects in the Group FX ........................................................................... 123
3.8.4 Setting up an FX Unit in Single FX Mode .................................................................... 125
3.8.5 Storing a Snapshot .................................................................................................... 130
3.8.6 Routing FX ................................................................................................................. 131
3.8.7 Using Four FX Units ................................................................................................... 131
3.9.1 Selecting and applying a Performance Mode ............................................................. 133
3.9.2 Using Performance Mode Pitch .................................................................................. 134
3.9.3 Using Performance Mode Filter .................................................................................. 135
3.9.4 Using Performance Mode FX SEND ............................................................................. 136
3.9.5 Using Performance Mode FX ...................................................................................... 138
3.9.5.1 Changing SINGLE FX in Performance Mode ................................................139
3.9.5.2 Changing GROUP FX in Performance Mode ................................................142
3.10.1 Checking a Beatgrid .................................................................................................. 145
3.10.2 Correcting a Beatgrid Manually ................................................................................. 147
3.10.3 Additional Help Actions ............................................................................................. 150
4 Hardware Reference ..................................................................................................
4.1 Overview of the Controller ........................................................................................................... 153
4.1.1 Top View .................................................................................................................... 154
4.1.2 Rear Panel ................................................................................................................. 155
4.1.3 Front Panel ................................................................................................................ 155
4.1.4 LED States ................................................................................................................. 155
153
TRAKTOR KONTROL S8 - Manual - 6
Page 7

Table of Contents
4.2 The Deck ..................................................................................................................................... 163
4.1.5 Identical Decks .......................................................................................................... 156
4.1.6 FX Units ..................................................................................................................... 159
4.1.7 Mixer .......................................................................................................................... 159
4.1.8 Rear Panel ................................................................................................................. 161
4.1.9 Front Panel ................................................................................................................ 163
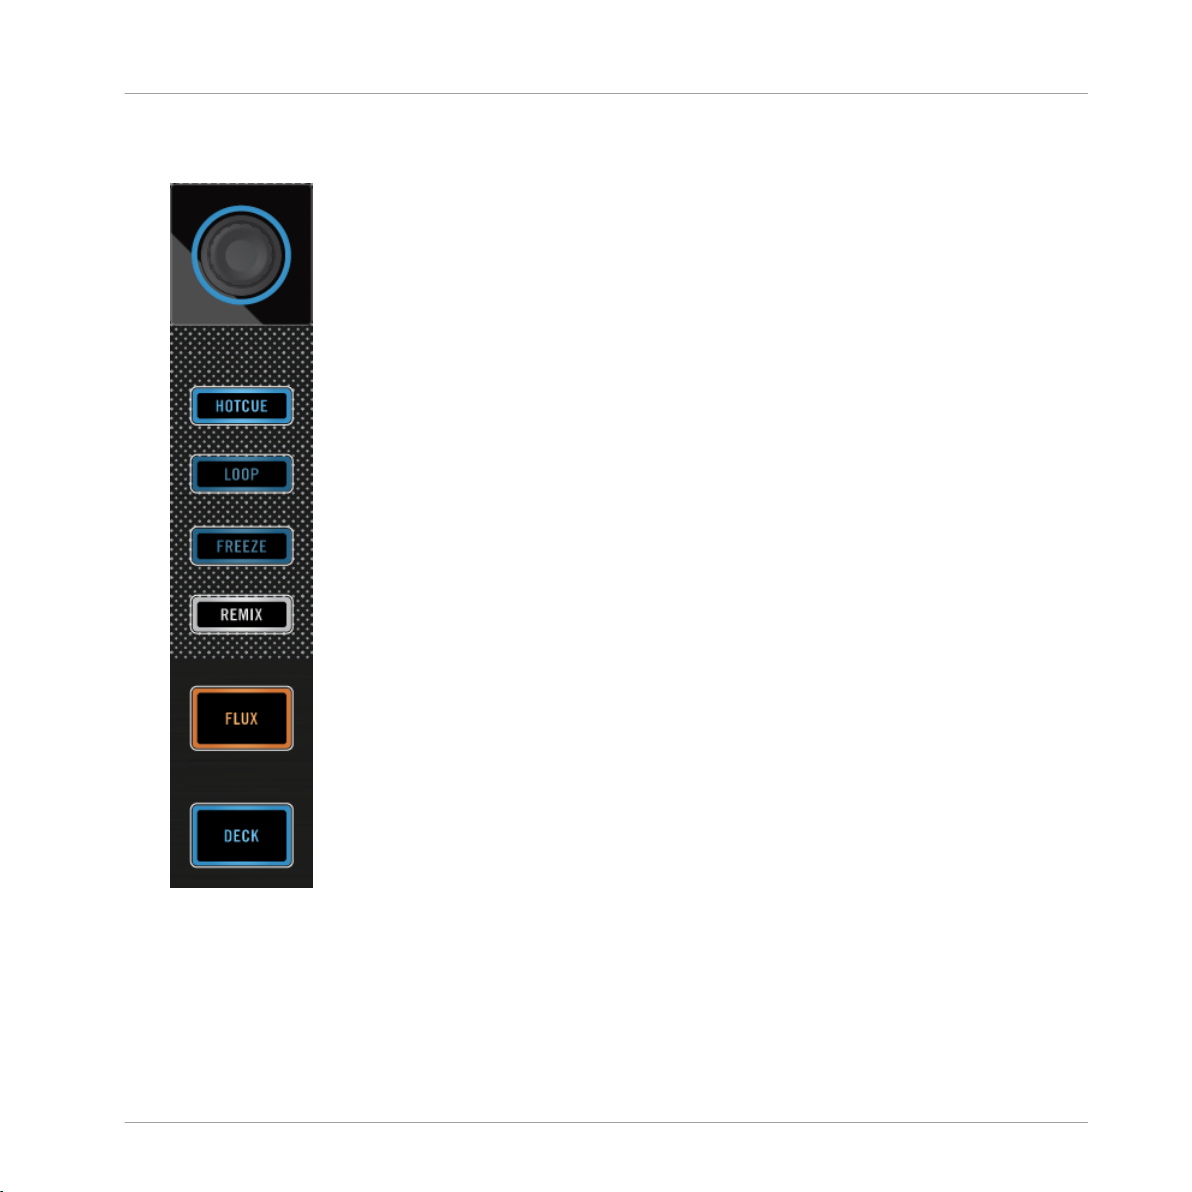
4.2.1 DECK Button .............................................................................................................. 163
4.2.2 FLUX Button ............................................................................................................... 164
4.2.3 Mode Select Buttons .................................................................................................. 165
4.2.3.1 HOTCUE Button ..........................................................................................166
4.2.3.2 LOOP Button ..............................................................................................166
4.2.3.3 FREEZE Button ..........................................................................................168
4.2.3.4 REMIX Button ............................................................................................170
4.2.4 Loop Encoder ............................................................................................................. 171
4.2.5 EDIT Button ............................................................................................................... 172
4.2.6 CAPTURE Button ........................................................................................................ 172
4.2.7 Display Area .............................................................................................................. 173
4.2.7.1 S8's Deck View ..........................................................................................174
4.2.7.2 View Button ...............................................................................................177
4.2.7.3 Display Buttons .........................................................................................178
4.2.7.4 Settings Button .........................................................................................180
4.2.7.5 Performance Mode Button .........................................................................181
4.2.7.6 BROWSE Encoder .......................................................................................182
4.2.7.7 BACK Button ..............................................................................................183
4.2.8 Performance Controls ................................................................................................ 183
4.2.9 Slot Volume Faders .................................................................................................... 186
4.2.10 Pads .......................................................................................................................... 186
4.2.11 Touch Strip ................................................................................................................ 189
TRAKTOR KONTROL S8 - Manual - 7
Page 8

Table of Contents
4.3 The FX Unit ................................................................................................................................. 197
4.4 The Mixer .................................................................................................................................... 205
4.2.12 Transport Controls ..................................................................................................... 195
4.3.1 FX Unit Overview ........................................................................................................ 198
4.3.2 FX SELECT Button ...................................................................................................... 200
4.3.3 FX Unit Assignment ................................................................................................... 201
4.3.4 Using Four FX Units ................................................................................................... 201
4.4.1 Mixer Channel ............................................................................................................ 207
4.4.2 Mixer Main Section .................................................................................................... 215
4.2.11.1 Touch Strip LEDs .......................................................................................189
4.2.11.2 Touch Strip Functions ................................................................................190
4.2.11.3 Customization Options ..............................................................................193
4.4.1.1 GAIN Knob ..................................................................................................209
4.4.1.2 TRAKTOR Button ........................................................................................210
4.4.1.3 FX Assign Buttons .....................................................................................210
4.4.1.4 EQ Knobs ...................................................................................................211
4.4.1.5 Channel Fader ...........................................................................................212
4.4.1.6 Channel Meter ...........................................................................................213
4.4.1.7 FILTER Button and FILTER Knob .................................................................213
4.4.1.8 CUE Button ................................................................................................214
4.4.2.1 Crossfader .................................................................................................216
4.4.2.2 CUE VOL Knob ............................................................................................217
4.4.2.3 CUE MIX Knob ............................................................................................217
4.4.2.4 TEMPO Encoder ..........................................................................................218
4.4.2.5 BOOTH Knob ..............................................................................................219
4.4.2.6 GLOBAL Section .........................................................................................220
4.4.2.7 MIC 1 and 2 Buttons ..................................................................................221
4.4.2.8 MAIN Knob .................................................................................................222
TRAKTOR KONTROL S8 - Manual - 8
Page 9

4.5 The Rear Panel ........................................................................................................................... 222
4.6 The Front Panel ...........................................................................................................................228
4.5.1 MAIN OUT ................................................................................................................... 223
4.5.2 BOOTH OUT ................................................................................................................ 224
4.5.3 External INPUTs ......................................................................................................... 224
4.5.4 MIC Input Section ...................................................................................................... 225
4.5.5 Kensington Lock Slot ................................................................................................. 226
4.5.6 MIDI Connectors ........................................................................................................ 226
4.5.7 USB Connector ........................................................................................................... 226
4.5.8 POWER Section .......................................................................................................... 227
4.6.1 Crossfader Assign Switches ...................................................................................... 228
4.6.2 PHONES Section ......................................................................................................... 229
4.6.3 Crossfader Curve Knob .............................................................................................. 229
5 Common Setups ........................................................................................................
5.1 Connecting Turntables ............................................................................................................... 231
5.2 Connecting CD Players ............................................................................................................... 234
5.3 Integrating External Audio Sources in your TRAKTOR Workflow ................................................... 235
5.4 Integrating External Sources as TIMECODE Controls .................................................................. 235
5.5 Using Your S8 as a Stand-alone DJ Mixer ................................................................................... 240
5.6 Connecting Microphones ............................................................................................................ 241
5.4.1 Final Preparations with Turntables ............................................................................ 235
5.4.2 Final Preparations with CD Players ............................................................................ 237
5.4.3 Successful Calibration .............................................................................................. 238
5.6.1 Checking Microphone Assignments ........................................................................... 242
5.6.2 Assigning a Microphone to another Channel ............................................................. 242
5.6.3 Switching between Live Input and Direct Thru ........................................................... 243
5.6.4 Activating a MIC Input ............................................................................................... 244
Table of Contents
231
TRAKTOR KONTROL S8 - Manual - 9
Page 10

Table of Contents
6 S8 Preferences .........................................................................................................
6.1 Restore Default ........................................................................................................................... 246
6.2 Touch Controls ............................................................................................................................246
6.3 Touchstrip .................................................................................................................................. 246
6.4 Calibrate .................................................................................................................................... 247
6.5 LEDs ........................................................................................................................................... 247
6.6 Loop Mode Sizes ......................................................................................................................... 248
7 The S8 Audio Interface and Control Panel ...................................................................
7.1 Settings on Mac OS X ................................................................................................................. 249
7.2 Settings on Windows: The Control Panel ..................................................................................... 249
7.3 Using the S8 Audio Interface with Other Music Applications ...................................................... 255
7.4 Setting up S8 as your Default Audio Interface ............................................................................ 255
7.2.1 Opening the Control Panel ......................................................................................... 250
7.2.2 Audio Settings Panel ................................................................................................. 250
7.2.3 Diagnostics Panel ...................................................................................................... 252
7.4.1 Windows .................................................................................................................... 255
7.4.2 Mac OS X ................................................................................................................... 255
8 Troubleshooting - Getting Help ...................................................................................
8.1 Troubleshooting .......................................................................................................................... 257
8.2 Getting Help ............................................................................................................................... 259
8.1.1 TRAKTOR Won’t Start ................................................................................................. 257
8.1.2 TRAKTOR Crashes ...................................................................................................... 257
8.1.3 TRAKTOR Has Performance Issues ............................................................................. 258
8.1.4 Updates ..................................................................................................................... 259
8.2.1 Knowledge Base ........................................................................................................ 259
8.2.2 Technical Support ...................................................................................................... 259
8.2.3 Registration Support ................................................................................................. 260
245
249
257
TRAKTOR KONTROL S8 - Manual - 10
Page 11

Table of Contents
8.2.4 User Forum ................................................................................................................ 260
9 Technical Specification .............................................................................................
261
TRAKTOR KONTROL S8 - Manual - 11
Page 12

Welcome to the World of TRAKTOR KONTROL S8!
1 Welcome to the World of TRAKTOR KONTROL S8!
Thank you for choosing TRAKTOR KONTROL S8.
What is TRAKTOR KONTROL S8?
TRAKTOR KONTROL S8 provides a direct tactile interface to TRAKTOR PRO's features and allows you to achieve more with the controller hardware so you have to do less on your computer
screen.
Whether you intend to perform and remix live with TRAKTOR, use S8 as a stand-alone mixer
with turntables or CD decks or a combination of both; S8 has you covered!
S8 enables performance in various live situations, combining the power of computer-based
DJing with the immediacy and flow you need to focus on your audience.
1.1 Where to Start
TRAKTOR KONTROL S8 installation provides you with many information sources. These are intended to be read in the following sequence to ensure easy access for users of all skill levels:
Where to Start
• TRAKTOR 2 Getting Started
• TRAKTOR 2 Manual
• TRAKTOR KONTROL S8 Manual (this document)
Your First Stop: Getting Started
This document guides you through configuration of TRAKTOR to work with a hardware controller by means of the Setup Wizard, as well as importing music into your Track Collection. Afterwards, it introduces you to TRAKTOR's basic concepts and workflows and helps you set up
your system correctly.
TRAKTOR KONTROL S8 - Manual - 12
Page 13
Welcome to the World of TRAKTOR KONTROL S8!
TRAKTOR PRO Manual
The Manual helps you learn all of the workflows which make TRAKTOR a unique DJing solution. In addition to learning to use TRAKTOR's core features, this document gives advice on
working in various configurations; from using TRAKTOR in the most basic setup on its own to
integrating turntables, external DJ mixers and audio interfaces, as well as the SCRATCH extension.
Access the TRAKTOR manual via TRAKTOR PRO's Help menu. The 'Open Manual...' entry
will open the Documentation sub-folder inside TRAKTOR's application folder.
TRAKTOR KONTROL S8 Manual
The S8 Manual picks up where controlling TRAKTOR features from the S8 are concerned. A
detailed tutorial section guides you through accessing the basics like loading tracks, mixing,
setting cue points, looping and using Remix Decks from S8.
Next, a comprehensive Hardware Reference details each and every component you will encounter on the TRAKTOR KONTROL S8 controller. The later chapters of this manual provide
additional information on solving common issues, and the device's full technical specification.
Where to Start
Controller Editor Manual
Besides using S8 with the dedicated TRAKTOR software, you can also use it as a powerful and
highly versatile MIDI controller with any other MIDI-capable application or device. This is
made possible by the Controller Editor software, an application which allows you to assign
MIDI controller messages to S8's pads, knobs, faders and encoders. The is usually automatically installed during TRAKTOR's installation. For more information on this, please refer to the
Controller Editor Manual available as a PDF file in the Documentation subfolder of the Controller Editor installation folder on your hard disk.
Other Online Resources
If you are experiencing problems related to your Native Instruments product that the supplied
documentation does not cover, there are several ways of getting help:
• Knowledge Base
• User Forum
• Technical Support
TRAKTOR KONTROL S8 - Manual - 13
Page 14

Welcome to the World of TRAKTOR KONTROL S8!
Manual Conventions
• Registration Support
You will find more information on these in chapters ↑8.1, Troubleshooting and ↑8.2, Getting
Help.
1.2 Manual Conventions
This section introduces you to the signage and text highlighting used in this manual. This manual uses particular formatting to point out special facts and to warn you of potential issues.
The icons introducing these notes let you see what kind of information is to be expected:
Whenever this exclamation mark icon appears, you should read the corresponding note
carefully and follow the instructions and hints given there if applicable.
This light bulb icon indicates that a note contains useful extra information. This information may often help you solve a task more efficiently, but does not necessarily apply to the
setup or operating system you are using; however, it's always worth a look.
Furthermore, the following formatting is used:
• Text appearing in (drop-down) menus (such as Open…, Save as… etc.) and paths to locations on your hard drive or other storage devices is printed in italics.
• Text appearing elsewhere (labels of buttons, controls, text next to checkboxes etc.) is
printed in blue. Whenever you see this formatting applied, you will find the same text appearing somewhere on the screen.
• Text appearing on displays of the S8 controller is printed in light grey. Whenever you see
this formatting applied, you will find the same text on a controller display.
• Text appearing on labels of the hardware controller is printed in orange. Whenever you see
this formatting applied, you will find the same text on the controller.
• Important names and concepts are printed in bold.
• References to keys on your computer’s keyboard you’ll find put in square brackets (e.g.,
“Press [Shift] + [Enter]”).
Single instructions are indicated by this play button type arrow.
►
TRAKTOR KONTROL S8 - Manual - 14
Page 15

Welcome to the World of TRAKTOR KONTROL S8!
Manual Conventions
Results of actions are indicated by this smaller arrow.
→
Naming Conventions
Throughout the documentation, we will refer to the TRAKTOR KONTROL S8 hardware controller either as the controller or simply S8.
The TRAKTOR 2 software and TRAKTOR SCRATCH will be referred to as TRAKTOR.
Button Combinations and Shortcuts on Your Controller
Most instructions will use the “+” sign to indicate buttons (or buttons and pads) that must be
pressed simultaneously, starting with the button indicated first. E.g., an instruction such as:
“Press SHIFT + PLAY”
means:
1. Press and hold SHIFT.
2. While holding SHIFT, press PLAY and release it.
3. Release SHIFT.
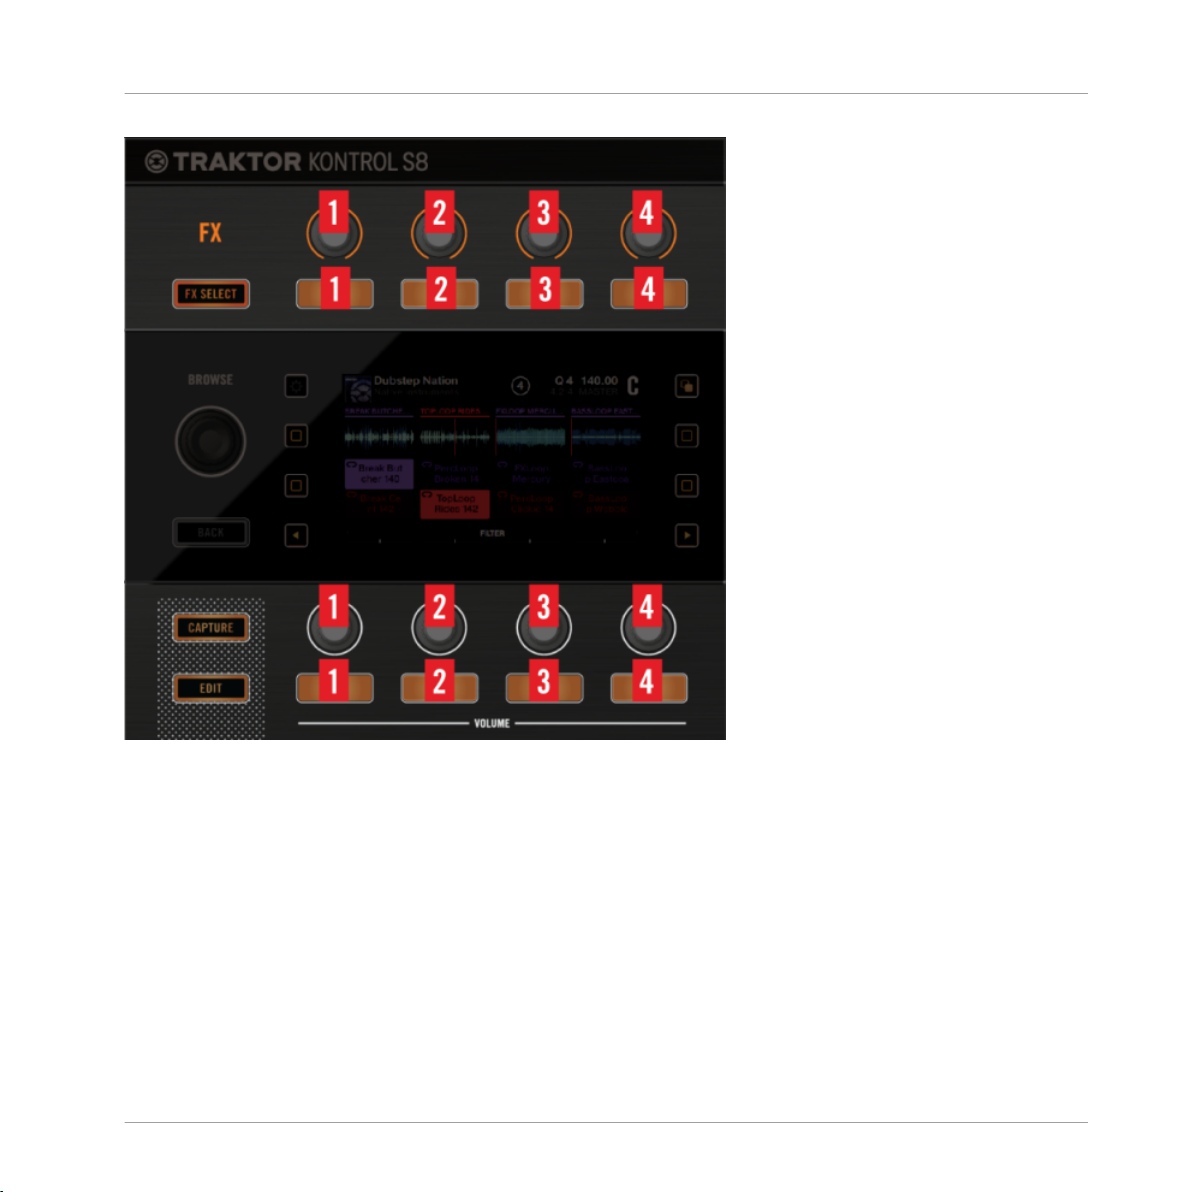
FX Knobs and Buttons
Above each of the Displays, there's a row of FX knobs and FX buttons which aren't labeled.
Similarly, the knobs below the display are unlabeled, the buttons are all labeled ON. To differentiate them, we'll refer to them as FX knobs 1-4 and FX buttons 1-4 for the elements above the
display and Performance knobs 1-4 and Performance buttons 1-4 beneath the display.
TRAKTOR KONTROL S8 - Manual - 15
Page 16
Welcome to the World of TRAKTOR KONTROL S8!
Manual Conventions
Numbering scheme for FX and Performance controls
Display Buttons
On each side of a display, there are two buttons marked by a square icon. To differentiate
them from each other, we'll refer to them as depicted here:
TRAKTOR KONTROL S8 - Manual - 16
Page 17
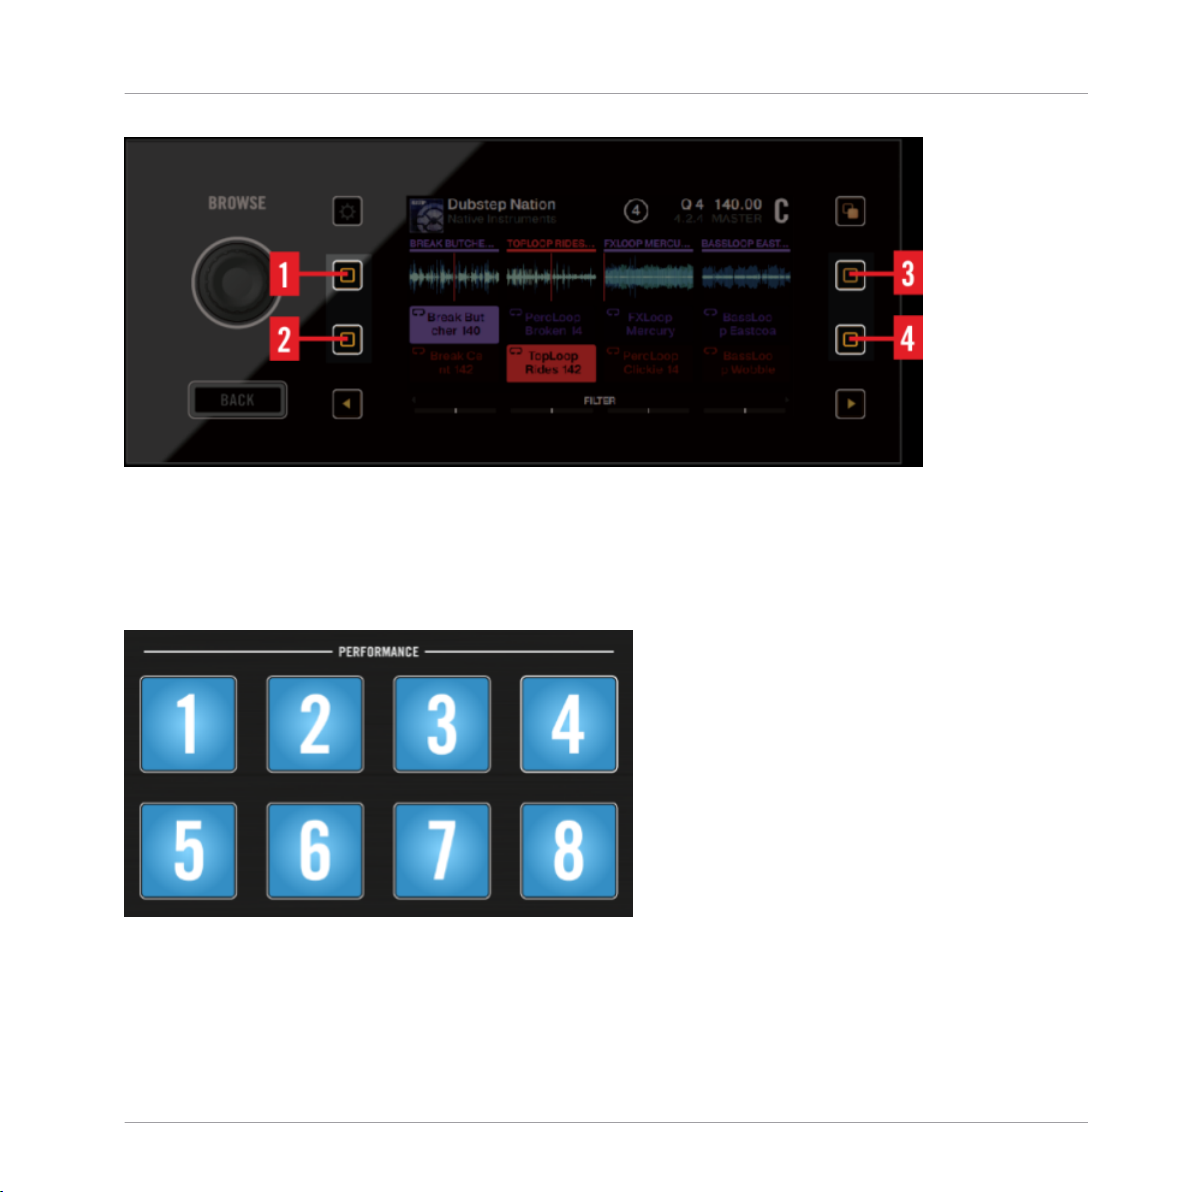
Welcome to the World of TRAKTOR KONTROL S8!
Manual Conventions
Numbering scheme for Display Buttons
Pads
1. Each Deck comes with 4 multi color pads. Where necessary, we'll refer to them in this
order:
Numbering of the Pads in the PERFORMANCE section
TRAKTOR KONTROL S8 - Manual - 17
Page 18

Using Your S8—Getting Started
2 Using Your S8—Getting Started
This section will guide you through the most common tasks you will encounter during your
work with TRAKTOR KONTROL S8. Most of the tutorials included are workflow-oriented. They
start with the simplest tasks and progressively lead you to more complex operation, helping you
to become familiar with TRAKTOR KONTROL S8.
The tutorials presented here make use of the included demo tracks, which were automatically
copied to your hard disk during the TRAKTOR KONTROL S8 installation procedure. Therefore,
you can follow these tutorials even if you haven't imported your own music.
Although the S8 can be used as a stand-alone mixer, the tutorials here focus on using the device as the integrated controller for the TRAKTOR software on your computer. By the end of
this chapter you will be equipped with the fundamental knowledge to enjoy using your TRAKTOR KONTROL S8, and begin to uncover the creative opportunities it presents to your DJ sessions.
General Prerequisites
We assume here that your TRAKTOR KONTROL S8 system is already up and running. If that's
not the case, please follow the instructions in the separate Setup Guide and return to this
chapter when you are ready.
In case you already changed some settings in TRAKTOR KONTROL S8 before you start with
these tutorials, we strongly recommend you to reset your TRAKTOR KONTROL S8 system to
the factory settings by doing the following:
1. In the TRAKTOR software, click the Help menu in the menu bar at the top of your screen
(on Mac OS X) or at the top of the window (on Windows), and select Help > Start Setup
Wizard.
2. In the window that opens, click Next to skip the setup screens.
3. On the YOUR TRAKTOR SETUP screen, click Finish at the bottom right corner without selecting anything else.
⇨ Your TRAKTOR KONTROL S8 is now reset to the factory settings.
The tutorials presented here assume that TRAKTOR KONTROL S8 is in its default factory
state. If it’s not the case, we cannot guarantee that you will experience what is described here,
and as a result you might find it difficult to follow the instructions.
TRAKTOR KONTROL S8 - Manual - 18
Page 19

Using Your S8—Getting Started
Overview of TRAKTOR KONTROL S8
2.1 Overview of TRAKTOR KONTROL S8
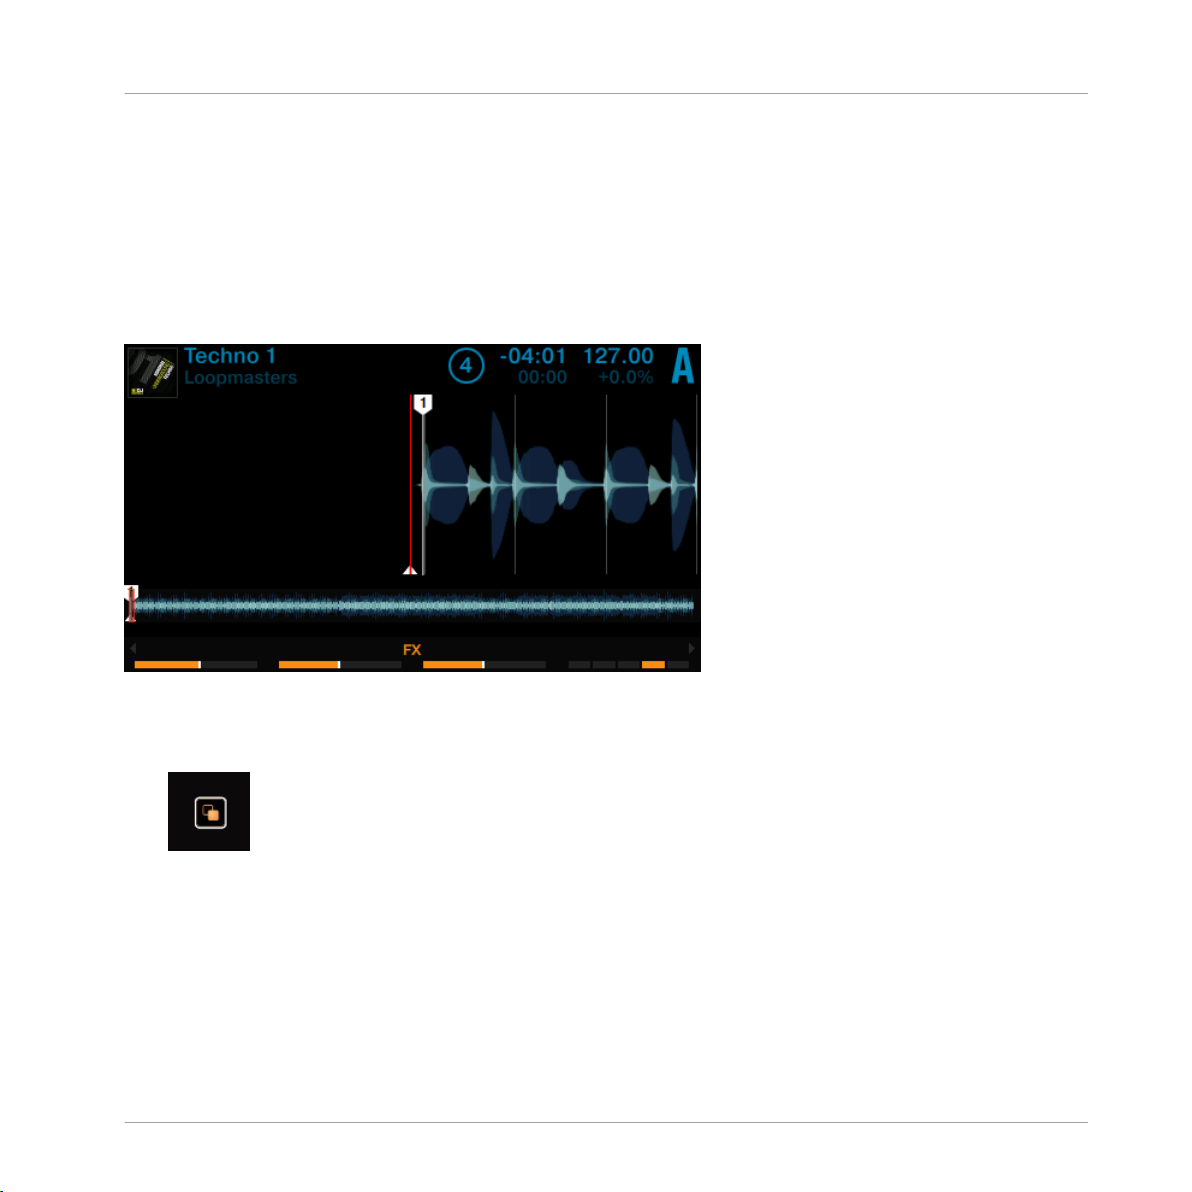
This section briefly introduces S8’s main areas. The image below illustrates which areas of the
S8 control the respective areas in the TRAKTOR software.
Hardware Controller and Software side by side.
(1) Decks: S8 features two identically equipped Deck sections at the far left and right of the
unit. These give you hardware control over the software Decks in the TRAKTOR PRO software.
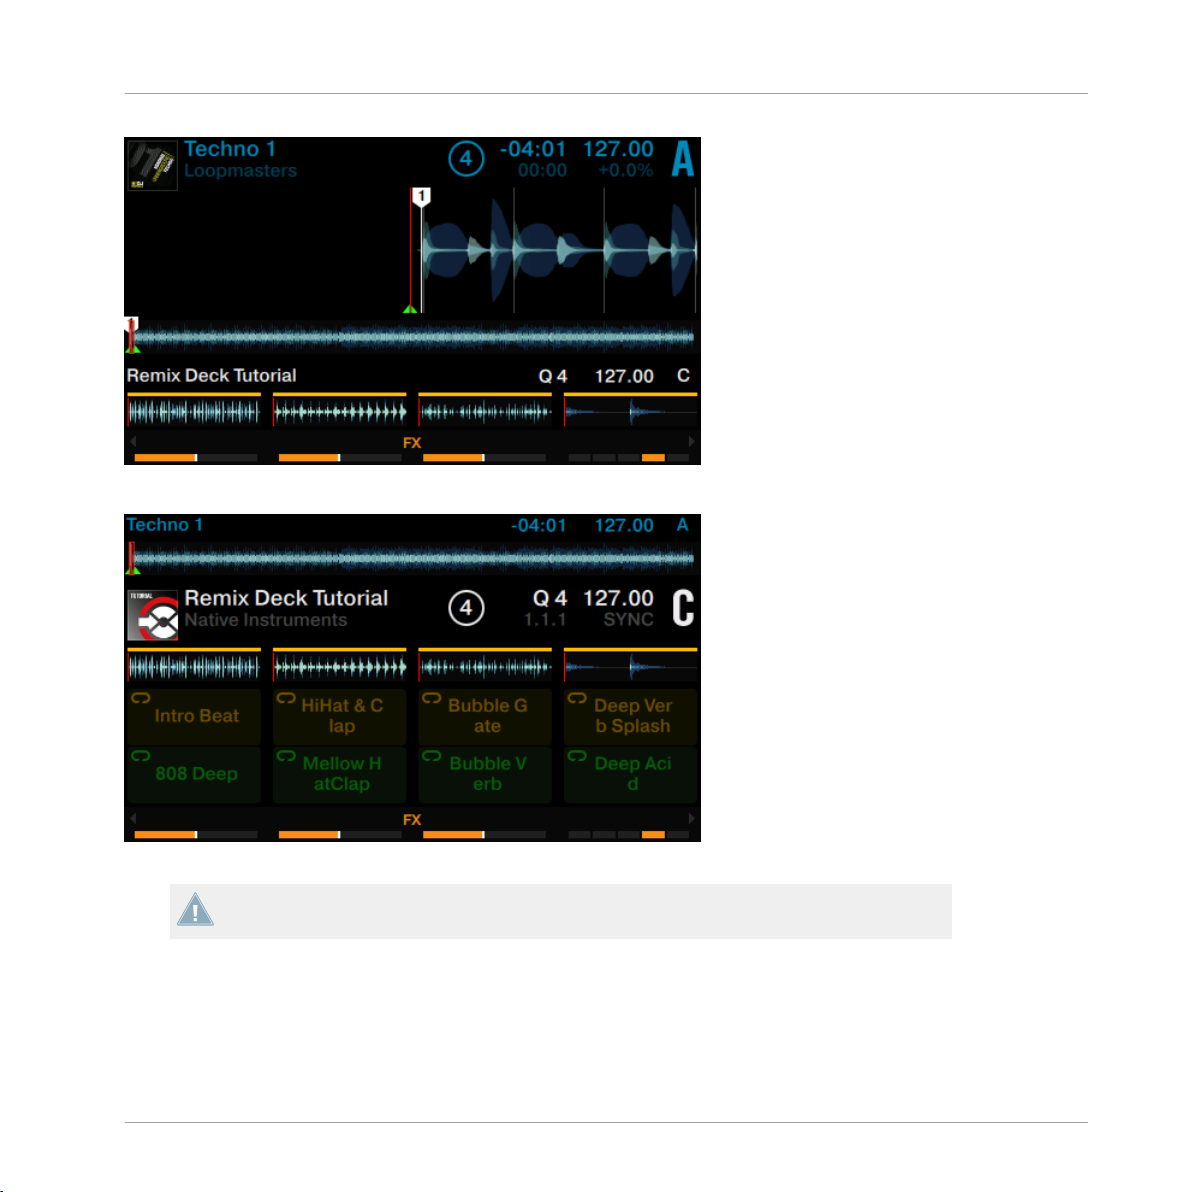
Active TRAKTOR Decks always work in one of the Deck modes, as either Track Deck, Remix
Deck or Live Input. The left hardware Deck section controls TRAKTOR's Decks A and C, the
right Deck section controls Decks B and D.
(2) FX Units: FX Units allow you to creatively process a track, ranging anywhere from just adding reverb for a build-up to completely messing up a beat with stutter effects. For that purpose, the TRAKTOR software offers a great selection of high-quality FX. These can easily be
configured from S8 and be controlled by the FX controls. The left FX Unit on the S8 will be
referred to as FX Unit 1 throughout this document, and the right FX Unit will be referred to as
FX Unit 2.
(3) Mixer: The 4-channel mixer is situated in the center of S8, and TRAKTOR's software interface. When connected to TRAKTOR, the knobs in S8's mixer section control the corresponding
knobs on the software mixer.
TRAKTOR KONTROL S8 - Manual - 19
Page 20
Using Your S8—Getting Started
Enabling Decks
2.2 Enabling Decks
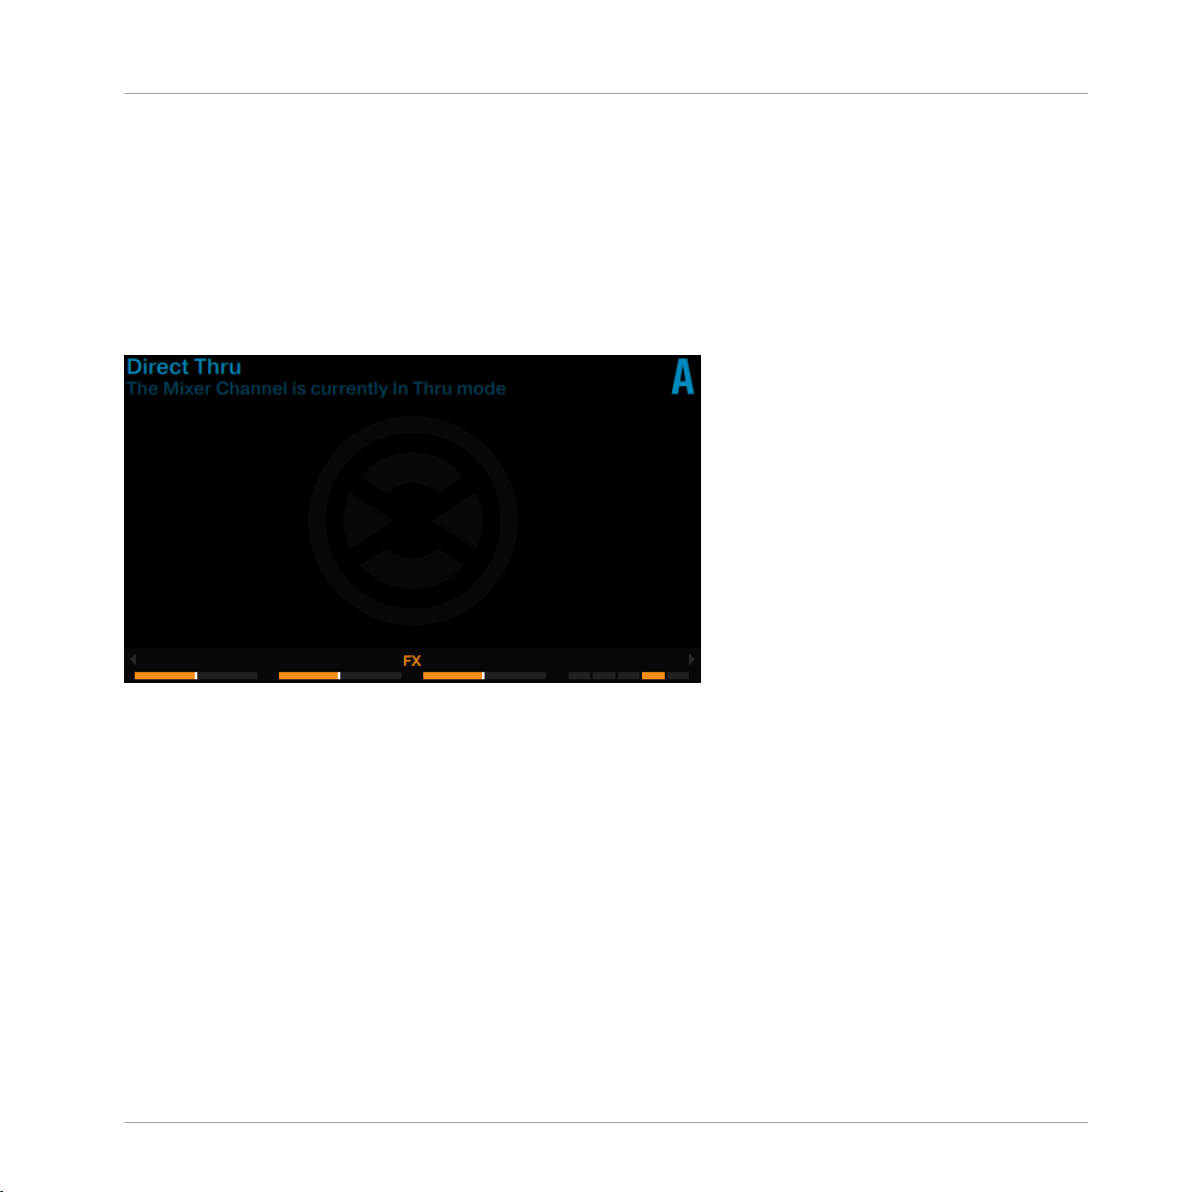
By default, the Decks on your S8 are enabled after you start the TRAKTOR software for the
first time. If, however, the Decks are not enabled (in Direct Thru mode), proceed as follows to
enable the Decks.
The following images show disabled Decks:
Deck A in Direct Thru mode
TRAKTOR KONTROL S8 - Manual - 20
Page 21
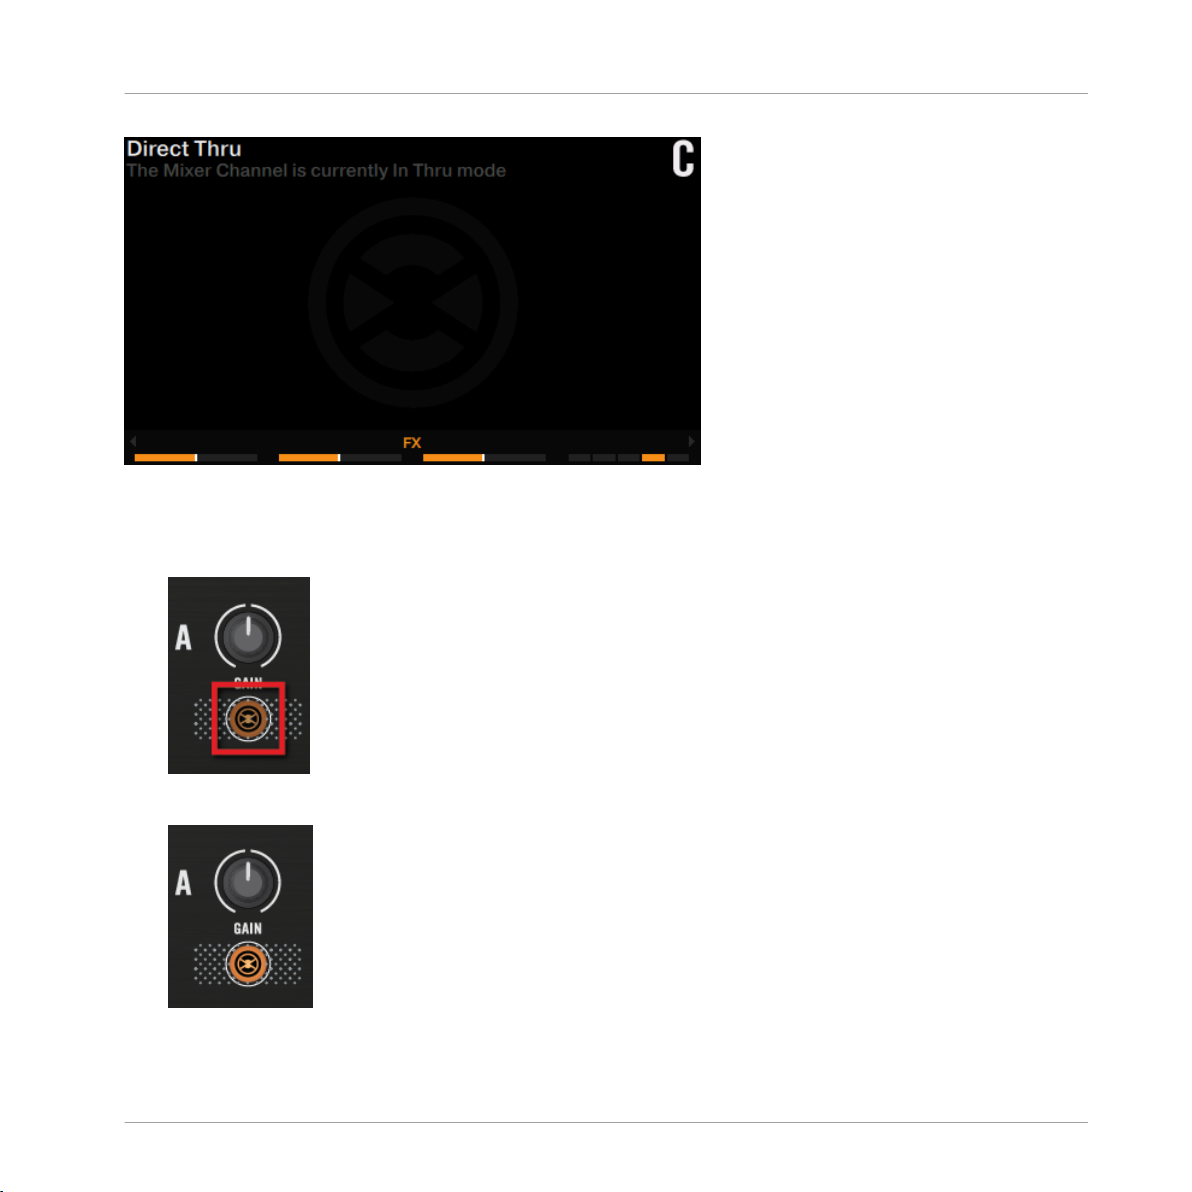
Deck C in Direct Thru mode
To enable the Decks:
Push the TRAKTOR buttons of each Deck.
►
Using Your S8—Getting Started
Enabling Decks
The TRAKTOR buttons light up in orange indicating the Deck is now in TRAKTOR mode.
→
The displays read No Track Loaded indicating the corresponding Decks are enabled.
TRAKTOR KONTROL S8 - Manual - 21
Page 22
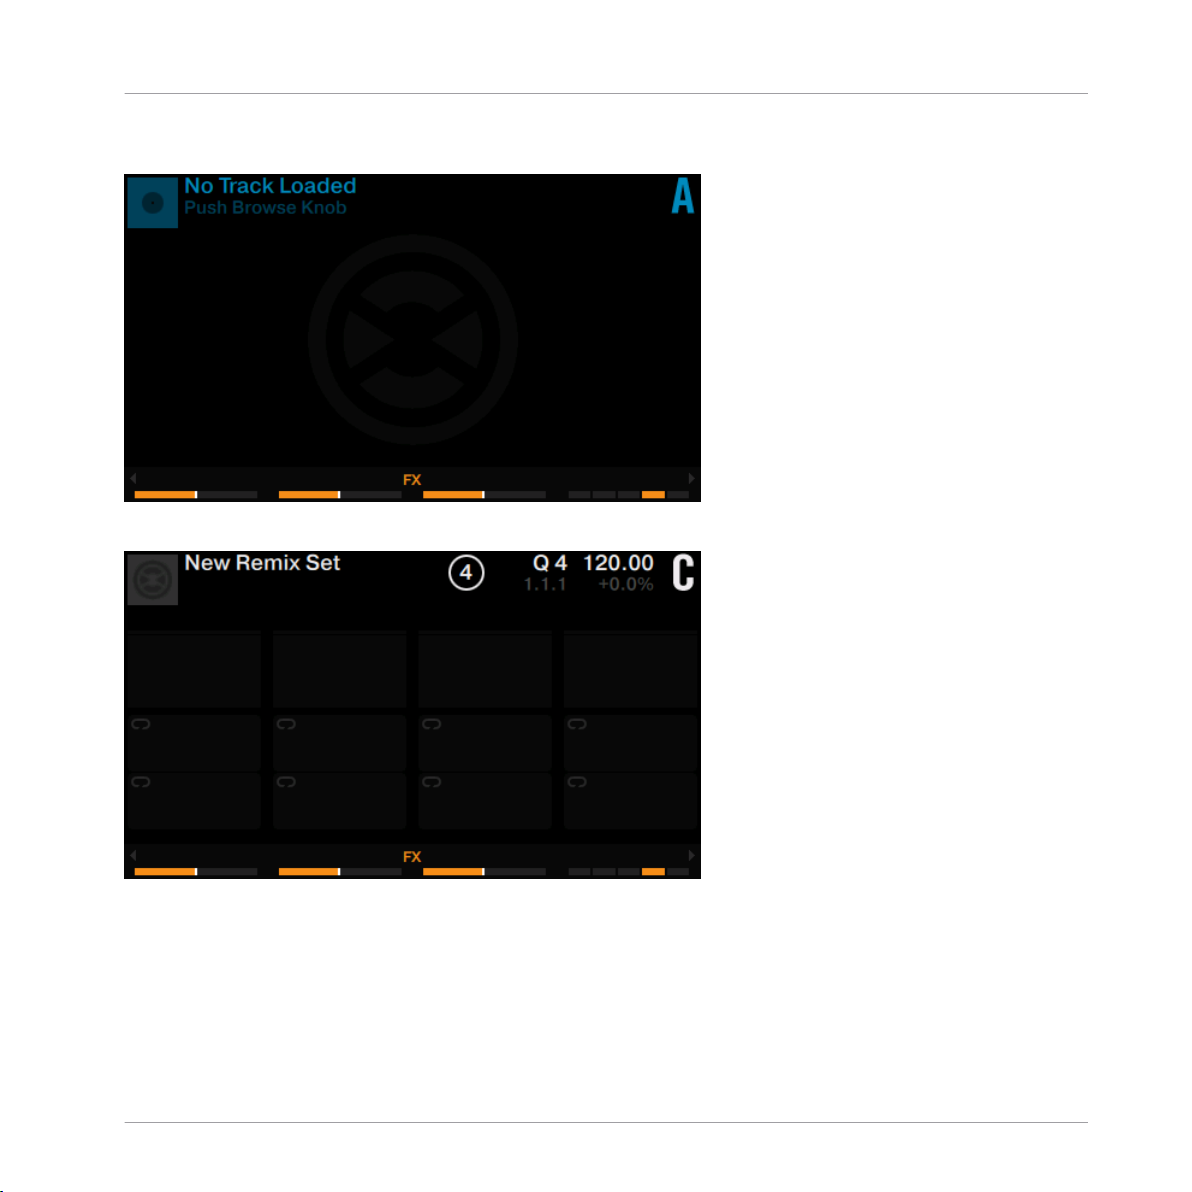
The following images show enabled Decks:
Deck A enabled as Track Deck
Using Your S8—Getting Started
Enabling Decks
Deck C enabled as Remix Deck
TRAKTOR KONTROL S8 - Manual - 22
Page 23
Using Your S8—Getting Started
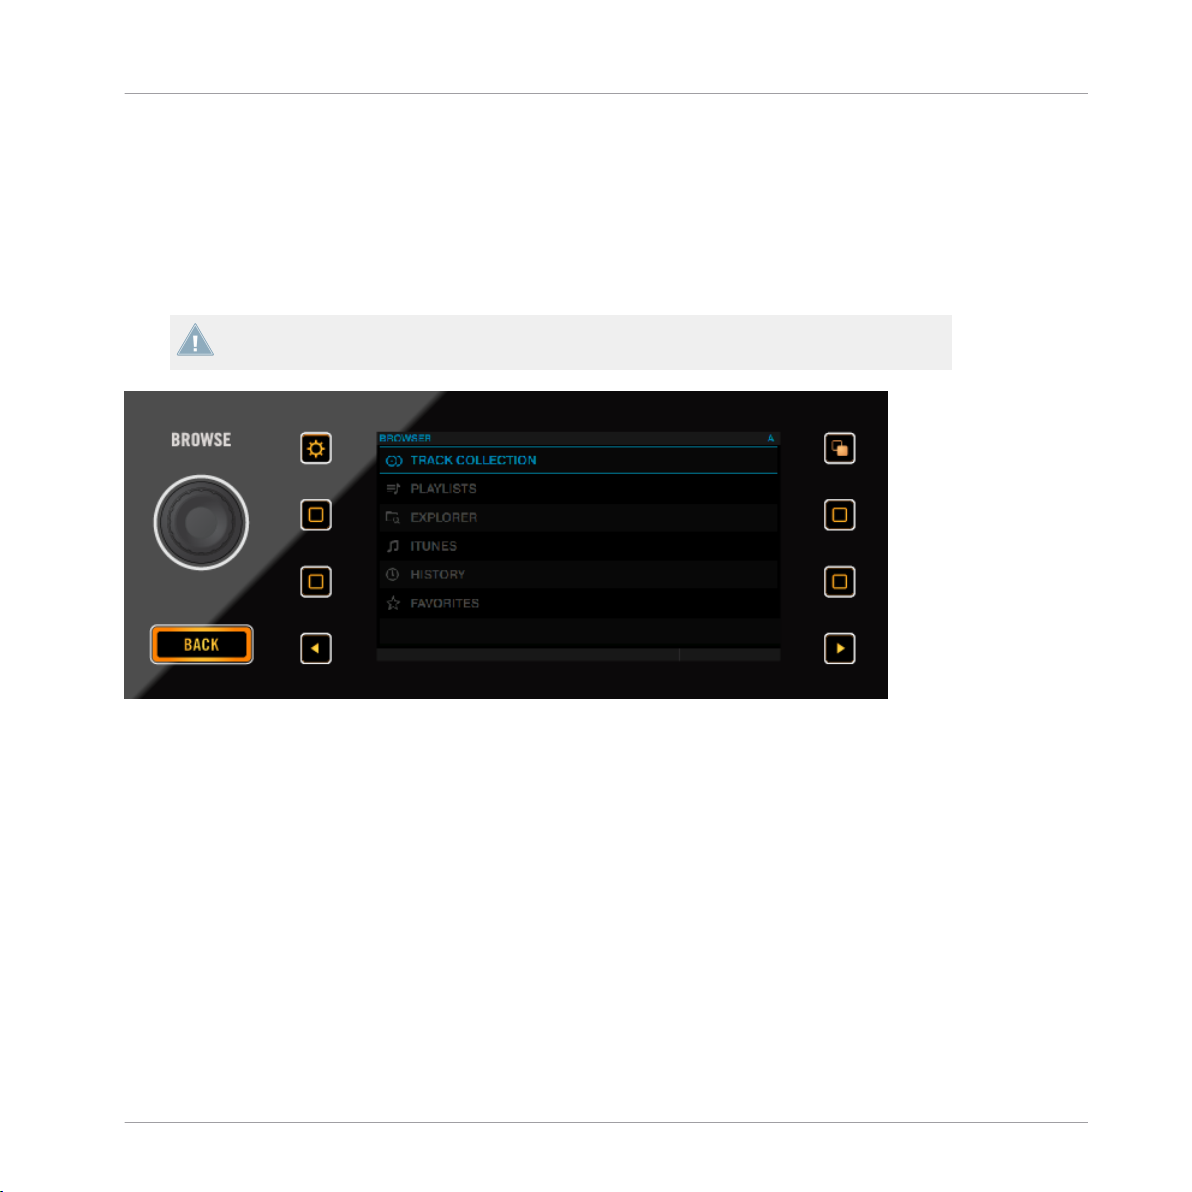
Browsing with Your S8
2.3 Browsing with Your S8
The first tutorial will explain how to browse through TRAKTOR's music library and load tracks
into Decks. The following section explains both—browse using regular interactions and browse
using touch interactions.
It is not possible to open the Browser on S8's left and right Decks simultaneously.
BROWSE Encoder, BACK Button, and Display section
2.3.1 Browse using Regular Interactions
To open the Browser:
TRAKTOR KONTROL S8 - Manual - 23
Page 24
Using Your S8—Getting Started
Push the BROWSE encoder. The Browser will be displayed in the respective display.
►
To scroll through the music folders:
Rotate the BROWSE encoder. The selected entry will be highlighted in blue. The Browser
►
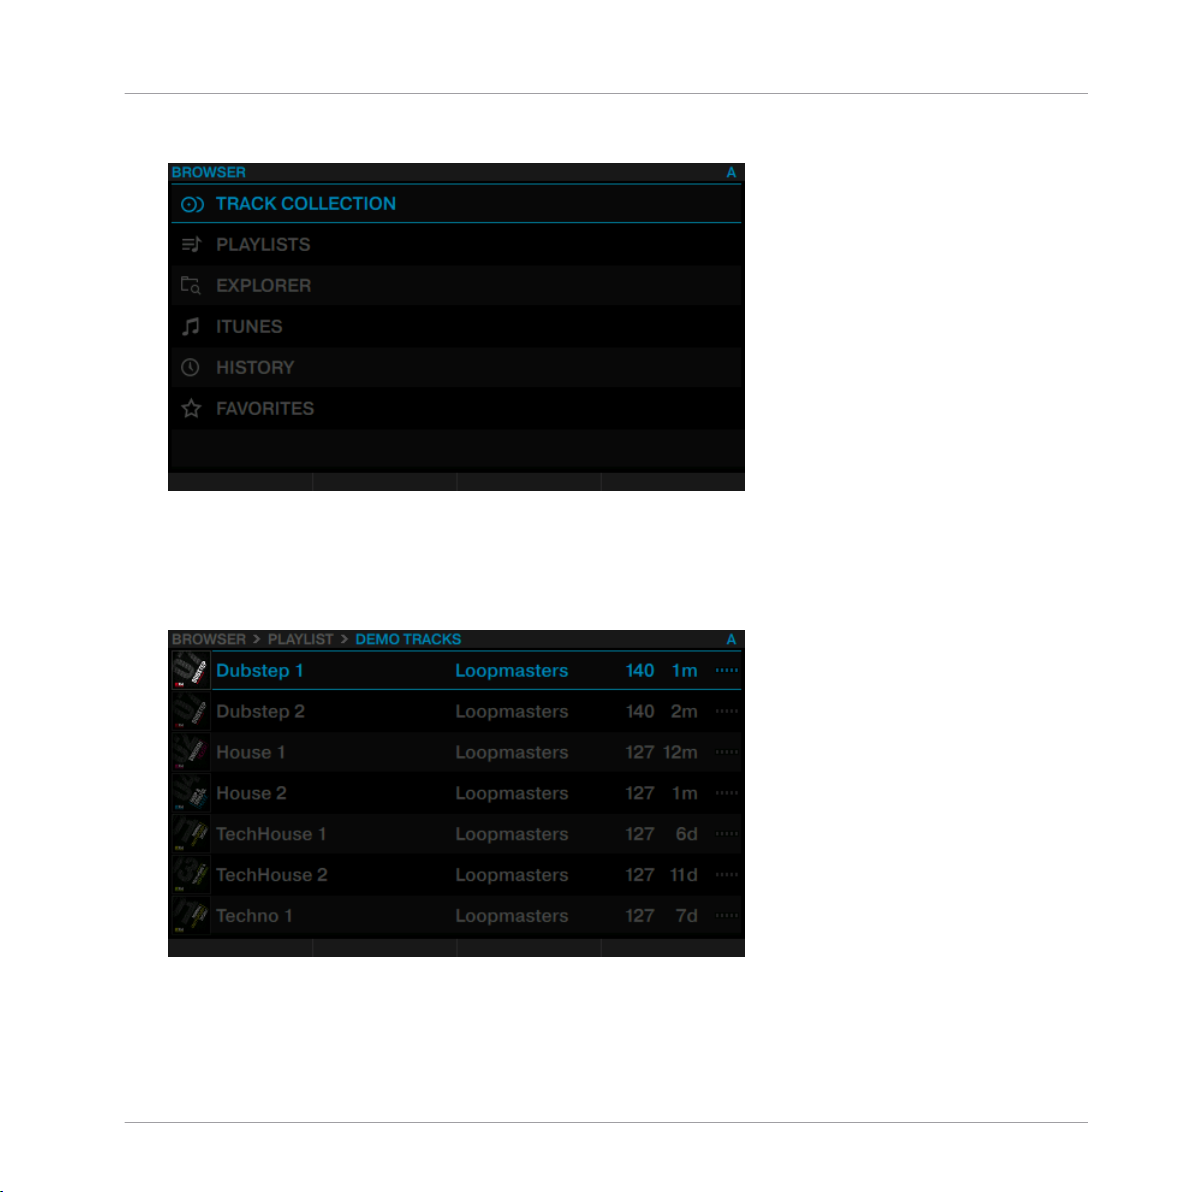
View shows your current location in the folder structure at the top of the display, e.g.
BROWSER>PLAYLIST>DEMO TRACKS.
Browsing with Your S8
To open folders and load tracks:
Press the BROWSE encoder to open a folder.
►
TRAKTOR KONTROL S8 - Manual - 24
Page 25
Using Your S8—Getting Started
Browsing with Your S8
Press the BROWSE encoder to load a track.
►
To return to the previous folder:
Press the BACK button.
►
To exit the Browser:
Press the VIEW button. The display will return to Track view.
►
2.3.2 Browse using Touch Interactions
In addition to regular interactions with S8, you can perform touch interactions. However, to
use touch interactions when browsing, the touch sensitivity for the BROWSE encoder has to be
enabled:
1. Open the TRAKTOR Preferences.
2. Select the tab TRAKTOR KONTROL S8.
3. Enable the Touch Control Auto Open Browser on Touch.
The touch sensitivity is now enabled on the BROWSE encoder.
→
With touch sensitivity enabled the following touch interactions can be performed:
To open the Browser:
Touch the BROWSE encoder. The Browser will be displayed in the respective display.
►
To exit the Browser:
Release the BROWSE encoder or stop interacting in the Browser. The display will return
►
to Track view.
TRAKTOR KONTROL S8 - Manual - 25
Page 26
Using Your S8—Getting Started
Switching Deck Focus
2.4 Switching Deck Focus
Although you can mix four TRAKTOR Decks with the S8, it is only possible to have the focus
on two of the Decks simultaneously. To access the respective other Decks, you have to switch
the Deck focus. In this example, toggle between Decks A and C by the following action:
Press the left DECK button to toggle between Deck A and Deck C.
►
TRAKTOR KONTROL S8 - Manual - 26
Page 27
Using Your S8—Getting Started
Switching Deck Focus
• If Deck A is focused, the DECK button, the Mode Select Button and the LED ring around
the LOOP encoder will be lit in blue.
TRAKTOR KONTROL S8 - Manual - 27
Page 28

Using Your S8—Getting Started
Switching Deck Focus
• If Deck C is focused, the DECK button, the Mode Select Button and the LED ring around
the LOOP encoder will be lit in white.
TRAKTOR KONTROL S8 - Manual - 28
Page 29
Using Your S8—Getting Started
Switching Deck View and Zooming
2.5 Switching Deck View and Zooming
By default, the display shows only the focused Deck. This is called Single View. Additionally,
you can switch to Spilt View to show both Decks together in the display - Decks A and C on the
left side, Decks B and D on the right side. The display focused on just one Deck has the following appearance:
Deck A in Single View
Press the View button located in the top-right corner of the display area to toggle Deck
►
View between Single View and Split View.
The display now shows both Decks in Split View.
→
The focused Deck always acquires the majority of space in the display.
TRAKTOR KONTROL S8 - Manual - 29
Page 30
Split View with focus on Deck A.
Using Your S8—Getting Started
Switching Deck View and Zooming
Split View with focus on Deck C.
Changing Deck View does not change the Deck's focus.
Zooming
To get a more precise view of the waveform at the current Playhead position, you can zoom in
or out of the waveform.
TRAKTOR KONTROL S8 - Manual - 30
Page 31

To zoom into the waveform:
Press Display button 3 repeatedly until you reach the desired zoom level.
►
Using Your S8—Getting Started
Switching Deck View and Zooming
To zoom out of the waveform:
TRAKTOR KONTROL S8 - Manual - 31
Page 32

Press Display button 4 several times until you reach the desired zoom level.
►
Using Your S8—Getting Started
Playing Your First Track
2.6 Playing Your First Track
In this tutorial, you will learn how to load and play back a track, how to check the audio outputs and how to quickly troubleshoot your system if no music can be heard. Before you proceed, ensure the following prerequisites are met:
Prerequisites
We assume your S8 is in the following state:
TRAKTOR KONTROL S8 - Manual - 32
Page 33

Using Your S8—Getting Started
Playing Your First Track
• The left Deck is focused on Track Deck A.
• The Channel A Crossfader Assign switch is set to the left position.
• The Crossfader is set all the way to the left.
• On channel A, the channel fader is set to minimum, the EQ knobs, the GAIN knob, and
the Filter knob are set to center position.
• The MAIN knob is set to minimum.
TRAKTOR KONTROL S8 - Manual - 33
Page 34

Using Your S8—Getting Started
Playing Your First Track
2.6.1 Loading a Track
Let’s load the track “Techno 1” from the included demo tracks on to Deck A.
Since Deck A is in the top-left part of the TRAKTOR window, we will use the left Deck on your
S8. You can check this by looking at the left Deck’s display: you should see a blue indicator
reading A:
The Deck Display with DECK A indicator.
While looking at the left Deck's display reading No Track Loaded. Push Browse Knob, do the following:
1. Press the BROWSE encoder of the left Deck to open the Browser.
TRAKTOR KONTROL S8 - Manual - 34
Page 35

2. Navigate to the folder FAVORITES > Demo Tracks.
3. Scroll to track Techno 1.
Using Your S8—Getting Started
Playing Your First Track
4. Press the BROWSE encoder to load the track into Deck A.
TRAKTOR KONTROL S8 - Manual - 35
Page 36

The track is loaded. Its waveform and info appear in the display.
→
2.6.2 Playing the Track
Once the track is loaded:
Using Your S8—Getting Started
Playing Your First Track
TRAKTOR KONTROL S8 - Manual - 36
Page 37

Using Your S8—Getting Started
1. Press the PLAY button at the bottom of the left Deck. The PLAY button lights up.
The waveform starts moving in the display. The track is assigned to MASTER.
Playing Your First Track
2. Gradually raise the channel A fader to maximum position.
TRAKTOR KONTROL S8 - Manual - 37
Page 38

Using Your S8—Getting Started
Playing Your First Track
3. Gradually turn the MAIN knob clockwise.
You will hear the track Techno 1 playing back through your speakers. If not, please check
→
↑2.6.3, If You Don’t Hear the Track.
Each Deck Has Its Own Channel
The audio playing on each Deck can be further shaped by the controls on the corresponding
channel of the Mixer. Since the track is loaded on Deck A, you can control its sound on channel A:
TRAKTOR KONTROL S8 - Manual - 38
Page 39

Using Your S8—Getting Started
Playing Your First Track
The Channel A.
2.6.3
If You Don’t Hear the Track
If the track is playing but the audio coming through your amplification system is not loud
enough, or if there is no sound at all, check the following:
TRAKTOR KONTROL S8 - Manual - 39
Page 40

Using Your S8—Getting Started
• At the bottom of your S8, verify that the Crossfader is moved all the way to the left:
• Above, the channel fader should be raised in channel A:
Playing Your First Track
TRAKTOR KONTROL S8 - Manual - 40
Page 41

Using Your S8—Getting Started
Playing Your First Track
• The channel meter should show some activity. If not, check that the HI, MID, and LOW
knobs in channel A are set to the center position.
• At the top of the channel, adjust the input level by turning the GAIN knob.
• At the top center of the Mixer, the MAIN knob should be turned at least part of the way to
the right. You should see the MAIN meters moving:
If you see some activity on the MAIN meters of your S8 but don’t hear any sound, then doublecheck the connection starting with the cable going from the S8’s Main Outputs to your PA.
TRAKTOR KONTROL S8 - Manual - 41
Page 42

Using Your S8—Getting Started
Mixing In a Second Track
2.7 Mixing In a Second Track
Now that you have learned how to load and play a track from the S8, let’s mix in a second
track on Deck B. By doing so, you will learn a few mixing basics which are essential for every
DJ: how to cue tracks, synchronize tracks, start the playback at the right position, and mix the
tracks together using the Crossfader.
Prerequisites
We assume here that your S8 is in the following state:
• The track “Techno 1” is loaded into Deck A. The track is playing and audible.
• The right Deck is focused on Track Deck B.
• The Channel B Crossfader Assign switch is set to the right position.
• The Crossfader is all way to the left.
TRAKTOR KONTROL S8 - Manual - 42
Page 43

Using Your S8—Getting Started
Mixing In a Second Track
• On channel B, the channel fader is set to minimum, the EQ knobs and the GAIN knob are
set to the center position.
• The CUE VOL knob and the CUE MIX knob are set to minimum.
2.7.1 Loading a Second Track
We will choose the track “Techno 2” and load it into the right Deck B, as we did for Deck A in
the previous tutorial.
TRAKTOR KONTROL S8 - Manual - 43
Page 44

Using Your S8—Getting Started
Mixing In a Second Track
Track Deck B in its empty state.
While looking at the right Deck display reading "No Track Loaded, Touch Browse Knob", do the following:
1. Press the BROWSE encoder of the right Deck to open the Browser. The Browser resumes
at the last selected item.
TRAKTOR KONTROL S8 - Manual - 44
Page 45

2. Scroll to the track Techno 2.
3. Press the BROWSE encoder to load the track into Deck B.
The track is loaded. Its waveform and info appear in the display.
→
Using Your S8—Getting Started
Mixing In a Second Track
2.7.2 Playing the Second Track
Press the PLAY button on the right Deck to start the playback.
►
TRAKTOR KONTROL S8 - Manual - 45
Page 46

Using Your S8—Getting Started
Mixing In a Second Track
The track “Techno 2” starts playing. The PLAY button lights up and the waveform in the
→
display starts moving.
You don’t hear anything from Deck B through the speakers yet because the Crossfader on the
S8 is all the way to the left.
To mix in the track “Techno 2” on Deck B:
Slowly move the Crossfader from left to right.
►
You should hear the track on Deck B fade in, whereas the track on Deck A progressively
→
fades out as you move the Crossfader further to the right.
If you followed the instructions above, the two tracks won't mix well, as they're not in sync. To
mitigate this, we have to beat-match the track in Deck B to the track playing on Deck A as
described in the following section. So for now:
TRAKTOR KONTROL S8 - Manual - 46
Page 47

Using Your S8—Getting Started
Mixing In a Second Track
Pull the Crossfader all the way back to the left.
►
If you still don’t hear any sound coming from Deck B even with the Crossfader all the way
to the right, check the troubleshooting guidelines in section ↑2.6.3, If You Don’t Hear the
Track.
2.7.3 Using Headphones to Prepare the Mix
Typically, a DJ needs to be able to prepare a mix on the headphone cue before committing to
it and sending it to the main out. This is how you use your headphones for the preparation on
S8:
1. Put on your headphones.
2. On your S8, press the CUE button on channel B. The button lights up, indicating that
Deck B is now sent to the CUE channel.
3. Gradually raise the CUE VOL knob.
You will hear the cued track in your headphones.
→
TRAKTOR KONTROL S8 - Manual - 47
Page 48

Using Your S8—Getting Started
Mixing In a Second Track
Adjusting the balance between the cued track and main mix
For a great mix, you need to sync the affected Decks, match their levels and make sure that
the result sounds good. Use the Cue controls to adjust the balance between the cued track (in
this case Deck B) and the main mix (in this case Deck A) in your headphones:
Turn the CUE MIX knob counterclockwise when you want to concentrate on the cued
►
track; turn it clockwise when you want to hear more of the main mix.
You are now ready to work on the track playing on Deck B without interfering with the
→
main mix sent to your audience.
Regardless of the mix that you’re hearing in your headphones, the main mix is still controlled
by the Crossfader and channel faders.
For smooth transitions, set the CUE MIX to the center position and adjust the cued Deck's
GAIN knob so that both sound equally loud.
2.7.4 Synchronizing the Second Track
Before mixing in the track playing on Deck B, we will use TRAKTOR’s automatic Sync feature
to adjust its tempo to that of Deck A. Since playback of Deck A was started first, it is automatically assigned the role of Tempo MASTER. To sync Deck B to it:
Press the SYNC button on the right Deck to synchronize its tempo and phase with those
►
of Deck A.
TRAKTOR KONTROL S8 - Manual - 48
Page 49

Using Your S8—Getting Started
The SYNC button lights up and the display of Deck B displays SYNC. Now the two tracks
→
are in perfect sync.
Cue the Track
Slowly turn the CUE MIX knob clockwise.
►
Mixing In a Second Track
You will hear the second track fade into the mix with both tracks in sync.
→
Note that you should always adjust the tempo of the cued track which is not audible to the
audience!
Mixing In the Second Track
When your track is ready for mixing:
TRAKTOR KONTROL S8 - Manual - 49
Page 50

Using Your S8—Getting Started
Mixing In a Second Track
Slowly move the Crossfader from the left to the right.
►
You just did your first mix with S8.
→
2.7.5 Interlude: In case the Left Track has finished
The track “Techno 1” on Deck A has been playing since we started with the tutorials, and it
might happen that the playback reaches the end of the track. In this case, just do the following:
On the left Deck, press Pad 1 to skip back to the beginning of the track.
►
You can then resume from where you left off.
2.7.6 Mixing In the Track by Using the Channel EQ and Filter
Besides simply using the Crossfader or channel volume faders to mix tracks, you can use
TRAKTOR KONTROL S8’s EQs and filters to make the mixes smoother and more interesting.
TRAKTOR KONTROL S8 - Manual - 50
Page 51

Using Your S8—Getting Started
Mixing In a Second Track
The EQ and FILTER knobs on channel B.
Prerequisites
We assume here that you have already followed the instructions in the previous tutorials and
the S8 is in the following state:
• The track “Techno 1” is loaded on Deck A. The track is playing and audible.
• The track “Techno 2” is loaded on Deck B. The track is playing and audible.
• Both tracks are synched.
• The Crossfader is all the way to the left.
• On channel B, the channel fader is set to minimum, the EQ knobs, the GAIN knob, and
the Filter knob are set to center position.
TRAKTOR KONTROL S8 - Manual - 51
Page 52

To prepare the cued track with EQ or Filter:
1. Put on your Headphones.
2. Enable CUE on channel B.
3. Press the FILTER button on Deck B.
Using Your S8—Getting Started
Mixing In a Second Track
TRAKTOR KONTROL S8 - Manual - 52
Page 53

Using Your S8—Getting Started
Mixing In a Second Track
4. Turn any of the EQ or FILTER knobs on channel B to hear the effect on the cued track.
The EQs and filters are excellent tools for making adjustments to tracks before mixing them in
so that you get the smoothest transition possible. The most common technique is to filter the
bass line out of the incoming track—having 2 bass lines running simultaneously rarely sounds
good.
We will now carry out a first version of the mix “for real.” Thus, turn the CUE MIX knob
fully clockwise to hear the main mix in your headphones (or put off your phones and listen
to your mix coming through your amplification system).
Do the following:
TRAKTOR KONTROL S8 - Manual - 53
Page 54

Using Your S8—Getting Started
Mixing In a Second Track
1. With the Crossfader still on the left, turn down the LOW knob on channel B to take the
bass out of the track on Deck B.
2. Progressively mix in channel B by gradually moving the Crossfader from the left to the
center position.
3. When both tracks are running together and you want to bring the bass back in, gradually
decrease the bass amount of channel A while simultaneously increasing that of channel
B.
4. Complete the transition by gradually moving the Crossfader all the way to the right.
You did your first mix using EQs and filters of your TRAKTOR KONTROL S8.
→
TRAKTOR KONTROL S8 - Manual - 54
Page 55

Using Your S8—Getting Started
Adjusting Levels
2.8 Adjusting Levels
Before we continue with the tutorials, let's talk about the importance of setting your mix levels
correctly. We will provide a few simple hints which help you achieve the best sound with your
mix.
Even if this section looks a bit technical at first, please take the time to read these few pages,
as this knowledge will help you later on, especially in a live situation!
2.8.1 The Theory
By mixing, you blend together (and process) signals coming from multiple sound sources. The
mix is almost always louder than a single source. So it's important to keep levels within a safe
range.
As a basic rule, you will want to avoid signal clipping, while keeping them loud enough so you
use the full dynamic range available.
• If your signal exceeds the specified limits, it can't get any louder, but the sound quality is
degraded by digital distortion, called clipping. Clipping leads to scratchy, unpleasant
noises being added to the loudest signals in your mix. Although the music may appear
louder overall, it will lose its impact. Speakers will suffer from this—and so will your audience! (Also, be prepared for some annoyed sound technician or club owner coming down
on you.)
• If, on the other hand, you mix with very low levels, you will encounter the other extreme;
an elevated noise floor, especially apparent in quiet sections of your performance.
Hence, you should always make sure that your signals stay in the safe range.
2.8.2 In Practice
To assist you in adjusting levels, S8's Mixer is equipped with various level meters and controls.
Each level meter consists of a range of blue LEDs, indicating the safe signal range, along with
an orange LED at the top indicating the clipping.
TRAKTOR KONTROL S8 - Manual - 55
Page 56

Using Your S8—Getting Started
Adjusting Levels
A channel meter clipping
In each channel, ensure that its channel meter shows a level in the upper range of the blue
LEDs when playing the loudest section of a track, only occasionally reaching the orange LEDs.
Letting your levels go “in the red” (or orange in this case) and using signal clipping to make
your mix sound dirtier is definitely not recommended: to do this, make use of TRAKTOR's great
FX selection instead!
Checking the Level on Each Channel
Each channel on the Mixer provides you with a vertical channel meter next to the fader. This
meter shows you the pre-fader level of the signal on that channel, i.e. the level of the signal
before it is adjusted by the channel fader. To adjust this level, use the GAIN knob at the very
top of the channel:
The GAIN knob sits at the top of each channel
Adjust the channel’s GAIN knob so that the level displayed on the channel meter stays in
►
the upper part of the blue area without reaching the orange clipping LED.
TRAKTOR KONTROL S8 - Manual - 56
Page 57

Using Your S8—Getting Started
Adjusting Levels
Note that the channel’s EQ and filter settings also affect the signal level, as well as the possible FX Unit(s) it is assigned to. Hence, when modifying any of these, you might need to readjust the GAIN knob accordingly.
To get a good idea of the right levels to choose, we recommend you get to know the songs in
your set - for tracks with a variable level over time (e.g. a track starting with a soft intro), you
should base the level settings on the loudest section of the track.
Matching Levels Between Channels
Moreover, in order to avoid an audible level jump when cross-fading between two channels, the
perceived channel levels should match:
Before mixing in a cued channel, adjust its GAIN knob so that its channel meter activity
►
roughly matches that of the channel currently on air.
TRAKTOR already does this for you by automatically applying a level balance value for each
newly loaded track. This so-called “Autogain” feature relies on the gain values extracted
from your tracks. Despite this automatism, depending on the particular EQ, filter and FX
applied to the cued track, you may want to double-check the level consistency before you
mix in the track. Moreover, what is important here is the perceived loudness of the specific
part of the track that you’re about to mix in.
Checking the Main Level in TRAKTOR
The signals coming from all channels are mixed together according to the relative levels determined by the channel faders and by the Crossfader. This mix is then sent from TRAKTOR’s
main output to the Main section:
The Main section on your S8
TRAKTOR KONTROL S8 - Manual - 57
Page 58

Using Your S8—Getting Started
Using Cue Points
In this section, the MAIN LEVEL meters show you the (left and right) overall level of your mix
after adjustment by the MAIN knob. Here, again, make sure not to exceed the safe range indi-
cated by blue LEDs too often.
For checking the level at the output of the TRAKTOR software, please refer to the meter in
TRAKTOR's header. Set the channel levels so that the mix mostly stays in the blue safe range
on the MAIN meter.
The MAIN meter showing too high levels in TRAKTOR's header.
By default, a limiter is enabled on TRAKTOR’s main output. With this limiter enabled, the
MAIN LEVEL meters’ clipping LEDs will cease to indicate clipping, but instead indicate when
the limiter kicks in. While the limiter prevents distortion inside TRAKTOR, the resulting contraction of the dynamic range cannot be undone. Therefore, even with the limiter enabled, ensure that the clipping LEDs don’t light up too often!
Setting the correct level on S8
Once correct levels are set in TRAKTOR, you can concentrate on working on the S8. Use the
MAIN knob to set the volume going to the speakers, again, so that your mix isn't clipping.
If turning up S8's MAIN knob doesn't give you satisfying levels, please check the channel
faders—they are probably set too low.
2.9 Using Cue Points
This tutorial will explain how to work with HotCues for jumping directly to certain points within
a track. HotCues can be assigned to the pads when the Track Deck is in HOTCUE mode.
On a Track Deck in HOTCUE mode, pad 1 always represents the Start Cue Point that will be
assigned automatically as soon as a track is loaded. The remaining pads can be assigned with
further HotCues, as explained in the following section.
TRAKTOR KONTROL S8 - Manual - 58
Page 59

Using Your S8—Getting Started
Using Cue Points
Pad 1 as Start Cue Point.
Prerequisites
We assume here that you already followed the instructions in the previous tutorials (see ↑2.2,
Enabling Decks). TRAKTOR KONTROL S8 is in the following state:
• The track “Techno 1” is loaded on Deck A.
• The Deck A is set to HOTCUE mode (default state).
2.9.1 Setting and Deleting Cue Points (HotCues)
To set Cue Points within a track:
TRAKTOR KONTROL S8 - Manual - 59
Page 60

Using Your S8—Getting Started
On the left Deck, whether or not the track is playing, press one of the unlit pads on a
►
downbeat—let’s say pad 2. The pad lights up blue.
You have just stored a Cue Point that you can return to by pressing the same pad again.
→
In the display, a CuePoint will be highlighted by a blue indicator and the pad number.
►
You can store up to eight CuePoints per track, including the first which is automatically
set to the track start.
Using Cue Points
The highlighted CuePoint in the display.
To delete a Cue Point:
TRAKTOR KONTROL S8 - Manual - 60
Page 61

Using Your S8—Getting Started
Using Cue Points
On the respective Deck press SHIFT + the pad assigned with a Cue Point.
►
The Cue point is deleted and the pad is unlit.
→
Snapping to the Beats
You don’t have to worry about being precise enough to set a HotCue directly on a beat; by default, TRAKTOR will make sure this happens automatically. This is because the Snap mode is
on, indicated by the lit S button located in the top-mid on the S8:
The S button on the Mixer.
With Snap mode on, any HotCue you set in the track will snap to the closest beat, thus ensuring that recalling a CuePoint will always trigger a downbeat.
2.9.2 Aligning Tracks using HotCues
Aligning both tracks is straightforward:
1. Make sure that Deck B is playing.
2. When you hear a downbeat in the other track, press the pad with the HotCue you just
used to store the downbeat position.
The playback position on Deck B jumps to the stored Cue Point, and the playback contin-
→
ues from there. Both tracks now are perfectly aligned and ready to be mixed.
Sticking to the Beats
Again, you do not have to worry about pressing the pads with HotCues exactly on the beat: by
default, TRAKTOR will make sure that the beats of both tracks are synchronized and that the
jump does not ruin the beat matching. This is because the so-called Quantize mode is on, as
you can see by the lit Q button located in the top-mid on the S8.
TRAKTOR KONTROL S8 - Manual - 61
Page 62

Using Your S8—Getting Started
Adjusting Tempo
The Q button on the Mixer.
With Quantize mode on, whenever you jump through the track (e.g. by pressing a pad with a
HotCue on it), the playback jumps to the nearest position that preserves the beat matching,
thus ensuring that the current sync does not get lost when you jump through the track.
2.10 Adjusting Tempo
In this tutorial you will learn how to adjust the tempo of a track and the global tempo. The S8
doesn't feature a dedicated tempo fader per Deck which you might expect of a conventional DJ
controller. Instead, the S8 offers a new approach to controlling the tempo of your mixes described in the following section.
Prerequisites
We assume here that S8 is in the following state:
• The track “Techno 1” is loaded on Deck A and stopped.
• The track “Techno 2” is loaded on Deck B and stopped.
• The tracks are not in sync.
2.10.1 Global Tempo Adjustments
Global tempo adjustments are made using the TEMPO encoder located in the center of the S8.
The TEMPO encoder on the S8
TRAKTOR KONTROL S8 - Manual - 62
Page 63

Using Your S8—Getting Started
Adjusting Tempo
Turning the TEMPO encoder will adjust the tempo of the assigned MASTER deck, along with any
other decks that have their SYNC buttons active. You can adjust the tempo in whole steps or in
decimal steps.
Adjusting the Global Tempo
1. Press the PLAY button on Deck A. The Deck will be assigned to MASTER.
2. Turn the TEMPO encoder clockwise or counterclockwise to increase or decrease the tempo of TRAKTOR's Master Clock in decimal steps.
TRAKTOR KONTROL S8 - Manual - 63
Page 64

Using Your S8—Getting Started
Adjusting Tempo
3. Press any SHIFT button and turn the TEMPO encoder clockwise or counterclockwise to increase or decrease the tempo of TRAKTOR's Master Clock in whole steps.
4. Release the Deck's SHIFT button.
The global tempo has changed.
→
2.10.2 Deck-specific tempo adjustments
Deck-specific tempo adjustments can be made by using BPM mode which will be enabled on
the Decks and the BROWSE encoders:
TRAKTOR KONTROL S8 - Manual - 64
Page 65

Adjusting the Deck-specific Tempo
1. On a Deck press the Display Button 1.
The BPM pop-up becomes visible on the display.
Using Your S8—Getting Started
Adjusting Tempo
TRAKTOR KONTROL S8 - Manual - 65
Page 66

Using Your S8—Getting Started
Adjusting Tempo
2. Turn the Deck's BROWSE encoder clockwise to increase the tempo; turn the Deck's
BROWSE encoder counterclockwise to decrease the tempo.
3. Hold the Deck's SHIFT button + turn the Deck's BROWSE encoder clockwise to increase
the tempo in whole steps; turn the Deck's BROWSE encoder counterclockwise to decrease
the tempo in whole steps.
4. Press the Display Button 1 again or press the View Button to close the BMP pop-up.
The Deck-specific tempo has changed.
→
TRAKTOR KONTROL S8 - Manual - 66
Page 67

Using Your S8—Getting Started
In this scenario, the BROWSE encoder has the same effect as the TEMPO encoder when making tempo adjustments. If the Deck is assigned as the MASTER, tempo adjustments made with
the BROWSE encoder will also be applied to any other Deck with their SYNC button activated.
In scenarios where automatic Deck synchronization isn't possible, e.g. syncing a TRAKTOR
Deck with an external audio source, you can use this method to manually dial in a Deck's
BPM.
2.11 Using Keylock
When synchronizing tracks, you end up altering at least one track's tempo, which consequently
changes their pitch (or key). For small tempo adjustments, this mostly isn't going to be an issue; but when the tempo is changed more significantly, the resulting pitch change might
sound unsuitable: kick sounds would lose their impact, vocals would sound unrealistic, harmonic instruments would become dissonant when mixed, etc. To avoid issues like these,
TRAKTOR provides the Keylock feature which uncouples the pitch and the tempo of a track.
This allows you to basically lock the pitch while adjusting the tempo or vice versa. In order to
activate Keylock from the S8, do the following:
Using Keylock
Prerequisites
We assume here that the S8 is in the following state:
• The track “Techno 1” is loaded on Deck A and playing.
Adjusting the Tempo and preserving the Original Pitch
If you want to mix a track in its original key to another track with a faster tempo, you need to
lock the key before adjusting the tempo of the track:
TRAKTOR KONTROL S8 - Manual - 67
Page 68

1. On a Deck, press the Display Button 2.
KEY pop-up opens on the display. For tracks which have been analyzed by TRAKTOR,
The
their key is displayed here.
Using Your S8—Getting Started
Using Keylock
TRAKTOR KONTROL S8 - Manual - 68
Page 69

Using Your S8—Getting Started
2. Press the Deck's BROWSE encoder to enable Keylock on the track. LOCK is now lit in
white.
3. Press the Display Button 2 again to exit the KEY pop-up in the display.
Now press Display Button 1 to open the BPM pop-up and adjust the track's tempo by turn-
4.
ing the BROWSE encoder.
Using Keylock
You can hear the tempo change, but the track's key remains intact.
→
TRAKTOR KONTROL S8 - Manual - 69
Page 70

Using Your S8—Getting Started
Adjusting the Key without changing Original Tempo
If you want to change just the key of a track without affecting its tempo, proceed as follows:
1. On a Deck, press the Display Button 2.
The KEY pop-up opens on the display. If the track has been analyzed by TRAKTOR, its key
will be displayed here.
Using Keylock
TRAKTOR KONTROL S8 - Manual - 70
Page 71

Using Your S8—Getting Started
2. Press the Deck's BROWSE encoder to enable Keylock on the track. LOCK is now lit in
white.
3. Now turn the Deck's BROWSE encoder to adjust the key of the track.
Using Keylock
4. Press the Display Button 2 again to exit the KEY window in the display.
You will hear that the track's key has changed, while the tempo is preserved.
→
TRAKTOR KONTROL S8 - Manual - 71
Page 72

Using Your S8—Getting Advanced
Using Touch Strip
3 Using Your S8—Getting Advanced
3.1 Using Touch Strip
S8 doesn't feature the conventional Jog Wheels of a regular DJ controller. Functions usually
associated with Jog Wheels are instead controlled by the intuitive Touch Strips. Each of S8's
Deck sections contains a Touch Strip, which always control just the focused Deck, indicated by
the DECK button's backlight color; Blue indicates a focus on a primary Deck (Decks A or B),
white indicates a focus on a secondary Deck (C or D). This tutorial explains how to use the
Touch Strip for the following actions:
• Seek/navigate through the entire track.
• Tempo bend (nudge).
• Create a scratch effect.
Prerequisites
We assume here that the S8 is in the following state:
• The track “Techno 1” is loaded on Deck A and is not playing.
• The Crossfader is set all the way to the left.
• The channel fader A is raised to the top.
• The MAIN knob is set at an adequate level.
3.1.1
Using the Touch Strip to Seek
Seeking within a track using Touch Strip
1. On the left Deck, press the PLAY button.
TRAKTOR KONTROL S8 - Manual - 72
Page 73

Using Your S8—Getting Advanced
Using Touch Strip
2. While holding the Deck's SHIFT button, the LED strip above the recessed touch-sensitive
area will display this:
The three orange segments represent the current playhead position within the track. The
LED segments represent the entire length of the track.
TRAKTOR KONTROL S8 - Manual - 73
Page 74

Using Your S8—Getting Advanced
Using Touch Strip
3. While holding SHIFT, place your finger on the Touch Strip beneath the orange LEDs and
drag your finger to the right to move forwards in the track's waveform.
TRAKTOR KONTROL S8 - Manual - 74
Page 75

Using Your S8—Getting Advanced
Using Touch Strip
The three orange LEDs will follow your finger movement to the right, as does the Playhead
in the waveform.
TRAKTOR KONTROL S8 - Manual - 75
Page 76

4. Drag your finger to the left to move backwards in the track's waveform.
Using Your S8—Getting Advanced
Using Touch Strip
The three orange LEDs will follow your finger movement to the left, just as the Playhead
in the waveform.
TRAKTOR KONTROL S8 - Manual - 76
Page 77

Using Your S8—Getting Advanced
Using Touch Strip
Alternatively, you can jump directly to an absolute position in the track by pressing SHIFT
+ placing your finger on the desired position on the Touch Strip.
3.1.2 Using the Touch Strip to Nudge/Pitchbend
Traditional DJ's who don't have an automatic Sync function at hand are used to physically
nudging, twisting, and tweaking a conventional turntable with either Timecode vinyl or traditional vinyl to temporarily speed up or slow down a track and align the beats manually. The S8
allows you to work in a similar way by using the Touch Strip:
The LEDs above the Touch Strip provide visual information about a Deck's phase alignment.
They help you make the necessary tempo bend adjustments to get your tracks aligned.
The following tutorial will demonstrate how to manually beatmatch the two demo tracks "Techno 1" and "Techno 2" by means of the Touch Strip, without using the sync function.
First step: Playing the Tracks
On Deck A press the PLAY button to start playback. The Deck will be assigned to MASTER.
1.
On Deck B press the SYNC button to disable Sync. The SYNC button's backlight goes dim.
2.
Listen to the track playing in Deck A, and press the PLAY button of deck B on an appropri-
3.
ate downbeat to start playback.
If your timing was perfect, a single orange LED at the center of the LED strip lights up,
→
indicating the phase-alignment of both tracks is correct.
If your timing was a little off, a few blue LEDs above the Touch Strip light up, indicating
the amount of phase-misalignment.
TRAKTOR KONTROL S8 - Manual - 77
Page 78

Using Your S8—Getting Advanced
Using Touch Strip
Second Step: Correcting phase-alignment
To correct the phase-alignment of both tracks, proceed as follows:
If blue LEDs are shown above the right side of the Touch Strip on the Deck not assigned to
MASTER:
Drag your finger toward the left side of the Touch Strip until the blue LEDs disappear and
►
a single orange LED is shown.
If blue LEDs are shown above the left side of the Touch Strip on the Deck not assigned to
MASTER:
Drag your finger toward the right side of the Touch Strip until the blue LEDs disappear
►
and a single orange LED is shown.
TRAKTOR KONTROL S8 - Manual - 78
Page 79

Using Your S8—Getting Advanced
Using Touch Strip
The phase-alignment is corrected and both tracks are perfectly synched.
→
3.1.3 Using the Touch Strip to Scratch
Similar to manually turning a vinyl on a turntable, swiping a finger over the recessed Touch
Strip area allows you to create a scratch effect in a Track Deck or Remix Deck.
A scratch effect can only be created when the track is stopped.
Perform Scratching
On a Deck's Touch Strip:
TRAKTOR KONTROL S8 - Manual - 79
Page 80

Using Your S8—Getting Advanced
Drag your finger to the left. This will move the Playhead slightly forward in the track's
►
waveform, and you will hear the typical scratch effect.
Using Touch Strip
TRAKTOR KONTROL S8 - Manual - 80
Page 81

Using Your S8—Getting Advanced
Drag your finger to the right. This will move the Playhead slightly backward in the track's
►
waveform and you will hear the typical scratch effect.
Using Touch Strip
TRAKTOR KONTROL S8 - Manual - 81
Page 82

Using Your S8—Getting Advanced
Playing with Loops in HOTCUE Mode
Try moving your finger across the Touch Strip (back and forth) to scratch the correspond-
►
ing Playhead over a beat.
As soon as you cease moving your finger on the Touch Strip, the playhead remains at that
→
position.
3.2 Playing with Loops in HOTCUE Mode
Now that we've covered all basic mixing techniques and how to use the Touch Strip, we will
focus on S8’s looping facilities in HOTCUE mode.
TRAKTOR KONTROL S8 - Manual - 82
Page 83

Using Your S8—Getting Advanced
Playing with Loops in HOTCUE Mode
Besides using the dedicated LOOP mode which will be explained in the next tutorial, you can
work with loops in default HOTCUE mode. This allows you to perform with HOTCUES and
loops at the same time.
Prerequisites
We assume here that the S8 is in the following state:
• The track “Techno 1” is loaded on Deck A and is not playing.
• The Crossfader is all the way to the left.
• The channel fader A is raised to the top.
• The MAIN knob has an adequate level.
3.2.1 Engaging and Disengaging a Loop
Let’s add a loop to the track on Deck A.
To engage a loop on a Deck:
1. Press the Deck's PLAY button to start playback.
2. Press the Deck's HOTCUE button to enable HOTCUE mode.
3. Press the Deck's LOOP encoder. The LED ring around the LOOP encoder starts to rotate to
indicate the loop is activated.
TRAKTOR KONTROL S8 - Manual - 83
Page 84

Using Your S8—Getting Advanced
Playing with Loops in HOTCUE Mode
This will automatically add a loop at the current playback position in the track.
→
The example above shows an engaged loop of four beats. You can change the loop size while
the loop is active:
TRAKTOR KONTROL S8 - Manual - 84
Page 85

Turn the Deck's LOOP encoder to change the loop size.
►
You can choose a loop size of 32 beats down to a loop size of 1/32 of a beat.
Using Your S8—Getting Advanced
Playing with Loops in HOTCUE Mode
Note that you can adjust the loop size either before or after you’ve set the Loop! If you adjust the loop size beforehand, the next loop you set will acquire the set loop size value.
To deactivate the active Loop:
Press the LOOP encoder again.
►
TRAKTOR KONTROL S8 - Manual - 85
Page 86

Using Your S8—Getting Advanced
Playing with Loops in HOTCUE Mode
Playback continues as normal.
→
By pushing the LOOP encoder when there is no Loop active, you activate looping: the next
Loop in the track will be activated.
3.2.2 Moving a Loop
With a loop size selected, you can move the Loop selection to another position within your
track.
To move the Loop:
Press the Deck's SHIFT button and turn the LOOP encoder. The loop selection will be
►
moved through the track on the fly and looping continues at the respective position.
The step size you move the selection by is the same as the loop size, which is shown in the
display.
Turning the LOOP encoder when there is no Loop active lets you jump backward/forward
through the track by the same step size.
TRAKTOR KONTROL S8 - Manual - 86
Page 87

Using Your S8—Getting Advanced
Playing with Loops in HOTCUE Mode
3.2.3 Storing a Loop
In a previous tutorial, you learned how to store Cue Points, which is as simple as pressing an
unlit pad. Storing Loops works in a similar way. Let's say you have stored two HotCues in the
track currently playing:
1. Press the Deck's LOOP encoder to engage a Loop.
2. To store the active Loop, press an unlit pad. The pad lights up green.
The display will show a green marker indicating the Loop. The marker also shows the
number of the corresponding pad.
TRAKTOR KONTROL S8 - Manual - 87
Page 88

Using Your S8—Getting Advanced
Playing with Loops in LOOP Mode
You have just stored a Loop that you can return to by pressing the same pad again.
→
Deleting a Loop
To delete a Loop:
Press the Deck's SHIFT button and the pad assigned to the Loop you want to delete.
►
3.3 Playing with Loops in LOOP Mode
LOOP mode offers a different set of control options for using loops on track Decks and Remix
Decks, which you will learn in the following tutorial.
When LOOP mode is activated, the top row of pads light up in green and the bottom row of
pads light up in orange. The green pads represent four Loop sizes. The orange pads represent
Beatjump sizes.
Pads illuminated in Loop Mode.
Prerequisites
We assume here that the S8 is in the following state:
• The track “Techno 1” is loaded on Deck A and is not playing.
TRAKTOR KONTROL S8 - Manual - 88
Page 89

Using Your S8—Getting Advanced
Playing with Loops in LOOP Mode
• The Crossfader is all the way to the left.
• The channel fader A is raised to the top.
• The MAIN knob has an adequate level.
3.3.1 Looping by Pre-defined Sizes
In LOOP mode, the first row of pads lets you trigger looping of a track by pre-defined values.
By default, these are (from left to right) 1/8, 1/4, 1/2 or 1 beat.
To engage a loop:
1. Press the Deck's PLAY button to start playback.
2. Press the Deck's LOOP button to enable LOOP mode.
The LOOP button lights up brightly and the pads also illuminate.
3. With a track playing and LOOP Mode enabled, you can perform the following actions:
Press one of the green pads to engage a Loop of 1/8 beat, 1/4 beat, 1/2 beat, or 1 beat.
►
The LED ring around the LOOP encoder starts to rotate to indicate a loop is active.
Press the same green pad again or press the LOOP encoder to disengage the Loop.
►
TRAKTOR KONTROL S8 - Manual - 89
Page 90

Using Your S8—Getting Advanced
Playing with Loops in LOOP Mode
While a loop is active, turn the LOOP encoder to alter the LOOP size for the active loop.
►
This will produce some interesting sound variations.
Loop sizes can be changed in TRAKTOR's software preferences: Preferences>TRAK-
TOR KONTROL S8>Loop Mode Sizes>Loop.
3.3.2 Beatjumping
With the orange pads, you can jump forward or backward in the track by the amount predefined as Beatjump size. By default, the orange pads 6 and 7 represent the Beatjump sizes of 1
beat backward and forward, whereas the beat-jump sizes of pad 5 and 8 are defined by the
Loop encoder.
To beat-jump within a track by 1 beat:
1. Press the Deck's PLAY button to start playback.
2. Press the Deck's LOOP button to enable LOOP mode.
The LOOP button lights up brightly and the pads also illuminate.
3. Press pad 6 to jump back by 1 beat. If doing so causes the Playhead to cross the boundaries of an active Loop area, it continues to loop again.
4. Press pad 7 to jump forward by 1 beat. If jumped out of a loop, playback continues as
normal.
Beatjump sizes can be changed in TRAKTOR's software preferences: Preferences>TRAK-
TOR KONTROL S8>Loop Mode Sizes>Beatjump.
Using the Loop encoder to define Beatjump sizes in real time
By default, pad 5 and pad 8 skip position back and forward by the amount shown in the display as loop-size value. To change this value:
1. Turn the Loop encoder to define a Beatjump size between 1/32 of a beat and 32 beats.
The Loop size will change in the display.
TRAKTOR KONTROL S8 - Manual - 90
Page 91

Using Your S8—Getting Advanced
Using FREEZE Mode
2. Press pad 5 to jump the playback position backward by the loop-size value displayed on
the display. If doing so causes the Playhead to jump into an active Loop area, it continues
to loop again.
3. Press pad 8 to jump the playback position forward by the beat-jump size defined in the
display. If you jump out of a loop this way, playback continues outside the loop.
3.4 Using FREEZE Mode
FREEZE mode takes the playhead position, adds the number of bars set as Freeze Slice Size
and splits this section of a track into eight equally sized slices. These are then mapped to the
adjacent pads, which light up blue. Press any of these pads to trigger playback from the mapped slice. Playback continues to the end of the track until you lift your finger off the pad.
In FREEZE mode, the numbers 1 - 8 are overlaid on the waveform to indicate the location of
the slices. The first row of pads triggers slices 1 - 4, the second row triggers slices 5 - 8
FREEZE overlay in the display.
The pads are now lit blue, and the Freeze slices are shown on the track's waveform. The pad
that is currently illuminated brightest represents the current playback position in the Freeze
area (see the image above).
TRAKTOR KONTROL S8 - Manual - 91
Page 92

Deck A in Freeze Mode.
Prerequisites
We assume here that the S8 is in the following state:
• The track “Techno 1” is loaded on Deck A and is not playing.
Using Your S8—Getting Advanced
Using FREEZE Mode
• The Crossfader is all the way to the left.
• The channel fader A is raised to the top.
• The MAIN knob has an adequate level.
TRAKTOR KONTROL S8 - Manual - 92
Page 93

3.4.1 Engaging Freeze mode on a track
1. Press PLAY to trigger playback.
2. Press the Deck's FREEZE button.
Using Your S8—Getting Advanced
Using FREEZE Mode
The current playback position is "frozen" and a section defined by the loop size on the display is automatically split into eight slices.
TRAKTOR KONTROL S8 - Manual - 93
Page 94

Using Your S8—Getting Advanced
Using FREEZE Mode
3. Press any of the eight pads to trigger playback and get a feel for the slices.
4. Press the HOTCUE button to exit Freeze mode.
If no further slice is triggered, the Playhead position will leave the frozen area and playback
continues towards the end of the track.
3.4.2 Adjusting the Freeze Slice Size
1. Hold the FREEZE button.
The SLICE SIZE window pops up in the display.
TRAKTOR KONTROL S8 - Manual - 94
Page 95

Using Your S8—Getting Advanced
Using FREEZE Mode
2. While holding the FREEZE button, turn the Loop encoder to increase or decrease the slice
size from a 1/4 of a beat to a range of 4 beats.
3. Release the FREEZE button.
The Slice size and zoom will change accordingly.
→
TRAKTOR KONTROL S8 - Manual - 95
Page 96

Using Your S8—Getting Advanced
Using FREEZE Mode
3.4.3 Slicer Mode
There's an extension of Freeze mode's functionality, called Slicer Mode. Press the Loop button
while in Freeze mode and the playback behavior of the pads changes. Instead of playing from
the slice start to the end of the entire track, pressing and holding a pad in Slicer Mode will
play back just the corresponding slice repeatedly
Slicer mode enabled.
To enable Slicer Mode on a Deck:
TRAKTOR KONTROL S8 - Manual - 96
Page 97

1. Turn the Deck's Loop encoder to define the desired Loop size.
2. Press the Deck's Loop encoder to engage a loop.
Using Your S8—Getting Advanced
Using FREEZE Mode
TRAKTOR KONTROL S8 - Manual - 97
Page 98

3. Press the FREEZE button to engage Slicer mode to the active loop.
The Slices appear in green.
While Slicer mode is engaged you can perform the following actions:
Using Your S8—Getting Advanced
Using FREEZE Mode
Press any of the pads to jump between the Slices.
►
TRAKTOR KONTROL S8 - Manual - 98
Page 99

Using Your S8—Getting Advanced
Hold a pad to retrigger its slice.
►
Hold two pads simultaneously to loop the entire area between the first and last selected
►
slice.
Using FREEZE Mode
TRAKTOR KONTROL S8 - Manual - 99
Page 100

Using Your S8—Getting Advanced
Turn the Deck's Loop encoder to change the Loop size. The slice size will be changed on
►
the fly and the waveform in the display adjusts its zoom accordingly.
Press the Loop encoder or the HOTCUE button to exit Slicer mode. Playback continues as
►
normal.
Using FLUX Mode
3.5 Using FLUX Mode
With FLUX mode activated, for every Deck, a second Playhead continues playing along the natural progression of a track, even if you loop a section, temporarily jump back to a cue point,
skip forward or backward, etc. That way, the beat of a track keeps flowing, no matter what you
do. These are the changes in FLUX mode compared to regular operation:
• HOTCUE mode: press and hold a pad to play back from a cue point. When you let go,
playback resumes at the second Playhead's position instead of continuing from the cue
point.
• LOOP mode: when leaving a loop, playback will continue at the position of the second
Playhead instead of the loop end position
• FREEZE mode: press and hold a pad to play back from a cue point. When you let go, playback resumes at the second Playhead's position instead of continuing playback from the
cue point.
TRAKTOR KONTROL S8 - Manual - 100
 Loading...