

Page 1
Manual
Page 2

The information in this document is subject to change without notice and does not represent a
commitment on the part of Native Instruments GmbH. The software described by this document is subject to a License Agreement and may not be copied to other media. No part of this
publication may be copied, reproduced or otherwise transmitted or recorded, for any purpose,
without prior written permission by Native Instruments GmbH, hereinafter referred to as Native
Instruments.
“Native Instruments”, “NI” and associated logos are (registered) trademarks of Native Instruments GmbH.
Mac, Mac OS, GarageBand, Logic, iTunes and iPod are registered trademarks of Apple Inc.,
registered in the U.S. and other countries.
Windows, Windows Vista and DirectSound are registered trademarks of Microsoft Corporation
in the United States and/or other countries.
All other trade marks are the property of their respective owners and use of them does not imply any affiliation with or endorsement by them.
Document authored by: Native Instruments GmbH
Software version: 2.5 (05/2012)
Disclaimer
Special thanks to the Beta Test Team, who were invaluable not just in tracking down bugs, but
in making this a better product.
Page 3
Germany
Native Instruments GmbH
Schlesische Str. 29-30
D-10997 Berlin
Germany
www.native-instruments.de
USA
Native Instruments North America, Inc.
6725 Sunset Boulevard
5th Floor
Los Angeles, CA 90028
USA
www.native-instruments.com
Contact
© Native Instruments GmbH, 2012. All rights reserved.
Page 4

Table of Contents
Table of Contents
1 Welcome to the World of TRAKTOR KONTROL S4! ........................................................
1.1 What Is TRAKTOR KONTROL S4? .................................................................................................. 11
1.2 The TRAKTOR KONTROL S4 Documentation ................................................................................. 11
1.3 System Requirements ................................................................................................................. 16
1.2.1 Where To Start ........................................................................................................... 11
1.2.2 In This Manual ........................................................................................................... 14
1.2.3 Manual Conventions .................................................................................................. 15
2 TRAKTOR KONTROL S4 Overview ................................................................................
3 Importing Your Music ................................................................................................
3.1 What Is the Track Collection? ..................................................................................................... 20
3.2 Importing Music Folders ............................................................................................................. 21
3.3 Tracks Managed by iTunes ......................................................................................................... 22
3.3.1 Playing Tracks Managed by iTunes ............................................................................ 22
3.3.2 Importing a Selection of Tracks from iTunes .............................................................. 24
3.3.3 Importing iTunes Playlists ......................................................................................... 24
4 Tutorials ...................................................................................................................
4.1 Playing Your First Track .............................................................................................................. 25
4.2 Mixing In a Second Track ............................................................................................................ 31
4.1.1 Quick Loading a Track ............................................................................................... 26
4.1.2 Playing the Track ....................................................................................................... 28
4.1.3 If You Don’t Hear the Track ........................................................................................ 29
4.2.1 Pre-listening a Second Track Directly from the Browser ............................................ 32
4.2.2 Loading and Playing the Second Track ...................................................................... 33
4.2.3 Using Headphones to Prepare the Mix ....................................................................... 33
4.2.4 Synchronizing the Second Track ................................................................................ 34
4.2.5 Setting a Cue Point as Starting Point ........................................................................ 35
11
17
20
25
TRAKTOR KONTROL S4 - Manual - 4
Page 5

Table of Contents
4.3 Adjusting Levels ......................................................................................................................... 41
4.4 Looping and Cueing ....................................................................................................................45
4.5 Using Samples in Your Mix ......................................................................................................... 50
4.6 Adding FX ................................................................................................................................... 57
4.7 Using the Loop Recorder ............................................................................................................. 62
4.8 Synchronization .......................................................................................................................... 67
4.2.6 Interlude: In Case the Left Track Is Over .................................................................... 37
4.2.7 Mixing In the Track by Using the Channel EQ and Filter ............................................ 37
4.2.8 Doing Everything by Hand .......................................................................................... 38
4.3.1 The Theory ................................................................................................................. 41
4.3.2 The Practice ............................................................................................................... 42
4.4.1 Playing with Loops ..................................................................................................... 45
4.4.2 Using Hotcues ........................................................................................................... 48
4.5.1 Loading a Sample from the Collection ....................................................................... 51
4.5.2 Triggering the Sample ............................................................................................... 52
4.5.3 Capturing a Sample From a Track Deck ..................................................................... 54
4.5.4 Unloading a Sample .................................................................................................. 56
4.5.5 Getting More Controls Over the Samples ................................................................... 56
4.6.1 Group Mode ............................................................................................................... 58
4.6.2 Getting the FX Unit Ready .......................................................................................... 58
4.6.3 Assigning Decks to the FX Unit and Bringing In the FX .............................................. 59
4.6.4 Controlling the FX Unit .............................................................................................. 60
4.6.5 Single Mode ............................................................................................................... 61
4.6.6 Storing a Snapshot .................................................................................................... 61
4.7.1 Choosing a Source ..................................................................................................... 63
4.7.2 Recording a Loop ....................................................................................................... 64
4.7.3 Overdubbing .............................................................................................................. 66
4.7.4 Further Uses of the Recorded Loop ............................................................................ 66
TRAKTOR KONTROL S4 - Manual - 5
Page 6

Table of Contents
4.8.1 Introduction ............................................................................................................... 67
4.8.2 Who’s the Master? ..................................................................................................... 69
4.8.3 Other Useful Tools for Synching ................................................................................. 72
4.8.4 In Conclusion ............................................................................................................. 73
5 Hardware Reference ..................................................................................................
5.1 Areas and Concepts ....................................................................................................................74
5.2 Types of Control Elements .......................................................................................................... 81
5.3 The Decks ................................................................................................................................... 86
5.1.1 Decks ......................................................................................................................... 74
5.1.2 Mixer .......................................................................................................................... 78
5.1.3 FX Units ..................................................................................................................... 79
5.1.4 Loop Recorder ............................................................................................................ 80
5.1.5 Front and Rear Panels ............................................................................................... 81
5.2.1 Buttons ...................................................................................................................... 81
5.2.2 Knobs ........................................................................................................................ 82
5.2.3 Encoders .................................................................................................................... 83
5.2.4 Jog Wheels ................................................................................................................. 83
5.2.5 Faders ....................................................................................................................... 84
5.2.6 Displays, Meters and Indicators ................................................................................ 84
5.2.7 Switches .................................................................................................................... 85
5.2.8 Sockets ...................................................................................................................... 86
5.3.1 Deck Flavors and Structure ........................................................................................ 86
5.3.2 SHIFT Buttons: Accessing Secondary Functions ......................................................... 88
5.3.3 Deck Assign Buttons: Switching Deck Focus .............................................................. 88
5.3.4 Deck Display: Informed at a Glance ........................................................................... 89
5.3.5 LOAD Button .............................................................................................................. 91
5.3.6 Jog Wheel ................................................................................................................... 92
5.3.7 Tempo Fader and Tempo Offset Buttons .................................................................... 93
74
TRAKTOR KONTROL S4 - Manual - 6
Page 7

Table of Contents
5.4 The Mixer .................................................................................................................................... 109
5.5 The FX Units ............................................................................................................................... 122
5.6 The Loop Recorder ...................................................................................................................... 124
5.7 Browsing, Loading and Copying ................................................................................................. 127
5.8 The Rear Panel ........................................................................................................................... 133
5.3.8 Loop Section .............................................................................................................. 96
5.3.9 Sample Play Buttons ................................................................................................. 99
5.3.10 Hotcue Buttons .......................................................................................................... 102
5.3.11 PLAY and CUE Buttons .............................................................................................. 106
5.3.12 SYNC Button .............................................................................................................. 107
5.3.13 SHIFT Button .............................................................................................................. 108
5.4.1 Mixer Overview ........................................................................................................... 110
5.4.2 The Main Section ....................................................................................................... 110
5.4.3 The Channels and the Crossfader .............................................................................. 112
5.4.4 The Master Display .................................................................................................... 118
5.4.5 The BROWSE Encoder and BROWSE Button ............................................................... 121
5.5.1 Single Mode and Group Mode .................................................................................... 123
5.5.2 FX Unit Reference ...................................................................................................... 123
5.6.1 DRY/WET Knob ........................................................................................................... 125
5.6.2 SIZE Button ............................................................................................................... 125
5.6.3 REC Button ................................................................................................................ 126
5.6.4 UNDO Button ............................................................................................................. 126
5.6.5 PLAY Button ............................................................................................................... 127
5.6.6 Copying and Saving the Recorded Loop ..................................................................... 127
5.7.1 Browsing Tracks and Samples ................................................................................... 128
5.7.2 Copying across the S4 ............................................................................................... 131
5.8.1 MAIN OUT Section ...................................................................................................... 134
5.8.2 INPUT CHANNEL D Section ......................................................................................... 134
TRAKTOR KONTROL S4 - Manual - 7
Page 8

Table of Contents
5.9 The Front Panel ...........................................................................................................................136
5.10 TRAKTOR KONTROL S4 Modes ..................................................................................................... 137
5.8.3 INPUT CHANNEL C Section ......................................................................................... 135
5.8.4 POWER Section .......................................................................................................... 136
5.10.1 Native Traktor Mode ................................................................................................... 137
5.10.2 MIDI Mode .................................................................................................................. 137
6 Customizing TRAKTOR KONTROL S4 ............................................................................
6.1 The Preferences Window ............................................................................................................. 140
6.2 Settings and Preferences for the S4 Control Elements ................................................................ 141
6.3 S4 Control Options ......................................................................................................................143
6.4 Other Settings of Interest ........................................................................................................... 149
6.5 The Setup Wizard ........................................................................................................................ 154
6.3.1 Restore Default .......................................................................................................... 148
6.3.2 Calibration ................................................................................................................ 149
6.4.1 Switching the Deck Flavors ........................................................................................ 150
6.4.2 Adjusting the Input Routing ...................................................................................... 150
6.4.3 Using Four FX Units ................................................................................................... 153
7 The S4 Audio Interface and Control Panel ...................................................................
7.1 Settings on Mac OS X ................................................................................................................. 161
7.2 Settings on Windows: The Control Panel ..................................................................................... 162
7.3 Using the S4 Audio Interface with Other Music Applications ...................................................... 167
7.4 Using the S4 as your Default Audio Interface ............................................................................. 168
7.2.1 Opening the Control Panel ......................................................................................... 162
7.2.2 Audio Settings Page .................................................................................................. 163
7.2.3 Diagnostics Page ....................................................................................................... 166
7.4.1 Windows XP ............................................................................................................... 168
7.4.2 Windows Vista and 7 ................................................................................................. 168
7.4.3 Mac OS X ................................................................................................................... 168
140
161
TRAKTOR KONTROL S4 - Manual - 8
Page 9

Table of Contents
8 Troubleshooting and Help ..........................................................................................
8.1 TRAKTOR Won’t Start .................................................................................................................. 170
8.2 Hardware-related Problems ........................................................................................................ 170
8.3 Loose Jog Wheel Top Plate .......................................................................................................... 173
8.4 TRAKTOR Crashes ....................................................................................................................... 174
8.5 Getting Help ............................................................................................................................... 174
8.6 Updates ...................................................................................................................................... 175
8.2.1 Basics ....................................................................................................................... 170
8.2.2 USB and Driver Issues ............................................................................................... 171
8.2.3 Update the Driver ...................................................................................................... 172
8.2.4 USB-related Power Issues .......................................................................................... 172
8.2.5 Using the TRAKTOR KONTROL S4 with a Laptop ......................................................... 173
8.5.1 Knowledge Base / Readme / Online Support .............................................................. 174
8.5.2 Forum ........................................................................................................................ 175
9 Appendix A – Common Setups ....................................................................................
9.1 TRAKTOR KONTROL S4 Basic Setup ............................................................................................ 176
9.2 Adding a Microphone .................................................................................................................. 186
9.3 Using a Master Mixer .................................................................................................................. 189
9.4 TRAKTOR KONTROL S4 with Turntables or CD Decks ................................................................... 189
9.5 TRAKTOR KONTROL S4 with Slave Mixer ...................................................................................... 193
10 Appendix B – Technical Information ...........................................................................
10.1 Technical Specifications ............................................................................................................. 195
10.2 Block Diagram ............................................................................................................................ 199
11 Appendix C – Quick References ..................................................................................
11.1 Track Deck Quick Reference ........................................................................................................ 200
11.2 Remix Deck Quick Reference ....................................................................................................... 203
11.3 Mixer Quick Reference ................................................................................................................ 207
11.3.1 Main Section Quick Reference ................................................................................... 207
170
176
195
200
TRAKTOR KONTROL S4 - Manual - 9
Page 10

Table of Contents
11.4 FX Unit Quick Reference ............................................................................................................. 209
11.5 Loop Recorder Quick Reference ................................................................................................... 210
11.6 Browsing, Loading and Copying Quick Reference ....................................................................... 211
11.3.2 Channel and Crossfader Quick Reference .................................................................. 208
11.3.3 Master Display Quick Reference ................................................................................ 209
Index ........................................................................................................................
212
TRAKTOR KONTROL S4 - Manual - 10
Page 11

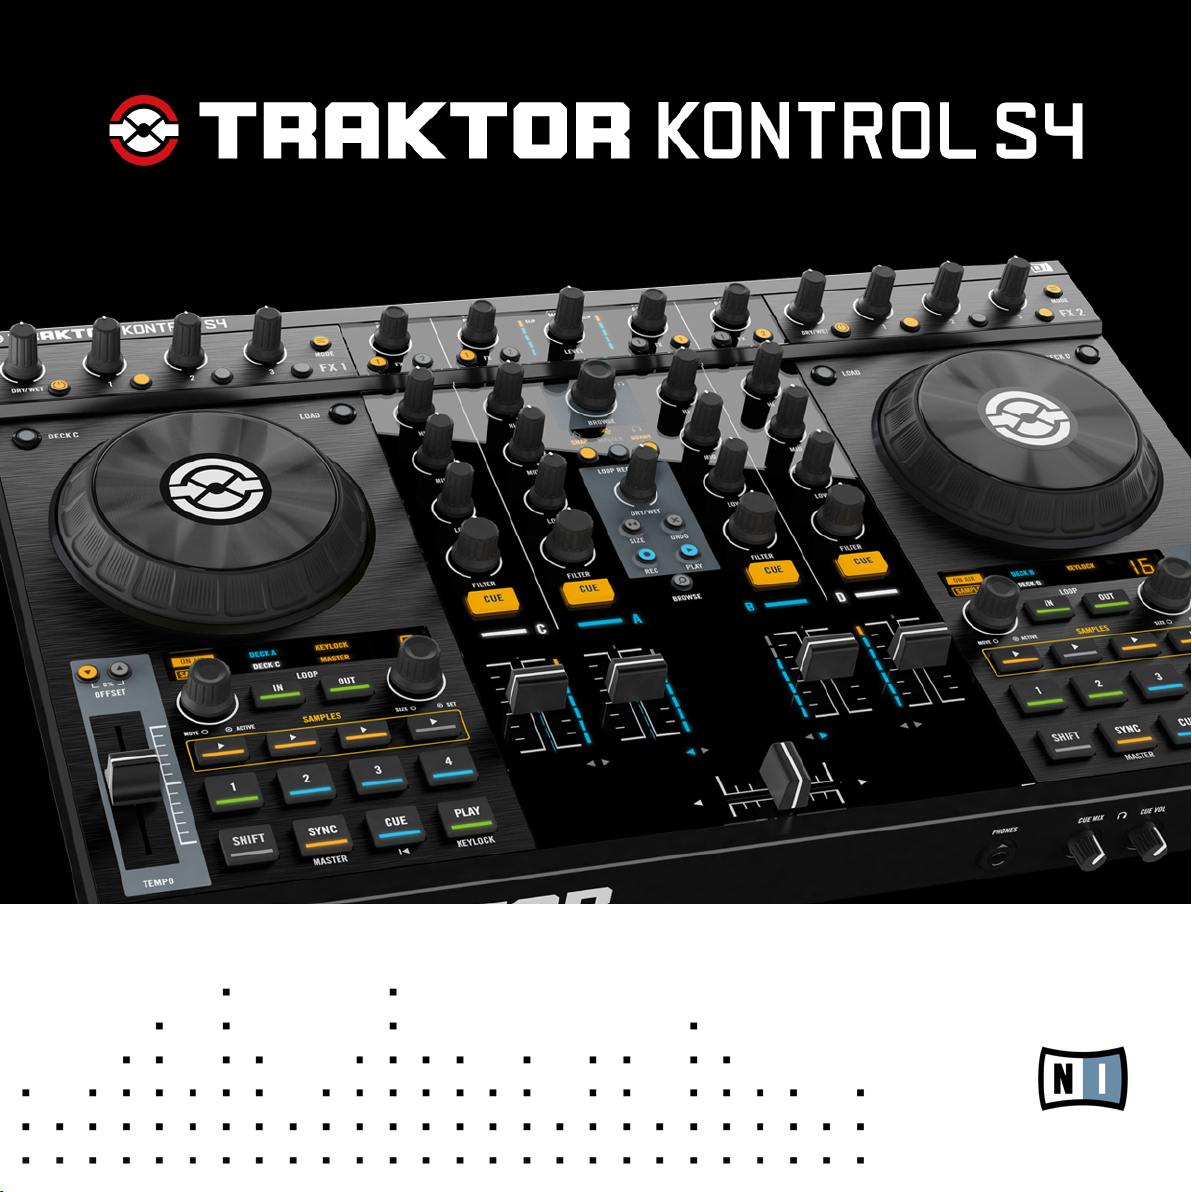
Welcome to the World of TRAKTOR KONTROL S4!
What Is TRAKTOR KONTROL S4?
1 Welcome to the World of TRAKTOR KONTROL S4!
We are delighted that you have chosen TRAKTOR KONTROL S4!
1.1 What Is TRAKTOR KONTROL S4?
TRAKTOR
system created by the makers of TRAKTOR. TRAKTOR KONTROL S4 fuses the full-featured
TRAKTOR KONTROL S4 hardware controller with the state-of-the-art TRAKTOR software.
The all-in-one TRAKTOR KONTROL S4 controller offers you an ergonomic DJ mixer, a built-in
24-bit/96 kHz audio interface, and a high-resolution control surface perfectly tailored for
TRAKTOR. All controls needed for live performances now are at your fingertips!
— The TRAKTOR team at Native Instruments.
1.2 The TRAKTOR KONTROL S4 Documentation
KONTROL S4 is the first fully integrated hardware and software DJ performance
1.2.1 Where To Start
TRAKTOR
meant to be read in the following sequence:
▪ Setup Guide
▪ TRAKTOR KONTROL S4 Manual (this document) and video tutorials
▪ TRAKTOR 2 Getting Started Guide
Additionally, an overview poster and keyboard shortcut overview card will help you in your everyday work with TRAKTOR KONTROL S4. Finally, the Controller Editor Reference Manual
deals specifically with the Controller Editor (see below).
Hereafter is a quick description of each of these documentation sources.
KONTROL S4 provides you with many information sources. The main sources are
TRAKTOR KONTROL S4 - Manual - 11
Page 12
Welcome to the World of TRAKTOR KONTROL S4!
The TRAKTOR KONTROL S4 Documentation
Some of these documents (Setup Guide, Overview Poster and Keyboard Shortcut Overview
Card)
are available in printed form in the product box. The whole documentation is also
available in PDF format and located within the TRAKTOR KONTROL S4 installation folder
on your hard drive. You can also access these documents from the application’s Help
menu.
Your First Stop: the Setup Guide
A printed Setup Guide is included in the product box. It will guide you through the software
and hardware installation of your TRAKTOR KONTROL S4 system, from the very beginning to
the first sound coming through your speakers. This should be your first stop in learning TRAKTOR KONTROL S4.
First read the Setup Guide. Then proceed with this TRAKTOR KONTROL S4 Manual to get
more familiar with TRAKTOR KONTROL S4!
TRAKTOR KONTROL S4 Manual
having read the Setup Guide and followed its instructions, your TRAKTOR KONTROL S4
After
system should be up and running. The next step is to read this TRAKTOR KONTROL S4 Manual. The TRAKTOR KONTROL S4 Manual first gives you a practical approach to TRAKTOR
KONTROL S4. Then, it provides you with a detailed reference of your TRAKTOR KONTROL S4
hardware controller along with extra information (solving common issues, specifications, etc.).
The next section will give you an overview of the manual content.
Video Tutorials
The Native Instruments website provides you with a bunch of video tutorials that give you a
hands-on approach to many sides of the TRAKTOR KONTROL S4 workflow. To see them, point
your favorite browser to following URL:
http://www.native-instruments.com/s4tutorials.
TRAKTOR 2 Getting Started Guide
The Getting Started guide gives you a practical approach to the TRAKTOR software. Here you
will learn about additional features of TRAKTOR that extend beyond the TRAKTOR KONTROL
S4 controller.
TRAKTOR KONTROL S4 - Manual - 12
Page 13

Welcome to the World of TRAKTOR KONTROL S4!
The TRAKTOR KONTROL S4 Documentation
TRAKTOR 2 Manual
in-depth information on all features provided by the TRAKTOR software, please refer to the
For
TRAKTOR 2 Manual. It is available as a PDF file in the Documentation subfolder of the TRAK-
TOR 2 installation folder.
Overview Poster
In the product box, you will also find a double-sided overview poster depicting the top panel of
your TRAKTOR KONTROL S4 hardware controller: on one side, you will find an overview of the
main areas and their functionality; on the other side, you will find a description of every control
element to be found on the Decks, the FX Units, the Loop Recorder and the rear and front panels of your controller. This poster can be used as a quick reference when using your TRAKTOR
KONTROL S4, saving you from opening the manual each time you feel uncertain about a particular control element.
Keyboard Shortcut Overview Card
A keyboard shortcut overview card is included in the product box. It gives you the dedicated
keyboard mappings for the TRAKTOR software.
Controller Editor Reference Manual
Beside of using your TRAKTOR KONTROL S4 hardware controller together with the TRAKTOR
software, you can also use it as a powerful and highly versatile MIDI controller to pilot any other MIDI-capable application or device. This is made possible by the Controller Editor software,
a little application that allows you to precisely define all MIDI assignments for your TRAKTOR
KONTROL S4 controller. The Controller Editor should have been installed during the TRAKTOR
KONTROL S4 installation procedure. For more info on this, please refer to the Controller Editor
Reference Manual available as a PDF file in the Documentation subfolder of the Controller Editor installation folder on your hard disk.
The Jog Wheel Calibration Guide
The jog wheels of the S4 where designed to recalibrate themselves dynamically during the use
of the controller; however, there is one situation in which manual recalibration of the jog
wheels can be necessary. If you accidentally turn the controller upside-down while it is connect-
ed to your computer, the jog wheel sensors might lose track of the position of the jog wheels'
top plates. As a result, the jog wheels may not respond as expected when you turn it back to
TRAKTOR KONTROL S4 - Manual - 13
Page 14

Welcome to the World of TRAKTOR KONTROL S4!
The TRAKTOR KONTROL S4 Documentation
the normal position. If this occurs, the easiest way to resolve this is to switch the unit off and
on again. Alternatively you can recalibrate the jog wheels manually in TRAKTOR. Please refer
to the separate Jog Wheel Calibration Guide in the Documentation subfolder of the TRAKTOR 2
program folder.
1.2.2 In This Manual
you are reading now is the TRAKTOR KONTROL S4 Manual. This manual is structured as
What
follows:
▪ The first part is this introduction.
▪ Chapter ↑2, TRAKTOR KONTROL S4 Overview quickly introduces you to the TRAKTOR
KONTROL S4 user interface and its main areas, both on the hardware side and software
side.
▪ Chapter ↑3, Importing Your Music shows you how to import your own music into the pow-
erful Track Collection of TRAKTOR, so that you can use all TRAKTOR KONTROL S4 features with your own tracks.
▪ Chapter ↑4, Tutorials is a selection of tutorials focused on your controller. They will let
you progressively discover how to use the various tools provided by TRAKTOR KONTROL S4. These practical examples will simplify the learning process and get you quickly
started with computer-based DJing.
▪ Chapter ↑5, Hardware Reference is an extensive reference of all hardware control ele-
ments to be found on your TRAKTOR KONTROL S4 hardware controller. Whenever you
are unsure about the functionality of a particular control element, you will find here all
the necessary information.
▪ Chapter ↑6, Customizing TRAKTOR KONTROL S4 shows you how to customize TRAKTOR
KONTROL S4 in order to make it fit your particular needs.
▪ Chapter ↑7, The S4 Audio Interface and Control Panel describes the on-board audio inter-
face of the TRAKTOR KONTROL S4 hardware controller.
▪ Chapter ↑8, Troubleshooting and Help provides you with a list of most common problems
and their solutions, along with info on how to get help.
▪ Finally, three appendixes provide you with useful additional information:
TRAKTOR KONTROL S4 - Manual - 14
Page 15
Welcome to the World of TRAKTOR KONTROL S4!
The TRAKTOR KONTROL S4 Documentation
◦ Appendix A shows you how to integrate TRAKTOR KONTROL S4 to your studio or live
setup in various configurations.
◦ Appendix B gives you the technical specifications of the TRAKTOR KONTROL S4 con-
troller.
◦ Appendix C provides you with Quick Reference tables for all control elements on your
controller. Should you have any doubt about a particular control element, you will find
here a useful reminder!
1.2.3 Manual Conventions
This section introduces you to the signage and text highlighting used in this manual. This man-
uses particular formatting to point out special facts and to warn you of potential issues.
ual
The icons introducing these notes let you see what kind of information is to be expected:
Whenever this exclamation mark icon appears, you should read the corresponding note
carefully and follow the instructions and hints given there if applicable.
This light bulb icon indicates that a note contains useful extra information. This information may often help you to solve a task more efficiently, but does not necessarily apply to
the setup or operating system you are using; however, it's always worth a look.
Furthermore, the following formatting is used:
▪ Text
appearing in (drop-down) menus (such as Open…, Save as… etc.) and paths to loca-
tions on your hard drive or other storage devices is printed in italics.
▪ Text appearing elsewhere (labels of buttons, controls, text next to checkboxes etc.) is
printed in blue. Whenever you see this formatting applied, you will find the same text appearing somewhere on the screen.
▪ Important names and concepts are printed in bold.
Single instructions are introduced by this play button type arrow.
►
Results of actions are introduced by this smaller arrow.
→
TRAKTOR KONTROL S4 - Manual - 15
Page 16

Pet Names for Software and Hardware
Welcome to the World of TRAKTOR KONTROL S4!
System Requirements
Throughout
the documentation, we will refer to the TRAKTOR KONTROL S4 hardware control-
ler either as “TRAKTOR KONTROL S4” or simply “S4.”
Likewise, the TRAKTOR software will often be referred as “TRAKTOR PRO” or simply “TRAKTOR.”
Hence, a sentence like “TRAKTOR KONTROL S4 is a highly integrated DJ system allowing you
to control TRAKTOR from your S4” shouldn’t sound weird to you.
1.3 System Requirements
the minimum system requirements your computer needs to meet, see the TRAKTOR speci-
For
fications section of the Native Instruments website:
http://www.native-instruments.com/#/en/products/dj/traktor-pro-2/specifications/?page=2050
To check the compatibility with several operating systems, please have a look at: http://
www.native-instruments.com/compatibility
TRAKTOR KONTROL S4 - Manual - 16
Page 17

TRAKTOR KONTROL S4 Overview
2 TRAKTOR KONTROL S4 Overview
This mini-chapter
cepts, both on your TRAKTOR KONTROL S4 hardware controller and in the TRAKTOR software.
Take the time to read these few pages, as they will familiarize you with the way TRAKTOR
KONTROL
with importing music files in TRAKTOR, you can skip ↑3, Importing Your Music and start
right away with the tutorials in chapter ↑4, Tutorials after having read this chapter.
will quickly introduce you to TRAKTOR KONTROL S4’s main areas and con-
S4 works and let you catch sight of the power of its design. If you're familiar
TRAKTOR KONTROL S4 - Manual - 17
Page 18
TRAKTOR KONTROL S4 Overview
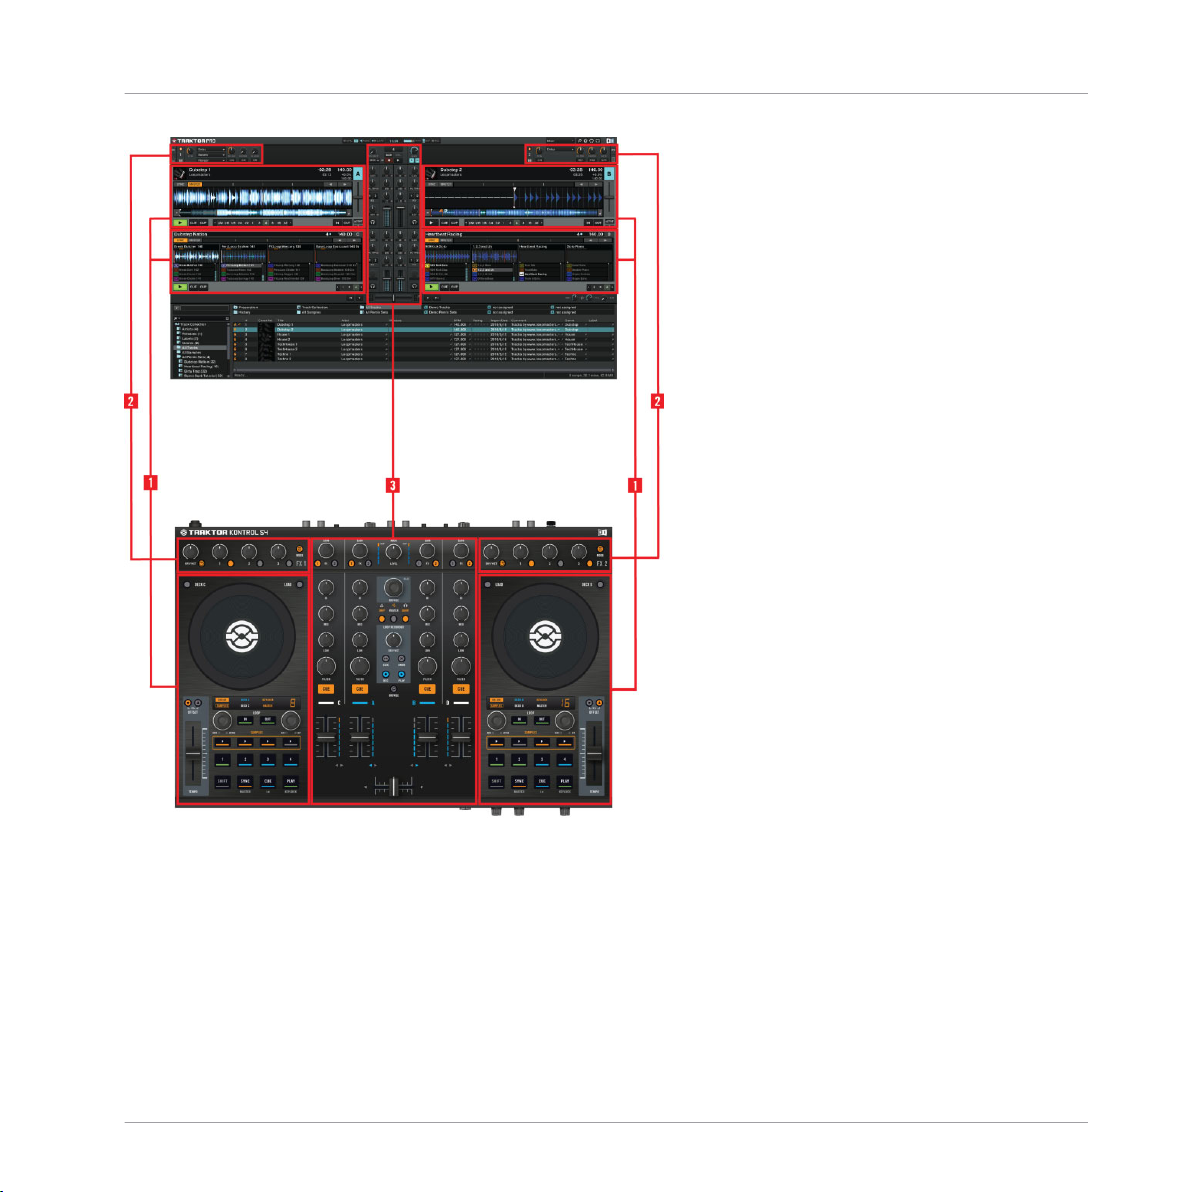
Hardware controller and software side by side
▪ (1) Decks:
TRAKTOR KONTROL S4 provides you with four virtual Decks. The Decks are
the place where tracks, Samples and live input are played back. The Decks can be seen
as the virtual equivalent to the good old vinyl or CD decks—just with a bunch of powerful
additional features and the flexibility of a computer-based system. The two Decks on your
S4 hardware controller allow you to control the four software Decks (labeled A, B, C and
D) available in TRAKTOR: The left Deck on your S4 can control Decks A and C in the software. The right Deck on your S4 can control Decks B and D in the software.
TRAKTOR KONTROL S4 - Manual - 18
Page 19
TRAKTOR KONTROL S4 Overview
▪ (2) FX Units: The signals coming from the Decks can be further processed by two FX Units
located at the top of your hardware and software interface. You can even activate two additional FX Units in the software, allowing you to process each Deck individually. The FX
Units give you access to the whole collection of high-quality FX included in TRAKTOR:
The left FX Unit on your S4 can control the left FX Unit(s) in the software. The right FX Unit
on your S4 can control the right FX Unit(s) in the software.
▪ (3) Mixer: Sitting in the middle of your TRAKTOR KONTROL S4 controller and of TRAK-
TOR’s window, the Mixer receives on its four channels the audio signals coming from the
four Decks described above. There is one channel for each Deck. As any DJ mixer, the
Mixer’s purpose basically is to adjust the relative level of each channel, to control the
channels’ frequency content, possibly feeding them into the FX Units before sending the
overall result to the Main section at its top — and in the end, to generate the mix that is
sent to your audience.
You will find a more detailed presentation at the beginning of chapter ↑5,
ence, followed by a thorough description of each control element to be found on your
TRAKTOR KONTROL S4 controller. For an in-depth explanation of each and every functionality provided by the TRAKTOR software, please refer to the separate TRAKTOR 2 Manual.
It is available as a PDF file in the Documentation subfolder of the TRAKTOR 2 installation
folder.
Hardware Refer-
TRAKTOR KONTROL S4 - Manual - 19
Page 20
Importing Your Music
What Is the Track Collection?
3 Importing Your Music
Most likely
can’t wait for mixing their own tracks, this chapter is for you! You will learn here how to quickly
import your music into the powerful Track Collection of TRAKTOR.
3.1 What Is the Track Collection?
Track Collection (or simply “Collection”) represents the whole music that you have used,
The
that you are using or that you plan to use in TRAKTOR.
Based on the music files on your computer, the Track Collection is just another way to display
them. The Collection makes it easy to organize, tag, and prepare your tracks for being integrated into your mix.
you already have a collection of music files on your computer. For those of you who
If you prefer to start learning how to use TRAKTOR KONTROL S4 right away, skip this
chapter
tracks provided with TRAKTOR KONTROL S4. You can always come back here at a later
point.
and go on with the tutorials in chapter ↑4, Tutorials, which make use of the demo
Worth to note is that the Track Collection doesn’t care about the actual file structure on your
hard disk, nor will it alter this structure in any way (as long as you don’t delete your files from
within TRAKTOR).
The Track Collection is:
▪ A database storing numerous information about your music files.
▪ A convenient way to represent and search your music files, according to many of their
characteristics (tags) like title, artist name, BPM, genre, length, etc.
▪ The place where TRAKTOR-specific information about your tracks is stored.
▪ The basis on which you can create your Playlists.
The Track Collection is not:
▪ Moving, copying nor converting any audio file to some secret location.
▪ Modifying in any way the hierarchic structure of your files on your hard disk.
TRAKTOR KONTROL S4 - Manual - 20
Page 21
Importing Your Music
Importing Music Folders
To make use of the Track Collection, you have to populate it by importing your music files.
3.2 Importing Music Folders
TRAKTOR offers an easy import function for tracks stored on your hard drive:
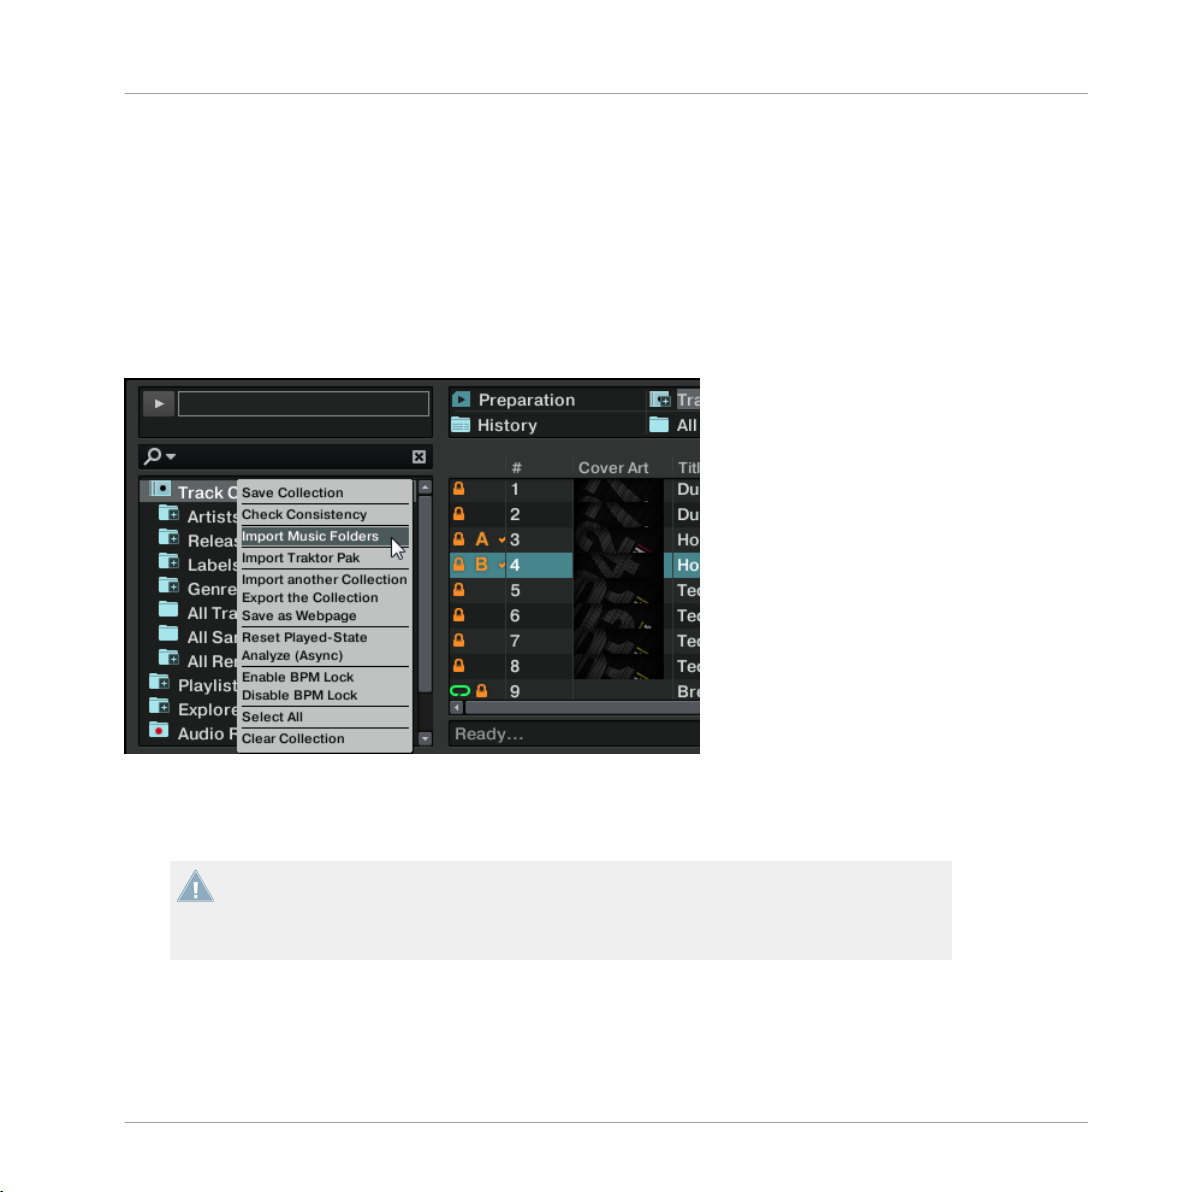
Right-click (Windows) or [Ctrl]+click (Mac OS X) on the Track Collection entry in the
►
Browser Tree and choose Import Music Folders from the menu.
The contextual menu for the Track Collection, with the Import Music Folders entry selected.
default this process imports all music files contained in the My Music folder of your operat-
By
ing system.
TRAKTOR analyzes music for certain characteristics (BPM, etc.) when importing tracks for
first time. This function takes some time to process. Be sure to prepare the tracks you
the
want to use in a DJ set beforehand if you want to use features such as synching or Auto
Looping with them.
If you have stored tracks in other folders or on external storage devices, you can add these
folders to the list of TRAKTOR Music Folders as follows:
Open Preferences > File Management.
1.
TRAKTOR KONTROL S4 - Manual - 21
Page 22
Importing Your Music
Tracks Managed by iTunes
2. Click Add… at the bottom of the Music Folders section.
3. Navigate to a folder you want to add.
4. Confirm with OK.
Repeat to add all of your Music Folders.
Subfolders are automatically included in the scan. Hence, you don’t need to add them to
this list.
3.3 Tracks Managed by iTunes
you have organized your music collection with iTunes, TRAKTOR KONTROL S4 offers direct
If
access to your iTunes Library and your iTunes playlists.
3.3.1 Playing Tracks Managed by iTunes
You
can browse your iTunes Library and playlists directly from your TRAKTOR KONTROL S4.
By the way, this will be the opportunity to introduce you to browsing and loading from your
hardware controller. For this, we will use following control elements:
▪ Any of the jog wheels:
TRAKTOR KONTROL S4 - Manual - 22
Page 23
▪ Any of the LOOP MOVE encoders, located below each jog wheel:
Importing Your Music
Tracks Managed by iTunes
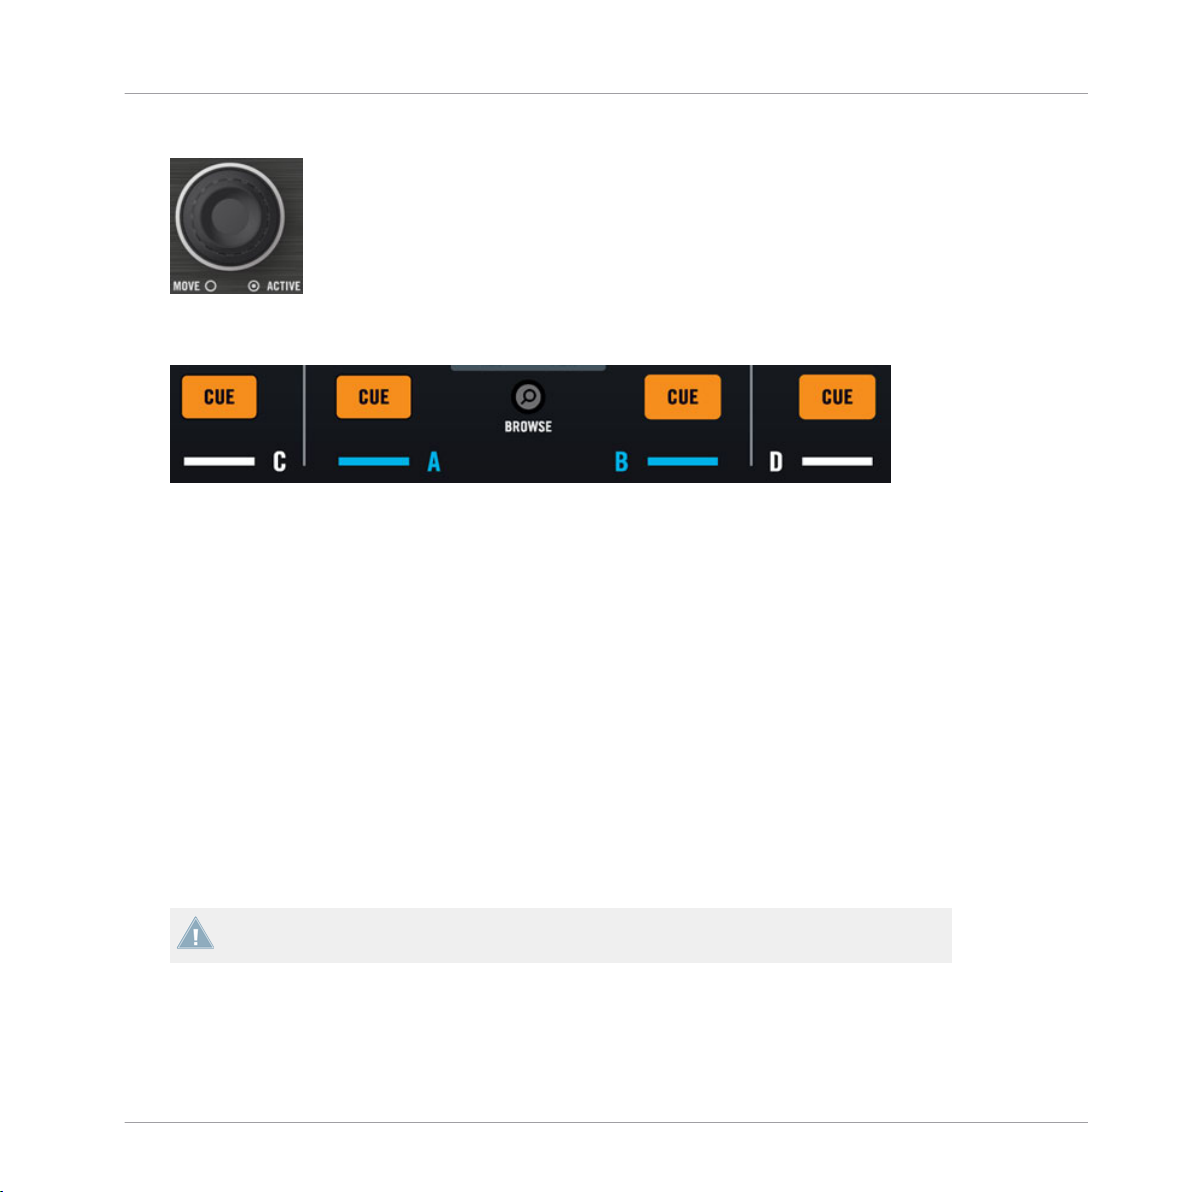
▪ The
CUE buttons, located on each channel of the Mixer, and the BROWSE button in <be-
tween:
Please do the following:
1. Push
the BROWSE button to enter Browse mode. On your computer screen, the Browser
fills up the whole TRAKTOR window.
2. Turn the LOOP MOVE encoders to scroll through the Browser Tree until the iTunes icon
gets selected, then push the encoder to open that node.
3. Browse through the iTunes Library and playlists in the same manner: turn the LOOP
MOVE encoder to scroll within the iTunes node and push the encoder to expand/collapse
the selected node.
4. Once the desired playlist is selected in the Browser Tree, select a track from the list by
spinning the jog wheel.
5. To load the selected track on to the left or right Deck, press the flashing CUE button on
the corresponding channel of the Mixer (A or B).
6. Repeat steps 3-5 to load a track on the other Deck.
7. When you are done, press the BROWSE button again to leave the Browse mode.
The iTunes tree node represents a read-only view on your iTunes Library and playlists. Editing functions are not available in this view.
Software Equivalent
Of course, you can do all this from the TRAKTOR user interface too:
TRAKTOR KONTROL S4 - Manual - 23
Page 24

Importing Your Music
Tracks Managed by iTunes
1. Click the iTunes icon in the Browser Tree to open that node.
2. Browse through the Library and playlists as you would do in iTunes.
3. Load a track into a Deck as you would do from a normal TRAKTOR Playlist—for example
by dragging the track onto that Deck.
3.3.2 Importing a Selection of Tracks from iTunes
can import a selection of tracks from your iTunes Library into the Track Collection via the
You
TRAKTOR user interface:
1. Click the iTunes icon in the Browser Tree to open that node.
2. Select the tracks to import into the Track Collection.
3. Drag the selection onto the Track Collection icon in the Browser Tree.
4. Alternatively right-click (Windows) or [Ctrl]-click (Mac OS X) on the selection and choose
Import to Collection in the contextual menu.
3.3.3 Importing iTunes Playlists
You can directly import iTunes playlists as TRAKTOR Playlists via the TRAKTOR user interface:
Click the iTunes icon in the Browser Tree to open that node.
1.
2. Select the playlist to be imported.
3. Drag the playlist onto the Playlists icon.
4. Alternatively right-click (Windows) or [Ctrl]-click (Mac OS X) on the playlist and choose
Import to Playlists in the contextual menu.
TRAKTOR KONTROL S4 - Manual - 24
Page 25
Playing Your First Track
4 Tutorials
This chapter
work with TRAKTOR KONTROL S4.
The tutorials are workflow-oriented. They start with the simplest tasks and progressively lead
you to more complex operation, helping you to get more and more familiar with your TRAKTOR
KONTROL S4 system. After reading this, you should have the basic know-how allowing you to
mix with TRAKTOR KONTROL S4.
4.1 Playing Your First Track
first tutorial will show you how to load and play a track, how to check the needed audio
This
outputs and how to quickly troubleshoot your system if no music can be heard.
will guide you through the most common tasks that you will encounter during your
The tutorials presented here and in the following chapter make use of the included demo
tracks,
which were copied to your hard disk during the TRAKTOR KONTROL S4 installation
procedure. Thus, you can follow these tutorials even if you haven’t imported your own music yet into the Track Collection. For more info on how to import your music into the Collection, please refer to chapter ↑3, Importing Your Music above.
Tutorials
Prerequisites
We assume here that your TRAKTOR KONTROL S4 system is already up and running. If it’s
not
the case, please follow first the instructions in the separate Setup Guide and come
back here when you’re done!
In case you already changed some settings in TRAKTOR KONTROL S4 before you start with
these
tutorials, we strongly recommend you to reset your TRAKTOR KONTROL S4 system to
the factory settings by doing the following:
1. In the TRAKTOR software, click the Help menu in the menu bar at the top of your screen
(on Mac OS X) or at the top of the window (on Windows), and select Help > Start Setup
Wizard.
2. In the window that opens, just click Finish at the bottom right corner without touching
anything else.
TRAKTOR KONTROL S4 - Manual - 25
Page 26
Playing Your First Track
Your TRAKTOR KONTROL S4 is now reset to the factory settings.
→
The tutorials presented here assume that TRAKTOR KONTROL S4 is in its default factory
If it’s not the case, we cannot guarantee that you will experience what we describe
state.
here, and you might miss important things to know!
4.1.1 Quick Loading a Track
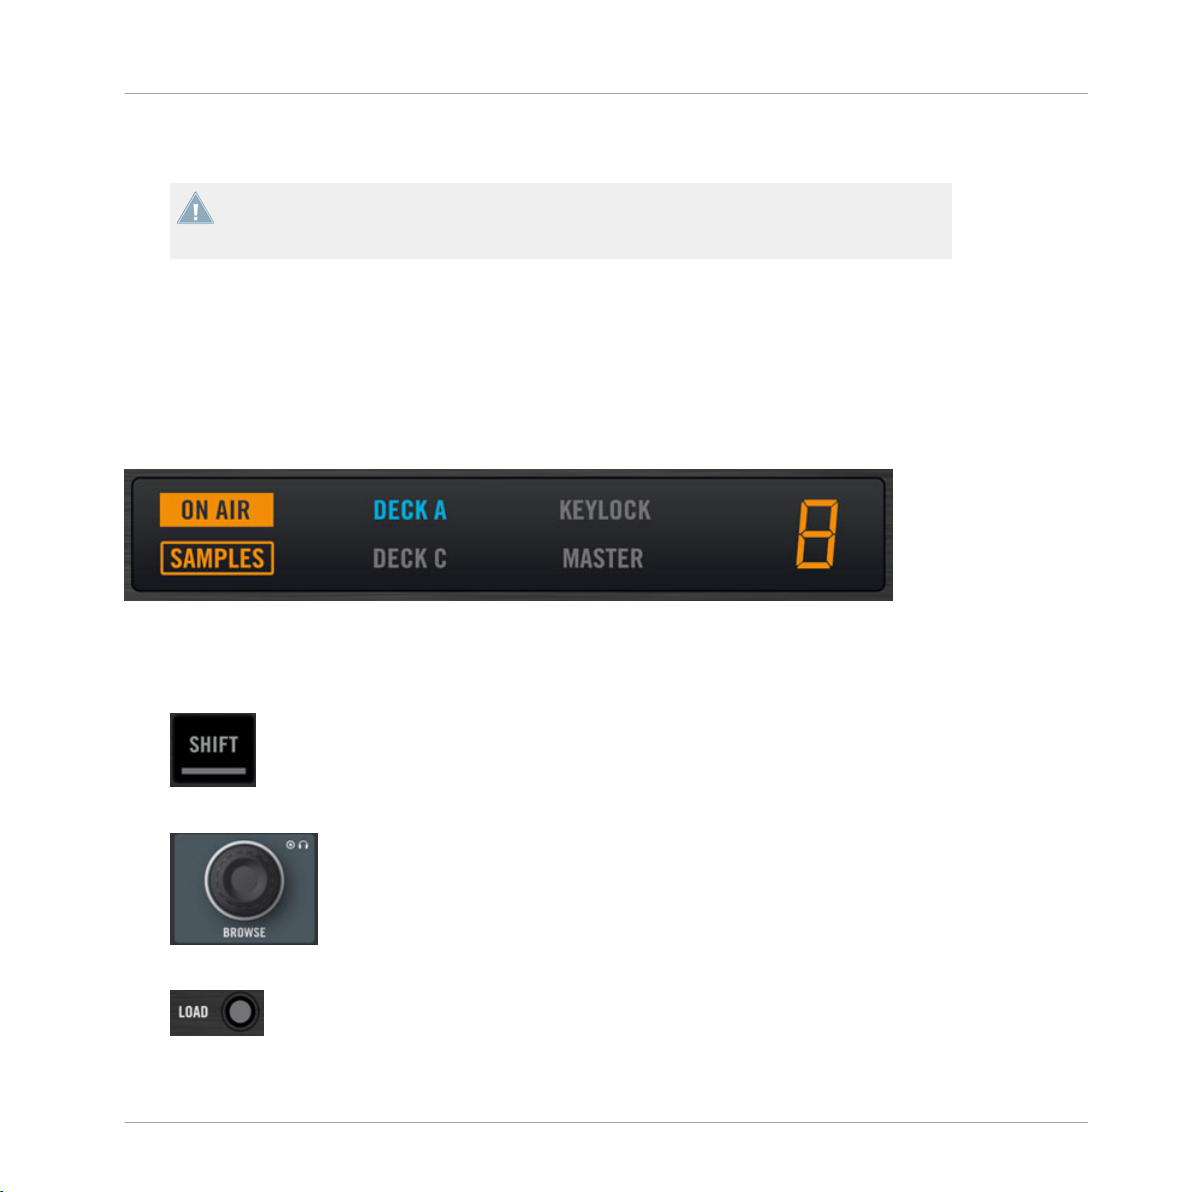
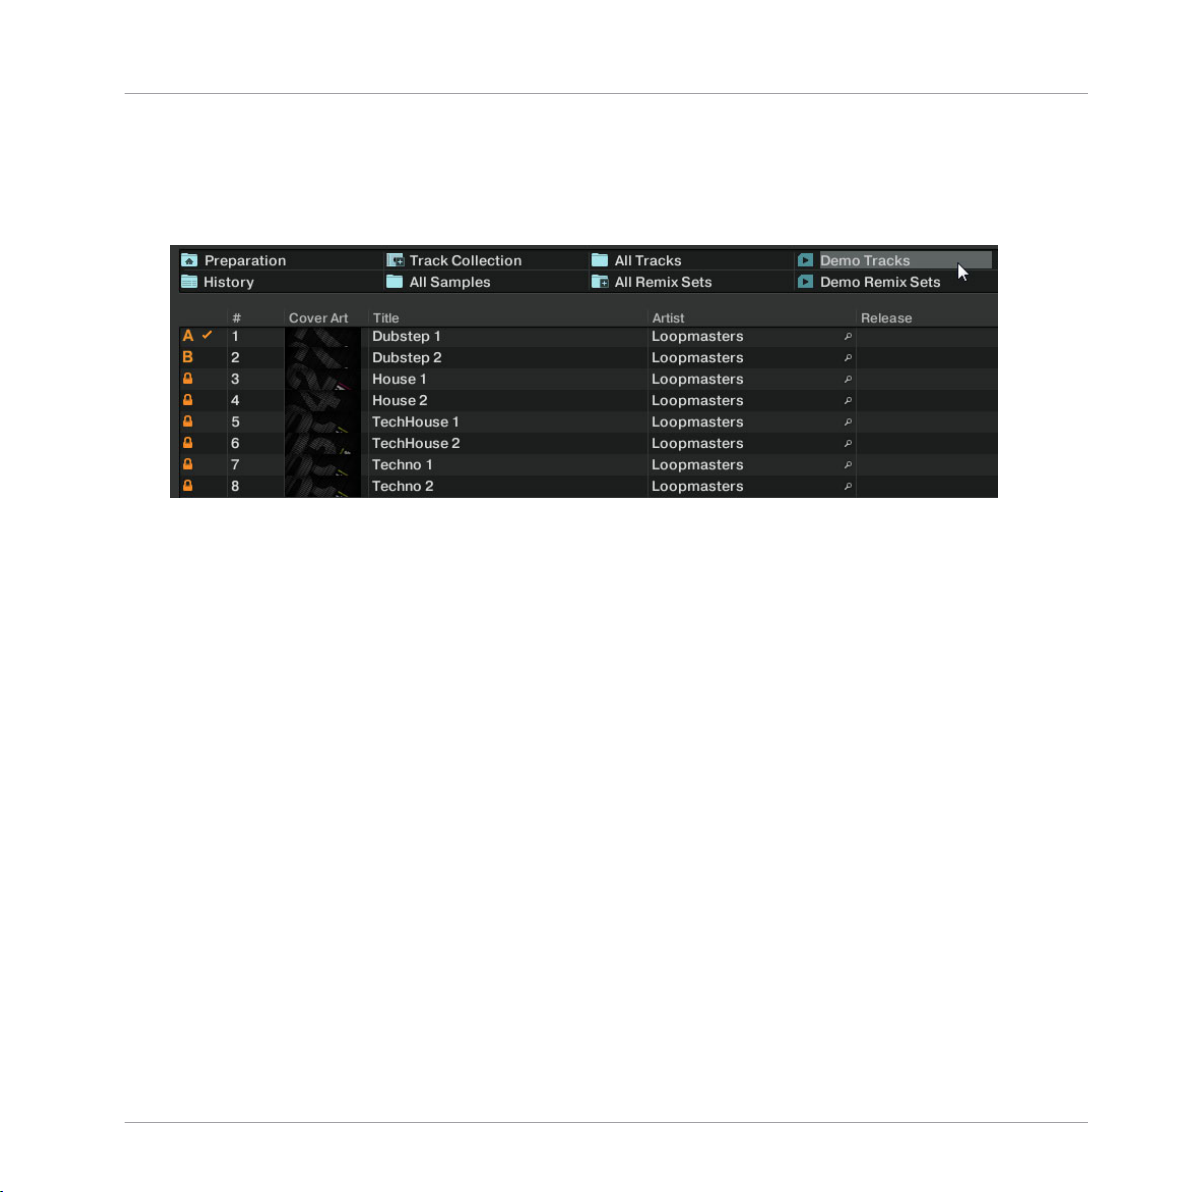
Let’s load the track “Techno 1” from the included demo tracks on to Deck A.
Since
Deck A is sitting in the left part of the TRAKTOR window, we will use the left Deck on
your S4. You can check this by looking at the left Deck’s display: you should see a lit blue
indicator reading “DECK A”:
The Deck Display with a lit DECK A indicator
Tutorials
To select and load the track, we will use three control elements on your S4:
▪ Any of the two SHIFT buttons (one at the bottom of each Deck):
▪ The BROWSE encoder (in the top center of the Mixer):
▪ The left Deck’s LOAD button (above the jog wheel):
TRAKTOR KONTROL S4 - Manual - 26
Page 27
Playing Your First Track
While looking at the TRAKTOR window, do the following:
1. Hold SHIFT and turn the BROWSE encoder to select the Demo Tracks Favorite (Favorites
are customizable shortcuts sitting at the top of the Browser in TRAKTOR’s window).
The tracks of the “Demo Tracks” Playlist appear below:
Release
SHIFT and turn the BROWSE encoder to scroll through the Playlist and navigate
to the track Techno 1.
2. Once the track is highlighted, press the LOAD button on the left Deck to load that track
on to Deck A.
Tutorials
TRAKTOR KONTROL S4 - Manual - 27
Page 28
The track is loaded. In TRAKTOR, its waveform and info appear on Deck A:
→
Tutorials
Playing Your First Track
The LOAD button on the right Deck of your S4 would have loaded the track on to Deck B in
TRAKTOR.
In addition to using the S4 to load a track, you can also drag and drop tracks from the
Browser or from a folder on your computer directly into one of TRAKTOR’s Decks.
4.1.2 Playing the Track
Once the track is loaded, simply press the PLAY button at the bottom of the left Deck:
►
The track starts playing. The PLAY button lights up and the waveform starts moving in
→
TRAKTOR.
TRAKTOR KONTROL S4 - Manual - 28
Page 29
Playing Your First Track
Again, pressing the PLAY button on the right Deck would have started the playback on
Deck B.
To Each Deck Its Own Channel
The
audio playing on each Deck can be further shaped by the controls on the corresponding
channel of the Mixer. Since the track is loaded on Deck A, you can control its sound on channel A (showing a lit blue “A” letter):
Tutorials
The Channel A
this point you will probably hear some audio coming through your speakers or PA. If not,
At
please check the following section.
4.1.3 If You Don’t Hear the Track
the track is playing on the Deck but the audio coming through your amplification system
If
sounds too low, or if there is no sound at all, check the following:
TRAKTOR KONTROL S4 - Manual - 29
Page 30
▪ At the bottom of your S4, verify that the crossfader is moved all the way to the left:
▪ Above, the channel fader should be raised on channel A:
Tutorials
Playing Your First Track
▪ The
channel meter (the vertical bar of LEDs along the channel fader, see picture above)
should show some activity. If not, check that the HI, MID, LOW and FILTER knobs higher
up on that channel are set to center position; at the top of the channel, push the GAIN
encoder once to reset the channel’s input gain to 0 dB.
TRAKTOR KONTROL S4 - Manual - 30
Page 31

Mixing In a Second Track
▪ At the top center of the Mixer, the MAIN LEVEL knob should be turned at least part of the
way to the right. You should see the MAIN LEVEL meters going up and down:
If not, at the top center of the TRAKTOR window, check that the MAIN knob is raised:
If you see some activity on the MAIN LEVEL meters of your S4 but don’t hear any sound, then
double-check
the connection starting with the cable going from the S4’s Main Outputs to your
PA.
Tutorials
4.2 Mixing In a Second Track
that you have learned how to quickly load and play tracks using the TRAKTOR KON-
Now
TROL S4 (see the previous tutorial), let’s see how to mix in a second track. On the way, you
will learn a few basic mixing tasks that every digital DJ needs to know: how to pre-listen tracks,
synchronize tracks, start the playback at the right position, and mix the tracks together using
the crossfader.
Prerequisites
We assume here that you already followed the instructions in the previous tutorial (see ↑4.1,
Playing Your First Track). TRAKTOR KONTROL S4 now is in the following state:
▪ The track “Techno 1” is loaded on Deck A. The track is playing and audible.
TRAKTOR KONTROL S4 - Manual - 31
Page 32

▪ The crossfader is all the way to the left.
4.2.1 Pre-listening a Second Track Directly from the Browser
Before
ten the track in the headphones directly from the Browser.
The PHONES socket and headphones controls on the front panel
we load another track, we will use TRAKTOR KONTROL S4’s Preview Player to pre-lis-
Tutorials
Mixing In a Second Track
1. If
it’s not already done, plug in a pair of headphones to the PHONES socket on the front
panel of your S4.
2. On the right of the PHONES socket, turn the CUE VOL knob fully down and put on your
headphones.
3. Next to the PHONES socket, Turn the CUE MIX knob fully counter-clockwise.
4. On the top panel of your S4, turn the BROWSE encoder to select any track in the Playlist.
5. Now press the BROWSE encoder.
The selected track is loaded into the Preview Player, as indicated by the Preview Play
(headphones) indicator in the top right corner of the Master Display in the middle of your
S4:
6. On the front panel, turn up the CUE VOL knob to a suitable level.
You should hear the track playing in the Preview Player.
7. By
turning the BROWSE encoder, you can seek through the track and pre-listen other
parts of the track.
8. To unload the track from the Preview Player, press the BROWSE encoder again.
TRAKTOR KONTROL S4 - Manual - 32
Page 33

Mixing In a Second Track
You get back to the list browsing. You can select another track for pre-listening or load
→
the desired track on a Deck.
4.2.2 Loading and Playing the Second Track
will choose the track “Techno 2” and load it on Deck B, as we did on Deck A in the previ-
We
ous tutorial:
1. Turn the BROWSE encoder to select the track Techno 2 in the Playlist.
2. Press the LOAD button on the right Deck to load the track on to Deck B.
In the TRAKTOR window, the track info and waveform appear on Deck B.
3. Press the PLAY button on the right Deck to start the playback.
The track starts playing. The PLAY button lights up and the waveform starts moving on
→
TRAKTOR’s Deck.
We don’t hear anything from Deck B through the speakers yet because we have set the crossfader on the S4 all the way to the left—our plan is to slowly mix in the track on Deck B.
can already give it a try: by slowly moving the crossfader to the right, you should hear the
You
track on Deck B fade in, whereas the track on Deck A progressively fades out as you move the
crossfader further to the right. Obviously, our mix is not satisfying at all yet: before mixing in
the second track, we first have to beat-match it to the track playing on Deck A. So for now,
pull the crossfader all the way back to the left.
Tutorials
If you don’t hear any sound coming from Deck B even with the crossfader all the way to the
check the few troubleshooting guidelines in section ↑4.1.3, If You Don’t Hear the
right,
Track above.
4.2.3 Using Headphones to Prepare the Mix
From
now on, let’s get used to preparing our mix with headphones until the next track (here on
Deck B) is ready to be mixed in.
TRAKTOR KONTROL S4 - Manual - 33
Page 34

The CUE button on channel B
On your S4, press the CUE button on the channel B.
►
The button lights up, indicating that Deck B is now sent to the Cue channel, which you
→
will hear in your headphones.
Tutorials
Mixing In a Second Track
At any time, use the CUE
MIX knob nearby to adjust the balance between the cued track (Deck
B) and the main mix (Deck A) in your headphones: turn it counter-clockwise when you want to
concentrate on the cued track; turn it clockwise when you want to hear more of the main mix.
You are now ready to work on the track playing on Deck B without interfering with the main
mix sent to your audience. Regardless of the mix that you’re hearing in your headphones, the
main mix is still controlled by the crossfader and channel faders.
4.2.4 Synchronizing the Second Track
Before
to adjust its tempo to that of Deck A. This is done in just one step via the SYNC button:
The SYNC button on the right Deck
mixing in the track playing on Deck B, we will use TRAKTOR’s automatic Sync feature
TRAKTOR KONTROL S4 - Manual - 34
Page 35

Mixing In a Second Track
Press the SYNC button on the right Deck to synchronize its tempo and phase with those
►
of Deck A.
The SYNC button lights up. Now the two tracks are in perfect sync.
→
By slowly turning the CUE MIX knob on the front panel, you will hear the second track come
into the mix in sync with Deck A.
Tutorials
Note that you should always adjust the tempo of the track that is not
ence!
audible to the audi-
4.2.5 Setting a Cue Point as Starting Point
You
will probably want to have more control over which particular part of the track you mix in.
For example, most of the time, not only the tempos but also the downbeats of both tracks
should match. Using a particular point in a track (for mixing in, triggering, etc.) is called “cueing.”
TRAKTOR KONTROL S4 lets you mark points for cueing—we call them Cue Points. This notably allows you to re-use these points at a later stage, or in a later session.
The four unlit Hotcue buttons
On the right Deck, whether or not the track is playing, simply press one of the unlit Hot-
►
cue buttons on a downbeat—let’s say the Hotcue button 1.
The Hotcue button lights up in blue: you’ve just stored a Cue Point that you can return to
→
simply by pressing the same Hotcue button again.
The first Hotcue button is now lit in blue.
TRAKTOR KONTROL S4 - Manual - 35
Page 36

Mixing In a Second Track
Snapping to the Beats
don’t have to worry about dropping a Hotcue directly on a beat: by default, TRAKTOR will
You
make sure this happens automatically. This is because the so-called Snap mode is on, as you
can see by the lit SNAP indicator on the Master Display, located in the middle of the Mixer:
The SNAP button and indicator on the Master Display
Snap mode on, any point you set in the track will snap to the closest beat, thus ensuring
With
that you get directly to that beat next time that you jump to that point.
Aligning the Tracks
Aligning both tracks is straightforward:
1. Make sure that Deck B is playing (its PLAY button must be lit).
2. When you hear a downbeat in the other track, press the Hotcue button you just used to
store the downbeat position.
The playback position on Deck B jumps to the stored Cue Point (as you can see in the
→
TRAKTOR window), and the playback continues from there. Both tracks now are perfectly
aligned, ready to be mixed.
Tutorials
Sticking to the Beats
Again, you
fault, TRAKTOR will make sure that the beats of both tracks stick together and that the jump
doesn’t ruin the beat matching. This is because the so-called Quantize mode is on, as you can
see by the lit QUANT indicator on the Master Display (see picture above).
With Quantize mode on, whenever you jump through the track (e.g. by pressing a Hotcue button), the playback jumps to the nearest position that preserves the beat matching, thus ensuring that the current sync doesn’t get lost when you jump through the track.
don’t have to worry about pressing the lit Hotcue button exactly on the beat: by de-
TRAKTOR KONTROL S4 - Manual - 36
Page 37

Mixing In a Second Track
4.2.6 Interlude: In Case the Left Track Is Over
The
track “Techno 1” on Deck A has been playing since we started with the tutorials, and it
might happen that the playback reaches the end of the track. In this case, just do the following:
On the left Deck, press SHIFT + CUE to skip back to the beginning of the track.
►
You can then resume from where you left off.
4.2.7 Mixing In the Track by Using the Channel EQ and Filter
Now would be a great time to audition some of TRAKTOR KONTROL S4’s EQs and filters:
Tutorials
The EQ and FILTER knobs on channel B
Turn any of the EQ or FILTER knob on channel B to hear the effect on the cued track.
►
TRAKTOR KONTROL S4 - Manual - 37
Page 38

Mixing In a Second Track
The EQs and filters are excellent tools for making adjustments to tracks before mixing them in
so that you get the smoothest transition possible. The most common technique is to filter the
bassline out of the incoming track—having 2 basslines running rarely sounds good. Do the following:
We will now carry out a first version of the mix “for real”. Thus, turn the CUE MIX knob
fully clockwise to hear the main mix in your headphones (or put off your phones and listen
to your mix coming through your amplification system).
You just did your first mix with TRAKTOR KONTROL S4!
→
4.2.8 Doing Everything by Hand
You can also do your mix manually instead of using TRAKTOR’s sync and cueing facilities.
probably, you won’t do everything by hand in your everyday DJ work. Nevertheless, it is a
Most
good idea to get familiar with the “handcrafted” way:
▪ It can be necessary when synching to a playing vinyl record or to the previous DJ.
▪ You can combine it with TRAKTOR’s advanced features, thus further developing your own
mixing style.
Tutorials
To show this, let’s mix a new track on Deck A with the one we just mixed in on Deck B.
From now on, the track on Deck B is “on air,” i.e. it is heard by your audience. Hence, we
will now exclusively work on the left Deck, which controls Deck A in the software.
First Steps
First check that the crossfader is at full right.
1.
2. With the track on Deck B still playing, load the track “House 1” onto Deck A (reminder:
turn the BROWSE encoder to select the track in the list, then push LOAD on the left
Deck).
At first, it may help to select a track with a similar BPM.
3. Press PLAY on the left Deck to start the playback of the new track.
4.
On the same Deck, make sure the SYNC button is off.
TRAKTOR KONTROL S4 - Manual - 38
Page 39

Mixing In a Second Track
5. On the Mixer, deactivate the CUE button above channel B’s fader and activate that of
channel A to hear the new track in the headphone mix (you might need to adjust the CUE
MIX knob accordingly).
Adjusting the Tempo
The tempo for each Deck can be manually controlled via the TEMPO fader:
Tutorials
Use the TEMPO fader to adjust the Deck’s tempo.
Adjust the TEMPO fader on the left Deck until the track’s BPM either “sounds right,” or
►
directly matches the value of the other track’s BPM, which is displayed at the top of Deck
B in TRAKTOR.
Manually Cueing with the Jog Wheel
You can use the jog wheel to manually seek through the track and find a nice bring-in point:
TRAKTOR KONTROL S4 - Manual - 39
Page 40

Use the jog wheel to manually seek through the track.
Tutorials
Mixing In a Second Track
1. On
the left Deck, press and spin the jog wheel’s top plate to seek through the track. (You
can also fast seek through the track by holding the SHIFT button at the bottom of the
Deck while spinning the jog wheel.)
2. Once you have found an interesting point for cueing (let’s say a downbeat), keep pressing
the top plate and release it when a downbeat arrives in the other track.
Deck A starts playing from that point.
Note that you could also stop the playback (by pressing the PLAY button) before you seek an
interesting point with the jog wheel. Once you have found the point, you can release the jog
wheel—since the Deck is not playing, you won’t lose the point. When a downbeat arrives in the
other track, press PLAY again on the left Deck.
Aligning the Beats
In case you still hear a slight offset between both tracks, you can use the outer rim of the jog
wheel to adjust the track’s phase and cancel the offset:
On the left Deck, move the jog wheel’s outer rim in the desired direction to temporarily
►
bend the tempo and adjust the phase in order to cancel any minor offset.
Your tracks now perfectly match.
→
TRAKTOR KONTROL S4 - Manual - 40
Page 41

Adjusting Levels
Note that this can also be useful when using TRAKTOR’s Sync feature. Indeed, in some
situations,
tracks with unusual low frequency content, the beat “feeling” might occur slightly after the
beat as detected by TRAKTOR. If you couldn’t make it to manually correct the Beatgrid of
your track before you go on stage, you can cancel the offset on the fly with the jog wheel’s
outer rim.
the automatic beat detection might need a slight correction: for example, in
Mixing In the New Track
When you’re ready, you can bring the crossfader over from Deck B and slowly mix in the
►
track in Deck A.
You just did your first handmade mix with TRAKTOR KONTROL S4!
→
Don’t expect to be capable of manually matching beats right away, though—this requires intensive training and can’t be fully explained here in detail. Practice makes perfect!
4.3 Adjusting Levels
Before going
at the right level. We provide you here with a few simple hints in order to get the best sound
out of your mix.
any further, we would like you to be aware of how important it is to have your mix
Tutorials
Even if this section might look a bit technical, please take the time to read these few pages, as they can save you a lot of trouble, especially in a live situation!
4.3.1 The Theory
By
mixing, you blend together signals coming from different sources (and possibly process
them on the way).
The basic rule is: you need to ensure that no signal is clipping, while simultaneously trying to
use the full dynamic range available. Just to keep it short, there are two reasons behind this:
▪ By using the full dynamic range available, you keep the noise level low relative to your
mix. As a result, all the details of your music are better rendered.
TRAKTOR KONTROL S4 - Manual - 41
Page 42

Adjusting Levels
▪ When a signal is clipping, it is not getting louder, just worse. The loud parts (typically the
beats) are cut, which both reduces the dynamic range and introduces distortion in your
mix. The speakers will suffer from this—and so will your audience! (Be also prepared for
some angered sound technician or club owner coming down on you.)
Hence, you should always make sure that your signals stay at levels that satisfy these two requirements.
4.3.2 The Practice
assist you in adjusting levels, the Mixer of your S4 is equipped with various level meters
To
and controls. Each level meter consists of a bar of blue LEDs indicating the signal level, along
with an orange LED at the top indicating the clipping.
Tutorials
A channel meter
The rule mentioned above can thus be translated as follows:
Best practices when adjusting levels: Ensure that the displayed levels go high enough in
►
the blue areas but don’t reach the orange LEDs, or only rarely.
Letting your levels go “in the red” (or orange in this case) and using signal clipping to let
mix sound dirtier is definitely not recommended: to do this, make use of the great FX
your
selection of TRAKTOR KONTROL S4 instead!
Checking the Level on Each Channel
channel on the Mixer provides you with a vertical channel meter next to the fader. This
Each
meter shows you the pre-fader level of the signal on that channel, i.e. the level of the signal
before it is adjusted by the channel fader. To adjust this level, use the GAIN encoder at the
very top of the channel:
TRAKTOR KONTROL S4 - Manual - 42
Page 43

Adjusting Levels
A GAIN encoder sits at the top of each channel
Adjust the channel’s GAIN encoder so that the level displayed on the channel meter stays
►
in the upper part of the blue area without reaching the orange clipping LED.
Note that the channel’s EQ and filter settings also affect the signal level, as well as the possi-
FX Unit(s) it is assigned to. Hence, when modifying any of these, you might need to re-
ble
adjust the GAIN encoder accordingly.
Of course, the artistic side of your tracks should not be overlooked: for tracks with a variable
average level over time (e.g. a track starting with a soft intro), you should consider the
loudest parts of the track when adjusting the channel level.
Matching Levels Between Channels
Moreover, in order to avoid any level jump when crossfading between two channels, the average channel levels should match:
Tutorials
Before mixing in a cued channel, adjust its GAIN encoder so that its channel meter activ-
►
ity roughly matches that of the channel currently on air.
TRAKTOR already does this for you by automatically setting the level for each newly loaded
track
to a satisfying value. This so-called “Autogain” feature relies on the gain values extracted from your tracks. Nevertheless, depending on the particular EQ, filter and FX applied to the cued track, you might have to double-check the level consistency before you
mix in the track. Moreover, what is important here is the average level of the specific part
of the track that you’re about to mix in.
Checking the Main Level
The signals coming from all channels are mixed together according to the relative levels set by
the channel faders and by the crossfader. This mix is then sent from TRAKTOR’s main output
to the Main section:
TRAKTOR KONTROL S4 - Manual - 43
Page 44

Adjusting Levels
The Main section on your S4
In
this section, the MAIN LEVEL meters show you the (left and right) overall level of your mix
before it is adjusted by the MAIN LEVEL knob. These meters actually mirror the MAIN meter in
the Header of TRAKTOR. To adjust this level, use the MAIN knob right below in TRAKTOR’s
Master panel:
The MAIN meter and knob in TRAKTOR
Adjust the MAIN knob in TRAKTOR’s Master panel so that the values on your S4’s MAIN
►
LEVEL meters stay in the upper part of the blue areas without reaching the orange clipping LEDs.
Tutorials
By default, a limiter is enabled on TRAKTOR’s main output. With this limiter enabled, the
MAIN
LEVEL meters’ clipping LEDs don’t indicate clipping anymore, but instead they indicate when the limiter kicks in. While the limiter virtually cancels any distortion that might
occur, the resulting contraction of the dynamic range, though, cannot be undone. Therefore, even with the limiter enabled, ensure that the clipping LEDs don’t light up too often!
When the orange clipping LEDs light up, turning down the MAIN LEVEL knob on your S4 is of
use: indeed, changing the level of the already distorted or shrinked signal coming from
no
TRAKTOR won’t repair it!
Should the level stay low on the MAIN LEVEL meters, check also the channel faders—they
are probably set too low as well!
TRAKTOR KONTROL S4 - Manual - 44
Page 45
Looping and Cueing
4.4 Looping and Cueing
Now that you have learned the basic mixing tasks, we will focus on one of TRAKTOR KONTROL S4’s great features: its looping facilities.
Prerequisites
As always, we assume here that you already followed the instructions in the previous tutorials.
TRAKTOR KONTROL S4 now is in the following state:
▪ The track “House 1” is loaded on Deck A. The track is playing and audible.
▪ The crossfader is all the way to the left.
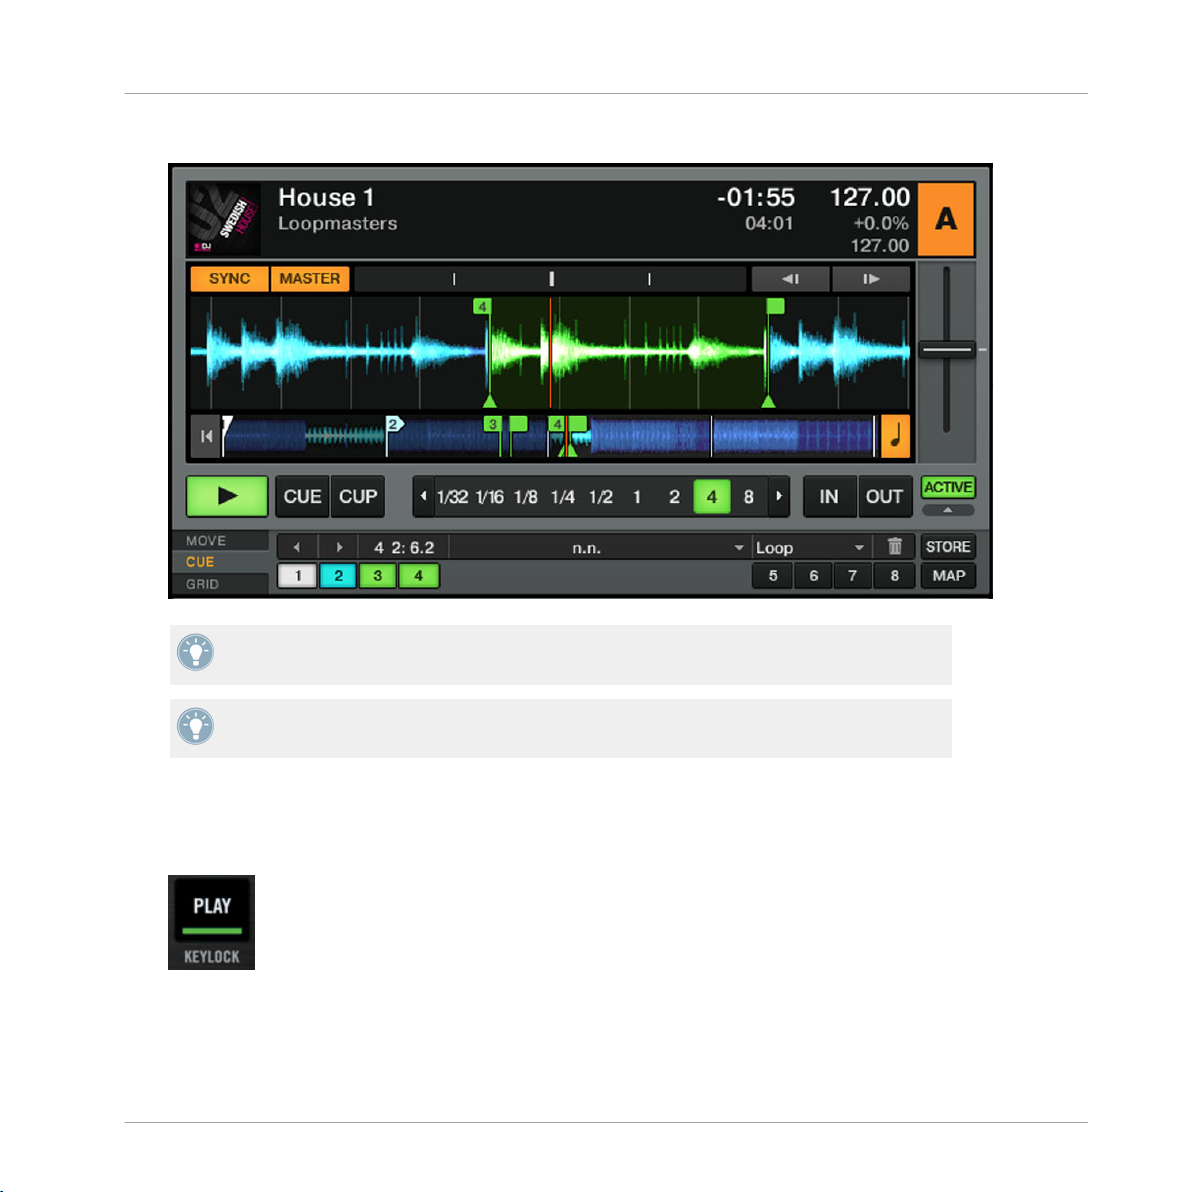
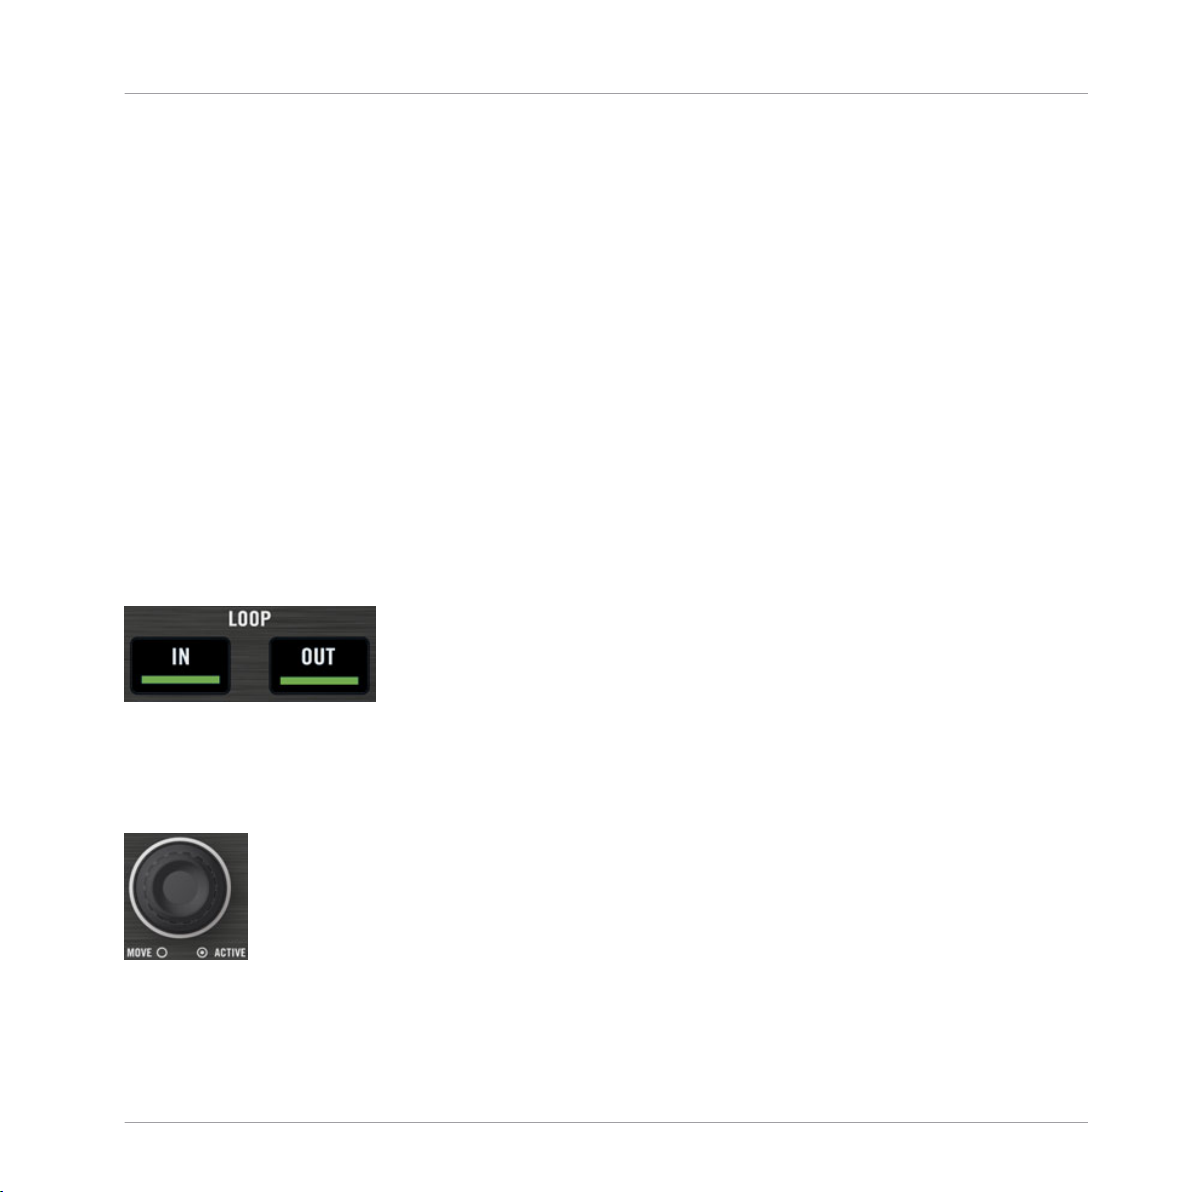
4.4.1 Playing with Loops
your S4, each Deck is equipped with dedicated loop controls, located in the Loop section,
On
right under the Deck Display:
Tutorials
The Loop section, from left to right: LOOP MOVE encoder, LOOP IN and LOOP OUT buttons, and LOOP SIZE encoder.
Setting a Loop with a Predefined Size
Let’s add a Loop to the track on Deck A.
The LOOP SIZE encoder
To engage a loop on a playing track, just push down the LOOP SIZE encoder.
►
TRAKTOR KONTROL S4 - Manual - 45
Page 46

Looping and Cueing
This will automatically add a loop at that position in the track.
→
The loop size will correspond to the number on the Deck Display just above the LOOP SIZE
encoder:
The Loop Size Display
To change the size of the Loop, just turn the same LOOP SIZE encoder until the display
►
reads the number of beats you’d like the Loop to be.
Note that you can adjust the loop size either before or after you’ve set the Loop! When doing it beforehand, it will affect the next Loops you set.
Setting a Loop Manually
can also manually set loop start and loop end points. To do this, use the LOOP IN and
You
LOOP OUT buttons in the Loop section:
Tutorials
The LOOP IN and LOOP OUT buttons
Press the LOOP IN button to set the Loop In Point.
1.
2. Press the LOOP OUT button to set the Loop Out Point.
As soon as you hit the LOOP OUT button, a Loop is set and the track will start looping.
We already introduced the Snap mode in the previous tutorial (see ↑4.2.5, Setting a Cue Point
as Starting Point). This mode also affects the Loop In and Loop Out Points, so that they will
automatically be positioned directly on the beat.
Of course, you can also change the size of manually set Loops via the LOOP SIZE encoder
as described above.
TRAKTOR KONTROL S4 - Manual - 46
Page 47

Looping and Cueing
When setting a Loop manually, the Loop Size Display (above the LOOP SIZE encoder)
might not always match the actual loop size.
Moving a Loop
You
can also quickly move the active Loop across your track by using the LOOP MOVE encod-
er, at the left of the Loop section:
The LOOP MOVE encoder
To move the Loop, turn the LOOP MOVE encoder.
►
The size of the move also corresponds to the loop size that is currently set, as displayed above
the LOOP SIZE encoder.
Turning the LOOP MOVE encoder when there is no Loop currently active lets you jump
backward/forward
tion for more info.
through the track by the same loop size. See section ↑5.3.8, Loop Sec-
Tutorials
Storing a Loop
In the previous tutorial, we looked at how to store Cue Points. This is as simple as pressing an
unlit Hotcue button.
An unlit Hotcue button
Storing Loops works similar:
To store the active Loop, press an unlit Hotcue button.
►
TRAKTOR KONTROL S4 - Manual - 47
Page 48

The Hotcue button lights up, this time in green: you’ve just stored a Loop that you can
→
return to simply by pressing the same Hotcue button again.
The same Hotcue button lit in green
Deactivating Looping
If you want to deactivate the current Loop, do the following:
To deactivate looping, push either of the LOOP MOVE or LOOP SIZE encoder.
►
The playback continues after the Loop.
→
By pushing the LOOP MOVE encoder when there is no Loop currently active, you activate
looping: the next Loop in the track will be activated.
Tutorials
Looping and Cueing
4.4.2 Using Hotcues
this tutorial and in the previous one, we already used Hotcues to store Cue Points and
In
Loops. We want to show you here a few more details on their use.
Hotcue buttons with various assignments
already explained, when pressing an unlit Hotcue button, if there is no Loop active you
As
store a Cue Point at the current playback position (the Hotcue button turns blue), and if there
is a Loop active you store this Loop (the Hotcue button turns green).
On the waveform of the software Deck, you can see that a line with the same color appears in
the track at the corresponding position. Moreover, a little number at the top reminds you which
button you should use to jump to that Cue Point or Loop:
TRAKTOR KONTROL S4 - Manual - 48
Page 49

Looping and Cueing
A waveform with a Cue Point stored as Hotcue 2 and a Loop stored as Hotcue 3.
If
you make a mistake, or just decide you no longer want a particular Hotcue, you can quickly
clear it:
To clear a Hotcue, hold down the SHIFT button and press the corresponding Hotcue but-
►
ton.
You can see that the button is no longer lit.
→
Creative Uses of Hotcues
Hotcues aren’t just bookmarks to particular sections of a track—they can also be used for creative techniques such as remixing parts of a song, beat juggling effects, etc.
As an example, we will show you here how you can quickly make use of a Loop stored in a
Hotcue slot to introduce the track you’re about to mix in. By the way, this will allow us to sum
up what we’ve learned until now.
Tutorials
Provided that you carefully followed the instructions in the previous tutorials, the track “Techno 2” is still loaded on Deck B. Let’s say that the track on Deck A is on air (crossfader at full
left) and you want to prepare the track on Deck B for mixing in:
1. Start the playback of the next track and send it to your headphones by activating the CUE
button on the corresponding channel.
2. Find an interesting Loop near the beginning of the track by using the controls in the Loop
section of the right Deck.
3. Once you have a nice Loop running, store it by pressing an unlit Hotcue button and leave
it playing.
4. Now start to bring this Loop in your mix, for example by implementing the lowcut we explained in the previous tutorial (see ↑4.2.7, Mixing In the Track by Using the Channel EQ
and Filter).
TRAKTOR KONTROL S4 - Manual - 49
Page 50

Using Samples in Your Mix
5. When you’re about to fade out the previous track completely, release the Loop on the new
track, and you’re done.
4.5 Using Samples in Your Mix
Remix Decks are a great way to add Samples to your set, or capture Samples from Track
The
Decks for on-the-fly remixing.
Tutorials
The Remix Deck C with a Sample loaded in the upper Sample Cell of the first Sample Slot.
can also use the Remix Decks to build new tracks on the fly, layering One-shot Samples
You
and Loops on top of each other. Now let’s find out how to control the Remix Decks with your
S4.
In case you were using Sample Decks in an earlier TRAKTOR version, don't panic! All former Sample Slot functionality stays preserved.
Prerequisites
always, we assume here that you already followed the instructions in the previous tutorials.
As
TRAKTOR KONTROL S4 now is in the following state:
TRAKTOR KONTROL S4 - Manual - 50
Page 51

Using Samples in Your Mix
▪ The track “Techno 2” is loaded on Deck B. The track is playing and audible. By the way,
from now on we will use “Track Deck” to describe Decks that play tracks, so that we can
easily distinguish Track Decks from Remix Decks. In TRAKTOR, you can see that the two
upper Decks (A and B) are Track Decks, whereas the two lower Decks (C and D) are Remix
Decks.
▪ The Deck A is stopped (if it’s not the case, press the PLAY button on the left Deck).
▪ The crossfader is all the way to the right.
4.5.1 Loading a Sample from the Collection
can load Samples directly from your Track Collection. This will give us the opportunity to
You
try the Browse mode on your S4 controller: this mode allows you to browse your whole computer for tracks and Samples.
The BROWSE button
Push the BROWSE button in the middle of the S4 to enter Browse mode.
1.
The BROWSE button lights up. You can see all available targets flashing on your S4 —
among them, the four Sample Play buttons on each Deck.
Tutorials
2. Turn
the LOOP MOVE encoder to select the Track Collection folder from the Browser Tree.
Press the LOOP MOVE encoder button to expand the folder node.
3. Turn
the LOOP MOVE encoder to select the All Remix Sets folder from the Browser Tree.
Press the LOOP MOVE encoder button to expand the folder node.
4. Turn the LOOP MOVE encoder to select the Dirty Trap folder from the Browser Tree.
TRAKTOR KONTROL S4 - Manual - 51
Page 52
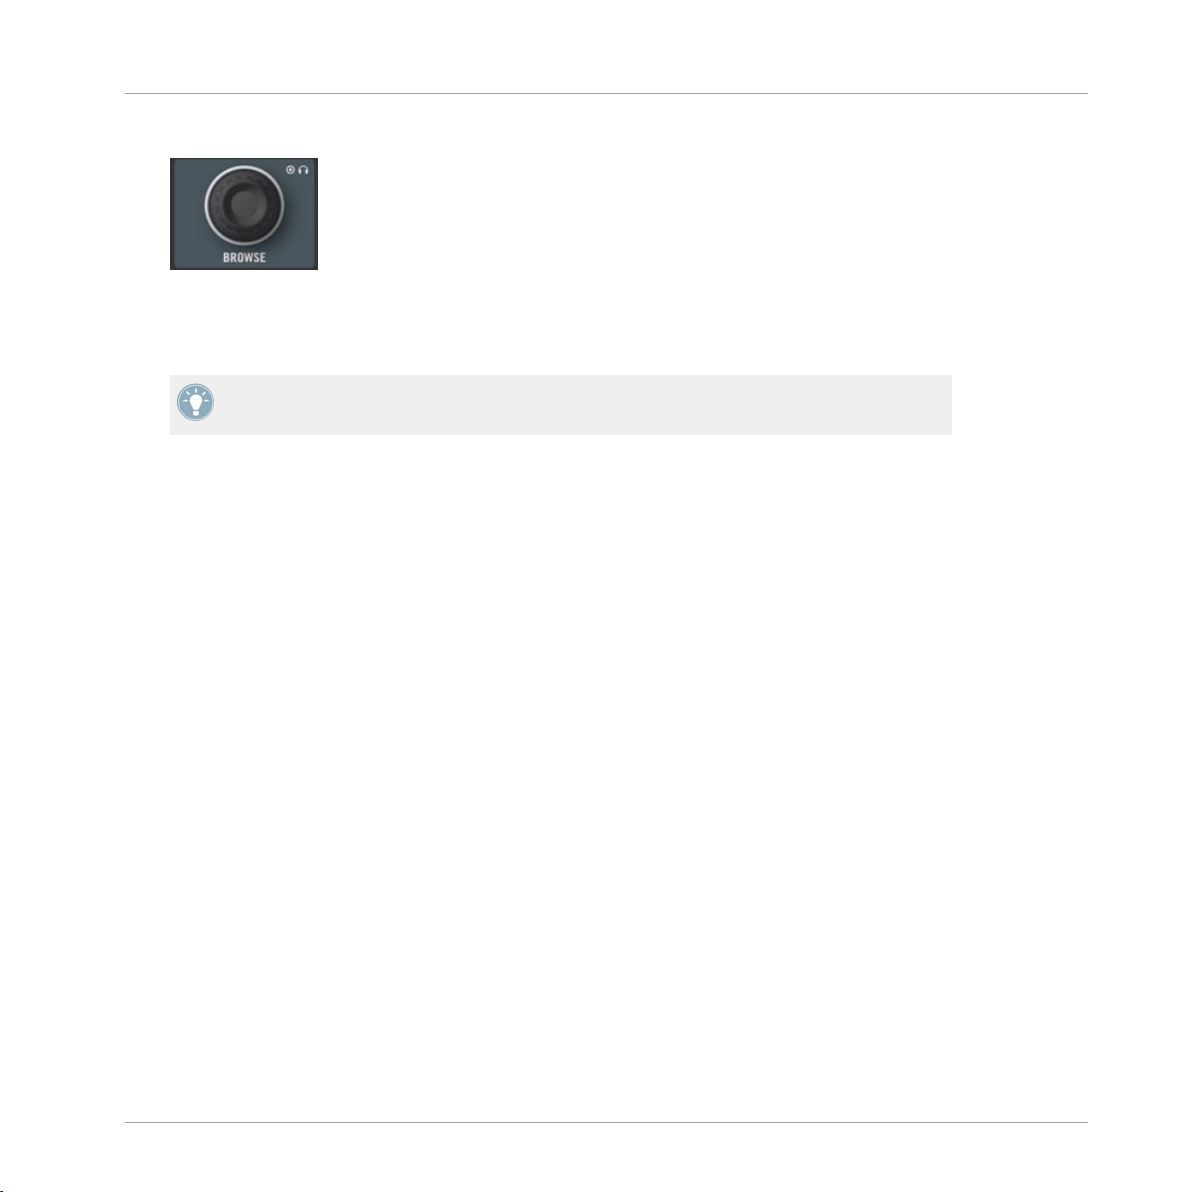
5. Turn the BROWSE encoder to highlight the Sample “C3 Bells #1” in the Playlist.
Tutorials
Using Samples in Your Mix
6. On
the left Deck, press one of the flashing Sample Play buttons (let’s say the first one) to
load the Sample into that particular Sample Slot.
7. Push the BROWSE button again to leave Browse mode.
You can do this in the software too: simply drag and drop the Sample from the list onto a
Sample Cell of a Sample Slot.
The Sample is now loaded and ready to play:
▪ In
TRAKTOR, the Remix Deck C now holds the Sample in the upper Sample Cell of the
first Sample Slot.
▪ On your S4, the corresponding Sample Play button is now dimmed, indicating that the
Sample Slot holds a Sample which is not audible (yet).
4.5.2 Triggering the Sample
Triggering the Sample is as simple as pressing the dimmed Sample Play button:
Press the dimmed Sample Play button to trigger the Sample.
1.
2. Press the button again to mute the relevant Sample Slot. Press once more to unmute it.
3. Press SHIFT + the Sample Play button to stop the Sample and skip back to start the next
time it is activated.
The Sample is looped. This is because the Sample is in Loop mode, which is indicated by the
loop symbol on the left side of the Sample Cell:
TRAKTOR KONTROL S4 - Manual - 52
Page 53

Using Samples in Your Mix
The Sample "C3 Bells #1" in Loop mode.
To
change the Play Type of the Sample to One-shot mode, the Advanced Panel of the Remix
Deck needs to be opened. Double-click repeatedly on the upper border of the Deck to cycle
through the Deck Layouts until the Advanced Panel becomes visible.
Tutorials
The Remix Deck C with the Advanced Panel on bottom. On the lower right you can see the cursor pointing on the Play Type
button, which switches the Sample Cell from One-shot to Loop mode and vice versa.
Click on the Play Type button in the lower right of the Advanced Panel (see screenshot
►
above) to switch the Sample to One-shot mode if you wish.
In One-shot mode, pressing the relevant Sample Play button when a Sample is playing results
in the Sample Slot being stopped.
Pressing SHIFT + Sample Play button once more after stopping Sample playback will clear
the Sample Slot from the Sample.
TRAKTOR KONTROL S4 - Manual - 53
Page 54

Using Samples in Your Mix
In case you don’t hear the playing (unmuted) Sample, check that channel C’s fader is
raised in the TRAKTOR software.
4.5.3 Capturing a Sample From a Track Deck
We
have seen how you can load Samples directly into one of the Remix Decks using TRAK-
TOR’s Browser, but here’s an even cooler performance feature:
1. Check that the track “Techno 2” is still playing on the right Deck (Deck B in TRAKTOR).
If not, start its playback by pressing PLAY. If the playback has reached the end of the
track, press SHIFT + CUE to skip back to start.
2. Set a Loop on this track using the controls in the Loop section.
3. On the same Deck, press an unlit Sample Play button — let’s say the Sample Play button
1.
This automatically captures the current Loop playing on Track Deck B, and copies it into
→
the upper Sample Cell of the first Sample Slot on Remix Deck D:
Tutorials
TRAKTOR KONTROL S4 - Manual - 54
Page 55

Tutorials
Using Samples in Your Mix
We just exported the active Loop from Deck B to the upper Sample Cell of Deck D's first Sample Slot.
loop is now ready to play in Remix Deck D. Furthermore, provided that Snap mode and
The
SYNC are active, the loop is in perfect sync with the Track Deck B above.
The Sample Play buttons offer you the same playback controls as described earlier (press to
unmute/mute the Sample, SHIFT+ press to stop it and skip to start next time it's activated,
SHIFT + press again to unload).
As previously described, you can switch the Sample Play Type between Loop and One-shot
mode (see ↑4.5.2, Triggering the Sample).
Now you can load a different track onto Deck B, but you will still have the Sample loop from
the
original song stored on the Remix Deck D to be retriggered at any time. It’s great for cap-
turing loops on the fly and using them to build an alternate mix.
TRAKTOR KONTROL S4 - Manual - 55
Page 56

Using Samples in Your Mix
If the Deck that you captured from wasn’t playing a Loop when you pressed the Sample
Play
button, it will still capture audio from the source Deck, but will instead take it from
the current playback position. The loop will automatically be cut to the length of the current Loop size (as displayed in TRAKTOR).
Capture a few Samples from various places in the track on Deck B and play around to get
►
used to the basic playback controls that we described above (triggering, muting etc.).
4.5.4 Unloading a Sample
at any time you’d like to clear the contents in one of the Sample Cells, hold the SHIFT but-
If
ton and press the corresponding Sample Play button to stop the Sample, then repeat the same
action to clear the Sample Cell. The Sample Play button turns back off.
4.5.5 Getting More Controls Over the Samples
you have a Sample loaded in one of the Remix Decks, you have many more controls over
Once
the Sample at your disposal. To access them, we need to switch the focus of the right Deck on
your S4 to the lower Remix Deck D in TRAKTOR:
Tutorials
Press the DECK D button to switch the right Deck focus to Deck D.
►
The button lights up. All other elements on the right Deck now control the Sample Slots
→
on Deck D in TRAKTOR.
We won’t describe all of the functions here (refer to ↑5.3,
The Decks and the TRAKTOR 2
Manual also), but at least show you some of the available functions:
▪ The jog wheel allows tempo bending (outer rim) and scratching (top plate) of the Remix
Deck including all Sample Slots.
▪ The Hotcue button under each Sample Play button will also function as a Play and Cap-
ture button. As a shortcut, if the Sample is already playing, the Hotcue button will retrigger the Sample.
▪ For any playing Sample, the Hotcue button’s brightness follows the Sample’s rhythm.
TRAKTOR KONTROL S4 - Manual - 56
Page 57
▪ It is also possible, to skip through a Sample Slot's Sample Cells by pressing SHIFT + a
Hotcue button; however, this is dependent on whether the Hotcue buttons are set to Remix or Legacy mode in TRAKTOR's preferences. See ↑6.3, S4 Control Options for further
information.
For a more in-depth description of the Remix Deck and its capabilities, please refer to the
TRAKTOR 2 Manual.
4.6 Adding FX
that we have seen the basics of playing tracks and Samples on the Decks and mixing
Now
them together, let’s see how to add effects—or “FX” in the TRAKTOR terminology.
TRAKTOR has an extremely powerful effect section. By default, there are two different FX
Units in TRAKTOR, which can be assigned to any of the Decks. These FX Units are directly
mirrored on your S4 above each Deck:
Tutorials
Adding FX
An FX Unit in TRAKTOR
An FX Unit on the S4
TRAKTOR KONTROL S4 - Manual - 57
Page 58

Prerequisites
always, we assume here that you already followed the instructions in the previous tutorials.
As
TRAKTOR KONTROL S4 now is in the following state:
▪ The track “Techno 2” is loaded on Deck B. The track is playing and audible.
▪ The Deck A is stopped (if it’s not the case, press the PLAY button on the left Deck).
▪ The crossfader is all the way to the right.
4.6.1 Group Mode
First we’ll look at Group
ously in a single FX Unit.
We’ll focus here on the left FX Unit (labeled FX1) of your S4—but the same applies to the
right FX Unit as well.
The MODE button
mode. This mode allows up to three different FX to be used simultane-
Tutorials
Adding FX
Press the MODE button to put the unit into Group mode (the button must be lit).
►
In TRAKTOR, you see three different FX slots stacked on top of each other in the corresponding FX Unit (see picture above).
4.6.2 Getting the FX Unit Ready
Let’s load the three default effects and activate the FX Unit:
1. Hold
the SHIFT button and press the FX On button (at the far left of the FX Unit) to load
the three default effects:
You now have the Delay, the Reverb, and the Filter loaded.
TRAKTOR KONTROL S4 - Manual - 58
Page 59

2. Choose which of the three loaded effects you want to activate by pressing the corresponding FX Buttons 1-3. Of course, you can use all three effects together—simply activate all
three buttons:
The FX Buttons light up to indicate the activated effects.
3. As
additional step, turn the DRY/WET knob fully counter-clockwise—we will use this knob
later to progressively bring in the effects:
Your FX Unit is now ready to process whatever you will send to it!
→
4.6.3 Assigning Decks to the FX Unit and Bringing In the FX
we need to assign this FX Unit to a Deck. To do this, we use the FX Assign buttons at the
Now
top of each channel on the Mixer, below the GAIN encoder:
Tutorials
Adding FX
The FX Assign buttons on each channel
Let’s assign the FX Unit 1 to Deck B:
1. Press
the left FX Assign button (labeled “1”) on channel B to assign Deck B to the FX
Unit 1.
2. Slowly turn the DRY/WET knob clockwise to bring in the FX.
You now hear the track on Deck B being processed by the FX Unit 1.
→
You can assign other channels to the same FX Unit. For example, if you also want to apply
FX to the Samples loaded on Deck C or D, simply press the FX Assign button “1” on
these
the corresponding channel(s).
TRAKTOR KONTROL S4 - Manual - 59
Page 60

4.6.4 Controlling the FX Unit
You can control each FX in this FX Unit by turning the respective FX Knob 1-3:
The FX Knobs 1-3
Play around with the FX Knobs 1-3 and listen to the result on the audio. You can also
►
activate/deactivate each FX individually by pressing the corresponding FX Buttons 1-3 below.
Changing the FX in a Slot
You can load another FX in each slot. Let’s switch the first FX slot to the Gater:
Tutorials
Adding FX
1. Hold
SHIFT and press the FX Button 1 repeatedly to scroll through all available FX until
the Gater is selected in the first slot of the FX Unit 1 in TRAKTOR.
2. If the first FX slot is currently deactivated, press the FX Button 1 to activate it (the button
must be lit).
You hear the Gater cutting the audio at regular intervals.
→
You might want to deactivate the FX Buttons 2 and 3 in order to better hear how the Gater
affects the audio.
Tempo-synchronized FX
Now try the following:
Set the FX Knob 1 to various positions and listen to the resulting effect on the audio.
►
You’ll notice that the gating effect stays synchronized to the beat! Among other things,
→
this can be very useful to temporarily emphasize the rhythm, e.g. by transitions between
tracks.
TRAKTOR KONTROL S4 - Manual - 60
Page 61

You can check this by moving the TEMPO fader on the right Deck: by pulling the fader
downwards, you hear the track playing faster… and the Gater following.
4.6.5 Single Mode
You
can also switch each FX Unit to Single mode. Instead of multiple FX with one parameter
each, Single mode will give you one FX but with much more control over its parameters.
This time, we will do it on the right FX Unit (labeled FX2) of your S4:
1. Check that the FX Mode button (MODE) is off. If it’s on, press it to switch that FX Unit to
Single mode.
2. Press SHIFT + FX On button for the FX Unit to load an FX. You can hold SHIFT depressed
and continue to press the FX On button to cycle through all the available FX until you see
in the software one FX you’d like to try.
3. Press the same FX On button (this time without SHIFT) to turn on the FX Unit globally.
The FX On button lights up.
4. On channel B, press the right FX Assign button (labeled “2”) to assign Deck B to this FX
Unit as well. You can deactivate the left FX Assign button on that channel if you want to
hear the new FX more distinctly.
The FX Knobs 1-3 and the FX Buttons 2 and 3 will give you access to each of the advanced
parameters for that FX. At any time, you can press the FX Button 1 to reset the parameters to
their default value.
Tutorials
Adding FX
As for Group mode, the DRY/WET knob allows you to adjust the balance between the unprocessed (dry) signal and the processed (wet) signal.
4.6.6 Storing a Snapshot
you find yourself making the same settings to the FX each time and would like to set a de-
If
fault state for the FX parameters, simply do the following:
1. Adjust the FX Knobs and Buttons to your liking.
2. Press SHIFT + MODE to store these settings as snapshot.
The next time you press the FX Button 1 with this FX loaded, its parameters will assume
→
the values you stored.
TRAKTOR KONTROL S4 - Manual - 61
Page 62

Using the Loop Recorder
It’s now time to check another new feature introduced in TRAKTOR KONTROL S4: the Loop
Recorder.
4.7 Using the Loop Recorder
Earlier
Samples. But this is how to work with existing material; the Loop Recorder, on the other hand,
allows you to record new material on the fly.
we saw how you can use Remix Decks as a means for triggering one-shot and looped
Tutorials
The Loop Recorder on your S4
could, for example, capture the signal from the microphone input on the S4, record your
You
scratching in real time, or just record a few bars of a particular track while tweaking the FX
settings.
Prerequisites
One more time, we assume here that you already followed the instructions in the previous tutorials. TRAKTOR KONTROL S4 now is in the following state:
▪ The track “Techno 2” is still loaded on Deck B. The track is playing and audible (remem-
ber: if the track is over, press SHIFT + CUE on the right Deck to skip back to the beginning).
▪ The Deck A is stopped (if it’s not the case, press the PLAY button on the left Deck).
TRAKTOR KONTROL S4 - Manual - 62
Page 63

Using the Loop Recorder
▪ The crossfader is all the way to the right.
▪ FX Unit 2 is in Single mode and loaded with your favorite FX.
▪ None of the FX Units are assigned to channel B (both FX Assign button on channel B
must be off).
4.7.1 Choosing a Source
Loop Recorder can capture the input from several sources. In TRAKTOR, you can choose
The
the desired source by clicking on the Source menu—the drop-down menu directly under the
Loop Recorder’s DRY/WET knob:
The Loop Recorder’s Source menu in TRAKTOR
In this menu, you have following choices:
Tutorials
▪ Main will record TRAKTOR’s overall signal.
▪ Cue will record any channels whose Headphones Cue button is on.
▪ Ext will record from the Input FX Send.
▪ Aux
will pick up the signal assigned to TRAKTOR’s Aux channel—typically the S4’s microphone input (for more info on how to use a microphone with your S4, please see ↑9.2,
Adding a Microphone).
For our example, we’ll capture the main output:
Select Main in the Source menu.
►
Selecting the source is the only action that must be done in the software. Everything else will
be done from your S4 controller.
TRAKTOR KONTROL S4 - Manual - 63
Page 64

Using the Loop Recorder
4.7.2 Recording a Loop
Let’s now record a loop.
Adjusting the Loop Size
Before we start recording, we need to specify the size of the loop we are going to record:
Press the SIZE button on the S4 repeatedly to cycle through loop record sizes (in bars).
►
You can see the current loop size in the software at the top of the Loop Recorder. For our example, we’ll choose a loop of 4 bars:
The selected loop size is displayed in the software.
Starting the Recording
Now do the following:
Tutorials
1. Cut
the low and mid frequencies on channel B by turning the LOW and MID knobs fully
counter-clockwise.
2. Turn the DRY/WET knob of the Loop Recorder fully clockwise.
3. When you’re ready, press the REC button.
The Loop Recorder will punch in (REC button lit), automatically punch out according to
→
the selected loop size (REC button back off), and then begin playing (PLAY button lit).
That’s all there is to it!
You can hear that our adjustments to the EQ are now part of the recording.
You’ll notice that the loop automatically started playing when it finished recording. If you
don’t
want this to happen, just push the PLAY button during recording. Now the loop will
only trigger when you explicitly tell it to.
Playing with the Recorded Loop
can control the balance between the looped recording and the main output using the Loop
You
Recorder’s DRY/WET knob:
TRAKTOR KONTROL S4 - Manual - 64
Page 65

Using the Loop Recorder
The Loop Recorder’s DRY/WET knob
You
can stop and start again the recorded loop by using the PLAY button. By doing this, you’ll
notice the following:
▪ The Loop Recorder always stays in sync with the Deck B, which is our current tempo ref-
erence—we say “tempo master” (for more info on tempo references, check the tutorial in
section ↑4.8, Synchronization).
▪ You don’t have to bother with the DRY/WET knob position when stopping the Loop Re-
corder: when you stop the Loop Recorder, the DRY/WET knob is automatically bypassed,
whatever its current position is. This ensures a seamless transition with the main signal at
its original level.
Deleting the Loop and Trying Again
Tutorials
If you don’t like what you hear and want to try again:
Press the UNDO button when the Loop Recorder is stopped.
►
Now the recording has been cleared and you can try again.
→
For example, you could try again to record a loop from the track on Deck B, this time while
tweaking the FX loaded on the FX Unit 2:
Turn channel B’s EQ knobs back to neutral position.
1.
2. Activate the FX Assign button “2” on channel B.
3. Press the REC button on the Loop Recorder and tweak the FX Knobs and buttons of the
FX Unit 2 as you see fit.
Since the Loop Recorder records the audio (including any processing by the FX), you can create this way brand new loops from your existing tracks!
TRAKTOR KONTROL S4 - Manual - 65
Page 66

Using the Loop Recorder
4.7.3 Overdubbing
You
can also dub over the current recorded loop, building additional recorder layers on the fly.
To do this:
1. Press the REC button while the Loop Recorder is already playing an existing loop, and
press REC again to exit overdubbing.
The new audio will then be added to the existing loop.
2. If you don’t like the overdub, just hit UNDO and it will clear your last overdub and you
can try it again.
3. If you hit UNDO once more, it will act as a “redo” and bring back the overdub.
4. If you want to completely clear all the contents of the Loop Recorder, just press UNDO
while the Loop Recorder is stopped.
4.7.4 Further Uses of the Recorded Loop
of the great things about the Loop Recorder is that you can use it to record loops that you
One
can then transfer to the Remix Decks. To do this, we will use the Copy mode on the S4:
1. Hold down the BROWSE button to enter Copy mode.
You will see the PLAY button on the Loop Recorder start flashing, letting you know that it
contains a loop ready to be copied.
2. While holding the BROWSE button, press the PLAY or REC button on the Loop Recorder
to select it as source.
3. Still holding the BROWSE button, press any flashing Sample Play button in the Remix
Decks to select it as target.
Tutorials
Now the loop has been stored in a Sample Slot, and you can record a new loop into the
→
Loop Recorder if you like. Moreover, your loop now has access to all Sample-related features provided by the Remix Deck. Last but not least, as already mentioned, the loop is
automatically added to your Collection!
TRAKTOR KONTROL S4 - Manual - 66
Page 67

Synchronization
4.8 Synchronization
It is now time to give a closer look at the advanced synchronization features offered by TRAKTOR. Once you will get more familiar with them, you will be able to use these powerful tools to
build rich and complex mixes.
4.8.1 Introduction
the previous tutorials, we have already seen TRAKTOR’s synchronization facilities many
In
times in action:
▪ We synchronized a track to the previous one before we mixed it in (see ↑4.2, Mixing In a
Second Track).
▪ We played with Loops and jumped to Cue Points whithout losing the beat (see ↑4.4, Loop-
ing and Cueing).
▪ We captured a Sample from a track and it played in sync with the track (see ↑4.5, Using
Samples in Your Mix).
Tutorials
▪ We noticed that the Gater FX was synchronized to the track it was processing (see ↑4.6,
Adding FX).
▪ We recorded a loop in the Loop Recorder and it played in sync with the track (see ↑4.7,
Using the Loop Recorder).
The Tempo Master
For all this to work, TRAKTOR needs both a tempo and beat reference it can synchronize
things with. We call this the tempo master. The tempo master doesn’t have to be the same
throughout your mix, but there is always one tempo master—and only one.
For example, by activating SYNC on a Track Deck, you say to TRAKTOR: “Synchronize the
on this Deck with the current tempo master.” Samples playing in Looped mode on a
track
Remix Deck, as well as loops recorded in the Loop Recorder, always play in sync with the
current tempo master.
In TRAKTOR, the Clock or any Track Deck can be the tempo master:
▪ TRAKTOR’s Clock can provide a tempo and a tick.
TRAKTOR KONTROL S4 - Manual - 67
Page 68

Synchronization
▪ A Track Deck can provide the tempo and the beats from the track that is currently play-
ing.
The Beatgrid
So that a Track Deck can provide reliable tempo and beats, these must be precisely determined in the loaded track—if not, the “reference” wouldn’t make any sense. Therefore, tracks
must first be analyzed beforehand by TRAKTOR in order to determine the BPM as well as the
position of the beats. The result of this analysis is the so-called Beatgrid. There is a specific
Beatgrid for each of your tracks:
A track's waveform with Grid Marker (1) and the Beatgrid (indicated by the white vertical segments, 2).
Tutorials
The track’s Beatgrid is not only important when a Track Deck is set as tempo master, but also
when you want this Track Deck to be synchronized with the current tempo master, whichever it
may be.
The included demo tracks used in the tutorials were previously analyzed, therefore they already
have a reliable Beatgrid. Before you can effectively use the synchronization facilities
on your own tracks, you will have to analyze them. By default, this is done automatically
when you import your music into the Track Collection. For more info on how to do this, see
chapter ↑3, Importing Your Music. For all the details on the Beatgrid, the Analysis and the
Track Collection, please refer to the separate TRAKTOR 2 Manual.
What Is Synched and What Is Not?
Basically, time-evolving FX are always automatically synched to the current tempo master.
the other hand, for each Track Deck you can decide whether to use the automatic Sync or
On
not — for example if you want to beat match the track manually (see tutorial in ↑4.2, Mixing
In a Second Track), or if you don’t want any beat matching at all for that track.
TRAKTOR KONTROL S4 - Manual - 68
Page 69

Synchronization
4.8.2 Who’s the Master?
You
can build your mix using various Deck setups: you can mix with two Track Decks only, or
make use of the lower Remix Decks (default setup), or even replace the Remix Decks with another two Track Decks.
Depending on your preferred way of DJing and Deck setup, you will have different needs and
perspectives for choosing your tempo master. We will describe here the various use cases.
Letting TRAKTOR Decide for You: the Auto Mode
Let’s first give a look at TRAKTOR’s Clock:
In TRAKTOR, click on the metronome icon at the top left of the window to show the
►
Clock panel:
The Clock panel in TRAKTOR
Tutorials
In this Clock panel, you see the activated AUTO button, meaning that we are in Auto mode.
The Auto mode is activated by default, and this the mode we used in all the previous tutorials.
With AUTO
activated, TRAKTOR automatically switches the tempo master between Track
Decks when needed—that is to say, when the Track Deck set as tempo master is stopped or
when you load a new track onto it. This way, you don’t have to worry about setting the tempo
master yourself.
Should there be no other Track Deck playing, the Clock would become the tempo master,
thus keeping in sync any FX still on air!
You can check this by doing the following:
TRAKTOR KONTROL S4 - Manual - 69
Page 70

1. Stop any playing Deck.
On the Master Display of your S4, the MASTER button and indicator light up, indicating
that the Clock currently is the tempo master:
2. Load two tracks on Deck A and B.
Start the playback on Deck A.
3.
Deck A now is the tempo master: the MASTER indicator in the Master Display turns back
off, whereas the MASTER indicator on the left Deck Display lights up:
Tutorials
Synchronization
4. Start
the playback on Deck B and beat match the track on Deck B with that on Deck A
(whether manually or via automatic Sync).
5. Stop Deck A.
Deck B now is the tempo master: the MASTER indicator on the left Deck Display turns
→
off, whereas that of the right Deck lights up:
If you play sets with two Decks only, or if you prefer to do your beat matching manually, the
mode might be for you: it guarantees that each new track in the mix sets the tempo refer-
Auto
ence, and all FX will synchronize to it correctly — without being constrained to a single tempo.
If you’d like to do a combination of manual and synched beat matching, again leave the AUTO
button engaged, and enable the SYNC button for individual Decks on your S4 as needed:
▪ If SYNC is enabled, the new Deck inherits the tempo from the previous tempo master.
▪ If SYNC is disabled, the new track sets the current tempo master.
Note that you can also manually set a particular Deck as tempo master:
TRAKTOR KONTROL S4 - Manual - 70
Page 71

Synchronization
To manually set a Track Deck as tempo master, press SHIFT + SYNC on that Deck.
►
Using the Clock as Tempo Master
run beat-mixed sets with more than 2 Decks, you should use the Clock as tempo master.
If you
The clock will always give you a solid tempo reference that will not change. Also, if you intend
to only do beat-synced transitions, and would like to stay within the same general BPM range
throughout your set, this is the ideal mode to use. To set it up, do as follows:
1. In TRAKTOR’s Clock panel, deactivate the AUTO button.
2. Set the Clock as tempo master, whether by activating the MASTER button in the Clock
panel, or by pressing the MASTER button on the Master Display of your S4 (in the middle
of the Mixer).
The Clock panel should now looks like this:
The Master Display on your S4 should now look like this:
Tutorials
3. On your S4, activate SYNC on all Decks by pressing the respective SYNC buttons.
This
way, all Decks will instantly follow the Clock’s tempo. You can then set the Clock’s tempo
to the tempo you intend to play your set via the numeric field to the right of the MASTER button (see picture above):
Change the Clock’s tempo by clicking the displayed BPM value and dragging your mouse
►
vertically while holding the mouse button depressed.
You can see the tempos on every Deck changing accordingly.
→
As in Auto mode, you can change the tempo master at any time from your S4 by pressing
SHIFT + SYNC on the desired Deck or by pressing MASTER again in the Master Display.
TRAKTOR KONTROL S4 - Manual - 71
Page 72

Synchronization
4.8.3 Other Useful Tools for Synching
Lastly,
chronization: the Snap and Quantize modes, and the Keylock function.
Snap and Quantize Modes
As you probably remember, we already mentioned the Snap and Quantize modes in the tutorial
in section ↑4.2, Mixing In a Second Track. They are other important tools that can help with
synchronizing your tracks:
Both Snap and Quantize modes can be enabled/disabled directly from your S4 by pressing the
corresponding buttons in the Master Display, on either side of the MASTER button:
we would like to quickly mention here three other interesting features related to syn-
▪ The Snap mode ensures that any Loop or Cue Point you set in a track will snap to the
closest beat.
▪ The Quantize mode ensures that any jump you make within the track will retain the phase
sync—may you jump to a Loop, a Cue Point or a beat.
Tutorials
The SNAP and QUANT buttons allow you to activate/deactivate Snap and Quantize mode, respectively.
Depending
on what you are about to do, you can decide to enable or disable them at any time.
Here are a few examples:
▪ If you want to set a Loop starting directly on a beat, activate SNAP and press the LOOP
SIZE encoder around the desired beat.
▪ On the contrary, should you wish to set a Cue Point at the beginning of some backing vo-
cals that don’t necessarily start on the beat, deactivate SNAP before pressing an unlit
Hotcue button.
▪ If you’re about to mix in a synched track and want the downbeats of both tracks to per-
fectly match, activate the QUANT button before you press PLAY (or some Hotcue button).
TRAKTOR KONTROL S4 - Manual - 72
Page 73

Synchronization
▪ On the other hand, if you want to jam around with a Sample loaded on a Remix Deck and
make some stutter-like effects by pressing the corresponding Hotcue button repeatedly,
you might prefer to deactivate QUANT to create repetitions shorter than a beat.
▪ Etc.
Locking the Key of Your Tracks
When synchronizing tracks, you alter their tempo, and consequently their pitch (or key). For
small tempo adjustments, this is not really serious; but when the tempo is changed more
frankly, the resulting pitch might get problematic: kick sounds would lose their power, vocals
would sound silly, etc.
To avoid this, TRAKTOR KONTROL S4 provides you with a Keylock feature that uncouples the
tone and the tempo of a track:
1. Load two tracks with quite different tempos on Deck A and B.
2. Start the playback on both Decks and synchronize Deck B to Deck A.
You can clearly hear how the tone of the track on Deck B changed.
3. Now press SHIFT + PLAY on the right Deck of your S4. This activates the Keylock on that
Deck.
Tutorials
The tone of the track gets back to its original value, thus preserving most of its acoustic
→
feeling. In the Deck Display, the KEYLOCK indicator lights up to remind you that the
Keylock is active on that Deck:
4.8.4 In Conclusion
There
is no “correct” sync setting: it all depends on your DJ style and the kind of music your
sets will consist of. Regardless of which setting you choose, you can see all necessary info on
your S4 and pilot your DJ set accordingly.
TRAKTOR KONTROL S4 - Manual - 73
Page 74

Hardware Reference
Areas and Concepts
5 Hardware Reference
This chapter details all you can do with your TRAKTOR KONTROL S4 controller.
After
a quick introduction to the main areas on your S4 and to their underlying concepts, we
will give a thorough description of each and every control element on your S4.
In this chapter, we describe actions on the TRAKTOR KONTROL S4. Of course, every ac-
on your S4 is instantly mirrored in TRAKTOR! For an in-depth explanation of all fea-
tion
tures provided by the TRAKTOR software, please refer to the TRAKTOR 2 Manual.
Quick References
will find in ↑6.5, The Setup Wizard a series of Quick Reference tables summing up the
You
basic functionality of each control element on your S4.
5.1 Areas and Concepts
first section will give you an overview of TRAKTOR KONTROL S4’s main areas, both on
This
your TRAKTOR KONTROL S4 hardware controller and in the TRAKTOR software. On the way,
we will describe some important concepts that together build the TRAKTOR KONTROL S4 system.
You will continuously encounter these concepts in your work with TRAKTOR KONTROL S4.
Previous
plemented.
chapter ↑4, Tutorials proposes a practical approach of how these concepts are im-
5.1.1 Decks
TRAKTOR
tracks, Samples and live input are played back. The Decks can be seen as the virtual equivalent to the good old vinyl or CD decks—just with a bunch of powerful additional features and
the flexibility of a computer-based system.
KONTROL S4 provides you with four virtual Decks. The Decks are the place where
TRAKTOR KONTROL S4 - Manual - 74
Page 75

Hardware Reference
Areas and Concepts
A Deck on your TRAKTOR KONTROL S4 hardware controller
TRAKTOR KONTROL S4 - Manual - 75
Page 76

Hardware Reference
Areas and Concepts
The equivalent control elements on a Track Deck in TRAKTOR
The two Decks on your TRAKTOR KONTROL S4 allow you to control the four software Decks
(labeled A, B, C and D) available in TRAKTOR:
▪ The left Deck on your S4 can control the upper Deck A and lower Deck C in the software.
▪ The right Deck on your S4 can control the upper Deck B and lower Deck D in the soft-
ware.
On your TRAKTOR KONTROL S4 controller, each Deck provides you with a multi-function jog
wheel with advanced transport functionality via its top plate (1) and outer rim (2), a TEMPO fader (3) to adjust the playback’s speed, a Deck Display (4) giving you various information about
the Deck’s state, a Loop section (5), Sample Play buttons (6) and Hotcue buttons (7) with different functionality according to the Deck type (Track Deck or Remix Deck, see below), the traditional PLAY and CUE buttons (8), along with a few other useful control elements. Of course, you
will find equivalent features in the TRAKTOR software.
TRAKTOR KONTROL S4 - Manual - 76
Page 77

Hardware Reference
Areas and Concepts
Both left and right Decks also provide a SHIFT button (9): when held depressed, this button
modifies the function of many other control elements (see section ↑5.3.2, SHIFT Buttons: Ac-
cessing Secondary Functions for more info).
Many control elements on the Decks can have their function customized in order to fit your
specific
TRAKTOR KONTROL S4.
needs and habits! For more info on this, please refer to chapter ↑6, Customizing
Three Types of Audio Material – Three Deck Flavors
Your Decks can handle three different types of audio material, each of them leading to a specific Deck Flavor:
▪ Tracks: A track is a song stored in digital format stored on your hard disk. For instance,
the traditional way-of-DJing consists in playing back a particular sequence of tracks—a
so-called Playlist. Decks handling tracks are called Track Decks.
▪ Samples: A Sample is a small piece of audio material. If its physical content does not
really differ from a track’s content (it’s all about audio stored in digital format on your
hard disk), the difference between them is both in their size and purpose: in general, a
Sample is much shorter than a track, and it is aimed to be added to (or blended into) your
main mix. Notably, Samples are perfect material for live remixing! Decks handling Samples are called Remix Decks. Each Remix Deck provides you with four Sample Slots containing 16 Sample Cells each.
▪ Audio input: Whereas the two aforementioned audio material types are played back from
your hard disk, Decks C and D can also be switched to Live Inputs, in which case they
transfer audio signals coming from the outside world to TRAKTOR’s audio processing and
mixing facilities. Whether it’s a microphone, a turntable, a keyboard or anything else, it
gets directly inserted in TRAKTOR’s signal flow.
Deck Configurations
In TRAKTOR KONTROL S4, the upper Decks A and B are always Track Decks. The lower Decks
C and D are Remix Decks by default, but you can switch them to Track Decks or Live Inputs—
or even deactivate them.
You will find a detailed description of every control element in the Decks in ↑5.3, The Decks.
TRAKTOR KONTROL S4 - Manual - 77
Page 78

5.1.2 Mixer
The Mixer
TOR’s window.
is sitting in the middle of your TRAKTOR KONTROL S4 controller and of TRAK-
Hardware Reference
Areas and Concepts
The Mixer on the S4 controller and in TRAKTOR
The
Mixer receives on its four channels (1) the audio signals coming from the four Decks de-
scribed above. There is one channel for each Deck. Hence, channels are labeled from A to D
according to their corresponding Deck.
TRAKTOR KONTROL S4 - Manual - 78
Page 79

Hardware Reference
Areas and Concepts
As any DJ mixer, the Mixer’s purpose basically is to adjust the relative level of each channel, to
control the channels’ frequency content, possibly feeding them into the FX Units (see section
↑5.1.3, FX Units below) before sending the overall result to the Main section (2)—and in the
end, to generate the mix that is sent to your audience. Of course, the Mixer also provides you
with a crossfader (3), which allows you to make seamless transitions between various channels.
The Mixer of your TRAKTOR KONTROL S4 hardware controller has a few additional features
not to be found on usual DJ mixers, though. For example, it includes a BROWSE encoder (4) for
quickly browsing your Playlist content, along with a set of indicators and switches in the Master
Display (5) that give you quick access to vital information and options, and last but not least,
the Loop Recorder (6), presented in more details below.
You will find a detailed description of every control element on the Mixer in section ↑5.4, The
Mixer.
Mixer-related controls dealing with the physical inputs and outputs of your TRAKTOR KONTROL S4 are also to be found on the front and rear panels of your S4 (see section ↑5.1.5,
Front and Rear Panels below).
5.1.3 FX Units
Adding
For that purpose, TRAKTOR provides you with a great selection of high-quality FX. These FX
can be loaded into the so-called FX Units.
effects to playing audio can tremendously expand the sonic possibilities of your mix.
The FX Unit 1 on the TRAKTOR KONTROL S4
The FX Unit 1 in TRAKTOR
TRAKTOR KONTROL S4 - Manual - 79
Page 80

Hardware Reference
Areas and Concepts
By default, two FX Units are active. Both FX Unit 1 and FX Unit 2 can be freely assigned to
any of the channels A-D.
the hardware side, the TRAKTOR KONTROL S4 also provides you with two FX Units (la-
On
beled FX1 and FX2 on your controller), which allow you to control the corresponding FX Units
in the software.
You will find a detailed description of every control element in the FX Units in section ↑5.5,
The FX Units.
You can activate two additional FX Units in the Preferences of TRAKTOR. Using four FX
Units
instead of two implies a few changes in the FX routing scheme. Please refer to sec-
tion ↑6.4.3, Using Four FX Units for more info.
5.1.4 Loop Recorder
The Loop Recorder is another powerful tool for live remixing your tracks.
The Loop Recorder on your S4
The Loop Recorder in TRAKTOR
TRAKTOR KONTROL S4 - Manual - 80
Page 81

Hardware Reference
Areas and Concepts
The Loop Recorder allows you to instantly create loops whether coming from the Mixer’s master signal, from a particular Deck or from a physical audio input. As soon as the loop is recorded, it is automatically triggered. You can then blend between the loop playing in the Loop Recorder and your main mix. Moreover, you can save the recorded loop to your hard disk or better, transfer it directly to any relevant location in TRAKTOR KONTROL S4 — typically a Sample Slot on a Remix Deck!
You will find a detailed description of every control element in the Loop Recorder in section
↑5.6, The Loop Recorder.
5.1.5 Front and Rear Panels
front and rear panel of your TRAKTOR KONTROL S4 contain controls and connectors re-
The
lated to the physical inputs and outputs of your controller. They are extensively described in section ↑5.8, The Rear Panel and ↑5.9, The Front Panel.
5.2 Types of Control Elements
TRAKTOR KONTROL S4 holds various types of control elements, which we will quickly
Your
describe here.
5.2.1 Buttons
A button on your S4
Buttons are spread everywhere over your TRAKTOR KONTROL S4. They can have three Flavors:
▪ Some
buttons: hit one of the Hotcue buttons, this triggers the playback to continue from there.
buttons trigger a function when they’re pressed (“trigger” action), e.g. the Hotcue
TRAKTOR KONTROL S4 - Manual - 81
Page 82

Hardware Reference
Types of Control Elements
▪ Some buttons switch to another state until they are pressed again (“toggle” action), e.g.
the PLAY button: hit it once and it starts the playback, press it a second time and the
playback stops.
▪ A few buttons activate a certain state for the time they are held depressed (“gate” or
“hold” action). Notably, this is the case of the SHIFT buttons (see below).
All buttons of your TRAKTOR KONTROL S4 are equipped with LEDs that give you various info.
Basically, the LED indicates the button’s current state, but its exact meaning varies for each
button—for more info, please refer to the description of each button later in this reference
chapter.
The SHIFT Buttons
Instead of triggering any function themselves, the SHIFT buttons (one on each Deck) modify the
behavior of other control elements on your TRAKTOR KONTROL S4, giving you access to some
secondary functions.
For more info on the SHIFT buttons, please refer to section ↑5.3.2, SHIFT Buttons: Ac-
cessing Secondary Functions.
5.2.2 Knobs
A knob on your S4
Knobs are rotary potentiometers with limited range—this is indicated by the limited white ring
around them. By turning them, you can dial an absolute value for the parameter. The small
white line on their top indicates the current value of the parameter within the defined range.
Depending on their purpose, most of them have a center detent at the middle (default) position, which is shown by the little notch on their ring.
TRAKTOR KONTROL S4 - Manual - 82
Page 83

5.2.3 Encoders
An encoder on your S4
Hardware Reference
Types of Control Elements
Encoders
are endless rotary potentiometers—this is indicated by the full white ring around
them. By turning them, you can dial a value for the parameter relatively to its current value in
the software. All encoders have a step-by-step movement.
Additionally, encoders have a “push” action available: pushing the encoder can trigger some
other function.
5.2.4 Jog Wheels
A jog wheel on your S4
Functionally
speaking, the two jog wheels are quite similar to the encoders described above:
they have an endless rotary movement (here continuous) and an additional push action available on their top plate. The main difference (beside their size) is that, on the jog wheel, the
TRAKTOR KONTROL S4 - Manual - 83
Page 84

Hardware Reference
Types of Control Elements
push movement is very tiny and is rather used for detecting whether you put your hand on the
top plate or on the outer rim when spinning the jog wheel. Hence, this leads to two different
rotation controls:
▪ You can spin the jog wheel’s outer rim.
▪ You can spin the jog wheel by (pressing and) turning its top plate.
This makes the jog wheel a versatile element that gives you a very precise control, e.g. for
scratching, seeking in a track, or browsing in lists.
5.2.5 Faders
A fader on your S4
Faders
are linear control elements with limited range. All of them set absolute values, with the
possible exception of the TEMPO faders (see ↑5.3.7, Tempo Fader and Tempo Offset Buttons).
5.2.6 Displays, Meters and Indicators
A Display with various indicators
TRAKTOR KONTROL S4 - Manual - 84
Page 85

A meter
Hardware Reference
Types of Control Elements
Displays, indicators
and meters are single- or multi-LED elements that provide you with real-
time feedback about various states and levels in the TRAKTOR KONTROL S4 system.
5.2.7 Switches
A switch
Switches are only available on the rear panel. They control a few basic options needed when
setting your TRAKTOR KONTROL S4 up.
TRAKTOR KONTROL S4 - Manual - 85
Page 86

5.2.8 Sockets
The RCA main output sockets on the rear panel of your S4
Hardware Reference
Types of Control Elements
Sockets
are to be found on the rear and front panels only. They allow you to plug various types
of cables (USB, audio, MIDI, etc.) into your TRAKTOR KONTROL S4.
5.3 The Decks
section describes the handling of the Decks on your TRAKTOR KONTROL S4. After an
This
overview of the general structure and the Deck Flavors in TRAKTOR, we will describe the individual areas and elements of the Decks on your S4.
5.3.1 Deck Flavors and Structure
described in section ↑5.1.1, Decks, TRAKTOR's software Decks can have three different
As
Flavors, depending on the type of audio material you want them to handle: Track Deck, Remix
Deck or Live Input.
▪ By default, Decks A and B are Track Decks when TRAKTOR is configured for use with
TRAKTOR KONTROL S4.
▪ Decks C and D are Remix Decks then.
2 Track Decks + 2 Remix Decks is the intended layout when TRAKTOR is configured for
with the S4. See also ↑6.5, The Setup Wizard for further information on configuring
use
TRAKTOR using the Setup Wizard; however, you are not restricted to use this configuration,
both Decks on the S4 can control Track Decks and Remix Decks in TRAKTOR.
TRAKTOR KONTROL S4 - Manual - 86
Page 87

Hardware Reference
Selecting Deck Flavors
TRAKTOR KONTROL S4, it is recommended to use the Track Deck Flavor for Decks A and
For
B, and the Remix Deck Flavor for Decks C and D; however, you can control any Deck Flavor
with the S4's Decks. To change the Flavor of a Deck:
Select the Flavor in the TRAKTOR Preferences via the settings in Preferences > Decks >
►
Deck Flavor.
Or click on the Deck letter in a Deck's upper right corner and select a Flavor from the
►
drop-down menu:
The Decks on your TRAKTOR KONTROL S4
two Decks on your TRAKTOR KONTROL S4 allow you to control all four Decks in TRAK-
The
TOR:
The Decks
▪ The left Deck on your S4 can control both Decks on the left of the TRAKTOR window: the
upper Deck A and the lower Deck C.
▪ The right Deck on your S4 can control both Decks on the right of the TRAKTOR window:
the upper Deck B and the lower Deck D.
At any time, each S4 Deck controls a particular Deck in the software: we say that the focus of
the S4 Deck is on that particular software Deck. You can switch the focus of an S4 Deck between two software Decks (e.g., between A and C). This is done via the Deck Assign buttons,
see section ↑5.3.3, Deck Assign Buttons: Switching Deck Focus below.
Depending on the Flavor of your Decks in TRAKTOR (Track Decks, Remix Decks or Live Input),
the Deck’s control elements have slightly differing functions on your S4. These differences will
be pointed out at the relevant places in the subsequent chapters.
TRAKTOR KONTROL S4 - Manual - 87
Page 88

Hardware Reference
Using a Deck as Live Input
a Deck is switched to Live Input, the Deck simply forwards audio signals coming from
When
your S4’s physical audio inputs to its corresponding channel on the Mixer. As a consequence,
all control elements for this Deck are deactivated. On your S4, you cannot put the focus on a
software Deck working as Live Input. For an in-depth description of the Live Input, please refer
to the separate TRAKTOR 2 Manual.
5.3.2 SHIFT Buttons: Accessing Secondary Functions
SHIFT buttons have an overall purpose, regardless of the Deck Flavor (Remix Deck or
The
Track Deck).
A SHIFT button
The
SHIFT buttons (one on each S4 Deck) act as “modifiers” for other control elements on
your TRAKTOR KONTROL S4, they allow you to access a secondary function when using other
control elements simultaneously—much like the [Shift] key on your computer keyboard.
The Decks
To access the secondary function of any control element, hold SHIFT depressed when us-
►
ing that control element.
▪ For
the Deck and FX Unit control elements, SHIFT operates locally, which means that you
cannot use the SHIFT button on the opposite side of your S4 to access the secondary
functions of a Deck or FX Unit.
▪ For the Mixer, the SHIFT button on either side can be used to access the secondary func-
tions.
On Track Decks, the SHIFT button additionally allows you to define the Deck tempo. See
section ↑5.3.13, SHIFT Button for further information.
5.3.3 Deck Assign Buttons: Switching Deck Focus
The
Deck Assign buttons have an overall purpose, regardless of the Deck Flavor (Remix Deck,
Track Deck or Live Input).
TRAKTOR KONTROL S4 - Manual - 88
Page 89

Hardware Reference
Both Deck Assign buttons (one on each Deck)
The
Deck Assign button (labeled DECK C on the left Deck and DECK D on the right Deck) allows you to switch the focus of your S4 Deck between the two Decks it can control in the
TRAKTOR software.
On the left Deck, press DECK C to switch the focus between Deck A and Deck C.
►
On the right Deck, press DECK D to switch the focus between Deck B and Deck D.
►
When the focus is on the lower Deck (Deck C or D), the Deck Assign button lights up.
→
Simultaneously, the DECK C (or DECK D) indicator lights up instead of the DECK A (or
DECK B) indicator in the Deck Display (see ↑5.3.4, Deck Display: Informed at a Glance
below), along with the Deck Assignment indicator in the corresponding channel of the
Mixer (see ↑5.4.3, The Channels and the Crossfader).
The Decks
Secondary Function: Switching Between Layouts
The Deck Assign buttons also allow you to switch between Layouts in TRAKTOR.
On the left Deck, press SHIFT + DECK C to switch to another Layout in TRAKTOR.
►
On the right Deck, press SHIFT + DECK D to switch to another Layout in TRAKTOR.
►
You can customize the Layouts that will be activated when pressing each Deck Assign button
going to Preferences > Traktor Kontrol S4 > S4 Control Options. Please refer to section
by
↑6.3, S4 Control Options for more info on this.
For more info on what a Layout is, please refer to the separate TRAKTOR 2 Manual.
5.3.4 Deck Display: Informed at a Glance
The Deck Display holds six indicators along with the Loop Size Display:
TRAKTOR KONTROL S4 - Manual - 89
Page 90

Hardware Reference
The Deck Display
Indicators in the Deck Display
The six indicators in the Deck Display provide various Deck-related information:
▪ ON
AIR indicator: lights up when the Deck is audible on the TRAKTOR KONTROL S4 main
outputs. This indicator takes the crossfader position as well as the corresponding channel
fader position into account in order to decide whether the Deck is “on air” or not. In a
nutshell: When the ON AIR indicator is lit, think twice before starting or pausing the
Deck!
▪ SAMPLES indicator: lights up if the lower Deck is a Remix Deck. This notably allows you to
know that the Sample Play buttons of the upper Track Deck are controlling the Sample
Slots of the Deck below (provided that you didn’t change their assignments—see the description of the Sample Play buttons in section ↑5.3.9, Sample Play Buttons).
▪ DECK A (or DECK B) indicator: lights up in blue when the Deck on your S4 is focused on the
upper Deck (Deck A on the left, Deck B on the right) in TRAKTOR.
The Decks
▪ DECK C (or DECK D) indicator: lights up in white when the Deck on your S4 is focused on
the lower Deck (Deck C on the left, Deck D on the right) in TRAKTOR.
▪ KEYLOCK indicator: lights up when the Keylock is active on that Deck. Note that Keylock
can be activated on Track Decks only. For more info on the Keylock feature of TRAKTOR,
please refer to the tutorial in section ↑4.8, Synchronization and to the TRAKTOR 2 Manual.
▪ MASTER indicator: Lights up when the Deck is the tempo master. This information is cru-
cial when synchronizing tracks. Note that only Track Decks can be set as tempo master.
To set a Track Deck as tempo master, use SHIFT + SYNC (see section ↑5.3.12, SYNC
Button). For more info on synchronization, please refer to the tutorial in section ↑4.8,
Synchronization and to the TRAKTOR 2 Manual.
TRAKTOR KONTROL S4 - Manual - 90
Page 91

Hardware Reference
Loop Size Display
The Loop Size Display
At the far right of the Deck Display, the Loop Size Display shows the currently selected loop size
(measured
in beats). You can change the selected Loop size and create Loops with this size via
the LOOP SIZE encoder (see section ↑5.3.8, Loop Section).
5.3.5 LOAD Button
The LOAD button
The
LOAD button allows you to load/unload a track / Remix Set to / from the Deck when using
Quick Loading. It is used in conjunction with the BROWSE encoder, which allows you to quickly browse the Playlist you’re currently in:
The Decks
1. Turn the BROWSE encoder to select the desired track in the currently opened Playlist in
the Browser. Hold SHIFT and turn the BROWSE encoder to scroll through your Favorites.
2. Press LOAD to load that track / Remix Set to the Deck.
By pressing SHIFT + LOAD, you unload the track from the Deck.
►
You will find more info on browsing and loading in section ↑5.7.1,
Browsing Tracks and Sam-
ples.
Moreover, the LOAD button lights up when you push the jog wheel’s top plate (e.g. for scratching, see ↑5.3.6, Jog Wheel).
The LOAD button can be switched to an alternate assignment in which it activates a special
Jog mode for the jog wheel. Please refer to section ↑6.3, S4 Control Options for more
info.
TRAKTOR KONTROL S4 - Manual - 91
Page 92

5.3.6 Jog Wheel
The jog wheel (right Deck pictured)
The jog wheel has several functions dealing with the playback of your Deck:
Hardware Reference
The Decks
▪ Tempo
bending: By spinning the jog wheel’s outer rim, you temporarily raise or lower the
Deck tempo. When you stop spinning the rim, the Deck tempo returns to its original value.
▪ Scratch: By pressing and spinning the jog wheel’s top plate, you fully take over manual
control for cueing up a beat, back spinning or for scratching. Also this can be very useful
to precisely locate any particular point in your track / Remix Set. When you release the top
plate, the Deck returns to its previous playback state (playing or paused).
▪ Seek: By additionally pressing SHIFT when spinning the jog wheel’s top plate, you can
fast seek through your track / Remix Set.
When you press the jog wheel’s top plate, the LOAD button above lights up to indicate that
you are manually controlling the playback position.
The jog wheel also provides additional features:
▪ Inside an active Loop, while holding the LOOP IN or LOOP OUT button depressed, use the
wheel to adjust the Loop In Point or Loop Out Point, respectively. See section ↑5.3.8,
jog
Loop Section for more info on this.
TRAKTOR KONTROL S4 - Manual - 92
Page 93

Hardware Reference
▪ In Browse mode, you can use the jog wheel to scroll through the selected Playlist. See
section ↑5.7, Browsing, Loading and Copying for more info on this.
▪ Your jog wheel can also be switched to a special Jog mode providing you with advanced
features like FX control or filter control. Please refer to section ↑6.3, S4 Control Options
for more info.
5.3.7 Tempo Fader and Tempo Offset Buttons
The Decks
The TEMPO fader and Tempo Offset buttons
TEMPO fader and the OFFSET buttons provide you with extended controls over the Deck
The
tempo.
The TEMPO fader controls the tempo of the focused Deck: Pulling the TEMPO fader downwards/upwards increases/decreases the tempo, respectively. By default, the range of the TEMPO fader is ±6 %.
You can change this range in Preferences
the software Deck and the TEMPO fader on your S4 are affected by this setting.
> Transport > Tempo. Both the tempo fader in
TRAKTOR KONTROL S4 - Manual - 93
Page 94

Hardware Reference
Absolute Mode
default, the TEMPO fader is in Absolute mode. In this mode, whenever you move the TEM-
By
PO fader on your S4, its position is transmitted 1:1 to the tempo fader on the software Deck—
which in the end controls the tempo of the software Deck.
Therefore, the software Deck’s tempo matches the TEMPO fader position on your S4, unless
you have somehow changed the software Deck’s tempo by other means such as:
▪ Activating SYNC on that Deck to sync it to another tempo, thus modifying the tempo on
the software Deck. As long as SYNC is on and the relevant Deck is not the tempo master,
the Deck tempo cannot be manually controlled via the faders (they are deactivated both
on the software and hardware Deck).
▪ Switching the Deck focus on your S4 to the alternate software Deck, in which the tempo
fader may have another position.
▪ Moving the tempo fader in the software.
For all these situations, the Tempo Offset buttons come into play and help you to keep track (!)
of the Deck tempo.
Tempo Offset Buttons
The Decks
The Tempo Offset buttons
Tempo Offset buttons (labeled OFFSET and showing little up and down arrows) are equip-
The
ped with LEDs that indicate you the offset between the TEMPO fader on your S4 and the tempo fader of the focused Deck in TRAKTOR:
▪ Down-arrow lit: The tempo fader position on the software Deck is below the TEMPO fader
position on your S4 (the software plays faster than indicated by the fader on the S4).
▪ Up-arrow lit: The tempo fader position on the software Deck is above the TEMPO fader
position on your S4 (the software plays slower than suggested by the fader on the S4).
You can cancel the offset shown by the OFFSET buttons in various ways:
TRAKTOR KONTROL S4 - Manual - 94
Page 95

Hardware Reference
▪ Hold SHIFT while moving the TEMPO fader: This disconnects the hardware fader from the
software fader and allows a soft takeover. While holding SHIFT depressed, find the fader
position at which the lit OFFSET button turns off and the other one lights up: This position roughly corresponds to the software fader position. Release SHIFT and move the
TEMPO fader: the tempo jump will be negligible.
▪ Press either OFFSET button to reset the software’s tempo fader to the position of the
TEMPO fader on your S4. This can lead to a substantial tempo jump.
In Absolute mode, slightly moving the TEMPO fader on your S4 also resets the software
fader to the position of the hardware fader.
Additionally, both OFFSET buttons light up dimmed to indicate that the TEMPO fader is near
0 %.
Locking the Tempo
The Decks
In case
you don’t use the TEMPO fader at all and play the Deck at its exact original speed, you
can lock the tempo and disable the fader on your S4 to avoid moving it by accident. To lock
the tempo to its original value:
Press both OFFSET buttons simultaneously (provided that none of them is lit).
►
The tempo of the focused Deck is reset to 0 % and the TEMPO fader is deactivated. Both
→
OFFSET buttons light up simultaneously to indicate the tempo locking.
Tempo locking is only possible if SYNC is deactivated on the relevant Deck.
To enable the TEMPO fader again, press either (or both) OFFSET button(s).
Relative Mode
can also switch the TEMPO faders to Relative mode. In this mode, each TEMPO fader on
You
your S4 affects the tempo fader of the software Deck relatively to its current position, even if
this position does not match the position of the TEMPO fader on your S4. This notably resolves
possible conflicts between the TEMPO fader and the Deck synchronization or Deck switching.
To activate the Relative mode, open Preferences > Traktor Kontrol S4 > Tempo Faders. Please
refer to section ↑6.3, S4 Control Options for more info in this.
TRAKTOR KONTROL S4 - Manual - 95
Page 96

Hardware Reference
5.3.8 Loop Section
The Loop section
Loop section holds all necessary controls for setting and modifying Loops in your tracks /
The
Remix Sets. The Loop section consists of two buttons in the middle and two push encoders on
the sides. From left to right, you find the following controls: LOOP MOVE encoder, LOOP IN
button, LOOP OUT button, and LOOP SIZE encoder.
LOOP IN and LOOP OUT Buttons
The Decks
The LOOP IN and LOOP OUT buttons
The LOOP IN and LOOP OUT buttons allow you to manually define a Floating Loop in the playing Track Deck / Remix Deck.
Pressing the LOOP IN button sets a Floating Cue Point at the current playback position. This
Floating Cue Point will serve as Loop In Point as soon as you press the LOOP OUT button.
Hint: The LOOP IN button is the perfect tool for setting a Floating Cue Point without stopping the playback, whether you set a Loop Out Point later or not!
Pressing the LOOP
OUT button sets a Loop Out Point at the current playback position and acti-
vates a Floating Loop between the previously set Floating Cue Point and this Loop Out Point.
You can reuse the same Loop In Point for several Loops: simply set a new Loop Out Point,
and the previous Loop In Point will be used for the new Floating Loop!
TRAKTOR KONTROL S4 - Manual - 96
Page 97

Hardware Reference
The LOOP IN and LOOP OUT buttons also act as indicator: they light up simultaneously to indicate that a Loop is running. If looping is active but the playback position is outside any
Loop, only the LOOP OUT lights up.
When a Loop is running, you can fine-tune its Loop In and Loop Out Points by holding the corresponding button depressed and using the jog wheel:
Hold the LOOP IN or LOOP OUT button depressed and spin the jog wheel to adjust the
►
Loop In or Loop Out Point of the running Loop.
Bear in mind that all your actions affect a Floating Loop (and not the original Stored Loop,
if
any). Hence, if you plan to use the modified Loop later, don’t forget to store it! For example, you can do this by assigning the Loop to a Hotcue slot (see section ↑5.3.10, Hotcue
Buttons). Storing Loops to a Hotcue slot is only available for Track Decks.
The LOOP IN and LOOP OUT buttons can also have alternate functions when switched to
Auto
Loop mode. You can do this in Preferences > Traktor Kontrol S4 > S4 Control Op-
tions. See section ↑6.3, S4 Control Options for more info.
LOOP MOVE Encoder
The Decks
The LOOP MOVE encoder
LOOP MOVE encoder allows you to activate/deactivate looping, move the Loop and jump in
The
the track:
LOOP MOVE encoder No Loop active Loop active
Turn Beatjumps by the current loop size (as
displayed in the Loop Size Display).
SHIFT + Turn Beatjumps by 1-beat steps. Moves the Loop by 1-beat steps.
Push Activates looping (current or next Loop
in track will be looped).
Moves the Loop by the current loop size
(as displayed in the Loop Size Display).
Deactivates looping.
TRAKTOR KONTROL S4 - Manual - 97
Page 98

Hardware Reference
Bear in mind that all your actions affect a Floating Loop (and not the original Stored Loop,
if
any). Hence, if you plan to use the modified Loop later, don’t forget to store it! For example, you can do this by pressing an unlit Hotcue button (see section ↑5.3.10, Hotcue But-
tons). Storing Loops to a Hotcue slot is only available for Track Decks.
LOOP SIZE Encoder
The LOOP SIZE encoder
The LOOP SIZE encoder allows you to select/adjust the loop size and to set a Floating Loop
with the selected size:
LOOP SIZE encoder No Loop active Loop active
Turn Selects a loop size (in beats) for the next
Floating Loop that you will set. The selected loop size is displayed in the Loop
Size Display above the encoder.
Halves/doubles the Loop’s size.
The Decks
Push Sets and activates a new Floating Loop
at the current playback position with the
selected loop size.
You may have noticed that pushing either of the LOOP MOVE and LOOP SIZE encoders activates/deactivates looping. The only difference when activating looping via the LOOP SIZE
encoder is that you additionally set a new Floating Loop at the current position.
Bear in mind that all your actions affect a Floating Loop (and not the original Stored Loop,
any). Hence, if you plan to use the modified Loop later, don’t forget to store it! For exam-
if
ple, you can quickly do this by assigning the Loop to a Hotcue slot (see section ↑5.3.10,
Hotcue Buttons). Storing Loops to a Hotcue slot is only available for Track Decks.
Deactivates looping.
TRAKTOR KONTROL S4 - Manual - 98
Page 99

Hardware Reference
5.3.9 Sample Play Buttons
The Sample Play buttons
By default, the Sample Play buttons control the Sample Cells of a Remix Deck:
case the upper Deck is a Track Deck, and the lower Deck is a Remix Deck, the Sample
▪ In
Play buttons will control the Remix Deck's Sample Cells.
▪ In case the upper Deck is a Remix Deck, the Sample Play buttons will control the upper
Remix Deck's Sample Cells.
The Sample Play buttons allow you to load and play Samples. Each Sample Play button represents a Sample Cell in one of the four Sample Slots of a Remix Deck.
If you don’t want to use Samples at all, or if you don’t want to mix Track Deck controls and
Deck controls, you can activate alternate functions for these Sample Play buttons in
Remix
Preferences > Traktor Kontrol S4 > S4 Control Options. For example, they can be used as
Beatjump buttons or as additional Hotcue buttons. Please refer to section ↑6.3, S4 Control
Options for more info.
The Decks
Sample Slot States
The LED of each Sample Play button indicates the current state of the Sample Slot:
Sample Play button Sample Slot’s state
Unlit Empty Sample Slot.
Dimmed Sample loaded but stopped or muted.
Lit Sample loaded and playing.
TRAKTOR KONTROL S4 - Manual - 99
Page 100

Hardware Reference
Capturing a Sample from another Deck
a track is currently loaded into a Track Deck, you can directly export a Sample from that
If
track by pressing an unlit Sample Play button. Select the Deck to be captured from with the
Capture Source selection drop-down menu in the Remix Deck's Header.
The Capture Source selection drop-down menu in the Deck's Header
Once
you press an unlit Sample Play button, a Sample is copied from the current playback po-
sition to the Sample Slot:
▪ If the current playback position is within an active Loop, the Sample is a copy of the
Loop.
▪ If the current playback position is outside any active Loop, the Sample starts at the cur-
rent playback position and its size is defined by the selected loop size (as displayed by
the Loop Size Display).
The Decks
The Sample Play button now lights up dimmed to indicate that the Sample is loaded but not
audible, because it is either muted or stopped.
To tell whether the Sample is stopped or muted, have a look at the TRAKTOR software: If
the
Sample is muted, its waveform in the Sample Slot is dimmed, while the lit/unlit Sam-
ple Play button indicates whether or not the Sample is playing.
When importing a Sample from the loaded track, as soon as the Sample is played live three
times in the main mix, the Sample is automatically saved to the Collection for later use!
Quick Loading a Sample from a Playlist
By
holding SHIFT and pressing an unlit Sample Play button, you load the currently selected
Sample from the currently active Playlist into the relevant Sample Slot.
TRAKTOR KONTROL S4 - Manual - 100
 Loading...