

Page 1
OPERATION MANUAL
Page 2

The information in this document is subject to change without
notice and does not represent a commitment on the part of NATIVE
INSTRUMENTS GmbH. The software described by this document
is subject to a License Agreement and may not be copied to other
media. No part of this publication may be copied, reproduced or
otherwise transmitted or recorded, for any purpose, without prior
written permission by NATIVE INSTRUMENTS GmbH, hereinafter
referred to as NATIVE INSTRUMENTS. All product and company
names are ™ or ® trademarks of their respective owners.
Furthermore, the fact that you are reading this text means you are
the owner of a legal version rather than an illegal, pirated copy. It
is only through the loyalty and honesty of people like yourself that
NATIVE INSTRUMENTS GmbH can continue to develop and create
innovative audio software. On behalf of the entire company, thank
you very much.
Written and revised by:
Irmgard Bauer, Friedemann Becker, Robert Kotok (Version 3)
Other valuable input from:
PhilL, Hobbes, Quartz, AudioRapture and all TRAKTOR Forum
Users!
Special thanks go to the beta test team, who were invaluable not just
in tracking down bugs, but in making this a better product!
Page 3

Germany
NATIVE INSTRUMENTS GmbH
Schlesische Str. 28
D-10997 Berlin
Germany
info@native-instruments.de
www.native-instruments.de
USA
NATIVE INSTRUMENTS North America, Inc.
5631 Hollywood Boulevard
Los Angeles, CA 90028
USA
sales@native-instruments.com
www.native-instruments.com
© Native Instruments GmbH, 2007. All rights reserved.
Page 4

1. Welcome Words
Dear Customer,
Thank you for choosing TRAKTOR 3!
As a legal owner of this software you contribute to the maintenance of the software
and to the creation of future updates.
Since spring 2007 TRAKTOR 3 has a new brother called TRAKTOR Scratch.
Version TRAKTOR 3.3 merges both worlds by connecting the intuitiveness of
turntable controlled playback with the powerful sync and loop tools for which
TRAKTOR is known.
This happens af ter 8 years of TRAKTOR history, initiated by a group of three
developers in 1999. In these years, the software has grown to a serious project
that covers a large variety of user proles from dance to hip hop and from bedroom
to main oor.
We wish you a great and successful time when driving TRAKTOR 3!
Friedemann Becker
TRAKTOR 3.3 – 4
Page 5

2. System Requirements
For latest system requirements, compatibility and support of the latest operating
systems please see our website at:
http://ww w.native-instruments.com/traktor3
TRAKTOR 3.3 – 5
Page 6

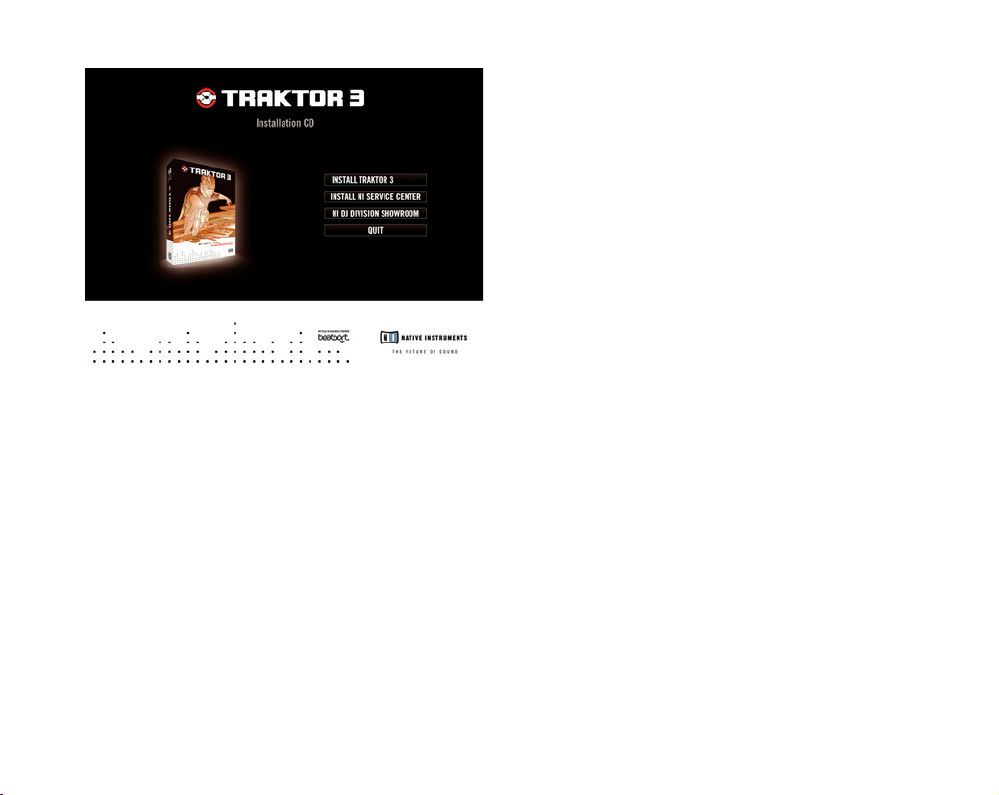
3. Installation
This chapter explains you in an easy step-by-step explanation how to install
TRAKTOR 3 on your computer.
3.1 Start – The Splash Screen
Insert the TRAKTOR 3 CD in the CD-drive of your computer.
On a PC, double-click on “My Computer” then double-click on the TRAKOR 3
►
CD I
COn
to open the content of the CD. Double-Click Traktor_3_Installation_
Menu.
On a Mac, the TRAKTOR 3 CD ICOn will be displayed on the desktop. Click on
►
it to open the content of the CD. Click on Traktor_3_Installation_Menu.
This starts the TRAKTOR 3 Splash Screen that lets you choose between different
possible actions. Follow the forthcoming chapters to make the right decisions
regarding the needed installations for your package and the right order of these
installations.
TRAKTOR 3.3 – 6
Page 7
3.2 Windows XP Installation
This section describes the installation and the uninstall processes on a Windows
PC.
3.2.1 Installing TRAKTOR 3
On the Splash Screen, choose InsTAll TRAKTOR 3.
►
A dialog opens that welcomes you to the installation of TRAKTOR 3. Click on
►
nexT to proceed.
In the next window, you are prompted to agree to the license agreement. Click
►
on I ACCepT to proceed.
The next window lets you choose an installation folder. Click n
►
with the default installation folder.
exT
to proceed
TRAKTOR 3.3 – 7
Page 8

In the next screen you can choose a program group where the TRAKTOR 3 icon
►
will be added to. You should leave it in the default path and proceed with
nexT.
Now the installation is running. At the end of this process, a dialog asks you
►
whether you want to see the Welcome.pdf, create a shortcut on the desktop,
start TRAKTOR 3 now and/ or start the NI SERVICE CENTER Setup. Choose
the options you want, and then click on FInIsh to nish the installation.
3.2.2 Uninstalling TRAKTOR 3
To uninstall TRAKTOR 3 from your computer, use the following steps:
Open C:\Program Files\Native Instruments\Traktor DJ Studio 3.
►
Double-click the UnwIse tool to begin un-installation.
►
Choose AUTOmATIC from the following dialog.
►
3.2.3 Installing NI SERVICE CENTER
On the Splash Screen, choose InsTAll nI seRvICe CenTeR.
►
A dialog opens that welcomes you to the installation of NI Service Center. Click
►
on nexT to proceed.
In the next window, you are prompted to agree to the license agreement. Click
►
on I ACCepT to proceed.
The next window lets you choose an installation folder. Click nexT to proceed
►
with the default installation folder.
On the next screen you can choose a program group where the TRAKTOR
►
Scratch icon will be added to. You should leave it in the default path and
proceed with nex T.
Now the installation is running. At the end of this process, a dialog asks you
►
whether you want to start the SERVICE CENTER now, open the Readme or
create a shortcut on the desktop. Choose the options you want, and then click
on FInIsh to nish the installation.
Please alway s r efer to
Please alway s r efer to
!
the Readme le on the
!
the Readme le on the
installation CD as it contains last
installation CD as it contains last
minute information not available
minute information not available
in the printed manual.
in the printed manual.
TRAKTOR 3.3 – 8
Page 9

3.3 Mac OS X Installation
This section describes the installation and the uninstall processes on a Macintosh
computer.
3.3.1 Installing TRAKTOR 3
On the Splash Screen, choose InsTAll TRAKTOR 3.
►
The next screen shows the license agreement. Click on COnTInUe to proceed.
►
In the next window you can choose an installation destination. Click COnTInUe
►
to proceed with the default path.
In the next window you can choose the installation type. Click on I
►
proceed.
When the installation is nished a new window informs you that you can com-
►
plete the installation process by clicking on QUIT.
3.3.2 Uninstalling TRAKTOR 3
To uninstall TRAKTOR 3 from your computer, please delete the following les
manually:
/Applications/Traktor DJ Studio 3/Library/Preferences/com.native-instruments.TraktorDJStudio3.
plist
nsTAll
to
Please alway s r efer to
Please alway s r efer to
!
the Readme le on the
!
the Readme le on the
installation CD as it contains last
installation CD as it contains last
minute information not available
minute information not available
in the printed manual.
in the printed manual.
TRAKTOR 3.3 – 9
Page 10

3.3.3 Installing NI SERVICE CENTER
On the Splash Screen, choose InsTAll nI seRvICe CenTeR.
►
The next screen shows the license agreement. Click on COnTInUe to proceed.
►
In the next window you can choose an installation destination. Click COnTInUe
►
to proceed with the default path.
The next window lets you ins tall the Flash Player that is needed for the
►
SERVICE CENTER. Click on Install to proceed.
After the installation, the window close s an you are back to the splash
►
screen.
TRAKTOR 3.3 – 10
Page 11

4. First Steps with TRAKTOR
This chapter helps you a lot if you are a rst time user. It covers the start of the
software, the registration and the audio setup. After this chapter you are able to
dive into the funky features of TRAKTOR!
4.1 Starting the Software
mAC Os x: Go to “Macintosh HD” > “Applications” > “Traktor DJ Studio 3”
►
and double-click on the TRAKTOR DJ Studio 3 program icon.
w
InDOws
►
4.2 Registration and Product Authorization
A registration and product authorization of TRAKTOR 3 is mandatory. This chapter
guides you through the registration process.
Before continuing further in this manual, you should rst install NI SERVICE
CENTER on your computer. A step-by-step installation guide is provided within
the separate Setup Guide booklet included in your TRAKTOR package. If you did
not install the NI SERVICE CENTER right away from the Splash Screen, you will
nd information about how to install the application on your hard drive and a step-
by-step introduction to the SERVICE CENTER application in this Setup Guide.
You can use the SERVICE CENTER to register and activate your copy of TRAKTOR
via the Internet. The SERVICE CENTER also includes an Update Manager that helps
: Go to “Start” > “All Programs” > “Native Instruments” > “Traktor DJ
Studio 3” and click the TRAKTOR DJ Studio 3 program icon.
TRAKTOR 3.3 – 11
Page 12

you download the most recent version of TRAKTOR. You should check regularly
for updates to TRAKTOR for best performance and compatibility with other audio
applications.
4.2.1 Demo Mode
When you start TRAKTOR for the rst time, you will see the following screen:
Choose A
►
Guide for more information about the NI SERVICE CENTER and activating
TRAKTOR. Note that you have to restart TRAKTOR to change from D
into FUll mODe.
Click on BUy to purchase a copy of TRAKTOR in the NI online shop or at a
►
dealer in your area. Your standard internet browser will be opened and the
Native Instruments website will open.
CTIvATe
to start the NI SERVICE CENTER right away. Consult the Setup
emO mODe
TRAKTOR 3.3 – 12
Page 13

Choose RUn D
►
are in DemO mODe from the DemO mODe graphic in the TRAKTOR heADeR. Once
you have decided to purchase a product, all you need do is unlock the demo
version by entering a valid serial number – it then instantly becomes the full
version.
The DemO mODe has the following restrictions:
Audio processing stops after 30 minutes
►
Audio recording disabled
►
Native Mix Recording disabled
►
Fixed broadcasting stream name
►
emO
to run TRAKTOR in D
emO mODe
. You can see whether you
4.3 Audio Setup
It is recommended to use TRAKTOR 3 with a multi-channel audio interface so
that you can pre-listen to a track in your headphones before bringing it into the
main mix.
However, you can also use your built-in soundcard and run TRAKTOR 3, but without
the ability to pre-listen (or CUe) tracks.
Multiple audio interfaces are not supported.
TRAKTOR 3.3 – 13
Page 14

4.3.1 Setting up a Multi-Channel Sound Card
Click on the pReFeRenCes button to open the pReFeRenCes window.
►
In the pReFeRenCes menu, double-click on AUDIO seTUp in the tree on the left.
►
Click on sOUnDCARD.
►
Click the arrow to drop down the A
►
UDIO DevICe
menu and select the sound card
you want to use.
Windows sound cards often come with different types of drivers. TRAKTOR 3
►
requires a fast response of the audio signal, and you should therefore use the
ASIO drivers that come with your sound card (if available).
For Mac OS X, simply select the name of your soundcard.
►
4.3.2 ConguringtheOutputsofaMulti-ChannelSoundCard
Open “Preferences” > “Audio Setup” > “Output Routing”
►
Make sure mIxeR mODe is set to Internal.
►
Monitor Outputs
The m
OnITOR OUTpUTs
controlled by the phvOl (Phones Volume) and phmIx (Phones Mix) knobs in the
internal mixer of TRAKTOR 3.
Click the arrow next to m
►
card.
Click the arrow next to mOn ITOR RIgh T and choose Output 2 of your sound
►
card.
You can now monitor or pre-listen to tracks through the outputs 1 and 2 of your
►
sound card.
Click on mOnO, if you want to merge both channels into one channel.
►
are used to pre-listen to a track by headphones. They are
OnITOR leFT
(m
OnO
) and choose Output 1 of your sound
It is useful to assign Outputs 1
It is useful to assign Outputs 1
and 2 for monitoring, as many
and 2 for monitoring, as many
sound cards with headphone s
sound cards with headphone s
connectors identify them as
connectors identify them as
Outputs 1 and 2.
Outputs 1 and 2.
TRAKTOR 3.3 – 14
Page 15

Master Outputs
The m
AsTeR OUTpUT
is an output pair directed at the audience. It is controlled by the
ChAnnel FADeRs and the CROssFADeR in the internal mixer of TRAKTOR 3.
Click the arrow next to m
►
AsTeR leFT
(m
OnO
) and choose Output 3 of your sound
card.
Click the arrow next to mA sTeR RI ghT and choose Output 4 of your sound
►
card.
The m
►
AsTeR OUTpUTs
of TRAKTOR are now routed through outputs 3 and 4 of
your sound card.
Booth Outputs
The BOOTh OUTpU T is an additional output pair directed to the DJ booth.
In large rooms, the sound can be reected and delayed, making exact beatmatching
imprecise or impossible at all. Extra booth boxes help you mix tighter.
The B
OOTh OUTpUT vOlUme
you don’t see the BOOTh panel, read more on page 5.4.4 (Details Section).
Click the arrow next to BOOTh leFT (mOnO) and choose Output 5 of your sound
►
card.
Click the arrow next to BOOTh RIghT and choose Output 6 of your sound card.
►
The m
►
AsTeR OUTpUTs
your sound card.
Click on mOnO, if you want to merge both channels into one channel.
►
is controlled by the B
OOTh
panel in the D
eTAIls
section. If
of TRAKTOR are now routed through outputs 5 and 6 of
TRAKTOR 3.3 – 15
Page 16
Record Outputs
The ReCORD OUTpUT is an additional output pair you can use for the recording
function of TRAKTOR 3. It is controlled by the A
section. If you don’t see the A
UDIO ReCORDeR
UDIO ReCORDeR
panel in the D
eTAIls
panel, read more on page 5.4.4 (Details
Section).
Click the arrow next to R
►
eCORD leFT
(m
OnO
) and choose Output 7 of your sound
card.
Click the arrow next to ReCORD RIghT and choose Output 8 of your sound card.
►
The m
►
AsTeR OUTpUTs
of TRAKTOR are now routed through outputs 7 and 8 of
your sound card.
4.3.3 Verifying the Audio Setup
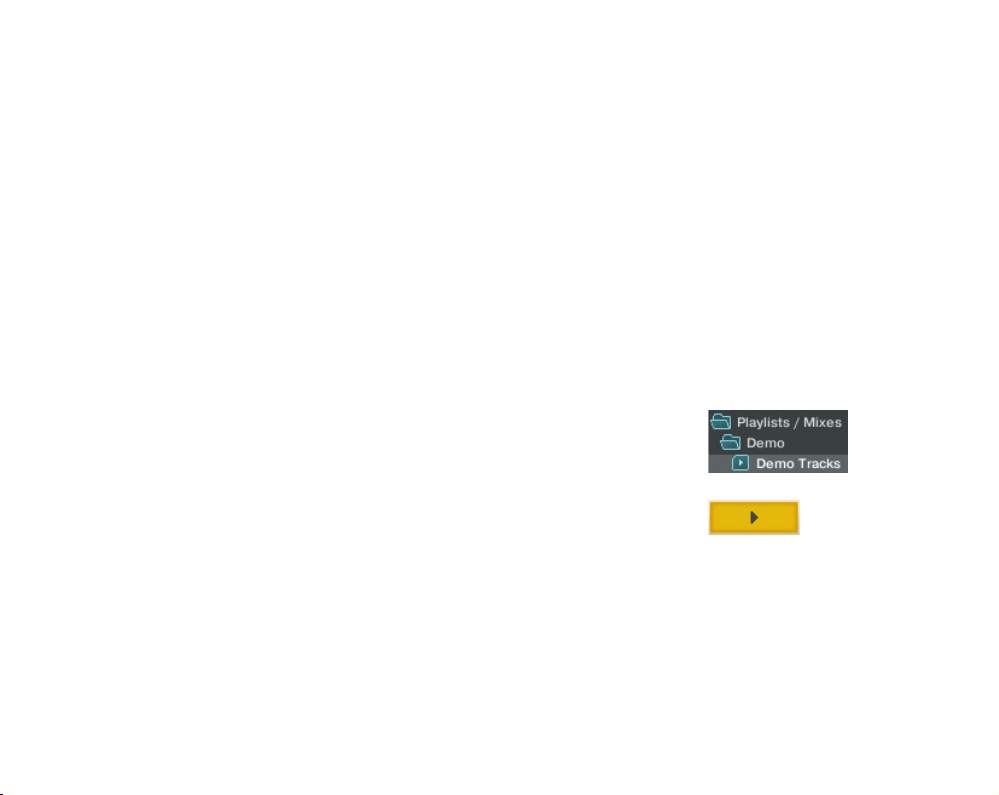
To verify the correct setup of your output channels, play one of the included DemO
TRACKs:
In the TRee wInDOw on the left, double-click on plAylIsT/ mIxes, then double-click
►
on DemO TRACKs to open the DemO plAylIsT.
Right-/ Ctrl-Click on a DemO TRACK in the lIsT wInDOw and choose Load Track in
►
Deck A. This will load the track in DeCK A, and the track wAveFORm will be dis-
played.
Click the p
►
speakers.
If the w
►
your AUDIO seTUp is incorrect - refer to the following paragraph and verify your
built-in sound card settings.
If the w
►
built-in speakers, you may have accidentally moved a knob or fader in the
mixer and turned down the volume.
lAy
button underneath D
AveFORm
does not scroll from right to left after you press the p
AveFORm
does scroll from left to right, but you hear no sound on your
eCK
A. You should hear output from your
lAy
button,
TRAKTOR 3.3 – 16
Page 17

4.4 Test Drive TRAKTOR 3
Now that the sound card is congured and TRAKTOR is up and running, let’s have
a little fun by doing a quick mix. For this, we use the DemO TRACKs that come with
TRAKTOR 3.
The D
eCKs
are your virtual turntables, and they behave just like any DJ turntable
available on the market. This means that you can not only play back, stop, scroll
forward and backward through your tracks, but you can also change the tempo of
a track. This makes it possible to match the tempo of two titles and then mix from
one to the other just like you would with two turntables and a mixer!
4.4.1 Test Driving on the Included Demo Tracks
We start by loading tracks in DeCK A and B and letting them play.
Click and hold on the rst DemO TRACK in the lIsT wInDOw and drag it into DeCK
►
A. The selected track will load into DeCK A and the track wAveFORm will appear
in the DeCK wAveFORm DIsplAy.
Click and hold on the second DemO TRACK in the lIsT wInDOw and drag it into
►
DeCK B. The track wAveFORm will appear in the wAveFORm display of DeCK B.
Make sure the C
►
the track playing in DeCK A will be heard.
Click the plAy button underneath DeCK A.
►
The track in D
►
the le info section in the upper part of the deck along with other useful information.
Underneath D
►
to play, but you won’t hear it in the main mix.
ROssFADeR
eCK
eCK
B, click the p
on the mixer is all the way to the left, so that only
A will begin playing and the track tempo will be displayed in
lAy
button. The D
emO TRACK
in D
eCK
B will begin
TRAKTOR 3.3 – 17
Page 18

The two tracks will most likely have different tempos and you will need to synchronize
their tempo and beat. You can observe current beat offset in the phAse meTeR above
the waveforms of both decks.
Click the synC button above DeCK B.
►
The tempo of the track in DeCK B now matches the tempo of DeCK A.
►
Click, hold and drag the CROssFADeR slowly to the right.
►
You will hear the track from DeCK B slowly blend in with the track in DeCK A,
►
eventually becoming the main audible track.
4.4.2 Test Driving on Your own Music
You now have learned enough to make a few mixes with the included tracks.
As you probably already have a collection of music les on your hard drive, you
might want to test drive TRAKTOR 3 with your own music. Nothing is simpler
than that.
Open a window of the Mac Finder or the Windows Explorer containing the tracks
►
that you want to play.
Click and hold one of your tracks and drag it from the external window to the
►
TRAKTOR 3 window and into DeCK A.
After a short loading time you see the w
►
display.
Click and hold one of your tracks and drag it form the external window to the
►
TRAKTOR 3 window and into DeCK B.
Play and mix the tracks as you have learned in the previous section.
►
AveFORm
of your track building up in the
You may not be able to
You may not be able to
%
use the Sync function
%
use the Sync function
wit h you r own tracks as their
wit h you r own tracks as their
tempo has to be analyzed in order
tempo has to be analyzed in order
for this function to work properly.
for this function to work properly.
Read more about the import and
Read more about the import and
the BPM detection of TRAKTOR
the BPM detection of TRAKTOR
3 on page 54 (Beatgrids).
3 on page 54 (Beatgrids).
TRAKTOR 3.3 – 18
Page 19
5. User Interface
5.1 Features and Terminology
Before we dive into the wealth of features and options, let’s get an overview about
the most important elements of TRAKTORs interface and where to nd the most
basic features!
5.1.1 Application Menu
The Application Menu gives access to basic functions and information about the software.
The Application Menu is
The Application Menu is
!
not visible in Fullscreen
!
not visible in Fullscreen
mode, therefore all File and View
mode, therefore all File and View
options can be reached directly
options can be reached directly
from the TRAKTOR graphical user
from the TRAKTOR graphical user
int er fac e. How eve r, th e He lp
int er fac e. How eve r, th e He lp
menu can only be accessed from
menu can only be accessed from
the Application Menu.
the Application Menu.
TRAKTOR 3.3 – 19
Page 20

File
Preferences: Opens the pReFeRenCes window.
►
Audio Setup: Opens the sOUnDCARD sub-menu of the pReFeRenCes.
►
MIDI Setup: Opens the mIDI InTeRFACes sub-menu of the pReFeRenCes.
►
Exit: Closes the program. If there is audio on the m
►
will have to conrm the closing after a warning message.
AsTeR OUTpUT
playing, you
View
Layouts: Choose from 10 different layouts that can be customized, renamed
►
and saved to your convenience.
Congure Layouts: Check and uncheck different options and see how the GUI
►
changes. Find a detailed description on page 5.4.3 (Layouts).
Fullscreen: Switches to F
►
chapter 5.4.7 (Miscellaneous Display Options).
UllsCReen mODe
. Read more about F
UllsCReen mODe
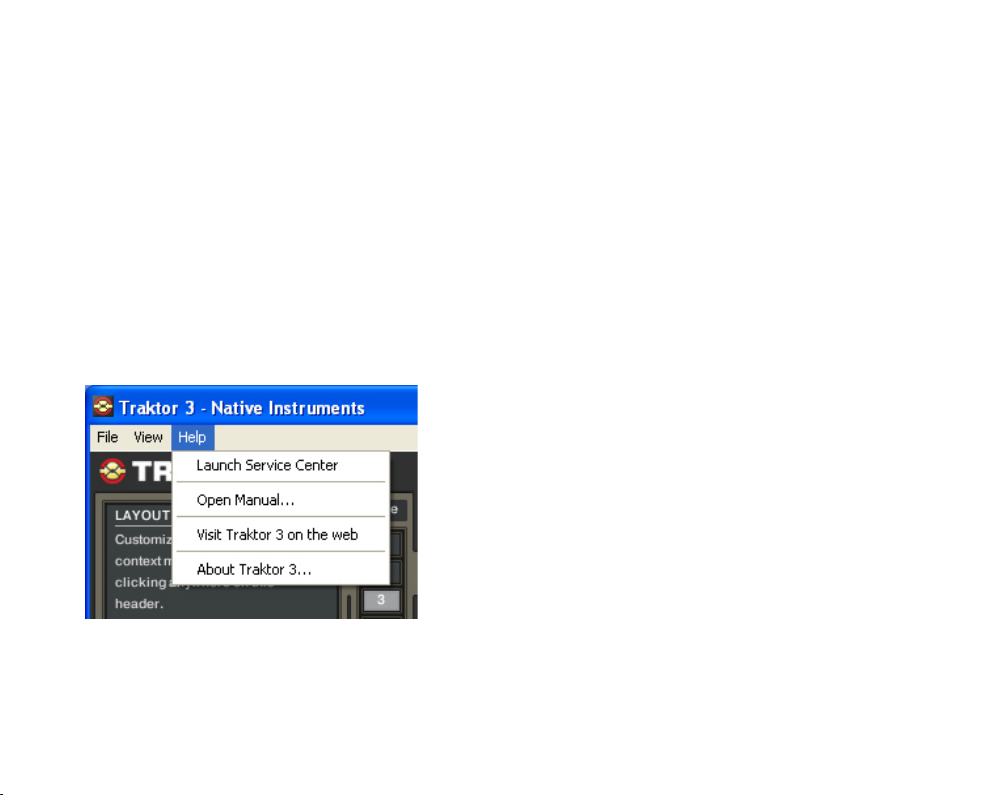
Help
Launch Service Center: Opens the NI SERVICE CENTER, where you can down-
►
load updates and register your products. Read more about the NI SERVICE
CENTER in the separate Setup Guide installed in the NI SERVICE CENTER
program folder.
Open Manual: Opens the TRAKTOR 3 user manual.
►
Visit TRAKTOR 3 on the web: Opens the TRAKTOR 3 website on the NATIVE
►
INSTRUMENTS website.
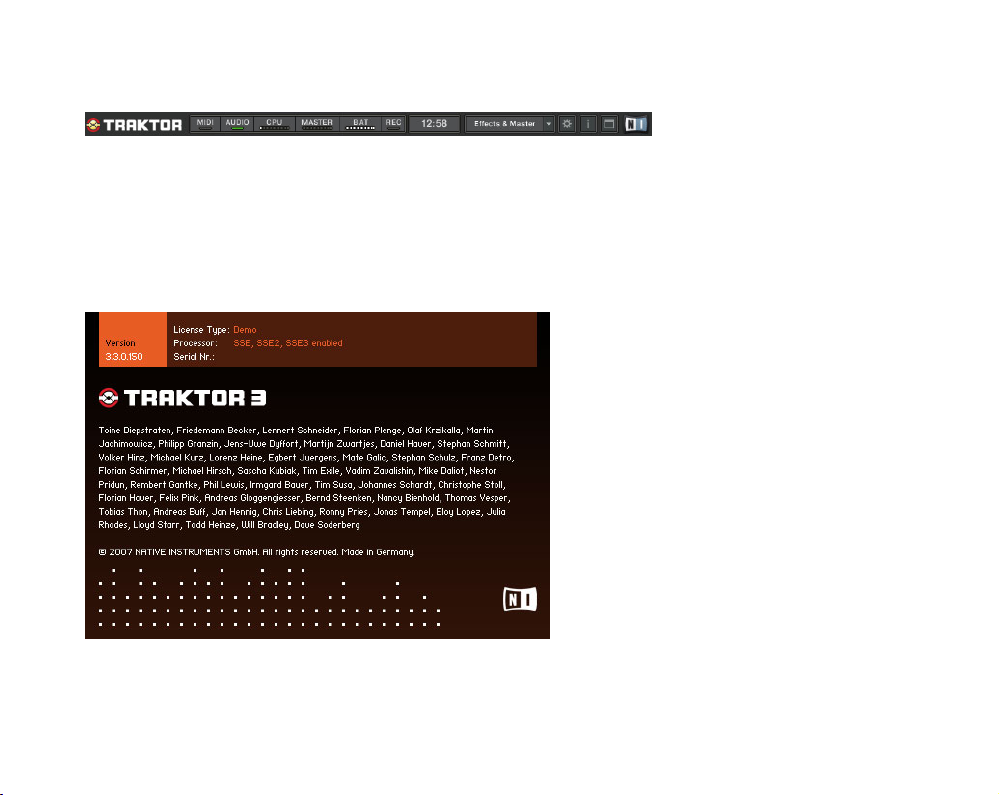
About TRAKTOR 3: Opens the A
►
about the software such as the exact version number, the serial number and
the license type as well as the credits. You can close it by clicking on it.
BOUT
window. It contains valuable information
in
You can also open the
You can also open the
%
About window by click-
%
About window by click-
ing on the TRAKTOR 3 logo.
ing on the TRAKTOR 3 logo.
TRAKTOR 3.3 – 20
Page 21
5.1.2 Header
The Header of TRAKTOR 3 is located directly beneath the Application Menu. The elements
contained in the Header give access to basic functions of the application.
TRAKTOR Logo
Clicking on the TRAKTOR 3 Logo opens the A
information about the software such as the version number, the serial number and
the license type as well as the credits. You can close it by clicking on it.
BOUT
window. It contains valuable
You can also open the
You can also open the
%
Ab out window in the
%
Ab out window in the
Help section of the Application
Help section of the Application
Menu.
Menu.
TRAKTOR 3.3 – 21
Page 22
System Monitor
In the middle of the heADe R you’ll see several displays that give you valuable
information about the status of your system:
mIDI: This displays the status of the connected device (green: a midi device is
►
connected and working; grey: no device is connected or a device is not working
properly).
AUDIO: This displays the status of your sound card. A green LED means, the
►
selected sound card is connected, a red LED means, the selected sound card
is not connected.
CpU: Indicates how much of the CPU-Capacity is available in TRAKTORs in-
►
ternal audio engine. It gives you information about how stressed your system
is, and how much headroom you have until you reach the capacity limit. If the
bar is fully lit, you most likely will experience audio dropouts.
mAsTeR: Displays the mAsTeR OUTpUT le vel.
►
BAT: Gives you quick information about how much power your battery has left;
►
useful if you’re working in FUllsCReen mODe.
ReC: If you are recording it turns green. If the input is clipping it turns red.
►
Reduce the recording gain if the input is clipping.
Clock
This displays the time depending on your computers time; useful if you are working
in FUllsCReen mODe.
Layout Selector
This drop-down menu is used to switch between different screen lAyO UTs in
TRAKTOR 3. Read more about l AyOUTs in chapter 5.4.3 (Layouts).
Preferences Button
This button opens the p
3 to your personal needs. Read more in chapter 19 (Preferences).
ReFeRenCes
dialog, which allows you to congure TRAKTOR
TRAKTOR 3.3 – 22
Page 23
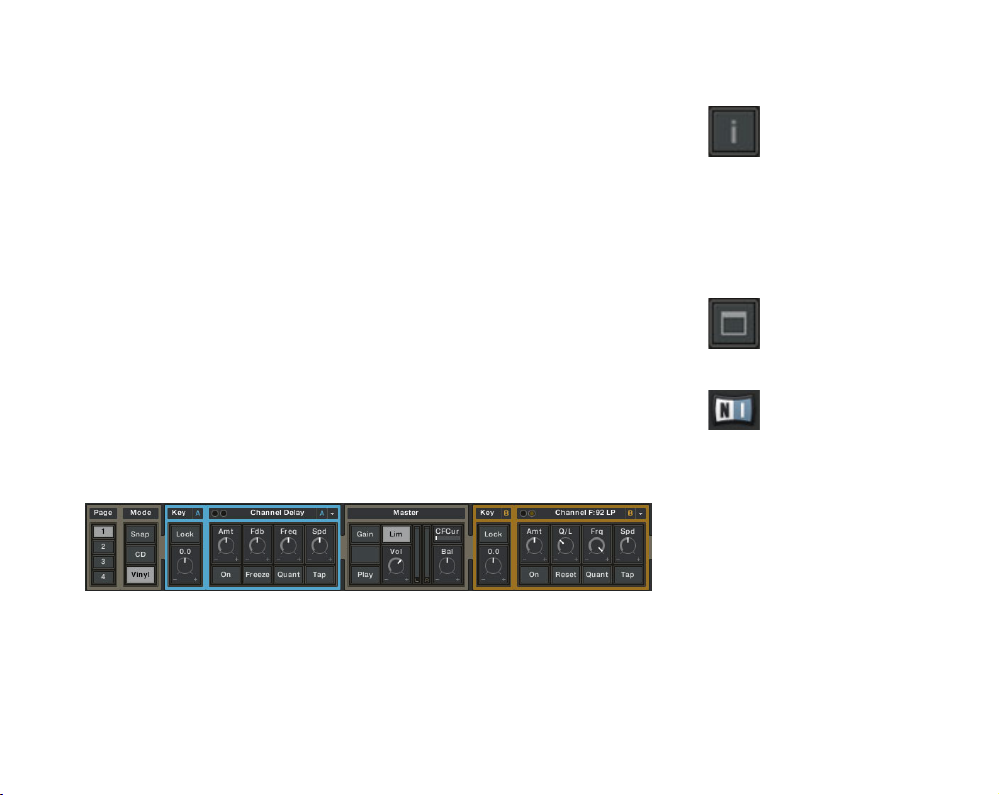
Tooltips/ Console
This button toggles the TOOlTIps/ COnsOle window on and off.
In TOOlTIp mODe it displays information about a particular feature and is especially
useful for the new user. Hover your mouse arrow over any control feature of the
TRAKTOR interface to get information about a feature. In C
OnsOle mODe
it displays
software status information. Different to the other panels, you can open and close
the T
OOlTIps
individually via the T
C in the upper right corner of the Tooltip panel to switch between T
OOlTIp
button in the Header. Click on the small
OOlTIps
and
COnsOle mODe.
Fullscreen Button
Use this button to switch to F
FUllsCReen mODe in chapter 5.4.7 (Miscellaneous Display Options).
UllsCReen mODe
. Read more about how to congure
NI Logo
Clicking on the nI l
logo.
OgO
opens the A
BOUT
window, like clicking on the TRAKTOR
5.1.3 Details Section
The Details Section is the part directly underneath the Header.
This window is fully customizable and used to display the messages window as well
as many different pAnels controlling TRAKTOR 3.
Find a detailed explanation of all DeTA Ils pAnel s in chapter 5.4.4 (Details
Section).
TRAKTOR 3.3 – 23
Page 24
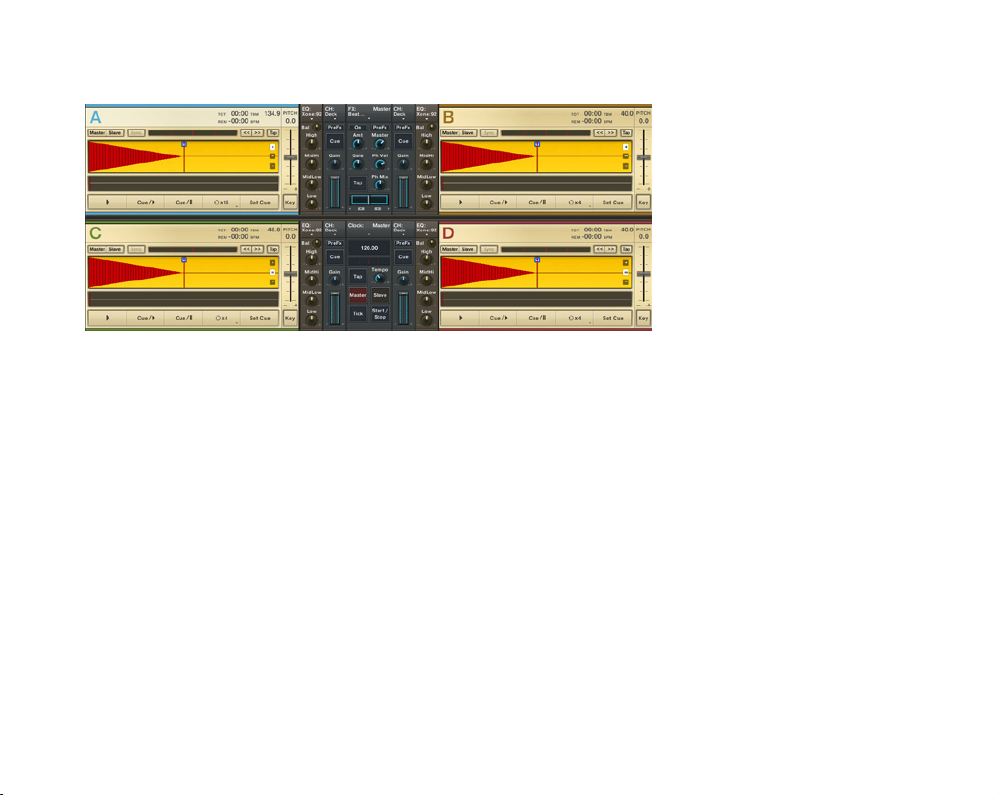
5.1.4 Decks
The Decks have a header showing File Info, Phase Meter, Pitch Bend Buttons, Master, Slave
and Sync Buttons, a detailed waveform, a graphical track overview (Stripe) and a few playback
control buttons underneath. They are referred to as Deck A and C for the left decks and Deck
B and D for the right decks.
Read a detailed explanation of all DeCK features in chapter 9 (Controlling the
Decks).
TRAKTOR 3.3 – 24
Page 25
5.1.5 Browser
The Track Browser of TRAKTOR 3
On the left you see the B
s
eARCh wInDOw
and the U
ROwseR TRee wInDOw
nDO BUTTOns
, the p
, which contains – top down – the
RevIew plAyeR
, the B
ROwseR TRee
and the
BROwseR BUTTOns as well as the sTATUs BAR and the pROgRess BAR.
On the right you see the lIsT wInDOw with the customizable BROwseR COlUmns and
the FAvORITes.
All detailed information about the B
ROwseR
can be found in chapter 6 (Using the
Track Browser).
5.2 Knob and Fader Control
Although each knob and slider in TRAKTOR has its own unique purpose, their
behavior is generally the same. You can control each knob or slider with your mouse
or by using a MIDI controller or keyboard shortcuts – called hOTKeys, explained later
in chapter 14 (MIDI and Hotkeys).
TRAKTOR 3.3 – 25
Page 26

5.2.1 Knob and Fader Control
All knobs and faders in TRAKTOR are either controlled by dragging the mouse, by
using the mouse wheel or by clicking the small p
lUs
and m
InUs
buttons next to the
knob. Dragging the mouse is a good way to make dynamic changes, whereas the
p
lUs
and m
InUs
buttons allow more subtle changes and are better suited to set a
knob to a specic value. Using the scroll wheel can be used for very ne adjustments
or for changing the parameter by steps.
5.2.2 Basic Control
Mouse Drag
Hold your mouse arrow over a knob, then click, hold and drag the mouse up or
►
down. This will move to the knob clockwise or counter-clockwise.
Click, hold and drag a knob horizontally. The knob will adjust within a ner
►
range.
Double-Click on the knob to return it to its default setting.
►
5.2.3 Advanced Control
Besides the standard mouse click functions explained above, TRAKTOR 3 offers
advanced functions utilizing p
right mouse button. If you have a track pad or mouse without a second button, you
can utilize these functions by pressing and holding the CTRl key of your computer
keyboard while clicking.
lUs
and m
InUs
buttons, the mouse wheel and the
TRAKTOR 3.3 – 26
Page 27

Plus and Minus Buttons and Mouse Wheel
Each click on the plUs (+) button next to a knob moves the value of the knob
►
incrementally up.
Each click on the mInUs (-) button next to a knob moves the value of the knob
►
incrementally down.
Turning the mouse wheel will adjust the parameter by one increment for each
►
step of the wheel.
Sensitivities
TRAKTOR 3 offers ve sensitivities for the incremental control of parameters:
Right-/ Ctrl-Click on the p
►
lUs
button to open a menu of ve sensitivity options:
min, ne, default, coarse, switch.
Select one of the options.
►
Click the p
►
lUs
and m
InUs
buttons or use the mouse wheel to see how the behavior of the knob has changed.
The small bar of dots below the knob – only visible, when you hover over the
►
control – change accordingly.
One single dot remains if you have chosen min, the full bar of 9 dots appears,
►
if you have chosen switch.
Right-/ Ctrl-Click Functions
Right-/ Ctrl-Click + hold and drag a knob. A g
►
although the knob itself will not move.
Keep holding the right mouse button, then left-click and hold. This will bring
►
the knob to the value of the ghOsT pOInTeR.
Keep holding the right mouse button and let go the left mouse button. The
►
knob will return to its last position and the red ghOsT pOInTeR remains visible.
If you want the knob to stay at the value of the g
►
the right mouse button after the knob has reached the value of the ghOsT
p
OInTeR
. The red g
hOsT pOInTeR
will disappear, and you can depress the left
mouse button as well.
hOsT pOInTeR
hOsT pOInTeR
will appear in red,
, simply release
TRAKTOR 3.3 – 27
Page 28
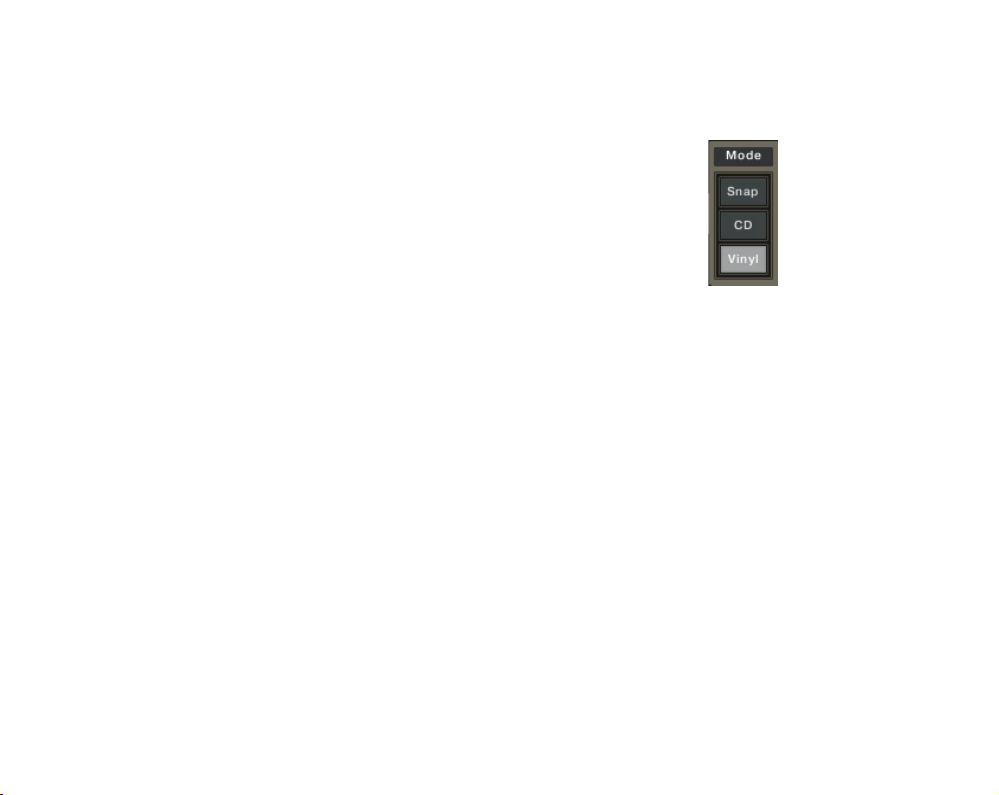
5.3 Mouse Modes
The mouse can be used to CUe, p
C
OnTROl mODes
: s
nAp
, CD and v
lAy
and p
AUse
a track. There are 3 available m
Inyl
. You can switch between m
OUse mODes
OUse
by pushing
the respective button in the mODe DeTAIls pAnel. If you can’t nd the mOD e panel,
refer to the l
AyOUT
chapter for learning how to insert the m
ODe
panel into one of
your DeTAIl views.
If you intend to often switch between m
is included on each of your D
eTAIls
OUse mODes
, make sure that the m
pages. If you intend to use only one m
ODe
panel
OUse mODe
you can remove the mODe panel from all your DeTAIls pages.
5.3.1 Snap Mode (Waveform)
In this mode the mouse pointer will snap to either BeATs, CUe pOInTs or BeATgRID
lines.
Hold your mouse pointer over the w
►
BeAT and CUe pOInT.
Click and hold. This snaps the cursor to the nearest B
►
as long as you hold the button. This is the same as CUe/ pAUse.
Release the button to return to the last CUe pOInT.
►
To avoid returning, press the right mouse button before releasing the left one
►
to switch to permanent playback.
Clicking on the wAveFORm with right-/ ctrl-click cues the song to the target but
►
starts playback only when you release the mouse button.
AveFORm
. Red s
nAp
points appear at each
eAT
and plays the track
TRAKTOR 3.3 – 28
Page 29

5.3.2 Snap Mode (Stripe)
Select snAp from the mODe De TAIls pAnel.
►
Hold your mouse pointer over the sTRIpe wAveFORm.
►
When moving the mouse back and forth, small, red s
►
along the sTRIpe wAveFORm.
Click to move the cursor to the snAp point in the sTRIpe wAveFORm.
►
nAp
points will appear
5.3.3 CD Mode (Waveform)
This triggers a stutter loop known from pitchable CD -players while clicking and
holding the wAveFORm.
Click and hold on the wAveFORm.
►
The DeCK will play a short, consistent loop as long as you hold the mouse but-
►
ton.
While holding the button pressed you can adjust the position of the loop by
►
horizontally dragging the wAveFORm.
To set a CUe p
►
wards the beat coming from the right side until you hear the very rst millisecond of the beat entering the loop. Release the left mouse button and the track
will pause exactly before the beat.
Right-/ Ctrl-Click and hold the wAveFORm, then release the mouse button to start
►
playback.
OInT
right before a B
eAT
, move the loop as close as you can to-
5.3.4 CD Mode/ Vinyl Mode (Stripe)
Select either CD or vInyl from the mODe module.
►
Click and hold anywhere on the sTRIpe wAveFORm.
►
Move the mouse backward or forward. This will navigate through the s
►
wAveFORm similar to moving a slider.
TRIpe
TRAKTOR 3.3 – 29
Page 30

5.3.5 Vinyl Mode
In this mode the w
pointer won’t snap to beats in the wAveFORm.
Click and hold the track wAveFORm. This is like putting your hand on a vinyl
►
record to pause playback.
While holding the mouse button, move the mouse backward and forward. This
►
moves the wAveFORm similar to scratching a vinyl record.
Release the mouse button. The track will begin playing from the point at which
►
you release it.
Right-/ Ctrl-Click on the wAveFORm to start and stop playback.
►
AveFORm
can be manipulated like a vinyl record and the mouse
5.4 Adjusting the Look of TRAKTOR
Whether you would like to take advantage of advanced features or simply wish to
perform basic mixing, the TRAKTOR interface can be adjusted for your specic
needs.
5.4.1 Scalability
The TRAKTOR interface can be scaled to the size of your liking:
Click + hold and drag the bottom-right corner of the TRAKTOR window. This
►
will expand and/ or contract the TRAKTOR interface while simultaneously resizing all TRAKTOR sections.
TRAKTOR 3.3 – 30
Page 31

5.4.2 Waveform Zoom
Each DeCK offers the ability to zoom in or out on a track wAveFORm. Zooming in on
a wAveFORm can be helpful in nding a more accurate CUe pOInT. Zooming out will
give you a broader view of the wAveFORm.
Click the p
►
display. This zooms in on the track wAveFORm.
Now click the eQUAl (=) sign. This zooms to TRAKTORs default view of the track
►
wAveFORm.
Now click the m
►
wAveFORm.
lUs
(+) sign button in the upper corner of the main D
InUs
(-) sign. This zooms out, giving a broader view of the track
eCK wAveFORm
5.4.3 Layouts
A l
AyOUT
is the way in which you have the TRAKTOR interface congured. Customize
your l
AyOUTs
to create a working environment for specic tasks that ts your needs
or use one of the 10 different sample lAyOUTs that are already precongured.
Switching between Layouts
Click on the lAyOUT sel eCTOR for opening the drop-down menu showing the
►
available lAyOUTs.
Select one of the available lAyOUTs and observe the changes in the interface.
►
The 10 lAyOUTs are optimized for typical situations.
►
Customizing a Layout
Switch to the lAyOUT that you intend to customize.
►
Unlock the selected l
►
un-checking the option Lock current Layout of the bottom of the list.
Right-/ Ctrl-Click anywhere on the TRAKTOR h
►
the currently visible sections in the active lAyOUT.
Visible sections are checked, invisible sections are un-checked.
►
AyOUT
by opening the drop-down menu a second time and
eADeR
to open a menu that shows
Waveform Zoom can also
Waveform Zoom can also
%
be performed with the
%
be performed with the
scroll wheel of your mouse. Hold
scroll wheel of your mouse. Hold
the mouse over the Waveform and
the mouse over the Waveform and
scroll up or down to zoom in or
scroll up or down to zoom in or
out.
out.
You can always minimize
You can always minimize
%
or ma ximize the Decks
%
or ma ximize the Decks
by double-clicking on the Header
by double-clicking on the Header
of one of the Deck s (where the
of one of the Deck s (where the
letters A and B are located).
letters A and B are located).
TRAKTOR 3.3 – 31
Page 32

Proceed to customize your l
►
sections.
When you are done, right-click on the l
►
current Layout.
The available options are:
Show Details: Opens and closes the DeTAIls section. Useful if you are working
►
with four decks and have not much space on your screen left, e.g. for the
browser.
Show Messages: Opens and closes the T
►
you’re a TRAKTOR 3 newbie, close it if you’re already familiar with TRAKTOR
3 and use the spare place for another panel.
Show Browser: Opens and closes the TRAKTOR 3 browser. If you manage your
►
tracks outside the TRAKTOR 3 browser, e.g. in iTunes, you might want to close
the TRAKTOR 3 browser.
Show Progressbar: Opens and closes the analyzation pROgRess BAR in the low-
►
er left corner.
Show Favorites: Opens and closes the FAvORITes playlists.
►
Show Browser Button Controls: Shows and hides buttons for several playlist
►
and track related functions. Find a detailed description of the Browser Buttons
in chapter 6.3.4 (Browser Buttons).
Minimize/ Maximize Deck A & B: As well as a double-click on the deck headline
►
this option minimizes and maximizes the view of your deck, removing the sTRIpe
and leaving more room for the browser.
Minimize/ Maximize Deck C & D: As well as a double-click on the deck headline
►
this option minimizes and maximizes the view of your deck, removing the sTRIpe
and leaving more room for the browser.
Hide and Mute Deck C & D: If you only use 2 decks, especially because you
►
have a low-end computer, check this option to save memory.
Show Pitch Fader: Turns the pITCh FADeR on and off.
►
AyOUT
by checking and un-checking the different
AyOUT
box and check the option Lock
OOlTIps
/ C
OnsOle
box. Keep it open when
All these options can be
All these options can be
%
r e ach ed f r o m t he
%
r e ach ed f r o m t he
Application Menu as well.
Application Menu as well.
TRAKTOR 3.3 – 32
Page 33

Show Mixer FX Controls: Shows and hides a selection of effect knobs and but-
►
tons for the channel effects. Learn more about the ChAnnel eFFeCTs in chapter
12 (Effects).
Show Mixer EQ Controls: Shows and hides the EQ controls. Choose from 4
►
different EQ emulations. Learn more about the EQ controls in chapter 11.1.1
(EQing the Mix).
Show Mixer Channel Controls: Shows and hides the typical channel controls
►
like the ChAnnel FADeR, CUe button and gAIn control.
Show Mixer Master Controls: Shows and hides the mA sTeR COn TROls like
►
CROss FADeR, the phmIx and phvOl knobs as well as controls for the mAsTeR
eFFeCT.
Lock Current Layout: Locks and unlocks the current l
►
permanent.
AyOUT
to make changes
Changing the Name of a Layout
Double-Click inside the lAyOUT box.
►
A cursor appears allowing you to edit the current name.
►
Enter a new name for the lAyOUT.
►
Conrm with the enTeR key of your computer keyboard.
►
5.4.4 Details Section
The DeTAIls seCTIOn has four individual pages. TRAKTOR is precongured for screens
having a width of 1024 pixels. On many current screens the D
therefore be only partly lled.
As for the l
example of how you can congure the interface. After spending some time with
TRAKTOR, you will want to change the pre-selected panels to t your personal
needs and your style of DJing. Here is the description of how to customize the
DeTAIls seCTIOn:
AyOUTs
, the panels loaded into the 4 available D
eTAIls seCTIOn
eTAIls
pages are an
will
TRAKTOR 3.3 – 33
Page 34

Arranging, Deleting and Inserting Panels from the Details Section
Right-/ Ctrl-Click on a panel in the DeTAIls section. This will drop down a selec-
►
tion menu.
Choose Close this Panel to remove the panel from the current DeTAIls page.
►
Choose Make First to move the panel all the way to the left-most side of the
►
DeTAIls section.
Choose Make Last to move the panel all the way to the right-most side of the
►
DeTAIls section.
Choose Move Left to move the panel to the left.
►
Choose Move Right to move the panel to the right.
►
Choose one of the available panels to insert the panel to the right of the other
►
panels into the page.
Available Panels
Page: Select here one of the four De TAIls pAges.
►
Mode: Select here the mOUse mOD e for the wAveFORm navigation.
►
Decks: Here you can focus any of the D
►
ment.
Cue Edit: Set, save and rename CUe pOInTs, delete them or navigate between
►
them.
Cue List: Direct access to the rst six CUe p
►
tion.
BeatJump: Performs B
►
size.
BPM: Tempo adjustment functions like setting a B
►
a BeATgRID.
Channel: Channel related functions and channel input selection.
►
Master: Master audio section for controlling main mixer functions
►
Loop Set: Sets Loops either manually or with beat accurate length.
►
Loop Slct: Handles navigation between Loops.
►
eATJUmps
eCKs
and change the C
OInTs
of a track for easier naviga-
forward and backward depending on the jump
eATmARKeR
ROssFADeR
and establishing
assign-
TRAKTOR 3.3 – 34
Page 35

Loop Move: Moves the current lOO p forward and backward depending on a
►
chosen step-size.
Loop Start: Resizes the current lOOp by moving the lOOp sTART pOInT depending
►
on the step-size.
Loop End: Resizes the current lOOp by moving the lO Op enD pOInT depending
►
on the step-size.
Track Info: Contains customizable displays for the track infos. Read more about
►
the TRACK InFO in chapter 5.4.5 (Deck Info).
Audio Recorder: Record audio from the internal mix, microphone or external
►
mixer sum.
Native Mix Recorder: Plays back and records nATIve mIx FIles.
►
Clock: Contains all controls for the mAsTeR ClOCK.
►
Key: Contains controls for changing the Key of your tracks and performing time
►
stretching.
Channel Effect: Switch between TRAKTORs Ch Annel eFF eCTs and adjust
►
them.
Master Effect: Switch between TRAKTORs mAsTeR eFFeC Ts and adjust them.
►
Tracking: Find here SCRATCH related information, like the calibration status
►
and the assignment of the decks. Click on the circle to switch from s
sTICKeR vIew.
Booth: Contains controls for a monitor speaker system.
►
COpe
to
Separators/ Growing Separators
sepARATORs are a visual help to organize panels into groups. To insert a sepARATOR,
do the following:
Right-/ Ctrl-Click on the panel to the right of the desired sepARATOR position.
►
Select Separator from the context menu
►
To remove a sepARATOR right-/ ctrl-click on it and choose Close this panel.
►
TRAKTOR 3.3 – 35
Page 36

gROwIng sepARATORs are helpful to build your details view symmetrical and equally
spaced. The gROwIng sepARATORs are especially useful if you’re assigning panels to
DeCK A and B – this way you can e.g. adjust the panels for DeCK A on the left side
and for DeCK B on the right side.
To insert a gROwIng sepARATOR, do the following:
Right-/ Ctrl- Click on the panel to the right of the desired g
►
position.
Select Growing Separator from the context menu
►
To remove a g
►
panel.
ROwIng sepARATOR
right-/ ctrl-click on it and choose Close this
ROwIng sepARATOR
Linking the selection of the Details pages to Layouts
Locked lAyOUTs recall the DeTAIls page they have been used with. If you prefer to
switch lAyOUTs and DeTAIls pages independently, unlock your lAyOUTs. When using
unlocked l
one lAyOUT to the other.
AyOUTs
the D
eTAIls
page will remain unchanged while you switch from
5.4.5 Deck Info Options
Open “Preferences” > “Appearance” > “Deck Info Options”.
►
In this pReFeRenCe menu you can choose the information you want to have
►
displayed in the DeCK heADIng.
There are two rows with three columns each available, or in other words, you
►
have six elds you can customize to your liking.
Click on the downwards pointing arrow to choose between one of the 19 available
elds:
Title: Displays the tracks’ title.
►
Artist: Displays the tracks’ artist name.
►
Release: Displays the tracks’ album name.
►
Mix: Displays the remix name.
►
The width of a Growing
The width of a Growing
%
Separato r de pends on
%
Separato r de pends on
the number of panels you made
the number of panels you made
visible in the Details section.
visible in the Details section.
TRAKTOR 3.3 – 36
Page 37

Label: Displays the Label name where the track was released.
►
Cat. No.: Displays the Beatport catalogue number.
►
Genre: Displays the musical genre.
►
Total Time: Displays the whole track time in minutes and seconds.
►
Bitrate: Displays the bitrate of a track in kbps.
►
Track BPM: Displays the original BPM of a track.
►
Gain: Displays the g
►
knob.
Elapsed Time: Displays the already expired track time in minutes and sec-
►
onds.
Remaining Time: Displays the remaining track time in minutes and seconds.
►
Beats: Counts the beats beginning with 1.1 at the origin of the BeATmARKeR.
►
Beats to Cue: Displays the beats remaining until the end of the track.
►
BPM: Displays the actual BPM depending on the current pitch.
►
Tempo: Displays the actual tempo of the track in percent depending on the
►
actual pitch.
Key: Displays the actual Key of a track depending of the value chosen in the
►
Key panel.
Off: Turns the respective DeCK InFO FIelD off.
►
AIn
of a track depending on the value chosen with the g
AIn
TRAKTOR 3.3 – 37
Page 38

5.4.6 Wave Display Options
The wAve FORm of a track can be customized in the following section of the
preferences: Open "Preferences" > "Appearance" > "Wave Display Options".
Highlight Beatmarkers
With this option checked, the small white lines on every beat get highlighted.
Load a track in DeCK A.
►
Move the pReFeRenCes window beneath the DeCK.
►
Check the option hIghlIghT BeATmARKeRs.
►
Click on Apply.
►
Observe that the white, vertical lines on every beat are now brighter than be-
►
fore.
Show Minute-Markers
With this option checked, every minute will be marked with a small, vertical, white
line in the overall waveform (s
will go on.
Load a track in DeCK A.
►
Move the pReFeRenCes window beneath the DeCK.
►
Check the option shOw mInUTe-mARKeRs.
►
Click on Apply.
►
Observe that the white, vertical lines every minute of the track in the overall
►
waveform (sTRIpe).
Channels
This option changes the appearance of the waveform.
Load a track into a DeCK.
►
Move the pReFeRenCes window beneath the DeCK.
►
BeATs uses a single color to display the beats of the track.
►
TRIpe
), giving you a visual hint of how long your track
TRAKTOR 3.3 – 38
Page 39

BeATs AnD hIghs uses two color shades to display beats and highs. The lighter,
►
semi-transparent shade represents the highs, the solid color the beats.
BeATs AnD envelOpe displays the beats and their envelopes to give a better im-
►
pression of the rhythmic structure of a track.
Press Apply to preview the change.
►
Colors
It is possible to select a color scheme for the wAveFORms that ts your personal taste
and working environment. When using TRAKTOR in daylight or with reections
on the screen it makes sense to use the highest contrast between w
background, whereas it might be easier for the eyes if you use a more subdued
color variation if you are working in a dark DJ booth or at home.
Load a track into a DeCK.
►
Move the pReFeRenCes window beneath the DeCK.
►
Choose yellOw, BlUe or BROwn as color.
►
Press Apply to preview the change.
►
AveFORm
and
Track End Warning Time
By setting a T
to 60 seconds before a DeCK stops playing. This is very helpful preventing a track
running out unnoticed.
Open pReFeRenCes > wAve DIsplAy OpTIOns.
►
Set the desired amount of seconds by moving the slider next to TRACK enD
►
wARnIng TIme.
Click Apply to apply the changes.
►
RACK enD wARnIng TIme
, TRAKTOR will ash the w
AveFORm sTRIpe
up
Stripe View
This is a TRAKTOR Scratch Preference, explained in chapter 18.2 (TRAKTOR
Scratch Preferences).
TRAKTOR 3.3 – 39
Page 40

Play Marker Position
This slider adjusts the position of the vertical, red line called p
where your track starts to play from.
Load a track into a DeCK.
►
Move the pReFeRenCes window beneath the DeCK.
►
Move the slider to a different value.
►
Click Apply to preview the result.
►
lAymARKeR
. This is
Show Phase Meter
With the option shOw phAse meTeR unchecked, the phAse meTeR will not be visible.
If you check this option you will see the phAse meTeR appear above the wAveFORm.
5.4.7 Miscellaneous Display Options
Other adjustable settings of TRAKTORs appearance can be found in "Preferences"
> "Appearance" > "Miscellaneous".
Fullscreen Mode
You can use the scale method to stretch TRAKTOR to t your whole screen or you
can use FUllsCReen mode. The advantage of using FUllsCReen mode is that nothing
on your computer screen will be visible (or controllable) other than the TRAKTOR
interface. For instance: If using a Mac, the dock will not be visible. If using Windows,
the taskbar and start menu will not be visible.
Click the FUllsCReen button located at the top of the TRAKTOR interface to enter
►
and exit F
face.
UllsCReen
mode. This will ll your entire screen with the TRAKTOR inter-
This looks great if you’re
This looks great if you’re
%
performing live!%
performing live!
TRAKTOR 3.3 – 40
Page 41

If your screen resolution is higher than 1024x768, the controls of TRAKTOR
►
may seem too small for you. In this case you can select 1024x768 in the
TRAKTOR p
screen with the TRAKTOR interface at 1024x768 resolution, making the controls larger and more visible.
On the same pReFeRenCes page you can also set FUllsCReen mode to default by
►
selecting the option swITCh TO FUllsCReen On sTARTUp.
ReFeRenCes
menu. With this selected, F
UllsCReen
mode will ll your
Show value when over control
With this option checked, hovering with your mouse over a control displays the
current value, if it’s not checked you can only see the name of the button, e.g.
AmT for amount.
Check the option shOw vAlUe when OveR COnTROl.
►
Click on Apply.
►
Hover over control buttons like the effect knobs and see the difference.
►
Font Size
You can customize the FOnT sIze used in the BROwseR TRee and the lIsT wInDOw.
Open “Preferences” > “Appearance” > “Miscellaneous”.
►
Click on FOnT sIze to choose between the font sizes from smAll to hUge.
►
Click Apply to preview the change.
►
Finally click OK to close the pReFeRenCes menu.
►
Hide Beatport
With this option checked, all Beatport related things are taken away from the GUI.
This means the BeATpORT FInD mORe BUTTOn as well as the Beatport shop.
Check the option hIDe BeATpORT.
►
Click on Apply.
►
Look at the lIsT wInDOw of the track browser to see the difference.
►
TRAKTOR 3.3 – 41
Page 42

Reset hidden dialogs
Whenever a dialog in TRAKTOR opens, e.g. if you try to delete a track, you can
put a checkmark in the eld DO
dialog again.
Use the option R
►
security dialogs show up again.
eseT hIDDen DIAlOgs
nOT shOw AgAIn
whenever you want to reset this, so that all
. If you do so you won’t see this
5.4.8 Customizing the List Window of the Browser
The content of the lIsT wInDOw can be sorted by any of the visible columns. Click
on a header to invert the sorting sequence of the column.
You can hide and show 27 attributes of a track:
Right-/ Ctrl-Click on a headline of the lIsT wInDOw.
►
Check an attribute that you would like to have represented as column in the
►
lIsT wInDOw.
Uncheck those attributes that you want to hide.
►
Repeat this action until you have congured the headlines you want to be vis-
►
ible.
To change the size of a column, drag the line next to it.
►
To change the relative position of a column, click + hold and drag it horizon-
►
tally.
Observe the red line indicating where the column will be inserted when releas-
►
ing the mouse button.
TRAKTOR 3.3 – 42
Page 43

6. Using the Track Browser
Whether you are at home, in the studio or DJing at a live gig, the T
is designed to help manage your songs, giving you the easiest, quickest access to
your songs, pl AylIsTs and FAvORITes.
RACK BROwseR
6.1 Preparing the Set
6.1.1 Compatible Music File Formats
TRAKTOR supports the following music le formats:
MP3
►
AAC (M4A)
►
WAV
►
AIFF
►
WMA
►
FLAC
►
OGG Vorbis
►
Find more information about the supported music le formats, especially about
the TRAKTOR support of ID3 tags on the following website:
http://ww w.native-instruments.com/traktor3letype
Read more about ID3-tags in chapter 6.3.3 (Writing Track Properties into Music
Files - ID3 Tags).
Yo u h av e to in st all
Yo u h av e to in st all
$
Quicktime or iTunes to
$
Quicktime or iTunes to
be able to use A AC fi les in
be able to use A AC fi les in
TRAKTOR.
TRAKTOR.
Yo u h av e to in st all
Yo u h av e to in st all
$
Windows Me dia Player
$
Windows Me dia Player
to be able to use WMA files in
to be able to use WMA files in
TRAKTOR.
TRAKTOR.
Mu sic fil es tha t ar e
Mu sic fil es tha t ar e
$
DRM-protected cannot
$
DRM-protected cannot
be played back in TRAKTOR. This
be played back in TRAKTOR. This
affects e.g. AAC-tracks bought in
affects e.g. AAC-tracks bought in
the iTunes store.
the iTunes store.
TRAKTOR 3.3 – 43
Page 44

6.1.2 Importing your Tracks
Managing your tracks in the TRAKTOR C
compared to simply organizing your tracks in folders. The T
le that categorizes and provides references to the music les on your computer,
making them easily accessible through various browser features. Importing a track
into your COlleCTIOn does not actually copy the music le - instead it adds the le
to the TRACK COlleCTI On list making it easily manageable and searchable. Each row
in your C
about the track such as its location (F
tag properties such as A
allows for even more specic information such as Bpm (beats per minute), original
song Key, personal RATIng and more.
If you have organized your music in a set of special folders like “My Music”, it
is advisable to reveal these directories to TRAKTOR. Hereafter you can use the
function Import Music Folders to synchronize TRAKTOR with recently added tracks
or with a changed folder structure within this set of folders.
OlleCTIOn
references a track on your hard drive and contains information
RTIsT
, T
ITle
Specify your Music Folders
Open “Preferences” > “Browser Preferences” > “Data Location”.
►
Click ADD on the bottom of the right window.
►
Browse to your mUsIC FOlDeRs.
►
Conrm with OK.
►
Repeat to add all of your mUsIC FOlDeRs.
►
Import your Music Folders
Right-/ Ctrl-Click on the COlleCTIOn icon in the BROwseR TRee.
►
Choose Import Music Folders from the menu.
►
OlleCTIO n
Ile pATh
, A
lBUm
, etc. However, the TRAKTOR C
represents a huge advantage
) on your computer and standard ID3
RACK COlleCTI On
OlleCTIOn
is a
Subfolders are automat-
Subfolders are automat-
!
ica lly include d in the
!
ica lly include d in the
scan. You don’t need to add sub-
scan. You don’t need to add sub-
folders to this list.
folders to this list.
TRAKTOR 3.3 – 44
Page 45

TRAKTOR offers other alternative methods to import single tracks or a special folder
that is not part of your conventional mUsIC FOlDeR structure:
Drag and drop a track or a folder from your Mac Finder or Windows Explorer
►
onto the COlleCTIOn icon in the TRAKTOR BROwseR TRee.
Drag and drop a track or a folder from the tree structure below the TRAKTOR
►
Explorer icon representing all drives connected to your computer onto the
COlleCTIOn icon.
In the same manner you can right-/ ctrl- click on a subfolder of the TRAKTOR
►
Explorer icon or on a track listed in the window on the right side and choose
Add to Collection from the menu.
Any track that is played in a DeCK or added to the CURRen T plAylI sT is also
►
added to the COlleCTIOn.
Collection Structure
Within the COlleCTIOn, the tracks are detached from their physical location on the
hard drive and can be represented in several independent and overlapping ways.
Underneath the C
►
R
eleAses
, l
within this category.
A track can be contemporarily listed in several plAylIsTs. plAylIsTs represent a
►
personalized sorting method often related to the circumstances for playing
these particular tracks. They can be seen as your virtual record crates.
Search results are a further way of displaying your C
►
the seARCh function in chapter 6.2 (Searching for tracks).
Finally in the l
►
such as Bpm, R
results.
ABels
IsT wInDOw
OlleCTIOn
or g
icon, you can see the tracks grouped by A
enRes
. A number indicates the current number of tracks
OlleCTIOn
on the right, tracks can be sorted by various criteria,
eleAse DATes
or R
ATIngs
, giving an additional value to search
RTIsTs
. Read more about
,
TRAKTOR 3.3 – 45
Page 46

6.1.3 Data Location
As you will learn, TRAKTOR has functions that create and reference cer tain le
types. These le types are stored in their own default directories. However, you can
change the directory paths by using the DATA lOCATIOn pReFeRenCes menu.
Open “Preferences” > “Browser Preferences” > “Data Location”.
►
You can change the directory path for the following le types by clicking on the
button with the exclamation mark (!) after the current path:
C
OlleCTIOn
►
information.
plAy lIsTs: the le path TRAKTOR follows for plAylIsT s. Read more about
►
plAylIsTs in chapter 6.4 (Working with the Collection and Playlists).
R
eCORDIngs
►
audio format.
ITUnes
►
settings in your iTunes).
B
eATpORT
►
loaded from BeATpORT through the TRAKTOR interface.
mUsIC: Here you can specify the location of folders and hard drives to be
►
scanned for supported music les during the mUsIC FOlDeRs Import.
: the le path TRAKTOR follows for loading and storing C
OlleCTIOn
: the le path in which TRAKTOR stores the recordings you make in
: the le path to your iTunes library (this path has to be identical with the
: the le path in which TRAKTOR physically stores all songs down-
TRAKTOR 3.3 – 46
Page 47

6.1.4 Analysis
The analysis scans the entire track and returns the following information:
Bpm e
sTImATe
►
of music. Read more about verifying the Bpm e
a BeATgRID in chapter 9.5 (Beatgrids).
g
AIn vAlUe
►
ties of the track and on the involved mastering techniques. The gA In vAlUe
established during the analysis is a very accurate estimation of the optimal
setting of the channel g
use this gain estimation when loading a track into a D
function, available in the mAsTeR DeTAIls panel.
sTRIpe: The small representation of the wAveFORm underneath the wave display
►
is created by the analysis process. If the s
likely not yet been analyzed.
: The Bpm e
: each track has a perceived loudness, based on its musical proper-
sTImATe
is more or less accurate according to the type
sTImATe
and about how to create
AIn
knob to match the loudness of a track to 0dB. To
eCK
, enable the A
TRIpe
of a track is missing it has most
Auto Analysis
Open “Preferences” > “Browser Preferences” > “Collection Preferences” for
►
options on automatic track analyzation.
Read more about the AnA lyze options in chapter 19.3.2 (Collection
►
Preferences).
6.2 Searching for tracks
One of the quickest ways to nd a specic track is to use the s
Rather than browsing through folders, you can type a key word into the s
and let TRAKTOR search your COlleCTIOn.
eARCh
function.
eARCh
UTO gAIn
eld
To make use of the
To make use of the
%
Se arch func tio n, the
%
Se arch func tio n, the
tracks need to be imported into
tracks need to be imported into
the Collection.
the Collection.
TRAKTOR 3.3 – 47
Page 48

6.2.1 Simple Search
Click in the seARCh eld.
►
Type anything related to the track you are searching for in the s
►
as Track Name, Artist Name, Album Name, etc. Hit the Enter key on your
computer keyboard. TRAKTOR will search your entire C
all matching les in the lIsT wInDOw.
Entering more than one word will return the tracks containing all the se
►
words.
eARCh
OlleCTIOn
eld such
and display
6.2.2 Rene
A search completed with the enTeR key of your keyboard searches the whole
COl leCTIO n. You can rene a search to a specic subset of the COlleC TIOn by
completing the search with the selection of one category in the ReFIne menu.
Type a word into the seARCh eld.
►
Click the R
►
drop-down menu.
The available options reect the relevant BROwseR COlUmns.
Playlist: Searches within the currently displayed plAylIsT only. This option can
►
also be used for rening a search by searching only within a search result.
All: Searches the whole COlleCTIOn.
►
Artists: Tries to match the search string with the ARTIsT elds only.
►
Same for Title, Genre, etc.
►
eFIne
button behind the s
eARCh
eld and choose a eld from the
A search for BPM gives
A search for BPM gives
%
back tracks with similar
%
back tracks with similar
values, which means a range of +/-
values, which means a range of +/-
2.5 BPM of the entered value.
2.5 BPM of the entered value.
TRAKTOR 3.3 – 48
Page 49

6.2.3 Search Operators
These are the available operators for advanced searches:
& (and)
►
| (or)
►
= (equal; if you search for attributes with decimal values the operator range is
►
used automatically also)
<> (unequal)
►
> (greater than)
►
< (less than)
►
~ ( a range of +/- 2,5)
►
“...” (phrases, use this for an exact search phrase)
►
Example:
The following search
$TITLE=Chicken & $TITLE <> Dance & $GENRE=Breakbeat & $ARTIST <> “ChickenLips” |
$ARTIST=Vee
translates to:
Show me all tracks that contain “Chicken” in the title
►
Don’t include tracks that contain “Dance” in the title as well
►
These tracks must have a genre of “Breakbeat”
►
The artist must NOT be “Chicken Lips” or contain “Vee”
►
TRAKTOR 3.3 – 49
Page 50

6.2.4 Magnifying Glass
In the l
IsT wInDOw
property elds. This is used to search tracks in your collection with the same entry
in that eld.
In the lIsT wInDOw, click the mAgnIFyIng glAss next to an ARTIsT nAme.
►
TRAKTOR will search your entire collection for tracks of the same ARTIsT.
►
, you will notice a small m
AgnIFyIng glAss
in many of the track
6.2.5 Beatport “Find More” Button
In the l
IsT wInDOw
the track property elds. This is the F
the Beatport store that have the same entry in that eld. Read more about the F
mORe button in chapter 8.2 (Beatport “Find More” Button).
, you will notice a small downwards pointing arrow in many of
InD mORe
button, used to search tracks within
InD
6.2.6 Search History
During a TRAKTOR session, the s
have searched for in a temporary list.
Type in a few search expressions and conrm with the enTeR key of your com-
►
puter keyboard.
Repeat this a few times.
►
Click the small downwards-pointing arrow left to the seARCh FIelD to see the list
►
of your search expressions.
eARCh
function recalls each search expression you
Clicking the Magnifying
Clicking the Magnifying
%
Gla ss nex t to a BPM
%
Gla ss nex t to a BPM
value gives back tracks with simi-
value gives back tracks with simi-
lar BPM value s, which means a
lar BPM value s, which means a
range of +/- 2.5 BPM.
range of +/- 2.5 BPM.
TRAKTOR 3.3 – 50
Page 51

6.2.7 Track Icons
It is especially important to keep an overview of your set with one look when you
are performing in front of an audience.
The ICOn column gives valuable information about the history of a track and can
be sorted to align the tracks in their historical sequence. Here is a list of each I
and its meaning.
A D
IAmOnD
►
played yet. This is modeled after the common habit of vinyl DJs who place the
records they want to play in the near future at a 45 degree angle in their
crate.
The letters A, B, C and B identify the tracks currently loaded into the DeCKs.
►
A CheCK mARK means that the track had been played in one of the two DeCKs.
►
An exClAmATIOn mARK identies tracks not found at the les’ previous location.
►
A reason for this could be that a storage medium is unavailable, the location
of the track has been changed or the track has been renamed.
The right-pointing A
►
playlist.
Sorting by this column orders the tracks as follows:
Already played tracks on top.
►
Currently playing tracks in the center.
►
Queued tracks waiting in the CURRenT plAylIsT to be played underneath.
►
Non queued tracks below.
►
Missing tracks at the bottom.
►
shows that the track is listed in the C
RROw
indicates that this is the next track in the current
URRenT plAylIsT
but hasn’t been
COn
TRAKTOR 3.3 – 51
Page 52

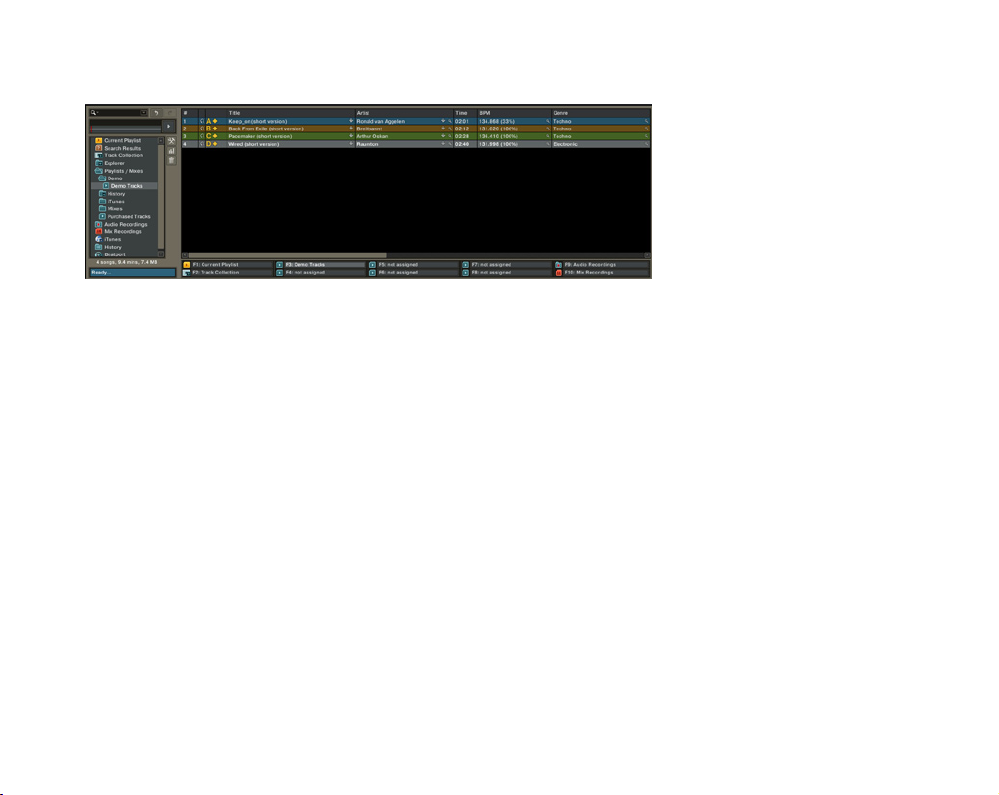
6.2.8 Consistency Check Report
The C
OnsIsTenCy CheCK RepORT
COlleCTIOn, providing options to help you in managing it.
In the T
►
►
Ree wInDOw
Consistency from the menu.
Once TRAKTOR has checked consistency, the C
appear showing the totals of its ndings.
Show Overview/ Missing Tracks/ Tracks to Analyze
The COnsIsTenCy CheCK RepORT gives you information about the following:
TOTAl TRACKs: The total number of tracks in your COlleCTIOn.
►
T
RACKs mIssIng
►
hard drive or moved from their original location.
TRACKs nOT AnAlyzeD: The total number of tracks that have not been analyzed.
►
T
RACKs mIssIng sTRIpe
►
analyzed but their OveRvIew wAveFORm (sTRIpe) has been moved or deleted.
TOTAl TRACKs TO AnAlyze: The total sum of TRACKs mIssIng sTRIpe and TRACKs nOT
►
AnAlyzeD. This is the total amount of tracks you need to analyze.
: The total number of tracks that have been deleted from your
Relocate Missing Tracks
The C
OnsIsTenCy CheCK RepORT
that are missing from your COlleCTIOn.
Click the RelOC. mIssIng TRACKs button.
►
A standard operating system dialog window will appear.
►
Use this to browse your hard drive for the folder in which your missing tracks
►
were moved.
To nd multiple tracks in different folders, choose the top level folder in which
►
they are stored. You can even choose your main hard drive folder.
provides an overview of the current state of your T
, right-/ ctrl-click on the T
: The total number of tracks that have been imported and
allows you also to relocate the references to tracks
RACK COlleCTIOn
OnsIsTenCy CheCK RepORT
and select Check
RACK
will
Relo cating tr acks in a
Relo cating tr acks in a
!
fo ld er that contain s
!
fo ld er that contain s
many subfolders can be a lengthy
many subfolders can be a lengthy
proce ss. Don’t hesitate to inter-
proce ss. Don’t hesitate to inter-
rupt relocation - this will not dam-
rupt relocation - this will not dam-
age your Collection consistency.
age your Collection consistency.
TRAKTOR 3.3 – 52
Page 53

Remove Missing Tracks
If you no longer want these missing tracks to be referenced in your C
►
delete their references by clicking the Rem. mIssIng TRACKs button.
OlleCTIOn
Analyze Tracks
If you have tracks in the C
►
now by clicking on the A
AnAlyzATIOn in chapter 19.3.2 (Collection Preferences).
OlleCTIOn
nAlyze TRACKs
not analyzed yet, you can analyze these
button. Read more about TRAKTORs
Show Consistency Check on Startup
The C
OnsIsTenCy CheCK RepORT
can be set to display each time you open TRAKTOR.
Please be aware that this function could be unpractical if you are using TRAKTOR
whilst performing live and you want keep the startup time to a minimum.
Go to “Preferences” > “Browser Preferences” > “Collection Preferences”.
►
Put a check in the box labeled shOw COnsIsTenCy CheCK RepORT On sTARTUp and
►
choose OK.
The COnsIsTenCy CheCK RepORT will now open each time you start TRAKTOR.
►
6.3 Editing tracks
Whether you are performing live or working in the studio, TRAKTOR gives you the
tools to keep your TRACK COlleCTIOn completely organized.
Each track in your C
n
Ame
, A
lBUm nAme
two methods.
OlleCTIOn
has track properties (“tags”) such as s
, etc. TRAKTOR allows you to edit and add T
Ong TITle
RACK pROpeRTIes
, A
RTIsT
with
,
TRAKTOR 3.3 – 53
Page 54

6.3.1 Editing Track Properties via Inline Editing
In the lIsT wInDOw, click on a track to highlight the track.
►
Click again in the eld you want to edit, e.g. the ARTIsT nAme.
►
A cursor will be placed inside the property eld.
►
Edit the ARTIsT nAme.
►
Click once in another property eld to edit its contents.
►
Hit the enTeR key on your keyboard to exit InlIne eDITIng mode.
►
6.3.2 Editing Track Properties via the Edit Dialog
Not all properties of a track are visible in the l
available proper ties of a track, use the eDIT DIAlOg. This dialog also allows to
contemporarily editing a selection of tracks, as described in the next section.
Edit Dialog
IsT wInDOw
. To get access to all
Alternat ively, you can
Alternat ively, you can
%
triple-click on a tracks’
%
triple-click on a tracks’
property to place the cursor di-
property to place the cursor di-
rectly inside the prop erty eld.
rectly inside the prop erty eld.
Press the Enter key of your key-
Press the Enter key of your key-
bo ard to lea ve Inline Editing
bo ard to lea ve Inline Editing
Mode.
Mode.
TRAKTOR 3.3 – 54
Page 55

Editing a Single Track
Select a track in the lIsT wInDOw by clicking it.
►
Right-/ Ctrl-Click on the selected track and choose Edit from the pop-up menu
►
or use the respective BROwseR BUT TOn.
The lIsT wInDOw turns into the track eDIT DIAlOg.
►
Edit the desired information for your track.
►
Use the drop-down menu next to a track property to select a property already
►
stored in your TRACK COlleCTIOn.
At the bot tom of the dialog you nd a button called ResTORe to undo any
►
changes you have made. To apply the changes, click the button labeled Apply
or use the respective BROwseR BUT TOn.
When you are done either conrm with OK or abort by pressing CAnCel. Of
►
course you can use the respective BROwseR BUTTOns here as well.
Editing a Selection of Tracks
If you want to edit all tracks of an AlBUm or of a plAylI sT, select them and
►
choose Edit from the context menu, (just as you did for editing a single track)
or use the respective BROwseR BUT TOn.
In the eDIT DIAlOg you will notice that most of the checkboxes beneath the at-
►
tributes are unchecked and most of the elds void.
At the bottom of the e
►
seleCT All and nexT. The buttons are used to browse your selection of tracks.
The checkboxes indicate which of the attributes have the same value among
►
the selected tracks. At the same time they indicate that the eld will be written
into the COlleCTIOn properties when applying the changes.
If you want to change an attribute globally for all selected tracks (for example
►
the way to write an A
beneath is checked and press the Apply button.
If you want to edit the tracks of your selection one by one, use the p
►
and nexT buttons at the bottom of the dialog to step through the list.
DIT DIAlOg
RTIsT nAme
you will notice 3 new buttons called p
), edit the A
RTIsT FIelD
, make sure that the box
RevIOUs
RevIOUs
,
TRAKTOR 3.3 – 55
Page 56

Clicking ResTORe will undo your changes.
►
Clicking OK will conrm all your changes.
►
6.3.3 Writing Track Properties into Music Files - ID3 Tags
As described in the introduction, the TRAKTOR C
references to the physical location of your tracks as well as all attribute information
about them. Many music le formats, such as MP3, allow you to store information
about the track in the le itself. This is done by special text tags embedded at the
beginning or at the end of the music portion of the le.
TRAKTOR does not need these kinds of tags because all relevant information is
stored in the COlleCTIOn le, but as soon as you move a track to another computer
the attributes of the track get detached from the music le itself.
It can therefore be useful to additionally write the properties into the track itself.
Not all le types support this kind of embedded information, for instance AIFF and
WAV les do not support it.
Other le types support a proprietary format of tags, such as FLAC that TRAKTOR
does not fully support yet. ID3v2, which is the name for the most common type of
embedded tags used in MP3 les, is fully supported by TRAKTOR. More le types
will be supported with future updates.
Find a complete list with all supported le formats here:
http://ww w.native-instruments.com/traktor3letype
Writing COlleCTIOn attributes into le tags should be used for:
Transferring tracks to other computers
►
Backup of the information contained in the COlleCTIOn
►
Reading tags from les is automatically done when importing tracks into the
C
OlleCTIOn
or when browsing tracks in the TRAKTOR e
the readout of tags from the les is mainly used for restoring unwanted changes
made in the TRAKTOR C
OlleCTI On
or if you changed track properties of a track
outside of TRAKTOR, i.e. with another application.
OlleCTIOn
is a database containing
xplOReR
. Manually triggering
TRAKTOR 3.3 – 56
Page 57

6.3.4 Browser Buttons
Even though all functions that can be applied to tracks or selections of tracks are
available in the context menu - accessed by right-/ ctrl-clicking on the selected
tracks - the most important functions have been provided also as buttons in a
special section between the B
BUTTOns.
The B
ROwseR BUTTOns
are not always the same - the functions of the buttons change
according to the currently selected view in the lIsT wInDOw.
e
DIT
: Clicking on the e
►
set of tracks as described above.
A
nAlyze
►
: Clicking on the A
track(s). The analysis scans the entire track and returns several pieces of information about it. Read more about A
Preferences).
Dele Te: Clicking on DeleTe will remove the selected track from your TRACK
►
C
OlleCTIOn
or p
lAylIsT
the lIsT wInDOw and click the DeleTe button.
Edit Browser Buttons
The following B
or choosing Edit from the context menu:
COnFIRm eDITIng: Conrms all editing changes and returns to the playlist view.
►
C
AnCel eDITIng
►
changes made after the last Apply action are discarded.
R
esTORe meTADATA
►
the C
one of the attributes’ elds.
ROwseR BUTTOns
: Clicking on the C
: Aborts current changes and restores track attributes from
OlleCTIOn
. This is especially useful if you accidentally deleted entries in
ROwseR TRee
DIT BUTTOn
nAlyze BUTTOn
and the l
opens the T
IsT wInDOw
RACK eDIT DIAlOg
triggers the analysis of the selected
nAlyzATIOn
in chapter 19.3.2 (Collection
, called B
ROwseR
for the selected
. To remove more than one track, select multiple tracks in
can only be accessed after clicking the e
AnCel BUTTOn
cancels the editing operation. All
DIT
button
Th is will re mo ve the
Th is will re mo ve the
!
track fro m the Playlist
!
track fro m the Playlist
only. It will not delete the track
only. It will not delete the track
from your hard drive!
from your hard drive!
TRAKTOR 3.3 – 57
Page 58

ReAD meTADATA: Clicking on the ReAD meTADATA BUTTOn imports the metadata of
►
the selected music les into the COlleCTIOn.
wRITe meTADATA: Clicking on the wRITe BUTTOn writes metadata information into
►
music les. Choose from 3 writing modes in “Preferences” > “Browser
Preference” > “Collection Preferences”.
Apply: The editing changes are applied and stored in the COlleC TIOn.
►
Beatport Browser Buttons
The BeATpOR T BROws eR BUT TOns can only be accessed from the Beatport icon.
Read more about the BeATpORT BROwseR BUTTOns in chapter 8.1 (Beatport Browser
Buttons).
6.3.5 Other Track Options
Relocate: Opens a dialog in which you can navigate to the folder containing the
►
missing track(s). Very useful, if you e.g. restructured your Music Folder.
Search in Playlists: Searches the selected track(s) in all playlists and returns
►
a list with all playlists containing the selected track(s).
Add to Playlist as Next: Adds the selected track(s) as nex t to the CURRen T
►
plAylIsT.
Add to Playlist at End: Adds the selected track(s) at the end of the C
►
plAylIsT.
Reset Played: Clicking Reset Played will reset the DIsplAy ICOn next to any track
►
that has been played. It will then appear as not played. This can be used if you
want to replay a track later in your set, avoiding confusion of it being marked
as having already been played.
Show in Explorer/ Finder: By right-/ ctrl-clicking on a track you can choose
►
Show in Explorer/ Finder from the context menu. This will display the track in
the Windows Explorer or Mac Finder, according to your operating system.
URRenT
Not all le types are sup-
Not all le types are sup-
$
ported by these op era-
$
ported by these op era-
tions. Find a complete list with all
tions. Find a complete list with all
supported le formats here:
supported le formats here:
http://w ww.native-instrum ents.
http://w ww.native-instrum ents.
com/traktor3letype
com/traktor3letype
The played state of your
The played state of your
!
tracks will be reset auto-
!
tracks will be reset auto-
matically after every session, i.e.
matically after every session, i.e.
closing and re-opening TRAKTOR
closing and re-opening TRAKTOR
will reset the played state.
will reset the played state.
TRAKTOR 3.3 – 58
Page 59

6.3.6 Deleting Tracks from your Hard Drive
The TRAKTOR B
from your hard drive.
ROwseR
has no features allowing the physical deleting of tracks
6.4 Working with the Collection and Playlists
6.4.1 New Collection Format
TRAKTOR 3.3 uses an updated C
the rst time after the update, you will be informed that importing your old COlleCTIOn
will make it incompatible to former versions of TRAKTOR. Please conrm the import
by clicking OK or cancel it by clicking on CAnCel.
After importing the COlleCTIOn it is written in the new format.
Older TRAKTOR versions can open COlleC TIOns that are newer than the ones they
use. If such a COlleCTIOn is opened, the data not known to that TRAKTOR version
is lost.
This is the current scenario for the TRAKTOR family:
TRAKTOR DJ Studio 2.x uses NML-version 7
►
TRAKTOR Scratch 1.0 uses NML-version 8
►
TRAKTOR DJ Studio 3.2 uses NML-version 8
►
TRAKTOR Scratch 1.1 uses NML-version 9
►
TRAKTOR 3.3 uses NML-version 9
►
OlleCTIOn
format. When starting TRAKTOR 3.3 for
TRAKTOR 3.3 – 59
Page 60

6.4.2 Playlists
p
lAylIsTs
are an alternative way of organizing your C
tags for tracks and retrieving them via search strings, you can create groups of
tracks inside your C
record crates, but contrary to a physical track contained on a vinyl record, a virtual
track can be contained in as many p
it back into the shelf. A p
Further advantages are saving and loading as well as exporting a playlist to transfer
it to another computer.
Right-/ Ctrl-Click on the plAylIsT folder icon in the BROwseR TRee.
►
Choose Create Playlist from the context menu.
►
Type the name of your plAylIsT in the following window.
►
Choose OK.
►
Your new plAylIsT will appear as a subfolder under the plAylIsT folder.
►
OlleCTIOn
lAylIsT
by creating p
can be shufed or ordered in any way you like.
lAylIsTs
lAylIsTs
as you want and you won’t have to put
OlleCTIOn
. These can be seen as virtual
. Instead of creating
6.4.3 Playlist Options
By right-/ ctrl-clicking on a playlist you nd the following options in the popup
menu:
Lock/ unlock the playlist: Lock and unlock your plAylIsT.
►
Analyze: Analyze the tracks contained in the selected playlist.
►
Relocate: Relocate the tracks contained in the selected playlist.
►
Save: Save the selected playlist.
►
Rename: Rename the selected playlist.
►
Clear: Remove all tracks from the selected playlist.
►
Delete: Delete the selected playlist. This will not actually delete the tracks from
►
your track COlleCTIOn, it will only delete the playlist le.
Reset Played State: This removes all track icons (played, cued etc.) from the
►
icon column in the track browser.
TRAKTOR 3.3 – 60
Page 61

Add to Collection: This adds all tracks contained in the playlist to the
►
COlleCTIOn.
Read File Tags (Async): This reads out the ID3 tags of the contained tracks.
►
This is going on in the background and does not affect the performance.
Write File Tags (Async): This writes ID3 tags to the contained tracks, depend-
►
ing on the setting in “Preferences” > “Browser Preferences” > “Collection
Preferences” > “ID3 Tag Mode”. This is going on in the background and does
not affect the performance.
Add to Playlist as Next: This places all tracks contained in the playlist as next
►
in the current playlist.
Add to Playlist at End: This places all tracks contained in the selected playlist
►
at the end of the CURRenT plAylIsT.
Export Webpage: This exports the tracks contained in the selected playlist
►
along with the playlist le (playlist_name.nml) to a place of your destination.
This way you can transport a playlist to another TRAKTOR computer without
losing data.
Export Printable: This exports a HTML-le containing a list with the tracks of
►
the selected playlist with customizable columns.
6.4.4 Locked Playlists
Lock/ Unlock a p
Unlock. A locked playlist has a lOCK ICOn next to it.
Sorting your Playlist
Click on the headline of a BROwseR COlUmn to sort the plAylIsT by this column. Click
another time on the headline to invert the sorting.
lAylIsT
by right-/ ctrl-clicking on a p
lAylIsT
and choosing Lock/
Sorting and rearranging
!
a Locked Playlist is only
momentary and will not be saved!
If you click on another folder in
the Browser Tree and then again
on the Locked Playlist, it will show
you the Lo cked Playlist in its
ori ginal s tatu s. If you w ant to
change the orde r of a Lo cked
Playlist permanently, you have to
unlock it beforehand!
TRAKTOR 3.3 – 61
Page 62

Rearranging Playlists by Drag & Drop
Click-hold and drag a track in the p
shows where the track will drop when you release the mouse button.
lAylIsT
up or down and observe the red line that
Adding one or more Tracks to a Playlist
Simply select one or more tracks in the T
name in the B
ROwseR TRee
. A security question will ask you for conrmation to
prevent from unwanted changes.
RACK COlleCTIOn
and drag it on the p
lAylIsT
Deleting Tracks from a Playlist
Deleting one or more tracks from a l
delete one or more tracks from a l
by right-/ ctrl-clicking on the playlist name and choosing Lock/ Unlock.
OCKeD plAylIsT
OCKeD plAylIsT
is not possible. If you want to
, you have to unlock it beforehand
6.4.5 Unlocked Playlists
Lock/ Unlock a p
Unlock. An unlocked Playlist shows no lOCK IC On.
Sorting your Playlist
Click on the headline of a BROwseR COlUmn to sort the plAylIsT by this column. Click
another time on the headline to invert the sorting.
Rearranging Playlists by Drag & Drop
Click-hold and drag a track in the p
shows where the track will drop when you release the mouse button.
lAylIsT
by right-/ ctrl-clicking on a p
lAylIsT
lAylIsT
and choosing Lock/
up or down and observe the red line that
Sorting and rearranging
!
an Unlocked Playlist is
permanent. If you want to main-
tain a certain order permanently,
you have to Lock the Playlist.
TRAKTOR 3.3 – 62
Page 63

Adding one or more Tracks to a Playlist
Simply select one or more tracks in the T
name in the BROwseR TRee.
RACK COlleCTIOn
and drag it on the p
lAylIsT
Deleting Tracks from a Playlist
Select one or more tracks you want to delete from the plAylIsT and choose Delete
– either via right-/ctrl-clicking on them and choosing Delete or by clicking on the
D
eleTe BROwseR BUTTOn
from unwanted changes.
. A security question will ask you for conrmation to prevent
6.4.6 Favorites
Favorites Window
The F
AvORITes
window is a navigational tool and is located at the bottom of the
interface. If you do not see the F
Show Favorites.
Three of the FAvORITes are pre-assigned:
F1: Current Playlist
►
F2: Track Collection
►
F9: Audio Recording
►
AvORITes
, right-/ ctrl-click on the h
eADeR
and choose
You can assi gn any o f
%
the le browser folders
or a playlist to a Favorite Playlist
(F1 – F10).
So me computer key-
!
boards r equir e you to
hold down the Function (fn) key in
order to use the F Keys.
TRAKTOR 3.3 – 63
Page 64

Do the following to create and use a FAvORITes folder:
Click the plAylIsTs folder to browse its contents.
►
Click on the DemO COnTenT folder to expose the DemO pl AylIsT.
►
Click, hold and drag the DemO plAylIsT name on top of the F3 Favorite icon.
►
F3 will now display the DemO plAylIsT icon.
►
From now on, you can access this folder at any time by pressing the F3 key on
►
your computer keyboard or by clicking on the FAvORITe icon with the mouse.
The contents of the DemO plAylIsT will then appear in the lIsT wInDOw.
►
6.4.7 History Playlist
The h
IsTORy plAylIsT
tracks you played during a gig.
It has a timestamp and will be created after every session you make, so that every
time you close TRAKTOR you will nd the history of what you have done the next
time you open TRAKTOR.
It is very useful, if you have to handout a p
evening or just to review, what you were doing last night.
In the T
►
►
►
If you are already working with TRAKTOR several months, this list can become very
large, often containing plAylIsTs with only a few tracks.
It’s a good habit to rename hIsTORy plAylIsTs of successful evenings, which makes
nding them way easier than only with the timestamp name.
Ree wInDOw
click on the hIsTORy folder.
If this was not the rst time you opened TRAKTOR, you will see several plAylIsTs
with a times tamp at the beginning for every s ession you made with
TRAKTOR.
hIsTORy plAylIsTs are locked by default.
is a special p
, double-click on the p
lAylIsT
that gives you information about what
lAylIsT
of the actual played tracks of an
lAylIsT
folder and then another double-
Dragging another playlist
!
on an already assigned
favorite will replace the favorite
playlist with the new playlist.
Shift- dragging another
!
playlist on a n already
assigned favorite will merge the
content of the favorite pla ylist
wit h the c ontent of the shift-
dragged playlist.
TRAKTOR 3.3 – 64
Page 65

You can do everything you’re used to do with p
but for the hIsTORy plAylIsTs this little trick might suit you better:
In the Windows Explorer/ Mac Finder, navigate to your ”Traktor3” folder and
►
open the “Playlists” folder, and in there the “History Folder”.
You will see the list of all your hIsTORy plAylIsTs.
►
As a rule of thumb, every track in a list equals around 1 kb. This means, all
►
p
lAylIsTs
with 5 or below kb will have most likely not more than 4-6 tracks
contained in them.
And usually they can be deleted, making browsing in the h
►
convenient.
lAylIsTs
, including deleting a p
IsTORy plAylIsTs
6.4.8 Current Playlist
The C
URRenT plAylIsT
recently or you plan to play in near future.
Whenever you play a track it will be placed automatically in the CURRen T
►
plAylIsT.
If you found some tracks you want to play not as next track, but in the near
►
future, drag-and-drop them onto the CURRenT pl AylIsT for quicker access.
Drag the tracks in the C
►
dicating, where the track will drop in.
Right-/ Ctrl-Click on the CURRenT plAylIsT and choose Clear to remove all tracks
►
from the CURRenT plAylIsT.
is a special p
URRenT plAylIsT
lAylIsT
in which you nd tracks that were played
in the desired order, see a red line in-
lAylIsT
more
,
Ano ther us eful tip for
%
organizing your Playlists
can b e found in chapte r 20.5
(Organizing Playlists).
TRAKTOR 3.3 – 65
Page 66

6.4.9 Track Collection
The TRACK COll eCTIOn is a special plAylIsT that contains every imported track,
regardless of the folder structure of your hard drive.
This makes it sometimes easier to search for tracks or get a general overview while
browsing for tracks you want to put in a plAylIsT.
The T
RACK COlleCTIOn
its database, making it easy to search – and to nd!
is the heart of TRAKTOR, containing every song of yours in
6.4.10 iTunes Import
TRAKTOR allows you to import your iTunes library as well as individual iTunes
playlists.
In TRAKTOR 3.3, the way of the iTunes import is slightly changed.
The le path to your iTunes library chosen in "Preferences" > "Browser Preferences"
> "Data Location" used to point to the folder of your iTunes library.
Now you have to point TRAKTOR exactly to the exact iTunes library le, usually
named iTunes Music Library.xml.
And all you have to do now is to click on the iTunes icon in the TRee wInDOw of the
BROwseR!
6.4.11 Connecting your iPod
TRAKTOR allows you to not only play non-DRM protected tracks from your iPod,
but also from playlists stored on your iPod.
Start TRAKTOR, and plug your iPod into your computer. TRAKTOR will then
recognize your iPod and display the iPod icon in the browser tree - this may take
up to 10 seconds.
This change was imple-
%
mented, because the li-
brary les of iTunes versions prior
version 4.9 were nam ed differ-
ently.
Another reason for this change was
that now you can rename your
iTunes library le and still make it
usable in TRAKTOR by pointing it to
the exact le instead of a folder.
TRAKTOR 3.3 – 66
Page 67

When rst selecting the iPod, the message lOADIng will appear to let you know that
TRAKTOR is reading the track and playlist information. The word Q
an iPod playlist means that it will be read next.
When nished, you will be able to select any non-DRM protected track to play as
you normally would from your hard disk drive.
UeUeD
next to
6.5 Working with Audio CDs
6.5.1 CD Text
Up to now, tracks of an Audio CD were displayed like Track01, Track02, etc.
But now, if you insert an Audio CD that shows CD-text, you will be able to see this
data in TRAKTOR, e.g. the correct TRACK TITle or the ARTIsT nAme.
6.5.2 Audio CDs and Favorites
If you drag the Audio CD Icon onto a F
►
the Audio CD drive, even if you remove a CD.
If you do not have an Audio CD loaded in your CD drive, the FAvORITe will be
►
displayed with a mIssIng icon, shown as ReD CROss.
6.5.3 Eject CD
You can eject a CD also from within TRAKTOR.
Right-/ Ctrl-Click on the AUDIO CD icon to eject the CD.
►
AvORITe
, this F
AvORITe
keeps assigned to
Plug ging and un-plug-
$
ging the iPod while tacks
are playing may cause the audio
to stop briey. Take extreme care
not to unplug the iPod when play-
ing a track from it!
Not all commercial Audio
!
CDs show these addi-
tional info texts.
TRAKTOR 3.3 – 67
Page 68

7. Backup and Transfer of your Collection
7.1 TRAKTOR File Formats and the Traktor3 Folder
TRAKTOR creates the following le types on your hard drive:
*.nml = all playlists have this extension, the C
►
and user-created playlists
*.tks = extension for keyboard or midi hotkey settings
►
*.nmx = extension for native mix recordings
►
*.wav = extension for the audio le created from the audio recorder
►
*.xml = extension for the settings les. Here are your p
►
the chosen le paths saved.
*.log = extension of the log-les that get created when opening TRAKTOR.
►
If you are using the default paths of TRAKTOR, you will nd all TRAKTOR les
in the folder
My Documents\Traktor3 (PC)
or
HD/[User]/Traktor3 (Mac).
You can change the default paths in "Preferences" > "Browser Preferences" > "Data
Location".
OlleCTIOn
, the h
ReFeRenCes
IsTORy
playlists
settings and
TRAKTOR 3.3 – 68
Page 69

7.2 Complete Backup
The easiest way to backup your whole TRAKTOR data is to use the default paths for
the "Traktor3" folder and save the whole folder somewhere else as backup.
If you re-install your operating system and then TRAKTOR, just copy your backed
up "Traktor3" folder to the default folder before starting TRAKTOR the rst time.
If you choose to point TRAKTORs le paths to another location, e.g. because
you want to store all your data on a second partition or an external hard disk for
security reasons, it’s the easiest to organize the TRAKTOR les in a folder called
"Traktor3"and a le structure like in the default folder.
It’s important to know that even if you changed all paths to another destination, the
*.log and the *.xml les get saved always to the default Traktor3 folder anyways,
so you have to copy these manually from time to time as backup to the folder you
store all other TRAKTOR les in and obviously before you re-install your operating
system.
If you have re-installed your operating system and TRAKTOR, copy the *.log and
*.xml les to the default TRAKTOR folder before you start TRAKTOR the rst
time.
If the drive letter of your customized location didn’t change, you should nd
everything as it was before the re-install.
If the drive letter of your customized location did change, you will nd all tracks with
an exclamation mark (!) that indicates that the links are broken. Use the RelOCATe
function to nd these les again. Read more about the R
6.2.8 (Consistency Check Report).
elOCATe
feature in chapter
TRAKTOR 3.3 – 69
Page 70

7.3 Automatic Backup (Security Backup)
Each time you change something in your COlleCTIOn and close TRAKTOR, a backup
of your C
folder. If you delete or partly ruin your T
follows:
►
►
►
►
►
A corrupted C
suspect this might be the case do the following:
►
►
►
►
OlleCTIOn
is created in the folder "Backups" contained in your "Traktor3"
RACK COlleCTI On
In TRAKTORs TRe e wI nDO w, open the ex plO ReR and navigate to your
"Traktor3"folder, found in your “User folder” (Mac) or in “My Documents”
(PC).
Click on the “Backup” folder.
Click on one of the mos t recent backups and verif y the integrity of the
COlleCTIOn.
If the backup seems to be corrupt, check an earlier backup.
If you have found an integer backup, drag and drop the folder onto the
COlleCTIOn icon to import the backup into the current COlleCTIOn.
OlleCTI On
Close TRAKTOR.
Make a backup of the le collection.nml found in the folder “user” > “Traktor3”
(Mac), “My Documents” > “Traktor3” (PC) before deleting it.
Restart TRAKTOR with an empty COlleCTIOn.
Import the backup of the COlleCTIOn as described above.
might cause TRAKTOR to crash during start-up. If you
by mistake proceed as
TRAKTOR only saves 10
!
backups, after which it
replaces the oldest backup with
the second oldest one. You should
therefore make a manual backup
of th e cur re nt st atus of th e
Co llectio n by cop ying suc h a
backup le to a separate folder,
not accessed by TRAKTOR.
The fil e Tr akt or DJ
%
Studio 3 Se tting s.xml
contains your layout settings and
is saved always to your Traktor3
folder. Backup this le as well!
Altho ug h TR AKT OR
!
gives you the choice to
stor e your Track Collection and
Playlists in different directories, it
is be st to keep these les orga-
nized in the default manner, a s
this makes it much easier to track
down problems.
TRAKTOR 3.3 – 70
Page 71

8. Beatport™ - Online Dance Music Store™
Up until recently it was difcult to purchase new tracks in MP3 format for DJs
working with TRAKTOR. Cutting-edge club music has been predominantly released
on vinyl, and recording tracks from a 12” to hard disk is a time-consuming process.
However, more and more labels are distributing their music in the digital domain
and it’s nally possible to buy music in digital format at the same time that it is
released on vinyl. Sometimes, certain tracks are even available earlier as MP3 or
TRAKTOR 3.3 – 71
Page 72

there is additional content available for download that didn’t make it to the vinyl
release.
In order to give TRAKTOR users a quick and easy way to purchase new tracks,
Native Instruments joined forces with Beatport. Beatport is the rst authentic digital
music store designed to service the evolution of the digital music culture, redening
how DJs and enthusiasts acquire their music. Beatport.com allows users to access
the world of club music through secure, legal, hi-speed, high quality downloads
in MP3, MP4 and WAV formats on a pay-per-download basis. With hundreds of
labels and thousands of users worldwide, Beatport is recognized as the leader in
online digital dance music.
To access the store, simply select the path Be ATpORT in the TRee wInDOw. Your
computer will now access the Beatport server and download information that is
being displayed in the l
IsT wInDOw
. In order to navigate the interface, just click the
relevant buttons and links. If you have not been a member of Beatport until now,
simply click the button labeled FIRsT TIme? sTART heRe! and follow the instructions
on the screen.
There are a lot of advantages when buying your music through the Beatport store
integrated in TRAKTOR:
It is possible to preview any track available in the store through the integrated
►
pRevIew plAyeR of TRAKTOR.
While previewing a track, you can see the actual w
►
AveFORm
in the p
RevIew plAyeR
and browse the track by moving the cursor through.
It is possible, to enter a search string in the TRAKTOR se ARCh FIelD to search
►
Beatport.
You can search for tracks with the same T
►
with the F
InD mORe
button (Read more about the F
ITle
, from the same l
InD mORe
ABel
or Artist
button in chapter
6.3.4 (Browser Buttons).
It is possible to transfer multiple les with the help of a download manager.
►
All tracks you have bought through the store interface are added to a playlist
►
called pURChAseD TRACKs.
TRAKTOR 3.3 – 72
Page 73

Any track you have purchased is saved automatically in your TRAKTOR TRACK
►
COlleCTIOn.
Purchased tracks contain extensive metadata, so there is hardly any need to
►
edit their tags.
Interrupted transfers can be resumed at any time.
►
TRAKTOR 3.3 disposes of an improved Beatport integration.
In the BROwseR TRee, you can nd now two new subfolders: pURChAseD TRACKs and
DOwnlOADs.
pURChA seD TRACKs is a playlist le. Whenever you buy a track from Beatport, a
reference to this track is placed in the pURChAseD TRACKs playlist.
The new F
Find more info about the F
Preferences).
The folder DOwnlOADs shows your current downloads and their download progress.
Ile sTRUCTURe mODe
feature also applies to the Purchased Tracks playlist.
Ile sTRUCTURe mODe
feature in chapter 19.3.2 (Collection
8.1 Beatport Browser Buttons
Please keep in mind that
!
you need to be connect-
ed to the internet in order to use
the Beatport store. For further
information on registration, please
The following B
don’t see the Beatport icon in the T
> AppeARA nCe > mIsCellAneOUs:
BUy pRevIeweD TRACK: Buy the track currently loaded into the preview deck.
►
CheCK DOwnlOADs: Checks your download queue for uncompleted downloads.
►
R
eFResh BeATpORT
►
lems.
ROwseR BUTTOns
can only be accessed from the Beatport icon. If you
Ree wInDOw
: Refreshes the Beatpor t shop. Use after connection prob-
, uncheck h
IDe BeATpORT
in p
ReFeRenCes
TRAKTOR 3.3 – 73
Page 74

8.2 Beatport “Find More” Button
In the lIsT wInDOw, you will notice a small downwards pointing arrow in many of the
track property elds. This is the F
Beatport store that have the same entry in that eld.
In the lIsT wInDOw, click the FInD mORe BUTTOn next to an ARTIsT nAme.
►
TRAKTOR will search the BeATpORT store for tracks of the same ARTIsT.
► !
InD mORe
button, used to search tracks within the
Beatport store in Preferences >
Appea rance > Miscellaneous by
unc h ec k in g t h e b ox H id e
Beatport.
If you don’t see the Find
More button, turn on the
TRAKTOR 3.3 – 74
Page 75

9. Controlling the Decks
This chapter addresses the general deck behavior, including the tempo controls
and the very interesting chapter about CUe pOInTs.
9.1 Deck Controls
In I
nTeRnAl mODe
►
hand on a vinyl record to pause playback.
While holding the mouse button, move the mouse backward and forward. This
►
moves the Waveform similar to scratching a vinyl record.
Release the mouse button. The track will begin playing from the point at which
►
you release it.
Right-/ Ctrl-Click on the wAveFORm to start and stop playback.
►
9.1.1 Play
Hit on the plAy button to start and stop the playback of the track.
►
, click and hold the track w
AveFORm
. This is like putting your
TRAKTOR 3.3 – 75
Page 76

9.1.2 Cue/ Play
The CUe/p
►
that you have chosen your built-in or onboard sound card in the pReFeRenCes.
Clicking with the left mouse button on the CUe/ p
►
back to the last CUe p
back.
Clicking and holding the CUe/ p
►
track jump back to the previous CUe pOInT and stop there until you release the
right mouse button again.
lAy
button only appears when you are in A
OInT
immediately and continuing from there the play-
lAy
button with the right mouse button lets the
IRplAne mODe
lAy
button lets the track jump
, which means
9.1.3 Cue/ Pause
The CUe/p
►
that you have chosen your built-in or onboard sound card in the pReFeRenCes.
Clicking on CUe/ p
►
the previous CUe pOInT and stop there.
If you click a second time on the CUe/ p
►
lits as well and the track begins to play again from the CUe p
release the mouse button again, then it snaps back again to the previous CUe
pOInT.
If you are clicking and holding the left mouse button and then additionally
►
pressing the right mouse button, the track will continue to play if you release
both mouse buttons.
If you press the right mouse button while the track is running, it jumps back
►
to the previous Cue Point and continues with the playback when you release
the mouse button.
AUse
button only appears when you are in A
AUse
while the track is running lets the track jump back to
AUse
IRplAne mODe
, which means
button and hold it, the p
OInT
lAy
– until you
button
TRAKTOR 3.3 – 76
Page 77

9.1.4 Deck Loop
If you click on DeCK lOOp button an instant lOOp gets created with the amount
►
beats that are displayed.
Right-/ Ctrl-Click on the DeCK lOOp button to dene the lOOp lengTh.
►
9.1.5 Set Cue
Clicking on this button creates a FlOATIng CUe pOInT as a visual reference or to
►
make use of the CUe/ plAy and CUe / pAUse buttons.
Opposite to CUe p
be stored. The next time you hit seT CUe or you stop the track, a new FlOATIng CUe
pOInT is generated.
Read more about CUe pOInTs in chapter 9.3 (Cue Points).
OInTs
set with the CUe e
DIT pAnel
the F
lOATIng CUe pOInT
will not
TRAKTOR 3.3 – 77
Page 78

9.2 Tempo Controls
This chapter explains the software tempo controls in TRAKTOR.
9.2.1 Pitch Fader
By moving the pITCh FADeR up or down, you can speed up or slow down the tempo
of the track. The p
any standard DJ record player or pitchable CD player.
Load and play a track in DeCK A.
►
To slow down the tempo, click + hold and drag upward on the pITCh FADeR.
►
Double-Click the pITCh FADeR to reset it to 0%.
►
Use the +/- buttons to change the tempo in steps.
►
Use the scroll wheel of your mouse to move the p
►
as well.
You can assign different sensitivities to the p
►
on the + button.
Advanced Pitch Fader functionality
Right-/ Ctrl-Click + hold and drag the pITCh FADeR up (or down).
►
While holding the right mouse button, click and hold the left mouse button.
►
This will temporarily slow down the tempo (or quicken it).
This is a special method for pitch bending.
►
9.2.2 Pitch Bend Buttons
Next to the phAse meTeR you will nd two buttons with arrows pointing to the left
and the right. These are the pITCh BenD BUTTOns.
ITCh FADeR
has just the same functionality as a pitch fader on
ITCh FADeR
ITCh FADeR
up or down in steps
by right-/ ctrl-clicking
To hide and show the
%
Pitch Fader, right-/ ctrl-
click on the Header and choose
Show Pitch Fader
TRAKTOR 3.3 – 78
Page 79

The pITCh BenD BUTTOns are used if two tracks are running with the same tempo,
but their phase is shifted slightly; this corresponds to a soft touching of the vinyl
to slow down or fasten to tracks that go slightly out of sync.
Click on the button with the left pointing arrows to slow down the track a bit
►
and click on the button with the right pointing arrows to fasten the track a bit.
The tempo change is only momentary. If you let go the mouse button, the track
continues in its normal tempo.
You can assign these also to (MIDI) hOTKeys.
►
9.2.3 Pitch Range
The Pitch Range denes how far you can pitch the tempo up and/ or down.
TRAKTOR allows you to adjust the Pitch Range by plus or minus 8%, 35%, 50% or
100%. Choosing a Pitch Range of +/- 100% will give you the largest possible Pitch
Range, allowing you to slow a track all the way down to a complete stop. Choosing
+/-35% will only allow you to slow a track down, or speed it up by 35%.
Click on “Preferences” > “Deck Preferences” > “Transport”.
►
Click on one of the Pitch Range buttons and choose OK.
►
9.2.4 Fine Pitch Range
The F
Ine pITCh
is a second controller not represented on the interface. It is only
controllable via MIDI. The option FIne pIT Ch RAnge determines the range of this
parameter.
Open pReFeRenCes > DeCK pReFeRenCes > TRAnspORT.
►
Click + hold and drag the F
►
pITCh RAnge up to +/- 12 BPM or to the left to bring the value down.
Ine pITCh RAnge
slider to the right to rise
The FIne
%
more subtle changes!
Right-/ Ctrl-Click on the
Pitch Bend Buttons for
TRAKTOR 3.3 – 79
Page 80

9.2.5 Phase Meter
Two tracks can have the same tempo, but still sound silly together, because the
phAse is shifted. The phase is represented in the horizontal phA se meTeR left from
the pITCh BenD BUTTOns.
If two tracks’ phases are synchronized, the meter stays in the middle.
►
If one tracks’ phase is shifted aback, a yellow stripe is seen on the left side of
►
the middle position.
If a tracks’ phase is shifted forward, a yellow stripe is seen on the right side of
►
the middle position.
You should use Beatgrids
%
to get reliable results!
There are several ways to manipulate the phase:
Shift the phAse by clicking on it, holding and dragging it with the mouse.
►
Shift the phAse by using the scroll wheel of your mouse.
►
Reset the phAse by double-clicking on it.
►
9.2.6 Tap Button
If you think, TRAKTORs automatic tempo detection has estimated a wrong BPM
value, you can easily correct this with the TAp button. It is shown in the DeCKs as
TAp. Clicking on it in time will change the tempo, obeying the following logic:
Tap 4-7 times to the rhythm of the beat to consolidate the automatically de-
►
tected BPM value with the tempo of your tapping.
Tap over 8 times to enter the BPM manually based on the tempo of your tap-
►
ping.
If you do n’t lik e the
%
Phase Meter, yo u can
tu rn it of f (and ba ck on ) in
Preferences > Appearance > Wave
Display Options.
TRAKTOR 3.3 – 80
Page 81

9.2.7 Sync Button
Use the s
to make p
recommended to establish B
the tempo and phase of each track will match 100%.
►
►
►
►
►
ynC
button as a quick way to match the tempo of two tracks without having
ITCh BenD
Load and play a track in each DeCK.
Because the track tempos do not match, the phAse meTeRs will jump back and
forth.
Click the synC button above the wAveFORm of DeCK B.
The tempo of DeCK B now matches that of DeCK A.
The synC offset meters will stay centered.
adjustments. To use this function with the best result, it is
eATgRIDs
for the tracks that are being synced. Only then
9.2.8 Master & Slaves
A D
eCK
synchronizes to the opposite deck by default, so if you press the s
of D
eCK
A, it will use the tempo of D
want to synchronize D
by assigning them to mAsTeR and slAve states:
Load and play a track in DeCK A.
►
Load and play a track in DeCK C.
►
Because the track tempos do not match, the phAse meTeRs will jump back and
►
forth.
Set the status of DeCK A to mAsTeR.
►
Set the status of DeCK C to slAve.
►
When you press the synC button on DeCK C, it synchronizes to the mAsTeR DeCK
►
because DeCK C has the status of a sl Ave DeCK.
eCKs
that are not opposite each other, it’s possible to do this
eCK
B as a reference and vice versa. When you
ynC
button
If Deck C is not visible,
%
make it visible by right-/
ctrl-clicking the Header and un-
checking the option Hide Deck C
and D.
TRAKTOR 3.3 – 81
Page 82

9.2.9 Master Clock
Once you are more familiar with TRAKTOR, you will want to synchronize the tempo
of more than two decks. According to the example above, you can set all decks to
slAve and the mAsTeR ClOCK to be the mAsT eR.
Load and play a track in DeCK A.
►
Click the Slave button above DeCK A.
►
Insert the ClOCK panel into the current DeTAIls page.
►
Adjust the speed of the mAsTeR ClOCK to a value close to the original tempo of
►
the track loaded into Deck A.
Click the mAsTeR button in the ClOCK pAnel.
►
Change the tempo of the mAsTeR ClOCK and observe the tempo of DeCK A chang-
►
ing accordingly.
9.2.10 Key Lock
With TRAKTOR it’s possible to change the tempo of a track while keeping its original
pitch. When you play a vocal track at a higher tempo, the voice will often sound
unnatural. To avoid this, you can lock the Key of this track so that tempo changes
do not affect it (also called Master Tempo).
Click the Key l
►
Key panel.
Drag the p
►
tempo. However, its Key will remain the same.
Key Changes
Open p
►
lOCK.
Turn the Key knob counter-clockwise to lower the key.
►
Turn the Key knob clockwise to raise the key.
►
This enables you to mix tracks harmonically. A 0.50 step equals a semi-tone.
►
ITCh FADeR
Age
2 of the D
OCK
button beneath the p
slowly upwards. You will hear the track in D
eTAIls
and click on l
ITCh FADeR
or on the Lock button in the
OCK
in the Key panel to activate Key
eCK
B lower its
The Master Clo ck has
%
also a small representa-
tion in the central mixer part when
playing with 4 decks.
TRAKTOR 3.3 – 82
Page 83

Time Stretching Quality
The TRAKTOR Ke y lOCK function uses “Time Stretching” as its method of effect.
There are three types of “Time Stretching”, each with its own sound quality and
requirement for processor power.
Open TRAKTOR “Preferences” > “Deck Preferences” > “Sound & Mixer”.
►
►
Next to T
Ime sTReTCh QUAlITy
, select nOn-A
DApTIve
. This will sound less natural
but will use much less CPU. It is the best mode for computers with slower
processors.
Selecting psOl A will sound more natural, using more CPU. This mode is
►
recommended for medium fast processors.
Selecting p
►
hAse vOC
. will give the highest quality sound. This mode is recom-
mended for very fast processors, since it is using far more CPU.
9.3 Cue Points (Regular)
9.3.1 Floating Cue Point
Each time a D
resumes, the CUe p
and the CUe/ p
oating CUe pOInT during playback.
During playback you can press seT CUe underneath the w
move the FlOATIng CUe pOInT to the current position.
eCK
is stopped it sets a oating (momentary) CUe p
OInT
remains at the last point of interruption. The CUe/ p
lAy
button in the CUe e
DIT pAnel
can be used to skip back to the last
OInT
. When playback
AveFORm
at any time to
AUse
TRAKTOR 3.3 – 83
Page 84

9.3.2 Storing Cue Points
TRAKTOR can store up to 10 Cue Points per track. You can store the current
FlOATIng CUe pOInT in the CUe eDIT panel in the DeTAIls section:
This panel offers all functions needed to manage the CUe pOInTs of a track:
A drop-down box with a list of all CUe pOInTs stored for this track.
►
Two buttons to cue to the previous and to the next CUe pOInT.
►
A drop-down box to assign a special function to a CUe pOInT.
►
A CUe/ pl Ay and a CUe/ pAUse button for test-playing your CUe pOInTs.
►
A lOCK button to store and to remove the current CUe pOInT.
►
9.3.4 Locking a Cue Point
If you want to recall a CUe pOInT for later use, you have to use the lOCK button
►
to store it.
To remove a CUe pOInT from the list of permanent CUe pOInTs, select it and re-
►
lease the lit lOCK button.
9.3.5 Naming Your Cue Points
After you have locked a CUe pOInT, you can name it. This way it is easy to nd it
in the CUe lIsT panel.
Skip to the CUe pOInT by selecting it from the list in the upper drop-down
►
box.
Double-Click on the display to place the text cursor in the name eld.
►
Type the new name and conrm with Enter.
►
Whenever you select a
%
Cue Point from the Cue
Edit Panel, it gets locked by de-
fault (except the Flo ating C ue
Point, obviously).
TRAKTOR 3.3 – 84
Page 85

9.3.6 Jumping between Cue Points
In TRAKTOR you have several options for jumping to CUe pOInTs:
Click on the CUe pOIn T s ymbol in the sTRIpe wIn DOw or in the wAv eFOR m
►
wInDOw.
Use the B
►
respective Hotkey).
Select an entry of the upper drop-down menu of the CUe eDIT panel.
►
Click one of the 6 buttons in the CUe lIsT details panel.
►
ACKwARD CUe
and F
ORwARD CUe
buttons in the CUe e
DIT
panel (or the
9.4 Cue Points (Special)
While regular CUe p
there are three other types of CUe pOInTs you can set, each with their own special
function.
Assigning a different type to a CUe pOInT is done by selecting the desired type in
the drop-down box in the CUe eDIT details panel.
Select a CUe pOInT by skipping to it.
►
In the CUe eDIT details panel, click on the CUe Type display above the lOCK button.
►
Select a new Type for the current CUe pOInT.
►
The next chapters describe the available CUe p
more detailed.
OInTs
help establish points in a track from which to play or cue,
OInTs
and their special functions
TRAKTOR 3.3 – 85
Page 86

9.4.1 Load Cue Point
A DeCK lOAD CUe pO InT causes a track to automatically cue to this point when it is
loaded into a D
eCK
, saving you from the need to manually cue your track to this
CUe pOInT.
If you want to make use of the lOAD CUe pOInTs, turn this option on: "Preferences"
> "Deck Preferences" > "Loading" > "Advanced" > "Cue to Marker when loading
Track".
9.4.2 Fade In/ Fade Out Cue Points
The F
ADe In
and F
ADe OUT CUe pOInTs
For this to work, you must set a FADe In CUe pOInT in one DeCK and a FADe OUT CUe
pOInT in the other.
Additionally, you have to turn this option on: "Preferences" > "Deck Preferences" >
"Transport" > "Synchronize" > "Use Fade In and Out Markers".
Load a track into DeCK A.
►
Scroll towards the end of the track and set a CUe pOInT.
►
From the CUe e
►
DIT
panel, drop-down the CUe T
the menu.
A red FADe OUT CUe pOInT will appear in the wAveFORm display.
►
Now load a track into DeCK B.
►
Set a CUe pOInT at the beginning of the track.
►
From the CUe e
►
DIT
panel, drop-down the CUe T
menu.
A red FADe In CUe pOInT will appear in the wAveFORm display.
►
Click + hold and drag the CROssFADeR all the way to the left.
►
In D
eCK
►
A, scroll backward through the track before the F
click the plAy button.
are used to automate the CUe/ p
ype
menu and select Out from
ype
menu and select In from the
ADe OUT CUe pOInT
lAy
of a track.
and
TRAKTOR 3.3 – 86
Page 87

When the FADe OUT CUe pOInT in DeCK A crosses the TRACK pOsITIO n mARKeR
►
(vertical red line), the track in DeCK B will automatically begin playing from its
FADe In CUe pOInT.
Click + hold and drag the CROssFADeR slowly to the right to mix the two tracks.
►
9.4.3 Grid Cue Point
A B
eATgRID
is dened by a B
eATmARKeR
. This is a special CUe p
OInT
from which a
regularly spaced grid of reference lines is created, used to synchronize tracks. The
following section explains BeATmARKeRs and BeATgRIDs en detail.
9.5 Beatgrids and the BPM Panel
The tempo detection of TRAKTOR simplies beatmatching, giving you more time
to express your creativity. But although TRAKTORs tempo detection is very precise,
BeATmA RKeR and Be ATgRID are still important tools to synchronize your music in
TRAKTOR. The analysis of a track produces a BPM estimation that is not sufciently
precise enough to guarantee synchronous playback of two tracks over the duration
of several minutes.
Tracks that have a correct B
with a B
eATgRID
loop perfectly, will let you mix on obscure intros, and will enable
you to get busy on the other features that TRAKTOR has to offer. Before we talk
about setting them, it’s useful to understand a bit about them.
When TRAKTOR analyses a track, it “nds” beats in the w
lines on the beats). The problem is that these “sensed” beats are not always an
even distance apart (like in Hip-Hop or Breakbeat). This means that when you
try to synchronize two tracks, TRAKTOR tries to lay one “sensed” beat on top of
eATgRID
don’t go out of sync in the mix – ever. Tracks
AveFORm
(the little white
TRAKTOR 3.3 – 87
Page 88

one in the other track, causing the phAse meTeR to jump around as it tries to mash
things together.
Setting a B
the actual beats. This means that a regular pattern is used, stopping the p
meTeRs from jumping around and ruining the mix. The grid represents quarter
notes or beats.
The following sections give you a step-by-step explanation to this very powerful
tool. Although it may sound somewhat complicated, if you’re reading this chapter
the rst time, it’s denitely worth the time and you will very soon get very fast at
setting BeATgRIDs!
eATgRID
xes this by placing a tempo structure on a track that supersedes
hAse
9.5.1 First: Choosing a BPM Range
You can nd this general setting in the pReFeRenCes. Use this to limit the possible
BPM range to a value that ts your musical style, e.g. if you’re a Hiphop DJ, you
will most likely choose a range between 70 and 120 BPM, if you’re a Techno DJ,
you’ll choose limits more in between 110 and 160 BPM.
Open “Preferences” > “Browser Preferences” > “BPM Ranges”.
►
Ideally, choose a range without doubling a value, e.g. choose a minimum of 80
►
BPM and a maximum of 159 BPM.
9.5.2 Second: Analyzing your track tempo
If your tracks are not analyzed already, analyze now your track tempo. The
analyzation gives back an estimated BPM value as well as several other values and
builds the overall waveform (sTRIpe).
Read more about analyzation in chapter 6.1.4 (Analysis).
Select one (or more) track(s) and click on the A
►
via right-/ ctrl-clicking and choosing Analyze.
nAlyze
button or choose Analyze
A quick BPM range for a
%
specifi c track can b e
chosen in the BPM panel. Click
on the downwards pointing arrow
next to the BPM value and choose
a BPM range.
TRAKTOR 3.3 – 88
Page 89

9.5.3 Third: Setting the Gridmarker (Grid Cue Point/ Beatmarker)
Load a track into DeCK A.
►
Click on the small plUs (+) button in the waveform to switch to the largest
►
possible zoom.
Let the track play and wait for the rst beat in the track.
►
Place a FlOATIng CUe pOInT exactly right before the beat by dragging the wAveFORm
►
(in InTeRnAl mODe with the mouse) exactly there
Audition the position of the F
►
pAUse button in the CUe eDIT panel.
If you are satis ed with the location of the CUe pO InT, transform it into a
►
g
RIDmARKeR
gRID.
If the gRIDmARKeR is a bit too far before or behind the beat, you can correct its
►
position with the two buttons above the BPM digits.
. Use the dropdown menu T
lOATIng CUe pOInT
ype
in the CUe e
by pushing and holding the CUe/
DIT
panel and choose
9.5.4 Forth: Adjusting the Grid (visibly)
Skip to the gRIDmARKeR and play the track.
►
Observe the drift of the white, vertical lines relatively to the beats of the
►
track.
Correct any kind of emerging offset with the buttons underneath the BPM
►
display in the BPM details panel. The white, vertical lines should align with the
beat of your track. Use the both buttons beneath the BPM eld to raise and
lower the BPM value and to align the g
beats in the wAveFORm.
Click on the left-pointing arrow to raise the BPM which has the effect that the
►
grid spaces will be smaller. Click on the right-pointing arrow to lower the BPM
which has the effect that the grid spaces will be bigger. Right-Click on these
buttons for bigger steps.
RID
lines with the visualization of the
Be very car eful during
!
this proce dure as you
can ea sily skip one beat when
al ig nin g th e G rid. Alth ou gh
TRA KTORs te mpo detection is
very precise, use at least 3 points
in a track to observe the drift.
TRAKTOR 3.3 – 89
Page 90

When the g
►
RID
lines and the beats of the track run perfectly in time, you can
fast forward through the track to preview the drift later on in the track.
The further away you get from the gRIDmARKeR, the more precise the tempo
►
value has to b e for the gRID line s to stay aligned with the beats in the
wAveFORm.
When you have reached the end of the track and it still is aligned perfectly with
►
the gRID lines, you can be sure that the BeATgRID is precise. Any mix using this
track will run smooth for its entire duration.
Example Pictures
The
g
RID
runs out of sync with the beats soon, the
with the right arrow button below the BPM display in the BPM panel.
The
g
RID runs out of sync with the beats soon, the BeATgRID is too wide. Raise the BPM value
with the left arrow but ton below the BPM display in the BPM panel.
B
eATgRID
is too tight. Lower the BPM value
Le ft -C lic kin g on th e
%
BPM plus or minus but-
tons changes the BPM by plus/
minus 0.01 BPM. Right-Clicking
on the BPM plus or minus buttons
changes the BPM by plus/ minus
0.1 BPM!
TRAKTOR 3.3 – 90
Page 91

The
B
eATgRID
Use at least 3 points in the track to check if the BeATgRID is still in sync!
lies perfectly on the beats. Scroll forward in the track to see if a drift starts later.
9.5.5 Forth: Adjusting the Grid (audibly)
Skip to the gRIDmARKeR and play the track.
►
Turn on the T
►
as ticks added to the track.
Observe the drift of the tick relatively to the beats of the track.
►
Correct any kind of emerging offset with the buttons underneath the BPM
►
digits in the BPM details panel. The tick should align with the beat of your
track. Use the both buttons beneath the BPM eld to raise and lower the BPM
value.
Click on the left-pointing arrow to raise the BPM which has the effect that the
►
tick will be faster. Click on the right-pointing arrow to lower the BPM which has
the effect that the tick will be slower. Right-Click on these buttons for bigger
steps.
When the tick and the beats of the track run perfectly in time, you can fast
►
forward through the track to preview the drift later on in the track.
The further away you get from the gRIDmARKeR, the more precise the tempo
►
value has to be for the tick to stay aligned with the beats in the wAveFORm.
When you have reached the end of the track and it still is aligned perfectly with
►
the tick, you can be sure that the BeATgRID is precise. Any mix using this track
will run smooth for its entire duration.
ICK
button in the BPM details panel to make the grid lines audible
Be very car eful during
!
this proce dure as you
can ea sily skip one beat when
al ig ning the ti ck . A lt ho ug h
TRA KTORs te mpo detection is
very precise, use at least 3 points
in a track to observe the drift.
Le ft -C lic kin g on th e
%
BPM plus or minus but-
tons changes the BPM by plus/
minus 0.01 BPM. Right-Clicking
on the BPM plus or minus buttons
changes the BPM by plus/ minus
0.1 BPM!
TRAKTOR 3.3 – 91
Page 92

9.5.6 Difculttracksandeasysolutions
x2 and :2 Buttons
Sometimes the TRAKTOR BPM analyzer cannot distinguish between a 170 BPM
Drum’n’Bass track and a 85 BPM Hip-Hop track.
In these cases, you can double or divide the BPM by two very easily with the x2
and :2 buttons.
Tap Button
If you have the feeling that you or the TRAKTOR analyzer have messed it up and
the BPM does not correspond to a correct value, you have the following possibilities
to solve the situation:
Click on the arrow beneath the BPM value in the BPM details panel and select
►
ResTORe to reload the BPM value stored in the COlleCTIOn for this track.
Select a Bpm-R
►
BPM value and choosing one of the offered options to transform the automatically generated BPM value into the selected interval.
Tap 4-7 times to the rhythm of the beat to transform the automatically de-
►
tected BPM value into a value close to the tempo of your tapping.
Tap over 8 times to enter the BPM manually based on the tempo of your tap-
►
ping.
Ange
by clicking on the downwards pointing arrow next to the
TRAKTOR 3.3 – 92
Page 93

Beatless Intros and tracks with different tempi
Sometimes you might have tracks that come with a beatless intro that irritates and
inuences TRAKTORs BPM detection. For these you can generate a Local BPM
value by just one click, giving you a very precise tempo at a certain point, e.g. when
the bass drum of the track starts.
In the overall waveform (s
►
tempo from.
In the BPM panel, click on the downwards pointing arrow and choose l
►
Bpm.
You’ll get a very precise tempo value back for this part of the track.
►
TRIpe
), click on the part where you want to get the
OCAl
Setting a Beatgrid for Tracks recorded from Vinyl
Since a turntable’s tempo always uctuates a little bit, a vinyl-ripped track may
drift over the time, making it impossible to set a perfectly aligned B
the whole track.
While the drift on a professional direct-driven turntable may only be small and
negligible, the drift on a belt-driven turntable may be unacceptable.
However, in this case it is recommended to establish several g
track.
Set a new g
►
lines
See how the phase of the tempo is being restarted.
►
This helps only to create a B
►
unsteady tempo. For tracks with unsteady tempi, please read chapter 20.4
(Beatgridding Tracks with unsteady Tempo).
RIDmARKeR
on a beat that has not aligned to the white, vertical g
eATgRID
for tracks that have a drifting, but not an
RIDmARKeR
eATgRID
over
during the
RID
You can only assign one
!
BPM value to a track in
TRAK TOR. S etting several Grid
Points do not help, if your track
has 2 different tempi, e.g. a value
of 110 BPM in the beginning and
120 in the end.
TRAKTOR 3.3 – 93
Page 94

9.5.7 Other BPM panel options
To access other BPM panel options, click on the downwards pointing arrow next
to the BPM gure.
Restore: If you think that your tapping has been less precise than TRAKTORs
►
BPM detection, click on Restore to restore the BPM value, TRAKTOR detected
during the analysis.
Round: Click on ROUnD to round the BPM value to a whole number.
►
Local BPM: This analyzes the track tempo only nearby the p
►
this, if your track has a varying tempo or different tempi (e.g. a beatless intro).
Click on a part of the track where you want to know the BPM and choose Local
BPM to generate a very precise BPM value for this area.
Exact BPM: This analyzes the whole track. Use this, if your track has a constant
►
tempo.
lAymARKeR
. Use
TRAKTOR 3.3 – 94
Page 95

10. Advanced Playback Functions
The following chapters will give you the ammunition to expand your creativity.
Load your tracks, experiment with the following features and re up your tracks
with some hot new moves!
10.1 BeatJump
The B
eATJUmp
feature allows you to jump through the track in sections of beats. You
can specify how many beats for ward or backward you want to jump.
This can be useful for scrolling through a track, but also has an added effect of
remixing when performed while the track is playing.
Load and play a track in DeCK A.
►
You’ll nd the BeATJUmp panel on DeTAIls pAge 2.
►
Listen to the beat of the track and click the 1/2 > button on-beat. This will
►
move the song forward 1/2 beat.
Now click the < 4 button. This will move the song backward 4 whole beats.
►
Using the BeATJUmp buttons on-beat can give the effect of Beat Juggling, allow-
►
ing you to remix the beat on-the-y.
TRAKTOR 3.3 – 95
Page 96

10.1.1 Customize the Jump Length
By default, the four B
you customize the length of any of the three BeATJUmp button pairs.
Right-/ Ctrl-Click the button labeled 1>.
►
A menu will appear with length selections. Select 1/4.
►
The B
►
eATJUmp
1/4th of a beat.
eATJUmp
buttons are set for 1, 4, and 16 beats. TRAKTOR lets
buttons will now be labeled 1/4. This allows your track to jump
10.1.2 Two Button Mouse control
The B
eATJUmp
button offers a special functionality for dual button mice and for dual
button track pads. The left row of the BeATJUmp buttons can be right-/ ctrl-clicked
to achieve a jump in the opposite direction. With this feature you can beat juggle
with your two nger tips.
10.2 Duplicate Deck
This feature allows you live remixing like you never could before with TRAKTOR you can create an instant, exact and synchronized copy of a track that even copies
the lOOps that were in the original tracks!
It’s as easy as loading a track:
Load a track in DeCK A and let the track run.
►
Click and hold on the h
►
and the letter of the deck - here the big A.
Now hold and drag the mouse onto Deck B.
►
Both tracks are now running in exactly in the same position and synchronized.
►
Of course you can duplicate the track from any D
►
DeCK B to DeCK D, or DeCK A to DeCK C etc.
eADeR
of the deck, that’s where you see the F
eCK
in any D
eCK
– e.g. from
Ile InFO
If you don’t want to use
%
the mouse, you can as-
sign th e respe ctive Ho tkeys in
Add -> D eck > Lo ad Tracks >
Deck duplicate Deck A or B in the
Hotkey & MIDI Setup section of
the Preferences. Read more about
Hotkeys in chapter 14 (MIDI and
Hotkeys).
TRAKTOR 3.3 – 96
Page 97

10.3 Loops
TRAKTOR has the ability to set points in a track that will loop sections of the track
seamlessly. You can adjust the lOOp lengTh even while the lOOp is running.
10.3.1 Looping From the Deck
DeCK A with an active 4-beat lOOp
Load and play a track in DeCK A.
►
Click the lOOp button. Your track will begin looping.
►
If the lOOp button is set to 4, your track will loop 4 beats.
►
To change the loop length, right-/ ctrl-click the l
►
deck and choose a different loop length number from the drop-down menu.
The lOOp will automatically change length and continue looping.
►
Click the lOOp button again to continue playing the track.
►
OOp
button underneath the
TRAKTOR 3.3 – 97
Page 98

10.3.2 Looping From the Details Section
These are the available lOOp panels.
Click on one of the 4 lengTh buttons to select a loop length.
►
Click on the seT/ In button to set the loop. This makes it automatically ac-
►
tive.
Right-/ Ctrl-Click on the lit lOOp button and choose a different loop length
►
number from the drop-down menu.
The lOOp will automatically change length and continue looping.
►
Click on the lit ACTIve button to leave the lOOp.
►
SettingafreeLoopwithoutpredenedlength
Make sure that none of the lengTh buttons in the lOOp seT panel is lit.
►
Click the seT/ In button to set the starting point of the loop.
►
Click the A
►
tive.
Click on the lit ACTIve button a second time to leave the loop.
►
Snap Button
If you have set your manual l
snAp button that will quantize the loop to the nearest beat or BeATgRID line.
Set a 4 beat lOO p anywhere in the track.
►
If the lOOp is off-beat, click the snAp button.
►
The lOOp will snap (or quantize) to the nearest beat.
►
CTIve
button to set the ending point of the loop and to make it ac-
OOp
a little bit off beat, the l
OOp seT
panel offers a
You can additionally use
%
the Snap to quantize the
loop borders to the beats of the
track.
If you want your loops to
%
quantize right when you
set them, leave the Snap button
enabled. Your loop will then auto-
matically quantize when you set
it.
It is helpful to use the
%
de cks in Sna p mode
when setting a free Loop by only
using the Set / In and Active but-
tons.
TRAKTOR 3.3 – 98
Page 99

Reloop
RelOOp instantly jumps back to the start point of the current lOOp.
10.3.3 Resizing the Loop
After you have established a lOOp, you can change its length in the lOOp seT, lOOp
sTART and lOOp enD panels.
Loop Set
With a track playing in DeCK A, set a 4 beat lOOp.
►
Click one of the 4 lengTh buttons in the lOOp seT panel to instantly change the
►
length of the lOOp.
To change the predened length assigned to these buttons, right-/ ctrl-click
►
the button and choose a new length value from the drop-down menu.
Loop Start
With a track playing in DeCK A, set a 4 beat lOOp.
►
Click a blank area of the D
►
down menu.
The l
►
►
►
►
►
OOp sTART
start point either forward or backward. Each button is labeled with the amount
it will move, shown in beats.
Click a FORwARD button. The lOOp sTART point will move forward.
Click the corresponding backward button. The l
ward.
To change the predened length of a F
/ ctrl-click the FORwARD button and choose a new length number from the
drop-down menu.
To change the lOOp sTART point in ner increments, use the CO nTInUOUs (COnT)
buttons.
module will appear with buttons that allow you to adjust the
eTAIls seCTIOn
and choose l
OOp sTART
ORwARD
and B
OOp sTART
ACKwARD
from the drop-
point will move back-
button pair, right-
TRAKTOR 3.3 – 99
Page 100

Loop End
Right-/ Ctrl-Click a blank area of the D
►
the drop-down menu.
The l
OOp enD
►
point either forward or backward. Each button is labeled with the amount it
will move, shown in beats.
Click a FORwARD button. The lOOp enD point will move forward.
►
Click the corresponding BACKwARD button. The lO Op enD point will move back-
►
ward.
To change the predened length of a F
►
/ ctrl-click the FORwARD button and choose a new length number from the
drop-down menu.
To change the lOOp enD point in ner increments, use the COnTInUOUs (CO nT)
►
buttons.
panel will appear with buttons that allow you to adjust the end
eTAIls seCTIOn
ORwARD
and B
and choose l
ACKwARD
button pair, right-
OOp enD
from
10.3.4 Loop Move
Once you have established a clean lOOp, you can move the entire lOOp forward or
backward.
Play a track in DeCK A and set a 4 beat lOOp.
►
Right-/ Ctrl-Click a blank area of the DeTAIls seCTIOn and choose lOOp mOve from
►
the drop-down menu.
The l
►
►
►
►
OOp mOve
entire lOOp forward or backward.
Click the forward button labeled lOOp.
This will move the lOOp forward by the amount it was set to. For instance, if
you set a 4 beat lOO p, this would move the lOOp forward 4 beats.
When the track marker reaches the l
ing again.
module will appear with buttons that enable you to move the
OOp sTART
point, the track will begin loop-
Leaving the Snap button
!
(in the Loop Set module)
enabled while resizing a Loop can
block or modify resizing because
the new size may be smaller than
the Beatgrid.
Leaving the Snap button
!
(in the Loop Set panel)
enabled while moving a Loop can
block or modify the step size be -
cau se th e incr emen ts may be
smaller than the Beatgrid.
TRAKTOR 3.3 – 100
 Loading...