

Page 1

Manual
Page 2

The information in this document is subject to change without notice and does not represent a
commitment on the part of Native Instruments GmbH. The software described by this document is subject to a License Agreement and may not be copied to other media. No part of this
publication may be copied, reproduced or otherwise transmitted or recorded, for any purpose,
without prior written permission by Native Instruments GmbH, hereinafter referred to as Native
Instruments.
“Native Instruments”, “NI” and associated logos are (registered) trademarks of Native Instruments GmbH.
Mac, Mac OS, GarageBand, Logic, iTunes and iPod are registered trademarks of Apple Inc.,
registered in the U.S. and other countries.
Windows, Windows Vista and DirectSound are registered trademarks of Microsoft Corporation
in the United States and/or other countries.
All other trade marks are the property of their respective owners and use of them does not imply any affiliation with or endorsement by them.
Document authored by: musicandtext.com, David Gover
Software version: 1.0 (10/2012)
Disclaimer
Special thanks to the Beta Test Team, who were invaluable not just in tracking down bugs, but
in making this a better product.
Page 3

Germany
Native Instruments GmbH
Schlesische Str. 29-30
D-10997 Berlin
Germany
www.native-instruments.de
USA
Native Instruments North America, Inc.
6725 Sunset Boulevard
5th Floor
Los Angeles, CA 90028
USA
www.native-instruments.com
Contact
© Native Instruments GmbH, 2012. All rights reserved.
Page 4

Table of Contents
Table of Contents
1 Welcome to SESSION HORNS .....................................................................................
2 What is SESSION HORNS? ..........................................................................................
2.1 About KONTAKT / KONTAKT PLAYER ............................................................................................. 8
3 SESSION HORNS Controls ..........................................................................................
3.1 Basic Control Types .................................................................................................................... 9
3.1.1 Buttons ...................................................................................................................... 9
3.1.2 Selector Switches ...................................................................................................... 9
3.1.3 Knobs ........................................................................................................................ 10
3.1.4 Drop-Down Menus .................................................................................................... 10
3.1.5 Spin Controls ............................................................................................................. 10
4 The Two KONTAKT Instruments ...................................................................................
5 SESSION HORNS – Performance.nki ...........................................................................
5.1 Main Page .................................................................................................................................. 13
5.2 Sound Page ................................................................................................................................ 21
5.3 Control Page ............................................................................................................................... 25
5.1.1 Section Setup ............................................................................................................ 15
5.1.2 Velocity Switch .......................................................................................................... 15
5.1.3 Voicing Assistant ....................................................................................................... 16
5.1.4 Octave ....................................................................................................................... 18
5.1.5 Animator .................................................................................................................... 18
5.2.1 Sound ........................................................................................................................ 23
5.2.2 Humanize .................................................................................................................. 23
5.2.3 Stereo ........................................................................................................................ 24
5.2.4 Reverb ....................................................................................................................... 24
5.3.1 Dynamic Control ........................................................................................................ 26
5.3.2 Pitch Wheel ................................................................................................................ 27
6
8
9
11
13
Session Horns - Manual - 4
Page 5

Table of Contents
5.3.3 Sustain Pedal ............................................................................................................ 28
6 SESSION HORNS – Single.nki .....................................................................................
6.1 Main Page .................................................................................................................................. 30
6.2 Sound Page ................................................................................................................................ 36
6.1.1 Section Setup ............................................................................................................ 32
6.1.2 Articulation ................................................................................................................ 32
6.1.3 Voicing Assistant ....................................................................................................... 33
6.1.4 Octave ....................................................................................................................... 34
6.1.5 Dynamic Control ........................................................................................................ 35
6.2.1 Sound ........................................................................................................................ 38
6.2.2 Humanize .................................................................................................................. 38
6.2.3 Stereo ........................................................................................................................ 39
6.2.4 Reverb ....................................................................................................................... 39
7 Credits ......................................................................................................................
30
40
Session Horns - Manual - 5
Page 6

Welcome to SESSION HORNS
1 Welcome to SESSION HORNS
Thank you for choosing SESSION HORNS. SESSION HORNS is a highly expressive and versatile Horn section that lets you quickly achieve great results.
Woodwind and brass are among the most dynamic and expressive acoustic instruments, and
the interaction between the individual players of a horn section can be very complex both harmonically and rhythmically.
SESSION HORNS combines outstanding sound quality, an intuitive interface, and innovative
functionality not only to provide you with a truly musical workflow, but also to recreate the
magic that a soulful Horn section can add to your music.
We hope you enjoy using SESSION HORNS!
Yours,
Thomas Koritke
Manual Conventions
This manual uses particular formatting to point out special facts and to warn you of potential
issues. The icons introducing the following notes let you see what kind of information is to be
expected:
Whenever this exclamation mark icon appears, you should read the corresponding note
carefully and follow the instructions and hints given there if applicable.
This light bulb icon indicates that a note contains useful extra information. This information may often help you to solve a task more efficiently, but does not necessarily apply to
the setup or operating system you are using; however, it's always worth a look.
Furthermore, the following formatting is used:
▪ Text appearing in (drop-down) menus (such as Open…, Save as… etc.) and paths to loca-
tions on your hard drive or other storage devices is printed in italics.
▪ Text appearing elsewhere (labels of buttons, controls, text next to checkboxes, etc.) is
printed in light blue. Whenever you see this formatting applied, you will find the same
text appearing somewhere on the screen.
Session Horns - Manual - 6
Page 7

▪ Important names and concepts are printed in bold.
Single instructions are introduced by this play button type arrow.
►
Results of actions are introduced by this smaller arrow.
→
To get the best from this instrument please read the manual in its entirety!
Welcome to SESSION HORNS
Session Horns - Manual - 7
Page 8

What is SESSION HORNS?
About KONTAKT / KONTAKT PLAYER
2 What is SESSION HORNS?
SESSION HORNS delivers the sound of a tight, modern brass section and is aimed at Soul and
Pop producers. Brass found in genres such as R&B, Latin, Indie, Nu-Jazz and Reggae can also
easily be created.
▪ SESSION HORNS features authentic phrases and sound settings for a variety of different
genres.
▪ SESSION HORNS is a collection of four multi-sampled brass instruments which you can
use in different combinations or as a complete section.
The full section consists of one Trombone, one Tenor Sax and two Trumpets. SESSION
HORNS' intuitive approach lets you quickly produce authentic brass phrases and arrangements, even if you don’t have prior detailed knowledge of brass arrangement.
▪ True legato transitions on all instruments provide a smooth and natural sound for melo-
dies.
▪ SESSION HORNS’ unique Smart Voice Split allocates each note of a chord to the corre-
sponding brass instrument.
▪ The Animator turns chords into authentic brass phrases while maintaining real-time con-
trol-ability. The Animator will always follow the played chord and adjust the brass phrase
to proper voicing.
▪ A variety of creative mix and mastering presets provides a scope of inspiring sound im-
ages.
2.1
About KONTAKT / KONTAKT PLAYER
SESSION HORNS is an Instrument powered by KONTAKT; you will, therefore, have to have
KONTAKT or the free KONTAKT PLAYER installed on your computer in order to use SESSION
HORNS. Refer to the KONTAKT / KONTAKT PLAYER documentation to learn how to load and
configure KONTAKT Instruments.
Session Horns - Manual - 8
Page 9

SESSION HORNS Controls
Basic Control Types
3 SESSION HORNS Controls
This chapter introduces you to SESSION HORNS’ specific controls, which are part of the Performance View section of the Instrument within your KONTAKT / KONTAKT PLAYER software.
The Instrument Header
To learn how to operate the Instrument Header’s controls, please refer to the documentation of your KONTAKT or KONTAKT PLAYER software.
3.1 Basic Control Types
SESSION HORNS includes six basic types of controls: buttons, switches, knobs, faders, dropdown menus and spin controls.
3.1.1 Buttons
Buttons can have different shapes (“LED” or square) and are all toggles — click once to turn
on, again to turn off. All buttons change their background color when actuated, which reflects
the new state.
3.1.2 Selector Switches
Selector switches are used to select one of several options.
▪ Click the round “LED” next to the desired option to select it.
The Animator section contains two special selector switch types:
▪ The Phrase selector in the Animator (looks like an octave of piano keys) — click any of
the “white” keys to select one of the available phrase.
Session Horns - Manual - 9
Page 10

SESSION HORNS Controls
Basic Control Types
▪ The Tempo selector in the Animator, where you can choose one of three available play-
back speeds.
3.1.3 Knobs
▪ To change a knob value, click on it and drag up to move the knob clockwise, or down to
move it counter-clockwise.
▪ Knobs can be fine-tuned by holding down your computer keyboard’s [Shift] key as you
move the knob.
▪ [Ctrl] + Click (Mac OS X: [Cmd] + Click) resets a knob to its default value.
3.1.4 Drop-Down Menus
Drop-down menus can usually be recognized by a small downward-pointing arrow. To access a
drop-down menu’s entries, click on the menu. A list holding several entries drops down.
To select one of the entries, move the mouse to the corresponding entry so that it gets
►
highlighted, then release the mouse button. The Instrument takes whatever action you’ve
requested, then closes the menu.
3.1.5 Spin Controls
Spin controls are pairs of two small horizontal arrows which provide a second option for selecting items; for instance drop-down menu entries. Click on either arrow to step through the available items.
▪ The left arrow lets you step backwards through the list.
▪ The right arrow lets you step forward through the list.
Session Horns - Manual - 10
Page 11

The Two KONTAKT Instruments
4 The Two KONTAKT Instruments
SESSION HORNS provides you with two separate KONTAKT Instruments (*.nki files): SESSION
HORNS – Performance and SESSION HORNS – Single Articulation. Each one of these *.nki files
holds all the relevant controls for shaping the sound of the included instruments.
▪ The SESSION HORNS – Performance.nki is designed for real time performance. It features
pre-programmed but very flexible brass phrases using SESSION HORNS’ unique Animator
function as well as a ‘standard’ keyboard mode, where different articulations are accessible via velocity switching and pitch wheel.
The SESSION HORNS engine can also intelligently split chord notes and assign them to
individual section instruments if required. The SESSION HORNS – Performance.nki has
three separate pages which you can access by simply clicking on the tabs on the bottom
margin of the program window.
▪ The SESSION HORNS – Single Articulation.nki is meant to be used for single articulations –
ideal for production and sequencing work.
All Articulations are available in the Single Articulation.nki file. In order to provide a minimum RAM footprint , they are automatically loaded and unloaded depending on your selection. The SESSION HORNS – Single Articulation.nki has two separate pages. These can be
opened by clicking on the tabs on the bottom margin of the program window.
Session Horns - Manual - 11
Page 12

The Two KONTAKT Instruments
SESSION HORNS – Performance.nki
Session Horns - Manual - 12
Page 13

SESSION HORNS – Performance.nki
5 SESSION HORNS – Performance.nki
The SESSION HORNS – Performance.nki has three different pages, called Main, Sound and
Control. This section details the controls present on these pages.
5.1 Main Page
Using the functions in the SESSION HORNS - Performance.nki Main page you can:
▪ Select instrument combinations for the horns section you want to use.
▪ Determine a second articulation that is used when you press the keys harder (velocity
switching).
▪ Control how the individual voices are distributed among the instruments in the horns sec-
tion you have selected.
▪ Lower the octave for individual instruments.
▪ Use the unique Animator to play back pre-programmed yet flexible phrases or just use the
pre-programmed rhythm of the phrase with your own chords.
Main Page
Session Horns - Manual - 13
Page 14

SESSION HORNS – Performance.nki
Main Page
The Main page of the SESSION HORNS – Performance.nki
[1] Section Setup: It contains the drop-down menu; Section Setup. Use this to select the de-
sired combination of woodwind and brass instruments. For details on this section see ↑5.1.1,
Section Setup.
[2] Velocity Switch: It contains a drop-down menu; Velocity Switch. Use this to select a second
articulation which is used when you play with stronger velocity. For details on this section see
↑5.1.2, Velocity Switch.
Session Horns - Manual - 14
Page 15
SESSION HORNS – Performance.nki
[3] Voicing Assistant: It contains a drop-down menu; Voicing Assistant. Use this to determine
how the individual instruments are distributed among the keys you press on your keyboard. For
details on this section see ↑5.1.3, Voicing Assistant.
[4] Octave: This section contains a drop-down menu; Octave. Use this to determine the octaves
used by the selected section instrument(s). For details on this section see ↑5.1.4, Octave.
[5] ANIMATOR: This section offers a selection of authentic horns phrases for different musical
styles. For details on this section see ↑5.1.5, Animator.
5.1.1 Section Setup
The Section Setup area is located in the top left of the Main page. It contains two drop-down
menus; Section Setup and Velocity Switch.
Section Setup Drop-Down Menu
You can use this drop-down menu to select the desired combination of woodwind and brass
instruments.
▪ To open the Section Setup menu, click on the downward pointing arrow. The drop-down
menu opens and lets you select one of the available horns section setups. Each instrument is abbreviated as follows:
Main Page
▪ Select one of the available instrument combinations in the menu. Your choice will be re-
flected by the instrument images on screen: images of unused instruments are dimmed.
Abbreviation Instrument
Tb Trombone
Ts Tenor Saxophone
Tp1 Trumpet 1
TP2 Trumpet 2
5.1.2 Velocity Switch
Velocity Switch is the second drop-down menu in the Section Setup area. Use this to select a
second articulation which is used when you play with stronger velocity, or to disable this function.
Session Horns - Manual - 15
Page 16

SESSION HORNS – Performance.nki
Note that the Velocity Switch Articulation is not affected by Chord + Legato, Legato (found
in the Voicing Assistant menu) or Doits/Falls on release (found on the Control page) settings.
Velocity Switch Drop-Down Menu
The following articulation types are available:
Articulation Explanation
Off No articulation. Selecting this disables the Velocity Switch function. As a re-
sult, sustain articulation is used over the entire velocity range.
Rip A glide at the beginning of a sustained note. Woodwind and brass variation of
a Glissando (Italian: glide).
Grace Note A continuous change between the (very briefly-sounding) grace note and the
longer lasting main note. Distance between the two notes: one whole tone.
Shake Sounds like a coarse trill. Note: For physical reasons, a Saxophone can not
create a shake.
FoPiCre Short for Forte-Piano-Crescendo (Italian: loud/quiet/growing).
This articulation starts with a loud attack, gets quiet very quickly, then increases volume and finally ends abruptly. The dynamic process is based on a
tempo of 120 BPM (beats per minute).
Main Page
FoPiCre Time This articulation is the same as FoPiCre above, but here the dynamic process
is synced to the tempo setting of your host sequencer!
Staccatissimo Italian: separated.
Staccatissimo is an articulation technique characterized by an accented start
of each pitch and a short, truncated end resulting in extremely detached and
briefly played notes.
Marcato Italian: marked.
Accentuated note or chord with a sharp attack followed by the decaying
sound.
5.1.3 Voicing Assistant
The Voicing Assistant area is located top right in the Main page. It contains two drop-down menus; Voicing Assistant and Octave.
Session Horns - Manual - 16
Page 17

SESSION HORNS – Performance.nki
Using the options on this menu, you determine how the individual instruments are distributed
among the keys you press on your keyboard. This has considerable impact on how your horns
section sounds. These are the available Voicing modes:
Voicing Assistant Drop-Down Menu
Voicing Explanation
Smart Voice Split The voices selected in Section Setup are realistically distributed among the
keys you press. The order and number of available voices is always consistent
and happens realistically from bottom to top, no matter in which order you
press the keys. Voices can therefore jump between notes when you press additional notes or release notes.
With the full section selected in Section Setup and playing a chord with four
notes, the lowest controls the Trombone, the next higher one the Tenor Saxophone and the next higher two control the Trumpets. If you add a fifth note,
the new one will replace one of the sounding notes. Which note this is depends on the pitch of the newly pressed note.
Chord + Legato Use this mode to simultaneously play chords and a monophonic legato melody.
Legato is an Italian word and means tied together. To generate a legato melody, you must overlay within an octave the sounding note with the next. Each
note you play triggers all instruments currently selected in Section Setup. Example: If you play a chord triad with Full Section selected in Section Setup,
each note in the chord is played by all four instruments. This mode does not
affect the selected Velocity Switch articulation.
Main Page
Legato Use this mode to generate a monophonic legato melody. To make it legato,
overlay the currently sounding note with the next. Each note you play triggers
all instruments currently selected in Section Setup.
SESSION HORNS provides true legato samples to achieve realistic and expressive note transitions both in Chord + Legato and Legato mode. This mode does
not affect the selected Velocity Switch articulation.
Polyphonic Each note you play triggers all instruments currently selected in Section Set-
up.
Animator Select this to activate the Animator and use the available Animator phrases;
for details see ↑5.1.5, Animator.
Session Horns - Manual - 17
Page 18
SESSION HORNS – Performance.nki
5.1.4 Octave
The Octave drop-down-menu is located in the Voicing Assistant area, on the top right of the
Main page.
By selecting items in this menu you determine the octaves used by the respective selected section instrument(s). Here’s a list of the individual menu entries and what they mean when you
have selected Full Section in Section Setup:
Octave Drop-Down Menu
Menu Item Explanation:
Drop Off Selecting this disables the Drop function.
Drop 1st The instrument with the lowest reaching tone range (in a full section the
Trombone) is shifted one octave downwards.
Drop 2nd The instrument with the second-lowest reaching tone range (in a full section
the Tenor Saxophone) is shifted one octave downwards.
Drop 3rd The instrument with the third-lowest reaching tone range (in a full section
the Trumpet 2) is shifted one octave downwards.
Main Page
Drop 1st + Drop 2nd The lowest and second-lowest reaching instruments (in a full section the
Trombone and the Tenor Saxophone) are shifted one octave downwards.
If you select other section setups, the content of the Octave drop-down-menu changes accordingly and the available menu items refer to the lowest reaching instruments in the selected section setup.
5.1.5 Animator
The Animator is located at the lower end of the Main page. It offers a selection of authentic
horns phrases for different musical styles. The phrases are grouped by genre, song and phrase.
Each song contains six phrases. Each phrase comes with a harmonic progression which you
can shape by playing your own chords. You can also disable the harmonic progression in the
phrases altogether and just use their rhythm.
Session Horns - Manual - 18
Page 19

SESSION HORNS – Performance.nki
To enable the Animator, click the “LED” next to the word ANIMATOR on the right side,
►
so that it lights up. As an alternative you can also select the Animator item on the Voicing
Assistant drop-down-menu.
Press a key or a chord on your controller keyboard. The selected phrase will play back for
►
as long as you hold down the key or chord. The progress bar below the Phrase spin control informs you about the current playback position within the phrase.
You can switch to a different phrase in the song by clicking or pressing its phrase selector
►
key.
Animator Parameters
The Animator contains the following controls.
Main Page
The Animator in the SESSION HORNS – Performance.nki
[1] Animator: Click the ANIMATOR text or blue LED once to turn the Animator on. Press it
again to turn it off.
[2] Genre Drop-Down-Menu: Select a genre in this drop-down-menu, located in the top left area
of the Animator section.
Session Horns - Manual - 19
Page 20

SESSION HORNS – Performance.nki
[3] Song Drop-Down-Menu and Spin Controls: These selection tools are located below the left
side of the Genre drop-down-menu. The drop-down-menu becomes visible when you click into
the area above the spin controls. Select one of the available songs in the drop-down-menu or
by using the Song spin controls.
[4] Link Sound Preset Button: This button is located below the Song spin controls. Each song
contains tailored Sound Mix and FX presets. If you activate the Link Sound Preset button these
presets are automatically used and when you select another Song, the preset Sound Mix and
FX settings of that Song will automatically be used.
[5] Phrase Selector Switch and Spin Controls: These selection tools are located below the right
side of the Genre drop-down-menu. Select a phrase. Several options are available for this:
▪ Press any of the phrase selector keys C1 to A1 on your controller keyboard or the KON-
TAKT on-screen keyboard, where they are shown in pink.
▪ Click any of the “white” keys in the Phrase area of the Animator.
▪ Use the Phrase spin controls.
[6] Progress Bar: This is located below the Phrase spin controls. When you trigger a phrase, the
progress bar informs you about the current playback position within the phrase.
[7] Mode Buttons: These two buttons are located to the right of the Phrase Selector.
Main Page
If you activate the One Shot button and just briefly press the desired chord, the full
►
phrase will be played back once.
If you activate the Rhythm only button, only the rhythm and the articulation of the re-
►
spective phrase will be used to play back the chords you press with proper woodwinds
and brass voicing.
[8] Swing: The Swing knob is located to the right of the Mode buttons.
If you wish, use this knob to apply a swing factor to the Animator phrases. Experiment to
►
find a fitting swing setting for the type of music you are creating.
[9] Dynamic: You find the Dynamic knob to the right of the Swing knob. It is used to define
what determines the dynamics in the Animator phrase; the velocity with which you hit the keys
and/or the dynamics pre-programmed in the phrase.
Session Horns - Manual - 20
Page 21

SESSION HORNS – Performance.nki
Use the Dynamic knob to determine how these two factors influence the phrase dynam-
►
ics.
[10] Timing: This is located to the right of the Dynamic knob.
Use this knob to control the timing accuracy of the instruments in selected horns section.
►
The further you turn this knob to the right, the more the start offsets between the individual instruments become clearly audible.
[11] Tempo: This selector switch to the right in the Animator lets you select a phrase playback.
No matter which speed you select here, it has no impact on the phrase pitch.
Select 1/2 to play back the phrase with half of the original tempo.
►
Select 1:1 to play back the phrase with the tempo currently set in your host application
►
or in KONTAKT.
Select X2 to play back the phrase with double speed.
►
5.2 Sound Page
Using the functions in the SESSION HORNS - Performance.nki Sound page you can:
Sound Page
▪ Select mix presets in the Sound section.
▪ Select and activate Master FX presets in the Sound section.
▪ Use the Detune function in the Humanize section to slightly (or heavily) detune the in-
struments in the selected horns section.
▪ Set up stereo width in the Stereo section or create a mono signal.
▪ Select and activate a reverb type and set the amount of reverb in the resulting output sig-
nal.
Session Horns - Manual - 21
Page 22

SESSION HORNS – Performance.nki
Sound Page
The Sound page of the SESSION HORNS – Performance.nki
[1] SOUND: Contains two separate control elements:
▪ Section Mix Drop-Down-Menu and Spin Controls: Use this to control the volume balance and
EQ settings of the individual instruments in the horns section.
▪ Master Fx Drop-Down-Menu and Spin Controls: Use the presets available here control a Mas-
ter effect chain consisting of Compressor, EQ, Tape Saturator, Delay, Distortion and Filter.
▪ For more details on the Sound section see ↑5.2.1, Sound.
Session Horns - Manual - 22
Page 23

SESSION HORNS – Performance.nki
[2] HUMANIZE: Use this to introduce detuning among the instruments in the horns section.
For more details see ↑5.2.2, Humanize.
[3] STEREO: Use this to increase/decrease the width of the stereo panorama or create a mono
signal. For more details see ↑5.2.3, Stereo.
[4] REVERB: Use this to place the horns section in a variety of different rooms and ambiences.
For more details see ↑5.2.4, Reverb.
5.2.1 Sound
The Sound area is located at the lower end of the Sound page. This is where you can select
one of the many available Section Mix and Master Fx presets.
Section Mix Drop-Down-Menu and Spin Controls
These are located on the left side of the sound area. The drop-down-menu becomes visible
when you click into the area above the spin controls. The presets available here control the volume balance and EQ settings of the individual instruments in the horns section.
Select one of the available mix presets in the drop-down-menu or by using the Section
►
Mix spin controls.
Sound Page
Master Fx Drop-Down-Menu and Spin Controls
These selection options are located to the right of the section mix options. The drop-downmenu becomes visible when you click into the area above the spin controls. The presets available here control a Master effect chain consisting of Compressor, EQ, Tape Saturator, Delay,
Distortion and Filter.
Select one of the available Master Fx presets in the drop-down-menu or use the Master Fx
►
spin controls.
Activate the Master FX by clicking the ON “LED.”
►
5.2.2 Humanize
The Detune knob in this section lets you introduce a degree of detuning among the instruments in the horns section that you have selected in Section Setup in the Main page.
Session Horns - Manual - 23
Page 24

SESSION HORNS – Performance.nki
To do this, activate the Humanize function by clicking its “LED” switch so that it lights
►
up. Then turn up the Detune knob.
Handle with care! Turning the Detune knob up all the way creates a heavily detuned signal.
5.2.3 Stereo
Session Horn’s audio signal is being output in stereo by default.
When you activate the Stereo section by clicking its “LED” switch, you can either increase/decrease the width of the stereo panorama or create a mono signal:
With Stereo activated, turn the Width knob up to increase or turn it down to decrease the
►
stereo panorama width.
With Stereo activated, turn the Width knob to 0 to get a mono signal.
►
5.2.4 Reverb
SESSION HORNS includes a high-end convolution reverb that lets you place the horns section
in a variety of different rooms and ambiences. You can choose from a great number of presets.
Sound Page
Reverb Drop-Down-Menu and Spin Controls
These are located below the Reverb switch.
Click on the name of the currently selected reverb preset to open the menu where you
►
can select another preset.
As an alternative, use the Spin controls to step through and thereby select any of the
►
available presets.
AMT Fader
Use this fader to determine the ratio between the dry signal (no reverb) and the reverberated
signal.
To do this, drag the fader handle in horizontal direction.
►
Session Horns - Manual - 24
Page 25

SESSION HORNS – Performance.nki
5.3 Control Page
Using the functions in the SESSION HORNS - Performance.nki Control page you can set up a
number of parameters that you can control using external MIDI controllers or by the way you
play.
Control Page
The Control page of the SESSION HORNS – Performance.nki
Session Horns - Manual - 25
Page 26

SESSION HORNS – Performance.nki
[1] DYNAMIC CONTROL: Use this section to control the SESSION HORNS dynamics. For more
details see ↑5.3.1, Dynamic Control.
[2] PITCH WHEEL: Use this section to define what happens when you use the Pitch Wheel on
your controller keyboard. For more details see ↑5.3.2, Pitch Wheel.
[3] SUSTAIN PEDAL: Use this section options to determine will happen if you press your Sus-
tain Pedal. For more details see ↑5.3.3, Sustain Pedal.
5.3.1 Dynamic Control
Here you can select one of two available methods (Velocity or Expression) to control the SESSION HORNS dynamics.
Velocity
If you select this option, you control the dynamics by playing the keys on your controller
►
keyboard harder or softer (i.e. with more or less velocity).
Expression
Control Page
If you select this option, you control the dynamics by using MIDI Controller Change #11
►
(CC#11). Use this mode for dynamic changes that should occur after you have pressed
the keys. One common use for this controller type is to generate crescendos or decrescendos. Note that the Velocity switch articulation is still available here. It can be activated as
usual by pressing the keys harder.
The Expression controller type can only be used if your keyboard supports it.
Velocity Drop-Down-Menu
This menu lets you select one of three available Velocity curves. These can be used to adjust
the overall Velocity response of SESSION HORNS to your controller keyboard’s characteristics:
Session Horns - Manual - 26
Page 27

SESSION HORNS – Performance.nki
Linear velocity The input velocity values are not processed.
Hard Velocity This is useful if you happen to use a “light” master keyboard (which outputs higher ve-
locity values even when you play rather softly) as this transforms higher input velocities
to relatively low ones.
Soft Velocity This setting is useful for “heavy” master keyboards as they respond more easily to your
playing.
Open the drop-down-menu and select the desired curve.
This menu is only available when you select Velocity for dynamic control.
5.3.2 Pitch Wheel
Here you can select one of three available options and thereby define what happens when you
use the Pitch Wheel on your controller keyboard. These are the options:
Normal
As the name implies, the Pitch Wheel will behave normally when you selected this option. This
means, you can use it to continuously bend the pitch of the sound by +- two semitones.
Control Page
Doits/Falls on Note
Select this option to use the Pitch Wheel for controlling Doits and Falls on Note start. Doits
and Falls are typical brass articulations.
Move the Pitch Wheel up and play a chord or note which quickly ends with Doits.
►
Move the Pitch Wheel fully down and play a chord or note which quickly ends with fast
►
Falls.
Move the Pitch Wheel down just a bit to get slower Falls.
►
Session Horns - Manual - 27
Page 28

SESSION HORNS – Performance.nki
Doits/Falls on release
Select this option to use the Pitch Wheel for controlling Doits and Falls on key release. This
lets you play a chord for as long as you want and end it with Doits or Falls as soon as you let go
of the keys on your controller keyboard. This mode does not affect the selected Velocity Switch
articulation.
Move the Pitch Wheel up and play a chord or note which ends with Doits when you re-
►
lease the keys.
Move the Pitch Wheel fully down and play a chord or note which ends with fast Falls
►
when you release the keys.
Move the Pitch Wheel down just a bit to get slower Falls.
►
With this option you can also use the Pitch Wheel after Note On.
5.3.3 Sustain Pedal
Select one of these two options to determine what should happen if you press your Sustain
Pedal (MIDI Controller Change # 64).
Control Page
Same Note Legato
When a real horns section plays same note legato, the second note has a “tongued” attack,
which sounds different than the usual attack. SESSION HORNS utilizes dedicated samples
with tongued attack and Same Note Legato allows for realistic note repetitions if the same key
is pressed repeatedly while holding the pedal down.
Animator
As an alternative you can use the Sustain Pedal to instantly start the Animator at any time.
When you have selected this option, Same Note Legato is not available.
How to utilize the Animator
Session Horns - Manual - 28
Page 29

SESSION HORNS – Performance.nki
1. Play and hold a chord or a key without pressing the sustain pedal. You will get a normal
sustained Horns sound.
2. Press the sustain pedal and play a chord with the left hand. The Animator will start.
3. Keep this chord pressed and release the sustain pedal.
4. Now play a chord or a note with the right hand.
The Animator will continue to run and you will hear both the Animator phrase and the
→
right hand notes. The Animator will play for as long as any key is pressed. This lets you
improvise by using a combination of Animator phrases and melody or chord notes. With a
little practice this can be a powerful real-time performance tool.
Control Page
Session Horns - Manual - 29
Page 30

SESSION HORNS – Single.nki
6 SESSION HORNS – Single.nki
This NKI features only one Articulation at a time and can be used for detailed composition and
production work. The NKI has two different pages; Main and Sound which are described in detail in this chapter.
6.1 Main Page
Using the functions in the SESSION HORNS - Single Articulation.nki Main page you can:
▪ Select instrument combinations for the horns section you want to use.
▪ Select an articulation type.
▪ Control how the individual voices are distributed among the instruments in the horns sec-
tion you have selected.
▪ Lower the octave for individual instruments.
Main Page
Session Horns - Manual - 30
Page 31
SESSION HORNS – Single.nki
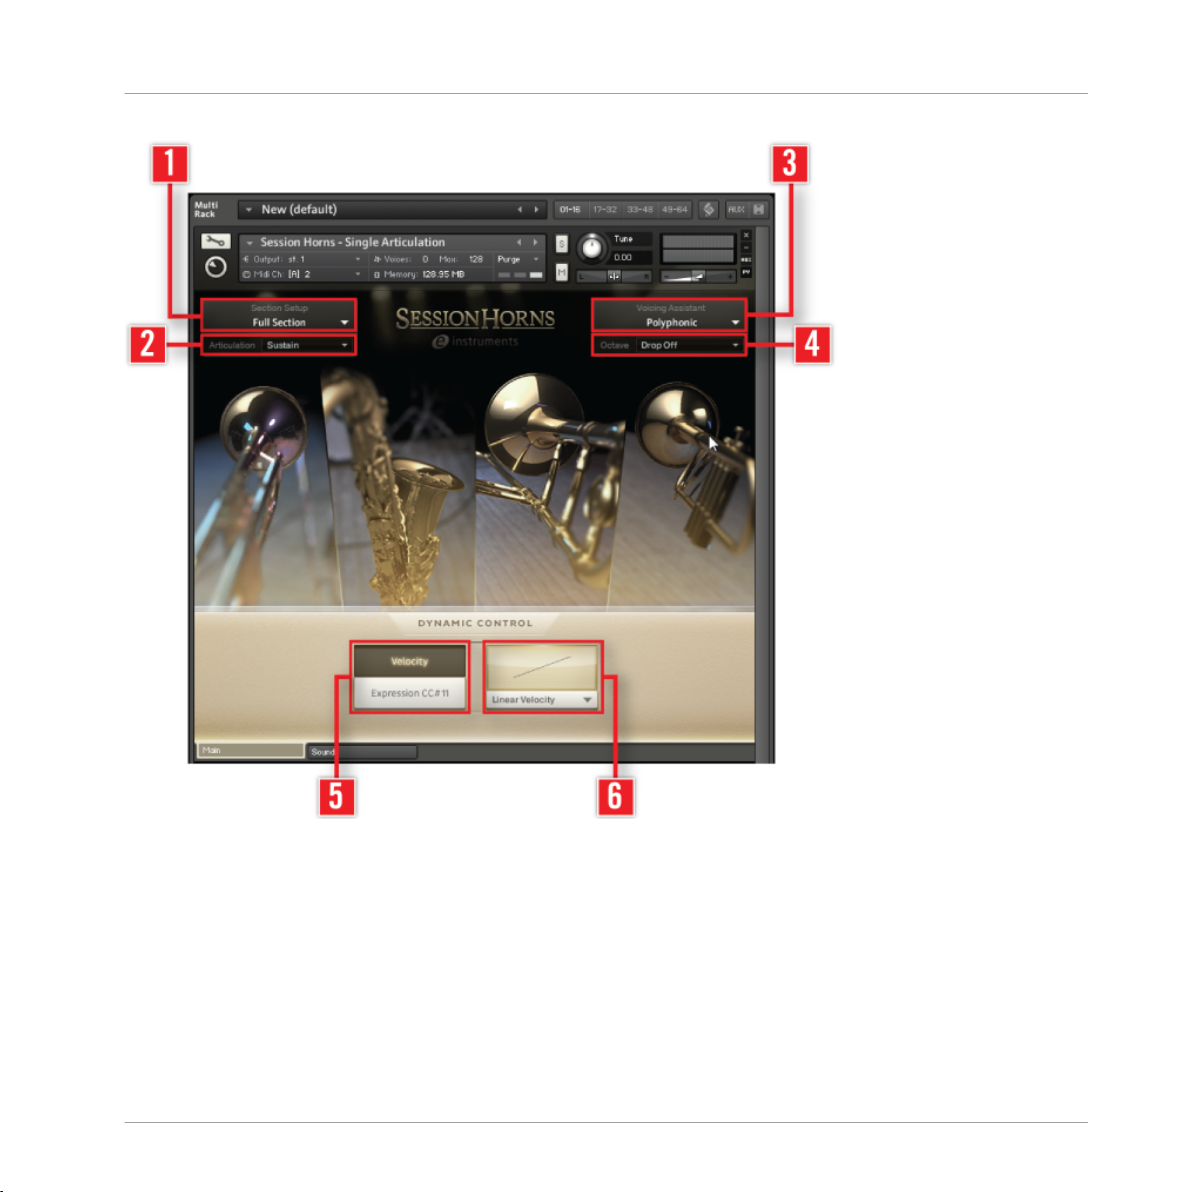
Main Page
The Main page of the SESSION HORNS – Single Articulation.nki
[1] Section Setup: It contains the drop-down menu; Section Setup. Use this to select the de-
sired combination of woodwind and brass instruments. For details on this section see ↑6.1.1,
Section Setup
[2] Articulation: It contains a drop-down menu; Articulation. Use this to select a second articu-
lation which is used when you play with stronger velocity. For details on this section see
↑6.1.2, Articulation
Session Horns - Manual - 31
Page 32

SESSION HORNS – Single.nki
[3] Voicing Assistant: It contains a drop-down menu; Voicing Assistant. Use this to determine
how the individual instruments are distributed among the keys you press on your keyboard. For
details on this section see ↑6.1.3, Voicing Assistant.
[4] Octave: This section contains a drop-down menu; Octave. Use this to determine the octaves
used by the selected section instrument(s). For details on this section see ↑6.1.4, Octave
[5] DYNAMIC CONTROL: Use this section to select one of two available MIDI Controller message types (Velocity or Expression) to control Session Horn’s dynamic behavior. For details on
this section see ↑6.1.5, Dynamic Control
6.1.1 Section Setup
The Section Setup area is located top left in the Main page. It contains two drop-down menus;
Section Setup and Articulation.
Section Setup Drop-Down Menu
You can use this drop-down menu to select the desired combination of woodwind and brass
instruments.
▪ To open the Section Setup menu, click on the downward pointing arrow. The drop-down
menu opens and lets you select one of the available horns section setups.
Main Page
▪ Select one of the available instrument combinations in the menu. Your choice will be re-
flected by the instrument images on screen: images of unused instruments are dimmed.
Abbreviation Instrument
Tb Trombone
Ts Tenor Saxophone
Tp1 Trumpet 1
TP2 Trumpet 2
6.1.2 Articulation
Articulation is the second drop-down menu in the Section Setup area. Use this to select an
articulation that you want to use. The following articulation types are available:
Session Horns - Manual - 32
Page 33

SESSION HORNS – Single.nki
Articulation Drop-Down Menu
Articulation Explanation
Sustain All notes are held for as long as you press the corresponding keys.
Rip A glide at the beginning of a sustained note. Woodwind and brass variation of a Glissando
(Italian: glide).
Grace Note A continuous change between the (very briefly-sounding) grace note and the longer lasting
main note. Distance between the two notes: one whole tone.
Shake Sounds like a coarse trill. Note: For physical reasons, a Saxophone can not create a shake.
FoPiCre Short for Forte-Piano-Crescendo (Italian: loud/quiet/growing). This articulation starts with a
loud attack, gets quiet very quickly, then increases volume and finally ends abruptly. The
dynamic process is based on a tempo of 120 BPM (beats per minute).
FoPiCre Time Same as FoPiCre above, but here the dynamic process is synced to the tempo setting of
your host sequencer!
Staccatissimo Italian: separated.
Staccatissimo is an articulation technique characterized by an accented start of each pitch
and a short, truncated end resulting in extremely detached and briefly played notes.
Marcato Italian: marked
Accentuated note or chord with a sharp attack followed by the decaying sound.
Main Page
Falls Slow A note of definite pitch that fairly slowly slides down to another note of definite pitch.
Falls Fast A note of definite pitch quickly sliding down to another note of definite pitch.
Doits A note that chromatically slides upwards to an indefinite pitch.
Soft Sustain Softly played sustained notes that are held until you release the corresponding keys.
6.1.3 Voicing Assistant
The Voicing Assistant area is located top right in the Main page. It contains two drop-down menus; Voicing Assistant and Octave.
Using the options on this menu, you determine how the individual instruments are distributed
among the keys you press on your keyboard. This has considerable impact on how your horns
section sounds. These are the available Voicing modes:
Session Horns - Manual - 33
Page 34

SESSION HORNS – Single.nki
Voicing Assistant Drop-Down Menu
Voicing Explanation
Smart Voice Split The voices selected in Section Setup are realistically distributed among the keys
you press. The order and number of available voices is always consistent and happens realistically from bottom to top, no matter in which order you press the keys.
Voices can therefore jump between notes when you press additional notes or release notes.
With the full section selected in Section Setup and playing a chord with four
notes, the lowest controls the Trombone, the next higher one the Tenor Saxophone
and the next higher two control the Trumpets. If you add a fifth note, the new one
will replace one of the sounding notes. Which note this is depends on the pitch of
the newly pressed note.
Chord + Legato Use this mode to simultaneously play chords and a monophonic legato melody.
Legato is an Italian word and means tied together. To generate a legato melody,
you must overlay within an octave the currently sounding note with the next. Each
note you play triggers all instruments currently selected in Section Setup. Example: If you play a chord triad with Full Section selected in Section Setup, each
note in the chord is played by all four instruments.
Legato Use this mode to generate a monophonic legato melody. To make it legato, over-
lay the currently sounding note with the next. Each note you play triggers all instruments currently selected in Section Setup.
SESSION HORNS provides true legato samples to achieve realistic and expressive
note transitions both in Chord + Legato and Legato mode.
Note: Chord + Legato and Legato are only available if the sustain articulation is
selected.
Main Page
Polyphonic Each note you play triggers all instruments currently selected in Section Setup.
6.1.4 Octave
The Octave drop-down-menu is located in the Voicing Assistant area, on the top right of the
Main page.
By selecting items in this menu you determine the octaves used be the respective selected
section instrument(s). Here’s a list of the individual menu entries and what they mean when
you have selected Full Section in Section Setup:
Session Horns - Manual - 34
Page 35

SESSION HORNS – Single.nki
Octave Drop-Down Menu
Menu item Effect:
Drop Off Selecting this disables the Drop function.
Drop 1st The instrument with the lowest reaching tone range (in a full section the
Trombone) is shifted one octave downwards.
Drop 2nd The instrument with the second-lowest reaching tone range (in a full section
the Tenor Saxophone) is shifted one octave downwards.
Drop 3rd The instrument with the third-lowest reaching tone range (in a full section
the Trumpet 2) is shifted one octave downwards.
Drop 1st + Drop 2nd The lowest and second-lowest reaching instruments (in a full section the
Trombone and the Tenor Saxophone) are shifted one octave downwards.
If you select other section setups, the content of the Octave drop-down-menu changes accordingly and the available menu items refer to the lowest reaching instruments in the selected section setup.
6.1.5 Dynamic Control
In this area you can select one of two available MIDI Controller message types (Velocity or Expression) to control Session Horn’s dynamic behavior.
Main Page
Velocity
Activate this button if you want to control the dynamics via Velocity; by playing the keys
►
on your controller keyboard harder or softer (i.e. with more or less velocity).
Expression
Activate this button if you want to control the dynamics using MIDI Controller Change
►
#11 (CC#11), e.g. generated by an expression pedal.
This controller type can only be used if your keyboard supports it.
Session Horns - Manual - 35
Page 36

SESSION HORNS – Single.nki
Velocity Drop-Down-Menu
This menu lets you select one of three available Velocity curves
Open the drop-down-menu and select the desired curve.
►
This menu is only available when select Velocity for dynamic control.
6.2 Sound Page
Using the functions in SESSION HORNS - Single Articulation.nki Sound page you can:
▪ Select mix presets in the Sound section.
▪ Select and activate Master FX presets in the Sound section.
▪ Use the Detune function in the Humanize section to slightly (or heavily) detune the in-
struments in the selected horns section.
▪ Set up stereo width in the Stereo section or create a mono signal.
Sound Page
▪ Select and activate a reverb type and set the amount of reverb in the resulting output sig-
nal.
Session Horns - Manual - 36
Page 37

SESSION HORNS – Single.nki
Sound Page
The Sound page of the SESSION HORNS – Single Articulation.nki
[1] SOUND: Contains two separate control elements:
▪ Section Mix Drop-Down-Menu and Spin Controls: Use this to control the volume balance and
EQ settings of the individual instruments in the horns section.
▪ Master Fx Drop-Down-Menu and Spin Controls: Use the presets available here control a Mas-
ter effect chain consisting of Compressor, EQ, Tape Saturator, Delay, Distortion and Filter.
▪ For more details on the Sound section see ↑5.2.1, Sound.
Session Horns - Manual - 37
Page 38

SESSION HORNS – Single.nki
[2] HUMANIZE: Use this to introduce detuning among the instruments in the horns section.
For more details see ↑5.2.2, Humanize.
[3] STEREO: Use this to increase/decrease the width of the stereo panorama or create a mono
signal. For more details see ↑5.2.3, Stereo.
[4] REVERB: Use this to place the horns section in a variety of different rooms and ambiences.
For more details see ↑5.2.4, Reverb.
6.2.1 Sound
The Sound area is located at the lower end of the Sound page. This is where you can select
one of the many available Section Mix and Master Fx presets.
Section Mix Drop-Down-Menu and Spin Controls
These are located on the left side of the sound area. The drop-down-menu becomes visible
when you click into the area above the spin controls. The presets available here control the volume balance and EQ settings of the individual instruments in the horns section.
Select one of the available mix presets in the drop-down-menu or by using the Section
►
Mix spin controls.
Sound Page
Master Fx Drop-Down-Menu and Spin Controls
These selection options are located to the right of the section mix options. The drop-downmenu becomes visible when you click into the area above the spin controls. The presets available here control a Master effect chain consisting of Compressor, EQ, Tape Saturator, Delay,
Distortion and Filter on/off switch.
Select one of the available Master Fx presets in the drop-down-menu or use the Master Fx
►
spin controls.
Activate the Master FX by clicking the ON "LED".
►
6.2.2 Humanize
The Detune knob in this section lets you introduce a degree of detuning among the instruments in the horns section that you have selected in Section Setup in the Main page.
Session Horns - Manual - 38
Page 39

SESSION HORNS – Single.nki
To do this, activate the Humanize function by clicking its “LED” switch so that it lights
►
up. Then turn up the Detune knob.
Handle with care! Turning the Detune knob up all the way creates a heavily detuned signal.
6.2.3 Stereo
Session Horn’s audio signal is being output in stereo by default.
When you activate the Stereo section by clicking its “LED” switch, you can either increase/decrease the width of the stereo panorama or create a mono signal:
With Stereo activated, turn the WIDTH knob up to increase or turn it down to decrease
►
the stereo panorama width.
With Stereo activated, turn the WIDTH knob to 0 to get a mono signal.
►
6.2.4 Reverb
SESSION HORNS includes a high-end convolution reverb that lets you place the horns section
in a variety of different rooms and ambiences. You can choose from a great number of presets.
Sound Page
Reverb Drop-Down-Menu and Spin Controls
These are located below the Reverb switch.
Click on the name of the currently selected reverb preset to open the menu where you
►
can select another preset.
As an alternative, use the Spin controls to step through and thereby select any of the
►
available presets.
AMT Fader
Use this fader to determine the ratio between the dry signal (no reverb) and the reverberated
signal.
To do this, drag the fader handle in horizontal direction.
►
Session Horns - Manual - 39
Page 40

7 Credits
Produced, engineered and mixed by Thomas Koritke
Sound Design / Sample Editing: Sascha Haske, Holger Brauns
Concept: Thomas Koritke, Sebastian Bretschneider, Frank Elting
Script Programming / Product Development: Sebastian Bretschneider
Animator: Sebastian Bretschneider, Paul Lawley, Lars Dahlke
Interface Design: Max Mondon, Gösta Wellmer, Efflam Le Bivic
Impulse Responses: Native Instruments, e-instruments, Studiotools
Manual: musicandtext.com, David Gover
Special thanks to: Jonas Schoen, Michael Leuschner, Jan-Peter Klöpfel, Sebastian Hoffman,
Claas Ueberschär, Jürgen Klever, Gerhard Groth, Johannes Waehneldt, Michael Pauli, Tobias
Menguser, Robert Linke, Alexander Stamm and all the fantastic musicians for their patience
and devotion.
Credits
Session Horns - Manual - 40
 Loading...