


Miele ESW7010B, ESW7010G, ESW7010W, ESW7110, ESW7020 Installation and Operation Guide
...
Operating and installation instructions
Gourmet warming drawer
To prevent the risk of accidents or damage to the appliance, it is essential to read these instructions before it is installed and used for the first time.
en-AU, NZ |
M.-Nr. 11 227 100 |

Contents |
|
Warning and Safety instructions.......................................................................... |
4 |
Caring for the environment ................................................................................ |
11 |
Overview............................................................................................................... |
12 |
ESW 7010, ESW 7110........................................................................................... |
12 |
ESW 7020, ESW 7030, ESW 7120........................................................................ |
13 |
Controls and display ............................................................................................. |
14 |
Accessories supplied ............................................................................................ |
15 |
Before using for the first time ............................................................................ |
16 |
Cleaning the drawer for the first time .................................................................... |
16 |
Heating up the drawer for the first time ................................................................ |
16 |
Miele@home .......................................................................................................... |
17 |
Operation.............................................................................................................. |
20 |
Operating principles .............................................................................................. |
20 |
Using MobileStart.................................................................................................. |
21 |
Functions............................................................................................................... |
21 |
Duration................................................................................................................. |
21 |
Temperature settings............................................................................................. |
22 |
Keeping food warm ............................................................................................. |
23 |
Warming crockery ............................................................................................... |
26 |
Heating-up times................................................................................................... |
26 |
Capacity ................................................................................................................ |
26 |
ESW 7010, ESW 7110...................................................................................... |
27 |
ESW 7020, ESW 7030, ESW 7120................................................................... |
28 |
Low temperature cooking .................................................................................. |
29 |
Other uses............................................................................................................ |
34 |
Networking with Miele built-in appliances........................................................ |
35 |
Sabbath mode...................................................................................................... |
36 |
Cleaning and care ............................................................................................... |
37 |
Problem solving guide ........................................................................................ |
39 |
Optional accessories .......................................................................................... |
41 |
Safety instructions for installation..................................................................... |
42 |
Installation notes ................................................................................................. |
43 |
2

|
Contents |
Installation dimensions ESW 7010, ESW 7110 |
.................................................. 44 |
Combination appliance with a height of 45 cm..................................................... |
44 |
Combination appliance with a height of 60 cm..................................................... |
45 |
Side view ............................................................................................................... |
46 |
Connections and ventilation.................................................................................. |
47 |
Installation dimensions ESW 7020, ESW 7120.................................................. |
48 |
Combination appliance with a height of 45 cm..................................................... |
48 |
Combination appliance with a height of 60 cm..................................................... |
49 |
Side view ............................................................................................................... |
50 |
Connections and ventilation.................................................................................. |
51 |
Installation dimensions ESW 7030..................................................................... |
52 |
Combination appliance with a height of 45 cm..................................................... |
52 |
Combination appliance with a height of 60 cm..................................................... |
53 |
Side view ............................................................................................................... |
54 |
Connections and ventilation.................................................................................. |
55 |
Installation............................................................................................................ |
56 |
Electrical connection .......................................................................................... |
57 |
Service.................................................................................................................. |
59 |
Contact in case of fault ......................................................................................... |
59 |
Data plate .............................................................................................................. |
59 |
Warranty ................................................................................................................ |
59 |
3

Warning and Safety instructions
Please note that the Gourmet warming drawer is referred to in these operating
instructions as the drawer.
This drawer complies with all relevant safety requirements. Inappropriate use can, however, lead to personal injury and damage to property.
To avoid the risk of accidents or damage to the appliance, please read these instructions carefully before installation and using it for the first time. They contain important notes on installation, safety, use and maintenance.
Miele cannot be held liable for damage caused by non-compliance with these Warning and Safety instructions.
Keep these instructions in a safe place and ensure that new users are familiar with the content. Pass them on to any future owner.
4

Warning and Safety instructions
Correct application
This drawer is designed for domestic use and for use in similar environments by guests in hotel or motel rooms, bed & breakfasts and other typical living quarters. This does not include common/ shared facilities or commercial facilities within hotels, motels or bed & breakfasts.
This drawer is not suitable for outdoor use.
The warming drawer must only be used as described in these instructions. Any other usage is not supported by the manufacturer and could be dangerous.
This appliance is not intended for use by persons (including children) with reduced physical, sensory or mental capabilities, or lack of experience and knowledge, unless they have been given supervision or instruction concerning its use by a person responsible for their safety, and are able to recognise the dangers of misuse.
5

Warning and Safety instructions
Safety with children
Young children must not be allowed to use this appliance.
Older children may use the appliance without supervision if its operation has been clearly explained to them and they are able to use it safely. Children must be able to recognise and understand the potential risks of improper use.
Cleaning may only be carried out by older children under the supervision of an adult.
Please supervise children in the vicinity of the drawer, and do not let them play with it.
The drawer gets hot when in use and remains hot for quite a while after being switched off. Keep children well away from the drawer until it has cooled sufficiently so that there is no longer any danger of burning.
Danger of suffocation! Whilst playing, children may become entangled in packaging material (such as plastic wrapping) or pull it over their head with the risk of suffocation. Keep packaging material away from children.
6

Warning and Safety instructions
Technical safety
Unauthorised installation, maintenance and repairs can cause considerable danger for the user. Installation, maintenance and repairs must only be carried out by a Miele authorised technician.
A damaged drawer can be dangerous. Always check for visible signs of damage. Never use a damaged appliance.
Reliable and safe operation of the drawer can only be assured if it has been connected to the mains electrical supply.
The electrical safety of this appliance can only be guaranteed when continuity is complete between it and an effective earthing system. It is most important that this basic safety requirement is present and tested regularly and, where there is any doubt, the household wiring system should be inspected by a qualified electrician.
The connection data (voltage and frequency) on the data plate of the drawer must match the mains electricity supply in order to avoid the risk of damage to the drawer.
Compare this data before connecting the appliance. If in any doubt, consult a qualified electrician.
Do not connect the drawer to the mains electrical supply by a multi-socket adapter or extension lead. These are a fire hazard and do not guarantee the required safety of the appliance.
For safety reasons, this drawer may only be used when it has been built in.
This appliance must not be installed and operated in mobile installations (e.g. on a ship).
Never open the casing of the drawer.
Touching or tampering with electrical connections or components
and mechanical parts is highly dangerous to the user and can cause
operational faults.
7

Warning and Safety instructions
The manufacturer's warranty will be invalidated if the appliance is not repaired by a Miele approved service technician.
Faulty components must only be replaced by genuine Miele spare parts. The manufacturer can only guarantee the safety of the appliance when Miele replacement parts are used.
If the plug has been removed or the connection cable is not supplied with a plug, the drawer must be connected to the mains supply by a suitably qualified electrician.
If the mains connection cable is damaged, it must be replaced with a special connection cable of type H 05 VV-F (rubber insulated), available from Miele, by a suitably qualified and competent electrician in order to avoid a hazard (see “Electrical connection”).
During installation, maintenance and repair work, the drawer must be disconnected from the mains electricity supply. It is only completely isolated from the electricity supply when:
–the mains circuit breaker is switched off, or
–it is switched off at the wall socket and the plug is withdrawn from the socket. Do not pull the mains connection cable but the mains plug to disconnect your appliance from the mains electricity supply.
If the drawer is installed behind a furniture panel (e.g. a door), ensure that the door is never closed whilst the drawer is in use. Heat and moisture can build up behind a closed furniture panel and cause subsequent damage to the drawer, the housing unit and the floor. Do not close the door until the drawer has cooled down completely.
8

Warning and Safety instructions
Correct use
You could burn yourself on the hot drawer or hot dishes. Protect your hands with heat-resistant pot holders or oven gloves when handling hot items. Do not let them get wet or damp. Heat transfers through damp and wet material more quickly with the risk of scalding or burning yourself.
Fire hazard! Do not store any plastic containers or combustible objects in the drawer. They can melt or catch fire when the appliance is switched on.
Due to the high temperatures radiated, objects left near the warming drawer when it is switched on could catch fire. Do not use the drawer to heat up the room.
Never replace the anti-slip mat supplied with the appliance with paper kitchen towel or similar.
The telescopic runners can support a maximum load of 25 kg. Overloading or leaning or sitting on the drawer will damage the telescopic runners.
The underside of the drawer gets hot when it is in use. Be careful not to touch it when the drawer is open.
The anti-slip mat is heat-resistant up to 200 °C.
It is possible for the bottom of pots and pans to exceed this temperature, especially after they have been used to sear food. Allow pots and pans to cool down for a minute or two before placing them in the drawer.
Items made of plastic or aluminium foil will melt at high temperatures. When keeping food warm, use only heat-resistant containers made of porcelain, glass, etc.
If liquids get into the appliance through the vents, it can cause a short circuit. Take care when opening and closing the loaded drawer so that liquids do not spill over.
9

Warning and Safety instructions
The “Keeping food warm” function is designed to keep hot food warm and not to warm up cold food. Ensure food is sufficiently hot when placed inside the drawer.
Bacteria can develop in certain foods if the temperature is too low. Make sure that you set a high enough temperature to keep food warm.
Cleaning and care
Danger of electric shock! The steam from a steam cleaning appliance could reach electrical components and cause a short circuit. Never use a steam cleaner for cleaning.
10
Caring for the environment
Disposal of the packing
material
The transport and protective packaging has been selected from materials which are environmentally friendly for disposal, and can normally be recycled.
Recycling the packaging reduces the use of raw materials in the manufacturing process and also reduces the amount of waste in landfill sites. Ensure that any plastic wrappings, bags etc. are disposed of safely and kept out of the reach of babies and young children. Danger of suffocation.
Disposing of your old
appliance
Electrical and electronic appliances often contain valuable materials. They also contain specific materials, compounds and components, which were essential for their correct function and safety. These could be hazardous to human health and to the environment if disposed of with your domestic waste or if handled incorrectly. Please do not, therefore, dispose of your old appliance with your household waste.
Please dispose of it at your local community waste collection / recycling centre for electrical and electronic appliances. You are also responsible for deleting any personal data that may be stored on the appliance prior to disposal. Please ensure that your old appliance poses no risk to children while being stored prior to disposal.
11

Overview
ESW 7010, ESW 7110
a Anti-slip mat
b Controls and indicators
c Drawer front with Push2open mechanism
The drawer can be opened and closed by pressing lightly on the drawer front.
12
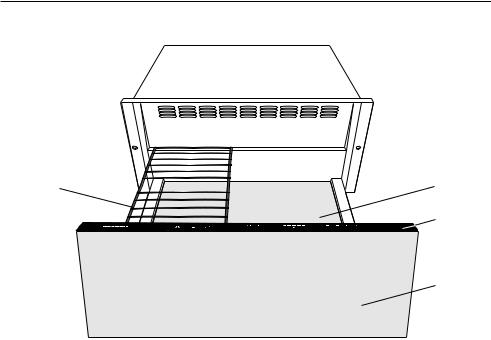
Overview
ESW 7020, ESW 7030, ESW 7120
e
d  a
a
b
c
a Anti-slip mat
b Controls and indicators
c Drawer front with Push2open mechanism
The drawer can be opened and closed by pressing lightly on the drawer front.
dRack
eAir vents
13
Overview
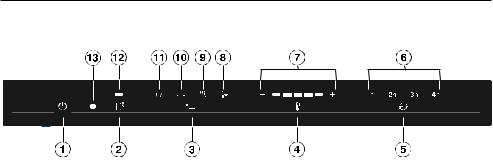
Controls and display
Sensor controls
a On/Off sensor
bMobileStart
cSelecting the operating mode
dSetting the temperature
eSetting the duration
Display/indicator lights
fDuration 1h = 1 hour
2h = 2 hours
3h = 3 hours
4h = 4 hours
gTemperature display with segment bars
hLow temperature cooking
iKeeping food warm
jWarming plates/dishes
kWarming cups/glasses
lMobileStart activated
mOptical interface
(for Miele service technicians only)
14
Overview
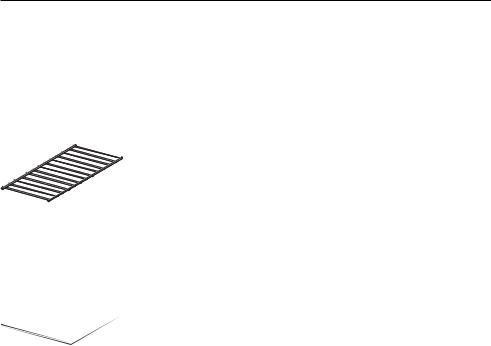
Accessories supplied
The accessories supplied with your appliance, as well as a range of optional ones, are available to order from Miele (see “Optional accessories”).
Rack
For increasing the loading area (ESW 7020, ESW 7030, ESW 7120).
Anti-slip mat
For keeping dishes secure.
“Low temperature cooking” the cookbook
A selection of the best recipes from the
Miele test kitchen.
15

Before using for the first time
Remove any protective wrapping and stickers.
Do not remove stickers carrying safety or installation information or the data plate.
This makes it easier to perform servicing and repair work.
Cleaning the drawer for the
first time
Remove the anti-slip mat and the rack, if present, from the drawer. Clean them with warm water and a little washing-up liquid applied with a clean sponge or with a clean, damp microfibre cloth.
Dry the mat and the rack with a soft cloth.
Wipe the drawer inside and out with a damp cloth to remove any dust or left-over packaging.
Dry all surfaces with a soft cloth.
Refit the anti-slip mat and the rack (if applicable) in the drawer.
Heating up the drawer for the
first time
Heat the empty drawer for at least 2 hours.
Switch the drawer on by touching the On/Off sensor.
Touch the sensor repeatedly until the symbol lights up.
Touch the sensor repeatedly until the segment on the far right-hand side of the temperature display lights up.
Touch the sensor repeatedly until
2h lights up.
Close the drawer.
The drawer is fitted with a contact switch. This ensures that the heating element and fan in the appliance only work when the drawer is closed.
The drawer will switch itself off automatically after 2 hours.
The metal components have a protective coating. This may give off a slight smell when the drawer is heated up for the first time. The smell and any vapours given off will dissipate after a short time and do not indicate a faulty connection or appliance.
Ensure that the kitchen is well ventilated when heating the drawer for the first time.
16
Before using for the first time
Miele@home
Your drawer is equipped with an integrated Wi-Fi module.
In order to use it, you need:
–a Wi-Fi network
–the Miele@mobile App
–a Miele user account. The user account can be created via the Miele@mobile App.
The Miele@mobile App will guide you as you connect your drawer to your home Wi-Fi network.
Once your drawer is connected to your Wi-Fi network, you can use the App, for example, to carry out the following activities:
–Access information about the operating status of your drawer
–Retrieve information on cooking processes that are in progress
–End cooking programmes that are in progress
Connecting your drawer to your Wi-Fi network will increase energy consumption, even when the drawer is switched off.
Before installing the drawer in its final location, ensure that the signal of your Wi-Fi network is strong enough.
Miele@home availability
The ability to use the Miele@mobile App depends on the availability of the Miele@home service in your country.
The Miele@home service is not available in every country.
For information about availability, please visit www.miele.com.
Miele@mobile App
You can download the Miele@mobile App from the Apple App Store® or the Google Play Store™ free of charge (only functional in selected countries).
17
Before using for the first time
Connecting via the app
The Miele@mobile App can be used to connect to your network.
Install the Miele@mobile App on your mobile device.
To log in you will need:
1.Your Wi-Fi network password.
2.The password of your drawer.
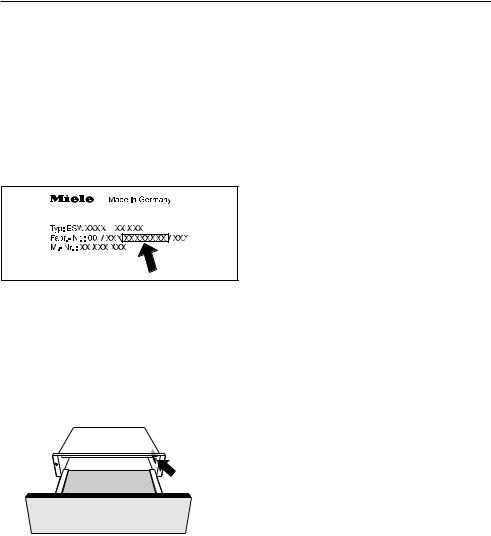
The password for your drawer consists of the last nine digits of the serial number. This can be found on the appliance's data plate.
Data plate
The data plate is located here:
Start signing the appliance on in the app. Follow the signing-in instructions.
When requested to activate Wi-Fi on the drawer, proceed as follows:
Switch the drawer off.
Press and hold the sensor.
At the same time, touch the
sensor.
2h will light up constantly, 3h will flash on and off.
The drawer will be ready for connection in the next 10 minutes.
Follow the instructions in the App.
When successfully connected, 2h and
3h will light up constantly.
Quit the connection mode on the drawer by touching the sensor.
The drawer can now be operated via the App.
18

Before using for the first time
Connecting via WPS
Your Wi-Fi router must support WPS (Wi-Fi Protected Setup).
Switch the drawer off.
Press and hold the sensor.
At the same time, touch the
sensor.
2h will light up constantly, 3h will flash on and off.
The WPS connection must be started on the drawer at the same time as on the Wi-Fi router.
Touch the sensor control on the drawer after a few seconds.
After a short while, 2h will light up constantly, and 3h and 4h will flash on and off.
The drawer will be ready for connection in the next 10 minutes.
Start the WPS connection on your Wi-Fi router.
When successfully connected, 2h and
3h will light up constantly.
Quit the connection mode on the drawer by touching the sensor.
The drawer can now be operated via the App.
If the connection fails, you have probably not connected WPS on your router quickly enough. Repeat the steps above.
Useful tip: If your Wi-Fi router does not support WPS, please connect via the Miele@mobile App.
Signing out of Wi-Fi (resetting factory default settings)
To set up a new Wi-Fi connection, the existing Wi-Fi connection must first be disconnected.
Switch the drawer off.
Press and hold the sensor.
At the same time, touch the
sensor.
With an existing Wi-Fi connection, 2h and 3h will light up constantly.
The drawer will be ready for disconnection in the next 10 minutes.
Touch the sensor.
2h will light up constantly, 3h will flash on and off.
After a few seconds, 2h and 3h will flash on and off. The connection has been disconnected.
Quit the signing-off mode on the drawer by touching the sensor.
The Wi-Fi connection has been disconnected. A new connection can now be set up.
19
Operation
Operating principles
Malfunction due to dirty and/or covered sensor controls.
The sensor controls do not react or unintentional switching procedures result, perhaps even automatic switching off of the drawer.
Keep the sensor controls and indicators clean.
Do not place anything over the sensor controls or indicators.
Damage caused by leaking liquids.
Liquids that get inside the drawer can cause a short circuit.
Open and close the loaded drawer carefully to prevent liquids from spilling.
Open the drawer.
Switch the drawer on by touching the
sensor.
Touch the sensor repeatedly until the required function lights up.
Touch the sensor repeatedly until the segment for the required temperature lights up in the temperature display.
Touch the sensor repeatedly until the required operating duration (in hours) lights up.
Close the drawer.
20
 Loading...