


MIELE F1411VI, F1801VI, K 1801 VI, K 1811 VI, K 1901 VI User Manual
...Installation instructions / Instructions d'installation / Instrucciones de instalación
Heater/Merging Kit for Vi models / Trousse de juxtaposition /
Equipo de combinación para modelos Vi
To prevent misuse read these instructions
before installation or use.
Afin d'éviter une utilisation inappropriée |
|
veuillez lire ces instructions avant |
|
l'installation ou l'utilisation. |
en, fr, es - US, CA, MX |
Para prevenir usos inadecuados, |
|
lea este instructivo antes de la |
|
instalación o utilización. |
M.-Nr. 07 179 171 |

Contents
en. . . . . . . . . . . . . . . . . . . . . . . . . . . . . . . . . . . . . . . . . . . . . . . . . . . . . . . . . . . . . . . 3
Before you begin . . . . . . . . . . . . . . . . . . . . . . . . . . . . . . . . . . . . . . . . . . . . . . . . . . . 3 Side-by-side . . . . . . . . . . . . . . . . . . . . . . . . . . . . . . . . . . . . . . . . . . . . . . . . . . . . 3
. . . without partition. . . . . . . . . . . . . . . . . . . . . . . . . . . . . . . . . . . . . . . . . . . . . . . 3
. . . with partition . . . . . . . . . . . . . . . . . . . . . . . . . . . . . . . . . . . . . . . . . . . . . . . . . 4 Required accessories and tools . . . . . . . . . . . . . . . . . . . . . . . . . . . . . . . . . . . . . . . 4 Tools . . . . . . . . . . . . . . . . . . . . . . . . . . . . . . . . . . . . . . . . . . . . . . . . . . . . . . . . . . 4 Other . . . . . . . . . . . . . . . . . . . . . . . . . . . . . . . . . . . . . . . . . . . . . . . . . . . . . . . . . . 4 Prepare the appliances . . . . . . . . . . . . . . . . . . . . . . . . . . . . . . . . . . . . . . . . . . . . . . 5 Installing the heating mat. . . . . . . . . . . . . . . . . . . . . . . . . . . . . . . . . . . . . . . . . . . . . 5 Connect the appliances. . . . . . . . . . . . . . . . . . . . . . . . . . . . . . . . . . . . . . . . . . . . . . 7 fr . . . . . . . . . . . . . . . . . . . . . . . . . . . . . . . . . . . . . . . . . . . . . . . . . . . . . . . . . . . . . . . 9
Avant de commencer l'installation . . . . . . . . . . . . . . . . . . . . . . . . . . . . . . . . . . . . . . 9 Côte à côte . . . . . . . . . . . . . . . . . . . . . . . . . . . . . . . . . . . . . . . . . . . . . . . . . . . . . 9
. . . sans cloison . . . . . . . . . . . . . . . . . . . . . . . . . . . . . . . . . . . . . . . . . . . . . . . . . 9
. . . avec cloison . . . . . . . . . . . . . . . . . . . . . . . . . . . . . . . . . . . . . . . . . . . . . . . . 10 Outils et accessoires nécessaires . . . . . . . . . . . . . . . . . . . . . . . . . . . . . . . . . . . . . 10 Outils. . . . . . . . . . . . . . . . . . . . . . . . . . . . . . . . . . . . . . . . . . . . . . . . . . . . . . . . . 10 Autres . . . . . . . . . . . . . . . . . . . . . . . . . . . . . . . . . . . . . . . . . . . . . . . . . . . . . . . . 10 Préparation des appareils . . . . . . . . . . . . . . . . . . . . . . . . . . . . . . . . . . . . . . . . . . . 11 Installation de la plaque de chauffage . . . . . . . . . . . . . . . . . . . . . . . . . . . . . . . . . 11 Connexion des appareils . . . . . . . . . . . . . . . . . . . . . . . . . . . . . . . . . . . . . . . . . . . . 13 es . . . . . . . . . . . . . . . . . . . . . . . . . . . . . . . . . . . . . . . . . . . . . . . . . . . . . . . . . . . . . . 15
Antes de comenzar . . . . . . . . . . . . . . . . . . . . . . . . . . . . . . . . . . . . . . . . . . . . . . . . 15 Instalaciones adyacentes . . . . . . . . . . . . . . . . . . . . . . . . . . . . . . . . . . . . . . . . . 15
. . . sin división . . . . . . . . . . . . . . . . . . . . . . . . . . . . . . . . . . . . . . . . . . . . . . . . . 15
. . . con división. . . . . . . . . . . . . . . . . . . . . . . . . . . . . . . . . . . . . . . . . . . . . . . . . 16 Accesorios y herramientas necesarias . . . . . . . . . . . . . . . . . . . . . . . . . . . . . . . . . 16 Herramientas . . . . . . . . . . . . . . . . . . . . . . . . . . . . . . . . . . . . . . . . . . . . . . . . . . 16 Otros . . . . . . . . . . . . . . . . . . . . . . . . . . . . . . . . . . . . . . . . . . . . . . . . . . . . . . . . . 16 Preparación de los aparatos . . . . . . . . . . . . . . . . . . . . . . . . . . . . . . . . . . . . . . . . . 17 Instalación de la esterilla eléctrica . . . . . . . . . . . . . . . . . . . . . . . . . . . . . . . . . . . . 17 Conexión de los aparatos . . . . . . . . . . . . . . . . . . . . . . . . . . . . . . . . . . . . . . . . . . . 19
2
en
This merging kit should be used for side-by-side installation of the following models:
–K 18x1 Vi, K 19x1 Vi
–F 14x1 Vi, F 18x1 Vi, F 19x1 Vi
–KF 18x1 Vi, KF 19x1 Vi
–KWT 16x1 Vi
Before you begin
Please read all instructions in this manual, as well as the manual which accompanied your machine, before installation and use.
This appliance is top-heavy and must be secured to prevent the possibility of tipping forward.
Keep the doors closed until the appliance is completely installed and secured per the installation instructions.
To reduce the risk of injury or damage to the product, two people should be used for installation.
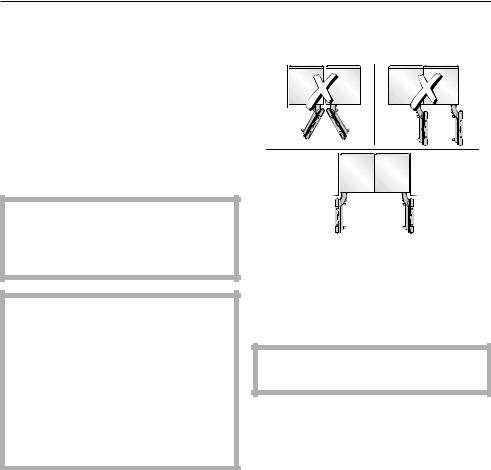
Side-by-side
. . . without partition
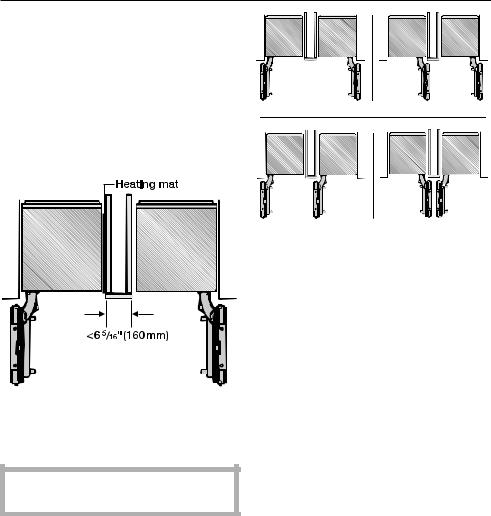
If the appliances are installed directly next to each other (without a partition), they need to be attached together. A heating mat must also be installed. This will help avoid condensation and prevent damages.
Installing the heating mat will increase energy consumption.
3
en
. . . with partition
The minimum thickness of the partition is 5/8" (16 mm).
If there is a partition with a thickness
from 5/8" (16 mm) to 6 5/16" (160 mm) between the adjacent appliances, then
each appliance should be individually installed within its own niche using the mounting accessories included.
In this case, you will only need the heating mat from the "Merging Kit" to avoid condensation and prevent damages.
Installing the heating mat will increase energy consumption.
When finding the dimensions for the partition in model 4, note the thickness of the custom door panels and the door handles. This will prevent damage to the doors if they are opened at the same time.
Required accessories and tools
Tools
–T 20 Torx screwdriver
–T 20 Torx bit + magnetic holder
–Adjustable wrench
Other
–Various bit sizes, suitable for material
–Piece of thin material (for example, linoleum) to protect the floor from damage
–Adhesive tape
4

en
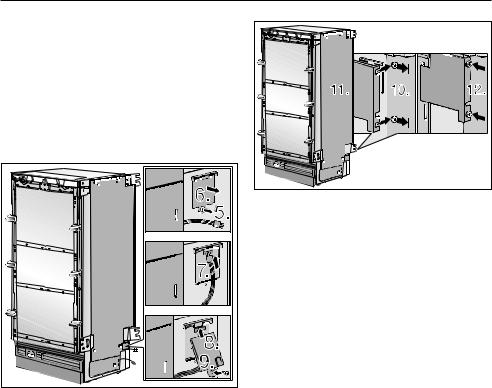
Prepare the appliances
^ Place the appliances next to each other in the intended configuration.
^On the handle side of the housing, remove the side attachment plates.
^Screw the side plates to both appliances. Check the position of both appliances!
Installing the heating mat
The heating mat has to be secured on the right side of the left-standing appliance.
^ Take the hinge halves from the side-by-side kit and screw them to both appliances.
^ Insert pins through the prepared holes a.
5
en
^Pull the protective strip off of the adhesive tape b.
^Insert the pins into the upper holes, while keeping the heating mat away from the bottom of the appliance c.
^Press on the heating mat from top to bottom, and insert the lower pins into the holes d.
^Loosen the screws from the connection box e.
^Open the connection box f.
^Attach the cable g.
^Close the connection box lid h.
^Secure the connection box screws i.
^Loosen the screws on the rear side of the appliance j. Do not unscrew completely.
^Hang the cable cover by its hinge on the heating mat and, from below, push into the screws k.
^Tighten the screws l.
6
 Loading...