


Logitech V-U0018 Quick Start Manual

Getting started with
Première utilisation
Logitech® HD Webcam C270

Logitech
®
HD Webcam C270
Logitech
®
HD Webcam C270
Contents
English . . . . . . . . . . . . . . . . . . . . . . . . . . . . . . . . . . . . . 3
Français . . . . . . . . . . . . . . . . . . . . . . . . . . . . . . . . . . . . 12
Español . . . . . . . . . . . . . . . . . . . . . . . . . . . . . . . . . . . . 21
Português . . . . . . . . . . . . . . . . . . . . . . . . . . . . . . . . . . . 30
www.logitech.com/support. . . . . . . . . . . . . . . . . . . . . . . . . . . . . 39
12
3
4
Thank you for buying a Logitech webcam!
Use this guide to set up and begin using
your Logitech webcam.
If you have questions before you start, or if you
just want to learn more about your Logitech
webcam, please visit logitech.com/support.
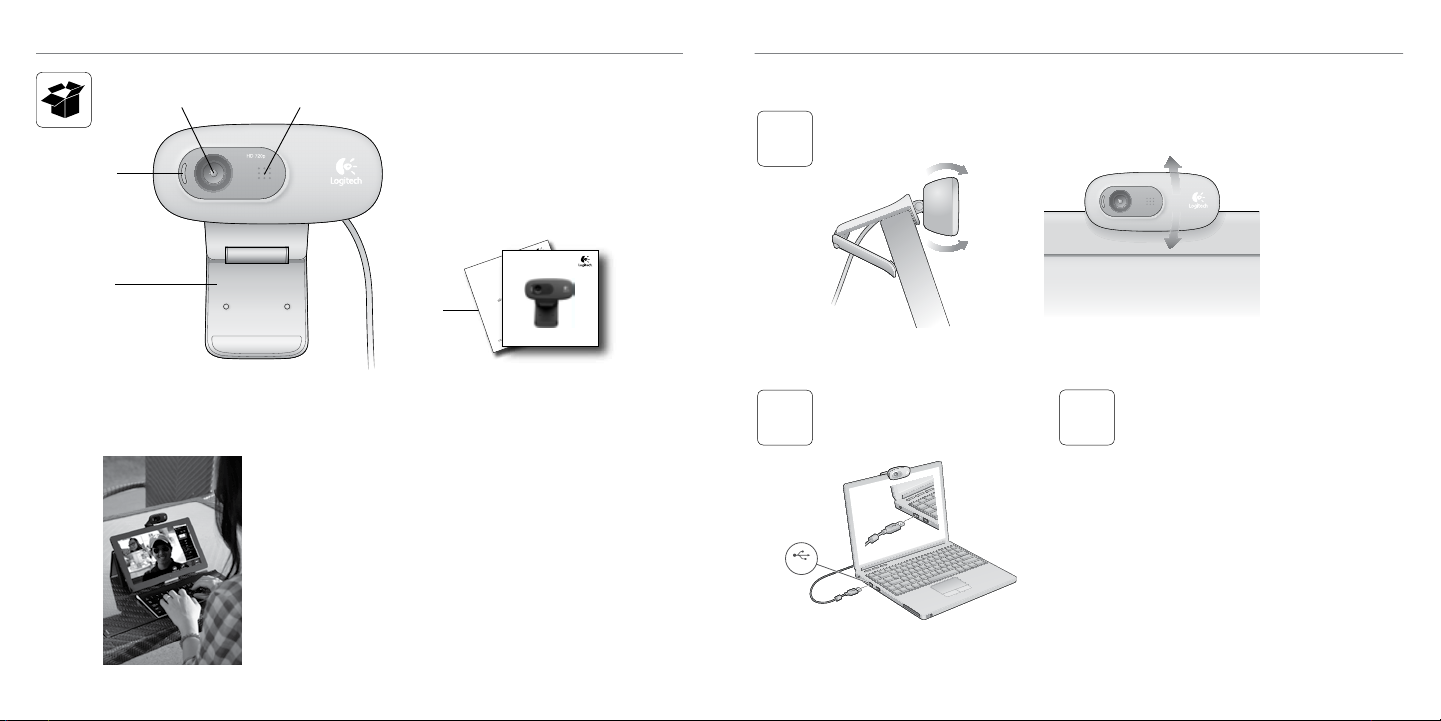
1. Microphone
2. Lens
3. Activity light
4. Flexible clip/base
5. Product documentation
Getting started with
Première utilisation
Logitech®HDWebcam C270
Important information
5
Safety, compliance, and warranty
2
English 3

Getting started with
Logitech® HD Webcam C270
Setting up your webcam
Place your webcam
1
Connect your webcam
2
USB
Install software
3
If you’re using your webcam with Windows® 8,
the software required is downloaded automatically
when you connect your webcam for the first time,
and installed silently in the background.
Important: Make sure you’re connected to
the Internet, so the software can be downloaded.
If you’re using your webcam with Windows® 7
or Windows Vista®, you must install the Logitech®
Webcam Software, available from:
logitech.com/downloads
Getting started with video calling
Your Logitech HD Webcam c270 provides HD 720p video calling.
To take advantage of video calling both you and the person you call must install
Skype™, or use a different video-calling application such as Yahoo!® Messenger,
Windows Live® Messenger or Gmail.
Learn more: skype.com
As well as a webcam and video calling application, both callers need:
•A computer with speakers
(or a headset) and a microphone;
your Logitech HD Webcam c270
has a built-in microphone.
•A broadband Internet connection
(e.g., DSL, T1, or cable).
4 English
English 5

Getting started with
Logitech® HD Webcam C270
Using your webcam with Windows 8
Use the Camera app, available from the Windows 8 Start screen, to operate and control
your webcam.
Understanding the Camera app
1. Preview window. Click or tap to capture
photos or videos (depending on whether
Video Mode is selected).
2. Change webcams (when you have more
than one). The face of your Logitech
webcam illuminates when selected.
3. Adjust your camera settings.
4. Activate or deactivate the Timer feature.
When activated, there is a three second
countdown to capturing a photo or video.
6 English
5. Turn Video Mode on (to record videos)
or off (to take photos).
6. Click or tap on the arrows to scroll
through the photos and videos you have
captured.
Videos are denoted by a timer and play
button in the bottom right-hand corner:
Tip: The Camera app lets you use your webcam’s most popular features quickly and easily.
If you want to take advantage of the enhanced features your webcam offers, such as motion
detection, use the Logitech Webcam Software available from logitech.com/downloads.
Adjusting your Camera settings
The Logitech software optimizes the settings for your environment automatically. To adjust any
of your settings choose Camera options. This is available from the Camera app (see the previous
page) and from within Metro apps that support webcams.
1. Choose your required resolution for photo capture, or video
capture when in Video Mode.
2. Choose the microphone you want to use to record sound in
your videos, if you have more than one available.
3. Access More Options, to benefit from enhanced features such
as digital Zoom and Move.
If the More Options pane doesn’t show the Logitech logo and
offer enhanced options, it is likely that the Logitech software
didn’t install correctly when you first connected your camera.
To reinstall it, go to the Windows Store and look for Logitech
Camera Controller.
4. Zoom in or out to include/exclude your surroundings.
5. Having zoomed in, drag the white box to pan (adjust the focus
area of your webcam).
6. Use Follow my face so you’re always in the picture.
7. Enjoy clear conversations without annoying background noise.
Depending on the features available with your camera,
you can access further advanced settings by scrolling.
English 7

Getting started with
Logitech® HD Webcam C270
Sharing your photos and videos
You can share your photos and videos via e-mail, Twitter, Facebook®, YouTube®,
or Microsoft SkyDrive®. Follow these steps:
1. In the Camera app, scroll to the photo or video you want to share.
2. Select Share in the Charms bar (or press - H):
3. Choose the media through which you want to share the photo or video.
8 English
Using your webcam with Windows 7 and Windows Vista
The Logitech Webcam Software provides everything you need to use and control your webcam.
Launch the software from the Windows Start® menu, or by right-clicking on the camera icon in
the Windows taskbar.
Understanding the Logitech Webcam Software
1. Capture pictures and videos.
2. View captured images and share via
e-mail, Facebook, or YouTube.
3. Capture videos triggered by detected
motion.
4. Control your webcam while on
a video call.
5. Change webcams (when you have
more than one).
6. Open Logitech Webcam
Software settings.
7. Open help dashboard.
English 9

Getting started with
Logitech® HD Webcam C270
Capturing video and snapping pictures
The gallery: viewing and sharing
Quick Capture allows you to take photos
and record videos easily.
You have quick access to webcam controls
and settings:
1. Preview window
2. Capture mode:
photo/video
3. Capture button
5. Photo thumbnails
6. Video thumbnails
7. Click a thumbnail
to enter the gallery
4. Webcam controls
Clicking on an image thumbnail in the webcam
gallery (1) opens the video or photo in the review
window (2). You can then:
•Attach the video or picture file to an e-mail (3)
•Edit the photo or splice together video (4)
•Upload the picture or video to Facebook (5)
•Upload the video to Twitter or YouTube (6)
You can also drag and drop a gallery image onto
one of the function tiles (items 3-6) to launch an
editing application or to attach or upload.
Using motion detection
•Set up your webcam to record video when
it detects movement.
•Adjust captured video duration and detection
sensitivity.
•Captured video is automatically saved
to your computer.
•View content in the Gallery or upload it using
the One-touch Upload window.
Fine tuning your webcam during a video call
1. Launch the webcam controller when on a video call.
2. Use pan and tilt to find the best angle.
3. Zoom in or out to include/exclude your surroundings.
4. Use Follow my face so you’re always in the picture.
5. Enjoy clear conversations without annoying
background noise.
6. Correct for poor lighting environments using
RightLight.
7. Access advanced webcam settings.
10 English
English 11
Première utilisation
Logitech® HD Webcam C270
12
3
4
Merci d'avoir acheté une webcam Logitech.
Suivez ce guide pour installer et commencer à
utiliser votre webcam Logitech.
Si vous avez des questions avant de commencer,
ou pour en savoir plus sur votre webcam Logitech,
veuillez consulter le site www.logitech.com/
support.
1. Microphone
2. Objectif
3. Témoin d'activité
4. Clip/base flexible
5. Documentation sur le produit
Getting started with
Première utilisation
Logitech®HDWebcam C270
Important information
5
Safety, compliance, and warranty
Installation de la webcam
Positionnez la webcam
1
Connectez votre webcam
2
USB
Installez le logiciel
3
Si vous utilisez votre webcam sur Windows® 8,
le logiciel requis est téléchargé automatiquement et
installé en arrière-plan lors de la première connexion
de la webcam.
Important: assurez-vous d'être connecté à Internet
pour permettre le téléchargement du logiciel.
Si vous utilisez la webcam sur Windows® 7 ou Vista®,
vous devez installer le logiciel Logitech® Webcam
Software à l'adresse suivante:
logitech.com/downloads
12 Français Français 13
 Loading...