


Logitech
®
QuickCam
®
Pro 9000
User’s Guide
QuickCam® Pro 9000
QuickCam® Pro 9000
Contents
1 Camera Features
English
English . . . . . . . . . . . . . . . . . . . . . . . . . . . . . . . . . . . . . . . . . . . . . . . . . . . . . . . . . . . . . . . . . . . . . 3
Español. . . . . . . . . . . . . . . . . . . . . . . . . . . . . . . . . . . . . . . . . . . . . . . . . . . . . . . . . . . . . . . . . . . . 10
Français . . . . . . . . . . . . . . . . . . . . . . . . . . . . . . . . . . . . . . . . . . . . . . . . . . . . . . . . . . . . . . . . . . . 17
Português . . . . . . . . . . . . . . . . . . . . . . . . . . . . . . . . . . . . . . . . . . . . . . . . . . . . . . . . . . . . . . . . . 24
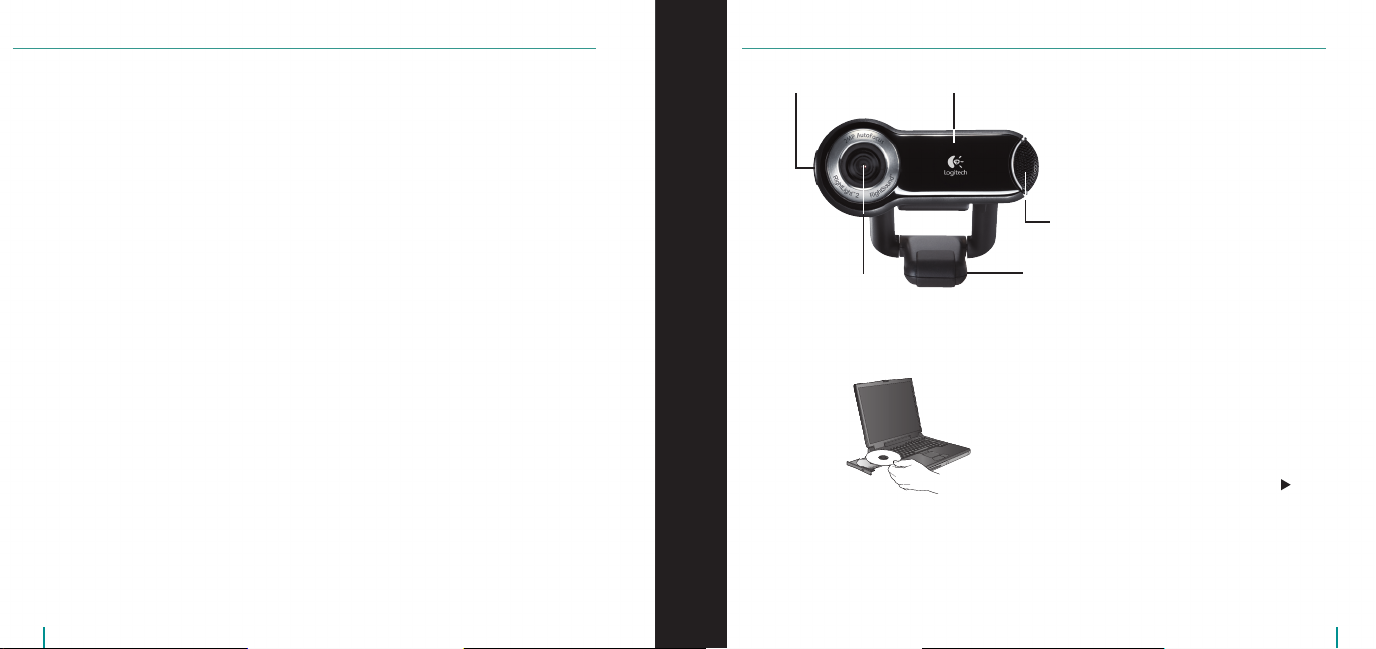
Snapshot button Thank you for purchasing your
Autofocus glass
lens system
Activity light
new Logitech® QuickCam® Pro 9000,
with an autofocus, glass lens
system. This guide will help you install
and get the best performance from
your webcam.
Microphone
Universal clip
Install the Software First
Insert the installation CD into your
CD-ROM/DVD-ROM drive. Your CD
should start automatically. If it does not,
follow the steps below:
Double-click the My computer icon.
•
Alternatively, click Start My computer.
Right-click the CD-ROM/DVD-ROM
Install the software
Many of your camera’s extended features,
including autofocus, will not operate properly
without the complete software installation.
before
plugging in the camera.
•
drive icon, and then click Autoplay.
QuickCam® Pro 9000
QuickCam® Pro 9000
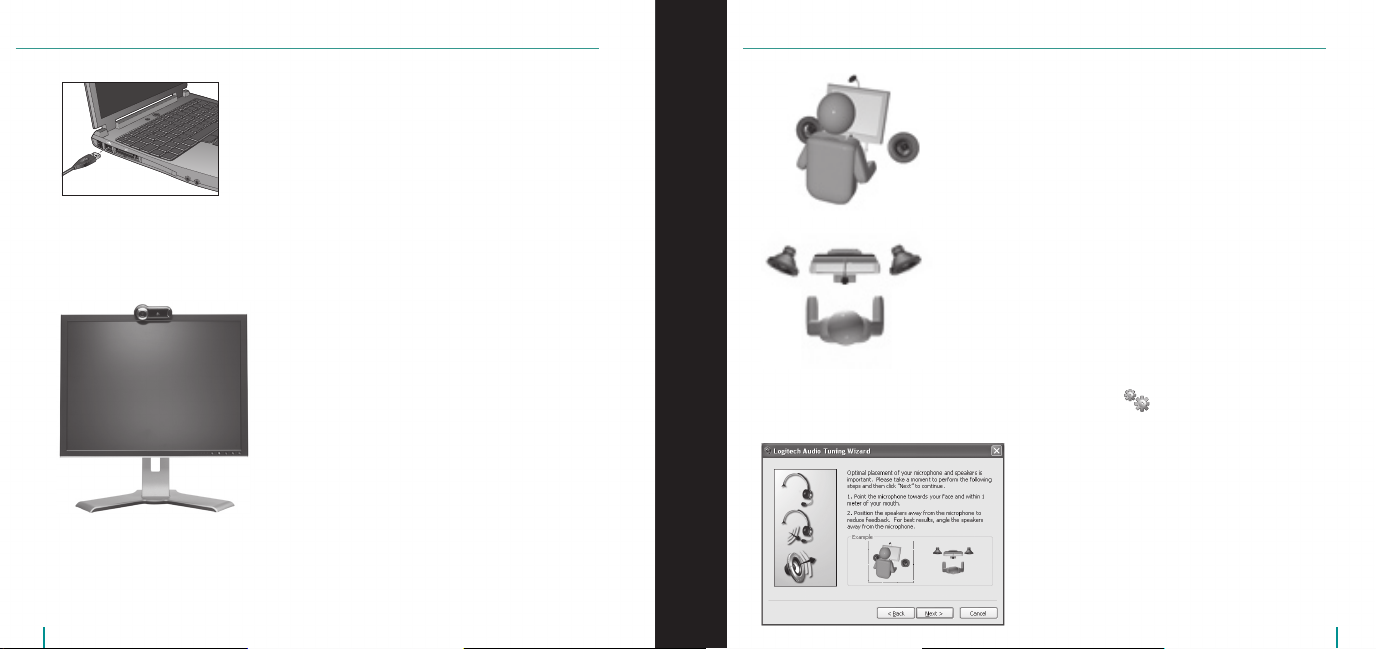
Connect Your Camera to Your Computer
The Audio Tuning Wizard
Wait until you are prompted by the software before
connecting your camera to an available USB port on
your computer.
Position Your Camera, Microphone,
and Speakers
Your camera comes with Logitech® RightSound™ Technology.
RightSound™ Technology cancels echo and significantly reduces
background noise. The following steps will ensure the best
possible audio performance:
Position your camera in the middle of your monitor
•
for optimal eye contact.
Position your camera’s microphone no more than 3 feet
•
(1 m) away from you and point it toward you.
Position your speakers (if used) at least 12 inches
•
(30 cm) away from your microphone to reduce feedback,
and then angle your speakers away from your microphone.
Tip Do not place objects between you and the microphone.
The first time that you start QuickCam, you are guided through
the Microphone/Speaker Setup Utility and Audio Tuning Wizard
that lets you do the following:
Select the audio input device (microphone)
•
and audio output device (speakers).
Enable Acoustic Echo Cancellation (AEC)—recommended.
•
Enable background suppression—recommended.
•
Specify microphone input volume and speaker output volume.
•
Test audio settings.
•
In situations with loud and irregular background noise, your voice
can become distorted when using noise suppression. If this occurs,
disable noise suppression in the QuickCam® software.
Tip To change your audio settings in the QuickCam® software,
click the Settings button, and then click the Audio tab.
QuickCam® Pro 9000
QuickCam® Pro 9000
Your camera is now set up and ready to go!
There are many ways to enjoy using your new webcam, including
Making free video calls to friends and family. (Installation and use of an instant messaging application
•
is required. Click in the QuickCam® software to learn more.)
Taking still photos or recording videos to share or e-mail.
•
Adding videos to your E-bay auctions (see www.logitech.com/videosnap).
•
8 QuickCam
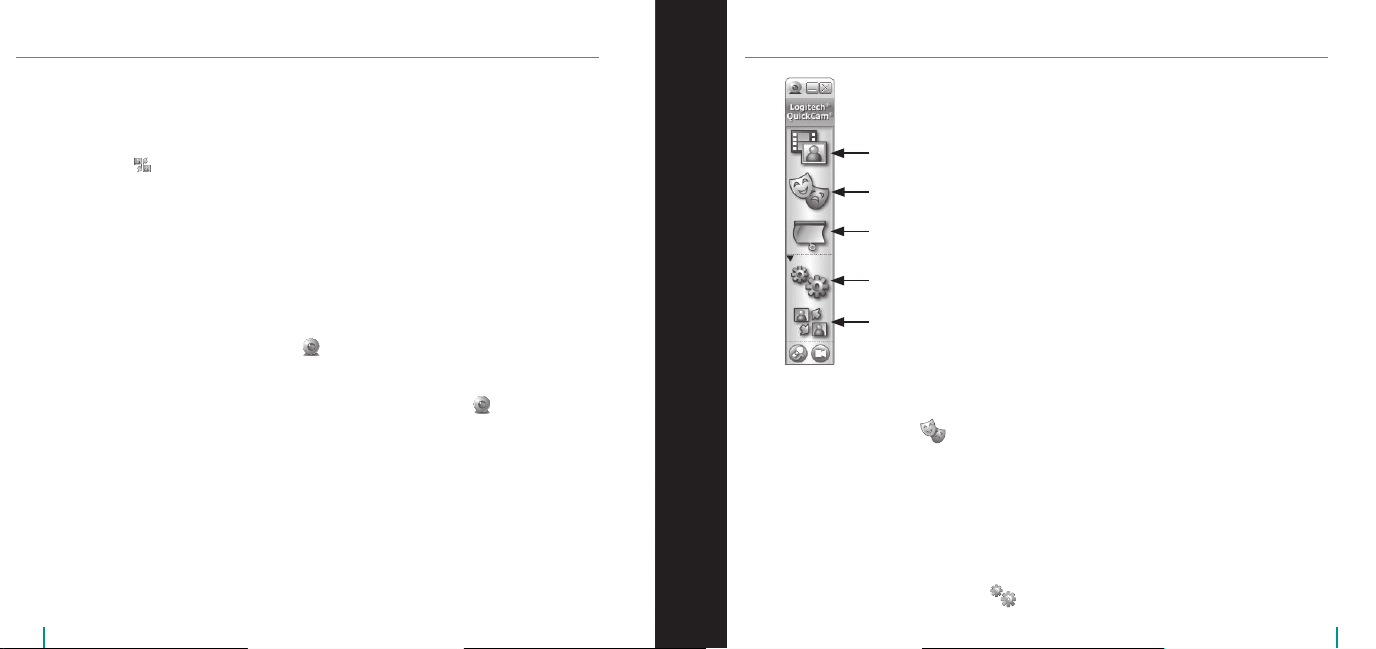
Record videos or capture images.
Enable Logitech Video Effects.
Enable Audio & Video Mute (when on a video call).
®
Software Features Congratulations
Using the QuickCam
To start the Logitech® QuickCam® software, do either of the following:
On your desktop, double-click the QuickCam® icon.
•
- or-
In the lower-right corner of your desktop in the taskbar, click the QuickCam® icon.
•
®
Software
Specify camera settings.
Install and use video programs and services.
Tip To personalize your video calls with customized Avatar images, Face Accessories, or Fun Filters,
click the Video Effects button.
9 Ensure Quality Images
Logitech® RightLight™2 ensures that you automatically get the best image quality in harsh, dim, or back lit
conditions that usually cast a shadow on your face. When your camera determines that you are experiencing
these situations, a dialog box appears asking if you want to turn on Logitech® RightLight™2. Click Yes to let
your camera automatically adjust frame rates, color, and exposure to produce the best image quality.
To manually adjust these settings, click the Settings button.

8 QuickCam® Pro 9000
9QuickCam® Pro 9000
10 Using Autofocus
Logitech
®
Hardware Product Limited Warranty
The autofocus system will ensure that images as close as 10 cm to the camera will be put in focus,
automatically. If you wish to control the lens focus manually, switch to manual mode in ‘‘autofocus’’
controls on the Settings tab of the QuickCam® software.
11 For More Information
Audio Information. Go to http://www.logitech.com/rightsound.
Software Updates. Go to http://www.logitech.com/support.
Additional Help. Launch the software and click the Help button.
To learn more about Logitech® products, go to http://www.logitech.com.
UL Testing. Your product is UL tested and should only be used with other UL listed devices.
Compliance. For compliance information, go to http://www.logitech.com/compliance.
Logitech® warrants that your Logitech hardware product shall be free from defects in material and workmanship for two (2) years, beginning
from the date of purchase. Except where prohibited by applicable law, this warranty is nontransferable and is limited to the original purchaser.
This warranty gives you specific legal rights, and you may also have other rights that vary under local laws.
Remedies
Logitech’s entire liability and your exclusive remedy for any breach of warranty shall be, at Logitech’s option, (1) to repair or replace the hardware,
or (2) to refund the price paid, provided that the hardware is returned to the point of purchase, or such other place as Logitech may direct,
with a copy of the sales receipt or dated itemized receipt. Shipping and handling charges may apply except where prohibited by applicable
law. Logitech may, at its option, use new or refurbished or used parts in good working condition to repair or replace any hardware product.
Any replacement hardware product will be warranted for the remainder of the original warranty period, or thirty (30) days, whichever is longer
or for any additional period of time that may be applicable in your jurisdiction.
Limits of Warranty
This warranty does not cover problems or damage resulting from (1) accident, abuse, misapplication, or any unauthorized repair,
modification or disassembly; (2) improper operation or maintenance, usage not in accordance with product instructions or connection
to improper voltage supply; or (3) use of consumables, such as replacement batteries, not supplied by Logitech except where such restriction
is prohibited by applicable law.
How to Obtain Warranty Support
Before submitting a warranty claim, we recommend you visit the support section at www.logitech.com for technical assistance. Valid warranty
claims are generally processed through the point of purchase during the first thirty (30) days after purchase; however, this period of time may
vary depending on where you purchased your product. Please check with Logitech or the retailer where you purchased your product for details.
Warranty claims that cannot be processed through the point of purchase and any other product related questions should be addressed directly to
Logitech. The addresses and customer service contact information for Logitech can be found in the documentation accompanying your product
and on the web at www.logitech.com/contactus.
Limitation of Liability
LOGITECH SHALL NOT BE LIABLE FOR ANY SPECIAL, INDIRECT, INCIDENTAL, OR CONSEQUENTIAL DAMAGES WHATSOEVER, INCLUDING BUT NOT
LIMITED TO LOSS OF PROFITS, REVENUE OR DATA (WHETHER DIRECT OR INDIRECT) OR COMMERCIAL LOSS FOR BREACH OF ANY EXPRESS OR IMPLIED
WARRANTY ON YOUR PRODUCT EVEN IF LOGITECH HAS BEEN ADVISED OF THE POSSIBILITY OF SUCH DAMAGES. Some jurisdictions do not allow
the exclusion or limitation of special, indirect, incidental, or consequential damages, so the above limitation or exclusion may not apply to you.
Duration of Implied Warranties
EXCEPT TO THE EXTENT PROHIBITED BY APPLICABLE LAW, ANY IMPLIED WARRANTY OR CONDITION OF MERCHANTABILITY OR FITNESS FOR
A PARTICULAR PURPOSE ON THIS HARDWARE PRODUCT IS LIMITED IN DURATION TO THE DURATION OF THE APPLICABLE LIMITED WARRANTY
PERIOD FOR YOUR PRODUCT. Some jurisdictions do not allow limitations on how long an implied warranty lasts, so the above limitation may
not apply to you.
National Statutory Rights
Consumers have legal rights under applicable national legislation governing the sale of consumer goods. Such rights are not affected
by the warranties in this Limited Warranty.
No Other Warranties
No Logitech dealer, agent, or employee is authorized to make any modification, extension, or addition to this warranty.
Logitech® Address. Logitech, Inc., 6505 Kaiser Drive, Fremont, California 94555, U.S.A.

10 QuickCam® Pro 9000
11QuickCam® Pro 9000
1 Componentes de la cámara
Español
Conexión de la cámara a la computadora
Botón de captura
de instantáneas
Sistema de
objetivo de
cristal y enfoque
automático
Diodo de actividad
Clip universal
Micrófono
Le agradecemos la adquisición de
Logitech® QuickCam® Pro 9000 con
sistema de objetivo de cristal y
enfoque automático. Aquí encontrará
instrucciones de instalación e información
para obtener el mejor rendimiento
posible de esta cámara Web.
Primer paso: instalación del software
Introduzca el CD de instalación en la unidad
de CD-ROM o DVD-ROM de la computadora.
El CD debería iniciarse automáticamente.
De no ser así, haga lo siguiente:
Haga doble clic en el icono Mi PC.
•
También puede hacer clic en Inicio
Mi PC.
Debe instalar el software antes de conectar la cámara.
Muchas de las funciones avanzadas, entre ellas la de enfoque
automático, no funcionarán correctamente a menos que se
realice una instalación de software completa.
Haga clic con el botón derecho en el
•
icono CD-ROM/DVD-ROM y luego haga
clic en Reproducción automática.
Espere hasta que aparezca la indicación en pantalla
para conectar la cámara a un puerto USB de la
computadora.
Colocación de la cámara, el micrófono
y las bocinas
La cámara está equipada con la tecnología Logitech® RightSound™.
La tecnología RightSound™ elimina el eco y reduce el ruido
ambiental. Para asegurar el mejor sonido posible, siga este
procedimiento:
Coloque la cámara sobre la parte central del monitor para
•
obtener un contacto visual más directo.
El micrófono de la cámara debe estar orientado hacia el
•
hablante, a una distancia no superior a un metro.
Si utiliza bocinas, colóquelas al menos a 30 cm del
•
micrófono y en ángulo, para reducir la retroalimentación.
Consejo No debería haber objetos entre el hablante y el
micrófono.

1 QuickCam® Pro 9000
1QuickCam® Pro 9000
Asistente para el ajuste de audio
La primera vez que utilice la cámara QuickCam, la Utilidad de
configuración de micrófono/bocinas y el Asistente para el ajuste de
audio le guiarán para realizar el siguiente procedimiento:
Seleccione el dispositivo de entrada de audio (micrófono) y el
•
dispositivo de salida de audio (bocinas).
Active la cancelación de eco (CEA) (acción recomendada).
•
Active la supresión de ruido ambiental (acción recomendada).
•
Ajuste el volumen de salida de las bocinas y el volumen de
•
entrada del micrófono.
Compruebe la configuración de audio.
•
En entornos ruidosos, es posible que la voz del hablante quede
distorsionada al usar la función de supresión de ruido. De ser así,
desactive la función en el software QuickCam®.
Consejo Si desea modicar la conguración en el software
QuickCam®, haga clic en el botón Configuración
y luego en la cha Audio.
¡Enhorabuena!
¡La cámara está configurada y lista para usar!
Éstas son algunas de las muchas posibilidades de uso de su nueva cámara Web
Videoconferencias en directo para charlar con la familia y los amigos. (Es preciso instalar y usar una
•
aplicación de mensajería instantánea. Para más información, haga clic en en el software QuickCam®.)
Fotografías y vídeos compartidos o enviados por correo electrónico.
•
Vídeo añadido a los artículos para subastar en eBay (visite www.logitech.com/videosnap).
•
Uso del software QuickCam
Utilice uno de estos métodos para iniciar el programa Logitech® QuickCam®:
Haga doble clic en el icono de QuickCam® situado en el escritorio.
•
- o bien-
Haga clic en el icono de QuickCam® situado en la barra de tareas (en la esquina inferior derecha
•
del escritorio).
®

1 QuickCam® Pro 9000
1QuickCam® Pro 9000
8 Funciones del software QuickCam
Grabación de vídeo y captura de fotografías.
®
10 Uso de enfoque automático
El sistema de enfoque automático asegura el correcto enfoque de imágenes muy próximas a la cámara (hasta
10 cm). Si desea controlar manualmente el enfoque de objetivo, active el modo manual en las opciones de
enfoque automático de la ficha Configuración del software software QuickCam®.
Activación de Logitech Video Effects.
Desactivación de audio o vídeo (durante una videoconferencia).
Configuración de parámetros de cámara.
Instalación y uso de servicios y programas de vídeo.
Consejo Para personalizar sus llamadas de vídeo con avatares, accesorios faciales o Fun Filters, haga clic en
el botón Video Effects .
9 Calidad de imagen
Logitech® RightLight™2 garantiza la mejor calidad de imagen posible en condiciones de luz posterior, escasa o
de contraste intenso que crea sombras en la cara del usuario. Si la cámara detecta ese tipo de condiciones,
se abrirá un cuadro de diálogo para permitir activar Logitech® RightLight™2. Haga clic en Sí para dejar que
la cámara ajuste automáticamente los valores de frecuencia de cuadro, color y exposición con los que
obtener una calidad de imagen óptima. Para ajustar esos parámetros manualmente, haga clic en el botón
Configuración .
11 Más información
Información de audio. Visite http://www.logitech.com/rightsound.
Actualizaciones de software. Visite http://www.logitech.com/support.
Ayuda adicional. Inicie el software y haga clic en el botón Ayuda.
Para averiguar más sobre los productos de Logitech®, visite http://www.logitech.com.
Pruebas UL. Este producto ha pasado las pruebas UL y sólo debería utilizarse con otros dispositivos
con certificación UL.
Conformidad. Para obtener más información sobre el cumplimiento de las normativas,
visite http://www.logitech.com/compliance.

1 QuickCam® Pro 9000
1QuickCam® Pro 9000
Garantía Limitada de Productos de Hardware Logitech
Logitech garantiza que sus productos de hardware Logitech no presentarán defectos materiales ni de fabricación durante 2 años, a partir de
la fecha de compra. Salvo disposición legal contraria, esta garantía no es transferible y se limita al comprador original. Esta garantía le otorga
derechos legales específicos y es posible que usted también tenga otros derechos que varían según las leyes locales.
Recursos
La responsabilidad total de Logitech y su recurso exclusivo en caso de violación de la garantía consistirá en, según el criterio de Logitech, (1)
reparar o reemplazar el hardware, o (2) reembolsar el precio abonado, siempre que se devuelva el hardware al punto de venta u otro lugar similar
indicado por Logitech, con una copia del recibo de venta o del recibo detallado y fechado Es posible que se apliquen gastos de envío y entrega,
salvo disposición legal contraria. Es posible que Logitech utilice, según su criterio, piezas nuevas, restauradas o usadas en buenas condiciones
para reparar o reemplazar cualquier producto de hardware. Todo producto de hardware de reemplazo estará cubierto por la garantía durante el
período restante correspondiente al período de la garantía original o durante treinta (30) días, el período que sea más largo, o durante cualquier
período adicional establecido en su jurisdicción.
Esta garantía no cubre los problemas o daños ocasionados por (1) accidente, abuso, mal uso o toda reparación, modificación o desmontaje
no autorizados; (2) uso o mantenimiento inadecuados, uso no compatible con las instrucciones del producto o conexión a una fuente de
alimentación eléctrica inadecuada o (3) utilización de insumos, como baterías de reemplazo, no proporcionados por Logitech, salvo disposición
legal contraria a esta restricción.
Cómo obtener respaldo de la garantía
Antes de gestionar un reclamo de garantía, le recomendamos que visite la sección de asistencia en www.logitech.com para recibir soporte
técnico. Los reclamos de garantía válidos generalmente son procesados a través del punto de venta durante los primeros treinta (30) días
posteriores a la compra. Sin embargo, dicho período podrá variar de acuerdo con el lugar donde usted adquirió el producto: consulte con
Logitech o con el minorista donde usted adquirió el producto para obtener más detalles al respecto. Los reclamos de garantía que no puedan ser
procesados a través del punto de venta y toda inquietud relacionada con el producto adquirido deberán ser enviados a Logitech. Usted podrá
encontrar las direcciones y la información de contacto del servicio al cliente de Logitech en la documentación adjunta al producto y en la página
web www.logitech.com/contactus.
Limitaciones de responsabilidad
LOGITECH NO ASUMIRÁ NINGUNA RESPONSABILIDAD POR DAÑOS ESPECIALES, INDIRECTOS, FORTUITOS O CONSIGUIENTES, A SABER, ENTRE OTROS,
LA PÉRDIDA DE GANANCIAS, INGRESOS O INFORMACIÓN (YA SEA DIRECTA O INDIRECTA) O LA PÉRDIDA COMERCIAL POR VIOLACIÓN DE CUALQUIER
GARANTÍA EXPRESA O IMPLÍCITA DE SU PRODUCTO, AÚN CUANDO LOGITECH HAYA SIDO ASESORADO CON RESPECTO A LOS POSIBLES DAÑOS
Algunas jurisdicciones no permiten la exclusión o limitación de los daños especiales, indirectos, fortuitos o consiguientes, de modo que es posible
que la limitación o exclusión antes mencionada no lo afecte a usted.
Duración de las garantías implícitas
SALVO DISPOSICIÓN LEGAL CONTRARIA, LA DURACIÓN DE TODA GARANTÍA O CONDICIÓN IMPLÍCITA DE APTITUD E IDONEIDAD QUE TENGA UN
PROPÓSITO ESPECÍFICO PARA ESTE PRODUCTO DE HARDWARE ESTARÁ LIMITADA A L A DURACIÓN DEL PERÍODO CORRESPONDIENTE A LA GARANTÍA
LIMITADA DE SU PRODUCTO Algunas jurisdicciones no avalan limitaciones relativas a la duración de la garantía implícita, de modo que es posible
que la limitación antes mencionada no lo afecte a usted.
Derechos legales nacionales
Los consumidores poseen derechos legales establecidos por la legislación nacional vigente con respecto a la venta de bienes de consumo.
Dichos derechos no se ven afectados por las garantías establecidas en esta Garantía Limitada.
Ninguna otra garantía
Ningún distribuidor, representante o empleado de Logitech tiene autorización para realizar modificaciones, extensiones o adiciones
a esta garantía.
Dirección de Logitech Logitech, Inc., 6505 Kaiser Drive, Fremont, California 94555, U.S.A.
1 Caractéristiques de la caméra
Bouton pour prises
de vue instantanées
Système de lentille
de verre avec
mise au point
automatique
Témoin d’activité
Attache universelle
Vous venez d’acheter la caméra Web
Logitech® QuickCam® Pro 9000, dotée
d’un système de lentille de verre
avec mise au point automatique, et
nous vous en félicitons. Ce guide vous
aidera à installer votre caméra Web et à
l’exploiter de façon optimale.
Microphone
Installation préalable du logiciel
Insérez le CD d’installation dans le lecteur
de CD-ROM ou de DVD-ROM. Le CD devrait
démarrer automatiquement. Dans le cas
contraire, procédez comme suit:
Cliquez deux fois sur l’icône Poste de
•
travail. Vous pouvez également cliquer
sur Démarrer Poste de travail.
Installez le logiciel avant de brancher la caméra.
L’installation complète du logiciel est requise pour obtenir un
bon fonctionnement de toutes les fonctions avancées de la
caméra, notamment la mise au point automatique.
Cliquez avec le bouton droit
•
de la souris sur l’icône du lecteur
de CD-ROM ou de DVD-ROM,
puis choisissez Exécution automatique.
Français

18 QuickCam® Pro 9000
19QuickCam® Pro 9000
Branchement de la caméra à l’ordinateur
Assistant de réglage audio
Attendez que l’invite de commande apparaisse avant
de brancher la caméra sur un port USB disponible de
l’ordinateur.
Positionnement de la caméra, du microphone
et des haut-parleurs
La caméra est équipée de la technologie Logitech® RightSound™,
qui élimine les effets d’écho et atténue considérablement les
bruits de fond. Pour bénéficier d’une qualité audio optimale,
procédez comme suit:
Centrez la caméra sur le moniteur pour un contact visuel
•
optimal.
Placez le microphone de la caméra à moins d’un mètre
•
de vous et pointez-le dans votre direction.
Si vous souhaitez utiliser les haut-parleurs, placez-les
•
à au moins 30 cm du microphone afin de minimiser
les interférences et orientez-les de façon à ce qu’ils ne soient
pas dirigés vers le microphone.
Conseil Ne placez aucun objet entre vous et le microphone.
Au premier démarrage de QuickCam, vous êtes guidé par l’utilitaire
de configuration du microphone/des haut-parleurs et l’assistant
de réglage audio pour effectuer les actions suivantes:
sélectionner le dispositif d’entrée audio (microphone) et le
•
dispositif de sortie audio (haut-parleurs);
activer la fonction d’annulation de l’écho acoustique (AEA)
•
(recommandé);
activer la suppression des bruits de fond (recommandé);
•
régler le volume d’entrée du microphone et le volume de sortie
•
des haut-parleurs;
tester les paramètres audio.
•
Lorsque les bruits de fond sont particulièrement forts et irréguliers
et que la suppression du bruit est activée, votre voix risque d’être
déformée. Le cas échéant, désactivez la suppression du bruit dans
le logiciel QuickCam®.
Conseil Vous pouvez modier les paramètres audio en cliquant sur
le bouton Paramètres puis sur l’onglet Audio dans
le logiciel QuickCam®.

0 QuickCam® Pro 9000
1QuickCam® Pro 9000
Félicitations
Votre caméra Web est maintenant configurée et prête à fonctionner!
Votre nouvelle caméra Web va vous permettre de réaliser une multitude d’opérations, notamment:
effectuer des appels vidéo gratuits vers vos amis et votre famille (l’installation et l’utilisation d’une
•
application de messagerie instantanée sont requises; cliquez sur dans le logiciel QuickCam® pour
en savoir plus);
prendre des photos ou enregistrer des vidéos à partager ou à envoyer par courrier électronique;
•
ajouter des vidéos à vos annonces eBay (voir www.logitech.com/videosnap).
•
8 Caractéristiques du logiciel QuickCam
Enregistrement de vidéos ou capture d’images
Activation de Logitech Video Effects
Coupure du son et de la vidéo (lors d’un appel vidéo)
Configuration des paramètres de la caméra
®
Utilisation du logiciel QuickCam
Pour démarrer le logiciel QuickCam®, procédez de l’une des manières suivantes:
Sur le Bureau, cliquez deux fois sur l’icône QuickCam® .
•
- ou-
Dans l’angle inférieur droit du Bureau, dans la barre des tâches, cliquez sur l’icône QuickCam® .
•
®
Installation et utilisation de programmes et services vidéo
Conseil Pour personnaliser vos appels vidéo avec des avatars, des accessoires ou des ltres amusants,
cliquez sur le bouton Video Effects .
9 Garantie d’images de qualité
La technologie Logitech® RightLight™2 vous garantit d’obtenir automatiquement la meilleure qualité d’image
en contre-jour, en éclairage faible ou en rétroéclairage, lesquels projettent souvent une ombre sur votre
visage. Lorsque la caméra détecte l’une de ces conditions, une boîte de dialogue s’affiche, vous demandant
si vous souhaitez activer la technologie Logitech® RightLight™2. Cliquez sur Oui pour permettre à la caméra de
régler automatiquement le débit d’image, la couleur et l’exposition afin d’obtenir la meilleure qualité d’image
possible. Pour effectuer vous-même ces réglages, cliquez sur le bouton Paramètres .

QuickCam® Pro 9000
QuickCam® Pro 9000
10 Utilisation de la mise au point automatique
Garantie limitée du matériel Logitech
®
La distance minimale de la mise au point automatique est de 10 cm. Pour contrôler la mise au point
manuellement, passez en mode manuel en utilisant les commandes de mise au point automatique de l’onglet
Paramètres dans le logiciel QuickCam®.
11 Pour plus d’informations
Informations audio. Rendez-vous sur le site http://www.logitech.com/rightsound.
Mises à jour logicielles. Rendez-vous sur le site http://www.logitech.com/support.
Aide supplémentaire. Lancez le logiciel et cliquez sur le bouton Aide.
Pour plus d’informations sur les produits Logitech®, rendez-vous sur le site http://www.logitech.com.
Certification UL. Votre produit est certifié UL et doit être utilisé uniquement avec des appareils certifiés UL.
Conformité. Pour les informations relatives à la conformité, rendez-vous sur le site
http://www.logitech.com/compliance.
Logitech garantit que votre produit Logitech exempt de tout défaut de matériel et de construction pour 2 ans, à partir de sa date d’achat. Hormis
lorsque les lois en vigueur l’interdisent, cette garantie n’est pas transférable et elle est limitée à l’acheteur initial. Cette garantie vous octroie un
certain nombre de droits et vous bénéficiez également d’autres droits qui varient selon les lois locales en vigueur.
Recours
En cas de rupture de garantie, la seule obligation de Logitech et votre seul recours consistent, à la discrétion de Logitech, (1) à réparer ou
remplacer le matériel, ou (2) à rembourser le montant payé, sous réserve qu’il soit renvoyé au point de vente ou à tout autre lieu indiqué par
Logitech, accompagné d’un justificatif d’achat ou d’un reçu détaillé et daté. Des frais de port et de traitement peuvent être demandés, sauf si
cela est contraire aux lois applicables. Logitech se réserve le droit d’utiliser des pièces neuves, remises à neuf ou déjà utilisées mais en état de
marche pour réparer ou remplacer le produit. Tout matériel de remplacement sera garanti pour le reste de la période de garantie initiale ou pour
trente (30) jours, selon la période la plus longue, ou pour toute durée supplémentaire éventuellement requise par la loi dans votre juridiction.
Cette garantie ne couvre pas les problèmes ou les préjudices résultant (1) d’un accident, d’un abus, d’une mauvaise utilisation, d’une modification
ou d’un désassemblage ; (2) d’une utilisation ou d’un entretien incorrect, d’une utilisation non conforme aux instructions fournies avec le produit
ou d’un branchement à une alimentation dont la tension est inadaptée ; ou (3) de l’utilisation de consommables (piles de remplacement, par
exemple) non fournis par Logitech, hormis là où une telle restriction est interdite par les lois en vigueur.
Comment bénéficier de la garantie
Avant de soumettre une réclamation relative à la garantie, nous vous recommandons de consulter la rubrique de support technique de notre site
Web, disponible à l’adresse www.logitech.com, afin d’obtenir de l’aide. Les réclamations fondées, et qui sont liées à la garantie, sont en général
traitées par l’intermédiaire du point de vente dans les trente (30) jours suivant l’achat. Cette durée peut toutefois varier en fonction du lieu
d’achat. Veuillez vous renseigner auprès de Logitech ou de la boutique qui vous a vendu le produit pour plus de détails. Les réclamations qui ne
peuvent être traitées par l’intermédiaire du point de vente, et les autres questions liées au produit, doivent être adressées directement à Logitech.
Les adresses et les coordonnées du service client de Logitech sont mentionnées dans la documentation qui accompagne votre produit, et sur
Internet à l’adresse www.logitech.com/contactus.
Limite de responsabilité
LOGITECH NE PEUT ÊTRE TENU RESPONSABLE DE TOUT PRÉJUDICE SPÉCIAL, INDIRECT, CONSÉCUTIF OU ACCIDENTEL, Y COMPRIS, MAIS SANS
RESTRICTION, DE TOUT MANQUE À GAGNER, DE TOUTE PERTE DE RECETTES OU DE DONNÉES (DIRECTE OU INDIRECTE) OU DE TOUT PRÉJUDICE
COMMERCIAL POUR RUPTURE DE TOUTE GARANTIE EXPLICITE OU IMPLICITE CONCERNANT VOTRE PRODUIT, MÊME SI LOGITECH A ÉTÉ INFORMÉ DE
L’ÉVENTUALITÉ DE CES PRÉJUDICES. Certaines juridictions n’autorisant pas l’exclusion ou la limitation des préjudices spéciaux, indirects, consécutifs
ou accidentels, les limitations ou les exclusions susmentionnées peuvent ne pas s’appliquer à votre cas.
Durée des garanties implicites
HORMIS LORSQUE CELA EST INTERDIT PAR LES LOIS EN VIGUEUR, TOUTE GARANTIE IMPLICITE OU CONDITION DE QUALITÉ MARCHANDE OU
D’ADAPTATION À UN USAGE PARTICULIER EST LIMITÉE EN TEMPS, POUR UNE DURÉE CORRESPONDANT À LA DURÉE DE LA PÉRIODE DE GARANTIE
LIMITÉE APPLICABLE À VOTRE PRODUIT. Certaines juridictions ne reconnaissant pas les limitations de durée des garanties implicites, les limitations
susmentionnées peuvent ne pas s’appliquer à votre cas.
Droits nationaux prévus par la loi
Les consommateurs bénéficient de droits reconnus par la loi en vertu de la législation nationale applicable régissant la vente de biens de
consommation. Ces droits ne sont pas affectés par les garanties mentionnées dans cette garantie limitée.
Aucune autre garantie
Aucun distributeur, représentant ou employé de Logitech n’est autorisé à modifier ou étendre la présente garantie, ni à y ajouter des éléments.
Adresse de Logitech®. Logitech, Inc., 6505 Kaiser Drive, Fremont, California 94555, U.S.A.

QuickCam® Pro 9000
QuickCam® Pro 9000
1 Recursos da câmara
Português
Conecte a câmara ao computador
Botão de instantâneo Obrigado por ter adquirido a QuickCam®
Sistema de lente
de vidro com foco
automático
Luz de actividade
Pro 9000 da Logitech®, com um sistema
de lentes de vidro de focagem
automática. Este guia ajuda-o a instalar
e obter o melhor desempenho da sua
câmara Web.
Microfone
Clipe Universal
Instale primeiro o software
Insira o CD de instalação na unidade de
CD-ROM ou DVD-ROM. O CD deve ser
iniciado automaticamente. Se não, siga
as etapas abaixo:
Clique duas vezes no ícone Meu
•
computador. Como alternativa, clique
em Iniciar Meu computador.
Instale o software antes de ligar a câmara. Vários dos
recursos estendidos da câmara, inclusive o foco automático,
não funcionarão corretamente sem a instalação completa
do software.
Clique com o botão direito do mouse
•
no ícone da unidade de CD-ROM ou
DVD-ROM e, em seguida, clique em
Reprodução automática Reprodução
automática.
Aguarde a solicitação do software antes de conectar a
câmara a uma porta USB disponível no computador.
Posicione a câmara, o microfone
e os alto-falantes
A câmara inclui a tecnologia Logitech® RightSound™. A tecnologia
RightSound™ cancela eco e reduz significativamente ruídos de
fundo. As etapas abaixo irão assegurar o melhor desempenho de
áudio possível:
Coloque a câmara no centro do monitor para um melhor
•
contato visual.
Posicione o microfone da câmara a não mais do que 1 m
•
de você e aponte-o para você.
Posicione os alto-falantes (se usados) a pelo menos 30 cm do
•
microfone, para reduzir o retorno, e coloque os alto-falantes
em um ângulo afastado do microfone.
Dica Não coloque objetos entre você e o microfone.

QuickCam® Pro 9000
QuickCam® Pro 9000
O assistente de sintonização de áudio
Na primeira vez que iniciar a QuickCam, ela orientará você no
Utilitário de configuração de microfone ou alto-falantes e no
Assistente de sintonização de áudio, que lhe permite:
Selecionar o dispositivo de entrada de áudio (microfone) e o
•
dispositivo de saída de áudio (alto-falantes).
Ativar o eliminador de eco acústico (AEC, Acoustic Echo
•
Cancellation) — recomendável.
Ativar a supressão de ruído de fundo — recomendável.
•
Especificar o volume de entrada do microfone e o volume de
•
saída dos alto-falantes.
Testar as configurações do áudio.
•
Em situações com ruídos de fundo altos e irregulares, sua voz
poderá ficar distorcida ao usar a supressão de ruídos. Se isso ocorrer,
desative a supressão de ruídos no software QuickCam®.
Dica Para alterar as configurações de áudio no software
QuickCam®, clique no botão Congurações e, em
seguida, clique na guia Áudio
Parabéns
A câmara agora está configurada e pronta para funcionar!
Existem várias maneiras de desfrutar o uso da nova câmara Web, incluindo:
Fazer videochamadas gratuitas a amigos e familiares. (É necessário instalar e usar um aplicativo de
•
mensagem instantânea. Para obter mais informações, clique em no software QuickCam®.)
Tirar fotografias ou gravar vídeo para compartilhar ou enviar por e-mail.
•
Adicionar vídeos aos leilões no E-bay (visite www.logitech.com/videosnap).
•
Utilizar o software da QuickCam
Para iniciar o software Logitech® QuickCam®, faça um dos seguintes:
Na área de trabalho, clique duas vezes no ícone QuickCam® .
•
- ou-
No canto direito inferior da área de trabalho, na barra de tarefas, clique no ícone QuickCam
•
®
®
.

8 QuickCam® Pro 9000
9QuickCam® Pro 9000
8 Recursos do software da QuickCam
Grave vídeos ou capture imagens.
®
10 Usando o foco automático
O sistema de foco automático assegura que imagens próximas 10 cm da câmara serão colocadas em foco
automaticamente. Se você desejar controlar o foco da lente manualmente, ligue o modo manual nos
controles de ‘‘foco automático’’ na guia Configurações do software QuickCam®.
Ative Logitech Video Effects.
Ative sem som de áudio e vídeo (durante uma videochamada).
Especifique configurações da câmara.
Instale e use programas e serviços de vídeo.
Dica Para personalizar as videochamadas com imagens de Avatar, Acessórios de rosto ou Filtros
divertidos personalizados, clique no botão Video Effects.
9 Assegure imagens de qualidade
Logitech® RightLight™2 assegura que você obtenha automaticamente a melhor qualidade de imagem em
condições de luz forte, fraca ou de iluminação traseira, que em geral projeta uma sombra sobre o rosto.
Quando a câmara identifica essas situações, é exibida uma caixa de diálogo que pergunta se você deseja
ativar Logitech® RightLight™2. Clique em Sim para deixar a câmara ajustar automaticamente taxas de
quadros, cor e exposição para produzir a melhor qualidade de imagem. Para ajustar manualmente estas
configurações, clique no botão Configurações.
11 Para obter mais informações
Informações sobre áudio. Visite http://www.logitech.com/rightsound.
Actualizações de software. Visite http://www.logitech.com/support.
Ajuda adicional. Inicie o software e clique no botão Ajuda.
Para obter mais informações sobre os produtos da Logitech®, visite http://www.logitech.com.
Teste de UL. Este produto foi submetido a teste de UL e deve ser utilizado somente com outros dispositivos
listados em UL.
Compatibilidade: Para informações sobre conformidade, visite http://www.logitech.com/compliance.

0 QuickCam® Pro 9000
1QuickCam® Pro 9000
Garantia Limitada de equipamento da Logitech
lll#ad\^iZX]#Xdb$hjeedgi
LL L
6OJUFE4UBUFT
"SHFOUJOB
#SB[JM
$BOBEB
$IJMF
-BUJO"NFSJDB
.FYJDP
A Logitech garante que o seu equipamento Logitech estará livre de defeitos de fabricação e de material por 2 anos, a partir da data de compra.
Exceto quando proibido por lei aplicável, esta garantia é intransferível e protege apenas o comprador original. Esta garantia lhe concede direitos
legais específicos e você pode ter também outros direitos que variam de acordo com a jurisdição.
Remédios jurídicos
A responsabilidade total da Logitech e seu exclusivo remédio jurídico para qualquer quebra de garantia deverão ser, a critério da Logitech, (1)
consertar ou substituir o equipamento ou (2) reembolsar o preço pago, desde que o equipamento seja devolvido ao local onde foi comprado
ou em outro local determinado pela Logitech com uma cópia da nota fiscal ou recibo datado. Taxas de manipulação e remessa poderão ser
aplicáveis, exceto quando proibido pelas leis locais. A Logitech poderá, a seu critério, usar peças novas, usadas ou recondicionadas em bom
estado de funcionamento para reparar ou substituir qualquer equipamento. Qualquer equipamento substituído terá garantia durante o
restante do período original da garantia ou trinta (30) dias, o que for mais longo, ou durante qualquer período adicional que possa ser aplicável
na sua jurisdição.
Esta garantia não cobre problemas ou danos resultantes de (a) acidente, abuso, mau uso ou qualquer reparo não autorizado, modificação
ou desmontagem; (b) operação ou manutenção inadequada, uso que não está em conformidade com as instruções do produto ou voltagem
incorreta; ou (c) uso de elementos, tais como baterias, não fornecidos pela Logitech, exceto quando essa restrição é proibida pela lei aplicável.
Como obter assistência para garantia
Recomendamos que, antes de enviar a reclamação de garantia, você visite a seção de assistência em www.logitech para obter assistência técnica.
As reclamações de garantia válidas são geralmente processadas pelo local onde foi feita a compra durante os primeiros trinta (30) dias após a
compra; entretanto, esse período pode variar, dependendo do local onde o produto foi comprado - para obter mais detalhes, entre em contato
com a Logitech ou com o varejista onde comprou o produto. As reclamações de garantia que não possam ser processadas pelo local de compra
e quaisquer outras perguntas relacionadas ao produto devem ser enviadas diretamente à Logitech. Os endereços e informações de contato
para atendimento ao cliente para a Logitech podem ser encontrados na documentação que acompanha seu produto e em www.logitech.
com/contactus.
Limitação de responsabilidade
A LOGITECH NÃO SERÁ RESPONSÁVEL POR NENHUM DANO ESPECIAL, INDIRETO, INCIDENTAL OU CONSEQÜENCIAL, INCLUINDO, MAS NÃO LIMITADO
A PREJUÍZOS OU LUCROS, PERDA DE RECEITA OU DE DADOS (SEJA DE FORMA DIRETA OU INDIRETA) OU PREJUÍZO COMERCIAL POR QUEBRA DE
QUALQUER GARANTIA EXPRESSA OU IMPLÍCITA NO SEU PRODUTO, MESMO SE A LOGITECH TENHA SIDO NOTIFICADA SOBRE A POSSIBILIDADE DE TAIS
DANOS. Algumas jurisdições não permitem a exclusão ou limitação de danos especiais, indiretos, incidentais ou conseqüenciais, e portanto a
limitação ou exclusão acima poderá não ser aplicável a você.
Duração de garantias implícitas
EXCETO NA MEDIDA EM QUE PROIBIDO PELA LEI APLICÁVEL, QUALQUER CONDIÇÃO OU GARANTIA IMPLÍCITA OU ESTADO DA COMERCIALIZAÇÃO
OU ADEQUAÇÃO PARA UM DETERMINADO FIM NESSE EQUIPAMENTO É LIMITADA EM DURAÇÃO À DURAÇ ÃO DO PERÍODO DE GARANTIA LIMITADA
APLICÁVEL PARA O SEU PRODUTO. Algumas jurisdições não permitem limitações da duração de uma garantia implícita, e portanto a limitação
acima poderá não ser aplicável a você.
Direitos estatutários nacionais
Os consumidores possuem direitos legais segundo a legislação nacional aplicável que rege a venda de produtos ao consumidor. Esses direitos
não são afetados pelas garantias nesta Garantia Limitada.
Nenhuma outra garantia
Nenhum revendedor, agente ou funcionário da Logitech está autorizado a fazer qualquer modificação, extensão ou acréscimo a esta garantia.
Endereço da Logitech Logitech, Inc., 6505 Kaiser Drive, Fremont, California 94555, Estados Unidos da América

www.logitech.com
© 2007 Logitech. All rights reserved. Logitech, the Logitech logo, and other Logitech marks are owned by
Logitech and may be registered. All other trademarks are the property of their respective owners. Logitech
assumes no responsibility for any errors that may appear in this manual. Information contained herein is
subject to change without notice.
© 2007 Logitech. Tous droits réservés. Logitech, le logo Logitech et les autres marques Logitech sont la
propriété exclusive de Logitech et sont susceptibles d’être des marques déposées. Toutes les autres marques
sont la propriété exclusive de leurs détenteurs respectifs. Logitech décline toute responsabilité en cas
d’erreurs dans ce manuel. Les informations énoncées dans le présent document peuvent faire l’objet de
modifications sans avis préalable.
620-000315
 Loading...