


LG LFXS26973*, LFXC22526*, LFXS28968*, LMXS28626*, LMXS28636* Users guide
...OWNER'S MANUAL
FRENCH DOOR REFRIGERATOR
Read this owner's manual thoroughly before operating the appliance and keep it handy for reference at all times.
ENGLISH
LFXS26973* / LFXC22526* / LFXS28968* / LMXS28626* / LMXS28636* / LMRS28626* / LRMXS2806* / LRMXC2206* / LMXC22626* / LFXS26566* / LFXS28566*
|
|
|
|
|
|
|
|
|
|
|
|
|
|
|
|
|
|
|
|
|
|
|
|
|
|
|
|
|
|
|
|
|
|
|
|
|
www.lg.com |
|
|
MFL70761734 |
|
|
|
|
|
|
|
|
|
||||||||||||||||||||||||||
|
|
|
|
|
|
|
|
|
|
|
|
|
|
|
|
|
|
|
|
Copyright © 2020-2021 LG Electronics Inc. All Rights Reserved. |
|||||||||||||||||
|
Rev.04_010721 |
|
|
|
|
|
|
|
|
|
|
|
|
|
|
|
|
|
|
||||||||||||||||||

2
TABLE OF CONTENTS
3 |
IMPORTANT SAFETY |
|
63 LIMITED WARRANTY |
|
|
INSTRUCTIONS |
63 |
USA |
|
|
|
|||
3 |
READ ALL INSTRUCTIONS BEFORE USE |
67 |
Canada |
|
3 |
WARNING |
|
|
|
6CAUTION
7PRODUCT OVERVIEW
7 Product Features
12 INSTALLATION
12Before Installing
13Choosing the Proper Location
15Removing/Assembling Handles
16Removing/Assembling Doors and Drawers
22Connecting the Water Line
25Leveling and Door Alignment
26Turning on the Power
27 OPERATION
27Before Use
28Control Panel
30Sabbath Mode
31Ice and Water Dispenser
32Ice Compartment
33Automatic Icemaker
35Storing Food
36Humidity Controlled Crispers
37Glide‘N’Serve
38Refrigerator Shelves
39Door-in-Door
39Door Bins
40Durabase
41 SMART FUNCTIONS
41 LG ThinQ Application
43Smart Grid Function
44Smart Diagnosis™ Feature
46 MAINTENANCE
46Cleaning
46Air Filter
47Water Filter
52 TROUBLESHOOTING
52FAQs
53Before Calling for Service

IMPORTANT SAFETY INSTRUCTIONS 3
IMPORTANT SAFETY INSTRUCTIONS
READ ALL INSTRUCTIONS BEFORE USE
Safety Messages
Your safety and the safety of others are very important.
We have provided many important safety messages in this manual and on your appliance. Always read and follow all safety messages.
This is the safety alert symbol.
This symbol alerts you to potential hazards that can kill or injure you and others. All safety messages will follow the safety alert symbol and either the word WARNING or CAUTION.
These words mean:
WARNING
You may be killed or seriously injured if you do not follow instructions.
CAUTION
You may be injured or cause damage to the product if you do not follow instructions.
All safety messages will tell you what the potential hazard is, tell you how to reduce the chance of injury, and tell you what may happen if the instructions are not followed.
WARNING
 WARNING
•To reduce the risk of explosion, fire, death, electric shock, scalding or injury to persons when using this product, follow basic precautions, including the following:
Installation
•To reduce the risk of injury to persons, adhere to all industry recommended safety procedures including the use of long-sleeved gloves and safety glasses.
•Never attempt to operate this appliance if it is damaged, malfunctioning, partially disassembled, or has missing or broken parts, including a damaged cord or plug.
•Only connect this product to a dedicated grounded electrical outlet rated for use with this product (115 V, 60 Hz, AC only). It is the user’s responsibility to replace a standard 2-prong wall outlet with a standard 3-prong wall outlet.
•Do not use an outlet that can be turned off with a switch. Do not use an extension cord.
•The appliance must be positioned for easy access to a power source.
•When moving the refrigerator, be careful not to roll over or damage the power cord.
•Contact an authorized service center when installing or relocating the refrigerator.
•Do not, under any circumstances, cut or remove the third (ground) prong from the power cord.
•Keep packing materials out of the reach of children. Packaging material can be dangerous for children. There is a risk of suffocation.
•Do not install the refrigerator in a damp or dusty place where insulation on electrical parts may deteriorate.
•Do not place the refrigerator in direct sunlight or expose it to the heat from heating appliances such as stoves or heaters.
<![endif]>ENGLISH

4 IMPORTANT SAFETY INSTRUCTIONS
• Do not bend or pinch the power cord excessively or place heavy objects on it.
Operation
•This appliance is intended to be used in household and similar applications such as:
-staff kitchen areas in shops, offices and other working environments;
-farm houses and by clients in hotels, motels and other residential type environments;
-bed and breakfast type environments;
-catering and similar non-retail applications.
•This product is not to be used for special purposes such as the storage of medicine or test materials or for use on ships, etc.
•DO NOT allow children to climb, stand, or hang on the refrigerator doors or on the shelves in the refrigerator. They could damage the refrigerator and seriously injure themselves.
•Do not allow children to climb into the refrigerator. They could be trapped and suffocated.
•Children should be supervised to ensure that they do not play with the refrigerator.
•Keep fingers out of pinch point areas; clearances between the doors and cabinets are necessarily small. Be careful closing doors when children are nearby.
•Do not touch frozen food or the metal parts in the freezer compartment with wet or damp hands. Doing so may cause frostbite.
•Do not refreeze frozen food that has thawed completely. Doing so may result in a serious health hazard.
•Do not use an adapter plug or plug the power plug into a multi-outlet extension cord.
•If the supply cord is damaged, it must be replaced by the manufacturer or its service agent or a similarly qualified person in order to avoid a hazard.
•Do not operate the refrigerator or touch the power cord with wet hands.
•Do not modify or extend the power cord.
•Do not use an uncertified power outlet. Do not plug appliance into a damaged wall outlet.
•Do not put hands, feet or other objects into the air vents or bottom of the refrigerator. Doing so could result in personal injury or electric shock.
•In the event of a gas leak (propane/LPG), ensure the area is adequately ventilated and contact an authorized service center before resuming use. Do not touch the refrigerator or power cord of the refrigerator.
•Disconnect the power cord immediately and contact an authorized service center if there is a strange noise, odor, or smoke coming from the appliance.
•Do not use any fuse (such as copper, steel wire, etc.) other than a standard fuse.
•Do not place or use an electrical appliance inside the refrigerator, unless it is of a type recommended by the manufacturer.
•Do not put animals inside the appliance.
•Do not place heavy or fragile objects, liquid filled containers, combustible substances, or flammable objects (such as candles and lamps) on the appliance.
•If connected to a circuit protected by fuses, use time delay fuse.
•Keep ventilation openings, in the appliance enclosure or in the built-in structure, clear of obstruction.
•Do not use mechanical devices or other means to accelerate the defrosting process, other than those recommended by the manufacturer.
•Do not use electrical appliances inside the food storage compartments of the appliance, unless they are of the type recommended by the manufacturer.
•Do not store explosive substances such as aerosol cans with a flammable propellant in this appliance.

IMPORTANT SAFETY INSTRUCTIONS 5
Maintenance
• |
Do not use a hair dryer to dry the inside of the refrigerator. |
|
|
• |
Do not light a candle to remove odors in the refrigerator. |
|
|
| <![if ! IE]> <![endif]>ENGLISH |
|||
• |
In the event of a refrigerant leak, move flammable objects away from the refrigerator. Ensure the area is |
||
|
adequately ventilated and contact an authorized service center. |
||
• |
Keep flammable materials and vapors, such as gasoline, away from the refrigerator. |
||
• |
This appliance is not intended for use by persons (including children) with reduced physical, sensory or |
|
|
|
|||
|
mental capabilities, or lack of experience and knowledge, unless they have been given supervision or |
|
|
|
instruction concerning use of the appliance by a person responsible for their safety. |
|
|
• |
Unplug the power plug before cleaning or repairing the refrigerator. |
|
|
• |
The refrigerator and freezer compartment lights are interior LED lighting, and service should be |
|
|
|
performed by a qualified technician. |
|
|
• Unplug the power plug immediately in the event of a blackout or thunderstorm. |
|
||
• |
Turn the power off if water or dust penetrates into the refrigerator. Call a service agent. |
|
|
• Do not store glass containers or soda in the freezer compartment. Contents may expand when frozen, |
|
||
|
break the container and cause injury. |
|
|
• |
Do not store, disassemble or repair the appliance yourself or allow unqualified personnel to do so. |
|
|
Disposal
•Junked or abandoned refrigerators are dangerous, even if they are sitting for only a few days. When disposing of the refrigerator, remove the packing materials from the door or take off the doors but leave the shelves in place so that children may not easily climb inside.
•If disposing of a refrigerator, make sure the refrigerant and insulation foam are removed for proper disposal by a qualified servicer. If you release the refrigerant or throw away the insulation foam, you may be fined or imprisoned in accordance with the relevant environmental law. Insulation foam contains flammable blowing gas.
•When discarding the appliance, remove the door gasket while leaving the shelves and bins in place, and keep children away from the appliance.
Grounding Instructions
•Improper connection of the equipment-grounding conductor can result in a risk of electric shock. Check with a qualified electrician or service personnel if you are in doubt whether the appliance is properly grounded. Do not modify the plug provided with the appliance; if it will not fit the outlet, have a proper outlet installed by a qualified electrician.
•Have a certified electrician check the wall outlet and wiring for proper grounding.
•Never unplug the appliance by pulling on the power cord. Always grip the plug firmly and pull straight out from the outlet. Failure to do so may damage the power cord, resulting in a risk of fire and electric shock.
6 IMPORTANT SAFETY INSTRUCTIONS
Risk of Fire and Flammable Materials
This appliance contains a small amount of isobutane refrigerant (R600a), which is combustible. When transporting and installing the appliance, care should be taken to ensure that no parts of the refrigerating circuit are damaged. Refrigerant squirting out of the pipes could ignite or cause an eye injury. If a leak is detected, avoid any naked flames or potential sources of ignition and air out the room in which the appliance is standing for several minutes.
In order to avoid the creation of a flammable gas air mixture if a leak in the refrigerating circuit occurs, the size of the room in which the appliance may be sited depends on the amount of refrigerant used. The room must be 10.8 square feet (1 square meter) in size for every 8g of R600a refrigerant inside the appliance. The amount of refrigerant in your particular appliance is shown on the identification plate inside the appliance. Never start up an appliance showing any signs of damage. If in doubt, consult your dealer.
CAUTION
 CAUTION
•To reduce the risk of minor or moderate injury to persons, malfunction, or damage to the product or property when using this product, follow basic precautions, including the following:
Installation
•Do not install the refrigerator where there may be a danger of the unit falling.
•The refrigerator must be properly installed in accordance with the Installation Instructions.
Operation
•Do not use aerosols near the refrigerator.
•This appliance is intended to be used only in domestic and similar applications.
•Do not strike or apply excessive force to any glass surface. Do not touch glass surfaces if they are cracked or broken.
•Do not overfill or pack items too tightly into door bins. Doing so may cause damage to the bin or personal injury if items are removed with excessive force.
•Do not hang on to or place heavy objects on the refrigerator’s dispenser.
Maintenance
•Do not use strong detergents like wax or thinners for cleaning. Clean with a soft cloth.
•Remove foreign objects (such as dust and water) off the prongs of the power plug and contact areas. Do not use a wet or damp cloth when cleaning the plug.
•Do not spray water directly on the inside or outside of the refrigerator.
•Do not clean glass shelves or covers with warm water when they are cold. They may break if exposed to sudden temperature changes.
SAVE THESE INSTRUCTIONS
PRODUCT OVERVIEW 7
PRODUCT OVERVIEW
Product Features
The images in this guide may be different from the actual components and accessories, which are subject to change by the manufacturer without prior notice for product improvement purposes.
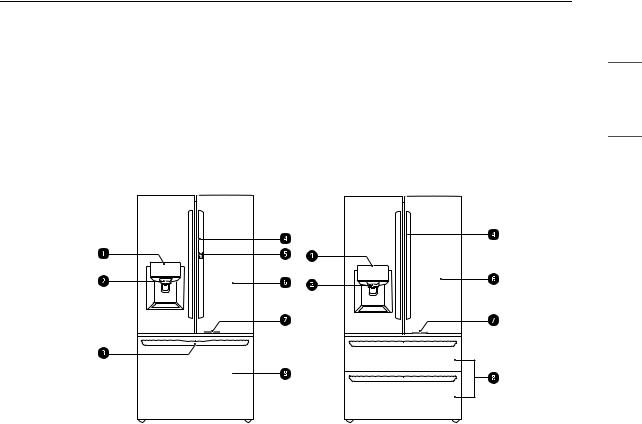
Exterior
† This feature is only available on some models.
aControl Panel
Sets the refrigerator temperature and freezer temperature, the water filter condition and the dispenser mode.
bFiltered Water and Ice Dispenser
Dispenses purified water and ice.
cEZ Handle
Easily opens the freezer door.
dHandle
Opens and closes the refrigerator door.
eDoor Button†
Opens the Door-in-Door Compartment.
fRefrigerator
Fresh food compartment
gLED Light
Lights up when the freezer door is opened.
hFreezer
Frozen food compartment
<![endif]>ENGLISH
8 PRODUCT OVERVIEW
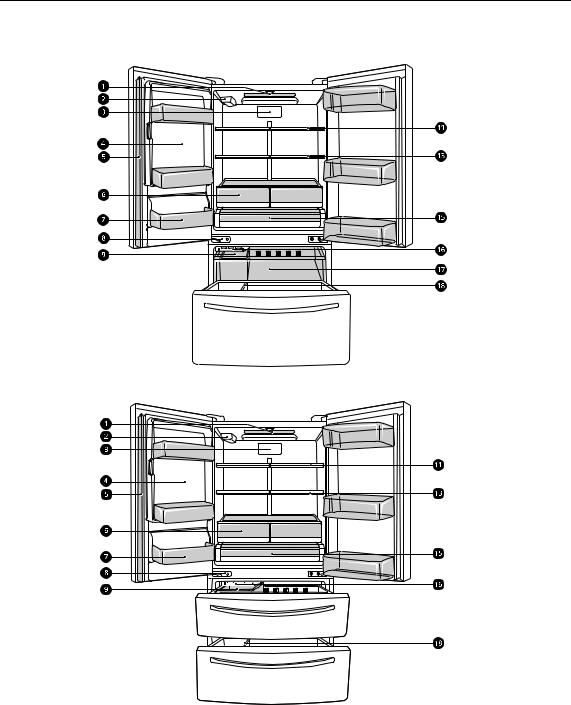
Interior
Standard Door : LFXS26973* / LFXC22526* / LFXS28968*
Standard Door : LMXS28626* / LMXS28636* / LMRS28626* / LRMXS2806* / LRMXC2206* / LMXC22626*
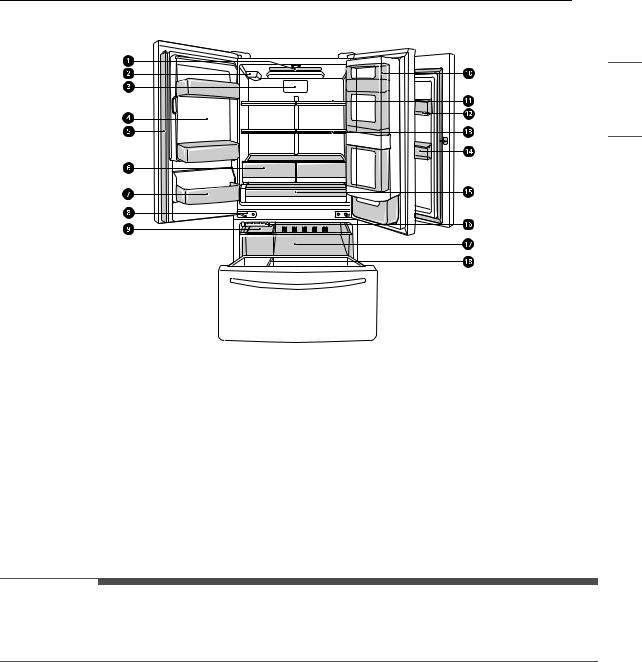
PRODUCT OVERVIEW 9
Door-in-Door : LFXS26566* / LFXS28566*
<![if ! IE]><![endif]>ENGLISH
aLED Interior Lighting
Lights up the inside of the refrigerator.
bWater filter
Purifies water. The filter should be replaced every 6 months.
cAir Filter
Reduces odors inside the refrigerator compartment.
dIn-Door Icemaker (Refrigerator)
This is where ice is automatically produced and stored.
eDoor Mullion
Prevents the cold air in the refrigerator from escaping when the doors are closed.
 CAUTION
•To reduce the risk of scratching the door or breaking the center door mullion, make sure that the folding door mullion is folded in before closing the left-hand door.
•The door alarm will sound every 30 seconds if the door remains open longer than one minute.
fHumidity Controlled Crisper
Helps vegetables and fruit to stay crisp and controls humidity.
gFixed Door Bin
Stores chilled food or drinks.
hAuto-Closing Hinge†
The refrigerator doors and freezer drawers close automatically when pushed slightly. (The door only closes automatically when it is open at an angle of less than 30°.)
iIce Bin
Stores ice from the freezer icemaker.

10 PRODUCT OVERVIEW
NOTE
•Pad†
-The pad attached to the bottom of the ice bin is designed to reduce the sound of the ice dropping. Do not remove the pad.
jDoor-in-Door Case†
A convenient storage area for frequently-used items that require easy access.
kAdjustable Refrigerator Shelf
The refrigerator shelves are adjustable to meet individual storage needs.
lCheese & Butter and Condiment Bins†
Cheese & Butter and Condiment bins are specially designed for these items, making spreading butter and slicing cheese easier.
mFolding Shelf†
Store taller items, such as gallon containers or bottles, by pushing the front half of the shelf underneath the back half of the shelf.
nModular Door Bin†
Interchangeable bins can be arranged to suit storage needs.
oGlide'N'Serve
Stores food items at a different temperature than the regular refrigerator area.
pAutomatic Icemaker (Freezer)†
Dispenses ice automatically.
qPullout Drawer†
Provides extra storage within the freezer compartment.
rDurabase and Durabase Divider
Provides storage for large frozen food items.
† This feature is only available on some models.
Product Specifications
The appearance and specifications listed in this manual may vary due to constant product improvements.
Electrical requirements: 115 V, 60 Hz
Min. / Max. water pressure: 20 - 120 psi (138 - 827 kPa)
Model |
Description |
Net weight |
|
|
|
LFXS28968* |
Standard-depth, French door refrigerator, bottom freezer |
295 lb (134 kg) |
|
|
|
LMXS28626* |
Standard-depth, French door refrigerator, bottom freezer |
311 lb (141 kg) |
|
|
|
LMXS28636* |
Standard-depth, French door refrigerator, bottom freezer |
333 lb (151 kg) |
|
|
|
LMRS28626* |
Standard-depth, French door refrigerator, bottom freezer, Sabbath |
313 lb (142 kg) |
|
Mode |
|
|
|
|
PRODUCT OVERVIEW 11
Model |
Description |
Net weight |
|
|
|
|
|
|
|
LRMXS2806* |
Standard-depth, French door refrigerator, bottom freezer, Sabbath |
313 lb (142 kg) |
|
|
|
Mode |
|
|
<![if ! IE]> <![endif]>ENGLISH |
|
|
|
|
|
LRMXC2206* |
Counter-depth, French door refrigerator, bottom freezer, Sabbath |
278 lb (126 kg) |
|
|
|
|
|||
|
Mode |
|
|
|
|
|
|
|
|
LMXC22626* |
Counter-depth, French door refrigerator, bottom freezer, Sabbath |
276 lb (125 kg) |
|
|
|
Mode |
|
|
|
|
|
|
|
|
LFXS26973* |
Standard-depth, French door refrigerator, bottom freezer, Sabbath |
291 lb (132 kg) |
|
|
|
Mode |
|
|
|
|
|
|
|
|
LFXC22526* |
Counter-depth, French door refrigerator, bottom freezer, Sabbath |
271 lb (123 kg) |
|
|
|
Mode |
|
|
|
|
|
|
|
|
LFXS26566* |
Standard-depth, French door refrigerator, bottom freezer, Sabbath |
302 lb (137 kg) |
|
|
|
Mode |
|
|
|
|
|
|
|
|
LFXS28566* |
Standard-depth, Door-in-Door French door refrigerator, bottom |
313 lb (142 kg) |
|
|
|
freezer |
|
|
|
|
|
|
|
|
12 INSTALLATION
INSTALLATION
Before Installing
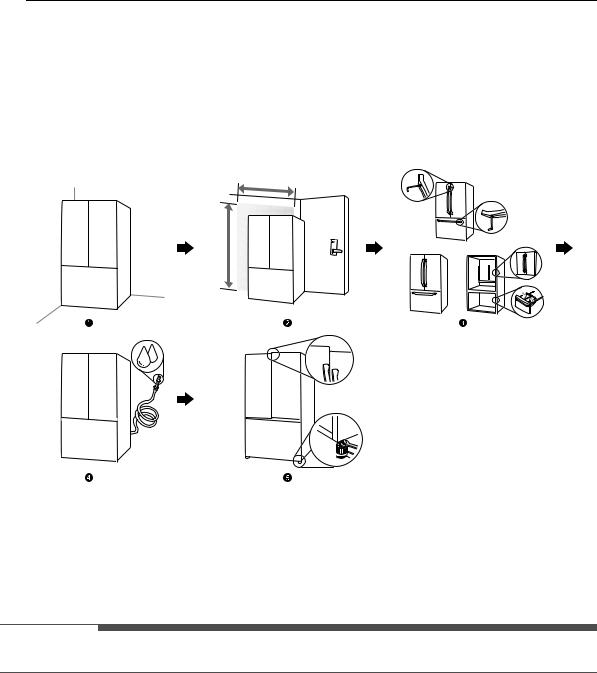
Installation Overview
Please read the following installation instructions first after purchasing this product or transporting it to another location.
aUnpacking the Refrigerator
bChoosing the Proper Location
cDisassembling/Assembling
dConnecting the Water Line
eLeveling and Door Alignment
 WARNING
• Connect to potable water supply only.

|
|
|
|
|
|
|
INSTALLATION 13 |
|
|
|
|
|
|
|
|
|
|
Unpacking the Refrigerator |
|
install a booster pump to compensate for the |
||||||
|
|
|
|
|
low pressure. |
|||
|
WARNING |
|
|
|
|
|
|
|
|
|
|
|
|
|
|
||
• Use two or more people to move and install the |
|
|
|
|
|
|||
|
refrigerator. Failure to do so can result in back |
|
Electricity |
|||||
|
injury or other injury. |
|
Use an individual, grounded outlet:115 Volts, 60 |
|||||
• |
The refrigerator is heavy. Protect the floor when |
|
||||||
|
Hz, AC, 15 amps minimum. |
|||||||
|
moving the refrigerator for cleaning or service. |
|
||||||
|
|
|
|
|
|
|||
|
Always pull the refrigerator straight out when |
|
|
|
|
|
||
|
|
WARNING |
|
|
||||
|
moving it. Do not wiggle or walk the refrigerator |
|
|
|||||
|
when trying to move it, as floor damage could |
|
• Do not overload house wiring and cause a fire |
|||||
|
occur. |
|
hazard by plugging in multiple appliances in the |
|||||
• |
Keep flammable materials and vapors, such as |
|
same outlet with the refrigerator. |
|||||
|
gasoline, away from the refrigerator. Failure to |
|
• To reduce the risk of electric shock, do not install |
|||||
|
do so can result in fire, explosion, or death. |
|
the refrigerator in a wet or damp area. |
|||||
|
|
|
|
|
|
|
||
|
|
|
|
|
|
|
|
|
NOTE |
|
|
Flooring |
|||||
|
|
|||||||
• Remove tape and any temporary labels from |
|
|||||||
|
your refrigerator before using. Do not remove |
|
To avoid noise and vibration, the unit must be |
|||||
|
any warning labels, the model and serial number |
|
||||||
|
|
installed and leveled on a solidly constructed floor. |
||||||
|
label, or the Tech Sheet that is located under the |
|
||||||
|
|
If required, adjust the leveling legs to compensate |
||||||
|
front of the refrigerator. |
|
||||||
|
|
for the unevenness of the floor. |
||||||
• To remove any remaining tape or glue, rub the |
|
|||||||
|
|
|
|
|
||||
|
area briskly with your thumb. Tape or glue |
|
NOTE |
|
||||
|
|
|
||||||
|
residue can also be easily removed by rubbing a |
|
|
|
|
|
||
small amount of liquid dish soap over the |
• Installing on carpeting, soft tile surfaces, a |
|
platform or weakly supported structure is not |
||
adhesive with your fingers. Wipe with warm |
||
recommended. |
||
water and dry. |
||
|
•Do not use sharp instruments, rubbing alcohol, flammable fluids, or abrasive cleaners to remove
tape or glue. These products can damage the |
Ambient Temperature |
|
surface of your refrigerator. |
Install this appliance in an area where the |
|
• Reinstall or adjust shelves as needed. |
||
temperature is between 55 °F (13 °C) and 110 °F |
||
Refrigerator shelves are installed in the shipping |
||
(43 °C). |
||
position. Reinstall shelves according to your |
||
If the temperature around the appliance is too low |
||
individual storage needs. |
||
|
or high, cooling ability may be adversely affected. |
|
|
Choosing the Proper
Location
Water
The refrigerator must be located where a water supply can be connected for the automatic icemaker.
NOTE
•The water pressure must be 20 - 120 psi or 138 -
827 kPa or 1.4 - 8.4 kgf/cm2. If the refrigerator is installed in an area with low water pressure (below 20 psi or 138 kPa or 1.4 kgf/cm2), you can
<![endif]>ENGLISH
14 INSTALLATION
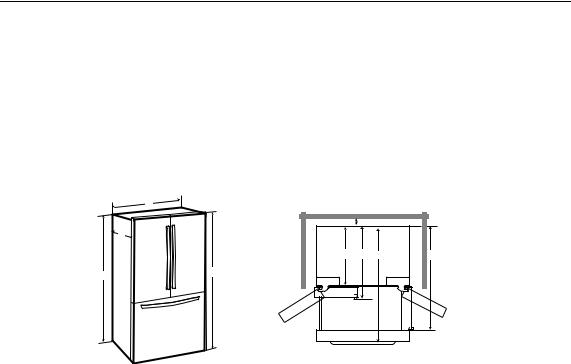
Dimensions and Clearances
•Check the dimensions of the appliance and the installation path to ensure there is sufficient room to move the refrigerator through doors or narrow openings.
•If an opening is too narrow to fit the refrigerator through, remove the refrigerator doors. See Removing/ Assembling the Doors and Drawers in this manual.
•The installation location chosen for the refrigerator should allow space behind the unit for connections and airflow and space in front to open the doors and drawers.
•Too small of a distance from adjacent items may result in lowered freezing capability and increased electricity consumption charges. Allow at least 24 inches (610 mm) in front of the refrigerator to open the doors, and at least 2 inches (50.8 mm) between the back of the refrigerator and the wall.
|
B |
|
|
|
|
E |
|
|
|
|
A |
|
|
|
|
F |
G |
H |
I |
C |
D |
|
|
|
|
|
|
|
|
|
|
|
|
|
|
|
|
|
|
|
|
|
|
|
|
|
|
|
|
|
|
|
|
|
|
|
|
LFXS28566* |
|
|
|
|
|
|
|
|
LFXS28968* |
|
|
|
|
LFXC22526* |
|
|
|
LMXS28626* |
|
LFXS26973* |
||||
- |
Dimension/Clearance |
|
LRMXC2206* |
|||||
LMXS28636* |
|
LFXS26566* |
||||||
|
|
|
LMXC22626* |
|||||
|
|
LMRS28626* |
|
|
|
|
||
|
|
|
|
|
|
|
||
|
|
LRMXS2806* |
|
|
|
|
|
|
|
|
|
|
|
|
|
|
|
A |
Depth without Handle |
33 3/4" (857 mm) |
32 3/8" (822 mm) |
28 3/4" (728 mm) |
||||
|
|
|
|
|
|
|
|
|
B |
Width |
35 3/4" (908 mm) |
35 3/4" (908 mm) |
35 3/4'' (908 mm) |
||||
|
|
|
|
|
|
|
|
|
C |
Height to Top of Case |
68 1/2" (1737 mm) |
68 1/2" (1737 mm) |
68 1/2" (1737 mm) |
||||
|
|
|
|
|
|
|
|
|
D |
Height to Top of Hinge |
69 3/4" (1772 mm) |
69 3/4" (1772 mm) |
69 3/4" (1772 mm) |
||||
|
|
|
|
|
|
|
|
|
E |
Back Clearance |
2" (50 mm) |
|
2" (50 mm) |
2" (50 mm) |
|||
|
|
|
|
|
|
|
|
|
F |
Depth without Door |
29 7/8'' (759 mm) |
28 1/2˝ (724 mm) |
24 3/4" (628 mm) |
||||
|
|
|
|
|
|
|
|
|
G |
Depth with Handle |
36 1/4" (921 mm) |
34 7/8" (886 mm) |
31 1/4" (792 mm) |
||||
|
|
|
|
|
|
|
|
|
H |
Depth (Total with Freezer |
57 5/8'' (1461 mm) |
56 1/4'' (1426 mm) |
48 1/2'' (1232 mm) |
||||
|
Drawer Open) |
|
|
|
|
|
|
|
|
|
|
|
|
|
|
|
|
I |
Depth (Total with Door Open |
48 5/8'' (1234 mm) |
47 1/4'' (1199 mm) |
43 1/2” (1103 mm) |
||||
|
90°) |
|
|
|
|
|
|
|
|
|
|
|
|
|
|
|
|
INSTALLATION 15
Removing/Assembling Handles
When moving the refrigerator through a narrow opening, removing the doors is preferred. If you must remove the handles, be very careful not to scratch the doors.
The appearance of the handles may vary from what is shown.
 CAUTION
•When assembling or disassembling the refrigerator handles, grasp the handle firmly to avoid dropping it.
•Do not swing the handle into nearby people or animals.
•Make sure that the set screws are in place and the handle footprints at the ends of the handles are aligned correctly over the mounting fasteners on the doors. The set screws should be loose enough to allow the handle footprints to slide down into place over the mounting fasteners on the door.
•Make sure that there is not a gap between the door and handle after assembling the handle.
•Tools Needed
-3/32 in. Allen wrench
-1/8 in. Allen wrench
-1/4 in. Allen wrench
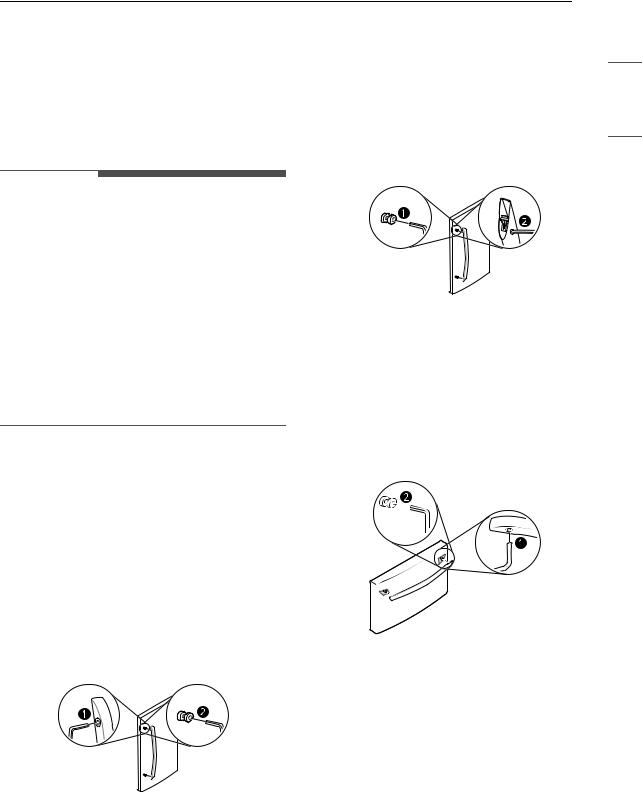
Removing Refrigerator Handles
1 Loosen the set screws a with a 3/32 in. Allen wrench and remove the handle.
2 If needed, loosen the mounting fasteners b that connect the refrigerator door and handle using a 1/4 in. Allen wrench, and remove the mounting fasteners.
Assembling Refrigerator Handles
1 If needed, reassemble the mounting fasteners a on the door with a 1/4 in. Allen wrench.
2 Place the handle on the door by fitting the handle footprints over the mounting fasteners and tightening the set screws b with a 3/32 in. Allen wrench.
Removing Freezer Drawer Handles
1 Loosen the set screws a located on the lower side of the handle with a 1/8 in. Allen wrench and remove the handle.
2 Loosen the mounting fasteners b with a 1/4 in. Allen wrench, and remove the mounting fasteners.
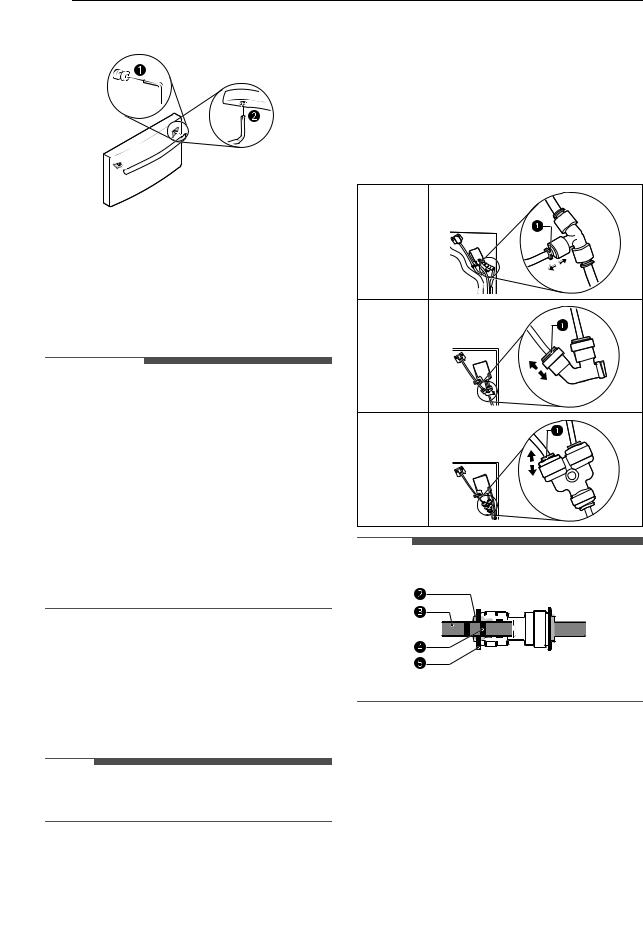
Assembling Freezer Drawer Handles
1 Assemble the mounting fasteners a at both ends of the handle with a 1/4 in. Allen wrench.
2 Place the handle on the door by fitting the handle footprints over the mounting
<![endif]>ENGLISH
16 INSTALLATION
fasteners and tightening the set screws b with a 1/8 in. Allen wrench.
Removing/Assembling Doors and Drawers
If the entrance door is too narrow for the refrigerator to pass through, remove the refrigerator doors and move the refrigerator sideways through the doorway.
 WARNING
•Use two or more people to remove and install the refrigerator doors and freezer drawer.
•Disconnect the electrical supply to the refrigerator before installing.
•Do not put hands, feet or other objects into the air vents or bottom of the refrigerator.
•Be careful when handling the hinge and hinge lever.
•Remove food and bins before detaching the doors and drawer.
•Do not hold the handle when removing or replacing the doors and drawer as the handle may come off.
Tools Needed
3/32 in. Allen wrench 1/8 in. Allen wrench 1/4 in. Allen wrench
Removing the Left Refrigerator
Door
NOTE
•The number of wire harnesses may vary depending on the model.
1 The water supply is connected to the upper right part of the rear surface of the refrigerator. Remove the clip in the joint area. Hold the water supply connection and gently push the collet a to detach the water supply line as shown.
• Connections may vary by model.
†This feature is only available on some models.
Type A† |
Type B† |
Type C† |
NOTE |
• Disassembling/Assembling the Water Lines
b Collet c Tube d Insert line e Clip
2 Remove the screw f from the hinge cover at the top of the refrigerator. Lift the hook (not visible), located at the bottom of the front side of the cover g with a flat-head screwdriver.
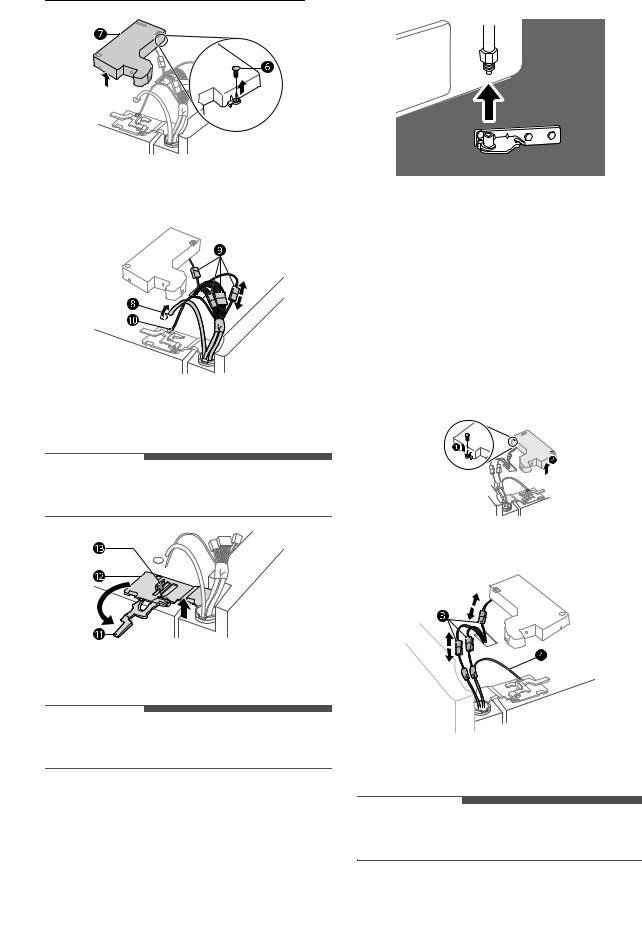
3 Remove the cover and pull out the tube h. Disconnect all wire harnesses i. Unscrew the ground wire j.
4 Rotate the hinge lever k counterclockwise. Lift the top hinge l free of the hinge lever latch m.
 CAUTION
•When lifting the hinge free of the latch, be careful that the door does not fall forward.
5 Lift the door from the middle hinge pin and remove the door.
 CAUTION
•Place the door, inside facing up, on a nonscratching surface.
INSTALLATION 17
<![if ! IE]><![endif]>ENGLISH
Removing the Right Refrigerator
Door
NOTE
•The number of wire harnesses may vary depending on the model.
•Ground wire is only present on some models.
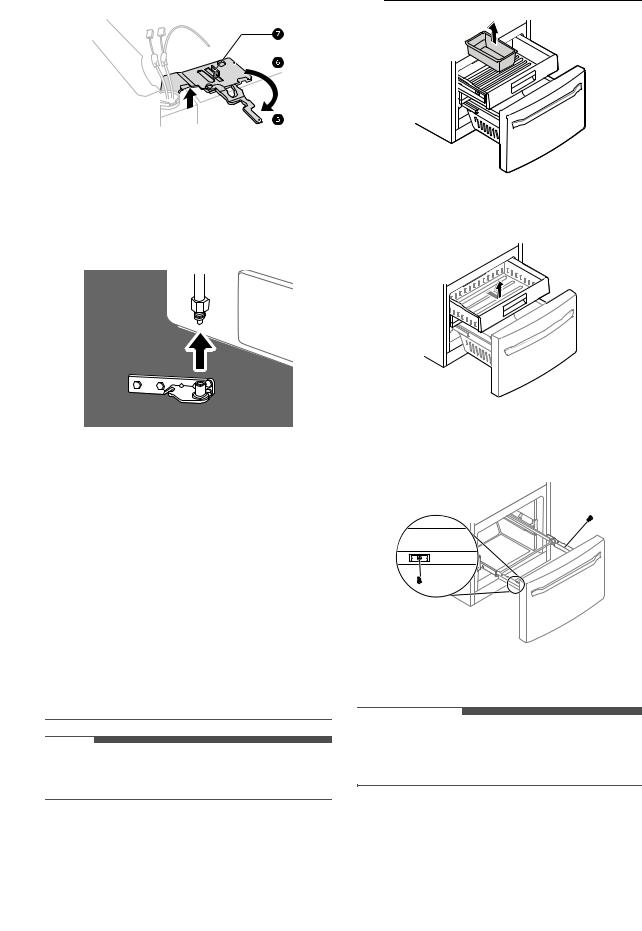
1 Remove the top hinge cover screw a. Lift the hook (not visible), located at the bottom of the front side of the cover b, with a flat-head screwdriver.
2 Detach all the wire harnesses c. Unscrew the ground wire d.
3 Rotate the hinge lever e clockwise. Lift the top hinge f free of the hinge lever latch g.
 CAUTION
•When lifting the hinge free of the latch, be careful that the door does not fall forward.
18 INSTALLATION
4 Lift the door from the middle hinge pin and remove the door.
 CAUTION
•Place the door, inside facing up, on a nonscratching surface.
Removing the Freezer Drawer
 WARNING
•Use two or more people to remove and install the refrigerator doors and freezer drawer.
•Be careful of sharp hinges on both sides of the drawer.
•When you lay the drawer down, be careful not to damage the floor.
•Do not sit or stand on the freezer drawer.
•To prevent accidents, keep children and pets away from the drawer. Do not leave the drawer
open. If the Durabase® storage bin is removed from the freezer drawer, there is sufficient space for a small child or pet to crawl inside.
NOTE
•For models with two freezer drawers, remove the second freezer drawer in the same way.
1 Pull the drawer open to full extension.
2 Gently lift and pull out the ice bin.
3 Lift the front of the drawer up, then pull it straight out.
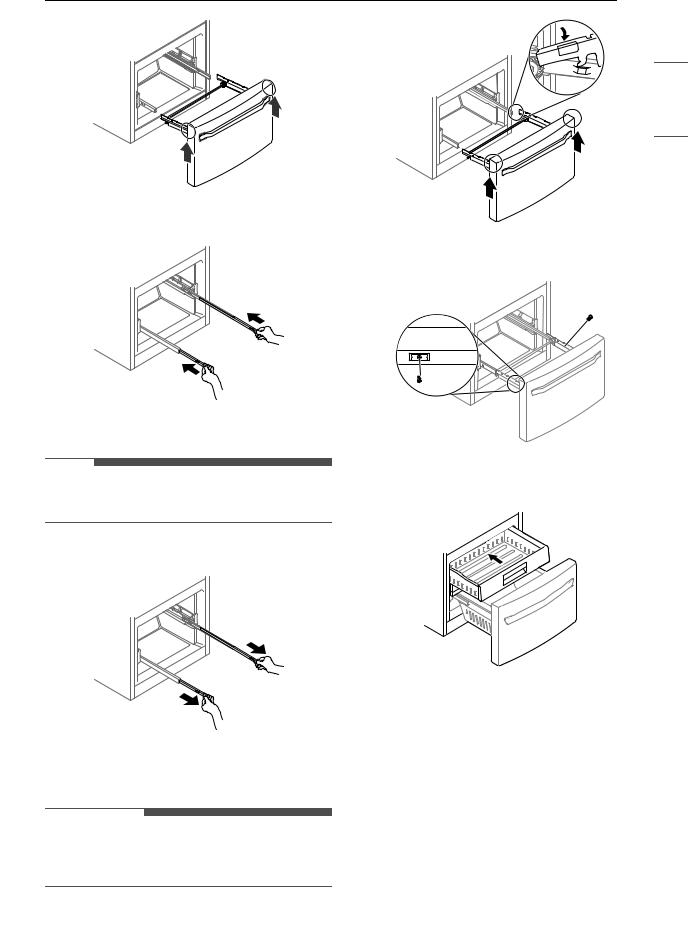
4 Remove the Durabase basket from the rails. Remove the screws from the rails at both ends.
5 Grip both sides of the drawer and pull it up to remove it from the rails.
 CAUTION
•Do not hold the handle when removing or replacing the drawer. The handle may come off, causing personal injury.
INSTALLATION 19
6 Hold both rails and push them in simultaneously.
<![endif]>ENGLISH
3 Lower the door into its final position and insert the screws in the rails on both sides.
Assembling the Freezer Drawer
NOTE
•For models with two freezer drawers, assemble the second freezer drawer in the same way.
1 Pull out both rails simultaneously, until they are fully extended.
2 Grasp the drawer on each side and hook the drawer supports into the rail tabs located on both sides.
 CAUTION
4 Insert the drawer into the frame, and push the drawer back until it clicks into place.
5 Replace the ice bin in the drawer. Insert the Durabase basket in the rail assembly.
•Do not hold the handle when removing or replacing the drawer. The handle may come off, causing personal injury.

20 INSTALLATION
|
4 Set the hinge cover d in place. Insert and |
Assembling the Right Refrigerator |
tighten the cover screw e. |
Door |
|
 CAUTION
• Install the right-side door first.
NOTE
•The number of wire harnesses may vary depending on the model.
•Ground wire is only present on some models.
1 Make sure that the plastic sleeve is inserted in the bottom of the door. Lower the door onto the middle hinge pin as shown in the figure.
2 Fit the hinge a over the hinge lever latch b and slot it into place. Rotate the lever c counterclockwise to secure the hinge.
Assembling the Left Refrigerator
Door
 CAUTION
•Install the left refrigerator door after the right door is installed.
NOTE
•The number of wire harnesses may vary depending on the model.
1 Make sure that the plastic sleeve is inserted in the bottom of the door. Install the refrigerator door onto the middle hinge.
3 Connect all the wire harnesses and the ground screw.
2 Fit the hinge a over the hinge lever latch b and slot it into place. Rotate the lever c clockwise and fasten the hinge.

INSTALLATION 21
3 Connect all the wire harnesses and the ground screw.
4 Push the water supply tube into the hole on the top case and pull it through the backplate.
5 Hold the water supply connection and gently push in the collet d to connect the water supply line as shown. Insert the tube at least 5/8 inch (15 mm) into the connector. Insert the clip on the joint to fasten the tube in place.
• Connections may vary by model.
†This feature is only available on some models.
Type B†
<![if ! IE]><![endif]>ENGLISH
Type C†
NOTE
•Disassembling/Assembling the Water Lines
e Collet f Tube g Insert line h Clip
•Gently press the collet and insert the tube until only one line shows on the tube.
6 Set the cover i in place. Insert and tighten the cover screw j.
Type A†

22 INSTALLATION
Connecting the Water Line |
• If the water pressure remains low, call a |
|
licensed, qualified plumber. |
Before Beginning
This water line installation is not covered by the refrigerator warranty. Follow these instructions carefully to minimize the risk of expensive water damage.
If necessary, call a qualified plumber to correct water hammer before installing the water supply line to the refrigerator. Water banging in the pipes (water hammer) in residential plumbing can cause damage to refrigerator parts and lead to water leakage or flooding.
•Turn the icemaker OFF if the refrigerator will be used before the water line is connected.
•Do not install the icemaker tubing in areas where the ambient temperatures fall below freezing.
 WARNING
• Connect to potable water supply only.
 CAUTION
•To prevent burns and product damage, only connect the refrigerator water line to a cold water supply.
•Wear eye protection during installation to prevent injury.
•All installations must be in accordance with local plumbing code requirements.
Supplies Needed
•Copper or PEX Tubing, ¼ in. outer diameter, to connect the refrigerator to the water supply. Be sure both ends of the tubing are cut square. To determine how much tubing you need, measure the distance from the water valve on the back of the refrigerator to the water supply pipe. Then, add 8 feet (2.4 m). Be sure there is sufficient extra tubing (about 8 feet [2.4 m] coiled into 3 turns of about 10 in. [25 cm] diameter) to allow the refrigerator to move out from the wall after installation.
•Power drill.
•½ in. or adjustable wrench.
•Flat-blade and Phillips screwdrivers.
•Two ¼ in. outer diameter compression nuts and 2 ferrules (sleeves) to connect the copper tubing to the shutoff valve and the refrigerator water valve.
Water Pressure
You will need a cold water supply.
Water Pressure
•Models with water filter:
-20 - 120 psi (138 - 827 kPa)
•Where reverse osmosis water filtration system is connected to a cold water supply:
-40 - 60 psi minimum to reverse osmosis system (2.8 kgf/cm2 - 4.2 kgf/cm2, or less than 2 - 3 seconds to fill a cup of 7 oz capacity)
If the water pressure from the reverse osmosis
system is less than 20 psi or 138 kPa or 1.4 kgf/cm2 (takes more than 4 seconds to fill a cup of 7 oz or 198 cc capacity):
•Check to see if the sediment filter in the reverse osmosis system is blocked. Replace the filter if necessary.
•Allow the storage tank on the reverse osmosis system to refill after heavy usage.
•If your existing copper water line has a flared fitting at the end, purchase an adapter (available at plumbing supply stores) to connect the water line to the refrigerator OR cut off the flared fitting with a tube cutter and use a compression fitting.
•Shutoff valve to connect to the cold water line. The shutoff valve should have a water inlet with a minimum inside diameter of 5/32 in. at the point of connection to the COLD WATER LINE. Saddle-type shutoff valves are included in many water supply kits. Before purchasing, make sure
INSTALLATION 23
a saddle-type valve complies with your local |
NOTE |
plumbing codes. |
NOTE
•A self-piercing saddle type water valve should not be used.
•The hookup line cannot be white, plastic tubing. Licensed plumbers must use only copper tubing (NDA tubing #49595 or #49599) or Cross Link Polyethylene (PEX) tubing.
Water Line Installation Instructions
Install the shutoff valve on the nearest frequently used drinking water line.
 WARNING
•When using any electrical device (such as a power drill) during installation, be sure the device is battery-powered, double-insulated or grounded in a manner that will prevent the hazard of electric shock.
1 Shut off the main water supply.
•Turn on the nearest faucet to relieve the pressure on the line.
2 Choose the valve location.
•Choose a location for the valve that is easily accessible. It is best to connect into the side of a vertical water pipe. When it is necessary to connect into a horizontal water pipe, make the connection to the top or side, rather than at the bottom, to avoid drawing off any sediment from the water pipe.
3 Drill the hole for the valve.
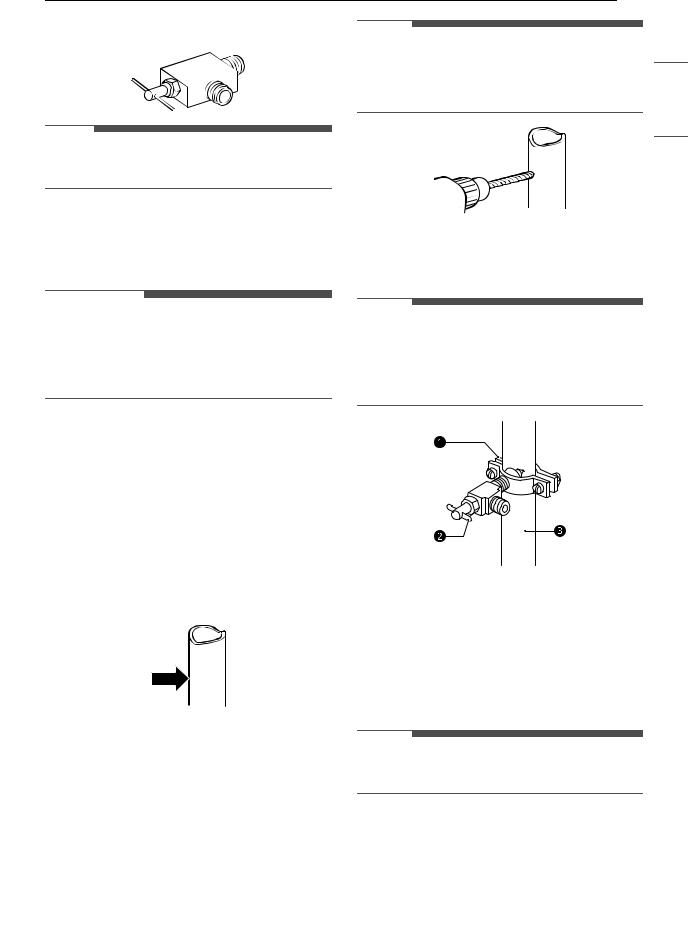
•Drill a ¼ in. hole in the water pipe using a sharp bit. Remove any burrs resulting from drilling the hole in the pipe. Be careful not to allow water to drain into the drill. Failure to drill a ¼ in. hole may result in reduced ice production or smaller cubes.
4 Fasten the shutoff valve.
•Fasten the shutoff valve to the cold water pipe with the pipe clamp.
NOTE
•Commonwealth of Massachusetts Plumbing Codes 248CMR shall be adhered to. Saddle valves are illegal and use is not permitted in Massachusetts. Consult with your licensed plumber.
aPipe Clamp
bSaddle-Type Shutoff Valve
cVertical Cold Water Pipe
5 Tighten the pipe clamp.
•Tighten the clamp screws until the sealing washer begins to swell.
NOTE
•Do not over tighten the clamp or you may crush the tubing.
<![endif]>ENGLISH
 Loading...