


 Loading...
ENGLISH
USER GUIDE
LG-B470
MFL69409201 (1.0) |
www.lg.com |
LIMITED WARRANTY STATEMENT
ARBITRATION NOTICE: THIS LIMITED WARRANTY CONTAINS AN ARBITRATION PROVISION THAT REQUIRES YOU AND LG TO RESOLVE DISPUTES BY BINDING ARBITRATION INSTEAD OF IN COURT, UNLESS YOU CHOOSE TO OPT OUT. IN ARBITRATION, CLASS ACTIONS AND JURY TRIALS ARE NOT PERMITTED. PLEASE SEE THE SECTION TITLED “PROCEDURE FOR RESOLVING DISPUTES” BELOW.
Warranty Laws
The following laws govern warranties that arise in retail sales of consumer goods:
ŢThe California Song-Beverly Consumer Warranty Act [CC §§1790 et seq],
ŢThe California Uniform Commercial Code, Division Two [Com C §§2101 et seq], and
ŢThe federal Magnuson-Moss Warranty Federal Trade Commission Improvement Act [15 USC §§2301 et seq; 16 CFR Parts 701– 703]. A typical Magnuson-Moss Act warranty is a written promise that the product is free of defects or a written promise to refund, repair, or replace defective goods. [See 15 USC §2301(6).] Remedies include damages for failing to honor a written warranty or service contract or for violating disclosure provisions. [See 15 USC §2310(d).] Except for some labeling and disclosure requirements, the federal Act does not preempt state law. [See 15 USC §2311.]
1.WHAT THIS WARRANTY COVERS:
LG offers you a limited warranty that the enclosed subscriber unit and its enclosed accessories will be free from defects in material and workmanship, according to the following terms and conditions:
(1)The limited warranty for the product extends for TWELVE (12) MONTHS beginning on the date of purchase of the product with valid proof of purchase, or absent valid proof of purchase, FIFTEEN (15) MONTHS from date of manufacture as determined by the unit's manufacture date code.
(2)The limited warranty extends only to the original purchaser of the product and is not assignable or transferable to any subsequent purchaser/end user.
(3)This warranty is good only to the original purchaser of the product during the warranty period as long as it is in the U.S., including Alaska, Hawaii, U.S. Territories and Canada.
(4)The external housing and cosmetic parts shall be free of defects at the time of shipment and, therefore, shall not be covered under these limited warranty terms.
(5)Upon request from LG, the consumer must provide information to reasonably prove the date of purchase.
(6)The customer shall bear the cost of shipping the product to the Customer Service Department of LG. LG shall bear the cost of shipping the product back to the consumer after the completion of service under this limited warranty.
2. WHAT THIS WARRANTY DOES NOT COVER:
(1)Defects or damages resulting from use of the product in other than its normal and customary manner.
(2)Defects or damages from abnormal use, abnormal conditions, improper storage, exposure to moisture or dampness, unauthorized modifications, unauthorized connections, unauthorized repair, misuse, neglect, abuse, accident, alteration, improper installation, or other acts which are not the fault of LG, including damage caused by shipping, blown fuses, spills of food or liquid.
(3)Breakage or damage to antennas unless caused directly by defects in material or workmanship.
(4)That the Customer Service Department at LG was not notified by consumer of the alleged defect or malfunction of the product during the applicable limited warranty period.
(5)Products which have had the serial number removed or made illegible.
(6)This limited warranty is in lieu of all other warranties, express or implied either in fact or by operations of law, statutory or otherwise, including, but not limited to any implied warranty of marketability or fitness for a particular use.
2
(7)Damage resulting from use of non LG approved accessories.
(8)All plastic surfaces and all other externally exposed parts that are scratched or damaged due to normal customer use.
(9)Products operated outside published maximum ratings.
(10)Products used or obtained in a rental program.
(11)Consumables (such as fuses).
3. WHAT LG WILL DO:
LG will, at its sole option, either repair, replace or refund the purchase price of any unit that is covered under this limited warranty. LG may choose at its option to use functionally equivalent re-conditioned, refurbished or new units or parts or any units. In addition, LG will not re-install or back-up any data, applications or software that you have added to your phone. It is therefore recommended that you back-up any such data or information prior to sending the unit to LG to avoid the permanent loss of such information.
4. STATE LAW RIGHTS:
No other express warranty is applicable to this product. THE DURATION OF ANY IMPLIED WARRANTIES, INCLUDING THE IMPLIED WARRANTY OF MARKETABILITY OR MERCHANTABILITY OR FITNESS FOR A PARTICULAR PURPOSE, IS LIMITED TO THE DURATION OF THE EXPRESS WARRANTY HEREIN. LG SHALL NOT BE LIABLE FOR THE LOSS OF
THE USE OF THE PRODUCT, INCONVENIENCE, LOSS OR ANY OTHER DAMAGES, DIRECT OR CONSEQUENTIAL, ARISING OUT OF THE USE OF, OR INABILITY TO USE, THIS PRODUCT OR FOR ANY BREACH OF ANY EXPRESS OR IMPLIED WARRANTY, INCLUDING THE IMPLIED WARRANTY OF MARKETABILITY OR MERCHANTABILITY OR FITNESS FOR A PARTICULAR PURPOSE APPLICABLE TO THIS PRODUCT. Some states do not allow the exclusive limitation of incidental or consequential damages or limitations on how long an implied warranty lasts; so these limitations or exclusions may not apply to you. This
warranty gives you specific legal rights and you may also have other rights which vary from state to state.
3
5. HOW TO GET WARRANTY SERVICE:
To obtain warranty service, please call or fax to the following telephone numbers from anywhere in the continental United States:
Tel. 1-800-793-8896 or Fax. 1-800-448-4026
Or visit http://www.lg.com/us/support. Correspondence may also be mailed to:
LG Electronics ServiceMobile Handsets, P.O. Box 240007, Huntsville, AL 35824
DO NOT RETURN YOUR PRODUCT TO THE ABOVE ADDRESS. Please call or write for the location of the LG authorized service center nearest you and for the procedures for obtaining warranty claims.
PROCEDURE FOR RESOLVING DISPUTES:
ALL DISPUTES BETWEEN YOU AND LG ARISING OUT OF OR RELATING IN ANY WAY TO THIS LIMITED WARRANTY OR THE PRODUCT SHALL BE RESOLVED EXCLUSIVELY THROUGH BINDING ARBITRATION, AND NOT IN A COURT OF GENERAL JURISDICTION. BINDING ARBITRATION MEANS THAT YOU AND LG ARE EACH WAIVING THE RIGHT TO A JURY TRIAL AND TO BRING OR PARTICIPATE IN A CLASS ACTION. Definitions. For the purposes of this section, references to “LG” mean LG
Electronics MobileComm U.S.A., Inc., its parents, subsidiaries and affiliates, and each of their officers, directors, employees, agents, beneficiaries, predecessors in interest, successors, assigns and suppliers; references to “dispute” or “claim” shall include any dispute, claim or controversy of any kind whatsoever (whether based in contract, tort, statute, regulation, ordinance, fraud, misrepresentation or any other legal or equitable theory) arising out of or relating in any way to the sale, condition or performance of the product or this Limited Warranty.
Agreement to Binding Arbitration and Class Action Waiver. You and LG agree to resolve any claims between us only by binding arbitration on an individual basis, unless you opt out as provided below. Any dispute
between you and LG shall not be combined or consolidated with a dispute involving any other person’s or entity’s product or claim. More specifically, without limitation of the foregoing, any dispute between you and LG shall not under any circumstances proceed as part of a class or representative
4
action. Instead of arbitration, either party may bring an individual action in small claims court, but that small claims court action may not be brought on a class or representative basis.
Arbitration Rules and Procedures. To begin arbitration of a claim, either you or LG must make a written demand for arbitration. The arbitration will be administered by the American Arbitration Association (AAA) and will be conducted before a single arbitrator under the AAA’s Consumer Arbitration Rules that are in effect at the time the arbitration is initiated (referred to as the “AAA Rules”) and under the procedures set forth in this section. The AAA Rules are available online at www.adr.org/consumer. Send a copy of your written demand for arbitration, as well as a copy of this provision, to the AAA in the manner described in the AAA Rules. You must also send a copy of your written demand to LG at LG Electronics, USA, Inc.Attn: Legal DepartmentArbitration1000 Sylvan AvenueEnglewood Cliffs, NJ 07632. If there is a conflict between the AAA Rules and the rules set forth in this section, the rules set forth in this section will govern. This arbitration provision is governed by the Federal Arbitration Act. Judgment may be entered on
the arbitrator’s award in any court of competent jurisdiction. All issues are for the arbitrator to decide, except that issues relating to the scope and enforceability of the arbitration provision and to the arbitrability of the dispute are for the court to decide. The arbitrator is bound by the terms of this provision.
Governing Law: The law of the state of your residence shall govern this Limited Warranty and any disputes between us except to the extent that such law is preempted by or inconsistent with applicable federal law. Fees/Costs. You do not need to pay any fee to begin an arbitration. Upon receipt of your written demand for arbitration, LG will promptly pay all arbitration filing fees to the AAA unless you seek more than $25,000 in damages, in which case the payment of these fees will be governed by the AAA Rules. Except as otherwise provided for herein, LG will pay all AAA filing, administration and arbitrator fees for any arbitration initiated in accordance with the AAA Rules and this arbitration provision. If you prevail in the arbitration, LG will pay your reasonable attorneys’ fees and
5
expenses to the extent required by applicable law. If the arbitrator finds either the substance of your claim or the relief sought in the demand is frivolous or brought for an improper purpose (as measured by the standards set forth in Federal Rule of Civil Procedure 11(b)), then the
payment of all arbitration fees will be governed by the AAA Rules. In such a situation, you agree to reimburse LG for all monies previously disbursed by it that are otherwise your obligation to pay under the AAA Rules.
Except as otherwise provided for, LG waives any rights it may have to seek attorneys’ fees and expenses from you if LG prevails in the arbitration. Hearings and Location. If your claim is for $25,000 or less, you may choose to have the arbitration conducted solely on the basis of (1) documents submitted to the arbitrator, (2) through a telephonic hearing, or (3) by an in-person hearing as established by the AAA Rules. If your claim exceeds $25,000, the right to a hearing will be determined by the AAA Rules. Any in-person arbitration hearings will be held at a location within the federal judicial district in which you reside unless we both agree to another location or we agree to a telephonic arbitration.
Opt Out. You may opt out of this dispute resolution procedure. If you opt out, neither you nor LG can require the other to participate in an arbitration proceeding. To opt out, you must send notice to LG no later than 30 calendar days from the date of the first consumer purchaser’s purchase of the product by either: (i) sending an e-mail to optout@lge.
com, with the subject line: “Arbitration Opt Out” or (ii) calling 1-800-980- 2973.You must include in the opt out e-mail or provide by telephone:
(a) your name and address; (b) the date on which the product was purchased; (c) the product model name or model number; and (d) the IMEI or MEID or Serial Number, as applicable (the IMEI or MEID or Serial Number can be found (i) on the product box; (ii) on a label on the back of the product beneath the battery, if the batter is removable;or (iii) from the settings menu via the following path: Settings  Phone Information). You may only opt out of the dispute resolution procedure in the manner described above (that is, by e-mail or telephone); no other form of notice will be effective to opt out of this dispute resolution procedure. Opting out of this dispute resolution procedure will not affect the coverage of
6
the Limited Warranty in any way, and you will continue to enjoy the full benefits of the Limited Warranty. If you keep this product and do not opt out, then you accept all terms and conditions of the arbitration provision described above.
7
Table of contents
Basics .......................................... |
10 |
Accessories .............................................. |
11 |
Phone layout ............................................ |
12 |
Phone Components................................................... |
12 |
Rear view......................................................................... |
14 |
Installing the SIM card and battery......... |
15 |
Charging your phone................................ |
17 |
On-Screen Icons....................................... |
17 |
General Functions....................... |
19 |
Before you begin...................................... |
20 |
Making a Call................................................................. |
20 |
Answering a Call.......................................................... |
21 |
Adjusting the Volume............................................... |
21 |
Entering Text.................................................................. |
22 |
In-Call Menu............................................. |
24 |
During a Call................................................................... |
24 |
Recent Calls.................................................................... |
25 |
Contacts................................................... |
26 |
Contact List.................................................................... |
26 |
ICE - Emergency Contacts.................................... |
26 |
AT&T Go Phone contacts....................................... |
26 |
AT&T Service Contacts............................................ |
26 |
New Contact................................................................. |
27 |
Groups............................................................................... |
27 |
Speed Dial........................................................................ |
27 |
SIM Management....................................................... |
27 |
Own Number................................................................. |
28 |
My Business Card....................................................... |
28 |
Messages.................................................. |
28 |
Create Message........................................................... |
28 |
Inbox................................................................................... |
31 |
Drafts................................................................................. |
32 |
Outbox............................................................................... |
32 |
Message Settings....................................................... |
33 |
Email......................................................... |
35 |
Sending an email......................................................... |
35 |
Retrieving your email................................................ |
35 |
Message folders.......................................................... |
36 |
Changing your email settings.............................. |
36 |
Alarm Clock.............................................. |
37 |
Edit Alarm....................................................................... |
37 |
Browser.................................................... |
38 |
Launch the Browser.................................................. |
38 |
Using the Browser...................................................... |
38 |
Menus for the Browser........................................... |
39 |
Using the Navigation Keys.................................... |
39 |
myAT&T .................................................... |
40 |
Notepad ................................................... |
40 |
Calendar ................................................... |
41 |
My Folder ................................................. |
42 |
Audio.................................................................................. |
42 |
Music Player................................................................... |
42 |
Pictures............................................................................. |
43 |
Video................................................................................... |
43 |
Other Files....................................................................... |
44 |
File Manager.................................................................. |
44 |
Games & Apps.............................................................. |
44 |
Tools ......................................................... |
45 |
Camera.............................................................................. |
45 |
Voice Command........................................................... |
47 |
Alarm Clock.................................................................... |
49 |
Notepad............................................................................ |
49 |
Calculator........................................................................ |
50 |
Tasks................................................................................... |
50 |
8
Stopwatch....................................................................... |
50 |
Tip Calculator................................................................ |
51 |
Unit Converter.............................................................. |
51 |
Voice Recorder.............................................................. |
52 |
Settings....................................... |
53 |
Audio & Ringtones ................................... |
54 |
Ringtone........................................................................... |
54 |
Message Tone ............................................................... |
54 |
Alert Tone........................................................................ |
54 |
Keypad Tone................................................................... |
55 |
Multimedia...................................................................... |
55 |
Call....................................................................................... |
55 |
Phone Settings......................................... |
55 |
Date & Time.................................................................... |
55 |
Languages....................................................................... |
56 |
Set Hotkeys.................................................................... |
56 |
Flight Mode.................................................................... |
56 |
Security............................................................................. |
56 |
Reset Settings.............................................................. |
57 |
Display...................................................... |
58 |
Wallpapers...................................................................... |
58 |
Fonts................................................................................... |
58 |
Clocks & Calendar...................................................... |
58 |
Brightness....................................................................... |
58 |
Backlight Timer............................................................ |
58 |
Menu Styles................................................................... |
58 |
Call............................................................ |
59 |
Call Forwarding............................................................ |
59 |
Send My Number........................................................ |
59 |
Auto Redial..................................................................... |
59 |
Answer Mode................................................................ |
59 |
Senior Mode................................................................... |
60 |
Minute Minder ............................................................. |
60 |
Call Waiting.................................................................... |
60 |
Call Reject........................................................................ |
60 |
Send DTMF Tones ...................................................... |
60 |
Accessibility.................................................................... |
60 |
Accessibility ............................................. |
61 |
Menu Readout.............................................................. |
61 |
Keypad Tone................................................................... |
61 |
Large Text........................................................................ |
61 |
Invert Color..................................................................... |
61 |
Mono Sound................................................................... |
61 |
Senior Mode................................................................... |
61 |
TTY...................................................................................... |
61 |
Hearing Aid..................................................................... |
62 |
Voice Command........................................................... |
62 |
Connection............................................... |
62 |
Bluetooth......................................................................... |
62 |
USB Connetion............................................................. |
64 |
Internet ProŻles........................................................... |
64 |
Access Points................................................................ |
64 |
Network Selection..................................................... |
64 |
Memory .................................................... |
64 |
Used Space..................................................................... |
64 |
Applications ............................................. |
65 |
Messages......................................................................... |
65 |
Browser............................................................................. |
65 |
Software Update...................................... |
68 |
Phone Information ................................... |
68 |
Appendix ..................................... |
69 |
Q&A .......................................................... |
70 |
More information..................................... |
71 |
Open Source Software Notice Information 71 |
|
Trademarks..................................................................... |
71 |
DivX HD ............................................................................ |
72 |
Dolby Digital Plus........................................................ |
72 |
For Your Safety........................... |
73 |
9
Basics
Accessories
There are a variety of accessories available for your mobile phone, some of which may be sold separately. You can select these options according to your personal communication requirements. Visit your local AT&T store or www.att.com/wirelessaccessories for specific offerings.
ŢTravel Adaptor
ŢUSB Cable
ŢBattery
 NOTE
NOTE
ŢAlways use genuine LG accessories. The supplied items are designed only for this device and may not be compatible with other devices.
ŢThe items supplied with the device and any available accessories may vary depending on the region or service provider.
Basics |
11 |
Phone layout
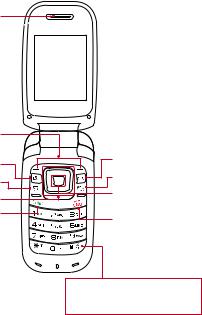
Phone Components
Earpiece
Main LCD 
Left Soft Key/ |
|
|
Right Soft Key |
Clear/Back Key |
|
Camera Key |
||
TTS Mode Key |
||
Message Key |
||
OK Key |
||
Navigation Keys |
||
|
||
Send Key |
End/Power Key |
|
|
Press and hold to activate/ deactivate Vibrating Mode.
Basics |
12 |

Volume Keys 

Charger/USB Port 

Earpiece |
Lets you hear the caller during a call. |
|
|
|
|
Main LCD |
Displays phone status icons, menu items, web items, |
|
web information, pictures and more, in full color. |
||
|
||
|
|
|
Left Soft Key/ |
Each of these keys perform the functions indicated |
|
Right Soft Key |
by the text on the display immediately above them. |
|
|
|
|
Camera Key |
Lets you activate the Camera and take pictures. |
|
|
|
|
Message Key |
Allows you to create a new message immediately. |
|
|
|
|
|
Home screen functions: |
Ţ Games & Apps
Ţ Contacts
Navigation Keys |
Alarm Clock |
Ţ |
|
Ţ |
Music Player |
- In a menu: Navigates between menus. |
|
Basics |
13 |

Send Key |
Press this key in standby mode to quickly access the |
|
most recent missed, dialed, and received calls. Also |
||
|
dials a call when you enter a number. |
|
|
|
|
Clear/Back Key |
Allows you to return to the previous screen. Press |
|
and hold to activate the Voice Command function. |
||
|
||
|
|
|
TTS Mode Key |
Lets you turn the Text-To-Speech mode on/off. |
|
|
|
|
OK Key |
Select options and menus. |
|
|
|
|
End/Power Key |
Allows you to power the phone on or off, end calls, |
|
or return to standby mode. |
||
|
||
|
|
|
Volume Keys |
Allows you to control the Master Volume while in |
|
standby mode and the earpiece volume during a call. |
||
|
||
|
|
|
Charger/USB |
Allows you to connect a charger or other supported |
|
Port |
accessories. |
|
|
|
Rear view
Back Cover
Battery
SIM Card Slot
Basics |
14 |

Installing the SIM card and battery
1Remove the back cover
Place your thumb at the top part of the back cover and slide it downwards to remove it.
2Remove the battery
Hold the top edge of the phone and use the fingernail cutout near the bottom of the battery to lift the battery from the phone.
 WARNING
ŢDo not remove the battery when the phone is turned on; this can damage the phone.
3Install the SIM card
Slide the SIM card into the SIM card slot (as shown below). Make sure that the gold contact area on the card is facing downwards. To remove the SIM card, slide it gently in the opposite direction.
Basics |
15 |

4Install the battery
Insert the top of the battery first into the top edge of the battery compartment. Ensure that the battery contacts align with the terminals on the phone. Press the bottom of the battery down until it snaps into place.
5Install the back cover
Align the back cover on the battery compartment and slide it upwards until it locks into place.
Basics |
16 |

Charging your phone
Locate the Charger/USB Port on the left side of your phone. Insert the charger connector to the phone (the ‘B’ side of the connector has to be facing up when connecting to the phone) and then plug the other end into the wall socket. Your phone will need to be charged until the Full Battery message appears on the screen.
 Important!
Ţ You must insert the battery before charging.
 Warning
ŢUse of unauthorized accessories could damage your phone and void your warranty.
On-Screen Icons
The table below describes various display indicators or icons that appear on the phone’s display screen.
Icon Description
Network signal strength (number of bars will vary)
Low Battery
New email
Icon Description
No network signal
New text message
An alarm is set
Basics |
17 |

Ring profile in use
EDGE network available
The browser is active
Vibrating Mode On
Call in Progress
Battery Full
Flight Mode On
Camcorder in use
Basics
Silent All profile in use
Bluetooth is active
3G network available
Speakerphone
Voicemail
Battery Charging
Camera in use
Duration mode
18

General Functions |
Before you begin
Remember that you can select the menu icons from the Menu screen using the Navigation Keys if you set the option to Icon. If you set the Menu Styles option to List, you can use the number keys to select the menu icons.
Making a Call
1Make sure your phone is powered on.
2Enter a phone number including the area code. To edit a number on the
display screen, simply press the Clear/Back Key  to erase one digit at a time.
Ţ Press and hold the Clear/Back Key  to erase the entire number.
3Press the Send Key  to call the number.
4To end the call, press the End/Power Key  .
.
Making a Call with the Send Key
1Press the Send Key  to display the most recent missed, dialed and received calls will be displayed.
2Highlight the desired number by using the Navigation Keys.
3Press the Send Key  .
.
Making International Calls
1Press and hold the  key and the international access character ‘+’ will appear.
2Enter the country code, area code, and the phone number.
3Press the Send Key  to call the number.
Ending a Call
To end a call, press the End/Power Key  .
.
General Functions |
20 |
Making a Call from the Contacts
You can store frequently called names and phone numbers in the SIM card as well as in your Contacts List.
You can dial a number by simply highlighting a name in the Contacts List and pressing the Send Key  .
.
1Press the Down Navigation Key  to access the Contact List.
2Highlight the Contact and press the Send Key  .
.
Answering a Call
When you receive a call, the phone displays a notification on the screen and rings and/or vibrates. If the caller can be identified, the caller’s phone number (or name, if stored in your Contacts) is displayed.
Press the Send Key  or the Left Soft Key
  Accept to answer an incoming call.
If the Answer Mode has been set as Any Key (  Menu > Settings
 >
>  Call >
  Answer Mode), any key press will answer a call, except for the End/Power Key
  , the Right Soft Key
  or the Volume Keys.
3 End the call by pressing the End/Power Key  .
.
 NOTE
NOTE
Ţ You can answer a call while using other functions or features.
Adjusting the Volume
Use the Volume Keys during a call to adjust the earpiece volume. While in standby mode, you can adjust the Master Volume using the
Volume Keys.
Vibrating Mode (Quick)
Vibrating Mode can be activated by pressing and holding down the  key.
key.
General Functions |
21 |
Signal Strength
If you are inside a building, being near a window may give you better reception. You can see the strength of your signal by the signal indicator on your phone’s display screen.
Entering Text
You can enter alphanumeric characters by using the phone’s keypad. For example, storing names in the Contacts, writing a message, or scheduling events in the calendar all require text to be entered.
Changing the Text Input Mode
Change the text input mode by pressing  when in a text entry field. You can check the current text input mode in the upper right corner of the screen.
The following text input modes are available on the phone.
123 Mode (Numbers Mode)
Type numbers using one keystroke per number. To change to 123 mode in a text entry field, press the  key until 123 mode is displayed in the upper right corner.
Using the 123 (Numbers) Mode
The 123 Mode enables you to enter numbers in a text message (a telephone number, for example) more quickly. Press the keys
corresponding to the required digits before manually switching back to the appropriate text entry mode.
Symbol Mode
The Symbol Mode enables you to enter various symbols or special characters. To enter a symbol, press the  key. Use the Navigation Keys to highlight the desired symbol and press the OK Key
  .
.
ABC Mode
This mode allows you to enter letters by pressing the key labeled with the required letter.
General Functions |
22 |
Using the ABC Mode
Use the alphanumeric keypad to enter your text.
1Press the key labeled with the required letter.
2To insert a space, press the  key once. To delete letters, press the
Clear/Back Key  . Press and hold down the Clear/Back Key
  to erase all of the entered text.
 NOTE
NOTE
ŢRefer to the table below for more information on the characters available using the keys.
Key |
Characters in the Order Displayed |
||
|
|
||
Upper Case |
Lower Case |
||
|
|||
|
|
|
|
1 |
. , ’ @ ? ! - : / 1 |
. , ’ @ ? ! - : / 1 |
|
|
|
|
|
2 |
A B C 2 |
a b c 2 |
|
|
|
|
|
3 |
D E F 3 |
d e f 3 |
|
|
|
|
|
4 |
G H I 4 |
g h i 4 |
|
|
|
|
|
5 |
J K L 5 |
j k l 5 |
|
|
|
|
|
6 |
M N O 6 |
m n o 6 |
|
|
|
|
|
7 |
P Q R S 7 |
p q r s 7 |
|
|
|
|
|
8 |
T U V 8 |
t u v 8 |
|
|
|
|
|
9 |
W X Y Z 9 |
w x y z 9 |
|
|
|
|
|
0 |
Space Key, |
Space Key, |
|
0 (Long press) |
0 (Long press) |
||
|
|||
|
|
|
|
General Functions |
23 |
In-Call Menu
During a Call
Your phone provides a number of control functions that you can use during a call. To access these functions during a call, press the Left Soft Key  Options.
Making a Second Call
You can select a number you wish to dial from the Contacts to make a second call.
1Press the Left Soft Key  Options, then select Contacts.
2Highlight the contact, then press the Send Key  to make a second call.
Swapping Between Two Calls
Once the second call has been dialed (or answered), you can switch between the calls by using one of the following three methods:
ŢPress the Send Key  .
.
ŢPress the Left Soft Key  Options and then select Swap Calls.
ŢPress the up or down Navigation Keys.
Answering an Incoming Call
To answer an incoming call when the phone is ringing, simply press the Send Key  . The phone is also able to warn you of an incoming call while you are already on a call. A tone sounds in the earpiece and the display will show that a second call is waiting. This feature, known as Call Waiting, is only available if your network supports it.
If Call Waiting is turned on, you can put the first call on hold and answer the second call by pressing the Send Key  .
.
Rejecting an Incoming Call
You can reject an incoming call without answering by simply pressing the
End/Power Key  or the Right Soft Key
  .
.
General Functions |
24 |

Muting the Microphone
You can mute the microphone during a call by pressing the Right Soft Key  Mute. The phone can be unmuted by pressing the Right Soft Key
  Unmute. When the phone is muted, the caller cannot hear you, but you can still hear the caller.
Using the Speakerphone
You can use the integrated Speakerphone during a call by pressing the OK Key  Spk. On. The loudspeaker is automatically deactivated when you end the call.
 WARNING
ŢDue to increased volume levels, do not place the phone near your ear while the speakerphone is enabled.
Recent Calls
This menu allows you to see the list of recent calls. To access Recent Calls, from the standby screen, press the Left Soft Key  Menu and select
Recent Calls  .
.
You can access the following menus:
All Calls, Missed Calls, Dialed Calls, and Received Calls.
General Functions |
25 |
Contacts
Contact List
This menu allows you to save and manage contact address information. The Contact List allows you to add a new address or search saved contact addresses by name.
To access Contact List, from the standby screen, press the Left Soft Key  Menu, Contacts
  and
and  Contact List.
ICE - Emergency Contacts
This menu allows you to make a contacts list to call or text, in case of emergency.
To access ICE-Emergency Contacts, from the standby screen, press the Left Soft Key  Menu, Contacts
  and
and  ICE Emergency Contacts.
To add an ICE contact, press the Right Soft Key  Add and choose a contact from the Contact List. You can also press the Left Soft Key
  Options,
  New Contact, enter the contact’s details, then press the
Right Soft Key  Save.
Save.
AT&T Go Phone contacts
This menu shows the list of default service contacts for AT&T Prepaid devices.
To access AT&T Go phone contacts, from the standby screen, press the Left Soft Key  Menu, Contacts
  and
and  AT&T Go phone contacts.
AT&T Service Contacts
This menu shows the list of default service contacts for AT&T Postpaid devices.
To access AT&T Service Contacts, from the standby screen, press the Left Soft Key  Menu, Contacts
  and
and  AT&T Service Contacts.
General Functions |
26 |
New Contact
This menu allows you to add a new contact to the Contact List. You can enter contact address information including name, phone numbers, email addresses, group information items, memos, ring tones, and a contact Picture ID.
To access New Contact, from the standby screen, press the Left Soft Key  Menu, Contacts
  and
and  New Contact.
Groups
This menu allows you to manage group information. You can also configure a ring tone for a group so that the group ring tone sounds when a call from a specific contact address within that group is received and there is no ring tone configured for the specific contact address.
To access Groups, from the standby screen, press the Left Soft Key  Menu, Contacts
  and
and  Groups.
Speed Dial
This menu allows you to assign a frequently-called contact to the Speed Dial List. You can select a number from 2 to 9 as a speed dial.
To access Speed Dial List, from the standby screen, press the Left Soft Key  Menu, Contacts
  and
and  Speed Dial.
SIM Management
This menu allows you to copy information from your SIM card to your phone and vice versa. If a name is duplicated during the copying operation, the information is also duplicated. You can also delete information from the SIM card.
To access SIM Management, from the standby screen, press the Left Soft Key  Menu, Contacts
  and
and  SIM Management.
General Functions |
27 |
Own Number
This displays your personal phone number.
To access Own Number, from the standby screen, press the Left Soft Key  Menu, Contacts
  and
and  Own Number.
My Business Card
This displays your business card stored in the phone. You can also edit it. To access My Business Card, from the standby screen, press the Left Soft Key  Menu, Contacts
  and
and  My Business Card.
Messages
This menu includes functions related to SMS (Short Message Service), MMS (Multimedia Message Service), Voicemail as well as the network’s service messages.
Create Message
1From the standby screen, press the Left Soft Key  Menu.
Menu.
2Select Messages  .
.
3Press  Create Message.
OR
You can simply press the Message Key  from the standby screen.
4Enter the recipient(s).
5Press the Right Soft Key  Compose.
6After completing a message, press the OK Key  Send to send the message.
 NOTE
NOTE
ŢIf you need more information about adding recipients, please refer to the Adding recipients section in the next page.
ŢIf you insert a picture, audio, or video file while writing a multimedia message, the file loading time will take about 5 seconds. You will not be able to activate any key during the file loading time. When the file loading is complete, you will be able to continue writing your multimedia message.
General Functions |
28 |
Adding recipients
The following options are available when adding the recipient(s). For more options, press the Left Soft Key  Options in the Recipients screen. In this menu, you can choose from the following options:
ŢEnter Number: Allows you to enter the phone number using the keypad.
ŢEnter Email: Allows you to enter an email address instead of a phone number.
ŢInsert Symbol: Allows you to enter symbols.
ŢCaller Groups: Displays Contacts Groups.
ŢRecent Messages: Choose a Contact from Recent Messages.
ŢRecent Calls: Choose a Contact from Recent Calls.
Editing a message
The following options are available when editing a message.
Using Insert
While entering text, press the Right Soft Key  Insert in the Compose screen. The following options are available.
ŢSymbol: You can insert various symbols into your message. Pressing the Left Soft Key  and Right Soft Key
  scrolls through the pages.
ŢPicture: You can select a picture to insert by using the Navigation Keys. You can preview the selected picture by pressing the Right Soft Key  View.
View.
ŢAudio: You can insert an audio file from your saved audio files.
ŢVideo: You can insert a video clip from your saved video clips.
ŢTake New Picture: You can take and insert a picture in your message.
ŢRecord New Audio: You can record a new audio clip by pressing the
OK Key  Record. Press the Left Soft Key
  Options before you begin recording to set the Quality option. After recording a
new audio clip, you can delete it by pressing the Left Soft Key  Discard.
General Functions |
29 |
Loading...