


website:http://us.lgservice.com
LCRM1240SW/SB/ST

2

SAFETY
PRECAUTIONS TO AVOID POSSIBLE EXPOSURE TO EXCESSIVE MICROWAVE ENERGY
•DO NOT attempt to operate this oven with the door open, since open-door operation can result in harmful exposure to microwave energy. It is important not to defeat or tamper with the safety interlocks.
•DO NOT operate the oven if it is damaged. It is particularly important that the oven door close properly and that there is no damage to the:
1.door (bent)
2.hinges and latches (broken or loosened)
3.door seals and sealing surfaces.
•DO NOT place any object between the oven front face and the door, or allow soil or cleaner residue to accumulate on sealing surfaces.
•THE OVEN should not be adjusted or repaired by anyone except properly qualified service personnel.
GROUNDING INSTRUCTIONS
This appliance must be grounded! If an electrical short circuit occurs, grounding reduces the risk of electric shock by providing an escape wire for the electric current. This appliance is equipped with a
cord having a grounding wire with a grounding plug. Put the plug into an outlet that is properly installed and grounded.
 WARNING
If you use the grounding plug improperly, you risk electric shock.
Ask a qualified electrician or the Sears Service Department if you do not understand the grounding instructions or if you wonder whether the appliance is properly grounded.
If you use an extension cord, be sure that:
•The extension cord has the same electrical rating as the appliance.
•The marked rating of the extension cord shall be equal to or greater than the electrical rating of the appliance.
This appliance has a short power supply cord to reduce the risk of anyone’s tripping over or becoming entangled in the cord. You may use an extension cord if you are careful.
•The extension cord is a grounding-type 3-wire cord.
•The extension cord does not drape over a countertop or tabletop, where it can be pulled on by children or tripped over accidentally.
•The electrical cord is dry and not pinched or crushed in any way.
NOTE: This oven draws 13.8 amperes at 120 Volts, 60 Hz.
3

SAFETY
IMPORTANT SAFETY INSTRUCTIONS
The safety instructions below will tell you how to use your microwave oven to avoid harm to yourself or damage to your oven.
To reduce the risk of burns, electric shock, fire, injury to persons, or exposure to excessive microwave energy:
1.Read all the instructions before using your microwave oven.
2.Do not allow children to use this oven without close supervision!
3.Read and follow the specific PRECAUTIONS TO AVOID
POSSIBLE EXPOSURE TO EXCESSIVE MICROWAVE ENERGY found on page 3.
4.Do not tamper with the built – in safety switches on the oven door! The oven has several built-insafety switches to make sure the power is off when the door is open.
5.When cleaning the door and the surfaces that touch the door, use only mild, nonabrasive soaps or detergents and a sponge or soft cloth.
6.If your oven is dropped or damaged, have it thoroughly checked by a qualified service technician before using it again.
7.To avoid a fire hazard:
a)Do not severely overcook foods. It can cause a fire in the oven.
b)Do not use recycled paper products in your oven.
They can contain particles that can cause arcing or may ignite.
c)Do not overcook potatoes. Overcooking could cause a fire.
d)Do not store combustible items (bread, cookies, etc.) in the oven, because if lightning strikes the power lines, it may cause the oven to turn ON.
e)Do not use wire twist-ties in the oven. Be sure to remove them before placing the item in the oven.
f)Do not use the cavity for storage purposes. Do not leave paper products, cooking utensils, or food in the cavity when not in use.
8.If a fire should start:
a)Keep the oven door closed.
b)Turn the oven off.
c)Disconnect the power cord or shut off thepower at the fuse or circuit breaker panel.
9.Do not use this oven for commercial purposes. This microwave is made for household use only.
10.Install or locate this appliance in accordance with the provided installation instructions.
11.To avoid electric shock:
a)This appliance must be grounded! Connect it only to a properly grounded outlet. (See the Grounding instructions on page 3.)
b)Do not operate this appliance if it has a damaged cord or plug, if it is not working properly, or if it has been damaged or dropped.
c)Do not immerse the electrical cord or plug in water.
d)Keep the cord away from heated surfaces.
e)This appliance should be serviced only by qualified service personnel.
12.Liquids such as water, coffee, or tea are able to be overheated beyond the boiling point without appearing to be boiling due to surface tension of the liquid. Visible bubbling or boiling when the container is removed from the microwave oven is not always present. This could result in very hot liquids suddenly boiling over when the container is disturbed or when a spoon or other utensil is inserted into the liquid. To reduce the risk of injury to persons;
1)Do not overheat the liquid.
2)Stir the liquid both before and halfway through heating it.
3)Use extreme care when inserting a spoon or other utensil into the container once heating has begun.
4)Do not use straight-sided containers with narrow necks.
5)After heating, allow the container to stand in the microwave oven for a short time before removing the container.
13.Keep the glass tray and the turntable roller rest in the oven when you are cooking.
14.Do not use the oven outdoors. Do not store the oven outdoors. Do not use this product near water.
– for example, near a kitchen sink, in a wet basement, near a swimming pool, or similar location.
15.Do not cover or block any openings in the oven.
16.Do not run the microwave oven empty.
17.Do not let the cord hang over the edge of a table or counter.
18.Do not heat glass turntable excessively.
–Do not cook bacon directly on the glass turntable.
–Do not allow the grey film on special microwave cooking packages to touch the glass turntable. Put the package on a microwave-safe dish.
–Keep a browning dish at least 3⁄16 inch above the glass turntable. If you use the browning dish incorrectly, you could break the glass turntable.
19.Be careful not to chip or scratch the edges of the turntable. Chips or scratches may cause the turntable to break during use.
20.Some produce such as whole eggs and sealed containers, for example, closed glass jars, are able to explode and should not be heated in this oven.
SAVE THESE INSTRUCTIONS!
4

SAFETY - COFFEE MAKER
IMPORTANT SAFETY INSTRUCTIONS
When using electrical appliances, basic safety precautions should always be flowed to reduce the risk of fire, electric shock and/or injury to person, including the following:
1.Read all instructions.
2.Do not touch hot surfaces. Use handles and knobs.
3.To protect against fire, electric shock and injury to persons, do not immerse cord, plugs or appliance in water or other liquid.
4.Close supervision is necessary when any appliance is used by or near children.
5.Unplug from outlet when not in use and before cleaning. Allow to cool before putting on or taking off parts, and before cleaning the appliance.
6.Do not operate any appliance with a damaged cord or plug or after the appliance malfunctions or has been dropped or damaged in any manner. Return appliance to the nearest authorized service center for examination, repair or electrical or mechanical adjustment.
7.The use of attachments not recommended by the manufacturer may cause hazards.
8.Do not use outdoors.
9.Do not let cord hang over edge of table or counter, or touch hot surface.
10.Do not place on or near a hot gas or electric burner, or in a heated oven.
11.Always attach plug to appliance first, then plug cord into the wall outlet. To disconnect, turn any control to "off", then remove plug from wall outlet.
12.Do not use appliance for other than intended use.
13.Snap lid securely onto carafe before serving any beverages.
14.Scalding may occur if the lid is removed during the brewing cycle.
15.The glass carafe is designed for use with this appliance only. It must never be used on the range top.
16.Do not set a hot carafe on a wet or cold surface.
17.Do not use cracked carafe or a carafe having a loose or weakened handle.
18.Do not clean carafe or warming plate with cleansers, steel wood pads, or other abrasive materials.
19.WARNING : To reduce the risk of fire of electric shock, do not remove the base plate. No user serviceable parts are inside. Repair should be done only by authorized personnel.
20.Avoid contact with moving parts.
21.Do not pull out the water reservoir while brewing coffee.
SAVE THESE INSTRUCTIONS! FOR HOUSEHOLD USE ONLY
5
UNDERSTANDING YOUR COFFEE COMBO
SPECIFICATIONS
Power Supply |
120V AC, 60 Hz |
||
|
|
|
|
Rated Power Consumption |
1650W |
||
|
|
|
|
Microwave Output |
Microwave |
*1200W |
|
|
|
||
Coffee Maker |
750W / 90W (Dual) |
||
|
|||
|
|
|
|
Rated Current |
13.8A(Microwave Oven) / 14.5A(Microwave Oven with Coffee Maker) |
||
|
|
|
|
Overall Dimensions (WxHxD)" |
23" x 121/2" x 171/8" |
||
Oven Cavity Dimensions (WxHxD)" |
1411/16" x 95/8" x 155/8" |
||
Capacity of Oven Cavity |
1.2 cu.ft |
||
|
|
|
|
*IEC 60705 RATING STANDARD
Specifications subject to change without prior notice.
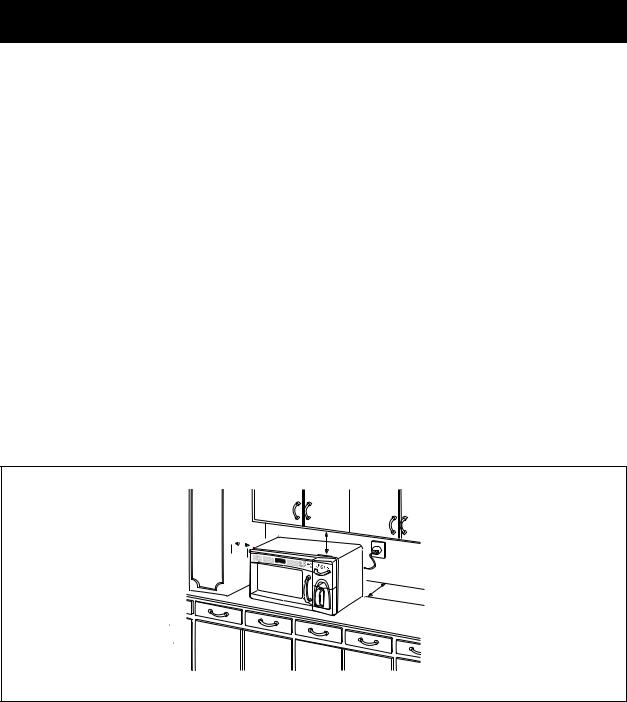
INSTALLATION
1.Remove your LG Coffee Combo and all packing materials from the shipping carton.
2.Place the oven on a level surface that provides at least 4 inches of space at the left, right, top, and rear sides for proper ventilation.
3.Slide the turntable support onto the pin in the center opening of the oven floor, making sure it seats properly on the pin.
Then place the glass turntable on the turntable support.
NOTE: Never place the glass turntable in the oven upside down. Blocking the inlet and/or outlet openings can damage the oven.
4
inches
4 |
inches |
|
4 |
inches |
Countertop
 WARNING
To reduce the risk of fire or electric shock, do not install closer than 4 inches to side and back wall.
6

UNDERSTANDING YOUR COFFEE COMBO
PARTS AND ACCESSORIES
Glass Turntable
Control 


Panel
Turntable Support
Microwave Oven Coffee Maker
Flavor
Selector
Filter Basket
See-Through Door
Easy-Clean
Oven Cavity
Water
Reservoir
Warming Plate
Safety Interlock System
Cooking Guide Label
Carafe
Your oven comes with the following accessories: 1 Use and Care Guide
1 Glass Turntable
1 Turntable Support
1 7 cup Water Reservoir
1 7 cup Carafe with lid
7

UNDERSTANDING YOUR COFFEE COMBO
CONTROL PANEL
MICROWAVE CONTROL AREA
4 |
6 |
8 |
10 |
2 |
13 |
5 |
7 |
9 |
11 |
1 |
12 |
3 |
1.DISPLAY. The Display includes a clock and indicators that tell you time of day, cooking time settings, and cooking functions selected.
2.STOP/CLEAR. Touch this pad to stop the oven or clear entries. (microwave oven only)
3.START. Touch this pad to start all entries (except the Auto Cook and Add Minute function which start automatically) and to turn Child Lock on or off.
4.AUTO COOK. Touch this pad to select programmed food items.
5.EZ-ON. Touch this pad to cook at 100% cooking power for 1 minute to 99 minutes 59 seconds.
6.AUTO DEFROST. This pad is an accurate defrosting method for frozen meat, poultry and fish up to 6.0 lbs.
7.EZ DEFROST. This pad provides you with the quick defrosting method for 1.0 pound of frozen foods.
8.CUSTOM SET. Touch this pad to change the oven's default settings for clock, sound, scroll speed and Lbs/Kg.
9.KITCHEN TIMER. Touch this pad to use your microwave oven as a kitchen timer.
10.COOK TIME. Touch this pad to set the cooking time.
11.POWER. Touch this pad to set the cooking power.
12.NUMBER PADS. Touch Number Pads to enter cooking time, power level, quantities, or weights.
13.SENSOR TOUCH. This pad allows you to cook most of your favorite foods without having to select cooking times and power levels.
COFFEE MAKER CONTROL AREA
1 |
3 |
5 |
2 |
4 |
6 |
1.1-4. This pad is small batch function. This pad is used when you want to brew a small amount (1~4 cups) of coffee.
2.TEMP. This pad is used when you want to adjust the warming plate temperature of the coffee.
3.OFF/CLEAR. Touch this pad to stop the coffee maker or clear entries. (coffee maker only)
4.ON. This pad is used when you want to brew more than 4 cups of coffee.
5.TIME SET. Touch this pad to change the default setting of the coffee maker for brew timer or warming plate timer.
6.TIMER ON/OFF. This pad is used when you want to turn the brew timer function On or Off.
8

USING YOUR MICROWAVE OVEN
COOKWARE GUIDE
Most heat-resistant, non-metallic cookware is safe for use in your microwave oven. However, to test cookware before using, follow these steps:
1.Place the empty cookware in the microwave oven.
2.Measure 1 cup of water in a glass measuring cup and place it in the oven beside the cookware.
3.Microwave on 100% power for 1 minute. If the dish is warm, it should not be used for microwave cooking.
USE |
DO NOT USE |
|
|
|
|
Ovenproof Glass |
Metal Utensils |
|
• Glass treated for use in high-intensity heat |
• Metal shields food from microwave energy and |
|
includes utility dishes, bread dishes, pie plates, cake |
produces uneven cooking. Avoid metal skewers, |
|
plates, liquid measuring cups, casseroles, and bowls |
thermometers, or foil trays. |
|
without metallic trim. |
• Metal utensils can cause arcing, which is a |
|
China |
discharge of electric current. Arcing can damage |
|
your microwave oven. |
||
• Bowls, cups, serving plates, and platters without |
||
|
||
metallic trim can be used in your oven. |
Metal Decoration |
|
Plastic |
• Do not use metal-trimmed or metal-banded |
|
dinnerware, casserole dishes, etc. |
||
• When using plastic wrap as a cover, make sure that |
|
|
the dish is deep enough so the plastic wrap does not |
Centura™ Tableware |
|
touch the food. As the food heats, it may melt the |
• The Corning Company recommends that you |
|
plastic wrap wherever the wrap touches the food. |
do not use Centura tableware and some Corelle™ |
|
• Place plastic wrap loosely over the top of the dish |
closed-handle cups for microwave cooking. |
|
and secure it by pressing the wrap to the sides of |
Aluminum Foil |
|
the dish. |
||
• Vent by turning back one corner of the plastic wrap. |
• Do not use large sheets of aluminum foil because |
|
they hinder cooking and may cause arcing. You may |
||
This will allow excess steam to escape. |
||
use small pieces of foil to shield poultry legs and |
||
• Use plastic dishes, cups, semi-rigid freezer |
||
wings. |
||
containers, and plastic bags only for short time |
||
• Keep all aluminum foil at least 1 inch from the walls |
||
cooking. Use these with care because the |
||
and door of the oven. |
||
plastic may soften from the heat of the food. |
||
|
||
Paper |
Wood |
|
• Wooden bowls, boards, and baskets will dry out and |
||
• Microwave-safe paper towels, waxed paper, paper |
||
may split or crack when you use them in the |
||
napkins, and paper plates with no metallic trim or |
||
microwave oven. |
||
design can be used in your oven. |
||
|
||
• Refer to the paper manufacturer’s label for use of |
Tightly Closed Containers |
|
any paper product in the microwave oven. |
||
• Tightly closed cookware can explode. Be sure |
||
|
||
|
to leave an opening for steam to escape from |
|
|
covered cookware. |
|
|
Brown Paper |
|
|
• Do not use brown paper bags. They absorb |
|
|
heat and could burn. |
|
|
Metal Twist-Ties |
|
|
• Always remove metal twist-ties as they can become |
|
|
hot and cause a fire. |
|
|
|
9

USING YOUR MICROWAVE OVEN
TIPS FOR MICROWAVE COOKING
BROWNING
Meat and poultry with high fat content that are cooked for 10 or 15 minutes or longer will brown lightly. Foods cooked a shorter time can be brushed with a browning agent, such as Worcestershire sauce, soy sauce, or barbecue sauce.
COVERING
A cover traps heat and steam and causes the food to cook more quickly. Use a lid or microwave-safe plastic wrap with one corner folded back to vent the excess steam. Lids on glass casseroles can become hot during cooking. Handle carefully. Waxed paper will prevent the food from splattering in the oven and help retain heat. When warming bread items, use waxed paper, napkins, or paper towels. To absorb extra moisture, wrap sandwiches and fatty foods in paper towels.
SPACING
Arrange individual foods, such as baked potatoes, cupcakes, and hors d’oeuvres’ in a circle and at least 1 inch apart. This will help the food cook more evenly.
STIRRING
Stirring blends flavors and redistributes the heat in foods. Always stir from the outside toward the center of the dish. Food at the outside of the dish heats first.
TURNING
Large foods, such as roasts and whole poultry, should be turned so that the top and bottom cook evenly. Also turn over chicken pieces and chops.
ARRANGEMENT
Do not stack food. Arrange in a single layer in the dish for more even cooking. Because dense foods cook more slowly, place thicker portions of meat, poultry, fish, and vegetables toward the outside of the dish.
TESTING FOR DONENESS
Because foods cook quickly in a microwave oven, you need to test frequently for doneness.
STANDING TIME IN OVEN
Depending on density, food often needs to stand from 2 to 15 minutes either in or outside of the oven after cooking power shuts off. Outside of the oven, you
usually need to cover food during standing time to retain heat. Remove most foods when they are slightly undercooked and they will finish cooking during standing time. The internal temperature of food will rise about 10°F during standing time.
SHIELDING
To prevent some portions of rectangular or square dishes from overcooking, you may need to shield them with small strips of aluminum foil to block the microwaves. You can also cover poultry legs and wing tips with foil to keep them from overcooking.
Always keep foil at least 1 inch from oven walls to prevent arcing.
PIERCING
Pierce the shell, skin, or membrane of foods before cooking to prevent them from bursting. Foods that require piercing include yolks and whites of eggs, hot dogs, clams, oysters, and whole vegetables, such as potatoes and squash.
CLEANING
Wipe the oven inside and outside with a soft cloth and a mild detergent solution. Then rinse and wipe dry. This should be done weekly or more often, if needed. Never use cleaning powders or rough pads. Excessive oil splatters on the inside top will be difficult to remove if left for many days. Wipe splatters with a wet paper towel, especially after cooking chicken or bacon.
REMOVABLE PARTS
The turntable and turntable support are removable. They should be hand-washed in warm (not hot) water with a mild detergent and a soft cloth. Once they are clean, rinse well and dry with a soft cloth. Never use cleaning powders, steel wool, or rough pads.
•The turntable may be cleaned at the sink. Be careful not to chip or scratch the edges as this may cause the turntable to break during use. Oven turntable may also be cleaned in a dishwasher.
•The turntable support rest should be cleaned regularly.
SPECIAL CARE
For best performance and safety, the inner door panel and the oven front frame should be free of food or grease buildup. Wipe often with a mild detergent; then rinse and wipe dry. Never use cleaning powders or rough pads.
After cleaning the control panel, touch STOP/CLEAR to clear any entries that might have been entered accidentally while cleaning the panel.
10
 Loading...