


English You can download the web manuals for this product at the following websites. (Keyword : SH7E, SM5E, SM5KE)
Česky Můžete si stáhnout webové návody k obsluze tohoto produktu z následujících webových stránek. (Klíčové slovo : SH7E, SM5E,
SM5KE)
Dansk Du kan downloade webvejledningen til dette produkt på følgende websteder. (Nøgleord : SH7E, SM5E, SM5KE)
Español Puede descargar los manuales web de este producto en los siguientes sitios web. (Palabra clave : SH7E, SM5E, SM5KE)
Suomi Voit ladata tuotteen verkko-oppaat seuraavilta verkkosivuilta. (Avainsana : SH7E, SM5E, SM5KE)
Français Vous pouvez télécharger le guide Web pour ce produit sur les sites suivants. (Mot-clé : SH7E, SM5E, SM5KE)
Deutsch Sie können die Webhandbücher für dieses Produkt auf den folgenden Websites herunterladen. (Schlüsselwort : SH7E, SM5E, SM5KE)
Ελληνικα Μπορείτε να κατεβάσετε τα εγχειρίδια web για αυτό το προϊόν στις παρακάτω τοποθεσίες web. (Λέξη-κλειδί : SH7E, SM5E, SM5KE)
Magyar A termék internetes útmutatóját a következő weboldalakról töltheti le. (Kulcsszó : SH7E, SM5E, SM5KE)
Bahasa Anda dapat mengunduh manual web untuk produk ini di situs web Indonesia berikut. (Kata kunci : SH7E, SM5E, SM5KE)
Italiano È possibile scaricare i manuali online di questo prodotto dai seguenti siti Web. (Parola chiave : SH7E, SM5E, SM5KE)
Қазақша Бұл өнімге арналған пайдаланушы нұсқаулығын төмендегі веб-сайттарынаң жүктеп алуға болады. (Негізгі сөз : SH7E, SM5E, SM5KE)
.. ( : SH7E, SM5E, SM5KE)
Nederlands U kunt de internethandleidingen voor dit product vanaf de volgende websites downloaden. (Term : SH7E, SM5E, SM5KE)
Norsk Du kan laste ned webhåndbøker for dette produktet fra de følgende webområdene. (Nøkkelord : SH7E, SM5E, SM5KE)
• www.lg.com/b2b

Polski |
Instrukcje obsługi tego produktu można pobrać na następujących |
|
stronach internetowych. (Słowo kluczowe : SH7E, SM5E, SM5KE) |
Português |
Pode transferir os manuais na Internet deste produto nos websites |
|
que se seguem. (Palavra-chave : SH7E, SM5E, SM5KE) |
Русский |
Онлайн-руководства для данного устройства можно |
|
скачать на следующих веб-сайтах. |
|
(Ключевое слово : SH7E, SM5E, SM5KE) |
Slovenčina |
Webové príručky pre tento výrobok môžete stiahnuť na |
|
nasledujúcich webových stránkach. (Kľúčové slovo : SH7E, SM5E, |
|
SM5KE) |
Svenska |
Du kan hämta produktens onlinehandböcker på följande |
|
webbplatser. (Nyckelord : SH7E, SM5E, SM5KE) |
|
( : SH7E, |
|
SM5E, SM5KE) |
Türkçe |
Bu ürünün web kılavuzlarını aşağıdaki web sitelerinden |
|
indirebilirsiniz. (Anahtar sözcük : SH7E, SM5E, SM5KE) |
Українська Завантажити веб-посібники для цього виробу можна на веб-сайтах, поданих нижче. (Ключове слово : SH7E, SM5E, SM5KE)
O’zbekcha Ushbu mahsulot uchun qo‘llanmalarni quyidagi veb-saytlarda yuklab olishingiz mumkin. (Kalit so’z : SH7E, SM5E, SM5KE)
Web Web( : SH7E, SM5E, SM5KE)
Português Do Você pode fazer download dos manuais na Web deste produto nos
Brasil seguintes sites. (Palavra-chave : SH7E, SM5E, SM5KE)
(SH7E, SM5E, SM5KE
(SH7E, SM5E, SM5KE
• www.lg.com/b2b
SuperSign : http://partner.lge.com

 **SM5E


2 |
1 |
2 |
3 |
4 |

A


OWNER’S MANUAL
LG Digital
Signage
(MONITOR SIGNAGE)
Please read this manual carefully before operating your set and retain it for future reference.
43SH7E 32SM5E 32SM5KE
49SH7E 43SM5E 43SM5KE
55SH7E 49SM5E 49SM5KE 55SM5E 55SM5KE
www.lg.com
Copyright © 2018 LG Electronics Inc. All Rights Reserved.

ENGLISH
2
TABLE OF CONTENTS
SAFETY PRECAUTION................... |
3 |
--Precautions In Installing the Product..................... |
3 |
--Precautions to the AC Adapter and Electrical |
|
Power....................................................................................... |
5 |
--Precautions In Moving the Product......................... |
7 |
--Precautions In Using the Product............................. |
7 |
--Mounting on a Wall.......................................................... |
8 |
LICENSES....................................... |
9 |
ASSEMBLY AND PREPARATION.10 |
|
--Optional Accessories.................................................... |
10 |
--Parts and Buttons.......................................................... |
12 |
--Assembling the Memory Cover.............................. |
13 |
--Connecting the Stand.................................................. |
14 |
--Connecting the Speakers........................................... |
16 |
--Connecting the IR Sensor.......................................... |
19 |
--Portrait Layout................................................................ |
20 |
--Attaching and removing the LG Logo Bracket..... |
|
.................................................................................................. |
21 |
--Installing on a Wall........................................................ |
23 |
REMOTE CONTROL..................... |
25 |
MAKING CONNECTIONS........... |
27 |
--Connecting to a PC....................................................... |
27 |
--External Device Connection..................................... |
27 |
--Using the Input List....................................................... |
29 |
TROUBLESHOOTING.................. |
30 |
PRODUCT SPECIFICATIONS....... |
33 |

3
WARNING: This equipment is compliant with Class A of CISPR 32. In a residential environment this equipment may cause radio interference.
SAFETY PRECAUTION
Please read these safety precautions carefully before using the product.
 WARNING
If you ignore the warning message, you may be seriously injured or there is a possibility of accident or death.
 CAUTION
If you ignore the caution message, you may be slightly injured or the product may be damaged.
 WARNING
•• Indoor Use Only.
Precautions In Installing the Product
 WARNING
••Keep away from heat sources like electrical heaters.
-- Electrical shock, fire, malfunction, or deformation may occur.
••Keep the packing anti-moisture material or vinyl packing out of the reach of children.
-- Anti-moisture material is harmful if swallowed. If swallowed by mistake, force the patient to vomit and visit the nearest hospital. Additionally, vinyl packing can cause suffocation. Keep it out of the reach of children.
••Do not put heavy objects on the product or sit upon it.
-- If the product collapses or is dropped, you may be injured. Children must pay particular attention.
••Do not leave the power or signal cable unattended on the pathway.
-- The passerby can trip or fall, which can cause electrical shock, fire, product breakdown, or injury.
••Install the product in a neat and dry place.
-- Dust or moisture can cause electrical shock, fire or product damage.
••If you can smell smoke or other odors or hear a strange sound unplug the power cord and contact the service center. -- If you continue to use without taking proper measures, electrical shock or fire can occur.
••If you dropped the product or the case is broken, turn off the product and unplug the power cord.
-- If you continue to use without taking proper measures, electrical shock or fire can occur. Contact the service center.
••Do not drop an object on or apply impact to the product. Do not throw any toys or objects on the product screen. -- It can cause injury to human, problem to product and damage the display.
ENGLISH
4
•• Do not let the product fall or drop when connecting it with an external device.
ENGLISH |
-- This may cause injury and/or damage to the product. |
|
•• When connecting it to a game device, keep a distance of four times the diagonal measurement of the screen from the |
||
|
||
|
device. |
|
|
-- If the product falls because of the short cable, this may cause injury and/or damage to the product. |
|
|
•• Leaving a fixed image on the screen for a long time may cause damage to the screen and cause image burn-in. To use |
|
|
the product for a long period of time, use a screen saver on the PC or utilize the residual image prevention function |
|
|
on the product, and when the product is not used, turn off the power. Burn-in and related problems are not covered |
|
|
by the warranty on this product. |
|
|
•• Do NOT install this product on a wall where there is high risk of exposure to oil fumes or mist. |
|
|
-- This may damage product and cause it to fall. |
 CAUTION
••Make sure the product ventilation holes are not blocked. Install the product in a suitably wide place (more than
100 mm from the wall).
-- If you install the product too close to the wall, it may be deformed or fire can break out due to internal heat.
••Do not block the ventilation hole of the product by a tablecloth or curtain.
-- The product can be deformed or fire can break out due to overheating inside the product.
••Install the product on a flat and stable place that has no risk of dropping the product. -- If the product is dropped, you may be injured or the product may be broken.
••Install the product where no EMI occurs.
••Keep the product away from direct sunlight. -- The product can be damaged.
••If you install the product in a place that does not meet the recommended conditions, this may cause serious damage to the product’s picture quality, life cycle, and appearance. Please check with LG or a qualified installer before installing. This caution applies to a place where there is an abundance of fine dust or oil mist, chemical substances are used, the temperature is very high or low, the humidity is very high, or the product is likely to remain turned on for a long period of time (airport and train station), failure to do so will invalidate the warranty.
••Do not install the product in an area with poor ventilation (e.g.on a bookshelf, in a closet) or outside and avoid placing on cushions or carpets.
••In addition, do not install it where there are heating objects such as lighting equipment.

5
Precautions to the AC Adapter and Electrical Power
 WARNING
••If water or any foreign substance goes inside the product (TV, monitor, power cord, or AC adapter), disconnect the power cord immediately and contact the service center.
-- Otherwise, this may cause a fire or electric shock due to damage to the product.
••Do not touch the power plug or AC adapter with wet hands. If the pins of the plug are wet or dusty, wipe and dry them before use.
-- Otherwise, this may cause a fire or electric shock.
••Make sure to completely insert the power cord into the AC adapter.
-- If loosely connected, the poor connection may cause a fire or electric shock.
••Be sure to use power cords and AC adapters provided or approved by LG Electronics, Inc. -- The use of non-approved products may cause a fire or electric shock.
••When unplugging the power cord, always pull it by the plug. Do not bend the power cord with excessive force. -- The power line can be damaged, which may cause electric shock or fire.
••Be careful not to step or place heavy objects (electronic appliances, clothing, etc.) on the power cord or AC adapter. Be careful not to damage the power cord or AC adapter with sharp objects.
-- Damaged power cords may cause a fire or electric shock.
••Never disassemble, repair or modify the power cord or AC adapter. -- This may cause a fire or electric shock.
••Make sure to connect the power cable to the grounded current. -- You may be electrocuted or injured.
••Use the rated voltage only.
-- The product can be damaged, or you may be electrocuted.
••In the presence of thunder and lightning, never touch the power cord and signal cable because it can be very dangerous.
-- It can cause electric shock.
••Do not connect several extension cords, electrical appliances, or electrical heaters to a single outlet. Use a power strip with a grounding terminal designed for exclusive use with the computer.
-- A fire can break out due to overheating.
ENGLISH

6
•• Do not touch the power plug with wet hands. Additionally, if the cord pin is wet or covered with dust, dry the power
ENGLISH |
plug completely or wipe dust off. |
|
-- You may be electrocuted due to excess moisture. |
||
|
||
|
•• If you don’t intend to use the product for a long time, unplug the power cable from the product. |
|
|
-- Covering dust can cause a fire, or insulation deterioration can cause electric leakage, electric shock or fire. |
|
|
•• Fix the power cable completely. |
|
|
-- If the power cable is not fixed completely, a fire can break out. |
|
|
•• Do not insert a conductor (like a metal chopstick) into one end of the power cable while the other end is connected |
|
|
to the input terminal on the wall. Additionally, do not touch the power cable right after plugging into the wall input |
|
|
terminal. |
|
|
-- You may be electrocuted. |
|
|
•• The appliance coupler is used as the disconnect device. |
|
|
•• Please make sure the device is installed near the wall outlet to which it is connected and that the outlet is easily |
|
|
accessible. |
|
|
•• As long as this unit is connected to the AC wall outlet, it is not disconnected from the AC power source even if the |
|
|
unit is turned off. |
 CAUTION
••Be sure to keep the outlet, AC adapter, and pins of the power plug clean from dust and etc. -- This may cause a fire.
••Do not unplug the power cord while the product is in use. -- Electrical shock can damage the product.
••Use only the power cord supplied with the unit. If you use another power cord, make sure that it is certified by the applicable national standards when not provided by the supplier. If the power cable is faulty in any way, please contact the manufacturer or the nearest authorized repair service provider for a replacement.

7
Precautions In Moving the Product
 WARNING
••Make sure to turn off the product.
-- You may be electrocuted or the product can be damaged.
••Make sure to remove all cables before moving the product. -- You may be electrocuted or the product can be damaged.
••Make sure the panel faces forward and hold it with both hands to move. If you drop the product, the damaged product can cause electric shock or fire. Contact an authorized the service center for repair.
••Make sure the product is turned off, unplugged, and all cables have been removed. It may take 2 or more people to carry larger apparatus. Do not press against or put stress on the front panel of the apparatus.
 CAUTION
••Do not shock the product when moving it.
-- You may be electrocuted or the product can be damaged.
••Do not dispose the product-packing box. Use it when you move.
Precautions In Using the Product
 WARNING
••Do not disassemble, repair or modify the product at your own discretion. -- Fire or electric shock accident can occur.
-- Contact the service center for check, calibration or repair.
••When the display is to be left unattended for an extended period of time, unplug it from the wall outlet.
••Keep the product away from water.
-- Fire or electric shock accident can occur.
••Do not shock or scratch the front and sides of the screen with metallic objects. -- Otherwise, it may cause damage to the screen.
••Avoid high temperatures and humidity.
ENGLISH

8
 CAUTION
ENGLISH |
•• Do not put or store inflammable substances near the product. |
||||||
|
|||||||
|
-- There is a danger of explosion or fire due to careless handling of the inflammable substances. |
||||||
|
•• When cleaning the product, unplug the power cord and scrub gently with a soft cloth to prevent scratching. Do not |
||||||
|
clean with a wet cloth or spray water or other liquids directly onto the product. An electric shock may occur. (Do not |
||||||
|
use chemicals such as benzene, paint thinners, or alcohol.) |
||||||
|
•• Take a rest from time to time to protect your vision. |
||||||
|
•• Keep the product clean at all times. |
||||||
|
•• Take a comfortable and natural position when working with a product to relax the muscles. |
||||||
|
•• Take a regular break when working with a product for a long time. |
||||||
|
•• Do not press strongly upon the panel with a hand or sharp object such as nail, pencil, or pen, or make a scratch on it. |
||||||
|
•• Keep the proper distance from the product. |
||||||
|
-- Your vision may be impaired if you look at the product too closely. |
||||||
|
•• Set the appropriate resolution and clock by referring to the User’s Guide. |
||||||
|
-- Your vision can be impaired. |
||||||
|
•• Use authorized detergent only when cleaning the product. (Do not use benzene, thinner, or alcohol.) |
||||||
|
-- Product can be deformed. |
||||||
|
•• Do not expose to dripping or splashing and do not place objects filled with liquids, such as vases, cups, etc. on or over |
||||||
|
the apparatus (e.g. on shelves above the unit). |
||||||
|
•• Batteries should not be exposed to excessive heat. For example, keep away from direct sunlight, open fireplace, and |
||||||
|
electric heaters. |
||||||
|
•• Do NOT place non-rechargeable batteries in charging device. |
||||||
|
•• Using headsets (earphones) for a long time or listening loudly can cause damage to your hearing. |
||||||
|
•• Spray water onto a soft cloth 2 to 4 times, and use it to clean the front frame; wipe in one direction only. Too much |
||||||
|
moisture may cause staining. |
||||||
|
|
|
|
|
|
|
|
|
|
|
|
|
|
|
|
|
|
|
|
|
|
|
|
WATER |
CHEMICALS |
|
••Do not use products using high voltage around the Monitor. (e.g., a bug zapper) -- Monitor may have malfunction as its electrical shock.
Mounting on a Wall
••Do NOT install this product by yourself as you may injure yourself or cause damage to product. Please contact service personnel authorised by manufacturer.

9
LICENSES
Supported licenses may differ by model. For more information of the licenses, visit www.lg.com.
The terms HDMI and HDMI High-Definition Multimedia Interface, and the HDMI Logo are trademarks or registered trademarks of HDMI Licensing Administrator, Inc. in the United States and other countries.
Manufactured under license from Dolby Laboratories. Dolby, Dolby Vision, Dolby Audio, Dolby Atmos, and the double-D symbol are trademarks of Dolby Laboratories.
For DTS patents, see http://patents.dts.com. Manufactured under license from DTS Licensing Limited. DTS, the Symbol, & DTS and the Symbol together, DTS 2.0 Channel, DTS 2.0+Digital Out, DTS-HD, and DTS Virtual:X are registered trademarks or trademarks of DTS, Inc. in the United States and/or other countries. © DTS, Inc. All Rights Reserved.
ENGLISH

ENGLISH
10
ASSEMBLY AND PREPARATION
 CAUTION
••Always use genuine components to ensure safety and product performance.
••The product warranty will not cover damage or injury caused by the use of counterfeit components.
 NOTE
NOTE
••The accessories provided with your product may vary depending on the model or region.
••Product specifications or contents in this manual may be changed without prior notice due to upgrade of product functions.
••SuperSign Software & Manual
-- Downloading from the LG Electronics website.
-- Visit the LG Electronics website (http://partner.lge.com) and download the latest software for your model.
••The warranty will not cover any damage caused by using the product in an excessively dusty environment.
Optional Accessories
Without prior notice, optional accessories are subject to change to improve the performance of the product, and new accessories may be added. The illustrations in this manual may differ from the actual product and accessories.
Stand kit
|
|
|
|
|
|
|
|
Screws |
|
|
|
|
|
|
Stand Spacers |
|
Diameter 4.0 mm x Pitch 0.7 mm |
||||
|
|
|
|
|
|
|
|
|
||
|
|
Stand |
|
|
|
|
|
|
|
|
|
|
|
|
|
|
|
|
|
|
|
|
|
|
32SM5* |
- |
|
Model |
Length (including |
Quantity |
|
|
|
|
|
|
|
|
|||||
|
|
|
|
43SH7E |
|
|
spring washer) |
|
||
|
|
|
|
|
|
|
|
|
||
|
ST-322T |
32SM5* |
|
43SM5* |
|
|
|
|
|
|
|
|
|
|
32SM5* |
10 mm |
6 EA |
|
|||
|
|
|
|
|
|
|
||||
|
ST-432T |
43SH7E, 43SM5* |
|
49SH7E |
|
|
|
|||
|
|
2 EA |
|
43SH7E |
|
|
|
|||
|
|
49SH7E, 49SM5* |
|
49SM5* |
|
|
|
|
||
|
ST-492T |
|
|
|
43SM5* |
|
|
|
||
|
55SH7E, 55SM5* |
|
55SH7E |
|
|
|
|
|
||
|
|
|
|
|
49SH7E |
14 mm |
8 EA |
|
||
|
|
|
|
55SM5* |
|
|
|
|||
|
|
|
|
|
|
|||||
|
|
|
|
|
|
49SM5* |
|
|||
|
|
|
|
|
|
|
|
|
|
|
|
|
|
|
|
|
|
55SH7E |
|
|
|
|
|
|
|
|
|
|
55SM5* |
|
|
|
|
|
|
|
|
|
|
|
|
|
|

Speaker kit
(Only for **SM5E model)
11
ENGLISH
|
|
Screws |
Speakers |
Cable holder/ Diameter 4.0 mm x Pitch 0.7 |
|
SP-5000 |
Cable Tie |
mm x Length 8 mm |
|
|
(including spring washer) |
Screws
Diameter 4.0 mm x Pitch 1.6 mm x Length 10 mm
Media Player kit
Media Player |
Screws |
CD (Owner's Manual)/ Cards |
|
MP500/ MP700 |
Diameter 3.0 mm x Pitch 0.5 mm x Length 6 mm |
||
|
|||
|
|
|
|
|
|
|
|
|
OPS kit |
|
|
|
|
|
KT-OPSA |
Screws |
|
Diameter 3.0 mm x Pitch 0.5 mm x Length 8 mm |
||
|
||
|
|
 NOTE
NOTE
••Cable holder/cable tie may not be available in some areas or for some models.
••Optional accessories are available for some models. If necessary, please purchase them separately.
••Before you attach the OPS kit or Media Player, connect the cable to the port.

ENGLISH
12
Parts and Buttons
The image may be different according to the model.
Buttons
•• : Changes the input source.
•• : Accesses the main menus, or saves your input and exits the menus. ••
 : Adjust the up and down.
••: Moves left and right.
•• : Displays the current signal and mode and selects menus. ••
 : Turns the power on or off.
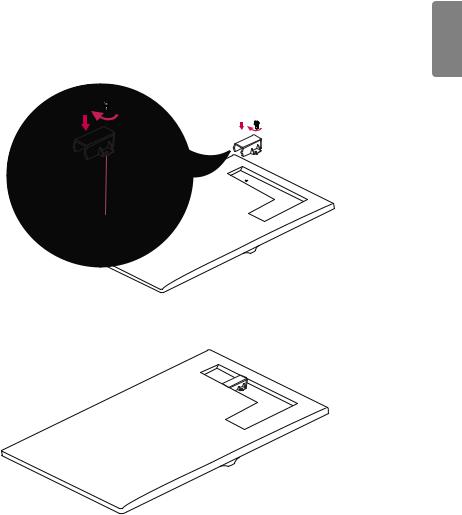
Assembling the Memory Cover
Assemble the cover with a screw as illustrated to prevent the USB memory from theft.
1
2
13
ENGLISH
ENGLISH
14
Connecting the Stand
-- For certain models only.
-- The image may be different according to the model.
32SM5*
1
2
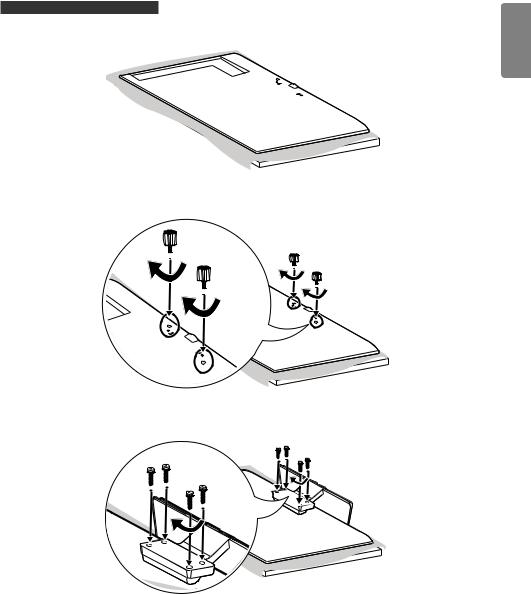
43/49/55SH7E, 43/49/55SM5*
1
2
3
15
ENGLISH

ENGLISH
16
Connecting the Speakers
-- For certain models only.
-- The image may be different according to the model.
32SM5E
1 Connect an input signal cable before installing the speakers.
2Mount the speakers by using screws as shown below. Make sure the power cable is disconnected before making a connection.
Basic installation
Installation with OPS connected

17
3Then connect the speaker cable. After installing your speakers, use holders and cable ties to organize the speaker cables.
Basic installation
Installation with OPS connected
ENGLISH

ENGLISH
18
43/49/55SM5E
1 Connect an input signal cable before installing the speakers.
2Mount the speakers by using screws as shown below. Make sure the power cable is disconnected before making a connection.
3Then connect the speaker cable. After installing your speakers, use holders and cable ties to organize the speaker cables.
 NOTE
NOTE
••Please turn off the power before removing the cable. Connecting or removing the speaker cable while turned on may result in no sound.

19
Connecting the IR Sensor
When you connect the cable to the product, the feature for receiving remote control signals is activated. Rotate the IR sensor according to the screen orientation (Landscape/Portrait).
-- The image may be different according to the model.
 Basic installation

ENGLISH
[Front] |
[Rear] |
 Landscape scene
[Front] |
[Rear] |
Portrait scene
[Front] |
[Rear] |

ENGLISH
20
Portrait Layout
When installing in a portrait layout, rotate the monitor counterclockwise 90 degrees (when facing the screen).
Using Kensington Lock
(This is not available for all models.)
The Kensington security system connector is located at the back of the monitor.
For more information on installation and use of this system, refer to the manual provided with the Kensington security system or visit http://www.kensington.com.
Connect the Kensington security system cable between the monitor and a table.
 NOTE
NOTE
••The Kensington security system is optional. You can obtain additional accessories from most electronics retail stores.
••The illustration shows a general example of installation and may look different from the actual product.
21
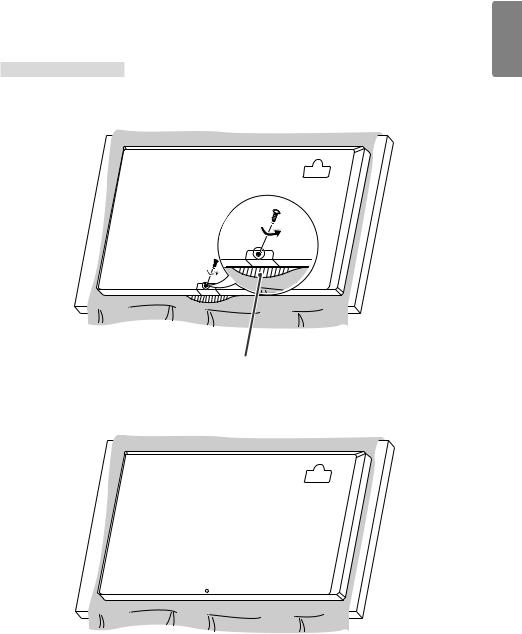
Attaching and removing the LG Logo Bracket
-- For certain models only.
-- The image may be different according to the model.
Removing the LG Logo Bracket
1Lay a clean cloth on the floor, and then put the monitor on it with the screen face down. Using a screwdriver, remove the screw that secures the LG Logo Bracket to the bottom rear of the monitor.
LG Logo Bracket
2After removing the screw, remove the LG Logo Bracket. When re-attaching the LG Logo Bracket, repeat the process in reverse order.
ENGLISH

22
Attaching the LG Logo Bracket on the right side
ENGLISH |
1 Lay a clean cloth on the floor, and then put the monitor on it with the screen face down. Using a screwdriver, |
|
|
|
remove the screw that secures the LG Logo Bracket to the bottom rear of the monitor. |
2After removing the screw, remove the LG Logo Bracket. Attach the LG Logo Bracket with a screw, aligning it with the hole on the right side.
23
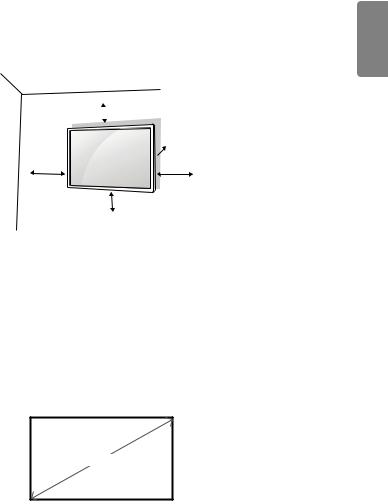
Installing on a Wall
For proper ventilation, allow a clearance of 100 mm on each side and from the wall. Detailed installation instructions are available from your dealer, see the optional Tilt Wall Mounting Bracket Installation and Setup Guide.
 100 mm
 100 mm
100 mm |
100 mm |
100 mm
ENGLISH
To install your monitor on a wall, attach a wall mounting bracket (optional part) to the back of the monitor. Make sure that the wall mounting bracket is securely fixed to the monitor and to the wall.
1Use only screws and wall mounting brackets that conform to VESA standards.
2Screws which are longer than standard length may damage the inside of the monitor.
3A non-VESA standard screw may damage the product and cause the monitor to fall. LG Electronics is not liable for any accidents related to the use of non-standard screws.
4Please use VESA standard as below.
••785 mm and above
*Fixing screws: Diameter 6.0 mm x Pitch 1.0 mm x Length 12 mm
785 mm
 Loading...