


 Loading...
ThinkCentre TIO24Gen3
User Guide
Machine Types: 10QY
Product numbers
10QY-PAR1-WW
First Edition (May 2017)
© Copyright Lenovo 2017.
LENOVO products, data, computer software, and services have been developed exclusively at private expense and are sold to governmental entities as commercial items as defined by 48 C.F.R. 2.101 with limited and restricted rights to use, reproduction and disclosure.
LIMITED AND RESTRICTED RIGHTS NOTICE: If products, data, computer software, or services are delivered pursuant a General Services Administration "GSA" contract, use, reproduction, or disclosure is subject to restrictions set forth in Contract No. GS-35F-05925.

Contents
Safety information . . . . . . . . . . . . . . . . . . . . . . . . . . . . . . . . . . . . . . . . . . . . . . . . . . . . . . . . . . . . . |
iii |
General Safety guidelines. . . . . . . . . . . . . . . . . . . . . . . . . . . . . . . . . . . . . . . . . . . . . . . . . . . . . . . . . . . . . . . . . . . . . . . . . . . . . . . . . . . . iii
Chapter 1. Getting started . . . . . . . . . . . . . . . . . . . . . . . . . . . . . . . . . . . . . . . . . . . . . . . . . . . . . . . 1-1
Shipping contents . . . . . . . . . . . . . . . . . . . . . . . . . . . . . . . . . . . . . . . . . . . . . . . . . . . . . . . . . . . . . . . . . . . . . . . . . . . . . . . . . . . . . . . . . 1-1 Locating connectors and controls on your monitor . . . . . . . . . . . . . . . . . . . . . . . . . . . . . . . . . . . . . . . . . . . . . . . . . . . . . . . . . . . . . . . 1-3 Front view . . . . . . . . . . . . . . . . . . . . . . . . . . . . . . . . . . . . . . . . . . . . . . . . . . . . . . . . . . . . . . . . . . . . . . . . . . . . . . . . . . . . . . . . . . . . 1-3 Rear view . . . . . . . . . . . . . . . . . . . . . . . . . . . . . . . . . . . . . . . . . . . . . . . . . . . . . . . . . . . . . . . . . . . . . . . . . . . . . . . . . . . . . . . . . . . . 1-3 Setting up your monitor . . . . . . . . . . . . . . . . . . . . . . . . . . . . . . . . . . . . . . . . . . . . . . . . . . . . . . . . . . . . . . . . . . . . . . . . . . . . . . . . . . . . 1-4 Assembling your monitor . . . . . . . . . . . . . . . . . . . . . . . . . . . . . . . . . . . . . . . . . . . . . . . . . . . . . . . . . . . . . . . . . . . . . . . . . . . . . . . . 1-4 Connecting cables . . . . . . . . . . . . . . . . . . . . . . . . . . . . . . . . . . . . . . . . . . . . . . . . . . . . . . . . . . . . . . . . . . . . . . . . . . . . . . . . . . . . . . 1-8 Turning on your monitor and computer . . . . . . . . . . . . . . . . . . . . . . . . . . . . . . . . . . . . . . . . . . . . . . . . . . . . . . . . . . . . . . . . . . . . . . . 1-11
Chapter 2. Adjusting and using your monitor . . . . . . . . . . . . . . . . . . . . . . . . . . . . . . . . . . . . . . . . . 2-1
Adjusting the full-function monitor stand . . . . . . . . . . . . . . . . . . . . . . . . . . . . . . . . . . . . . . . . . . . . . . . . . . . . . . . . . . . . . . . . . . . . . . 2-1 Camera Swivel . . . . . . . . . . . . . . . . . . . . . . . . . . . . . . . . . . . . . . . . . . . . . . . . . . . . . . . . . . . . . . . . . . . . . . . . . . . . . . . . . . . . . . . . . . . 2-3 Speakers . . . . . . . . . . . . . . . . . . . . . . . . . . . . . . . . . . . . . . . . . . . . . . . . . . . . . . . . . . . . . . . . . . . . . . . . . . . . . . . . . . . . . . . . . . . . . . . . 2-4 Wall Mounting (Optional) . . . . . . . . . . . . . . . . . . . . . . . . . . . . . . . . . . . . . . . . . . . . . . . . . . . . . . . . . . . . . . . . . . . . . . . . . . . . . . . . . . 2-5 Installing the monitor driver. . . . . . . . . . . . . . . . . . . . . . . . . . . . . . . . . . . . . . . . . . . . . . . . . . . . . . . . . . . . . . . . . . . . . . . . . . . . . . . . . 2-5 Comfort and accessibility. . . . . . . . . . . . . . . . . . . . . . . . . . . . . . . . . . . . . . . . . . . . . . . . . . . . . . . . . . . . . . . . . . . . . . . . . . . . . . . . . . . 2-6
Arranging your work area. . . . . . . . . . . . . . . . . . . . . . . . . . . . . . . . . . . . . . . . . . . . . . . . . . . . . . . . . . . . . . . . . . . . . . . . . . . . . . . . 2-6 Positioning and viewing your monitor: . . . . . . . . . . . . . . . . . . . . . . . . . . . . . . . . . . . . . . . . . . . . . . . . . . . . . . . . . . . . . . . . . . . . . 2-6 Quick tips for healthy work habits . . . . . . . . . . . . . . . . . . . . . . . . . . . . . . . . . . . . . . . . . . . . . . . . . . . . . . . . . . . . . . . . . . . . . . . . . 2-7 Accessibility information . . . . . . . . . . . . . . . . . . . . . . . . . . . . . . . . . . . . . . . . . . . . . . . . . . . . . . . . . . . . . . . . . . . . . . . . . . . . . . . . . . . 2-7 Adjusting your monitor image . . . . . . . . . . . . . . . . . . . . . . . . . . . . . . . . . . . . . . . . . . . . . . . . . . . . . . . . . . . . . . . . . . . . . . . . . . . . . . . 2-8 Using the user controls . . . . . . . . . . . . . . . . . . . . . . . . . . . . . . . . . . . . . . . . . . . . . . . . . . . . . . . . . . . . . . . . . . . . . . . . . . . . . . . . . . 2-8 Using the OSD controls . . . . . . . . . . . . . . . . . . . . . . . . . . . . . . . . . . . . . . . . . . . . . . . . . . . . . . . . . . . . . . . . . . . . . . . . . . . . . . . . . 2-8 Using the USB connectors . . . . . . . . . . . . . . . . . . . . . . . . . . . . . . . . . . . . . . . . . . . . . . . . . . . . . . . . . . . . . . . . . . . . . . . . . . . . . . . 2-9 Wake on the System and Display . . . . . . . . . . . . . . . . . . . . . . . . . . . . . . . . . . . . . . . . . . . . . . . . . . . . . . . . . . . . . . . . . . . . . . . . . 2-12 Selecting a supported display mode . . . . . . . . . . . . . . . . . . . . . . . . . . . . . . . . . . . . . . . . . . . . . . . . . . . . . . . . . . . . . . . . . . . . . . . . . . 2-13
Understanding power management . . . . . . . . . . . . . . . . . . . . . . . . . . . . . . . . . . . . . . . . . . . . . . . . . . . . . . . . . . . . . . . 2-14 Caring for your monitor . . . . . . . . . . . . . . . . . . . . . . . . . . . . . . . . . . . . . . . . . . . . . . . . . . . . . . . . . . . . . . . . . . . . . . . . 2-15
Chapter 3. Reference information . . . . . . . . . . . . . . . . . . . . . . . . . . . . . . . . . . . . . . . . . . . . . . . . . . 3-1
Disassembling your monitor . . . . . . . . . . . . . . . . . . . . . . . . . . . . . . . . . . . . . . . . . . . . . . . . . . . . . . . . . . . . . . . . . . . . . . . . . . . . . . . . 3-1 Monitor specifications . . . . . . . . . . . . . . . . . . . . . . . . . . . . . . . . . . . . . . . . . . . . . . . . . . . . . . . . . . . . . . . . . . . . . . . . . . . . . . . . . . . . . 3-4 Troubleshooting . . . . . . . . . . . . . . . . . . . . . . . . . . . . . . . . . . . . . . . . . . . . . . . . . . . . . . . . . . . . . . . . . . . . . . . . . . . . . . . . . . . . . . . . . . 3-6 Manual image setup . . . . . . . . . . . . . . . . . . . . . . . . . . . . . . . . . . . . . . . . . . . . . . . . . . . . . . . . . . . . . . . . . . . . . . . . . . . . . . . . . . . . . . . 3-7 Manually installing the monitor driver . . . . . . . . . . . . . . . . . . . . . . . . . . . . . . . . . . . . . . . . . . . . . . . . . . . . . . . . . . . . . . . . . . . . . . 3-8 Installing the monitor driver in Windows 7. . . . . . . . . . . . . . . . . . . . . . . . . . . . . . . . . . . . . . . . . . . . . . . . . . . . . . . . . . . . . . . . 3-8 Installing the monitor driver in Windows 10. . . . . . . . . . . . . . . . . . . . . . . . . . . . . . . . . . . . . . . . . . . . . . . . . . . . . . . . . . . . . . . 3-9 Getting further help . . . . . . . . . . . . . . . . . . . . . . . . . . . . . . . . . . . . . . . . . . . . . . . . . . . . . . . . . . . . . . . . . . . . . . . . . . . . . . . . . . 3-9 Service information . . . . . . . . . . . . . . . . . . . . . . . . . . . . . . . . . . . . . . . . . . . . . . . . . . . . . . . . . . . . . . . . . . . . . . . . . . . . . . . . . . . . . . 3-10 Product numbers . . . . . . . . . . . . . . . . . . . . . . . . . . . . . . . . . . . . . . . . . . . . . . . . . . . . . . . . . . . . . . . . . . . . . . . . . . . . . . . . . . . 3-10 Getting further help . . . . . . . . . . . . . . . . . . . . . . . . . . . . . . . . . . . . . . . . . . . . . . . . . . . . . . . . . . . . . . . . . . . . . . . . . . . . . . . . . 3-10 Service parts . . . . . . . . . . . . . . . . . . . . . . . . . . . . . . . . . . . . . . . . . . . . . . . . . . . . . . . . . . . . . . . . . . . . . . . . . . . . . . . . . . . . . . 3-11
Appendix A. Service and Support . . . . . . . . . . . . . . . . . . . . . . . . . . . . . . . . . . . . . . . . . . . . . . . . . |
A-1 |
Registering your option . . . . . . . . . . . . . . . . . . . . . . . . . . . . . . . . . . . . . . . . . . . . . . . . . . . . . . . . . . . . . . . . . . . . . . . . . . . . . . . . . . . . A-1 Online technical support. . . . . . . . . . . . . . . . . . . . . . . . . . . . . . . . . . . . . . . . . . . . . . . . . . . . . . . . . . . . . . . . . . . . . . . . . . . . . . . . . . . . A-1 Telephone technical support. . . . . . . . . . . . . . . . . . . . . . . . . . . . . . . . . . . . . . . . . . . . . . . . . . . . . . . . . . . . . . . . . . . . . . . . . . . . . . . . . A-1
Appendix B. Notices . . . . . . . . . . . . . . . . . . . . . . . . . . . . . . . . . . . . . . . . . . . . . . . . . . . . . . . . . . . |
B-1 |
Recycling information . . . . . . . . . . . . . . . . . . . . . . . . . . . . . . . . . . . . . . . . . . . . . . . . . . . . . . . . . . . . . . . . . . . . . . . . . . . . . . . . . . . . . B-2 Disposing of Lenovo computer components . . . . . . . . . . . . . . . . . . . . . . . . . . . . . . . . . . . . . . . . . . . . . . . . . . . . . . . . . . . . . . . . . . . . B-2 Turkish statement of compliance . . . . . . . . . . . . . . . . . . . . . . . . . . . . . . . . . . . . . . . . . . . . . . . . . . . . . . . . . . . . . . . . . . . . . . . . . . . . . B-3 Trademarks. . . . . . . . . . . . . . . . . . . . . . . . . . . . . . . . . . . . . . . . . . . . . . . . . . . . . . . . . . . . . . . . . . . . . . . . . . . . . . . . . . . . . . . . . . . . . . B-3 Power cords and power adapters . . . . . . . . . . . . . . . . . . . . . . . . . . . . . . . . . . . . . . . . . . . . . . . . . . . . . . . . . . . . . . . . . . . . . . . . . . . . . B-3
Contents ii

Safety information
General Safety guidelines
For tips to help you use your computer safely, go to:
http://www.lenovo.com/safety
Before installing this product, read the Safety Information.


 í
í


 í
í


 í
í
iii

Chapter 1. Getting started
This User’s Guide provides detailed operation instructions for the user. For quick instruction overview, please see the Setup Poster for brief information.
Shipping contents
The product package should include the following items:
•AC Power Adapter
•Flat Panel Monitor
•Information Flyer
•Monitor Stand
•Monitor Base
•Power Cord
•Reference and Driver CD
Chapter 1. 1-1
***Your monitor supports the following Tinys that can be installed in your monitor:
1
(2)
1
ThinkCentre M53, M83 |
√ |
√ |
|
|
|
ThinkCentre M600, M700, M900 |
√ |
√ |
|
|
|
ThinkCentre Chromebox |
X |
√ |
|
|
|
ThinkCentre M73, M93 |
√ |
X |
|
|
|
ThinkCentre M900x, M910x, M910, |
√ |
√ |
M715 |
|
|
|
|
|
ThinkCentre M715 |
√ |
√ |
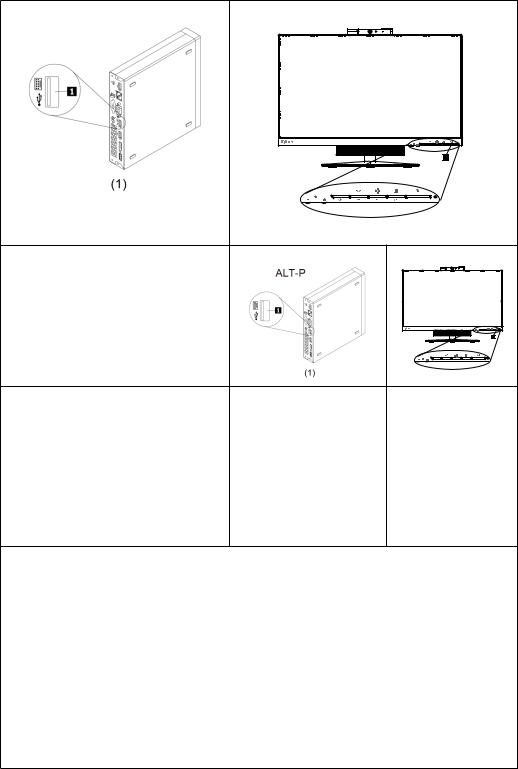
Before you install your Tiny into your monitor, ensure that the Tiny is listed above.Install your computer into the TIO24Gen3
2 When using "ALT+P" to power on Tiny, please Connect a Lenovo keyboard the USB port shown as above on the rear of computer
3 Press ALT+P on the keyboard to power on the computer and TIO24Gen3.
Note 1: ThinkCentre M53, M83, M600, M700, M900, M900x, M910x, M910, M715 Tiny may also be powered on with the TIO24Gen3 power button. (See Figure 2)
Note 2: When connect many cables to ThinkCentre M910x w/Gxf, it is recommended to do cable management or open lift door.
Note 3: Some ThinkCentre M93&M73 can't be powered on with the TIO24Gen3, please press ALT+P on the keyboard to power on computer.
Chapter 1. 1-2
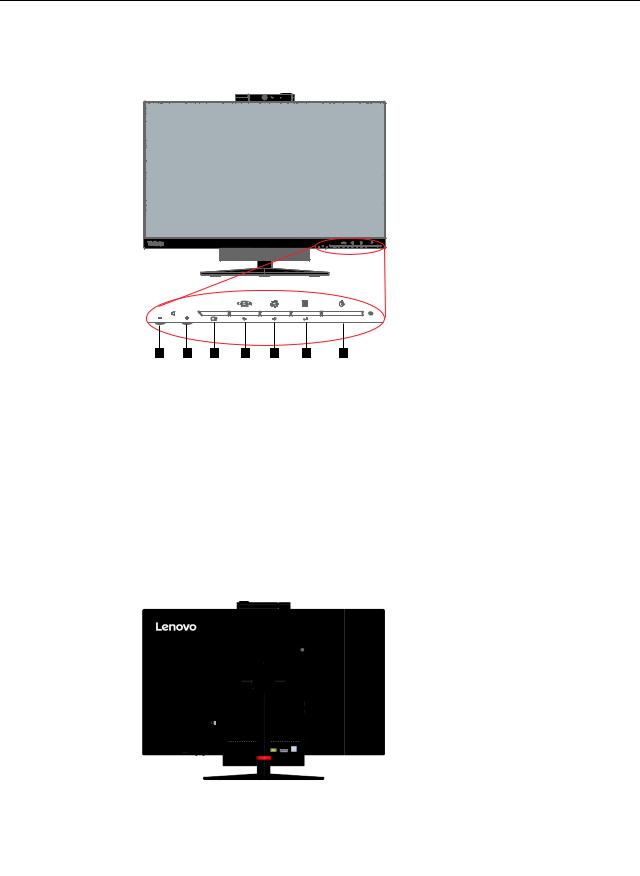
Locating connectors and controls on your monitor
Front view
1 2 3 4 5 6 7
1. Volume Down |
2. Volume Up |
|
|
|
|
3. |
Exit |
4. Modes switch Left shift button |
|
|
|
5. |
Brightness control / Right shift button |
6. Menu-opening button Selection button |
|
|
|
7. |
Power button |
|
|
|
|
Rear view
|
|
|
|
|
|
|
|
|
|
|
|
|
|
|
|
|
|
|
|
|
|
|
|
|
|
|
|
|
|
|
|
1. |
Security-lock slot |
2. AC power adapter connector |
|
||||
|
|
|
|
|
|
|
|
3. |
DisplayPort connector |
4. USB 3.0 connector |
|
||||
|
|
|
|
|
|
|
|
|
|
|
|
|
|
Chapter 1. |
1-3 |
Setting up your monitor
This section provides information on how to set up your monitor.
•Assembling your monitor
•Connecting cables
•Turning on your monitor and computer
Note: Before setting up your monitor, ensure that you have read and understood the “Safety information” on page iii.
Assembling your monitor
To assemble your monitor, follow the four parts below one by one:
Part 1: Install the full-function monitor stand.
Part 2: Install the Tiny.
Part 3: Install the rear Wi-Fi antenna (optional).
Part 4: Install the Kensington-style cable lock (optional).
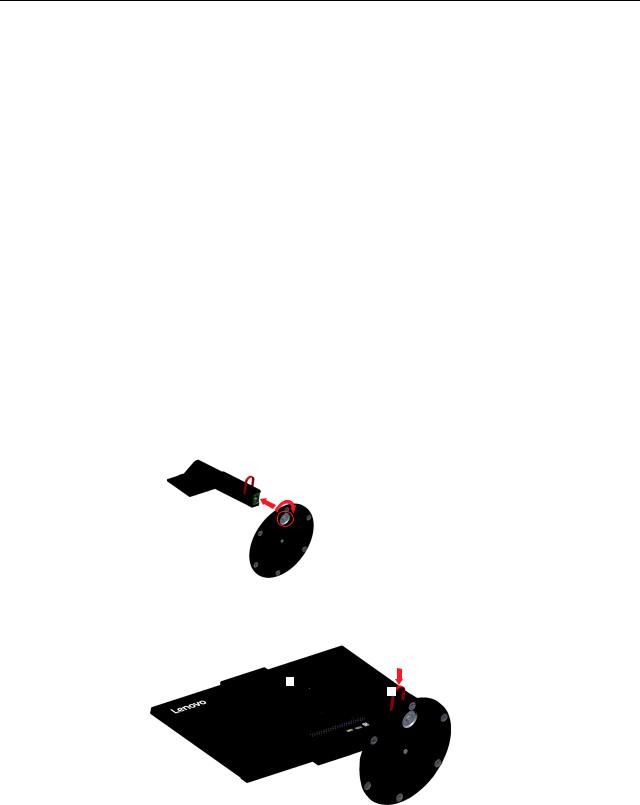
Part 1: Install the full-function monitor stand.
Note: The full-function monitor stand includes one monitor stand and one stand base.
1.Place a soft, clean towel or cloth on the desk or surface. Hold the sides of your monitor and gently lay it down so that the screen is against the surface and the cover is facing up.
2.Insert the three metal studs on the base into the corresponding holes in the stand. Then, tighten the screw as shown to secure the stand.
3.Insert the two metal tabs on the stand into the corresponding holes on the rear of the monitor. Then, pivot the stand downward until it clicks into position.
1 
 2
2
Chapter 1. 1-4

Part 2: Install the Tiny.
1.Press the decorative cover 1 as shown to remove it. Then, press the button 2 to open the cable cover.
Note: Keep the decorative cover for future use.
1 
2
2.With the Lenovo logo facing you, insert your Tiny into the computer bay until it rests on the stoppers.
3.Press the computer from the front until it completely snaps into position.
Note: Make sure the Tiny is aligned with the back cover.
One hand can push the downside of tiny, the other hand assist adjust the Tiny to smoothly inset.
Chapter 1. 1-5

4.Tighten the screw to secure the Tiny.
Part 3: Install the rear Wi-Fi antenna (optional).
1.Pivot the cable cover as shown to the open position. Then, press the decorative cover 2 from the inner side of the cable cover to remove the decorative cover.
2
1 
Chapter 1. 1-6
2.Screw the rear Wi-Fi antenna to the antenna connector on the rear of the computer. Then, adjust the angle of the antenna to 90 degrees.
1  2
2
3.Pivot the cable cover as shown to the closed position.
Part 4: Install the Kensington-style cable lock (optional).
With the key of the Kensington-style cable lock, attach the lock to the security-lock slot on the rear panel of your computer as shown. The lock secures your monitor to a desk, table, or other
non-permanent fixture. It also blockV the Tiny so that the Tiny cannot be removed from the monitor
Chapter 1. 1-7

Connecting cables
After assembling your monitor, you must connect cables correctly to use the monitor and computer. Your monitor can be used with either the Tiny installed in the monitor or an external desktop/laptop computer. To connect cables, do one of the following:
1.If you use the Tiny installed in the monitor, connect the ac power adapter cable and power
cord that comes with the monitor. First connect the ac power adapter cable to the ac power adapter connector on the monitor.Then, connect one end of the power cord to the ac power adapter and the other end to a properly-grounded electrical outlet.
Note: When usLQJ ThinkCentre M900x, M910x, M910 or M715 it is recommended to match 135W adapter which bundled with Tiny for better experience.
2.Use a DisplayPort cable of this type as shown. Connect one end of the DisplayPort cable
to the DisplayPort connector on the monitor and the other end to a DisplayPort connector on the computer. To locate the DisplayPort connector on the monitor, see "Locating connectors and controls on your monitor"on page 1-3.
Chapter 1. 1-8

3.Use a type B-to-type A USB cable as shown. Connect type B connector of this cable to the USB 3.0 upstream connector on the monitor. Then, connect type A connector of the cable to a USB connector on the computer. To locate the USB 3.0 upstream connector on the monitor, see "Locating connectors and controls on your monitor"on page 1-3.
 *
*
Connect one end of the USB cable to the USB downstream terminal on the side of the monitor, and connect the other end of the USB cable to an appropriate USB port on your device. Note: The USB downstream port does not provide power while the monitor switch is off.
 *
*
*: Depending on many factors such as the processing capability of peripheral devices, file attributes, and other factors related to system configuration and operating environments, the actual transfer rate using the various USB connectors on this device will vary and is typically slower than the data rates as defined by the respective USB specifications: - 5 Gbit/s for USB 3.1 Gen 1; 10 Gbit/s for USB 3.1 Gen 2 & 20 Gbit/s for USB 3.2.
Chapter 1. 1-9

4.To initiate the monitor driver, insert the Reference and Driver CD, click Install driver, and follow the on-screen instructions.
Chapter 1. 1-10

Turning on your monitor and computer
To turn on your monitor and computer, do one of the following:
•If you only have the Tiny installed in the monitor, press the power button on the monitor
to turn on your monitor and computer. To locate the power button, see"Locating connectors and controls on your monitor"on page 1-3.
•If you only have the external desktop/laptop computer connected to the monitor, press the power button on the monitor to turn on your monitor. Then, press the power button on the
computer to turn on your computer. To locate the power button, see"Locating connectors and controls on your monitor"on page 1-3.
•If you have both the Tiny installed in the monitor and the external desktop/laptop computer connected to the monitor, do one of the following:
•If you use the Tiny, press the power button on the monitor to turn on your monitor and computer. To locate the power button, see "Locating connectors and controls on your monitor"on page 1-3.
•If you use the external desktop/laptop computer, press the mode-switching button on the monitor to select the DP mode so that the monitor is turned on. Then, press the power button on the computer to turn on your computer. To locate the mode-switching button, see "Locating connectors and controls on your monitor"on page 1-3.
Note: When both the Tiny and the external desktop/laptop computer are working, you can press the mode-switching button to switch between the two computers. When you select the AIO mode, you will use the Tiny. When you select the DP mode, you will use the external desktop/laptop computer.
When you switch between the AIO mode and the DP mode, ensure that no data is being transmitted between your computer and any USB device that is connected to your monitor. If you switch between the two modes while the USB data is being transmitted, the transmission will be interrupted and loss of data may result.
When you switch between the AIO mode and the DP mode the following is required to wake your computer from sleep or hibernation:
•DP mode to AIO mode. If the Tiny installed in your monitor is in sleep or hibernation mode, press the power button of the monitor to wake up the Tiny.
•AIO mode to the DP mode. If the external desktop/laptop computer is in sleep or
hibernation mode, press the power button of the external desktop/laptop computer to wake up it.
Note: When you switch between AIO mode and DP mode, the keyboard and mouse that are connected to your monitor are also switched.
Chapter 1. 1-11
Loading...