


 Loading...
Lenovo ThinkPad T14s Gen 1, ThinkPad X13 Gen 1 User Guide [en, ar, bg, cs, da, de, el, es, fi, fr, he, hr, hu, id, it, ja, ko, nb, nl, pl, pt, pt, ro, ru, sh, sk, sl, sv, th, tr, uk, zc, zh]

T14s Gen 1 and X13 Gen 1
User Guide
Read this first
Before using this documentation and the product it supports, ensure that you read and understand the following:
•Safety and Warranty Guide
•Generic Safety and Compliance Notices
•Setup Guide
First Edition (August 2020)
© Copyright Lenovo 2020.
LIMITED AND RESTRICTED RIGHTS NOTICE: If data or software is delivered pursuant to a General Services Administration “GSA” contract, use, reproduction, or disclosure is subject to restrictions set forth in Contract No. GS- 35F-05925.

Contents
About this documentation . . . . . . . .iii
Chapter 1. Meet your computer . . . . . 1
Front . . . . . . . . . . . . . . . . . . . . 1
Base |
. . . . |
. . . |
. . . . . |
. . |
. |
. . . . |
. |
2 |
Left |
. . . . |
. . . |
. . . . . |
. . |
. |
. . . . |
. |
4 |
Right . . . . . . . . . . . . . . . . . . . . 6 Rear . . . . . . . . . . . . . . . . . . . . 7 Bottom . . . . . . . . . . . . . . . . . . . 8
USB connectors . . . . . . . . . . . . . . 10
Chapter 2. Get started with your computer . . . . . . . . . . . . . . . . 11
Get started with your desktop . . . . . . . . . |
11 |
Manage networks . . . . . . . . . . . . . . |
11 |
Connect to Wi-Fi networks. . . . . . . . . |
11 |
Airplane mode . . . . . . . . . . . . . |
12 |
Interact with your computer . . . . . . . . . . |
12 |
Use the camera . . . . . . . . . . . . . |
12 |
Use the keyboard shortcuts . . . . . . . . |
12 |
Use the TrackPoint pointing device . . . . . |
13 |
Use the trackpad . . . . . . . . . . . . |
14 |
Use the multi-touch screen . . . . . . . . |
16 |
Connect to an external display . . . . . . . |
17 |
Chapter 3. Explore your computer . . |
19 |
Use the Intelligent Cooling feature (for selected |
|
models) . . . . . . . . . . . . . . . . . . |
19 |
Use the P-to-P 2.0 charging function . . . . . . |
19 |
Connect to a Bluetooth-enabled device . . . . . |
20 |
Enabling Nvidia proprietary drivers in Fedora (for |
|
selected models) . . . . . . . . . . . . . . |
20 |
Accessories . . . . . . . . . . . . . . . . |
21 |
Purchase options . . . . . . . . . . . . |
21 |
Docking station . . . . . . . . . . . . . |
21 |
Chapter 4. Secure your computer |
|
and information . . . . . . . . . . . . |
27 |
Lock the computer . . . . . . . . . . . . . |
27 |
Use the fingerprint reader (for selected models) . . |
27 |
Use privacy protection (for selected models) . . . |
28 |
Use passwords . . . . . . . . . . . . . . . |
28 |
Password types . . . . . . . . . . . . . |
28 |
Set, change, and remove a password . . . . |
30 |
Use Power Loss Protection function (for selected |
|
models) . . . . . . . . . . . . . . . . . . |
31 |
Chapter 5. Configure advanced
settings. . . . . . . . . . . . . . . . . 33
UEFI BIOS . . . . . . . . . . . . . . . . . |
33 |
What is UEFI BIOS . . . . . . . . . . . . |
33 |
Enter the UEFI BIOS menu . . . . . . . . . |
33 |
Navigate in the UEFI BIOS interface . . . . . |
33 |
Change the startup sequence . . . . . . . |
33 |
Set the system date and time. . . . . . . . |
34 |
Update UEFI BIOS . . . . . . . . . . . . |
34 |
Chapter 6. CRU replacement . . . . . |
35 |
CRU list . . . . . . . . . . . . . . . . . . |
35 |
Disable the built-in battery. . . . . . . . . . . |
35 |
Replace a CRU . . . . . . . . . . . . . . . |
36 |
Base cover assembly . . . . . . . . . . . |
36 |
Wireless-WAN card (for selected models) . . . 37 |
|
M.2 solid-state drive . . . . . . . . . . . |
39 |
Keyboard (for ThinkPad X13 Gen 1) . . . . . |
42 |
Chapter 7. Help and support . . . . . |
49 |
Frequently asked questions . . . . . . . . . . |
49 |
Error messages . . . . . . . . . . . . . . . |
50 |
Beep errors . . . . . . . . . . . . . . . . |
51 |
Self-help resources . . . . . . . . . . . . . |
52 |
Call Lenovo . . . . . . . . . . . . . . . . |
53 |
Before you contact Lenovo . . . . . . . . |
53 |
Lenovo Customer Support Center . . . . . . |
54 |
Purchase additional services. . . . . . . . . . |
55 |
Appendix A. Ergonomic
information . . . . . . . . . . . . . . . 57
Appendix B. Compliance
information . . . . . . . . . . . . . . . 59
Appendix C. Notices and
trademarks . . . . . . . . . . . . . . . 63
© Copyright Lenovo 2020 |
i |
ii T14s Gen 1 and X13 Gen 1 User Guide

About this documentation
•Illustrations in this documentation might look different from your product.
•Depending on the model, some optional accessories, features, software programs, and user interface instructions might not be applicable to your computer.
•Documentation content is subject to change without notice. To get the latest documentation, go to https:// pcsupport.lenovo.com.
© Copyright Lenovo 2020 |
iii |
iv T14s Gen 1 and X13 Gen 1 User Guide

Chapter 1. Meet your computer
ThinkPad T14s Gen 1 and ThinkPad X13 Gen 1 might be shipped with different microprocessors, namely Intel® and Advanced Micro Devices (AMD). Hereby Intel models and AMD models are used to distinguish computer models with different microprocessors.
Front
1. |
Infrared LED* |
2. |
Camera with IR function* |
3. |
ThinkShutter* |
4. |
Microphones* |
5. |
Camera* |
6. |
Multi-touch screen* |
* for selected models
ThinkShutter Slide ThinkShutter to cover or uncover the camera lens. It is designed to protect your privacy.
Related topic
“Use the multi-touch screen” on page 16
© Copyright Lenovo 2020 |
1 |
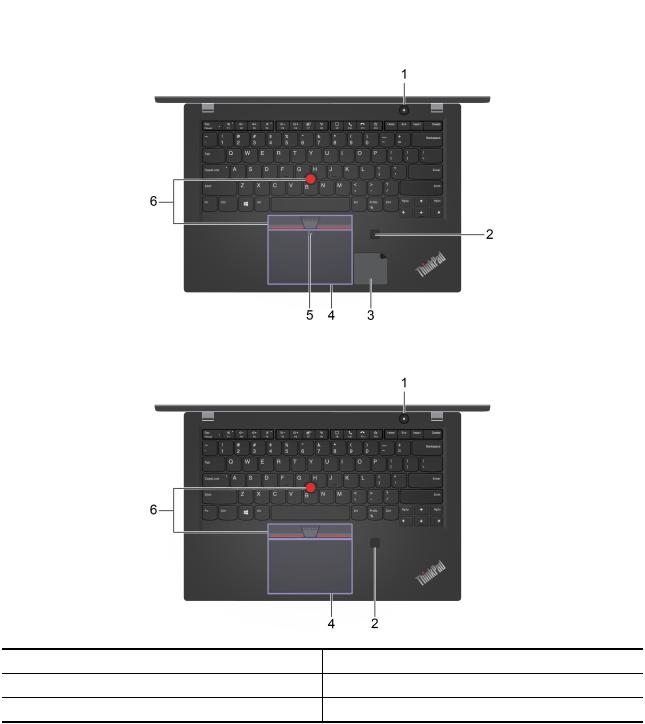
Base
Intel models
AMD models
1. |
Power button |
2. |
Fingerprint reader* |
3. |
NFC label (for selected Intel models) |
4. |
Trackpad |
5. |
NFC mark (for selected Intel models) |
6. |
TrackPoint® pointing device |
* for selected models
Related topics
•“Use the fingerprint reader (for selected models)” on page 27
•“Use the trackpad” on page 14
•“Use the TrackPoint pointing device” on page 13
2 T14s Gen 1 and X13 Gen 1 User Guide
Chapter 1. Meet your computer 3

Left
Intel models
AMD models
1. USB-C™ (3.2 Gen 1) connector (for Intel models)
3. Thunderbolt™ 3 connector (USB-C) (for Intel models) 5. Docking-station connector
7. HDMI connector |
™ |
 2. USB-C (3.2 Gen 2) connectors (for AMD models)
4. Ethernet extension connector Gen 2
 6. USB 3.2 connector Gen 1 8. Audio connector
4 T14s Gen 1 and X13 Gen 1 User Guide
Related topics
•“USB connectors” on page 10
•“Docking station” on page 21
Chapter 1. Meet your computer 5
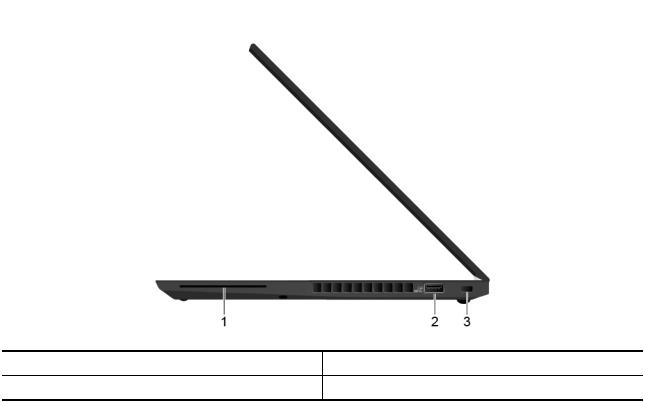
Right
1. Smart-card slot* |
2. Always On USB 3.2 connector Gen 1 |
3. Security-lock slot |
|
Related topics
•“USB connectors” on page 10
•“Lock the computer” on page 27
6 T14s Gen 1 and X13 Gen 1 User Guide
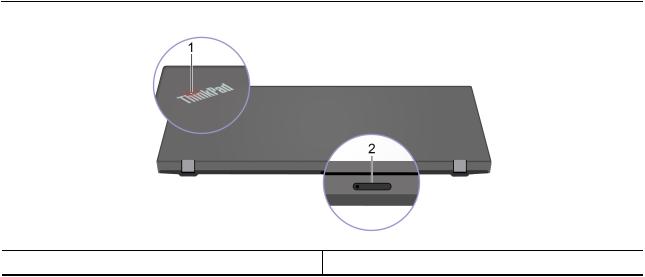
Rear
1. System status indicator |
2. Nano-SIM-card and microSD-card slot* |
* for selected models
Chapter 1. Meet your computer 7
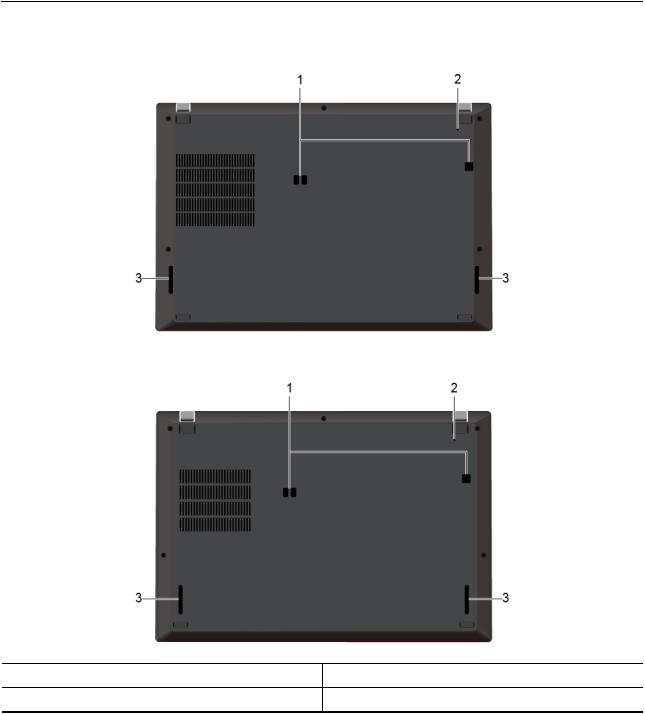
Bottom
ThinkPad T14s Gen 1
ThinkPad X13 Gen 1
1. Docking-station hook holes |
2. Emergency-reset hole |
3. Speakers |
|
Emergency-reset hole
If the computer stops responding and you cannot turn it off by pressing the power button, reset your computer:
1.Disconnect your computer from ac power.
2.Insert a straightened paper clip into the hole to cut off power supply temporarily.
3.Connect your computer to ac power and then turn on your computer.
8 T14s Gen 1 and X13 Gen 1 User Guide
Related topic
“Docking station” on page 21
Chapter 1. Meet your computer 9
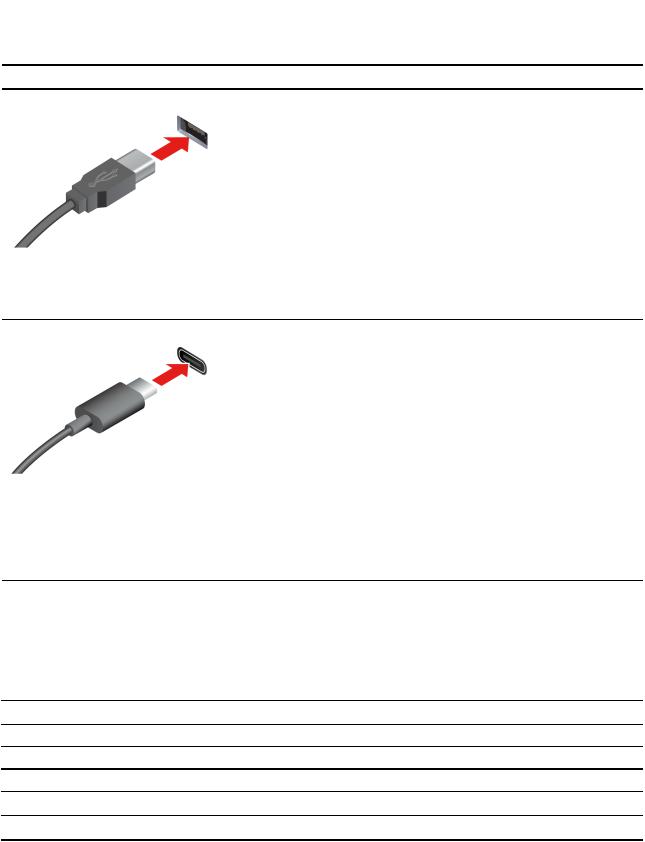
USB connectors
Note: Depending on the model, some USB connectors might not be available on your computer.
Connector name |
Description |
Connect USB-compatible devices, such as a USB keyboard, USB mouse, USB storage device, or USB printer.
• USB 2.0 connector
• USB 3.2 connector Gen 1
• USB 3.2 connector Gen 2
• USB-C (3.2 Gen 1) connector
• USB-C (3.2 Gen 2) connector
• Thunderbolt 3 connector (USB-C)
• Thunderbolt 4 connector (USB-C)
Statement on USB transfer rate
•Charge USB-C compatible devices with the output voltage and current of 5 V and 1.5 A. If the connected device supports USB Power Delivery, the output current can reach 3 A.
•Connect to an external display:
–USB-C to VGA: up to 1920 x 1200 pixels, 60 Hz
–USB-C to DP: up to 5120 x 3200 pixels, 60 Hz
•Connect to USB-C accessories to help expand your computer functionality. To purchase USB-C accessories, go to https:// www.lenovo.com/accessories.
Depending on many factors such as the processing capability of the host and peripheral devices, file attributes, and other factors related to system configuration and operating environments, the actual transfer rate using the various USB connectors on this device will vary and will be slower than the data rate listed below for each corresponding device.
USB device |
Data rate (Gbit/s) |
|
3.2 Gen 1 |
/ 3.1 Gen 1 |
5 |
3.2 Gen 2 |
/ 3.1 Gen 2 |
10 |
3.2 Gen 2 |
× 2 |
20 |
Thunderbolt 3 connector (USB-C) |
40 |
|
Thunderbolt 4 connector (USB-C) |
40 |
|
10 T14s Gen 1 and X13 Gen 1 User Guide
Chapter 2. Get started with your computer
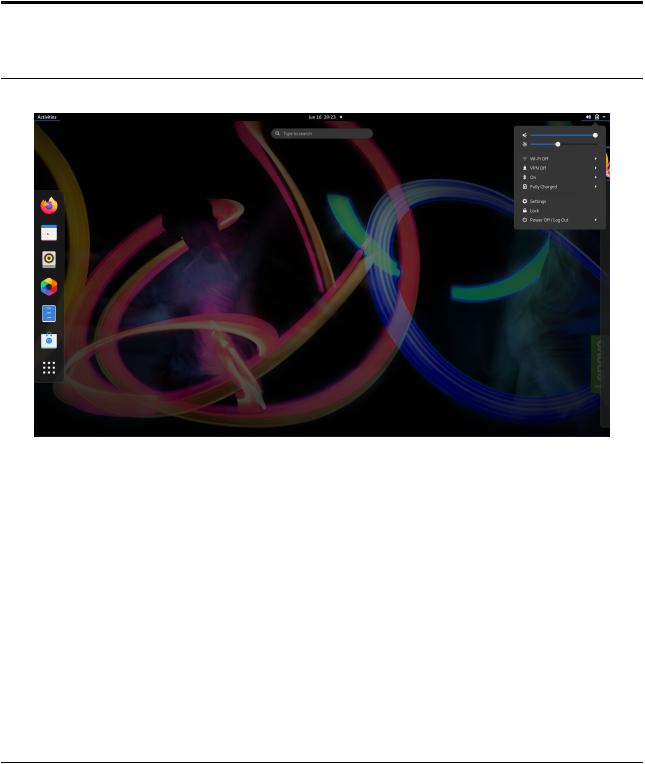
Get started with your desktop
Launch an app
•Use the super key (with the Windows logo) or open the Activities menu on the top left and type in the name of the application you want to launch.
•Click the "show application" menu (For the Fedora operating system, you can see the menu after opening Activities menu) on the lower left and type in the name of the application you want to launch.
Launch settings
Select the system menu arrow on the top right and click on Settings
Get support
•For the Ubuntu operating system, see the Ubuntu documentation site at https://help.ubuntu.com/lts/ ubuntu-help/index.html.
•For the Fedora operating system, see the Fedora project wiki at https://fedoraproject.org/wiki/Fedora_ Project_Wiki.
•The Gnome desktop is installed by default and is designed to be simple and easy to use. Details on using Gnome are available by launching the Help application or online at https://help.gnome.org/users/.
Manage networks
Your computer helps you connect to the world through a wired or wireless network.
Connect to Wi-Fi networks
1. Click the system menu arrow on the top right. A list of available wireless networks is displayed.
© Copyright Lenovo 2020 |
11 |

2. Select a network available for connection. Provide required information, if needed.
Airplane mode
When the Airplane mode is enabled, all wireless features are disabled.
To enable or disable the Airplane mode:
1.Use the system menu drop down (top right) and choose Settings
2.Click the Wi-Fi option.
3.Turn on or turn off the Airplane mode switch.
Interact with your computer
Your computer provides you various ways to navigate the screen.
Use the camera
•Take pictures or record videos by using the Cheese application. The indicator next to the camera is on when the camera is in use.
•If you use other apps that support photographing, video chatting, and video conference, the camera starts automatically when you enable the camera-required feature from the app.
Note: IR camera support is currently limited in Linux. Make sure the regular camera is selected if you see gray lines.
Use the keyboard shortcuts
The special keys on the keyboard help you work more easily and effectively.
|
Enable / disable speakers |
|
Decrease volume |
|
Increase volume |
|
Enable / disable microphones |
|
Darken display |
|
Brighten display |
|
Manage external displays |
|
Enable / disable wireless |
* |
Open Settings window |
|
|
* |
Enable / disable Bluetooth |
|
12 T14s Gen 1 and X13 Gen 1 User Guide

Fn+Spacebar
Fn+B
Fn+K
Fn+P
Fn+S
Fn+4
Fn+Left arrow key Fn+Right arrow key
* for selected models
Invoke the special function printed as an icon on each key or standard function of F1–F12 function keys.
FnLock indicator on: standard function
FnLock indicator off: special function
Toggle keyboard backlight
Break operation
Scroll contents
Pause operation
Send system request
Enter sleep mode
To wake up the computer, press Fn or the power button.
Go to beginning
Go to end
Use the TrackPoint pointing device
The TrackPoint pointing device enables you to perform all the functions of a traditional mouse, such as pointing, clicking, and scrolling.
Use the TrackPoint pointing device
1. Pointing stick
Use your index finger or middle finger to apply pressure to the pointing-stick nonslip cap in any direction parallel to the keyboard. The pointer on the screen moves accordingly but the pointing stick itself does not move. The higher the pressure applied, the faster the pointer moves.
2. Left-click button
Chapter 2. Get started with your computer 13
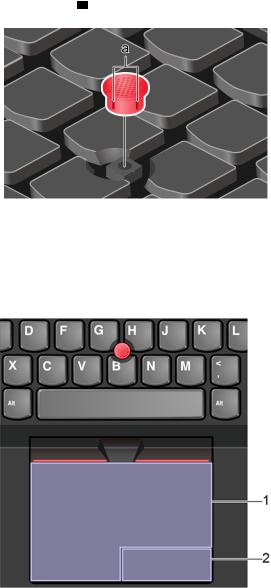
Press to select or open an item.
3. Right-click button
Press to display a shortcut menu.
4. Middle button
Press and hold the dotted middle button while applying pressure to the pointing stick in the vertical or horizontal direction. Then, you can scroll through the document, Web site, or apps.
Replace the pointing-stick nonslip cap
Note: Ensure that the new cap has grooves a .
Use the trackpad
The entire trackpad surface is sensitive to finger touch and movement. You can use the trackpad to perform all the pointing, clicking, and scrolling functions of a traditional mouse.
Use the trackpad
1. Left-click zone
Press to select or open an item.
14 T14s Gen 1 and X13 Gen 1 User Guide
You also can tap anywhere on the surface of the trackpad with one finger to perform the left-click action.
2. Right-click zone
Press to display a shortcut menu.
You also can tap anywhere on the surface of the trackpad with two fingers to perform the right-click action.
Use the touch gestures
Tap
Tap anywhere on the trackpad with one finger to select or open an item.
Two-finger tap
Tap anywhere on the trackpad with two fingers to display a shortcut menu.
Two-finger scroll
Put two fingers on the trackpad and move them in the vertical or horizontal direction. This action enables you to scroll through the document, Web site, or apps.
Two-finger zoom out
Put two fingers on the trackpad and move them closer together to zoom out.
Two-finger zoom in
Put two fingers on the trackpad and move them farther apart to zoom in.
Notes:
•When using two or more fingers, ensure that you position your fingers slightly apart.
•Some gestures are not available if the last action was done from the TrackPoint pointing device.
•Some gestures are only available when you are using certain apps.
•If the trackpad surface is stained with oil, turn off the computer first. Then, gently wipe the trackpad surface with a soft and lint-free cloth moistened with lukewarm water or computer cleaner.
Chapter 2. Get started with your computer 15

For more gestures, see the help information of the pointing device.
Use the multi-touch screen
If your computer display supports the multi-touch function, you can navigate the screen with simple touch gestures.
Note: Some gestures might not be available depending on the app you use.
Tap once
•From the Start menu: Open an app or item.
•From the desktop: Select an app or item.
•In an open app: Perform an action such as Copy Save and
Delete depending on the app. |
, |
Tap twice quickly
Open an app or item from the desktop.
Tap and hold
Open a shortcut menu.
Slide
Scroll through items, such as lists, pages, and photos.
Drag an item to the location you want
Move an object.
16 T14s Gen 1 and X13 Gen 1 User Guide
Loading...