


 Loading...
KODAK EASYSHARE MAX
Camera / Z990
Extended user guide
www.kodak.com
For help with your camera:
www.kodak.com/go/Z990support

Eastman Kodak Company
Rochester, New York 14650
© Eastman Kodak Company, 2011
All screen images are simulated.
Kodak, EasyShare Max, Ektachrome, Kodachrome, Kodacolor, Pulse, T-Max, and Tri-X are trademarks of Eastman Kodak Company.
4H7367_en
Product features
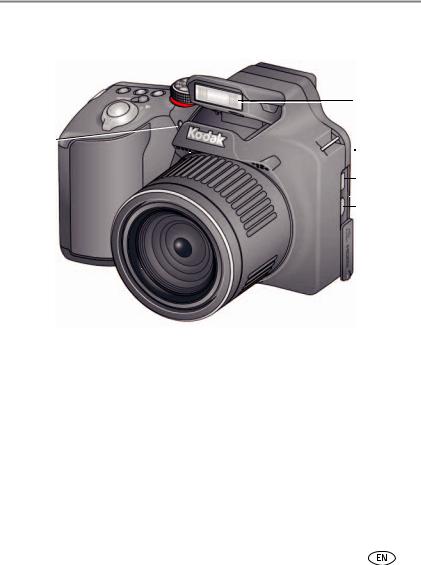
Front view
AF Assist/
Self-timer/ 
Video light
Lens 
Flash
Stereo
 Microphones
HDMI Out
Micro USB
AV Out
www.kodak.com/go/support |
i |
Product features
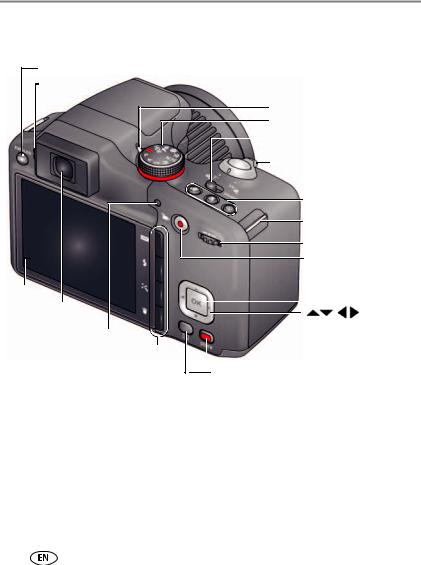
Back view
EVF/LCD button
Speaker
LCD EVF (Electronic viewfinder)
Luminance
sensor Display Flash,
Effects,
Delete
ii
Power light
Mode dial
Power

 Shutter button
Zoom
Burst, Focus Mode,
Self-timer
Strap post
Jog dial
Video Record button
OK

 Share
Share
Review
www.kodak.com/go/support

Bottom view
Tripod socket
Slot for SD/SDHC
Card (optional
accessory) Battery compartments
www.kodak.com/go/support |
iii |

Table of contents |
|
|
1 |
Setting up your camera ......................................................................... |
1 |
|
Charging the rechargeable batteries .............................................................. |
1 |
|
Loading the batteries .................................................................................... |
2 |
|
Turning on the camera .................................................................................. |
3 |
|
Setting the language and date/time............................................................... |
3 |
|
Storing pictures on an accessory SD/SDHC Card ............................................. |
4 |
|
Attaching the strap ....................................................................................... |
5 |
2 |
Taking pictures/videos ........................................................................... |
6 |
|
Taking pictures in Smart Capture mode ......................................................... |
6 |
|
Your camera, the way you want it ................................................................. |
7 |
|
Using Tools to choose actions, preferences .................................................... |
8 |
|
Understanding the picture-taking icons.......................................................... |
9 |
|
Watch the battery level ................................................................................. |
9 |
|
Taking a video ............................................................................................ |
10 |
|
Using the zoom........................................................................................... |
11 |
|
Using the flash............................................................................................ |
12 |
|
Using different modes ................................................................................. |
13 |
|
Using HDR mode......................................................................................... |
14 |
|
Using SCN (Scene) modes ........................................................................... |
15 |
|
Using Panorama in SCN mode..................................................................... |
16 |
|
Using Creative modes ................................................................................. |
17 |
|
Using Automatic Panorama in Creative mode .............................................. |
18 |
|
P, A, S, and M modes.................................................................................. |
19 |
|
Using the Self-timer button ......................................................................... |
21 |
|
Using the Focus button ............................................................................... |
22 |
|
Using focus/exposure zones......................................................................... |
23 |
|
Using the Burst button ................................................................................ |
24 |
iv |
www.kodak.com/go/support |

|
|
Table of contents |
|
Using the Effects button .............................................................................. |
25 |
|
Using the histogram to view picture brightness............................................ |
26 |
|
Using exposure compensation to adjust brightness ...................................... |
27 |
3 |
Reviewing and editing ......................................................................... |
28 |
|
Reviewing pictures/videos ........................................................................... |
28 |
|
Deleting pictures/videos .............................................................................. |
30 |
|
Viewing pictures/videos in different ways..................................................... |
31 |
|
A smarter way to find and enjoy your pictures.............................................. |
32 |
|
Understanding the review icons................................................................... |
33 |
|
Cropping a picture ...................................................................................... |
34 |
|
Using the RAW Develop feature .................................................................. |
35 |
|
Adding a border to a picture........................................................................ |
36 |
|
Using photo effects to change a picture’s tint .............................................. |
36 |
|
Trimming a video ........................................................................................ |
37 |
|
Making a picture from a video..................................................................... |
38 |
|
Making an action print from a video............................................................ |
39 |
|
Selecting multiple pictures/videos ................................................................ |
40 |
|
Displaying pictures/videos on a television..................................................... |
41 |
|
Creating a slide show.................................................................................. |
42 |
|
Adding a date stamp................................................................................... |
42 |
|
Using the optional remote control ............................................................... |
43 |
4 |
Sharing pictures/videos ....................................................................... |
44 |
|
Sharing through email and social networks.................................................. |
44 |
|
Tagging pictures ......................................................................................... |
46 |
|
Marking pictures/videos as favorites ............................................................ |
49 |
5 Doing more with your camera ............................................................. |
50 |
|
|
Changing settings ....................................................................................... |
50 |
www.kodak.com/go/support |
v |

6 |
Install software ................................................................................... |
53 |
|
Install software, transfer pictures, and share ................................................ |
53 |
|
Printing pictures.......................................................................................... |
54 |
|
Marking pictures for print............................................................................ |
55 |
7 |
Troubleshooting .................................................................................. |
56 |
|
Getting help on the Web ............................................................................. |
60 |
8 Appendix ............................................................................................. |
61 |
|
|
Specifications.............................................................................................. |
61 |
|
Care and maintenance ................................................................................ |
63 |
|
Upgrading your software and firmware........................................................ |
64 |
|
Storage capacities ....................................................................................... |
64 |
|
Important safety instructions ....................................................................... |
64 |
|
Battery replacement, battery life .................................................................. |
65 |
|
Limited warranty ......................................................................................... |
66 |
|
Regulatory compliance ................................................................................ |
68 |
vi |
www.kodak.com/go/support |
1 Setting up your camera
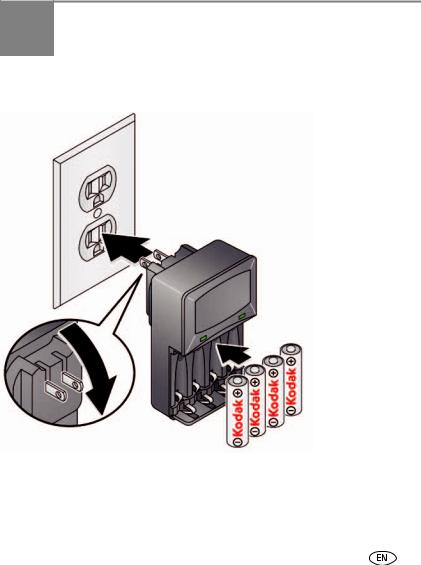
Charging the rechargeable batteries
All batteries lose power over time–even if they’re not being used. For longer life, fully charge KODAK Ni-MH Rechargeable Batteries AA prior to use.
Lights are on while the charger is plugged in. (See the charger documentation for instructions and charging times.)
Your plug may differ.
|
Watch the battery level |
See page 9 |
|
|
Extend battery life |
See page 66 |
|
|
Purchase extra batteries |
www.kodak.com/go/accessories |
|
|
|
|
|
www.kodak.com/go/support |
1 |
||

Setting up your camera
Loading the batteries
1 |
2 |
|
Watch the battery level |
See page 9 |
|
|
Extend battery life |
See page 66 |
|
|
Purchase extra batteries |
www.kodak.com/go/accessories |
|
2 |
|
|
|
|
www.kodak.com/go/support |
||
Setting up your camera
Turning on the camera
Setting the language and date/time
Language:
 to change. OK to accept.
Date/Time:
At the prompt, press OK.
 to change current field.
  for previous/next field.
OK to accept.
Sharing Destinations:
You can tell the camera which sharing sites to offer when it’s time to share pictures/videos.
 to highlight a site.
OK to check/uncheck the site.
NOTE: To change language in the future, use the Settings menu (see page 51).
www.kodak.com/go/support |
3 |
Setting up your camera
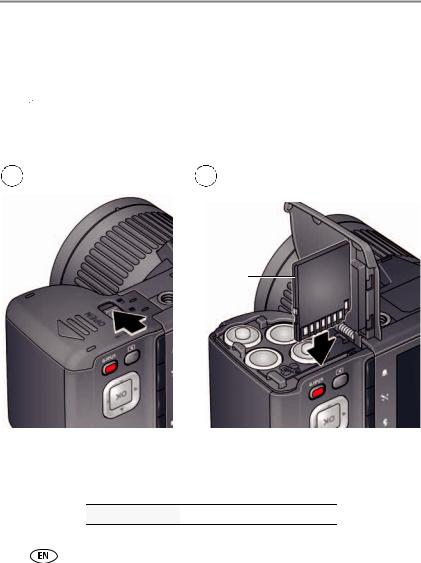
Storing pictures on an accessory SD/SDHC Card
Your camera has internal memory. We recommend purchasing a SD or SDHC Card (Class 4 or higher) to conveniently store more pictures/videos.
 CAUTION:
A card can only be inserted one way; forcing it may cause damage. Inserting or removing a card while the camera is on may damage the pictures, the card, or the camera.
1 |
Turn off the camera, then |
|
open the door. |
2 |
Insert a card until it clicks. To remove a |
|
card, press and release it. |
Optional accessory
IMPORTANT: When you turn on the camera, it checks to see if a card is inserted. If so, new pictures/videos are stored on the card. If no card is inserted, new pictures/videos are stored in the camera’s internal memory. If pictures/videos are detected in internal memory and a card is inserted, the camera prompts you to move the pictures to the card (and erase those in internal memory).
Purchase cards www.kodak.com/go/accessories
4 |
www.kodak.com/go/support |
Setting up your camera
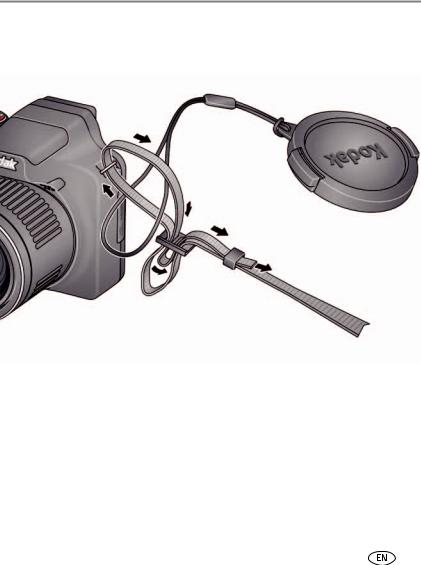
Attaching the strap
www.kodak.com/go/support |
5 |
2 Taking pictures/videos
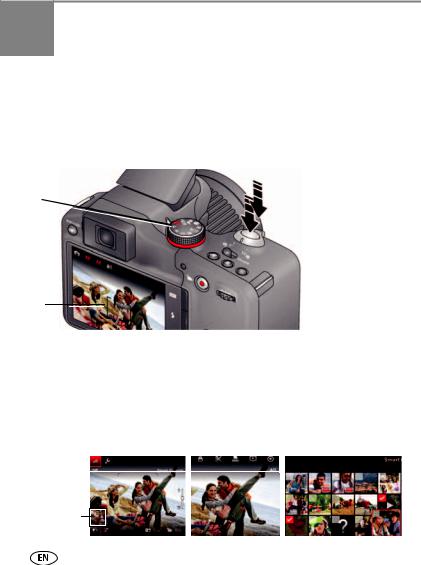
Taking pictures in Smart Capture mode
1 Turn the Mode dial to Smart Capture  .
.
2Use the LCD or EVF to compose the picture. Press the EVF/LCD button and use the electronic viewfinder to conserve battery power and improve visibility outdoors.
Mode dial 
EVF/LCD  button
Framing marks
3Press the Shutter button halfway to focus and set exposure. Framing marks indicate the camera focus area. If the camera is not focusing on the desired subject, release the Shutter button and recompose the scene.
4Press the Shutter button completely down. The new picture is briefly displayed. If you don’t like it, press the Delete button, then follow the prompts. (To delete a picture later, see page 30.) To take a picture while recording a video, see page 10.
IMPORTANT: Press the Share button to share anytime. To learn more, see page 28.
In Liveview |
|
In Quickview |
In Review |
Most recent picture/video
6 |
www.kodak.com/go/support |
Taking pictures/videos
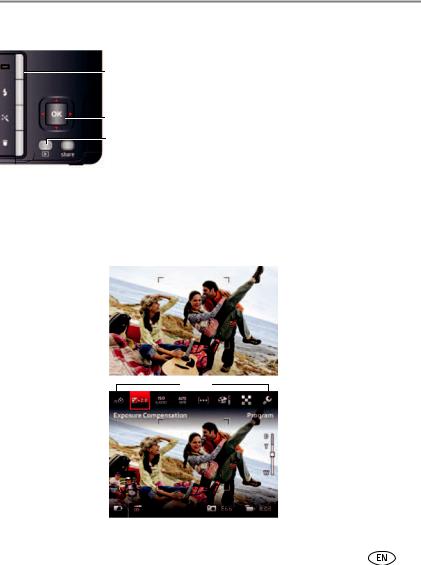
Other picture-taking features
Display
OK
Review
■To view available tools, press the Display button  . Press
  to choose a tool, then press OK.
■To review, tag, and edit pictures and videos, press the Review button  (see page 28).
■To change camera settings, see page 50.
■If it’s hard to see the LCD, you can adjust the brightness (see page 51).
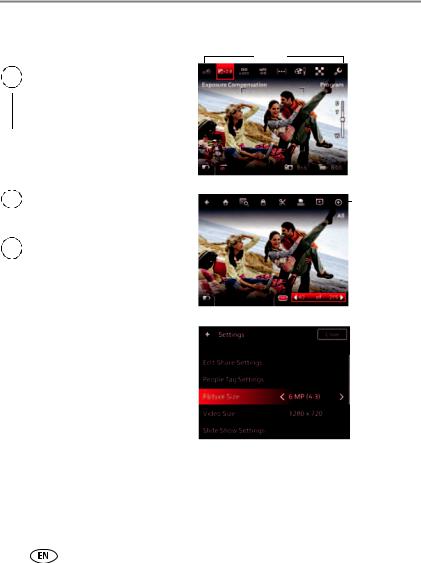
Your camera, the way you want it
Sometimes, you want to see everything available! (Other times, you want everything out of your way.) Press the Display button  to change between Clean view and Tools view.
Clean view
Tools
Tools view (Tools vary by camera mode.)
Note: If you’re in a PASM mode, Liveview Histogram and Framing Grid view* are also available.
* To enable Liveview Histogram and/or Framing Grid, see page 51.
www.kodak.com/go/support |
7 |
Taking pictures/videos
Using Tools to choose actions, preferences
1In Liveview, press  to move between Tools and the most recent picture.
or |
Most recent |
||
|
|
picture |
|
|
|
|
|
|
|
|
|
1In Review, press  to move between Tools and Previous/Next.
2Press  to choose a tool, then press OK.
Press  to change a tool’s setting, then press OK.
Note: If you chose  , press
 to choose a setting, then press OK.
Some settings can be chosen using  .
.
Tools
More tools
8 |
www.kodak.com/go/support |
Taking pictures/videos
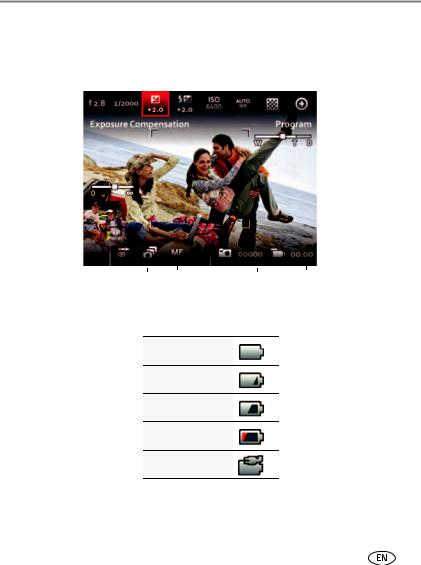
Understanding the picture-taking icons
Flash compensation |
|
|
|
|
|
|
|
|
|
|
|
|
|
|
|
|
|
ISO |
|||||||||
Exposure compensation |
|
|
|
|
|
|
|
|
|
|
|
|
|
|
|
|
White balance |
||||||||||
Shutter speed |
|
|
|
|
|
|
|
|
|
|
|
|
Sharpness |
||||||||||||||
Aperture |
|
|
|
|
|
|
|
|
|
|
|
|
|
|
|
|
|
|
|
|
|
|
|
|
|
More tools |
|
|
|
|
|
|
|
|
|
|
|
|
|
|
|
|
|
|
|
|
|
|
|
|
|
|
|||
|
|
|
|
|
|
|
|
||||||||||||||||||||
|
|
|
|
|
|
|
|
|
|
|
|
|
|
|
|
|
|
|
|
|
|
|
|
|
|||
Manual focus |
|
|
|
|
|
|
|
|
|
|
|
|
|
|
|
|
|
|
|
|
|
|
Zoom slider |
||||
|
|
|
|
|
|
|
|
|
|
|
|
|
|
|
|
|
|
|
|
|
|
||||||
|
|
|
|
|
|
|
|
|
|
|
|
|
|
|
|
|
|
|
|||||||||
|
|
|
|
|
|||||||||||||||||||||||
Most recent |
|
|
|
|
|||||||||||||||||||||||
picture/video |
|
|
|
|
|
|
|
|
|
|
|
|
|
|
|
|
|
|
|
|
|
|
|
Number of |
|||
Flash, Burst, |
|
|
|
||||||||||||||||||||||||
|
|
|
pictures/video |
||||||||||||||||||||||||
Focus modes |
|
|
|
|
|
|
|
|
|
|
|
|
time remaining |
||||||||||||||
|
|
|
|
|
|
|
|
|
|
||||||||||||||||||
|
|
|
|
|
|
|
|
|
|
|
|
|
|
|
|
|
|
||||||||||
Watch the battery level
Don’t miss out on great pictures and videos—keep your batteries fully charged.
Full
Three quarters
Half
Critical
AC Power
|
Charge the batteries |
See page 1 |
|
|
Purchase extra batteries |
www.kodak.com/go/accessories |
|
|
|
|
|
www.kodak.com/go/support |
9 |
||
Taking pictures/videos
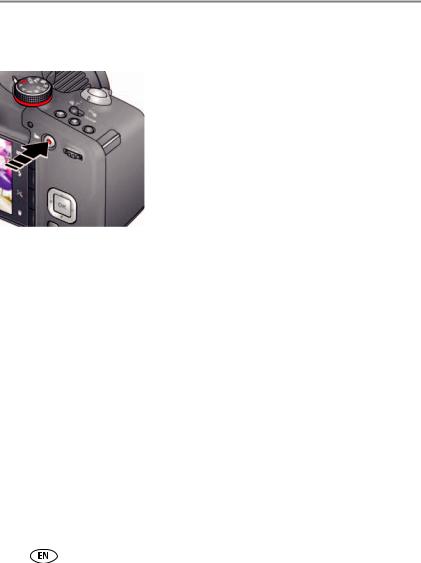
Taking a video
The camera is always ready to take a video—just press the Video Record button!
1 Use the LCD or EVF to compose the video.
2To start recording, press and release the Video
Record button  . To stop recording, press and release the button again.
The first frame of the new video and the play button are displayed for a few seconds.
■To play/pause the video, press the OK button.
■If you don’t like the video, press the Delete button, then follow the prompts. (To delete a video later, see page 30.)
NOTE: Longer recording times may raise camera temperature (see page 56).
Take a picture while recording a video
While recording a video, press the Shutter button completely down.
The camera takes a picture and continues recording video until you press the Video Record button again. The picture size matches the video size. (For example, if the Video Size is set to 1920 x 1080, the picture size is also 1920 x 1080.)
10 |
www.kodak.com/go/support |
Taking pictures/videos
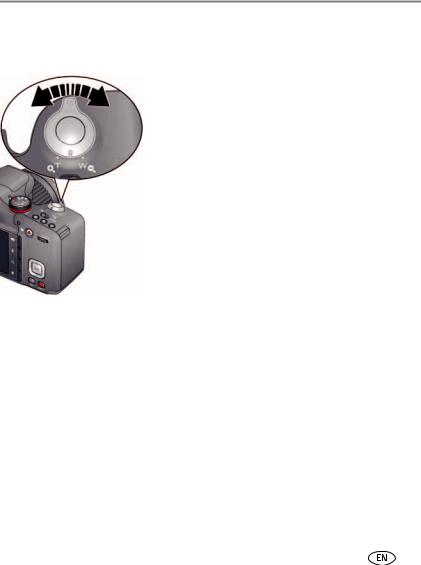
Using the zoom
Use optical zoom to get up to 30X closer to your subject.
1Use the LCD or EVF to frame your subject. (For focus distances, see Specifications, page 61.)
2Press Telephoto (T) to zoom in. Press Wide Angle
(W) to zoom out.
3 Take the picture or video.
NOTE: To get a focused picture every time, use the framing marks (page 6).
Using digital zoom
Digital zoom is not available in Smart Capture mode.
NOTE: You may notice decreased image quality when using digital zoom.
www.kodak.com/go/support |
11 |
Taking pictures/videos
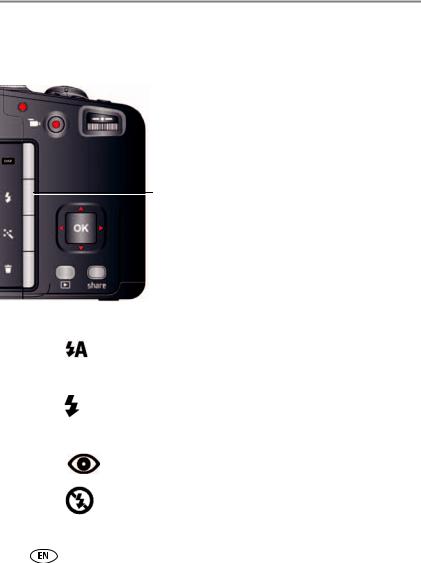
Using the flash
Use the flash when you take pictures at night, indoors, or outdoors in heavy shadows. Flash settings are limited in some capture modes.
Press the Flash button repeatedly to scroll through flash modes.
The current flash mode appears on the LCD or EVF.
Flash modes |
The flash fires |
|||||
Auto |
|
|
|
|
|
When the lighting conditions require it. |
|
|
|
|
|
||
|
|
|
|
|
|
|
Fill |
|
|
|
|
|
Every time you take a picture, regardless of the lighting conditions. |
|
|
|
|
|
|
Use when the subject is in shadow or is “backlit” (when the light is |
|
|
|
|
|
|
behind the subject). In low light, hold the camera steady or use a |
|
|
|
|
|
|
tripod. |
|
|
|
|
|
|
NOTE: Not available in Smart Capture mode. |
Red-eye |
|
|
|
|
|
A preflash fires, shrinking the eye pupil, before the picture is taken. |
|
|
|
|
|
||
Reduction |
|
|
|
|
|
|
|
|
|
|
|
|
|
Off |
|
|
|
|
|
Never. |
|
|
|
|
|
||
|
|
|
|
|
|
|
|
|
|
|
|
|
|
12 |
www.kodak.com/go/support |
Taking pictures/videos
Using different modes
Choose the mode that best suits your subjects and surroundings.
Capture mode |
For |
||
|
|
Smart Capture |
Excellent image quality and ease of use. |
|
|
||
|
|
|
■ Faces are detected. |
|
|
|
|
|
|
|
■ The scene is analyzed for other content and for lighting. |
|
|
|
■ KODAK PERFECT TOUCH Technology is applied, for better |
|
|
|
pictures. |
|
|
|
|
|
P |
Program |
More control over your camera and pictures. (See page 19.) |
AAperture Priority
S |
Shutter Priority |
MManual
SCN Scene |
A suite of features that let you take pictures in unique |
|
||||||
|
|
|
|
|
|
|
environments, but with point-and-shoot simplicity. (See |
|
|
|
|
|
|
|
|
page 15.) |
|
|
|
|
|
|
|
|
|
|
|
|
|
|
|
|
Sport |
Subjects that are in motion. Shutter speed is fast. |
|
|
|
|
|
|
||||
|
|
|
|
|
|
|
|
|
|
|
|
|
|
|
|
|
|
|
|
|
|
|
|
Portrait |
Full-frame portraits of people. |
|
|
|
|
|
|
||||
|
|
|
|
|
|
|
|
|
|
|
|
|
|
|
|
|
|
|
|
|
|
|
|
Creative |
A suite of advanced, artistic features. (See page 17.) |
|
|
|
|
|
|
|
|||
|
|
|
|
|
|
|
|
|
|
|
|
|
|
|
|
|
|
|
|
|
|
|
|
High Dynamic |
High-contrast scenes. The camera takes and merges 3 pictures |
|
|
|
|
|
|
|
|||
|
|
|
|
|
|
Range |
to produce one of high dynamic range, accommodating light |
|
|
|
|
|
|
|
|
||
|
|
|
|
|
|
|
levels from bright sunlight to faint starlight. Resolution is set at |
|
|
|
|
|
|
|
|
12 MP. Best for stationary subjects. Hold the camera steady. |
|
|
|
|
|
|
|
|
(See page 14.) |
|
|
|
|
|
|
|
|
|
|
www.kodak.com/go/support |
13 |
|||||||

Taking pictures/videos
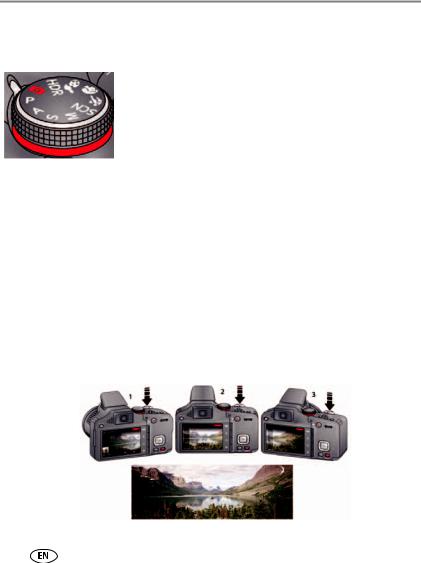
Using HDR mode
Use HDR (high dynamic range) mode to capture high-contrast scenes—those with both bright highlights and dark shadows. (Example: The bark of a shaded tree against a bright sky.)
1Turn the Mode dial to HDR.
Resolution is set at 12 MP.
2Compose the picture. Important tips:
■Hold the camera steady or use a tripod—the camera will be taking multiple pictures.
■For best results, photograph stationary subjects.
■Avoid fluorescent lights, which may produce horizontal bands.
3Press the Shutter button halfway down, then completely down.
The camera takes 3 pictures, then combines them into 1, with shadows and highlights at their best exposure.
4 When finished, turn the Mode dial to another mode.
14 |
www.kodak.com/go/support |

Taking pictures/videos
Using SCN (Scene) modes
1 Turn the Mode dial to SCN (Scene).
2 Press  and
and  to read Scene mode descriptions.
3 Press OK to choose the Scene mode that you’ve highlighted.
SCN mode |
For |
Landscape |
Distant scenes. |
Flower |
Close range. Use available light instead of flash, if possible. |
Sunset |
Subjects at dusk. |
Backlight |
Subjects that are in shadow or “backlit.” |
Candle Light |
Subjects illuminated by candle light. |
Children |
Action pictures of children in bright light. |
Bright |
Bright beach or snow scenes. |
Fireworks |
Fireworks. For best results, place the camera on a steady surface or tripod. |
Self-Portrait |
Close-ups of yourself. Assures proper focus and minimizes red eye. |
Night Portrait |
Reduces red eye of people in night scenes or low-light conditions. |
Night Landscape |
Distant scenery at night. Flash does not fire. |
Stage |
People on a lit stage. Fast shutter speed, high ISO. Flash and sounds are |
|
off. (Flash setting can be changed.) |
High ISO |
People indoors, in low-light scenes. |
Panorama R-L, |
“Stitching” 2 or 3 pictures into 1 panoramic scene. (See page 16.) |
L-R |
|
|
|
www.kodak.com/go/support |
15 |
Taking pictures/videos
Using Panorama in SCN mode
Use panorama to “stitch” up to 3 pictures into a panoramic scene.
IMPORTANT: In Panorama SCN mode, you take 2 or 3 pictures which the camera “stitches” together in a panorama.
In Automatic Panorama mode—found in Creative mode  (see page 18)—you “sweep” the camera in a continuous arc. The camera then creates a panorama.
NOTE: For best results, use a tripod. Only the panoramic picture is saved; individual pictures are not. (Exposure and white balance are set with the first picture. The flash is set to Off.)
1 Turn the Mode dial to SCN.
2Press 
 to choose Panorama Left-Right or Panorama Right-Left (depending on the direction you want to pan), then press OK.
3Take the first picture.
After a quickview, the LCD displays the liveview and an “overlay” from the first picture.
4Compose the second picture. Make the overlay from the first picture cover the same portion in the new picture.
5If you are taking/stitching only 2 pictures, press OK to stitch them together.
After you take 3 pictures, the pictures are automatically stitched together.
Take 2 or 3
pictures.
Get 1 panoramic picture.
NOTE: To use the self-timer 10-second or 2-second setting, see page 21.
16 |
www.kodak.com/go/support |

|
|
|
|
|
|
Taking pictures/videos |
Using Creative modes |
|
|||||
1 Turn the Mode dial to Creative mode |
. |
|||||
2 Press |
|
|
and |
to read Creative mode descriptions. |
||
|
||||||
3 Press OK to choose the Creative mode that you’ve highlighted. |
||||||
|
|
|
|
|
|
|
Creative mode |
|
For |
|
|||
Night Scene |
|
|
For night photos that contain moving objects. Gives the impression of |
|||
Long Exposure |
|
motion. Resolution is set at 12 MP. |
||||
Dramatic |
|
|
Highly saturated, vibrant color. The camera takes and merges 2 pictures to |
|||
|
|
|
|
|
produce one of rich tone and detail. Resolution is set at 12 MP. |
|
Intelligent |
|
|
Close-ups of faces. The camera takes multiple pictures, then chooses the |
|||
Portrait Mode |
|
one with the best focus, most smiles, and most eyes open. Resolution is set |
||||
|
|
|
|
|
at 12 MP. |
|
Photo Booth |
|
|
Taking 4 pictures and combining them into single strip, like a vintage |
|||
|
|
|
|
|
photobooth. For best results, place the camera on a tripod or steady |
|
|
|
|
|
|
surface. |
|
Automatic |
|
|
Press and hold the Shutter button while vertically or horizontally panning a |
|||
Panorama |
|
|
scene (Left to Right, Right to Left, Bottom to Top, and Top to Bottom). The |
|||
(See page 18.) |
|
|
camera “stitches” the pictures together. |
|||
|
|
|
|
|
|
|
www.kodak.com/go/support |
17 |
Taking pictures/videos
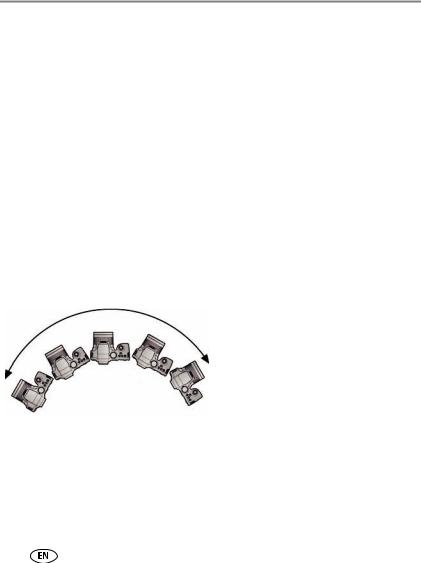
Using Automatic Panorama in Creative mode
Pan up to 180 degrees horizontally or up to 120 degrees vertically. The camera takes several pictures, then “stitches” them into a single, wide image.
Choose the direction of panning
1 Turn the Mode dial to Creative mode  .
.
2 Press  and
and  to highlight Automatic Panorama, then press OK.
3The default panning direction is Left-to-Right. To change it:
■Press  to highlight the Automatic Panorama icon, then press OK.
■Press  for Right-to-Left, Bottom-to-Top, or Top-to-Bottom. Then press OK.
Take the picture
For best results, set the lens to wide angle (no zoom). Choose stationary subjects.
1At your starting point, press the Shutter button halfway down to focus and set the exposure, then press completely down and hold it.
2Keeping the Shutter button pressed, slowly pan or tilt in the direction you selected.
•Cover the entire sweep in about 5 seconds.
•If you pan or tilt too quickly or too slowly, the LCD displays an error.
•Experiment until you get the timing right.
3 Release the Shutter button when the LCD displays “Processing.”
The camera automatically stops recording images when a certain number of pixels is reached. This equates to approximately 180 degrees horizontally or 120 degrees vertically. (You might capture more or less, depending on scene content.)
NOTE: If the scene contains an uninterrupted expanse of similar pixels—such as a plain, white wall—the camera may interpret this as the same group of pixels and abbreviate the wall in the final image.
4 When finished, turn the Mode dial to another mode.
18 |
www.kodak.com/go/support |
Loading...