

Page 1
96M11353
Instruction
Manual
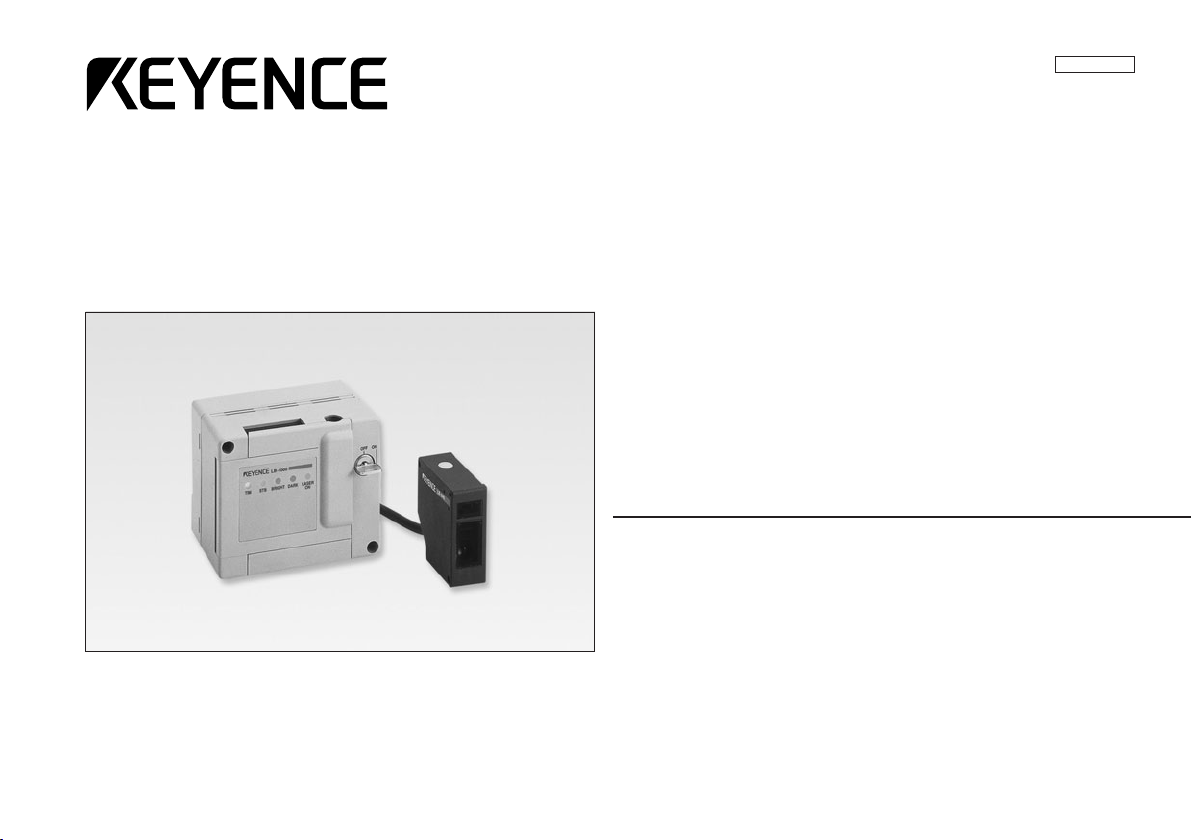
Laser Displacement Sensors
LB-1000(W) Series
Page 2
CONTENTS
SAFETY INFORMATION ON LB-1000 SERIES
Safety Information for LB-1000 Series .................................................... 2
Safety Precautions on Laser Product ..................................................... 3
Precautions on Regulations and Standards ............................................ 6
Part Names ............................................................................................. 7
Connections ............................................................................................ 8
Installation ............................................................................................... 9
Setting ................................................................................................... 10
Auto Zero/Output Adjustment ............................................................... 10
Measuring Range vs. Analog Output .................................................... 11
Setting Dip Switch 1 (FUZZY logic control) ........................................... 12
Setting Dip Switch 2 (Interference suppression function) ..................... 13
Setting Dip Switch 3 (Laser power control) ........................................... 14
Setting Dip Switch 4 (AUTO ZERO) ..................................................... 14
Troubleshooting .................................................................................... 15
Hints on Correct Use ............................................................................. 16
Characteristics ...................................................................................... 17
Specifications ........................................................................................ 19
Dimensions ........................................................................................... 21
Warranty ............................................................................................... 23
This manual describes how to install the LB-1000 Series as well as its
operating procedures and precautions. Read this manual carefully for
your safety.
Symbols
The following symbols alert you to important messages. Be sure to read
these messages carefully.
WARNING
CAUTION
Note
Failure to follow instructions may lead to injury.
(electric shock, burn, etc.)
Failure to follow instructions may lead to product
damage.
Provides additional information on proper operation.
General precautions
• At startup and during operation, be sure to monitor the functions and
performance of the LB-1000 series.
• We recommend that you take substantial safety measures to avoid
any damage in the event a problem occurs.
• Do not open or modify the LB-1000 series or use it in any way other
than described in the specifications.
• When the LB-1000 series is used in combination with other instruments, functions and performance may be degraded, depending on
operating conditions and the surrounding environment.
• Do not use this product for the purpose to protect a human body or a
part of human body.
• This product is not intended for use as explosion-proof product. Do
not use this product in hazardous location and/or potentially explosive
atmosphere.
2
Page 3

SAFETY PRECAUTIONS ON LASER PRODUCT
1. Classification
LB-041/ LB-081/ LB-301/
LB-1001(W) LB-1101(W) LB-1201(W)
FDA (CDRH) 21CFR Part 1040.10 Class IIIa IIIb
IEC/EN 60825-1 Class 2M Class 3R Class 3B
2. Labels
FDA (CDRH) Class IIIa FDA (CDRH) Class IIIb
[LB-041/1001(W) [LB-301/1201(W)]
LB-081/1101(W)]
AVOID EXPOSURE
VISIBLE LASER RADIATION IS
EMITTED FROM THIS APERTURE
DANGER
VISIBLE LASER RADIATION AVOID
DIRECT EXPOSURE TO BEAM
SEMICONDUCTOR LASER 670nm
MAXIMUM OUTPUT 3mW
PULSE DURATION 35µSEC
CLASS IIIa LASER PRODUCT
DANGER - Visible laser radiation when open
AVOID DIRECT EXPOSURE TO BEAM
IEC Class 2M [LB-41] IEC Class 3R [LB-81]
IEC Class 3B [LB-301]
AVOID EXPOSURE
INVISIBLE LASER RADIATION IS
EMITTED FROM THIS APERTURE
DANGER
INVISIBLE LASER RADIATION AVOID
DIRECT EXPOSURE TO BEAM
SEMICONDUCTOR LASER 780nm
MAXIMUM OUTPUT 20mW
PULSE DURATION 35µSEC
CLASS IIIb LASER PRODUCT
DANGER - Invisible laser radiation when open
AVOID DIRECT EXPOSURE TO BEAM
3. Labels location
FDA Warning labels are attached to the sensor head as shown below.
When using this product in the countries and/or regions other than
U.S.A., use the IEC warning/explanatory label in the package of this
product. In this case, it can be affixed on the FDA (CDRH) warning label,
which has already been affixed to this product.
FDA (CDRH)
LB-041 LB-081
AVOID EXPOSURE
VISIBLE LASER RADIATION IS
EMITTED FROM THIS APERTURE
DANGER
VISIBLE LASER RADIATION AVOID
DIRECT EXPOSURE TO BEAM
SEMICONDUCTOR LASER 670nm
MAXIMUM OUTPUT 3mW
PULSE DURATION 35µSEC
CLASS IIIa LASER PRODUCT
LB-301
AVOID EXPOSURE
LB-041
DANGER
AVOID EXPOSURE
VISIBLE LASER RADIATION IS
EMITTED FROM THIS APERTURE
DANGER
VISIBLE LASER RADIATION AVOID
DIRECT EXPOSURE TO BEAM
SEMICONDUCTOR LASER 670nm
MAXIMUM OUTPUT 3mW
PULSE DURATION 35µSEC
CLASS IIIa LASER PRODUCT
DANGER - Visible laser radiation when open
AVOID DIRECT EXPOSURE TO BEAM
AVOID EXPOSURE
DANGER
AVOID EXPOSURE
VISIBLE LASER RADIATION IS
EMITTED FROM THIS APERTURE
DANGER
VISIBLE LASER RADIATION AVOID
DIRECT EXPOSURE TO BEAM
SEMICONDUCTOR LASER 670nm
MAXIMUM OUTPUT 3mW
PULSE DURATION 35µSEC
CLASS IIIa LASER PRODUCT
LB-081
AVOID EXPOSURE
VISIBLE LASER RADIATION IS
EMITTED FROM THIS APERTURE
DANGER
VISIBLE LASER RADIATION AVOID
DIRECT EXPOSURE TO BEAM
SEMICONDUCTOR LASER 670nm
MAXIMUM OUTPUT 3mW
PULSE DURATION 35µSEC
CLASS IIIa LASER PRODUCT
DANGER - Visible laser radiation when open
AVOID DIRECT EXPOSURE TO BEAM
3
Page 4

SAFETY PRECAUTIONS ON LASER PRODUCT
4. Safety consideration
CAUTION
Use of controls or adjustments or the performance of procedures other
than those specified herein may result in hazardous radiation exposure.
1) Class IIIb/3B laser products
WARNING
Follow the instructions mentioned in this manual. Otherwise, injury to the
human body (eyes and skin) may result.
• Do not directly look at or touch the laser beam and its reflection
from a mirror-like surface.
• Do not direct the beam at other people or into areas where other
people unconnected with the laser work might be present.
• Be careful of the path of the laser beam. Make the laser path as
short as possible and be sure to terminate the laser path with a
diffusion reflector or diffusion absorber with proper reflectance
and thermal characteristics so that the laser beam does not
diffuse. (It is recommended that you install a protective enclosure.)
• Install the laser product carefully so that the laser beam is not
unintentionally directed at mirror-like surfaces.
• Install the products so that the path of the laser beam is not as
the same height as that of human eye.
• Wear protective eye goggles appropriate for the laser beam
wavelength.
• Do not disassemble this product. Laser emission from this
product is not automatically stopped when it is disassembled.
• Clean the aperture regularly. In addition, stop the emission of the
laser beam when cleaning.
• MPE (Maximum Permissible Exposure): 1.66mW/cm
• NOHD (Nominal Ocular Hazard Distance): 17.2 m (LB-301) from
the aperture.
2
(LB-301)
2) Class IIIa/3R laser products
WARNING
Follow the instructions mentioned in this manual. Otherwise, injury to the
human body (eyes and skin) may result.
• Do not directly look at or touch the laser beam and its reflection
from a mirror-like surface.
• Do not direct the beam at other people or into areas where other
people unconnected with the laser work might be present.
• Be careful of the path of the laser beam. Make the laser path as
short as possible and be sure to terminate the laser path with a
diffusion reflector or diffusion absorber with proper reflectance
and thermal characteristics so that the laser beam does not
diffuse. (It is recommended that you install a protective enclosure.)
• Install the laser product carefully so that the laser beam is not
unintentionally directed at mirror-like surfaces.
• Install the products so that the path of the laser beam is not as
the same height as that of human eye.
• Do not disassemble this product. Laser emission from this
product is not automatically stopped when it is disassembled.
4
Page 5

SAFETY PRECAUTIONS ON LASER PRODUCT
3) Class 2M laser products
WARNING
Viewing the laser output with certain optical instruments designed for
use at a distance (for example, telescopes and binoculars) may pose an
eye hazard.
Follow the instructions mentioned in this manual. Otherwise, injury to the
human body (eyes and skin) may result.
• Do not stare into the beam.
• Do not direct the beam at other people or into areas where other
people unconnected with the laser work might be present.
• Be careful of the path of the laser beam.
If there is a danger that the operator may be exposed to the laser
beam reflected by specular or diffuse reflection, block the beam by
installing an enclosure with the appropriate reflectance.
• Install the products so that the path of the laser beam is not as
the same height as that of human eye.
• Do not disassemble this product. Laser emission from this
product is not automatically stopped when it is disassembled.
5. Safety features provided with the LB-1000
series
The LB-1000 series is provided with the following safety features. Make
sure these features function correctly before operating.
1. Laser radiation emission warning
A visible LED informs you that the laser beam is being emitted, or is
about to be emitted, at least 3 second after power is provided to the
controller and the sensor head.
2. Laser emission delay
Laser emission only starts after the LED has been ON for at least 3
seconds, thus decreasing the possibility of laser exposure.
3. Laser emission stop input terminals
Terminals for controlling laser emission are provided on the controller.
You can remotely control laser emission using these terminals.
4. Key-operated switch
Set to the ON position to supply power. You can lock the power switch
using the supplied key; the key can be removed only when the switch
is set to the OFF position.
5. Beam attenuator
A laser beam shield is supplied. This cover is to be attached to the
laser-beam-emitting portion of the sensor head. If an operator must
work in front of the sensor head and there is risk to the eyes from the
laser beam, be sure to attach this cover.
5
Page 6
SAFETY PRECAUTIONS ON LASER PRODUCT
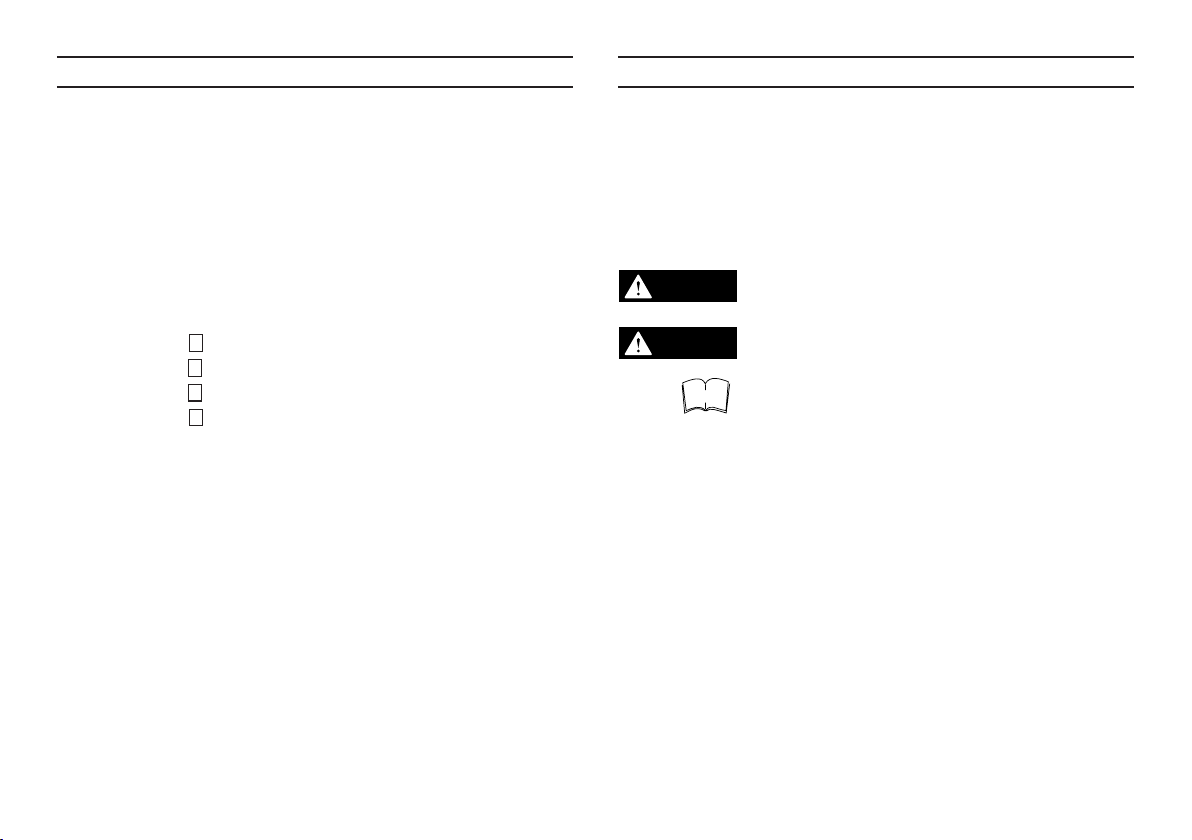
For use with shield:
Attach the shield to the front surface of the sensor head.
LB-041/LB-081 LB-301
For use without shield:
Place the shield as shown below, and screw in place.
LB-041/LB-081 LB-301
PRECAUTIONS ON REGULATIONS AND STANDARDS
CE Marking
Applicable Models: LB-041/LB-1001W, LB-081/LB-1101W and
Keyence Corporation has confirmed that these products comply with the
essential requirements of the applicable EC Directives, based on the
following specifications. Be sure to consider the following specifications
when using these products in the Member State of European Union.
■ EMC Directive (2004/108/EC)
• Applicable Standard EMI: EN61326-1, Class A
•
The length of the cable connected to the Sensor head or the Controller must be less than or equal to 30 m.
Remarks:
These specifications do not give any guarantee that the end-product with
these products incorporated complies with the essential requirements of
EMC Directive. The manufacturer of the end-product is solely responsible
for the compliance on the end-product itself according to EMC Directive.
LB-301/ LB-1201W
EMS: EN61326-1
6
Page 7
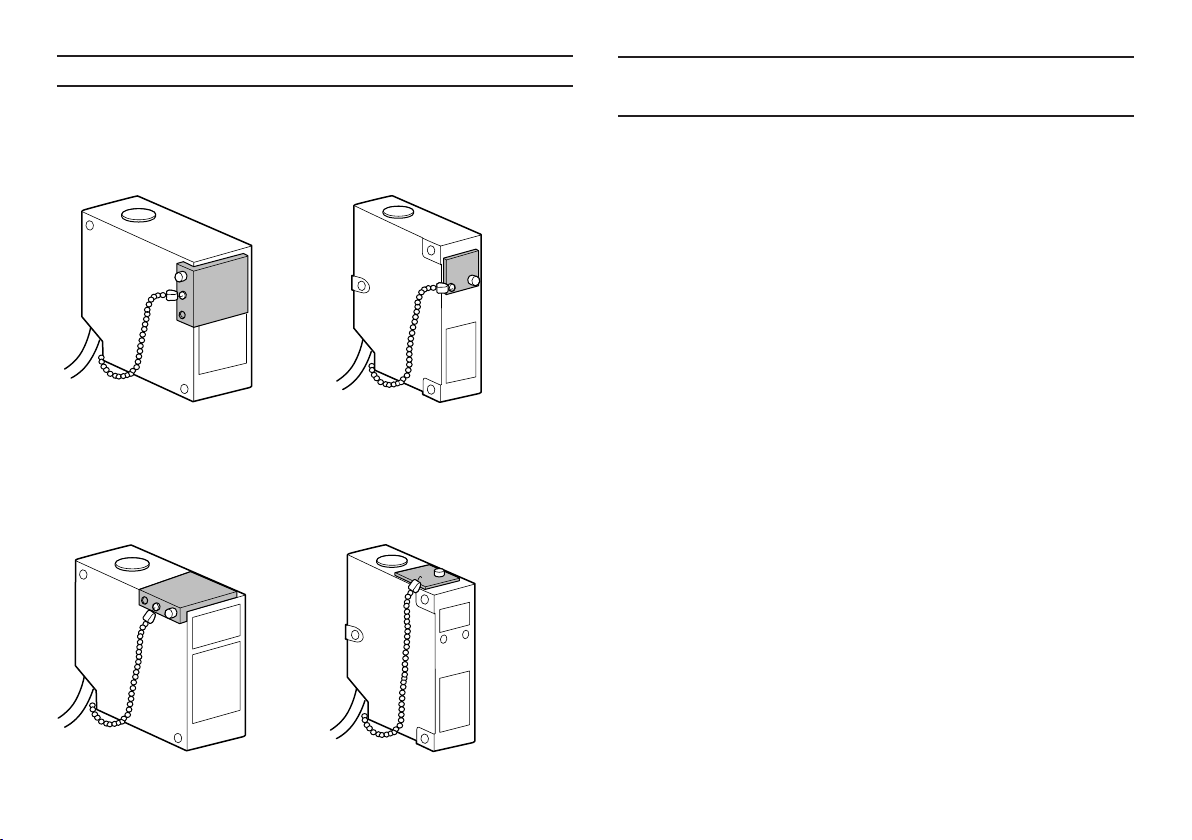
PART NAMES
Controller
5
4
Beam attenuator
LASER ON alarm LED
Sensor head
1
Key-operated
power switch
2
6
7
3
1 Indicators
TIM: Timing indicator
STB: Stability indicator (3-color indicator)
BRIGHT: Excessive light quantity indicator
DARK: Insufficient light quantity indicator
LASER ON: Laser radiation emission warning
2 RESPONSE speed selector switch
Used to select response speed (0.4 ms, 10 ms, or 40 ms)
3 SENS (sensitivity) selector switch
Used to select WHITE, BLACK, or AUTO mode.
4 DIP switches (see p.11)
Used to switch to FUZZY logic control, alternating oscillation circuit,
etc.
5 Output adjustment trimmers
SPAN: Span adjustment
For adjusting output voltage level relative to target displacement.
SHIFT: Zero point adjustment
For shifting output voltage reading to zero.
6 AUTO ZERO key
For resetting the analog output to 0 V (12 mA for current output).
7 Receptacle for sensor head cable
7
Page 8

CONNECTIONS
LB-1001/1101/1201
CAUTION
Be sure to confirm
the model number.
* GND terminals
4, 0, and B
are connected
internally.
■ Description of terminals
3 Earth ground terminal
5 Alarm output (NPN open-collector)
Outputs if light quantity is insufficient or excessive, or when no target
is present in the operating range.
6 AUTO ZERO input
Connecting this terminal to a GND terminal (4, 0, or B) resets the
analog voltage output to 0 V (12 mA for current output).
9 Analog current output
Current of 4 to 20 mA relative to full measuring range is output.
CAUTION
LB-1001W/1101W/1201W
CAUTION
8
CAUTION
Be sure to confirm
the model number.
* GND terminals
4, 0, and B
are connected
internally.
A Laser emission stop input
Disconnecting this terminal from a GND terminal (4, 0, or B) stops
laser emission. Use this terminal in an emergency to stop laser
emission. (Output will be retained at 12 V.)
C Synchronous (timing) input
Connecting this terminal to a GND terminal (4, 0, or B) permits
timing input. Laser emission will stop, and the analog output value just
prior to timing input will be retained. (DIP switch 2 of the controller
must be set to MAIN.)
D Synchronous (timing) output
When using 2 sensors (for thickness measurement, etc.), use this
terminal to prevent mutual interference. It allows 2 sensors to
alternately emit a laser beam at oscillation output of 30 Hz. (Set DIP
switch 2 of one controller to MAIN, and the other to SUB.)
Page 9

CONNECTIONS
INSTALLATION
■ Description of DIP switches
RESPONSE
MANUAL
1 2 3 4
DIP
FUZZY SUB AUTO LOCK
MAIN
1 RESPONSE speed mode selector switch
To use the FUZZY logic control circuit, set the switch to FUZZY.
2 Interference suppression function selector switch
To have 2 sensors emit laser beams alternately, set the switch of one
controller to MAIN and the other to SUB.
3 Laser power control selector switch
MAX: Laser emission power is set to maximum.
AUTO: Laser emission power is controlled according to changes in
received light quantity. (Selecting AUTO mode prevents
fluctuations in received light quantity caused by surface
unevenness from affecting target measurement.
4 AUTO ZERO setting lock
LASER
POWER
MAX
ZERO
FREE
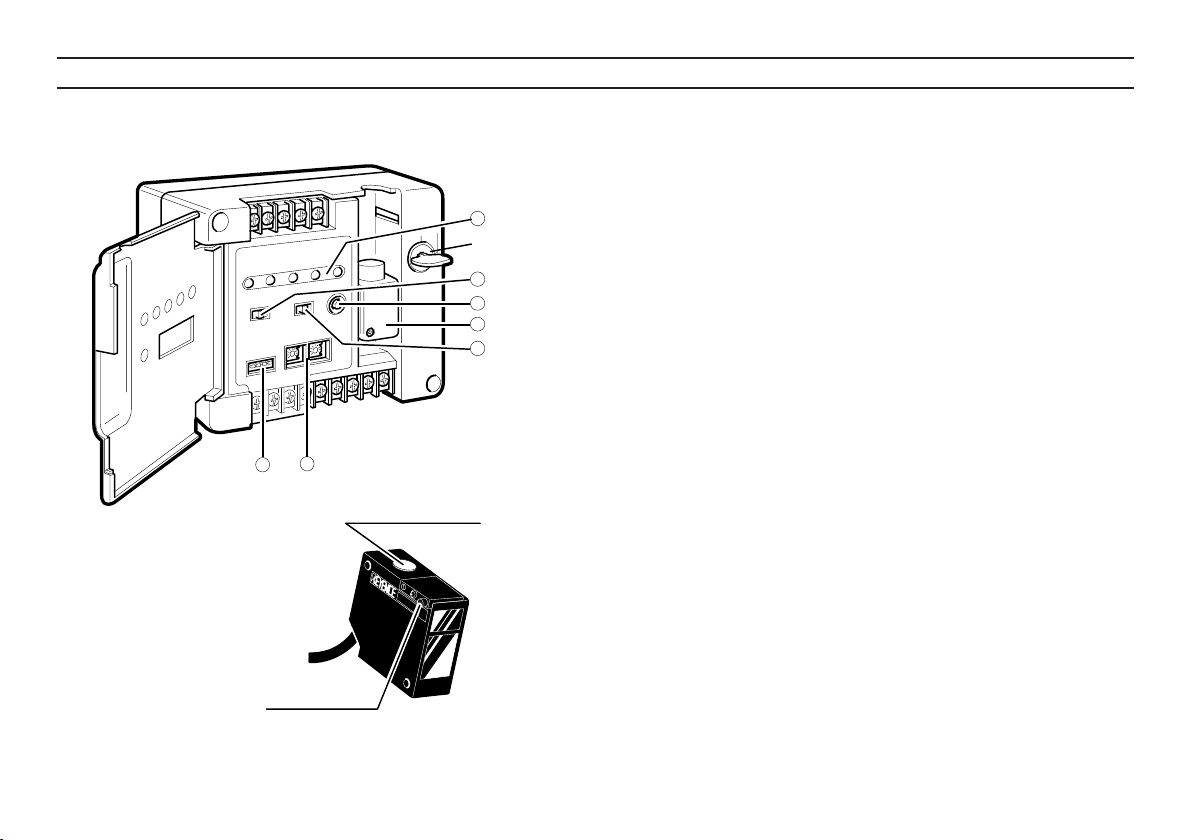
Controller
The controller can be mounted to a DIN
rail. When mounting or removing the
controller, pull the claw (bottom center) in
the direction of the arrow. The controller
can also be screw-mounted using the
mounting holes provided.
Sensor head
1. First, tilt the receptacle of the controller
forward, as shown.
2. To attach the connector, gently press
the plug into the receptacle, turn the
plug left or right to locate the engaging
position, then press until you hear a
click.
(Also follow this procedure to connect an
extension cable or sensor head cable to the
receptacle.)
To remove the connector, hold the
connecting sleeve as shown, and pull it
out in the direction of the arrow.
Mounting the sensor head
The sensor head has mounting holes, as
shown in the figure on the right.
Secure the sensor head using M4
screws.
(LB-301 has three mounting holes.)
9
Page 10

SETTING
AUTO ZERO/OUTPUT ADJUSTMENT
1. Adjust the distance between the sensor head and target and confirm
the position with the LASER ON alarm LED. Set the sensor head so
that the laser emitting surface is parallel to the measuring surface of
the target, then secure it in place. (See figure below.)
Distance between sensor head and target
Out of
measuring
range
(Operating range)
Red Yellow Green Yellow Red
Measuring range
Center
Out of
measuring
range
(Operating range)
LASER ON
alarm LED
When the LED lights green, the target is in the center area of the
measuring range.
LB-041: approx. 40 mm
LB-081: approx. 80 mm
LB-301: approx. 300 mm
2. Adjust orientation of the sensor head (for a moving target).
Be sure to mount the sensor head as shown in the right-hand figure
below to ensure stable measurement.
Example: Step detection
Incorrect
Correct
Example: Eccentricity measurement
Press the AUTO ZERO key to reset the output voltage to zero at the
mounting position.
Example: LB-041
The LED light green.
ZERO Panel meter
Approx.
40 mm
*12 mA for
current output.
V
AUTO ZERO setting is possible from external terminals (connecting the
6 terminal to a GND terminal).
* The AUTO ZERO function can be used when the DIP switch No. 3 of
the controller is set to FREE (top setting).
Output adjustment
If the output voltage value is not in proportion with the target displacement, adjust the output voltage using the SPAN adjustment trimmer.
Example: LB-041
40 mm
V V
Change by 2 mm
(To change
-2.010 to -2.000.)
38 mm
Span adjustment
adjustment +0.010.
SPN-ADJ
V
10
Incorrect
Correct
When a sensor is positioned on both sides of a
Note
target for measurement, be sure to adjust the span
of each sensor separately.
Page 11

MEASURING RANGE VS. ANALOG OUTPUT
OFF
LB-041/LB-1001(W)
LB-081/LB-1101(W)
Spot size (mm)
Alarm output (N.C.)
Spot size (mm)
Alarm output (N.C.)
LB-041
1.1
2.2
35 mm
35 37.5 40 42.5 45
ON
OFF
1.2
2.3
65 mm 30 mm
ON
OFF
1.0
0.9
2.0
10 mm
Measuring range
12
7
6
(20 mA)
5
Analog output voltage (V)
4
3
2
1
(12 mA)
0
-1
Measuring distance (mm)
-2
-3
-4
(4 mA)
-5
-6
-7
1.0
0.9
2.0
Measuring range
12
7
6
(20 m A)
5
Analog output voltage (V)
4
3
2
1
(12 mA)
0
72.5 80 87. 5 9565
-1
Measuring distance (mm)
-2
-3
-4
(4 mA)
-5
-6
-7
LB-301/LB-1201(W)
1.8
Spot size (mm)
Alarm output (N.C.)
200 mm
ON
1.4
3.0
1.2
2.5
200 mm
Measuring range
12
7
6
(20 mA)
5
4
Analog output voltage (V)
3
2
1
0
250 300200 350 400
Measuring distance (mm)
-1
-2
-3
-4
(4 mA)
-5
-6
-7
1.0
(12 mA)
2.2
If the target is out of the measuring range:
1.7
Less than 200 mm from the sensor: Analog output is retained at 12 V
when the target is approximately 195 mm away from the sensor.
More than 400 mm from the sensor: Analog output is retained at 12 V
when the target is approximately 405 mm away from the sensor.
11
Page 12

SETTING DIP SWITCH 1 (FUZZY LOGIC CONTROL)
To use the FUZZY logic control circuit, set DIP switch 1 to FUZZY
(bottom setting).
(The switch is factory-set to MANUAL)
1234
DIP
The FUZZY logic control circuit is used to obtain both stability and high
response speed when measuring a target traveling on a production line.
FUZZY mode is selected using the RESPONSE speed selector switch.
RESPONSE
LO HIGH MID
FUZZY mode settings
• RESPONSE speed selector switch MID
Select for normal measurement. The optimal response speed is given
according to absolute light quantity and changes in distance and light
quantity received.
* The switch should normally be set to MID. Set to HIGH or LO only
when you cannot perform accurate measurement with MID.
• RESPONSE speed selector switch HIGH
Response speed is determined based mainly on changes in distance.
Set to HIGH when positioning for stepped target detection, or
detection of target recesses or projections.
• RESPONSE speed selector switch LO
Response speed is determined based mainly on changes in received
light quantity. When detecting hairline finishes or targets of mottled
material, setting the switch to LO will stabilize the output.
12
Page 13

SETTING DIP SWITCH 2 (INTERFERENCE SUPPRESSION FUNCTION)
When using 2 sensor heads in close proximity, set the DIP switch of one
controller to MAIN, and that of the other to SUB to suppress interference.
(This can also be used for synchronized measurement.)
DIP 1 2 3 4
Wire as follows. (Upper terminals of controller)
10 11 12 13 14 10 11 12 1413
Set DIP switch 2 to MAIN Set DIP switch 2 to SUB
Example: Step measurement using 2 sensors.
Alternating oscillation frequency and ON/OFF ratio (all models)
Frequency ON/OFF ratio
30Hz 1 : 1
Synchronous
(timing) pulse
AB
ON
OFF
Note
• Controller set to MAIN: Monitor output is retained when the synchro-
nous (timing) pulse is OFF.
Controller set to SUB: Monitor output is retained when the synchro-
nous (timing) pulse is ON.
• Controller set to MAIN: The laser beam is emitted at the rising edge
of the synchronous (timing) pulse, but the
signal is not read for 8 to 10 ms. Effective
measurement occurs only during the last half
of the synchronous (timing) pulse (6 to 8 ms).
Controller set to SUB: The laser beam is emitted at the falling edge
of the synchronous (timing) pulse, but the
signal is not read for 8 to 10 ms. Effective
measurement occurs only during the last half
of the synchronous (timing) pulse (6 to 8 ms).
Synchronous
(timing) pulse (TIM OUT)
Controller set to MAIN
Laser emission
Controller set to MAIN
Data reading
Controller set to SUB
Laser emission
Approx.
6 to 8 ms
Controller set to SUB
Data reading
Approx. 6 to 8 ms
13
Page 14

SETTING DIP SWITCH 3
(LASER POWER CONTROL)
SETTING DIP SWITCH 4
(AUTO ZERO)
Laser power control
DIP
1234
When the DIP switch is set to AUTO (bottom setting), emitted laser beam
quantity is automatically controlled according to the reflectivity of the
target. The switch is factory-set to MAX.
The AUTO mode is especially effective for measuring metal targets or
targets of a mottled material.
AUTO ZERO setting lock
DIP
1234
DIP switch 4 is factory-set to FREE. In this mode, AUTO ZERO can be
performed by either using the key on the controller panel or short
circuiting the terminals.
To prevent the output voltage from being mistakenly reset to zero, disable
AUTO ZERO by setting the switch to LOCK (bottom setting).
Note:
• The SHIFT adjustment trimmer on the controller panel functions only
when the switch is set to LOCK.
• When AUTO ZERO is used with the DIP switch set to FREE and then
the switch is switched to LOCK, the AUTO ZERO setting becomes
invalid and the AUTO ZERO function is disabled.
Caution:
After DIP switch 4 has been switched between FREE and LOCK, be
sure to turn the power supply OFF once and then ON again.
14
Page 15

TROUBLESHOOTING
If a problem occurs, first apply the remedy given in the troubleshooting
guide below.
If this does not solve the problem, please contact your nearest distributor
or Keyence office.
Problem Cause Remedy
Analog voltage
does not change.
(Measured value is
not indicated.)
Analog voltage
output fluctuates.
Sensor head is
incorrectly mounted.
Connector of sensor head is
not firmly inserted.
BRIGHT or DARK indicator
is lit.
Filter glass of sensor head
is dirty
Noise is affecting sensor
operation.
There is vibration in feeder
line.
Secure sensor head in range
where LASER ON alarm LED
lights yellow or green.
Fully insert connector to make
proper contact.
Adjust position and orientation of
the sensor head to increase or
decrease the light quantity
received.
Set DIP switch 3 to AUTO
(bottom setting) to control laser
power.
Switch sensitivity selector switch.
Clean using a soft cloth.
Isolate power cable and
connecting cable(s) of sensor
from high-tension lines or power
lines.
Minimize vibration near
measuring position.
Problem Cause Remedy
Resolution
fluctuates greatly.
Measurement is
inaccurate.
When 2 sensors
are used for
thickness
measurement, etc.,
analog output
voltage fluctuates
greatly.
Output voltage value is not
in proportion with target
displacement.
RESPONSE speed selector
switch is set to HIGH
(0.4 ms).
Target is moving.
Extraneous light is affecting
sensor operation.
SPAN adjustment has been
performed for only one
sensor.
Calibrate output voltage using
SPAN adjustment trimmer.
If high response speed is not
required, select lowest possible
response speed.
Set DIP switch 1 to FUZZY and
use FUZZY logic control.
Make sure that extraneous light
does not fall on the light emitting/
receiving lenses of the sensor
head.
Perform SPAN adjustment for
each sensor separately.
15
Page 16

HINTS ON CORRECT USE
Compatibility
The controller and sensor head of the LB-1000 series have been factorycalibrated in pairs. Therefore, in order to satisfy specifications, be sure to
use a sensor head and controller having the same serial number.
Interference prevention
• Isolate the power cable and connecting cable(s) of the sensor from
high-tension lines or power lines; otherwise the sensor may malfunction or the laser diode may deteriorate or be broken due to noise
interference.
• The sensor head is case-grounded. If noise occurs at the mounting
position of the sensor head, install insulation between the mounting
position and sensor head.
• To prevent radiation noise interference, cover the sensor head with a
metal casing. (Be sure that noise does not enter at the mounting
position of the casing.)
• To prevent radiation noise and inductive noise interference, shield the
cables with metal or use independent metal conduits.
• To avoid a malfunction due to excessive noise interference, be sure to
correctly ground the earth ground terminal.
Operating environment
• Always keep the sensor head free from light-refracting substances
such as water or oil.
• Make sure that extraneous light does not fall on the lenses of the
sensor head.
• When extremely high measurement accuracy is required, install a
cover over the sensor head to prevent light from entering.
• When no target is present, the effect of extraneous light on the sensor
can be ignored by using timing input.
16
CAUTION
CAUTION
CAUTION
AUTO ZERO function lock (DIP switch 4 )
• When DIP switch 4 is set to LOCK (bottom setting), the AUTO ZERO
key on the front panel does not function. Note that when the switch is
set to FREE, the AUTO ZERO function operates but the SHIFT
adjustment trimmers cannot be used to adjust output.
• When AUTO ZERO is used with the DIP switch set to FREE and then
the switch is switched to LOCK, the AUTO ZERO setting becomes
invalid, and the AUTO ZERO function is disabled.
• After switching between FREE and LOCK, turn the power supply OFF
once and then ON again to ensure that the monitor voltage will be
normally output.
Sensor head orientation
When a target consists of differently colored portions or different
materials separated by a border, measurement error may result
depending on the orientation of the sensor head. To minimize measurement deviation, install the sensor head parallel to the border line as
shown in the illustration below.
Incorrect Correct
Operating illumination
Although the operating illumination is specified to 2,500 lux max., (LB301: 4000 lux max.) if possible avoid using the sensor near lighting
equipment that emits light in recurring pulses. If the sensor must be
positioned near such equipment, minimize the effect by using a light
shielding plate.
Note
Note
Page 17

CHARACTERISTICS (TYPICAL)
■ LB-041/LB-1001(W): 40 mm ± 5 mm
Shift-point adjustment range Span adjustment range
Changes in detection span when target is tilted Changes in detection span when target is tilted
■ LB-081/LB-1101(W): 80 mm ± 15 mm
Shift-point adjustment range Span adjustment range
The shift-point adjustment range shows the range where the output voltage reading can be shifted to zero using the SHIFT adjustment trimmer (operates when DIP switch 4 is set to LOCK). The AUTO ZERO function (operates when DIP switch 4 is set to FREE), allows 0.V resetting at any position
within the measuring range.
17
Page 18

CHARACTERISTICS (TYPICAL)
■ LB-301/LB-1201(W): 300 mm ± 100 mm
Shift-point adjustment range Span adjustment range
Changes in detection span when target is tilted
The shift-point adjustment range shows the range where the output
voltage reading can be shifted to zero using the SHIFT adjustment
trimmer (operates when DIP switch 4 is set to LOCK). The AUTO
ZERO function (operates when DIP switch 4 is set to FREE), allows 0.V
resetting at any position within the measuring range.
18
■ Frequency characteristic
Common to LB-1001(W), LB-1101(W), and LB-1201(W)
RESPONSE speed selector switch set to HIGH
Analog output
voltage (dB)
0
-10
-20
-30
915 Hz (-3dB)
100 1 K
Frequency (Hz)
RESPONSE speed selector switch set to MID
Analog output
voltage (dB)
0
-10
-20
-30
36 Hz (-3dB)
10 100
Frequency (Hz)
RESPONSE speed selector switch set to LO
■ Interference range*
a
XY
b
XY
LB-041 40 mm 20 mm 40 mm
LB-081 50 mm 30 mm 80 mm
LB-301 200 mm 180 mm 290 mm
* Use of the interference suppression function enables close mounting
of 2 sensors. Since sensors “X” and “Y” alternately emit a laser beam
at 30 Hz, interference does not occur. (Target: white paper)
c
XY
Page 19

SPECIFICATIONS
Type High resolution Standard Long range
Model Sensor head LB-041 LB-081 LB-301
Reference distance 40 mm 80 mm 300 mm
Measuring range ±5 mm ±15 mm ±100 mm
Light source Visible red semiconductor laser
Output 3.0 mW (FDA), 2.0 mW (IEC) 3.0 mW (FDA), 2.5 mW (IEC) 20 mW (FDA), 15 mW (IEC)
Pulse duration 35 µs
Wavelength 670 nm 785 nm
Laser FDA (CDRH) 21CFR Part 1040.10 Class IIIa Class IIIb
Class IEC/EN 60825-1 Class 2M Class 3R Class 3B
Spot diameter (with white paper) 1 x 2 mm (at reference distance)
Linearity 0.25% of F.S. 0.4% of F.S.
Resolution (at LO mode) 2 µm 8 µm 50 µm
Output Analog voltage ±5 V (1 mm/V) ±5 V (3 mm/V) ±5 V (20 mm/V)
Adjustment range Zero-point ±0.35 V max.
Response frequency (-3 dB) 915 Hz (HIGH), 36 Hz (MID), 9 Hz (LO)
Sensitivity WHITE, BLACK and AUTO (switch selectable)
Other functions AUTO ZERO, Response speed selectable, Fuzzy logic control, Interference suppression
Temperature Sensor head 0.02% of F.S./°C
fluctuation Controller 0.02% of F.S./°C
Ambient light
Ambient Sensor head 0 to +45°C (32 to 113°F)
temperature Controller 0 to +50°C (32 to 122°F), No condensation
Relative humidity 35 to 85%, No condensation
Power supply 100 to 240 VAC ±10% 50/60 Hz
Power consumption Approx. 15 VA
Vibration resistance 10 to 55 Hz, 1.5 mm double amplitude in X, Y, and Z directions, 2 hours respectively
Material Sensor head Aluminum die-cast
Weight Sensor head Approx. 170 g Approx. 250 g
1. Every measuring point within measuring range can be shifted to zero with the AUTO ZERO
function.
2. Incandescent/fluorescent lamps
The LB-1000 series controller and sensor head are calibrated as a pair. Therefore, to satisfy
specifications, combine units having the same serial number.
Controller LB-1001 LB-1101 LB-1201
Invisible infrared semiconductor laser
1.2 x 2.5 mm (at reference distance)
Impedance 100 Ω
Analog current 4 to 20 mA (350 Ω max.)
Alarm NPN open-collector: 100 mA (40 V) max. (N.C.) Residual voltage: 1 V max.
Span ±4% max.
2.
Controller Polycarbonate
Controller Approx. 530 g
2,500 lux max. 4,000 lux max.
1.
Option
Extension cable
The sensor head cable can be extended up to 40 m.
Model Cable length
LB-C2 2 m
LB-C3 3 m
LB-C8 8 m
19
Page 20

SPECIFICATIONS
Type High resolution Standard Long range
Model Sensor head LB-041 LB-081 LB-301
Reference distance 40 mm 80 mm 300 mm
Measuring range ±5 mm ±15 mm ±100 mm
Light source Visible red semiconductor laser
Output 3.0 mW (FDA), 2.0 mW (IEC) 3.0 mW (FDA), 2.5 mW (IEC) 20 mW (FDA), 15 mW (IEC)
Pulse duration 35 µs
Wavelength 670 nm 785 nm
Laser FDA (CDRH) 21CFR Part 1040.10 Class IIIa Class IIIb
Class IEC/EN 60825-1 Class 2M Class 3R Class 3B
Spot diameter (with white paper) 1 x 2 mm (at reference distance)
Linearity 0.25% of F.S. 0.4% of F.S.
Resolution (at LO mode) 2 µm 8 µm 50 µm
Output Analog voltage ±5 V (1 mm/V) ±5 V (3 mm/V) ±5 V (20 mm/V)
Adjustment range Zero-point ±0.35 V max.
Response frequency (-3 dB) 915 Hz (HIGH), 36 Hz (MID), 9 Hz (LO)
Sensitivity WHITE, BLACK and AUTO (switch selectable)
Other functions AUTO ZERO, Response speed selectable, Fuzzy logic control, Interference suppression
Temperature Sensor head 0.02% of F.S./°C
fluctuation Controller 0.02% of F.S./°C
Ambient light
Ambient Sensor head 0 to +45°C (32 to 113°F)
temperature Controller 0 to +50°C (32 to 122°F), No condensation
Relative humidity 35 to 85%, No condensation
Power supply 24 VDC ± 10%, Ripple (P-P): 10% max.
Current consumption (Max.) Approx. 320 mA Approx. 350 mA
Vibration resistance 10 to 55 Hz, 1.5 mm double amplitude in X, Y, and Z directions, 2 hours respectively
Material Sensor head Aluminum die-cast
Weight Sensor head Approx. 170 g Approx. 250 g
1. Every measuring point within measuring range can be shifted to zero with the AUTO ZERO
function.
2. Incandescent/fluorescent lamps
The LB-1000 series controller and sensor head are calibrated as a pair. Therefore, to satisfy
specifications, combine units having the same serial number.
Controller LB-1001W LB-1101W LB-1201W
Invisible infrared semiconductor laser
1.2 x 2.5 mm (at reference distance)
Impedance 100 Ω
Analog current 4 to 20 mA (350 Ω max.)
Alarm NPN open-collector: 100 mA (40 V) max. (N.C.) Residual voltage: 1 V max.
Span ±4% max.
2.
Controller Polycarbonate
Controller Approx. 500 g
2,500 lux max. 4,000 lux max.
1.
Option
Extension cable
The sensor head cable can be extended up to 40 m.
Model Cable length
LB-C2 2 m
LB-C3 3 m
LB-C8 8 m
20
Page 21

DIMENSIONS
Unit: mm
Sensor head
LB-041/LB-081
Data in ( ) applies to LB-081.
All other dimension are the
same for both models.
62
4
2 x φ 4.5
mounting hole
LASER ON
alarm LED
(65 to 95)
35 to 45
54
56
28° (18°)
Reference position
13
52 60
Controller
LB-301
φ 7
52 60
4
3 x φ 4.5
mounting hole
φ 15
43
190
28
14
φ
15
43
φ 7
4
190
25
LASER ON
alarm LED
56
200 to 400
12.5
85
77
4
38.5
9°
15.5
LB-1001(W)/LB-1101(W)/
LB-1201(W)
21
Page 22

22
Page 23

WARRANTIES AND DISCLAIMERS
(1) KEYENCE warrants the Products to be free of defects in materials and workmanship for a period of one (1) year from the date of shipment. If any models
or samples were shown to Buyer, such models or samples were used merely to illustrate the general type and quality of the Products and not to
represent that the Products would necessarily conform to said models or samples. Any Products found to be defective must be shipped to KEYENCE
with all shipping costs paid by Buyer or offered to KEYENCE for inspection and examination. Upon examination by KEYENCE, KEYENCE, at its sole
option, will refund the purchase price of, or repair or replace at no charge any Products found to be defective. This warranty does not apply to any defects
resulting from any action of Buyer, including but not limited to improper installation, improper interfacing, improper repair, unauthorized modification,
misapplication and mishandling, such as exposure to excessive current, heat, coldness, moisture, vibration or outdoors air. Components which wear are
not warranted.
(2) KEYENCE is pleased to offer suggestions on the use of its various Products. They are only suggestions, and it is Buyer's responsibility to ascertain the
fitness of the Products for Buyer’s intended use. KEYENCE will not be responsible for any damages that may result from the use of the Products.
(3) The Products and any samples ("Products/Samples") supplied to Buyer are not to be used internally in humans, for human transportation, as safety
devices or fail-safe systems, unless their written specifications state otherwise. Should any Products/Samples be used in such a manner or misused in
any way, KEYENCE assumes no responsibility, and additionally Buyer will indemnify KEYENCE and hold KEYENCE harmless from any liability or
damage whatsoever arising out of any misuse of the Products/Samples.
(4) OTHER THAN AS STATED HEREIN, THE PRODUCTS/SAMPLES ARE PROVIDED WITH NO OTHER WARRANTIES WHATSOEVER. ALL
EXPRESS, IMPLIED, AND STATUTORY WARRANTIES, INCLUDING, WITHOUT LIMITATION, THE WARRANTIES OF MERCHANTABILITY,
FITNESS FOR A PARTICULAR PURPOSE, AND NON-INFRINGEMENT OF PROPRIETARY RIGHTS, ARE EXPRESSLY DISCLAIMED. IN NO
EVENT SHALL KEYENCE AND ITS A FFILIATED ENTITIES BE LIABLE TO ANY PERSON OR ENTITY FOR ANY DIRECT, INDIRECT,
INCIDENTAL, PUNITIVE, SPECIAL OR CONSEQUENTIAL DAMAGES (INCLUDING, WITHOUT LIMITATION, ANY DAMAGES RESULTING FROM
LOSS OF USE, BUSINESS INTERRUPTION, LOSS OF INFORMATION, LOSS OR INACCURACY OF DATA, LOSS OF PROFITS, LOSS OF
SAVINGS, THE COST OF PROCUREMENT OF SUBSTITUTED GOODS, SERVICES OR TECHNOLOGIES, OR FOR ANY MATTER ARISING OUT
OF OR IN CONNECTION WITH THE USE OR INABILITY TO USE THE PRODUCTS, EVEN IF KEYENCE OR ONE OF ITS AFFILIATED ENTITIES
WAS ADVISED OF A POSSIBLE THIRD PARTY’S CLAIM FOR DAMAGES OR ANY OTHER CLAIM AGAINST BUYER. In some jurisdictions, some
of the foregoing warranty disclaimers or damage limitations may not apply.
BUYER'S TRANSFER OBLIGATIONS:
If the Products/Samples purchased by Buyer are to be resold or delivered to a third party, Buyer must provide such third party with a copy of this
document, all specifications, manuals, catalogs, leaflets and written information provided to Buyer pertaining to the Products/Samples.
E 1110-2
23
Page 24

Copyright (c) 2010 KEYENCE CORPORATION. All rights reserved. 1422E 1110-2a 96M11353 Printed in Japan
 Loading...