


JJW2430WP00
Jenn-Air JJW2430WP00, JJW2530WS00, JJW2530WB00, JJW2430WS00, JJW2330WS00 Use & Care Manual
...
JENN-AIR_BUILT-INELECTRICSINGLE
AND DOUBLEOVENS
ETDOUBLEJENN-AII_
'_iii
______________
______________
______________
______________
______________
______________
______________
______________
______________
______________
______________
______________
_____________________________________________________________________________________________________________________________________________________________________________________________________________________________________________________________________________________________________________________________________________________________________________________________________________________________________________________________________________________________________________________________________________________________________________________________________________________________________________________________________________________________________________________________________________________________________________
____________________________________________________________________________________________________________________________________________________________________________________________________________________________________________________________________________________________________________________________________________________________________________________________________________________________________________________________________________________________________________________________________________________________________________________________________________________________________________________________________________________________________________________________________________________________________________
For questions about features, operation/performance, parts, accessories, or service in the U.S.A., call:
1-800-JennAir (1-800-536-6247) or visit our website at www.jennair.com.
In Canada, call: 1-800-807-6777, or visit our website at www.jennair.ca.
Au Canada, pour assistance, installation ou service, composez le 1-800-807-6777 ou visitez notre site web a www.jennair.ca.
Table of Contents/Table des matieres ................... 2
Models/Mod61es JJW2830, JJW2827, JJW2730, JJW2727, JJW2530, JJW2527, JJW2430, JJW2427,
JJW2330, JJW2327
JENN-AIR°
W10221394B
Use& CareGuide
Guide d'utilisationetd'entretien
TABLEOF CONTENTS
TABLEDESMATIERES
OVEN SAFETY ................................................................................ 3
PARTS AND FEATURES ................................................................ 4
ELECTRONIC OVEN CONTROL ................................................... 5
Control Panel ................................................................................ 6
Main Menus .................................................................................. 6
Menu Demonstration .................................................................... 7
Setup Menu .................................................................................. 8
OVEN USE ..................................................................................... 10
Aluminum Foil............................................................................. 10
Positioning Racks and Bakeware .............................................. 11
Roll-Out Rack ............................................................................. 11
Meat Thermometer ..................................................................... 12
Oven Vent(s) ............................................................................... 12
Cooking Functions ..................................................................... 12
Auto Convection Conversion ..................................................... 12
My Creations .............................................................................. 13
Bake ............................................................................................ 13
Broil ............................................................................................ 14
Convection ................................................................................. 15
Convect Bake............................................................................. 15
Convect Bake (Rapid Preheat) ................................................... 16
Convect Roast ............................................................................ 17
Convect Broil .............................................................................. 17
Convect Slow Roast ................................................................... 18
Convect Frozen Pizza ................................................................ 18
Convect Pastry ........................................................................... 19
Proof ........................................................................................... 19
Rapid Proof ................................................................................ 19
Keep Warm TM Option ................................................................. 20
Cook Timer ................................................................................. 20
Temperature Probe .................................................................... 20
Delay Start .................................................................................. 21
Button Lock ................................................................................ 21
OVEN CARE .................................................................................. 22
CustomClean TM Self-Cleaning with Adjustable
Levels and Auto Lock ................................................................. 22
General Cleaning ........................................................................ 23
Oven Lights ................................................................................ 23
Oven Door .................................................................................. 24
TROUBLESHOOTING .................................................................. 25
ASSISTANCE OR SERVICE ......................................................... 26
WAR RANTY .................................................................................. 27
SI_CURITI_ DU FOUR ................................................................... 29
PIECES ET CARACTleRISTIOUES .............................................. 30
COMMANDES leLECTRONIOUES DU FOUR ............................ 31
Tableau de commande .............................................................. 32
Menus principaux ....................................................................... 32
Demonstration de menu ............................................................. 33
Menu de reglage ......................................................................... 34
UTILISATION DU FOUR ............................................................... 37
Papier d'aluminium ..................................................................... 37
Positionnement des grilles et des ustensiles de
cuisson au four ........................................................................... 37
Grille deployante ......................................................................... 37
Thermometre & viande ............................................................... 38
€:vent(s) du four .......................................................................... 38
Fonctions de cuisson ................................................................. 38
Conversion pour automatique pour convection ........................ 39
Mes creations ............................................................................. 39
Cuisson au four .......................................................................... 39
Cuisson au gril ............................................................................ 41
Convection ................................................................................. 42
Cuisson au four par convection ................................................. 42
Prechauffage rapide avec cuisson au four par convection ....... 43
R6tissage par convection .......................................................... 44
Cuisson au gril par convection ................................................... 45
R6tissage lent par convection .................................................... 45
Cuisson par convection de pizza surgelee ................................ 46
Cuisson de p&tisseries par convection ...................................... 46
Levee .......................................................................................... 47
Levee rapide ............................................................................... 47
Option de Maintien au chaud ..................................................... 47
Minuterie de cuisson .................................................................. 48
Sonde thermometrique .............................................................. 48
Mise en marche differ6e ............................................................. 49
Verrouillage des commandes ..................................................... 49
ENTRETIEN DU FOUR ................................................................. 50
Autonettoyage CustomClean TM avec niveaux
reglables et autoverrouillage ...................................................... 50
Nettoyage gen6ral ...................................................................... 51
Lampes du four .......................................................................... 51
Porte du four ............................................................................... 52
DI_PAN NAG E................................................................................. 53
ASSISTANCE OU SERVICE ......................................................... 54
GARANTIE ..................................................................................... 55
2
OVEN SAFETY
Your safety and the safety of others are very important.
We have provided many important safety messages in this manual and on your appliance. Always read and obey all safety
messages.
This is the safety alert symbol.
This symbol alerts you to potential hazards that can kill or hurtyou and others.
All safety messages will follow the safety alert symbol and either the word "DANGER" or "WARNING."
These words mean:
You can be killed or seriously injured if you don't immediately
follow instructions.
You can be killed or seriously injured if you don't follow
instructions.
All safety messages will tell you what the potential hazard is, tell you how to reduce the chance of injury, and tell you what can
happen if the instructions are not followed.
IMPORTANT SAFETY INSTRUCTIONS
WARNING: To reduce the risk of fire, electrical shock,
injury to persons, or damage when using the oven, follow
basic precautions, including the following:
m Proper Installation - Be sure the oven is properly installed
and grounded by a qualified technician.
m Never Use the Oven for Warming or Heating the Room.
m Do Not Leave Children Alone - Children should not be left
alone or unattended in area where oven is in use. They
should never be allowed to sit or stand on any part of the
oven.
m Wear Proper Apparel - Loose-fitting or hanging garments
should never be worn while using the oven.
m User Servicing - Do not repair or replace any part of the
oven unless specifically recommended in the manual. All
other servicing should be referred to a qualified technician.
m Storage in Oven - Flammable materials should not be
stored in an oven.
m Do Not Use Water on Grease Fires - Smother fire or flame
or use dry chemical or foam-type extinguisher.
m Use Only Dry Potholders - Moist or damp potholders on
hot surfaces may result in burns from steam. Do not let
potholder touch hot heating elements. Do not use a towel
or other bulky cloth.
m Use Care When Opening Door - Let hot air or steam
escape before removing or replacing food.
m Do Not Heat Unopened Food Containers - Build-up of
pressure may cause container to burst and result in injury.
[] Keep Oven Vent Ducts Unobstructed.
[] Placement of Oven Racks - Always place oven racks in
desired location while oven is cool. If rack must be moved
while oven is hot, do not let potholder contact hot heating
element in oven.
[] DO NOT TOUCH HEATING ELEMENTS OR INTERIOR
SURFACES OF OVEN - Heating elements may be hot
even though they are dark in color. Interior surfaces of an
oven become hot enough to cause burns. During and after
use, do not touch, or let clothing or other flammable
materials contact heating elements or interior surfaces of
oven until they have had sufficient time to cool. Other
surfaces of the oven may become hot enough to cause
burns - among these surfaces are oven vent openings and
surfaces near these openings, oven doors, and windows of
oven doors.
For self-cleaning ovens:
[] Do Not Clean Gasket - The gasket is essential for a good
seal. Care should be taken not to rub, damage, or move
the gasket.
[] Do Not Use Oven Cleaners - No commercial oven cleaner
or oven liner protective coating of any kind should be used
in or around any part of the oven.
[] Clean Only Parts Listed in Manual.
[] Before Self-Cleaning the Oven - Remove broiler pan and
other utensils.
SAVE THESE
State of California Proposition 65 Warnings:
WARNING: This product contains a chemical known to the State of California to cause cancer.
WARNING: This product contains a chemical known to the State of California to cause birth defects or other reproductive harm.
INSTRUCTIONS
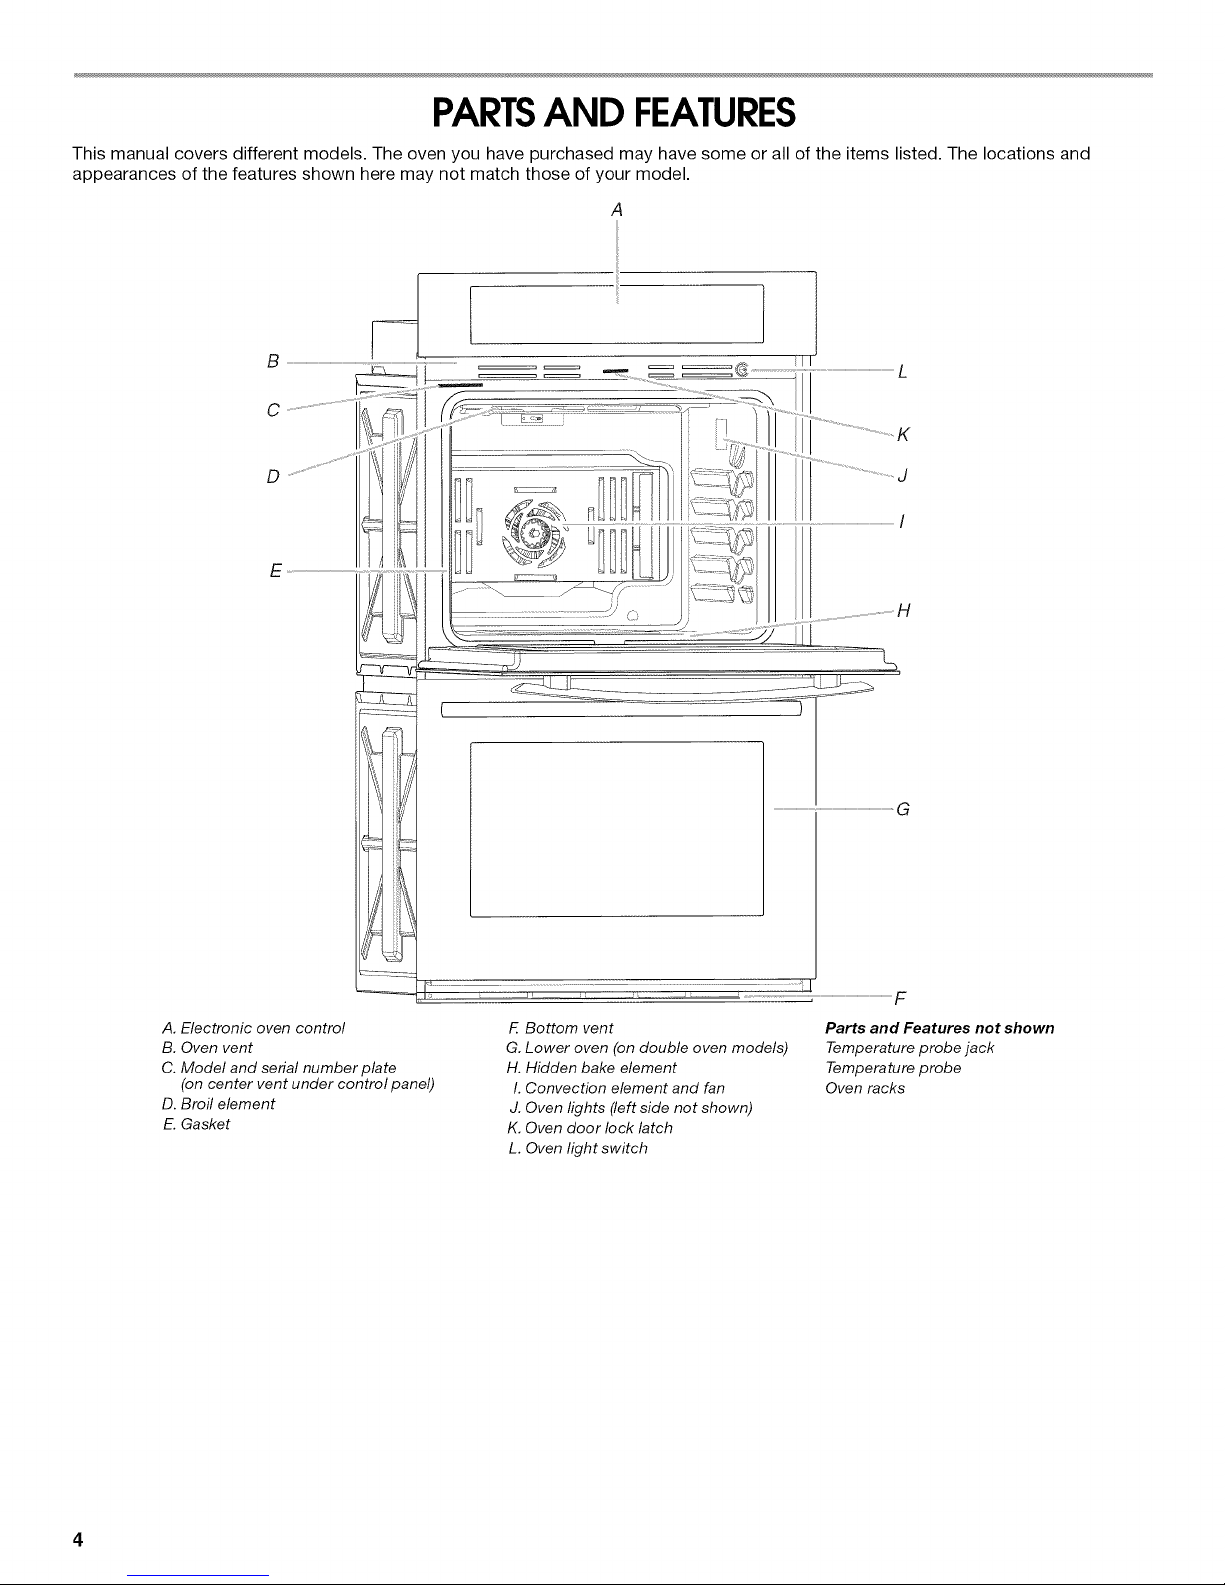
PARTSAND FEATURES
This manual covers different models. The oven you have purchased may have some or all of the items listed. The locations and
appearances of the features shown here may not match those of your model.
A
D
E
r
A. Electronic oven control
B. Oven vent
C. Model and serial number plate
(on center vent under control panel)
D. Broil element
E. Gasket
E Bottom vent
G. Lower oven (on double oven models)
H. Hidden bake element
I. Convection element and fan
J. Oven lights (left side not shown)
K. Oven door lock latch
L. Oven light switch
.........................................................................................................................G
F
Parts and Features not shown
Temperature probe jack
Temperature probe
Oven racks

ELECTRONICOVEN CONTROL
This manual covers different models. The oven you have purchased may have some or all of the items listed. The locations and
appearances of the items shown here may not match those of your model.
The oven's controls are accessed through its control panel.
NOTE: Due to the sensitivity of the control panel, we have provided special instructions for cleaning. See "General Cleaning" section for
cleaning instructions.
Single Oven Control Panel
J
u
Fq
Fq
D
mD
A B C
I Select mode: 1
l Li°,tI
CancelOven ]
Bake Auto Convection
L ZI:II
Fq
Fq
R [ sta.i B
!i'
A. Touch panel
B. Light
C. Display
Double Oven Control Panel
A B C
_ [K,tchonT,merI
iLow%Ovon][Lib,]
M L
A. Touch panel
B. Upper oven
C. Kitchen timer
D. Display
E. Number keypad
J
D. Number keypad
E. Kitchen timer
F. Quickset pads
,,#///,/"/_' ...........................
H G
D
....,//' ..............
F
E
G. More
H. Start
I. Back
J. Cancel oven
E
F
sss
Select mode:
|Bake AUto Cco_Ver(_io nnl D
D Convection
K I H G
F. Cancel upper oven
G. Cancel lower oven
H. Quickset pads
NNN
DDD
I. More
J. Start
K. Back
L. Light
M. Lower oven
The control panel houses the control menu and function controls.
The control pads are very sensitive, and require only a light touch
to activate.
For more information about the individual controls, see their
respective sections in this manual.
Welcome Guide
This appears on your display the first time the oven is powered
up. The Welcome Guide allows you to set up your new oven.
After every selection, a double beep will sound.
1. Select your language by pressing the quickset pad next to
English or French.
2. Select the temperature units by pressing the quickset pad
next to Fahrenheit or Celsius.
3. Select the clock units by pressing the quickset pad next to
AM/PM or 24 Hour (Military Time).
4. Choose Yes or No to have the daylight saving time
automatically updated.
5. Enter current time (00:00) using the number keypad and
choose AM or PM by pressing the quickset pad next to the
desired choice. Select Next to move to next screen.
6. Enter current date (MM/DD/YYYY) using the number keypad,
and press the quickset pad next to the Next option.
7. Select a screen appearance to match your oven. Press the
quickset pad next to DarWBlue, Light/Blue, DarWOrange,
Bronze/White.
8. Review your settings and press the quickset pad next to Save
option. A message will show: "You have selected a new
theme. The oven will reset momentarily. Please wait...." It will
take 1 minute to restart with the new settings set.
9. See the "Setup Menu" section for more detailed information.
Display
When the oven is in use (active mode), the display shows the
time, mode, oven temperature and timer, if set. If the timer is not
set, the Set Timer Option will also be displayed.
After approximately 2 minutes of inactivity, the display will go into
standby (sleep) mode, and the backlight of the display will dim.
When the oven is in operation, the display will remain active.
During programming, the display shows menus and the
appropriate selections for the respective cooking function.
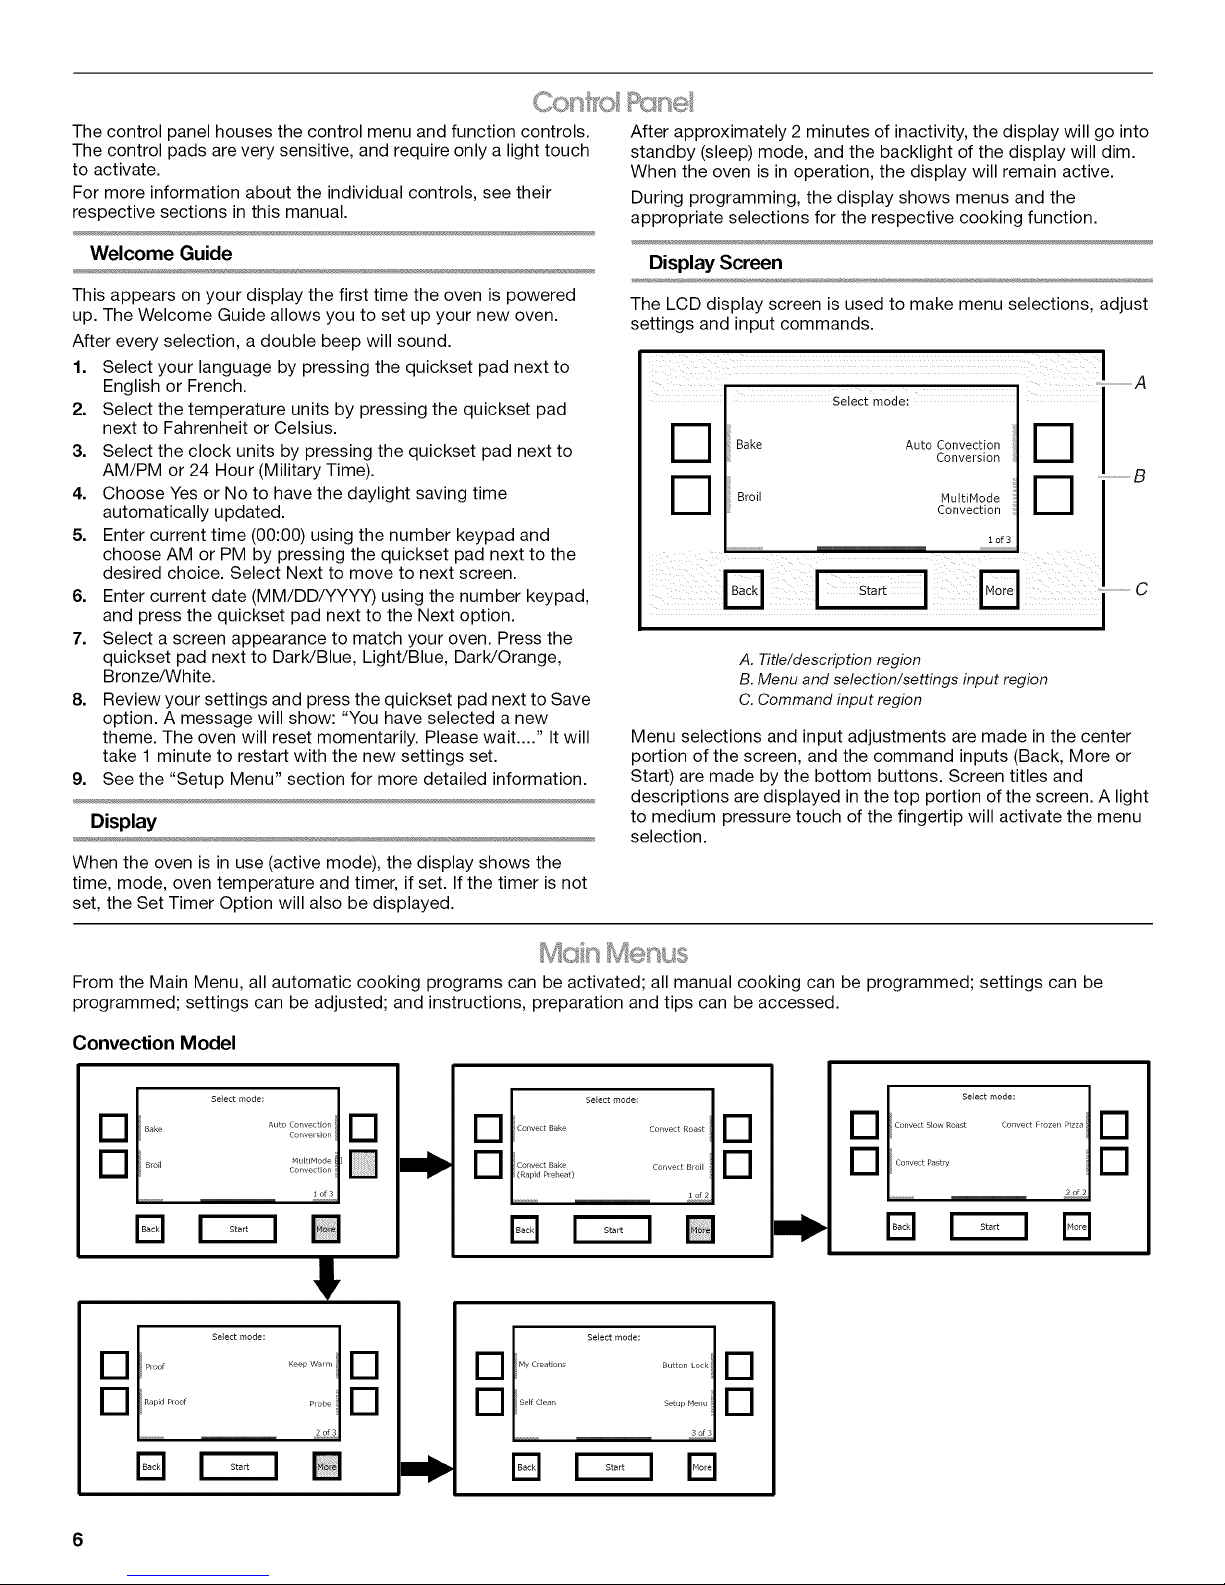
Display Screen
The LCD display screen is used to make menu selections, adjust
settings and input commands.
I
D Bake Auto Convection
D Broil NultiNode
A. Title/description region
B. Menu and selection/settings input region
C. Command input region
Menu selections and input adjustments are made in the center
portion of the screen, and the command inputs (Back, More or
Start) are made by the bottom buttons. Screen titles and
descriptions are displayed in the top portion of the screen. A light
to medium pressure touch of the fingertip will activate the menu
selection.
Select mode:
Conversion
Convection
Start C
M_',',Xlh ¢i/teFsJ@
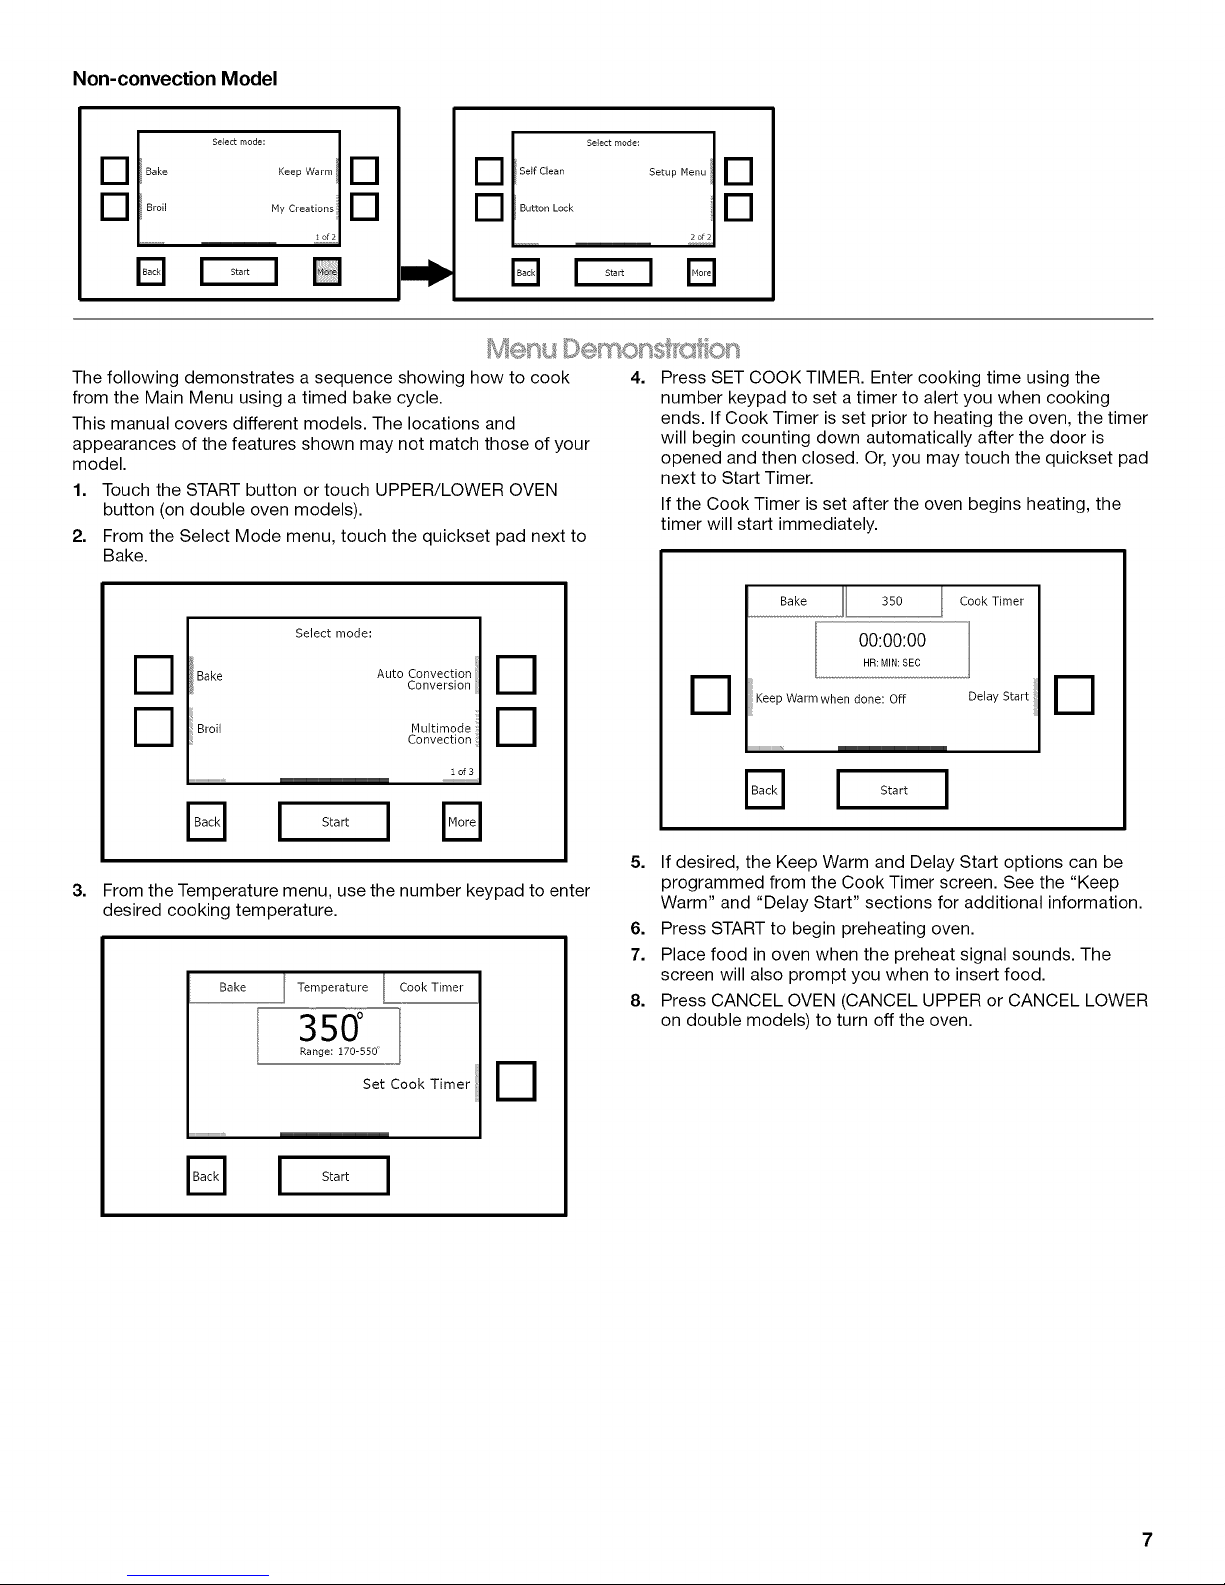
From the Main Menu, all automatic cooking programs can be activated; all manual cooking can be programmed; settings can be
programmed; settings can be adjusted; and instructions, preparation and tips can be accessed.
Convection Model
Convect Slow Roast Convect Frozen Pizza
Convect Pash y
d.:.....j£
F--=--1
.... _,,toI]I:CII]I:
..... /]/,IIiiii
i .,.:.....,t
.......... L£!
rq i .....i
Convect Bake Convect Roast
Convect Bake Convect Broil
(Rapid P_ebeat)
s......11
D F=--1
I
Proof Keep Warm
Rapid P_oof Probe
I s......j£
F1 I .....I
My Creations Button Lock
Self Clean Setup fqenu
I Select mode:
3of,,,,,,,.,,,,,]
D F--=r--1Vt
6
Non-convection Model
Bake Keep Warm
Broil My Creations
.......... ,!.,_£
Eli .....I
The following demonstrates a sequence showing how to cook
from the Main Menu using a timed bake cycle.
This manual covers different models. The locations and
appearances of the features shown may not match those of your
model.
1. Touch the START button or touch UPPER/LOWER OVEN
button (on double oven models).
2. From the Select Mode menu, touch the quickset pad next to
Bake.
Select mode:
Bake Auto Convection
Broil Nultimode
r
Conversion
Convection
E3 [-_ E3
i of 3
lq i stortI Iq
Select mode: _Imrq ! sBifttoCieio_k Setup Menu _r_
4.
Press SET COOK TIMER. Enter cooking time using the
number keypad to set a timer to alert you when cooking
ends. If Cook Timer is set prior to heating the oven, the timer
will begin counting down automatically after the door is
opened and then closed. Or, you may touch the quickset pad
next to Start Timer.
If the Cook Timer is set after the oven begins heating, the
timer will start immediately.
D
Bake 350 Cook Timer
Keep Warm when done: Off
Fq I I
Delay Start
D
3. From the Temperature menu, use the number keypad to enter
desired cooking temperature.
Bake
Temperature Cook Timer
35d
Range: 170-550 _
Set Cook Timer ::
E3 i stortI
5. If desired, the Keep Warm and Delay Start options can be
programmed from the Cook Timer screen. See the "Keep
Warm" and "Delay Start" sections for additional information.
6. Press START to begin preheating oven.
7. Place food in oven when the preheat signal sounds. The
screen will also prompt you when to insert food.
8. Press CANCEL OVEN (CANCEL UPPER or CANCEL LOWER
on double models) to turn off the oven.
Yourovenprovidesyouwiththeabilitytocontrolseveralofthe
defaultsettingsandaccessinformationthroughtheonscreen
display.Theseinclude:Clock,Sound,ScreenAppearance,
Language,TempUnits,ServiceInfo,SabbathMode,Oven
CalibrationandRestoreDefaults.
To Access Setup Menu:
1. Press START or Oven.
2. From the Select Mode menu, press the MORE button until
you see the Setup Menu choice.
3. Touch the quickset pad next to the Setup Menu choice.
Clock
This clock can be used in 12-hour or 24-hour format.
At any time desired, press BACK to return to the Setup Menu.
1. From the Setup menu, touch the quickset pad next to Clock.
2. From the Clock menu, touch the quickset pad next to Time.
3. Enter current time (--:--). Choose AM or PM.
4. Select SAVE. This will return you to the Clock settings menu.
5. From the Clock menu, touch the quickset pad next to DATE.
6. Enter current date (MM/DD/YYYY). Select ON or OFF for
Daylight Savings Adjust.
7. Select SAVE. This will return you to the Clock settings menu.
8. From the Clock menu, touch the quickset pad next to Format.
9. Select time format: AM/PM or 24 hour (Military Time).
10. Select SAVE. This will return you to the clock display screen.
11. From the Setup Menu, touch the quickset pad next to Clock.
12. From the Clock menu, touch the quickset pad next to Clock
Style.
13. Select clock style on idle screen: Analog or Digital.
14. Select SAVE. This will return you to the clock display screen.
Sound
1. From the Setup menu, touch the quickset pad next to Sound.
2. From the Sound menu, touch the quickset pad next to Timer
Volume.
3. Adjust the Timer Volume by touching the left quickset pad to
decrease the volume, or the right quickset pad to increase
the volume. To turn Timer Volume off, touch the left quickset
pad until Off appears.
4. Select SAVE. This will return you to the Sound settings menu.
5. From the Sound menu, touch the quickset pad next to Button
Volume.
6. Adjust Button volume by touching the left quickset pad to
decrease the volume and the right quickset pad to increase
the volume. To turn Button Volume off, touch the left quickset
pad until Off appears.
7. Select SAVE. This will return you to the Sound menu.
8. From the Sound menu, select ON or OFF on Startup/
Shutdown Sounds.
9. Press BACK to return to the Setup menu.
Screen Appearance
1. From the Setup menu, touch the quickset pad next to Screen
Appearance.
2. From the Appearance menu, touch the quickset pad next to
Brightness.
3. Adjust the screen brightness by touching the left quickset
pad to select dimmer and the right quickset pad to select
brighter.
4. Select SAVE. This will return you to the Screen Appearance
settings menu.
5. From the Screen Appearance menu, select ON or OFF on
Animation. When on, the animation (gradient and heat waves)
are shown while the oven is heating.
6. From the Screen Appearance Menu, touch the quickset pad
next to Theme.
7. Select an appearance to match your oven: DarWBlue, Light/
Blue, DarWOrange, Bronze/White.
8. After selecting a theme, a message will show: "You have
selected a new theme. The oven will reset momentarily.
Please wait...." It will take 1 minute to restart with the new
settings set.
Language
1. From the Setup menu, touch the quickset pad next to
Language.
2. From the Language menu, select your language: English or
French. This will return you to the Setup Menu.
Temperature Units
1. From the Setup Menu, touch the MORE button until Temp
Units appears.
2. Touch the quickset pad next to Temp Units.
3. From the Temp Units menu, select temperature units:
Fahrenheit or Celsius.
4. Select SAVE. This will return you to the Setup menu.
Service Information
1. From the Setup Menu, touch the MORE button until Service
Info appears.
2. Touch the quickset pad next to Service Info.
3. The Jenn-Air service phone number and website are
displayed in the screen.
4. Depending on the oven model, a Demo Mode is available.
This mode will allow you to make selections with various
options without heating the oven. Select ON/OFF to activate
or deactivate the function. When On, it will be indicated at the
bottom of the screen.
5. See "Assistance or Service" section for additional
information.
8
Sabbath Mode
The Sabbath Mode sets the oven to remain ina Bake setting until
turned off. A timed Sabbath Mode can also be set to keep the
oven on for only part of the Sabbath. When the Sabbath Mode is
set, only the number and Start keys will function, no tones will
sound, and the displays will not show messages or temperatures
changes. The heat source icons will appear lit on the oven display
throughout the Sabbath Mode.
When the oven door is opened or closed, the oven light will not
turn on or off, and the heating elements will not turn on or off
immediately.
If a power failure occurs when the Sabbath Mode is set, the oven
will remain in Sabbath Mode but will no longer be actively
cooking. When power returns, the display will read "SABBATH
MODE - Power outage has occurred." Touch CANCEL to return
to the normal operating mode (non-Sabbath Mode, not cooking).
7. Select Next by pressing the quickset pad next to it.
8. On double ovens, repeat steps 1-7 to set the second cavity, if
desired.
Food Poisoning Hazard
Do not let food sit in oven more than one hour before
or after cooking.
Doing so can result in food poisoning or sickness.
9. To set a Delayed Start, press the quickset pad next to Delay
Start. See the "Delay Start" section for additional information.
10. Press START to begin heating the oven.
11. Press CANCEL OVEN (CANCEL UPPER or CANCEL LOWER
on double oven models) to turn off the oven.
To disable Sabbath Mode:
Sabbath Mode will automatically be disabled when a cook time
ends, or it can be disabled by pressing CANCEL. "Sabbath
Mode: OFF" will appear on screen. To program a new cycle,
follow steps 2 - 11 in the "To Use Sabbath Mode" section.
Burn Hazard
Use an oven mitt to remove temperature probe.
Do not touch broil element.
Failure to follow these instructions can result in burns.
NOTE: If you touch Sabbath Mode while the temperature probe
is set, a message will appear saying "Probe not inserted."
Remove the probe and touch NEXT to enter the untimed Sabbath
Mode. Touch CANCEL to return to the Bake mode.
To use Sabbath Mode:
1. From the Setup Menu, touch the MORE button until Sabbath
Mode appears. Press the quickset pad next to Sabbath
Mode.
2. From the Sabbath Mode menu, read the instructions on the
screen and press the quickset pad next to On to turn Sabbath
Mode on.
NOTE: Sabbath Mode disables the 12-hour shutoff. All lights
and displays are disabled, so that no visible activity takes
place when the oven door is opened.
3. On double ovens, select the cavity to set up by pressing the
quickset pad next to Upper or Lower.
4. Select Oven Temperature. Use the numbered keypad to enter
a desired cooking temperature. The temperature must be
between 170°F (77°C) and 550°F (288°C) or an invalid key
alert occurs and the default temperature appears on the
screen.
5. Select Next by pressing the quickset pad next to it.
6. If a programmed Cook Time is desired, enter a Cook Time by
using the number keypad. The time length may not exceed
12:00:00. When the timer ends, the oven cavity will stop
heating.
Temperature Change:
The oven temperature can be changed when the oven is in
Sabbath Mode. No tones will sound, and the display will not
change. While the oven is running, pressing a number keypad
and the Start button will change the temperature after a random
delay of between 25 and 40 seconds.
Number keys 1 through 0 represent temperatures. Use the
following chart as a guide.
Number Keypad Oven Temperature
1 170°F (77°C)
2 200°F (93°C)
3 225°F (121 °C)
4 250°F (135°C)
5 300°F (149°C)
6 325°F (163°C)
7 350°F (177°C)
8 375°F (191 °C)
9 400°F (204°C)
0 450°F (232°C)
To Change Temperature:
1. Touch the number keypad for the desired temperature from
the chart.
2. Touch START.
Oven Calibration
1. From the Setup menu, touch the More button until Oven
Calibration appears.
2. Touch the quickset pad next to Oven Calibration.
3. On double models, touch UPPER OVEN or LOWER OVEN to
choose the oven cavity to be checked or calibrated.
4. Adjust the calibration of the oven by choosing the
temperature offset: -1o(if oven is too hot) or +1° (if oven is too
cool); or press the quickset pad next to Use Calibration Tool.
5. When using the -1°/+1° temperature offset, select Save after
entering the desired value.
6. When using the Use Calibration Tool function, place an oven
thermometer in the middle of the oven. After pressing Start,
the oven will heat to a standard temperature.
7. Press START.
8. Wait while the oven heats. This process may take several
minutes.
9. When the message "oven is ready" appears, open the oven
door and read the temperature on the oven thermometer.
10. Select NEXT.
11. Enter the exact value on the thermometer. Use the increase
(+1o)or decrease (-1°) buttons to reflect the thermometer
temperature.
12. Select NEXT.
13. The temperature offset will be calculated when the oven is off
and cooling down.
14. Select SAVE.
Restore Factory Settings
3.
The following settings will be lost: Language, Temperature
Units, Clock Settings, Date and Screen Appearance. The
Welcome Guide will appear to help you reset these settings.
See the "Welcome Guide" section for additional information.
Kitchen Timer
This is an independent timer not associated with the cook timers.
1. Press the Kitchen Timer button anytime needed.
2. Enter the desired time (00:00:00) using the number keypad.
3. Press the quickset pad next to Cancel Timer to cancel the
function or press Start.
4. While the Kitchen Timer is running, the timer is minimized to
the bar at the bottom of the screen.
5. To adjust the Kitchen Timer, press the Kitchen Timer button
and choose between Cancel Timer, Hide, or Reset by
pressing the quickset pads next to them.
6. If Cancel Timer is pressed, the timer is canceled and the
panel is hidden.
7. If Hide is pressed, the panel is lowered to the appropriate
position. Pressing the Kitchen Timer button will also hide the
panel.
8. If Reset is pressed, the Kitchen Timer is kept open but resets
to (00:00:00); a new value can now be entered.
9. When the Kitchen Timer is complete, a beep will sound.
10. It is possible to add extra time by pressing the quickset pad
next to Add More Time or to cancel the function by pressing
the quickset pad next to Cancel Timer.
11. To add more time, use the number keypad.
12. Press START.
1. From the Setup Menu, touch the More button until Restore
Factory Defaults appears.
2. Touch the quickset pad next to Restore Factory Defaults.
OVEN USE
Odors and smoke are normal when the oven is used the first few
times, or when it is heavily soiled.
During oven use, the heating elements will not remain on, but will
cycle on and off throughout oven operation.
IMPORTANT: To avoid permanent damage to the oven bottom • To catch spills, place foil on rack below dish. Make sure foil is
finish, do not line the oven bottom with any type of foil or liner, at least 1/2"(1.3 cm) larger than the dish and that it is turned
• For best cooking results, do not cover entire rack with foil up at the edges.
because air must be able to move freely.
IMPORTANT: The health of some birds is extremely sensitive to
the fumes given off. Exposure to the fumes may result indeath to
certain birds. Always move birds to another closed and well-
ventilated room.
10
IMPORTANT: To avoid permanent damage to the porcelain
finish, do not place food or bakeware directly on the oven door or
bottom.
RACKS
• Position racks before turning on the oven.
• Do not position racks with bakeware on them.
• Make sure racks are level.
Depending on the oven model, you could have flat, offset and/or
roll-out racks. If "f" is after the rack position, the flat rack should
be used. An "o" after the rack position indicates the offset rack
should be used. An "r" indicates the roll-out rack should be used.
For example: 1o, 3f, 5r indicates the use of the offset rack in rack
position 1, the flat rack in position 3, and the roll-out rack in
position 5. Refer to the section for the mode you are using for
specific rack recommendations.
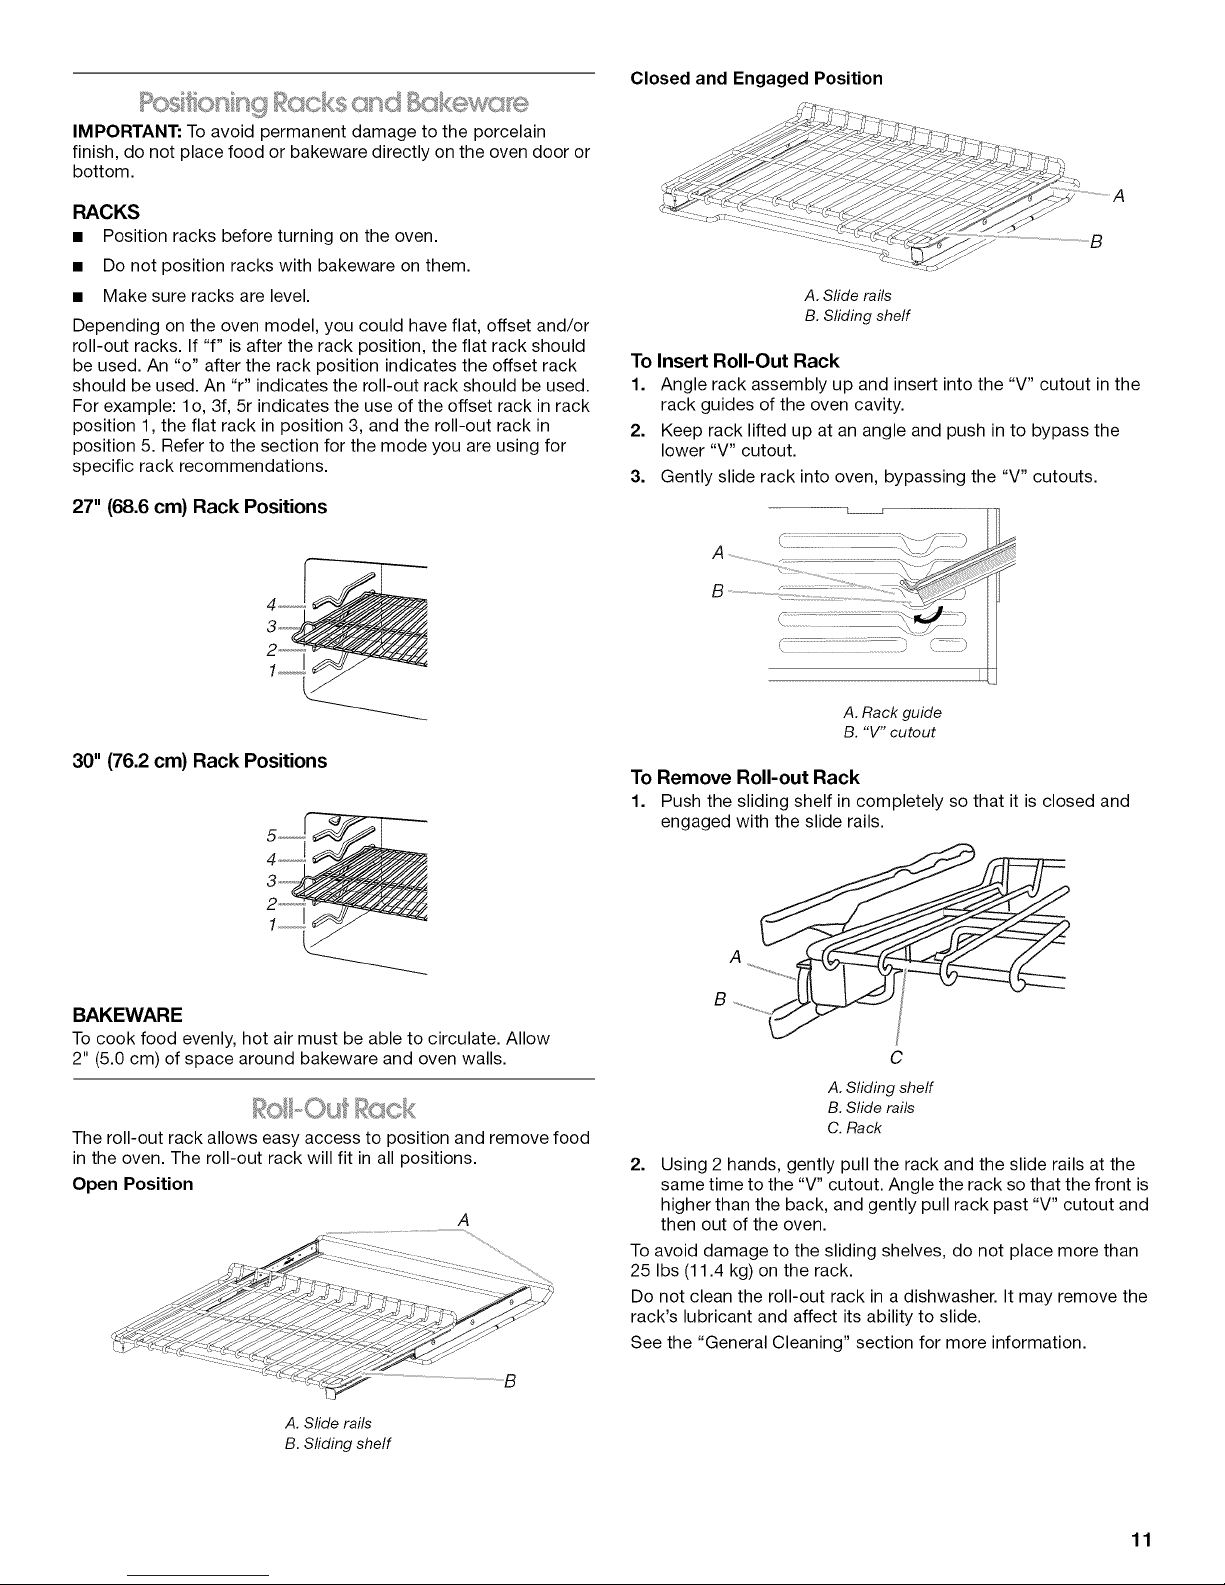
27" (68.6 cm) Rack Positions
Closed and Engaged Position
A. Sfide rails
B. Sliding shelf
To Insert Roll-Out Rack
1. Angle rack assembly up and insert into the "V" cutout in the
rack guides of the oven cavity.
2. Keep rack lifted up at an angle and push in to bypass the
lower "V" cutout.
3. Gently slide rack into oven, bypassing the "V" cutouts.
30" (76.2 cm) Rack Positions
BAKEWARE
To cook food evenly, hot air must be able to circulate. Allow
2" (5.0 cm) of space around bakeware and oven walls.
The roll-out rack allows easy access to position and remove food
in the oven. The roll-out rack will fit in all positions.
Open Position
A. Rack guide
B. "V" cutout
To Remove Roll-out Rack
1. Push the sliding shelf in completely so that it is closed and
engaged with the slide rails.
C
A. Sliding sholf
B. Slide rails
C.Rack
2. Using 2 hands, gently pull the rack and the slide rails at the
same time to the "V" cutout. Angle the rack so that the front is
higher than the back, and gently pull rack past "V" cutout and
then out of the oven.
To avoid damage to the sliding shelves, do not place more than
25 Ibs (11.4 kg) on the rack.
Do not clean the roll-out rack in a dishwasher. It may remove the
rack's lubricant and affect its ability to slide.
See the "General Cleaning" section for more information.
A. Slide rails
B. Sfiding shelf
B
11
i __ _t_"i I'_ _ '_,¢'__ '" _ _6 _
M®u T omee
On models without a temperature probe, use a meat
thermometer to determine whether meat, poultry and fish, are
cooked to the desired degree of doneness. The internal
temperature, not appearance, should be used to determine
doneness. A meat thermometer is not supplied with this
appliance. Follow manufacturer's directions for using a meat
thermometer.
B
C _ (. )
( )
3. Select the temperature. The default temperature and its range
is shown in the following table.
Mode Default Range
Temperature
Bake 350°F (177°C) 170-550°F (77-288°C)
Broil 550°F (288°C) 450-550°F (232-238°C)
K. Warm 170°F (77°C) 150-200°F (66-93°C)
Cvt. Bake 325°F (163°C) 170-550°F (77-288°C)
Cvt. Bake (Rapid 325°F (163°C) 170-550°F (77-288°C)
Preheat)
Cvt. Roast 325°F (163°C) 170-550°F (77-288°C)
Cvt. Broil 550°F (288°C) 450-550°F (232-238°C)
Cvt. S. Roast 4h 275°F (135°C) 250-300°F (120-150°C)
Cvt. S. Roast 8h 225°F (107°C) 200-250°F (93-120°C)
Cvt. S. Roast 12h 185°F (85°C) 170-225°F (77-107°C)
Cvt. Frozen Pizza 375°F (190°C) 170-550°F (77-288°C)
Cvt. Pastry 325°F (163°C) 170-550°F (77-288°C)
Proof 100°F (38°C)
Rapid Proof 200°F (93°C) 170-200°F (77-93°C)
EZC3 _ EZ] EZZZ] r--q
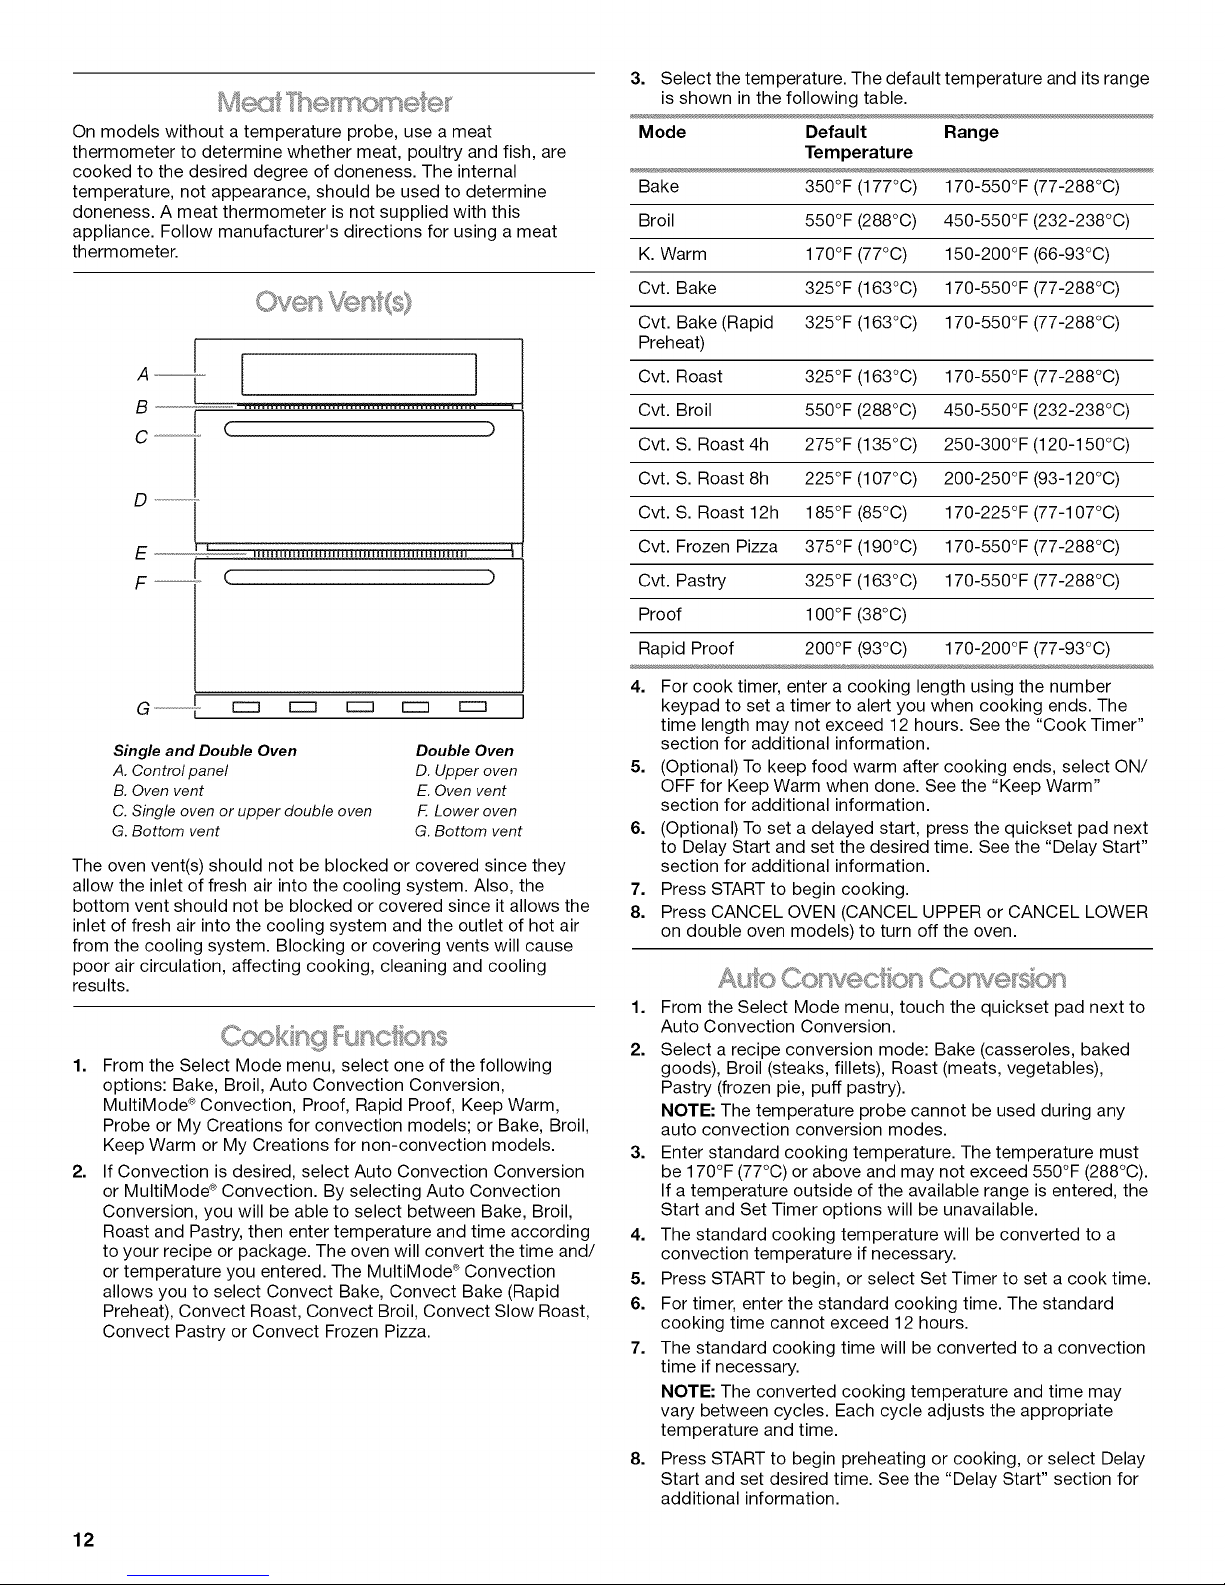
Single and Double Oven
A. Control panel
B. Oven vent
C. Single oven or upper double oven
G. Bottom vent
Double Oven
D. Upper oven
E. Oven vent
F. Lower oven
G. Bottom vent
The oven vent(s) should not be blocked or covered since they
allow the inlet of fresh air into the cooling system. Also, the
bottom vent should not be blocked or covered since it allows the
inlet of fresh air into the cooling system and the outlet of hot air
from the cooling system. Blocking or covering vents will cause
poor air circulation, affecting cooking, cleaning and cooling
results.
1.
From the Select Mode menu, select one of the following
options: Bake, Broil, Auto Convection Conversion,
MultiMode ®Convection, Proof, Rapid Proof, Keep Warm,
Probe or My Creations for convection models; or Bake, Broil,
Keep Warm or My Creations for non-convection models.
2.
If Convection is desired, select Auto Convection Conversion
or MultiMode ®Convection. By selecting Auto Convection
Conversion, you will be able to select between Bake, Broil,
Roast and Pastry, then enter temperature and time according
to your recipe or package. The oven will convert the time and/
or temperature you entered. The MultiMode ®Convection
allows you to select Convect Bake, Convect Bake (Rapid
Preheat), Convect Roast, Convect Broil, Convect Slow Roast,
Convect Pastry or Convect Frozen Pizza.
4. For cook timer, enter a cooking length using the number
keypad to set a timer to alert you when cooking ends. The
time length may not exceed 12 hours. See the "Cook Timer"
section for additional information.
5. (Optional) To keep food warm after cooking ends, select ON/
OFF for Keep Warm when done. See the "Keep Warm"
section for additional information.
6. (Optional) To set a delayed start, press the quickset pad next
to Delay Start and set the desired time. See the "Delay Start"
section for additional information.
7. Press START to begin cooking.
8. Press CANCEL OVEN (CANCEL UPPER or CANCEL LOWER
on double oven models) to turn off the oven.
1. From the Select Mode menu, touch the quickset pad next to
Auto Convection Conversion.
2. Select a recipe conversion mode: Bake (casseroles, baked
goods), Broil (steaks, fillets), Roast (meats, vegetables),
Pastry (frozen pie, puff pastry).
NOTE: The temperature probe cannot be used during any
auto convection conversion modes.
3. Enter standard cooking temperature. The temperature must
be 170°F (77°C) or above and may not exceed 550°F (288°C).
If a temperature outside of the available range is entered, the
Start and Set Timer options will be unavailable.
4. The standard cooking temperature will be converted to a
convection temperature if necessary.
5. Press START to begin, or select Set Timer to set a cook time.
6. For timer, enter the standard cooking time. The standard
cooking time cannot exceed 12 hours.
7. The standard cooking time will be converted to a convection
time if necessary.
NOTE: The converted cooking temperature and time may
vary between cycles. Each cycle adjusts the appropriate
temperature and time.
8.
Press START to begin preheating or cooking, or select Delay
Start and set desired time. See the "Delay Start" section for
additional information.
12
My Creations allows the customization of cooking processes.
When My Creations is selected from the main menu a list of
existing creations is presented along with the ability to create
more.
1. From the Select Mode menu, touch the MORE button until
My Creations is shown. Press the quickset pad next to it.
2. Press the quickset pad next to ADD NEW CREATION to
customize your cooking process.
3. Select cook mode. See "Cooking Functions" section to check
available function on convection and non-convection models.
4. Select cook temperature.
5. Select NEXT.
6. Select how to monitor cooking. Cook timer, probe and no
alerts probe are not available in non-convection models.
7. If Cook Timer is selected, enter cook timer length.
8. Select NEXT.
If the oven door is opened during baking, the heating elements
will turn off approximately 30 seconds after the door is opened.
They will turn on again approximately 30 seconds after the door
is closed. If used, the convection fan turns off immediately when
the door is opened and turns on immediately when door is
closed.
Before Using Bake:
Before using Bake, see the "Positioning Racks and Bakeware"
section and the following tips for rack positions.
NOTE: An "o" after the rack position number indicates that the
offset rack should be used. An "f" indicates that the flat rack
should be used, and an "r" indicates that the roll-out rack should
be used.
Rack positions for 27" (68.6 cm) Convection ovens
1-rack baking: 20, 2f or 3f
2-rack baking: 20 and 3r
For meat and poultry: 20
For best results when baking cakes on 2 racks, use racks 20 and
3r for baking. Place the cakes on the racks as shown.
Burn Hazard
Use an oven mitt to remove temperature probe.
Do not touch broil element.
Failure to follow these instructions can result in burns.
9. If Probe is selected, select target probe internal temperature.
10. Select NEXT.
11. Review your settings and select ADD STAGE or SAVE. If Add
Stage is selected, repeat steps 3-9 and select SAVE.
12. Select a name for the new creation.
13. A summary screen will appear. You may save the creation or
add another stage to the cooking process.
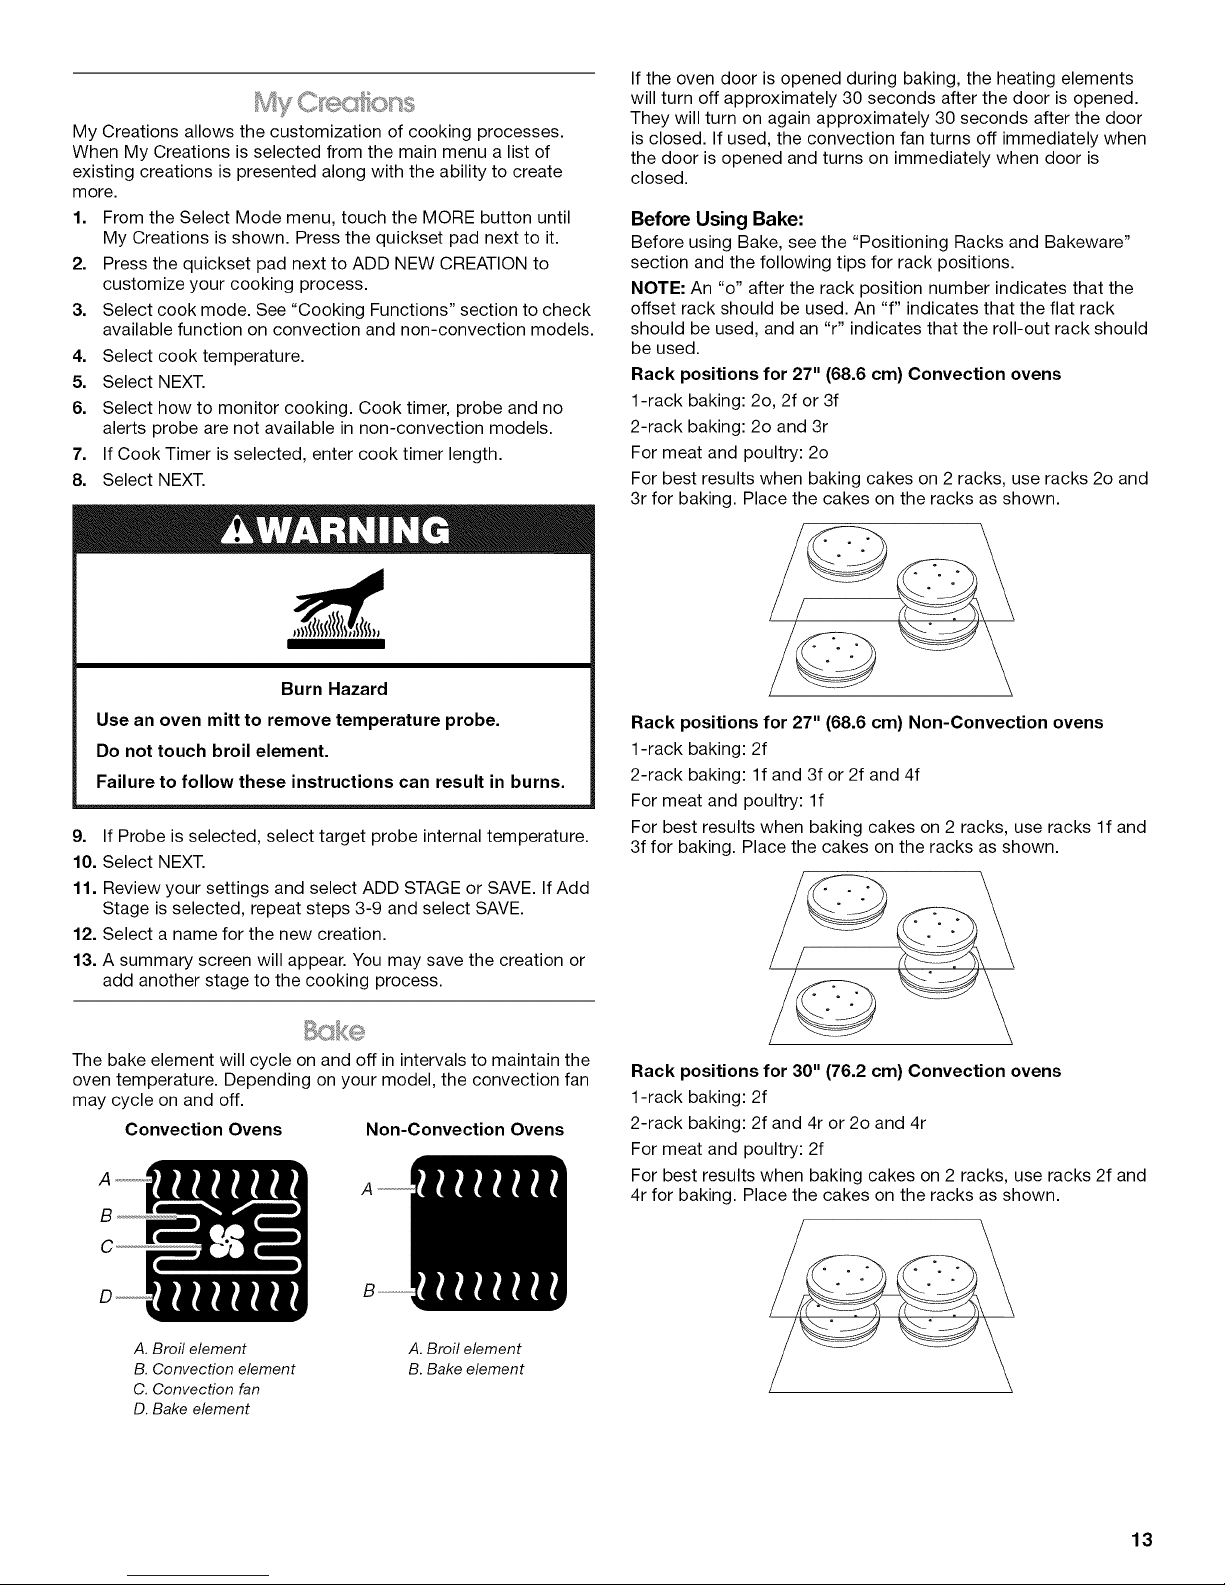
The bake element will cycle on and off in intervals to maintain the
oven temperature. Depending on your model, the convection fan
may cycle on and off.
Convection Ovens Non-Convection Ovens
A
C
Rack positions for 27" (68.6 cm) Non-Convection ovens
1-rack baking: 2f
2-rack baking: If and 3f or 2f and 4f
For meat and poultry: If
For best results when baking cakes on 2 racks, use racks If and
3f for baking. Place the cakes on the racks as shown.
Rack positions for 30" (76.2 cm) Convection ovens
1-rack baking: 2f
2-rack baking: 2f and 4r or 20 and 4r
For meat and poultry: 2f
For best results when baking cakes on 2 racks, use racks 2f and
4r for baking. Place the cakes on the racks as shown.
A. Broil element
B. Convection element
C. Convection fan
D. Bake element
A. Broil element
B. Bake element
13
Rack positions for 30" (76.2 cm) Non-Convection ovens
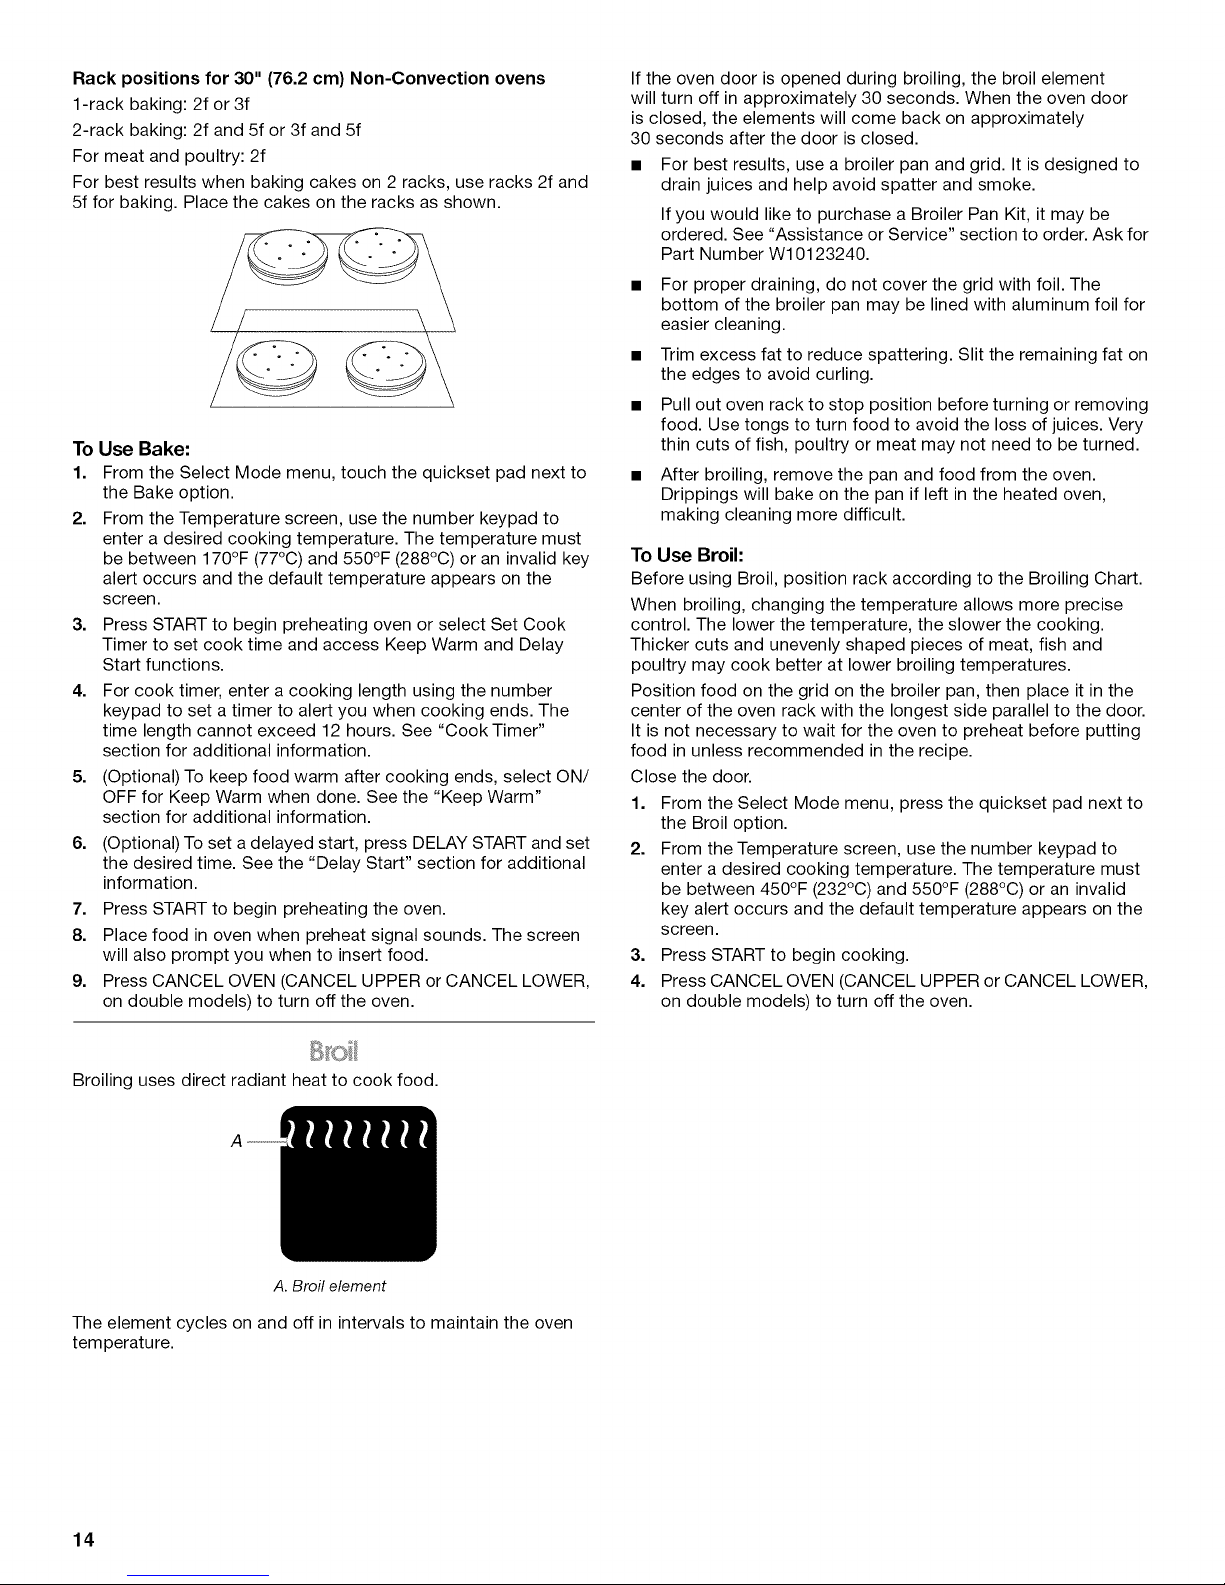
1-rack baking: 2f or 3f
2-rack baking: 2f and 5f or 3f and 5f
For meat and poultry: 2f
For best results when baking cakes on 2 racks, use racks 2f and
5f for baking. Place the cakes on the racks as shown.
To Use Bake:
1. From the Select Mode menu, touch the quickset pad next to
the Bake option.
2. From the Temperature screen, use the number keypad to
enter a desired cooking temperature. The temperature must
be between 170°F (77°C) and 550°F (288°C) or an invalid key
alert occurs and the default temperature appears on the
screen.
3. Press START to begin preheating oven or select Set Cook
Timer to set cook time and access Keep Warm and Delay
Start functions.
4. For cook timer, enter a cooking length using the number
keypad to set a timer to alert you when cooking ends. The
time length cannot exceed 12 hours. See "Cook Timer"
section for additional information.
5. (Optional) To keep food warm after cooking ends, select ON/
OFF for Keep Warm when done. See the "Keep Warm"
section for additional information.
6. (Optional) To set a delayed start, press DELAY START and set
the desired time. See the "Delay Start" section for additional
information.
7. Press START to begin preheating the oven.
8. Place food in oven when preheat signal sounds. The screen
will also prompt you when to insert food.
9. Press CANCEL OVEN (CANCEL UPPER or CANCEL LOWER,
on double models) to turn off the oven.
If the oven door is opened during broiling, the broil element
will turn off in approximately 30 seconds. When the oven door
is closed, the elements will come back on approximately
30 seconds after the door is closed.
• For best results, use a broiler pan and grid. It is designed to
drain juices and help avoid spatter and smoke.
If you would like to purchase a Broiler Pan Kit, it may be
ordered. See "Assistance or Service" section to order. Ask for
Part Number W10123240.
• For proper draining, do not cover the grid with foil. The
bottom of the broiler pan may be lined with aluminum foil for
easier cleaning.
• Trim excess fat to reduce spattering. Slit the remaining fat on
the edges to avoid curling.
• Pull out oven rack to stop position before turning or removing
food. Use tongs to turn food to avoid the loss of juices. Very
thin cuts of fish, poultry or meat may not need to be turned.
• After broiling, remove the pan and food from the oven.
Drippings will bake on the pan if left in the heated oven,
making cleaning more difficult.
To Use Broil:
Before using Broil, position rack according to the Broiling Chart.
When broiling, changing the temperature allows more precise
control. The lower the temperature, the slower the cooking.
Thicker cuts and unevenly shaped pieces of meat, fish and
poultry may cook better at lower broiling temperatures.
Position food on the grid on the broiler pan, then place it in the
center of the oven rack with the longest side parallel to the door.
It is not necessary to wait for the oven to preheat before putting
food in unless recommended in the recipe.
Close the door.
1. From the Select Mode menu, press the quickset pad next to
the Broil option.
2. From the Temperature screen, use the number keypad to
enter a desired cooking temperature. The temperature must
be between 450°F (232°C) and 550°F (288°C) or an invalid
key alert occurs and the default temperature appears on the
screen.
3. Press START to begin cooking.
4. Press CANCEL OVEN (CANCEL UPPER or CANCEL LOWER,
on double models) to turn off the oven.
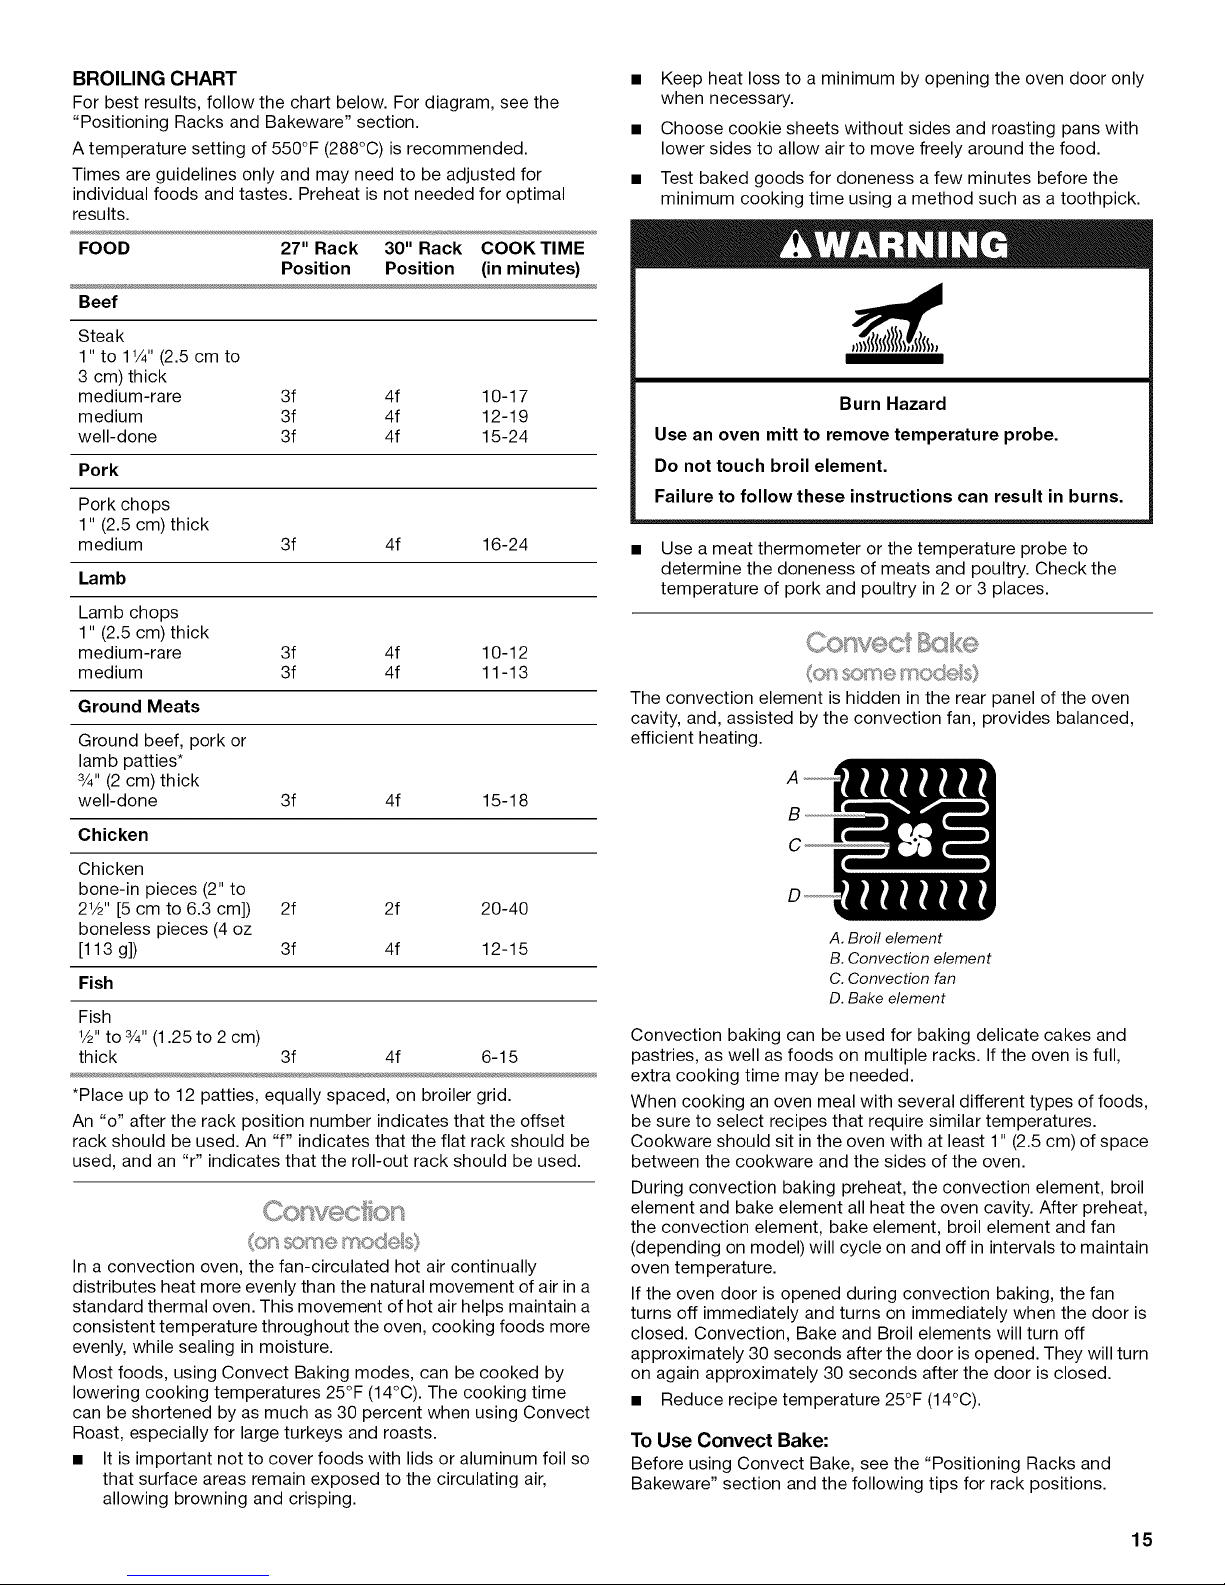
Broiling uses direct radiant heat to cook food.
A
A. Broil element
The element cycles on and off in intervals to maintain the oven
temperature.
14
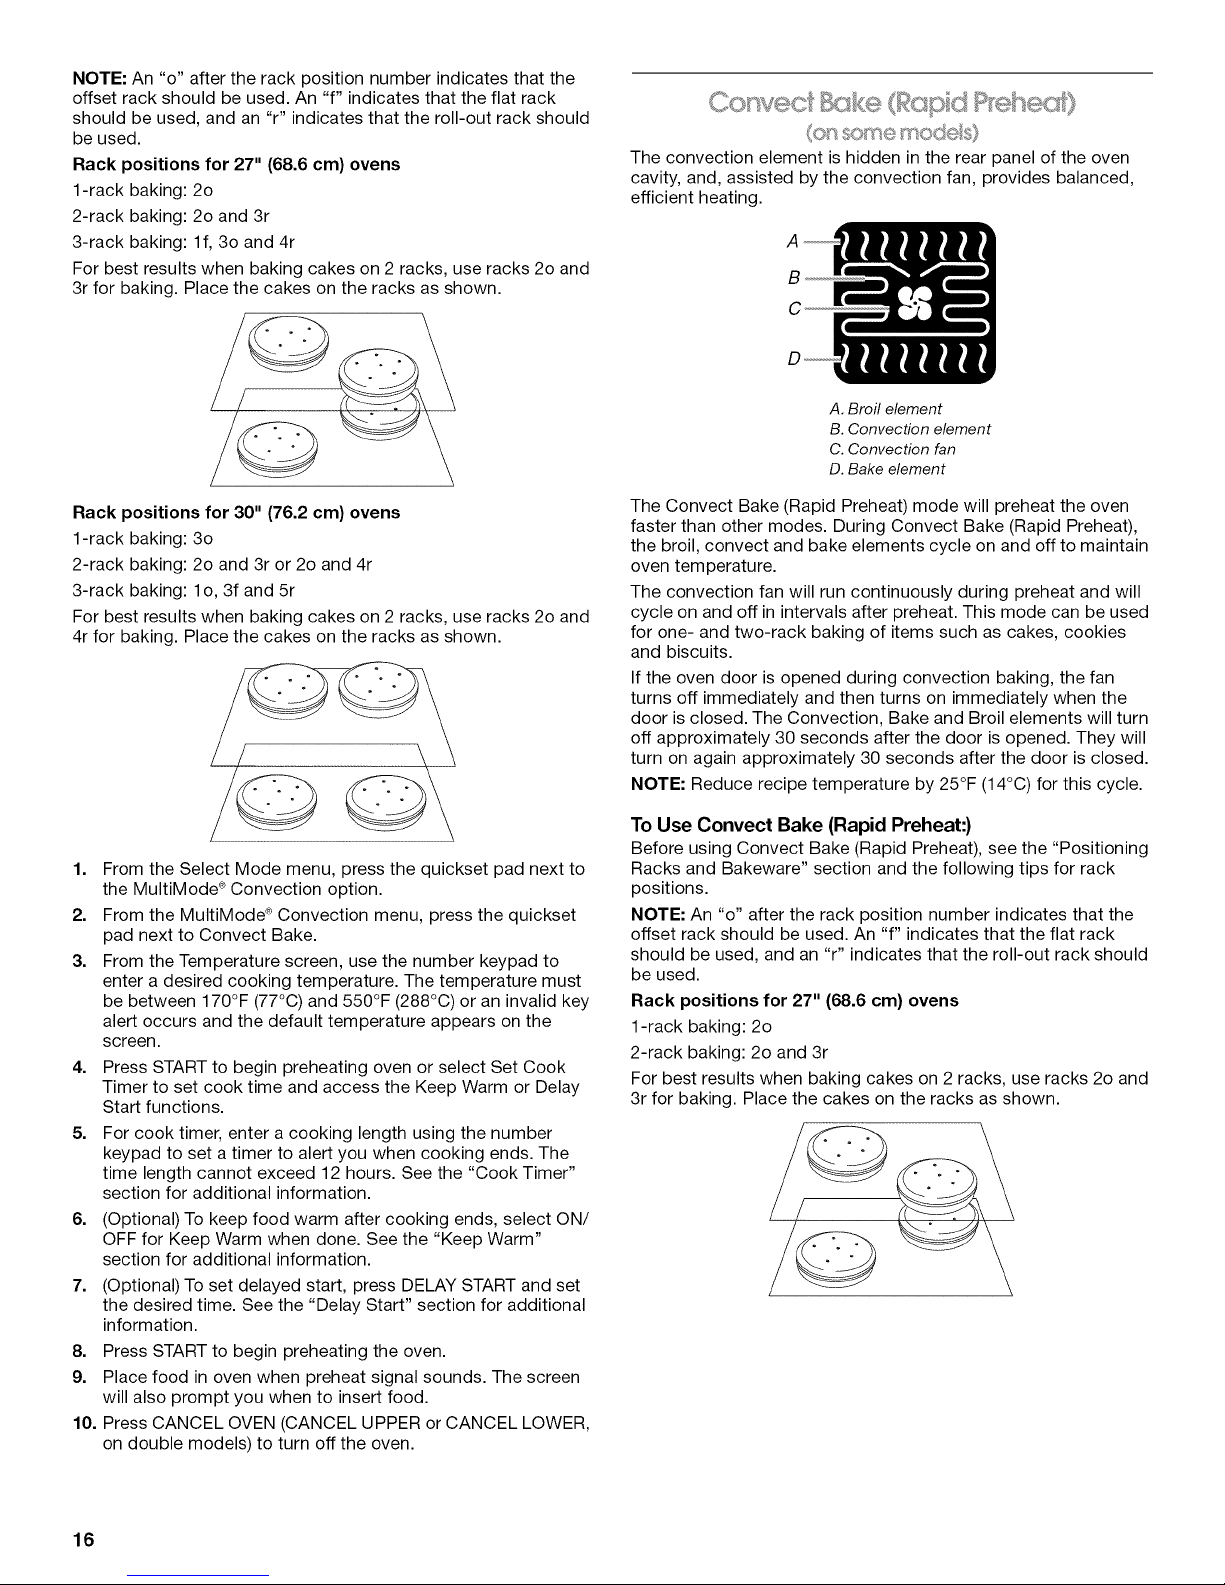
BROILING CHART
For best results, follow the chart below. For diagram, see the
"Positioning Racks and Bakeware" section.
A temperature setting of 550°F (288°C) is recommended.
Times are guidelines only and may need to be adjusted for
individual foods and tastes. Preheat is not needed for optimal
results.
FOOD 27" Rack 30" Rack COOK TIME
Position Position (in minutes)
Beef
Steak
1" to 1Y4" (2.5 cm to
3 cm) thick
medium-rare 3f 4f 10-17
medium 3f 4f 12-19
well-done 3f 4f 15-24
Pork
Pork chops
1" (2.5 cm) thick
medium 3f 4f 16-24
Lamb
Lamb chops
1" (2.5 cm) thick
medium-rare 3f 4f 10-12
medium 3f 4f 11-13
Ground Meats
Ground beef, pork or
lamb patties*
3/4"(2 cm) thick
well-done 3f 4f 15-18
Chicken
Chicken
bone-in pieces (2" to
21/2"[5 cm to 6.3 cm]) 2f 2f 20-40
boneless pieces (4 oz
[113 g]) 3f 4f 12-15
Fish
Fish
1/2"to 3/4"(1.25 to 2 cm)
thick 3f 4f 6-15
*Place up to 12 patties, equally spaced, on broiler grid.
An "o" after the rack position number indicates that the offset
rack should be used. An "f" indicates that the flat rack should be
used, and an "r" indicates that the roll-out rack should be used.
In a convection oven, the fan-circulated hot air continually
distributes heat more evenly than the natural movement of air in a
standard thermal oven. This movement of hot air helps maintain a
consistent temperature throughout the oven, cooking foods more
evenly, while sealing in moisture.
Most foods, using Convect Baking modes, can be cooked by
lowering cooking temperatures 25°F (14°C). The cooking time
can be shortened by as much as 30 percent when using Convect
Roast, especially for large turkeys and roasts.
• It is important not to cover foods with lids or aluminum foil so
that surface areas remain exposed to the circulating air,
allowing browning and crisping.
• Keep heat loss to a minimum by opening the oven door only
when necessary.
• Choose cookie sheets without sides and roasting pans with
lower sides to allow air to move freely around the food.
• Test baked goods for doneness a few minutes before the
minimum cooking time using a method such as a toothpick.
Burn Hazard
Use an oven mitt to remove temperature probe.
Do not touch broil element.
Failure to follow these instructions can result in burns.
• Use a meat thermometer or the temperature probe to
determine the doneness of meats and poultry. Check the
temperature of pork and poultry in 2 or 3 places.
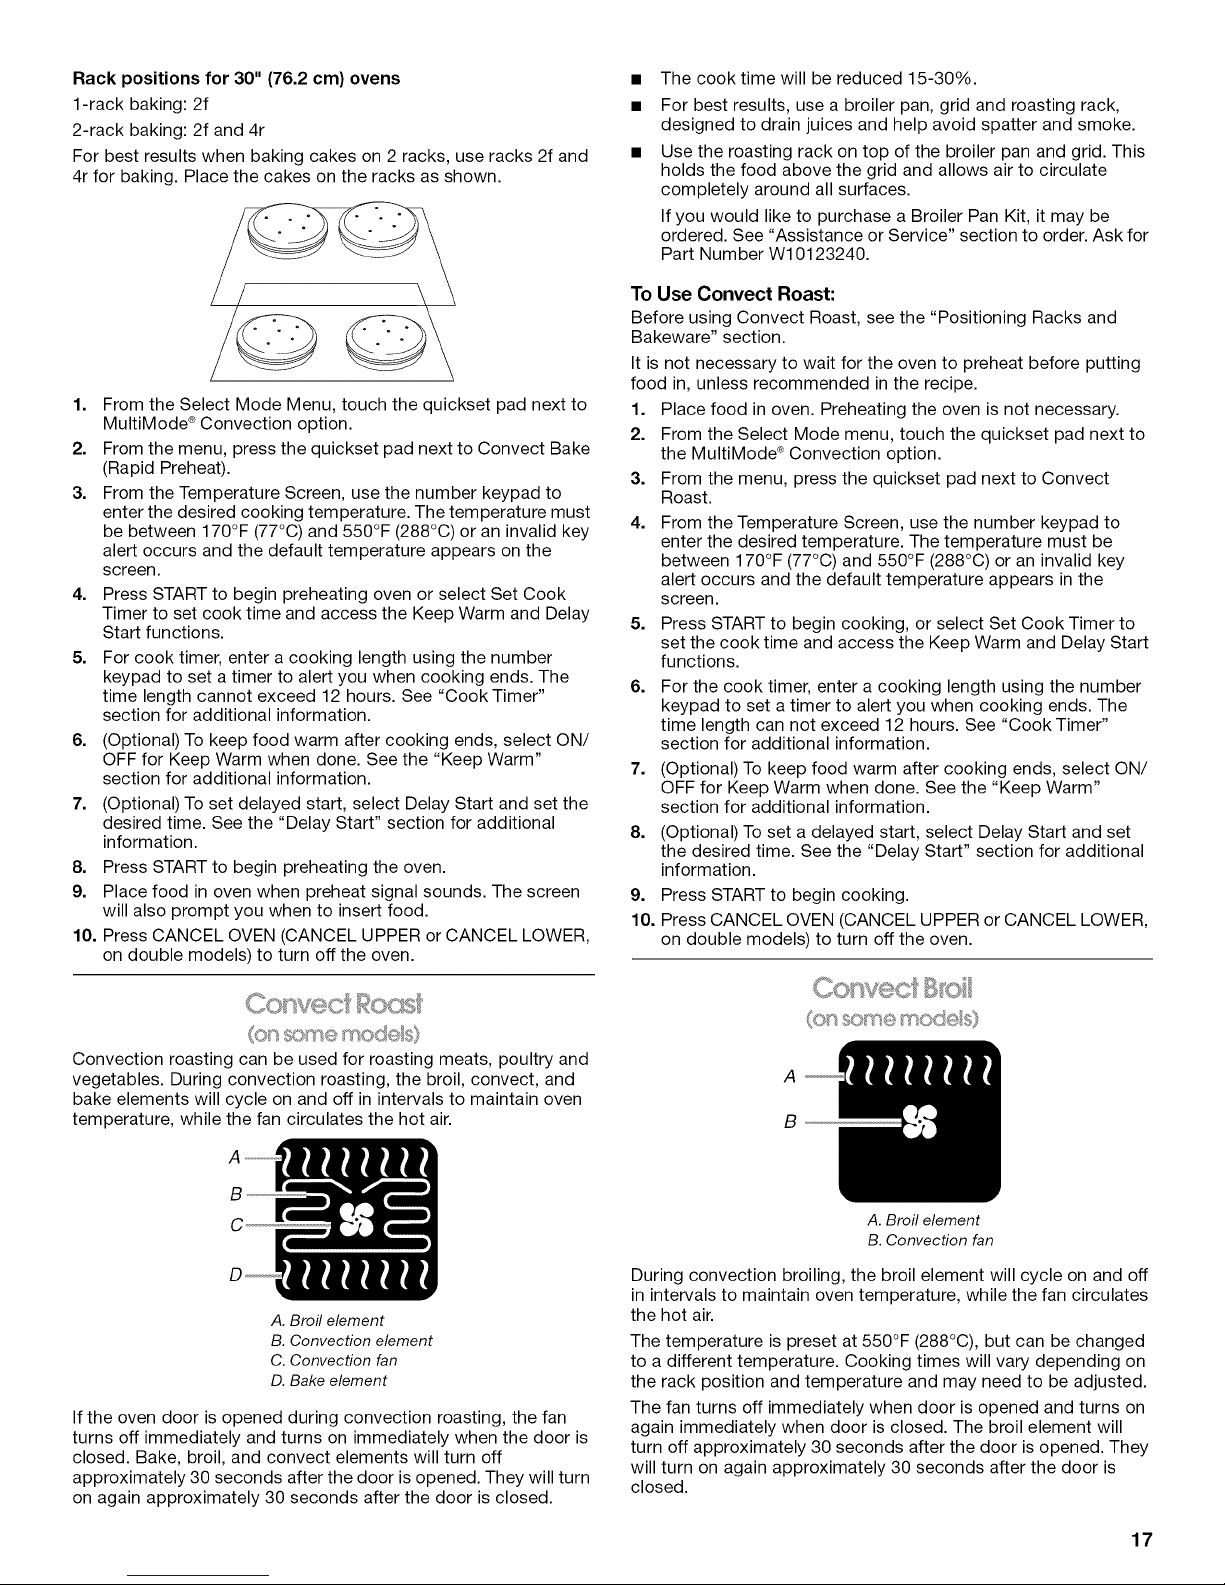
SOre® l"_sOC_®S}
The convection element is hidden in the rear panel of the oven
cavity, and, assisted by the convection fan, provides balanced,
efficient heating.
A
C
A. Broil element
B. Convection element
C. Convection fan
D. Bake element
Convection baking can be used for baking delicate cakes and
pastries, as well as foods on multiple racks. If the oven is full,
extra cooking time may be needed.
When cooking an oven meal with several different types of foods,
be sure to select recipes that require similar temperatures.
Cookware should sit in the oven with at least 1" (2.5 cm) of space
between the cookware and the sides of the oven.
During convection baking preheat, the convection element, broil
element and bake element all heat the oven cavity. After preheat,
the convection element, bake element, broil element and fan
(depending on model) will cycle on and off in intervals to maintain
oven temperature.
If the oven door is opened during convection baking, the fan
turns off immediately and turns on immediately when the door is
closed. Convection, Bake and Broil elements will turn off
approximately 30 seconds after the door is opened. They will turn
on again approximately 30 seconds after the door is closed.
• Reduce recipe temperature 25°F (14°C).
To Use Convect Bake:
Before using Convect Bake, see the "Positioning Racks and
Bakeware" section and the following tips for rack positions.
15
NOTE: An "o" after the rack position number indicates that the
offset rack should be used. An "f" indicates that the flat rack
should be used, and an "r" indicates that the roll-out rack should
be used.
Rack positions for 27" (68.6 cm) ovens
1-rack baking: 2o
2-rack baking: 2o and 3r
3-rack baking: lf, 3o and 4r
For best results when baking cakes on 2 racks, use racks 2o and
3r for baking. Place the cakes on the racks as shown.
Convec/ ( Tep d
some Modes}
The convection element is hidden in the rear panel of the oven
cavity, and, assisted by the convection fan, provides balanced,
efficient heating.
A
C
A. Broil element
B. Convection element
C. Convection fan
D. Bake element
Rack positions for 30" (76.2 cm) ovens
1-rack baking: 3o
2-rack baking: 2o and 3r or 2o and 4r
3-rack baking: lo, 3f and 5r
For best results when baking cakes on 2 racks, use racks 2o and
4r for baking. Place the cakes on the racks as shown.
1. From the Select Mode menu, press the quickset pad next to
the MultiMode ®Convection option.
2. From the MultiMode ®Convection menu, press the quickset
pad next to Convect Bake.
3. From the Temperature screen, use the number keypad to
enter a desired cooking temperature. The temperature must
be between 170°F (77°C) and 550°F (288°C) or an invalid key
alert occurs and the default temperature appears on the
screen.
4. Press START to begin preheating oven or select Set Cook
Timer to set cook time and access the Keep Warm or Delay
Start functions.
5. For cook timer, enter a cooking length using the number
keypad to set a timer to alert you when cooking ends. The
time length cannot exceed 12 hours. See the "Cook Timer"
section for additional information.
6. (Optional) To keep food warm after cooking ends, select ON/
OFF for Keep Warm when done. See the "Keep Warm"
section for additional information.
7. (Optional) To set delayed start, press DELAY START and set
the desired time. See the "Delay Start" section for additional
information.
8. Press START to begin preheating the oven.
9. Place food in oven when preheat signal sounds. The screen
will also prompt you when to insert food.
10. Press CANCEL OVEN (CANCEL UPPER or CANCEL LOWER,
on double models) to turn off the oven.
The Convect Bake (Rapid Preheat) mode will preheat the oven
faster than other modes. During Convect Bake (Rapid Preheat),
the broil, convect and bake elements cycle on and off to maintain
oven temperature.
The convection fan will run continuously during preheat and will
cycle on and off in intervals after preheat. This mode can be used
for one- and two-rack baking of items such as cakes, cookies
and biscuits.
If the oven door is opened during convection baking, the fan
turns off immediately and then turns on immediately when the
door is closed. The Convection, Bake and Broil elements will turn
off approximately 30 seconds after the door is opened. They will
turn on again approximately 30 seconds after the door is closed.
NOTE: Reduce recipe temperature by 25°F (14°C) for this cycle.
To Use Convect Bake (Rapid Preheat:)
Before using Convect Bake (Rapid Preheat), see the "Positioning
Racks and Bakeware" section and the following tips for rack
positions.
NOTE: An "o" after the rack position number indicates that the
offset rack should be used. An "f" indicates that the flat rack
should be used, and an "r" indicates that the roll-out rack should
be used.
Rack positions for 27" (68.6 cm) ovens
1-rack baking: 20
2-rack baking: 20 and 3r
For best results when baking cakes on 2 racks, use racks 20 and
3r for baking. Place the cakes on the racks as shown.
16
Rack positions for 30" (76.2 cm) ovens
1-rack baking: 2f
2-rack baking: 2f and 4r
For best results when baking cakes on 2 racks, use racks 2f and
4r for baking. Place the cakes on the racks as shown.
1. From the Select Mode Menu, touch the quickset pad next to
MultiMode ®Convection option.
2. From the menu, press the quickset pad next to Convect Bake
(Rapid Preheat).
3. From the Temperature Screen, use the number keypad to
enter the desired cooking temperature. The temperature must
be between 170°F (77°C) and 550°F (288°C) or an invalid key
alert occurs and the default temperature appears on the
screen.
4. Press START to begin preheating oven or select Set Cook
Timer to set cook time and access the Keep Warm and Delay
Start functions.
5.
For cook timer, enter a cooking length using the number
keypad to set a timer to alert you when cooking ends. The
time length cannot exceed 12 hours. See "Cook Timer"
section for additional information.
6. (Optional) To keep food warm after cooking ends, select ON/
OFF for Keep Warm when done. See the "Keep Warm"
section for additional information.
7. (Optional) To set delayed start, select Delay Start and set the
desired time. See the "Delay Start" section for additional
information.
8. Press START to begin preheating the oven.
9. Place food in oven when preheat signal sounds. The screen
will also prompt you when to insert food.
10. Press CANCEL OVEN (CANCEL UPPER or CANCEL LOWER,
on double models) to turn off the oven.
The cook time will be reduced 15-30%.
For best results, use a broiler pan, grid and roasting rack,
designed to drain juices and help avoid spatter and smoke.
Use the roasting rack on top of the broiler pan and grid. This
holds the food above the grid and allows air to circulate
completely around all surfaces.
If you would like to purchase a Broiler Pan Kit, it may be
ordered. See "Assistance or Service" section to order. Ask for
Part Number W10123240.
To Use Convect Roast:
Before using Convect Roast, see the "Positioning Racks and
Bakeware" section.
It is not necessary to wait for the oven to preheat before putting
food in, unless recommended in the recipe.
1. Place food in oven. Preheating the oven is not necessary.
2. From the Select Mode menu, touch the quickset pad next to
the MultiMode ®Convection option.
3. From the menu, press the quickset pad next to Convect
Roast.
4.
From the Temperature Screen, use the number keypad to
enter the desired temperature. The temperature must be
between 170°F (77°C) and 550°F (288°C) or an invalid key
alert occurs and the default temperature appears in the
screen.
5. Press START to begin cooking, or select Set Cook Timer to
set the cook time and access the Keep Warm and Delay Start
functions.
6.
For the cook timer, enter a cooking length using the number
keypad to set a timer to alert you when cooking ends. The
time length can not exceed 12 hours. See "Cook Timer"
section for additional information.
7. (Optional) To keep food warm after cooking ends, select ON/
OFF for Keep Warm when done. See the "Keep Warm"
section for additional information.
8. (Optional) To set a delayed start, select Delay Start and set
the desired time. See the "Delay Start" section for additional
information.
9. Press START to begin cooking.
10. Press CANCEL OVEN (CANCEL UPPER or CANCEL LOWER,
on double models) to turn off the oven.
Con c
_t_#'s,£}1_'_ moc_es
Convection roasting can be used for roasting meats, poultry and
vegetables. During convection roasting, the broil, convect, and
bake elements will cycle on and off in intervals to maintain oven
temperature, while the fan circulates the hot air.
B
C
A. Broil element
B. Convection element
C. Convection fan
D. Bake element
If the oven door is opened during convection roasting, the fan
turns off immediately and turns on immediately when the door is
closed. Bake, broil, and convect elements will turn off
approximately 30 seconds after the door is opened. They will turn
on again approximately 30 seconds after the door is closed.
A
B
A. Broil element
B. Convection fan
During convection broiling, the broil element will cycle on and off
in intervals to maintain oven temperature, while the fan circulates
the hot air.
The temperature is preset at 550°F (288°C), but can be changed
to a different temperature. Cooking times will vary depending on
the rack position and temperature and may need to be adjusted.
The fan turns off immediately when door is opened and turns on
again immediately when door is closed. The broil element will
turn off approximately 30 seconds after the door is opened. They
will turn on again approximately 30 seconds after the door is
closed.
17
 Loading...