


Horizon Memory Craft 8900QCP Special Edition
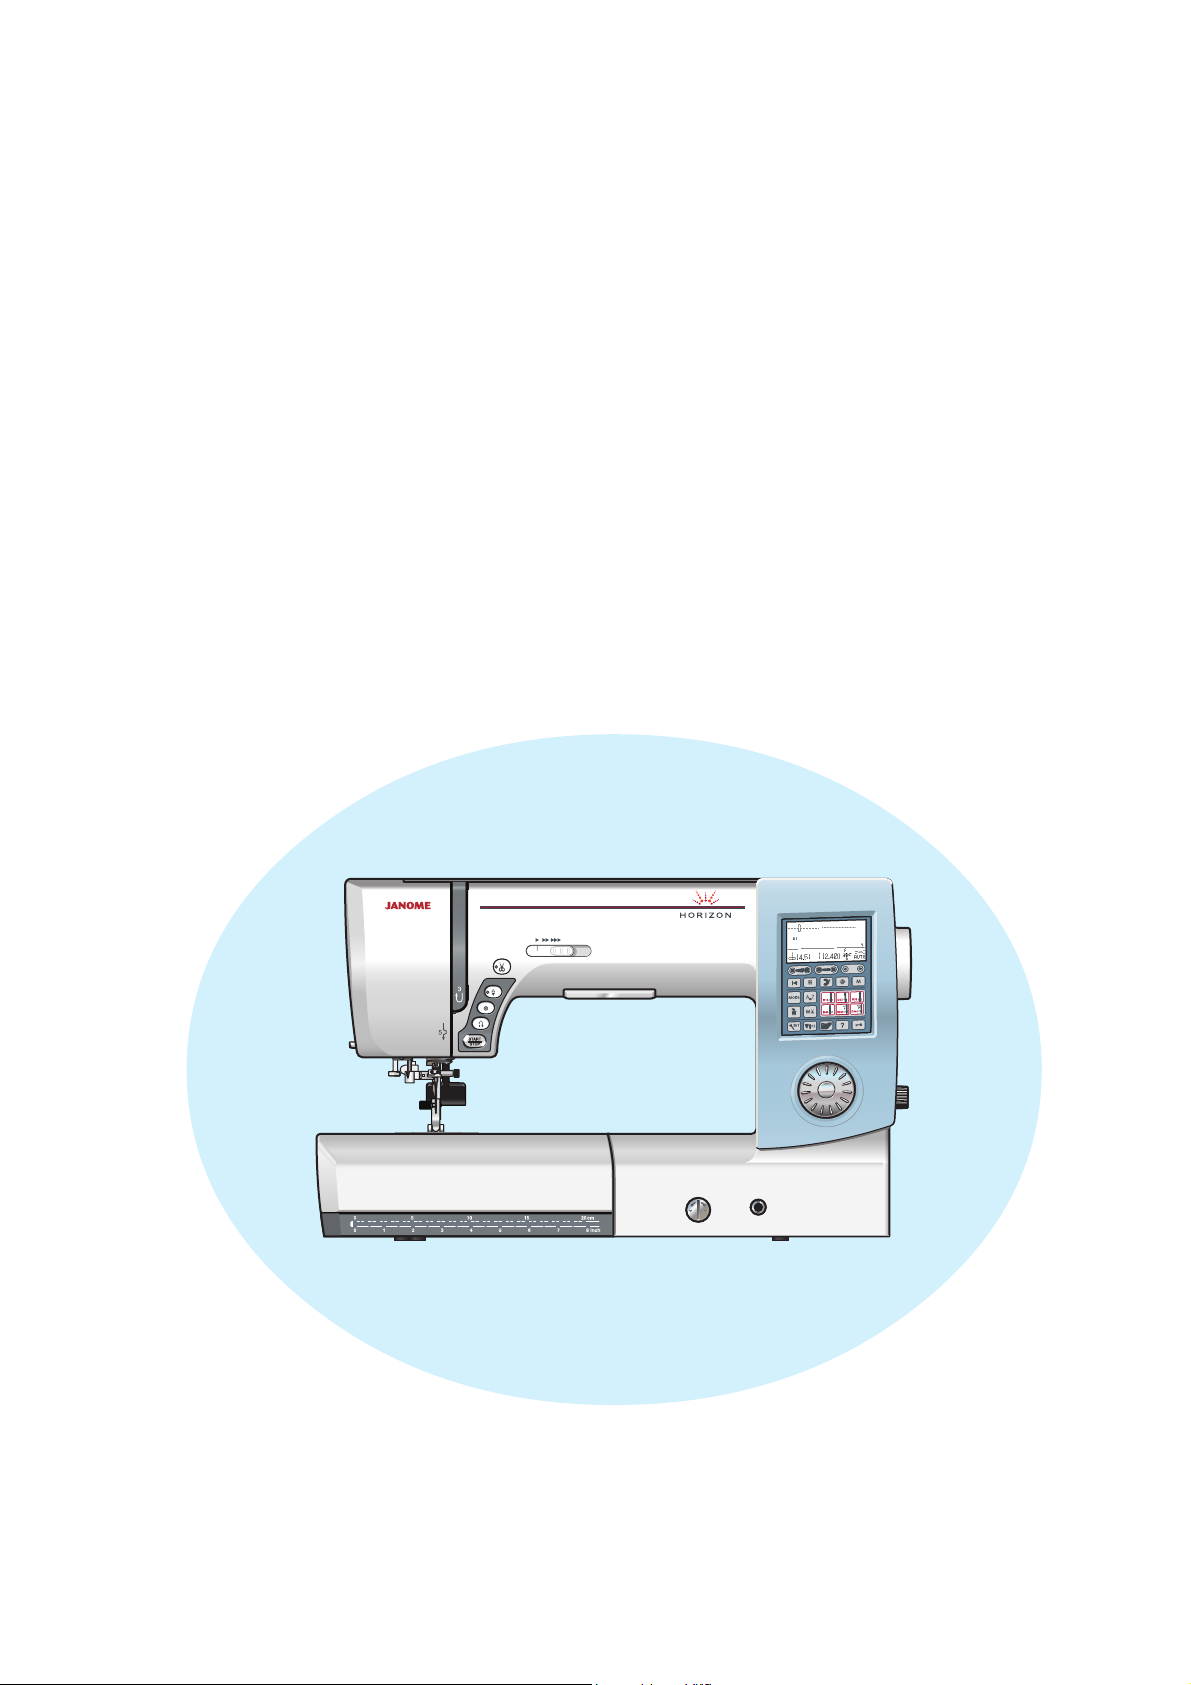
Instruction Book


IMPORTANT SAFETY INSTRUCTIONS
When using an electrical appliance, basic safety precautions should always be followed, including the
following:
This sewing machine is designed and manufactured for household use only.
Read all instructions before using this sewing machine.
To reduce the risk of electric shock:
DANGER
1. An appliance should never be left unattended when plugged in. Always unplug this sewing
machine from the electric outlet immediately after using and before cleaning.
WARNING
1. Do not allow to be used as a toy. Close attention is necessary when this sewing machine is used
by or near children.
2. Use this appliance only for its intended use as described in this owner’s manual.
Use only attachments recommended by the manufacturer as contained in this owner’s manual.
3. Never operate this sewing machine if it has a damaged cord or plug, if it is not working properly, if
it has been dropped or damaged, or dropped into water.
Return this sewing machine to the nearest authorized dealer or service center for examination,
repair, electrical or mechanical adjustment.
4. Never operate the appliance with any air opening blocked. Keep ventilation openings of this
sewing machine and foot controller free from accumulation of lint, dust and loose cloth.
5. Never drop or insert any object into any opening.
6. Do not use outdoors.
7. Do not operate where aerosol (spray) products are being used or where oxygen is being
administered.
8. To disconnect, turn all controls to the off (“O”) position, then remove plug from outlet.
9. Do not unplug by pulling on cord. To unplug, grasp the plug, not the cord.
10. Keep fingers away from all moving parts. Special care is required around the sewing machine
needle and/or cutting blade.
11. Always use the proper needle plate. The wrong plate can cause the needle to break.
12. Do not use bent needles.
13. Do not pull or push fabric while stitching. It may deflect the needle causing it to break.
14. Switch this sewing machine off (“O”) when making any adjustment in the needle area, such as
threading the needle, changing the needle, threading the bobbin or changing the presser foot, and
the like.
15. Always unplug this sewing machine from the electrical outlet when removing covers, lubricating, or
when making any other adjustments mentioned in this owner’s manual.
—
—
To reduce the risk of burns, fire, electric shock, or injury to persons:
SAVE THESE INSTRUCTIONS
For Europe only:
This appliance can be used by children aged from 8 years and above and persons with reduced
physical, sensory or mental capabilities or lack of experience and knowledge if they have been given
supervision or instruction concerning use of the appliance in a safe way and understand the hazards
involved. Children shall not play with the appliance. Cleaning and user maintenance shall not be made
by children without supervision.
For outside Europe (except U.S.A and Canada):
This appliance is not intended for use by persons (including children) with reduced physical, sensory
or mental capabilities, or lack of experience and knowledge, unless they have been given supervision
or instruction concerning use of the appliance by a person responsible for their safety.
Children should be supervised to ensure that they do not play with the appliance.
Please note that on disposal, this product must be safely recycled in accordance with relevant
National legislation relating to electrical/electronic products. If in doubt please contact your
retailer for guidance. (European Union only)
1

tabLe of CoNteNts
Names of Parts
Names of Parts ............................................................... 3
Standard Accessories .................................................... 4
Accessories Storage ...................................................... 5
Extension Table .............................................................. 5
GettiNG ready to sew
Connecting the Power Supply ........................................ 6
Machine Operating Buttons ............................................ 7
Controlling Sewing Speed .............................................. 8
Foot Control .................................................................... 8
Jog Dial .......................................................................... 8
Function Keys ................................................................. 9
Raising and Lowering the Presser Foot ....................... 10
Knee Lifter .................................................................... 10
Adjusting the Foot Pressure ..........................................11
Dropping the Feed Dog ................................................. 11
Balancing Thread Tension ............................................ 12
Lockout Key .................................................................. 13
Changing the Presser Foot .......................................... 13
Removing and Attaching the Foot Holder .................... 14
Dual Feed Foot .........................................................14 -15
Replacing the Needle Plate .......................................... 16
Changing Needles ........................................................ 17
Fabric and Needle Chart .............................................. 17
Winding the Bobbin ..................................................18 -19
Inserting the Bobbin ..................................................... 20
Threading the Machine ................................................. 21
Built-in Needle Threader .............................................. 22
Drawing up the Bobbin Thread..................................... 23
Selecting the Patterns ............................................. 24-25
Help Key ....................................................................... 26
Customizing Machine Settings ................................ 27-31
traditioNaL sewiNG
Straight Stitch .......................................................... 32-34
Assembling the Extra Wide Table ................................ 35
Using the Cloth Guide .................................................. 35
Customizing the Preset Values of the Stitch Length
and Width ..................................................................... 36
Sewing with the Dual Feed Device............................... 37
Dual Feed Balancing Dial ............................................. 37
Straight Stitch Needle Plate .........................................38
Lock-a-Matic Stitch ....................................................... 38
Locking Stitch ............................................................... 38
Straight Stitch with Left Needle Position ...................... 39
Triple Stretch Stitch ...................................................... 39
Knit Stitch ..................................................................... 39
Zipper Sewing ......................................................... 40-42
Rolled Hem ................................................................... 43
Gathering ...................................................................... 44
Pintucking ..................................................................... 44
Basting ......................................................................... 45
Zigzag Stitch ................................................................. 46
Multiple Zigzag Stitch (Tricot stitch) ............................. 47
Overcasting Stitch ........................................................ 47
Knit Stitch ..................................................................... 48
Double Overcasting Stitch ............................................ 48
Overlocking Stitch ........................................................ 49
Blind Hemming ........................................................ 50-51
Shell Tuck ..................................................................... 52
Buttonholes .................................................................. 53
Square (Sensor) Buttonholes .................................. 54-57
Using the Stabilizer Plate ............................................. 58
Memory Buttonholes ...............................................59-60
Round End and Fine Fabric Buttonholes ..................... 61
Keyhole Buttonholes .................................................... 61
Stretch Buttonhole ........................................................ 62
Corded Buttonhole ....................................................... 63
Welted Buttonhole ...................................................64-65
Button Sewing .............................................................. 66
Darning .................................................................... 67-68
Tacking ......................................................................... 69
Fly Stitches ................................................................... 70
Eyelet ............................................................................ 71
Applique ....................................................................... 72
Fringing ......................................................................... 73
Drawn Work ..............................................................73-74
Smocking ...................................................................... 74
Fagoting ........................................................................ 75
Scallop .......................................................................... 75
Patchwork Piecing ........................................................ 76
Patchwork ..................................................................... 76
Quilting ......................................................................... 77
Stippling ........................................................................ 78
Clasp Stitches .............................................................. 78
Free Motion Quilting (1) ................................................ 78
Free Motion Quilting (2) ................................................ 79
Satin Stitches ............................................................... 80
Twin Needle Sewing ................................................ 81-82
ProGrammiNG a PatterN CombiNatioN
Pattern Combination ..................................................... 83
Programming Auto-lock Stitch ...................................... 84
Programming Automatic Thread Cutting ...................... 85
Mirror Image ................................................................. 86
Pattern Combination with a Mirror Image ..................... 87
Sewing the Pattern from the Beginning ........................ 88
Sewing the Pattern Combination from the Beginning .. 88
Bridge Stitches ........................................................89-90
Checking Pattern Combination Length ........................ 90
Monogramming ....................................................... 91-93
Editing a Pattern Combination .................................94-95
Uniform Stitch Adjustment ............................................ 96
Individual Stitch Adjustment ......................................... 97
Storing and Recalling a Pattern combination .......... 98-99
Correcting Distorted Stitch Patterns ........................... 100
Care aNd maiNteNaNCe
Cleaning the Hook Area ..............................................101
Cleaning the Inside of the Thread Guide .................... 102
Problems and Warning Signals ............................103-104
Troubleshooting .......................................................... 105
2
!3
!4
e
w
q
#5
#6
#7
!5
#8
#9
r
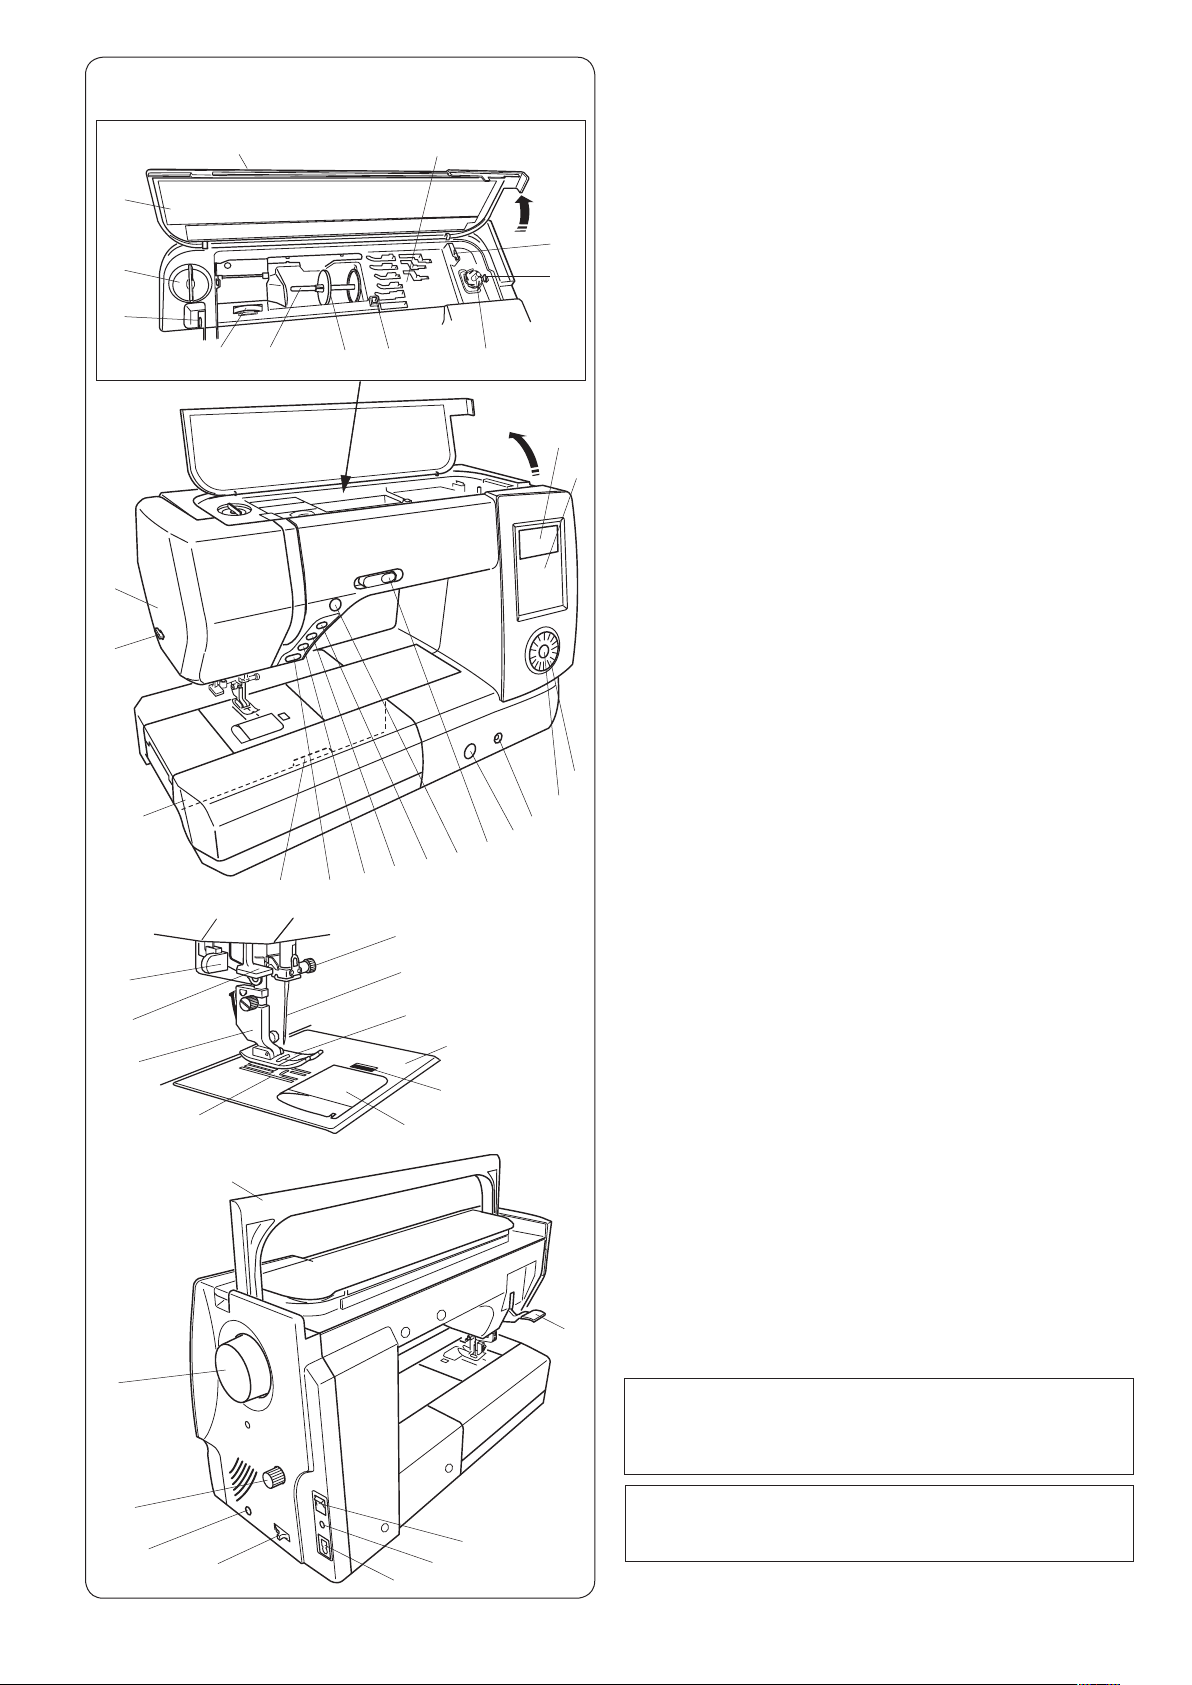
NAMES OF PARTS
Names of Parts
q
Thread take-up lever
t
y
u
!1!2
!6
!7
!0
!8
o
!9
@9
#0
#4
#1
@0
#3
#2
@1
i
@2
@3
@8
@5
@4
@6
@7
w
Foot pressure dial
e
Reference chart
r
Top c o v e r
t
Foot storage compartment
y
Bobbin thread cutter
u
Bobbin winder stopper
i
Bobbin winder spindle
o
Hole for extra spool pin
!0
Spool holder (large)
!1
Spool pin
!2
Thread tension dial
!3
Face cover
!4
Thread cutter
!5
Extension table (accessory storage)
!6
Needle plate release lever
!7
Start/stop button
!8
Reverse button
!9
Auto-lock button
@0
Needle up/down button
@1
Thread cutter button
@2
Speed control slider
@3
Feed balancing dial
@4
Knee lifter socket
@5
Confirmation button
@6
Jog dial
@7
Function keys
@8
LCD screen
@9
Needle clamp screw
#0
Needle
#1
Zigzag foot A
#2
Needle plate
#3
Hook cover release button
#4
Hook cover plate
#5
Buttonhole lever
#6
Needle threader
#7
Foot holder
#8
Feed dog
#9
Carrying handle
$0
Presser foot lifter
$1
Handwheel
$2
Dual feed balancing dial
$3
Connector for external thread cutter switch
$4
Drop feed lever
$5
Power switch
$6
Foot control jack
$7
Machine socket
$1
$2
$3
$4
$7
$6
$5
$0
NOTE:
To carry the sewing machine, hold the carrying handle
with your hand, and support the sewing machine with
the other hand.
NOTE:
Sewing machine design and specifications are subject
to change without prior notice.
* Thread cutter switch is an optional item.
3
q w e r
y u i o
!4 !5
!6
!7
@1 @2
@8
#2
!8
!9
@3
@4
@9 #0
#1
#3 #4
@0
!2
@5
@7
!1
!0
t
!3
@6
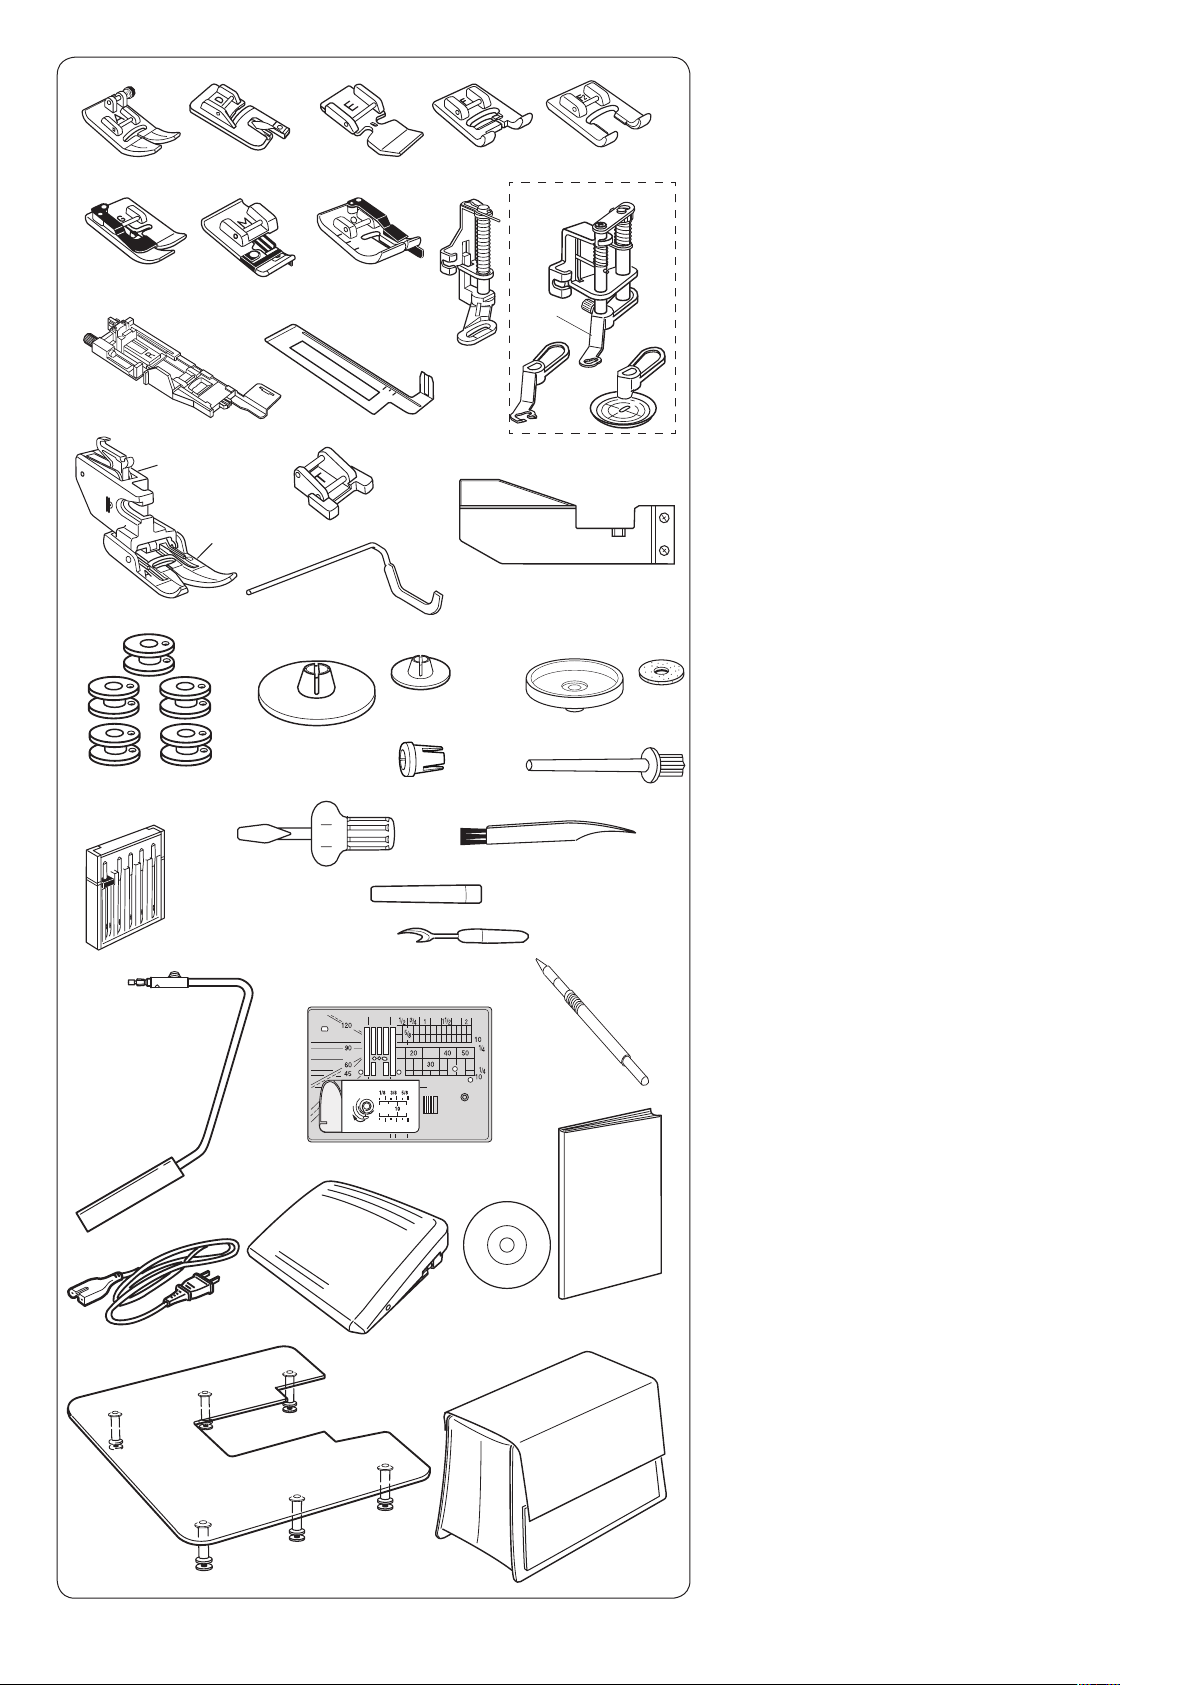
Standard Accessories
Zigzag foot A (set on the machine)
q
Rolled hem foot D
w
Zipper foot E
e
Satin stitch foot F
r
Open-toe satin stitch foot F2
t
Blind hemming foot G
y
Overcast foot M
u
1/4˝ seam foot O
i
Darning foot PD-H
o
Convertible free motion quilting foot QB-S
!0
Close-toe foot
!1
Open-toe foot
!2
Clear view foot
!3
Automatic buttonhole foot R
!4
Buttonhole stabilizer plate
!5
Dual feed foot holder
!6
Dual feed foot AD
!7
Button sewing foot T
!8
Quilting guide bar
!9
Cloth guide
@0
Bobbin (5 pcs.) (1 set on the machine)
@1
Spool holder (large, set on the machine)
@2
Spool holder (small)
@3
Spool holder (special)
@4
Spool supporter
@5
Felt
@6
Extra spool pin
@7
Needle case
@8
Screwdriver
@9
Lint brush
#0
Seam ripper (Buttonhole opener)
#1
Knee lifter
#2
Straight stitch needle plate
#3
Touch panel stylus
#4
Power cable
#5
Foot control
#6
Instructional video DVD
#7
Instruction book
#8
Extra wide table
#9
Semi-hard fabric cover
$0
#6
#5
#9 $0
#8
#7
4
w
q
i
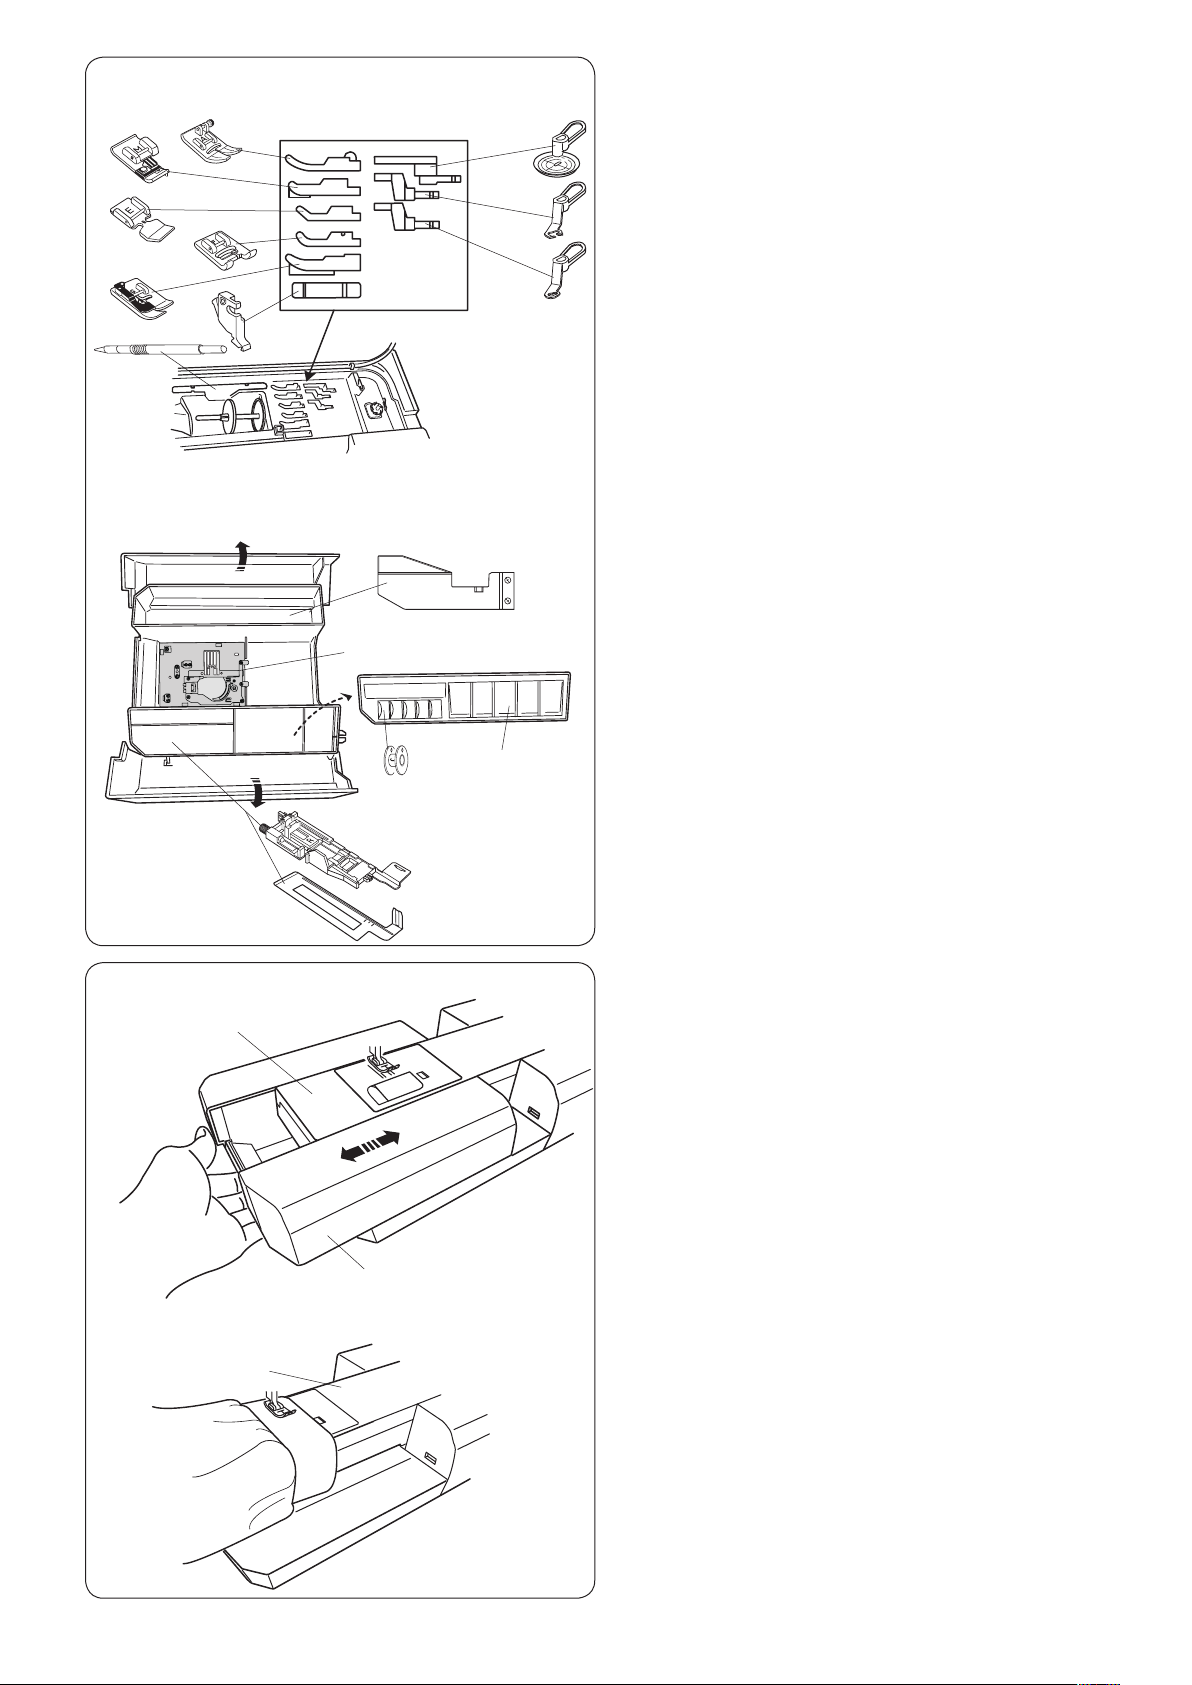
Accessories Storage
The accessories can be conveniently stored in the foot
storage compartment under the top cover and in the
extension table.
u
e
t
r
y
w
e
q
r
o
!0
Under top cover:
q Zigzag foot A
w Overcast foot M
e Zipper foot E
r Satin stitch foot F
t Blind hemming foot G
y Foot holder
u Touch panel stylus
i Clear view foot
o Open-toe foot
!0 Close-toe foot
In extension table:
q Cloth guide
w Straight stitch needle plate
e Bobbin
r Presser foot
t Automatic buttonhole foot R
y Buttonhole stabilizer plate
Other accessories can be also stored in the
compartment.
w
w
y
t
q
Extension Table
The extension table provides an extended sewing area
and can be removed for free-arm sewing.
q Extension table
w Free-arm
To detach:
Draw the table out to the left.
To attach:
Slide the table on the base and push the table to the
right.
Free-arm sewing
Free-arm sewing is used for stitching sleeves,
waistbands, pant legs or any other tubular garments.
It is also useful for darning socks or mending knees or
elbows.
w Free-arm
5
q
e
w
z
c
t
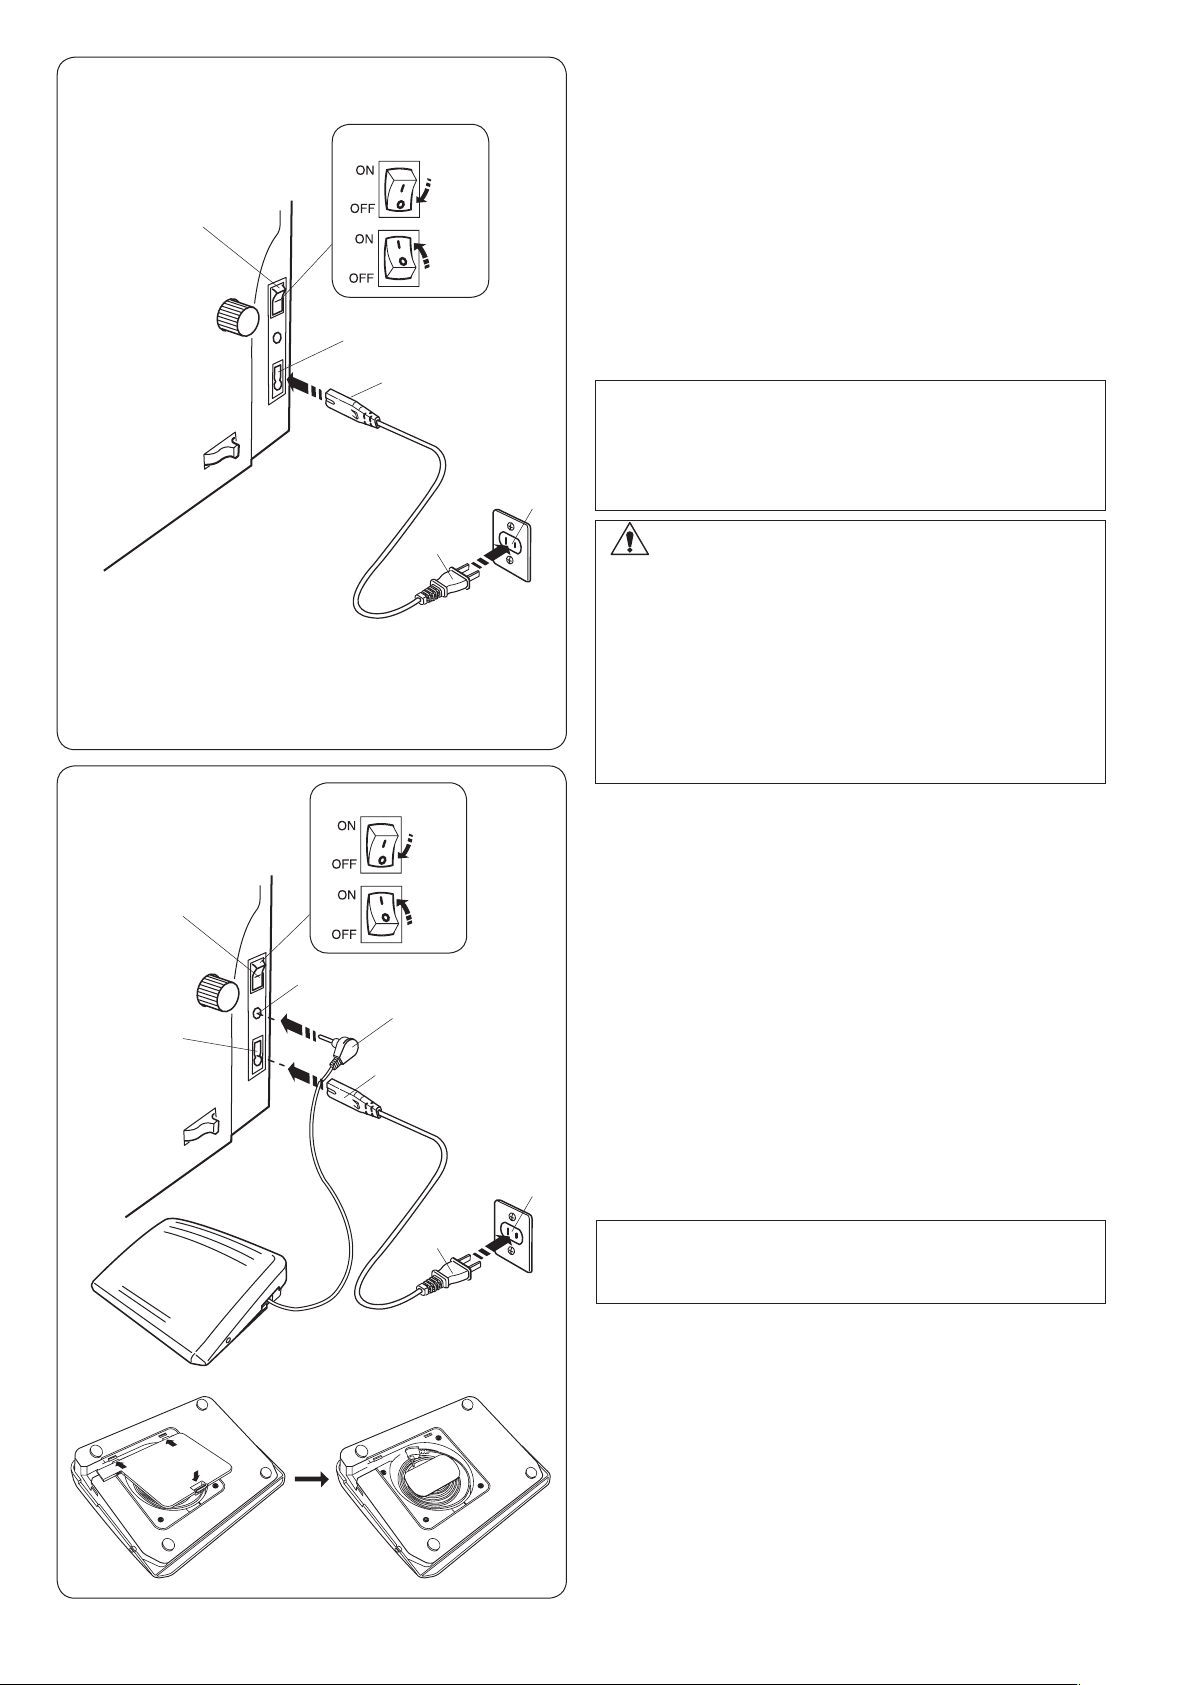
GETTING READY TO SEW
Connecting the Power Supply
z First make sure the power switch q is off.
x Insert the machine plug w of the power supply cord
into the machine socket e.
c Insert the power supply plug r into the wall outlet t,
and turn the power switch q on.
q Power switch
w Machine plug
e Machine socket
r Power supply plug
t Wall outlet
NOTE:
Make sure to use the power supply cable that came
with the machine.
If you turn off the power switch, wait for 5 seconds
before turning it on again.
q
e
t
w
r
r
z
v
u
If you wish to use the foot control, pull out the cord from
the foot control and insert the pin connector into the jack
on the machine.
z First make sure the power switch q is off.
x Insert the machine plug w of the power supply cord
c Draw out the cord from the foot control and insert the
v Insert the power supply plug y into the wall outlet u,
q Power switch
w Machine plug
e Machine socket
r Pin connector
t Jack
y Power supply plug
u Wall outlet
WARNING:
While in operation, always keep your eyes on the
sewing area, and do not touch any moving parts such
as the thread take-up lever, handwheel or needle.
Always turn off the power switch and unplug the
machine from the power supply:
- when leaving the machine unattended.
- when attaching or removing parts.
- when cleaning the machine.
Do not place anything on the foot control.
into the machine socket e.
pin connector r into the jack t on the machine.
and turn the power switch on.
c
y
NOTE:
The start/stop button does not work when the foot
control is connected.
Operating Instructions:
The symbol “O” on a switch indicates the “off” position of
the switch.
For the U.S.A. and Canada only
Polarized plug (one blade wider than the other):
To reduce the risk of electric shock, this plug is intended
to fit in a polarized outlet only one way. If it does not fit
fully in the outlet, reverse the plug. If it still does not fit,
contact a qualified electrician to install the proper outlet.
Do not modify the plug in any way.
6
u
y
q
t
r
e
w
q
(A) (B)
w
e
r
y
t
u
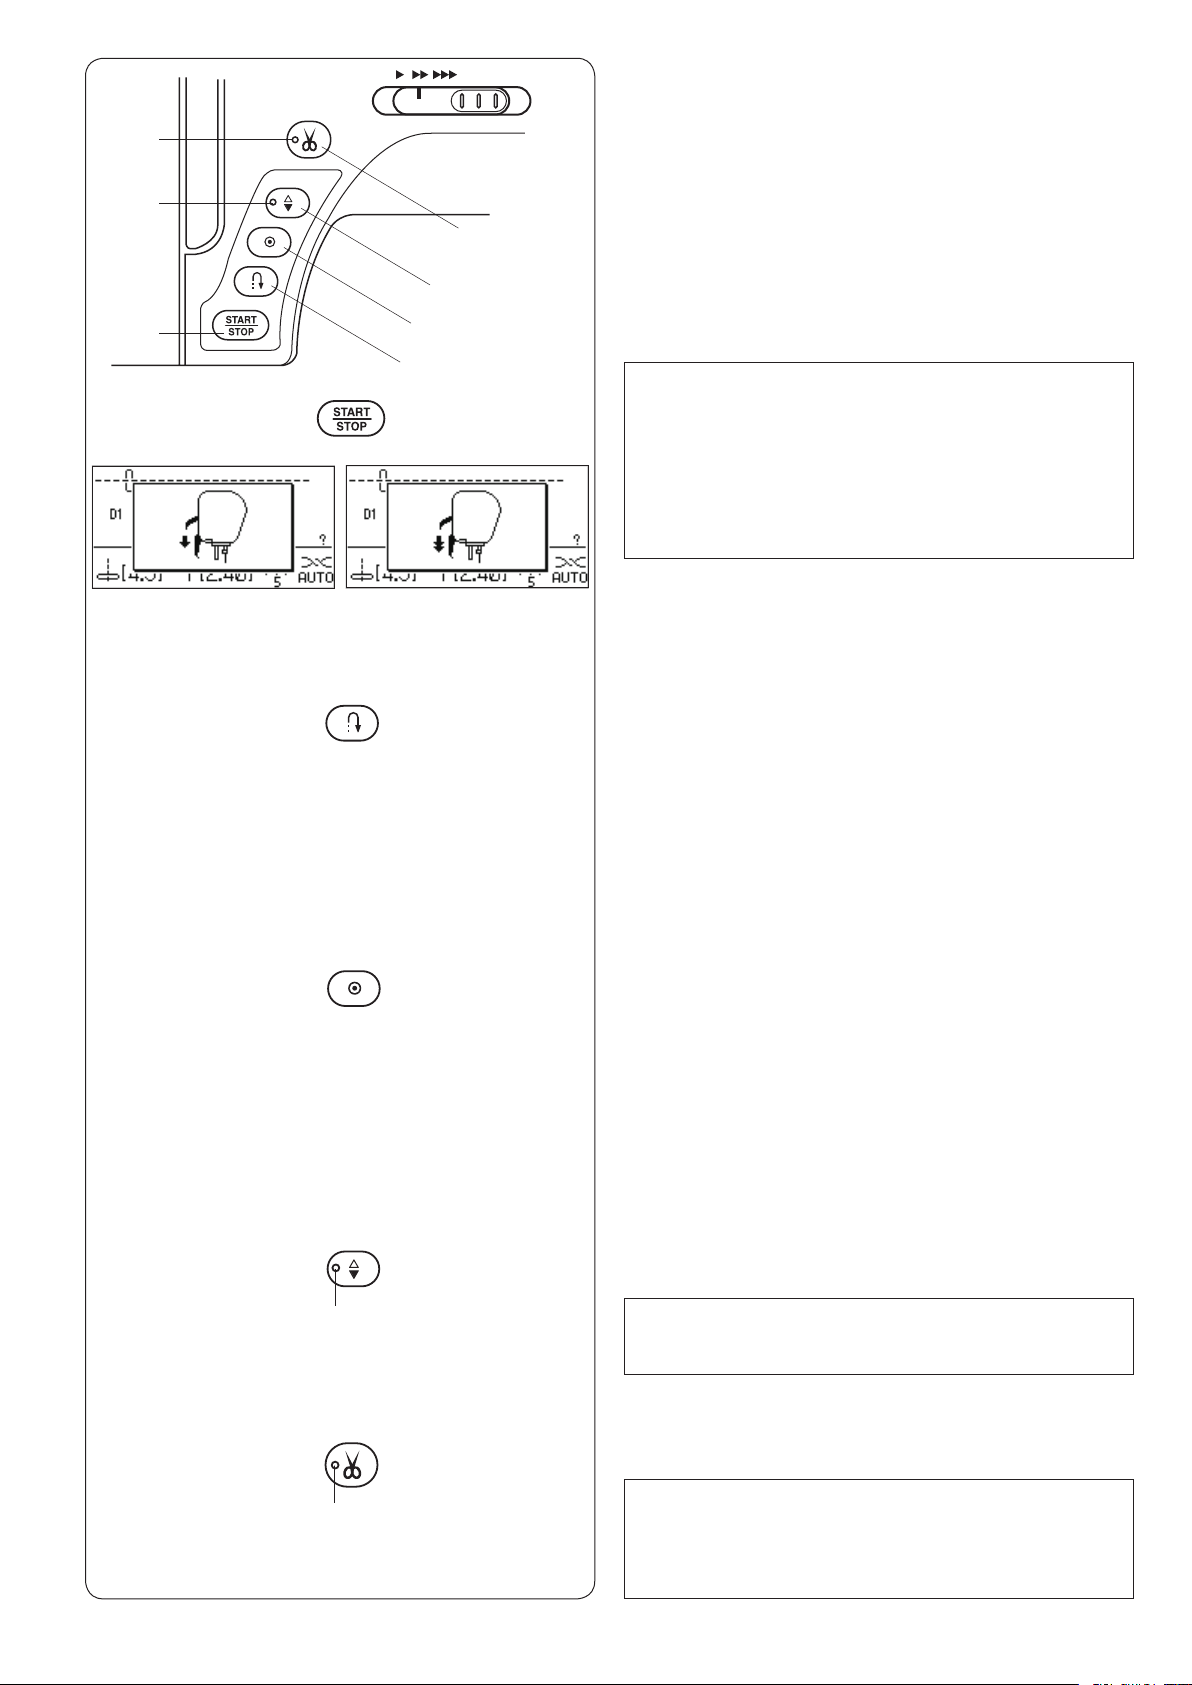
Machine Operating Buttons
q Start/stop button
Press this button to start or stop the machine.
The machine starts running slowly for the first few
stitches, it then runs at the speed set by the speed
control slider. The machine runs slowly as long as this
button is pressed.
The button will turn red when the machine is running, and
green when it has been stopped.
Pressing and holding this button while sewing will slow
down the sewing speed and the machine will stop when
the button is released.
NOTE:
•Thestart/stopbuttoncannotbeusedwhenthe
foot control is connected to the machine.
•Themachinewillnotstartifthepresserfootisup
and the LCD screen shows message (A) or (B).
Lower the presser foot and start the machine
•Youcanselectthedesiredstart-upspeedfrom
slow, normal or high (refer to page 29).
w Reverse button
When sewing stitch pattern D1 (D1S), D4 (D4S), 9, 10,
11, D96, D97 (D97S), D98 (D98S), 164, 165, 166 or 167,
the machine will sew in reverse as long as the reverse
button is pressed.
If stitch pattern D1 (D1S), D4 (D4S), 9, 10, 11, D94,
D95 (D95S), D96 (D96S), 164, 165, 166 or 167 has
been selected and the foot control is not connected,
the machine will start sewing in reverse as long as the
reverse button is pressed.
If you press the reverse button when sewing any other
patterns, the machine will immediately sew locking
stitches and automatically stop.
e Auto-lock button
When sewing stitch pattern D1 (D1S), D4 (D4S), 9, 10,
11 D94, D95 (D95S), D96 (D96S), 164, 165, 166 or 167,
the machine will immediately sew locking stitches and
automatically stop when the auto-lock button is pressed.
When sewing all other patterns, the machine will sew to
the end of the current pattern, sew locking stitches and
stop automatically.
The machine will trim the threads automatically after
locking the stitch when the auto thread cutting option is
turned on.
r Needle up/down button
Press this button to bring the needle bar up or down.
The machine will stop with the needle in down position.
However, you can change the needle stop position in the
setting mode (refer to page 29).
NOTE:
The LED signal y is turned on when the down
position is selected and vice versa.
t Thread cutter button
Press this button when you finish sewing to trim the
threads. The needle bar automatically rises after trimming
the threads (refer to page 33).
NOTE:
The LED signal u is turned on when the auto thread
cutter is selected (refer to page 85).
Use the thread cutter on the face cover if the thread is
#30 or thicker.
7
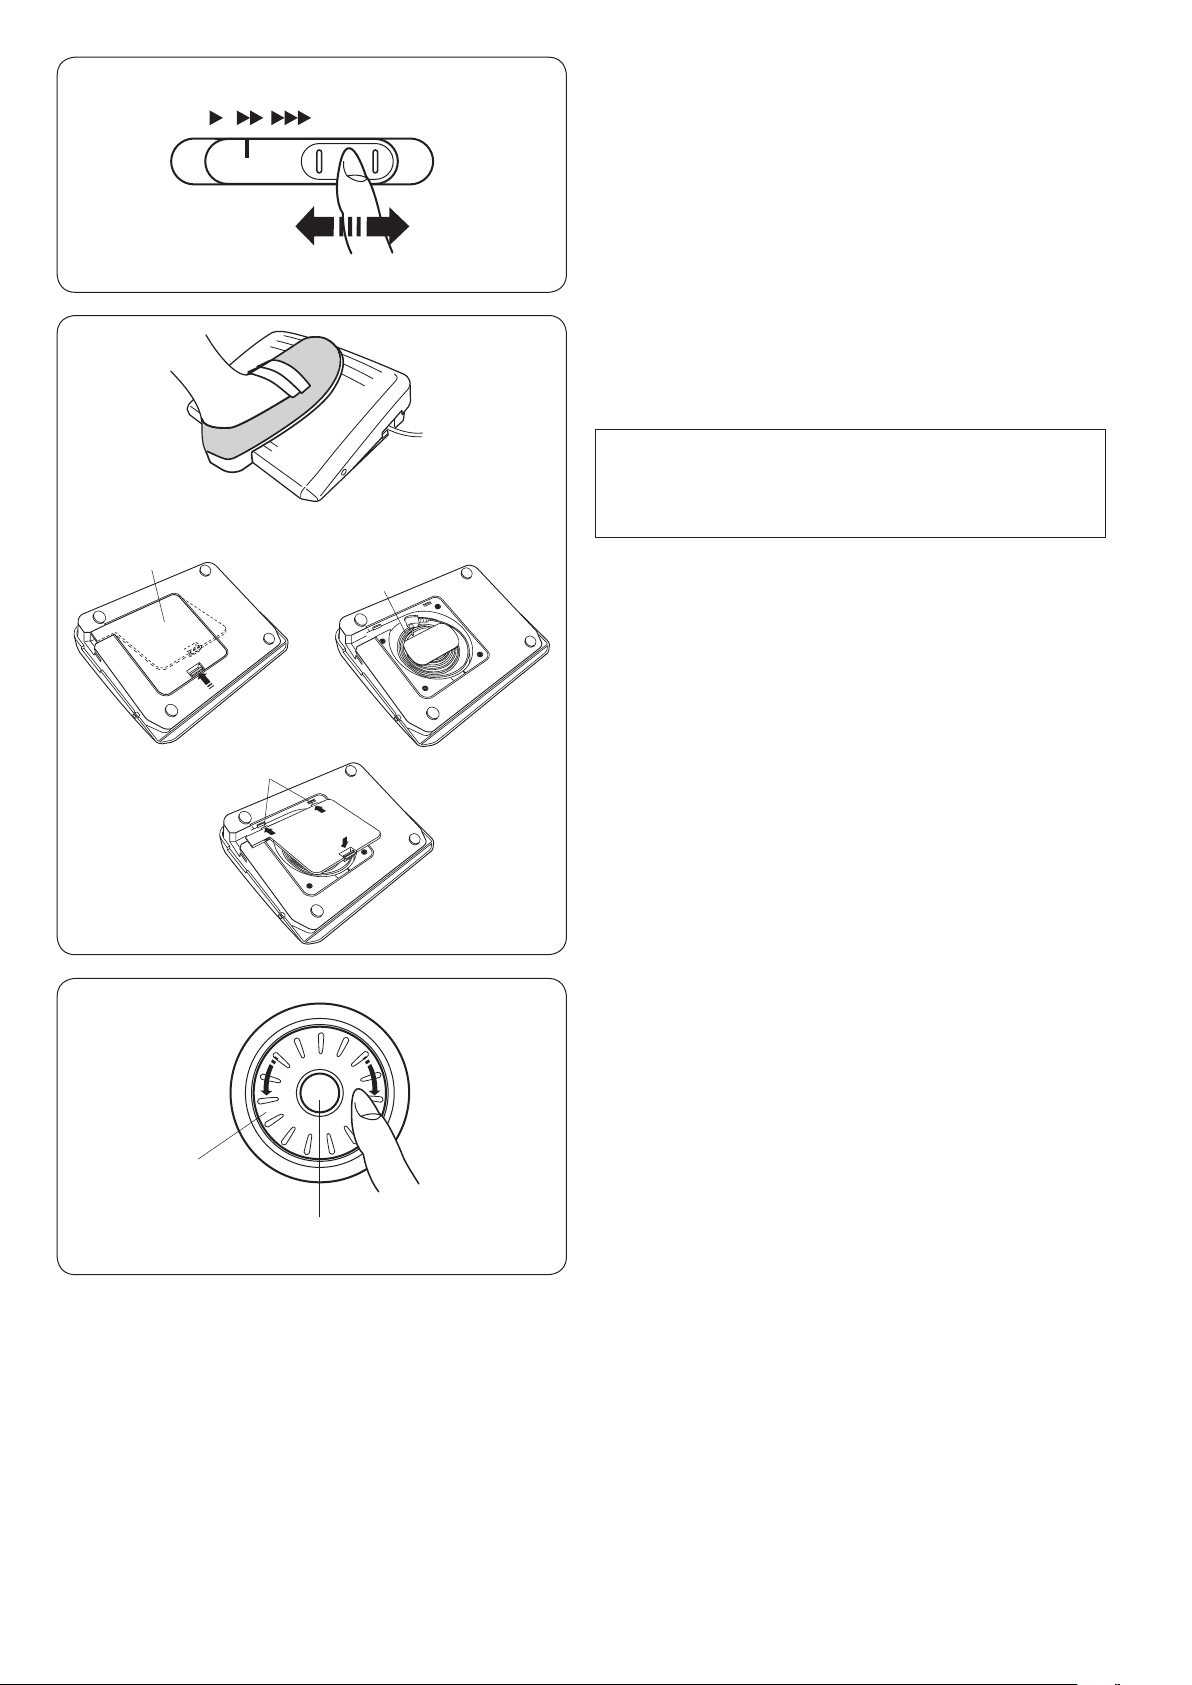
Controlling Sewing Speed
Speed control slider
You can limit the maximum sewing speed with the speed
control slider according to your sewing needs.
To increase the sewing speed, move the slider to the
right.
To decrease the sewing speed, move the slider to the left.
Foot Control
Pressing on the foot control can vary sewing speed.
The harder you press the foot control, the faster the
machine runs.
NOTE:
The machine runs at the maximum speed set by the
speed control slider when the foot control is fully
depressed.
q
q
e
w
w
Cord storage
The cord of the foot control can be conveniently stored in
the cord storage under the base cover of the foot control.
q Base cover
w Cord
e Hook
Operating Instructions:
Foot control model 21380 is for use with this sewing
machine.
Jog Dial
q Jog dial
The jog dial is used for selecting stitch patterns,
characters and certain settings.
Turn the jog dial clockwise or counterclockwise with your
fingertip to browse patterns or settings.
w Confirm button
Press the confirm button to select the desired pattern or
settings.
8
q w y e
t
r
o
!0
!1
!2
!4 !5 !6 !7 !8
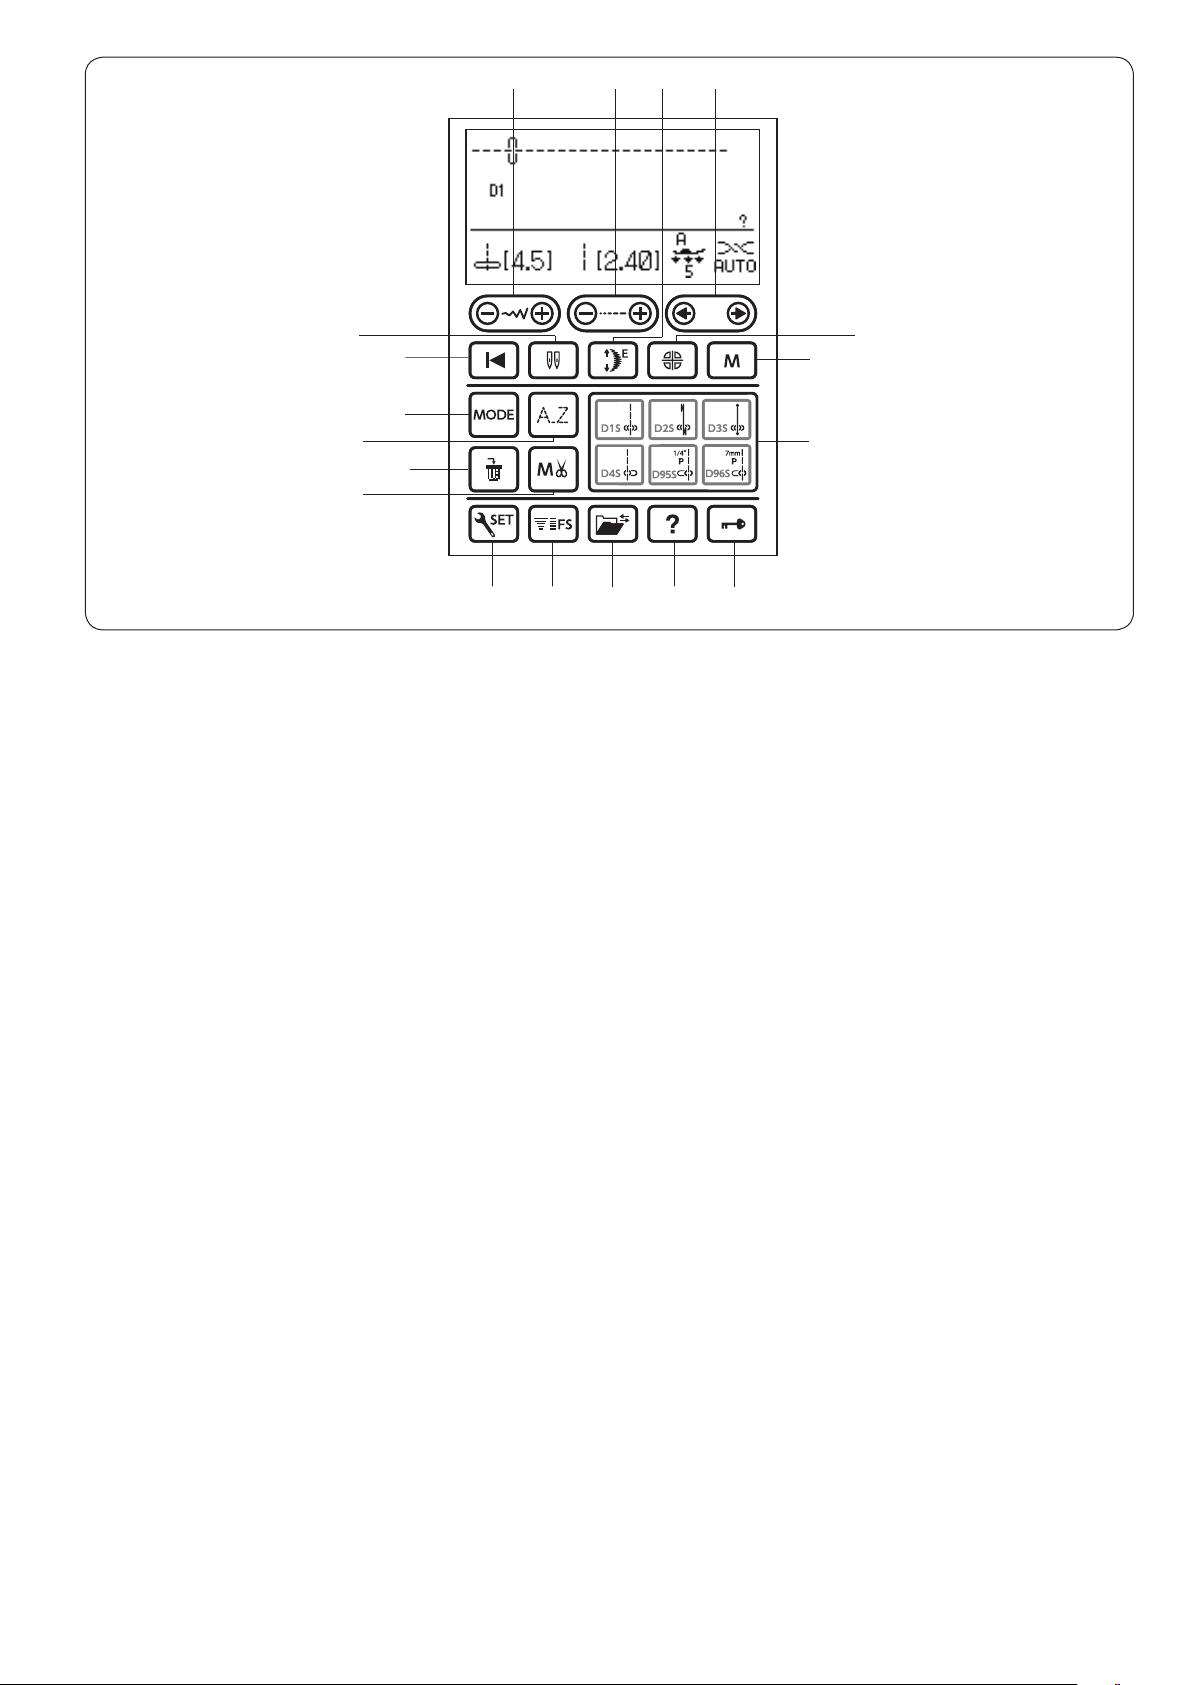
Function Keys
q Stitch width adjusting key (refer to pages 34, 46, 57)
Press this key to alter the stitch width or needle drop
position.
w Stitch length adjusting key (refer to pages 34, 46, 57)
Press this key to alter the stitch length.
e Edit key (refer to pages 24, 57, 94)
Press this key to edit the programmed pattern
combinations.
r Startover key (refer to page 88)
Press this key to sew a pattern combination from the
beginning.
u
i
!3
!1 Clear key (refer to pages 30, 36, 95, 99)
Press this key to delete the last memorized pattern.
Press and hold this key until the buzzer sounds to delete
the whole pattern combination.
!2 Auto thread cutter key (refer to page 85)
Press this key before sewing, if you wish to cut the
threads automatically after finishing sewing with a locking
stitch.
When programming a pattern combination, press this
key after the last programmed pattern to cut the threads
automatically after finishing sewing.
The LED signal on the thread cutter button will turn on
when the auto thread cutter key is pressed.
t Twin needle key (refer to pages 81-82)
Press this key when sewing with a twin needle.
y Elongation key (refer to page 80)
Press this key to elongate satin stitch patterns.
u Mirror image key (refer to pages 86-87)
Press this key to sew a mirror image of the selected
pattern.
i Memory key (refer to pages 36, 69)
Press this key to register programmed pattern
combinations.
Up to 50 stitch patterns combination can be memorized.
This key is also used to customize the default settings of
stitch length and width.
o Mode key (refer to page 24)
Press this key to open the group selection window.
!0 Monogram key (refer to pages 91-92)
Press this key to select one of 5 letter styles available.
!3 Direct pattern selection keys (refer to page 25)
Press one of 6 keys to select a stitch pattern directly.
!4 Set key (refer to page 27)
Press this key to open the machine setting window for
customizing the machine settings.
!5 Favorite setting key (refer to page 36)
Press this key to view information on the selected pattern.
!6 Memory recall key (refer to pages 98-99)
Press this key to memorize the selected pattern or recall
the memorized pattern.
!7 Help key (refer to page 26)
Press this key to view information on the selected pattern.
!8 Lockout key (refer to page 13)
Press this key to lockout the machine when threading the
machine, replacing the accessories etc.
To reduce the risk of injury, all the buttons and keys are
deactivated.
To unlock the machine, press this key again.
9
q
w
w
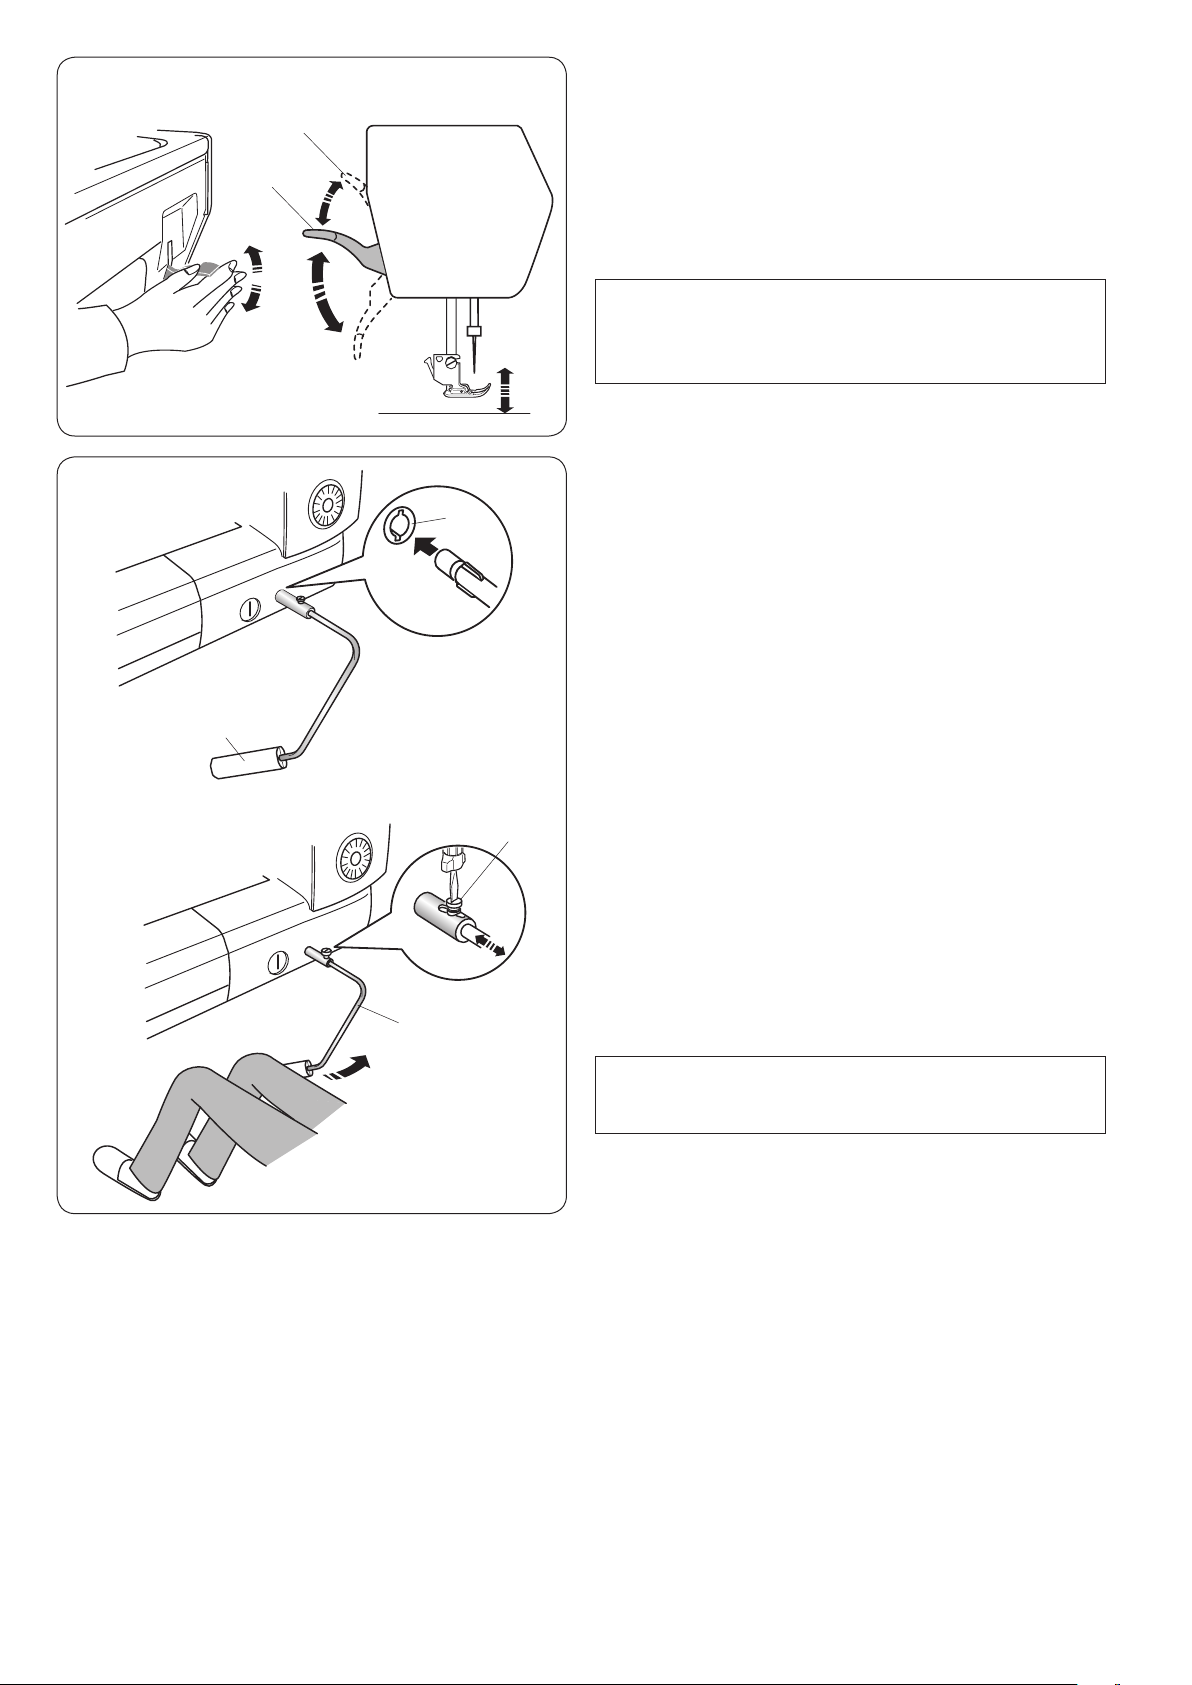
Raising and Lowering the Presser Foot
The presser foot lifter raises and lowers the presser foot.
q Presser foot lifter
Youcanraisethepresserfoothigherthanthenormalup
position. This allows for changing the needle plate, and
also helps you to place thick layers of fabrics under the
foot.
w Extra lifted position
NOTE:
Do not turn the hand wheel of press the up/down
needle button when the presser foot is in the extra
lifted position.
Knee Lifter
The knee lifter is extremely helpful when sewing
patchwork, quilting etc, since it allows you to handle the
fabric while your knee controls the presser foot.
Attaching the knee lifter
Match the ribs on the knee lifter with the notches in the
knee lifter socket and insert the knee lifter.
q Knee lifter
w Knee lifter socket
q
r
e
Adjusting the knee lifter
The angle of the knee lifter can be adjusted to fit you.
Loosen the setscrew and slide the angle bar in or out to
adjust the angle of the knee lifter.
Tighten the setscrew to secure the angle bar.
e Setscrew
r Angle bar
Using the knee lifter
Push the knee lifter with your knee to easily move the
presser foot up and down.
Youcancontrolhowhighthefootrisesbytheamountof
knee pressure you exert.
NOTE:
Do not touch the knee lifter while stitching, otherwise
the fabric will not be fed smoothly.
10
q
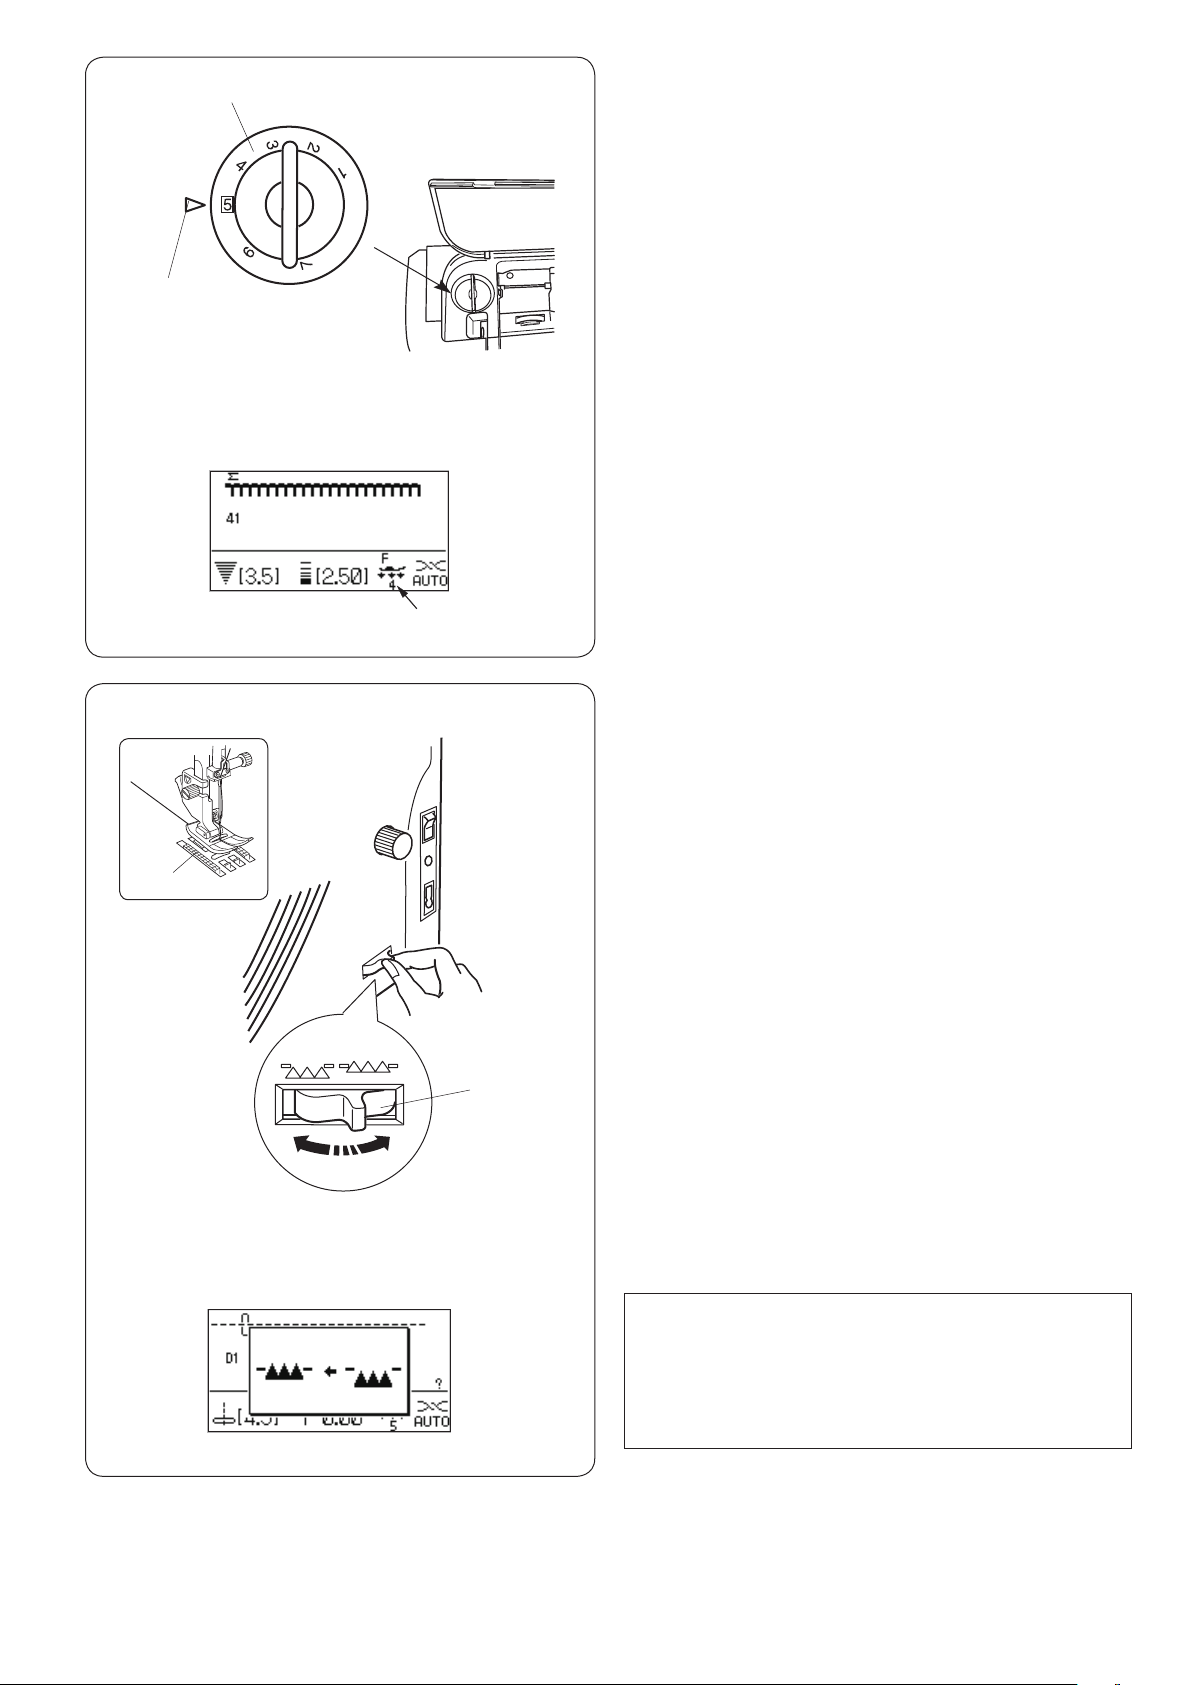
Adjusting the Foot Pressure
The foot pressure can be adjusted with the foot pressure
dial located under the top cover.
The dial has 7 setting positions from 1 to 7.
For ordinary sewing, set 5 at the setting mark.
q Foot pressure dial
w Setting mark
w
w
Reduce the pressure when sewing fine synthetics and
stretch fabrics.
To reduce the pressure, set the dial at a lower number.
The recommended dial setting for the selected pattern
will be show on the LCD screen.
For example, set the dial at 4 for applique stitches.
e Recommended setting
e
Dropping the Feed Dog
The feed dog can be lowered for basting, sewing on
buttons, free motion quilting etc.
Shift the drop feed lever toward you to lower the feed
dog.
q Drop feed lever
w Feed dog
Shift the drop feed lever away from you to raise the feed
dog, it will return to the up position when you start the
machine.
q
NOTE:
If you start the machine with the feed dog lowered, a
message will appear on the LCD screen.
The machine will not run with the feed dog lowered
when pattern number 23-33, 35-40 or monogram is
selected.
11
q
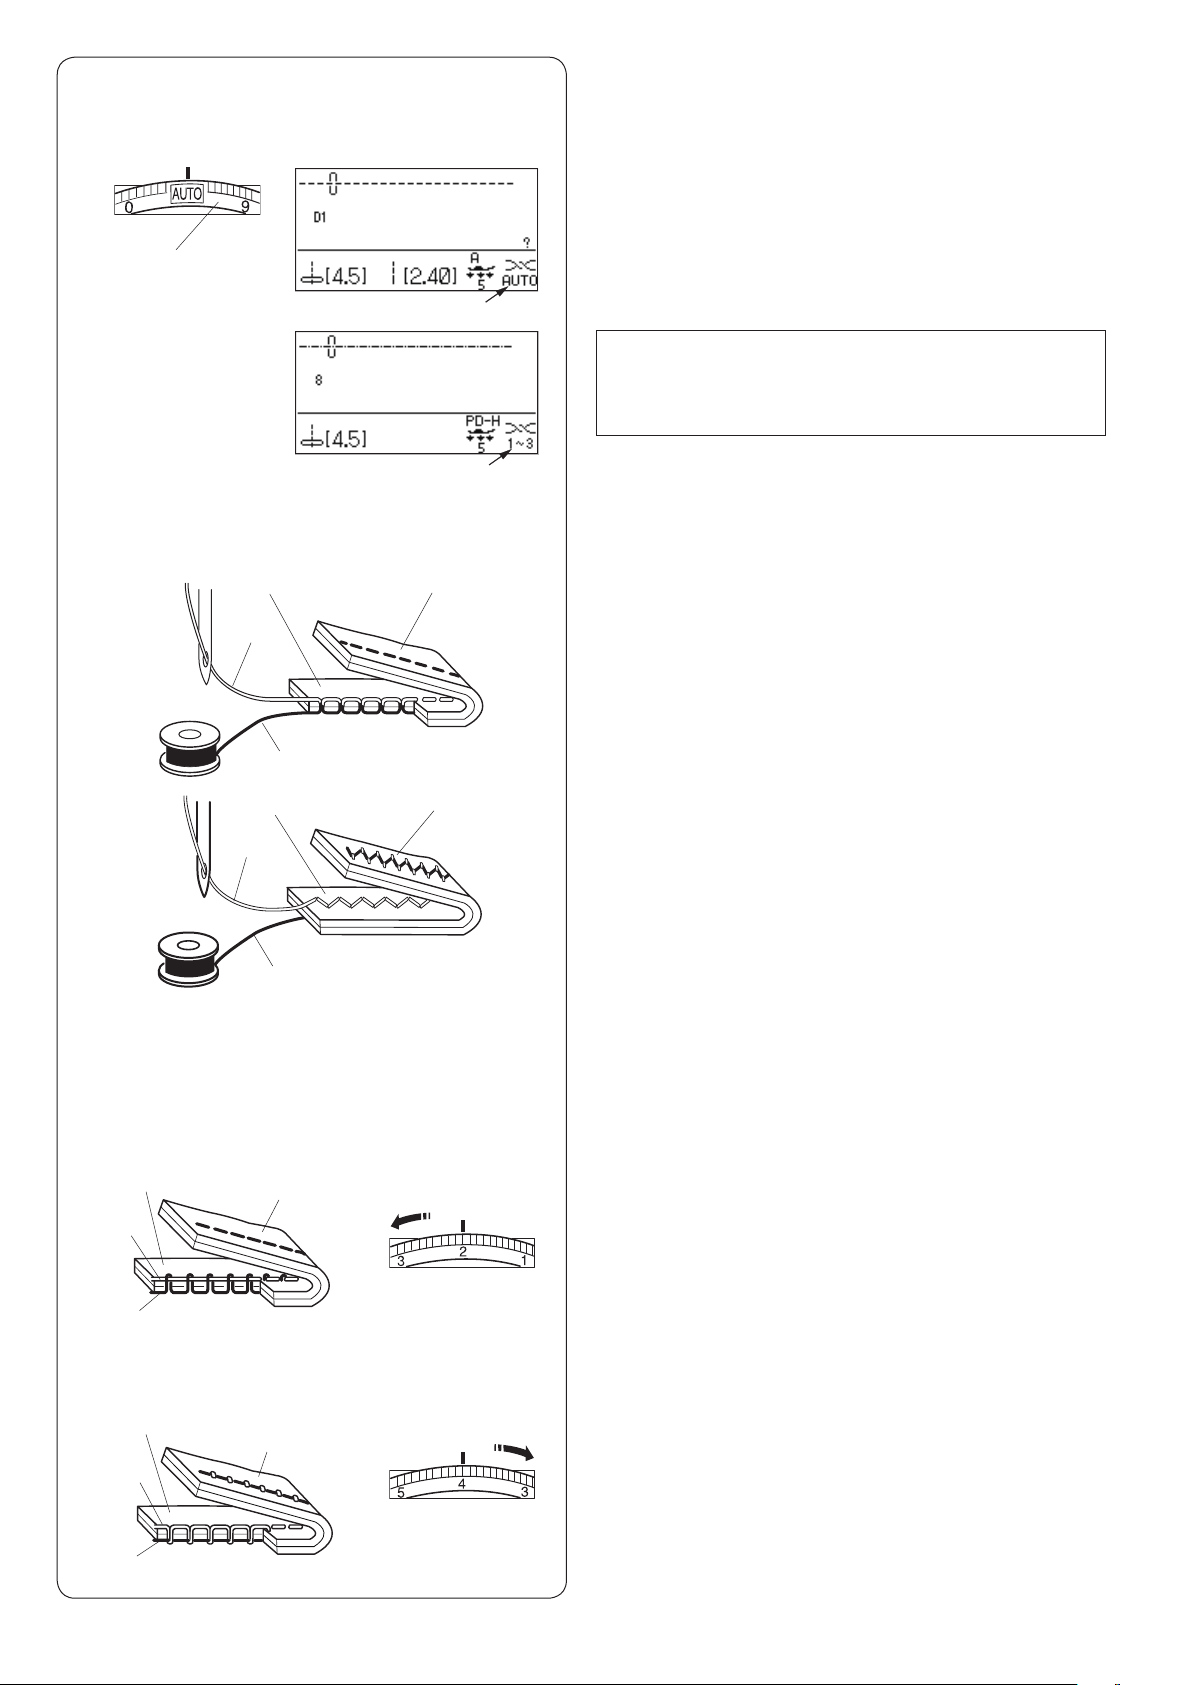
Balancing Thread Tension
Auto-thread tension
For general sewing, set the thread tension dial at AUTO,
which covers a wide range of sewing conditions.
Recommended tension setting for the selected pattern is
indicated on the LCD screen.
q Thread tension dial
w Recommended tension setting
w
NOTE:
Manual thread tension adjustment may be required
when the stitch width is set more than “7.0” (see
below).
w
e
r
w
e
e
w
w
r
r
q
q
q
Balanced thread tension
For straight stitch sewing, both needle and bobbin
threads will join at the middle of the fabrics.
q Wrong side of fabric
w Right side of fabric
e Needle thread
r Bobbin thread
For zigzag stitch sewing, the needle thread will appear
slightly on the wrong side of the fabric.
q Wrong side of fabric
w Right side of fabric
e Needle thread
r Bobbin thread
Manual thread tension adjustment
YoushouldadjustthetensionmanuallyiftheLCDscreen
shows a tension setting other than AUTO.
Youmayalsoneedtoadjusttensionmanuallydepending
on the sewing conditions such as the type of fabric and
number of layers.
If the needle thread is too tight, the bobbin thread
appears on the right side of the fabric.
q Wrong side of fabric
w Right side of fabric
e Needle thread
r Bobbin thread
Turn the thread tension dial to a lower number to
decrease the thread tension.
r
e
w
q
If the needle thread is too loose, the needle thread loops
on the underside of the fabric.
q Wrong side of fabric
w Right side of fabric
e Needle thread
r Bobbin thread
Turn the thread tension dial to a higher number to
increase the thread tension.
12
q
w
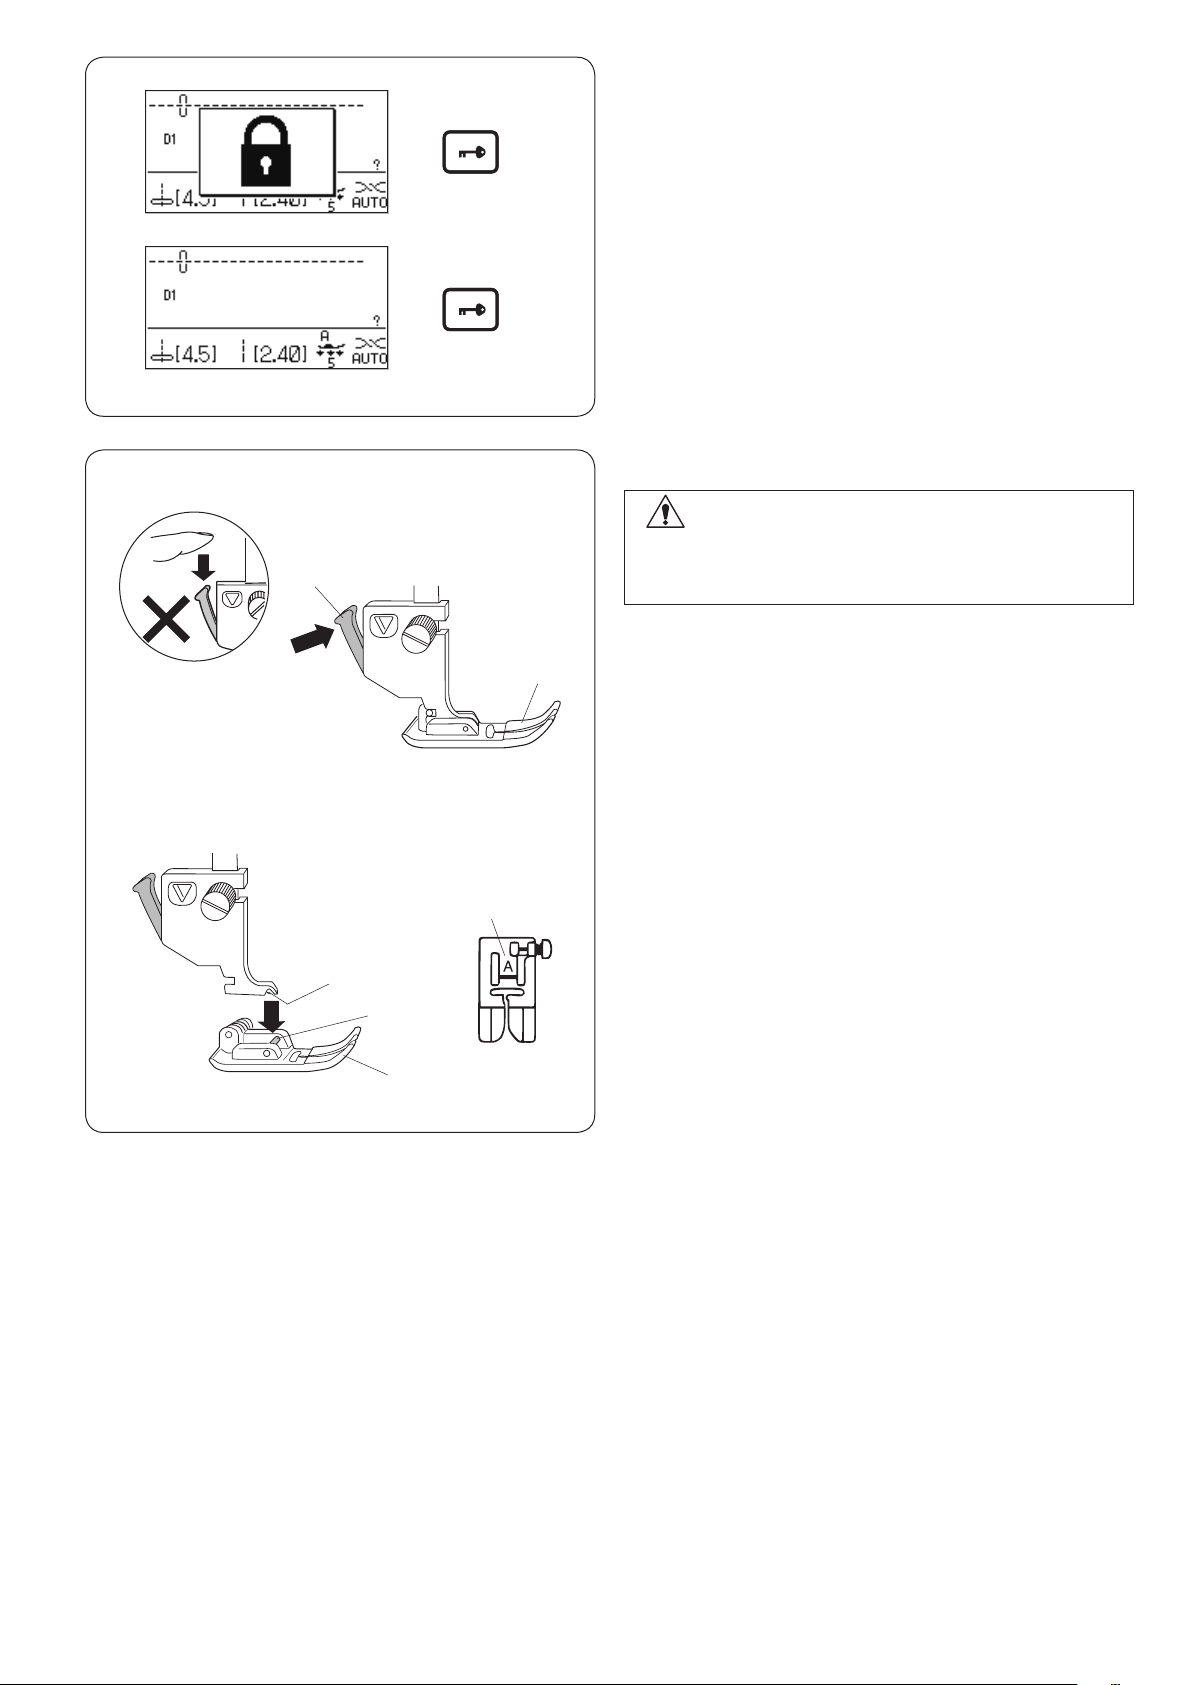
Lockout Key
Press this key to lockout the machine when threading the
machine, replacing the accessories etc.
To reduce the risk of injury, all the buttons and keys are
deactivated.
To unlock the machine, press this key again.
Changing the Presser Foot
CAUTION:
Always make sure to press the lockout key to lockout
the machine or turn the power switch off before
replacing the presser foot.
Raise the needle to its highest position and raise the
presser foot lifter.
Press the black lever on the back of the foot holder.
The presser foot will drop off.
q Lever
w Presser foot
e
r
t
y
Attaching the presser foot
Place the presser foot so that the pin on the foot lies just
under the groove of the foot holder.
Lower the presser bar to lock the foot in place.
Each foot is marked with an identification letter.
e Groove
r Pin
t Presser foot
y Identification letter
13
w
q
e
w
e
Removing and Attaching the Foot Holder
CAUTION:
Always make sure to press the lockout key to lockout
the machine or turn the power switch off before
replacing the presser foot.
Removing the foot holder
Raise the needle to the highest position.
Raise the presser foot and loosen the setscrew.
Remove the foot holder.
q Presser bar
w Foot holder
e Setscrew
q
Attaching the foot holder
Attach the foot holder to the presser bar from the rear.
Tighten the thumbscrew securely with the screwdriver.
NOTE:
Lower the presser foot when loosening and tightening
the thumbscrew if it is hard to access.
z
x
q
e
r
w
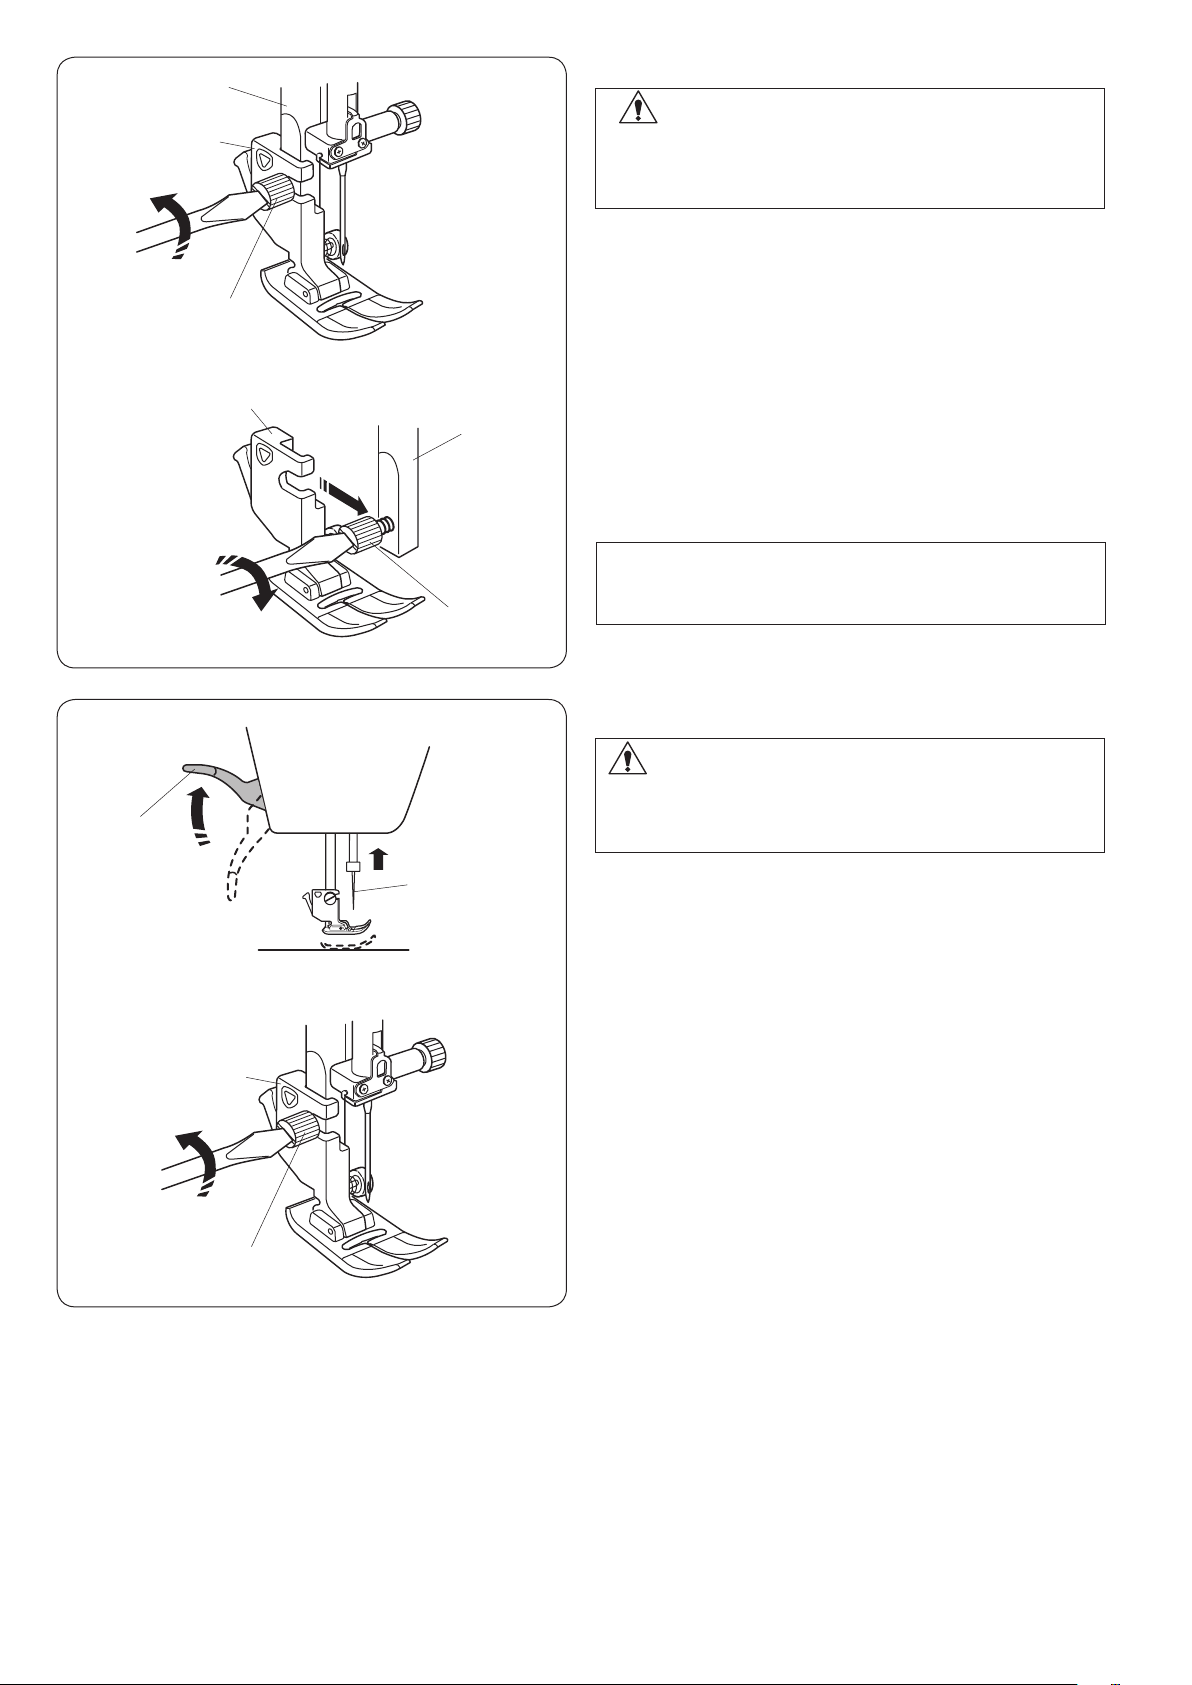
Dual Feed Foot
CAUTION:
Always make sure to press the lockout key to lockout
the machine or turn the power switch off before
replacing the presser foot.
z Raise the needle to its highest position.
Raise the presser foot lifter.
q Presser foot lifter
w Needle
x Loosen the setscrew.
Remove the foot holder.
e Foot holder
r Setscrew
14
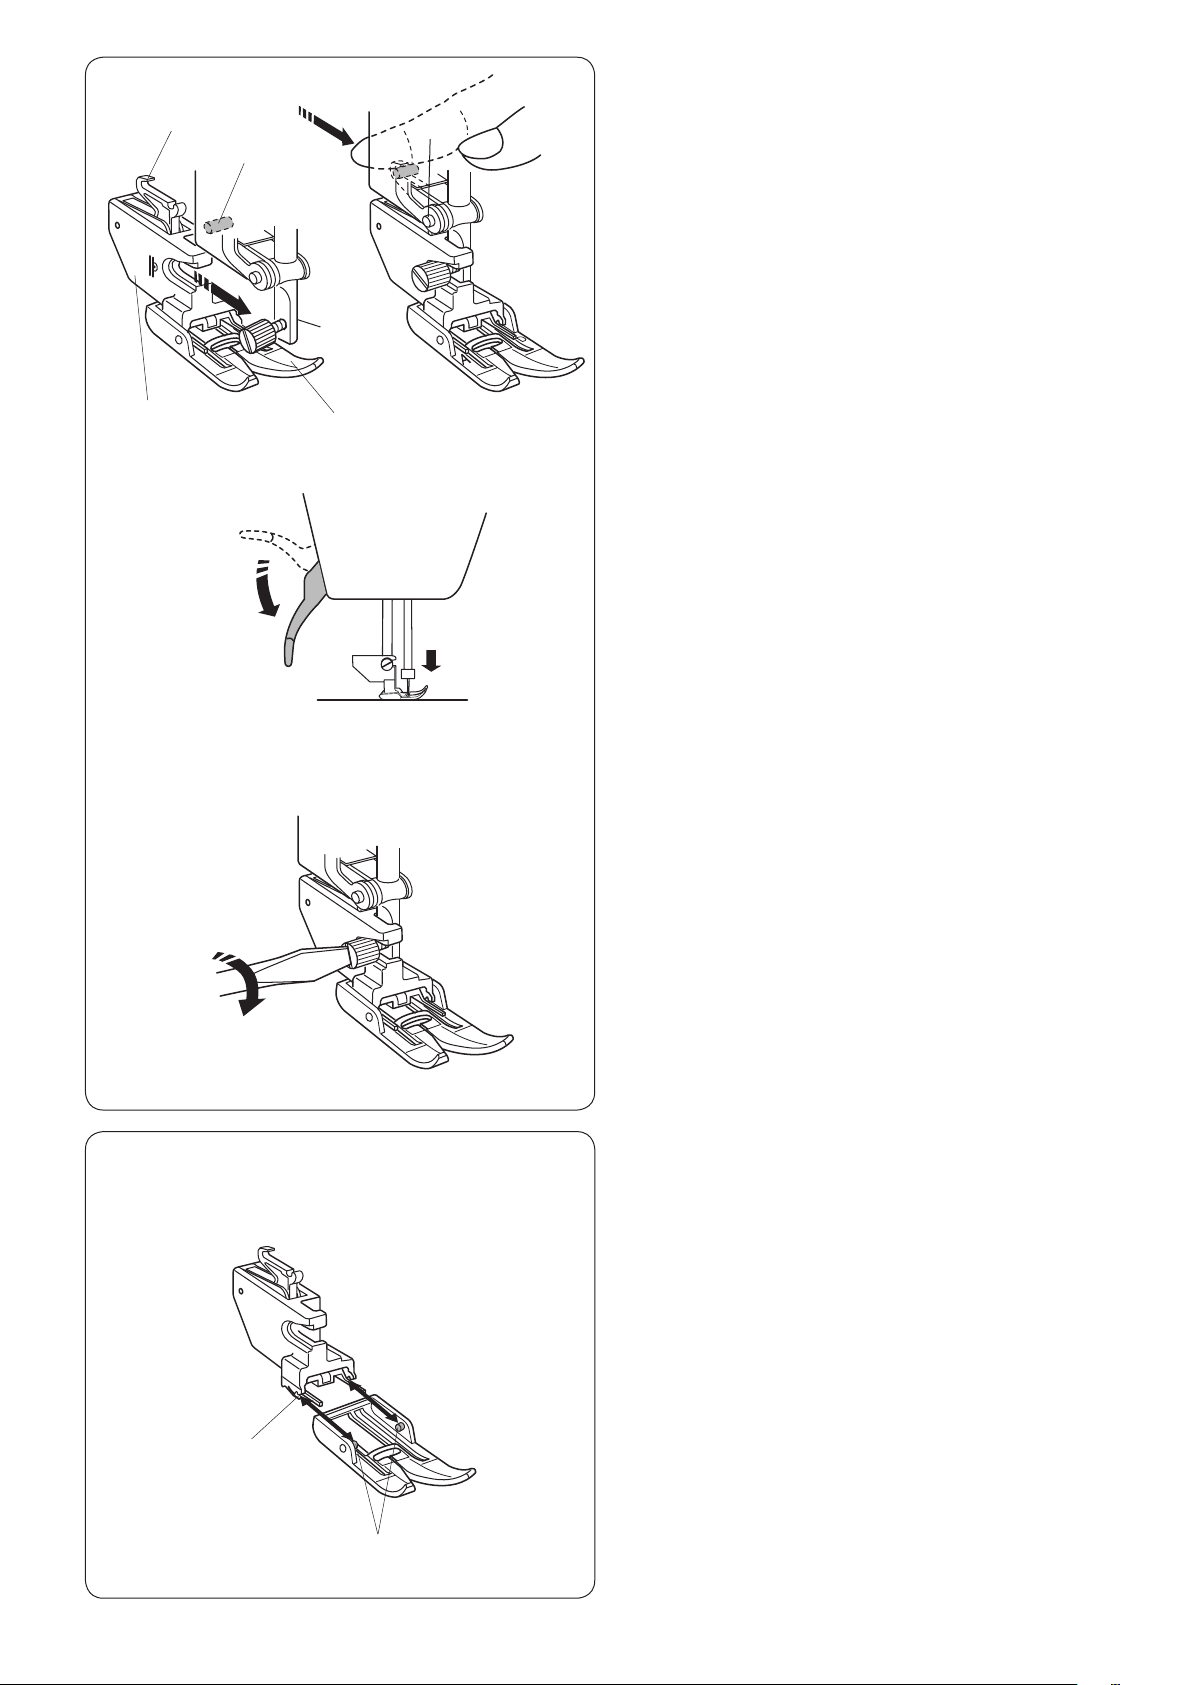
c
t
u
v
c Attach the dual feed foot holder to the presser bar.
Tighten the setscrew lightly with your finger.
t Dual feed link
y Dual feed foot holder
u Upper feed drive
i Dual feed foot
v Push the dual feed link to engage it with upper feed
drive.
b
n
y
i
b Lower the presser foot lifter. Lower the needle to the
lowest position by turning the handwheel.
n Tighten the setscrew securely with the screwdriver.
w
Replacing the dual feed foot
Pull the foot toward you to remove it.
Insert the pins of the foot into the slits of the foot holder
and gently push the foot until it snaps into place.
q Pin
w Slit
q
15
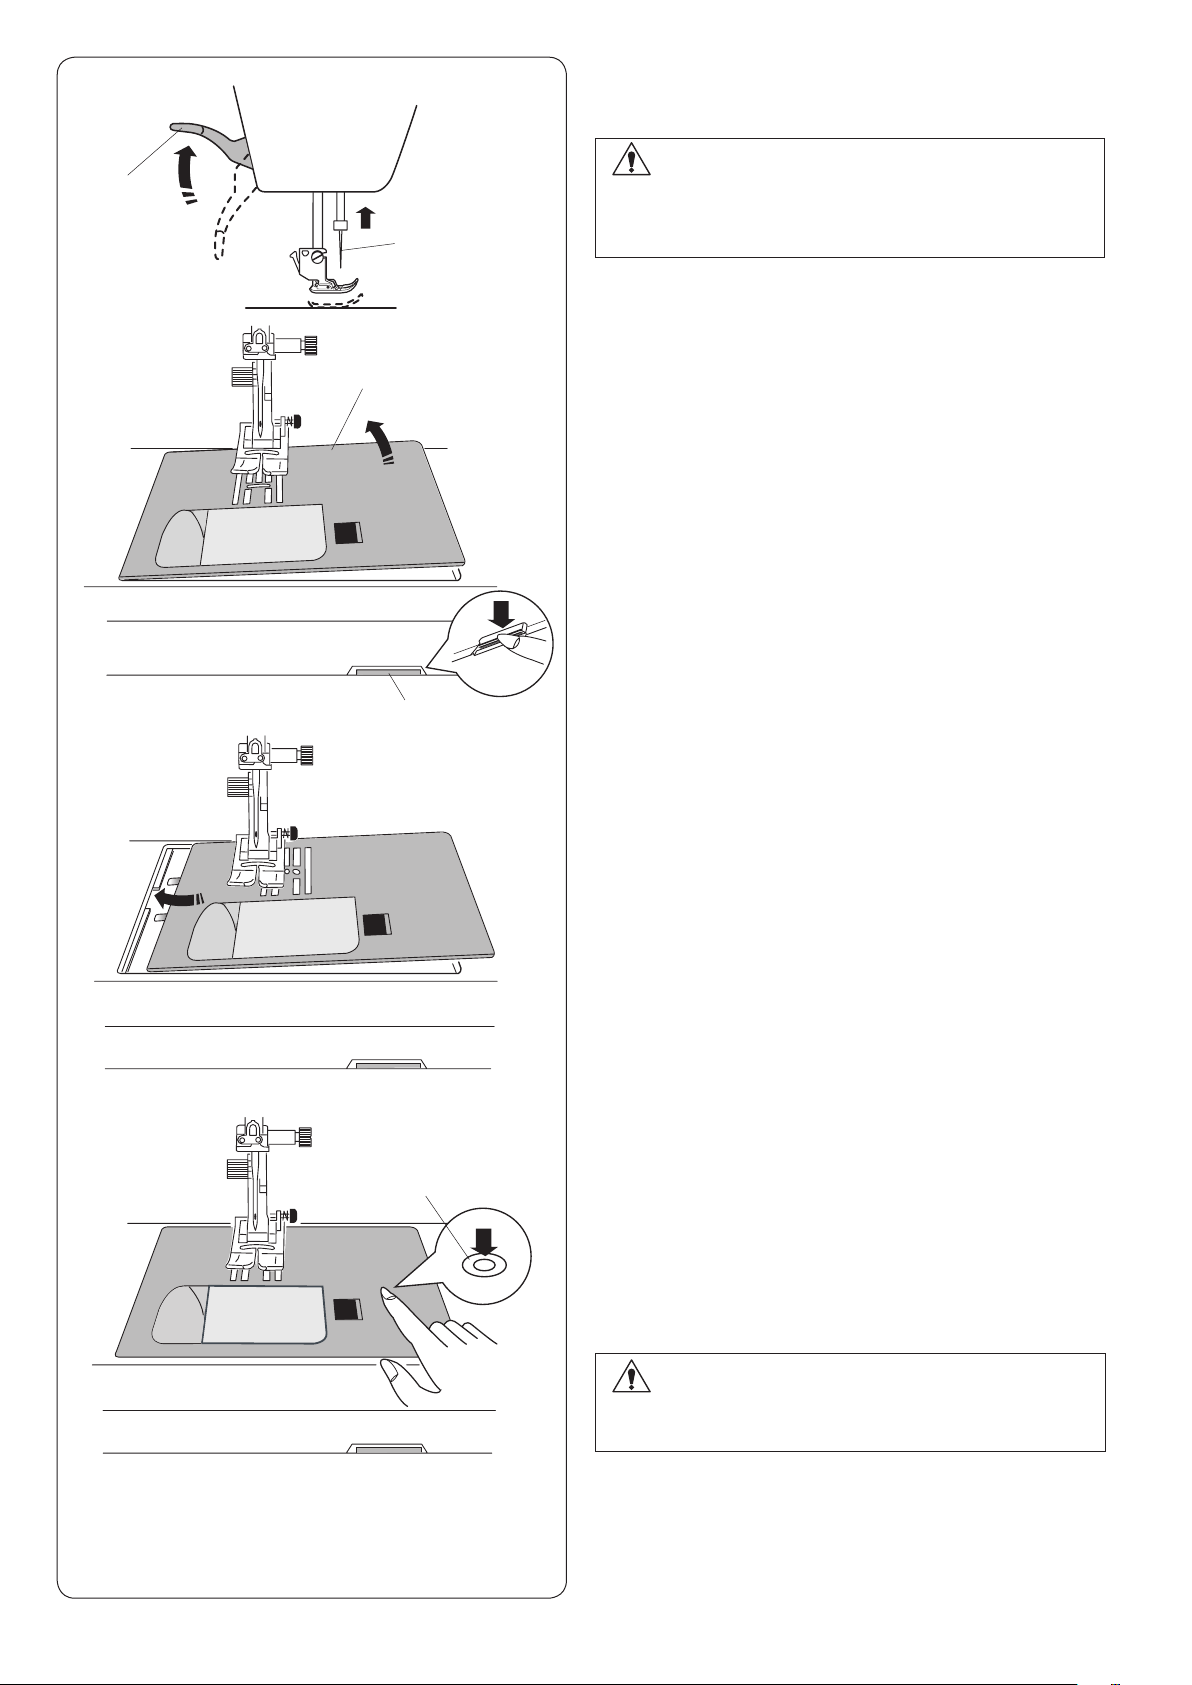
z
Replacing the Needle Plate
Use the straight stitch needle plate when sewing fine
fabrics or sewing with the dual feed foot.
x
c
q
r
w
CAUTION:
Always make sure to press the lockout key to lockout
the machine or turn the power switch off before
replacing the needle plate.
z Raise the needle to the highest position.
Raise the presser foot lifter to the extra lifted position.
q Presser foot lifter
w Needle
x Slide the extension table to the left to remove it.
Push down the needle plate release lever and the
needle plate will snap off.
e Needle plate release lever
r Needle plate
e
c Place the straight stitch needle plate on the machine.
Set the left edge of the needle plate into the opening.
v
t
v Push down on the needle plate mark until the needle
plate locks in place.
Lower the presser foot to the normal up position.
Press the lockout key to unlock or turn the
power switch on. Make sure the straight stitch is
automatically selected.
Turn the hand wheel slowly and make sure that the
needle does not hit the needle plate.
t Needle plate mark
CAUTION:
Never press the needle plate release lever while
running the machine.
16
q
e
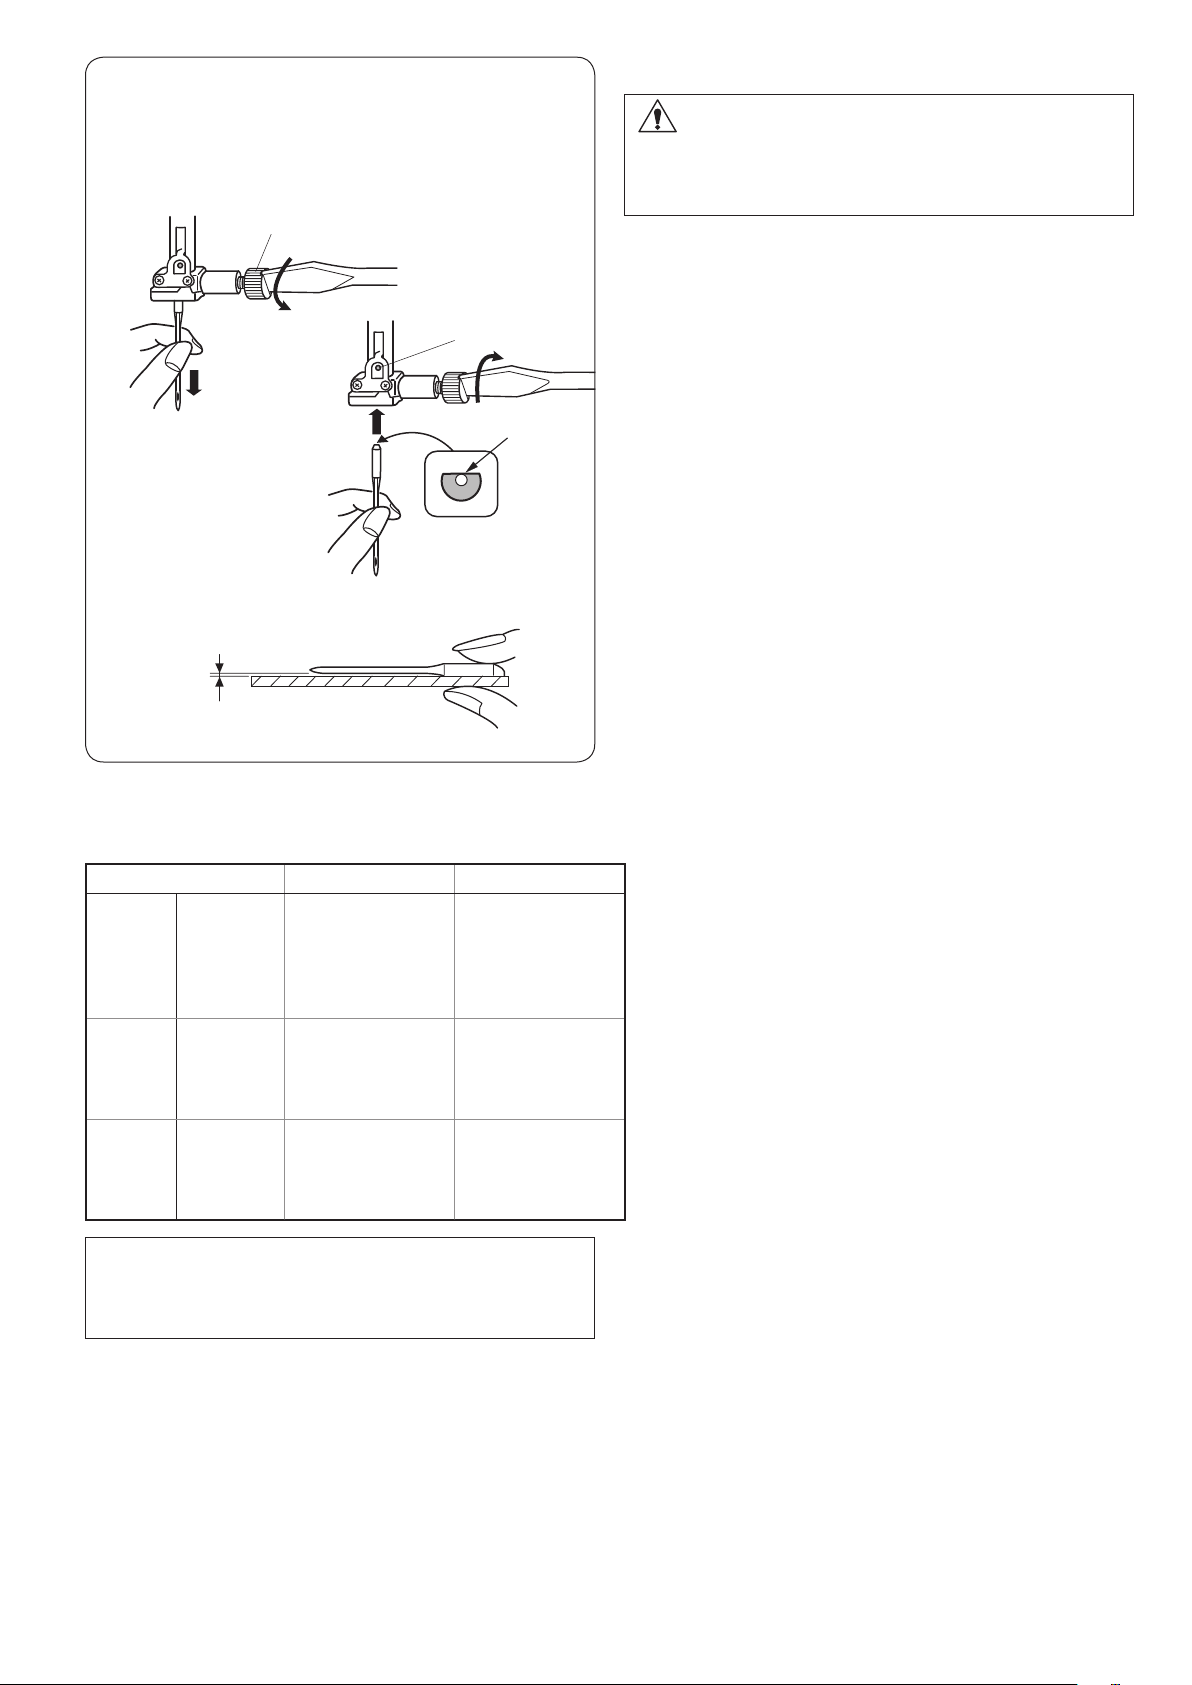
Changing Needles
CAUTION:
Always make sure to press the lockout key to lockout
the machine or turn the power switch off before
changing the needle.
Raise the needle by pressing the needle up/down button
and lower the presser foot.
Turn the power switch off.
Loosen the needle clamp screw and remove the needle
from the clamp.
q Needle clamp screw
w
r
Fabric Thread Needle
Lawn
Georgette
Fine
Medium
Heavy
weight
NOTE:
1 x twin needle, 2 x blue tip needle (#11/75), 1 x red
tip needle (#14/90) and 1 x purple tip needle (#14/90)
are included in the needle case (Part No. 859856005).
Tric o t
Organza
Crepe
Sheeting
Jersey
Broadcloth
Fleece
Denim
Tweed
Coating
Quilting
Silk #80-100
Cotton #80-100
Synthetic #80-100
Silk #50
Cotton #50-80
Synthetic #50-80
Silk #30-50
Cotton #40-50
Synthetic #40-50
Blue tip needle
Universal needle
#9/65-11/75
Red tip needle
Purple tip needle
Universal needle
#11 / 75 -14 / 9 0
Red tip needle
Purple tip needle
Universal needle
#14/ 9 0-16/10 0
Insert a new needle into the needle clamp with the flat
side of the needle to the rear.
When inserting the needle into the needle clamp, push it
up against the stopper pin and tighten the needle clamp
screw firmly with a screwdriver.
w Flat side
e Stopper pin
To check needle straightness, place the flat side of the
needle onto something flat (a needle plate, glass etc.)
The gap between the needle and the flat surface should
be consistent.
Never use a blunt needle.
r Gap
Fabric and Needle Chart
•Forgeneralsewing,useredneedle.
•Finethreadsandneedlesshouldbeusedforsewing
fine fabrics.
•Ingeneral,usethesamethreadforbothneedleand
bobbin.
•Useabluetipneedleforsewingnefabrics,stretch
fabrics, tricot and buttonholes to prevent skipped
stitches.
•Useapurpletipneedleforsewingknits,freequilting
and across the hem to prevent skipped stitches.
•Useastabilizerorinterfacetostretchornefabrics
to prevent seam puckering.
•Alwaystestthethreadandneedlesizeonasmall
piece of the same fabric you will use for actual
sewing.
17
e
w
r
q
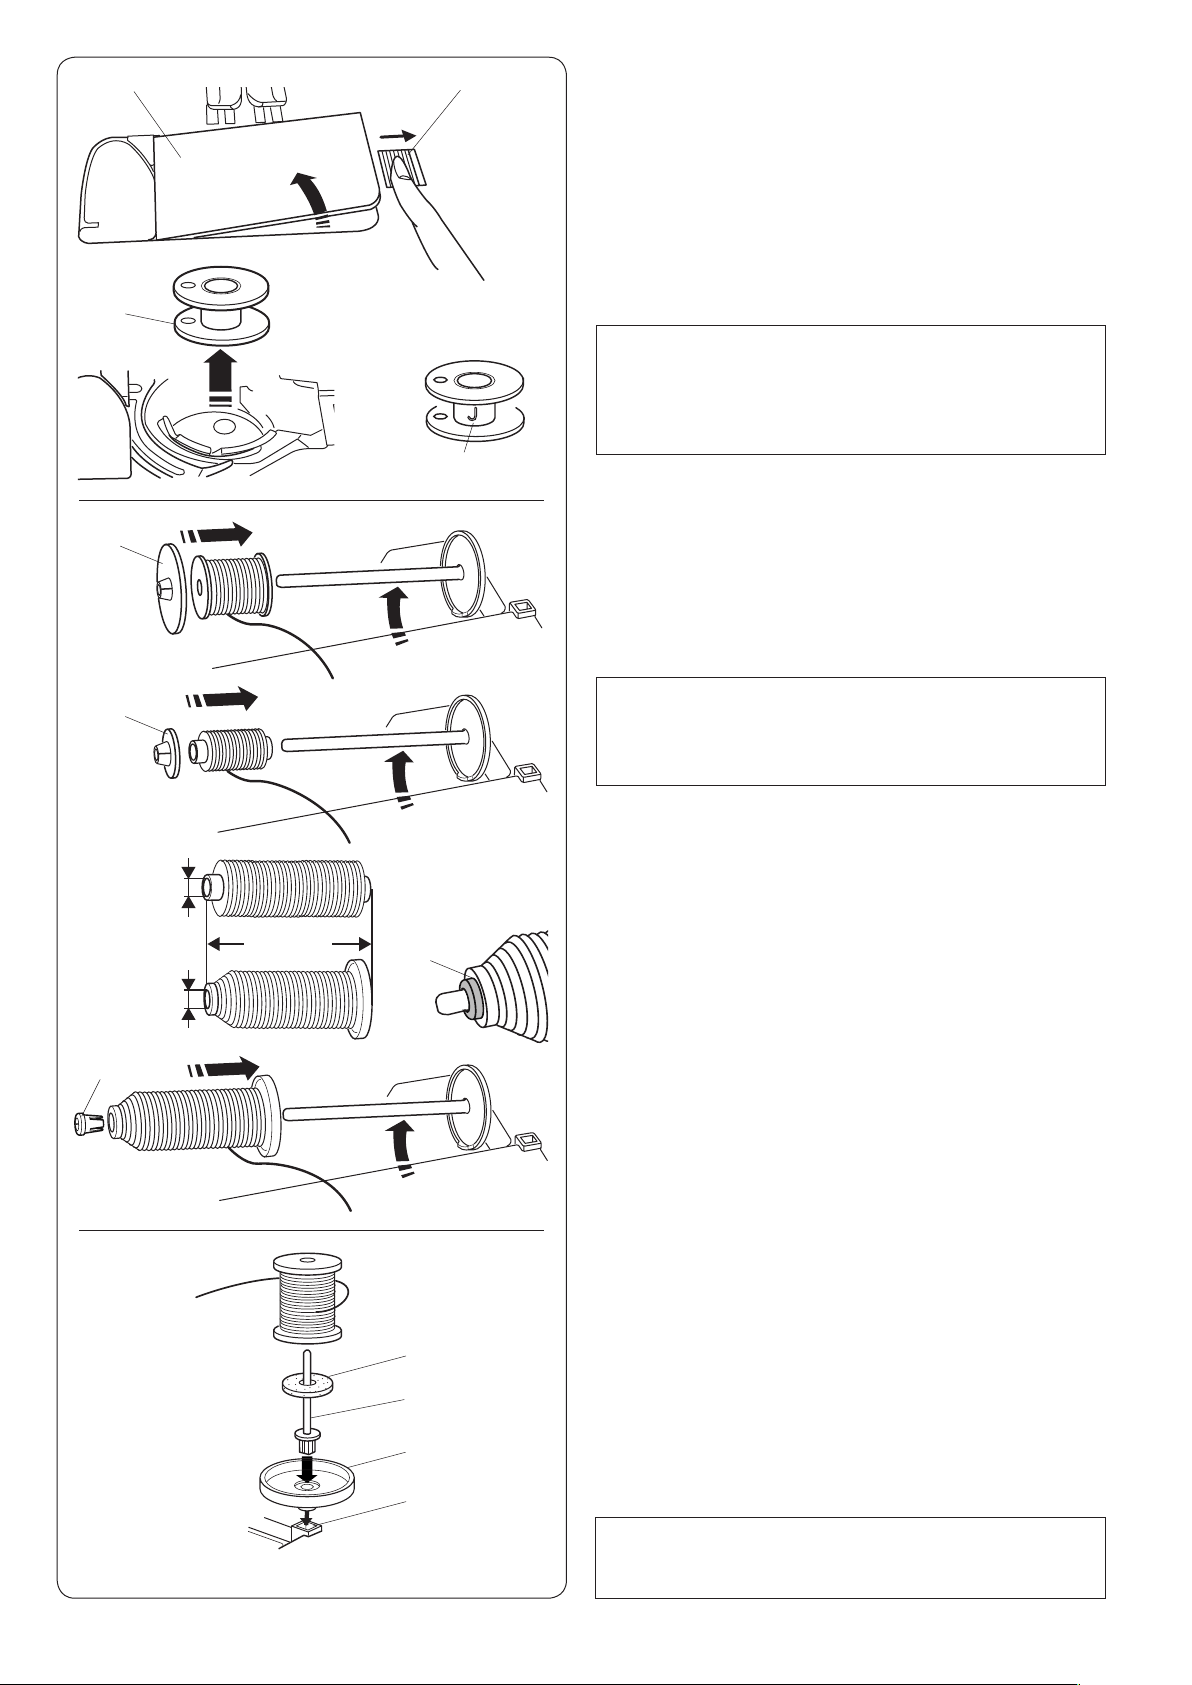
Winding the Bobbin
Removing the Bobbin
Slide the hook cover release button to the right, and
remove the hook cover plate.
q Hook cover release button
w Hook cover plate
Lift out the bobbin from the bobbin holder.
e Bobbin
NOTE:
Use the J plastic bobbins for horizontal hook (marked
with “J” r). Using other bobbins, such as pre-wound
paper bobbins, may cause stitching problems and/ or
damage to the bobbin holder.
t
q
w
e
e
r
y
Setting the spool of thread
Lift up the spool pin. Place the spool of thread on the
spool pin with the thread coming off the spool as shown.
Attach the large spool holder, and press it firmly against
the spool of thread.
q Large spool holder
NOTE:
Use the small spool holder to hold narrow or small
spools of thread.
w Small spool holder
Spool Holder (special)
Use the spool holder (special) when using a long spool of
thread as shown.
e
9.5 - 10.5mm (3/8 - 7/16inch)
r 70 - 75mm (2-3/4 - 3inch)
Attach the spool holder (special) by inserting it into the
hole of the spool of thread. Make sure there is no gap
between the spool holder and the spool of thread.
t Spool holder (special)
y No gap
r
q
w
e
Extra spool pin
Use the extra spool pin when you need to wind a bobbin
without unthreading the machine while working on a
sewing project.
Insert the extra spool pin into the spool supporter and
then into the hole beside the horizontal spool pin.
Place the felt on the spool pin and place a spool of thread
on it as shown.
q Extra spool pin
w Spool supporter
e Hole for extra spool pin
r Felt
NOTE:
The extra spool pin is also used for twin needle
sewing.
18
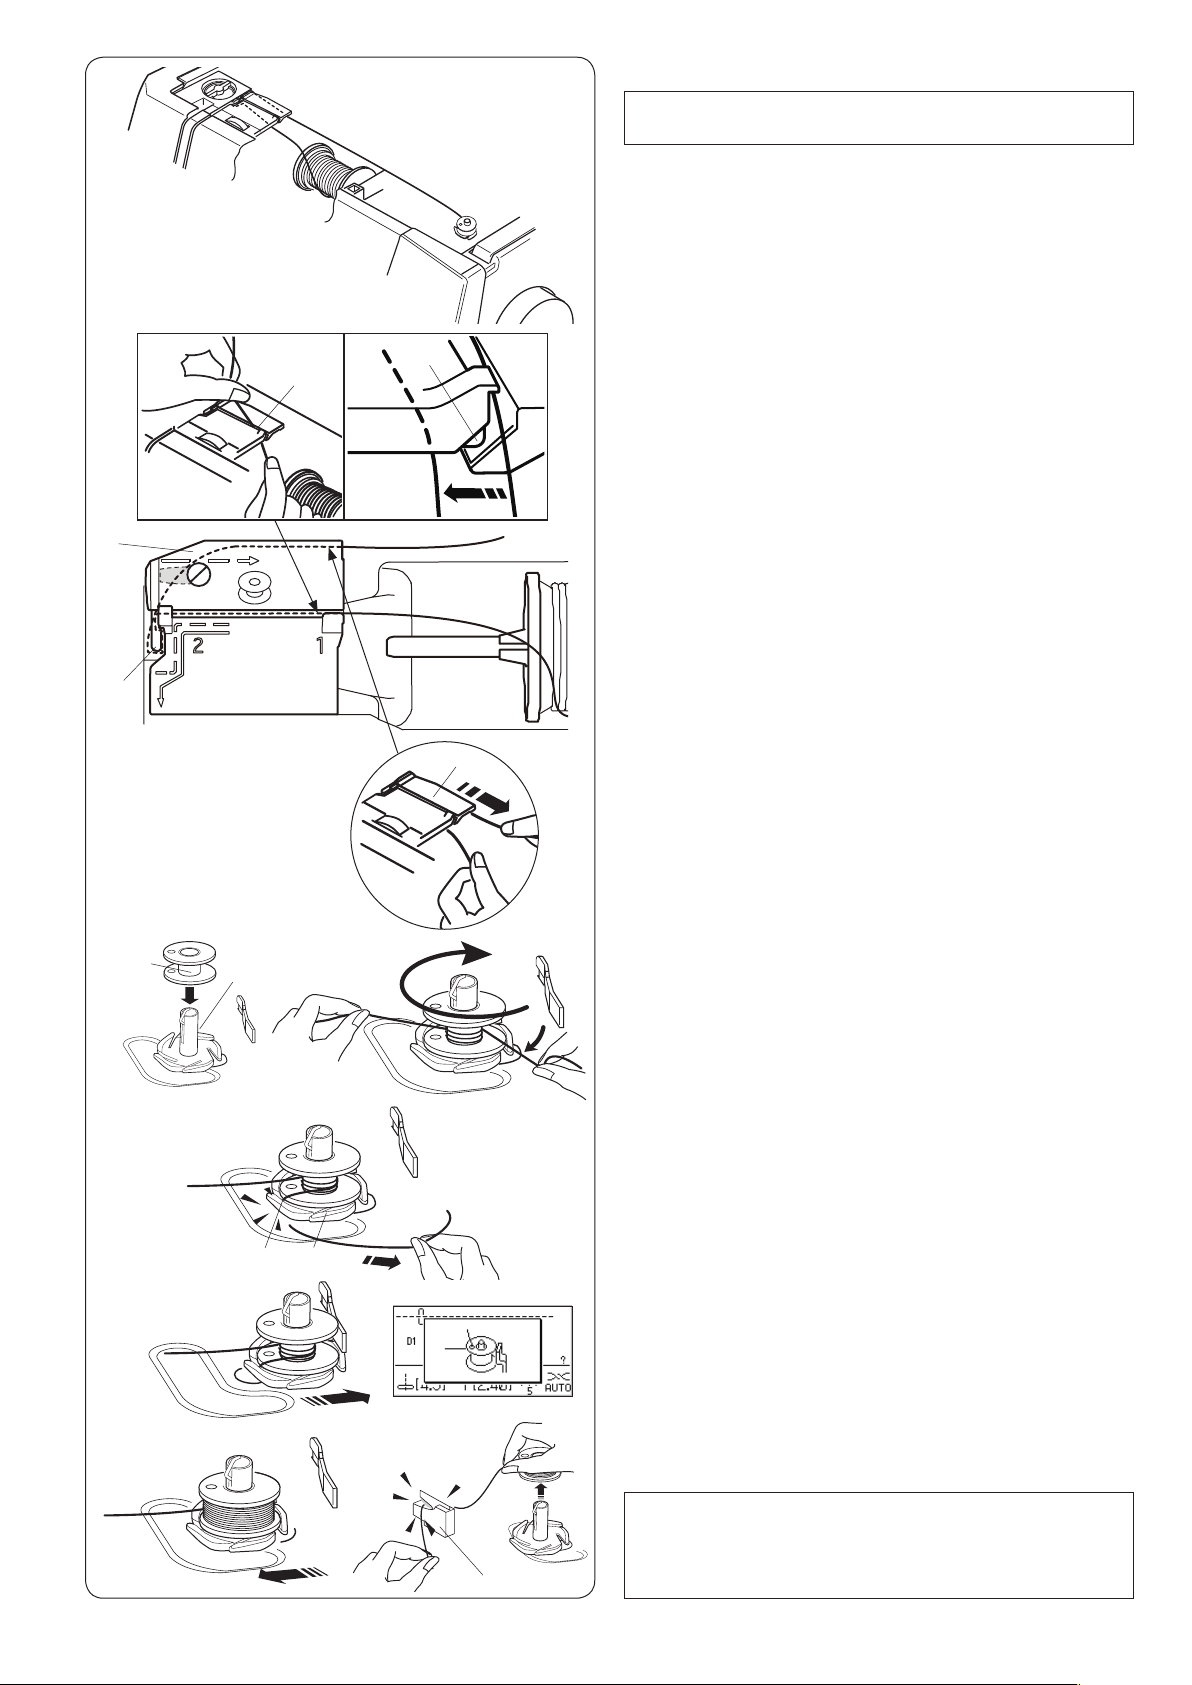
Winding the bobbin
NOTE:
Set the speed control slider at the fastest position.
r
e
z
q
c
x
w
r
z Pull the thread from the spool.
Hold the thread with both hands and pass the thread
into the guide slot.
q Guide slot
x Be sure that the thread is pulled down under the notch
and into the space below the guide slot as shown.
w Notch
c Draw the thread to the left and forward around the
thread guide.
Draw the thread to the rear and to the right around
and under the guide plate.
Firmly pull the thread to the right while holding it with
both hands.
e Thread guide
r Guide plate
v
n
m
,
t
y
i
b
u
.
o
v Put the bobbin on the bobbin winder spindle.
t Bobbin
y Bobbin winder spindle
b Pass the thread to the bobbin.
Hold the thread with both hands and wind it around
the bobbin clockwise several times.
n Insert the thread into one of the slits of the flange plate
and pull the thread to cut.
u Flange plate
i Slit
m Push the bobbin to the right. The bobbin winding
window appears.
, Start the machine. When the bobbin is fully wound, it
will stop spinning automatically.
Stop the machine and return the bobbin winder to its
original position by moving the spindle to the left.
. Remove the bobbin. Cut the thread with thread cutter.
o Thread cutter
NOTE:
For safety purposes, the machine will automatically
stop approximately 90 seconds after starting bobbin
winding.
19

Inserting the Bobbin
z
x
q
z Place the bobbin in the bobbin holder with the thread
running off counterclockwise as shown on the hook
cover plate.
CAUTION:
Always make sure to press the lockout key to lockout
the machine or turn the power switch off before
threading the machine.
x Hold the bobbin with your fingertip so it does not
rotate. Guide the thread into the front notch of the
bobbin holder. Pull the thread to the left to pass it
under the guide.
q Front notch
w Guide
w
c
v
r
y
Correct
t
r
e
r
Wrong
c Draw the thread to the left to pass it into the guide
path marked “1”.
Make sure that the thread comes out from the side
notch of the bobbin holder.
e Guide path 1
r Side notch
NOTE:
If the thread does not come out from the side notch,
rethread from step z.
v Continue to draw the thread along the guide path
marked “2” and pull the thread to the right through the
slit. The thread will be cut to a proper length and held
in place.
t Guide path 2
y Slit (Thread cutter)
b
u
b Set the left edge of the hook cover plate into opening.
Push down the hook cover plate to fit in place.
u Hook cover plate
NOTE:
Unless otherwise noted, you can start sewing without
drawing up the bobbin thread.
Refer to page 23 for how to draw up the bobbin
thread.
20

n
b
m
c
,
z x
v
Threading the Machine
Raise the presser foot lifter to raise the presser foot.
Turn the power switch on.
Press the needle up/down button to raise the take-up
lever to the highest position.
Press the lockout key or turn the power switch off.
Pass the thread in the order from z to ,.
CAUTION:
Always make sure to press the lockout key to lockout
the machine or turn the power switch off before
threading the machine.
c
v
y
z
r
e
r
q
x
b
w
u
z Hold the thread with both hands and pass the thread
into the guide slot.
q Guide slot
x Be sure that the thread is pulled down under the notch
and into the space below the guide slot as shown.
w Notch
c Hold the thread with both hands and draw the thread
around the corner of the guide.
Firmly pull the thread toward you along the right
channel until the thread snaps.
e Corner of the guide
r Right channel
v Draw the thread down along the right channel and
around the bottom of the thread guide plate. Pull the
thread up along the left channel.
r Right channel
t Thread guide plate
y Left channel
n m ,
i
o
t
b While holding the thread at the spool, firmly draw the
thread up and to the back of the take-up lever. Draw
the thread forward to slip it into the eye of the take-up
lever.
u Eye of the take-up lever
n Then pull the thread down along the left channel and
through the lower thread guide.
i Lower thread guide
m Slide the thread behind the needle bar thread guide
from the right.
o Needle bar thread guide
, Thread the needle with the needle threader (refer to
the next page).
21
z
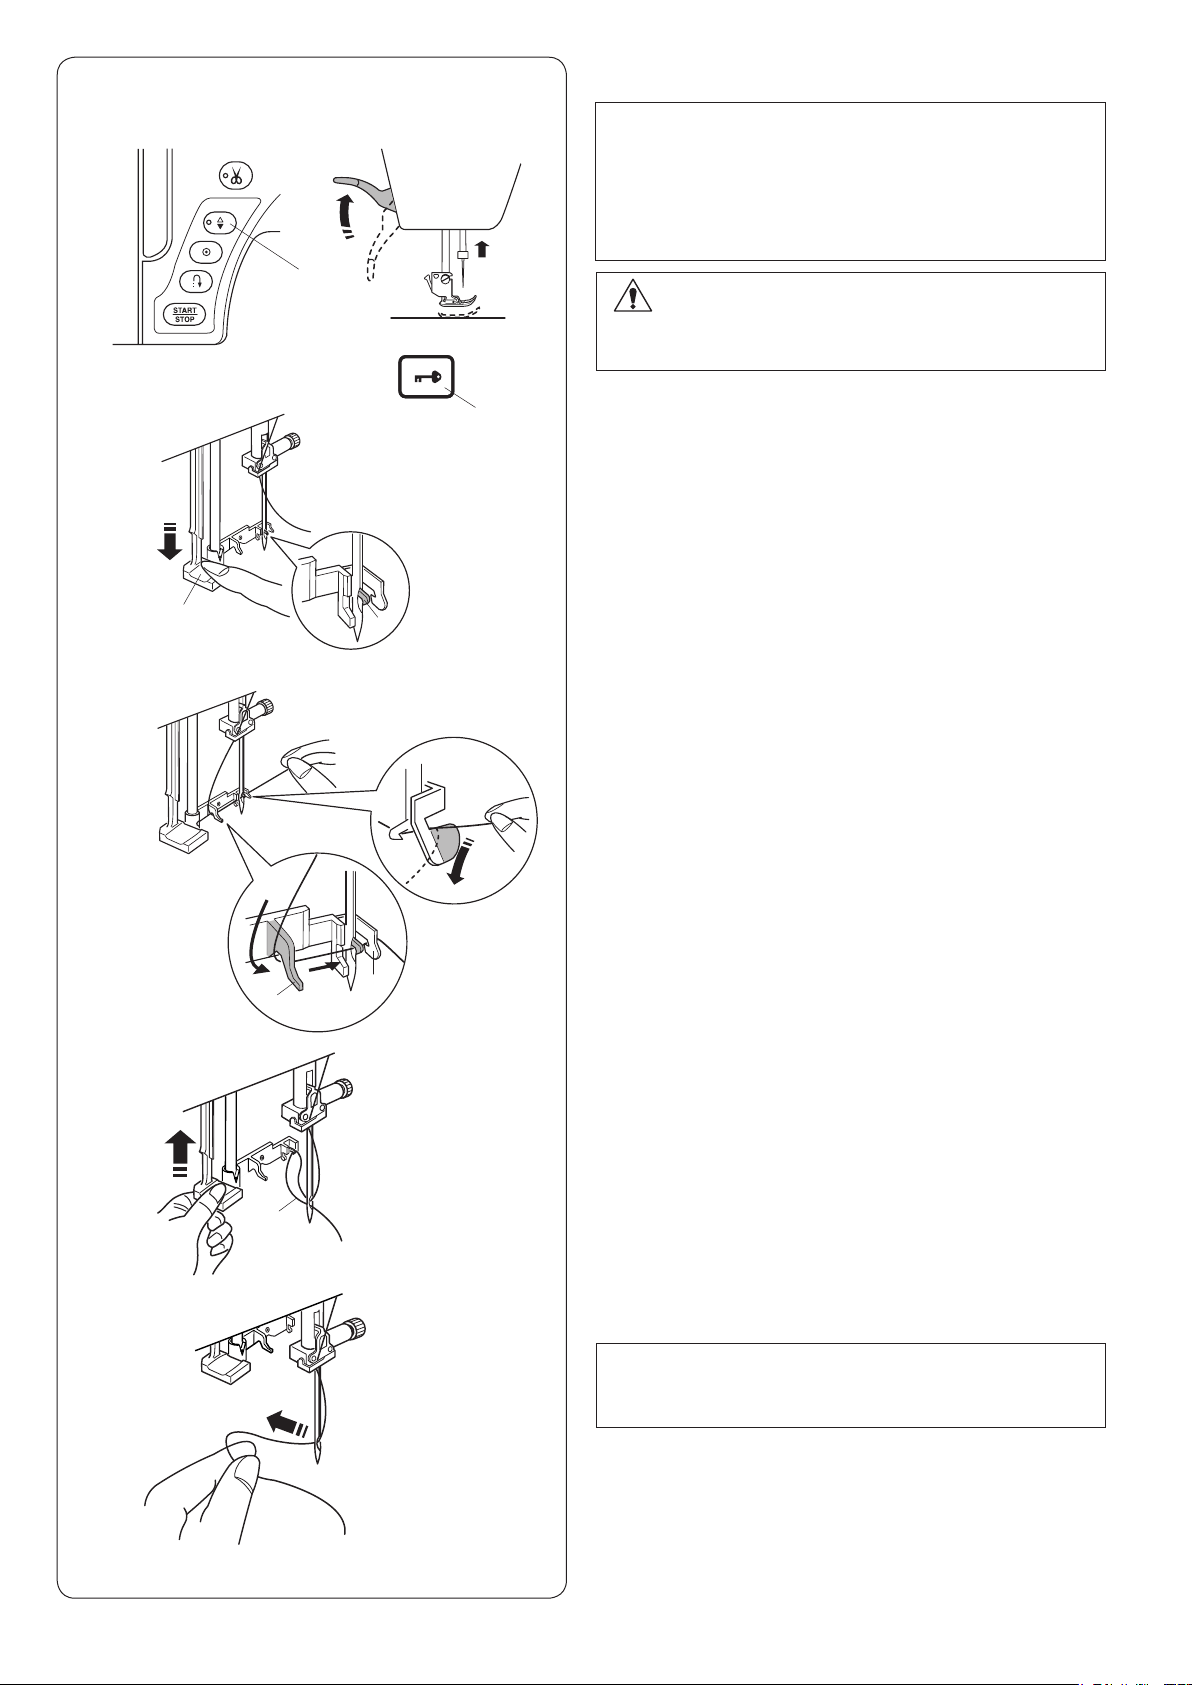
Built-in Needle Threader
NOTE:
•Theneedlethreadercanbeusedwitha#11to#16
needle.
Threadsize50to90isrecommended.
•Theneedlethreadercannotbeusedwiththetwin
needle.
q
CAUTION:
Alwaysmakesuretopressthelockoutkeytolockout
themachinebeforeusingthebuilt-inneedlethreader.
x
e
t
y
r
w
z TurnthepowerswitchON.
Presstheneedleup/downbuttontoraisetheneedle.
Pressthelockoutkeytolockthemachine.
Pulldowntheneedlethreaderknobasfarasitwillgo.
Thethreaderhookcomesoutthroughtheneedleeye
frombehind.
q Needleup/downbutton
w Lockoutkey
e Threaderknob
r Threaderhook
x Drawthethreadfromlefttoright,undertheleftguide,
threaderhookandrightguide.
Drawthethreadaroundtherightguidetowardyou.
t Leftguide
y Rightguide
c
v
c Raisethethreaderslowlysoaloopofthethreadis
pulledupthroughtheneedleeye.
u Threadloop
u
v Removethethreadendthroughtheneedleeyetothe
re a r.
NOTE:
Theneedlethreadercannotbeusedwiththetwin
needle.
22
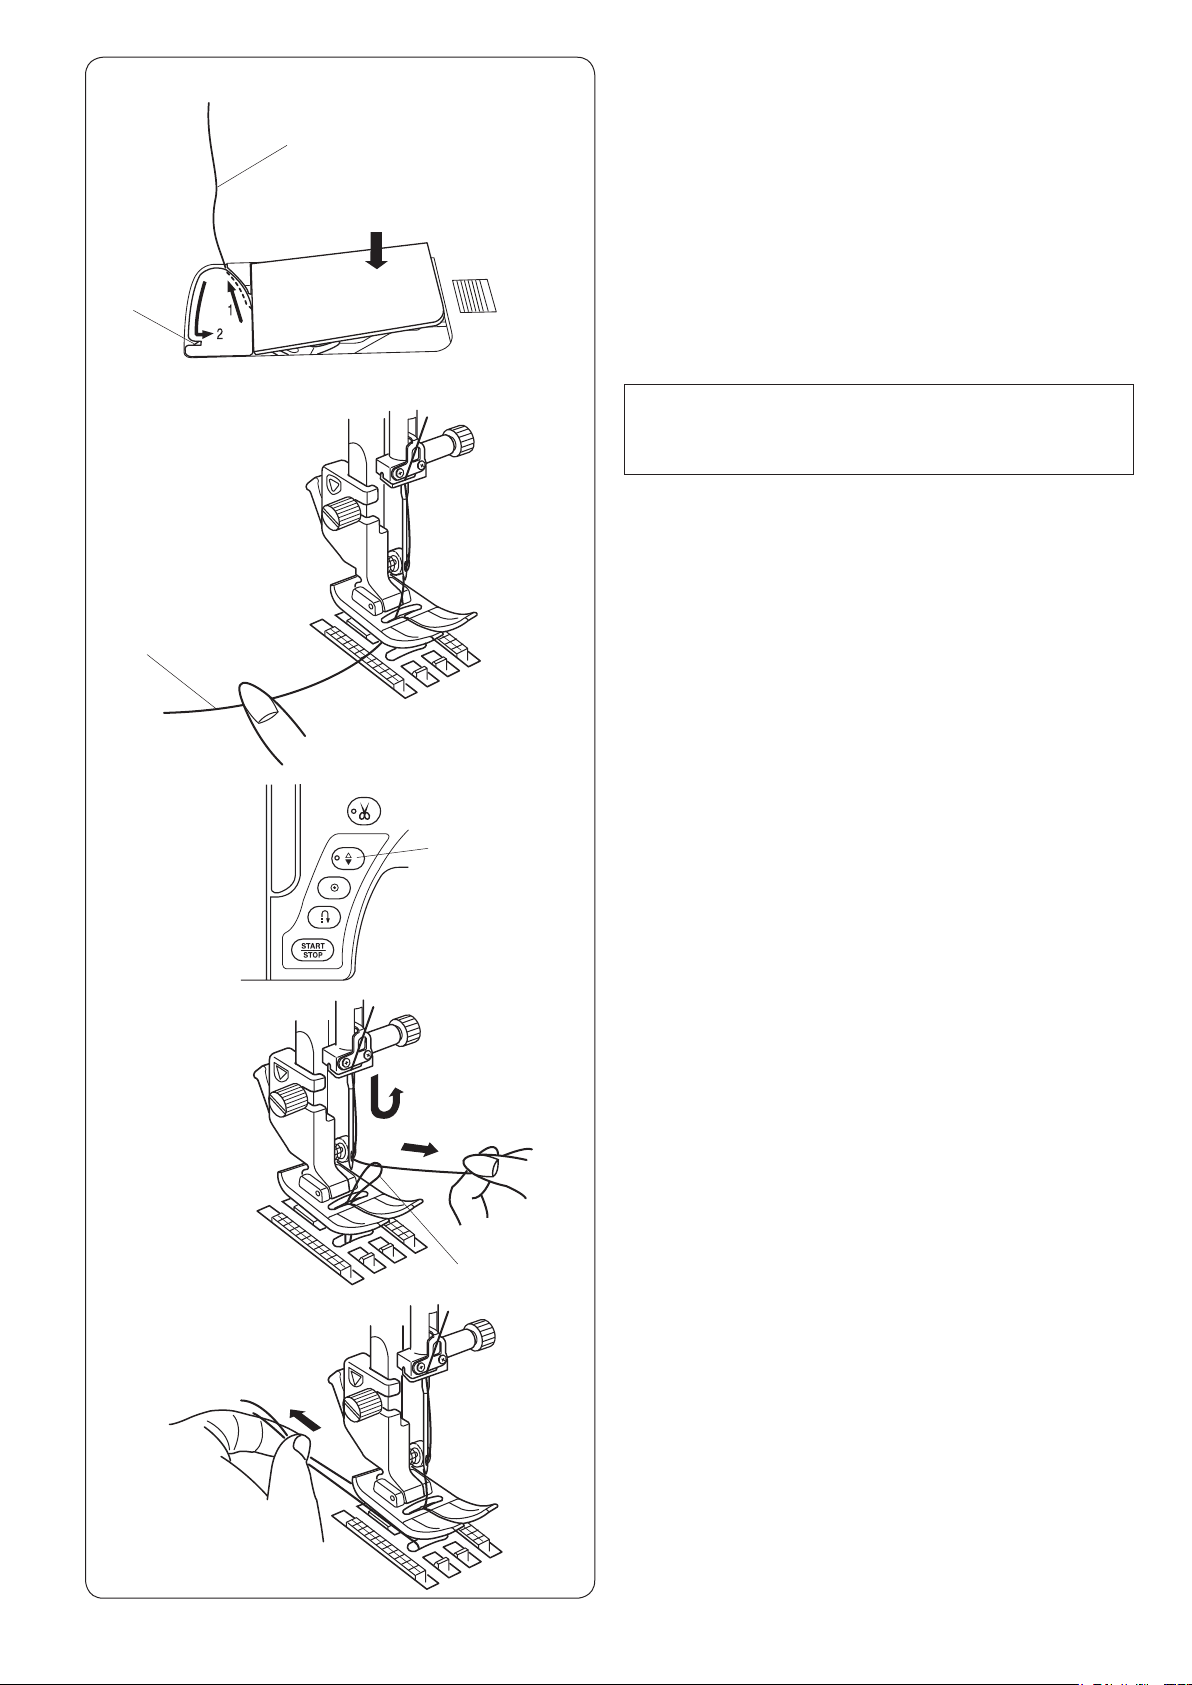
Drawing up the Bobbin Thread
z
w
x
e
q
After using auto thread cutting or threading the bobbin
holder, you can start sewing without drawing up the
bobbin thread.
However, you need to draw up the bobbin thread when
sewing gathering stitches, etc.
z Remove the bobbin. Insert the bobbin into the bobbin
holder again and rethread the bobbin holder according
to the instructions on page 20, but leave a 10 cm (4˝)
tail of bobbin thread as shown.
q Bobbin thread
NOTE:
Do not cut the bobbin thread with the thread cutter.
w Thread cutter
x Raise the presser foot. Hold the needle thread lightly
with your left hand.
e Needle thread
c
r
v v Pull the needle thread to bring up the loop of bobbin
t
b
c Press the needle up/down button twice to lower and
raise the needle.
r Needle up/down button
thread.
t Loop of bobbin thread
b Pull both threads 10 cm (4˝) under and behind the
presser foot.
23
q
w
e
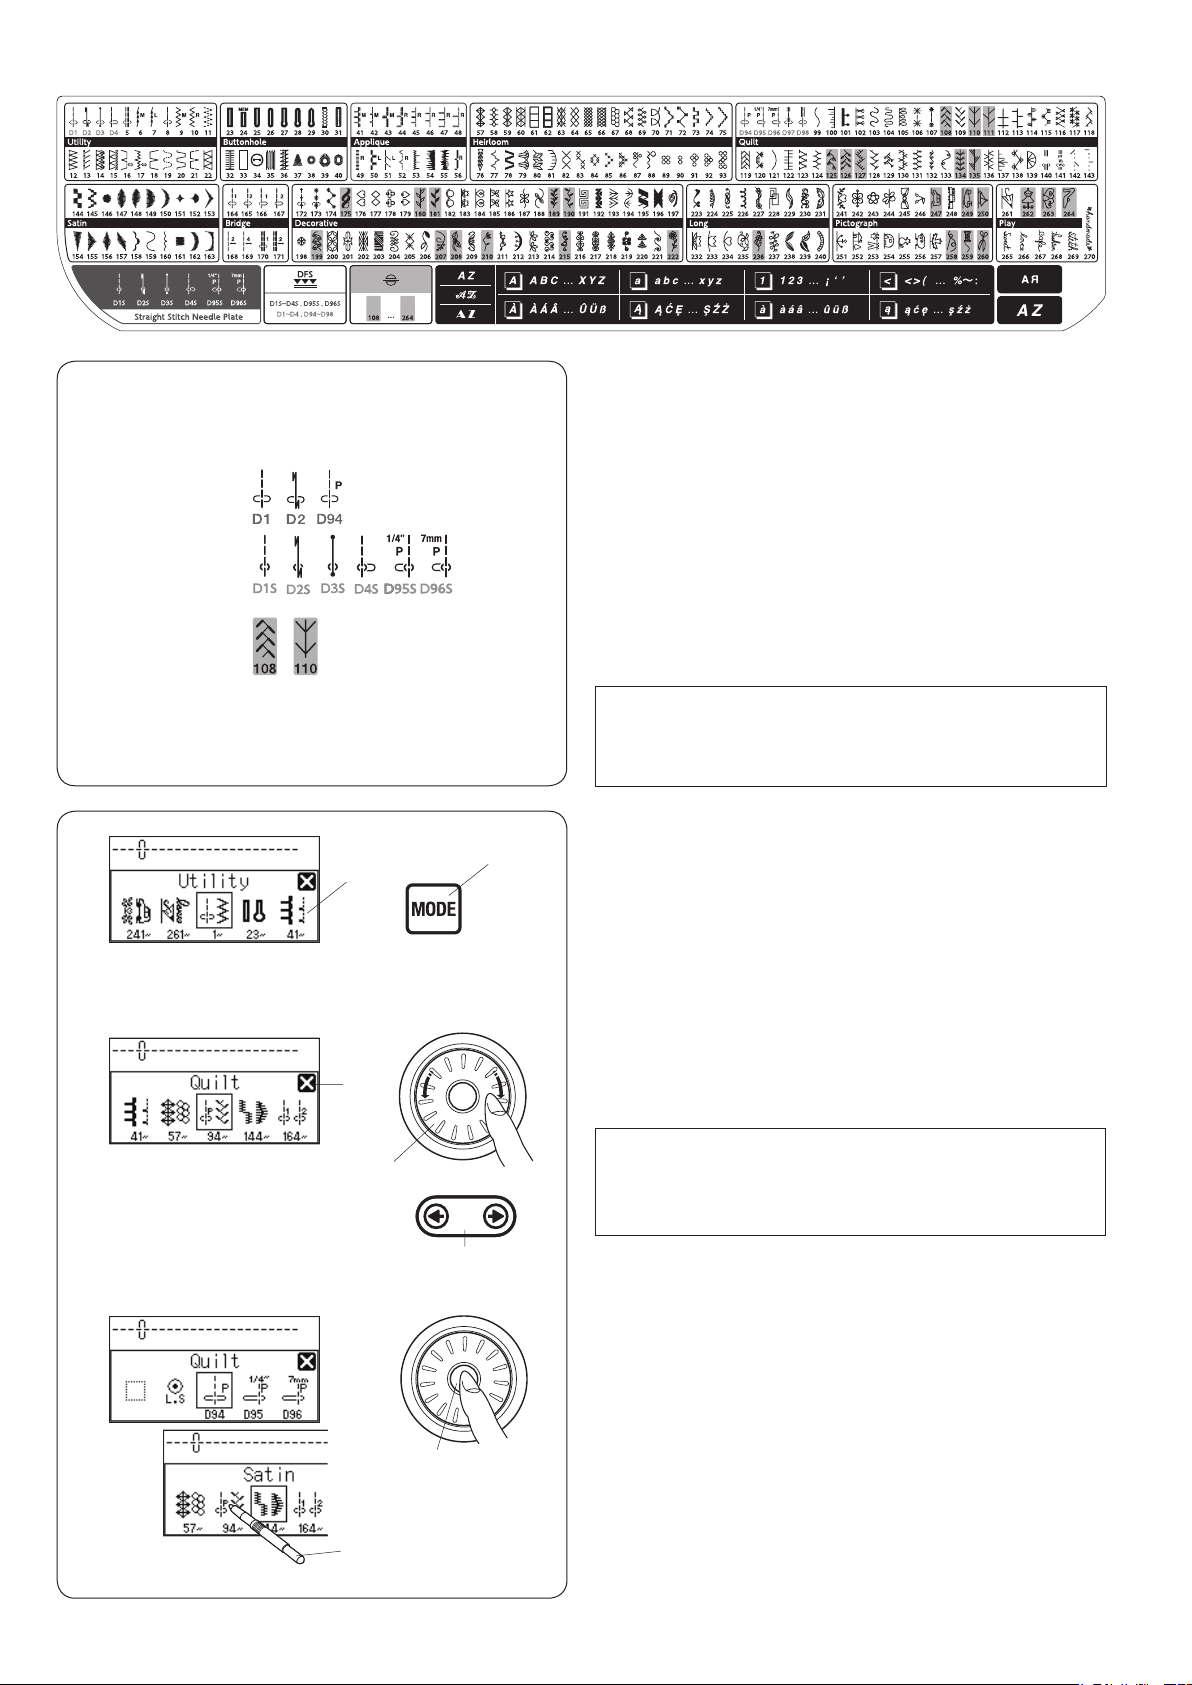
Selecting the Patterns
The stitch patterns are classified into 11 groups and
monogramming.
To select the desired stitch pattern, refer to the reference
chart inside the top cover to identify the stitch group and
pattern number.
q The stitch patterns that start with “D” (for example, D1,
D2 or D94) can be sewn with the dual feed foot AD.
w The stitch patterns end with “S” (D1S, D2S, D3S, D4S,
D95S or D96S) can be sewn with the straight stitch
needle plate.
e The stitch patterns shaded with red can be turned
over vertically (refer to page 86).
z
x
w
t
e
r
q
NOTE:
When the straight stitch needle plate is attached to
the machine, the patterns not suitable for the straight
stitch needle plate cannot be selected.
z When turning the power switch on, the LCD screen
will show the straight stitch D1 selected.
Press the mode key and the group selection window
will open.
q Mode key
w Group selection window
x Turn the jog dial or press the edit key to browse
through the groups.
e Jog dial
r Edit key
NOTE:
To close the group selection window, press the cross
mark with the touch panel stylus.
t Cross mark
c
c Press the confirm button in the center of the jog dial to
select the group enclosed with a frame, or press the
icon of the desired group with the touch panel stylus.
y Confirm button
u Touch panel stylus
y
u
24
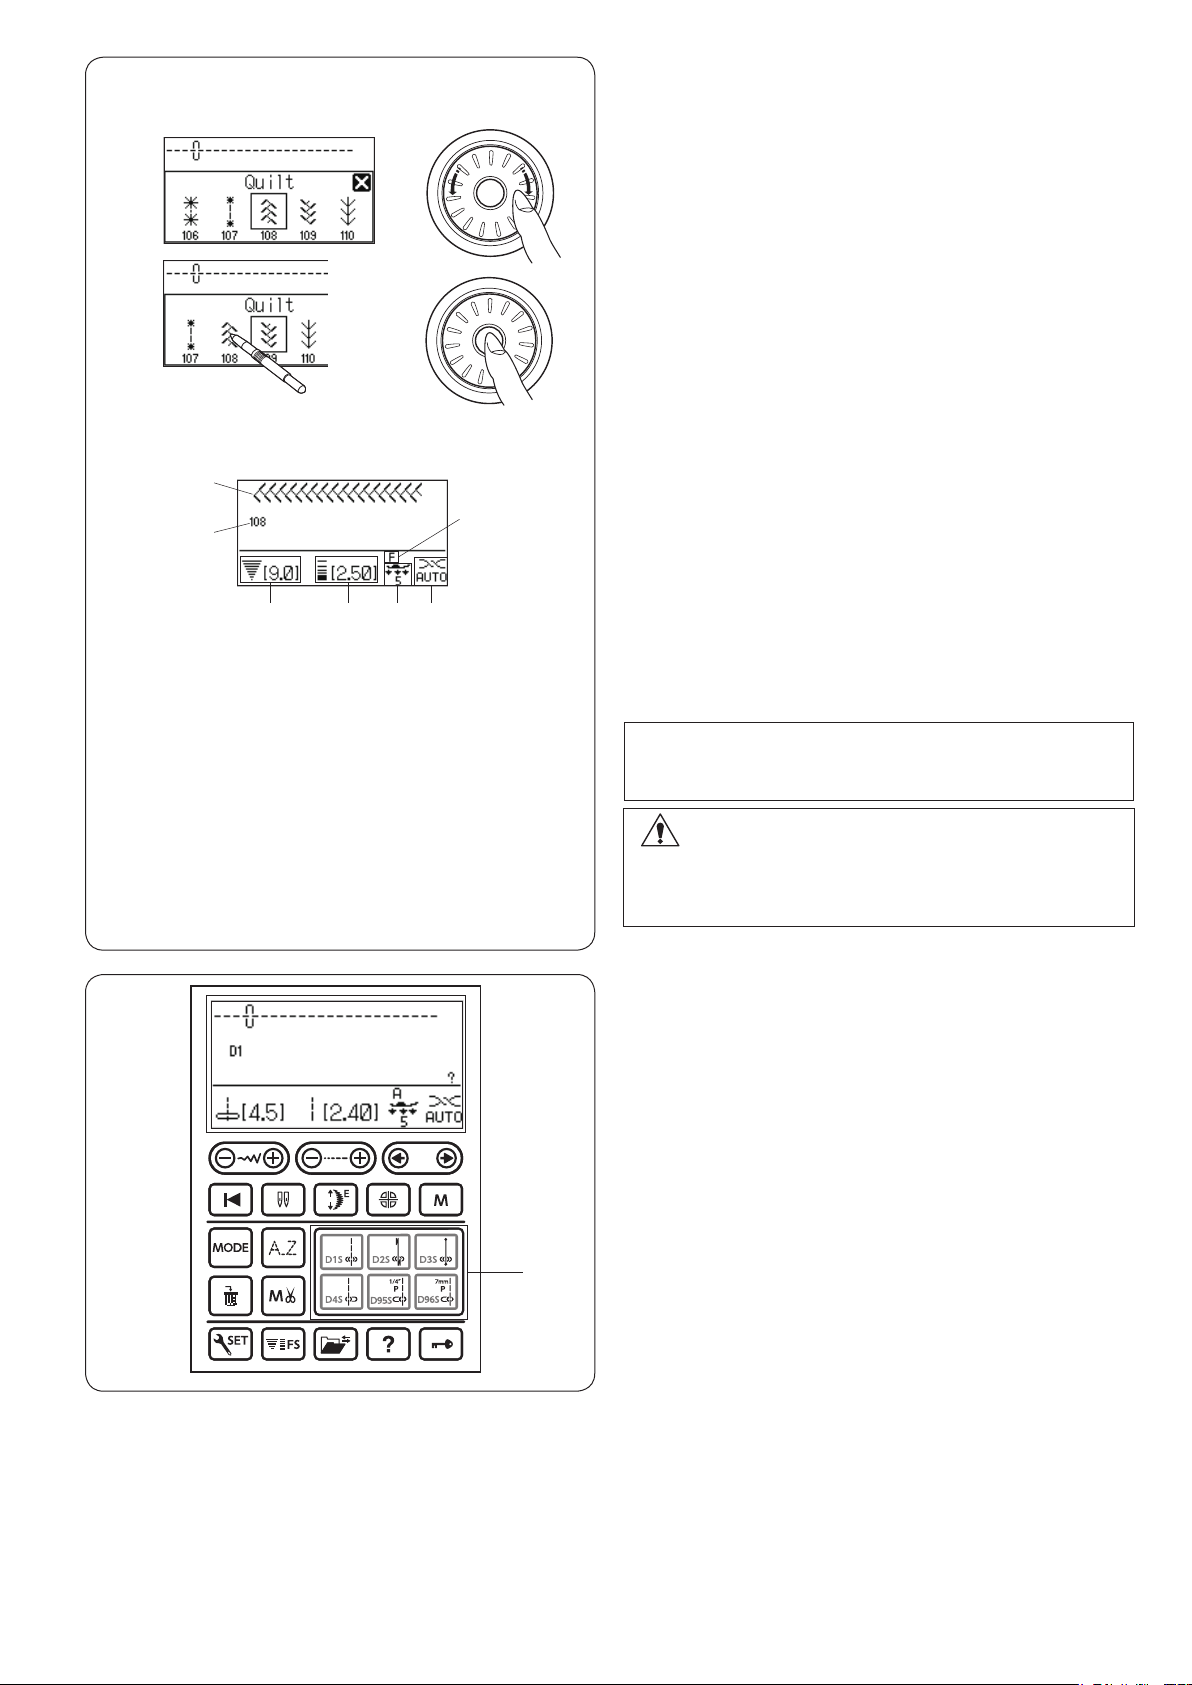
v
v The pattern selection window will open.
Turn the jog dial and press the confirm button, or
press the stitch icon to select the desired stitch
pattern.
b
u
i
o
!0
!2 !3
!1
b The LCD screen will display the pattern number and
stitch image, along with information such as stitch
width and length, recommended foot, foot pressure
and tension setting.
u Stitch image
i Pattern number
o Stitch width
!0 Stitch length
!1 Recommended presser foot type
!2 Foot pressure
!3 Tension setting
NOTE:
A message window will be displayed briefly when
certain stitch pattern is selected.
CAUTION:
Do not press the surface of the LCD screen with hard
or sharp objects like pencils, screwdrivers or the like.
Use the touch panel stylus to press the LCD screen.
Direct pattern selection
YoucanselectthestitchpatternsD1-D4,D95,andD96
dir e c t l y.
When attaching the straight stitch needle plate, you can
select the stitch patterns D1S-D4S, D95S and D96S
dir e c t l y.
q Direct pattern selection keys
q
25
q
w
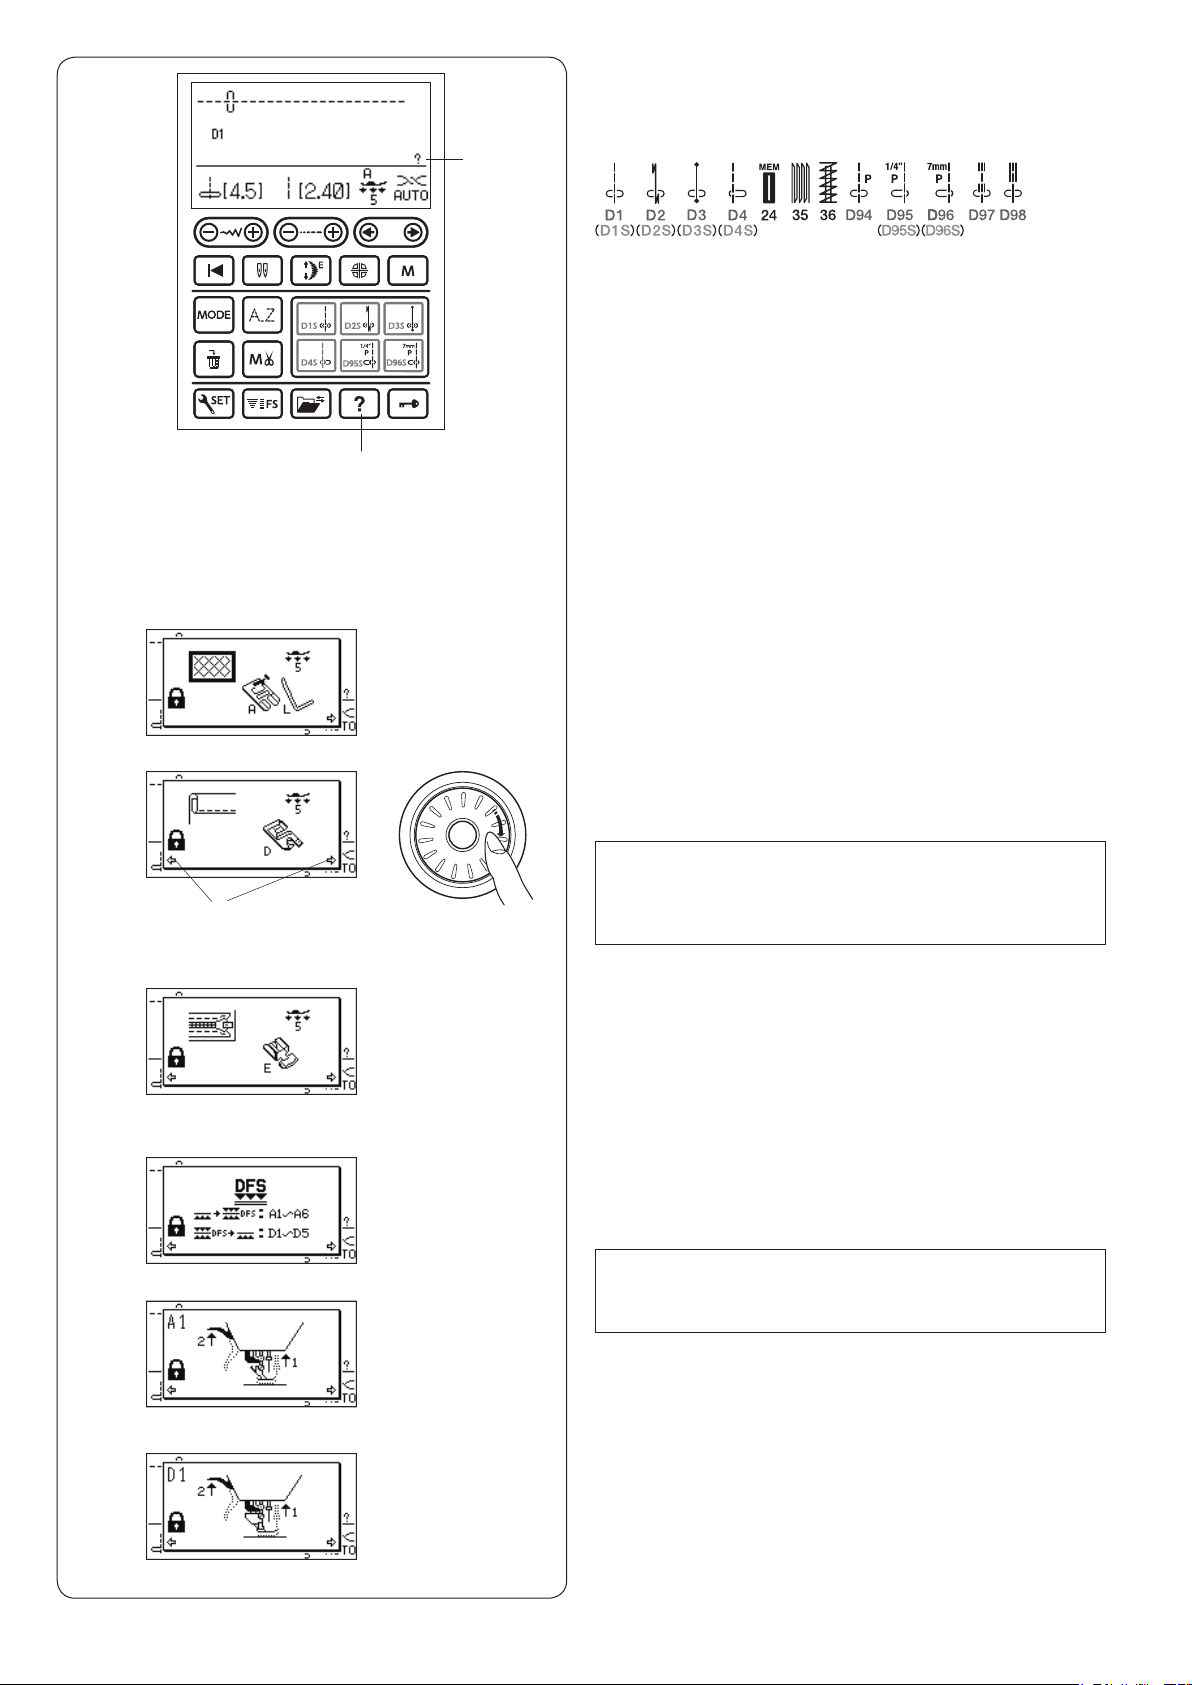
Help Key
Pressing this key will show alternative applications and
useful information for the following stitch patterns:
q Help key
When one of the above patterns is selected, the “?” mark
is displayed.
w “?” mark
Example: Stitch pattern D1 is selected.
When you press the help key, the following will be
displayed on the LCD screen as you turn the jog dial.
z
x
c
v
e
z The first page shows the zigzag foot A and quilting
guide bar for quilting.
x The second page shows the rolled hem foot D for
rolled hemming applications.
NOTE:
Arrow marks indicate that there are previous and next
pages to be displayed.
e Arrow marks
c The third page shows the zipper foot E for zipper
sewing applications.
v Pages A1 to A6 and D1 to D5 show step-by-step
instructions on how to engage and disengage the dual
feed device.
NOTE:
Use the jog dial to scroll through the pages.
To close the help window, press the help key again.
26

w
e
Customizing Machine Settings
You can customize the machine settings to your
preference.
q
Press the set key and the LCD screen will show the
machine setting window.
q Set key
w Machine setting window
To close the machine setting window, press the cross
mark.
e Cross mark
r
t
Turn the jog dial to select the desired item to set and
press the confirm button
r Jog dial
t Confirm button
Screen brightness
The screen brightness can be adjusted from level 0 to 20.
The preset level is 10.
Turn the jog dial to adjust the screen brightness.
Press the confirm button to register the new setting.
Buzzer sound
The level of the buzzer sound can be adjusted and you
can mute the buzzer in normal operation.
Turn the jog dial to select the desired sound level; mute,
low normal or loud.
Press the confirm button to register the new setting.
You can select the desired level by also pressing a sound
level icon with the touch panel stylus.
NOTE:
Items and settings can also be selected by pressing
the relevant icon on the LCD screen.
27
q
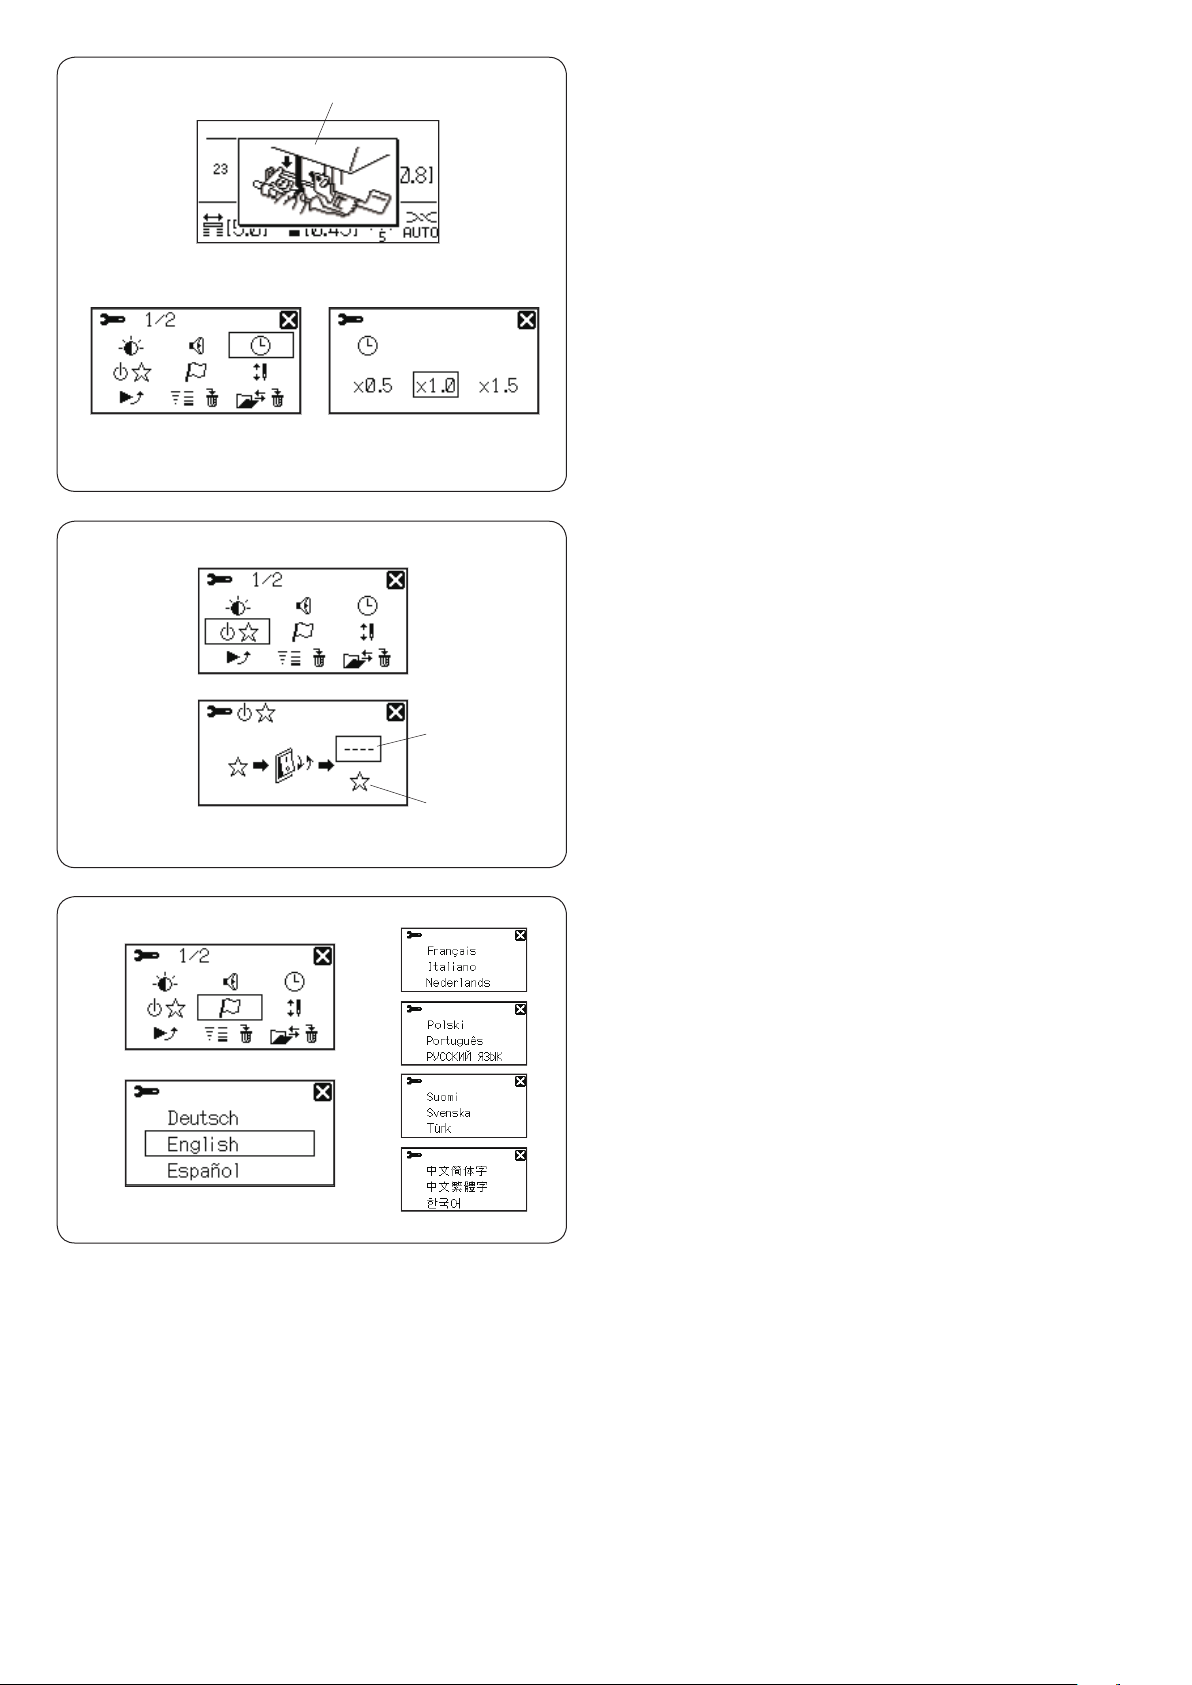
Sub window display time
A sub window will appear when selecting certain patterns
such as buttonholes.
The duration of the sub window display can be altered.
q Sub window
Turn the jog dial to select x0.5 (1 second), x1.0 (2
seconds) or x1.5 (3 seconds).
The preset time is x1.0 (2 seconds).
Press the confirm button to register the new setting.
Resumption setting
The last pattern sewn before turning the power off can be
recalled when turning the power on again by setting the
resumption setting on.
q
w
Turn the jog dial to select the normal set or resumption
set. Press the confirm button to register the new setting.
q Normal set
w Resumption set
Language selection
You can choose one of the 15 languages for screen
display.
Turn the jog dial to select the desired language.
Press the confirm button to register the new setting.
28
 Loading...