


|
15 |
16 |
17 |
18 |
19 |
1 |
2 |
3 |
|
|
|
|
|
|
|
|
|
14
7 6
8
|
12 |
20 |
13 |
21 |
|
|
24 |
22 |
23 |
9 |
|
11 |
25 |
10 |
32 |
26 |
|
|
|
31
29 30
4 |
GETTING READY TO SEW |
|
|
|
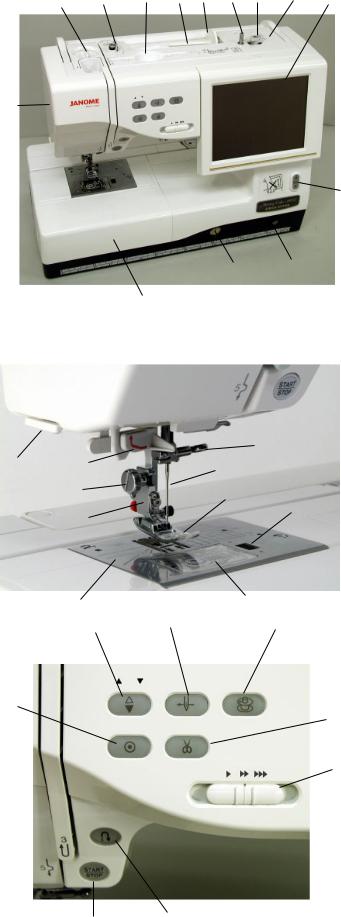
Names of Parts |
1Bobbin winder spindle
2Bobbin winder stopper
3Bobbin thread cutter
4Visual touch screen
5Screen up/down button
6Knee lifter socket
7Feed balancing dial
8Extension table (accessory storage)
9Hook cover release button
510 Hook cover plate
11 Needle plate
12 Automatic needle threader
13 Thread cutter/holder
14 Face plate
15 Foot pressure dial
16 Bobbin winding thread guide
17 Stylus holder (for the touch panel stylus)
18 Spool pin
19 Spool holder
20 Needle clamp screw
21 Needle
22 Zigzag foot A
23 Foot holder
24 Thumbscrew
25 Auto needle threader button
26 Bobbin winding button
27 Thread cutter button
28 Speed control slider
29 Start/stop button
30 Reverse button
31 Auto-lock button
32 Needle up/down button
27
28
2
1
10
9
2
8
3
7 |
6 |
5 |
4 |
11
12
13
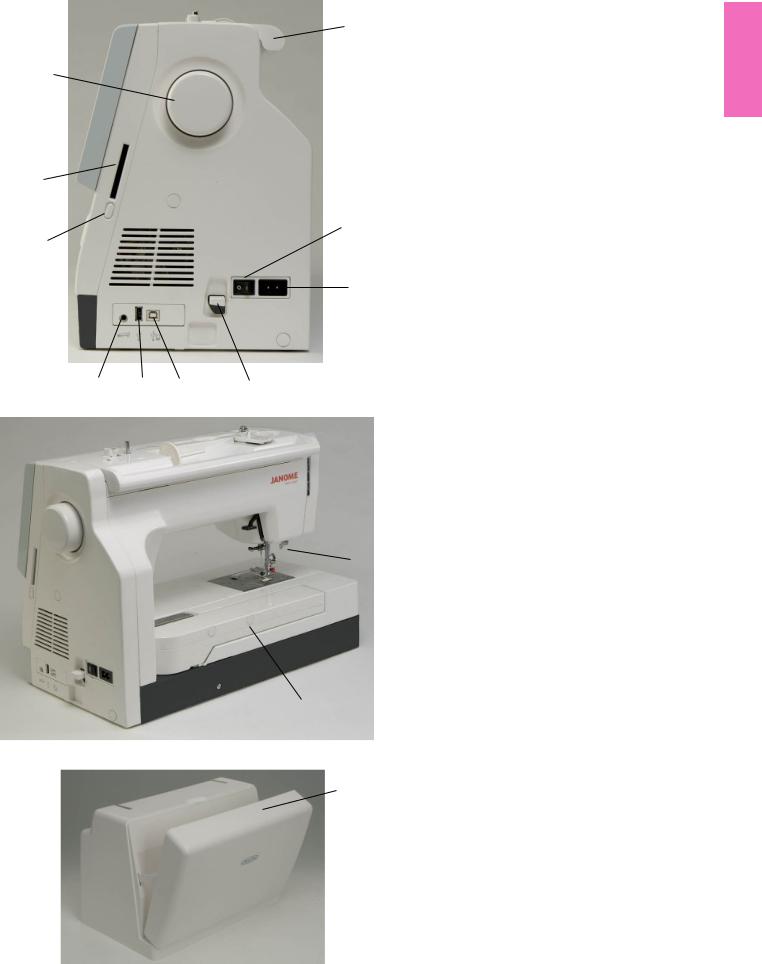
1Carrying handle
2Power switch
3Machine socket
4Carriage release lever
5USB port (for direct PC link)
6USB port (for CD-ROM drive/USB memory key)
7Foot control jack
8Card ejecting button
9Card slot
10Hand wheel
11Buttonhole lever
12Retractable carriage arm
13Hard cover (accessory storage)
3

1 |
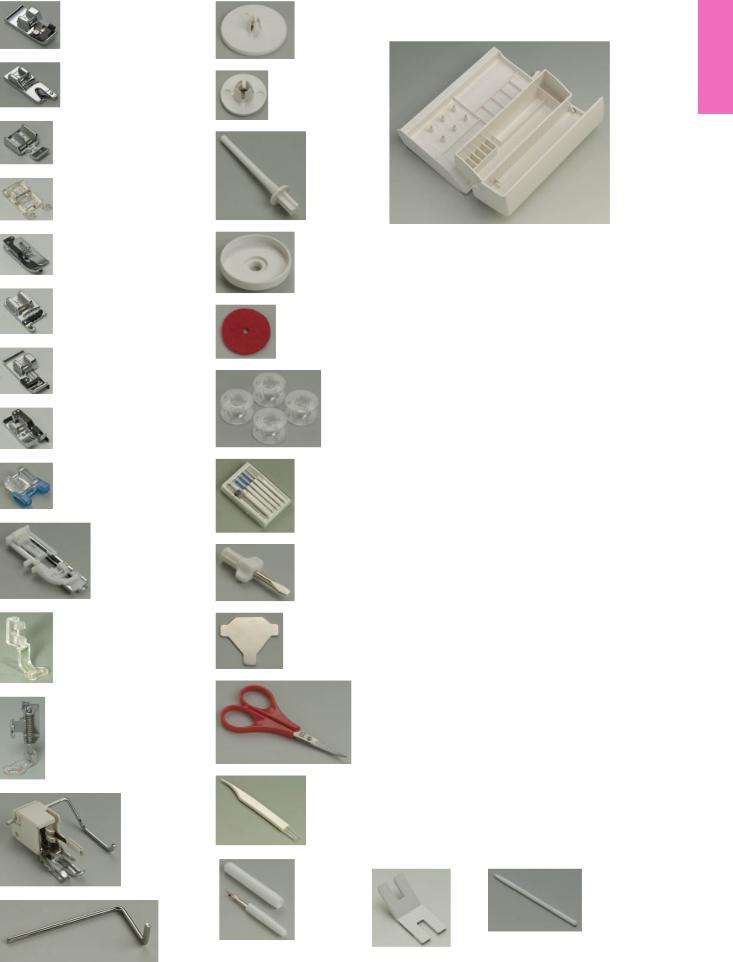
Standard Accessories and Storage |
|
The embroidery hoops, foot control, power supply cord, |
|
knee lifter etc. can be conveniently stored in the hard cover. |
2
3
11
4
12
5
13
9 14
7
6
15
8
10
17
16
1Embroidery hoop-ST (with template)
2Embroidery hoop-SQ (with template)
3Foot control
4Power supply cord
5Knee lifter
6Set of red tip needles
7Bobbin thread for embroidery
8Felts
9Stabilizers
10Template sheets for built-in embroidery designs
11USB cable
12Instruction book
13Key icon reference chart
14Instructional movie DVD
15Handbook CD-ROM
16MC11K Tools CD-ROM (with instruction booklet)
17Cloth guide
18Embroidery hoop-AQ (with template and clamps)
18
4
1
2
3
4
5
6
7
8
9
10
11
12
13
14
15
16
17
18
19
20
21
22
23
24
25
26
The extension table provides a handy compartment for storing various accessories.
1Overcasting foot C
2Rolled hem foot D
3Zipper foot E
4Satin stitch foot F
5Blind hemming foot G
6Cording foot H
7Overedge foot M
81/4” seam foot O
9Button sewing foot T
10Automatic buttonhole foot R
11Embroidery foot P
12Darning foot P-2
13Even feed foot with quilting bar
14Quilting guide bar
15Spool holder (large)
16Spool holder (small)
17Extra spool pin
18Spool supporter
19Felt cushion
20Bobbins
21Set of needles
22Screwdriver
23Screwdriver key
24Scissors
25Lint brush
26Seam ripper (Buttonhole opener)
27Button shank plate
28Touch panel stylus
27 |
28 |
5
1
3
4
2
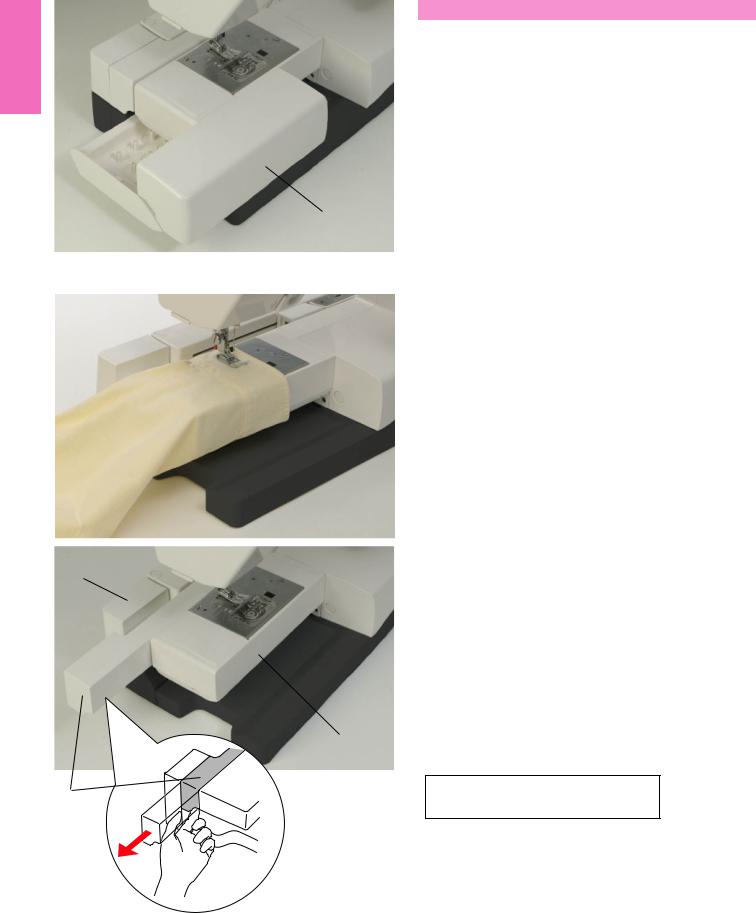
Extension Table
The extension table provides an extended sewing area and can be removed for free arm sewing.
1 Extension table
To detach:
Draw the table out to the left.
To attach:
Slide the table on the base and push the table to the right.
Free arm sewing
Free-arm sewing is used for stitching sleeves, waistbands, pant legs or any other tubular garments.
It is also useful for darning socks or mending knees or elbows.
For free arm sewing
1Return the carriage to the home position (refer to page 67).
2Turn the power switch off.
3Remove the extension table.
4Hook your finger on the bottom of the fillet and draw the fillet out to the left.
2 Fillet
For flat bed sewing
1Return the carriage to the home position.
2Turn the power switch off.
3Insert the fillet and slide it to the right, between the free arm and carriage base.
4Attach the extension table.
3Carriage base
4Free arm
NOTE:
Do not pull or push the carriage base.
6

3
 2
2
1
2 |
1 |
Connecting the Power Supply
First mak sure the power switch is off and then insert the foot control plug into the jack on the machine if you wish to use foot control.
Insert the machine plug of the power supply cord into the machine socket.
Insert the power supply plug into the wall outlet, and turn the power switch on.
1Power switch
2Machine plug
3Machine socket
NOTES:
Make sure to use the power supply cord that came with the machine.
If you turn off the power switch, wait for 5 seconds before turning it on again.
The foot control cannot be used in the embroidery mode.
 WARNING:
While in operation, always keep your eyes on the sewing area, and do not touch any moving parts such as the thread take-up lever, handwheel or needle. Always turn off the power switch and unplug the machine from the power supply:
-when leaving the machine unattended.
-when attaching or removing parts.
-when cleaning the machine.
Do not place anything on the Foot Control.
Operating Instructions:
The symbol “O” on a switch indicates the “off” position of the switch.
For the U.S.A. and Canada only
Polarized plug (one blade wider than the other):
To reduce the risk of electric shock, this plug is intended to fit in a polarized outlet only one way. If it does not fit fully in the outlet, reverse the plug. If it still does not fit, contact a qualified electrician to install the proper outlet. Do not modify the plug in any way.
If you wish to use the foot control, pull out the cord from the foot control and insert the pin connector into the jack on the machine.
1Foot control cord
2Pin connector
Insert the machine plug of the power supply cord into the machine socket.
Insert the power supply plug into the wall outlet, and turn the power switch on.
 CAUTION:
Do not pull the foot control cord beyond the red mark.
7
|
3 |
6 |
7 |
|
|
|
|
4
8
1 |
2 |
5 |
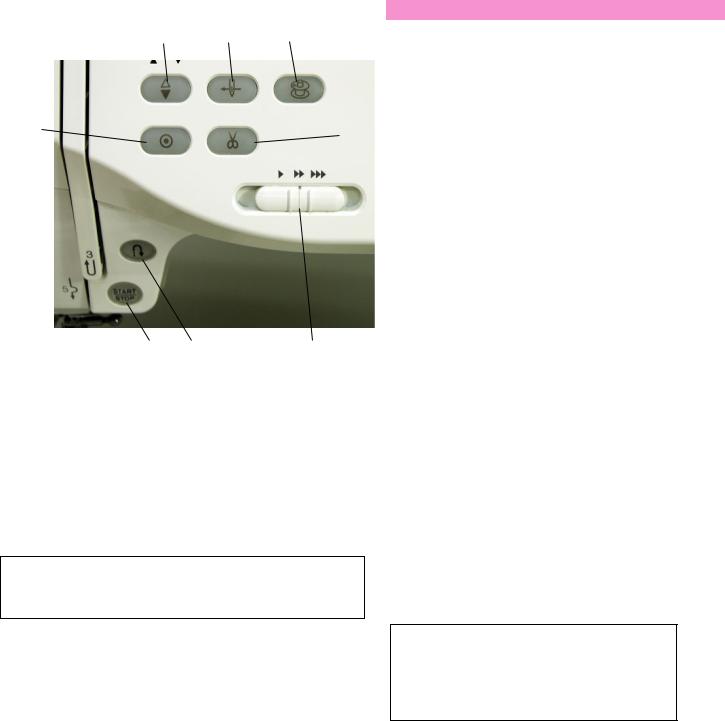
1 Start/stop button
Press this button to start or stop the machine. This button can be used either in the ordinary sewing mode or embroidery mode. In the ordinary sewing mode, the machine starts running slowly for the first few stitches, it then runs at the speed set by the speed control slider. The machine runs slowly as long as this button is pressed.
The button will turn red when the machine is running, and green, that it has been stopped.
NOTE:
The start/stop button cannot be used in the ordinary sewing mode when the foot control is connected to the machine.
2 Reverse button
When sewing stitch pattern U1, U2, U8 or U9, the machine will sew in reverse as long as the reverse button is pressed. If the stitch pattern U1, U2, U8 or U9 has been selected and the foot control is not connected, the machine will start sewing in reverse as long as the reverse button is pressed. If you press the reverse button when sewing any other stitches, the machine will immediately sew locking stitches and automatically stop.
3 Needle up/down button
Press this button to bring the needle bar up or down.
Machine Operating Buttons
4 Auto-lock button
When sewing stitch pattern U1, U2, U8 or U9, the machine will immediately sew locking stitches and automatically stop when the auto-lock button is pressed.
When sewing all other stitches, the machine will sew to the end of the current pattern, sew locking stitches and stop automatically.
The machine will trim the threads automatically after locking the stitch when the auto thread cutting is enabled (refer to page 22).
5 Speed control slider
This slider will set the maximum sewing speed in the ordinary sewing mode (refer to page 9).
6 Auto needle threader button
Press this button and follow the step-by-step instruction displayed on the visual touch screen to thread the needle.
Refer to page 13.
7 Bobbin winding button
Press this button to wind the bobbin. Refer to page 10.
8 Thread cutter button
Press this button after finishing sewing and the machine will trim the threads automatically. Refer to page 28.
NOTES:
The thread cutter button does not function:
-soon after turning on the power.
-when the presser foot is in the up position.
-when being pressed 4 times in a row.
8
 Loading...