


Instruction Book
 D1S
D1S  APC
APC
D2S |
D3S |
Automat icPl ate Converter |
|
MemoryCraft7700QCP

IMPORTANT SAFETY INSTRUCTIONS
This appliance is not intended for use by persons (including children) with reduced physical, sensory or mental capabilities, or lack of experience and knowledge, unless they have been given supervision or instruction concerning use of the appliance by a person responsible for their safety.
Children should be supervised to ensure that they do not play with this sewing machine.
When using an electrical appliance, basic safety precautions should always be followed, including the following:
This sewing machine is designed and manufactured for household use only.
Read all instructions before using this sewing machine.
DANGER— To reduce the risk of electric shock:
1.An appliance should never be left unattended when plugged in. Always unplug this sewing machine from the electric outlet immediately after using and before cleaning.
WARNING— To reduce the risk of burns, fire, electric shock, or injury to persons:
1.Do not allow to be used as a toy. Close attention is necessary when this sewing machine is used by or near children.
2.Use this appliance only for its intended use as described in this owner’s manual.
Use only attachments recommended by the manufacturer as contained in this owner’s manual.
3.Never operate this sewing machine if it has a damaged cord or plug, if it is not working properly, if it has been dropped or damaged, or dropped into water.
Return this sewing machine to the nearest authorized dealer or service center for examination, repair, electrical or mechanical adjustment.
4.Never operate the appliance with any air opening blocked. Keep ventilation openings of this sewing machine and foot controller free from accumulation of lint, dust and loose cloth.
5.Never drop or insert any object into any opening.
6.Do not use outdoors.
7.Do not operate where aerosol (spray) products are being used or where oxygen is being administered.
8.To disconnect, turn all controls to the off (“O”) position, then remove plug from outlet.
9.Do not unplug by pulling on cord. To unplug, grasp the plug, not the cord.
10.Keep fingers away from all moving parts. Special care is required around the sewing machine needle and/or cutting blade.
11.Always use the proper needle plate. The wrong plate can cause the needle to break.
12.Do not use bent needles.
13.Do not pull or push fabric while stitching. It may deflect the needle causing it to break.
14.Switch this sewing machine off (“O”) when making any adjustment in the needle area, such as threading the needle, changing the needle, threading the bobbin or changing the presser foot, and the like.
15.Always unplug this sewing machine from the electrical outlet when removing covers, lubricating, or when making any other adjustments mentioned in this owner’s manual.
SAVE THESE INSTRUCTIONS
The design and specifications are subject to change without a prior notice.
Please note that on disposal, this product must be safely recycled in accordance with relevant National legislation relating to electrical/electronic products. If in doubt please contact your retailer for guidance. (European Union only)
TABLE OF CONTENTS
GETTING READY TO SEW |
|
Names of Parts ......................................................................... |
2 |
Standard Accessories ............................................................... |
3 |
Extension Table ......................................................................... |
4 |
Accessories Storage ................................................................. |
4 |
Connecting the Power Supply ................................................... |
5 |
Controlling Sewing Speed ......................................................... |
6 |
Speed control slider ............................................................... |
6 |
Foot control ............................................................................ |
6 |
Machine Operating Buttons ....................................................... |
7 |
Start/stop button ..................................................................... |
7 |
Reverse button ....................................................................... |
7 |
Auto-lock button ...................................................................... |
7 |
Needle up/down position button ............................................. |
8 |
Thread cutter button ............................................................... |
8 |
Jog dial ................................................................................... |
8 |
Confirm button ........................................................................ |
8 |
Raising and Lowering the Presser Foot .................................... |
9 |
Knee Lifter ................................................................................. |
9 |
Function Keys .......................................................................... |
10 |
Changing the Presser Foot ..................................................... |
11 |
Removing and attaching the Foot Holder ................................ |
11 |
Setting for Dual Feed Sewing ................................................. |
12 |
Attaching the dual feed foot ................................................. |
12 |
Setting the dual feed device ................................................. |
12 |
Disengaging the dual feed device ........................................ |
13 |
Removing the dual feed foot ................................................ |
13 |
Setting the Spool of Thread .................................................... |
14 |
Extra spool pin ..................................................................... |
14 |
Removing the Bobbin .............................................................. |
14 |
Winding the Bobbin ................................................................. |
15 |
Inserting the Bobbin ................................................................ |
16 |
Threading the Machine ........................................................... |
17 |
Built-in needle threader ........................................................ |
18 |
Drawing up the Bobbin Thread ................................................ |
19 |
Changing Needles .................................................................. |
20 |
Balancing Thread Tension ....................................................... |
21 |
Balanced thread tension ...................................................... |
21 |
Manual thread tension adjustment ....................................... |
21 |
Adjusting the Foot Pressure .................................................... |
22 |
Dropping the Feed Dog ........................................................... |
22 |
Selecting Patterns ................................................................... |
23 |
Help key ............................................................................... |
24 |
Customizing Machine Settings ................................................ |
25 |
Screen brightness ................................................................ |
25 |
Buzzer sound ....................................................................... |
25 |
Sub window display time ...................................................... |
26 |
Resumption setting .............................................................. |
26 |
Favorite stitch adjustment ..................................................... |
26 |
Touch panel calibration......................................................... |
27 |
Language selection .............................................................. |
28 |
Deleting stored pattern combinations ................................... |
28 |
Resetting all to default .......................................................... |
28 |
UTILITY STITCHES |
|
Straight Stitch .......................................................................... |
29 |
Starting to sew ..................................................................... |
29 |
Sewing from the edge of thick fabric .................................... |
29 |
Changing sewing direction ................................................... |
29 |
Securing seams ................................................................... |
30 |
Using the Seam Guides .......................................................... |
30 |
Turning a square corner ....................................................... |
30 |
Assembling the Extra Wide Table ........................................... |
31 |
Using the Cloth Guide ............................................................. |
31 |
Adjusting the needle drop position ....................................... |
32 |
Adjusting the stitch length .................................................... |
32 |
Customizing preset values of stitch length and width ........... |
33 |
Restoring the default settings ............................................... |
33 |
Automatic plate converter ..................................................... |
34 |
Opening the automatic plate converter ................................ |
35 |
Variety of straight stitches .................................................... |
36 |
Sewing with the Dual Feed Device .......................................... |
38 |
Basting .................................................................................... |
39 |
Zigzag Stitch ........................................................................... |
40 |
Adjusting the stitch width ...................................................... |
40 |
Adjusting the stitch length .................................................... |
40 |
Overcasting stitches ................................................................ |
41 |
Zipper Sewing ......................................................................... |
43 |
Rolled Hem ............................................................................. |
46 |
Blind Hemming ........................................................................ |
47 |
Shell Tuck................................................................................ |
49 |
Buttonholes ............................................................................. |
50 |
Square (Sensor) buttonhole ................................................. |
51 |
Corded buttonhole ................................................................ |
54 |
Adjusting the buttonhole width ............................................. |
55 |
Adjusting the buttonhole stitch density ................................. |
55 |
Memory buttonhole .............................................................. |
56 |
Round end and fine fabric buttonholes ................................. |
57 |
Keyhole buttonholes ............................................................. |
57 |
Stretch buttonholes .............................................................. |
58 |
Button Sewing ......................................................................... |
59 |
Darning ................................................................................... |
60 |
Tacking .................................................................................... |
62 |
Eyelet ...................................................................................... |
63 |
PATCHWORK AND QUILTING |
|
Patchwork Piecing ................................................................... |
64 |
Patchwork Stitches .................................................................. |
64 |
Quilting .................................................................................... |
65 |
Clasp Stitch ............................................................................. |
65 |
Free-motion Quilting ................................................................ |
66 |
DECORATIVE STITCHES |
|
Applique .................................................................................. |
67 |
Smocking ................................................................................ |
67 |
Fagoting .................................................................................. |
68 |
Scallop .................................................................................... |
68 |
Cording (3-strand cording) ...................................................... |
69 |
Cording (1-strand cording) ...................................................... |
69 |
Satin Stitches .......................................................................... |
70 |
Sewing Border Designs with the Border Guide Foot ............... |
70 |
Sewing a Mirror Images of a Pattern ....................................... |
71 |
Sewing a Single Unit of a Pattern ........................................... |
71 |
Twin Needle Sewing ................................................................ |
72 |
PROGRAMMING A PATTERN COMBINATION |
|
Pattern Combination ............................................................... |
74 |
Pattern Combination with a Mirror Image ................................ |
75 |
Programming Automatic Thread Cutting ................................. |
76 |
Checking Properties of a Pattern Combination ....................... |
76 |
Sewing the Pattern Combination from the Beginning ............. |
77 |
Sewing the Current Pattern from the Beginning ...................... |
77 |
Bridge Stitches ........................................................................ |
78 |
Programming French Knots .................................................... |
79 |
MONOGRAMMING |
|
Selecting a Letter Style ........................................................... |
80 |
Selecting a Character .............................................................. |
80 |
Programming a Monogram ..................................................... |
81 |
EDITING A PTTERN COMBINATION |
|
Viewing a Long Combination .................................................. |
82 |
Deleting Patterns or Characters .............................................. |
82 |
Inserting a Pattern ................................................................... |
83 |
Duplicating a Pattern ............................................................... |
83 |
Uniform Stitch Adjustment ....................................................... |
84 |
Unified needle drop position ................................................. |
84 |
Programming Satin Stitches and Stretch Stitches .................. |
85 |
Individual Stitch Adjustment .................................................... |
85 |
STORING AND RECALLING A PATTERN COMBINATION |
|
Storing a Pattern Combination ................................................ |
86 |
Overwriting a Stored Combination .......................................... |
86 |
Recalling a Stored Combination ............................................. |
87 |
Deleting a Stored Combination ............................................... |
87 |
CARE AND MAINTENANCE |
|
Correcting Distorted Stitch Patterns ........................................ |
88 |
Cleaning the Hook Race, Feed Dog and Thread Cutter |
|
Mechanism ........................................................................... |
89 |
Reattaching the Bobbin Holder and Needle Plate .................. |
89 |
Problems and Warning Signals ............................................... |
90 |
Troubleshooting ....................................................................... |
92 |
1
|
4 |
|
|
5 |
|
|
|
|
|
3 |
|
|
|
|
2 |
|
|
|
6 |
|
|
|
7 |
|
|
|
|
|
|
1 |
|
|
|
|
12 |
11 |
10 |
9 |
8 |
14
13
22
24 23
25
43
26
34
33
32
45
35
42
41
40
15
16
 44
44
17
46
18
19
20
21
27
28
29
30
31
36
37
38
39
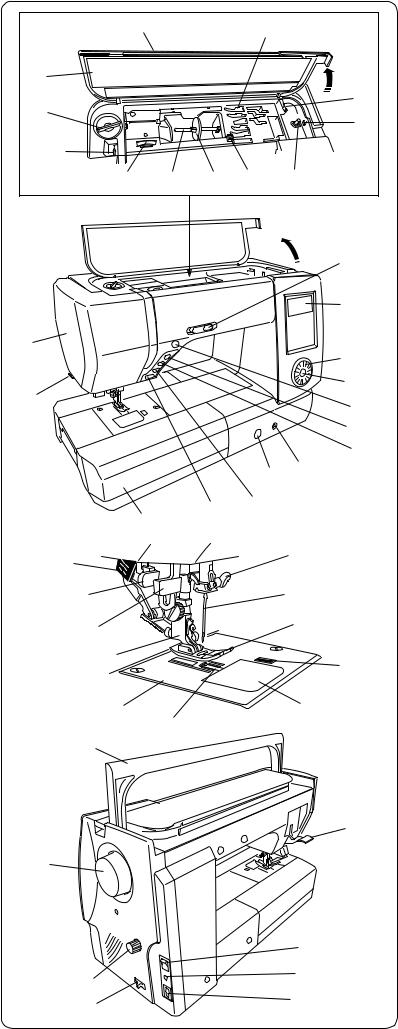
GETTING READY TO SEW
Names of Parts
1Take-up lever
2Foot pressure dial
3Reference chart
4Top cover
5Foot storage compartment
6Bobbin thread cutter
7Bobbin winder stopper
8Bobbin winder spindle
9Hole for extra spool pin
10Spool holder
11Spool pin
12Thread tension dial
13Thread cutter
14Face plate
15Speed control slider
16LCD screen
17Jog dial
18Thread cutter button
19Needle up/down position button
20Auto-lock button
21Knee lifter socket
22Feed balancing dial
23Reverse button
24Start/stop button
25Extension table (accessory storage)
26Buttonhole lever
27Needle clamp screw
28Needle
29Zigzag foot A
30Hook cover release button
31Hook cover plate
32Needle plate
33Foot holder
34Built-in needle threader
35Carrying handle
36Presser foot lifter
37Power switch
38Foot control jack
39Machine socket
40Drop feed lever
41Dual feed balancing dial
42Hand wheel
43Dual feed device
44Touch panel
45Automatic plate converter
46Confirm button
2
1 |
2 |
3 |
4 |
5 |
6 |
7 |
8 |
9 |
10 |
11 |
12 |
|
|||
13 |
14 |
15 |
16 |
|
|
17 |
18 |
19 |
20 |
21 |
22 |
23 |
24 |
|
25 |
26 |
|
27 |
||
|
28 
29
30 31
32 |
33 |
34 |
35 |
36 |
37 |
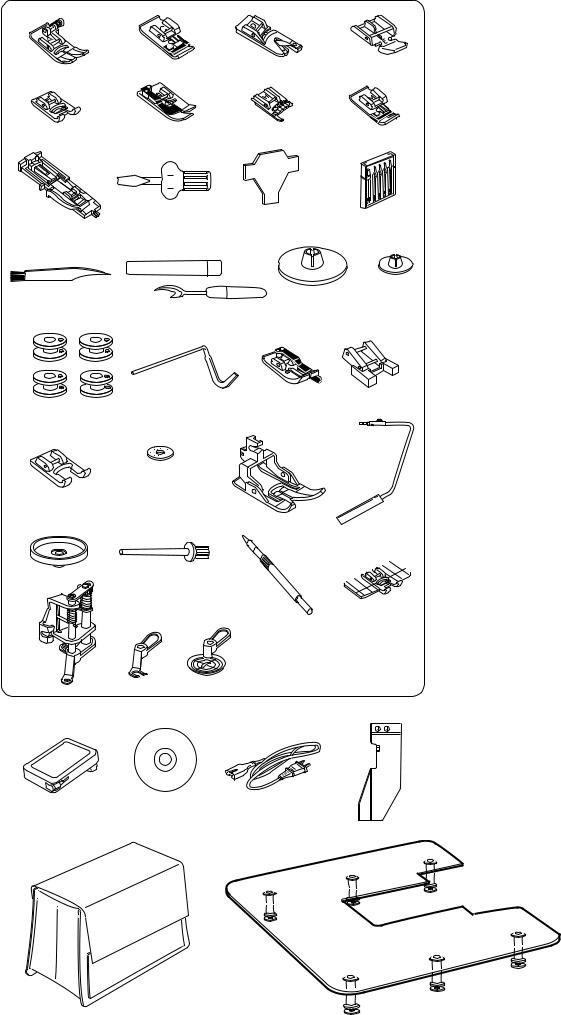
Standard Accessories
1Zigzag foot A (set on the machine)
2Overcasting foot C
3Rolled hem foot D
4Zipper foot E
5Satin stitch foot F
6Blind hemming foot G
7Cording foot H
8Overedge foot M
9Automatic buttonhole foot R
10Screwdriver
11Screwdriver key
12Set of needles
13Lint brush
14Seam ripper (Buttonhole opener)
15Spool holder (large, set on the machine)
16Spool holder (small)
17Bobbins
18Quilting guide bar
191/4” seam foot O
20Button sewing foot T
21Open toe satin stitch foot F2
22Felt cushion
23Dual feed foot AD
24Knee lifter
25Spool supporter
26Extra spool pin
27Touch panel stylus
28Border guide foot
29Convertible free motion quilting foot QB- H
30Open-toe foot
31Clear view foot
32Foot control
33Instructional video DVD
34Power cable
35Cloth guide
36Semi-hard fabric cover
37Extra wide table
3

|
Extension Table |
|
The extension table provides an extended sewing area |
|
and can be removed for free arm sewing. |
|
1 Extension table |
|
To detach: |
|
Draw the table out to the left. |
1 |
To attach: |
|
Slide the table on the base and push the table to the |
|
right. |
Free-arm sewing
Free-arm sewing is used for stitching sleeves, waistbands, pant legs or any other tubular garments.
It is also useful for darning socks or mending knees or elbows.
3
2
1
9
19 |
10 |
|
15
18 |
16 |
|
17 |
||
|
Accessories Storage
4
The accessories can be conveniently stored in the foot
5
storage compartment under the top cover and in the extension table.
|
|
6 |
|
|
|
Under the top cover |
|
|
|
1 |
Zipper foot E |
|
|
2 |
Overcasting foot C |
|
|
3 |
Zigzag foot A |
|
7 |
4 |
Clear view foot |
|
5 |
Open-toe foot |
|
8 |
|
||
|
6 |
Convertible free motion quilting foot QB-H |
|
|
|
||
7Satin stitch foot F
8Blind hemming foot G
9Touch panel stylus
|
|
In the extension table |
|
11 |
12 |
10 |
Rolled hem foot D |
|
|
11 |
Overedge foot M |
121/4” seam foot O
13Button sewing foot T
14Cording foot H
15Bobbins
16Screwdriver key
13 |
17 |
Dual feed foot AD |
|
18 |
Automatic buttonhole foot R |
|
19 |
Rear compartment |
14
NOTE:
Other accessories can be stored in the rear compartment.
4
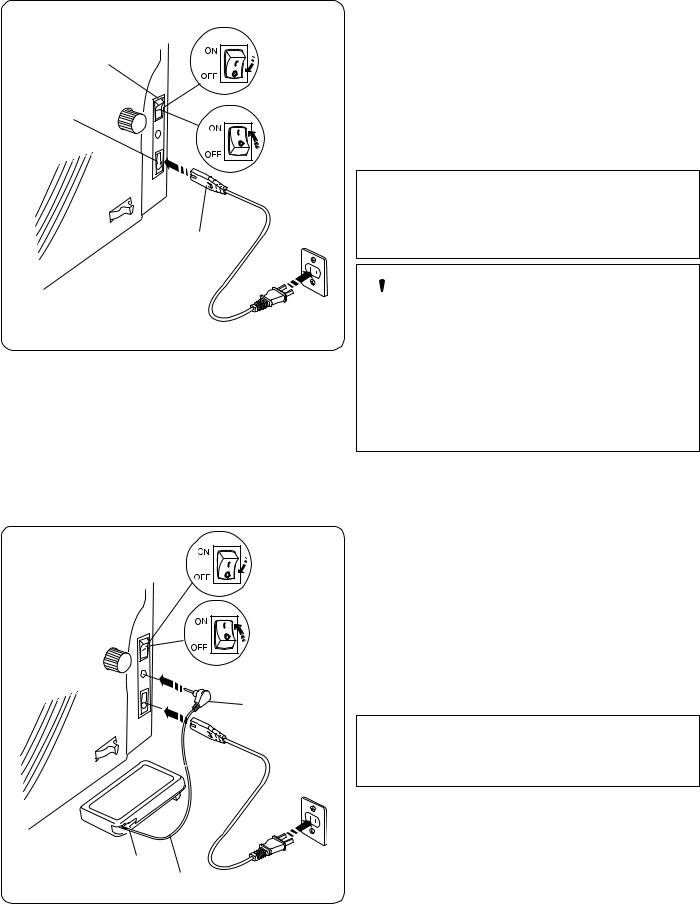
Connecting the Power Supply
|
|
First make sure the power switch is off. |
|
|
1 |
Insert the machine plug of the power supply cord into the |
|
|
machine socket. |
||
|
|
||
|
|
Insert the power supply plug into the wall outlet, and turn |
|
3 |
|
the power switch on. |
|
|
1 |
Power switch |
|
|
|
||
|
|
2 |
Machine plug |
|
|
3 |
Machine socket |
|
NOTES: |
|
|
Make sure to use the power supply cord that came with |
|
|
the machine. |
|
2 |
If you turn off the power switch, wait for 5 seconds before |
|
turning it on again. |
||
|
 WARNING:
While in operation, always keep your eyes on the sewing area, and do not touch any moving parts such as the thread take-up lever, handwheel or needle.
Always turn off the power switch and unplug the machine from the power supply:
-when leaving the machine unattended.
-when attaching or removing parts.
-when cleaning the machine.
Do not place anything on the foot control.
If you wish to use the foot control, pull out the cord from
the foot control and insert the pin connector into the jack
on the machine.
1 Foot control cord
2 Pin connector
Insert the machine plug of the power supply cord into the machine socket.
Insert the power supply plug into the wall outlet, and turn
the power switch on.
2
3
1
 CAUTION:
Do not pull the foot control cord beyond the red mark. 3 Red mark
Operating Instructions:
The symbol “O” on a switch indicates the “off” position of the switch.
For the U.S.A. and Canada only
Polarized plug (one blade wider than the other):
To reduce the risk of electric shock, this plug is intended to fit in a polarized outlet only one way. If it does not fit fully in the outlet, reverse the plug. If it still does not fit, contact a qualified electrician to install the proper outlet. Do not modify the plug in any way.
5
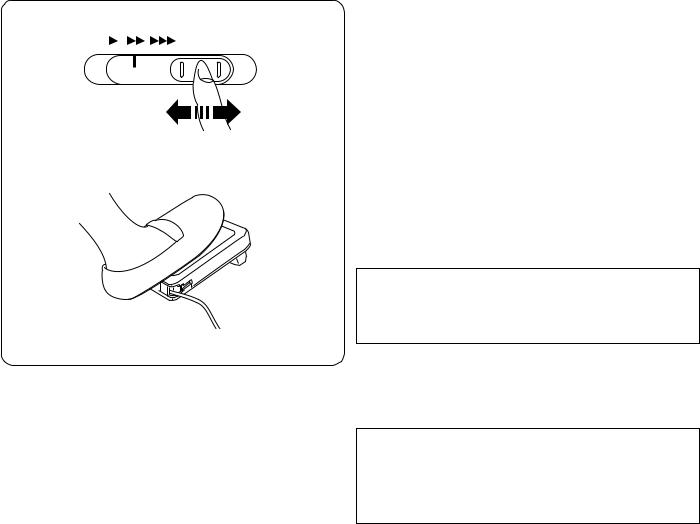
Controlling Sewing Speed
Speed control slider
You can limit the maximum sewing speed with the speed control slider according to your sewing needs.
To increase the sewing speed, move the slider to the right. To decrease the sewing speed, move the slider to the left.
Foot control
Pressing on the foot control can vary sewing speed. The harder you press the foot control, the faster the machine runs.
NOTE:
The machine runs at the maximum speed set by the speed control slider when the foot control is fully depressed.
Operating Instructions:
Foot control model 21371 is for use with this sewing machine.
NOTE:
This machine is equipped with an automatic shutdown safety feature to prevent overheating whenever the machine is running overloaded. Follow the safety instructions that appear on the LCD screen.
6
3
2
1
(A)
(B)
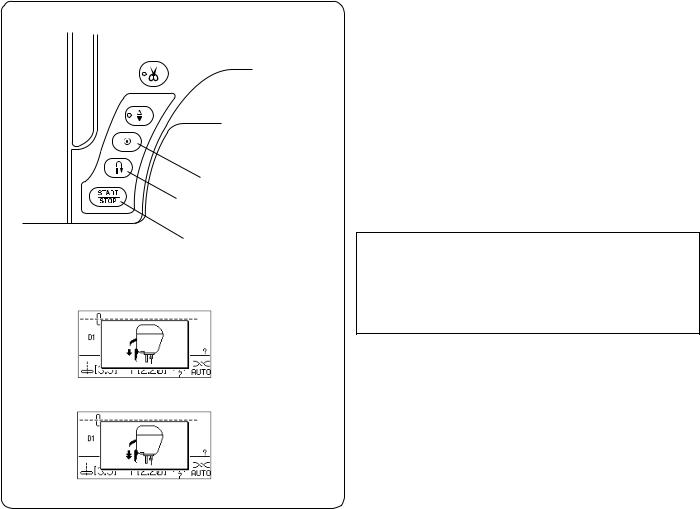
Machine Operating Buttons
1 Start/stop button
Press this button to start or stop the machine. The machine starts running slowly for the first few stitches, it then runs at the speed set by the speed
control slider. The machine runs slowly as long as this button is pressed.
The button will turn red when the machine is running, and green when it has been stopped.
Pressing and holding this button while sewing will slow down the sewing speed and the machine will stop when the button is released.
NOTE:
The start/stop button cannot be used when the foot control is connected to the machine.
The machine will not start if the presser foot is up and the LCD screen shows message (A) or (B).
Lower the presser foot and start the machine.
2 Reverse button
When sewing pattern number D1S, D1, D4, 9-11, 93 or 151-154 the machine will sew in reverse as long as the reverse button is pressed.
If you press the reverse button when sewing any other patterns, the machine will immediately sew locking stitches and automatically stop.
When the foot control is not connected and pattern D1S, D1, D4, 9-11, 93 or 151-154 is selected, the machine will sew in reverse at the slowest speed as long as the reverse button is pressed.
3 Auto-lock button
When sewing pattern number D1S, D1, D4, 9-11, 93 or 151-156, the machine will immediately sew locking stitches and automatically stop when the auto-lock button is pressed.
When sewing all other patterns, the machine will sew to the end of the current pattern, sew locking stitches and stop automatically.
7
LED signal
5
4
6
7
4 Needle up/down position button
Press this button to bring the needle bar up or down. The machine will stop with the needle up or down depending on the position set by this button.
The LED signal is turned on when the down position is selected.
NOTE:
The machine will always stop with the needle up after sewing buttonholes, darning and monograms.
If you press the up/down needle position button when the presser foot is at the extra lifted position, the LCD screen will advise you to lower the foot.
5 Thread cutter button
Press this button after finishing sewing and the machine will trim the threads automatically.
The LED signal blinks while cutting threads.
NOTES:
Use the thread cutter on the face plate when cutting specialized threads or threads #30 or thicker.
Clean the auto thread cutter mechanism regularly to avoid malfunction due to built up lint.
Avoid using a paper-cored spools with the auto thread cutter. When nearly empty, they may not unwind smoothly and cause the thread to bunch up or slip when using the auto thread cutter (refer to page 10).
Do not pull the fabric if auto thread cutting fails and the thread tangles. Turn the power switch off and remove the needle plate to remove the tangled threads (refer to page 89).
6 Jog dial
The jog dial is used for selecting stitch patterns, characters and certain settings.
Turn the jog dial clockwise or counterclockwise with your fingertip to browse patterns or settings.
7 Confirm button
Press the confirm button to select the desired pattern or settings.
8
2
1
Raising and Lowering the Presser Foot
The presser foot lifter raises and lowers the presser foot. 1 Presser foot lifter
1
You can raise the presser foot higher than the normal up position. This allows for setting the dual feed device,
attaching presser foot, and also helps you to place thick
layers of fabrics under the foot. 2 Extra lifted position
NOTE:
Do not turn the hand wheel of press the up/down needle position button when the presser foot is in the extra lifted position.
2Knee Lifter
The knee lifter is extremely helpful when sewing
patchwork, quilting etc, since it allows you to handle the fabric while your knee controls the presser foot.
Attaching the knee lifter
Match the ribs on the knee lifter with the notches in the knee lifter socket and insert the knee lifter.
1
1 Knee lifter
2 Knee lifter socket
1 |
Adjusting the knee lifter |
The angle of the knee lifter can be adjusted to fit you. Loosen the setscrew and slide the angle bar in or out to
3 adjust the angle of the knee lifter.
Tighten the setscrew to secure the angle bar. 3 Setscrew
4 Angle bar
|
Using the knee lifter |
|
4 |
Push the knee lifter with your knee to easily move the |
|
presser foot up and down. |
||
|
||
|
You can control how high the foot rises by the amount of |
|
|
knee pressure you exert. |
NOTE:
Do not touch the knee lifter while stitching, otherwise the fabric will not be fed smoothly.
9

Function Keys
15
16
14
12
11
9 |
|
13 |
10 |
|
6 |
|
|
|
4 |
|
8 |
|
|
|
5 |
|
7 |
|
|
|
1 |
2 |
3 |
1 Mode key (refer to page 23)
Press this key to open the group selection window.
2 Monogram key (refer to page 80)
Press this key to select one of 3 letter styles available.
3 Direct pattern selection keys (refer to page 34)
8 Set key (refer to page 25)
Press this key to open the machine setting window for customizing the machine settings.
9 Twin needle key (refer to page 72)
Press this key when sewing with a twin needle.
Press one of 3 keys to select a straight stitch pattern using automatic plate converter.
4 Memory recall key (refer to page 86)
10 Elongation key (refer to page 70)
Press this key to elongate satin stitch patterns.
11 Mirror image key (refer to pages 71, 75)
Press this button to register or recall programmed pattern combinations.
This button is also used to customize the default settings of stitch length and width.
5 Auto thread cutter key (refer to page 76)
Press this key to sew a mirror image of the selected pattern.
12 Help key (refer to page 24)
Press this key to view information on the selected pattern.
Press this key before sewing, if you wish to cut the |
13 Memory key (refer to pages 71, 75) |
threads automatically after finishing sewing with a locking |
Press this key to memorize the selected pattern. |
stitch. |
Up to 50 patterns can be memorized. |
When programming a pattern combination, press this key |
|
after the last programmed pattern to cut the threads |
14 Stitch width adjusting key (refer to pages 32, 40, 55) |
automatically after finishing sewing. |
Press this key to alter the stitch width. |
The LED signal on the thread cutter button (refer to page |
|
8) will turn on when the auto thread cutter key is pressed. |
15 Stitch length adjusting key (refer to pages 32, 40, 55) |
|
Press this key to alter the stitch length. |
6 Locking stitch key (refer to page 71) |
|
Press this key after the last memorized pattern.
The machine will automatically lock the stitch off and then stop when finishing sewing.
7 Clear key (refer to page 82)
Press this key to delete the last memorized pattern. Press and hold this key until the buzzer sounds to delete the whole pattern combination.
16 Edit key (refer to page 82)
Press this key to edit the programmed pattern combinations.
10
2
3
1
|
5 |
4 |
6 |
|
2
1
3
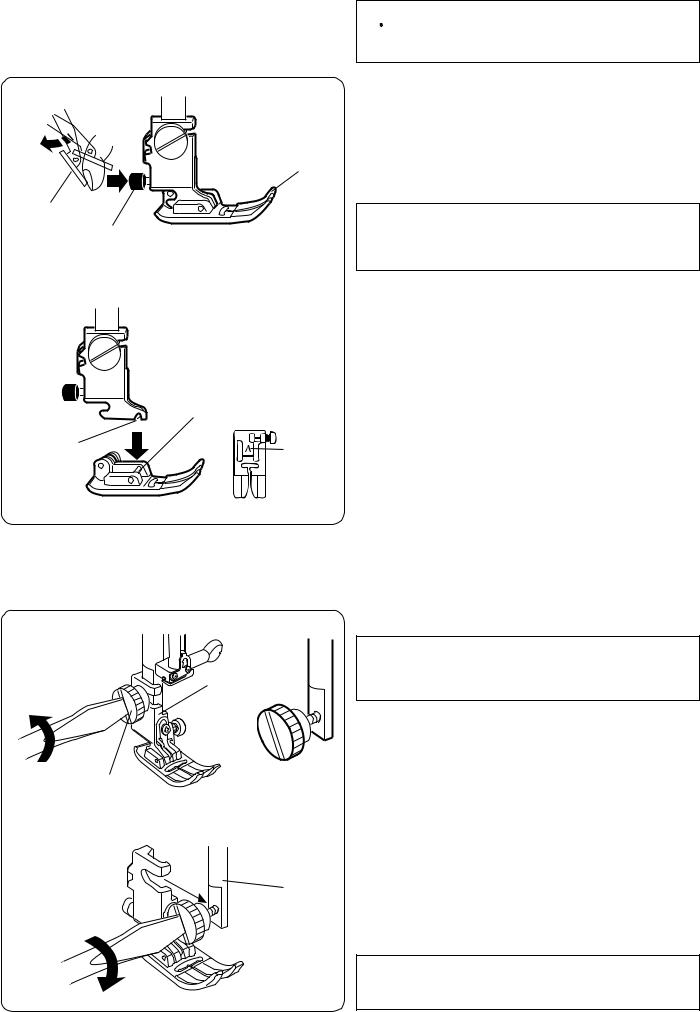
Changing the Presser Foot
 WARNING:
Turn the power switch off before changing the presser foot.
Removing the presser foot
Raise the needle to its highest position and raise the presser foot lifter.
Press the red button on the back of the foot holder. The presser foot will drop off.
1Red button
2Presser foot
NOTE:
If the dual feed device interferes when pressing the red button, shift the dual feed device away.
3 Dual feed device
Attaching the presser foot
Place the presser foot so that the pin on the foot lies just under the groove of the foot holder.
Lower the presser bar to lock the foot in place. Each foot is marked with an identification letter.
4Groove
5Presser foot
6Identification letter
Removing and Attaching the Foot Holder
 WARNING:
Turn the power switch off before removing or attaching the foot holder.
Remove the needle for easy operation.
Removing the foot holder
Raise the presser foot and loosen the thumbscrew. Remove the foot holder.
1Thumbscrew
2Foot holder
Attaching the foot holder
Attach the foot holder to the presser bar from the rear. Tighten the thumbscrew securely with the screwdriver.
3 Presser bar
Attach the needle after installation of the foot holder.
NOTE:
Lower the presser foot when loosening and tightening the thumbscrew if it is hard to access.
11
z 1
x |
2 |
c |
4 |
|
|
|
3 |
z1
x
2
c
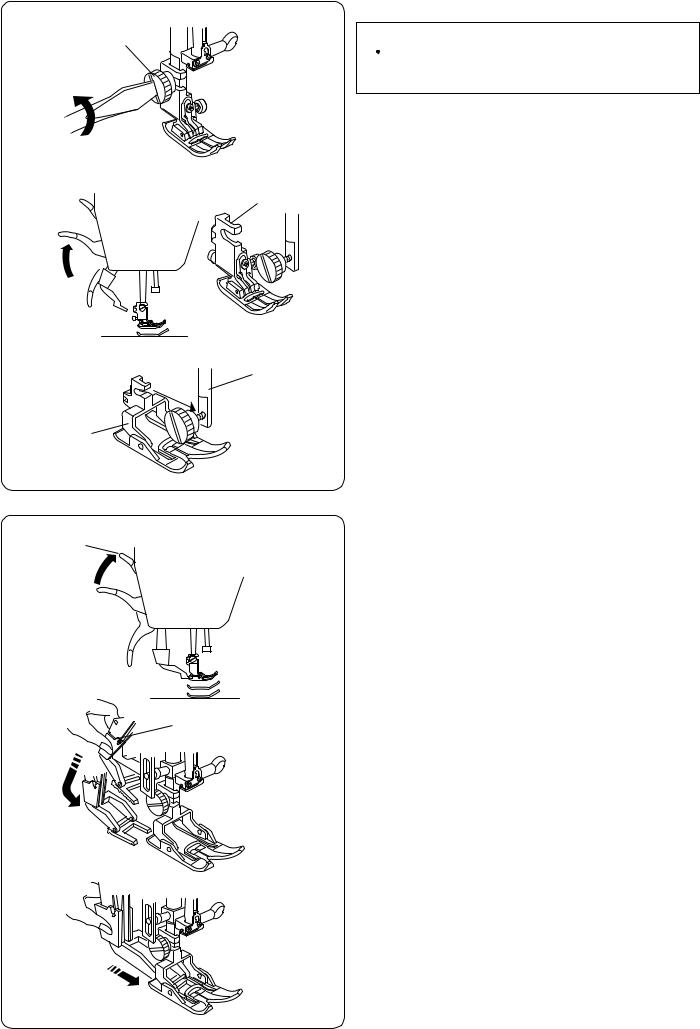
Setting for Dual Feed Sewing
 WARNING:
Turn the power switch off before changing the presser foot.
Attach the dual feed foot when sewing with the dual feed device.
Attaching the dual feed foot
zRemove the needle and loosen the thumbscrew with the screwdriver.
1 Thumbscrew
xRaise the presser foot and loosen the thumbscrew to remove the foot holder .
2 Foot holder
cAttach the dual feed foot to the presser bar and tighten the thumbscrew lightly. Lower the presser foot and tighten the thumbscrew securely with the screwdriver.
3 Dual feed foot
4 Presser bar
Setting the dual feed device
z Raise the presser foot lifter to the extra lifted position. 1 Extra lifted position
x Hold the dual feed device and lower it slowly. 2 Dual feed device
cSwing the dual feed device forward to the underside of the dual feed foot until they engage.
12

z
1
2
x
c
3
z
1
x
|
2 |
c |
4 |
|
3
Disengaging the dual feed device
zRaise the presser foot lifter to the extra lifted position.
1 Extra lifted position
xPull down the dual feed device to disengage it from the dual feed foot. Swing the dual feed device to the rear.
2 Dual feed device
cSwing up the dual feed device until it catches the pins.
3 Pin
Removing the dual feed foot
z Loosen the thumbscrew with the screwdriver. 1 Thumbscrew
xRaise the presser foot and loosen the thumbscrew to remove the dual feed foot.
2 Dual feed foot
cAttach the foot holder to the presser bar and tighten the thumbscrew lightly. Lower the presser foot and tighten the thumbscrew securely with the screwdriver.
3 Foot holder
4 Presser bar
13

Setting the Spool of Thread
|
|
Lift up the spool pin. Place the spool of thread on the |
|
|
|
spool pin with the thread coming off the spool as shown. |
|
|
|
Attach the large spool holder, and press it firmly against |
|
|
|
the spool of thread. |
|
1 |
|
1 |
Large spool holder |
|
|
|
|
|
|
NOTE: |
|
|
|
Use the small spool holder to hold narrow or small spools |
|
|
|
of thread. |
|
|
|
2 |
Small spool holder |
2 |
|
|
|
|
|
Extra spool pin |
|
|
|
Use the extra spool pin when you need to wind a bobbin |
|
|
|
without unthreading the machine while working on a |
|
|
|
sewing project. |
|
|
|
Insert the extra spool pin into the spool supporter and |
|
6 |
|
then into the hole beside the horizontal spool pin. |
|
|
Place the felt cushion on the spool pin and place a spool |
||
|
|
of thread on it as shown. |
|
3 |
|
3 |
Extra spool pin |
|
4 |
Spool supporter |
|
|
4 |
5 |
Hole for extra spool pin |
|
6 |
Felt cushion |
|
|
|
||
5 |
|
NOTE: |
|
|
|
|
|
|
|
The extra spool pin is also used for twin needle sewing. |
|
Removing the Bobbin
1 |
Slide the hook cover release button to the right, and |
|
|
remove the hook cover plate. |
|
|
1 |
Hook cover release button |
|
2 |
Hook cover plate |
2
3 |
Lift out the bobbin from the bobbin holder. |
|
3 Bobbin |
NOTE:
Use the Janome plastic bobbins for horizontal hook (marked with “J”). Using other bobbins, such as pre-wound paper bobbins, may cause stitching problems and/ or damage to the bobbin holder.
14

z
1
x
3
2 
c 4
v
5
b
Winding the Bobbin
zPull the thread from the spool.
Hold the thread with both hands and pass the thread into the guide slot.
1 Guide slot
xDraw the thread to the left and forward around the thread guide.
Draw the thread to the rear and to the right around under the guide plate.
Firmly pull the thread to the right while holding it with both hands.
2 Thread guide
3 Guide plate
cPass the thread through the hole in the bobbin from the inside to the outside.
Put the bobbin on the bobbin winder spindle. Push the bobbin to the right.
4 Hole
vHold the free end of the thread in your hand and start the machine.
Stop the machine when the bobbin has wound several layers, and cut the thread close to the hole in the bobbin.
NOTE:
Set the speed control slider at the fastest position.
bStart the machine again.
Stop the machine when the bobbin is fully wound and stops spinning.
Return the bobbin winder spindle to its original position. Remove the bobbin and cut the thread with the thread cutter.
5 Thread cutter
NOTE:
For safety purposes, the machine will automatically stop 2 minutes after starting bobbin winding.
15
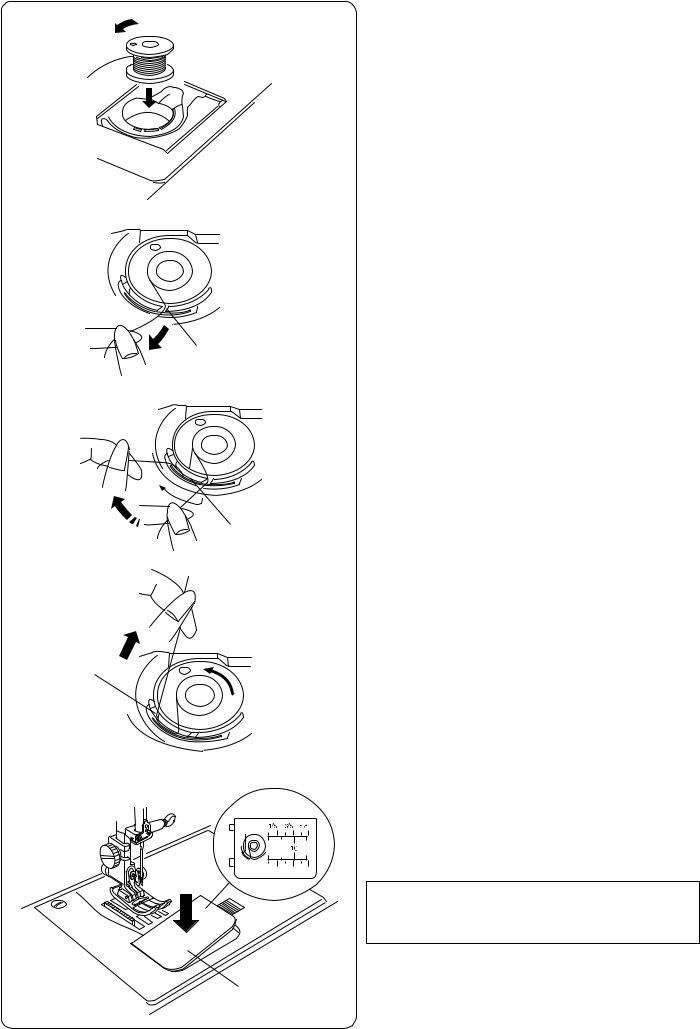
|
Inserting the Bobbin |
z |
z Place the bobbin in the bobbin holder with the |
|
thread running off counterclockwise. |
x |
x Guide the thread into the front notch on the bobbin |
|
holder. |
||
|
||
|
1 Front notch |
|
1 |
c |
c Draw the thread to the left, sliding it between the |
|
tension spring blades. |
|
2 Tension spring blades |
2
v
3
b
vContinue to draw the thread lightly until the thread slips into the side notch.
3 Side notch
bPull out about 10 cm (4") of thread to the rear. Reattach the hook cover plate.
4 Hook cover plate
NOTE:
The threading chart is shown on the hook cover plate for your reference.
4
16
x
z
v
n

 b c m
b c m
z x
1
2
3
c
6
4
|
5 |
v |
7 |
|
b n
8
9
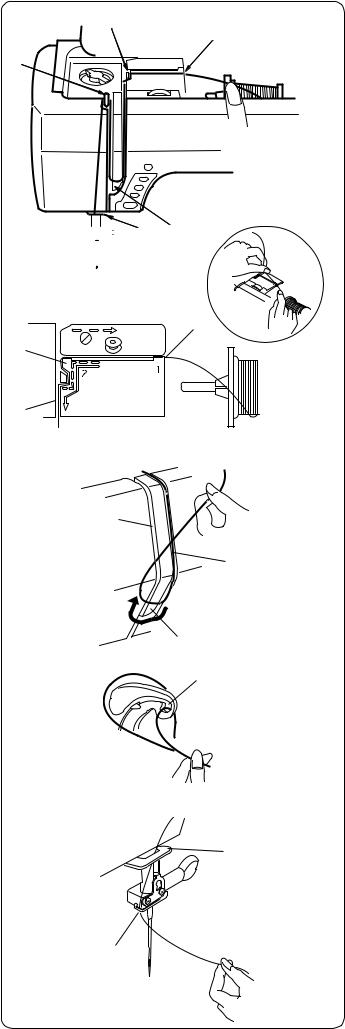
Threading the Machine
Raise the presser foot. Press the needle up/down position button twice to raise the needle.
Turn the power switch off.
Pass the thread in order from z to m.
z Hold the thread with both hands and pass the thread into the guide slot.
1 Guide slot
xDraw the thread to the left and around the corner of the guide toward you.
Pull the thread along the channel.
2Corner of the guide
3Channel
cDraw the thread down along the right channel and around the bottom of the thread guide plate.
Pull the thread up along the left channel. 4 Right channel
5 Thread guide plate
6 Left channel
vWhile holding the thread at the spool, firmly draw the thread up and to the back of the take-up lever. Draw the thread forward to draw it into the eye of the take-up lever.
7 Eye of the take-up lever
bThen pull the thread down along the left channel and through the lower thread guide.
8 Lower thread guide
nSlide the thread behind the needle bar thread guide from the left.
9 Needle bar thread guide
mThread the needle with the needle threader (refer to the next page).
17

z
1
2
x |
4 |
|


 4
4
2
3
c
5
v
Built-in needle threader
NOTE:
The needle threader can be used with a #11 to #16 needle, or a #11 Blue needle.
Thread size 50 to 90 is recommended.
zLower the presser foot. Raise the needle to its highest position. Turn the power switch off.
Pull down the needle threader knob as far as it will go. The threader hook comes out through the needle eye from behind.
1 Knob
2 Threader hook
xDraw the thread from the left to the right, under the left guide, threader hook and the right guide.
Draw the thread around the right guide toward you. 3 Left guide
4 Right guide
cRaise the threader slowly so a loop of the thread is pulled up through the needle eye.
5 Thread loop
v Pull the thread end through the needle eye.
NOTE:
The needle threader cannot be used with the twin needle.
18
Drawing Up the Bobbin Thread
z |
z Raise the presser foot lifter. |
|
|
|
Hold the needle thread with your finger. |
|
1 Needle thread |
1
|
x Press the needle up/down position button twice to |
x |
draw up the bobbin thread. |
|
2 Needle up/down position button |
2
c |
c Pull the needle thread to bring up the loop of bobbin |
|
thread. |
|
3 Loop of bobbin thread |
3
v
v Pull both threads 10 cm (4") and draw them to the rear under the presser foot.
19
1
3
2
4
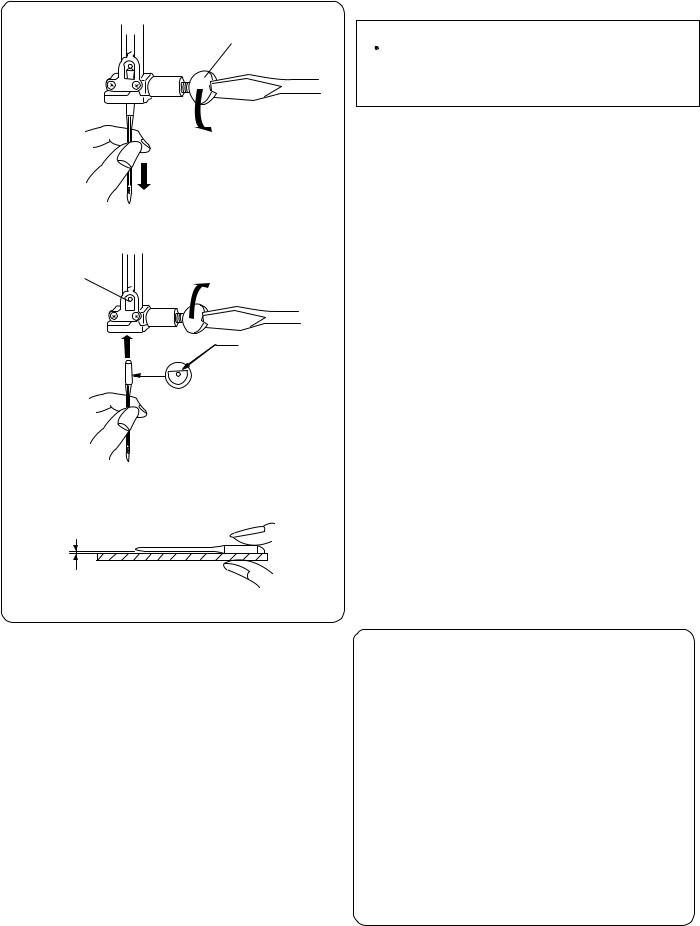
Changing Needles
 CAUTION:
Always make sure to turn the power switch off and disconnect the machine from the power supply before changing the needle.
Raise the needle by pressing the needle up/down position button and lower the presser foot.
Turn the power switch off.
Loosen the needle clamp screw and remove the needle from the clamp.
1 Needle clamp screw
Insert a new needle into the needle clamp with the flat side of the needle to the rear.
When inserting the needle into the needle clamp, push it up against the stopper pin and tighten the needle clamp screw firmly with a screwdriver.
2Flat side
3Stopper pin
To check needle straightness, place the flat side of the needle onto something flat (a needle plate, glass etc.) The gap between the needle and the flat surface should be consistent.
Never use a blunt needle. 4 Gap
Fabric |
Thread |
Needle |
|
|
|
|
|
|
|
|
Lawn |
Silk #80-100 |
#9/65–11/75 |
|
Light |
Georgette |
Cotton #80-100 |
|
|
Tricot |
Synthetic #80-100 |
|
|
|
|
Wool |
|
|
|
|
Polyester |
|
|
|
|
|
|
|
|
|
Cotton |
Silk #50 |
#11/75–14/90 |
|
Medium |
Polyester |
Cotton #60-80 |
|
|
|
Fine jersey |
Synthetic #50-80 |
|
|
|
Wool |
Cotton #50 |
#14/90 |
|
|
|
|
|
|
|
Denim |
Silk #50 |
#14/90–16/ |
|
Heavy |
Jersey |
Cotton #40-50 |
100 |
|
Coating |
Synthetic #40-50 |
|
|
|
|
|
|
||
|
Quilting |
Silk #30 |
|
|
|
|
Cotton #50 |
#16/100 |
|
|
|
|
|
|
|
|
|
|
|
20
|
|
Balancing Thread Tension |
||
1 |
|
Auto-thread tension |
||
|
|
For general sewing, set the thread tension dial at AUTO, |
||
|
|
which covers a wide range of sewing conditions. |
||
|
|
Recommended tension setting for the selected pattern is |
||
|
|
indicated on the LCD screen. |
||
|
|
1 |
Thread tension dial |
|
|
|
2 |
Recommended tension setting |
|
|
|
2 |
|
|
|
|
Balanced thread tension |
||
3 |
1 |
For straight stitch sewing, both needle and bobbin |
||
|
2 |
|||
|
|
threads will join at the middle of the fabric. |
||
|
|
For zigzag stitch sewing, the needle thread will appear |
||
|
|
slightly on the wrong side of the fabric. |
||
|
4 |
1 |
Wrong side of fabric |
|
|
1 |
|||
3 |
2 |
Right side of fabric |
||
2 |
3 |
Needle thread |
||
|
||||
|
4 |
Bobbin thread |
||
|
|
|||
4
Manual thread tension adjustment
2 1
3
4
2 1
3
4
You should adjust the tension manually if the LCD screen shows a tension setting other than AUTO.
You may also need to adjust tension manually depending on the sewing conditions such as the type of fabric and number of layers.
If the needle thread is too tight, the bobbin thread appears on the right side of the fabric.
1Wrong side of fabric
2Right side of fabric
3Needle thread
4Bobbin thread
Turn the thread tension dial to a lower number to decrease the thread tension.
If the needle thread is too loose, the needle thread loops on the underside of the fabric.
1Wrong side of fabric
2Right side of fabric
3Needle thread
4Bobbin thread
Turn the thread tension dial to a higher number to increase the thread tension.
21

6
7
2
1
5
4
3
2
1
3
1
Adjusting the Foot Pressure
The foot pressure can be adjusted with the foot pressure dial located under the top cover.
The dial has 7 setting positions from 1 to 7. For ordinary sewing, set “7” at the setting mark.
1Foot pressure dial
2Setting mark
Reduce the pressure when sewing fine synthetics and stretch fabrics.
To reduce the pressure, set the dial at a lower number.
The recommended dial setting for the selected pattern will be show on the LCD screen.
For example, set the dial at 5 for heirloom stitch patterns number 55 to 64. Set the dial at 4 for applique stitches.
3 Recommended setting
Dropping the Feed Dog
The feed dog can be lowered for basting, sewing on buttons, free motion quilting etc.
Shift the drop feed lever toward you to lower the feed dog.
1 Drop feed lever
Shift the drop feed lever away from you to raise the feed dog, it will return to the up position when you start the machine.
NOTE:
If you start the machine with the feed dog lowered, a message will appear on the LCD screen.
The machine will not run with the feed dog lowered when pattern number 23-33, 35-40 or monogram is selected.
22

2
1
4
3
6 5
7
8
9
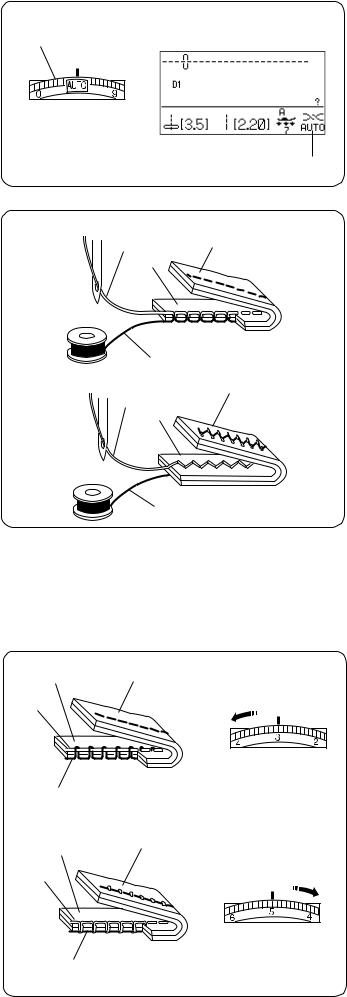
Selecting the Patterns
The stitch patterns are classified into 11 groups.
To select the desired stitch pattern, refer to the reference chart inside the top cover to identify the stitch group and pattern number.
When turning the power switch on, the LCD screen will show the straight stitch D1 selected.
Press the mode key and the group selection window will open.
1Mode key
2Group selection window
Turn the jog dial clockwise or counterclockwise to browse through the groups.
3 Jog dial
NOTE:
To close the group selection window, press the cross mark with the touch panel stylus.
4 Cross mark
Press the confirm button in the center of the jog dial to select the group enclosed with a frame, or press the icon of the desired group with the touch panel stylus.
5Confirm button
6Touch panel stylus
The pattern selection window will open.
Turn the jog dial and press the confirm button, or press the stitch icon to select the desired stitch pattern.
The LCD screen will display the pattern number and stitch image, along with information such as stitch width and length, recommended foot, foot pressure and tension setting.
7Stitch image
8Pattern number
9Information
NOTE:
A message window will be displayed for briefly when certain stitch pattern is selected.
CAUTION:
Do not press the surface of the LCD screen with hard or sharp objects like pencils, screwdrivers or the like. Use the touch panel stylus to press the LCD screen.
23

2
1
3 3
Help key
Pressing this key will show alternative applications and useful information for the following stitch patterns:
1 Help key
When one of the above patterns is selected, the “?” mark is displayed.
2 “?” mark
Example: Stitch pattern D1 is selected.
When you press the help key, the following will be displayed on the LCD screen.
The first page shows the zigzag foot A and quilting guide bar for quilting.
The second page shows the rolled hem foot D for rolled hemming applications.
NOTE:
Arrow marks indicate that there are previous and next pages to be displayed.
3 Arrow marks
The third page shows the zipper foot E for zipper sewing applications.
Pages A1 to A6 and D1 to D6 show step-by step instructions on how to engage and disengage the dual feed device.
NOTES:
Use the jog dial to scroll through the pages.
To close the help window, press the help key again or press the clear key.
24

1
3
2
Customizing Machine Settings
You can customize the machine settings to your preference.
Press the set key and the LCD screen will show the machine setting window.
1Set key
2Machine setting window
To close the machine setting window, press the cross mark.
3 Cross mark
Turn the jog dial to select the desired item to set and press the confirm button
Screen brightness
The screen brightness can be adjusted from level 0 to 20. The preset level is 10.
Turn the jog dial to adjust the screen brightness. Press the confirm button to register the new setting.
Buzzer sound
The level of the buzzer sound can be adjusted and you can mute the buzzer in normal operation.
Turn the jog dial to select the desired sound level; mute, low normal or loud.
Press the confirm button to register the new setting.
You can select the desired level by also pressing a sound level icon with the touch panel stylus.
NOTE:
Items and settings can also be selected by pressing the relevant icon on the LCD screen
25

Sub window display time
A sub window will appear when selecting certain patterns such as buttonholes.
The duration of the sub window display can be altered.
Turn the jog dial to select x0.5 (1 second), x1.0 (2 seconds) or x1.5 (3 seconds).
The preset time is x1.0 (2 seconds).
Press the confirm button to register the new setting.
Resumption setting
The last pattern sewn before turning the power off can be recalled when turning the power on again by setting the resumption setting on.
Turn the jog dial to select the normal set or resumption set. Press the confirm button to register the new setting.
Favorite stitch adjustment
If you wish to save the altered stitch length and width for future use, turn on this option.
Turn the jog dial to select ON or OFF.
Press the confirm button to register the new setting.
26

Touch panel calibration
If the touch panel keys seem out of alignment, calibrate the key position as follows.
z |
z Press the center of the stitch width adjusting key with |
|
the touch panel stylus. |
||
|
x |
x Press the center of the stitch length adjusting key with |
|
the touch panel stylus. |
||
|
c |
c Press the center of the edit key with the touch panel |
|
stylus. |
v |
v Press the “+” sign that appears on the LCD screen with |
|
the touch panel stylus. |
b |
b Press the center of the D1S key with the touch panel |
|
stylus. |
||
|
b |
n Press the “ ” sign that appears on the LCD screen |
|
|
|
with the touch panel stylus. |
|
The new settings are registered. |
To start over the calibration again press the confirm button.
27
 Loading...