


Horizon Memory Craft 14000
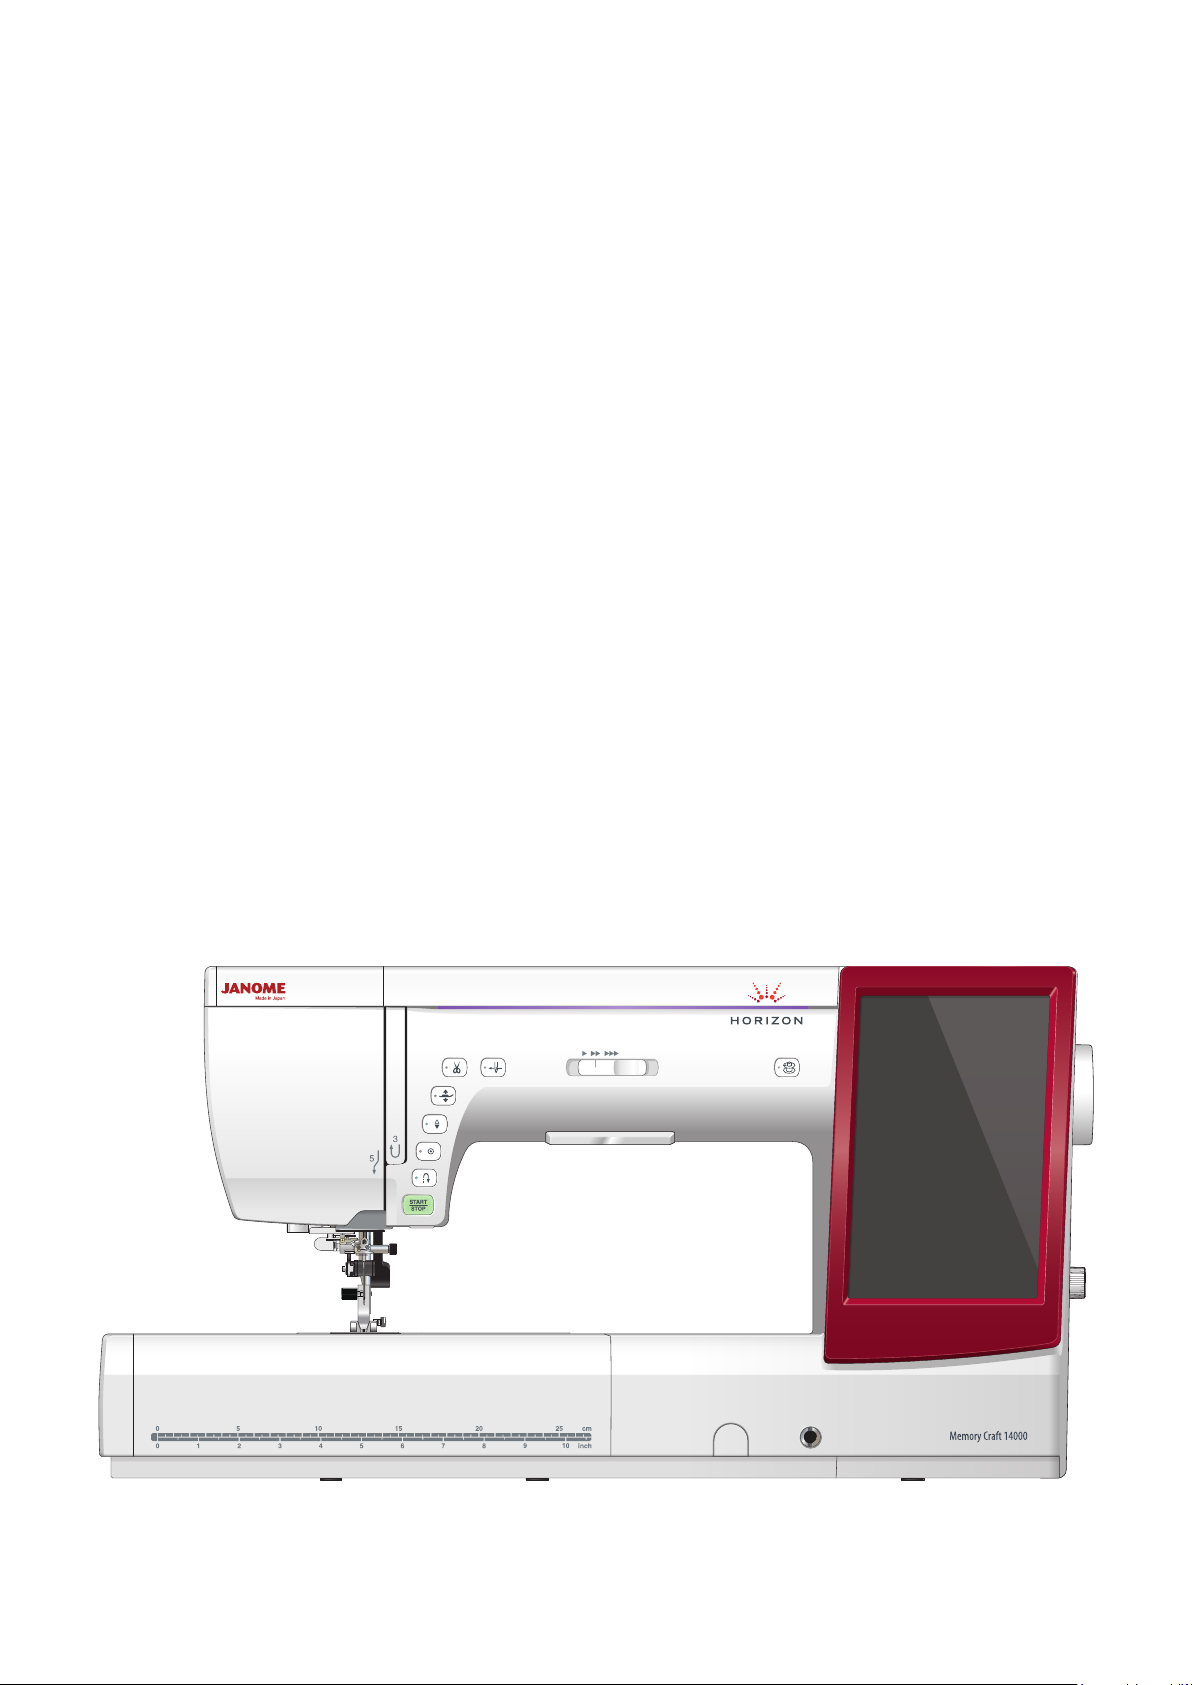
Instruction Book


IMPORTANT SAFETY INSTRUCTIONS
When using an electrical appliance, basic safety precautions should always be followed, including the
following:
This sewing machine is designed and manufactured for household use only.
Read all instructions before using this sewing machine.
To reduce the risk of electric shock:
DANGER
1. An appliance should never be left unattended when plugged in. Always unplug
this sewing machine from the electric outlet immediately after using and before
cleaning.
WARNING
1. Do not allow to be used as a toy. Close attention is necessary when this sewing machine is used
by or near children.
2. Use this appliance only for its intended use as described in this owner’s manual.
Use only attachments recommended by the manufacturer as contained in this owner’s manual.
3. Never operate this sewing machine if it has a damaged cord or plug, if it is not working properly, if
it has been dropped or damaged, or dropped into water.
Return this sewing machine to the nearest authorized dealer or service center for examination,
repair, electrical or mechanical adjustment.
4. Never operate the appliance with any air opening blocked. Keep ventilation openings of this
sewing machine and foot controller free from accumulation of lint, dust and loose cloth.
5. Never drop or insert any object into any opening.
6. Do not use outdoors.
7. Do not operate where aerosol (spray) products are being used or where oxygen is being
administered.
8. To disconnect, turn all controls to the off (“O”) position, then remove plug from outlet.
9. Do not unplug by pulling on cord. To unplug, grasp the plug, not the cord.
10. Keep ngers away from all moving parts. Special care is required around the sewing machine
needle and/or cutting blade.
11. Always use the proper needle plate. The wrong plate can cause the needle to break.
12. Do not use bent needles.
13. Do not pull or push fabric while stitching. It may deect the needle causing it to break.
14. Switch this sewing machine off (“O”) when making any adjustment in the needle area, such as
threading the needle, changing the needle, threading the bobbin or changing the presser foot, and
the like.
15. Always unplug this sewing machine from the electrical outlet when removing covers, lubricating, or
when making any other adjustments mentioned in this owner’s manual.
—
—
To reduce the risk of burns, re, electric shock, or injury to persons:
SAVE THESE INSTRUCTIONS
For Europe only:
This appliance can be used by children aged from 8 years and above and persons with reduced
physical, sensory or mental capabilities or lack of experience and knowledge if they have been given
supervision or instruction concerning use of the appliance in a safe way and understand the hazards
involved. Children shall not play with the appliance. Cleaning and user maintenance shall not be made
by children without supervision.
For outside Europe (except U.S.A and Canada):
This appliance is not intended for use by persons (including children) with reduced physical, sensory or
mental capabilities, or lack of experience and knowledge, unless they have been given supervision or
instruction concerning use of the appliance by a person responsible for their safety.
Children should be supervised to ensure that they do not play with the appliance.
Please note that on disposal, this product must be safely recycled in accordance with relevant
National legislation relating to electrical/electronic products. If in doubt please contact your
retailer for guidance. (European Union only)

TABLE OF CONTENTS
GETTING READY TO SEW
Names of Parts ............................................................... 4
Standard Accessories .................................................... 6
Extension Table .............................................................. 8
Free arm sewing .......................................................... 8
Accessory Storage ......................................................... 8
Connecting the Power Supply ........................................ 9
Controlling Sewing Speed ............................................ 10
Speed control slider ..................................................... 10
Foot Control .................................................................. 10
Extra Wide Table ...........................................................11
Machine Operating Buttons .......................................... 12
Common Keys .............................................................. 13
Setting the Spool of Thread ......................................... 14
Additional spool pin ................................................... 14
Winding the Bobbin ..................................................14 -16
Removing the bobbin ................................................ 14
Winding the bobbin ................................................... 15
Inserting the bobbin .................................................. 16
Threading the Machine................................................. 17
Automatic Needle Threader ......................................... 18
Drawing up the Bobbin Thread .................................... 19
Replacing Needles ....................................................... 20
Fabric, Thread and Needle Chart ................................. 20
Replacing the Presser Foot .......................................... 21
Replacing the Foot Holder ........................................... 22
Removing the presser foot holder ............................. 22
Attaching the dual feed holder .................................. 22
Detaching and attaching the dual feed foot .............. 23
Attaching the darning foot PD-H ............................... 23
Attaching the embroidery foot P ................................ 23
Attaching the couching foot PC-1 or PC-2 ................ 23
Replacing the Needle Plate .......................................... 24
Raising and Lowering the Presser Foot ....................... 25
Knee Lifter .................................................................... 25
Retractable Sewing Light ............................................. 26
Optic Magnier ............................................................. 26
Mode Selection ............................................................ 27
On-screen Help ......................................................... 27
ORDINARY SEWING MODE
Ordinary Stitch Patterns .......................................... 28-29
Function Keys in Ordinary Sewing Mode ................ 30-31
Utility Stitches ............................................................... 32
Straight stitches ............................................................ 32
Starting to sew .......................................................... 32
Sewing from the edge of thick fabric ......................... 32
Changing sewing direction ........................................ 32
Turning a square corner ............................................ 32
Securing seams......................................................... 33
Cutting threads .......................................................... 33
Using the seam guide lines ....................................... 33
Angle scale on the needle plate ................................ 33
Variety of Straight Stitches ........................................... 34
Sewing with the Dual Feed Device ............................... 35
Dual feed balancing dial ............................................ 35
Zigzag Stitches ............................................................. 36
Variety of Overcasting Stitches .................................... 37
Manual Stitch Settings ................................................. 38
Altering needle drop position (straight stitches) ........ 38
Altering stitch width ................................................... 38
Altering stitch length .................................................. 38
Adjusting thread tension ............................................ 39
Adjusting foot pressure control .................................. 39
Foot up for pivoting .................................................... 39
Favorite Stitch Adjustment....................................... 4 0 -41
Cloth Guide .................................................................. 42
Other Utility Stitches ................................................43-44
Buttonholes and Specialty Stitches .............................. 45
Variety of Buttonholes .................................................. 45
B1 Sensor (Square) Buttonhole ............................... 46-47
Double layer buttonhole ............................................ 47
Manual settings ......................................................... 48
Using the stabilizer plate ........................................... 49
B2 Automatic (square) buttonhole ................................ 50
Other Buttonholes ........................................................ 52
B13 Welted Buttonhole (Bound buttonhole) ............53-54
Corded Buttonhole ....................................................... 55
Specialty Stitches .................................................... 55-57
B14 Button Sewing .................................................... 55
B15 Darning ............................................................... 56
Fly Stitches (B17 to B20) ........................................... 57
Eyelets (B21 to B25) .................................................. 57
Decorative Stitches .................................................58- 61
Quilting(Q) .................................................................... 62
Using the quilting guide bar ....................................... 62
Q1-Q3 Patchwork piecing ......................................... 62
Q66-Q67 Hand-look quilt stitches ............................. 62
S1-S29 Decorative Satin Stitches ................................ 63
Elongation ratio ......................................................... 63
Created Stitches (CS) ................................................... 64
Twin Needle Sewing ..................................................... 65
Programming a Pattern Combination ........................... 66
Mirror image of patterns ............................................ 66
Bridge stitches ........................................................... 66
Editing a Pattern Combination...................................... 67
Deleting a pattern ...................................................... 67
Inserting a pattern ..................................................... 67
Startover Key ................................................................ 68
Current pattern startover ........................................... 68
First pattern startover ................................................ 68
Checking Pattern Combination Length ........................ 69
Monogramming ............................................................ 70
Function keys ............................................................ 70
Manual thread tension .................................................. 71
Individual thread tension adjustment......................... 71
Unied thread tension adjustment ............................. 71
Spacing ..................................................................... 71
Reducing the size of letters ....................................... 71
Programming a Monogram........................................... 72
Saving a Pattern Combination ...................................... 73
Creating a new folder ................................................ 73
Changing the folder name or le name ..................... 73
Opening a Pattern Combination ....................................74
Sewing Application ....................................................... 75
Seaming ....................................................................... 76
Overedge ...................................................................... 77
Blind Hem ..................................................................... 78
Shell Tuck ..................................................................... 79
Rolled Hem ................................................................... 80
Zipper Sewing .............................................................. 81
Lapped zipper sewing .......................................... 81-83
Concealed zipper sewing .....................................84-85
Gathering ...................................................................... 86
Basting ......................................................................... 86
Button Sewing .............................................................. 87
Tacking ......................................................................... 88
Applique ....................................................................... 89

Patchwork ..................................................................... 90
Quilting .................................................................... 91-93
Straight stitches (with dual feed) ............................... 91
Quilting guide bar for dual feed foot .......................... 91
Clasp stitches ............................................................ 91
Free quilting ............................................................... 92
One stitch off .......................................................... 92
Foot height for free motion quilting ......................... 92
Sculpture stitches ...................................................... 92
Hand-look quilt stitches ............................................. 93
Variable zigzag .......................................................... 93
Maximum zigzag width adjustment ........................ 93
CUSTOMIZING MACHINE SETTINGS
Machine Setting Mode ................................................. 94
Registering the custom settings ................................ 94
Common Setting Mode ...........................................95-98
Ordinary Sewing Setting Mode ............................. 99 -101
Language Selection Mode ......................................... 102
Correcting Deformed Stitch Patterns ......................... 102
EMBROIDERY MODE
Embroidery Unit .................................................. 103 -105
Attaching the embroidery unit ................................. 103
Extending the carriage arm ..................................... 104
Detaching the embroidery unit ................................ 105
Attaching the Embroidery Foot................................... 106
Attaching the Straight Stitch Needle Plate ................. 107
Special Bobbin Holder for Embroidery ....................... 108
Bobbin Winding While Working on an Embroidery
Project ........................................................................ 108
Embroidery Hoops ..................................................... 109
Stabilizers ....................................................................110
Types of the stabilizers .............................................110
Setting the Fabric in an Embroidery Hoop .................. 111
Attaching the Embroidery Hoop to the Machine .........112
Thread Holder .............................................................112
Selecting Built-in Embroidery Designs ........................113
Design category .......................................................113
Hoop size .................................................................114
Monogramming .................................................... 114 -118
Function keys ..............................................................115
Programming a monogram ......................................116
Monogram placement ..............................................116
2- Letter monogram .................................................. 117
Editing a monogram .................................................118
Ready to Sew Window ................................................119
Function keys ...........................................................119
Pattern information ...................................................119
Stitch back/forward keys ......................................... 12 0
Jump key ................................................................. 120
Cross key................................................................. 120
Color section key ..................................................... 120
Color list key ............................................................ 120
Jog keys .................................................................. 120
Tr a ce key ..................................................................121
Hoop back key ..........................................................121
Adjust key ................................................................ 122
• Auto thread tension level ...................................... 122
• Cutting the tails of jump threads........................... 122
• Embroidery foot height ......................................... 122
Embroidery foot key ................................................ 122
Embroidery mode key ............................................. 123
Starting to Sew Embroidery ........................................124
Applique Designs ....................................................... 125
Fringe Designs .................................................... 12 6 -129
Fringe designs for applique ..................................... 12 8
Alternative method .................................................. 129
Frame Designs ........................................................... 13 0
Lace Designs ...............................................................131
Editing Mode ........................................................13 2-141
Selecting a hoop size .............................................. 132
Opening the embroidery designs ............................ 132
Editing tool bar information...................................... 133
Selecting a pattern .................................................. 133
Moving a pattern...................................................... 133
Selecting a pattern with pattern selection keys ....... 134
Resizing a pattern ................................................... 134
Duplicating a pattern ............................................... 134
Deleting a pattern .................................................... 135
Rotating a pattern .................................................... 135
Flipping a pattern .................................................... 136
Creating a square frame .......................................... 136
Grouping patterns ................................................... 137
Sewing order ........................................................... 138
Color grouping ......................................................... 138
Single color sewing ................................................. 139
Zooming in the editing window ................................ 139
Customizing the display colors ................................ 14 0
Monogramming in an arc .........................................141
Free Arm Embroidery ................................................. 142
Couching Designs ................................................143-145
Pennant Designs ........................................................ 14 6
CUSTOMIZING EMBROIDERY MODE SETTINGS
Embroidery Mode Settings ..........................................147
Thread cutting ......................................................... 148
Saving and Opening a File ......................................... 150
Saving a le ............................................................. 150
Creating a new folder ...............................................151
Deleting a le or folder .............................................151
Opening a le ...........................................................151
Changing a name of the le or folder ...................... 152
Direct PC-Link ............................................................ 152
CARE AND MAINTENANCE
Cleaning the Hook Area ............................................. 153
Problems and Warning Signals .................................. 15 4
Troubleshooting ................................................... 155-156
Troubleshooting (automatic needle threader) ............. 157
STITCH CHART
Ordinary Sewing .................................................. 15 8 -160
DESIGN CHART
Embroidery ........................................................... 161-169
INDEX ..................................................................170 -172
!4
!3
!2
!5
@1
@0
q
w
e
r ot
!6
y
!1
u i
!7
!0
@9
#0
#1
!8
!9
GETTING READY TO SEW
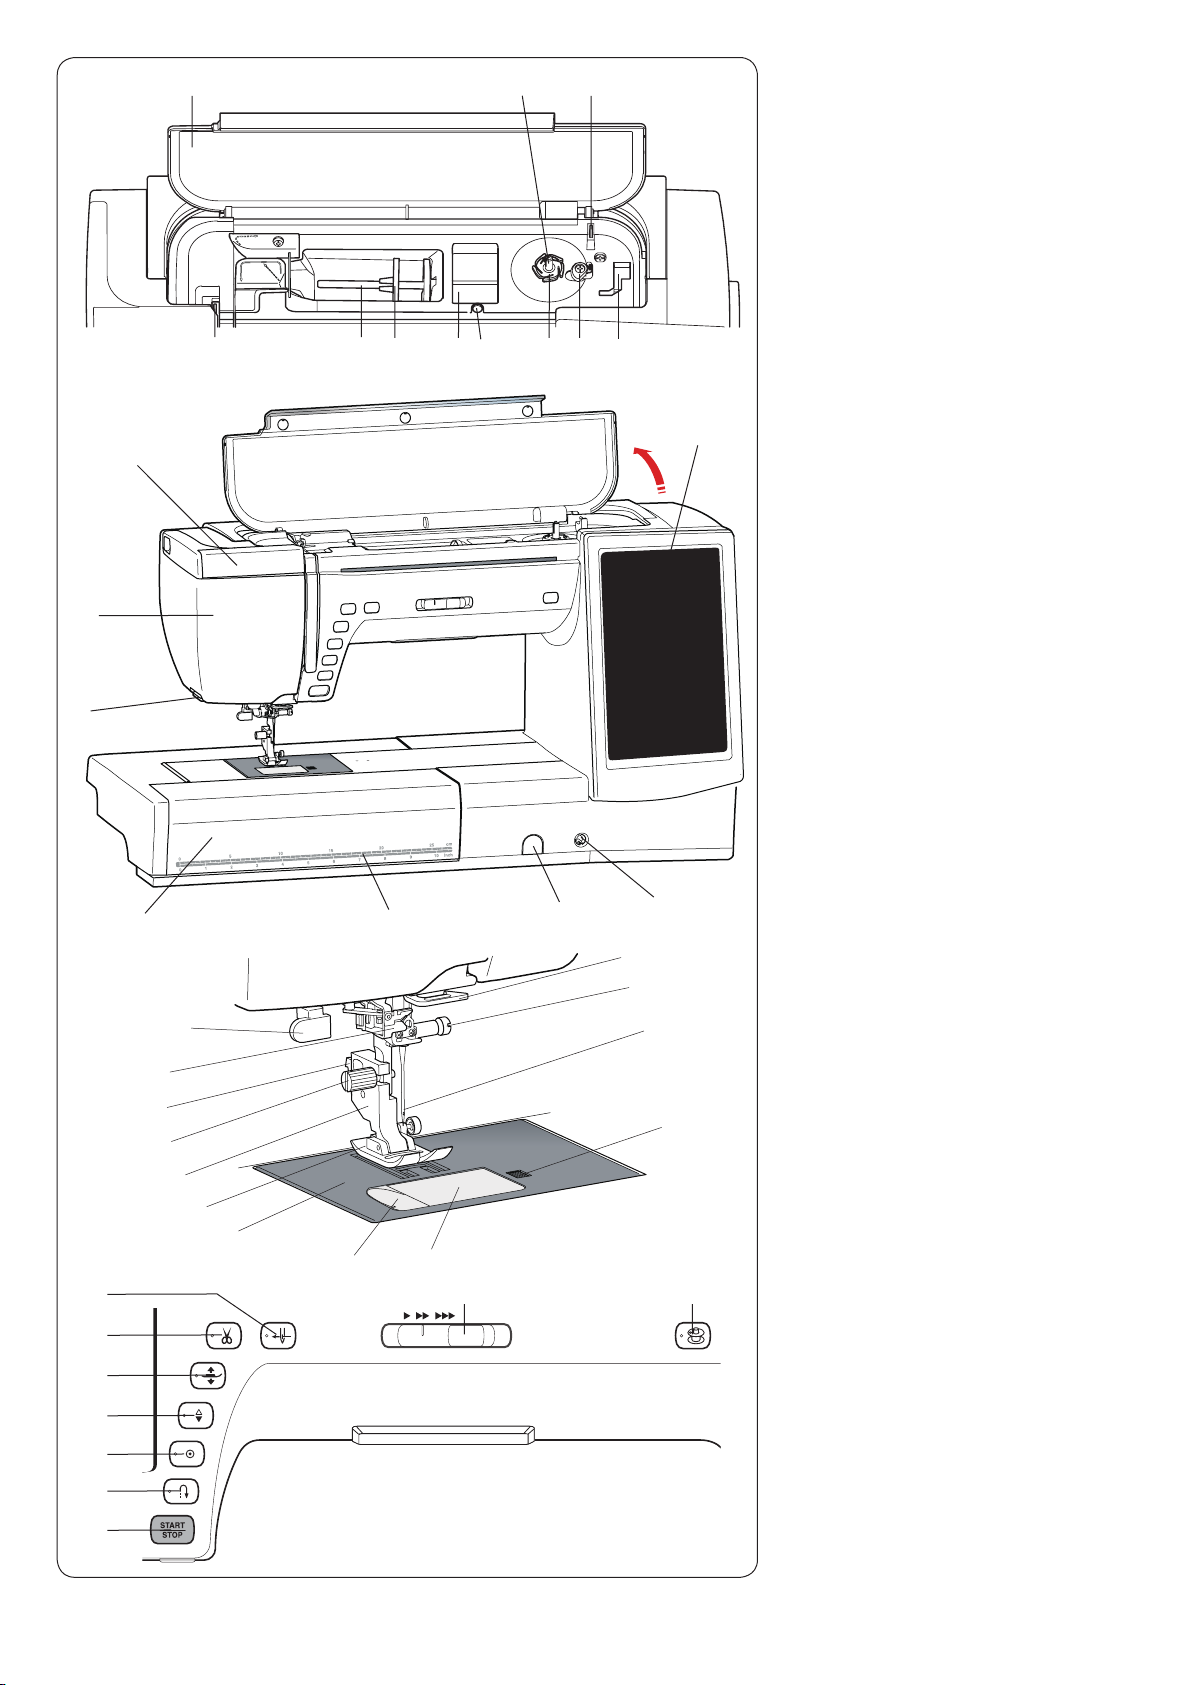
Names of Parts
q
Top cover
w
Thread take-up lever
e
Spool pin
r
Spool holder (large)
t
Foot compartment
y
Hole for additional spool pin
u
Bobbin thread cutter A
i
Bobbin winder stopper
o
Foot compartment (for P foot)
!0
Bobbin thread cutter B
!1
Bobbin winder spindle
!2
Retractable light
!3
Face plate
!4
Thread cutter/holder
!5
Extension table
!6
Centimeter/inch measurements
!7
Feed balancing dial cap
!8
Knee lifter socket
!9
Visual touch screen
@0
Buttonhole lever
@1
Automatic needle threader
@2
Lever
@3
Thumbscrew
@4
Presser foot holder
@5
Presser foot
@6
Needle plate
@7
Thread cutter
@8
Hook cover plate
@9
Lower thread guide
#0
Needle clamp screw
#1
Needle
#2
Hook cover release button
@2
#2
@3
@4
@5
@6
@7
@8
#3 $0 $1
#4
#5
#6
#7
#8
#9
* Design and specications are subject to change without prior notice.
4
#3
Needle threader button
#4
Thread cutter button
#5
Presser foot lifter button
#6
Needle up/down button
#7
Auto-lock button
#8
Reverse button
#9
Start/stop button
$0
Speed control slider
$1
Bobbin winding button
w
e
q
!1
!0
o
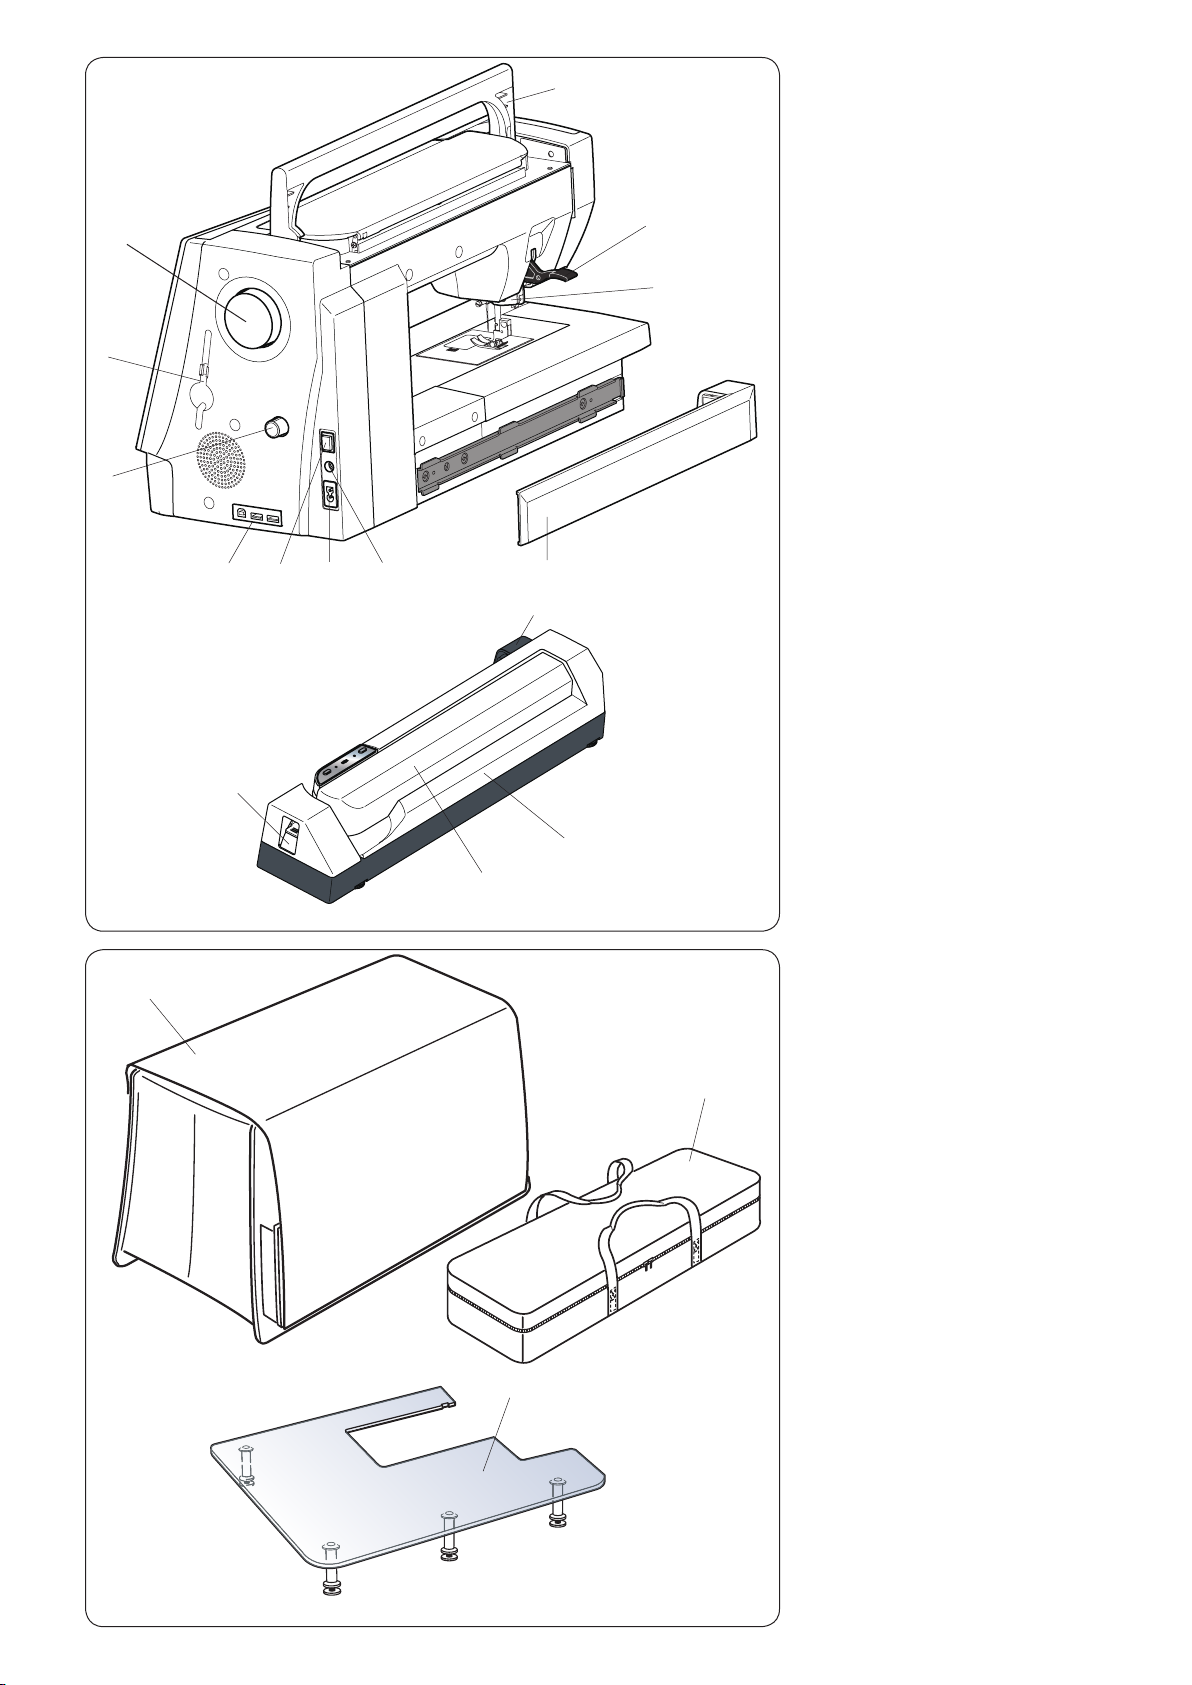
Hand wheel
q
Touch panel stylus holder
w
Dual feed balancing dial
e
USB ports
r
Power switch
t
Power inlet
y
Foot control jack
u
Cover
i
Dual feed drive
o
Presser foot lifter
!0
Carrying handle
!1
Embroidery unit socket
!2
Embroidery unit
!3
Carriage arm
!4
Carriage arm release lever
!5
q
r
!5
t
y
u
!4
!2
i
!3
w
q
Semi-hard fabric cover
w
Embroidery unit case
e
Extra wide table
e
5
q
!7
@4
y
!1
@8
!9
w
e
u
r
o
i
!8
!3
!4
@1
!5
@2
!2
@0
@5 @6 @7
@9
!0
!6
t
#0
@3
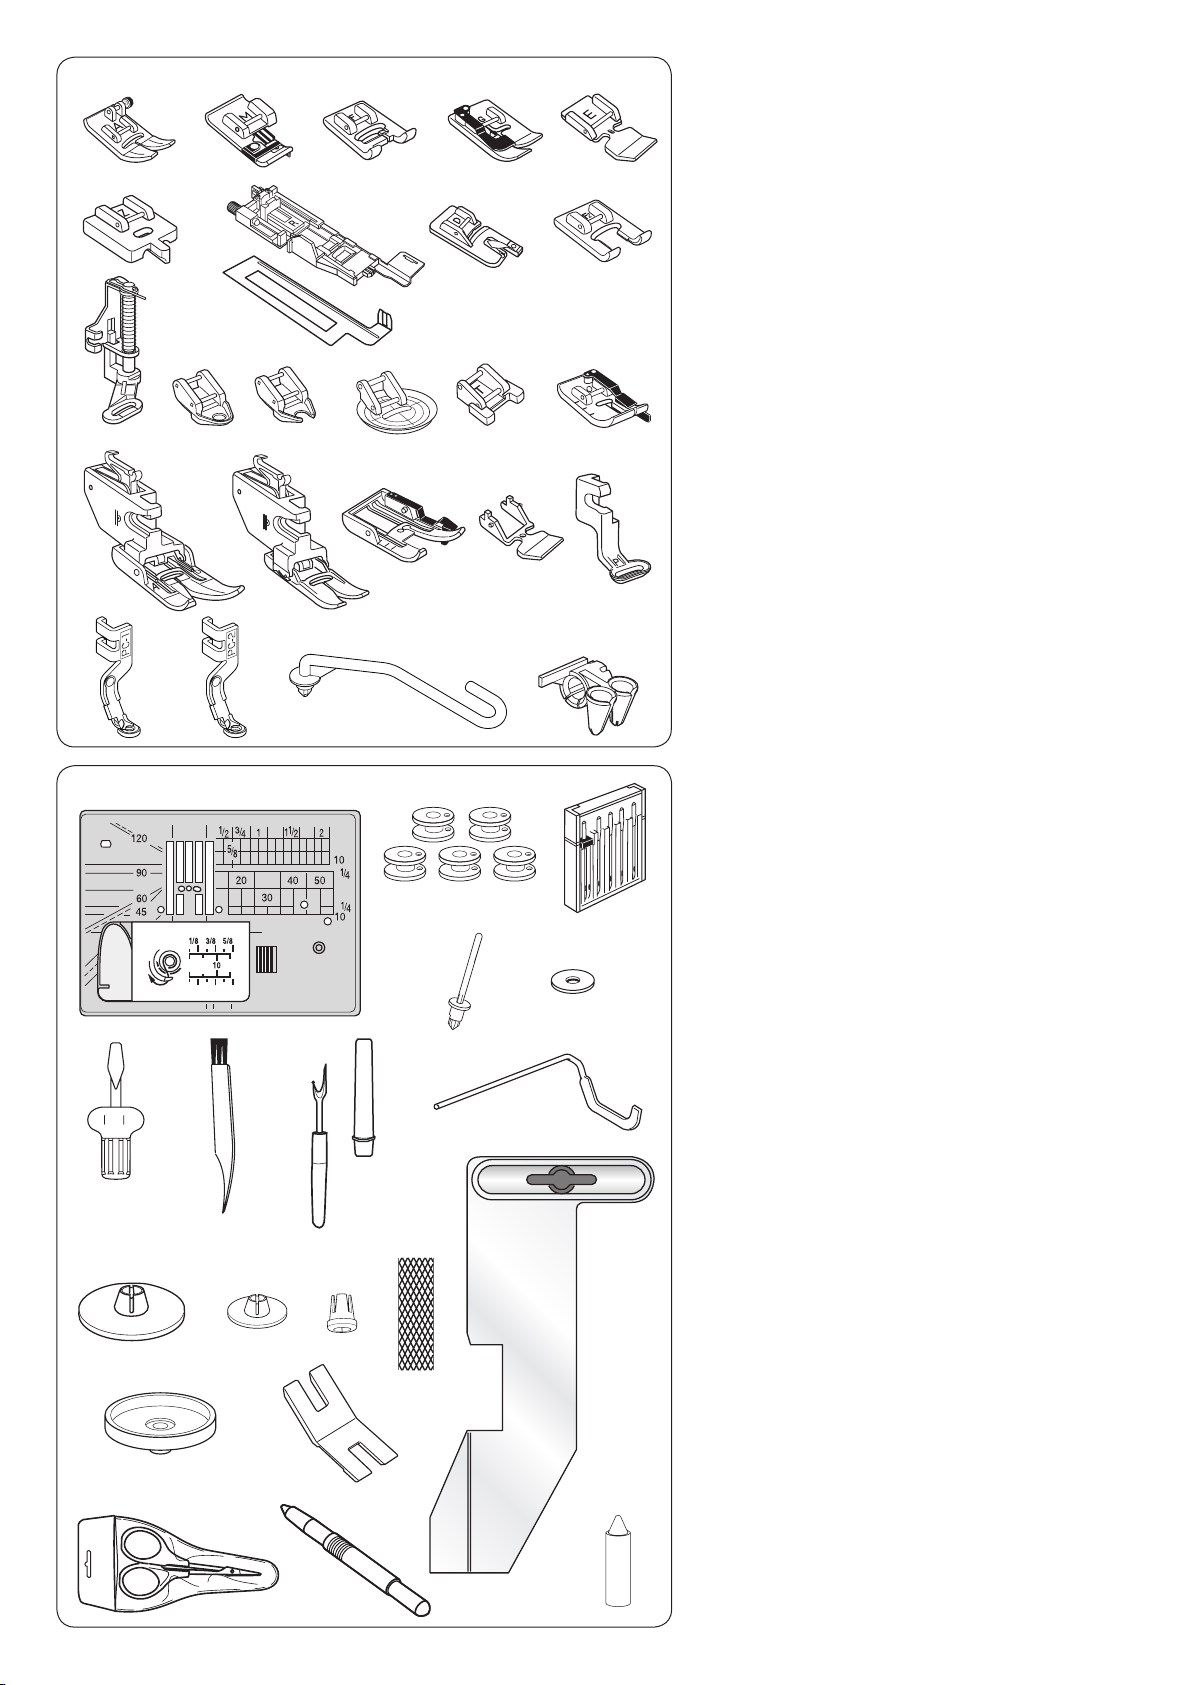
Standard Accessories
q
Zigzag foot A (set on the machine)
w
Overedge foot M
e
Satin stitch foot F
r
Blind hemming foot G
t
Zipper foot E
y
Concealed zipper foot Z
u
Automatic buttonhole foot R
i
Stabilizer plate
o
Rolled hem foot D
!0
Open toe satin stitch foot F2
!1
Darning foot PD-H
!2
Free motion quilting closed-toe foot QC
!3
Free motion quilting open-toe foot QO
!4
Free motion quilting zigzag foot QV
!5
Button sewing foot T
!6
1/4˝ seam foot O
!7
Dual feed holder (twin)
!8
Dual feed holder (single)
!9
Dual feed foot AD (twin)
@0
Dual feed foot VD (single)
@1
Dual feed quilt piecing foot OD (twin)
@2
Dual feed zipper foot ED (single)
@3
Embroidery foot P
@4
Couching foot PC-1
@5
Couching foot PC-2
@6
Yarn guide bar
@7
Yarn guide
#3
$1
#7
#4
#8
$2
#5
#9
$0
#1
#6
$5
#2
@8
Straight stitch needle plate
@9
Bobbin x 5 (1 set on the machine)
#0
Needle set
#1
Additional spool pin
#2
Felt
#3
Screwdriver
#4
Lint brush
#5
Seam ripper (buttonhole opener)
#6
Quilting guide bar
#7
Spool holder (large) (set on the machine)
#8
Spool holder (small)
#9
Spool holder (special)
$0
Net
$1
Spool stand
$2
Button shank plate
$3
Scissors
$4
Touch panel stylus
$5
Cloth guide
$6
Bobbin holder cleaner
$3
$4
$6
6
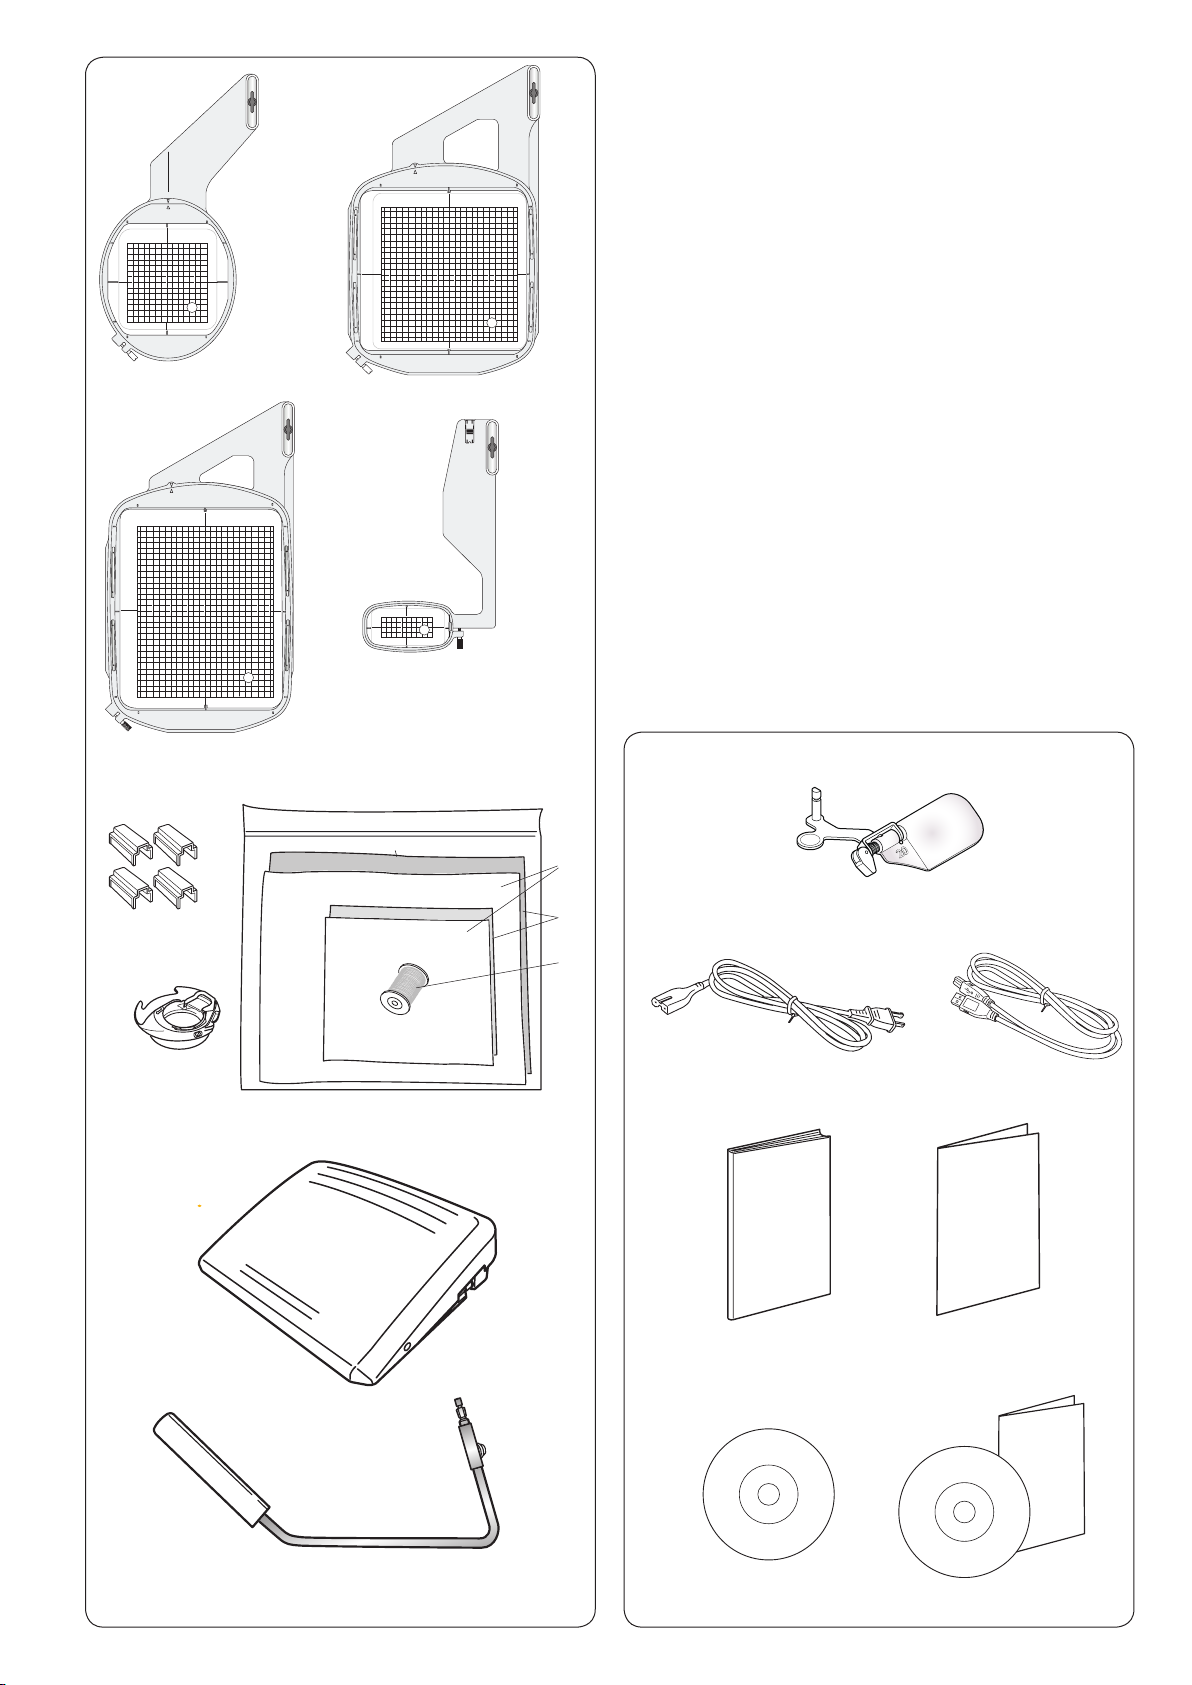
q w
e
r
Embroidery hoop SQ14 (with template)
q
Embroidery hoop SQ23 (with template)
w
Embroidery hoop GR (with template)
e
Embroidery hoop FA10 (with template)
r
Magnetic clamps (for SQ23 and GR)
t
Felt
y
Stabilizers
u
Bobbin thread for embroidery
i
Special bobbin holder for embroidery
o
Foot control
!0
Knee lifter
!1
Optic magnier (20)
!2
Power cable*
!3
USB cable
!4
Instruction book
!5
Key icon reference chart
!6
Instructional video DVD
!7
Acutools CD-ROM (with installation guide)
!8
o
t
!0
y
u
i
* The power cable included may differ from the illustration.
!2
!3
!5
!4
!6
!1
!7
7
!8
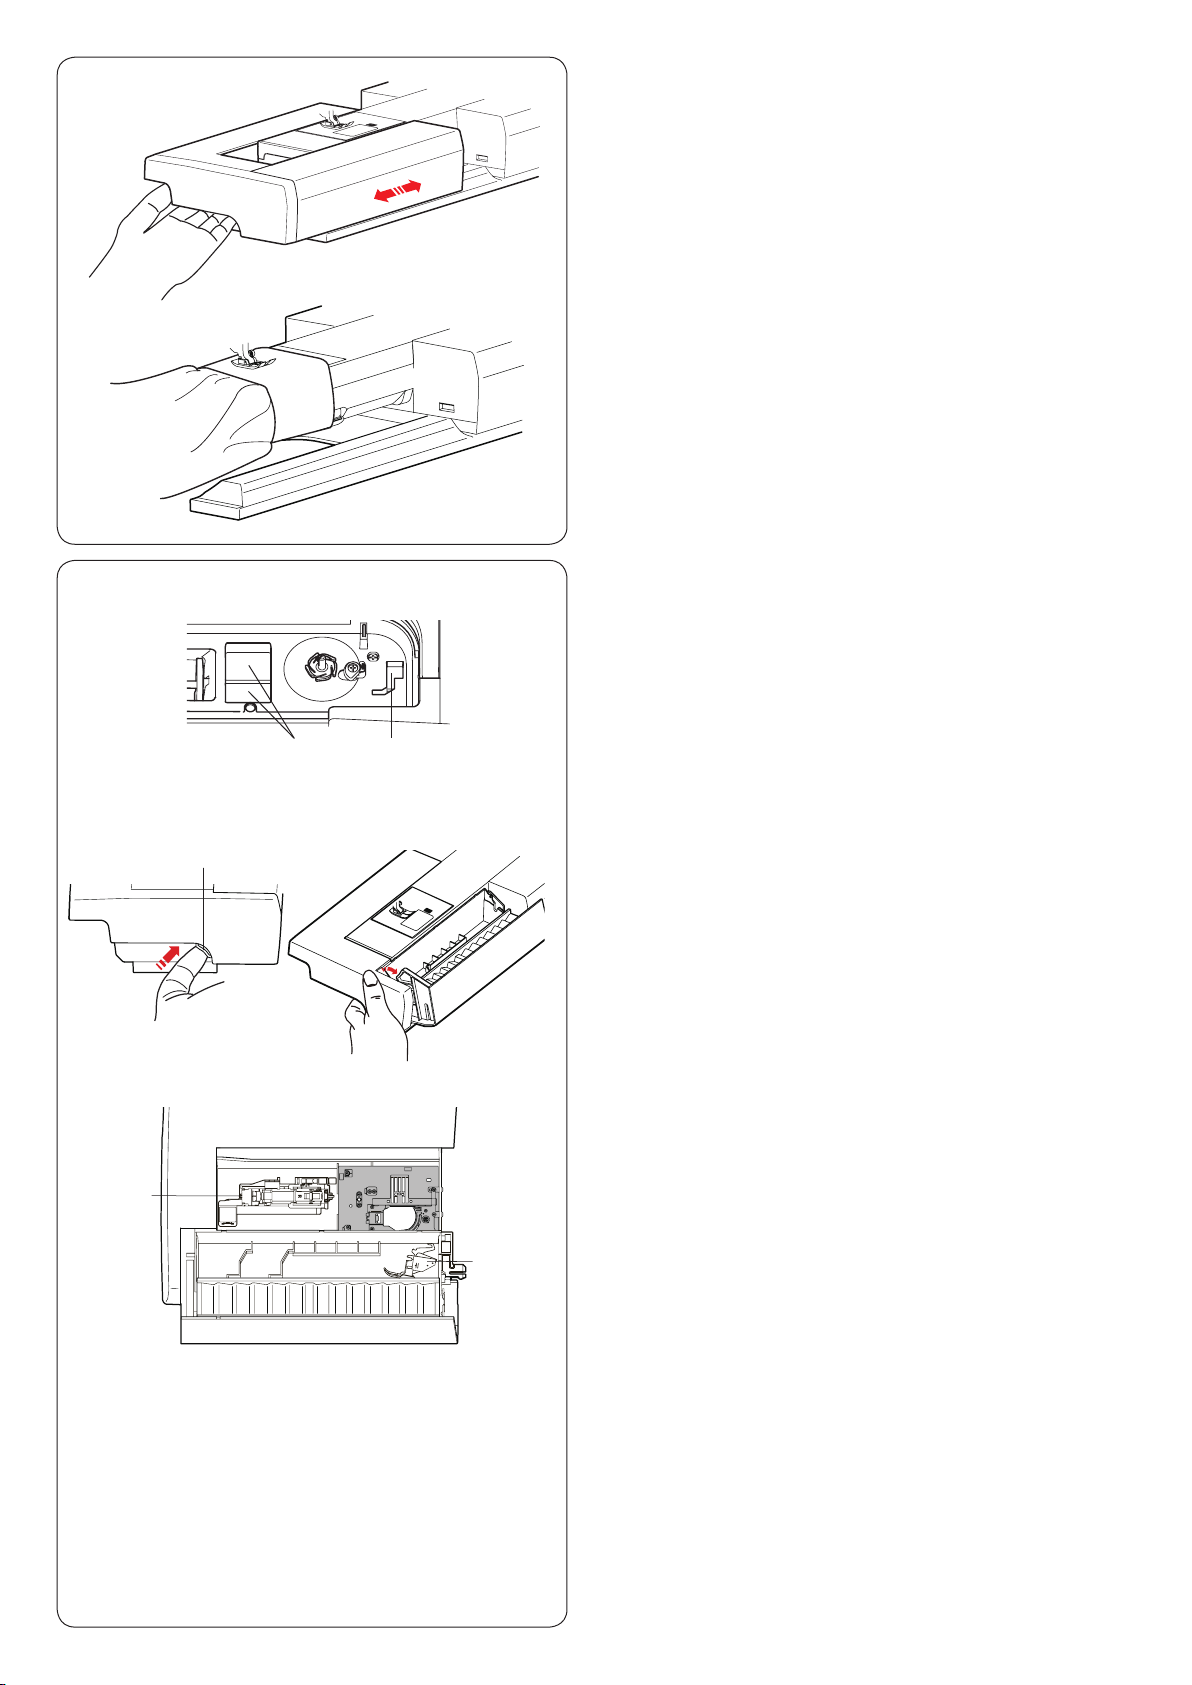
Extension Table
The extension table provides an extended sewing area
and can be removed for free arm sewing.
To remove:
Draw the table to the left.
To attach:
Slide the table on the base and push it to the right.
Free arm sewing
The free arm is used for stitching sleeves, waistbands,
pant legs or any other tubular garments.
It is also useful for darning socks or elbows.
Accessory Storage
The accessories can be conveniently stored in the
accessory case, the compartment in the extension table
and the compartment under the top cover.
t
e
q
w
r
y
To store the accessories in the compartment of the
extension table, push up the lever towards you to open
the accessory storage.
q Foot compartment
w Foot compartment for P foot
e Lever
r Straight stitch needle plate (Place it upside down as
sh own.)
t Automatic buttonhole foot and stabilizer plate
Dual feed holder (twin)
y
8
w
q
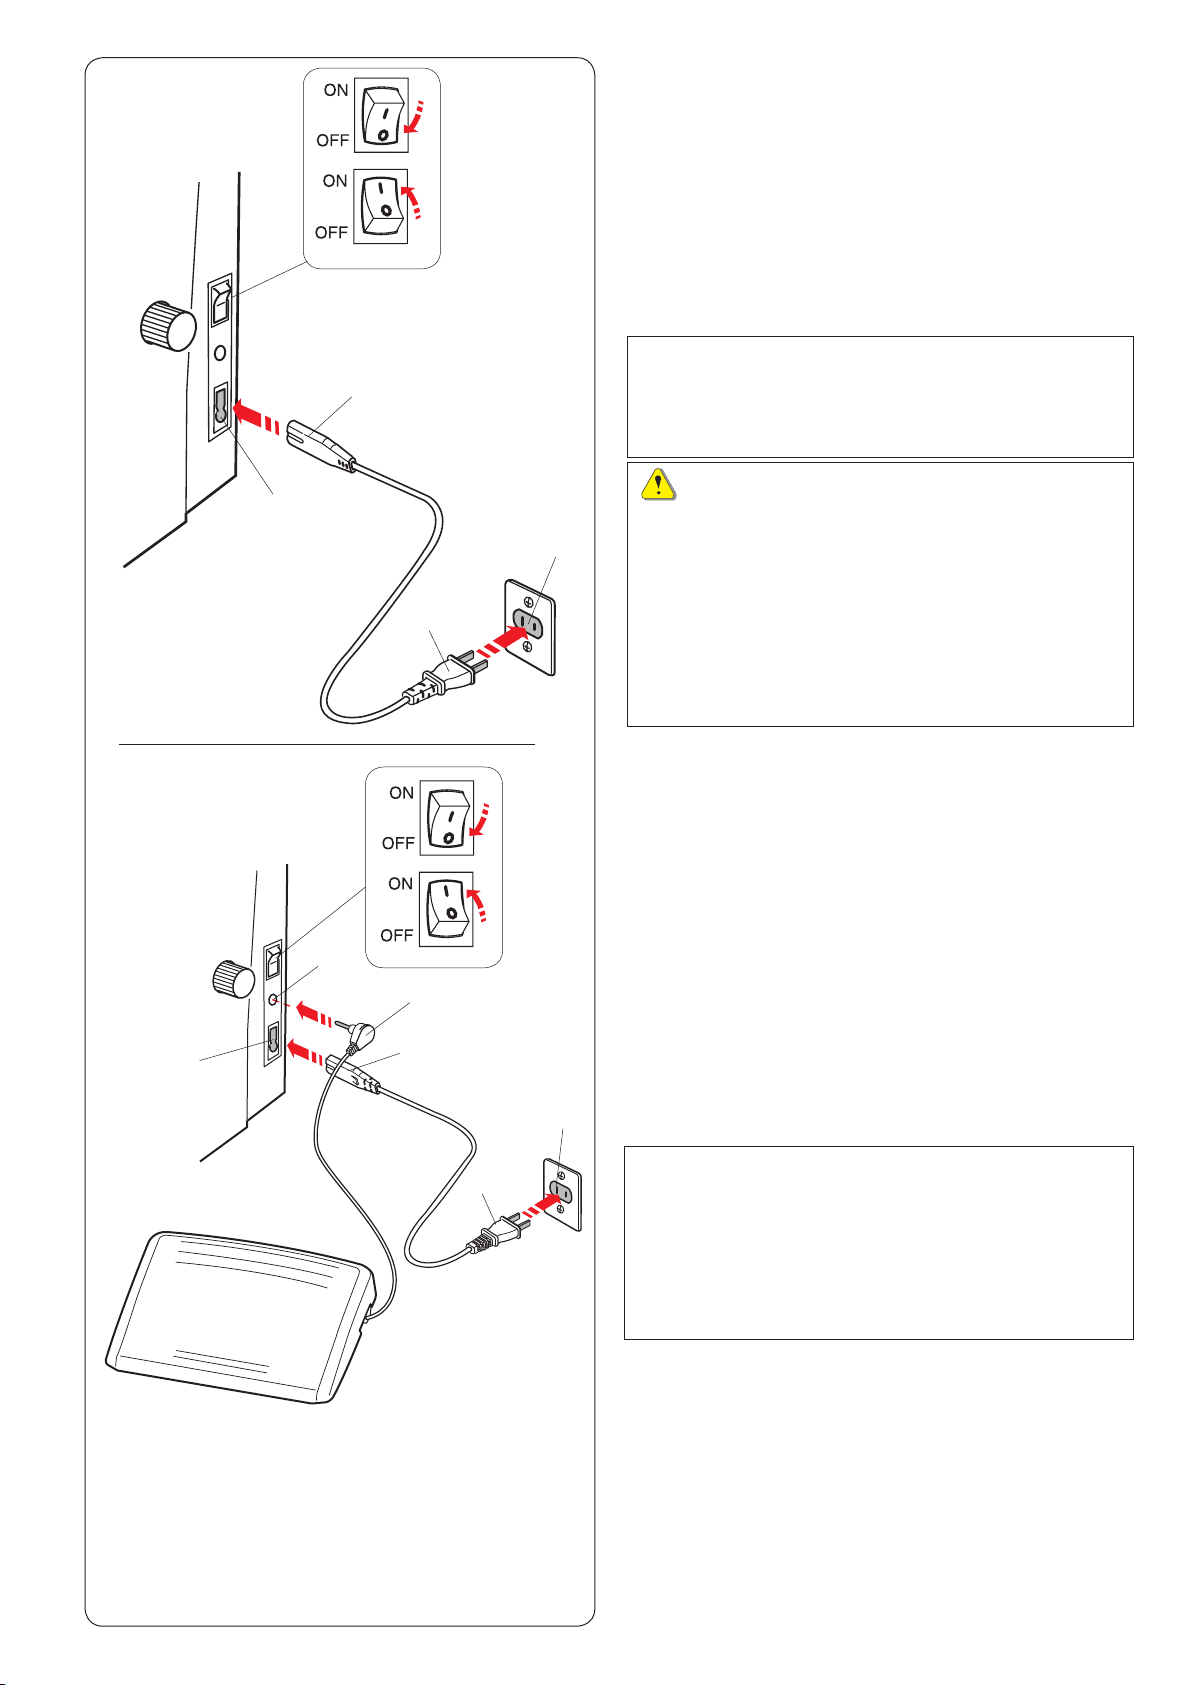
Connecting the Power Supply
z First make sure the power switch q is off.
x Insert the machine plug w of the power supply cord
into the power inlet e.
c Insert the power supply plug r into the wall outlet t,
and turn the power switch q on.
q Power switch
w Machine plug
e Power inlet
r Power supply plug
t Wall outlet
NOTE:
Make sure to use the power cable that came with the
machine.
If you turn off the power switch, wait for 5 seconds
before turning it on again.
e
e
u
w
y
r
r
q
t
t
If you wish to use the foot control, pull out the cord from
the foot control and insert the pin connector into the jack
on the machine (see page 10).
z First make sure the power switch q is off.
x Insert the machine plug w of the power supply cord
c Draw out the cord from the foot control and insert the
v Insert the power supply plug r into the wall outlet t,
q Power switch
w Machine plug
e Power inlet
r Power supply plug
t Wall outlet
y Pin connector
u Jack
Operating Instructions:
The symbol “O” on a switch indicates the “off” position of
the switch.
Foot controller Model 21390 is for use with sewing
machine MC 14000.
For the U.S.A. and Canada only
Polarized plug (one blade wider than the other):
To reduce the risk of electric shock, this plug is intended
to t in a polarized outlet only one way. If it does not t
fully in the outlet, reverse the plug. If it still does not t,
contact a qualied electrician to install the proper outlet.
Do not modify the plug in any way.
9
WARNING:
While in operation, always keep your eyes on the
sewing area, and do not touch any moving parts such
as the thread take-up lever, handwheel or needle.
Always turn off the power switch and unplug the
machine from the power supply:
- when leaving the machine unattended.
- when attaching or removing parts.
- when cleaning the machine.
Do not place anything on the foot control.
into the power inlet e.
pin connector y into the jack u on the machine.
and turn the power switch on.
NOTE:
• The start/stop button does not work when the foot
control is connected.
• The foot control cannot be used in the embroidery
mode.
• Do not depress the thread cutter switch when
inserting the pin connector into the jack of the foot
control (Thread cutter switch is an optional item).
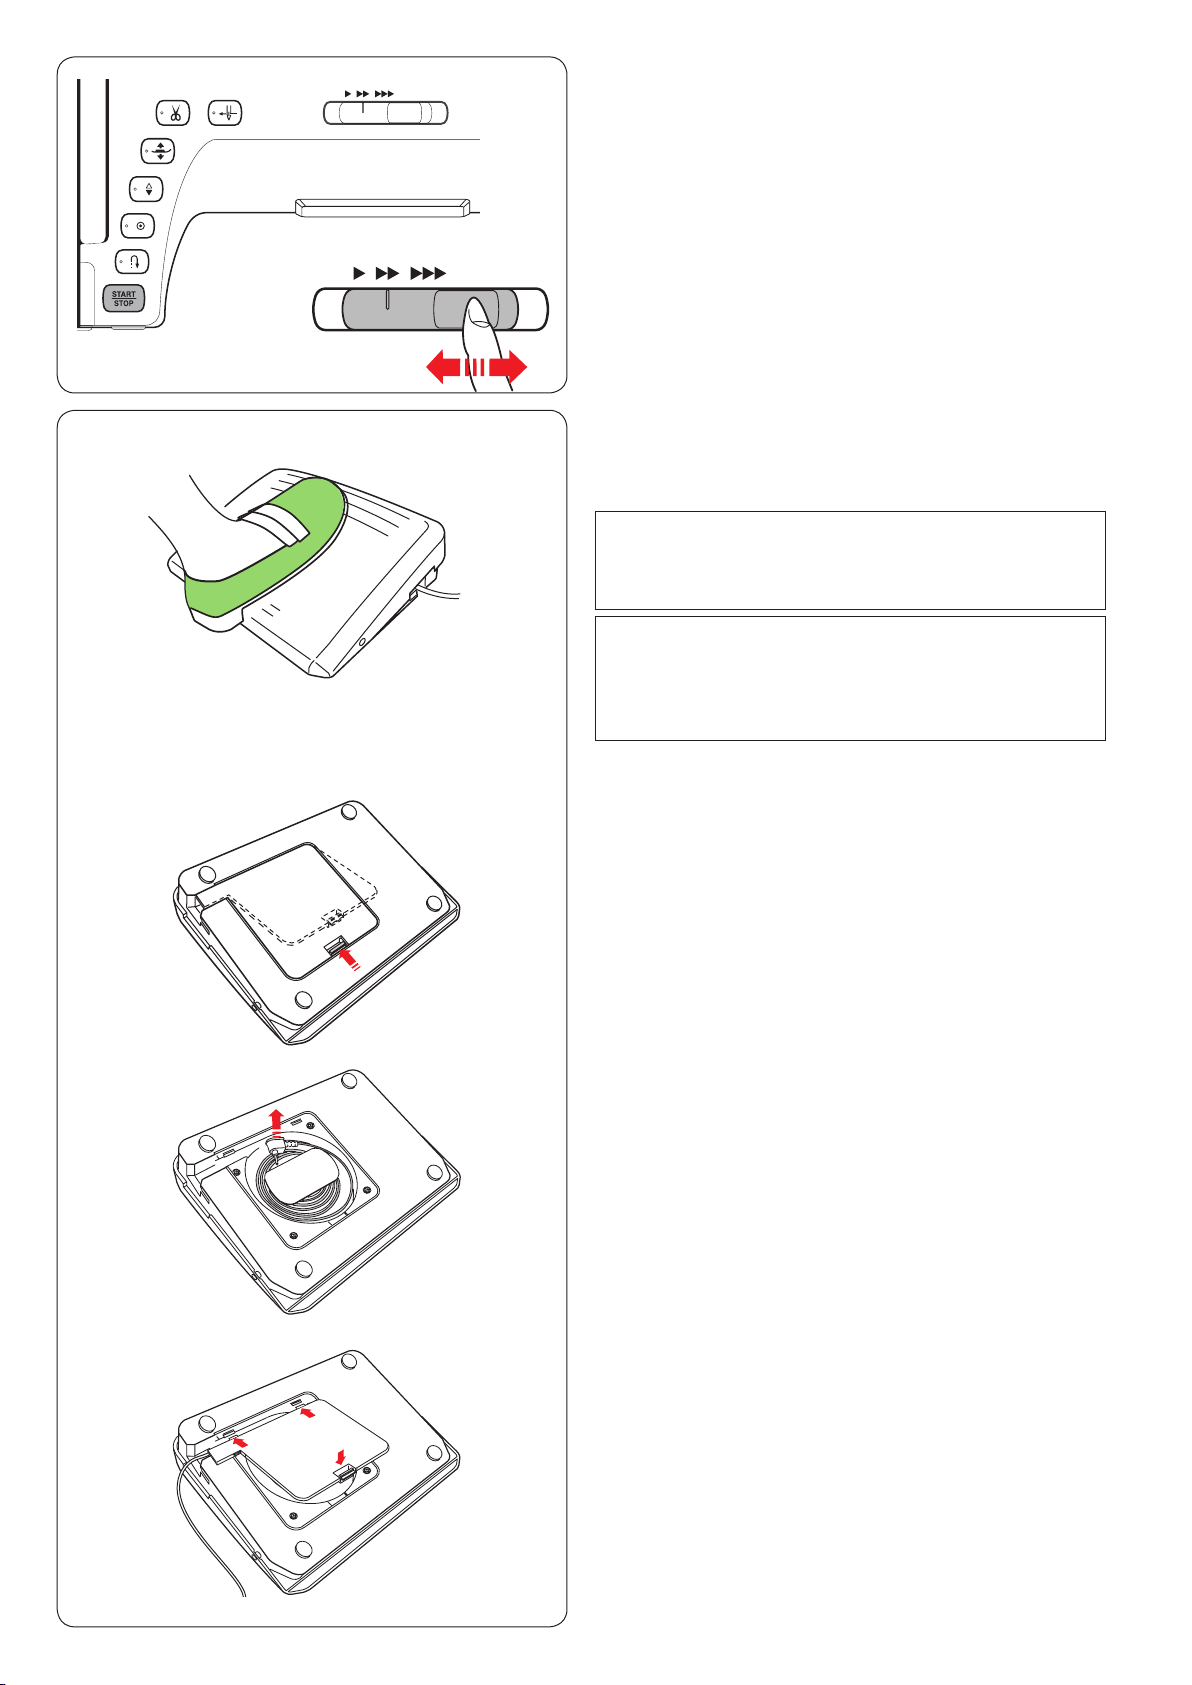
Controlling Sewing Speed
Speed control slider
You can limit the maximum sewing speed in both the
ordinary sewing mode and embroidery mode with the
speed control slider according to your sewing needs.
To increase the sewing speed, move the slider to the right.
To decrease the sewing speed, move the slider to the left.
The sewing speed can be changed while stitching.
Foot Control
Pressing on the foot control can vary sewing speed.
The harder you depress the foot control, the faster the
machine runs.
NOTE:
The machine runs at the maximum speed set by
the speed control slider when the foot control is fully
depressed.
NOTE:
This machine is equipped with an automatic shutdown
safety feature to prevent overheating whenever the
machine is running overloaded. Follow the safety
instructions that appear on the visual touch screen.
z
x
Foot Control Preparation
z Turn the foot control upside down.
Open the cover of the foot control.
x Draw out the cable from the foot control.
c
c Close the cover.
10
r
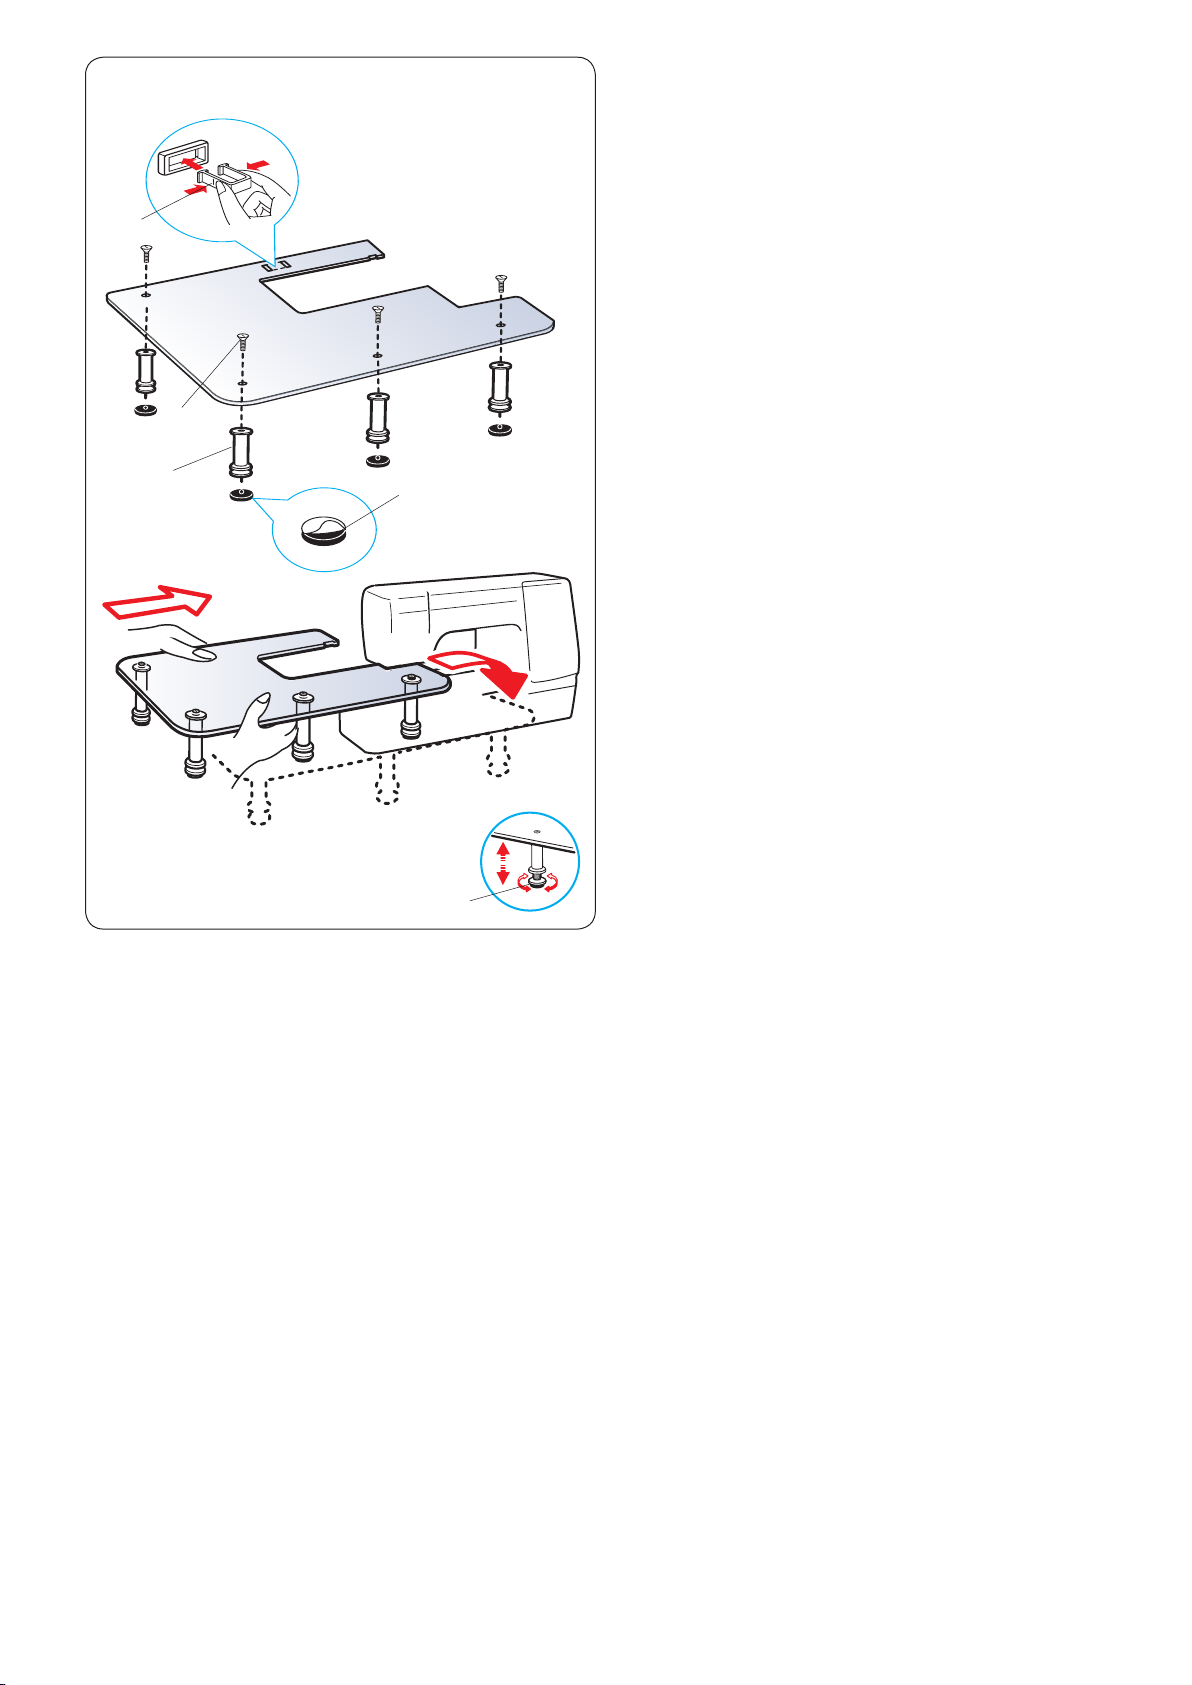
Extra Wide Table
Peel off the backing paper from the rubber soles and
attach them to the bottom of the legs
q Rubber sole
w Leg
Attach the 4 legs to the table top with the setscrew.
Attach the table support to the underside of the table by
inserting the hooks into the slots.
e Setscrew
r Table support
Remove the extension table.
Place the assembled table on the machine.
Adjust the table height by turning the adjusting screws.
t Adjusting screw
e
w
q
t
11
r t y u
e
w
q
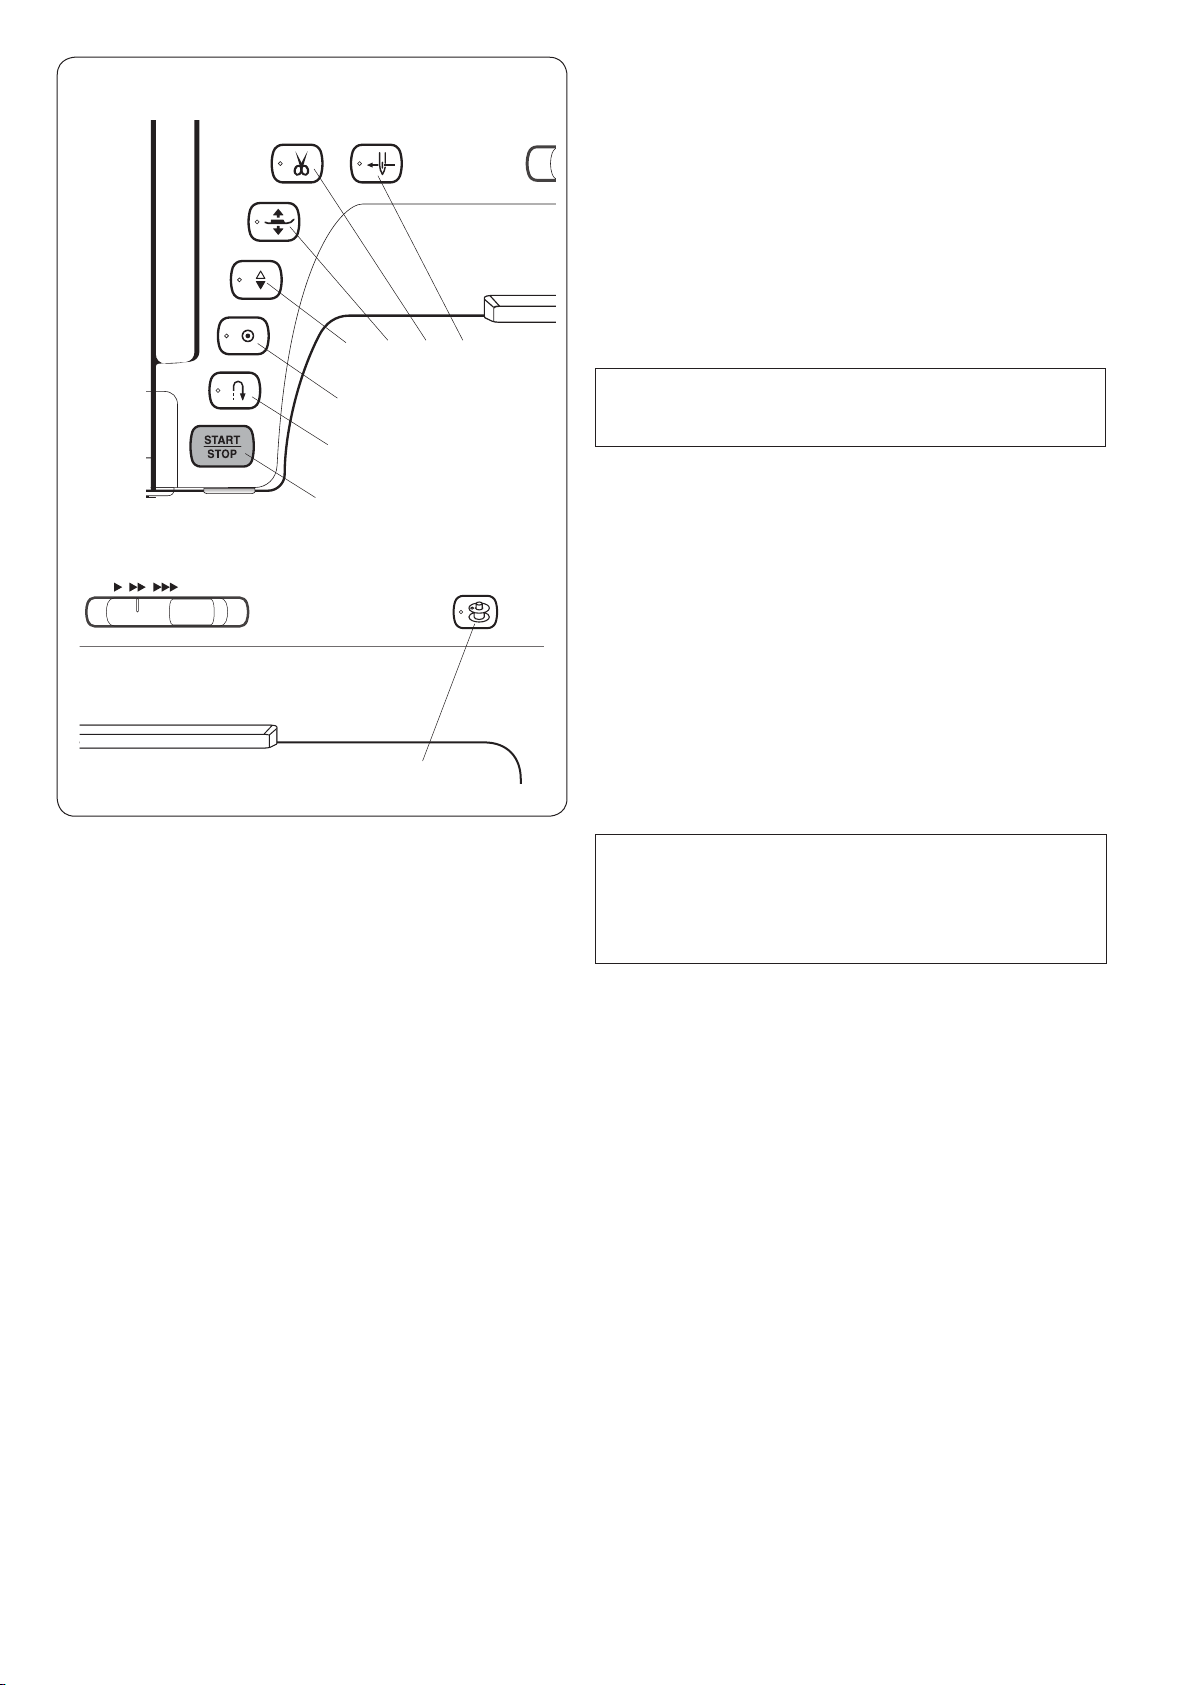
Machine Operating Buttons
q Start/stop button
Press this button to start or stop the machine. This
button can be used either in the ordinary sewing mode or
embroidery mode.
In the ordinary sewing mode, the machine starts running
slowly for the rst few stitches. It then runs at the speed
set by the speed control slider.
The machine runs slowly as long as this button is being
pressed.
The button turns red when the machine is running, and
green when it stops.
NOTE:
The start/stop button cannot be used in the ordinary
sewing mode when the foot control is connected.
w Reverse button
When sewing stitch pattern U1, U4, U9-12, Q1-3 or
BR1-4, the machine will sew in reverse as long as the
reverse button is pressed.
If stitch pattern U1, U4, U9-12, Q1-3 or BR1-4 has
been selected and the foot control is not connected,
the machine will start sewing in reverse as long as the
reverse button is pressed.
If you press the reverse button when sewing any other
patterns, the machine will immediately sew locking
stitches and automatically stop.
i
e Auto-lock button
When sewing stitch pattern U1, U4, U9-12, Q1-3 or
BR1-4, the machine will immediately sew locking stitches
and automatically stop when the auto-lock button is
pressed.
When sewing all other patterns, the machine will sew to
the end of the current pattern, sew locking stitches and
stop automatically.
The machine will trim the threads automatically after
locking the stitch when the thread cut after auto-lock
option is turned on (refer to page 101).
r Needle up/down button
The machine will always stop with the needle down
except when buttonholes, darning, tacking, eyelets or
monograms are selected.
Press this button to bring the needle bar up or down.
t Presser foot lifter button
The presser foot will go up or go down by pressing this
button.
You can also use the presser foot lifter and knee lifter to
raise and lower the presser foot.
NOTE:
The thread cutter button does not function:
- directly after turning on the power.
- when the presser foot is raised with the foot lifter.
- after being pressed 3 times in a row.
u Needle threader button
Press this button to thread the needle thread through the
needle eye (refer to page 18).
i Bobbin winding button
Press this button to wind the bobbin (refer to page 15).
y Thread cutter button
Press this button when you nish sewing to trim the
threads. The needle bar and presser foot automatically
rise after trimming the threads.
Refer to page 33.
12
w r t yq e
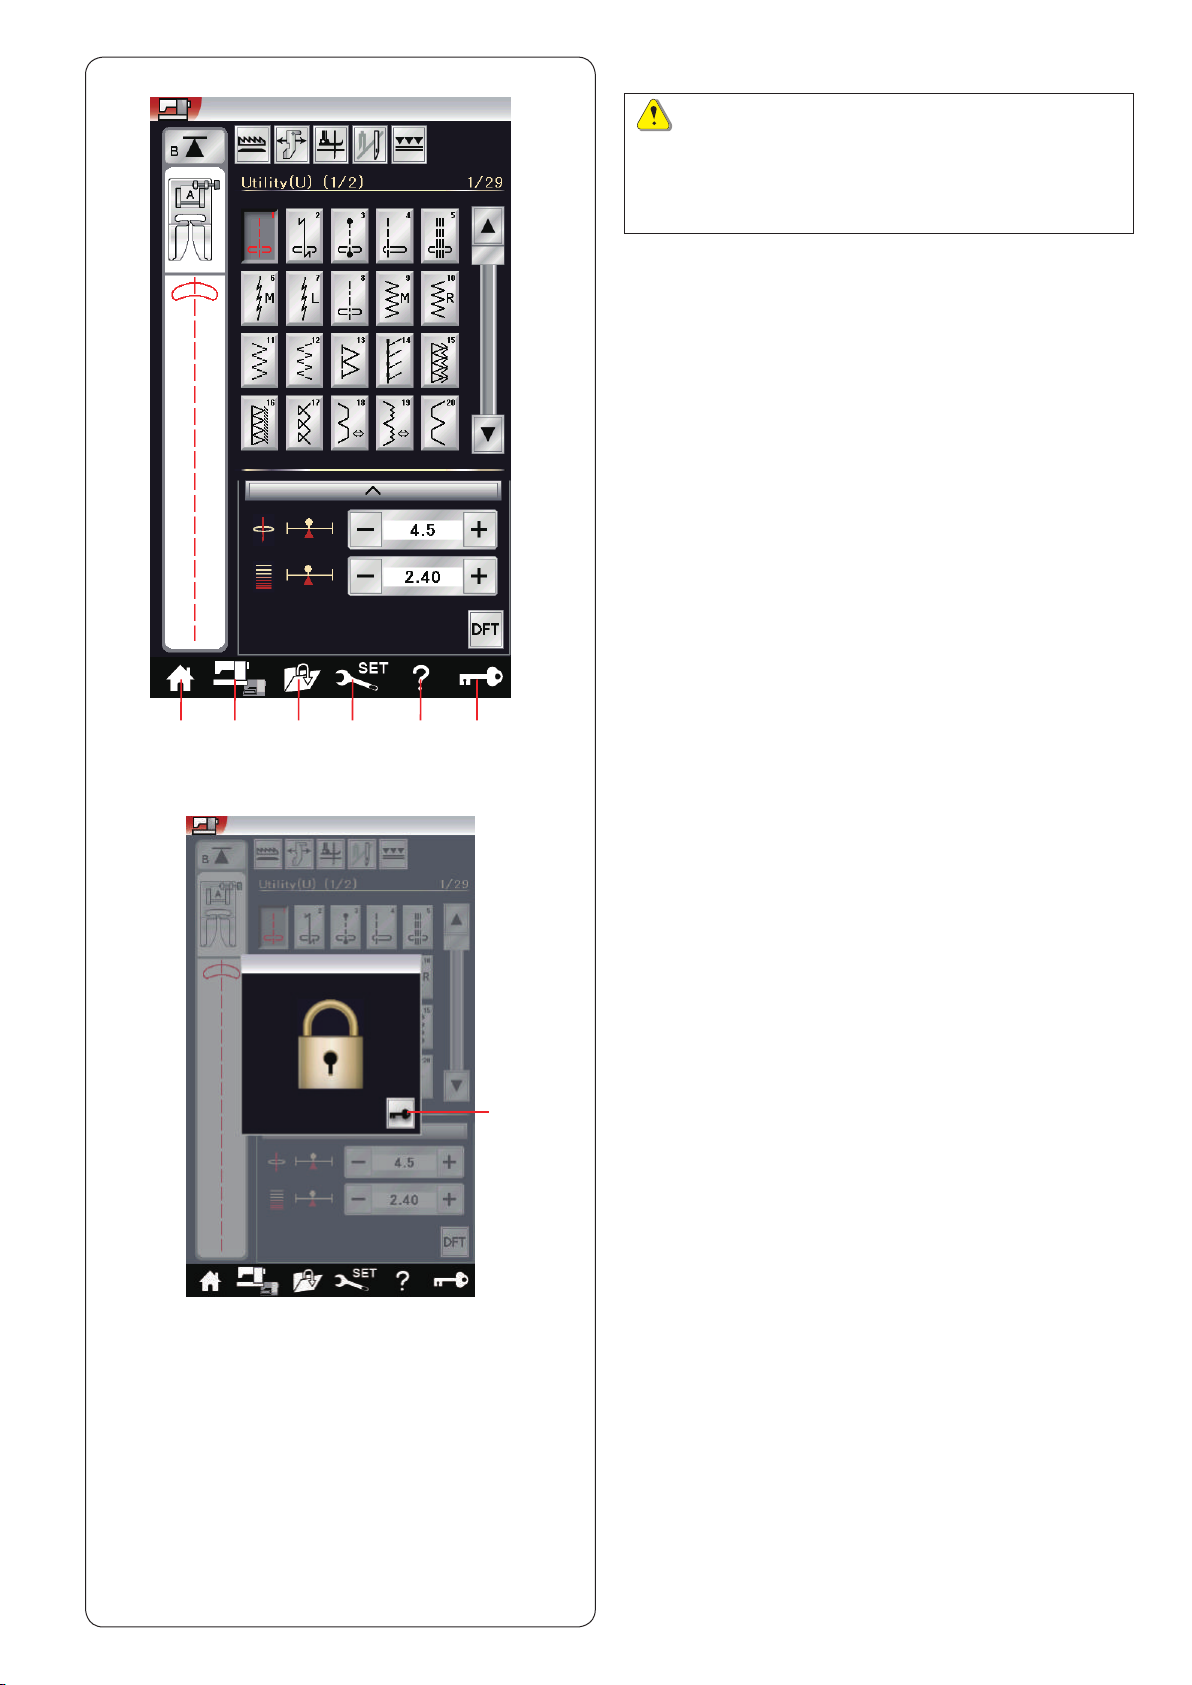
Common Keys
CAUTION:
Do not press the visual touch screen with hard or
sharp objects like pencils, screwdrivers or the like.
Use the touch panel stylus included in the standard
accessories.
q Home key
Press this key to enter the category selection of the
ordinary sewing mode or embroidery mode.
w Mode switch key
Press this key to enter into embroidery mode or to return
to ordinary sewing mode.
e Open le key
Press this key and the open le window will open.
You can open pattern combinations, monograms and
embroidery designs saved in the machine’s internal
memory or on a USB ash drive.
r Set mode key
Press this key to enter the setting mode. You can
customize the machine settings to your preference.
The machine settings for common settings, ordinary
sewing, embroidery and language selection are available
in this mode.
u
t Help movie key
Press this key to view the on-screen movie about the
essential operations.
y Lockout key
Press this key to lockout the machine when threading the
machine, replacing the accessories etc.
To reduce the risk of injury, all the buttons and keys
except for the presser foot lifter and needle threader
button are deactivated.
To unlock the machine, press the unlock key u on the
window.
13
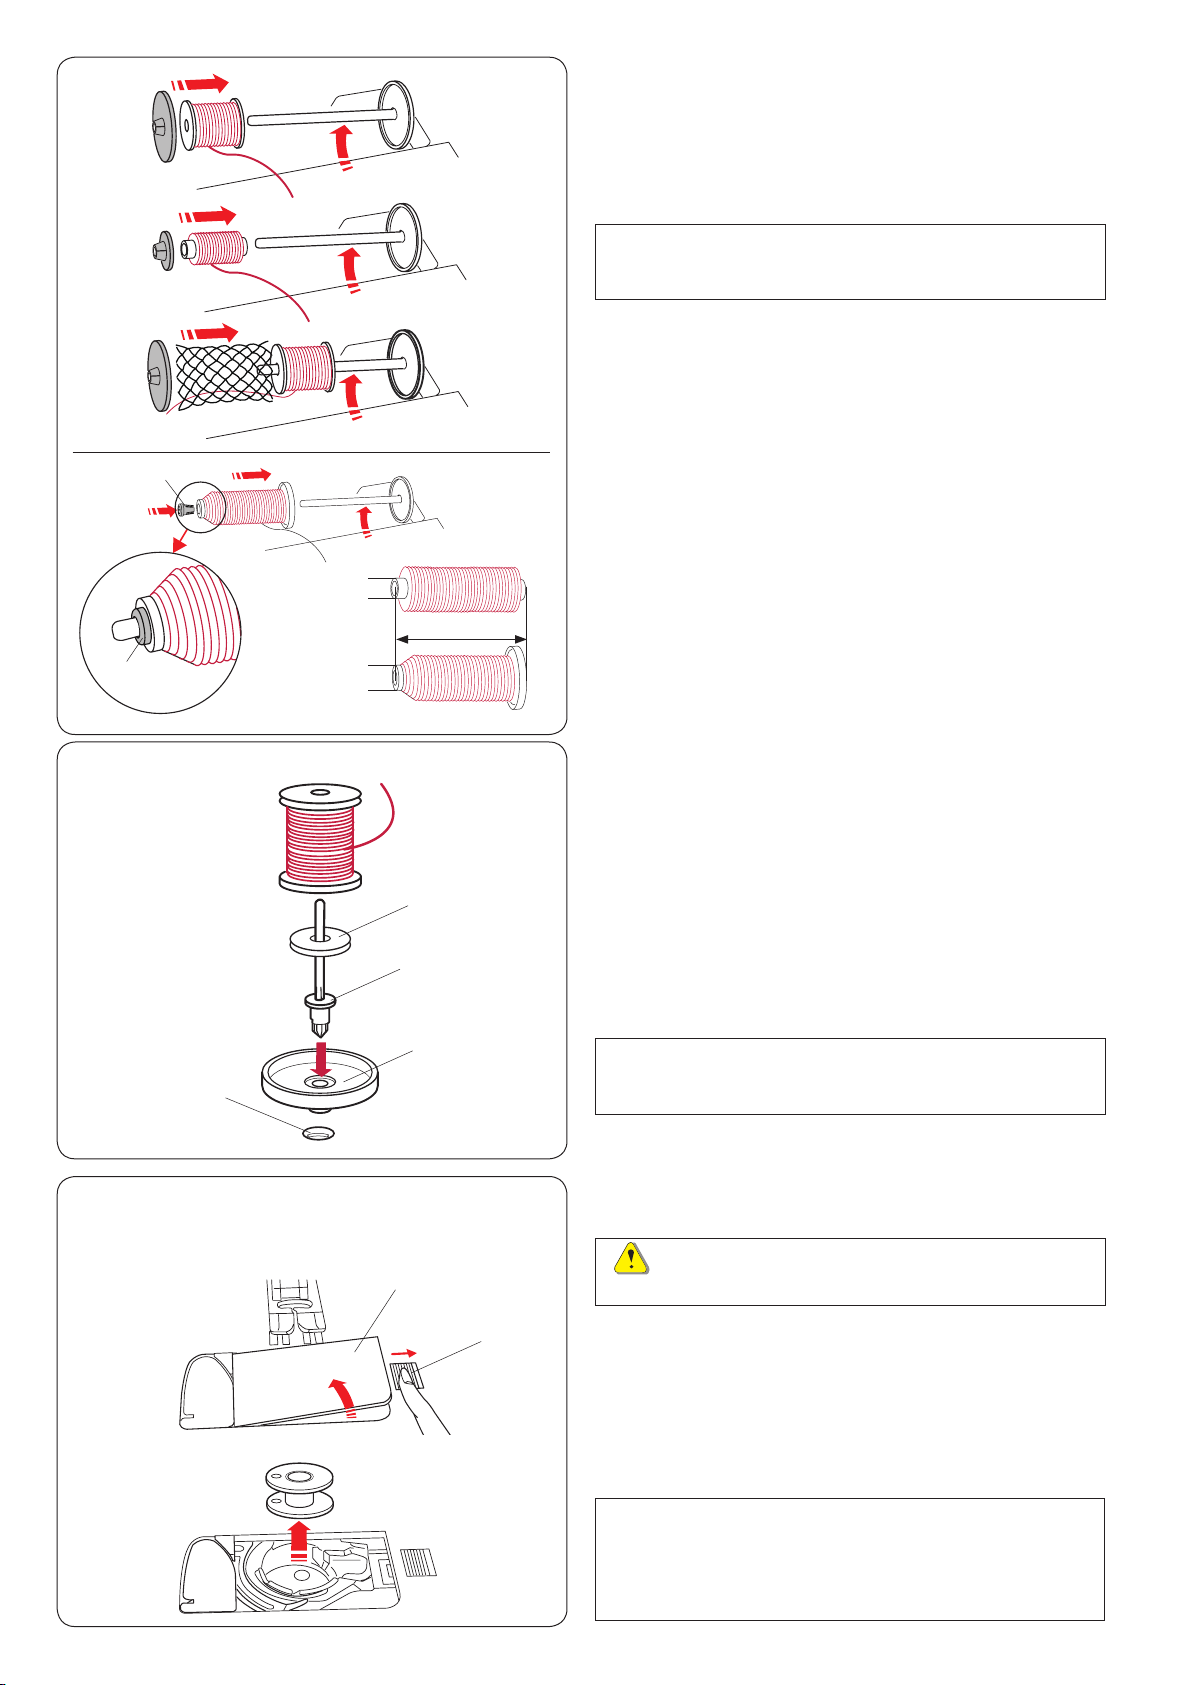
Setting the Spool of Thread
Open the top cover.
Lift up the spool pin. Place the spool of thread on the
spool pin.
Attach the large spool holder, and press it rmly against
the spool of thread.
NOTE:
Use the small spool holder to hold narrow or small
spools of thread.
If you use a slippery thread such as monolament
transparent thread, put the net on the spool of thread
to prevent the thread from slipping off the spool and
jamming around the spool pin.
q
q
w
w
w
r
e
Use the spool holder (special) to hold the specic size of
the spool of threads as shown.
The sizes of the spools of thread are as follows;
The hole diameter of the spool has a range of 3/8˝ to
7/16˝ (9.5 to 10.5 mm)), and the spool length has a range
of 2 3/4˝ to 3˝ (70 to 75 mm).
q Spool holder (special)
w Hole diameter (3/8˝ to 7/16˝)
e Spool length (2 3/4˝ to 3˝)
Firmly insert the spool holder (special) into the hole and
hold the spool as illustrated.
Additional spool pin
Use the additional spool pin when you need to wind a
bobbin without unthreading the machine while working on
a sewing project (refer to page 108).
Set the spool stand q under the additional spool pin w.
Insert the additional spool pin w into the hole e.
Place the felt r and a spool on the pin.
q Spool stand
w Additional spool pin
e Hole for additional spool pin
r Felt
z
x
e
w
q
q
NOTE:
The additional spool pin is also used for twin needle
sewing.
Winding the Bobbin
Removing the bobbin
CAUTION:
Press the lockout key or turn the power switch off.
z Slide the hook cover release button q to the right,
and remove the hook cover plate w.
q Hook cover release button
w Hook cover plate
x Remove the bobbin from the bobbin holder.
NOTE:
Use the plastic bobbins for horizontal hook marked
with a “J”. Using other bobbins, such as pre-wound
paper bobbins, may cause stitching problems and/
or damage to the bobbin holder.
14
Winding the bobbin
c
z
w
r
q
t
w
v
x
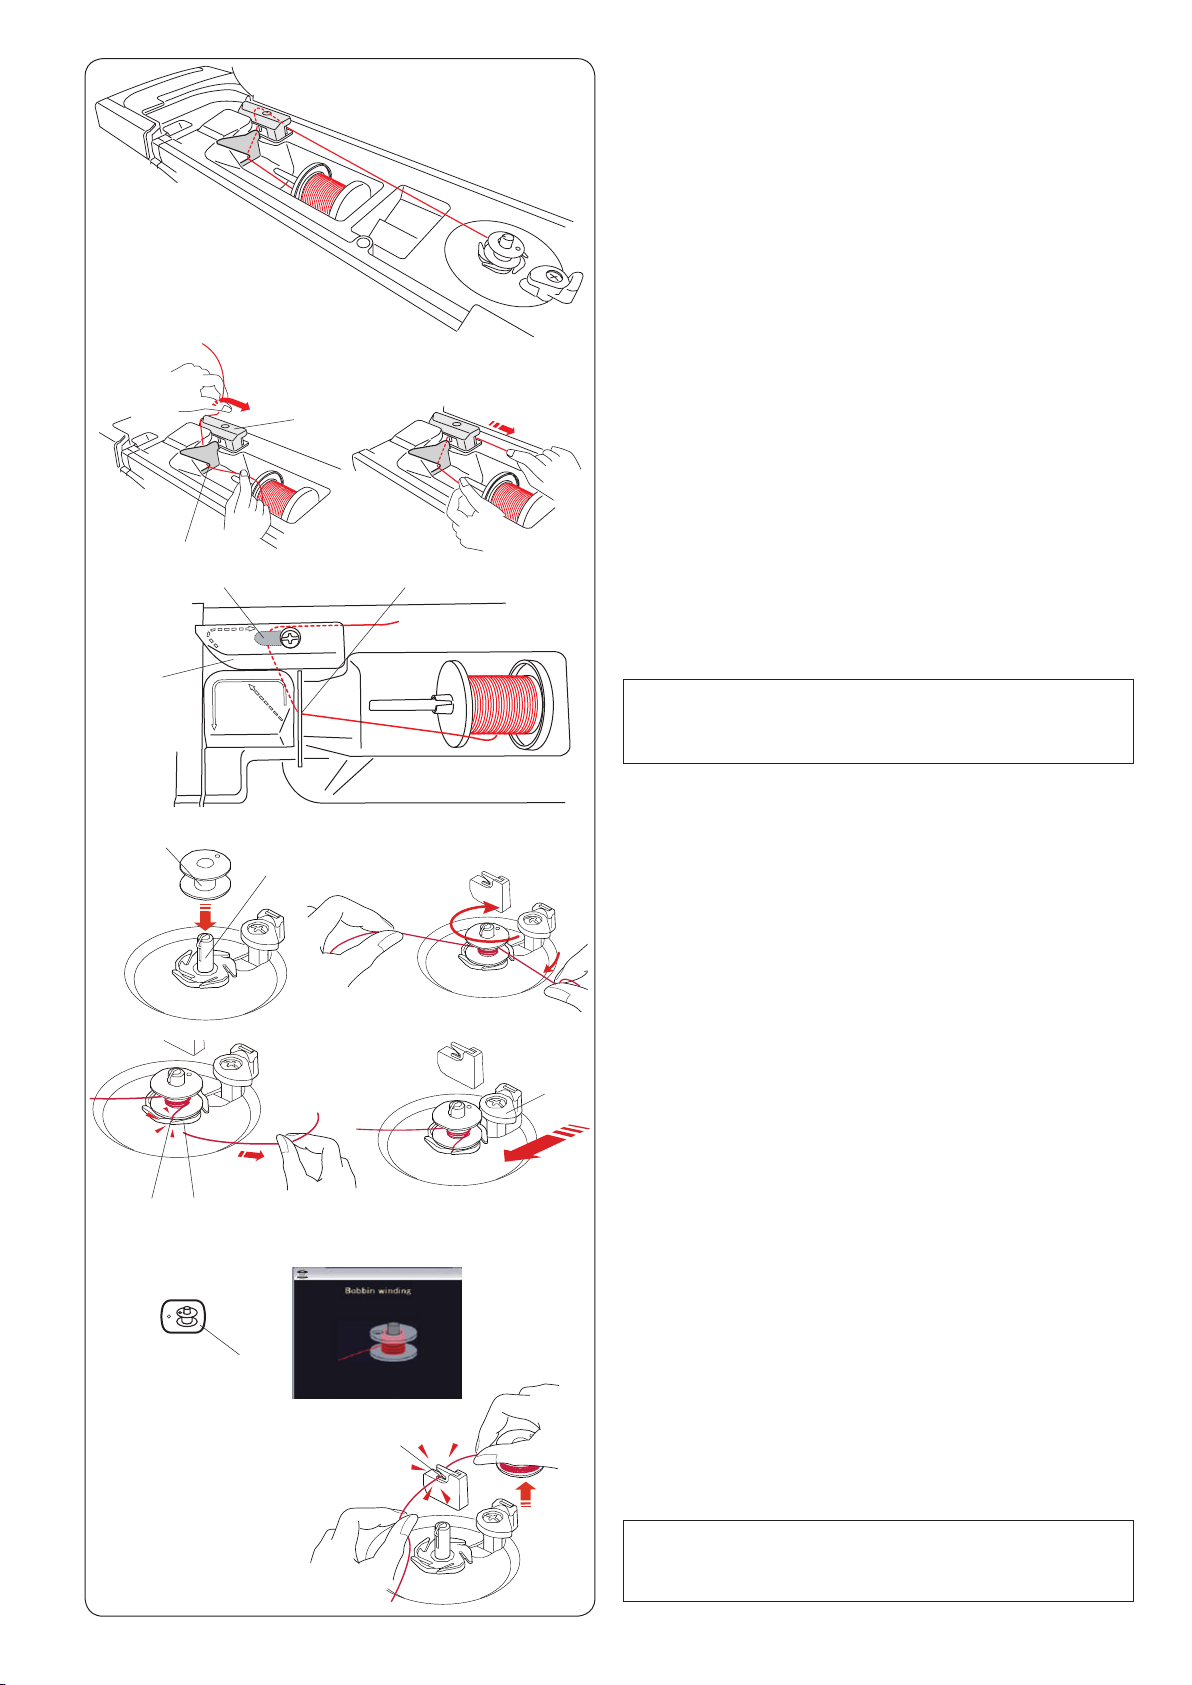
z Pull the thread from the spool.
Hold the thread with both hands and pass the thread
into the guide slot q.
Draw the thread to the left and forward around the
thread guide w.
Draw the thread to the rear and to the right around
and under the guide plate e.
q Guide slot
w Thread guide
qe
e Guide plate
x Firmly pull the thread to the right while holding it with
both hands.
NOTE:
You can adjust the bobbin winding speed in the
setting mode (refer to page 98).
c Put the bobbin on the bobbin winder spindle.
r Bobbin
t Bobbin winder spindle
b
m ,
u
y
o
n
!0
i
v Pass the thread to the bobbin.
Hold the thread with both hands and wind it around
the bobbin clockwise several times.
b Insert the thread into one of the slits u of the ange
plate y and pull the thread to cut.
y Flange plate
u Slit
n Push the bobbin stopper i to the left.
i Bobbin stopper
m Press the bobbin winding button o. The visual touch
screen will show the bobbin winding sign.
o Bobbin winding button
When the bobbin is fully wound, it will stop spinning
and the bobbin stopper returns to its original position
automatically.
, Remove the bobbin. Cut the thread with bobbin thread
cutter B !0.
! 0 Bobbin thread cutter B
NOTE:
For safety purposes, the machine will automatically
stop 1.5 minutes after starting bobbin winding.
15
Inserting the bobbin
z
x
r
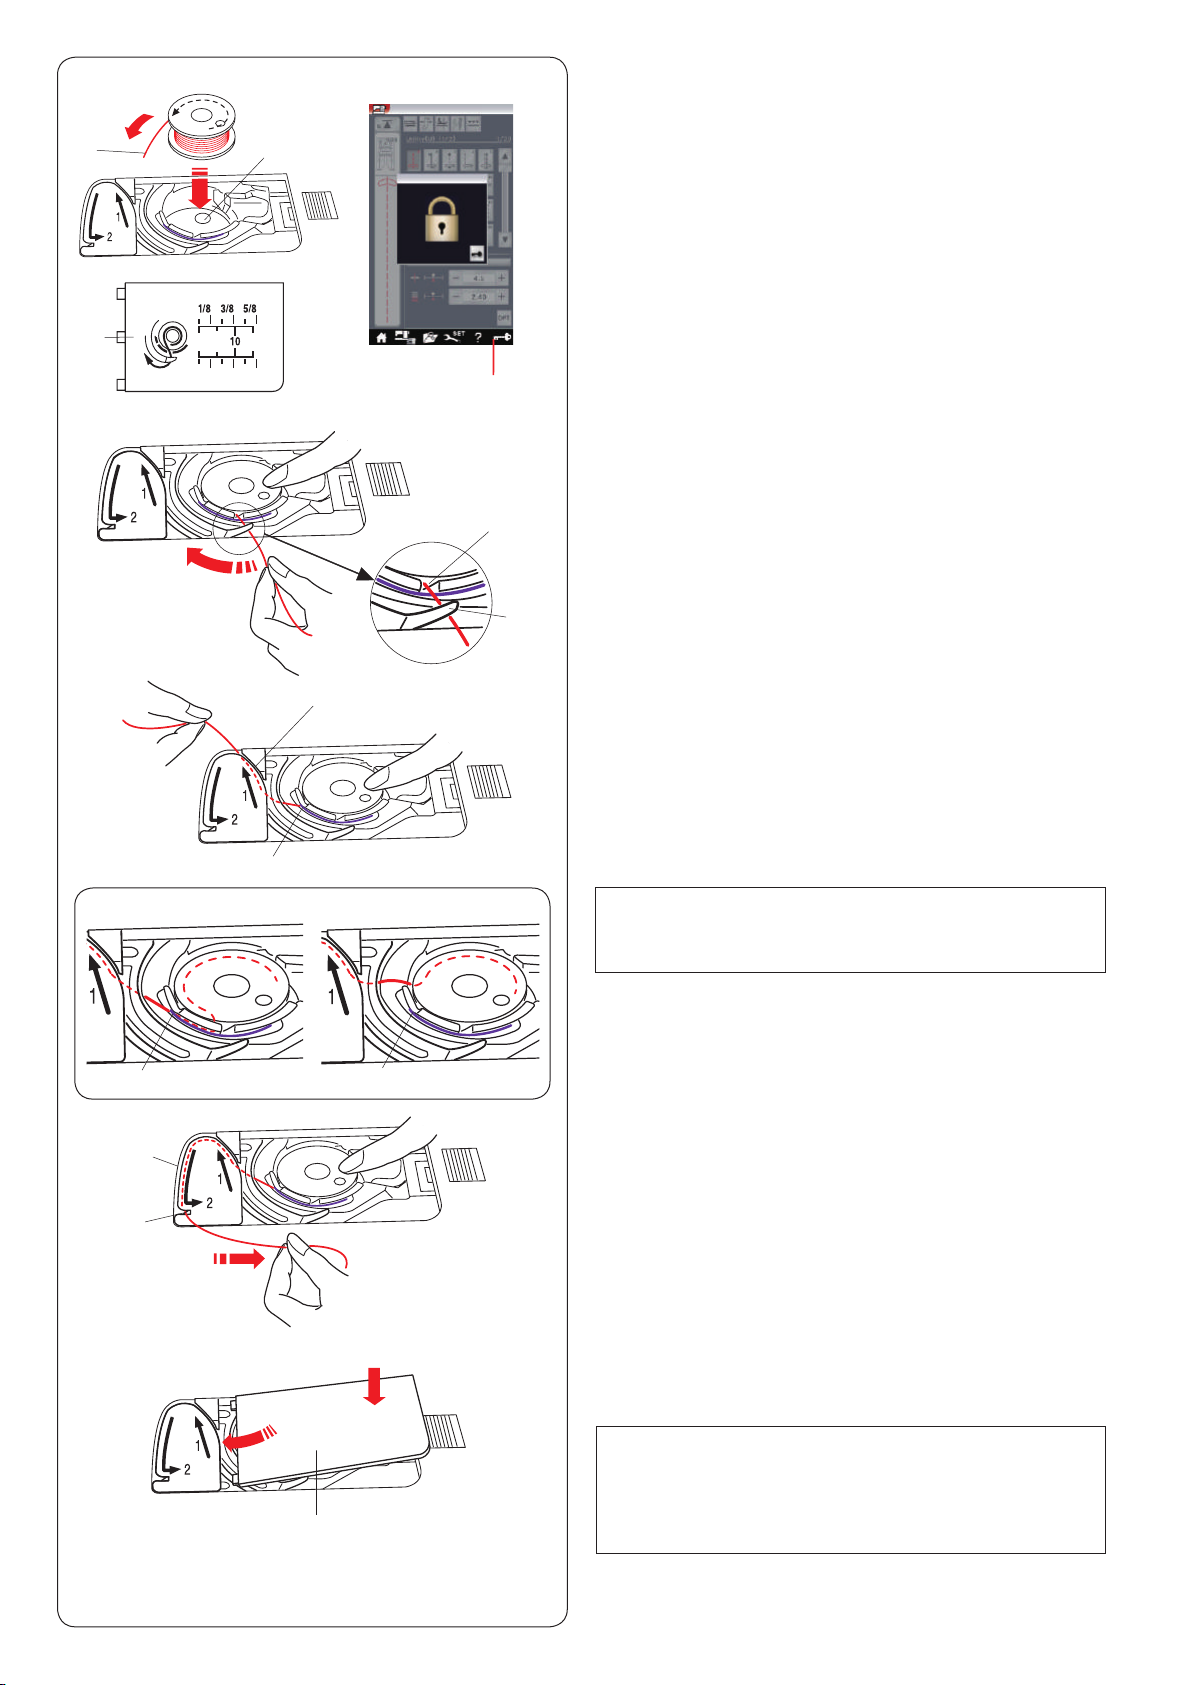
z Press the lockout key.
Place a bobbin in the bobbin holder with the thread
ew
q
t
running off counterclockwise as shown on the hook
cover plate.
q Lockout key
w End of thread
e Bobbin holder
r Hook cover plate
x Hold the bobbin with your ngertip so it does not
rotate.
Guide the thread into the front notch of the bobbin
hol d er.
Pull the thread to the left to pass it under the guide.
t Front notch
y Guide
y
c
v
i
o
!0
Correct
i
u
i
Wrong
c Draw the thread to the left to pass it into the guide
path marked “1”.
Make sure that the thread comes out from the side
notch of the bobbin holder.
u Guide path 1
i Side notch
NOTE:
If the thread does not come out from the side notch,
rethread from step z.
v Continue to draw the thread along the guide path
marked “2” and pull the thread to the right through the
slit. The thread will be cut to a proper length and held
in place.
o Guide path 2
! 0 Slit (Thread cutter)
b
r
b Set the left edge of the hook cover plate into opening.
Push down the hook cover plate to t in place.
NOTE:
Unless otherwise noted, you can start sewing without
drawing up the bobbin thread.
Refer to page 19 for how to draw up the bobbin
thread.
16
v
x
z
Threading the Machine
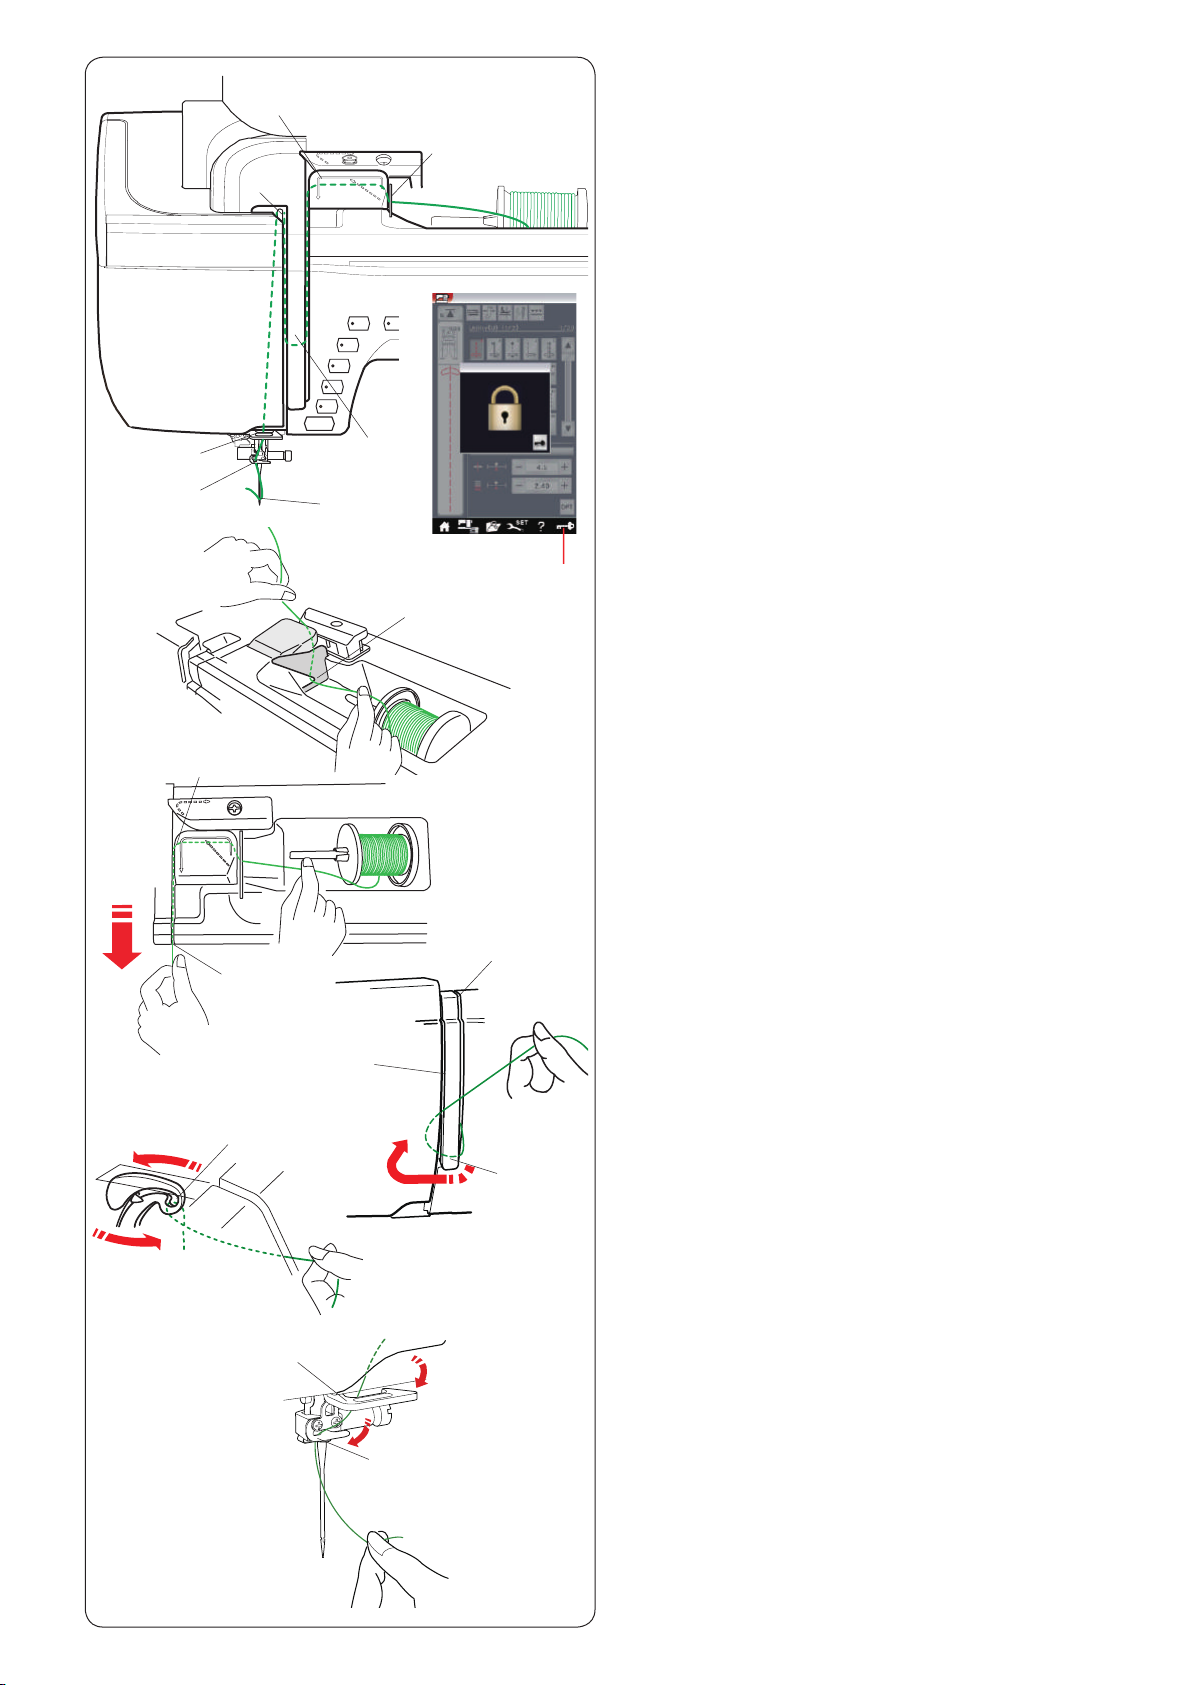
Press the needle up/down button to raise the take-up lever
to the highest position.
Press the lockout key to lockout the machine. The presser
foot will go down and the upper thread tension disks will
open.
q Lockout key
Pass the thread in order from z to m.
z
x
b
n
e
r
c
m
y
c
w
r
q
z Hold the thread with both hands and pass the thread
into the guide slot.
w Guide slot
x Hold the thread with both hands and draw the thread
around the corner of the guide.
Firmly pull the thread toward you along the right
channel until the thread snaps.
e Corner of the guide
r Right channel
c Draw the thread down along the right channel and
around the bottom of the thread guide plate.
Pull the thread up along the left channel.
r Right channel
t Thread guide plate
y Left channel
v
u
b
n
m
i
o
t
v While holding the thread at the spool, rmly draw the
thread up and to the back of the take-up lever. Draw
the thread forward to draw it into the eye of the take-
up lever.
u Eye of the take-up lever
b Then pull the thread down along the left channel and
through the lower thread guide.
i Lower thread guide
n Slide the thread from the right of the needle bar thread
guide to the left.
o Needle bar thread guide
m Thread the needle with the needle threader (refer to
the next page).
17
z
q
w
Automatic Needle Threader
NOTE:
The needle threader can be used with a #11 to #16
needle.
Thread size 50 to 90 is recommended.
Do not use thread size 30 or thicker.
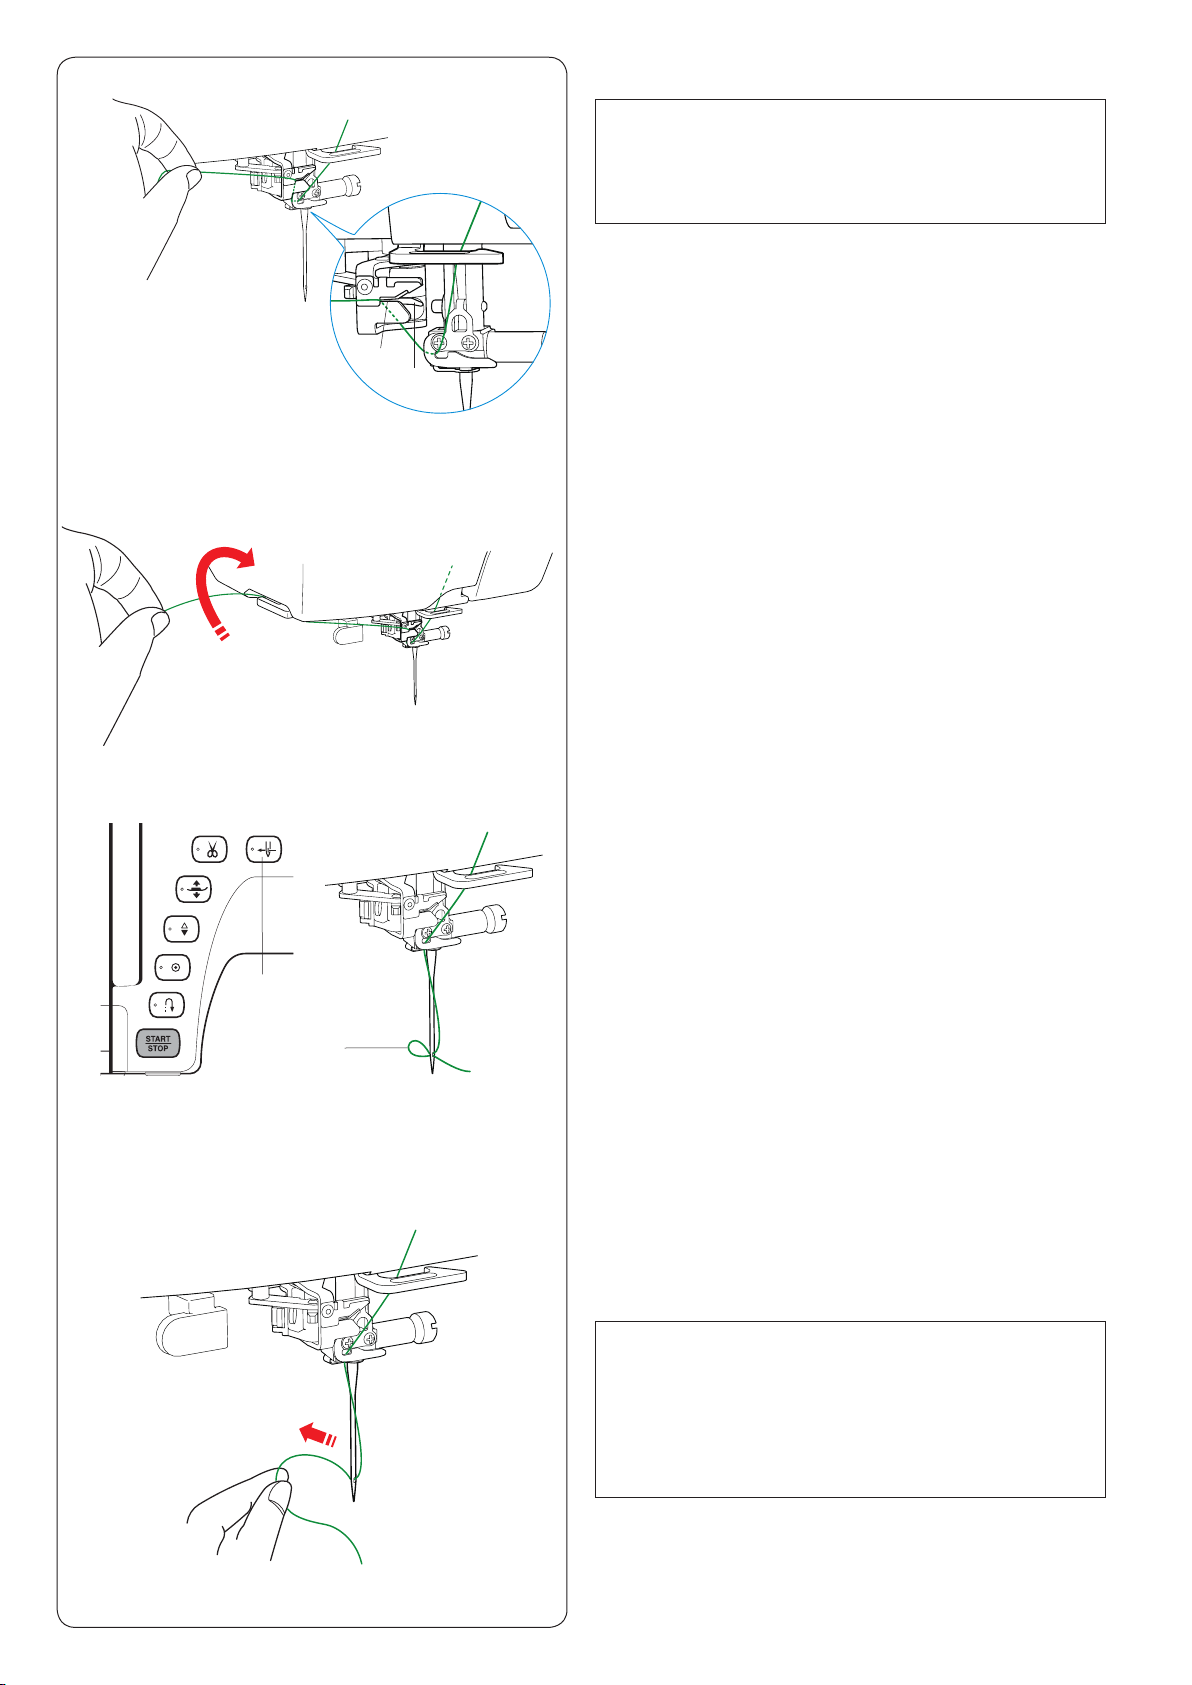
Make sure the machine is locked out.
z Draw the thread through the slit q of the needle
threader. The thread should pass under the hook w.
q Slit
w Hook
x
c
x Pull the thread up and slip it between the thread cutter
and face plate from behind.
Pull the thread toward you to cut.
c Press the needle threader button e.
The needle thread will be automatically threaded
through the needle eye.
e Needle threader button
e
r
v
v Pull the thread loop r to take the thread end out
through the needle eye to the rear.
r Thread loop
NOTE:
• The automatic needle threader cannot be used
with the twin needle.
• If the thread is caught in the hook and the thread
loop is not formed, remove the thread from the
hook and pull it to take the thread end out through
the needle eye.
18
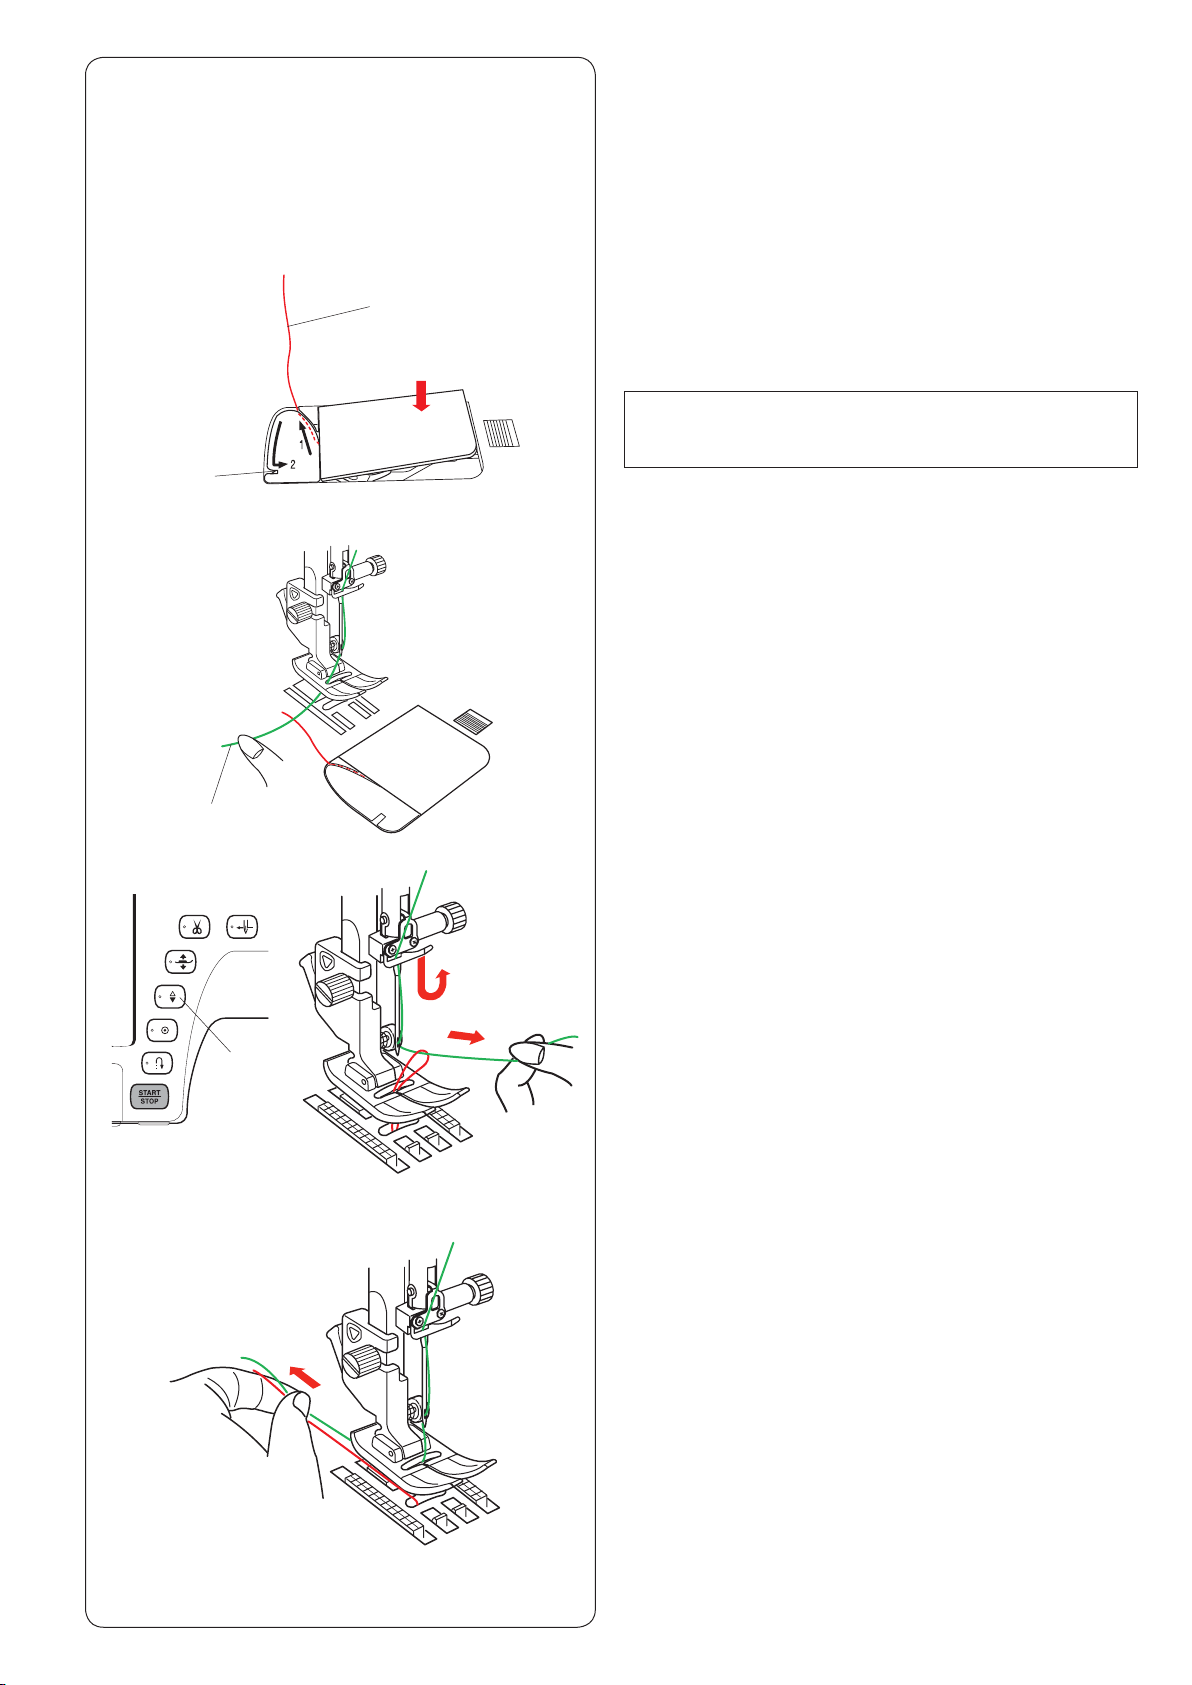
Drawing up the Bobbin Thread
After using auto thread cutting or threading the bobbin
holder, you can start sewing without drawing up the
bobbin thread.
However, you need to draw up the bobbin thread when
sewing gathering stitches etc.
z
x
w
e
q
z Remove the bobbin. Insert the bobbin into the bobbin
holder again and rethread the bobbin holder according
to the instructions on page 16, but leave a 10 cm (4˝)
tail of bobbin thread as shown.
q Bobbin thread
NOTE:
Do not cut the bobbin thread with the thread cutter.
w Thread cutter
x Raise the presser foot. Hold the needle thread lightly
with your left hand.
e Needle thread
c
v
c Press the needle up/down button twice to lower and
raise the needle and pick up the bobbin thread.
r Needle up/down button
r
v Pull both threads 10 cm (4˝) under and behind the
presser foot.
19
w
q
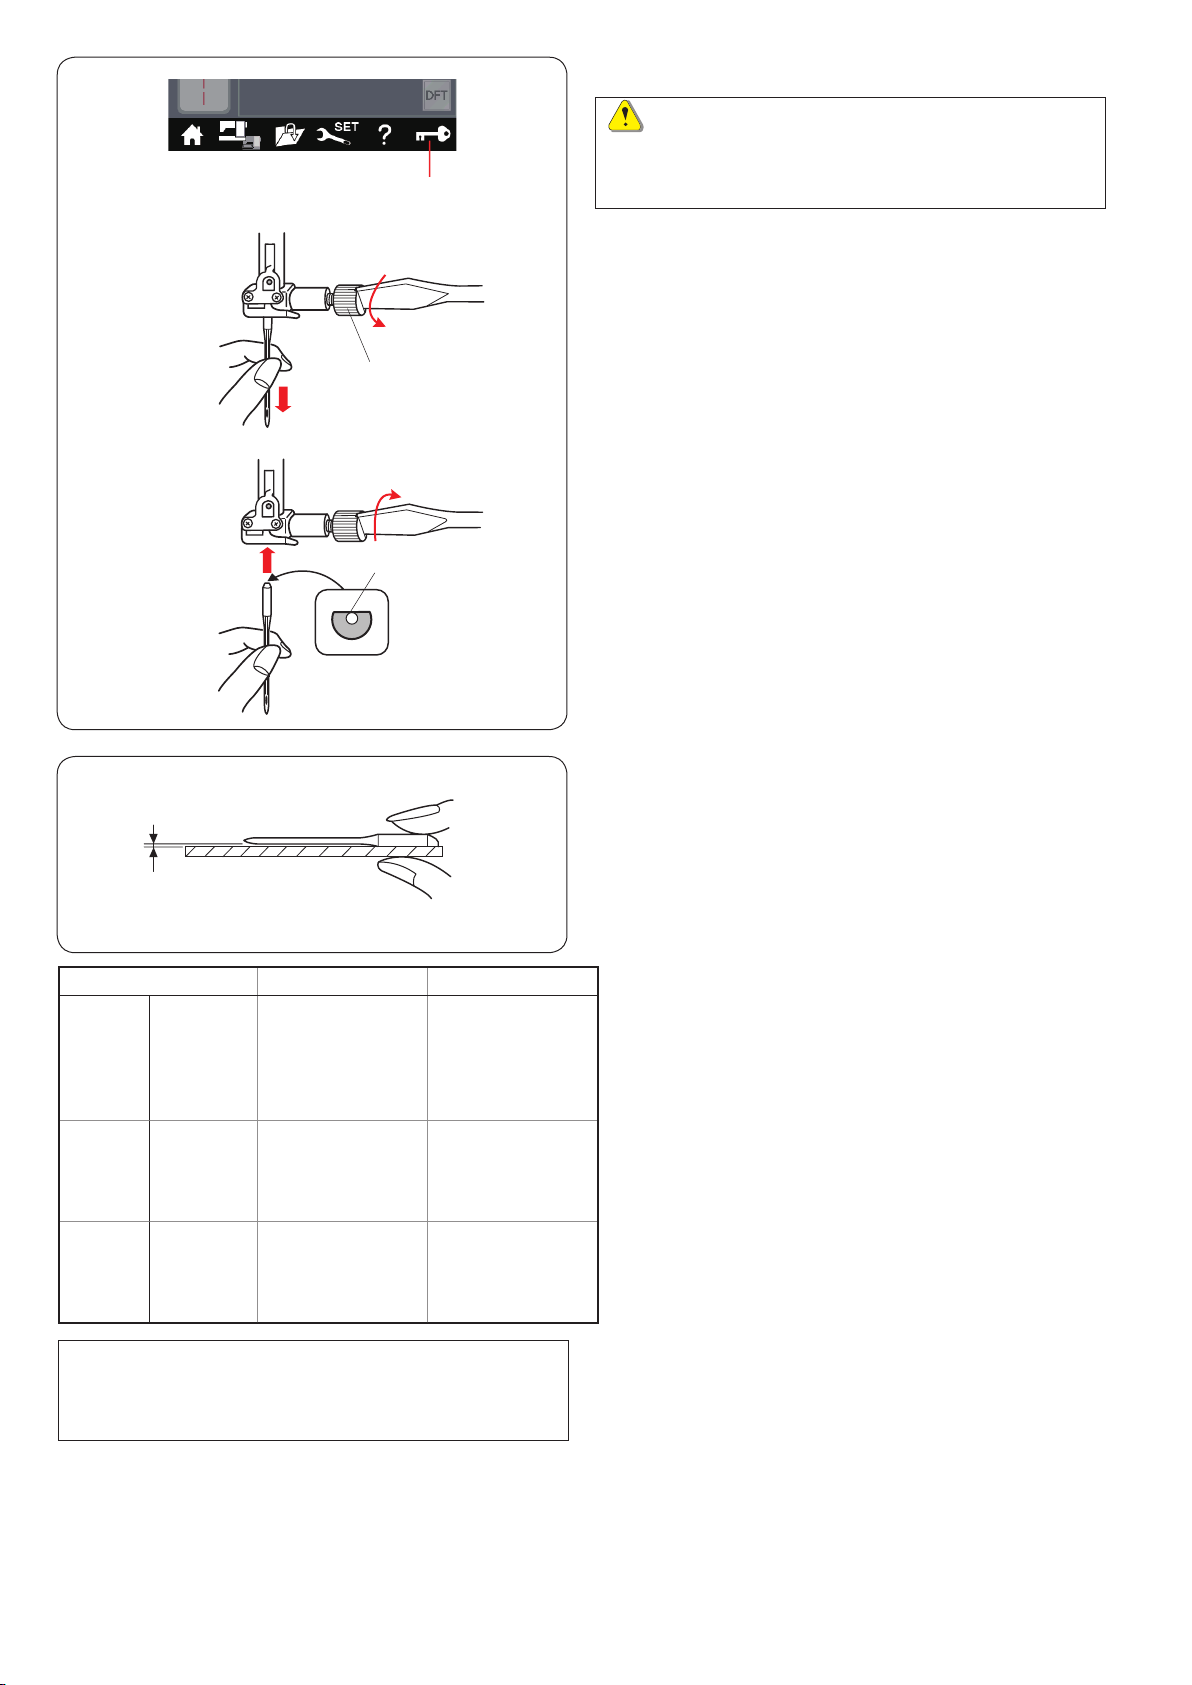
Replacing Needles
CAUTION:
Always make sure to press the lockout key to lockout
the machine or turn the power switch off before
replacing the needle.
Raise the needle by pressing the needle up/down button.
Press the lockout key.
q Lockout key
Loosen the needle clamp screw by turning it
counterclockwise.
Remove the needle from the clamp.
w Needle clamp screw
Insert a new needle into the needle clamp with the at
side of the needle to the rear.
e Flat side
e
r
Fabric Thread Needle
Lawn
Georgette
Fine
Medium
Heavy
weight
NOTE:
1 x twin needle, 2 x blue tip needle (#11/75), 1 x red tip
needle (#14/90) and 1 x purple tip needle (#14/90) are
included in the needle case (Part No. 859856005).
Tric o t
Organza
Crepe
Sheeting
Jersey
Broadcloth
Fleece
Denim
Tweed
Coating
Quilting
Silk #80-100
Cot ton # 80-10 0
Synthetic #80-100
Silk #50
Cotton #50-80
Synthetic #50-80
Silk #30-50
Cotton #40-50
Synthetic #40-50
Blue tip needle
Universal needle
#9/65-11/75
Red tip needle
Purple tip needle
Universal needle
#11/ 7 5 -14 / 9 0
Red tip needle
Purple tip needle
Universal needle
#14 / 90-16 /10 0
When inserting the needle into the needle clamp, push it
up against the stopper pin and tighten the needle clamp
screw rmly with a screwdriver.
To check needle straightness, place the at side of the
needle onto something at (a needle plate, glass etc.).
The gap between the needle and the at surface should
be consistent.
r Gap
Never use a blunt needle.
Fabric, Thread and Needle Chart
• For general sewing, use red needle.
• Fine threads and needles should be used for sewing
ne fabrics.
• In general, use the same thread for both needle and
bobbin.
• Use a blue tip needle for sewing ne fabrics, stretch
fabrics, tricot and buttonholes to prevent skipped
stitches.
• Use a purple tip needle for sewing knits, free quilting
and across the hem to prevent skipped stitches.
• Use a stabilizer or interface to stretch or ne fabrics
to prevent seam puckering.
• Always test the thread and needle size on a small
piece of the same fabric you will use for actual
sewing.
For embroidery:
• In general, use a blue tip needle.
• Use a red tip needle or purple tip needle for thicker
fabrics.
• Use a purple tip needle for dense stitch embroidery
and Quilting designs.
• Janome bobbin thread for embroidery is
recommended for bobbin.
20

q
Replacing the Presser Foot
CAUTION:
Always make sure to press the lockout key to lock out
the machine.
Raise the needle by pressing the needle up/down button.
Press the lockout key.
q Lockout key
w
Raise the presser foot lifter.
w Presser foot lifter
e
Press the black lever on the backside of the foot holder.
The presser foot will snap off.
e Lever
CAUTION
To avoid damaging the lever, do not push it down.
t
r
y
Place the desired foot under the foot holder so that the
pin of the foot lies just under the groove of the foot holder.
Lower the presser foot lifter to lock the foot in place.
r Pin
t Groove
Each foot is marked with an identication letter.
y Identication letter
21
e
w
q
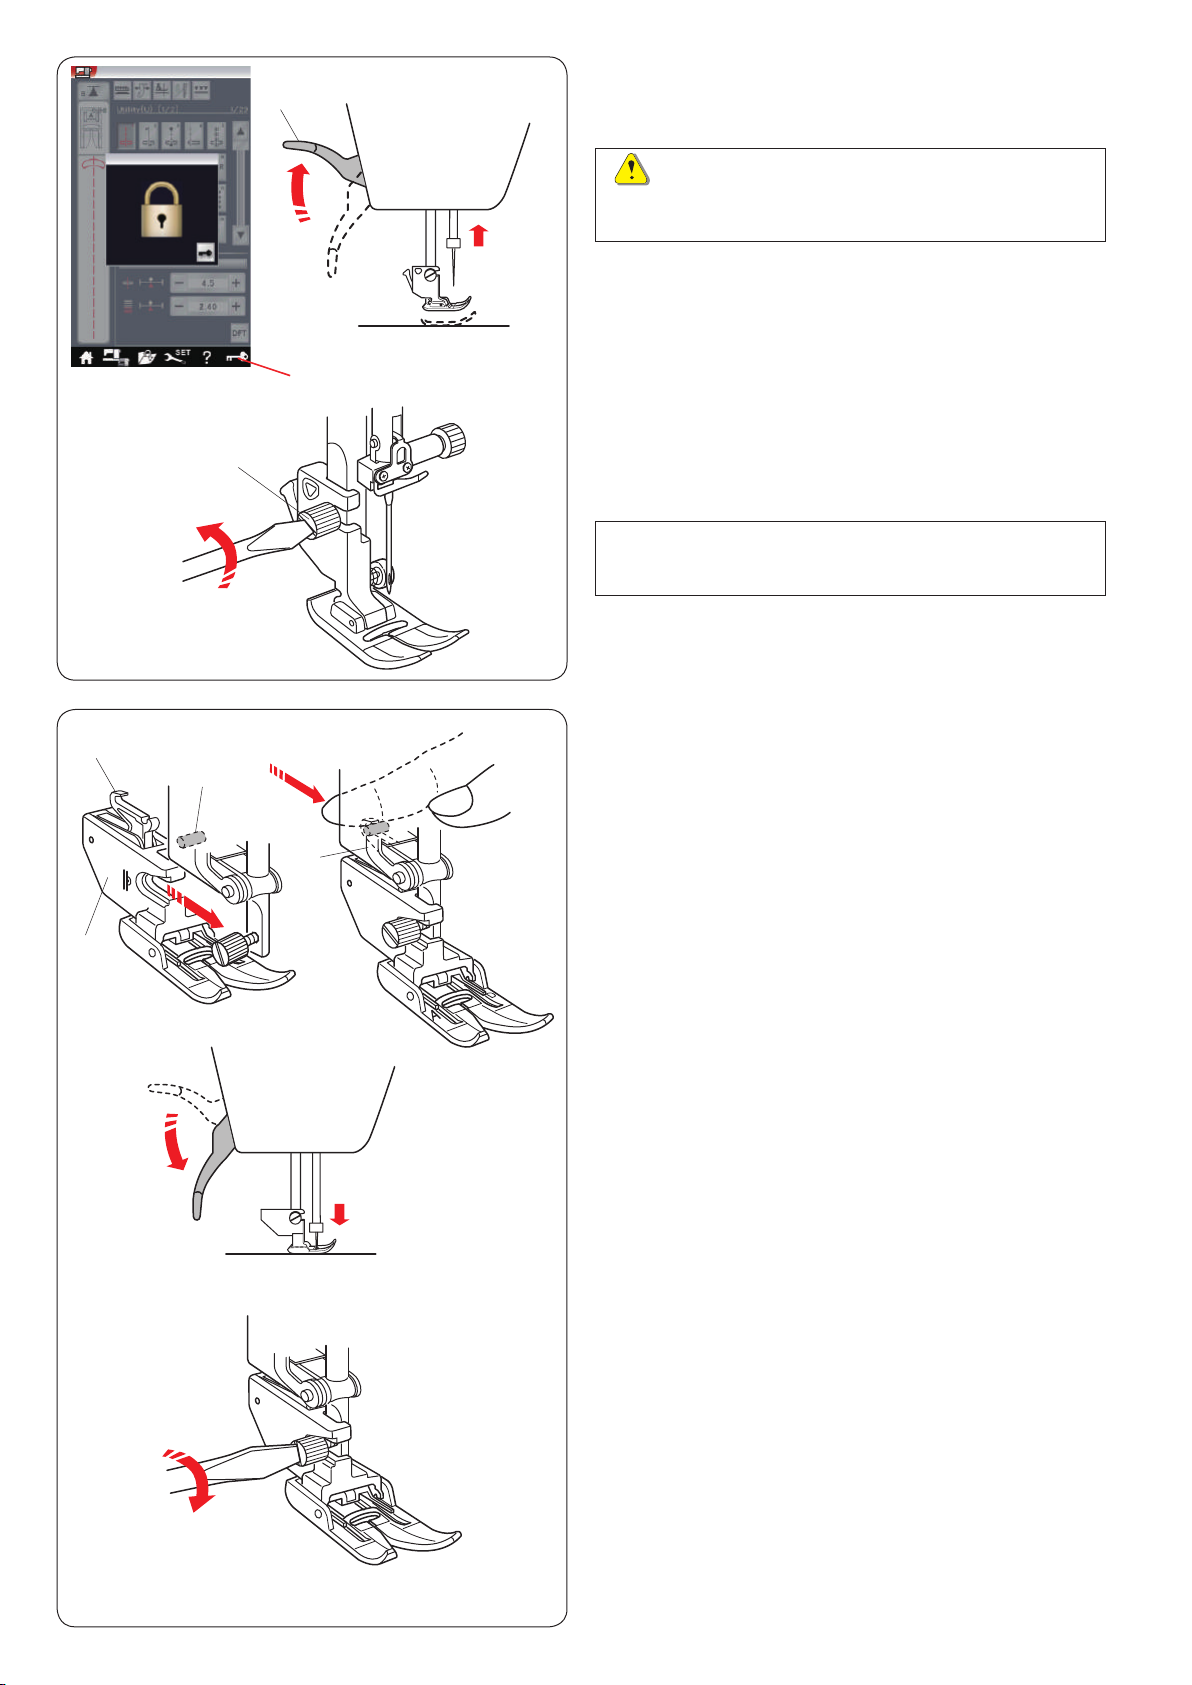
Replacing the Foot Holder
Replace the foot holder, if you use the dual feed feet,
darning foot or embroidery foot.
CAUTION:
Press the lockout key to lockout the machine before
replacing the foot holder.
Removing the presser foot holder
Raise the needle by pressing the needle up/down button.
Press the lockout key and raise the presser foot with the
presser foot lifter.
q Lockout key
w Presser foot lifter
Loosen the thumbscrew and remove the presser foot
hol d er.
e Thumbscrew
NOTE:
Use the foot holders included in the standard
accessories only.
q
w
e
w
Attaching the dual feed holder
Attach the dual feed holder to the presser bar.
q Dual feed holder
Tighten the thumbscrew with your ngers.
Push the dual feed link to engage it with upper feed drive.
w Dual feed link
e Upper feed drive
Lower the presser foot lifter. Lower the needle to the
lowest position by turning the hand wheel.
Tighten the thumbscrew securely with the screwdriver.
22
w
q
q
w
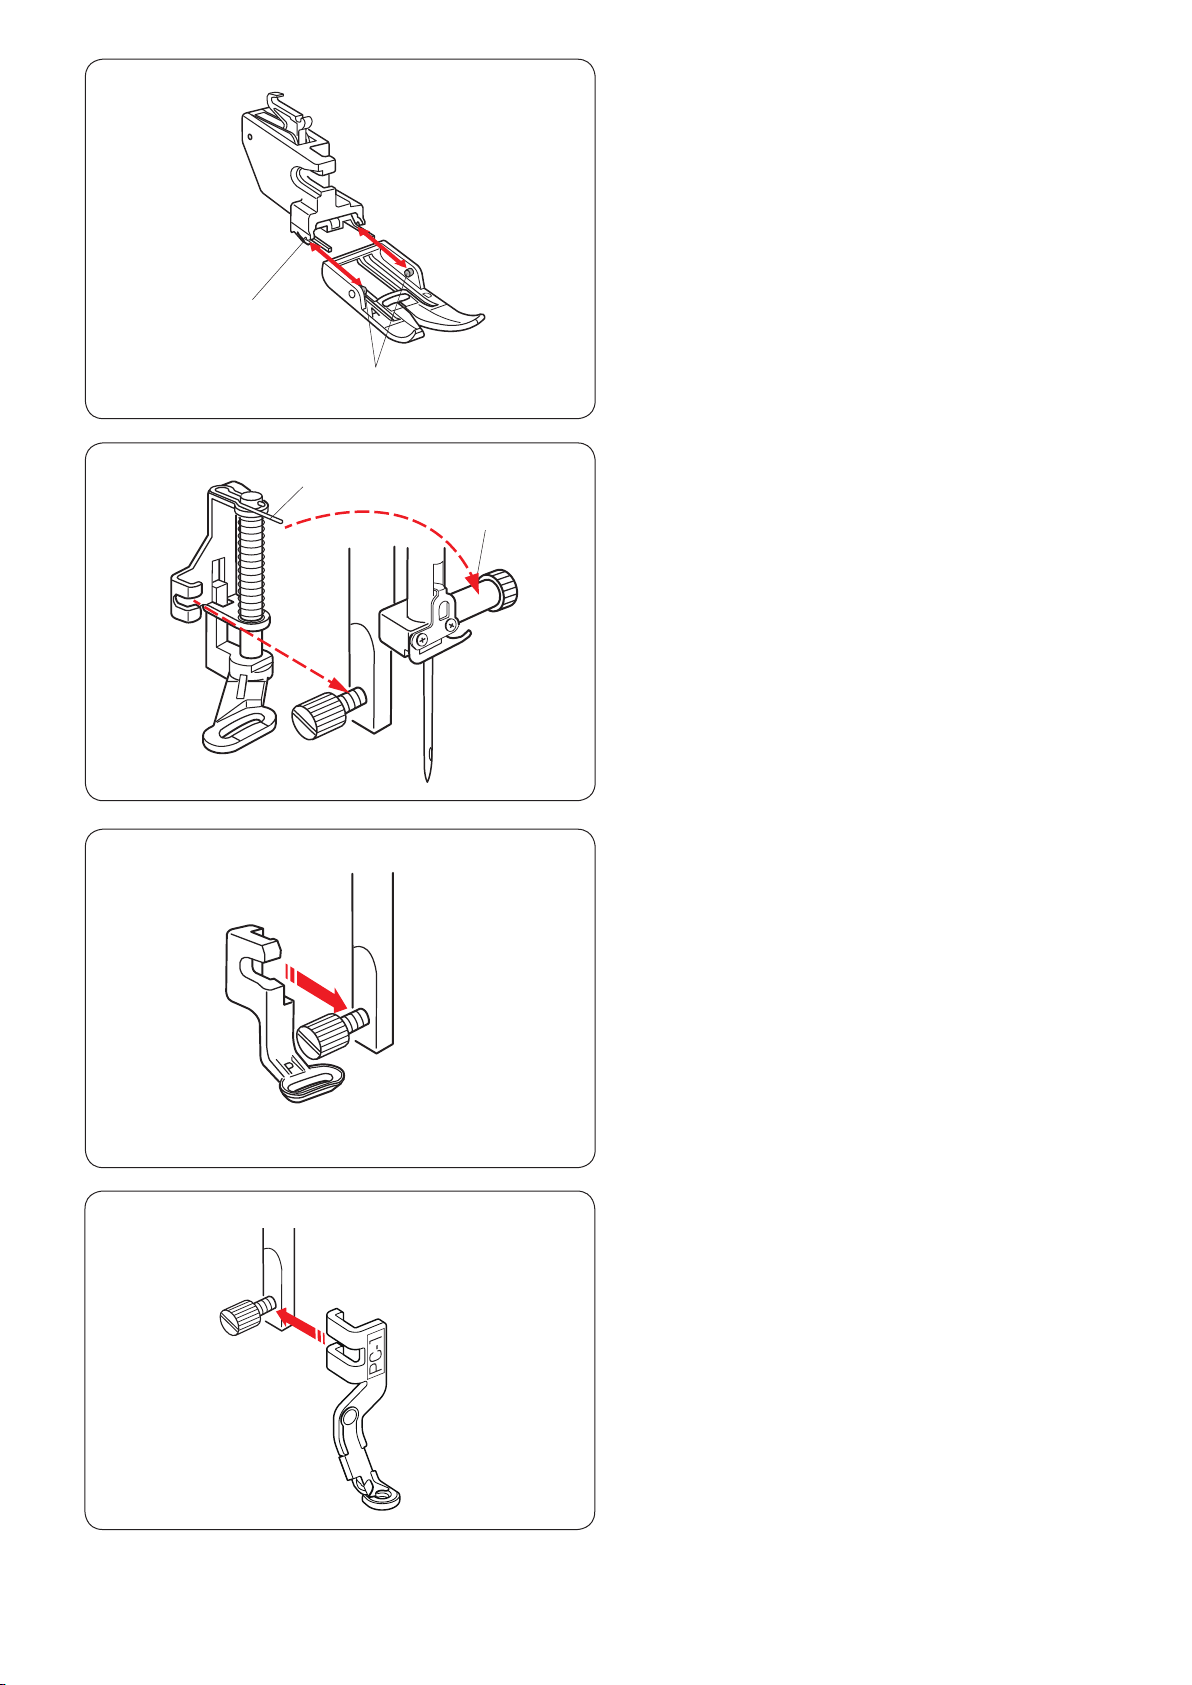
Detaching and attaching the dual feed foot
Pull the foot toward you to remove it.
Insert the pins of the foot into the slits of the foot holder
and gently push the foot until it snaps into place.
q Pin
w Slit
Attaching the darning foot PD-H
Attach the darning foot PD-H to the presser bar by
putting the pin on the needle clamp screw.
q Pin
w Needle clamp screw
Tighten the thumbscrew rmly with the screwdriver.
Attaching the embroidery foot P
Attach the embroidery foot P to the presser bar from
behind (refer to page 106).
Tighten the thumbscrew rmly with the screwdriver.
Attaching the couching foot PC-1 or PC-2
Attach the couching foot PC-1 or PC-2 to the presser bar
from front (refer to page 143).
Tighten the thumbscrew rmly with the screwdriver.
23
w
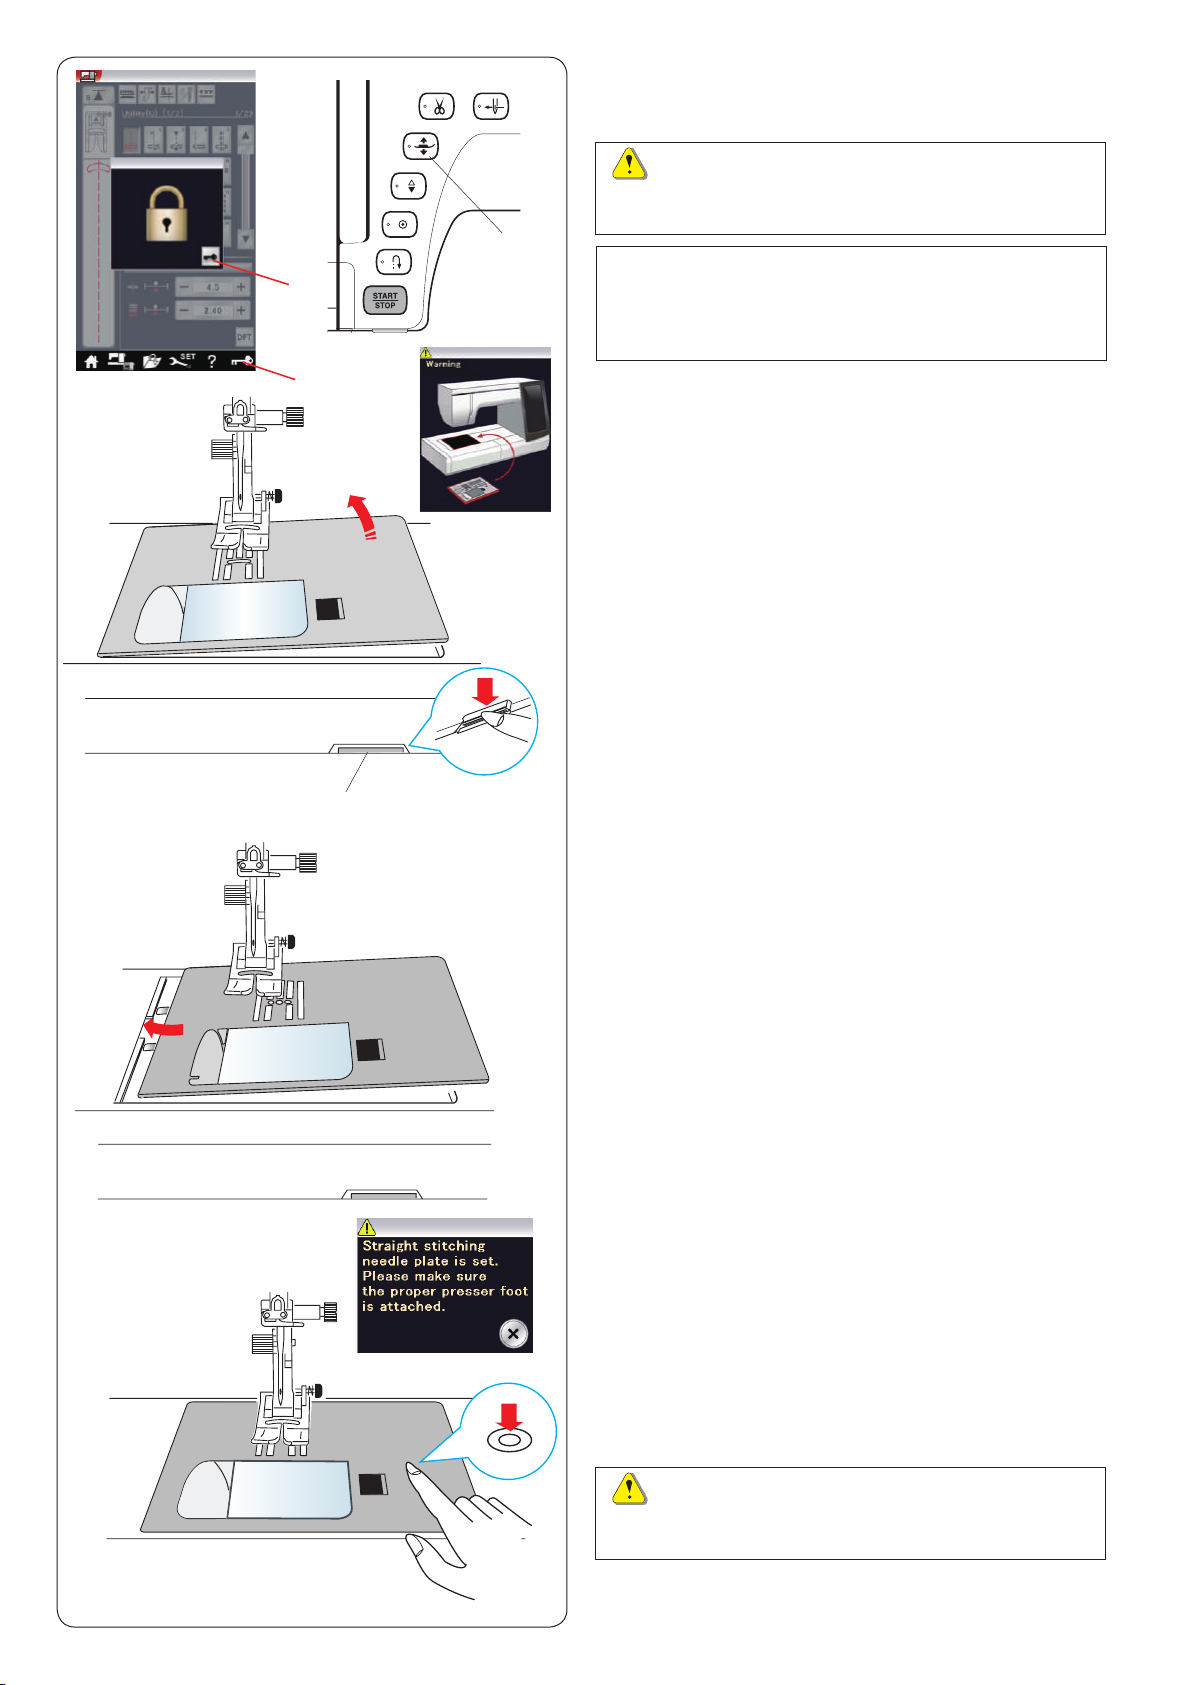
Replacing the Needle Plate
Use the straight stitch needle plate when sewing with the
dual feed foot and also when embroidering.
CAUTION:
Always make sure to press the lockout key to lockout
the machine before replacing the needle plate.
e
NOTE:
When the straight stitch needle plate is attached to
the machine, the patterns not suitable for the straight
stitch needle plate cannot be selected.
q
Raise the needle and press the lockout key.
Press the presser foot lifter button to raise the presser
foot.
q Lockout key
w Unlock key
e Presser foot lifter button
Slide the extension table to the left to remove it.
Push down the needle plate release lever and the needle
plate will snap off.
r Needle plate release lever
A message will appear warning that the needle plate is
not secured.
Remove the needle plate to the right.
r
Place the straight stitch needle plate on the machine.
Set the left edge of the needle plate into the opening.
Push down on the mark of the needle plate until it locks
in place.
Make sure the warning message disappears and the
straight stitch is automatically selected.
Turn the hand wheel slowly and make sure that the
needle does not hit the needle plate.
Press the unlock key to unlock.
CAUTION:
Never press the needle plate release lever while
running the machine.
24
q
Raising and Lowering the Presser Foot
You can raise and lower the presser foot with the presser
foot lifter button, the presser foot lifter or the knee lifter.
q Presser foot lifter button
w Presser foot lifter
You can raise the presser foot about 7 mm (1/4˝) higher
than the normal up position by exerting more pressure
when lifting the presser foot lifter or knee lifter.
This helps you to place layers of thick fabrics or
embroidery hoops under the foot.
w
w
NOTE:
The presser foot cannot be lowered with the presser
foot lifter if the foot was raised with the presser foot
lifter button.
The knee lifter cannot be used in the embroidery
mode.
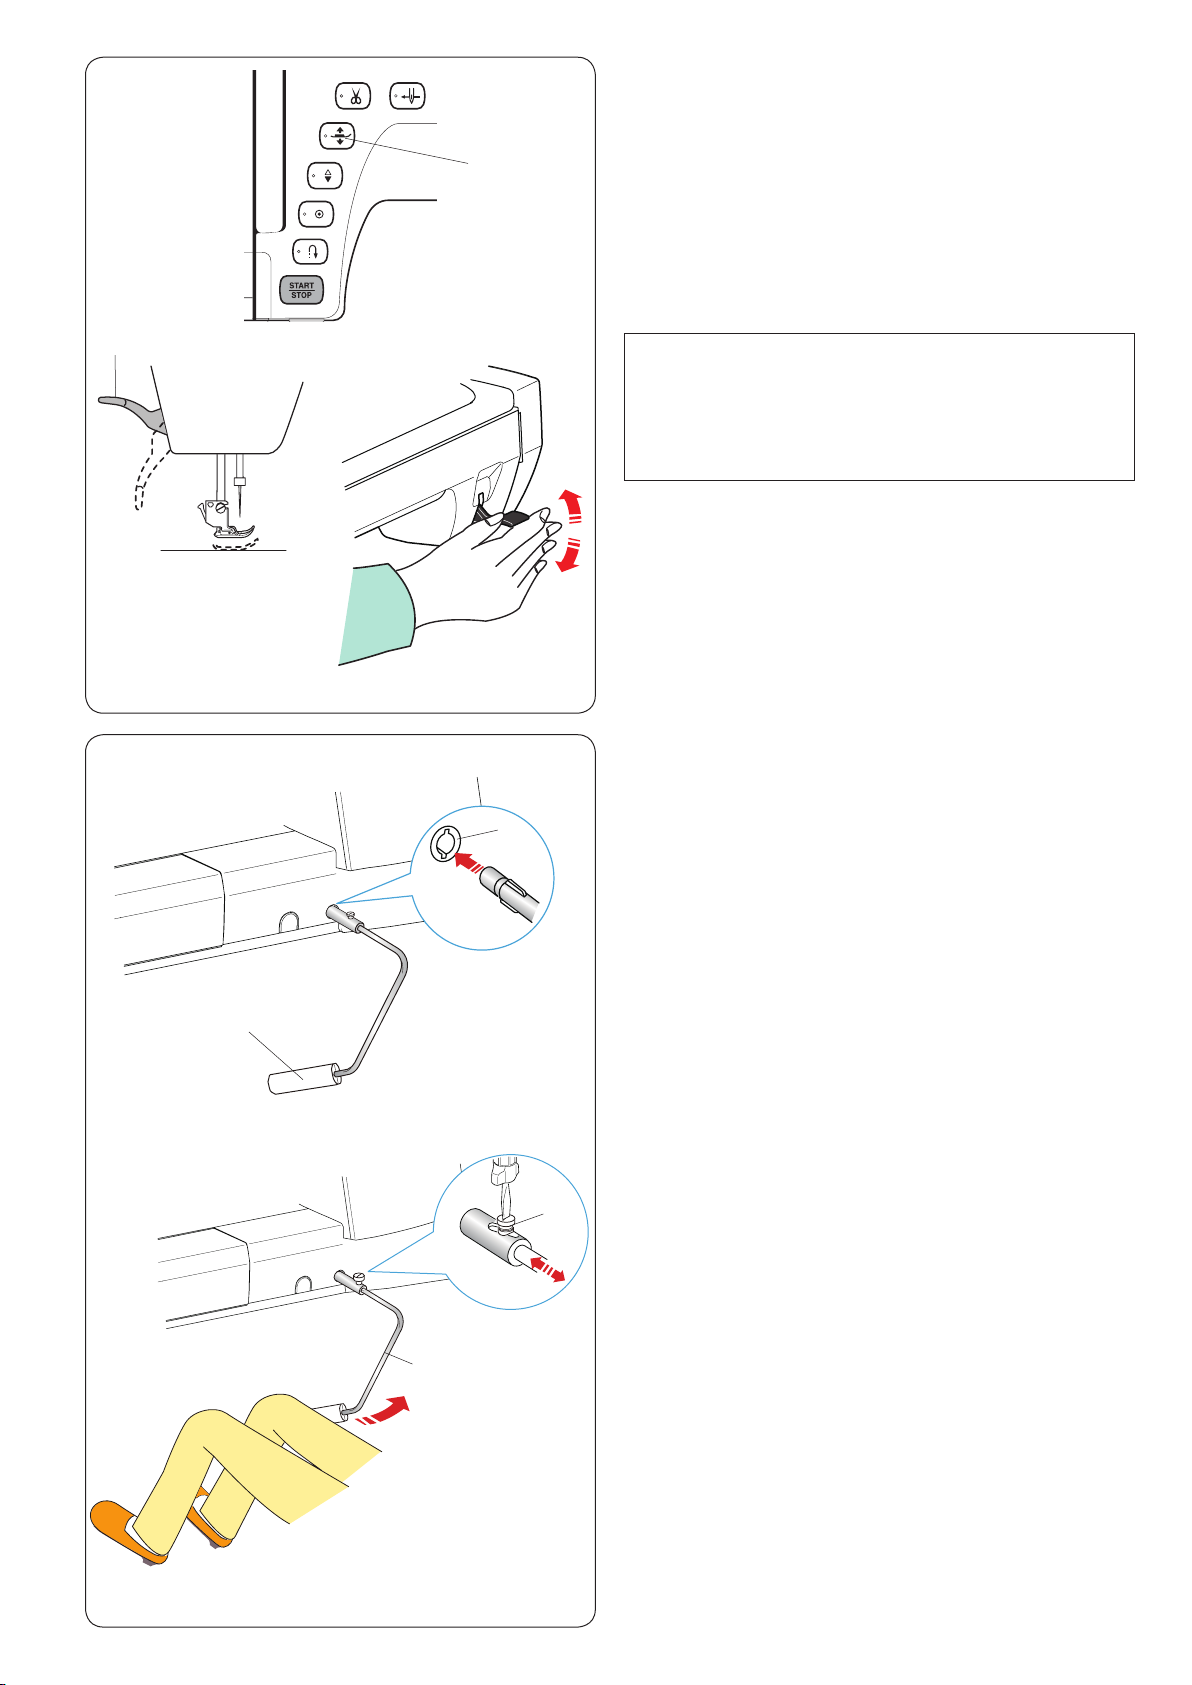
Knee Lifter
The knee lifter is extremely helpful when sewing
patchwork, quilting etc., since it allows you to handle the
fabric while your knee controls the presser foot.
Attaching the knee lifter
Match the ribs on the knee lifter with the notches in the
knee lifter socket and insert the knee lifter.
q Knee lifter
w Knee lifter socket
q
r
e
Adjusting the knee lifter
The angle of knee lifter can be adjusted to t your knee.
Loosen the setscrew and slide the angle bar in or out to
adjust the angle of the knee lifter.
Tighten the setscrew to secure the angle bar.
e Setscrew
r Angle bar
Using the knee lifter
Push the knee lifter with your knee to move the presser
foot up and down.
The knee lifter controls zigzag width of the variable
zigzag (refer to page 93).
25
w
q
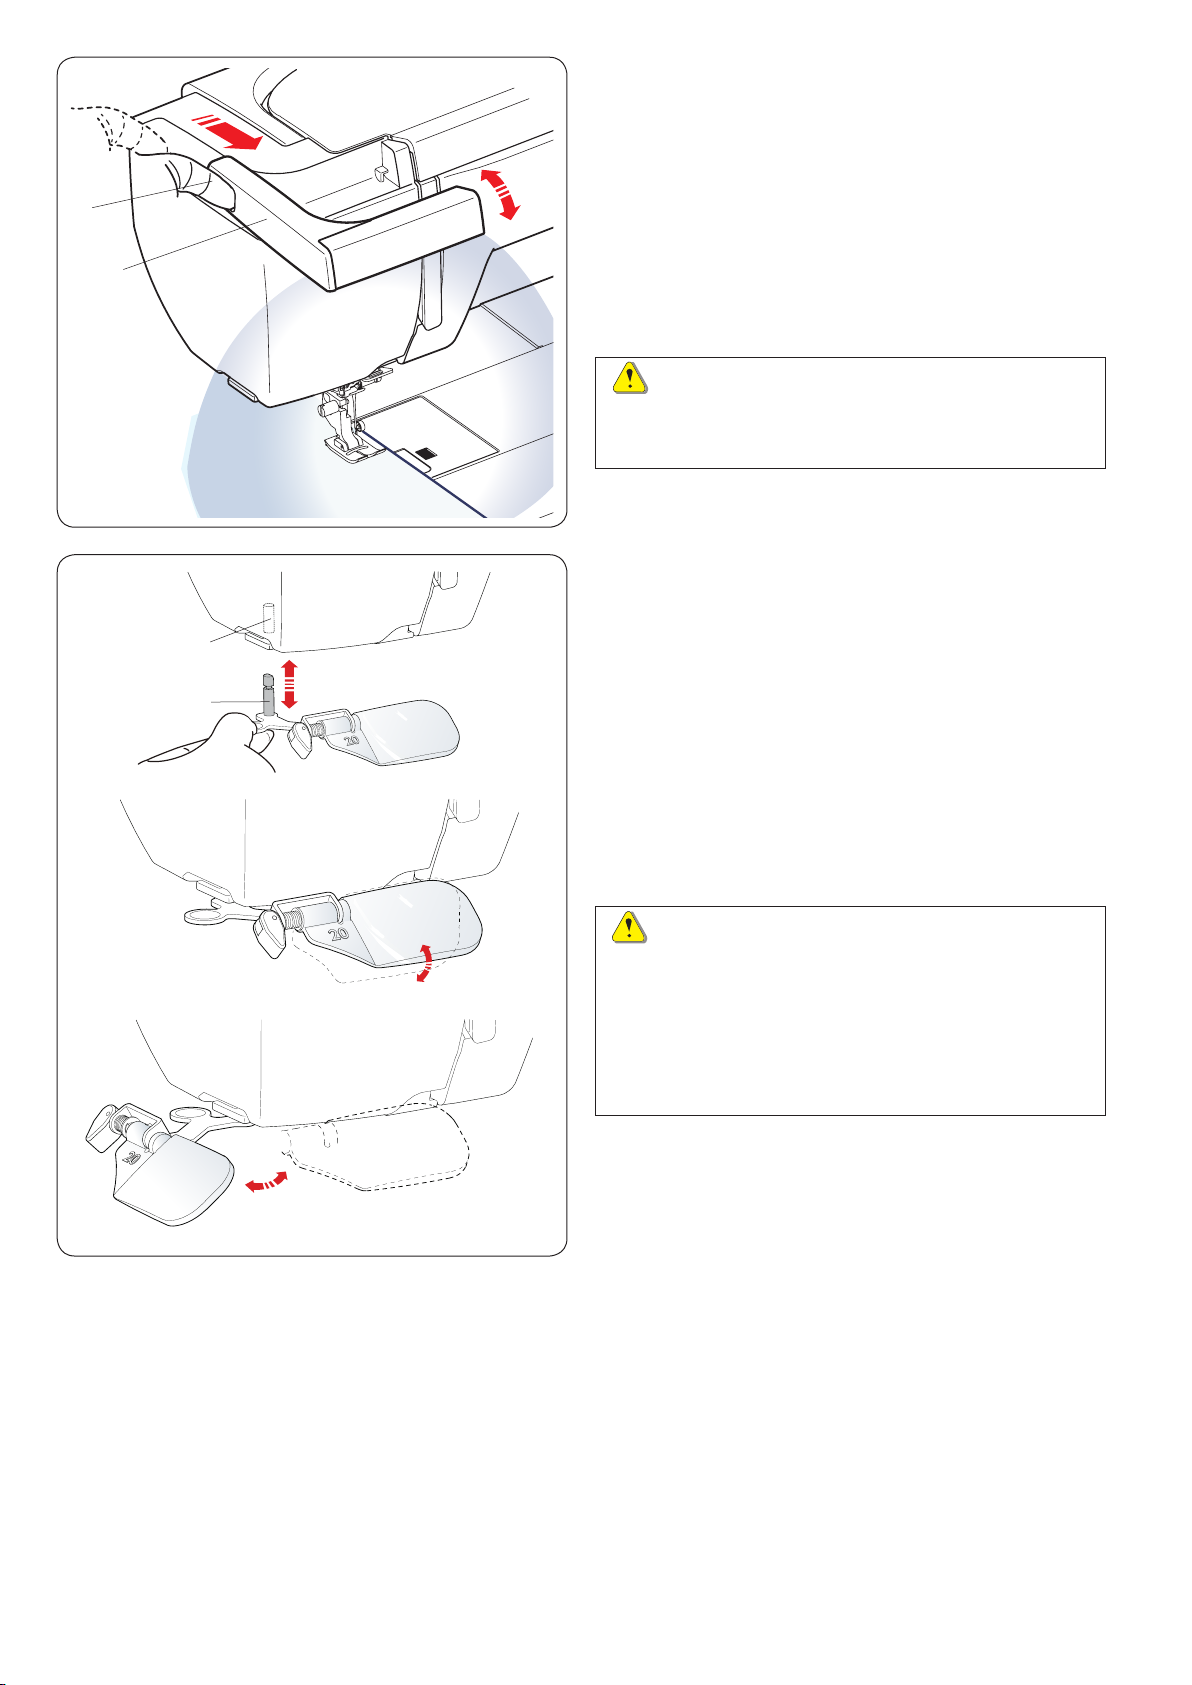
Retractable Sewing Light
In addition to the twin LED lights, the machine is
equipped with a retractable light.
Place your nger in the groove and slide the arm towards
you. The light will turn on automatically.
Adjust the angle of the light to illuminate the working
area.
q Arm
w Groove
Push back the arm to turn the light off and store it.
CAUTION:
Do not hit or exert excessive force on the arm of the
retractable sewing light as this may cause damage
when it is extended.
Optic Magnier
Use the magnier to get a larger view of the needle area.
w
q
Attaching the magnier
Hold the knob with your ngers and insert the pin into the
hole in the bottom of the face plate.
Push the magnier up until it snaps to t.
Adjust the angle to get the best view.
q Pin
w Hole
Removing the magnier
If the magnier is not in use, turn it to the left out of sight
or pull it down to remove.
CAUTION:
Do not use or leave the magnier in the direct sunlight,
otherwise it may cause a re or burn.
Do not look at the sun through the magnier as it can
damage your eyes.
Do not hit or exert excessive force on the optic
magnier as this may cause damage when it is
attached.
26
w
q
e
q
!0
u o
!1 i
y
w
y
e
r
t
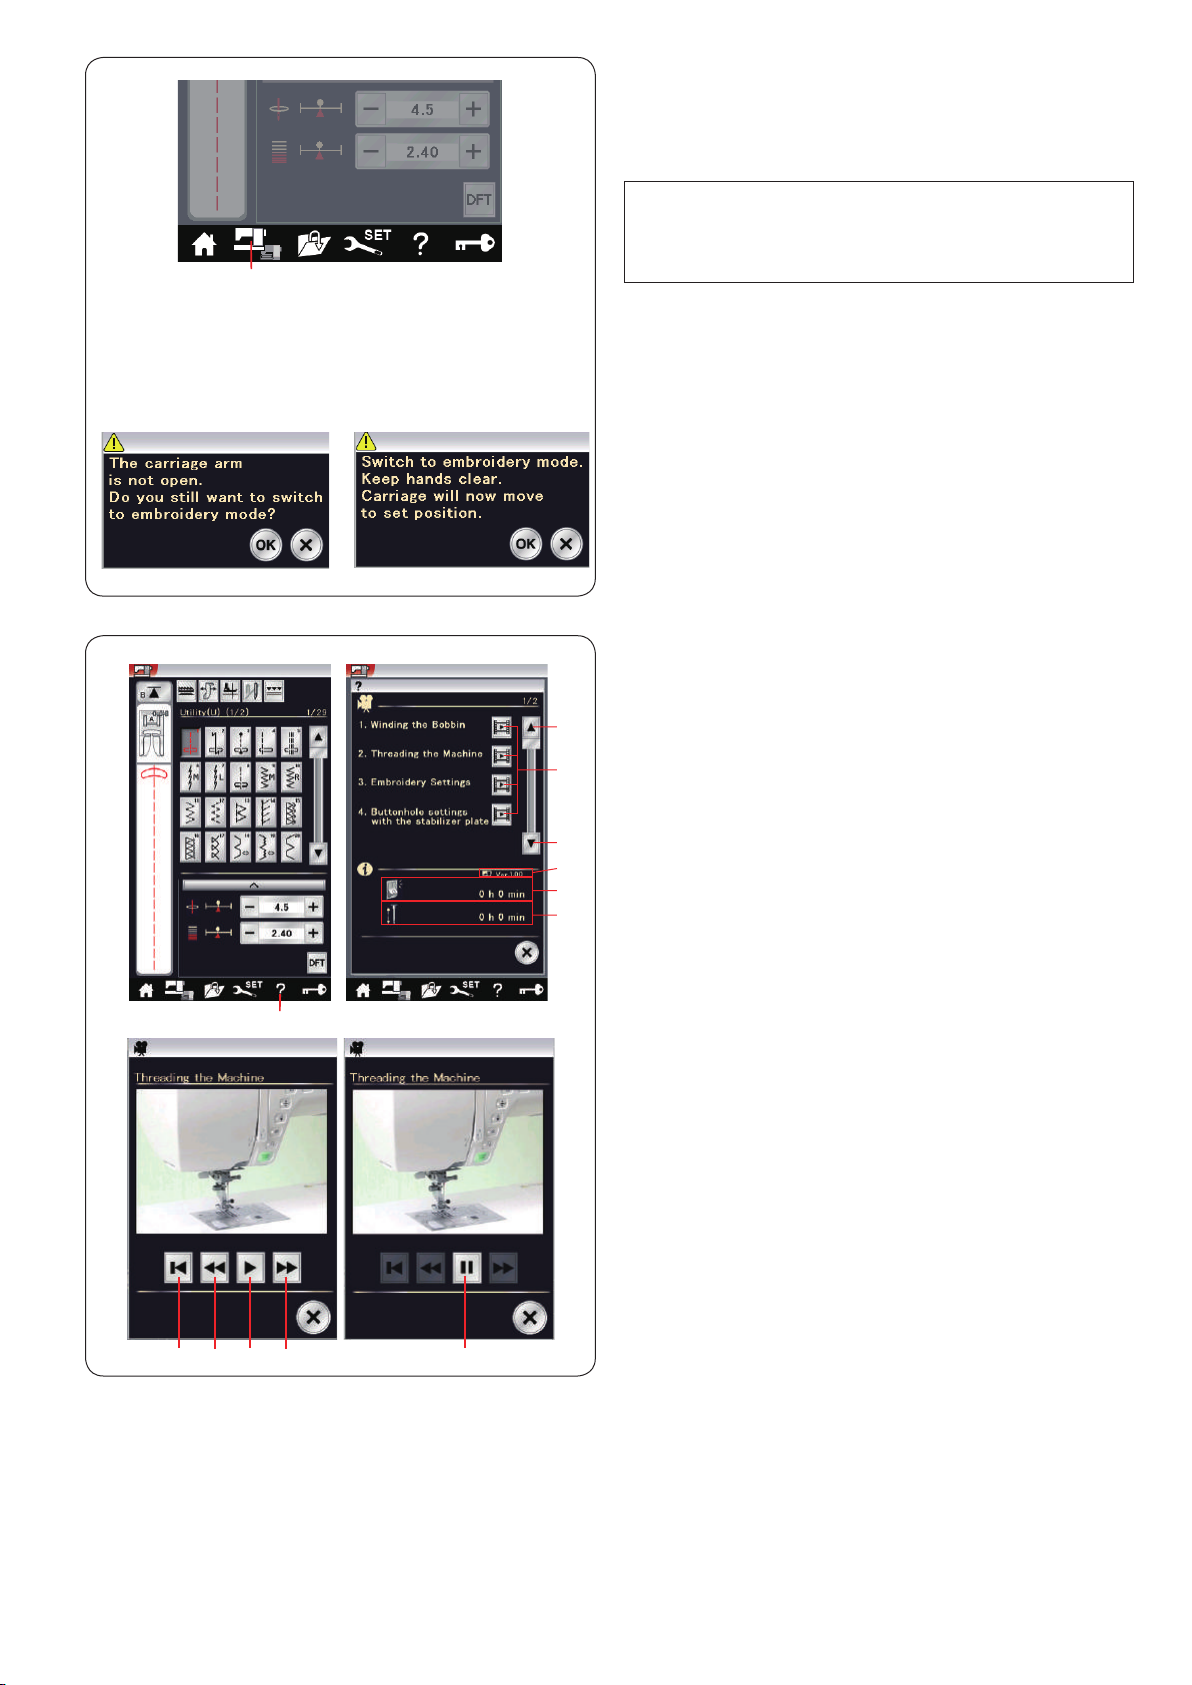
Mode Selection
When you turn the power switch on, the visual touch
screen will show the ordinary sewing mode after a few
seconds.
The machine is set for straight stitch sewing.
NOTE:
After turning on the power, it takes several seconds to
display the opening window.
(This is the required boot up procedure.)
To switch to the embroidery mode, rst turn the power
switch off then attach the embroidery unit (refer to pages
103 -104).
Turn the power switch on and press the mode switch key.
q Mode switch key
A conrmation message w will appear. Do not press the
OK key or X key. Open the carriage arm and a warning
message e will appear. Press the OK key to switch to
the embroidery mode and the carriage will move to the
starting position.
To switch back to the ordinary sewing mode, press
the mode switch key and follow the instructions in the
conrmation message.
On-screen Help
Press the help key to open the help menu.
You can view movies on 7 topics of essential operations
of the machine, total power-on time of the machine and
total operating time of the machine.
Press the page key to display the next page or previous
page.
Select the help topic by pressing the movie key and the
movie window will open.
q Help key
w Movie key
e Software version
r Total power-on time
t Total operating time
y Page keys
Press the play key to start the movie and press the pause
key to stop playing.
You can search through the movie in forward or reverse
direction by pressing the fast forward key or rewind key.
u Play key
i Pause key
o Fast forward key
!0 Rewind key
Press the return key to return to the beginning of the
movie.
!1 Return key
Press the X key to close the current window.
27
ORDINARY SEWING MODE
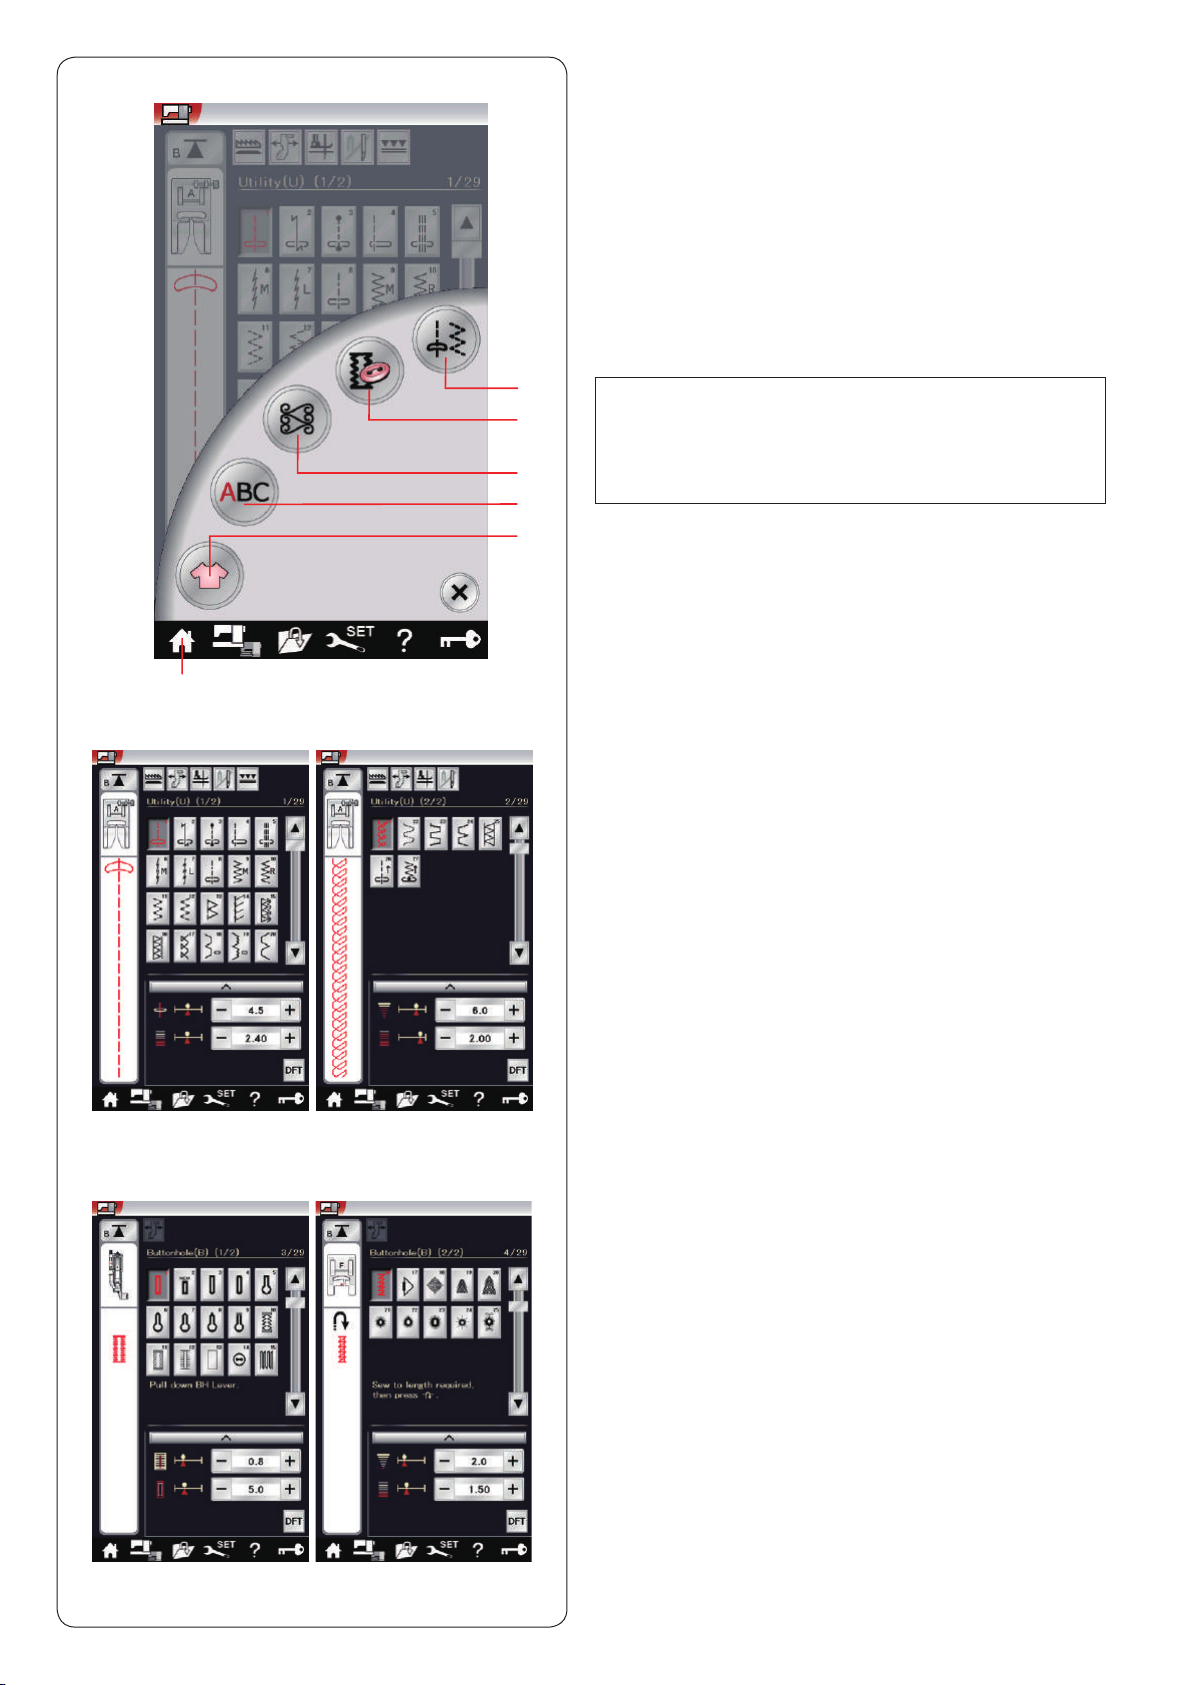
Ordinary Stitch Patterns
In the ordinary sewing mode, there are 5 categories
available. Press the home key q to enter the category
selection.
q Home key
w Utility stitches (U)
e Buttonhole and specialty stitches (B)
r Decorative and quilting stitches
t Monogramming
y Sewing applications
Press one of the icon keys to select the category.
w
q
w
e
r
t
y
NOTE:
In this manual, the pattern number refers to the initial
for each group or category.
For example pattern #15 in the buttonholes and
specialty stitches is referred to as pattern B15.
w Utility stitches (U)
You can select utility stitches for seaming, overcasting,
blind hemming, basting and shell tucking.
e
e Buttonholes and specialty stitches (B)
There are various styles of buttonholes, button sewing
stitches, darning, tacking, y stitches and eyelets
available in this category.
28
 Loading...