


Instruction book

IMPORTANT SAFETY INSTRUCTIONS
This appliance is not intended for use by persons (including children) with reduced physical, sensory or mental capabilities, or lack of experience and knowledge, unless they have been given supervision or instruction concerning use of the appliance by a person responsible for their safety.
Children should be supervised to ensure that they do not play with this sewing machine.
When using an electrical appliance, basic safety precautions should always be followed, including the following:
This sewing machine is designed and manufactured for household use only.
Read all instructions before using this sewing machine.
DANGER— To reduce the risk of electric shock:
1.An appliance should never be left unattended when plugged in. Always unplug this sewing machine from the electric outlet immediately after using and before cleaning.
2.Always unplug before replacing a sewing machine bulb. Replace bulb with same type rated 5 Watts.
WARNING— To reduce the risk of burns, fire, electric shock, or injury to persons:
1.Do not allow to be used as a toy. Close attention is necessary when this sewing machine is used by or near children.
2.Use this appliance only for its intended use as described in this owner’s manual.
Use only attachments recommended by the manufacturer as contained in this owner’s manual.
3.Never operate this sewing machine if it has a damaged cord or plug, if it is not working properly, if it has been dropped or damaged, or dropped into water.
Return this sewing machine to the nearest authorized dealer or service center for examination, repair, electrical or mechanical adjustment.
4.Never operate the appliance with any air opening blocked. Keep ventilation openings of this sewing machine and foot controller free from accumulation of lint, dust and loose cloth.
5.Never drop or insert any object into any opening.
6.Do not use outdoors.
7.Do not operate where aerosol (spray) products are being used or where oxygen is being administered.
8.To disconnect, turn all controls to the off (“O”) position, then remove plug from outlet.
9.Do not unplug by pulling on cord. To unplug, grasp the plug, not the cord.
10.Keep fingers away from all moving parts. Special care is required around the sewing machine needle and/or cutting blade.
11.Always use the proper needle plate. The wrong plate can cause the needle to break.
12.Do not use bent needles.
13.Do not pull or push fabric while stitching. It may deflect the needle causing it to break.
14.Switch this sewing machine off (“O”) when making any adjustment in the needle area, such as threading the needle, changing the needle, threading the bobbin or changing the presser foot, and the like.
15.Always unplug this sewing machine from the electrical outlet when removing covers, lubricating, or when making any other adjustments mentioned in this owner’s manual.
SAVE THESE INSTRUCTIONS
The design and specifications are subject to change without a prior notice.
Please note that on disposal, this product must be safely recycled in accordance with relevant National legislation relating to electrical/electronic products. If in doubt please contact your retailer for guidance. (European Union only)
I
TABLE OF CONTENTS
SECTION I. NAME OF PARTS |
|
Names of parts ................................................................. |
2 |
Standard accessories ...................................................... |
3 |
SECTION II. GETTING READY TO SEW |
|
Connecting machine to power supply .............................. |
4 |
Before using your sewing machine .................................. |
4 |
For your safety ................................................................. |
4 |
Controlling sewing speed ................................................. |
4 |
Speed control lever .......................................................... |
5 |
Machine operating buttons ........................................... |
5–7 |
Up/down needle position button ................................ |
5 |
Auto-lock button ......................................................... |
5 |
Reverse stitch button ................................................. |
5 |
Screen sharpness adjusting dial ................................ |
5 |
Cursor keys ................................................................ |
6 |
Mode key ................................................................... |
6 |
Stitch width selection key ........................................... |
6 |
Stitch length selection key ......................................... |
6 |
Memory key ............................................................... |
7 |
Clear key .................................................................... |
7 |
Function touchpad ..................................................... |
7 |
• Direct pattern selection ..................................... |
7 |
• Number keys ..................................................... |
7 |
Pattern selection and screen indication ........................... |
8 |
Number key selection ....................................................... |
8 |
Language selection .......................................................... |
9 |
Presser foot lifter ............................................................ |
10 |
Thread cutter .................................................................. |
10 |
Extension table ............................................................... |
10 |
• Detaching the table ............................................... |
10 |
• Attaching the table ................................................. |
10 |
• Accessory box ....................................................... |
10 |
Changing needle ............................................................ |
11 |
To remove and attach the foot holder ............................. |
11 |
• To remove .............................................................. |
11 |
• To attach ................................................................ |
11 |
Changing presser foot .................................................... |
11 |
• To remove .............................................................. |
11 |
• To attach ................................................................ |
11 |
Selecting thread and needles ......................................... |
12 |
Bobbin winding ......................................................... |
13–15 |
• Removing the bobbin ............................................ |
13 |
• Horizontal spool pin ............................................... |
13 |
• Additional spool pin ............................................... |
13 |
• Winding the bobbin ................................................ |
14 |
• Inserting the bobbin ............................................... |
15 |
Threading the machine ............................................ |
16–17 |
• Threading the machine .......................................... |
16 |
• Needle threader ..................................................... |
16 |
• Drawing up bobbin thread ..................................... |
17 |
Adjust the needle thread tension for a straight stitch ..... |
17 |
• Correct tension ...................................................... |
17 |
• Tension is too tight ................................................. |
17 |
• Tension is too loose ............................................... |
18 |
Adjust the needle thread tension for a zigzag stitch ....... |
18 |
• Correct tension ...................................................... |
18 |
• Tension is too tight ................................................. |
18 |
• Tension is too loose ............................................... |
18 |
SECTION III. BASIC SEWING |
|
Straight stitch ................................................................. |
19 |
• Starting to sew ....................................................... |
19 |
• Changing sewing direction .................................... |
19 |
• Finishing sewing .................................................... |
19 |
Using the seam guides on the needle plate ................... |
20 |
Turn a square corner ...................................................... |
20 |
Quilting .......................................................................... |
22 |
Sewing on heavy fabrics ................................................ |
21 |
Manual stitch length ....................................................... |
21 |
Variable needle position ................................................. |
21 |
To drop or raise the feed dog ......................................... |
22 |
Basting .......................................................................... |
22 |
• Attaching the darning foot ..................................... |
22 |
• To sew ................................................................... |
22 |
Quiliting with walking foot ............................................... |
23 |
Automatic reverse stitch ................................................. |
24 |
Triple stretch stitch ......................................................... |
24 |
Straight stretch ............................................................... |
24 |
Auto-lock stitch ............................................................... |
25 |
Saddle stitch ................................................................... |
25 |
Zigzag stitch ................................................................... |
25 |
• To change the width and length ............................. |
25 |
Overcasting .................................................................... |
26 |
Tricot stitch ..................................................................... |
26 |
Knit stitch ........................................................................ |
26 |
Overedge stitch .............................................................. |
27 |
Double overedge stitch ................................................... |
27 |
Button sewing ................................................................. |
28 |
Automatic buttonhole................................................ |
29–31 |
• Preparation for sewing ..................................... |
29–30 |
• Starting to sew ....................................................... |
30 |
Adjusting the stitch width and density in buttonholes |
..... 31 |
• To change the stitch width ..................................... |
31 |
• To change the stitch density .................................. |
31 |
Round end buttonhole .................................................... |
31 |
Keyhole buttonhole ......................................................... |
31 |
Stretch buttonhole .......................................................... |
32 |
Knit buttonhole ............................................................... |
32 |
Adjusting the stitch width and density in round end, |
|
keyhole, stretch and knit buttonholes ............................. |
32 |
• To change the stitch density .................................. |
32 |
• Adjustment of the stitch width on rounded end |
|
buttonhole .............................................................. |
32 |
• Adjustment of the stitch width on keyhole |
|
buttonhole .............................................................. |
32 |
• Adjustment of the stitch width on stretch and knit |
|
buttonhole .............................................................. |
32 |
Corded buttonhole .......................................................... |
33 |
II
TABLE OF CONTENTS
Eyelet ............................................................................. |
34 |
• To sew ................................................................... |
34 |
Zipper sewing ........................................................... |
35–36 |
• Attaching the zipper foot ........................................ |
35 |
• Fabric preparation ................................................. |
35 |
• To sew ............................................................. |
35–36 |
Darning stitch ................................................................. |
37 |
• To sew ................................................................... |
37 |
• For darning less than 3/4˝ (2 cm) .......................... |
37 |
• To adjust the shape of darning stitch ..................... |
37 |
• To memorize darning stitch.................................... |
37 |
Bartacking ...................................................................... |
38 |
• Memorizing bartacking .......................................... |
38 |
• Adjusting the evenness of bartacking .................... |
38 |
Blind hem stitch .............................................................. |
39 |
• To sew ................................................................... |
39 |
Pintucking ....................................................................... |
39 |
Shell stitch ...................................................................... |
40 |
Applique ......................................................................... |
40 |
SECTION IV. DECORATIVE STITCHING |
|
Smocking ....................................................................... |
41 |
• To sew ................................................................... |
41 |
Fagoting ......................................................................... |
41 |
Scallop stitch (A) ............................................................ |
42 |
• To sew ................................................................... |
42 |
Scallop stitch(B) ............................................................. |
42 |
• To sew ................................................................... |
42 |
Patchwork ...................................................................... |
43 |
• To sew ................................................................... |
43 |
Satin stitch...................................................................... |
43 |
Cross stitch .................................................................... |
44 |
Sand stitch ..................................................................... |
44 |
• To sew ................................................................... |
44 |
Decorative stitch ............................................................. |
44 |
Twin needle stitch ........................................................... |
45 |
Adjusting pattern balance .............................................. |
46 |
Adjusting distorted stretch stitch patterns ...................... |
46 |
Adjusting distorted letters or numbers ........................... |
46 |
Extender stitch combination ........................................... |
47 |
Programming decorative stitch patterns ......................... |
48 |
Sewing letters ................................................................. |
49 |
Editing function ............................................................... |
50 |
Deleting a stitch pattern, letter or number by editing ...... |
50 |
Adding a letter or space between letters ........................ |
51 |
SECTION V. CARE OF YOUR MACHINE |
|
Clean the hook race and feed dogs ............................... |
52 |
Assemble the hook race ................................................. |
52 |
Removing the light bulb .................................................. |
53 |
Attaching the light bulb ................................................... |
53 |
Troubleshooting .............................................................. |
54 |
III

SECTION I. NAME OF PARTS
Names of parts
q Extension table (Accessory box) w Needle plate
e Needle threader r Thread cutter t Face cover
y Thread take-up lever u Upper thread guide i Thread tension dial o Spool pin
!0Large spool holder !1Flip top stitch chart
!2Screen sharpness adjusting dial !3Liquid crystal display !4Function touchpad
!5Speed control lever !6Up/down needle position button !7Auto-lock button
!8Reverse stitch button !9Feed balancing dial @0Hook cover release button @1Hook cover plate
@2Foot holder @3Presser foot @4Needle
@5Needle clamp screw @6Thumb screw @7Machine sockets @8Power switch @9Handwheel
#0Bobbin winder stopper #1Bobbin winder spindle #2Carrying handle
#3Hole for additional spool pin #4Presser foot lifter #5Buttonhole lever #6Free-arm
#7Drop feed dog lever #8Nomenclature plate #9Power supply cord $0Foot control $1Hard cover
i o !0
u
y
t
r
e
w
q
@1
@5 @0
@4
@6
@3 #2
@2 #1 #0 
@9
@8
@7
#8
$1
#9 $0
!1!2
!3
!4
 !5
!5
!6
!7
!8
!9
#3
#4
#5
#6
#7
2
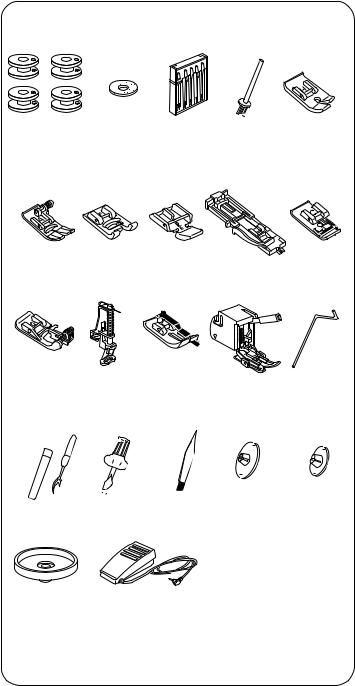
Standard accessories
q Bobbin
w Spool pin felt
e Assorted needle set r Additional spool pin t Straight stitch foot
y Zigzag foot (set on the machine) u Satin stitch foot
i Zipper foot
o Automatic buttonhole foot !0Overedge foot
!1Blind hem foot !2Darning foot !31/4˝ seam foot !4Walking foot !5Quilter
!6Seam ripper/Buttonhole opener !7Large screwdriver
!8Lint brush !9Large spool holder @0Small spool holder @1Spool stand @2Foot control
q |
w |
e |
r |
t |
y |
u |
i |
o |
!0 |
!1 |
!2 |
!3 |
!4 |
!5 |
!6 |
!7 |
!8 |
!9 |
@0 |
@1 @2
3
SECTION II. GETTING READY TO SEW
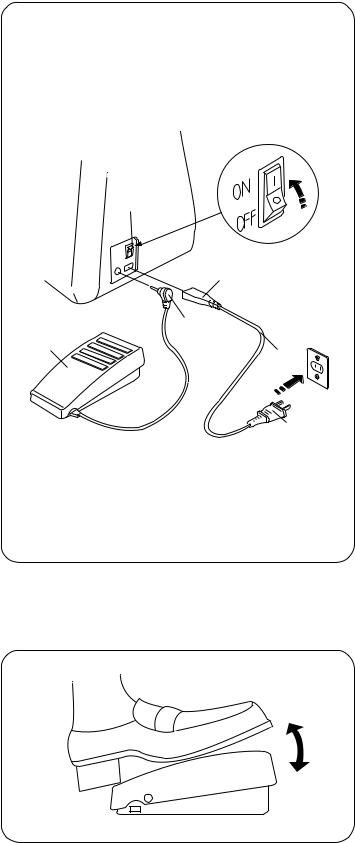
Connecting machine to power supply q Foot control plug
w Machine plug
e Power supply plug r Power switch
t Power supply cord y Foot control
Before connecting the power cord, make sure the voltage and frequency shown on the machine conform to your electrical power.
1.Turn off the power switch r.
2.Insert the foot control plug q, machine plug w into the machine.
3.Insert the power supply plug e into the outlet.
4.Turn on the power switch r.
Before using your sewing machine
Before using your sewing machine for the first time, place a waste fabric under the presser foot and run the machine without thread for a few minutes. Wipe away any oil which may appear.
For your safety
*While in operation, always keep your eyes on the sewing area. Do not touch any moving parts such as the thread take-up lever, handwheel or needle.
*Always turn off the power switch and unplug from the power supply:
-When leaving the machine unattended.
-When attaching or removing any parts.
-When cleaning the machine.
*Do not place anything on the foot control, when not sewing.
Controlling sewing speed
Sewing speed is varied by the foot control.
The further down you press on the foot control, the faster the machine runs.
Operating instrucitons:
This appliance has a polarized plug (one blade wider than the other). To reduce the risk of electric shock, this plug is intended to fit in a polarized outlet only one way. If the plug does not fit in the outlet, reverse the plug. If it still does not fit, contact a qualified electrician to install the proper outlet. Do not modify the plug in any way.
Foot control model YC-542 is used with this sewing machine.
r
w
q
y
t
 e
e
4
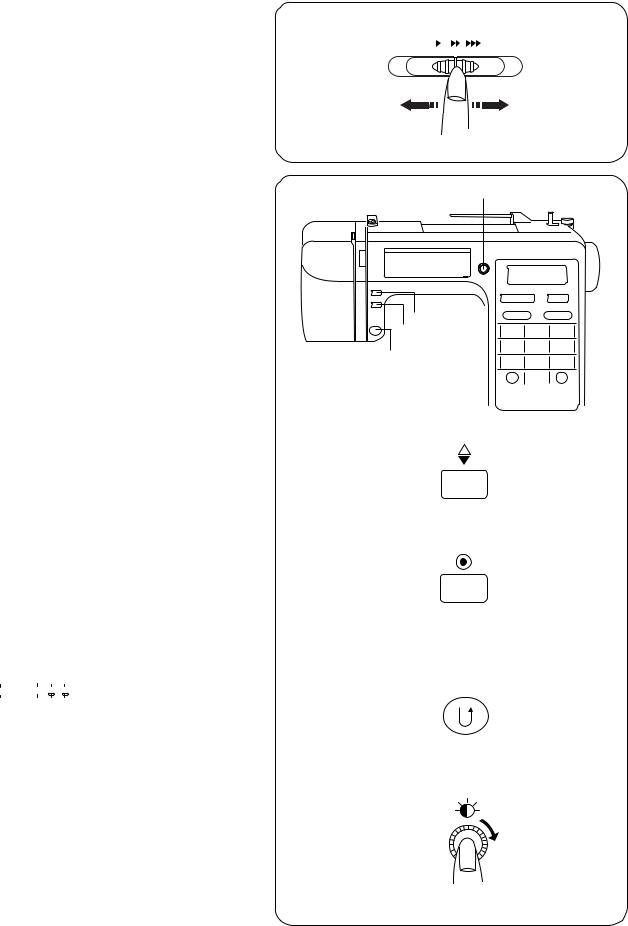
Speed control lever
Sewing speed can be varied by the speed control lever according to your sewing needs.
To increase sewing speed, slide the lever to the right. To decrease sewing speed, slide the lever to the left.
Machine operating buttons q Up/down needle position button w Auto-lock button
e Reverse stitch button
r Screen sharpness adjusting dial
Up/down needle position button q Up/down needle position button
Press this button to set the needle position up or down when the machine stops.
Auto-lock button w Auto-lock button
When stitches are selected, the machine will immediately sew locking stitches when the Auto-lock button is pressed, then automatically stop. When sewing all other stitches, the machine will sew locking stitches at the end of the current pattern and automatically stop.
Reverse stitch button e Reverse stitch button
1 |
4 |
5 |
11 |
30 |
31 |
When stitches 


 3
3  3 are selected, the machine will sew in reverse while the reverse stitch button is pressed. If you press the reverse stitch button when sewing all other stitches, the machine will immediately sew locking stitches and automatically stop.
Screen sharpness adjusting dial r Screen sharpness adjusting dial
Use this dial to adjust the sharpness of the liquid crystal display. If the screen is blank after you switch on the power, adjust the screen brightness with this dial.
r |
q w
e
q
w
e
r 
5
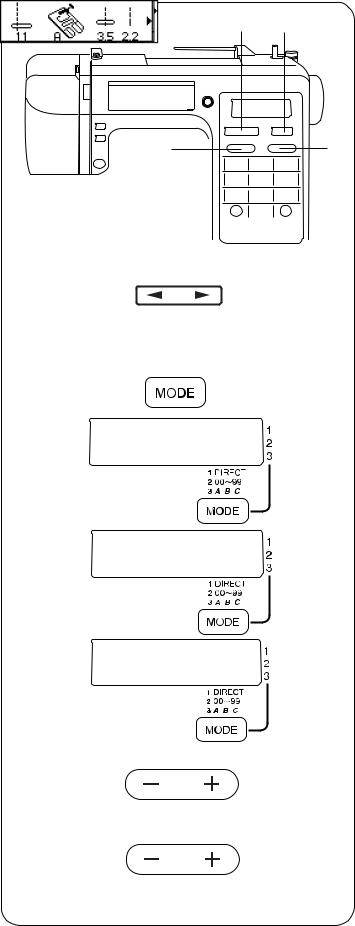
Machine operating buttons (continued) t Cursor keys
y Mode key
u Stitch width selection key i Stitch length selection key
t |
y |
u |
i |
Cursor keys t Cursor keys
Use these keys to check and correct pattern combinations before sewing. For editing, use these keys to select editing position.
Mode key y Mode key
When the power switch is turned on, the direct pattern selection is set automatically.
Press the mode key to change the mode.
z Mode 1 (Black mode): Direct pattern selection
xMode 2 (Blue mode): Utility and decorative stitch pattern selection
c Mode 3 (Red mode): Number and block letter selection
*The triangle mark (  ) on the screen indicates the selected mode number.
Stitch width selection key u Stitch width selection key
Press “+” or “–” to change the stitch width.
Stitch length selection key i Stitch length selection key
Press “+” or “–” to change the stitch length.
t
y
z
x
c
uWIDTH
iLENGTH
6
Machine operating buttons (continued) o Memory key
!0Clear key !1Function touchpad
Memory key o Memory key
The memory key will memorize your pattern selection. Press the memory key after you selected your stitch pattern. (You can program up to 50 patterns in memory.)
*The following patterns cannot be memorized.
*The machine cannot memorize stitch patterns in mode 1. Use mode 2 or 3 to memorize the stitch patterns.
Clear key
!0Clear key
If an incorrect pattern is memorized, pressing this key will immediately clear it (like a backspace key).
Function touchpad
!1Function touchpad
•Direct pattern selection
You can select the stitch patterns from 00 to 09 directly in mode 1 (direct pattern selection mode).
•Number keys
Enter the 2-digit pattern number to select the desired stitch pattern in mode 2 and 3.
!1
o !0
o
MEM
!0
CLR
!1
7
Pattern selection and screen indication
You can select these patterns directly by pressing the pattern keys. The following patterns can be selected simply by pressing the pattern keys.
zWhen the power switch is turned on, the mode 1 is set automatically.
x Press pattern key 4.
c The display shows following information:
q Stitch pattern: |
04 |
w Presser foot: |
A: Zigzag foot |
e Stitch width: |
5.0 |
r Stitch length: |
2.0 |
t Mode: |
1 |
z
x
c |
q w e r t |
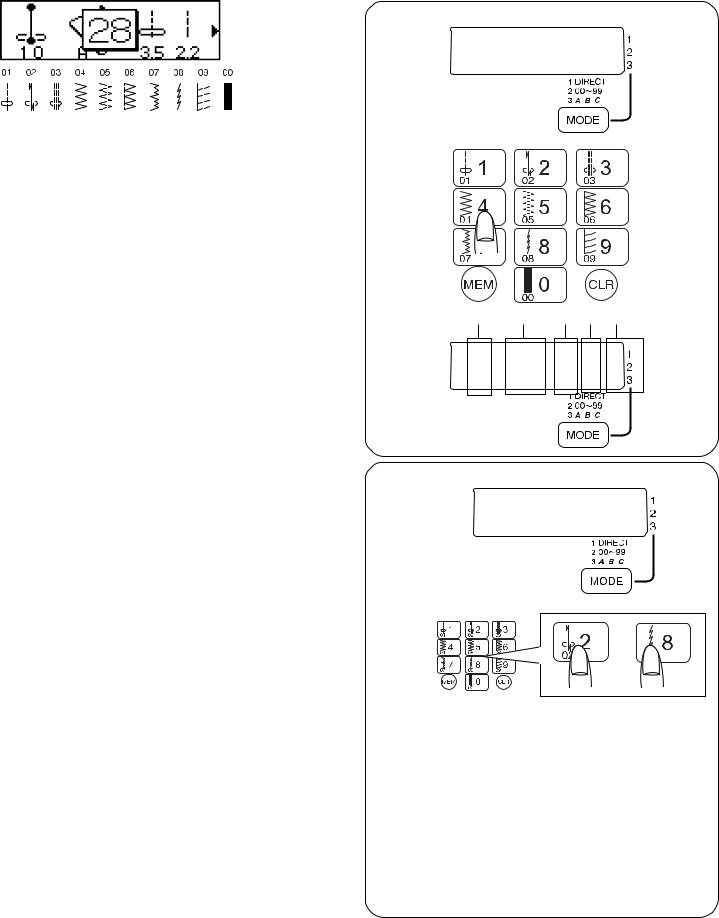
Number key selection
You can select the stitch patterns by pressing number keys. This function cannot be used in direct pattern selection mode (mode 1).
Example: pattern number 28
zSelect mode 2 (Utility and decorative stitch pattern selection).
xPress the number key on the function touchpad. Example: Pattern 28, as shown.
c Now the pattern 28 is selected.
z
x
c
8
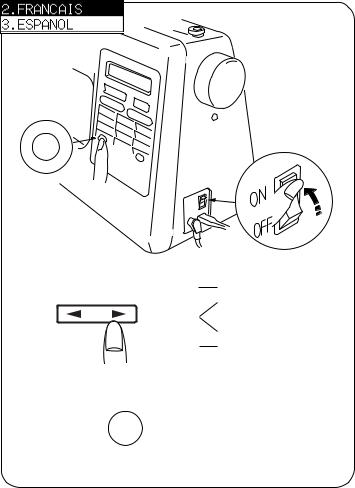
Language selection q Power switch
w Memory key e English
r French
t Spanish
zTurn on the power switch q while pressing the memory key w.
xYou can select the language (English, Spanish or French) by pressing the  key or number keys.
c Press the memory key w to set the language.
z
MEM
q
w
e
x |
r |
|
|
|
t |
cMEM
9
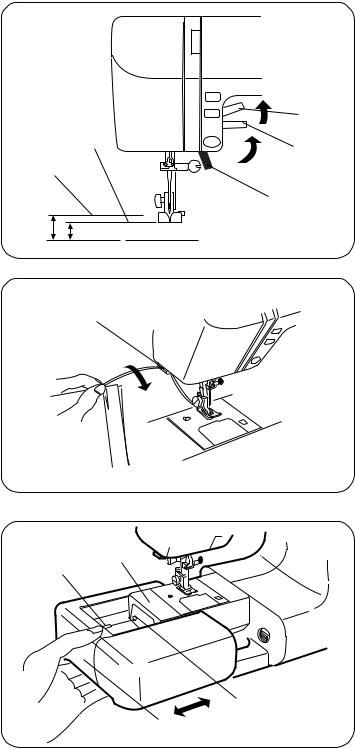
Presser foot lifter q Presser foot lifter w Normal up position e Highest position
The presser foot lifter q raises and lowers the presser foot. You can raise it about 1/4˝ (0.6 cm) higher than the normal up position w for easy removal of the presser foot, or to help you place thick material under the foot.
|
e |
w |
w |
|
|
e |
|
|
q |
Thread cutter q Thread cutter
You do not need a pair of scissors to cut the thread after sewing. Simply use the built-in thread cutter.
Extension table
•Detaching the table
Pull the table away from the machine, as illustrated, for “free-arm” sewing of cuffs and sleeves.
•Attaching the table
Push the extension table until it snaps into the machine. q Extension table
w Pin e Hole
r Free-arm
•Accessory box
Open the cover of the accessory box toward you. The sewing accessories are conveniently located in the box.
q
r
w
e
q
10
Changing needle
q Needle clamp screw w Needle clamp
zTurn off the power switch.
Raise the needle to its highest position by turning the handwheel counterclockwise, toward you, and lowering the presser foot. Loosen the needle clamp screw q by turning it counterclockwise. Remove the needle from the needle clamp w.
xInsert a new needle into the needle clamp w with the flat side to the rear. When inserting the needle into the needle clamp w, push it up as far as it goes. Tighten the needle clamp screw q firmly by turning it clockwise.
cTo see if the needle is good, place the flat side of the needle onto something flat (needle plate, glass, etc.). The gap between the needle and the flat surface should be consistent. Never use a bent or blunt needle.
A damaged needle can cause permanent snags or runs in knits, fine silks and silk-like fabrics.
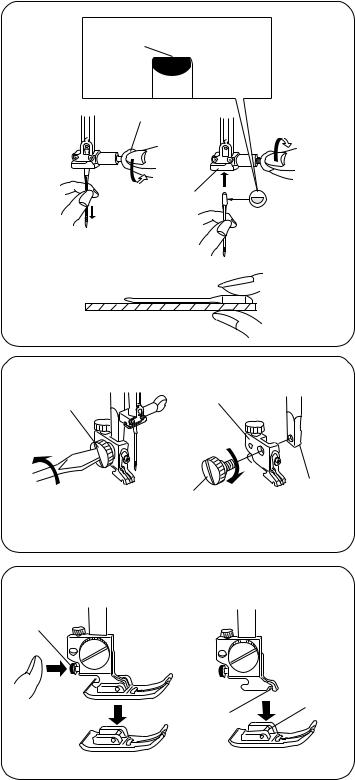
To remove and attach the foot holder q Thumb screw
w Foot holder e Presser bar
•To remove
Remove the thumb screw q by turning it counterclockwise with a screwdriver.
•To attach
Match the hole in the foot holder w with the threaded hole in the presser bar e. Fit the thumb screw q into the hole. Tighten the screw q by turning it clockwise with a screwdriver.
Changing presser foot q Snap-on button (red button) w Groove
e Pin
•To remove
Raise the needle to its highest position by turning the handwheel counterclockwise. Raise the presser foot, and press the red button q on the back of the foot holder.
•To attach
Place the selected presser foot so that the pin e on the foot lies just under the groove w on the foot holder. Lower the presser bar to lock the foot into place.
Flat side |
|
Lado plano |
Needle |
Méplat vers |
Aguja |
|
Aiguille |
zq x
w
c
q |
w |
|
e
q
q
e
w
11

Selecting Thread and Needles
For general sewing, use needle size 11/75 or 14/90. A fine thread and needle should be used for sewing lightweight fabrics, so the fabric will no be marred. Heavy fabrics requires a needle large enough to the fabric without fraying the needle thread.
Always test the needle size on a small pierce of fabric which will be used for actual sewing.
In general, use same thread for needle and bobbin. When sewing stretch, very fine fabrics and synthetics, use
a BLUE TIPPED needle. The blue tipped needle effectively prevents skipped stitches.
|
Fabric |
Thread |
Needle |
|
Lawn |
Silk #80–100 |
#9/65–11/75 |
Light |
Georgette |
Cotton #80–100 |
|
Tricot |
Synthetic #80–100 |
|
|
|
|
||
|
Wool, Synthetic |
|
|
|
|
|
|
|
Cotton, Synthetic |
Silk #50 |
#11/75–14/90 |
Medium |
Fine jersey |
Cotton #60–80 |
|
|
Wool |
Synthetic #50–80 |
|
|
|
Cotton #50 |
#14/90 |
|
|
|
|
|
Denim |
Silk #50 |
#14/95–16/100 |
Heavy |
Jersey |
Cotton #40–50 |
|
|
Coating |
Synthetic #40–50 |
|
|
Quilting |
Silk #30 |
#16/100 |
|
|
Cotton #50 |
|
12
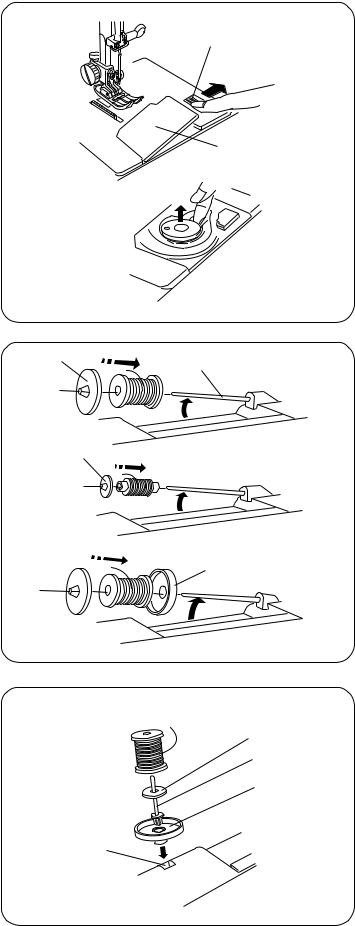
Bobbin winding
• Removing the bobbin
q Hook cover plate release button w Hook cover plate
Gently slide the hook cover plate release button q to the right and remove the cover plate w.
Lift out the bobbin.
• Horizontal spool pin q Spool pin
w Large spool holder e Small spool holder r Spool stand
Lift up the spool pin q. Place a spool of thread on the spool pin with the thread coming off the spool as shown.
Attach the large spool holder w, and press it firmly against the spool of thread.
The small spool holder e is used with narrow or small spools of thread.
If the thread jams around the spool pin, use the spool stand r.
• Additional spool pin q Spool stand
w Additional spool pin
e Hole for additional spool pin r Spool pin felt
The additional spool pin w is for bobbin winding, without unthreading the machine, and for twin needle sewing. Set the spool stand q under the additional spool pin w. Insert the additional spool pin w into the hole e.
Place the felt r and a spool on the pin.
q
w
w |
q |
|
e
r
r
w
q
e
13
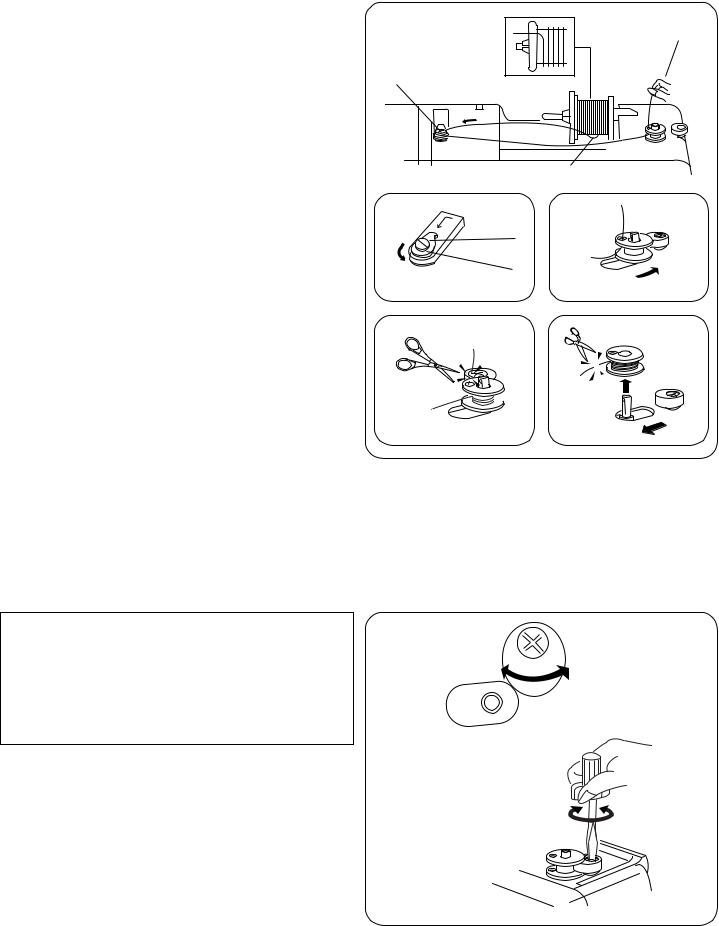
• Winding the bobbin |
|
|
z Draw the thread from the spool. |
|
|
x Guide the thread around the thread guide. |
|
|
c Thread through the hole in the bobbin from the inside to |
|
|
the outside. |
x |
|
v Put the bobbin on the bobbin winder spindle. |
||
|
||
b Push the bobbin to the right. |
|
nWith the free end of the thread held in your hand, depress the foot control. Stop the machine when it has made a few turns, and then cut the thread close to the hole in the bobbin.
mDepress the foot control again. When the bobbin is fully wound, it stops automatically. Return the bobbin winder to its original position by moving the spindle to the left, and cut the thread as shown.
x
n
NOTE:
The position of the bobbin winder stopper is adjustable depending on the required amount of thread on the bobbin (example: 1/2 full or full). Using a screwdriver, loosen the screw one turn or less, so that you can adjust the position of the bobbin winder stopper. Do not take the screw all the way out. Retighten the screw to fix the stopper at the desired position.
c
z
v b
m
14
 Loading...