


INSTRUCTION BOOK
COVER PRO 900CP

IMPORTANT SAFETY INSTRUCTIONS
When using an electrical appliance, basic safety precautions should always be followed, including the followings:
Read all instructions before using this appliance.
DANGER— To reduce the risk of electric shock:
1.An appliance should never be left unattended when plugged in. Always unplug this sewing machine from the electric outlet immediately after using and before cleaning.
2.Always unplug before replacing a sewing machine bulb. Replace bulb with same type rated 15 Watts.
WARNING— To reduce the risk of burns, fire, electric shock, or injury to persons:
1.Do not allow to be used as a toy. Close attention is necessary when this sewing machine is used by or near children.
2.Use this appliance only for its intended use as described in this owner’s manual.
Use only attachments recommended by the manufacturer as contained in this owner’s manual.
3.Never operate this sewing machine if it has a damaged cord or plug, if it is not working properly, if it has been dropped or damaged, or dropped into water.
Return this sewing machine to the nearest authorized dealer or service center for examination, repair, electrical or mechanical adjustment.
4.Never operate the appliance with any air opening blocked. Keep ventilation openings of this sewing machine and foot controller free from accumulation of lint, dust and loose cloth.
5.Never drop or insert any object into any opening.
6.Do not use outdoors.
7.Do not operate where aerosol (spray) products are being used or where oxygen is being administered.
8.To disconnect, turn all controls to the off (“O”) position, then remove plug from outlet.
9.Do not unplug by pulling on cord. To unplug, grasp the plug, not the cord.
10.Keep fingers away from all moving parts. Special care is required around the sewing machine needle.
11.Always use the proper needle plate. The wrong plate can cause the needle to break.
12.Do not use bent needles.
13.Do not pull or push fabric while stitching. It may deflect the needle causing it to break.
14.Switch this sewing machine off (“O”) when making any adjustment in the needle area, such as threading the needle, changing the needle, threading the bobbin or changing the presser foot, and the like.
15.Always unplug this sewing machine from the electrical outlet when removing covers, lubricating, or when making any other adjustments mentioned in this owner’s manual.
SAVE THESE INSTRUCTIONS
The design and specifications are subject to change without a prior notice.

795-800-003 (E)
Printed in Taiwan
TABLE OF CONTENTS |
|
KNOW YOUR MACHINE |
|
Names of Parts .................................................................................................. |
2 |
Standard Accessories ........................................................................................ |
3 |
GETTING READY TO SEW |
|
Connecting the Machine to the Power Supply ................................................... |
4 |
Controlling Sewing Speed .................................................................................. |
4 |
How to Turn the Handwheel ............................................................................... |
5 |
Opening and Closing the Looper Cover ............................................................. |
5 |
Extension Table ................................................................................................. |
5 |
Raising or Lowering the Presser Foot ................................................................ |
6 |
Removing the Presser Foot ............................................................................... |
6 |
Attaching the Presser Foot ................................................................................. |
6 |
Adjustment of Foot Pressure .............................................................................. |
6 |
Adjustment of Stitch Length ............................................................................... |
7 |
Adjustment of Differential Feed Ratio ................................................................ |
7 |
Changing Needle ............................................................................................... |
8 |
How to use the needle threader/holder .................................................................... |
8 |
Setting the Thread Guide Bar ............................................................................ |
9 |
Setting the Spool Cones .................................................................................... |
9 |
Threading the Machine .................................................................................... |
10 |
Threading the needles ............................................................................................ |
11 |
How to use the threader ......................................................................................... |
12 |
Threading the looper .............................................................................................. |
13 |
STITCH TYPES |
|
Cover Stitch ...................................................................................................... |
15 |
Balancing the thread tension .................................................................................. |
15 |
Chain Stitch ...................................................................................................... |
16 |
Balancing the thread tension .................................................................................. |
16 |
Finishing the Seam .......................................................................................... |
17 |
Beginning of the seam ............................................................................................ |
17 |
End of the seam ..................................................................................................... |
17 |
Knotting the threads ............................................................................................... |
17 |
Removing the Fabric in the Middle of the Stitching .......................................... |
18 |
Hemming with the Cover Stitch ........................................................................ |
19 |
Free Arm Hemming .......................................................................................... |
19 |
Cover Stitch Applications ................................................................................. |
20 |
CARE OF YOUR MACHINE |
|
Cleaning the Feed Dogs and Looper Area ....................................................... |
21 |
Replacing the Light Bulb .................................................................................. |
21 |
Troubleshooting................................................................................................ |
22 |
1

o
!1 !0
!2
u
i
!3 |
y |
|
t
r
!4
|
e |
!5 |
w |
|
q |
!6 |
|
|
@0 |
!7 |
!9 |
|
|
|
!8 |
@1 |
|
@2 |
|
|
@8 |
|
@9 |
@3 |
|
|
@7 |
|
@6 |
@4 |
#0 |
@5
KNOW YOUR MACHINE
Names of Parts
q Differential feed dial w Stitch length dial
e Handwheel r Spool stand t Spool holder y Spool pin
u Thread guide bar i Thread guide post o Thread guide plate
!0Looper thread tension dial
!1Carrying handle
!2Right needle thread tension dial
!3Pressure adjusting screw
!4Left needle thread tension dial
!5Looper
!65Looper release knob
!7Looper thread take-up lever
!8Looper cover
!98Power switch
@0Machine socket
@1Presser foot lifter
@2Presser foot holder
@3Thread cutter
@4Extension table
@5Needle plate
@6Attachment mount
@7Presser foot
@8Left needle (#80/12)
@9Right needle (#80/12)
#0Feed dogs
2
q |
w |
e |
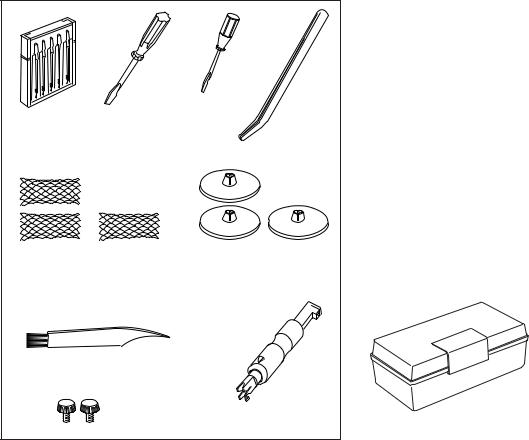
Standard Accessories |
|
|
r |
|
||
|
|
|
q Set of needles: 2 X #80/12, 3 X #90/14 |
|
|
|
|
(Schmetz EL X 705) |
|
|
|
|
w Screwdriver (Large) |
|
|
|
|
e Screwdriver (Small) |
|
|
|
|
r Tweezers |
|
|
|
|
t Nets |
|
t |
|
y |
y Spool holder caps |
|
|
u Lint brush |
|
||
|
|
|
|
|
|
|
|
i Needle threader |
|
|
|
|
o Attachment screws |
(for fixing optional accessories) |
|
|
|
(Refer to the instructions of the optional |
|
|
|
|
accessory) |
|
|
|
|
!0Accessory box |
|
u |
|
|
i |
|
|
|
|
!0 |
|
o |
|
|
|
|
3
|
|
GETTING READY TO SEW |
|
t |
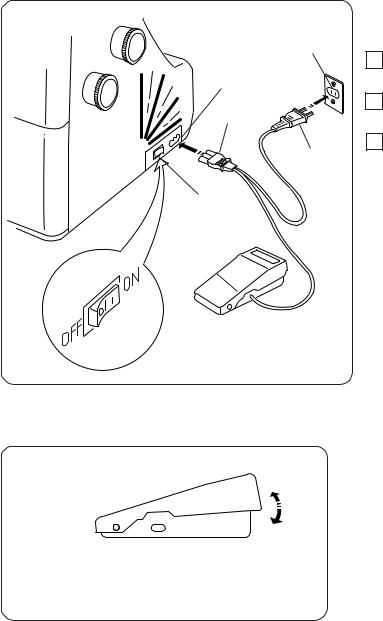
Connecting the Machine to the Power Supply |
|
1 Turn off the power switch, and connect the |
|
|
|
|
e |
|
machine plug to the machine socket. |
w |
|
2 Connect the power supply plug to your power |
|
supply. |
|
|
|
|
|
r |
3 Turn on the power switch. |
|
q Power switch |
|
|
|
|
|
|
w Machine plug |
q |
|
e Machine socket |
|
|
|
|
|
r Power supply plug |
y |
|
t Power supply |
|
y Foot control |
|
|
|
Controlling Sewing Speed
q |
Sewing speed can be varied by the foot control. |
|
The harder you press on the control, the faster the machine runs.
Step on the foot control with the presser foot lifter up, and practice controlling the speed.
q Foot control
Operating Instructions: |
For Your Safety: |
•The symbol “O” of a switch indicates the “off” position of a switch.
•For appliances with a polarized plug (one blade wider than the other): To reduce the risk of electric shock, this plug is intended to fit in a polarized outlet only one way. If it does not fit fully in the outlet, reverse the plug. If it still does not fit, contact a qualified electrician to install the proper outlet. Do not modify the plug in any way.
Foot controller Model YC-482-J is for use with sewing machine model 900P.
*While the machine is in operation, always keep your eyes on the sewing area, and do not touch any moving parts such as the thread take-up lever, loopers, handwheel or needles.
*Always disconnect the machine from the power supply:
—when leaving the machine unattended.
—when attaching or removing parts.
—when threading or cleaning the machine.
*Do not place anything on the foot control, except when the machine is in use.
4
 Loading...