

Page 1
EN Instructions for Use
Page 2
IT Istruzioni d’uso
Pagina 41
Cem Kit
Abutment Solutions
EN Instructions for Use Page 2
Set for the clinical try-in and permanent
extraoral cementation of hybrid abutment
solutions
DE Gebrauchsinformation Seite 15
Set für die klinische Einprobe und die
definitive extraorale Verklebung von
Hybrid-Abutment-Lösungen
FR Mode d’emploi Page 28
Set pour l'essayage clinique et le collage
extraoral définitif des piliers hybrides
implantaires
Rx ONLY
Manufacturer
Ivoclar Vivadent AG
FL-9494 Schaan / Liechtenstein
www.ivoclarvivadent.com
1
IT Istruzioni d’uso Pagina 41
Set per la messa in prova clinica e
l'incollaggio definitivo extraorale di
abutment ibridi
ES Instrucciones de uso Pagina 54
Set para la prueba clínica y cementación
permanente extraoral de pilares híbridos
PT Instruções de uso Página 67
Conjunto para testes clínicos e para
cimentaçao extra-orale permanente de
pilares híbridos
Page 2
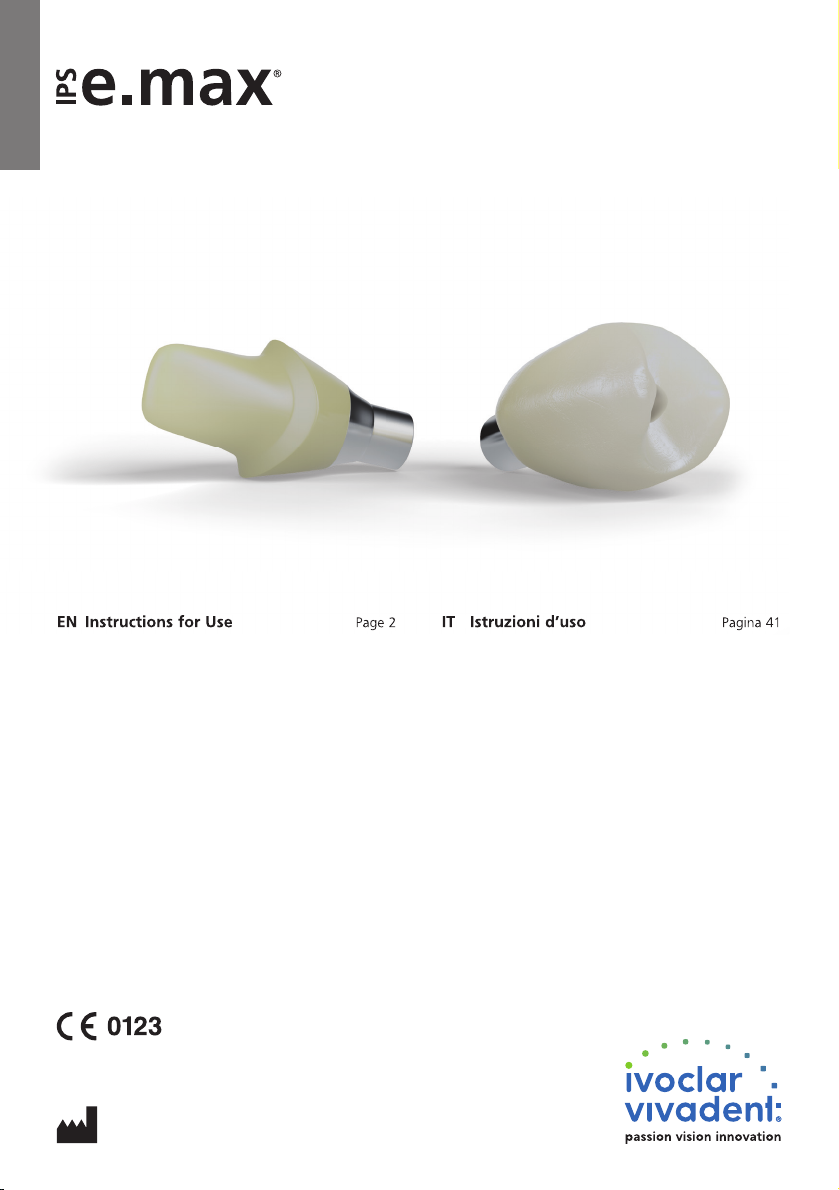
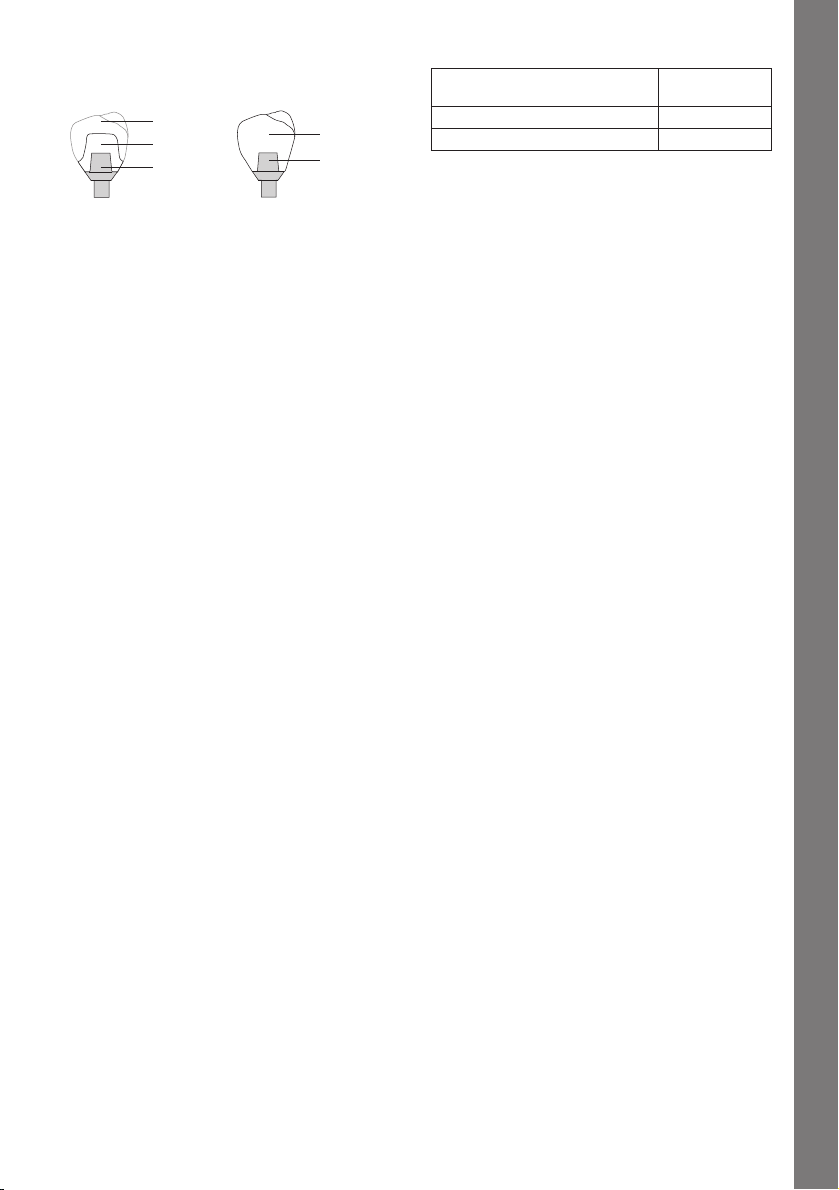
Hybrid abutment Hybrid abutment crown
Crown
Ceramic
structure
Base
Ceramic
structure
Base
Description
The IPS e.max® Abutment Solutions Cem Kit is a professional kit containing quality materials for the permanent
cementation of ceramic structures made of lithium disilicate glass-ceramic (LS2) or zirconium oxide on bases
(e.g. abutment or adhesive basis) made of titanium/titanium alloy or zirconium oxide in the fabrication of hybrid
abutments or hybrid abutment crowns. Furthermore, the
kit contains materials for the clinical try-in procedure.
Indication
Extraoral, permanent cementation of ceramic structures
made of lithium disilicate glass-ceramic (LS2) or zirconium oxide on titanium/titanium alloy or zirconium oxide
bases. Provisional securing of ceramic structures on the
base as well as securing of the crown during try-in.
Contraindication
The materials are contraindicated
– for intraoral luting;
– if the stipulated working technique cannot be applied;
– if a patient is known to be allergic to any of the ingre-
dients of Multilink Hybrid Abutment, Monobond Plus
and Virtual Extra Light Body Fast Set.
Composition
The IPS e.max Abutment Solution Cem Kit includes the
following components:
– Multilink® Hybrid Abutment – self-curing luting
composite for the permanent cementation of ceramic
structures made of lithium disilicate glass-ceramic
(LS2) or zirconium oxide on bases (e.g. abutment or
adhesive basis) made of titanium/titanium alloy or
zirconium oxide. The monomer matrix is composed
of dimethacrylate and HEMA. The inorganic fillers
include barium glass, ytterbium trifluoride, spheroid
mixed oxide and titanium dioxide. The particle size
is between 0.15 and 3.0 μm. The mean particle size
is 0.9 μm. The total volume of inorganic fillers is
approx. 36%.
Shade
– HO0 (High Opacity)
The working and curing times depend on the ambient temperature. Once Multilink Hybrid Abutment has been dispensed from the automix syringe, the following times apply:
2
At room temperature
23 °C ± 1 °C/73 °F ± 2 °F
Working time approx. 2 minutes
Curing time
(including working time)
approx. 7 minutes
The working and curing times become shorter at higher
temperatures, while they become longer at lower temperatures.
– Monobond® Plus – universal primer promoting
an adhesive bond between luting composites
and all indirect restorative materials
Alcohol solution of silane methacrylate, phosphoric
acid methacrylate and sulphide methacrylate
– Liquid Strip – oxygen-impermeable glycerine
gel for the prevention of an oxygen-inhibited
layer on composite surfaces
Glycerine gel
– Virtual® Extra Light Body Fast Set – vinylpoly-
siloxane based impression material (additioncuring) for provisionally securing components
in place during try-in
Addition-curing silicone containing vinylpolysiloxane,
methylhydrogensiloxane, organoplatinic complex,
silica and food dyes
Side effects
– Multilink Hybrid Abutment, Monobond Plus
Systemic side effects are not known. In rare cases,
allergic reactions to individual components have
been reported.
Interactions
– Multilink Hybrid Abutment:
Phenolic substances (e.g. wintergreen oil, eugenol)
inhibit polymerization. Therefore, materials containing these components must not be used. Oxidative
disinfectants (e.g. hydrogen peroxide) may interact
with the initiator system and impair the setting process. As a result, the automix syringe must not be
disinfected with oxidative agents. The syringe can
be disinfected by wiping it with medical alcohol for
example.
– Monobond Plus:
IMPORTANT! In order to create a strong bond,
zirconium oxide and metal surfaces must not be
cleaned with phosphoric acid.
Do not insert the brush into the Monobond Plus
bottle. This may lead to contamination.
– Virtual Extra Light Body Fast Set:
The setting of vinylpolysiloxanes is inhibited by latex
gloves. The surfaces to which the silicone will be
applied (ceramic structure, titanium base, etc.) must
not be touched with latex gloves.
Page 3
Abutment Solutions
Optional: Clinical Try-in
Provisional securing of the ceramic structure on the base
Before the ceramic structure is permanently luted to the base, a clinical try-in can take place. To facilitate intraoral
handling, the components are temporarily attached to one other with silicone material, e.g. Virtual Extra Light
Body Fast Set.
The following procedure should be observed in the temporary attachment of the components:
– The untreated base and the ceramic structure are cleaned with steam and subsequently dried with blown air.
– The ceramic structure is placed on the base (which is screwed on the model analog) and the relative position
of the components is marked with a waterproof pen. This step makes it easier to attain the correct position
when the parts are temporarily assembled.
– The screw channel is sealed with a foam pellet.
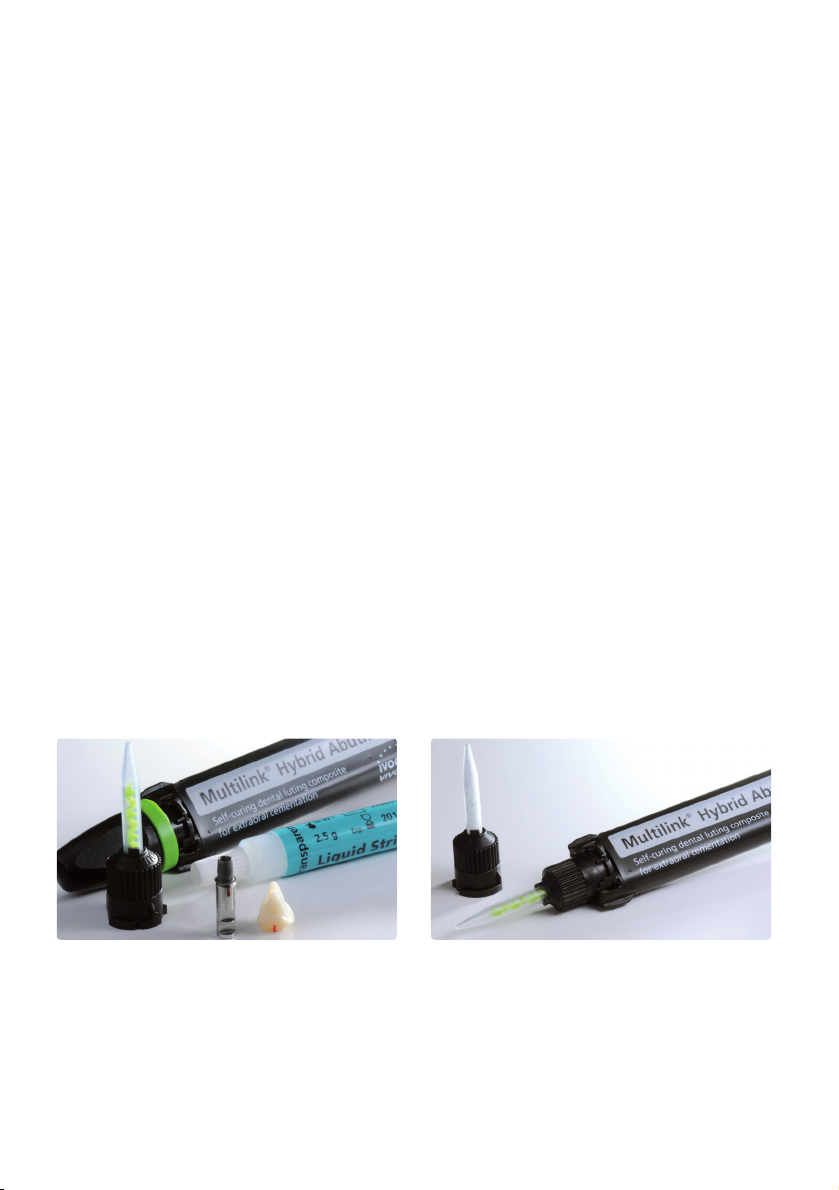
– The Virtual cartridge is inserted in the dispenser and the protective cap is removed.
– The mixing tip is screwed on and the Oral Tip is attached to the mixing tip.
– Virtual Extra Light Body Fast Set is applied to the base and directly into the ceramic structure.
– The base is introduced into the ceramic structure. The alignment of the two components must be checked
(rotation lock/marking).
– The components should be held firmly in the correct position for 2:30 minutes until Virtual Extra Light Body
Fast Set has set.
– Any excess that has been displaced must be carefully removed with a suitable instrument, e.g. a scalpel.
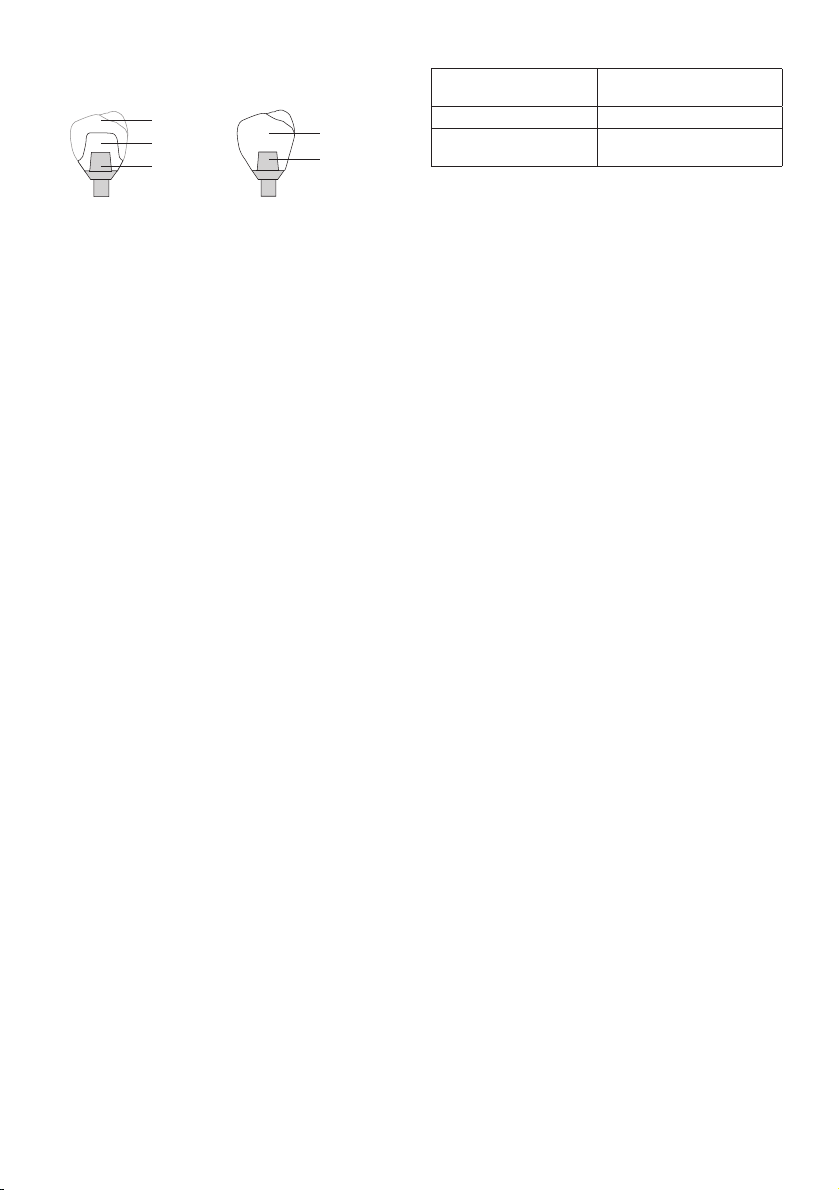
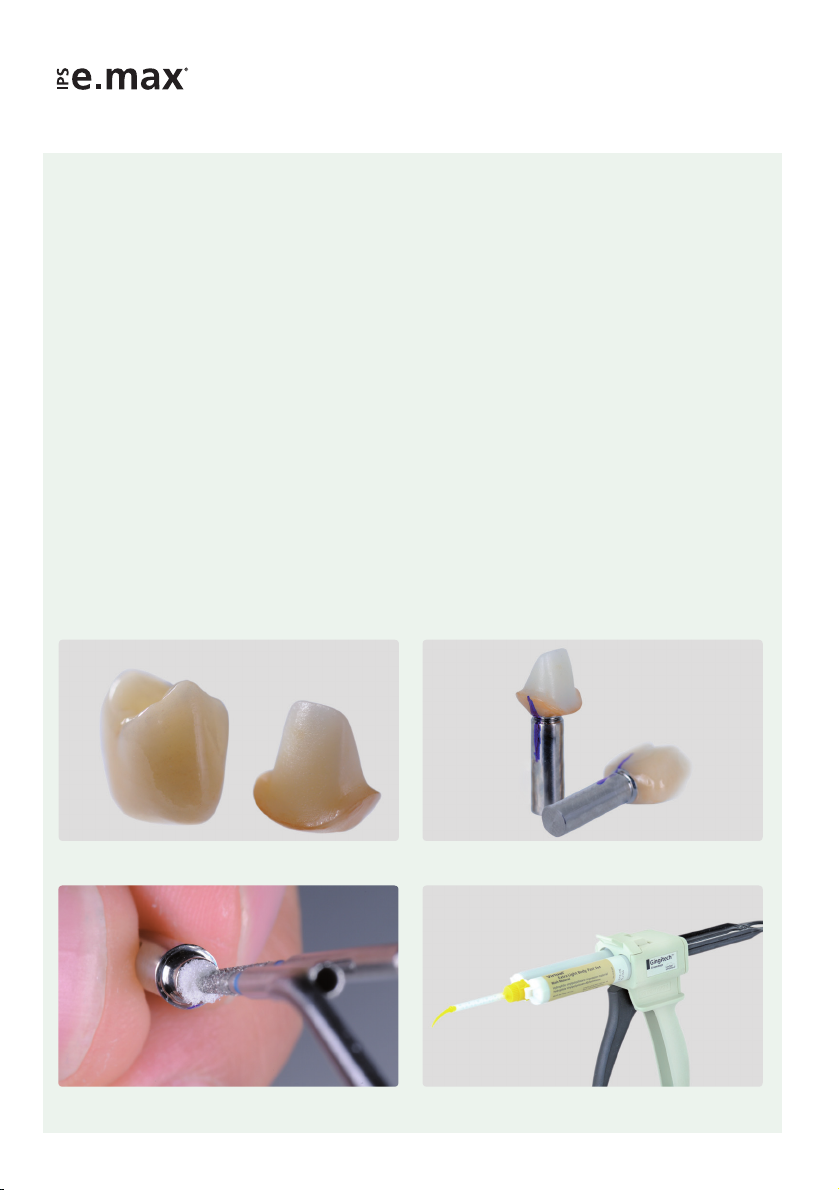
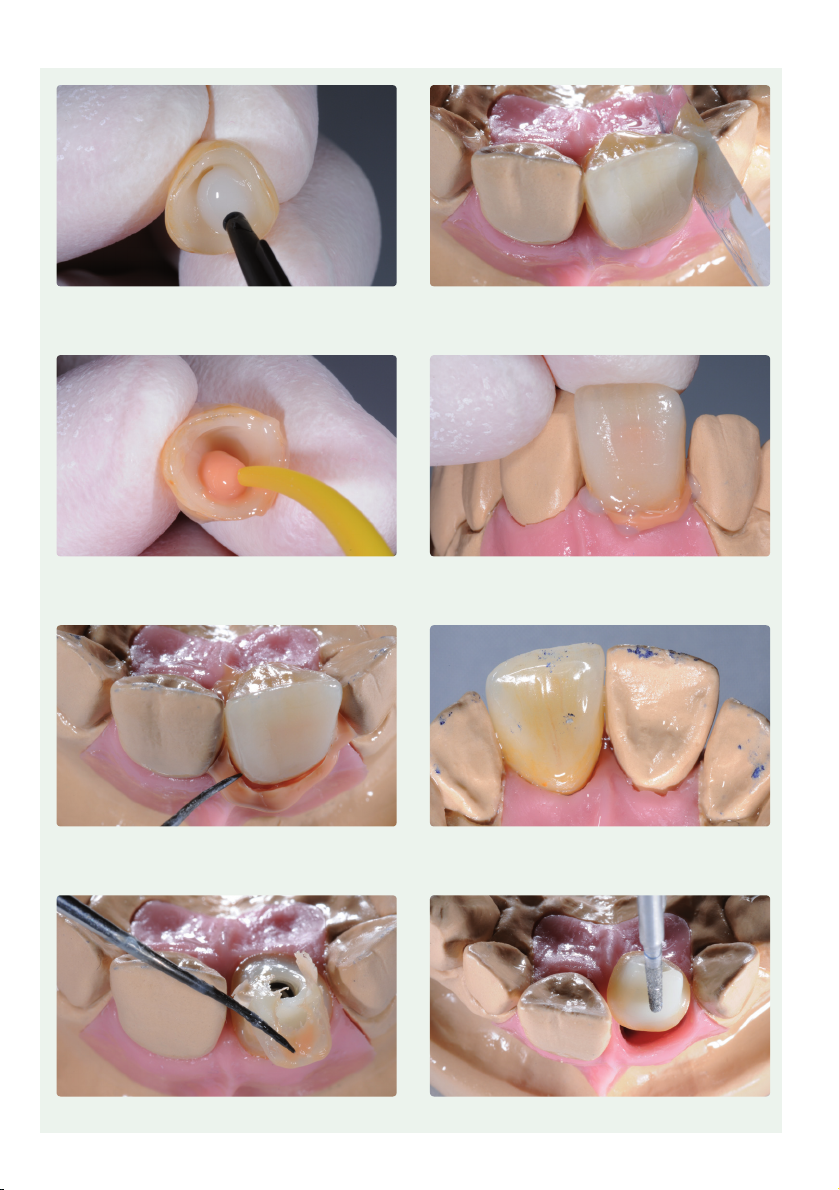
Cleaned, untreated ceramic structures
The screw channel is sealed with a foam pellet.
The ceramic structure is placed on the base and the relative position is
marked.
The Virtual cartridge is inserted in the dispenser. The mixing tip is screwed on
and the Oral Tip is attached.
3
Page 4
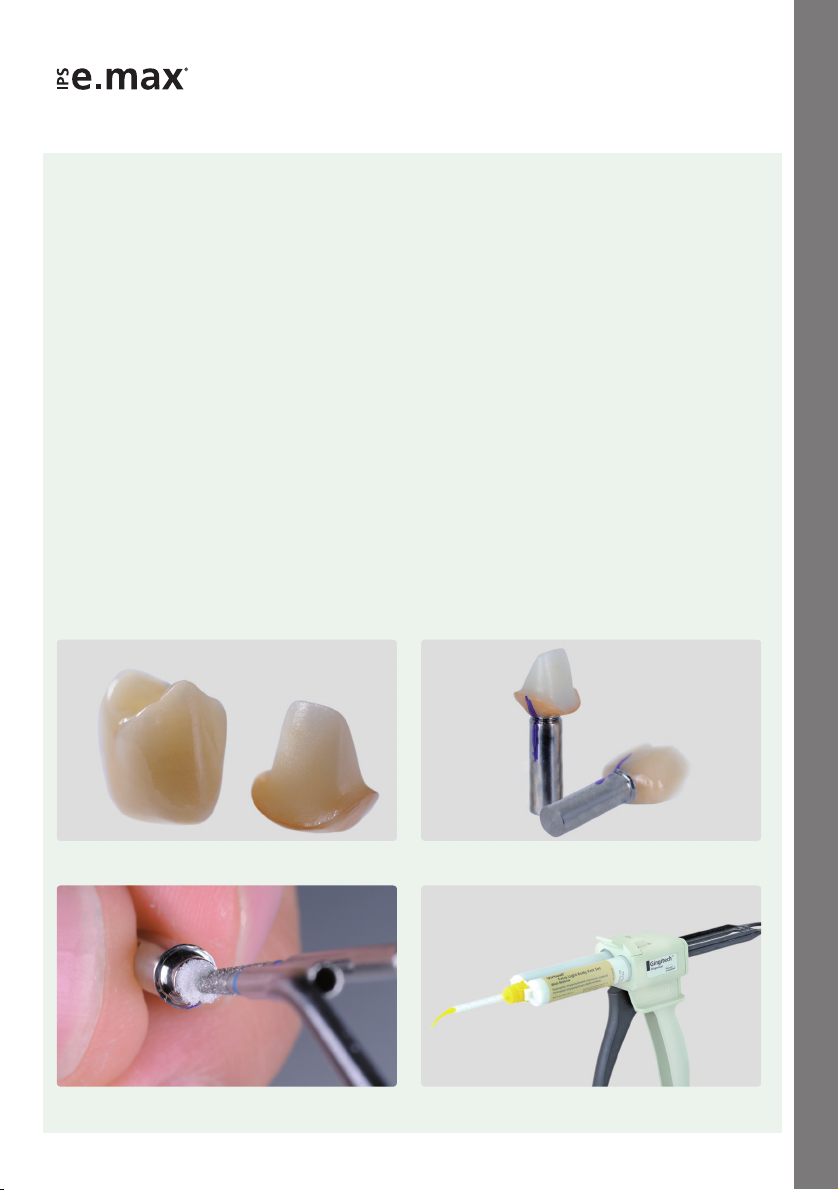
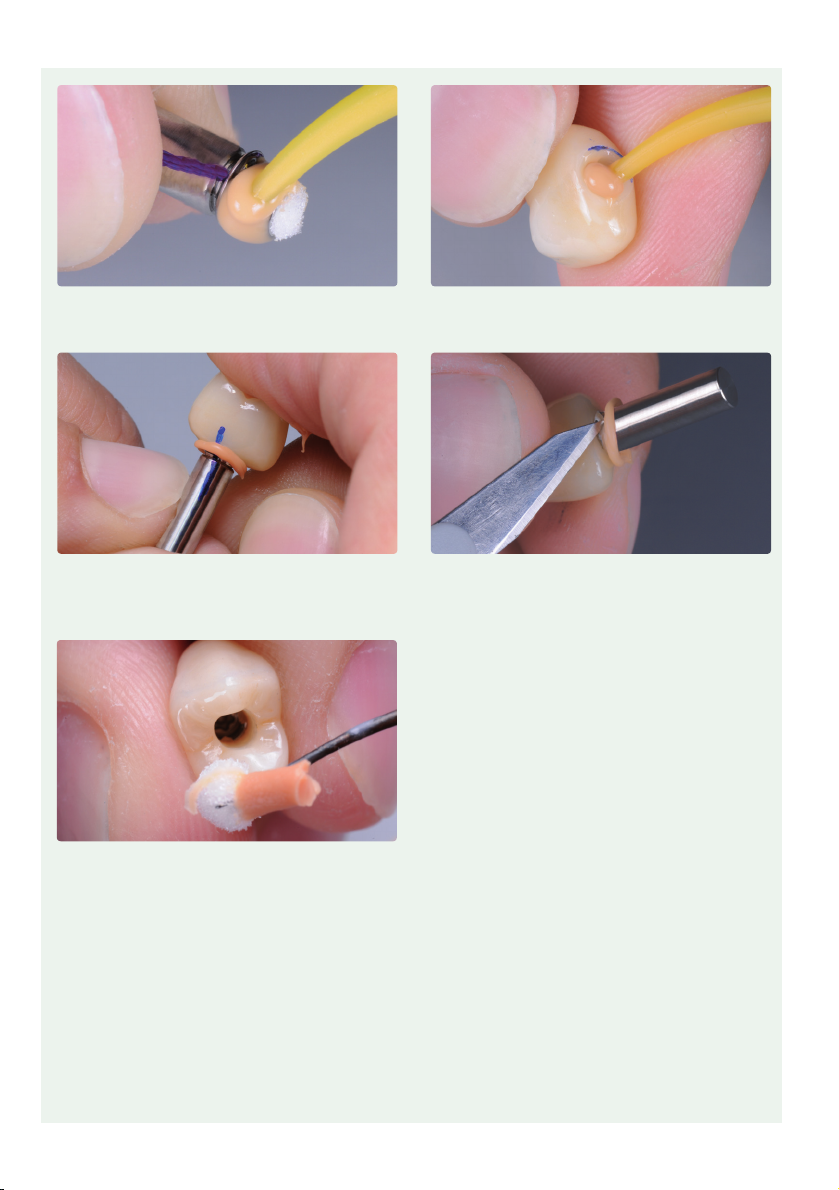
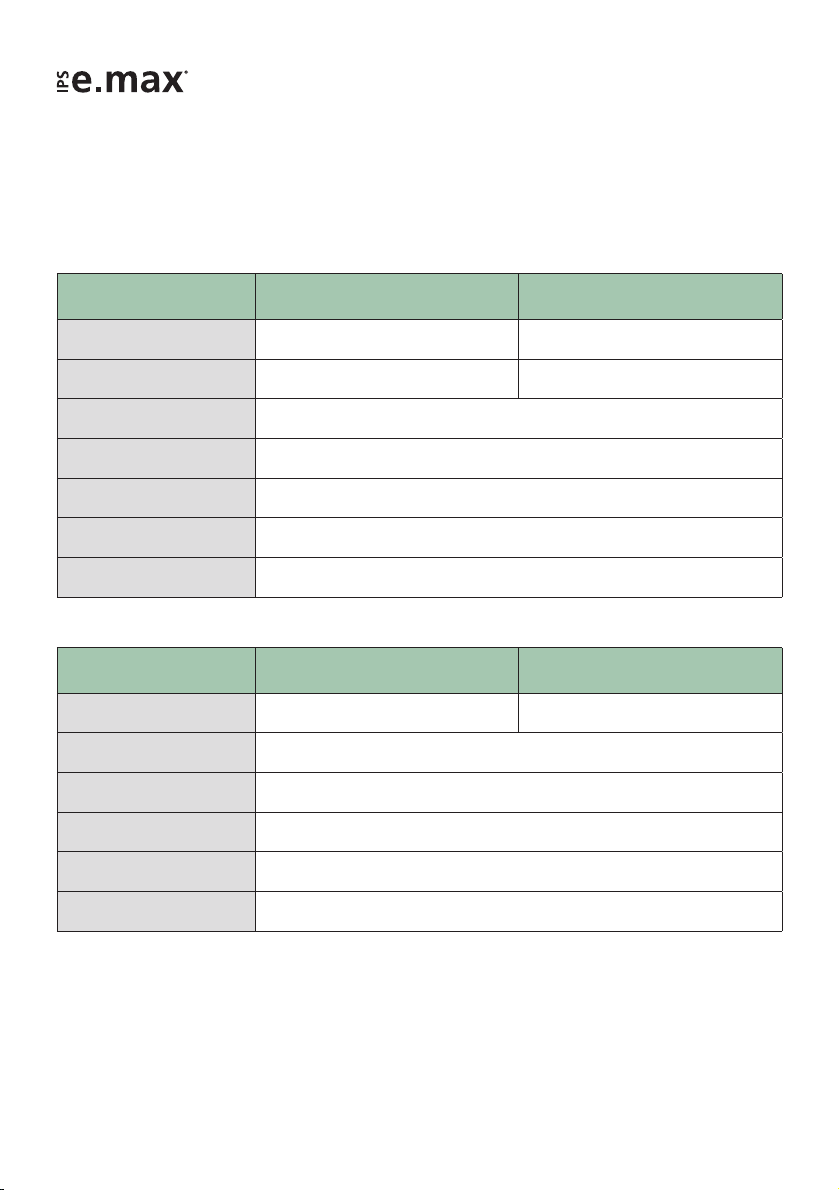
Virtual Extra Light Body Fast Set is applied to the base and…
…directly on the ceramic structure.
The base is introduced into the ceramic structure. In doing so, the alignment
of the two components is checked (rotation lock/marking). The components
are firmly held in place for approx. 2:30 minutes until Virtual Extra Light
Body Fast Set has set.
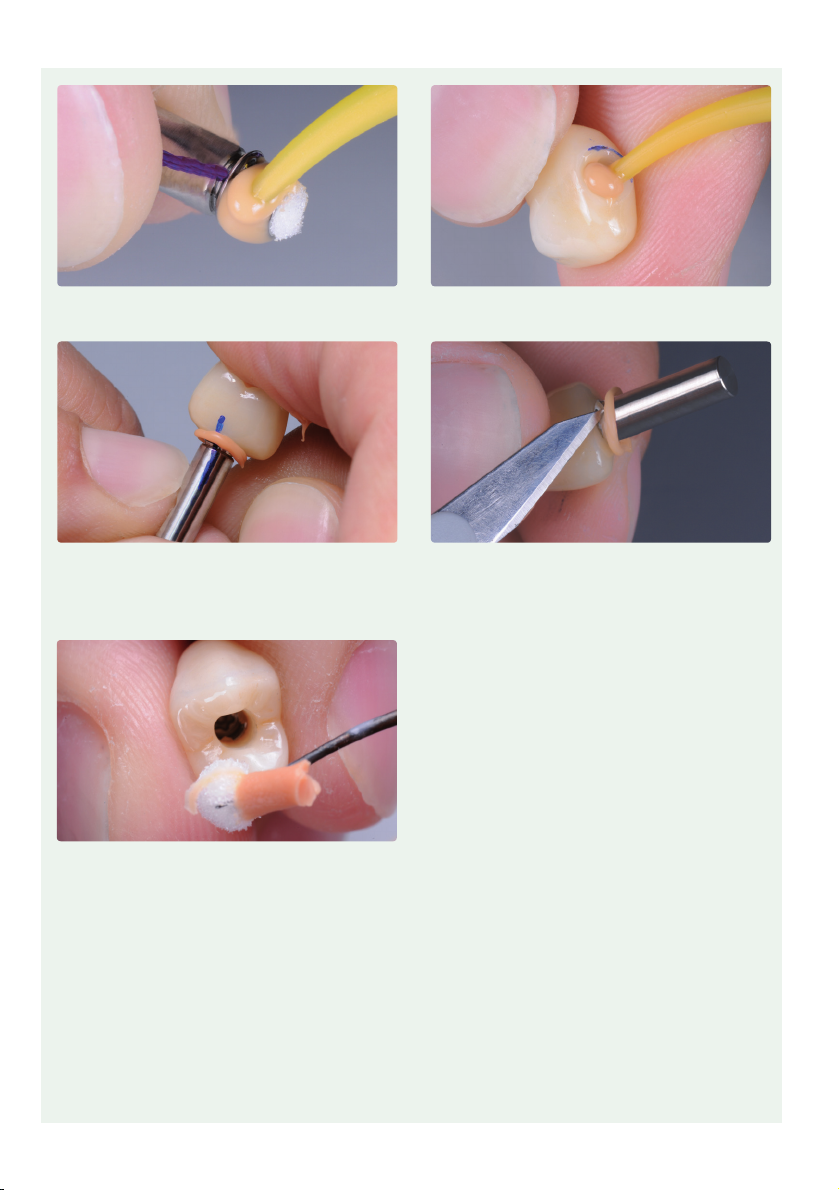
Excess Virtual Extra Light Body Fast Set is removed from the screw channel
with an instrument.
Displaced excess is carefully removed with a suitable instrument, e.g. a
scalpel.
4
Page 5

Clinical try-in
Hybrid abutment with dedicated crown
Important note: Any intraoral inspection of the occlusion/articulation and any necessary grinding adjustments
may only be carried out if the components have been attached to one other with Virtual Extra Light Body Fast Set.
Virtual has a cushioning effect during the try-in procedure, in particular, if any grinding adjustments have to be
made. Therefore, it prevents chipping in the transition area between the hybrid abutment and the crown.
The following procedure should be observed during the clinical try-in:
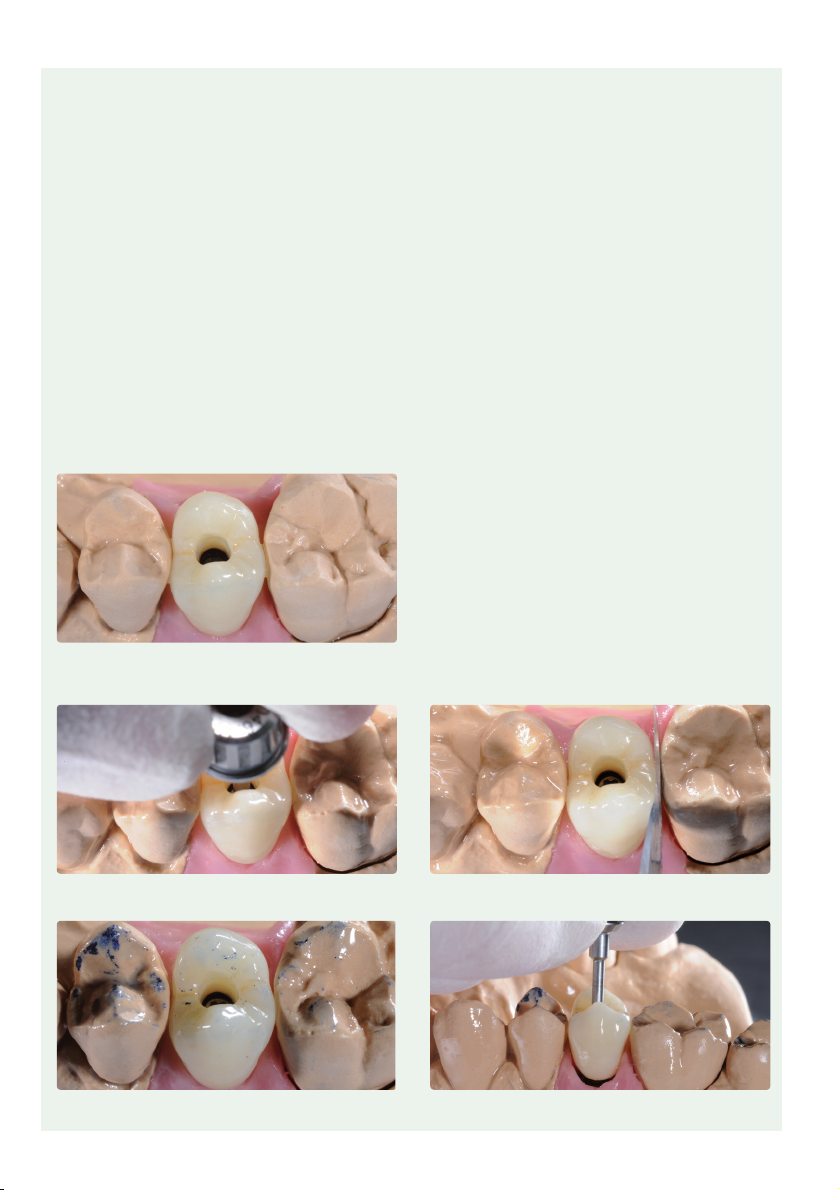
– The prepared hybrid abutment (provisionally secured in place) and the clean corresponding crown are laid out.
– The provisional restoration is removed.
– The hybrid abutment is screwed in manually with the dedicated screw.
– The geometry of the hybrid abutment is checked (e.g. fit, gingival anaemia) in relation to the gingival margin.
– If desired, the screw channel on the hybrid abutment can be sealed with a foam pellet.
– Tip: Isolate the inner aspect of the crown, e.g. with Try-In-Paste, Liquid Strip
– The crown is placed on the hybrid abutment intraorally to check and if necessary adjust the proxi-
mal contacts. Note: No occlusal functional inspection must be performed at this stage.
– For the functional inspection, the crown has to be secured on the hybrid abutment with Virtual
Extra Light Body Fast Set. Try-in paste must not be used for this purpose, as this material is not
sufficiently resistant to compressive force.
– The Virtual cartridge is inserted in the dispenser and the protective cap is removed.
– The mixing tip is screwed on and the Oral Tip is attached to the mixing tip.
– Virtual Extra Light Body Fast Set is applied to the inner aspect of the crown.
– The crown is pressed onto the hybrid abutments using the fingers until the final position is reached. The
crown is held in the final position until the Virtual material has set.
– Excess Virtual material is removed.
– The occlusion/articulation is checked and if necessary adjustments are made with suitable grinding instru-
ments (see separate IPS e.max recommended grinding instruments for ceramics – use in the dental practice).
If adjustments have been made by grinding, the restoration has to be re-polished or glaze fired again.
– The crown is carefully removed from the hybrid abutment, and the hybrid abutment (including the base).
– The temporary restoration is placed.
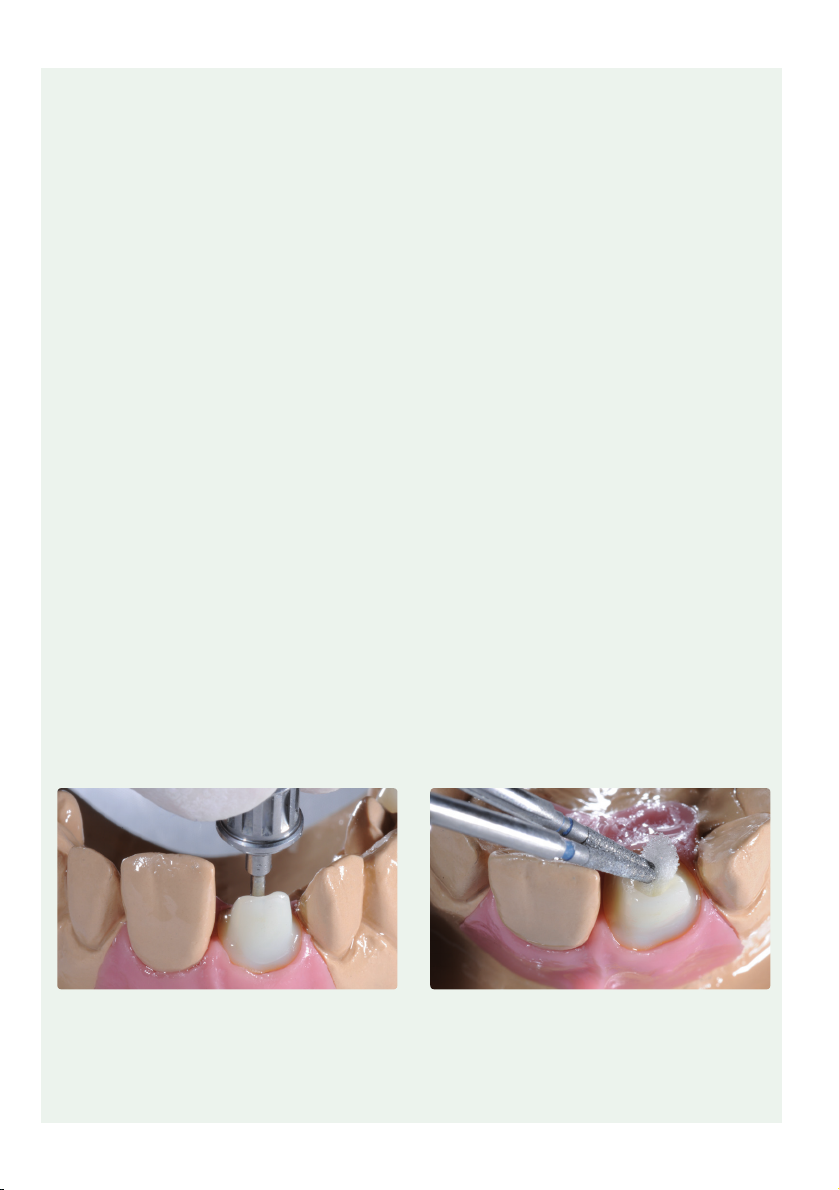
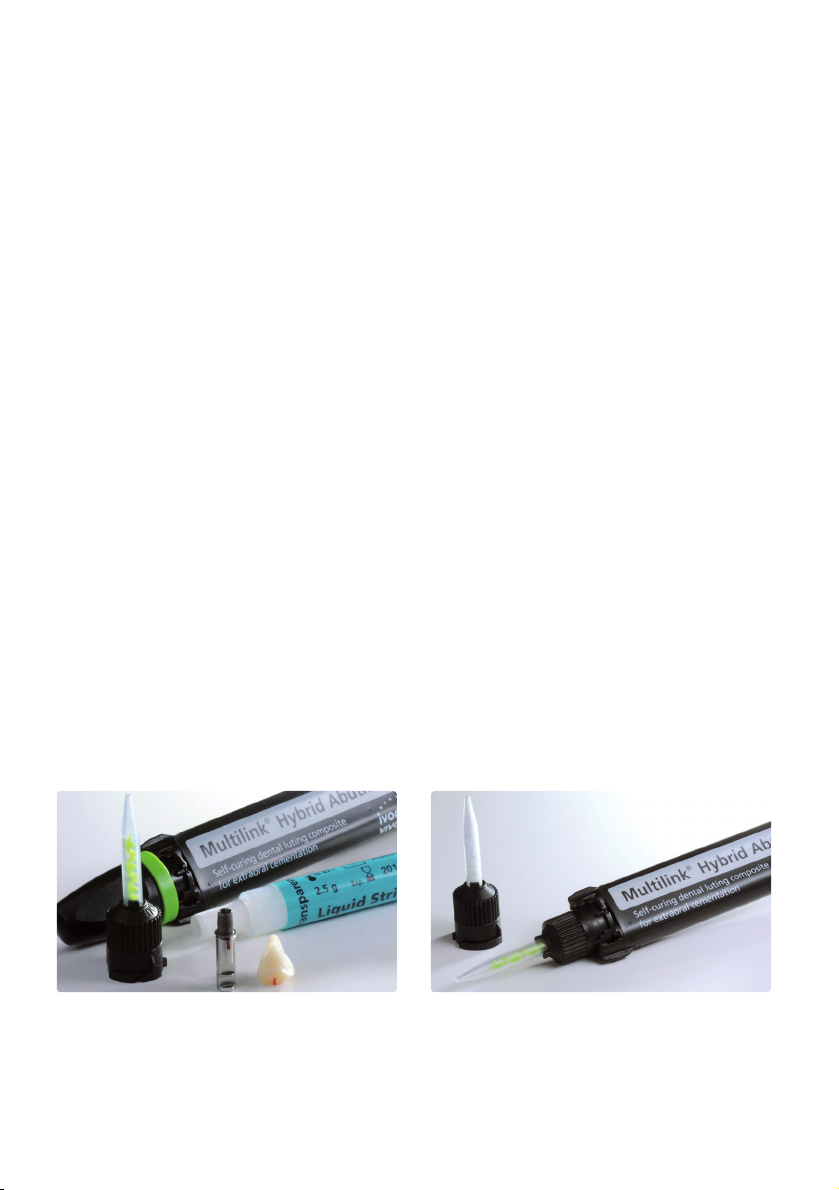
The hybrid abutment is manually screwed in place with the dedicated screw.
The geometry of the hybrid abutment (e.g. fit, gingival anaemia) is checked in
relation to the gingival margin.
If desired, the screw channel of the hybrid abutment can be sealed with a
foam pellet.
5
Page 6

Tip: The inner aspect of the crown can be isolated with glycerine gel.
The crown is placed on the hybrid abutment intraorally to check and if
necessary adjust the proximal contacts. Note: No occlusal functional
inspection must be performed at this stage.
Virtual Extra Light Body Fast Set is applied to the inner aspects of the crown.
Excess Virtual material is removed.
The crown is carefully lifted from the hybrid abutment and the Virtual Extra
Light Body Fast Set is removed.
The crown is pressed onto the hybrid abutment using the fingers until the
final position is reached. The crown is held in the final position until the
Virtual material has set.
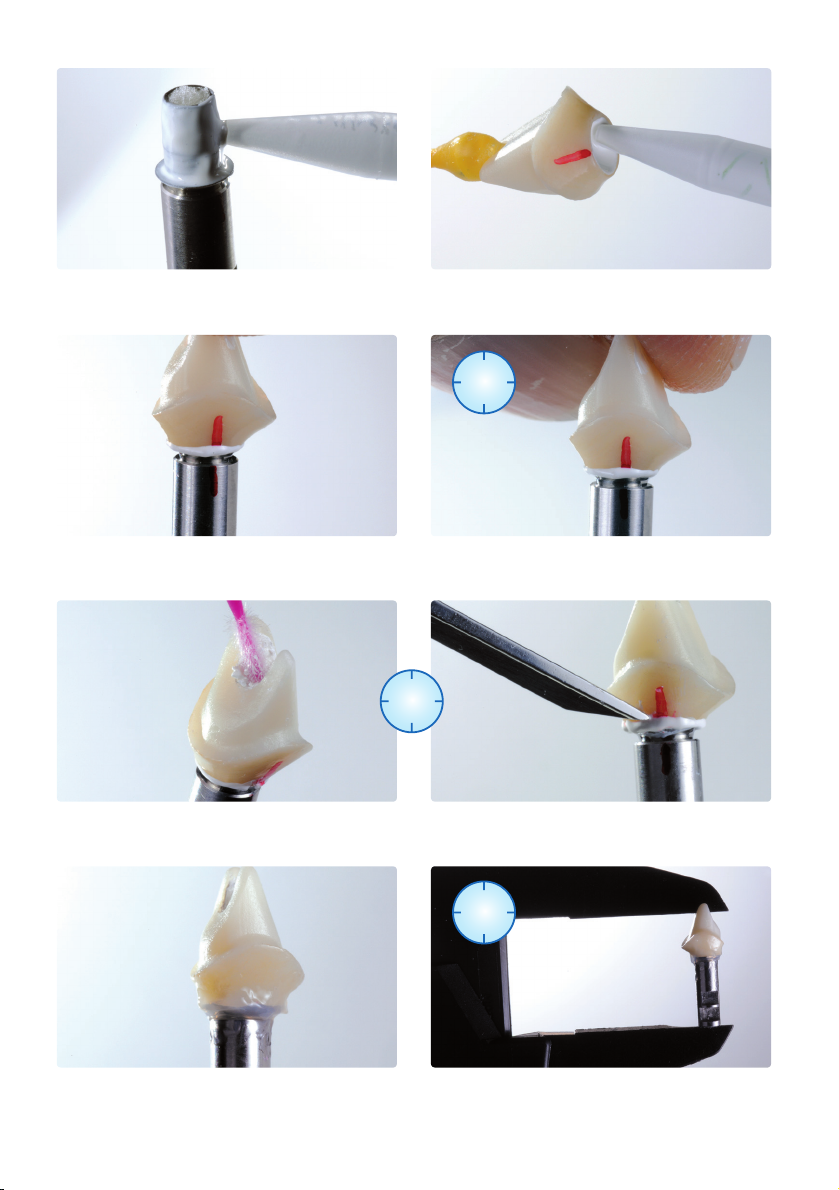
The occlusion/articulation is checked and if necessary adjustments are made
with suitable grinding instruments.
The hybrid abutment is unscrewed.
6
Page 7
Hybrid abutment crown
The following procedure should be observed during the clinical try-in:
– The prepared and cleaned hybrid abutment crown (provisionally secured in place with Virtual Extra Light Body
Fast Set) is laid out.
– The provisional restoration is removed.
– The hybrid abutment crown is placed on the implant intraorally in order to check and if necessary adjust the
proximal contacts. Note: No occlusal functional inspection must be performed at this stage.
– The hybrid abutment crown is screwed in manually with the dedicated screw.
– The geometry of the hybrid abutment crown is checked (e.g. fit, gingival anaemia) in relation to the gingiva.
– The occlusion/articulation is checked and if necessary adjustments are made with suitable grinding instru-
ments (see separate IPS e.max recommended grinding instruments for ceramics – use in the dental practice).
If adjustments have been made by grinding, the restoration has to be re-polished or glaze fired again.
– The crown is carefully removed from the hybrid abutment crown (including the base).
– The implant site is rinsed, e.g. with Cervitec® Liquid (antibacterial mouth rinse containing chlorhexidine) to
clean and disinfect it.
– The temporary restoration is placed.
The hybrid abutment crown is placed on the implant intraorally in order to
check and if necessary adjust the proximal contacts. Note: No occlusal
functional inspection must be performed at this stage.
The hybrid abutment crown is screwed in with the dedicated screw.
The occlusion/articulation is checked and if necessary adjusted with suitable
grinding instruments.
The geometry of the hybrid abutment crown (e.g. fit, gingival anaemia) is
checked in relation to the gingiva.
The hybrid abutment crown (including base) is carefully removed.
7
Page 8

Abutment Solutions
Permanent cementation of base / ceramic structure
Careful preparation of the bonding surface is a requisite for the successful adhesive cementation of the base and the
ceramic structure. The following paragraphs outline the required procedures. The procedure is the same for hybrid
abutments and hybrid abutment crowns.
Hybrid abutments and hybrid abutment crowns made of IPS e.max lithium disilicate glass-ceramic (LS2)
Ceramic structure
(LS2)
Blasting –
Etching
Conditioning The bonding area with Monobond Plus for 60 s
Adhesive cementation Multilink Hybrid Abutment
Covering the cementation joint Glycerine gel, e.g. Liquid Strip
Curing Approx. 7 min auto-polymerization
Polishing the cementation joint Conventional polishers for ceramic/composite resin
Hybrid abutments made of zirconium oxide (ZrO2)
The bonding area with
®
Ceramic Etching Gel for 20 s
IPS
According to the instructions of the
manufacturer
Ceramic structure
(ZrO2)
Blasting
Conditioning The bonding area with Monobond Plus for 60 s
Adhesive cementation Multilink Hybrid Abutment
Covering the cementation joint Glycerine gel, e.g. Liquid Strip
According to the instructions of the
manufacturer
According to the instructions of the
manufacturer
Base
–
Base
Curing Approx. 7 min auto-polymerization
Polishing the cementation joint Conventional polishers for ceramic/composite resin
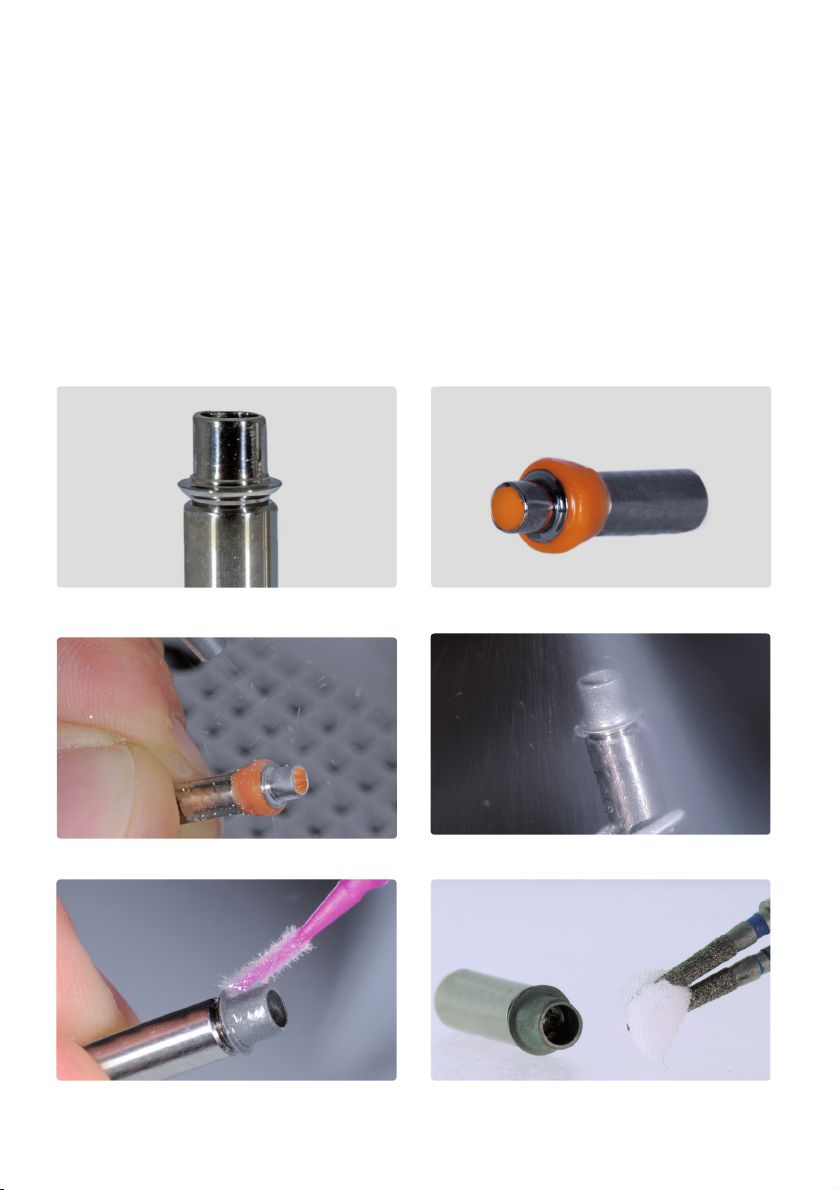
Preparation of the base
The following procedure should be observed in the preparation of the base for the cementation with
the ceramic structure:
– The base should be prepared according to the instructions of the manufacturer.
– The base is cleaned in an ultrasonic bath or with a steam cleaner and then dried with blown air.
– The base is screwed on the model analog.
– The ceramic structure is placed on the base and the relative position of the components is marked with a water-
proof pen. This facilitates locating the correct position when the parts are assembled at a later stage.
8
Page 9
– The emergence profile of the base must not be blasted or modified in any way!
– If the manufacturer recommends that the bonding surfaces be blasted, the following procedure should
be observed:
– Hard modelling wax is applied to protect the emergence profile, since this type of material is easy to remove
later on.
– The screw channel is also sealed with wax.
– The bonding area is carefully blasted according to the instructions of the manufacturer.
– An instrument and a steam cleaner are used for cleaning. It is important to remove all the wax meticulously.
– After the bonding surface has been cleaned, it must not be contaminated under any circumstances, as this would
impair the bond.
– Monobond Plus is applied on the clean bonding surface and allowed to react for 60 s. After the reaction time, any
residue is dispersed with air that is free of water and oil.
– The screw channel is sealed with a foam pellet or wax. The bonding surface must not be contaminated in the process.
If the manufacturer recommends that the bonding surfaces be
blasted, the following procedure should be observed:
The base is screwed on the model analog. The relative position to the
ceramic structure is marked with a waterproof pen.
Optional: The bonding surface can be carefully blasted according to the
instructions of the manufacturer.
Monobond Plus is applied to the clean bonding surface and allowed to react
for 60 s. After the reaction time, any remaining residue is dried with blown
air that is free of water and oil.
Optional: Wax is applied in order to protect the emergence profile. In addition, the screw channel is sealed with wax.
Optional: Cleaning with an instrument and a steam cleaner. It is important
to remove all the wax meticulously.
The screw channel is sealed with a foam pellet or wax. The bonding surface
must not be contaminated in the process.
9
Page 10

Preparing ceramic structures made of IPS e.max lithium disilicate glass-ceramic (LS2)
The following procedure must be observed in the preparation of the ceramic structure for cementation on the base:
– The ceramic structure must not be blasted in preparation for cementation.
– The ceramic structure is cleaned in an ultrasonic bath or with a steam cleaner and subsequently blown dry.
– After cleaning, the bonding must not be contaminated under any circumstances, as this would impair the bond.
– Wax can be applied to protect the outer surfaces or the glazed areas.
– The bonding surface is etched with 5% hydrofluoric acid gel (IPS Ceramic Etching Gel) for 20 s.
– Subsequently, the bonding surface is thoroughly rinsed under running water and dried with air that is free of
water and oil.
– Monobond Plus is applied to the clean bonding surface and allowed to react for 60 s. After this reaction time, any
residue is dispersed with air that is free of water and oil.
Ceramic structures made of IPS e.max lithium disilicate glass-ceramic (LS
) must not be blasted.
2
Etching with IPS Ceramic Etching Gel for 20 s and
subsequently rinsing it off with water.
Monobond Plus is allowed to react for 60 s and
then it is dried with blown air.
Preparing ceramic structures made of zirconium oxide (ZrO2)
The following procedure must be observed in the preparation of the ceramic structure for cementation on the base:
– In order to facilitate its handling, the ceramic structure is attached to a holder (e.g. Microbrush) before it is blasted.
– The outer surfaces of the ceramic structure are protected with a wax coating.
– In order to better control the blasting procedure, the bonding surface can be coloured with a permanent marker.
– The bonding surface of the ceramic structure is cleaned by means of blasting with Al2O3 100 μm at max. 1 bar and
at a distance of max. 1–2 cm from the blasting nozzle (The instructions of the manufacturer must be
observed).
– The ceramic structure is cleaned with steam or in an ultrasonic bath.
– After cleaning, the bonding surface must not be contaminated under any circumstances, since this may negatively
influence the bonding results.
– Monobond Plus is applied to the clean bonding surface and allowed to react for 60 s. After this reaction time, any
remaining residue is dried with air that is free of water and oil.
Optional: Wax is applied to protect the outer
surfaces.
10
Optional: The bonding surface is cleaned by blasting it (The instructions of the manufacturer
must be observed).
Monobond Plus is allowed to react for 60 s and
then dried with blown air.
Page 11
Cementation with Multilink Hybrid Abutment
The following instructions must be observed in the cementation procedure:
– The cleaned and conditioned components (ceramic structure, base) are laid out ready for cementation.
– The subsequent cementation procedure must be carried out quickly and without interruption.
The working time of Multilink Hybrid Abutment is approx. 2 min at 23 °C (± 1 °C)/73 °F (± 2 °F).
– As a general rule, a new mixing tip is attached to the Multilink Hybrid Abutment prior to each use.
– A thin layer of Multilink Hybrid Abutment is directly applied from the mixing syringe to the bonding surface of the
base and the bonding surface of the ceramic structure.
– The mixing tip is left on the Multilink Hybrid Abutment syringe until the next use. The remaining cement polymer-
izes in the tip and functions a seal.
– The ceramic structure is placed on the base in such a way that the position markings are aligned.
– The parts are lightly and evenly pressed together and the correct relative position of the components is checked
(transition base/ceramic structure).
– Subsequently, the parts are tightly pressed together for 5 s.
– Excess in the screw channel is carefully removed, e.g. with a Microbrush or brush, using rotary movements.
– Important: Excess must not be removed before curing has started, i.e. 2–3 minutes after mixing. For
the purpose, a suitable dental lab instrument (e.g. Le Cron) is used and the components are held in
place with light pressure in the process.
– Glycerine gel is applied (e.g. Liquid Strip) on the cementation joint to prevent the formation of an inhibition layer.
The glycerine gel must be applied cautiously to avoid blending it with or displacing the composite. The gel must
be left on the cementation joint until polymerization is complete.
– Next, the luting composite is completely auto-polymerized within 7 min.
– Important: The components must not be moved until Multilink Hybrid Abutment has completely cured.
They can be held immobile with, e.g. diamond-coated tweezers.
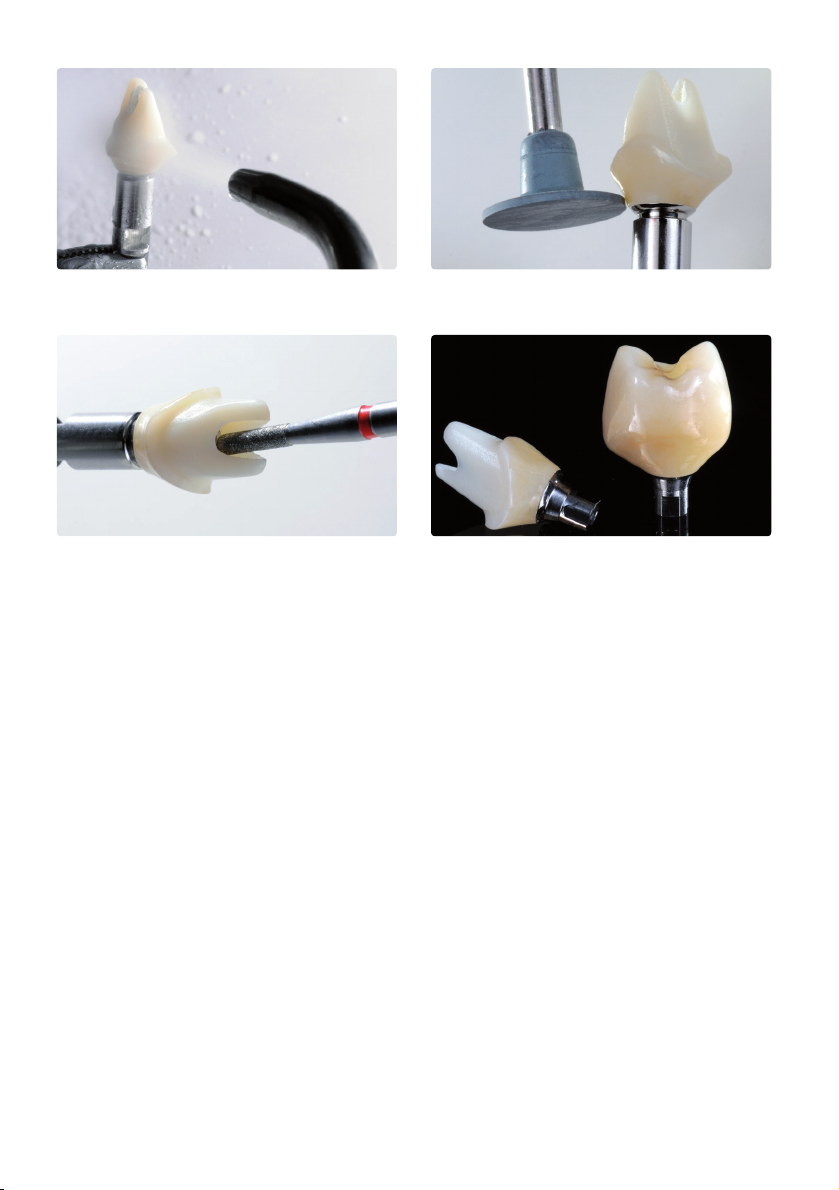
– After the completion of auto-polymerization, the glycerine gel is rinsed off with water.
– The cementation joint should be cautiously polished with rubber polishers at a low speed
(< 5,000 rpm) to avoid overheating.
– Any cement residue left in the screw channel is removed with suitable rotating instruments.
– The restoration is steam cleaned.
The cleaned and conditioned components are laid out ready for cementation. A new mixing tip is attached to the Multilink Hybrid Abutment prior
to each use.
11
Page 12

A thin layer of Multilink Hybrid Abutment is directly applied from the mixing
syringe to the bonding surface of the base.
A thin layer of Multilink Hybrid Abutment is directly applied from the mixing
syringe on the bonding surface of the ceramic structure.
5 s
The ceramic structure is placed on the base in such a way that the position
markings are aligned.
Excess in the screw channel is carefully removed, e.g. with a Microbrush or
brush, using rotary movements.
Glycerine gel (e.g. Liquid Strip) is applied on the cementation joint to prevent
the formation of an inhibition layer.
The components are joined using even and light pressure. Subsequently, the
components are tightly pressed together for 5 s.
2-3
min
Important: Excess must not be removed before curing has started,
i.e. 2–3 minutes after mixing. For the purpose, a suitable dental
lab instrument (e.g. Le Cron) is used and the components are held
in place with light pressure.in the process.
7
min
The luting composite auto-polymerizes within 7 min.
Important: The components must not be moved until auto-polymerization is
completed. The components must be immobilized during this time.
12
Page 13
After the auto-polymerization process, the glycerine gel is rinsed off with
water.
The cementation joint is cautiously polished with rubber polishers
at a low speed (< 5,000 rpm) to avoid overheating.
Any remaining cement residue in the screw channel is removed with suitable
rotating instruments. The base must not be damaged.
Completed hybrid abutment and hybrid abutment crown after cementation.
13
Page 14

Additional notes
– Multilink Hybrid Abutment should be processed at
room temperature. Low(er) temperatures may cause
difficulty in dispensing and mixing the material and
may prolong the working and curing time.
– Unpolymerized material may stain clothing.
Warning
– Contact of uncured Multilink Hybrid Abutment with
skin/mucous membrane and eyes must be prevent-
ed. In an unpolymerized state, Multilink Hybrid
Abutment my cause slight irritation and lead to a
sensitization against methacrylates. Commercial
medical gloves do not provide protection against the
sensitizing effect of methacrylates.
– Monobond Plus:
– Highly flammable
– Irritating
– The product contains ethanol.
– The product must be kept away from sources of
ignition.
– Virtual Extra Light Body Fast Set:
If uncured material comes in contact with the eyes,
they should immediately be rinsed with plenty of
water. If irritation persists, a physician should be
consulted. If the material comes in contact with the
skin, it should be rinsed off with water and soap.
Shelf life and storage
– The individual components of the IPS e.max
Abutment Solution Cem Kit should not be used after
the indicated date of expiration.
– Shelf life: see note on syringes/bottles/cartridges
– Storage temperature of Multilink Hybrid Abutment,
Monobond Plus, Liquid Strip and Virtual Extra Light
Body Fast Set: 2–28 °C/36–82 °F.
– Monobond Plus and Liquid Strip: Close immediately
after use.
– Multilink Hybrid Abutment and Virtual Extra Light
Body Fast Set:
The mixing tip is left on the syringe/cartridge after
use. The material contained within will polymerize
and allow the mixing tip to function as a seal.
Keep out of the reach of children!
For use in dentistry only.
The material has been developed solely for use in dentistry. Processing
should be carried out strictly according to the Instructions for Use. Liability
cannot be accepted for damages resulting from failure to observe the
Instructions or the stipulated area of application. The user is responsible for
testing the material for its suitability and use for any purpose not explicitly
stated in the Instructions. Descriptions and data constitute no warranty of
attributes and are not binding.
14
Page 15
Hybrid-Abutment Hybrid-Abutment-Krone
Krone
Keramik-
struktur
Basis
Keramikstruktur
Basis
Beschreibung
Das IPS e.max® – Abutment Solutions Cem Kit ist ein
professionelles Kit für die definitive Verklebung von
Keramikstrukturen aus Lithium-Disilikat-Glaskeramik (LS2)
oder Zirkoniumoxid auf Basen (z.B. Abutment oder
Klebebasis) aus Titan/Titanlegierung oder Zirkoniumoxid
zur Herstellung eines Hybrid-Abutments oder einer
Hybrid-Abutment-Krone. Des Weiteren sind Materialien
für die klinische Einprobe enthalten.
Indikation
Extraorales, definitives Verkleben von Keramikstrukturen
aus Lithium-Disilikat-Glaskeramik (LS2) oder Zirkoniumoxid auf Basen aus Titan/Titanlegierung oder Zirkoniumoxid. Reversible Fixierung der Keramikstruktur auf der
Basis sowie der Krone während der Einprobe.
Kontraindikation
Der Einsatz ist kontraindiziert,
– für die intraorale Verklebung.
– wenn die vorgeschriebene Anwendungs-
technik nicht möglich ist.
– bei erwiesener Allergie gegen Bestandteile
von Multilink Hybrid Abutment, Monobond Plus
und Virtual Extra Light Body Fast Set.
Zusammensetzung
Das IPS e.max Abutment Solution Cem Kit setzt sich aus
folgenden Komponenten zusammen:
– Multilink® Hybrid Abutment – Selbsthärtendes
Befestigungscomposite für die definitive Verklebung
von Keramikstrukturen aus Lithium-Disilikat-
Glaskeramik (LS2) oder Zirkoniumoxid auf Basen (z.B.
Abutment oder Klebebasis) aus Titan/Titanlegierung
oder Zirkoniumoxid. Die Monomermatrix besteht aus
Dimethacrylat und HEMA. Die anorganischen Füll-
stoffe bestehen aus Bariumglas, Ytterbiumtrifluorid,
sphäroidem Mischoxid und Titandioxid. Die Partikel-
grösse liegt zwischen 0,15 –3,0 μm. Die mittlere
Partikelgrösse beträgt 0,9 μm. Der Gesamtvolumen-
anteil anorganischer Füller beträgt ca. 36 %.
Farbe
– HO 0 (hohe Opazität)
Die Verarbeitungs- und Abbindezeiten sind abhängig von
der Umgebungstemperatur. Sobald Multilink Hybrid
Abutment aus der Automischspritze ausgedrückt ist, gelten folgende Zeiten:
Raumtemperatur
23 °C ± 1 °C
Verarbeitungszeit Ca. 2 Minuten
Aushärtezeit (mit Verarbeitungszeit) Ca. 7 Minuten
Bei höherer Temperatur verkürzen sich Verarbeitungs- und
Aushärtezeit, bei tieferer Temperatur verlängern sie sich.
– Monobond® Plus – Primer für den Aufbau eines
adhäsiven Verbunds von Befestigungscompositen
zu allen indirekten Restaurationsmaterialien
Alkoholische Lösung von Silanmethacrylat,
Phosphorsäuremethacrylat und Sulfidmethacrylat
– Liquid Strip – Sauerstoffundurchlässiges
Glyceringel zum Vermeiden der sauerstoffinhibierten Schicht bei Composites
Glyceringel
– Virtual® Extra Light Body Fast Set –
Vinylpolysiloxan-Abformmasse (additionsvernetzend) zur reversiblen Fixierung der Objekte
während der Einprobe
Additionsvernetzendes Silikon, das Polyvinylsiloxan,
Methylhydrogensiloxan, organischen Platin-Komplex,
Kieselsäure und Lebensmittelfarbe enthält.
Nebenwirkungen
– Multilink Hybrid Abutment, Monobond Plus:
Systemische Nebenwirkungen sind nicht bekannt. In
einzelnen Fällen wurden allergische Reaktionen auf
Einzelkomponenten beschrieben.
Wechselwirkungen
– Multilink Hybrid Abutment:
Phenolische Substanzen (z.B. Wintergrünöl,
Eugenol) inhibieren die Polymerisation. Daher
sollten Werkstoffe, die diese Komponenten enthalten, nicht verwendet werden. Oxidativ wirkende
Desinfektionsmittel (z.B. Wasserstoffperoxid) können
mit dem Initiatorsystem wechselwirken, wodurch
die Aushärtung beeinträchtigt wird. Daher Automixspritze nicht oxidativ desinfizieren. Die Desinfektion
kann z.B. durch Abwischen mit medizinischem
Alkohol erfolgen.
– Monobond Plus:
WICHTIG! Für einen optimalen Verbund die
Zirkoniumoxid- und Metalloberflächen nicht mit
Phosphorsäure reinigen.
Um Verunreinigungen zu vermeiden darf Monobond
Plus nicht direkt mit dem Pinsel aus der Flasche
entnommen werden.
– Virtual Extra Light Body Fast Set:
Latex-Handschuhe beeinflussen den Aushärtungs-
verlauf von Vinylpolysiloxanen. Zu benetzende
Oberflächen (Keramikstruktur, Titanbasis etc.) dürfen
nicht mit Latexhandschuhen in Berührung
kommen.
15
Page 16
Abutment Solutions
Optional: Klinische Einprobe
Provisorisches Fixieren der Keramikstruktur auf der Basis
Vor der definitiven Verklebung der Keramikstruktur mit der Basis, kann eine klinische Einprobe durchgeführt werden. Um das intraorale Handling zu erleichtern, werden die Komponenten temporär mittels Silikon, z.B. Virtual
Extra Light Body Fast Set, zueinander fixiert.
Zur temporären Fixierung bitte folgende Vorgehensweise beachten:
– Die unbehandelte Basis sowie die Keramikstruktur mittels Dampfstrahler reinigen und anschliessend trocken
blasen.
– Keramikstruktur auf die Basis (verschraubt auf dem Modellanalog) setzen und die Lagebeziehung zueinander
mit einem wasserfesten Stift anzeichnen. Dies erleichtert beim folgenden temporären Zusammenfügen der
Teile, die korrekte Position zu erreichen.
– Schraubenkanal mit einem Schaumstoffpellet verschliessen.
– Die Virtual-Kartusche in den Dispenser einlegen und Schutzkappe abnehmen.
– Mischkanüle aufschrauben und auf die Mischkanüle den Oral Tip aufsetzen.
– Virtual Extra Light Body Fast Set sowohl auf die Basis auftragen als auch direkt in die Keramikstruktur
applizieren.
– Die Basis in die Keramikstruktur einführen. Ausrichtung der beiden Objekte zueinander beachten
(Rotationsicherung/Anzeichnung).
– Die Objekte 2:30 Minuten in der korrekten Lage zueinander fixieren bis das Virtual Extra Light Body Fast Set
abgebunden ist.
– Ausgetretene Überschüsse vorsichtig mit einem geeigneten Instrument, z.B. Skalpell, entfernen.
Gereinigte, unbehandelte Keramikstrukturen.
Schraubenkanal mit einem Schaumstoffpellet verschliessen.
16
Keramikstruktur auf die Basis setzen und Lagebeziehung anzeichnen.
Die Virtual-Kartusche in den Dispenser einlegen, Mischkanüle aufschrauben
und den Oral Tip aufsetzen.
Page 17
Virtual Extra Light Body Fast Set sowohl auf die Basis auftragen…
…als auch direkt in die Keramikstruktur applizieren.
Die Basis in die Keramikstruktur einführen. Dabei die Ausrichtung der beiden
Objekte zueinander beachten (Rotationsicherung/Anzeichnung).
Die Objekte ca. 2:30 Minuten fixieren bis das Virtual Extra Light Body Fast
Set abgebunden ist.
Überschuss des Virtual Extra Light Body Fast Set mit einem Instrument aus
dem Schraubenkanal entfernen.
Ausgetretene Überschüsse vorsichtig mit einem geeigneten Instrument,
z.B. Skalpell, entfernen.
17
Page 18
Klinische Einprobe
Hybrid-Abutment mit zugehöriger Krone
Wichtiger Hinweis: Jegliche intraorale Okklusions- /Artikulationskontrollen und eventuell notwendige
Schleifkorrekturen dürfen nur durchgeführt werden, wenn die Objekte mit Virtual Extra Light Body Fast Set
zueinander fixiert sind. Das Virtual wirkt während der Einprobe, insbesondere bei eventuellem Einschleifen, wie
ein Dämpfer und verhindert Abplatzung im Übergangsbereich zwischen Hybrid-Abutment und Krone.
Zur Durchführung der klinischen Einprobe bitte folgende Hinweise beachten:
– Vorbereitetes Hybrid-Abutment (provisorisch fixiert) und zugehörige Krone gereinigt bereitlegen.
– Entfernen der provisorischen Versorgung.
– Manuelles Einschrauben des Hybrid-Abutments mit zugehöriger Schraube.
– Kontrolle der Geometrie des Hybrid-Abutments (z.B. Passung, Gingivaanämie) in Relation zum Gingivalsaum.
– Schraubenkanal am Hybrid-Abutment falls gewünscht mittels Schaumstoffpellet verschliessen.
– Tipp: Isolierung der Kroneninnenseite mittels Gyceringel, z.B. Try-In-Paste, Liquid Strip
– Krone intraoral auf das Hybrid-Abutment setzen zur Überprüfung und ggf. Korrektur der approxi-
malen Kontaktpunkte. Achtung: Zu diesem Zeitpunkt darf keine okklusale Funktionsprüfung erfolgen.
– Zur Funktionsüberprüfung muss die Krone mit Virtual Extra Light Body Fast Set auf dem Hybrid-
Abutment fixiert werden. Hierfür darf keine Try-In-Paste verwendet werden, da diese keinen ausreichenden Widerstand gegen Druckkräfte bietet.
– Die Virtual-Kartusche in den Dispenser einlegen und Schutzkappe abnehmen.
– Mischkanüle aufschrauben und auf die Mischkanüle den Oral Tip aufsetzen.
– Virtual Extra Light Body Fast Set auf die Kroneninnenseite applizieren.
– Krone unter Fingerdruck auf das Hybrid-Abutment drücken, bis die Endposition erreicht ist. Krone in der
Endposition bis zum Abbinden des Virtual fixieren.
– Entfernen des Virtual Überschusses.
– Okklusions-/Artikulationskontrolle durchführen und ggf. mittels geeigneten Schleifkörpern einschleifen
(siehe separate IPS e.max Schleifkörperempfehlung für Keramik – Anwendung in der zahnärztlichen Praxis).
Nach Schleifkorrekturen muss eine Politur oder ein erneuter Glanzbrand durchgeführt werden.
– Vorsichtiges Entfernen der Krone vom Hybrid-Abutment, sowie des Hybrid-Abutments (inklusive Basis).
– Einbringen der provisorischen Versorgung.
Manuelles Einschrauben des Hybrid-Abutments mit zugehöriger Schraube.
Kontrolle der Geometrie des Hybrid-Abutments (z.B. Passung, Gingivaanämie)
in Relation zum Gingivalsaum.
18
Schraubenkanal am Hybrid-Abutment falls gewünscht mittels
Schaumstoffpellet verschliessen.
Page 19
Tipp: Isolierung der Kroneninnenseite mittels Glyzeringel.
Krone intraoral auf das Hybrid-Abutment setzen zur Überprüfung und
ggf. Korrektur der approximalen Kontaktpunkte. Achtung: Zu diesem
Zeitpunktdarf keine okklusale Funktionsprüfung erfolgen.
Virtual Extra Light Body Fast Set auf die Kroneninnenseite applizieren.
Entfernen des Virtual Überschusses.
Vorsichtiges Entfernen der Krone vom Hybrid-Abutment, und Entfernung von
Virtual Extra Light Body Fast Set.
Krone unter Fingerdruck auf das Hybrid-Abutment drücken, bis die
Endposition erreicht ist. Krone in der Endposition bis zum Abbinden des
Virtual fixieren.
Okklusions-/Artikulationskontrolle durchführen und ggf. mittels geeigneten
Schleifkörpern einschleifen.
Hybrid-Abutment herausschrauben.
19
Page 20

Hybrid-Abutment-Krone
Zur Durchführung der klinischen Einprobe bitte folgende Hinweise beachten:
– Vorbereitete Hybrid-Abutment-Krone (provisorisch mit Virtual Extra Light Body Fast Set fixiert) gereinigt
bereitlegen.
– Entfernen der provisorischen Versorgung.
– Hybrid-Abutment-Krone zur Überprüfung und ggf. Korrektur der approximalen Kontaktpunkte intraoral auf das
Implantat setzen. Achtung: Zu diesem Zeitpunkt darf keine okklusale Funktionsprüfung erfolgen.
– Manuelles Einschrauben der Hybrid-Abutment-Krone mit zugehöriger Schraube.
– Kontrolle der Geometrie der Hybrid-Abutment-Krone (z.B. Passung, Gingivaanämie) in Relation zur Gingiva.
– Okklusions-/Artikulationskontrolle durchführen und ggf. mittels geeigneten Schleifkörpern einschleifen (siehe
separate IPS e.max Schleifkörperempfehlung für Keramik – Anwendung in der zahnärztlichen Praxis). Nach
Schleifkorrekturen muss eine Politur oder ein erneuter Glanzbrand durchgeführt werden.
– Vorsichtiges Entfernen der Hybrid-Abutment-Krone (inklusive Basis).
– Spülen des Implantatlumens z.B. mit Cervitec® Liquid (antibakterielle Mundspüllösung mit Chlorhexidin) zur
Reinigung und Desinfektion.
– Einbringen der provisorischen Versorgung.
Hybrid-Abutment-Krone zur Überprüfung und ggf. Korrektur der approximalen
Kontaktpunkte intraoral auf das Implantat setzen. Achtung: Zu diesem
Zeitpunkt darf keine okklusale Funktionsprüfung erfolgen.
Manuelles Einschrauben der Hybrid-Abutment-Krone mit zugehöriger
Schraube.
Okklusions-/Artikulationskontrolle durchführen und ggf. mittels geeigneten
Schleifkörpern einschleifen.
20
Kontrolle der Geometrie der Hybrid-Abutment-Krone (z.B. Passung,
Gingivaanämie) in Relation zur Gingiva.
Vorsichtiges Entfernen der Hybrid-Abutment-Krone (inklusive Basis).
Page 21
Abutment Solutions
Definitive Verklebung Basis / Keramikstruktur
Eine präzise Vorbereitung der Klebeflächen ist die Voraussetzung für eine optimale adhäsive Verklebung zwischen der
Basis und der Keramikstruktur. Nachfolgend ist diesbezüglich die Vorgehensweise beschrieben. Die Vorgehensweise ist
beim Hybrid-Abutment, sowie der Hybrid-Abutment-Krone identisch.
Hybrid-Abutment und Hybrid-Abutment-Krone aus IPS e.max Lithium-Disilikat-Glaskeramik (LS2)
Keramikstruktur
(LS2)
Abstrahlen – Entsprechend den Angaben des Herstellers
Ätzen
Konditionieren Klebefläche für 60 s mit Monobond Plus
Adhäsive Verklebung Multilink Hybrid Abutment
Abdeckung Klebefuge Glyceringel, z.B. Liquid Strip
Aushärtung ca. 7 min Autopolymerisation
Politur Klebefuge Gebräuchliche Polierer für Keramik-/Kunststoffpolitur
Klebefläche für
20 s mit IPS
®
Ceramic Ätzgel
Basis
–
Hybrid-Abutments aus Zirkoniumoxid (ZrO2)
Keramikstruktur
(ZrO2)
Abstrahlen Entsprechend den Angaben des Herstellers Entsprechend den Angaben des Herstellers
Konditionieren Klebefläche für 60 s mit Monobond Plus
Adhäsive Verklebung Multilink Hybrid Abutment
Abdeckung Klebefuge Glyceringel, z.B. Liquid Strip
Basis
Aushärtung ca. 7 min Autopolymerisation
Politur Klebefuge Gebräuchliche Polierer für Keramik-/Kunststoffpolitur
Vorbereitung der Basis
Zur Vorbereitung der Basis für die Verklebung mit der Keramikstruktur bitte folgende Vorgehensweise beachten:
– Zur Bearbeitung der Basis Hinweise des Hersteller beachten.
– Basis im Ultraschallbad oder mittels Dampfstrahler reinigen und anschliessend trocken blasen.
– Basis auf ein Modellanalog aufschrauben.
– Keramikstruktur auf die Basis setzen und die Lagebeziehung zueinander mit einem wasserfesten Stift anzeichnen.
Dies erleichtert beim späterfolgenden Zusammenfügen der Teile, die korrekte Position zu erreichen.
21
Page 22

– Das Emergenzprofil der Basis darf weder gestrahlt noch anderweitig bearbeitet werden!
– Sofern Abstrahlen der Klebefläche seitens des Herstellers empfohlen wird, folgendes Vorgehen beachten:
– Zum Schutz des Emergenzprofils wird hartes Modellierwachs aufgetragen, da sich dieses anschliessend leicht
entfernen lässt.
– Schraubenkanal ebenfalls mit Wachs verschliessen.
– Vorsichtiges Abstrahlen der Klebefläche nach Herstellerangaben.
– Reinigung mittels Instrument und Dampfstrahler. Unbedingt darauf achten, dass das gesamte Wachs gründlich
entfernt ist.
– Nach der Reinigung ist unbedingt jegliche Kontamination der Klebefläche zu vermeiden, da dies die Klebung
negativ beeinflusst.
– Monobond Plus auf die gereinigte Klebefläche auftragen und 60 Sekunden einwirken lassen. Nach der Einwirkzeit
den verbleibenden Überschuss mit wasser-/ölfreier Luft trocken blasen.
– Schraubenkanal mit einem Schaumstoffpellet oder Wachs verschliessen. Darauf achten, dass die Klebefläche nicht
verunreinigt wird.
Sofern Abstrahlen der Klebefläche seitens des Herstellers empfohlen
wird, folgendes Vorgehen beachten :
Basis auf ein Modellanalog aufschrauben. Lagebeziehung zur
Keramikstruktur mit einem wasserfesten Stift anzeichnen.
Optional: Vorsichtiges Abstrahlen der Klebefläche nach Herstellerangaben.
Monobond Plus auf die gereinigte Klebefläche auftragen und 60 Sekunden
einwirken lassen. Nach der Einwirkzeit den verbleibenden Überschuss mit
wasser-/ölfreier Luft trocken blasen.
22
Optional: Zum Schutz des Emergenzprofils wird Wachs aufgetragen.
Zusätzlich den Schraubenkanal ebenfalls mit Wachs verschliessen.
Optional: Reinigung mittels Instrument und Dampfstrahler. Unbedingt darauf achten, dass das gesamte Wachs gründlich entfernt ist
Schraubenkanal mit einem Schaumstoffpellet oder Wachs verschliessen.
Darauf achten, dass die Klebefläche nicht verunreinigt wird.
Page 23

Vorbereitung der Keramikstruktur aus IPS e.max Lithium-Disilikat-Glaskeramik (LS2)
Zur Vorbereitung der Keramikstruktur für die Verklebung mit der Basis bitte folgende Vorgehensweise beachten:
– Die Keramikstruktur zur Vorbereitung für die Verklebung nicht abstrahlen.
– Die Keramikstruktur im Ultraschallbad oder mittels Dampfstrahler reinigen und anschliessend trocken blasen.
– Nach der Reinigung ist unbedingt jegliche Kontamination der Klebefläche zu vermeiden, da dies die Klebung
negativ beeinflusst.
– Zum Schutz der Aussenflächen bzw. der glasierten Bereiche kann Wachs aufgetragen werden.
– Klebefläche mit 5%igem Flusssäuregel (IPS Ceramic Ätzgel) für 20 Sekunden ätzen.
– Anschliessend Klebefläche mit fliessendem Wasser gründlich abspülen und mit ölfreier Luft trocknen.
– Monobond Plus auf die gereinigte Klebefläche auftragen und 60 Sekunden einwirken lassen. Nach der Einwirkzeit
den verbleibenden Überschuss mit wasser-/ölfreier Luft trocken blasen.
Keramikstruktur aus IPS e.max Lithium-DisilikatGlaskeramik (LS
) nicht abstrahlen.
2
20 Sekunden mit IPS Ceramic Ätzgel ätzen und
anschliessend mit Wasser abspülen.
Monobond Plus 60 Sekunden einwirken lassen
und trocken blasen.
Vorbereitung der Keramikstruktur aus Zirkoniumoxid (ZrO2)
Zur Vorbereitung der Keramikstruktur für die Verklebung mit der Basis bitte folgende Vorgehensweise beachten:
– Die Keramikstruktur zur einfacheren Handhabung vor dem Strahlen auf einem Träger fixieren (z.B. Microbrush)
– Zum Schutz der Aussenflächen der Keramikstruktur Wachs auftragen.
– Zur besseren Kontrolle des Strahlvorgangs kann die Klebefläche vor dem Abstrahlen mit einem Permanentmarker
bemalt werden.
– Zur Reinigung kann die Klebefläche der Keramikstruktur mit Strahlmittel Al2O3 100 μm bei max. 1 bar
und max. 1–2 cm Distanz zur Strahldüse abgestrahlt werden (Bitte Herstellerangaben beachten).
– Reinigen der Keramikstruktur mit Dampfstrahler oder im Ultraschallbad.
– Nach der Reinigung ist unbedingt jegliche Kontamination der Klebefläche zu vermeiden, da dies die Klebung
negativ beeinflusst.
– Monobond Plus auf die gereinigte Klebefläche auftragen und 60 Sekunden einwirken lassen.
Nach der Einwirkzeit den verbleibenden Überschuss mit wasser-/ölfreier Luft trocknen.
Optional: Wachs zum Schutz der Aussenflächen
auftragen.
Optional: Reinigung der Klebefläche mittels
Abstrahlen (Herstellerangaben beachten).
Monobond Plus 60 Sekunden einwirken lassen und
trocken blasen.
23
Page 24
Verklebung mit Multilink Hybrid Abutment
Zur Verklebung bitte nachfolgende Vorgehensweise beachten:
– Die zu verklebenden Komponenten (Keramikstruktur, Basis) gereinigt und konditioniert bereitlegen.
– Die nachfolgende Klebung muss rasch und ohne Unterbrechung durchgeführt werden. Die
Verarbeitungszeit des Multilink Hybrid Abutment beträgt bei 23 °C (± 1°C) ca. 2 Minuten.
– Grundsätzlich vor jeder Verklebung eine neue Mischkanüle auf die Multilink Hybrid Abutment Spritze
aufsetzen.
– Multilink Hybrid Abutment direkt aus der Mischkanüle dünn auf die Klebefläche der Basis als auch auf
die Klebefläche der Keramikstruktur applizieren.
– Aufgesetzte Mischkanüle bis zu nächsten Verwendung auf der Multilink Hybrid Abutment Spritze lassen,
da das Material in der Kanüle polymerisiert und als Verschluss dient.
– Keramikstruktur über der Basis ausrichten, so dass die Lage-Markierungen übereinander stehen.
– Unter gleichmässigem leichten Anpressdruck die Teile zusammenführen und korrekte Lagebeziehung in
Endposition kontrollieren (Übergang Basis/Keramikstruktur)
– Anschliessend die Objekte für 5 Sekunden fest aneinander pressen.
– Überschüsse im Schraubenkanal vorsichtig, z.B. mit einem Microbrush oder Pinsel, mit einer drehenden
Bewegung entfernen.
– Achtung: Den Zementüberschuss erst in der Anhärtephase 2-3 Minuten nach dem Anmischen mit
einem geeigneten zahntechnischen Instrument (z. B. Le Cron) entfernen. Dabei die Teile durch
leichten Druck fixieren.
– Auftrag eines Glyceringels (z.B. Liquid Strip) auf die Zementfuge zur Verhinderung der Bildung einer
Inhibitionsschicht. Glyceringel vorsichtig applizieren, um ein Durchmischen oder Verdrängen des
Befestigungscomposites zu vermeiden. Das Gel bis zum Ende der Abbindezeit auf der Zementfuge belassen.
– Danach erfolgt die vollständige Autopolymerisation des Befestigungscomposites innerhalb von 7 Minuten.
– Wichtig: Bis zum Abschluss der Aushärtung des Multilink Hybrid Abutment die Objekte nicht
bewegen und in der Lage bewegungsfrei fixieren z.B. diamantierte Pinzette.
– Nach Abschluss der Autopolymerisation das Glyceringel mit Wasser abspülen
– Klebefuge vorsichtig mit Gummipolierern bei geringen Drehzahlen (< 5‘000 U/min) polieren,
um Überhitzung zu vermeiden.
– Falls im Schraubenkanal Rückstände des Befestigungsmaterials sind, diese mit geeigneten rotierenden
Instrumenten entfernen.
– Reinigung mittels Dampfstrahler.
Die zu verklebenden Komponenten gereinigt und konditioniert bereitlegen. Vor jeder Verklebung eine neue Mischkanüle auf die Multilink Hybrid
24
Abutment-Spritze aufsetzen.
Page 25
Multilink Hybrid Abutment direkt aus der Mischkanüle dünn auf die
Klebefläche der Basis applizieren.
Multilink Hybrid Abutment direkt aus der Mischkanüle dünn auf die
Klebefläche der Keramikstruktur applizieren.
5 s
Keramikstruktur über der Basis ausrichten, so dass die Lage-Markierungen
übereinander stehen.
Überschüsse im Schraubenkanal vorsichtig, z.B. mit einem Microbrush oder
Pinsel mit einer drehenden Bewegung entfernen.
Auftrag eines Glyceringels (z.B. Liquid Strip) auf die Zementfuge zur
Verhinderung der Bildung einer Inhibitionsschicht.
Unter gleichmässigem leichten Anpressdruck die Teile zusammenführen.
Anschliessend die Objekte für 5 Sekunden fest aneinander pressen.
2-3
min
Achtung: Den Zementüberschuss erst in der Anhärtephase 2-3
Minuten nach dem Anmischen mit einem geeigneten zahntechnischen Instrument (z. B. Le Cron) entfernen. Dabei die Teile durch
leichten Druck fixieren.
7
min
Autopolymerisation des Befestigungscomposites innerhalb von 7 Minuten.
Wichtig: Bis zum Abschluss der Autopolymerisation die Objekte nicht
bewegen und in der Lage bewegungsfrei fixieren.
25
Page 26

Nach Abschluss der Autopolymerisation das Glyceringel mit Wasser abspülen.
Klebefuge vorsichtig mit Gummipolierern bei geringen Drehzahlen
(< 5‘000 U/min) polieren, um Überhitzung zu vermeiden.
Falls im Schraubenkanal Rückstände des Befestigungsmaterials sind,
diese mit geeigneten rotierenden Instrumenten entfernen. Die Basis nicht
beschädigen.
Fertiges Hybrid-Abutment bzw. Hybrid-Abutment-Krone nach der Verklebung.
26
Page 27

Besondere Hinweise
– Multilink Hybrid Abutment soll zur Verarbeitung
Raumtemperatur aufweisen. Kühlschranktemperatur
kann das Auspressen und Mischen erschweren
sowie die Verarbeitungs- und Aushärtungszeit
verlängern.
– Unausgehärtetes Material kann Kleidung verschmut-
zen.
Warnhinweise
– Kontakt von unausgehärtetem Multilink Hybrid
Abutment und Monobond Plus mit Haut /
Schleimhaut und Augen vermeiden. Diese Produkte
können in unausgehärtetem Zustand leicht reizend
wirken und zu einer Sensibilisierung auf
Methacrylate führen. Handelsübliche medizinische
Handschuhe bieten keinen wirksamen Schutz gegen
den sensibilisierenden Effekt von Methacrylaten.
– Monobond Plus:
– Leicht entzündlich
– Reizend
– Das Produkt enthält Ethanol
– Von Zündquellen fernhalten
– Virtual Extra Light Body Fast Set:
Bei versehentlichem Augenkontakt mit unausgehär-
tetem Material sofort mit viel Wasser spülen, bei
anhaltender Reizung Arzt konsultieren. Nach
Hautkontakt mit Wasser und Seife waschen.
Lager- und Aufbewahrungshinweise
– Die einzelnen Komponenten vom IPS e.max
Abutment Solution Cem Kit nach Ablauf des
Verfalldatums nicht mehr verwenden. Haltbarkeit:
siehe Hinweis auf Spritze/Fläschchen/Kartusche
– Lagertemperatur von Multilink Hybrid Abutment,
Monobond Plus, Liquid Strip und Virtual Extra Light
Body Fast Set: 2–28 °C
– Monobond Plus und Liquid Strip: nach Gebrauch
sofort verschliessen.
– Multilink Hybrid Abutment und Virtual Extra Light
Body Fast Set:
Mischkanüle nach Gebrauch auf der Spritze/
Kartusche belassen. Das darin enthaltene Material
härtet aus, und die Mischkanüle übernimmt daher
die Funktion eines Verschlusses.
Für Kinder unzugänglich aufbewahren!
Nur für zahnärztlichen Gebrauch!
Das Produkt wurde für den Einsatz im Dentalbereich entwickelt und muss
gemäss Gebrauchsinformation verarbeitet werden. Für Schäden, die sich aus
anderweitiger Verwendung oder nicht sachgemässer Verarbeitung ergeben,
übernimmt der Hersteller keine Haftung. Darüber hinaus ist der Verwender
verpflichtet, das Material eigenverantwortlich vor dessen Einsatz auf Eignung
und Verwendungsmöglichkeit für die vorgesehenen Zwecke zu prüfen, zumal
wenn diese Zwecke nicht in der Gebrauchsinformation aufgeführt sind.
27
Page 28

Pilier implantaire
anatomique
Couronne
Structure
céramique
Base
Description
®
IPS e.max
Abutment Solutions Cem Kit est un kit profession-
Couronne transvissée
directement sur l'implant
Structure
céramique
Base
nel contenant des matériaux de qualité pour le collage définitif des structures en vitrocéramique au disilicate de lithium
(LS
) ou en zircone sur des bases (ex. pilier ou base de sup-
2
port) en titane/alliage en titane ou en zircone dans le cadre
de la fabrication de piliers implantaires anatomiques ou de
couronnes transvissées directement sur l'implant. Le kit contient
également les matériaux pour effectuer un essayage clinique.
Indication
Collage extraoral définitif des structures céramiques en vitrocéramique au disilicate de lithium (LS
) ou en zircone, sur
2
bases en titane, alliage titane ou zircone. Maintien provisoire
des structures en céramique sur leur base; de même que de
la couronne pendant l'essayage.
Contre-indication
Les matériaux sont contre-indiqués
– pour le collage intraoral ;
– si la technique stipulée ne peut pas être appliquée ;
– en cas d'allergie connue du patient à l'un des compo-
sants de Multilink Hybrid Abutment, Monobond Plus et
Virtual Extra Light Body Fast Set.
Composition
IPS e.max Abutment Solution Cem Kit inclut les composants
suivants :
– Multilink
®
Hybrid Abutment – est un composite de
collage autopolymérisant pour le collage définitif des
structures en vitrocéramique au disilicate de lithium
(LS
) ou en zircone sur bases (ex. pilier ou base de sup-
2
port) en alliage titane/titane ou zircone. La matrice
monomère se compose de dimethacrylate et de HEMA.
Les charges minérales se composent de verre de
baryum, de trifluorure d'ytterbium, d'oxyde mixte sphé-
roïdal et d'oxyde de titane. La taille des particules est
comprise entre 0.15 et 3.0 μm. La taille moyenne des
particules est de 0.9 μm. Le taux de charge minérale en
volume est d'environ 36 %.
Teintes
– HO0 (Haute Opacité)
Les temps de travail et de prise dépendent de la température
ambiante. Une fois que Multilink Hybrid Abutment est sorti
de la seringue automélangeante, les temps suivants s'appliquent :
28
Température de la pièce
23 °C ± 1 °C
Temps de travail Environ 2 minutes
Temps de prise
(temps de travail inclus)
Environ 7 minutes
Les temps de travail et de prise sont écourtés à températures
élevées, et augmentent à des températures plus faibles.
– Monobond
®
Plus – primer universel permettant l'adhésion chimique entre les composites de collages et
tous les matériaux de restauration indirecte.
Solution alcoolisée de méthacrylate de silane, de métha-
crylate d'acide phosphorique et de sulfure méthacrylate.
– Liquid Strip – Gel protecteur contre l'oxygène, à
base de glycérine, évitant la formation d'une
couche inhibée sur les surfaces composites.
Gel glycérine
– Virtual
®
Extra Light Body Fast Set – matériau
d'empreinte (par addition) vinyle polysiloxane
pour la fixation provisoire des éléments pendant
la phase d'essayage
Silicone par addition contenant du vinyle polysiloxane,
du méthylhydrogènesiloxane, un complexe organo-platinique, du silicate et des colorants alimentaires.
Effets secondaires
– Multilink Hybrid Abutment, Monobond Plus:
Aucun effet secondaire systémique connu. Dans
certains cas rares, des réactions allergiques à l'un des
composants ont été signalées.
Interactions
– Multilink Hybrid Abutment:
Les substances phénoliques (ex. eugénol, essence de
wintergreen) inhibent la polymérisation. Ne pas utiliser de matériaux contenant de telles substances. Le
peroxyde d'hydrogène et autres désinfectants ayant
un effet d'oxydation peuvent inhiber le système de
prise et compromettre le processus de polymérisation.
La seringue automélangeante ne doit donc pas être
désinfectée avec des agents oxydants. Il est possible de
la désinfecter par exemple en l'essuyant avec un coton
imbibé d'alcool.
– Monobond Plus:
IMPORTANT ! Afin de créer une adhésion forte, ne pas
nettoyer les surfaces en zircone et en métal avec un
acide phosphorique. Ne pas plonger le pinceau directement dans le flacon de Monobond Plus. Ceci peut provoquer des contaminations.
– Virtual Extra Light Body Fast Set:
Le processus de prise des matériaux en vinyle polysi-
loxane est inhibé par les gants en latex. Ne pas toucher
les surfaces à enregistrer (structure céramique, base
titane, etc.) avec des gants en latex.
Page 29

Abutment Solutions
Optionnel : Essayage en bouche
Fixation provisoire de la structure sur la base
Avant que la structure ne soit collée de manière définitive à la base, il est possible de procéder à un essayage en
bouche. Pour faciliter la manipulation en bouche, les composants sont solidarisés provisoirement les uns aux
autres avec un matériau silicone, par exemple Virtual Extra Light Body Fast Set.
Veuillez respecter la procédure suivante pour la solidarisation provisoire des composants :
– Nettoyer la base non traitée et la structure céramique à la vapeur, puis sécher avec un souffle d'air.
– Placer la structure céramique sur la base (qui est vissée sur le modèle analogue) et marquer la position
relative des éléments au feutre indélébile. Ceci facilite l'obtention de la position correcte lorsque les parties
seront ensuite assemblées de manière provisoire.
– Obturer le puits de vis avec une boulette de mousse.
– Insérer la cartouche Virtual dans le pistolet et retirer le bouchon de protection.
– Visser l'embout de mélange et y fixer l'embout intraoral.
– Appliquer Virtual Extra Light Body Fast Set sur la base ainsi que directement sur la structure.
– Insérer la base dans la structure céramique. Contrôler l'alignement des deux éléments (verrouillage rotatif /
marquage).
– Maintenir fermement les parties dans la bonne position relative pendant 2 min 30 jusqu'à ce que le
Virtual Extra Light Body Fast Set ait pris.
– Retirer soigneusement les excès à l'aide d'un instrument adapté, par exemple un scalpel.
Structures céramiques nettoyées, non traitées
Obturer le puits de vis avec une boulette de mousse.
Placer la structure sur la base et marquer la position relative.
Insérer la cartouche Virtual dans le pistolet, visser l'embout de mélange et y
fixer l'embout intraoral.
29
Page 30

Appliquer Virtual Extra Light Body Fast Set sur la base et…
… directement sur la structure.
Insérer la base dans la structure tout en respectant la position relative des
deux éléments (verrouillage rotatif / marquage). Maintenir les composants
pendant 2 min 30 environ, jusqu'à ce que le Virtual Extra Light Body Fast
Set ait pris.
Retirer les excès de Virtual Extra Light Body Fast Set du puits de vis
à l'aide d'un instrument.
Retirer soigneusement les excès à l'aide d'un instrument adapté,
par exemple un scalpel.
30
Page 31

Essayage en bouche
Pilier implantaire anatomique avec couronne correspondante
Remarque importante : Tout contrôle en bouche de l'occlusion/articulation et tout éventuel ajustage par grat-
tage ne doivent être réalisés que si les éléments ont été solidarisés les uns aux autres avec du Virtual Extra Light
Body Fast Set. Au cours de l'essayage, le matériau Virtual agit comme un amortisseur, notamment si un grattage
est nécessaire, et évite les éclats dans la zone de transition entre le pilier implantaire anatomique et la couronne.
Veuillez respecter les consignes suivantes lors de l'essayage en bouche :
– Avoir à portée de main le pilier implantaire anatomique nettoyé et préparé (fixé provisoirement)
et la couronne correspondante nettoyée.
– Retirer la restauration provisoire.
– Visser manuellement le pilier implantaire anatomique avec la vis correspondante.
– Contrôler la géométrie du pilier implantaire anatomique (ex. l'ajustage, la compression gingivale)
par rapport aux limites gingivales.
– Si besoin, obturer le puits de vis sur le pilier implantaire anatomique avec une boulette de mousse.
– Conseil : Isoler l'intrados de la couronne avec un gel de glycérine, ex. la pâte Try-in, Liquid Strip
– Placer la couronne en bouche sur le pilier implantaire anatomique pour contrôler et ajuster les
contacts proximaux, si nécessaire. Remarque : Aucun contrôle occlusal fonctionnel ne doit être
effectué à ce stade.
– Pour le contrôle fonctionnel, la couronne doit être fixée sur le pilier implantaire anatomique avec
du Virtual Extra Light Body Fast Set. Ne pas utiliser de pâte Try-in pour cela, car ce matériau n'est
pas suffisamment résistant aux forces de compression.
– Insérer la cartouche Virtual dans le pistolet et retirer le bouchon de protection.
– Visser l'embout de mélange et y fixer l'embout intraoral.
– Appliquer Virtual Extra Light Body Fast Set dans l'intrados de la couronne.
– Avec le doigt, placer la couronne sur le pilier implantaire anatomique afin de lui donner sa position finale.
Maintenir la couronne en place jusqu'à ce que le matériau Virtual ait pris.
– Retirer les excès de Virtual.
– Contrôler l'occlusion/articulation et procéder aux ajustages nécessaires à l'aide d'instruments adaptés
(consulter le guide IPS e.max des instruments de grattage recommandés pour la céramique – utilisation au
cabinet dentaire). Si les ajustages ont été effectués par grattage, effectuer un nouveau cycle de polissage
ou une nouvelle cuisson de glaçage.
– Retirer délicatement la couronne du pilier implantaire anatomique, puis le pilier implantaire anatomique
(avec la base).
– Insérer la restauration provisoire.
Visser manuellement le pilier implantaire anatomique avec la vis
correspondante. Contrôler la géométrie du pilier hybride (ex. ajustage,
anémie gingivale) en fonction des limites gingivales.
Si besoin, obturer le puits de vis du pilier implantaire anatomique
avec une boulette de mousse
31
Page 32

Conseil : isoler l'intrados de la couronne avec un gel glycériné.
Placer la couronne en bouche sur le pilier implantaire anatomique pour
contrôler et ajuster les contacts proximaux, si nécessaire.
Remarque : Aucun contrôle de la fonction occlusale ne doit être
effectué à ce stade.
Appliquer Virtual Extra Light Body Fast Set dans l'intrados de la couronne.
Retirer les excès de Virtual.
Retirer délicatement la couronne du pilier implantaire anatomique et
retirer le matériau Virtual Extra Light Body Fast Set.
Avec le doigt, placer la couronne sur le pilier implantaire anatomique afin
de lui donner sa position finale. Maintenir la couronne en place jusqu'à ce
que le matériau Virtual ait pris.
Contrôler l'occlusion/articulation et procéder aux ajustages nécessaires à
l'aide d'instruments adaptés.
Dévisser le pilier implantaire anatomique.
32
Page 33

Couronne transvissée directement sur l'implant
Veuillez respecter la procédure suivante pour l'essayage en bouche :
– Avoir à portée de main la couronne transvissée nettoyée (fixée provisoirement avec du Virtual Extra Light
Body Fast Set).
– Retirer la restauration provisoire.
– Placer la couronne à transvisser en bouche sur l'implant pour contrôler et ajuster les contacts proximaux,
si nécessaire. Remarque : Aucun contrôle occlusal fonctionnel ne doit être effectué à ce stade.
– Transvisser la couronne directement sur l'implant avec la vis correspondante.
– Contrôler la géométrie de la couronne transvissée directement sur l'implant (ex. l'ajustage, la compression
gingivale) par rapport aux limites gingivales.
– Contrôler l'occlusion/articulation et procéder aux ajustages nécessaires à l'aide d'instruments adaptés
(consulter le guide IPS e.max des instruments de grattage recommandés pour la céramique – utilisation au
cabinet dentaire). Si les ajustages ont été effectués par grattage, effectuer un nouveau cycle de polissage ou
une nouvelle cuisson de glaçage.
– Retirer doucement la couronne transvissée directement sur l'implant (avec la base).
– Rincer la zone de l'implant par exemple avec du Cervitec Liquid (bain de bouche antibactérien contenant
de la chlorhexidine) pour le nettoyer et le désinfecter.
– Insérer la restauration provisoire.
Placer la couronne à transvisser, en bouche, sur l'implant, pour contrôler et
ajuster les contacts proximaux, si nécessaire. Remarque : Aucun contrôle
occlusal fonctionnel ne doit être effectué à ce stade.
Transvisser la couronne directement sur l'implant avec la vis correspondante.
Contrôler l'occlusion/articulation et procéder aux ajustages nécessaires à
l'aide d'instruments adaptés.
Contrôler la géométrie de la couronne transvissée (ex. l'ajustage,
la compression gingivale) par rapport aux limites gingivales.
Retirer doucement la couronne transvissée (avec la base).
33
Page 34

Abutment Solutions
Collage définitif de la base / structure céramique
Les surfaces de contact doivent être soigneusement préparées afin de garantir une adhésion optimale entre la base
et la structure céramique. La procédure est décrite ci-dessous. La procédure est la même pour les piliers implantaires
anatomiques que pour les couronnes transvissées directement sur l'implant.
Piliers implantaires anatomiques et couronnes transvissées directement sur l'implant, en vitrocéramique
au disilicate de lithium (LS2) IPS e.max
Structure céramique
(LS2)
Sablage – Respecter le mode d'emploi du fabricant
Mordançage
Conditionnement Conditionner la surface de collage avec du Monobond Plus et laisser agir 60 s
Collage Multilink Hybrid Abutment
Recouvrement du joint
de collage
Polymérisation Environ 7 min en autopolymérisation
Polissage du joint de collage Polissoirs conventionnels pour céramique/composite
Piliers en zircone (ZrO2)
Mordancer la surface de collage avec du
®
Ceramic Etching Gel pendant 20 s
IPS
Gel glycériné, ex. Liquid Strip
Structure céramique
(ZrO2)
Sablage Respecter le mode d'emploi du fabricant Respecter le mode d'emploi du fabricant
Conditionnement Conditionner la surface de collage avec du Monobond Plus et laisser agir 60 s
Collage Multilink Hybrid Abutment
Recouvrement du joint
de collage
Polymérisation Environ 7 min en autopolymérisation
Gel glyceriné, ex. Liquid Strip
Base
–
Base
Polissage du joint de collage Polissoirs conventionnels pour céramique/composite
Pré-traitement de la base
Respecter la procédure suivante de la préparation de la base pour le collage avec la structure céramique :
– La base doit être préparée selon le mode d'emploi du fabricant.
– Nettoyer la base dans un bain à ultrasons ou au nettoyeur vapeur, puis la sécher avec un souffle d'air.
– Visser la base sur le modèle analogue.
– Placer la structure céramique sur la base et marquer la position relative au feutre indélébile. Cela facilite
l'obtention de la bonne position finale relative lorsque les parties seront assemblées par la suite.
34
Page 35

– Ne pas sabler ni modifier d'une quelconque manière le profil d'émergence de la base !
– Si le fabricant recommande de sabler les surfaces de contact, procéder de la manière suivante :
– Appliquer de la cire de modelage dure pour protéger le profil d'émergence, ce type de matériau étant
facile à retirer ensuite.
– Obturer également le puits de vis avec la cire.
– Sabler soigneusement la surface de collage en respectant le mode d'emploi du fabricant.
– Utiliser un instrument et un jet de vapeur pour le nettoyage. Retirer méticuleusement la cire.
– Lorsque les surfaces de collages ont été nettoyées, elles ne doivent en aucun cas être contaminées afin de
ne pas compromettre l'adhésion.
– Appliquer Monobond Plus sur la surface de collage propre et laisser agir 60 s. Passé le temps de réaction,
disperser les résidus à l'air exempt d'eau et d'huile.
– Obturer le puits de vis avec une boulette de mousse ou de la cire. La surface de collage ne doit pas être
contaminée pendant la procédure.
Si le fabricant recommande de sabler les surfaces de collage,
procéder de la manière suivante :
Visser la base sur le modèle analogue. Marquer la position relative de la
structure céramique au feutre indélébile.
Optionnel : Sabler soigneusement la surface de collage en respectant le
mode d'emploi du fabricant.
Appliquer Monobond Plus sur la surface de collage propre et laisser agir
60 s. Passé le temps de réaction, disperser les résidus à l'air exempt d'eau
et d'huile.
Optionnel : Appliquer de la cire pour protéger le profil d'émergence.
Obturer également le puits de vis avec la cire.
Optionnel : Utiliser un instrument et un jet de vapeur pour le nettoyage. Il
est important de retirer méticuleusement toute la cire.
Obturer le puits de vis avec une boulette de mousse ou de la cire. La surface
de collage ne doit pas être contaminée pendant la procédure.
35
Page 36

Préparation des structures céramiques en vitrocéramique au disilicate de lithium (LS2) IPS e.max
Respecter la procédure suivante de la préparation de la structure céramique pour le collage avec la base :
– Ne pas sabler la structure céramique lorsqu'elle est préparée pour le collage.
– Nettoyer la structure céramique dans un bain à ultrasons ou un nettoyeur vapeur, puis sécher avec un souffle d'air.
– Après le nettoyage, la surface de collage ne doit pas être contaminée afin de ne pas compromettre l'adhésion.
– Il est possible d'appliquer de la cire pour protéger les surfaces externes et les zones glacées.
– Mordancer la surface de collage avec de l'acide fluorhydrique à 5% (IPS Ceramic Etching Gel) pendant 20 s.
– Ensuite, rincer soigneusement la surface de collage à l'eau courante puis sécher à l'air exempt d'huile.
– Appliquer Monobond Plus sur la surface de collage propre et laisser agir 60 s. Passé le temps de réaction,
disperser les résidus à l'air exempt d'eau et d'huile.
Ne pas sabler les structures en vitrocéramique au
disilicate de lithium IPS e.max (LS
).
2
Mordancer avec IPS Ceramic Etching Gel pendant
20 s et rincer à l'eau.
Laisser agir Monobond Plus pendant 60 s et sécher
avec un souffle d'air.
Préparation des structures céramiques en zircone (ZrO2)
Respecter la procédure suivante de la préparation de la structure céramique pour le collage avec la base :
– Dans le but de faciliter la manipulation, fixer la structure céramique sur un support (ex. Microbrush) avant
de la sabler.
– Protéger les surfaces externes de la structure céramique par une couche de cire.
– Pour un meilleur contrôle de la procédure de sablage, il est possible de colorer la surface de collage avec
un feutre indélébile.
– Nettoyer la surface de collage de la structure céramique en la sablant à l'Al2O3 100 μm sous une pression
max. de 1 bar et à une distance max. de 1 à 2 cm de l'embout de sablage. (Respecter le mode d'emploi du
fabricant).
– Nettoyer la structure céramique au jet de vapeur ou dans un bain à ultrasons.
– Lorsque les surfaces de collage ont été nettoyées, elles ne doivent en aucun cas être contaminées afin de
ne pas compromettre l'adhésion
– Appliquer Monobond Plus sur la surface de collage propre et laisser agir 60 s. Passé le temps de réaction,
disperser les résidus à l'air exempt d'eau et d'huile.
Optionnel : Appliquer de la cire pour protéger les
surfaces externes.
36
Optionnel : Nettoyer la surface de collage en
la sablant (Respecter le mode d'emploi du
fabricant).
Laisser agir Monobond Plus pendant 60 s et sécher
avec un souffle d'air.
Page 37

Collage avec Multilink Hybrid Abutment
Pour un collage optimal entre la mésostructure et la base titane, utiliser le composite de collage autopolymérisant
Multilink Implant avec option photopolymérisation. Lire le mode d'emploi pour une information plus détaillée.
Respecter la procédure de collage suivante :
– Disposer les éléments nettoyés et conditionnés (structure céramique, base) prêts pour le collage.
– La procédure de collage qui va suivre doit être effectuée rapidement et sans interruption. Le temps de
travail de Multilink Hybrid Abutment est d'environ 2 min à 23°C (± 1°C).
– Fixer un nouvel embout de mélange sur la seringue Multilink Hybrid Abutment avant chaque utilisation.
– Appliquer directement une fine couche de Multilink Hybrid Abutment de la seringue sur la surface de collage
de la base et sur la surface de collage de la structure céramique.
– Laisser l'embout de mélange sur la seringue Multilink Hybrid Abutment jusqu'à la prochaine utilisation. La colle
composite polymérisant dans l'embout de mélange, celui-ci servira de bouchon.
– Placer la structure céramique sur la base en alignant les repères de positionnement.
– Presser légèrement et régulièrement les parties l'une contre l'autre et contrôler la position relative des éléments
(transition entre la base et la structure céramique).
– Ensuite, presser fermement les parties l'une contre l'autre pendant 5 s.
– Retirer soigneusement les excès dans le puits de vis, par exemple à l'aide d'une Microbrush ou d'une brossette,
par des mouvements rotatifs.
– Important : ne pas retirer les excès avant le début de la polymérisation, c'est-à-dire 2 à 3 minutes
après avoir mélangé. Pour retirer les excès, utiliser un instrument de laboratoire adapté (ex. le Cron)
et maintenir les éléments en place par une légère pression.
– Appliquer un gel glycériné (ex. Liquid Strip) sur le joint de collage afin d'éviter la formation d'une couche inhibée.
Le gel glycériné doit être appliqué avec précaution pour ne pas qu'il se mélange au composite ou qu'il le déplace.
Laisser le gel sur le joint de collage jusqu'à la polymérisation complète.
– Ensuite, laisser prendre le composite de collage en autopolymérisation pendant 7 min.
– Important : Ne pas bouger les éléments jusqu'à la polymérisation complète de Multilink Hybrid
Abutment. Il est possible de les maintenir immobiles par exemple à l'aide de pinces diamantées.
– Après autopolymérisation complète, rincer le gel glycériné à l'eau.
– Polir le joint de collage avec précaution, à l'aide de polissoirs siliconés, et à faible vitesse
(< 5,000 tr/min) pour éviter les surchauffes.
– Retirer tout résidu de colle dans le puits de vis à l'aide d'instruments rotatifs adaptés.
– Nettoyer la restauration à la vapeur.
Avoir à portée de main les éléments à coller, propres et conditionnés. Fixer un nouvel embout de mélange sur la seringue Multilink Hybrid
Abutment avant chaque utilisation.
37
Page 38

Appliquer Multilink Hybrid Abutment en couche fine directement depuis
l'embout de mélange sur la surface de collage de la base.
Appliquer Multilink Hybrid Abutment en couche fine directement depuis la
seringue automélangeante sur la surface de collage de la structure.
5 s
Positionner la structure sur la base de manière à aligner les repères de
position.
Retirer soigneusement les excès du puits de vis, par exemple à l'aide d'un
pinceau ou d'une Microbrush, par mouvements rotatifs.
Appliquer un gel glycérine (ex. Liquid Strip) sur le joint de collage pour éviter
la formation d'une couche inhibée.
38
D'une pression faible et régulière, assembler les parties puis presser fermement les composants ensemble pendant 5 secondes.
2-3
min
Important : Ne pas retirer les excès avant le début de la polymérisation, c'est-à-dire 2 à 3 minutes après avoir mélangé. Pour retirer
les excès, utiliser un instrument de laboratoire adapté (ex. le Cron)
et maintenir les éléments en place par une légère pression.
7
min
Procéder à la polymérisation du composite de collage pendant 7 minutes.
Important : Ne pas bouger les éléments jusqu'à ce que le matériau
soit complètement durci, et les maintenir en place sans exercer aucun
mouvement.
Page 39

Après polymérisation complète, rincer le gel glycérine avec de l'eau.
Polir le joint de collage à l'aide de polissoirs en caoutchouc, à
faible vitesse (< 5,000 tr/m) afin d'éviter les surchauffes.
Retirer tout résidu de colle dans le puits de vis à l'aide d'instruments rotatifs
adaptés. Ne pas endommager la base.
Pilier implantaire anatomique et couronne transvissée directement sur
l'implant terminés, après collage.
39
Page 40

Remarques supplémentaires
– Multilink Hybrid Abutment doit être mis en œuvre à
température ambiante. Des températures basses
peuvent rendre le matériau difficile à extruder et à
mélanger, et peuvent allonger le temps de travail et
de prise.
– Le matériau non polymérisé peut tacher les vête-
ments.
Mise en garde
– Éviter le contact du Multilink Hybrid Abutment non
polymérisé avec la peau, les muqueuses et les yeux.
Le matériau Multilink Hybrid Abutment non polymé-
risé peut provoquer de légères irritations et conduire
à une sensibilité aux méthacrylates. Les gants médi-
caux en vente dans le commerce ne protègent pas
contre une sensibilité aux méthacrylates
– Monobond Plus:
– Hautement inflammable
– Irritant
– Le produit contient de l'éthanol
– Conserver le produit à l'abri des sources
de combustion
– Virtual Extra Light Body Fast Set:
Si les yeux sont en contact avec du matériau non
polymérisé, rincer aussitôt et abondamment à l'eau.
Si l'irritation persiste, consulter un ophtalmologue.
Après un contact cutané, laver à l'eau et au savon.
Date de péremption et conservation
– Ne pas utiliser les produits du kit IPS e.max
Abutment Solution Cem Kit au-delà de la date de
péremption.
– Date de péremption : voir étiquette sur les seringues/
flacons/cartouches.
– Conserver Multilink Hybrid Abutment, Monobond
Plus, Liquid Strip et Virtual Extra Light Body Fast Set
à une température comprise entre 2 et 28 °C
– Monobond Plus et Liquid Strip: Refermer immédiate-
ment après utilisation.
– Multilink Hybrid Abutment et Virtual Extra Light
Body Fast Set :
Laisser l'embout de mélange sur la seringue/
cartouche après utilisation. Le matériau polymérisera
dans l'embout, formant ainsi un bouchon naturel.
Conserver hors de portée des enfants !
Réservé à l'usage dentaire.
Ce matériau a été développé en vue d'une utilisation dans le domaine
dentaire et doit être mis en oeuvre selon le mode d'emploi. Les dommages
résultant du nonrespect de ces prescriptions ou d'une utilisation à d'autres
fins que celles indiquées n'engagent pas la responsabilité du fabricant.
L'utilisateur est tenu de vérifier sous sa propre responsabilité l'appropriation
du matériau à l'utilisation prévue et ce d'autant plus si celle-ci n'est pas citée
dans le mode d'emploi.
40
Page 41

Abutment ibrido Corona abutment ibrida
Corona
Struttura
ceramica
Base
Struttura
ceramica
Base
Descrizione
Das IPS e.max® Abutment Solutions Cem Kit è un assortimento professionale per l’incollaggio definitivo di strutture ceramiche in vetroceramica al disilicato di litio (LS2)
oppure ossido di zirconio su basi (p.es. Abutment o basi
di incollaggio) in titanio/lega in titanio o ossido di zirconio, per la realizzazione di un abutment ibrido o di una
corona abutment ibrida. Sono inoltre contenuti materiali
per la prova clinica.
Indicazioni
Incollaggio extraorale, definitivo di strutture ceramiche
realizzate in vetroceramica al disilicato di litio (LS2) oppure ossido di zirconio su basi in titanio/lega al titanio o
ossido di zirconio. Fissaggio reversibile della struttura
ceramica sulla base, nonché della corona durante la
messa in prova.
Controindicazioni
L’impiego è controindicato:
– per l’incollaggio intraorale.
– qualora non fosse possibile rispettare la tecnica di
impiego prevista.
– in caso di allergia a componenti di Multilink Hybrid
Abutment, Monobond Plus e Virtual Extra Light
Body Fast Set.
Composizione
IPS e.max Abutment Solution Cem Kit è composto da:
– Multilink® Hybrid Abutment – cemento composito
autoindurente per l’incollaggio definitivo di strutture
ceramiche in vetroceramica al disilicato di litio (LS2) o
ossido di zirconio su basi (p.es. Abutment o basi di
incollaggio) in titanio/lega in titanio o ossido di zirconio. La matrice monomerica è composta da dimetacrilato e HEMA. I riempitivi inorganici sono vetri di
bario, trifluoruro di itterbio, ossido misto sferoidale ed
ossido di titanio. La dimensione delle particelle è di
0,15 –3,0 μm, mentre la dimensione media delle particelle è di 0,9 μm. Il volume totale dei riempitivi inorganici è di ca. 36 %.
Colori
– HO 0 (elevata opacitá)
I tempi di lavorazione e di presa dipendono dalla temperatura circostante. Non appena Multilink Hybrid
Abutment é estruso dalla siringa, valgono i seguenti
tempi:
Temperatura ambiente
23 °C ± 1 °C
Tempo di lavorazione Ca. 2 minuti
Tempo di indurimento
(con tempo di lavorazione)
Ca. 7 minuti
Ad una temperatura maggiore i tempi di lavorazione ed
indurimento si abbreviano, in caso di temperatura inferiore
invece si allungano.
– Monobond® Plus – Primer per creare un legame
adesivo dei cementi compositi verso tutti i
materiali da restauro indiretto.
Soluzione alcolica di metacrilato di silano, metacrila-
to di acido fosforico e metacrilato di sulfuri.
– Liquid Strip – gel di glicerina impermeabile
all’ossigeno per impedire lo strato inibito da
ossigeno dei compositi.
Gel di glicerina
– Virtual® Extra Light Body Fast Set – materiale
da impronta in polivinilsilossano (di addizione)
per il fissaggio degli oggetti durante la prova
clinica.
Silicone di addizione contenente vinilpolisilossano,
metilidrogenosilossano, complesso di platino organico,
acido silicico e colorante alimentare.
Effetti collaterali
– Multilink Hybrid Abutment, Monobond Plus:
Non sono finora noti effetti collaterali di tipo siste-
mico. In singoli casi sono state descritte reazioni
allergiche ai singoli componenti.
Interazioni
– Multilink Hybrid Abutment:
Sostanze fenoliche (p.e. olio di sempreverdi, euge-
nolo) inibiscono la polimerizzazione. Evitare quindi
l'uso di prodotti contenenti tali sostanze. I disinfettanti con azione ossidante (p.e. acqua ossigenata)
possono interagire con l’iniziatore, che a sua volta
può influenzare la reazione di presa: pertanto non
disinfettare la siringa automiscelante con prodotti di
questo tipo. La disinfezione può avvenire p.es. con
panno imbevuto di alcol ad uso medico.
– Monobond Plus:
IMPORTANTE! Per un ottimale legame non deterge-
re con acido fosforico le superfici in ossido di zirconio e metallo. Per evitare l’apporto di impurità, non
prelevare Monobond Plus direttamente dal flacone
con il pennello.
– Virtual Extra Light Body Fast Set:
I guanti in lattice influiscono sul decorso di induri-
mento dei vinilpolisilossani. Le superfici da umettare
(struttura ceramica, base in titanio, ecc.) non devono
venire a contatto con i guanti in lattice.
41
Page 42

Abutment Solutions
Opzione: prova clinica
Fissaggio provvisorio della struttura sulla base
Prima dell’incollaggio definitivo della struttura ceramica con la base, può essere
effettuata una prova clinica. Per facilitare la lavorazione intraorale, le componenti si fissano provvisoriamente con
silicone, p.es.Virtual Extra Light Body Fast Set.
Per il fissaggio provvisorio, procedere come segue:
– Detergere la base non trattata, nonché la struttura in ceramica con vaporizzatore e quindi asciugare
con getto d’aria.
– Posizionare la struttura ceramica sulla base (avvitata sul modello analogo) e segnare la posizione.
Questo facilita il corretto posizionamento nella successiva unione provvisoria.
– Chiudere il canale di avvitamento con un pellet in gommapiuma.
– Inserire la cartuccia Virtual nel dispenser e togliere il tappo di protezione.
– Avvitare la cannula di miscelazione ed applicarvi sopra l’Oral Tip.
– Applicare Virtual Extra Light Body Fast Set sia sulla base che direttamente nella struttura ceramica.
– Inserire la base nella struttura ceramica. Rispettare l’orientamento di entrambi gli oggetti fra di loro
(parete antirotazione / demarcazione).
– Fissare le parti per 2:30 minuti nella corretta posizione, finché Virtual Extra Light Body Fast Set ha fatto presa.
– Rimuovere cautamente le eccedenze con uno strumento idoneo, p.es. bisturi.
Strutture ceramiche deterse, non trattate.
Chiudere il canale di avvitamento con un pellet in gommapiuma.
42
Posizionare la struttura ceramica sulla base e contrassegnare la posizione.
Inserire la cartuccia Virtual nel dispenser, avvitare quindi la cannula
di miscelazione ed applicare l’Oral Tip.
Page 43

Applicare Virtual Extra Light Body Fast Set sia sulla base …
… che direttamente nella struttura ceramica.
Inserire la base nella struttura ceramica. Considerare l’orientamento dei due
oggetti fra di loro (parete antirotazionale / demarcazione). Fissare gli oggetti
per ca. 2:30 minuti finché Virtual Extra Light Body Fast Set ha fatto presa.
Rimuovere con uno strumento le eccedenze di Virtual Extra Light Body Fast
Set dal canale di avvitamento.
Rimuovere cautamente le eccedenze fuoriuscite con uno strumento idoneo,
p.es. bisturi.
43
Page 44

Messa in prova clinica
Abutment ibrido con relativa corona
Avvertenza importante: qualsiasi controllo dell’occlusione/articolazione e le eventuali necessarie correzioni devo-
no sempre avvenire dopo che gli oggetti sono stati fissati con Virtual Extra Light Body Fast Set. Durante la messa
in prova, ed in particolare durante l’eventuale rifinitura, Virtual ha un effetto ammortizzante ed impedisce distacchi nella zona di passaggio fra abutment ibrido e corona.
Per effettuare la prova clinica, si prega di considerare quanto segue:
– Tenere pronti e detersi l’abutment ibrido (fissato provvisoriamente) e la relativa corona.
– Rimuovere il trattamento provvisorio.
– Avvitamento manuale dell’abutment ibrido con la relativa vite.
– Controllo della geometria dell’abutment ibrido (p.es. adattamento, anemia gengivale) in relazione al
bordo gengivale.
– Se desiderato, chiudere il canale di avvitamento dell’abutment ibrido con pellet in gommapiuma.
– Consiglio: isolamento del lato interno della corona con gel di glicerina, p.es. Pasta Try-In-Paste, Liquid Strip.
– Posizionare la corona intraoralmente sull’abutment ibrido per il controllo ed eventualmente la
correzione dei punti di contatto prossimali. Attenzione: a questo punto NON deve avvenire il
controllo della funzione occlusale.
– Per il controllo della funzione, la corona deve essere fissata con Virtual Extra Light Body Fast Set
sull’abutment ibrido. A tale scopo non deve essere usata una pasta Try-In, perché non offre una
sufficiente resistenza alle forze di pressione.
– Inserire la cartuccia Virtual nel dispenser e prelevare il cappuccio di protezione.
– Avvitare la cannula di miscelazione ed applicarvi poi l‘Oral Tip.
– Applicare Virtual Extra Light Body Fast Set all’interno della corona.
– Con le dita premere la corona sull’abutment ibrido fino ad aver raggiunto la posizione finale.
Fissare la corona in posizione finale fino alla presa del Virtual.
– Rimuovere le eccedenze di Virtual.
– Effettuare il controllo dell’occlusione/articolazione ed eventualmente rifinire con idonei strumenti per
rifinitura (vedi strumenti di rifinitura consigliati per la ceramica IPS e.max - utilizzo nello studio dentistico).
Dopo le correzioni di rifinitura, deve avvenire una lucidatura oppure una nuova cottura di glasura.
– Rimuovere cautamente la corona dall’abutment ibrido, nonché l’abutment ibrido (inclusa la base).
– Inserimento del trattamento provvisorio.
Avvitamento manuale dell’abutment ibrido con relativa vite. Controllo della
geometria dell’abutment ibrido (p.es. adattamento, anemia gengivale) in
relazione al bordo gengivale.
44
Se desiderato, chiudere il canale di avvitamento dell’abutment ibrido con
pellet in gommapiuma.
Page 45

Consiglio: isolamento del bordo interno della corona con gel di glicerina.
Posizionare la corona intraoralmente sull’abutment ibrido per il controllo e
l’eventuale correzione dei punti di contatto prossimali. Attenzione: a questo
punto NON deve avvenire il controllo della funzione occlusale.
Applicare Virtual Extra Light Body Fast Set sul lato interno della corona.
Rimozione delle eccedenze di Virtual.
Rimuovere cautamente la corona dall’abutment ibrido e rimozione di Virtual
Extra Light Body Fast Set.
Premere con le dita la corona sull’abutment ibrido, fino al raggiungimento
della posizione finale. Fissare la corona in posizione finale fino alla presa
del Virtual.
Effettuare il controllo dell’occlusione/articolazione e, se necessario,
correggere con idonei strumenti per rifinitura.
Svitare l’abutment ibrido.
45
Page 46
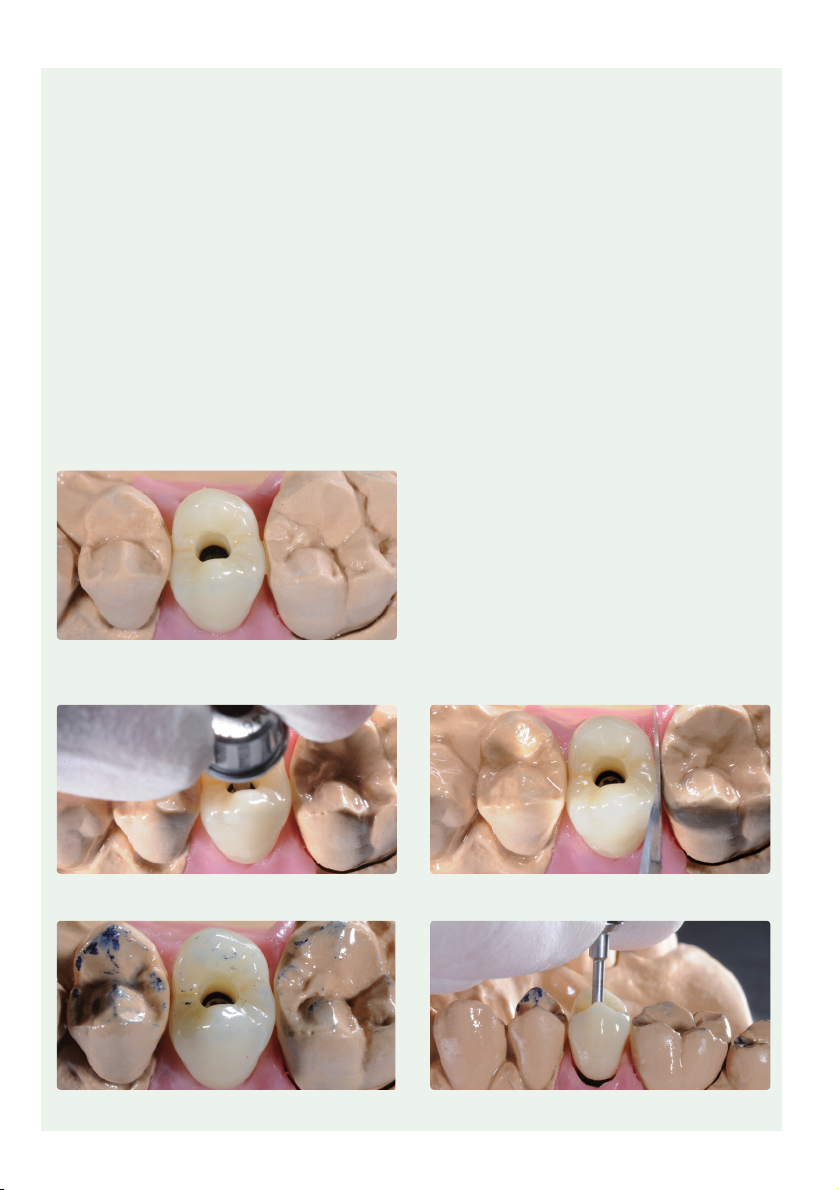
Corona abutment ibrida
Per effettuare la prova clinica, procedere come segue:
– tenere pronta e detersa la corona abutment ibrida (fissata provvisoriamente con
Virtual Extra Light Body Fast Set).
– Rimuovere il trattamento provvisorio.
– Posizionare intraoralmente la corona abutment ibrida sull’impianto, per il controllo e l’eventuale correzione
dei punti di contatto prossimali. Avvitamento manuale dell’abutment ibrido con la relativa vite.
Attenzione: a questo punto NON deve avvenire il controllo della funzione occlusale.
– Avvitamento manuale della corona abutment ibrida con la relativa vite.
– Controllo della geometria della corona abutment ibrida (p.es. adattamento, anemia gengivale) in relazione
alla gengiva.
– Effettuare il controllo dell’occlusione/articolazione ed eventualmente rifinire con idonei strumenti per rifinitura
(vedi strumenti di rifinitura consigliati per la ceramica IPS e.max - utilizzo nello studio dentistico). Dopo le cor-
rezioni di rifinitura, deve avvenire una lucidatura oppure una nuova cottura di glasura.
– Rimuovere cautamente la corona abutment ibrida (inclusa la base).
– Sciacquare il lumen dell’impianto p.es. con Cervitec Liquid (soluzione antibatterica con clorexidina) per la
detersione e disinfezione.
– Inserimento del trattamento provvisorio.
Posizionare intraoralmente la corona abutment ibrida sull’impianto, per il
controllo e l’eventuale correzione dei punti di contatto prossimali.
Attenzione: a questo punto NON deve avvenire il controllo della
funzione occlusale.
Avvitamento manuale della corona abutment ibrida con la relativa vite.
Effettuare il controllo dell’occlusione/articolazione ed eventualmente rifinire
con idonei strumenti per rifinitura.
46
Controllo della geometria della corona abutment ibrida (p.es. adattamento,
anemia gengivale) in relazione alla gengiva.
Rimuovere cautamente la corona abutment ibrida (inclusa la base).
Page 47

Abutment Solutions
Incollaggio definitivo base / struttura ceramica
Un’accurata preparazione delle superfici di unione è essenziale per garantire l’incollaggio ottimale tra la base e la
struttura ceramica. Qui di seguito sono descritte le procedure pratiche da seguire in questa fase. Esse sono identiche
sia per gli abutment ibridi che per le corone abutment ibride.
Abutment ibridi e corone abutment ibride in vetroceramica al disilicato di litio (LS2) IPS e.max
Struttura in ceramica
(LS2)
Sabbiatura – Secondo le indicazioni del produttore
Mordenzatura
Condizionamento/silanizzazione Superfici di unione per 60 s con Monobond Plus
Incollaggio adesivo Multilink Hybrid Abutment
Copertura fughe cementizie Gel alla glicerina, p.e. Liquid Strip
Indurimento ca. 7 min autopolimerizzazione
Lucidatura fughe cementizie Sistemi lucidanti convenzionalmente utilizzati per la lucidatura di materiali ceramici/resinosi
Per 20 s le superfici di unione con
gel mordenzante IPS
®
Ceramic gel
Base
–
Abutment in ossido di zirconio (ZrO2)
Struttura in ceramica
(ZrO2)
Sabbiatura Secondo le indicazioni del produttore Secondo le indicazioni del produttore
Condizionamento Superfici di unione per 60 s con Monobond Plus
Incollaggio adesivo Multilink Hybrid Abutment
Copertura fughe cementizie Gel alla glicerina, p.e. Liquid Strip
Base
Indurimento ca. 7 min autopolimerizzazione
Lucidatura fughe cementizie Sistemi lucidanti convenzionalmente utilizzati per la lucidatura di materiali ceramici/resinosi
Pretrattamento della base
Nel pretrattamento della base per l’incollaggio con la struttura ceramica, procedere come segue:
– Per la lavorazione della base, osservare le indicazioni di lavorazione.
– Detergere la base in bagno ad ultrasuoni e con vaporizzatore, successivamente asciugare con getto d’aria.
– Avvitare la base sull’analogo del modello.
– Posizionare la struttura ceramica sulla base e segnarne la posizione con un pennarello resistente all’acqua.
In tal modo risulterà più facile posizionare correttamente le due parti quando queste verranno assemblate
assieme nelle fasi successive.
47
Page 48

– Non sabbiare o modificare in alcun modo il profilo di emergenza della base!
– Se da parte del produttore, è consigliata la sabbiatura, procedere come segue:
– Per proteggere il profilo di emergenza, si applica cera di modellazione dura, perché è poi facilmente rimovibile.
– Chiudere con cera anche il canale di avvitamento.
– Cauta sabbiatura della superficie di unione, secondo le indicazioni del produttore.
– Detersione tramite strumento e vaporizzatore. Prestare attenzione a rimuovere accuratamente tutta la cera.
– Dopo la detersione, evitare qualsiasi contaminazione delle superfici di unione. Le contaminazioni possono
influire negativamente sull'incollaggio.
– Applicare Monobond Plus sulle superfici di unione deterse e lasciare agire per 60 secondi. Successivamente,
asciugare le eccedenze con soffio d’aria privo d’acqua e olio.
– Sigillare il canale di avvitamento con pellet in gommapiuma assorbente o cera. Prestare attenzione a non
contaminare le superfici di unione.
Se da parte del produttore, è consigliata la sabbiatura della superficie di
unione, procedere come segue:
Avvitare la base sull’analogo del modello. Con pennarello resistete all’acqua,
segnare la posizione in rapporto alla struttura ceramica.
Opzione: sabbiare cautamente la superficie di unione secondo le indicazioni
del produttore.
Applicare Monobond Plus sulle superfici di unione deterse e lasciare agire
per 60 secondi. Successivamente, asciugare le eccedenze con getto d’aria
privo d’acqua e olio.
48
Opzione: per proteggere il profilo di emergenza, applicare della cera.
Sigillare anche il canale di avvitamento con cera.
Opzione: detersione tramite strumento e vaporizzatore. Prestare attenzione
a rimuovere accuratamente tutta la cera.
Sigillare il canale di avvitamento con pellet in gommapiuma assorbente o
cera. Attenzione a non contaminare le superfici d’unione.
Page 49

Pretrattamento della struttura ceramica in vetroceramica al disilicato di litio (LS2) IPS e.max
Nel pretrattamento della struttura ceramica per l’incollaggio con la base, procedere come segue:
– Prima dell’incollaggio, NON sabbiare la struttura ceramica.
– Detergere la struttura ceramica in bagno ad ultrasuoni oppure con vaporizzatore, successivamente asciugare
con getto d’aria.
– Dopo la detersione, evitare qualsiasi contaminazione delle superfici di unione. Le contaminazioni possono
influire negativamente sull’incollaggio.
– Per proteggere le superfici esterne o le zone glasate, è possibile applicare della cera.
– Mordenzare le superfici di unione con acido fluoridrico al 5% (IPS Ceramic gel mordenzante) per 20 secondi.
– Successivamente, sciacquare accuratamente le superficie di unione sotto acqua corrente e asciugare con
getto d’aria privo di olio.
– Applicare Monobond Plus sulle superfici di unione deterse e lasciare agire per 60 secondi. Dopo il tempo
di azione, asciugare le eccedenze con soffio d’aria privo d’acqua e olio.
NON sabbiare la struttura ceramica in vetroceramica al disilicato di litio (LS
) IPS e.max
2
Mordenzare con IPS Ceramic gel mordenzante per
20 secondi e quindi sciacquare con acqua.
Lasciare agire Monobond Plus per 60 secondi e
asciugare con getto d’aria.
Pretrattamento della struttura ceramica in ossido di zirconio (ZrO2)
Nel pretrattamento della struttura ceramica per l’incollaggio con la base, procedere come segue:
– Per una più semplice manipolazione, prima della sabbiatura, fissare la struttura ceramica ad un portaoggetti
(p.es. microbrush)
– Per proteggere le superfici esterne della struttura ceramica, applicare della cera.
– Per un migliore controllo del processo di sabbiatura, prima della sabbiatura, si può pitturare la superficie
di unione con un pennarello permanente.
– Per la detersione, la superficie di unione della struttura ceramica può essere sabbiata con Al2O3 100 μm a
max. 1 bar e max. 1–2 cm di distanza dall’ugello (rispettare le indicazioni del produttore).
– Detergere la struttura ceramica in bagno ad ultrasuoni e con vaporizzatore, successivamente asciugare con
getto d’aria.
– Dopo la detersione, evitare qualsiasi contaminazione delle superfici di unione. Le contaminazioni
possono influire negativamente sull’incollaggio.
– Applicare Monobond Plus sulle superfici di unione deterse e lasciare agire per 60 secondi. Dopo il tempo
di azione, asciugare le eccedenze con soffio d’aria privo d’acqua e olio.
Opzione: applicare cera a protezione delle
superfici esterne.
Opzione: detersione delle superfii di unione
tramite sabbiatura (rispettare indicazioni del
produttore).
Lasciare agire Monobond Plus per 60 secondi ed
asciugare con getto d’aria.
49
Page 50

Incollaggio con Multilink Hybrid Abutment
Per l’incollaggio procedere come segue:
– Predisporre le parti da incollare, deterse e condizionate (struttura ceramica, base).
– La seguente procedura di incollaggio deve essere realizzata rapidamente e senza interruzioni.
Il tempo di lavorazione di Multilink Hybrid Abutment a 23 °C (± 1 °C) è di ca. 2 minuti.
– Come regola generale, applicare una nuova cannula di miscelazione sulla siringa Multilink Hybrid Abutment
ad ogni incollaggio.
– Applicare Multilink Hybrid Abutment direttamente dalla cannula di miscelazione apportandolo in strato sottile
sulle superfici di unione sia della base che della struttura ceramica.
– Lasciare la cannula di miscelazione sulla siringa Multilink Hybrid Abutment fino alla successiva applicazione.
Dato che il materiale nella cannula di miscelazione indurisce, esso servirà da cappuccio di chiusura
– Predisporre la struttura sopra la Base in modo tale che le marcature di posizionamento risultino allineate.
– Unire le due parti con lieve ed omogenea pressione e controllare il corretto posizionamento dell’una in
rapporto all’altra (zona di passaggio base / struttura ceramica).
– Successivamente, tenerle saldamente pressate assieme per 5 secondi.
– Rimuovere con cura le eccedenze nel canale di avvitamento, p.e. con Microbrush o pennellino, eseguendo
un movimento rotatorio.
– Attenzione: rimuovere le eccedenze di cemento soltanto nella fase di indurimento, 2-3 minuti dopo la
miscelazione e con un idoneo strumento da laboratorio (p.es. Le Cron). Durante questa operazione
mantenere ferme le parti con leggera pressione.
– Applicare gel alla glicerina, p.e. Liquid Strip, sulle fughe cementizie per evitare la formazione di uno strato
inibito. Applicare cautamente il gel di glicerina per evitare uno spostamento o una miscelazione con il
cemento composito. Lasciare il gel sulla fuga del cemento fino al termine del tempo di presa.
– Successivamente, procedere con la completa polimerizzazione del cemento composito entro 7 minuti.
– Importante: fino a completa polimerizzazione di Multilink Hybrid Abutment non muovere gli
oggetti e mantenerli così posizionati senza muoverli, p.e. con l’aiuto di pinzette diamantate.
– Completata l’autopolimerizzazione, rimuovere il gel alla glicerina con acqua.
– Levigare e lucidare la fuga cementizia con gommini per lucidatura a basso regime di giri
(< 5‘000 U/min), per evitare il surriscaldamento.
– In presenza di residui di cemento nel canale di avvitamento, rimuoverli con strumenti rotanti idonei.
– Detergere con vaporizzatore.
Predisporre le parti da incollare, deterse e condizionate. Applicare una nuova cannula di miscelazione sulla siringa Multilink Hybrid
50
Abutment ad ogni incollaggio.
Page 51

Applicare Multilink Hybrid Abutment direttamente dalla cannula di miscelazione apportandolo in strato sottile sulle superfici di unione della base.
Applicare Multilink Hybrid Abutment direttamente dalla cannula di miscelazione apportandolo in strato sottile sulle superfici di unione della struttura
ceramica.
5 s
Orientare la struttura ceramica sulla base in modo tale che le marcature di
posizionamento risultino allineate.
Rimuovere con cura le eccedenze nel canale di avvitamento, p.e. con
Microbrush o pennellino, eseguendo un movimento rotatorio.
Applicare gel alla glicerina, p.e. Liquid Strip, sulle fughe cementizie per evitare la formazione di uno strato inibito.
Unire le due parti con lieve ed omogenea pressione. Quindi tenerle saldamente pressate assieme per 5 secondi.
2-3
min
Attenzione: rimuovere le eccedenze di cemento soltanto nella fase
di indurimento, 2-3 minuti dopo la miscelazione e con un idoneo
strumento da laboratorio (p.es. Le Cron). Durante questa operazione mantenere ferme le parti con leggera pressione.
7
min
Autopolimerizzazione del cemento composito entro 7 minuti.
Importante: fino a completa polimerizzazione non muovere gli oggetti e
mantenerli così posizionati.
51
Page 52

Completata la polimerizzazione, rimuovere il gel alla glicerina con acqua.
Levigare e lucidare cautamente la fuga cementizia con gommini
per lucidatura a basso regime di giri (< 5‘000 U/min) per evitare il
surriscaldamento.
In presenza di residui di cemento nel canale di avvitamento, rimuoverli con
strumenti rotanti idonei. Non danneggiare la base.
Risultato finale: abutment ibrido e corona abutment ibrida dopo incollaggio.
52
Page 53

Avvertenze particolari
– Al momento della lavorazione Multilink Hybrid
Abutment dovrebbe essere a temperatura ambiente.
La temperatura del frigorifero può rendere più diffi-
coltosa l’estrusione e la miscelazione, nonché pro-
lungare il tempo di lavorazione e di indurimento.
– Materiale non indurito può sporcare gli indumenti.
Avvertenze
Evitare il contatto di Multilink Hybrid Abutment con cute,
mucose ed occhi. Multilink Hybrid Abutment allo stato
non indurito è leggermente irritante e può condurre ad
una sensibilizzazione ai metacrilati. L'utilizzo di convenzionali guanti ad uso medico non protegge dall'azione
sensibilizzante dei metacrilati.
Conservazione
– Non utilizzare Multilink Hybrid Abutment dopo la
data di scadenza.
– Temperatura di Multilink Hybrid Abutment: 2–28°C.
Scadenza: vedi data di scadenza sulla siringa.
– Per sigillare la siringa, lasciare sulla siringa automi-
scelante la cannula di miscelazione utilizzata.
– Monobond Plus:
– facilmente infiammabile
– irritante
– il prodotto contiene etanolo
– tenere lontano da fonti infiammabili
– Virtual Extra Light Body Fast Set:
In caso di contatto accidentale di materiale non
indurito con gli occhi, sciacquare immediatamente
ed abbondantemente con acqua, in caso di irritazio-
ne persistente, consultare il medico. In caso di con-
tatto con la cute, sciacquare abbondantemente con
acqua e sapone.
Avvertenze per la conservazione
– Non utilizzare i singoli componenti di IPS e.max
Abutment Solutions Cem Kit dopo la data di scadenza.
Scadenza: vedi data di scadenza sulla siringa/flacone/
cartuccia.
– Temperatura di conservazione di Multilink Hybrid
Abutment, Monobond Plus, Liquid Strip e Virtual
Extra Light Body Fast Set: 2–28°C.
– Monobond Plus e Liquid Strip: chiudere immediata-
mente dopo l’uso.
– Multilink Hybrid Abutment e Virtual Extra Light Body
Fast Set: per sigillare la siringa, lasciare sulla siringa
automiscelante la cannula di miscelazione utilizzata.
Il materiale contenuto nella cannula indurisce ed
assume la funzione di tappo di chiusura.
Conservare fuori della portata dei bambini.
Solo per uso odontoiatrico!
Il prodotto é stato realizzato per l'impiego nel campo dentale e deve essere
utilizzato secondo le istruzioni d'uso. Il produttore non si assume alcuna
responsabilitá per danni derivanti da diverso o inadeguato utilizzo. L'utente
é tenuto a controllare personalmente l'idoneità del prodotto per gli impieghi
da lui previsti, soprattutto se questi impieghi non sono riportati nelle
istruzioni d'uso.
53
Page 54

Pilar híbrido Corona-pilar híbrida
Corona
Estructura
cerámica
base
Estructura
cerámica
base
Descripción
El IPS e.max® Abutment Solutions Cem Kit es un kit profesional que contiene materiales de calidad para la cementación permanente de estructuras de cerámica vítrea de disilicato de litio (LS2) o de óxido de circonio sobre base de
titanio/aleaciones de titanio o de óxido de circonio (por
ejemplo, base de pilar o adhesiva) en la fabricación de
pilares híbridos o coronas de pilares híbridos. Además, el
kit contiene materiales para el proceso de prueba en la clínica.
Indicaciones
Cementación permanente extraoral de estructuras cerámicas de disilicato de litio (LS2) u óxido de circonio sobre
bases de aleaciones de titánio, titánio u óxido de circonio
Fijación provisional de estructuras cerámicas sobre la
base y fijación de la corona durante la prueba.
Contraindicaciones
Los materiales están contraindicados
– para la cementación intrabucal;
– en los casos en que no se puede aplicar la técnica
de trabajo establecida;
– si un paciente es alérgico a cualquiera de los com-
ponentes de Multilink Hybrid Abutment, Monobond
Plus y Virtual Extra Light Body Fast Set.
Composición
El IPS e.max Abutment Solution Cem Kit incluye los
siguientes componentes:
– Multilink® Hybrid Abutment: composite adhesivo
autopolimerizable para la cementación permanente
de estructuras de cerámica vítrea de disilicato de litio
(LS2) o de óxido de circonio sobre base de titanio/
aleaciones de titanio o de óxido de circonio (por
ejemplo, base de pilar o adhesiva). La matriz de
monómero está compuesta por dimetacrilato y HEMA.
Los rellenos inorgánicos incluyen vidrio de bario, tri-
fluoruro de iterbio, oxido mixto esferoide y dióxido de
titanio. El tamaño de las partículas oscila entre 0,15 y
3,0 μm. El tamaño medio de partícula mide 0,9 μm. El
volumen total de los rellenos inorgánicos es aproxi-
madamente del 36%.
Colores
– HO0 (Opacidad alta)
Los tiempos de trabajo y de polimerización dependen de
la temperatura ambiente. Una vez extraído Multilink
Hybrid Abutment de la jeringa de automezclado, se aplican los siguientes tiempos:
Temperatura ambiente
23 °C ± 1 °C
Tiempo de trabajo Aprox. 2 minutos
Tiempo de polimerización (incluido
el tiempo de trabajo)
Aprox. 7 minutos
Los tiempos de trabajo y de polimerización son menores a
temperaturas más altas y mayores a temperaturas más bajas.
– Monobond® Plus – primer universal diseñado
para establecer un enlace adhesivo entre el
composite de cementación y todos los materiales de restauración indirectos.
solución alcohólica de metacrilato de silano, meta-
crilato de ácido fosfórico y metacrilato de sulfuro
– Liquid Strip: gel de glicerina impermeable al
oxígeno para prevenir la formación de una
capa inhibidora de oxígeno sobre las superficies de composite
Gel de glicerina
– Virtual® Extra Light Body Fast Set: material de
impresión con base de polivinil siloxano (polimerización por adición) para la fijación provisional de las piezas durante la prueba
Silicona de polimerización por adición que contiene
polivinil siloxano, metil hidrógeno siloxano, complejo organoplatinico, silice y colorantes alimenticios.
Efectos secundarios
– Multilink Hybrid Abutment, Monobond Plus:
No se conocen efectos secundarios sistémicos. En
raras ocasiones se han notificado reacciones alérgicas a alguno de sus componentes.
Interacciones
– Multilink Hybrid Abutment:
Los compuestos fenólicos (como el aceite de gaul-
teria o el eugenol) inhiben la polimerización. Por
ello, debe evitarse la aplicación de materiales que
contengan estos componentes. Los desinfectantes
oxidantes, como el peróxido de hidrógeno, pueden
interactuar con el sistema de iniciadores y puede
perjudicar el proceso de polimerización. Por ello, la
jeringa de automezcla no debe desinfectarse con
agentes oxidantes. La desinfección se puede realizar,
por ejemplo, frotando con alcohol para uso médico.
– Monobond Plus:
IMPORTANTE: Con el fin de crear una unión fuerte,
no limpiar las superficies de óxido de circonio con
ácido fosfórico. Para evitar la contaminación, no
debe extraerse el Monobond Plus del frasco con un
cepillo.
– Virtual Extra Light Body Fast Set:
Los guantes de látex inhiben el sistema iniciador de
los polivinil siloxano. Por eso se hay que evitar tocar
las superficies sobre las que se va a aplicar la silicona (estructura de cerámica, base de titanio, etc.) con
guantes de látex.
54
Page 55

Abutment Solutions
Opcional: Prueba en la clínica
Fijación provisional de la estructura cerámica a la base
Antes de cementar de forma permanente la estructura cerámica sobre la base, puede realizarse una prueba en la
clínica. Para facilitar la manipulación intrabucal se fijan las piezas provisionalmente entre sí con un material de
silicona, como Virtual Extra Light Body Fast Set
Para la fijación temporal de las piezas debe seguirse el siguiente procedimiento:
– La base y la estructura cerámica sin tratar se limpian con vapor y se secan después con aire a presión.
– La estructura cerámica se coloca sobre la base (que está atornillada al análogo del modelo) y se señala la
posición relativa de las piezas con un marcador resistente al agua. De este modo se facilita la localización de
la posición correcta en el montaje provisional de las piezas.
– El canal del tornillo se sella con un gránulo de espuma.
– El cartucho Virtual se inserta en el dispensador y se retira la cubierta protectora.
– Se rosca la boquilla de mezclado y se fija la Oral Tip sobre ella.
– Se aplica Virtual Extra Light Body Fast Set a la base y directamente a la estructura cerámica.
– La base se introduce en la estructura cerámica. Comprobar la alineación de las dos piezas (bloqueo en rota-
ción/marcado).
– Estas deben sujetarse firmemente en la posición correcta durante 2 minutos y medio hasta que el Virtual Extra
Light Body Fast Set haya fraguado.
– El exceso sobrante debe eliminarse cuidadosamente con un instrumento adecuado, por ejemplo, un escalpelo.
Estructuras cerámicas limpias y no tratadas .
El canal del tornillo se sella con un gránulo de espuma.
La estructura cerámica se coloca sobre la base y se marca la posición
relativa.
El cartucho Virtual se inserta en el dispensador. Se rosca la boquilla de mezclado y se fija la Oral Tip.
55
Page 56

Se aplica Virtual Extra Light Body Fast Set a la base y...
…directamente a la estructura cerámica.
La base se introduce en la estructura cerámica. Comprobar la alineación de
las dos piezas (bloqueo en rotación/marcado). Estas deben sujetarse firmemente en su sitio durante 2 minutos y medio hasta que el Virtual Extra Light
Body Fast Set haya fraguado.
Se retira el exceso de Virtual Extra Light Body Fast Set del canal del tornillo
con un instrumento.
El exceso sobrante se elimina cuidadosamente con un instrumento adecuado,
por ejemplo, un escalpelo.
56
Page 57

Prueba en la clínica
Pilar híbrido con corona especial
Observación importante: las comprobaciones intrabucales de la oclusión/articulación y las rectificaciones por
repaso solo se pueden realizar si las piezas están fijadas entre sí con Virtual Extra Light Body Fast Set. Virtual confiere un efecto amortiguador durante el proceso de prueba, sobre todo si es necesario hacer rectificaciones por
repaso. Por tanto, evita la formación de fracturas en la zona de transición entre el pilar híbrido y la corona.
Durante la prueba en la clínica se debe observar el siguiente procedimiento:
– Se presentan el pilar híbrido preparado (provisionalmente fijado en posición) y la corona limpia correspon-
diente.
– Se retira la restauración provisional.
– El pilar híbrido se atornilla manualmente con el tornillo especial.
– Se comprueba la geometría del pilar híbrido (por ejemplo, ajuste, anemia gingival) relativa al margen gingival.
– Si se desea, puede sellarse el canal del tornillo en el pilar híbrido con un gránulo de espuma.
– Sugerencia: Aísle la cara interna de la corona, por ejemplo, con Try-In-Paste o Liquid Strip
– La corona se coloca sobre el pilar híbrido intrabucalmente para comprobar y, si fuera necesario,
ajustar las zonas de contacto proximales. Observación: en esta fase no se debe verificar la funcio-
nalidad oclusiva.
– Para las comprobaciones funcionales hay que fijar la corona sobre el pilar híbrido con Virtual Extra
Light Body Fast Set. No utilizar Try-In-Paste para este fin, ya que este material carece de la resis-
tencia suficiente a la compresión.
– El cartucho Virtual se inserta en el dispensador y se retira la cubierta protectora.
– Se rosca la boquilla de mezclado y se fija la Oral Tip sobre ella.
– Se aplica Virtual Extra Light Body Fast Set a la cara interna de la corona.
– Se presiona la corona sobre los pilares híbridos con los dedos hasta alcanzar la posición final. La corona se
mantiene en esta posición hasta que se haya secado el material Virtual.
– Se retira el exceso del material Virtual.
– Se comprueba la oclusión/articulación y, si fuera necesario, se realizan los ajustes necesarios con los instru-
mentos de fresado pertinentes (consulte el documento separado "Instrumentos de fresado recomendados
para materiales cerámicos IPS e.max en la consulta dental"). Si se han hecho modificaciones por fresado,
debe volver a pulirse la restauración o glasear en el horno.
– Se retira cuidadosamente la corona del pilar híbrido y el pilar híbrido (con la base).
– Se coloca la restauración provisional.
El pilar híbrido se atornilla manualmente con el tornillo especial. – Se comprueba la geometría del pilar híbrido (por ejemplo, ajuste, anemia gingival) relativa
al margen gingival.
Si se desea, puede sellarse el canal del tornillo en el pilar híbrido con un
gránulo de espuma.
57
Page 58
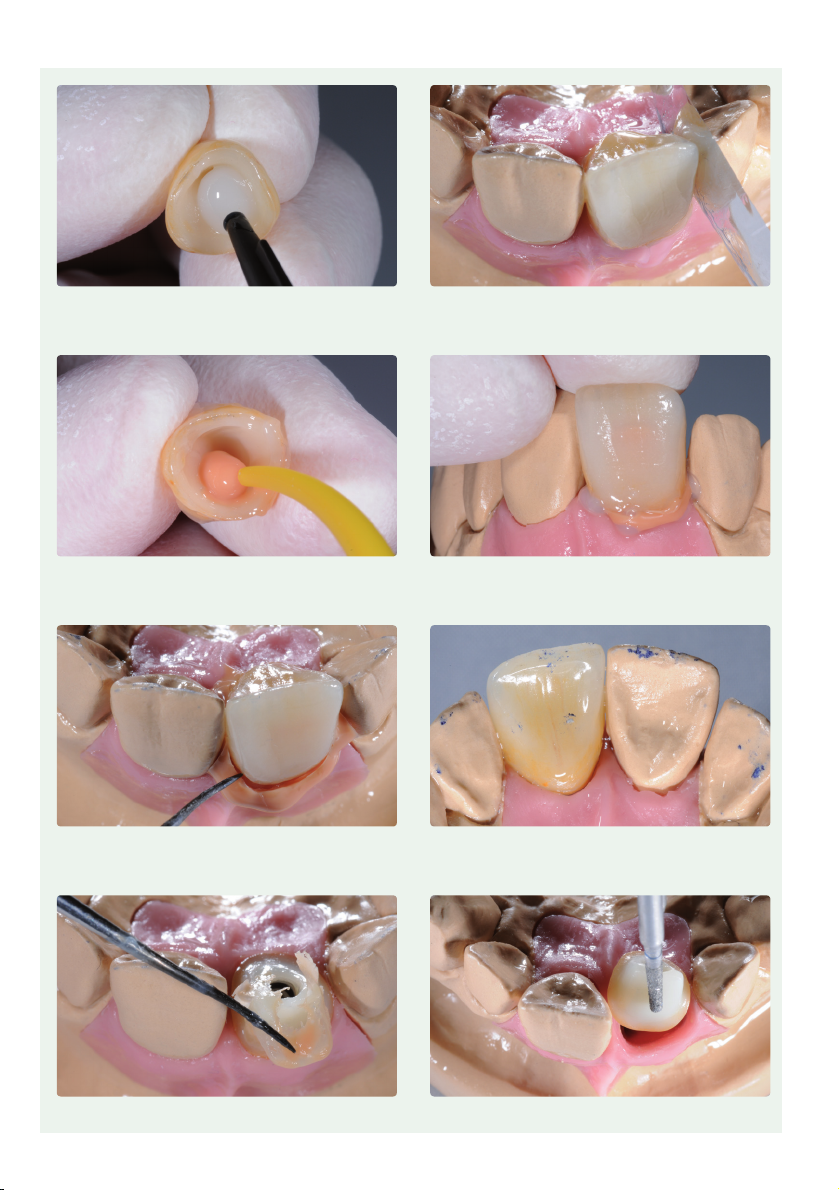
Sugerencia: Se puede aislar la cara interna de la corona con gel de glicerina.
La corona se coloca sobre el pilar híbrido intrabucalmente para comprobar y,
si fuera necesario, ajustar las zonas de contacto proximales.
Observación: en esta fase no se debe verificar la funcionalidad
oclusiva.
Se aplica Virtual Extra Light Body Fast Set a la cara interna de la corona.
Se retira el exceso del material Virtual.
Se retira con cuidado la corona del pilar híbrido así como el Virtual Extra
Light Body Fast Set.
58
Se presiona la corona sobre el pilar híbrido con los dedos hasta alcanzar la
posición final. La corona se mantiene en esta posición hasta que se haya
secado el material Virtual.
Se comprueba la oclusión/articulación y, si fuera necesario, se realizan ajustes con los instrumentos de fresado adecuados.
Se desatornilla el pilar híbrido.
Page 59

Corona con pilar híbrido
Durante la prueba en la clínica se debe observar el siguiente procedimiento:
– Se prepara la corona del pilar híbrido limpia (provisionalmente fijada en posición con Virtual Extra Light Body
Fast Set).
– Se retira la restauración provisional.
– La corona del pilar híbrido se coloca sobre el implante intrabucal para comprobar y, si fuera necesario,
ajustar las zonas de contacto proximales. Observación: en esta fase no se debe verificar la
funcionalidad oclusiva.
– La corona del pilar híbrido se atornilla manualmente con el tornillo especial.
– Se comprueba la geometría del pilar híbrido (por ejemplo, ajuste, anemia gingival) relativa al margen gingival.
– Se comprueba la oclusión/articulación y, si fuera necesario, se realizan los ajustes necesarios con los instru-
mentos de fresado pertinentes (consulte el documento separado "Instrumentos de fresado recomendados
para materiales cerámicos IPS e.max en la consulta dental"). Si se han hecho modificaciones por fresado,
debe volver a pulirse la restauración y vidriarse al horno.
– Se retira cuidadosamente la corona del pilar híbrido (con la base).
– Para limpiar y desinfectar la zona del implante se aclara, por ejemplo, con Cervitec® Liquid
(colutorio antibacteriano con clorhexidina).
– Se coloca la restauración provisional.
La corona del pilar híbrido se coloca sobre el implante intrabucal para comprobar
y ajustar, si fuera necesario, las zonas de contacto proximales. Observación: en
esta fase no se debe verificar la funcionalidad oclusiva.
El pilar híbrido se atornilla con el tornillo especial.
Se comprueba la oclusión/articulación y, si fuera necesario, se realizan ajustes con los instrumentos de fresado adecuados.
Se comprueba la geometría del pilar híbrido (por ejemplo, ajuste, anemia
gingival) relativa al margen gingival.
Se retira cuidadosamente la corona del pilar híbrido (con la base).
59
Page 60

Abutment Solutions
Cementación permanente de la base/estructura cerámica
Para una cementación adhesiva eficaz de la base y la estructura cerámica es un requisito preparar meticulosamente
las superficies de unión. A continuación se describen los procedimientos necesarios. El procedimiento es el mismo
para los pilares híbridos y las coronas con pilares híbridos.
Pilares híbridos y coronas de pilares híbridos de cerámica vítrea de disilicato de litio (LS2) IPS e.max
Estructura cerámica
(LS2)
Arenado – Según las instrucciones del fabricante
Grabado
Acondicionado La zona de adhesión se prepara con Monobond Plus durante 60 s
Cementación adhesiva Multilink Hybrid Abutment
Recubrimiento de la junta de
cementación
Polimerización Aprox. 7 min de autopolimerización
Pulido de la junta de
cementación
Pilares realizados en óxido de circonio (ZrO2)
La zona de adhesión se graba con
®
Ceramic Etching Gel durante 20 s
IPS
Gel de glicerina, por ejemplo, Liquid Strip
Pulidores convencionales para cerámica/composite
Estructura cerámica
(ZrO2)
Arenado Según las instrucciones del fabricante Según las instrucciones del fabricante
Acondicionado La zona de adhesión se prepara con Monobond Plus durante 60 s
Cementación adhesiva Multilink Hybrid Abutment
Recubrimiento de la junta de
cementación
Polimerización Aprox. 7 min de autopolimerización
Pulido de la junta de
cementación
Gel de glicerina, por ejemplo, Liquid Strip
Pulidores convencionales para cerámica/composite
Base
–
Base
Preparación de la base
En la preparación de la base para la cementación con la estructura cerámica se debe observar el siguiente procedimiento:
– La base debe prepararse según las instrucciones del fabricante.
– La base se limpia en un baño ultrasónico o con un limpiador a vapor y después se seca con aire a presión.
– La base se atornilla al modelo análogo.
– La estructura cerámica se coloca sobre la base y se señala la posición relativa de los componentes con un
marcador resistente al agua. De este modo se facilita la localización de la posición correcta en el montaje
posterior de las partes.
60
Page 61

– El perfil que sobresale de la base no debe ni arenarse ni modificarse de ningún modo.
– Si el fabricante recomienda arenar las superficies de unión, hay que seguir este procedimiento:
– Para proteger el perfil que sobresale se aplica cera dura de modelado, ya que este tipo de material
se puede eliminar después fácilmente.
– El canal del tornillo también se sella con cera.
– La superficie de la zona de unión se arena meticulosamente siguiendo las instrucciones del fabricante.
– La limpieza se efectúa con la ayuda de un instrumento y un limpiador de vapor. Es importante eliminar
exhaustivamente toda la cera.
– Una vez limpia la superficie de unión, no debe contaminarse de ningún modo, ya que esto afectaría a la adhesión.
– Se aplica Monobond Plus sobre la superficie de unión limpia y se deja reaccionar durante 60 segundos.
Transcurrido este tiempo, se eliminan los restos con aire exento de agua y aceite.
– El canal del tornillo se sella con un gránulo de espuma o cera. Durante el proceso no debe contaminarse
la superficie de unión.
Si el fabricante recomienda arenar las superficies de unión, hay que seguir
este procedimiento:
La base se atornilla al modelo análogo. Se señala la posición relativa de las
piezas con un marcador resistente al agua.
Opcional: La superficie de la zona de unión se arena meticulosamente
siguiendo las instrucciones del fabricante.
Se aplica Monobond Plus sobre la superficie de unión limpia y se deja reaccionar durante 60 segundos. Transcurrido este tiempo, se secan los restos con
aire exento de agua y aceite.
Opcional: Se aplica cera para proteger el perfil que sobresale.
Además, también se sella con cera el canal del tornillo.
Opcional: La limpieza se efectúa con la ayuda de un instrumento y un
limpiador de vapor. Es importante eliminar exhaustivamente toda la cera.
El canal del tornillo se sella con un gránulo de espuma o cera. Durante el
proceso no debe contaminarse la superficie de unión.
61
Page 62

Preparación de las estructuras de cerámica vítrea de disilicato de litio (LS2) IPS e.max
En la preparación de la estructura cerámica para la cementación con la base se debe observar el siguiente procedimiento:
– La estructura cerámica no debe arenarse cuando se prepara para la cementación.
– La estructura cerámica se limpia en un baño ultrasónico o con un limpiador a vapor y después se seca con aire a
presión.
– Una vez limpia, no debe contaminarse bajo ninguna circunstancia, ya que esto afectaría a la unión.
– Puede aplicarse cera para proteger las superficies externas y las zonas con brillo.
– La superficie de unión se graba con gel de ácido fluorhídrico al 5 % (IPS Ceramic Etching Gel) durante
20 segundos.
– A continuación se aclara la superficie de unión abundantemente con agua corriente y se seca con aire
exento de aceite.
– Se aplica Monobond Plus sobre la superficie de unión limpia y se deja reaccionar durante 60 segundos.
Transcurrido este tiempo, se dispersan los restos con aire exento de agua y aceite.
Las estructuras de cerámica vítrea de disilicato de
) IPS e.max no deben arenarse.
litio (LS
2
Grabado con IPS Ceramic Etching Gel durante
20 seg y posteriormente aclarado con agua.
Se deja reaccionar el Monobond Plus durante
60 seg y después se seca con aire a presión.
Preparación de estructuras cerámicas de óxido de circonio (ZrO2)
En la preparación de la estructura cerámica para la cementación con la base se debe observar el siguiente procedimiento:
– Para facilitar su manipulación, la estructura cerámica se sujeta a un soporte (por ejemplo, Microbrush) antes de
arenar.
– Las superficies externas de la estructura cerámica se protegen con un recubrimiento de cera.
– Para controlar mejor el procedimiento de arenado puede colorearse la superficie de unión con un marcador
permanente.
– La superficie de unión de la estructura cerámica se limpia arenando con Al2O3 de 100 μm a una presión máxima
de 1 bar y una distancia máxima de 1-2 cm de la boquilla de arenado (seguir las instrucciones del fabricante).
– La estructura cerámica se limpia con un chorro de vapor o en baño ultrasónico.
– Una vez limpia la superficie de unión, no debe contaminarse de ningún modo, ya que esto afectaría a la unión.
– Se aplica Monobond Plus sobre la superficie de unión limpia y se deja reaccionar durante 60 segundos.
Transcurrido este tiempo, se secan los restos con aire exento de agua y aceite.
Opcional: se aplica cera para proteger las superficies externas.
Opcional: para limpiar la superficie de unión se
arena (Seguir las instrucciones del fabricante).
Se deja reaccionar el Monobond Plus durante
60 seg y después se seca con aire a presión.
62
Page 63

Cementación con Multilink Hybrid Abutment
En el procedimiento de cementación se deben observar las siguientes instrucciones:
– Se preparan los componentes limpios y acondicionados (estructura cerámica, base) para la cementación.
– El procedimiento de cementación posterior debe llevarse a cabo de forma rápida y sin interrupciones.
El tiempo de trabajo de Multilink Hybrid Abutment es de aprox. 2 min. a 23 °C (± 1 °C).
– Como norma general antes de cada uso se coloca una nueva boquilla de mezclado en la jeringa de Multilink
Hybrid Abutment.
– Se aplica una capa fina de Multilink Hybrid Abutment directamente con la jeringa de mezclado a la superficie
de unión de la base y a la superficie de unión de la estructura cerámica.
– La boquilla de mezclado se deja en la jeringa Multilink Hybrid Abutment hasta el siguiente uso. El cemento res-
tante se polimeriza en la boquilla y actúa de sellador.
– La estructura cerámica se coloca en la base de forma que las marcas de posición estén alineadas.
– Se ejerce una presión ligera y uniforme sobre las piezas y se comprueba que la posición relativa de los
componentes (transición entre la base y la estructura cerámica) sea correcta.
– Posteriormente se presionan firmemente las piezas durante 5 segundos.
– El exceso en el canal del tornillo se retira minuciosamente, por ejemplo, mediante un movimiento de rotación
con un Microbrush o un cepillo.
– El exceso de la transición a la base se retira con un gránulo de espuma cuando el material todavía está blando.
Durante el proceso los componentes se mantienen en posición ejerciendo una presión ligera.
– Importante: el exceso ha de retirarse antes de iniciarse al polimerización, 2-3 minutos tras la mezcla.
Para ello utilizar un instrumento dental adecuado (ej. Le Cron) manteniendo los componentes en su
lugar con una ligera presión.
– Se aplica un gel de glicerina (por ejemplo, Liquid Strip) a la junta de cementación para evitar que se forme una
capa de inhibición. – El gel de glicerina se debe aplicar con precaución para que no se mezcle con o desplace el
composite. El gel debe permanecer sobre la junta de cementación hasta que se complete la polimerización.
– A continuación, se autopolimeriza completamente el composite de cementación en 7 min.
– Importante: No deben moverse las piezas hasta que Multilink Hybrid Abutment se haya polimerizado
por completo. Se pueden inmovilizar, por ejemplo, con pinzas diamantadas.
– Una vez completada la autopolimerización, se elimina el gel de glicerina con agua.
– La junta de cementación se debe pulir cuidadosamente con un pulidor de goma a velocidad baja
(< 5000 rpm) para evitar un sobrecalentamiento.
– Los restos de cemento que queden en el canal del tornillo se eliminan con instrumentos giratorios adecuados.
– La restauración se limpia con vapor.
Se preparan los componentes limpios y acondicionados para la cementación. Antes de cada uso se coloca una nueva boquilla de mezclado en la jeringa
de Multilink Hybrid Abutment.
63
Page 64

Se aplica una capa fina de Multilink Hybrid Abutment directamente con la
jeringa de mezclado a la superficie de unión de la base.
Se aplica una capa fina de Multilink Hybrid Abutment directamente con la
jeringa de mezclado a la superficie de unión de la base.
5 s
La estructura cerámica se coloca en la base de forma que las marcas de
posición estén alineadas.
El exceso en el canal del tornillo se retira minuciosamente, por ejemplo,
mediante un movimiento de rotación con un Microbrush o un cepillo.
Se aplica un gel de glicerina (por ejemplo, Liquid Strip) a la junta de cementación para evitar que se forme una capa de inhibición.
64
Las piezas se unen ejerciendo una presión ligera y uniforme. Posteriormente
se presionan firmemente los componentes durante 5 segundos.
2-3
min
Importante: el exceso ha de retirarse antes de iniciarse al polimerización, 2-3 minutos tras la mezcla. Para ello utilizar un instrumento dental adecuado (ej. Le Cron) manteniendo los componentes en su lugar con una ligera presión.
7
min
El composite de cementación se autopolimeriza en 7 min.
Importante: Las piezas no deben moverse hasta que se haya completado
la autopolimerización. Las piezas deben estar inmovilizadas durante este
tiempo.
Page 65

Una vez completado el proceso de autopolimerización, se elimina el gel de
glicerina con agua.
La junta de cementación se debe pulir cuidadosamente con un
pulidor de goma a velocidad baja (< 5000 rpm) para evitar un
sobrecalentamiento.
Los restos de cemento que queden en el canal del tornillo se eliminan con
instrumentos giratorios adecuados. No se debe dañar la base.
Pilar híbrido y corona con pilar híbrido terminados tras la cementación.
65
Page 66

Notas adicionales
– Multilink Hybrid Abutment se debe procesar a tem-
peratura ambiente. Las temperaturas bajas o más
bajas pueden dificultar la dispensación y el mezcla-
do del material y prolongar el tiempo de trabajo y
de polimerización.
– El material no polimerizado puede manchar la ropa.
Advertencia
– Evite el contacto de Multilink Hybrid Abutment sin
polimerizar con las mucosas, la piel y los ojos.
Cuando no está polimerizado, Multilink Hybrid
Abutment puede provocar una leve irritación e indu-
cir sensibilización a los metacrilatos. Los guantes
médicos convencionales no sirven como protección
contra el efecto sensibilizante de los metacrilatos.
– Monobond Plus:
– Fácilmente inflamable
– Irritante
– El producto contiene etanol
– Mantener alejado de fuentes de calor
– Virtual Extra Light Body Fast Set:
si el material no polimerizado entra en contacto con
los ojos, aclarar de inmediato con cantidades abun-
dantes de agua. Si la irritación persiste, consultar a
un médico. Si el material entra en contacto con la
piel, lavar con agua y jabón.
Almacenamiento y caducidad
– No deben utilizarse los componentes individuales
del Abutment Solution Cem Kit IPS e.max después
de la fecha de caducidad indicada.
– Caducidad: consultar la nota en la jeringa/botellas/
cartucho.
– Temperatura de almacenamiento de Multilink Hybrid
Abutment, Monobond Plus, Liquid Strip y Virtual
Extra Light Body Fast Set: 2-28°C
– Monobond Plus y Liquid Strip:
Cerrar inmediatamente después de usar.
– Multilink Hybrid Abutment y Virtual Extra Light Body
Fast Set:
La boquilla de mezclado se deja colocada en la jerin-
ga/cartucho después de cada uso. El material conte-
nido en su interior se polimerizará y actuará de
sellador.
¡Manténgase fuera del alcance de los niños! Para
uso exclusivo en odontología.
Este material ha sido fabricado para su uso dental y debe manipularse según
las instrucciones de uso. El fabricante no se hace responsable de los daños
ocasionados por otros usos o una manipulación indebida. Además, el usuario
está obligado a comprobar, bajo su propia responsabilidad, antes de su uso,
si el material es apto para los fines previstos, sobre todo si éstos no figuran
en las instrucciones de uso.
66
Page 67

Pilar híbrido Coroa de pilar híbrido
Coroa
Estrutura
cerâmica
Base
Estrutura
cerâmica
Base
Descrição
O “IPS e.max® Abutment Solutions Cem Kit” é um kit
profissional que contém materiais de qualidade para a
cimentação definitiva de estruturas cerâmicas feitas de
di-silicato de lítio (LS2) ou de óxido de zircônio em bases
(p.ex., pilares ou bases adesivas) feitas de titânio, ligas
de titânio ou óxido de zircônio para a fabricação de pilares híbridos ou coroas pilares híbridas. Além disso, o kit
contém materiais para o clínico testar os procedimentos.
Indicação
Cimentação extraoral, permanente de estruturas feitas
de cerâmica vítrea de di-silicato de lítio (LS2) ou de óxido
de zircônio sobre bases de titânio/liga de titânio ou óxido
de zircônio. Fixação provisória de estruturas cerâmicas
em suas bases, bem como, fixação da coroa durante a
sua prova.
Contra-indicação
Os materiais são contra-indicados
– para a cimentação intra-oral;
– quando a técnica de trabalho estipulada não puder
ser aplicada;
– quando o paciente for alérgico a qualquer um dos
ingredientes de Multilink Plus e de Virtual Extra
Light Body Fast Set.
Composição
O IPS e.max Abutment Solution Cem Kit inclui os seguintes componentes:
– Multilink Hybrid Abutment - compósito auto-poli-
merizável para a cimentação permanente de estrutu-
ras cerâmicas de cerâmica vítrea de di-silicato de
lítio (LS2) ou óxido de zircônio em bases (p.ex., abut-
ment ou bases adesivas) feitas de titânio, liga de
titânio ou óxido de zircônio. A matriz do monômero
é composta de dimetacrilato e HEMA. As partículas
inorgânicas incluem vidro de bário, tri-fluoreto de
itérbio, óxidos mistos esferoidais e dióxido de titâ-
nio. O tamanho da partícula está situado entre
0,15 e 3,0 μm. O tamanho médio da partícula é de
0,9 μm. O volume total de partículas inorgânicas é
de, aprox., 36 %.
Cor
– HO0 (Alta Opacidade).
Os tempos de trabalho e de cura dependem da tempera-
tura ambiente. Uma vez que Multilink Hybrid Abutment
tenha sido dispensado da seringa automix, os tempos
são os seguintes:
Temperatura ambiente
23 °C ± 1 °C
Tempo de trabalho Aprox. 2 minutos
Tempo de cura
(incluindo tempo de trabalho)
Aprox. 7 minutos
Os tempos de trabalho e de cura ficam mais curtos em
temperaturas mais altas, enquanto eles ficam mais longos
em temperaturas mais baixas.
– Monobond® Plus – primer universal que promo-
ve uma união adesiva entre os compósitos de
cimentação e todos os materiais restauradores
indiretos.
Solução alcoólica de metacrilato de silano, metacri-
lato do ácido fosfórico e sulfeto de metacrilato.
– Liquid Strip – Gel de glicerina impermeável ao
oxigênio para a prevenção da formação da
camada de inibição do oxigênio em superfícies
de compósitos.
Gel de glicerina
– Virtual® Extra Light Body Fast Set – Material de
moldagem (cura por adição), baseado em vinilpoli-siloxano, para a fixação provisória dos
componentes durante as provas (“try-in”).
Silicone de cura por adição, que contém vinilpoli-
siloxano, metil-hidrosiloxano, complexo organo-platínico, silicato e corantes alimentícios.
Efeitos colaterais
– Multilink Hybrid Abutment, Monobond Plus:
Até agora, não são conhecidos efeitos sistêmicos
colaterais. Em alguns casos, foram informadas reações alérgicas aos componentes individuais.
Interações
– Multilink Hybrid Abutment:
As substâncias fenólicas (p.ex., óleo de gualtéria,
eugenol) inibem a polimerização. Por conseguinte,
a aplicação de materiais que contêm estes componentes deve ser evitada. Os desinfetantes com efeito
oxidante (p.ex., peróxido de hidrogênio) podem interagir com o sistema de iniciadores e, assim, podem
prejudicar o processo de cura. Assim, a seringa
automix não deve ser desinfetada com estes agentes
oxidantes. Deste modo, a desinfecção deve ser feita
esfregando com álcool médico.
– Monobond Plus:
IMPORTANTE! Para criar uma união forte, as super-
fícies de óxido de zircônio e metálicas não podem
ser limpas com ácido fosfórico. Não insira o pincel
no frasco de Monobond Plus. Isto pode provocar
contaminação.
– Virtual Extra Light Body Fast Set:
A presa de polivinil-siloxanos é inibida por luvas de
látex. As superfícies nas quais o silicone será aplicado (estrutura cerâmica, base de titânio, etc.) não
devem ser tocadas com luvas de látex.
67
Page 68

Abutment Solutions
Opcional: Try-In Clínico
Fixação provisória da estrutura de cerâmica na base
Antes da estrutura cerâmica ser cimentada na base, de modo permanente, uma prova clínica pode ser realizada.
Para facilitar este manuseio intra-oral, os componentes são prendidos, entre si e de modo temporário, com um
material de silicone, p.ex., Virtual Extra Light Body Fast Set.
O procedimento seguinte deve ser feito para fixação temporária dos componentes:
– A base, sem tratamento, e a estrutura cerâmica são limpas com vapor e, a seguir, secas com jato de ar.
– A estrutura cerâmica é colocada na base (que é aparafusada no modelo análogo) e a posição relativa dos
componentes é marcada com uma caneta impermeável. Este passo torna mais fácil obter a posição correta
quando as partes são montadas temporariamente.
– O orifício do parafuso é selado com uma pelota de espuma.
– O cartucho da silicona Virtual é inserido no dispensador e a tampa protetora é retirada.
– A ponta de mistura é fixada e a ponteira intra-oral é fixada à ponta de mistura.
– O “Virtual Extra Light Body Fast Set” é aplicado, de modo direto, na base e na estrutura cerâmica.
– A base é introduzida na estrutura cerâmica. O alinhamento dos dois componentes deve ser conferido
(anti-rotacional/marcação).
– Os componentes devem ser mantidos firmemente na posição correta, durante 2:30 minutos, até que o
“Virtual Extra Light Body Fast Set” tenha polimerizado.
– Qualquer excesso, que tenha sido deslocado, deve ser removido, de modo cuidadoso, com instrumento
satisfatório, p.ex., um bisturi.
Estruturas cerâmicas limpas e sem tratamento.
O orifício de parafuso deve ser selado com uma bola de espuma.
68
A estrutura cerâmica deve ser colocada na base e a posição
relativa deve ser marcada.
O cartucho Virtual é inserido no dispensador. A ponta de mistura deve ser
aparafusada e a ponteira intra-oral deve ser fixada.
Page 69

Virtual Extra Light Fast Set deve ser aplicado na base e…
… diretamente na estrutura cerâmica.
Uma base é introduzida na estrutura cerâmica básica. Assim, o alinhamento
dos dois componentes pode ser conferido (anti-rotacional/marcação).
Os componentes são mantidos firmemente em seus lugares, por aprox.
2:30 minutos, até que o Virtual Extra Light Body Fast Set tenha se fixado.
O excesso do Virtual Extra Light Body Fast Set é removido do orifício do
parafuso com um instrumento.
O excesso deslocado é cuidadosamente eliminado com um instrumento
satisfatório, p.ex., um bisturi.
69
Page 70

Procedimento clínico
Pilar híbrido com coroa dedicada
Nota importante: Qualquer inspeção intra-oral da oclusão/articulação e quaisquer ajustes necessários só poderão
ser executados quando os componentes forem conectados, um ao outro, e com o “Virtual Extra Light Body Fast
Set”. O Virtual tem um efeito amortecedor durante o procedimento, em particular quando ajustes por desgaste
têm que ser feitos. Além disto, previne lascamento na área de transição entre o pilar híbrido e a coroa.
Os seguintes procedimentos devem ser observados durante o tratamento clínico:
– O pilar híbrido preparado (provisoriamente, fixado no lugar) e a respectiva coroa limpa são armazenados.
– A restauração provisória é removida.
– O pilar híbrido é parafusado manualmente com o respectivo parafuso.
– A geometria do pilar híbrido é checada (quanto à adaptação, isquemia) em relação à margem gengival).
– Se desejado, o orifício do parafuso sobre o pilar híbrido pode ser marcado com uma bola de espuma.
– Aviso: Isolar o aspecto interno da coroa, p.ex., com Try-In-Paste, Liquid Strip.
– A coroa é colocada, intra-oralmente, no pilar híbrido para conferir e, se necessário, ajustar os
contatos proximais. Nota: Nenhuma inspeção oclusal deve ser executada nesta fase.
– Para a inspeção funcional, a coroa tem que ser fixada no pilar híbrido com Virtual Extra Light
Body Fast Set. A pastaTry-in não deve ser usada para este propósito, porque este material não é
suficientemente resistente para forças de compressão.
– O cartucho do Virtual é inserido no dispensador e a tampa protetora é removida.
– A ponta de mistura é parafusada e o Oral Tip é prendido na ponta de mistura.
– O Virtual Extra Light Body Fast Set é aplicado nos aspectos internos da coroa.
– A coroa é pressionada sobre os abutments híbridos, usando os dedos, até que a posição final seja alcançada.
A coroa deve ser mantida na posição final até que o material Virtual tenha polimerizado.
– O excesso do material Virtual deve ser removido.
– A oclusão/articulação devem ser checadas e, se for necessário, os ajustes devem ser feitos com instrumentos
de desgaste indicados (ver a separata “Instrumentos de desgaste recomendados para cerâmica IPS e.max -
uso em consultório odontológico”). Se os ajustes foram feitos por desgaste, a restauração tem que ser polida
e glazeada novamente.
– A coroa é cuidadosamente removida do pilar, além do pilar híbrido em si (incluindo a base).
– A restauração provisória é colocada.
O pilar híbrido é parafusado manualmente em seu lugar com o parafuso
apropriado. A geometria do pilar híbrido (p.ex., ajuste, isquemia) é conferida
em relação à margem de gingival.
70
Se desejado, o orifício do parafuso do pilar híbrido pode ser selado
com uma pelota de espuma.
Page 71

Informação: O aspecto interno da coroa pode ser isolado com
gel de glicerina.
Intra-oralmente, a coroa deve ser posicionada no pilar híbrido para
conferir se são necessários ajustes nos contatos proximais. Nota: Nenhuma
inspeção oclusal funcional deve ser executada nesta fase.
Virtual Extra Light Body Fast Set deve ser aplicado nos aspectos internos
da coroa.
O excesso do material Virtual deve ser removido.
Cuidadosamente, a coroa é erguida do pilar híbrido e o Virtual Extra Light
Body Fast Set é removido.
A coroa deve ser pressionada sobre pilar híbrido, usando os dedos, até que
a posição final seja alcançada. A coroa deve ser mantida na posição final
até a fixação do material Virtual tenha se concretizado.
A oclusão e articulação devem ser conferidas. Se forem necessários,
os ajustes devem ser feitos com adequados instrumentos de desgaste.
O pilar híbrido pode ser desparafusado.
71
Page 72

Coroa de pilar híbrido
Os procedimentos seguintes devem ser observados durante a prova clínica:
– A coroa de pilar híbrido preparada e limpa (provisoriamente posicionada com Virtual Extra Light Body Fast
Set) é reservada.
– A restauração provisória é removida.
– A coroa de pilar híbrido é colocada intra-oralmente sobre o implante para ser checada e, se necessário,
para ajustar os contatos proximais. Nota: Nenhuma inspeção oclusal funcional deve ser executada
nesta fase.
– A coroa de pilar híbrido deve ser aparafusado manualmente com o respectivo parafuso.
– A geometria da coroa de pilar híbrido deve ser checada (quanto ao ajuste e isquemia) em relação à gengiva.
– A oclusão/articulação deve ser conferida e, se necessário, devem ser feitos os ajustes necessários com
instrumentos de desgaste satisfatórios (ver a separata “IPS e.max Instrumentos de desgaste recomendados
para cerâmica IPS e.max - uso em consultório odontológico”). Se ajustes tiverem sido feitos por desgaste, a
restauração tem que ser re-polida e glazeada novamente.
– A coroa deve ser cuidadosamente removida da coroa de pilar híbrida (inclusive a base).
– O local do implante deve ser enxaguado, com, p.ex., com Cervitec® Liquid (solução bucal anti-bacteriana,
contendo clorexidina) limpo e desinfetado.
– A restauração provisória é colocada.
A coroa de pilar híbrida deve ser colocada, intra-oralmente, sobre o implante,
para conferir e, se necessário, ajustar os contatos proximais. Nota: Nenhuma
inspeção occlusal funcional deve ser executada nesta fase.
Uma coroa pilar híbrida é atarraxada em seu lugar, com o parafuso indicado.
A oclusão e a articulação devem ser conferidas e, se necessário, devem ser
ajustadas com instrumentos de desgaste satisfatórios.
72
A geometria da coroa pilar híbrida (p.ex., ajuste, “anemia gengival”) deve
ser conferida em relação à gengiva.
A coroa de pilar híbrida (inclusive a base) deve ser cuidadosamente
removida.
Page 73

Abutment Solutions
Cimentação definitiva da base / estrutura de cerâmica
O preparo cuidadoso da superfície de união é exigido para a correta cimentação adesiva da base e da estrutura de
cerâmica. Os parágrafos seguintes mostram os passos exigidos. O procedimento é o mesmo para pilares híbridos e
coroas de pilares híbridos.
Pilares híbridos e coroas de pilares híbridas feitos de cerâmica vítrea IPS e.max dissilicato de lítio (LS2)
Estrutura de Cerâmica
(LS2)
Jateamento – Conforme as instruções do fabricante.
®
Ataque ácido
Condicionamento Da área de união com Monobond Plus durante 60 seg.
Cimentação adesiva Multilink Hybrid Abutment
Proteção da interface
de cimentação
Polimerização Aprox. 7 min. de auto-polimerização
Polimento da interface
de cimentação
Da área de união com IPS
Gel, durante 20 seg.
Ceramic Etching
Gel de glicerina, p.ex., Liquid Strip
Polidores convencionais para cerâmica / resina composta
Base
–
Pilares híbridos feitos com óxido de zircônio (ZrO2)
Estrutura de Cerâmica
(ZrO2)
Jateamento Conforme as instruções do fabricante. Conforme as instruções do fabricante.
Condicionamento Da área de união com Monobond Plus durante 60 seg.
Cimentação adesiva Multilink Hybrid Abutment
Proteção da interface
de cimentação
Polimerização Aprox. 7 min. de auto-polimerização
Polimento da interface
de cimentação
Gel de glicerina, p.ex., Liquid Strip
Polidores convencionais para cerâmica / resina composta
Base
Preparo da base
O seguinte procedimento deve ser observado no preparo da base para a cimentação com a estrutura de cerâmica:
– A base deve estar preparada de acordo com as instruções do fabricante.
– A base deve ser limpa em um banho ultra-som OU com limpador a vapor e, a seguir, seca com jato de ar.
– A base deve ser aparafusada no modelo análogo.
– A estrutura de cerâmica deve ser colocada na base e a posição relativa dos componentes marcada com uma
caneta impermeável. Isto facilita localizar a correta posição quando quando as partes são montadas, em uma
fase posterior.
73
Page 74

– O perfil de emergência da base não deve ser jateado ou modificado de nenhuma forma.
– Se o fabricante recomendar que as superfícies devam ser jateadas, o procedimento seguinte deve ser
observado:
– Aplicar cera de modelagem dura para proteger o perfil de emergência, porque este tipo de material é de fácil
remoção posteriormente.
– O orifício do parafuso também deve ser vedado com cera.
– A área de união deve ser jateada cuidadosamente, conforme as instruções do fabricante.
– Um instrumento e um limpador a vapor são usados para limpar. É importante remover,
meticulosamente, toda a cera.
– Depois de limpa, a superfície de união não deve ser contaminada de forma alguma, porque isto prejudicaria a
união.
– Monobond Plus deve ser aplicado na superfície de união limpa e deixado reagir durante 60 seg. Depois do tempo
de reação, qualquer resíduo retirado com jato de ar, que deve estar livre de água e óleo.
– O orifício do parafuso deve ser lacrado com uma bolinha de espuma ou com cera. A superfície de união não deve
ser contaminada neste processo.
Se o fabricante recomendar que as superfícies de união sejam jateadas, o
procedimento seguinte deve ser observado:
A base deve ser aparafusada no modelo análogo. A posição relativa da
estrutura de cerâmica deve ser marcada com uma caneta impermeável.
Opcional: A superfície de união deve ser jateada de modo
cuidadoso, de acordo com as instruções do fabricante.
Monobond Plus deve ser aplicado à superfície de união limpa e deixado para
reagir durante 60 seg. Após o tempo de reação, todo o resíduo remanescente deve ser secado com jato de ar, livre de água e de óleo.
74
Opcional: Aplicar cera para roteger o perfil de aparecimento.
Além disto, o orifício do parafuso deve ser vedado com cera.
Opcional: Limpando com um instrumento e um limpador a vapor.
É importante remover, meticulosamente, toda a cera.
O canal do parafuso deve ser lacrado com uma pelota de espuma ou com
cera. A superfície união não deve ser contaminada no processo.
Page 75

Preparando as estruturas cerâmicas feitas de IPS e.max di-silicato de lítio (LS2)
O procedimento seguinte deve ser observado na preparação da estrutura cerâmica para cementação sobre a base:
– A estrutura de cerâmica não deve ser jateada na preparação para a cimentação.
– A estrutura de cerâmica deve ser limpa em banho ultra-sônico ou com um limpador a vapor e, a seguir, seca com
jato de ar.
– Depois da limpeza, a ligação não deve ser contaminada de forma alguma, porque isto poderia impedir o laço de ligação.
– A cera pode ser aplicada para proteger as superfícies externas ou as áreas glazeadas.
– A superfície de união deve ser atacada com gel do ácido fluorídrico a 5% (IPS Ceramic Etching Gel) durante 20 seg.
– Subseqüentemente, a superfície de união é lavada completamente, sob água corrente e seca com ar, livre de
água e de óleo.
– Monobond Plus é aplicado à superfície de união limpa e deixado para reagir durante 60 seg. Depois deste tempo
de reação, qualquer resíduo deve ser dispersado com ar, livre de água e óleo.
As estruturas cerâmicas feitas de IPS e.max disilicato lítio (LS
) não devem ser jateadas.
2
Atacar com IPS Ceramic Etching Gel durante
20 seg. e, a seguir, enxaguar com água.
Monobond Plus deve ser deixado para reagir por
60 seg., e, a seguir, deve ser seco com jato de ar.
Preparando as estruturas cerâmicas feitas de óxido de zircônio (ZrO2)
O procedimento seguinte deve ser observado na preparação da estrutura cerâmica para a cimentação na base:
– Para facilitar sua manipulação, a estrutura de cerâmica é prendida a um dispositivo de fixação (p.ex., Microbrush)
antes de ser jateada.
– As superfícies exteriores da estrutura cerâmica são protegidas com uma camada de cera.
– Para melhor controle do procedimento de jateamento, a superfície de união pode ser cromatizada com um
marcador permanente.
– A superfície de união da estrutura cerâmica é limpa por meio de jateamento com Al2O3, 100 μm, 1 bar à distância
máxima de 1–2 cm do bocal de jateamento (As instruções do fabricante devem ser observadas).
– A estrutura de cerâmica deve ser limpa com vapor ou em um banho ultra-sônico.
– Depois da limpeza, a superfície de união não deverá ser contaminada de forma alguma, desde que isto pode
influenciar negativamente os resultados da união.
– Monobond Plus é aplicado na limpa superfície de união e deixado para reagir durante 60 seg. Depois deste
tempo de reação, qualquer resíduo remanescente deve ser eliminado com jato de ar, livre de água e óleo.
Opcional: Cera é aplicada para proteger as superfícies externas.
Opcional: A superfície de união é limpa por
com jateamento (As instruções do fabricante
devem ser observadas).
Monobond Plus é deixado para reagir durante
60 seg. e, a seguir, é seco com jato de ar.
75
Page 76

Cimentação com Multilink Hybrid Abutment
As seguintes instruções devem ser observadas no procedimento de cimentação:
– Os componentes condicionados e limpos (estrutura de cerâmica, base) são reservados para a cimentação.
– O procedimento de cimentação subseqüente deve ser executado rapidamente e sem interrupção.
O tempo de trabalho do “Multilink Hybrid Abutment” é, aprox., de 2 min., a 23 °C (± 1 °C).
– Como regra geral, uma ponta de mistura nova deve ser fixada ao Multilink Hybrid Abutment, antes de cada uso.
– Uma camada fina de “Multilink Hybrid Abutment” é diretamente aplicada da seringa de mistura à superfície
da base e à superfície de união da estrutura de cerâmica.
– A ponta de mistura é deixada na seringa do Multilink Hybrid Abutment até o próximo uso. O cimento
restante polimeriza na ponta de mistura e funciona como um selamento.
– A estrutura de cerâmica é colocada na base de tal modo que as marcações de posições permaneçam alinhadas.
– As partes são leve e uniformemente apertadas entre si e a posição relativa correta dos componentes é
conferida (entre base/estrutura cerâmica).
– Subseqüentemente, as partes são firmemente pressionadas por 5 seg.
– O excesso no orificio do parafuso deve ser cuidadosamente removido, p.ex., com um Microbrush ou escova,
usando movimentos rotatórios.
– Importante: O excesso não deve ser removido antes da cura ser iniciada, isto é, de 2 a 3 minutos
após a mistura. Para esta finalidade, uma instrumento de laboratório adequado (por ex., uma
LeCron) é usado e os componentes são mantidos na posição com suave pressão durante o processo).
– Gel de glicerina deve ser aplicado (p.ex. Liquid Strip) na linha de cimentação para prevenir a formação de
uma camada de inibição. O gel de glicerina deve ser aplicado cuidadosamente para evitar a mistura ou o
deslocamento do compósito. O gel deve ser mantido na junta de cimentação até que a polimerização seja
completada.
– Em seguida, o compósito de cimentação auto-polimeriza completamente em 7 min.
– Importante: Os componentes não devem ser movidos até que o “Multilink Hybrid Abutment”
tenha curado totalmente. Eles podem ser imobilizados com, p.ex., pinças revestidas de diamante.
– Após a conclusão da auto-polimerização, o gel de glicerina deve ser enxaguado com água.
– A linha de cimentação deve ser cuidadosamente polida com polidores de borracha, em baixa
velocidade (< 5.000 rpm) com o intuito de evitar o super-aquecimento.
– Qualquer resíduo de cimento, deixado no orifício do parafuso, deve ser removido com instrumentos giratórios
apropriados.
– A restauração deve ser limpa com vapor.
Os componentes limpos e condicionados são reservados e estão prontos para
a cimentação.
76
Uma nova ponta de mistura é conectada ao “Multilink Hybrid Abutment”,
antes de cada uso.
Page 77

Uma fina camada de “Multilink Hybrid Abutment” é diretamente aplicada
da seringa de mistura à superfície de união da base.
Uma camada fina de “Multilink Hybrid Abutment” é diretamente aplicada
da seringa de mistura à superfície de união da estrutura de cerâmica.
5 s
A estrutura de cerâmica é colocada na base de tal modo que
as marcações das posições ficam alinhadas.
O excesso no orifício do parafuso deve ser cuidadosamente removido,
p.ex. com um Microbrush ou uma escova, e usando movimentos rotatórios.
Gel de glicerina (ex., Liquid Strip) deve ser aplicado na linha de
cimentação para evitar a formação de uma camada de inibição.
Os componentes são unidos, usando uma pressão leve e constante. Em
seguida, os componentes devem ser firmemente unidos, durante 5 seg.
2-3
min
Importante: o excesso não deve ser removido antes de iniciar a cura,
isto é, 2 a 3 minutos após a mistura. Para esta finalidade, um instrumento laboratorial adequado (por ex., Le Cron) é usado e os componentes mantidos em posição com suave pressão durante o processo.
7
min
O compósito de cimentaçãp auto-polimeriza dentro de 7 min.
Importante: Os componentes não devem ser movidos até que auto-
polimerização seja completada. Os componentes devem ser imobilizados
durante este tempo.
77
Page 78

Após o processo de auto-polimerização, o gel de glicerina, o gel de glicerina
é enxaguado.
A linha de cimentação deve ser cautelosamente polida com polidores de borracha, em baixa velocidade (< 5,000 rpm), para evitar o
superaquecimento.
Qualquer resíduo de cimento no orifício do parafuso deve ser removido
com adequados instrumentos rotatórios. A base não deve ser danificada.
Pilar híbrido e Coroa de pilar híbrido terminados, após a cimentação.
78
Page 79

Observações adicionais
– “Multilink Hybrid Abutment” deve ser processado
em temperatura ambiente. Temperaturas mais
baixas (frio) temperaturas podem dificultar o propor-
cionamento e a mistura do material, e podem
prolongar os tempos de trabalho e de cura.
– O material ainda não polimerizado pode manchar a
roupa.
Advertências
– O contato do “Multilink Hybrid Abutment” com
pele/mucosa e olhos deve ser evitado. No estado
não polimerizado, “Multilink Hybrid Abutment”
causa leve irritação e leva a uma sensibilização aos
metacrilatos. As luvas médicas comerciais não pro-
vêem proteção contra o efeito de sensibilização dos
metacrilatos.
– Monobond Plus:
– Altamente inflamável
– Irritante
– O produto contém etanol
– O produto deve ser mantido longe de fontes de
ignição
– Virtual Extra Light Body Fast Set:
Se o material não curado entrar em contato com os
olhos, enxágue imediatamente, com bastante água.
Se a irritação persistir, um médico deverá ser consultado. Se o material entrar em contato com a pele,
lave com água e sabão
Vida útil e armazenamento
– Os componentes individuais do IPS e.max Abutment
Solution Cem Kit não devem ser usados após a indi-
cada data de validade.
– Vida útil: ver nota em seringas/frascos/cartuchos.
– Temperatura de armazenamento de Multilink Hybrid
Abutment, Monobond Plus, Liquid Strip e Virtual
Extra Light Body Fast Set: 2–28 °C.
– Monobond Plus e Liquid Strip: Fechar imediatamente
após o uso.
– Multilink Hybrid Abutment e Virtual Extra Light Body
Fast Set:
A ponta de mistura é deixada na seringa/cartucho,
após o uso. O material contido vai curar na ponta de
mistura, funcionando como um selamento.
Manter fora do alcance de crianças!
Somente para uso odontológico.
Este material foi fabricado somente para uso dental e deve ser manipulado
de acordo com as Instruções de Uso. O fabricante não é responsável pelos
danos causados por outros usos ou por manipulação incorreta. Além disto, o
usuário está obrigado a comprovar, antes do uso e sob sua responsabilidade,
se o material é compatível com a utilização desejada, principalmente quando
esta utilização não está indicada nestas Instruções de Uso. Descrições e
dados não constituem nenhum tipo de garantia e, por isto, não possuem
qualquer vinculação.
79
Page 80

Ivoclar Vivadent – worldwide
Ivoclar Vivadent AG
Bendererstrasse 2
9494 Schaan
Liechtenstein
Tel. +423 235 35 35
Fax +423 235 33 60
www.ivoclarvivadent.com
Ivoclar Vivadent Pty. Ltd.
1 – 5 Overseas Drive
P.O. Box 367
Noble Park, Vic. 3174
Australia
Tel. +61 3 9795 9599
Fax +61 3 9795 9645
www.ivoclarvivadent.com.au
Ivoclar Vivadent Ltda.
Alameda Caiapós, 723
Centro Empresarial Tamboré
CEP 06460-110 Barueri – SP
Brazil
Tel. +55 11 2424 7400
Fax +55 11 3466 0840
www.ivoclarvivadent.com.br
Ivoclar Vivadent Inc.
1-6600 Dixie Road
Mississauga, Ontario
L5T 2Y2
Canada
Tel. +1 905 670 8499
Fax +1 905 670 3102
www.ivoclarvivadent.us
Ivoclar Vivadent Shanghai
Trading Co., Ltd.
2/F Building 1, 881 Wuding Road,
Jing An District
200040 Shanghai
China
Tel. +86 21 6032 1657
Fax +86 21 6176 0968
www.ivoclarvivadent.com
Ivoclar Vivadent Marketing Ltd.
Calle 134 No. 7-B-83, Of. 520
Bogotá
Colombia
Tel. +57 1 627 3399
Fax +57 1 633 1663
www.ivoclarvivadent.co
Ivoclar Vivadent SAS
B.P. 118
F-74410 Saint-Jorioz
France
Tel. +33 4 50 88 64 00
Fax +33 4 50 68 91 52
www.ivoclarvivadent.fr
Ivoclar Vivadent GmbH
Dr. Adolf-Schneider-Str. 2
D-73479 Ellwangen, Jagst
Germany
Tel. +49 7961 889 0
Fax +49 7961 6326
www.ivoclarvivadent.de
Wieland Dental + Technik
GmbH & Co. KG
Schwenninger Strasse 13
D-75179 Pforzheim
Germany
Tel. +49 7231 3705 0
Fax +49 7231 3579 59
www.wieland-dental.com
Ivoclar Vivadent Marketing
(India) Pvt. Ltd.
503/504 Raheja Plaza
15 B Shah Industrial Estate
Veera Desai Road, Andheri (West)
Mumbai, 400 053
India
Tel. +91 22 2673 0302
Fax +91 22 2673 0301
www.ivoclarvivadent.in
Ivoclar Vivadent s.r.l.
Via Isonzo 67/69
40033 Casalecchio di Reno (BO)
Italy
Tel. +39 051 6113555
Fax +39 051 6113565
www.ivoclarvivadent.it
Ivoclar Vivadent K.K.
1-28-24-4F Hongo
Bunkyo-ku
Tokyo 113-0033
Japan
Tel. +81 3 6903 3535
Fax +81 3 5844 3657
www.ivoclarvivadent.jp
Ivoclar Vivadent Ltd.
12F W-Tower, 1303-37
Seocho-dong, Seocho-gu,
Seoul 137-855
Republic of Korea
Tel. +82 2 536 0714
Fax +82 2 596 0155
www.ivoclarvivadent.co.kr
Ivoclar Vivadent S.A. de C.V.
Av. Insurgentes Sur No. 863,
Piso 14, Col. Napoles
03810 México, D.F.
México
Tel. +52 55 5062 1000
Fax +52 55 5062 1029
www.ivoclarvivadent.com.mx
Ivoclar Vivadent BV
De Fruittuinen 32
2132 NZ Hoofddorp
Netherlands
Tel. +31 23 529 3791
Fax +31 23 555 4504
www.ivoclarvivadent.com
Ivoclar Vivadent Ltd.
12 Omega St, Rosedale
PO Box 303011 North Harbour
Auckland 0751
New Zealand
Tel. +64 9 914 9999
Fax +64 9 914 9990
www.ivoclarvivadent.co.nz
Ivoclar Vivadent Polska Sp.
z o.o.
Al. Jana Pawla II 78
00-175 Warszawa
Poland
Tel. +48 22 635 5496
Fax +48 22 635 5469
www.ivoclarvivadent.pl
Ivoclar Vivadent Marketing Ltd.
Prospekt Andropova 18 korp. 6/
office 10-06
115432 Moscow
Russia
Tel. +7 499 418 0300
Fax +7 499 418 0310
www.ivoclarvivadent.ru
Ivoclar Vivadent Marketing Ltd.
Qlaya Main St.
Siricon Building No.14, 2nd Floor
Office No. 204
P.O. Box 300146
Riyadh 11372
Saudi Arabia
Tel. +966 11 293 8345
Fax +966 11 293 8344
www.ivoclarvivadent.com
Ivoclar Vivadent Pte. Ltd.
171 Chin Swee Road
#02-01 San Centre
Singapore 169877
Tel. +65 6535 6775
Fax +65 6535 4991
www.ivoclarvivadent.com
Ivoclar Vivadent S.L.U.
C/ Ribera del Loira nº 46, 5ª planta
28042 Madrid
Spain
Tel. +34 913 757 820
Fax +34 913 757 838
www.ivoclarvivadent.es
Ivoclar Vivadent AB
Dalvägen 14
S-169 56 Solna
Sweden
Tel. +46 8 514 939 30
Fax +46 8 514 939 40
www.ivoclarvivadent.se
Ivoclar Vivadent Liaison Office
: Tesvikiye Mahallesi
Sakayik Sokak
Nisantas’ Plaza No:38/2
Kat:5 Daire:24
34021 Sisli – Istanbul
Turkey
Tel. +90 212 343 0802
Fax +90 212 343 0842
www.ivoclarvivadent.com
Ivoclar Vivadent Limited
Ground Floor Compass Building
Feldspar Close
Warrens Business Park
Enderby
Leicester LE19 4SE
United Kingdom
Tel. +44 116 284 7880
Fax +44 116 284 7881
www.ivoclarvivadent.co.uk
Ivoclar Vivadent, Inc.
175 Pineview Drive
Amherst, N.Y. 14228
USA
Tel. +1 800 533 6825
Fax +1 716 691 2285
www.ivoclarvivadent.us
Date information prepared:
2013-08-06/REV1
649681/WE1
Printed in Liechtenstein
© Ivoclar Vivadent AG, Schaan, Liechtenstein
 Loading...