


User Guide
Stereo Receiver with Bluetooth
NS-STR514
Before using your new product, please read these instructions to prevent any damage.

Contents
Introduction . . . . . . . . . . . . . . . . . . . . . . . . . . . . . . . . . . . . . . . . . . . . . . . . . . . . .1
Safety information . . . . . . . . . . . . . . . . . . . . . . . . . . . . . . . . . . . . . . . . . . . . . . .1
Electric shock warning . . . . . . . . . . . . . . . . . . . . . . . . . . . . . . . . . . . . . . . . . . . 1 Ventilation . . . . . . . . . . . . . . . . . . . . . . . . . . . . . . . . . . . . . . . . . . . . . . . . . . . . . . 1 Power cord . . . . . . . . . . . . . . . . . . . . . . . . . . . . . . . . . . . . . . . . . . . . . . . . . . . . . . 1 Important safety instructions . . . . . . . . . . . . . . . . . . . . . . . . . . . . . . . . . . . . . 1
Features . . . . . . . . . . . . . . . . . . . . . . . . . . . . . . . . . . . . . . . . . . . . . . . . . . . . . . . . .3
Front controls . . . . . . . . . . . . . . . . . . . . . . . . . . . . . . . . . . . . . . . . . . . . . . . . . . . 3 Display . . . . . . . . . . . . . . . . . . . . . . . . . . . . . . . . . . . . . . . . . . . . . . . . . . . . . . . . . . 4 Back . . . . . . . . . . . . . . . . . . . . . . . . . . . . . . . . . . . . . . . . . . . . . . . . . . . . . . . . . . . . . 4 Remote control . . . . . . . . . . . . . . . . . . . . . . . . . . . . . . . . . . . . . . . . . . . . . . . . . . 5 Package contents . . . . . . . . . . . . . . . . . . . . . . . . . . . . . . . . . . . . . . . . . . . . . . . . 5
Setting up your receiver . . . . . . . . . . . . . . . . . . . . . . . . . . . . . . . . . . . . . . . . . .5
Finding a location for your receiver . . . . . . . . . . . . . . . . . . . . . . . . . . . . . . . 5 Connecting devices . . . . . . . . . . . . . . . . . . . . . . . . . . . . . . . . . . . . . . . . . . . . . . 6 Installing batteries . . . . . . . . . . . . . . . . . . . . . . . . . . . . . . . . . . . . . . . . . . . . . . . 9 Using the remote control . . . . . . . . . . . . . . . . . . . . . . . . . . . . . . . . . . . . . . . . 9
Using your receiver . . . . . . . . . . . . . . . . . . . . . . . . . . . . . . . . . . . . . . . . . . . . |
10 |
Listening to audio on your receiver . . . . . . . . . . . . . . . . . . . . . . . . . . . . . . 10 Adjusting the tone . . . . . . . . . . . . . . . . . . . . . . . . . . . . . . . . . . . . . . . . . . . . . . 10 Adjusting the sound balance . . . . . . . . . . . . . . . . . . . . . . . . . . . . . . . . . . . . 10 Listening to the radio . . . . . . . . . . . . . . . . . . . . . . . . . . . . . . . . . . . . . . . . . . . 11 Recording . . . . . . . . . . . . . . . . . . . . . . . . . . . . . . . . . . . . . . . . . . . . . . . . . . . . . . 12 Using the sleep timer . . . . . . . . . . . . . . . . . . . . . . . . . . . . . . . . . . . . . . . . . . . 13 Adjusting the display brightness . . . . . . . . . . . . . . . . . . . . . . . . . . . . . . . . 13 Using a Bluetooth device . . . . . . . . . . . . . . . . . . . . . . . . . . . . . . . . . . . . . . . . 13
Maintaining . . . . . . . . . . . . . . . . . . . . . . . . . . . . . . . . . . . . . . . . . . . . . . . . . . . . 14 Troubleshooting . . . . . . . . . . . . . . . . . . . . . . . . . . . . . . . . . . . . . . . . . . . . . . . 14 Specifications . . . . . . . . . . . . . . . . . . . . . . . . . . . . . . . . . . . . . . . . . . . . . . . . . . 15 Trademarks and Licenses . . . . . . . . . . . . . . . . . . . . . . . . . . . . . . . . . . . . . . . 16
Legal notices . . . . . . . . . . . . . . . . . . . . . . . . . . . . . . . . . . . . . . . . . . . . . . . . . . . 16
FCC Statement . . . . . . . . . . . . . . . . . . . . . . . . . . . . . . . . . . . . . . . . . . . . . . . . . 16 Canada ICES-003 statement . . . . . . . . . . . . . . . . . . . . . . . . . . . . . . . . . . . . . 16
One-year limited warranty - Insignia. . . . . . . . . . . . . . . . . . . . . . . . . . . . . 17
ii |
www.insigniaproducts.com |

Insignia NS-STR514
Stereo Receiver with Bluetooth
Introduction
Power cord
Caution
Congratulations on your purchase of a high-quality Insignia product. Your NS-STR514 represents the state of the art in stereo receiver design and is designed for reliable and trouble-free performance.
Safety information
Electric shock warning
CAUTION
Risk of Electric Shock
Do Not Open
Warning
To reduce the risk of electric shock, do not remove the cover or back. There are no user-serviceable parts inside. Refer servicing to qualified service personnel.
This lightning flash with arrowhead symbol within an equilateral triangle is intended to alert the user to the
presence of uninsulated dangerous voltage within your receiver’s enclosure that may be of sufficient magnitude to constitute a risk of electric shock to persons.
The exclamation point within an equilateral triangle is intended to alert the user to the presence of important operating and maintenance (servicing) instructions in the literature accompanying your receiver.
Warning
To prevent fire or electric shock hazard, do not expose this receiver to rain or moisture.
Caution
Your receiver should not be exposed to water (dripping or splashing) and no objects filled with liquids, such as vases, should be placed on your receiver.
Ventilation
Caution
Do not block any ventilation openings. Install in accordance with these instructions.
Slots and openings in the cabinet are provided for ventilation and to ensure reliable operation of your receiver and to protect it from over-heating.
The openings should never be blocked by placing your receiver on a bed, sofa, rug, or other similar surface. This receiver should not be placed in a built-in installation such as a bookcase or rack unless correct ventilation is provided or these instructions have been adhered to.
We recommend that most appliances be placed upon a dedicated circuit—a single outlet circuit which powers only that appliance and has no additional outlets or branch circuits. Check the specification page of this manual for power requirements.
Do not overload wall outlets. Overloaded wall outlets, loose or damaged wall outlets, extension cords, frayed power cords, or damaged or cracked wire insulation are dangerous. Any of these conditions could result in electric shock or fire.
Periodically examine your receiver cord, and if its appearance indicates damage or deterioration, unplug it, discontinue use of your receiver, and have the cord replaced with an exact replacement part by an authorized service provider.
Protect the power cord from physical or mechanical abuse, such as being twisted, kinked, pinched, closed in a door, or walked upon. Pay particular attention to plugs, wall outlets, and the point where the cord exits your receiver.
The unit remains connected to AC power as long as it is plugged into the wall outlet, even if the unit has been turned off. To disconnect power from the outlet, pull out the plug. When installing your receiver, make sure that the plug is easily accessible.
Important safety instructions
1 Read these instructions.
2 Keep these instructions.
3 Heed all warnings.
4 Follow all instructions.
5 Do not use this apparatus near water.
6 Clean only with dry cloth.
7Do not block any ventilation openings. Install in accordance with the manufacturer's instructions.
8Do not install near any heat sources such as radiators, heat registers, stoves, or other apparatus (including amplifiers) that produce heat.
9Do not defeat the safety purpose of the polarized or grounding-type plug. A polarized plug has two blades with one wider than the other. A grounding type plug has two blades and a third grounding prong. The wide blade or the third prong are provided for your safety. If the provided plug does not fit into your outlet, consult an electrician for replacement of the obsolete outlet.
10Protect the power cord from being walked on or pinched particularly at plugs, convenience receptacles, and the point where they exit from the apparatus.
11Only use attachments/accessories specified by the manufacturer.
www.insigniaproducts.com |
1 |

Insignia NS-STR514 Stereo Receiver with Bluetooth
12Use only with the cart, stand, tripod, bracket, or table specified by the manufacturer, or sold with the apparatus. When a cart is used, use caution when moving the cart/apparatus combination to avoid injury from tip-over.
13Unplug this apparatus during lightning storms or when unused for long periods of time.
14Refer all servicing to qualified service personnel. Servicing is required when the apparatus has been damaged in any way, such as power-supply cord or plug is damaged, liquid has been spilled or objects have fallen into the apparatus, the apparatus has been exposed to rain or moisture, does not operate normally, or has been dropped.
15To reduce the risk of fire or electric shock, do not expose this device to rain, moisture, dripping, or splashing, and no objects filled with liquids, such as vases, shall be placed on it.
16An apparatus with a three-prong, grounding-type plug is a Class I apparatus, which needs to be grounded to prevent possible electric shock. Make sure that you connect this Class I device to a grounding-type, three-prong outlet.
17The wall plug is the disconnecting device. The plug must remain readily operable.
18Batteries should not be exposed to excessive heat such as sunshine, fire, or the like.
2 |
www.insigniaproducts.com |
Insignia NS-STR514 Stereo Receiver with Bluetooth
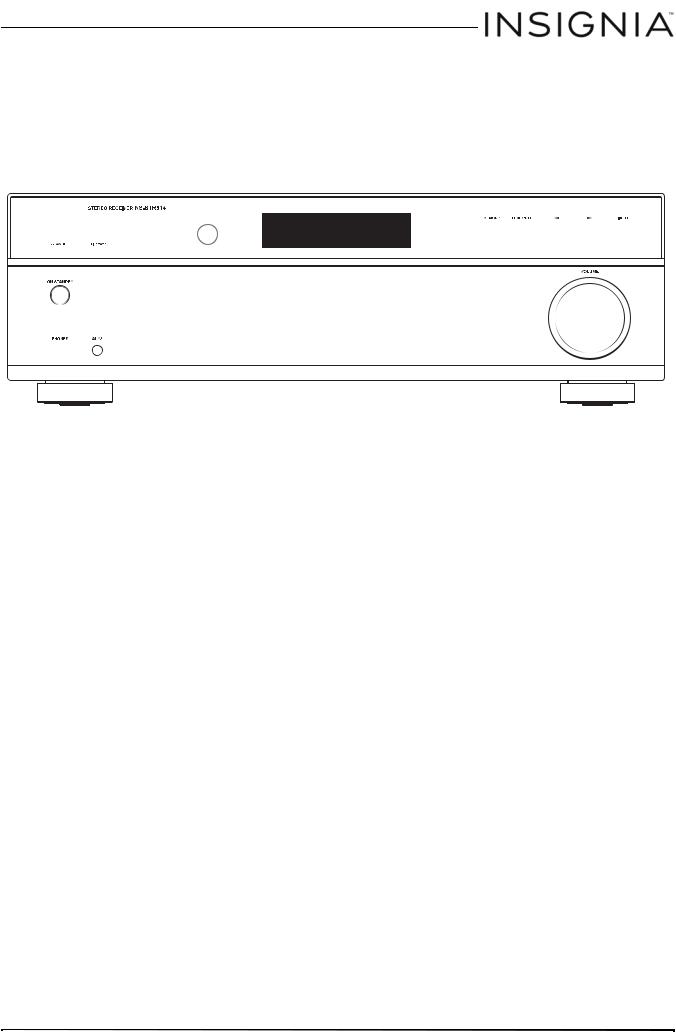
Features
Front controls
# |
Item |
Description |
1 |
ON/STANDBY button |
Press to turn on your stereo receiver or to put |
|
|
it in standby mode. |
|
STANDBY indicator |
|
2 |
Lights red when your stereo receiver is in |
|
|
|
standby mode. |
3 |
Bluetooth indicator |
• Blinks when your stereo receiver is in |
|
|
|
|
|
pairing mode and “PAIRING” is shown on |
|
|
the display. |
|
|
• Lights when your stereo receiver is |
|
|
connected via Bluetooth, and |
|
|
“CONNECTED” is shown on the display. |
|
|
|
4 |
Remote sensor |
Receives the signal from the remote control. |
5 |
Display |
Provides information about the receiver. |
|
MEMORY button |
|
6 |
Press to save a station preset. |
|
|
|
Press and hold to automatically search for |
|
|
FM stations and store them in memory. |
7 |
TUNE/PRESET button |
Press to toggle between tune and preset |
|
|
mode. |
# |
Item |
|
Description |
8 |
/ |
buttons |
Does one of the following, depending on the |
|
|
|
mode selected: |
|
|
|
• In TUNE mode, tunes the receiver up or |
|
|
|
down or searches for the next or previous |
|
|
|
station. See page 11. |
|
|
|
• In MEMO mode, stores stations to the |
|
|
|
selected preset number. See page 11. |
|
|
|
• In PRESET mode, selects the preset station |
|
|
|
you want. See page 12. |
|
|
|
• In BLUETOOTH playback mode, skips or |
|
|
|
searches forward or back. See page 14. |
9 |
INPUT button |
Press to cycle through the available input |
|
|
|
|
options. Options are in the following order: |
|
|
|
FM>AM>CD>AUX 1>AUX 2>AUX 3>BT |
|
|
|
(Bluetooth) AUDIO>. |
|
|
|
|
10 |
Headphone (PHONES) jack |
Plug 1/4” stereo headphones into this jack. |
|
11 |
AUX3 jack |
Connect a portable audio device, such as an |
|
|
|
|
MP3 player, to this jack. |
|
|
|
|
12 |
VOLUME control knob |
Turn to increase or decrease the volume. |
|
|
|
|
|
www.insigniaproducts.com |
3 |

Insignia NS-STR514 Stereo Receiver with Bluetooth
Display
# |
Item |
Description |
1 |
Information display |
Shows input, frequency, volume level, and operating |
|
|
information. |
|
|
|
2 |
Headphone |
Lights when in Headphone mode and headphones are |
|
indicator |
connected. |
3 |
ST(EREO) indicator |
Lights when in stereo mode. |
|
|
|
4 |
TUNE indicator |
Lights when tuned to a radio station. |
5 |
SLEEP indicator |
Lights when the sleep timer is active. |
|
|
|
6 |
PRESET indicator |
Lights to indicate that the receiver will scan through |
|
|
preset radio channels when tuning. |
|
|
|
# |
Item |
Description |
7 |
MEM (station |
Blinks when setting preset channels. |
|
memory) indicator |
|
8 |
Preset station |
Shows preset number selected. |
|
indicator |
|
|
|
|
Back
|
|
|
|
|
|
|
|
|
|
|
|
|
|
|
|
|
|
|
|
|
|
|
|
|
|
|
|
|
|
|
|
|
|
|
|
|
|
|
|
|
|
|
|
|
|
|
|
|
|
|
|
|
|
|
|
|
|
|
|
|
|
|
|
|
|
|
|
|
|
|
|
|
|
|
|
|
|
|
|
|
|
|
|
|
|
|
|
|
|
|
|
|
|
|
|
|
|
|
|
|
|
|
|
|
|
|
|
|
|
|
|
|
|
|
|
|
|
|
|
|
|
|
|
|
|
|
|
|
|
|
|
|
|
|
|
|
|
|
|
|
|
|
|
|
|
|
|
|
|
|
|
|
|
|
|
|
|
|
|
|
|
|
|
|
|
|
|
|
|
|
|
|
|
|
|
|
|
|
|
|
|
|
|
|
|
|
|
|
|
|
|
|
|
|
|
|
|
|
|
|
|
|
|
|
|
|
|
|
|
|
|
|
|
|
|
|
|
|
|
|
|
|
|
|
|
|
|
|
|
|
|
|
|
|
|
|
|
|
|
|
|
|
|
|
|
|
|
|
|
|
|
|
|
|
|
|
|
|
|
|
|
|
|
|
|
|
|
|
|
|
|
|
|
|
|
|
|
|
|
|
|
|
|
|
|
|
|
|
|
|
|
|
|
|
|
|
|
|
|
|
|
|
|
|
|
|
|
|
|
|
|
|
|
|
|
|
|
|
|
|
|
|
|
|
|
|
|
|
|
|
|
|
|
|
|
|
|
|
|
|
|
|
|
|
|
|
|
|
|
|
|
|
|
|
|
|
|
|
|
|
|
|
|
|
|
|
|
|
|
|
|
|
|
|
|
|
# |
|
Item |
Description |
|
|
|
|
|
|
|
|
|
||||||||||||||||
1 |
|
AC power cord |
Plug this cord into an AC power outlet. |
|
|
|
|
|
|
|
|
|
||||||||||||||||
|
|
|
|
|
|
|
|
|
|
|
|
|
|
|
|
|
|
|
|
|
|
|
||||||
2 |
|
AM and FM |
Connect the AM and FM antennas to these jacks. |
|
|
|
|
|
|
|
|
|
||||||||||||||||
|
|
|
antenna jacks |
|
|
|
|
|
|
|
|
|
|
|
|
|
|
|
|
|
|
|||||||
3 |
|
AUX IN jacks |
Connect an external sound source (such as a CD, |
|
|
|
|
|
|
|
|
|
||||||||||||||||
|
|
|
|
|
|
|
|
|
|
|
DVD/Blu-ray player, or TV) to these jacks. |
|
|
|
|
|
|
|
|
|
||||||||
4 |
|
AUX OUT jacks |
Connect audio recording devices to these jacks to record |
|
|
|
|
|
|
|
|
|
||||||||||||||||
|
|
|
|
|
|
|
|
|
|
|
audio played through your receiver. |
|
|
|
|
|
|
|
|
|
||||||||
5 |
|
Speaker terminals |
Connect speakers to these terminals. |
|
|
|
|
|
|
|
|
|
||||||||||||||||
|
|
|
|
|
|
|
|
|
|
|
|
|
|
|
|
|
|
|
|
|
|
|
|
|
|
|
|
|
4 |
www.insigniaproducts.com |
 Loading...