


User’s Guide
 K E E P I N G T H E
 W O R L D
 S E W I N G ™
Downloaded from www.Manualslib.com manuals search engine
This houshold sewing machine is designed to comply with IEC/EN 60335-2-28 and UL1594
IMPORTANT SAFETY INSTRUCTIONS
When using an electrical appliance, basic safety precautions should always be followed, including the following:
Read all instructions before using this household sewing machine.
DANGER - To reduce the risk of electric shock:
•A sewing machine should never be left unattended when plugged in. Always unplug this sewing machine from the electric outlet immediately after using and before cleaning.
•Always unplug before relamping. Replace bulb with same type rated 15 Watt (for model 116) or 5 Watts (for model 118 and 122).
WARNING - To reduce the risk of burns, Àre, electric shock, or injury to persons:
•This sewing machine is not intended for use by persons (including children) with reduced physical, sensory or mental capabilities, or lack of experience and knowledge, unless they have been given supervision or instruction concerning use of the sewing machine by a person responsible for their safety.
•Children should be supervised to ensure that they do not play with the sewing machine.
•Use this sewing machine only for its intended use as described in this manual. Use only attachments recommended by the manufacturer as contained in this manual.
•Never operate this sewing machine if it has a damaged cord or plug, if it is not working properly, if it has been dropped or damaged, or dropped into water. Return the sewing machine to the nearest authorized dealer or service center for examination, repair, electrical or mechanical adjustment.
•Never operate the sewing machine with any air openings blocked. Keep ventilation openings of the sewing machine and foot controller free from the accumulation of lint, dust, and loose cloth.
•Keep Àngers away from all moving parts. Special care is required around the sewing machine needle.
•Always use the proper needle plate. The wrong plate can cause the needle to break.
•Do not use bent needles.
•Do not pull or push fabric while stitching. It may deÁect the needle causing it to break.
•Wear safety glasses.
•Switch the sewing machine off (“0”) when making any adjustment in the needle area, such as threading needle, changing needle, threading bobbin, or changing presser foot, etc.
•Always unplug sewing machine from the electrical outlet when removing covers, lubricating, or when making any other user servicing adjustments mentioned in the instruction manual.
•Never drop or insert any object into any opening.
•Do not use outdoors.
•Do not operate where aerosol (spray) products are being used or where oxygen is being administrated.
•To disconnect, turn all controls to the off (“0”) position, then remove plug from outlet.
•Do not unplug by pulling on cord. To unplug, grasp the plug, not the cord.
SAVETHESE INSTRUCTIONS
Downloaded from www.Manualslib.com manuals search engine
Table of Contents |
|
|
Overview ........................................................ |
|
2 |
Extension Table............................................. |
|
3 |
Free-arm sewing............................................ |
|
3 |
Standard Accessories and Storage .............. |
|
4 |
Getting ready to sew |
5-20 |
|
Connecting the Power Supply..................... |
|
5 |
Adjusting the Sewing Speed ........................ |
|
6 |
Needle up/down........................................... |
|
6 |
Sewing Guide Reference Chart................... |
|
7 |
Reverse Lever................................................. |
|
8 |
Presser Foot Pressure Dial .......................... |
|
8 |
Lowering the Feed Teeth ............................. |
|
8 |
Raising and Lowering the Presser Foot |
......9 |
|
Changing the Presser Foot .......................... |
|
9 |
Changing the Needle .................................. |
|
10 |
Placing the thread spool |
|
|
on the spool pin .......................................... |
|
11 |
Removing the bobbin................................. |
|
11 |
Bobbin Winding .......................................... |
|
12 |
Placing the bobbin ...................................... |
|
13 |
Threading the Machine .............................. |
|
14 |
Needle threader ........................................... |
|
15 |
Bringing up the Bobbin Thread................ |
|
16 |
Stitches.......................................................... |
|
17 |
Stitch Selection ............................................ |
|
18 |
Stitch Length................................................ |
|
18 |
Adjusting stretch stitch balance ................ |
|
19 |
Stitch Width ................................................. |
|
19 |
Variable needle position ............................. |
|
19 |
Balancing Needle Thread Tension ........... |
|
20 |
Basic Sewing |
21-23 |
Straight Stitch Sewing................................. |
21 |
Finishing sewing.......................................... |
22 |
Seam Guides on the Needle Plate ............ |
23 |
Pivoting......................................................... |
23 |
Utility Stitches |
24-38 |
Basic Zigzag ................................................ |
24 |
Three-step Zigzag ...................................... |
24 |
Seam and Overcast .................................... |
24 |
Reinforced Straight Stitch ......................... |
25 |
Button Sewing ............................................ |
25 |
Automatic Buttonhole............................... |
26 |
Corded Buttonhole .................................... |
30 |
Manual Buttonhole .................................... |
31 |
Sewing Zipper............................................. |
33 |
Blind Hem................................................... |
37 |
Non-stick Glide Foot H............................ |
38 |
Quilting Guide............................................ |
38 |
Presser Feet only model 122 38-39 |
|
Transparent Foot B.................................... |
38 |
Gathering Foot ........................................... |
39 |
Quilter’s 1/4” Piecing Foot ...................... |
39 |
Care and Maintenance 40-42 |
|
Cleaning the Hook Assembly area |
|
and Feed Teeth........................................... |
40 |
Replacing the Bobbin Case....................... |
41 |
Replacing the Light Bulb .......................... |
41 |
Troubleshooting ......................................... |
42 |
1
Downloaded from www.Manualslib.com manuals search engine

7 |
6 |
|
|
|
|
|
|
Overview |
|
8 |
|
|
5 |
4 |
3 |
2 |
1 |
1. |
Bobbin stop |
|
|
2. |
Bobbin spindle |
||||||
|
|
|
|
|
|
|
|
||
9 |
|
|
|
|
|
|
|
3. |
Hole for extra spool pin |
|
|
|
|
|
|
|
|
4. |
Spool holder |
10 |
|
|
|
|
|
|
|
5. |
Spool pin |
|
|
|
|
|
|
|
6. |
Thread guide for bobbin winding |
|
11 |
|
|
|
|
|
|
|
||
|
|
|
|
|
|
|
7. |
Thread take-up lever |
|
|
|
|
|
|
|
|
23 |
||
|
|
|
|
|
|
|
8. |
Presser foot pressure dial |
|
|
|
|
|
|
|
|
|
||
|
|
|
|
|
|
|
|
9. |
Face plate |
|
|
|
|
|
|
|
|
10. |
Thread cutter |
|
|
|
|
|
|
|
|
11. |
Needle threader |
|
|
|
|
|
|
|
|
12. |
Needle plate |
|
|
|
|
|
|
|
22 |
13. |
Extension table (Accessory |
|
|
|
|
|
|
|
21 |
|
storage) |
|
|
|
|
|
|
|
14. |
Bobbin cover plate |
|
|
|
|
|
|
|
|
|
15. |
Bobbin cover plate release button |
|
|
|
|
|
|
|
|
16. |
Thread tension dial |
|
|
|
|
|
|
|
|
17. |
Needle up/down button (only |
|
16 |
17 |
18 |
19 |
20 |
|
|
|
model 118 and 122) |
|
|
|
18. |
Speed control slider (only model |
|||||
|
|
|
|
|
|
|
|
||
|
|
|
|
|
|
26 |
|
118 and 122) |
|
|
|
|
27 |
|
|
19. |
Reverse stitch lever |
||
|
|
|
|
|
|
|
20. |
Sewing Guide |
|
|
|
|
|
|
|
25 |
|
||
|
|
|
|
|
|
|
21. |
Stitch length dial |
|
|
|
|
|
|
|
|
|
||
|
|
|
28 |
|
|
24 |
|
22. |
Stitch selection dial |
12 |
|
|
|
|
|
|
23. |
Stitch width dial |
|
|
|
|
|
|
|
|
24. |
Presser foot |
|
|
13 |
14 15 |
|
|
|
|
|
||
|
|
|
|
|
|
25. |
Needle |
||
|
29 |
|
|
|
|
|
|
26. |
Needle clamp screw |
|
|
|
|
|
|
|
27. |
Ankle to hold foot |
|
|
|
|
|
|
|
|
|
||
|
|
|
|
|
|
|
|
28. |
Thumbscrew |
30 |
|
|
|
|
|
37 |
|
29. |
Carrying handle |
|
|
|
|
|
36 |
|
30. |
Handwheel |
|
|
|
|
|
|
|
31. |
Power switch, Emerald™ 118/122 |
||
|
|
|
|
|
|
|
|
31.a Power switch,Emerald 116 |
|
|
|
|
|
|
|
35 |
|
32. Foot control socket (only model |
|
|
|
|
|
|
|
|
|
118 and 122) |
|
|
|
|
|
|
34 |
|
|
|
|
|
|
|
|
|
|
|
33. |
Machine socket, model 118 and |
|
|
|
|
|
|
|
|
|
||
31 |
|
|
|
|
|
|
|
|
122 |
|
|
|
|
|
|
|
33.a Machine socket, model 116 |
||
32 |
33 |
|
|
|
|
|
|
34. |
Drop feed lever |
|
|
|
|
|
|
|
|||
|
|
|
31.a |
|
|
|
35. |
Free-arm |
|
|
|
|
33.a |
|
|
36. |
Buttonhole lever |
||
|
|
|
|
|
|
|
|||
2 |
|
|
|
|
|
|
|
37. |
Presser foot lift |
|
|
|
|
|
|
|
|
|
|
Downloaded from www.Manualslib.com manuals search engine

ExtensionTable
To remove
Hook your Àngers on the bottom left of the extension table and pull it to the left.
Free-arm sewing
For stitching sleeves, waistbands, pant legs or any other tubular garments. For darning socks or mending knees or elbows.
|
|
To attach |
|
1 |
2 |
Slide the extension table on and insert |
|
the pins into the holes and push the |
|||
|
|
extension table to snap it in place. |
|
|
|
1 |
Pin |
|
|
2 |
Hole |
Some fabrics have a lot of excess dye which can cause discoloration on other fabric but also on your sewing machine. This discoloring may be very difÀcult or impossible to remove.
Fleece and denim fabric in especially red and blue often contain a lot of excess dye.
If you suspect that your fabric/ready-to-wear garment contains a lot of excess dye, always pre-wash it before sewing to avoid the discoloring.
3
Downloaded from www.Manualslib.com manuals search engine

1  2
2  3
3  4
4
5  6
6  7
7  8
8 
9 |
10 |
|
11 |
12 |
|
13 |
14 |
|
|
||
|
|
|
|
15 |
|
|
16 |
|
|
|
|
|
|
|
18 |
17 |
|
|
|
19 |
|
|
20 |
21 |
|
|
22 |
|
|
|
23
4
Standard Accessories and
Storage
1.Utility Foot A
2.Utility Foot B
3.Buttonhole Foot C
4.Adjustable Blind Hem Foot
5.Zipper Foot E
6.Non-stick Glide Foot H
7.Edging Foot J
8.Automatic Buttonhole Foot R
9.Transparent Foot B (only model 122)
10.Quilter’s 1/4” Piecing Foot P (only model 122)
11.Gathering Foot (only model 122)
12.Self-adhesive Glide Plates
13.Edge/quilting Guide
14.Needles
15.Bobbins
16.Screwdriver
17.Lint brush
18.Seam ripper (Buttonhole opener)
19.Spool holder (Large)
20.Spool holder (Small)
21.Vertical spool pin
22.Felt cushion
23.Accessory storage (Open the extension table for storing accessories.)
Downloaded from www.Manualslib.com manuals search engine

For Emerald 118 and 122
1 6
5
3
4 |
2 |
For Emerald 116
6
1 5
4 |
2, 3 |
|
For the USA and Canada:
This sewing machine has a polarized plug (one blade wider than the other). To reduce the risk of electric shock, this plug is intended to Àt in a polarized outlet only one way. If the plug does not Àt fully in the outlet, reverse the plug. If it still does not Àt, contact a qualiÀed electrician to install the proper outlet.
DO NOT modify the plug in any way!
Getting ready to sew
Connecting the Power Supply
Turn the power switch off.
Insert the foot control plug into the machine socket.
Insert the power supply plug into the machine and the wall outlet.
Turn the power switch on.
1Power switch
2Foot control plug
3Machine plug
4Machine socket
5Power supply plug
6Wall outlet
NOTE: Before connecting to the power supply, make sure the voltage shown on the machine conforms to your electrical power.
The foot control model that has to be used for each sewing machine model are shown in the table below.
Foot control |
Model |
|
|
|
|
Model |
Emerald |
120V or |
21361 |
122 and |
230 - 240V |
|
118 |
|
|
|
|
Model |
Emerald |
230 - 240V |
YC-190 |
116 |
|
|
|
|
Model |
Emerald |
120V |
YC-482 |
116 |
|
|
|
|
5
Downloaded from www.Manualslib.com manuals search engine

For model 118 and 122
For model 116
 1
1
6
Adjusting the Sewing Speed
You can control the sewing speed in two ways; with the speed control slide or with the foot control.
Speed control slide (model 118 and 122)
With the speed control slide, you can change the sewing speed to suit your needs. The slide limits how fast you can sew.
To increase the sewing speed, slide the bar to the right.
To reduce the sewing speed, slide the bar to the left.
Foot control
You can control the sewing speed by using the foot control. The harder you press the foot control, the faster the machine sews.
If you press the foot control all the way, the machine runs at the maximum speed set by the speed control slide.
Needle up/down (model 118 and
122)
Touch this button to move the needle down or up. The setting of the needle stop position is changed at the same time.
1 Needle up/down
Downloaded from www.Manualslib.com manuals search engine

|
|
|
|
|
|
|
Sewing Guide Reference Chart |
|
|
|
|
|
|
|
Consult the Sewing Guide Reference Chart |
|
|
|
|
|
|
|
for the fast easy way to select the best |
|
|
|
|
|
|
|
stitch, stitch length, stitch width, thread |
|
|
|
|
|
|
|
tension, presser foot and presser foot |
|
|
|
|
|
|
|
pressure for your sewing technique and |
|
|
|
|
|
|
|
fabric. |
|
|
|
|
|
|
|
Look in the column for your fabric type: |
|
|
|
|
|
|
|
WOVEN FABRICS: for stable fabrics |
|
|
|
|
|
|
|
that have no stretch. Usually woven. |
|
|
|
|
|
|
|
STRETCH FABRICS: for fabrics that |
|
|
|
|
|
|
|
have stretch. Usually knit. |
|
|
|
|
|
|
|
LEATHER/VINYL: for suede, real |
|
|
|
|
|
|
|
leather and for artiÀcial leather and |
|
|
|
|
|
|
|
suede. |
|
|
|
|
|
|
|
Select the stitch for the technique you want |
|
|
|
|
|
|
|
to sew: |
|
|
|
|
|
|
|
SEAM: sews two pieces of fabric |
|
|
|
|
|
|
|
together. |
|
|
|
|
|
|
|
NOTE: For Stretch Fabrics the Sewing |
|
|
|
|
|
|
|
Guide Reference Chart recommends |
|
|
|
|
|
|
|
setting the zig zag stitch length to |
|
|
|
|
|
|
|
1.5 and stitch width to 1.5 for a seam |
|
|
|
|
|
|
|
that stretches with the fabric. |
|
|
|
1 |
|
|
|
OVERCAST: overcast fabric edges to |
|
|
|
|
|
2 |
prevent them from fraying and to |
|
|
|
|
|
|
|
|
help them lay Áat. |
|
|
|
|
|
|
|
SEAM/OVERCAST: sews the seam and |
|
|
|
|
|
|
|
overcasts the edge all at one time. |
|
|
|
|
|
|
|
BASTE: a temporary stitching for |
|
|
|
|
|
|
|
Àtting garments, gathering and |
|
|
|
|
|
|
|
marking. Use maximum stitch length. |
|
|
|
|
|
|
|
NOTE: Basting will leave permanent |
|
3 |
4 |
5 |
6 |
7 |
8 |
holes in leather and vinyl. |
1 |
Fabric |
|
|
|
|
|
BLIND HEM: creates an invisible hem |
|
|
|
|
|
on garments. Is not recommended |
||
2 |
Presser foot pressure |
|
|
|
for light weight fabric or for leather/ |
||
3 |
Sewing technique |
|
|
|
|
vinyl. |
|
4 |
Stitch |
|
|
|
|
|
HEM |
5 |
Presser foot |
|
|
|
|
|
: sews the best visible or top |
|
|
|
|
|
stitch hem for your fabric type and |
||
6 |
Thread tension |
|
|
|
|
weight. |
|
7 |
Stitch length |
|
|
|
|
|
BUTTONHOLE: sews the best |
8 |
Stitch width |
|
|
|
|
|
buttonhole possible for your fabric. |
|
|
|
|
|
|
|
7 |
Downloaded from www.Manualslib.com manuals search engine

Reverse Lever
When you press the reverse lever downwards, the machine will sew in reverse. The machine will only sew in reverse as long as the reverse lever is pressed down.
1 Reverse lever
1
1 |
Presser Foot Pressure Dial |
Turn the pressure dial to adjust the |
|
|
pressure of the presser foot on the |
|
fabric when sewing on different |
|
|
|
thicknesses of fabric. The pressure dial |
|
should be set at 3 for regular sewing. |
|
Reduce the pressure to 2 for appliqué, |
|
cutwork and basting. Set the setting mark |
|
at 1 when sewing stretch fabrics, chiffon, |
|
lace, organdy and other Àne fabrics. Set |
|
on 0 for free motion. |
|
1 Setting mark |
Lowering the FeedTeeth
The drop feed lever is located on the
|
|
|
|
|
|
|
free-arm on the back of the machine. |
|
|
|
|
|
|
|
|
To lower the feed teeth, push the lever in |
|
|
|
|
|
|
|
|
the direction of the arrow, as illustrated. |
|
|
|
|
|
|
|
|
To raise the feed teeth, push the lever in |
|
|
|
|
|
|
|
|
||
|
|
|
|
|
|
|
the direction of the arrow, as illustrated, |
|
|
|
|
|
|
|
|
and turn the handwheel toward you or |
|
|
|
|
|
|
|
|
start sewing to bring the feed teeth up. |
|
1 |
|
|
|
|
|
|
The feed teeth must be up for regular |
|
|
|
|
|
|
|
|||
|
|
|
|
|
|
|||
|
|
|
|
|
|
sewing. |
Raised position |
|
|
|
|
|
|
|
|
1 |
|
|
|
|
|
|
|
|
2 |
Lowered position |
|
|
|
|
|
|
|
|
|
2 |
|
|
|
|
|
|
|
|
|
|
|
|
|
|
|
|
|
|
|
|
|
|
|
|
|
|
8
Downloaded from www.Manualslib.com manuals search engine
3
3
2 |
2 |
|
|
|
1 |
1
Raising and Lowering the Presser Foot
The presser foot is raised and lowered with the presser foot lever. The presser foot must be down when sewing.
By raising the presser foot lever as far as it goes the lift height of the presser foot can be increased by 1/4” (0.6 cm). This is useful for easy removal of the presser foot or when placing heavy fabrics under the foot.
1Lowered position
2Normal lift height
3Extra lift height
Changing the Presser Foot
Turn off the power switch
1 Make sure the needle is in the highest position. Pull the presser foot towards you.
2 
 2 To put foot on, line up the cross pin
 on the foot between the spring and


 the presser foot ankle. Press back
 until the foot snaps into place.
9
Downloaded from www.Manualslib.com manuals search engine

1 |
2 |
|
Changing the Needle |
a |
c |
c |
Turn off the power switch. |
Your machine uses standard sewing
machine needles.
1 Lower the presser foot. Loosen the
b screw in the needle clamp by turning
it counterclockwise. Remove the
needle.
2 Push up the new needle as far as it will go with the Áat side away from you. Tighten the screw Àrmly by turning it clockwise.
a Stop
b Flat side
c Needle clamp screw
To check for a good needle:
Put the Áat side of the needle onto something Áat (needle plate, glass etc.). The gap between the needle and the Áat surface should be consistent.
Never use a blunt needle. A damaged needle can cause permanent snags or runs in knits, Àne silks and silk-like- fabrics.
NOTE: Check the needle frequently for barbed or blunt points.
10
Downloaded from www.Manualslib.com manuals search engine
1
2
1
Placing the thread spool on the spool pin
Place the thread spool on the spool pin with the thread coming off as illustrated. With large thread spools, the large holder is placed in front of the thread. If you use narrow thread spools, the small holder is placed in front of the thread.
1 Large spool holder
2 Small spool holder
Removing the bobbin
a |
Turn off the power switch. |
|
|
1 Push the bobbin cover release |
|
|
button to the right and remove the |
|
|
cover. |
|
|
a |
Release button |
b |
b |
Bobbin cover plate |
2
2 Lift out the bobbin.
11
Downloaded from www.Manualslib.com manuals search engine

2
1
2
3
4
5
6
7
12
3
1
b
a
 c
c
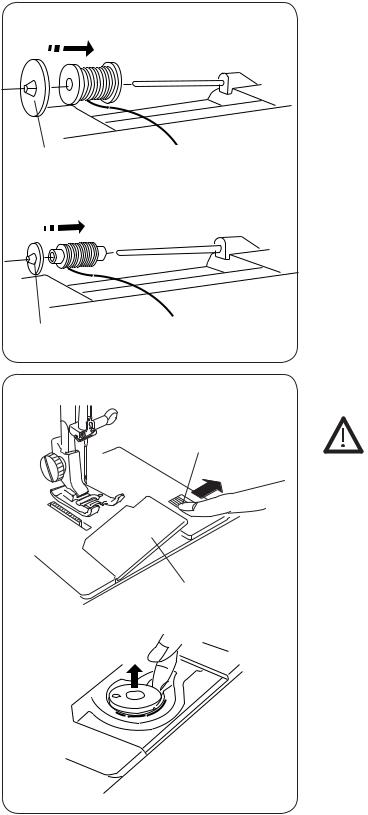
Bobbin Winding
1Pull the handwheel out to put the machine in bobbin wind position (the needle will not go up and down).
2Guide the thread around the bobbin thread tension guide into the tension disk.
3Thread through the hole in the bobbin from the inside to the outside. Put the bobbin on the bobbin winder spindle with the free end of the thread coming out at the top.
4Slide the bobbin winder spindle to the
right.
NOTE: Do not move the bobbin winder spindle while the machine is running.
5With the free end of the thread held in your hand, press the foot control. Stop the machine when the bobbin has made a few turns, and cut the thread as illustrated.
6Press the foot control again. When the bobbin is fully wound, it will stop automatically. Slide the bobbin winder to its original position by moving the spindle to the left, and cut the thread as illustrated.
7Push in the handwheel.
To use the vertical spool pin, set the felt and the spool as shown above.
aVertical spool pin
bSpool pin felt
cSpool pin hole
Downloaded from www.Manualslib.com manuals search engine

1
2
Placing the bobbin
Turn off the power switch
1 Place the bobbin in the bobbin case with the thread pulling off as illustrated.
2 Guide the thread into the front notch (a) on the front side of the bobbin case. Draw the thread to the left, sliding it between the tension spring blades.
a
3
b
4
3Continue to draw the thread lightly until the thread slips into the side notch (b).
4Pull out about 10 cm (4”) of thread. Attach the bobbin cover. Check the threading by referring to the chart shown on the bobbin cover.
13
Downloaded from www.Manualslib.com manuals search engine
 Loading...