


Personal Video Recorder
Free-To-Air
PVR-8000T
User's Manual

** |
** |
** |
|
|
|
|
|
** |
|
** |
Notice
Copyright (Copyright © 2001 HUMAX Corporation)
Not to be copied, used or translated in part or whole without HUMAX's prior consent in writing except approval of ownership of copyright and copyright law.
Confidential unpublished works. Copyright 1992-1997 Dolby Laboratories. All rights reserved.
Warranty
The information in this document is subject to change without notice. HUMAX does not have any responsibility for direct, indirect, accidental, necessary and other damage due to your offer or use of the information contained in this manual.
Trademarks
VIACCESS™ is a trademark of France Telecom.
CryptoWorks (TM) is a trademark of Philips Electronics N.V.
Irdeto is a trademark of Mindport BV.
Nagravision is a registered trademark of KUDELSKI S.A.
Conax is a trademark of Telenor Conax AS.
Dolby and the double-D symbol are trademarks of Dolby Laboratories.
Manufactured under license from Dolby Laboratories.
Thank you for purchasing a HUMAX digital terrestrial receiver and personal video recorder.
Please read this user manual carefully, to be able to safely install, use and maintain the receiver at maximum performance. Keep this user manual next to your receiver for future reference.
** |
GB 1 |
** |
** |
** |
** |
** |
** |
** |
|
|
|

** |
** |
** |
|
|
|
|
|
** |
|
** |
Notice
Read this manual carefully and make sure you understand the instructions provided. For your safety, check what the result of each action will be.
Warnings, Cautions and Notes
Throughout the whole manual, pay special attention to the following marks that indicate hazardous situations.
• Warning
Indicates a hazardous situation which, if not avoided, could result in serious injury.
• Caution
Indicates a situation which, if not avoided, could damage the equipment or other apparatus.
• Note
Indicates additional information to the user to make the user aware of possible problems and information of any importance to help the user to understand, to use and to maintain the installation.
To reduce the risk of electric shock, do not remove cover (or back). No user serviceable parts inside. Refer servicing to qualified service personnel.
This symbol indicates dangerous voltage inside the product that presents a risk of electric shock or personal injury.
This symbol indicates important instructions accompanying the product.
** |
GB 2 |
|
** |
** |
|
** |
** |
** |
|
** |
** |
|
|
|
|

** |
** |
** |
|
|
|
|
|
** |
|
** |
Safety and Warning
This receiver has been manufactured to comply with international safety standards. Please read the following safety precautions carefully.
Safety Instructions and Precautions
1.MAINS SUPPLY
90 - 250V AC 50/60Hz
Operate this product only from the type of power supply indicated on the marking label. If you are not sure of the type of power supplied to your home, consult your local power company. Disconnect the product from the mains before you start any maintenance or installation procedures.
2.OVERLOADING
Do not overload a wall outlet, extension cord or adapter as this may result in electric fire or shock.
3.LIQUIDS
The product should not be exposed to any liquids such as dripping or splashing. In addition, no objects filled with liquids, such as vase, shall be placed on the apparatus.
4.CLEANING
Disconnect the product from the wall outlet before cleaning. Use a light damp cloth (no solvents) to dust the product.
5.VENTILATION
The slots on top of the product must be left uncovered to allow proper airflow to the unit. Do not stand the product on soft furnishings or carpets. Do not stack electronic equipments on top of the product.
6.ATTACHMENTS
Do not use any unsupported attachments as these may be hazardous or cause damage the product.
7.CONNECTION TO THE AERIAL
Disconnect the product from the mains before connecting or disconnecting the cable from the aerial. Failure to do so can damage the aerial.
8.CONNECTION TO THE TV
Disconnect the product from the mains before connecting or disconnecting the cable from the aerial. Failure to do so can damage the TV.
9.EARTHING
The aerial cable must be buried in the ground.
The buried cable of the system must comply with SABS 061.
** |
GB 3 |
** |
** |
** |
** |
** |
** |
** |
|
|
|

** |
** |
** |
|
|
|
|
|
** |
|
** |
Safety and Warning
10.LOCATION
Place the product indoors to avoid exposing it to lightening, rain or sun. Do not place it near a radiator or heat register. Make sure it has more than 10 cm clearance from any appliances susceptible to electromagnetic influences, such as a TV or a VCR. Do not block these openings with any object, and do not place the product on a bed, sofa, rug, or other similar surface. If you place the product on a rack or bookcase, ensure that there is adequate ventilation and that you have followed the manufacturer’s instructions for mounting. Do not place the product on an unstable cart, stand, tripod, bracket, or table where it can fall. A falling product can cause serious injury to a child or adult, and serious damage to the appliance.
11.LIGHTNING, STORM, or NOT IN USE
Unplug the product from the wall outlet and disconnect the aerial during a lightning storm or when left unattended and unused for long periods of time. This will prevent damage to the unit due to lightning and power-surges.
12.EXTRANEOUS OBJECTS
Do not insert anything through the openings in the unit, where they can touch dangerous voltage point or damage parts.
13.REPLACEMENT of PARTS
When the replacement parts are required, be sure the service technician uses replacement parts specified by the manufacturer or those that have the same characteristics as the original part. Unauthorised substitutions may result in additional damage to the unit.
Warning
1.Follow these directions in order not to damage the power cord or plug. Do not modify or process the power cord or plug arbitrarily. Do not bend or twist the power cord too much. Make sure to disconnect the power cord with the plug held. Keep heating appliances as far as possible from the power cord in order to prevent the cover vinyl from melting.
2.Follow these directions. Failure to follow one of them may cause electrical shock. Do not open the main body. Do not insert metals or inflammable objects inside the product. Do not touch the power plug with wet hands. Disconnect the power cord in case of lightning.
3.Do not use the product when it is out of order. If you continue to use the product when defective, serious damage can be caused toit. Make sure to contact your local product distributor if the product is out of order.
4.Please do not insert metal or alien substance into the slots for the modules and smart cards. In doing so can cause damage to the STB and reduce its life span.
5.Hard Disk Drive
Do not move the product or turn the power off suddenly while the hard disk drive is running. The company shall not be liable for any corruption of data on the hard disk drive caused by the carelessness or misuse of users. Do not separate the hard disk drive from the main body.
** |
GB 4 |
|
** |
** |
|
** |
** |
** |
|
** |
** |
|
|
|
|

** |
** |
** |
|
|
|
|
|
** |
|
** |
Contents
** |
GB 5 |
** |
** |
** |
** |
** |
** |
** |
|
|
|

** |
** |
** |
||
|
|
|
|
|
** |
|
|
** |
|
Contents
** |
GB 6 |
|
** |
** |
|
** |
** |
** |
|
** |
** |
|
|
|
|
** |
** |
** |
|
|
|
|
|
** |
|
** |
1.Before Using the Receiver
This chapter provides detailed instructions on the product and its accessories.
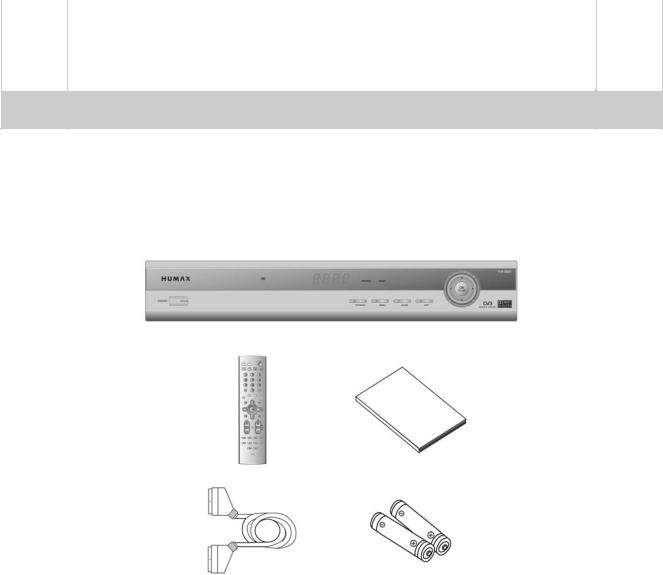
1.1 Package Contents
Please check all package contents before using your product.
Remote Control Unit |
User's Manual |
Scart Cable |
Batteries |
Note:
•Since faults may occur if the remote controller is being left without a battery for a long time, always keep the battery inserted in the remote controller.
•Package Contents can be changeable according to the area.
** |
GB 7 |
** |
** |
** |
** |
** |
** |
** |
|
|
|

** |
** |
** |
|
|
|
|
|
** |
1. Before Using the Receiver |
** |
|
|
|
|
|
|
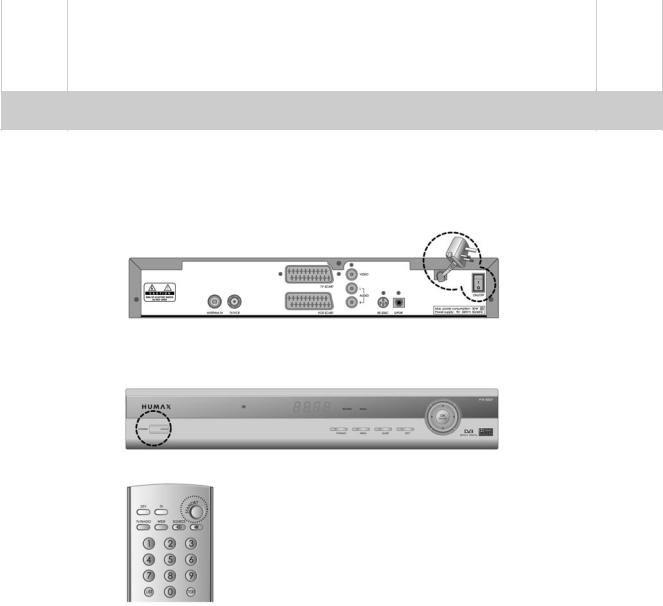
1.2 Front Panel |
|
|
1.STANDBY
Switches between Operation and Standby modes.
2.Sensor, Display and LED
IR
Infrared remote control command indicator. This indicator lights up momentarily when a command from the handset is received.
Digit LED Display
This will display the current channel or certain programming functions when using the menus.
RECORD LED
Indicates that the STB is in recording mode.
RADIO LED
Indicates that the STB is in radio mode.
3.TV/RADIO Button
Switches between TV and Radio.
4.MENU
Displays the main menu.
5.GUIDE
Displays the Programme Guide.
6.EXIT
Exits the main menu or Guide screen.
7.ARROW buttons
Changes the channel or move the cursor to the up, down, left or right menu option.
8.OK
Selects a menu, or confirm the selected operation. And display the channel list whilst watching a programme.
**GB 8
** |
** |
|
** |
||
** |
||
|
|
**
**
**
|
** |
** |
** |
|
|
|
|
|
|
|
** |
|
** |
|
|
|
** |
|
|
|
|
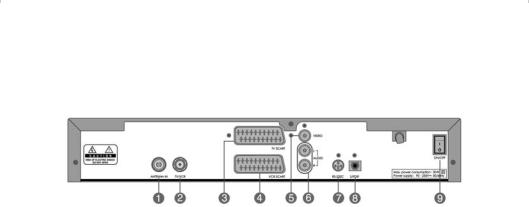
1.3 Rear Panel |
|
|
1.ANTENNA IN
Connects a aerial to a ANTENNA input jack on the your receiver.
2.TV / VCR
Connects a RF signal from your receiver to RF(ANT) input jack on your TV or VCR.
3.TV SCART
Connects a TV SCART cable.
4.VCR SCART
Connects a VCR SCART cable.
5.VIDEO
Connects to your TV or VCR and output Video signals.
6.AUDIO L/R
Connects to your TV or VCR and output Audio signals.
7.RS-232C
Connects to your PC to upgrade product’s software programme.
8.S/PDIF
Outputs the digital audio signals(S/PDIF).
9.ON/OFF
Power on/off.
** |
GB 9 |
** |
** |
** |
** |
** |
** |
** |
|
|
|
** |
** |
** |
|
|
|
** |
1. Before Using the Receiver |
** |
|
|
|
|
1.4 Remote Control |
|
** |
GB 10 |
|
** |
** |
|
** |
** |
** |
|
** |
** |
|
|
|
|

|
** |
|
** |
|
** |
|
|
|
|
|
|
|
** |
|
|
|
** |
|
|
** |
|
|
|
|
|
1. TV |
|
14.STANDBY |
|
|
|
Tune on the TV. |
|
Switches between Operation and |
|
|
|
2. DTV |
|
Standby modes. |
|
|
|
|
|
|
|
Turn on the DTV.
3.TV / RADIO
Switches between TV and Radio modes.
4.WIDE
Set the Display Format.
5.NUMBERICAL BUTTONS
Enters a TV/Radio channel number or menu option number.
6.LIST
Displays the channel list in DTV.
7.COLOR BUTTONS
Select color keys for interactive applications.
8.MENU
Displays the main menu in DTV.
9.ARROW BUTTONS
Changes the channel or move the cursor to the up, down, left or right menu option.
10.BACK
Returns to the previous menu and screen.
11.V- / V+
Adjusts the audio volume of TV.
12.SOUNDTRACK
Displays the Soundtrack.
13.OPT+ (OPTION)
Displays the channel attributes whilst watching a programme.
15.MUTE
Pauses the audio temporarily. That is, volumes on/off temporarily.
16.SOURCE / AUX
Selects the input source between TV and receiver. / Controls input mode of TV.
17.TEXT
Displays digital text.
18.GUIDE
Displays the Programme Guide.
19.OK
Selects a menu, or confirms the selected operation. And displays the channel list during watching a programme.
20.EXIT
Exits the main menu or Guide screen.
21.i (INFORMATION)
Displays the information about the channel and programme.
22.CH - / + or PAGE - / +
Changes the Channel or Page.
23.SUBTITLE
Changes the subtitle language.
24.G (Game)
Displays the games.
25.PLAYBACK CONTROL BUTTONS
Includes fast rewind, play, fast forward, record, stop, and pause buttons.
Note: This remote control can also control your TV. To set the remote control for your TV, please
|
refer to Chapter 13. |
|
** |
GB 11 |
** |
** |
** |
** |
** |
** |
** |
|
|
|
** |
** |
** |
|
|
|
|
|
** |
|
** |
2. Setup
This chapter describes how to set up the receiver. Select the most appropriate procedure depending on your requirements.
Note: If you encounter any problem when setting up the receiver, please contact your local product distributor.
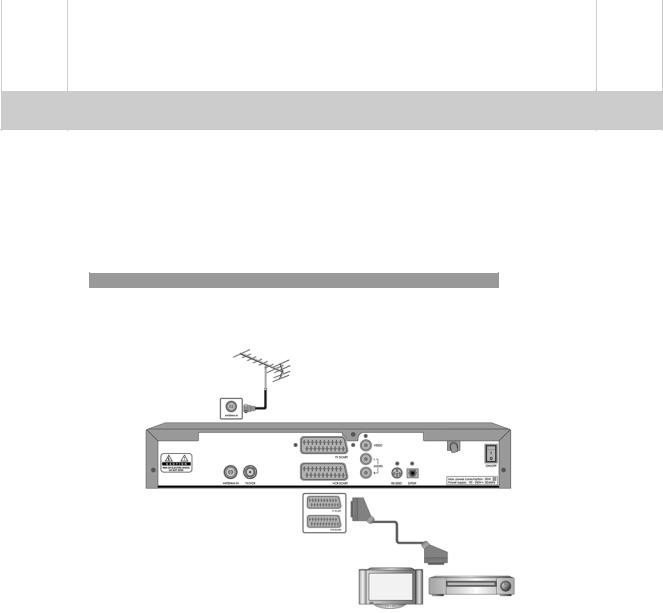
2.1 Connecting the Aerial
1. Connecting TV and VCR
Connect the cable of your TV aerial to the ANTENNA IN connector on the rear of the receiver.
SCART and co-axial cable are connected as in the figure above.
** |
GB 12 |
|
** |
** |
|
** |
** |
** |
|
** |
** |
|
|
|
|
** |
** |
** |
|
|
|
|
|
** |
|
** |
**
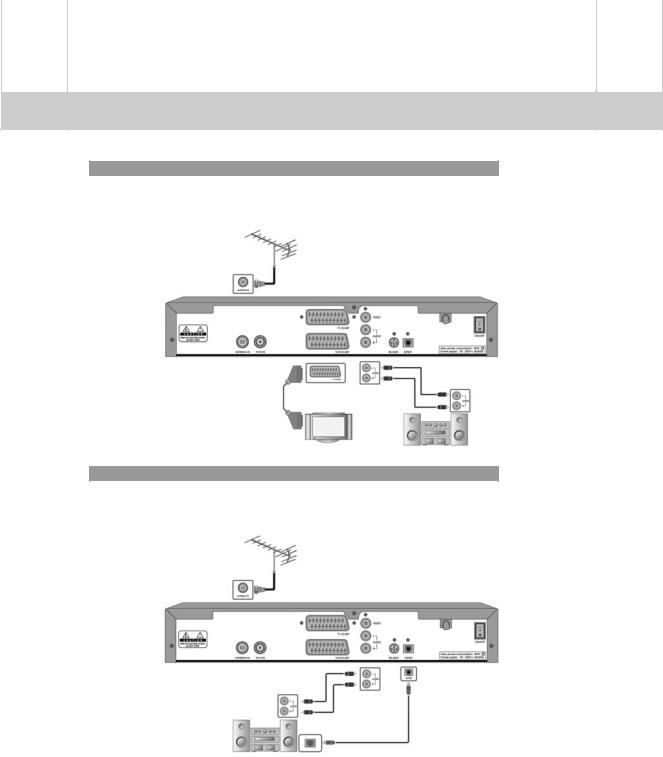
2. Connecting Hi-Fi system 1
Connect the outputs on this receiver to corresponding inputs on your Hi-Fi Audio. ( left audio out to left audio in, right audio out to right audio in)
3. Connecting Hi-Fi system 2
If you wish to connect S/PDIF the optical S/PDIF terminal and Dolby digital decoder to listen digital audio, connect as following.
** |
GB 13 |
** |
** |
** |
** |
** |
** |
** |
|
|
|
** |
** |
** |
||
|
|
|
|
|
** |
|
|
** |
|
2. Setup
2.2Powering On
1.Connect the power cord of the receiver to a wall outlet.
Turn on the power button, located at the left on the back of the receiver.
2.Power on by pressing the STANDBY  button at Remote Controller or the STANDBY
  button at the front of the receiver.
** |
GB 14 |
|
** |
** |
|
** |
** |
** |
|
** |
** |
|
|
|
|

** |
** |
** |
|
|
|
|
|
** |
|
** |
3. Installation Wizard
This will guide you through the installation procedure and will perform an channel search automatically. (Installation Wizard will also run after the receiver has been returned to Default Settings.)
Search
Please wait until the channel search is complete.
1.During the channel search, the cursor is located at Stop.
Therefore, if you press the OK  button during searching, the operation is stopped and the channels found until then will be displayed.
2.Even if the search does not find any channels, press the
OK  button and try to reset the search operation again if necessary.
3.You can delete unwanted channels from the found channels. Select your desired channels to delete and press
the OK  button. Then select Delete and press the OK
 button. To delete all channels, select Select All to select all channels, select Delete, and press the OK
  button.
4.After completing the Channel Search and deleting unwanted channels, select Save to save the changes.
Warning: If you exit the Install Wizard without fully completing the channel searching procedures, you many not receive all the channels available. In this case, you can use the Installation Menu to configure your receiver as you like.
** |
GB 15 |
** |
** |
** |
** |
** |
** |
** |
|
|
|

** |
** |
** |
|
|
|
|
|
** |
|
** |
4. Basic Operation
This chapter describes functions such as switching channel, volume control, and basic features for watching programmes.
4.1 Switching Channel
You can switch the current channel using one of the following methods.
1.Press the CH-/CH+  button.
2.Enter your desired channel numeric using the NUMERICAL (0-9) button to move to the channel directly.
3.Press the TV/RADIO  button to switch between TV channel and Radio channel.
Note: You can switch channel using the channel list or programme guide. Please refer to Chapter 5 and 6 for more information.
4.2Volume Control
1.Press the V-/V+  buttons to adjust the audio volume.
2.Press the MUTE  button to disables the sound temporarily.
Note: The mute function remains enabled while you change the channel. This function is only for
TV. Refer to chapter 13 to set the TV.
4.3 Text and interactive services
If your chosen channel has teletext (MHEG) features , you can access them. Teletext services often load automatically shortly after the Digital Teletext window is displayed. In which case, simply follow the given instructions(press color buttons).
1.Press TEXT  button to access teletext(MHEG) features.
2.Press TEXT  button again to return to normal viewing.
3.Press the CH-/CH+  button to exit this service.
Note: You should select Off from the subtitle language to display teletext(MHEG).
** |
GB 16 |
|
** |
** |
|
** |
** |
** |
|
** |
** |
|
|
|
|

** |
** |
** |
||
|
|
|
|
|
** |
|
|
** |
|
4. Basic Operation
4.4 Change the Subtitle Language
If the current programme provides Subtitle information, you can select the language for the Subtitle.
1.Press the SUBTITLE  button to display the subtitle language list.
2.Select your desired subtitle language using the  button, and press the OK
  button. Then the subtitle will be displayed in the selected language at the bottom of the screen.
3.Select Off from the subtitle language list to deactivate all subtitle from the screen.
Note: You can select a default subtitle language by selecting MENU - Preferences - Language
Setting - Subtitle Language.
4.5 Change a Audio Language
If the current programme is available in multiple audio languages, you can select the language that you wish to listen to.
1.Press the SOUNDTRACK  button to display soundtrack list.
2.Select your desired audio language using the  button and OK
  button to change Audio immediately.
3.Select Audio Direction(left, right, stereo) using the  button.
4.Press the EXIT  or SOUNDTRACK
  button to exit the soundtrack list.
Note: you can select your desired default audio language by selecting MENU - Preferences -
Language Setting -Audio Language.
** |
GB 17 |
** |
** |
** |
** |
** |
** |
** |
|
|
|

** |
** |
** |
||
|
|
|
|
|
** |
|
|
** |
|
4. Basic Operation
4.6 Programme Information (I- plate)
Programme information is always displayed for a specific period of time whenever you switch channels. You can view the programme information by pressing the i  button while watching a programme. Press the EXIT
  button to hide the I-plate.
1. General Information
The General Information is displayed as following on the screen.
1.Channel number and channel name
2.Programme name
3.Icons
Displayed only if this programme is recording.
Displayed only if this programme is reserved.
Represents parental level. It indicates the minimum level of ages that the programme is targeted at.
Displayed only when the channel is a locked channel.
Displayed only when the channel is a scrambled channel.
Displayed only when subtitle information is available.
Displayed only when there is any teletext information.
Displayed only when the programme has Dolby Digital soundtrack.
Displayed when the channel supports teletext(MHEG).
Displayed when the channel supports data channel.
** |
GB 18 |
|
** |
** |
|
** |
** |
** |
|
** |
** |
|
|
|
|

|
** |
** |
** |
|
|
|
|
|
** |
|
** |
|
|
** |
|
|
|
|
|
4.Current time
5.Detailed programme information: displayed if detailed programme information is provided.
6.Signal Strength and Signal Quality bars.
7.Programme broadcasting time and progress bar: displays programme playing time and progress bar.
8.Next programme Information: displayed if next programme information is provided. Press the  button to display the next programme information.
Note: If there is no available programme information, programme information is not displayed.
2. Detailed Programme Information
You can see detailed information about the current programme. Press the i  button where I-plate is displayed to view detailed information.
Note:
•Press the i  button again to hide the information box.
•If the Detail information is more than one page, use  button to move to the previous or next page.
** |
GB 19 |
** |
** |
** |
** |
** |
** |
** |
|
|
|
** |
** |
** |
|
|
|
|
|
** |
|
** |
4. Basic Operation
4.7 Option List
You can view and confirm detailed information about the current channel and change the information in necessary.
Note: Press the OPT+  button when the channel list is displayed to view option list. Then the following functions in the option list are performed to the channel where cursor is located.
1. Add a channel to favourite group
You can add the current channel to the favourite group immediately. Also, you can add a channel to multiple Favourite groups.
1.Press the OPT+  button.
2.Select Favourite using the  button, and press the OK
 or
or  button.
3.Select Favourite Group using the  button and press the OK
  button to register for favourite group.
4.Press the OK  button again on the selected favourite group to release the registered channel.
5.Move to the parent menu using the  button to save the changes automatically.
Note: For detailed information about how to change Favourite Group's name and how to register Favourite channels from the complete channel list, please refer to Chapter 5.
** |
GB 20 |
|
** |
** |
|
** |
** |
** |
|
** |
** |
|
|
|
|

|
** |
|
|
|
|
|
|
** |
|
** |
|
|
|
|
|
|
|
|
|
|
|
|
** |
|
|
|
|
|
|
|
|
** |
|
|
** |
|
|
|
|
|
|
|
|
|
|
|
|
|
|
|
|
|
|
|
|
|
|
2. Lock/Unlock a Channel |
|
|
|
|
|||
|
|
|
You can lock or unlock the current channel whilst watching a programme. |
|
|
|||||
1. |
Press the OPT+ |
button. |
|
|
|
|
||||
2. |
Select Lock using the |
button, and press the OK |
|
|
||||||
|
|
|
|
or |
button. |
|
|
|
|
|
3. |
Select Lock option using the |
|
button, and press the |
|
|
|||||
|
|
|
|
OK |
button. |
|
|
|
|
|
4. |
Select Unlock option using the |
button, and press the |
|
|
||||||
|
|
|
|
OK |
button. |
|
|
|
|
|
5. |
You will be prompted to enter your Password. Enter your |
|
|
|||||||
|
|
|
|
password to unlock the channel. |
|
|
|
|||
6. |
Move to the parent menu using the |
button to save the |
|
|
||||||
|
|
|
|
changes automatically. |
|
|
|
|
||
Note: When switching to the locked channel, you must enter the password to watch a programme.
3. Delete a Channel
You can delete the current channel whilst watching a programme
1.Press the OPT+  button.
2.Select Delete using the  button, and press the OK
 or
or  button.
3.Select Yes in the confirmation message and press the OK
 button.
4.Enter your password using the NUMERICAL (0-9) button to delete the current channel.
** |
GB 21 |
** |
** |
** |
** |
** |
** |
** |
|
|
|

** |
** |
** |
|
|
|
|
|
** |
|
** |
5. Time Shifted Recording
This unit automatically saves the programme on air in the installed hard disk drive temporarily, this allows the user to manipulate the saved programme using functions such as rewind, fast forward, replay and pause.
5.1 Time Bar
If you press playback control buttons while watching TV, the Time bar appears on the bottom of the screen.
Time bar displays the current operation status, the time difference between the broadcasting point and watching point, and an amount of temporarily saved programme. Time bar also provides 5 operation buttons on the right side for additional time shift operations.
5.2 Pause
If you press the PAUSE  button on the remote controller, the current programme is paused. If you press the PLAY
  or PAUSE
  button once again, the programme is resumed from that point.
Note:
Pause makes the time difference or delay between the broadcasting point and watching point. The time difference is equal to the paused time period. You can check the time difference in the Time bar. Other operations such as slow motion and rewind also make the time difference. Press STOP  button to remove the time difference, and watch the programme on air presently.
** |
GB 22 |
|
** |
** |
|
** |
** |
** |
|
** |
** |
|
|
|
|

** |
** |
** |
|
|
|
|
|
** |
|
** |
5. Time Shifted Recording
5.3 Rewind to Previous Scene
Press the REWIND  button on the remote controller to watch the scene passed by. Whenever you press the REWIND
  button, the rewind speed increases by 3 steps.If you press the PLAY
  button, the rewinding operation stops, and the programme will play at normal speed.
Note: You can rewind to the point when you have changed to the current channel. If the watching point reaches the start point during rewinding, the programme will begin to play at normal speed from the point.
5.4 Fast Forward to the Next Scene
Press the FORWARD  button on the remote controller to fast forward the programme. Whenever you press the FORWARD
  button, the speed increases by 3 steps. If you press the PLAY
  button, the fast forward operation is stops, and the programme will play at normal speed.
Note:
You can use the fast forward operation only when there is a time difference between the current watching and the broadcasting point caused by some previous operations such as pause, slow motion, or rewind. You can fast forward up to the current broadcasting point. If the watching point reaches to the broadcasting point, the programme will play at normal speed.
5.5 Recording
|
Press the REC |
button on the remote controller to start recording the current programme. While |
|
|
the time shift operation records the programme temporarily, record operation records the programme |
|
|
|
permanently so you can playback the recorded programme at any time. For more information about |
|
|
|
recording, refer to Chapter 6. |
|
|
|
5.6 Additional Time Shift Operations Using Time Bar |
|
|
|
You can perform additional time shift operations using the 5 operation buttons on the right side of the |
|
|
|
time bar. |
|
|
** |
|
GB 23 |
** |
** |
|
** |
** |
** |
|
** |
** |
|
|
|
|
 Loading...