


FVP-4000T

The default password is 0000.
HD Digital Recorder
User’s Manual
FVP-4000T
www.humaxdigital.co.uk

GB3
For Your Safety
For Your Safety
Safety Instructions
1. POWER SUPPLY
• Operate this product only from the type of power
supply shown on the marking label. If you do not
know the type of power supplied to your home,
contact your local power company.
• Disconnect the power supply before you start
any maintenance or installation procedures.
2. OVERLOADING
• Make sure that the wall outlet, extension cord
and adapter have a sufficient power rating for the
appliance. If not, this can cause an electric fire
shock.
3. LIQUID
• Do not expose this product to liquids. Do not put
objects filled with liquid on the product.
4. CLEANING
• Disconnect the product from the wall outlet
before you clean it.
• Use a moist cloth to clean the product. Do not
use solvents. Wipe the surface gently with a soft
cloth as it may get scratched.
5. VENTILATION
• Make sure that the slots on top of the product are
not blocked. It is necessary to have a sufficient
airflow into the unit.
• Do not put electronic equipment on the product.
• Do not put objects on the product. This will block
the ventilation or cause damage to the surface.
6. ATTACHMENTS
• Do not use any unsupported attachments as
these may be hazardous or cause damage to the
product.
7. LIGHTNING, STORM OR NOT IN USE
• Unplug the product from the wall outlet and
disconnect the antenna during a thunderstorm
or when left unattended and unused for long
periods of time. This will prevent damage to the
unit due to lightning and power-surges.
8. EXTRANEOUS OBJECTS
• Do not insert anything through the openings
in the unit, where they can touch dangerous
voltage points or damage parts.
9. REPLACEMENT OF PARTS
• When replacement of parts is required, be sure
the service technician uses replacement parts
specified by the manufacturer or those that
have the same characteristics as the original
part. Unauthorised substitution may result in
additional damage to the unit.
10. CONNECTION TO THE SATELLITE DISH LNB/CABLE TV
SIGNAL/AERIAL
• Disconnect the power supply before you connect
or disconnect the cable from the satellite dish/
cable TV signal/aerial. If not, this can cause
damage to the LNB/cable TV line/aerial.
11. CONNECTION TO THE TV
• Disconnect the power supply before you
connect or disconnect the cable from the TV.
If not, this can cause damage to the TV.
12. LOCATION
• Place the product indoors to avoid exposure
to lightning, rain or sun. Do not place it near a
radiator or heat register.
• Keep at least 10 cm clearance from any other
appliances susceptible to electromagnetic
influences such as a TV or a VCR.
• If you place the product on a rack or a
bookcase, make sure that there is adequate
ventilation and that you have followed the
manufacturer’s instructions for mounting.
• Do not place the product on an unstable
surface where it can fall. A falling product can
cause serious injury to a personnel and serious
damage to the appliance.
13. ENVIRONMENT
• Attention should be drawn to the
environmental aspects of battery disposal.
• Care is required for the use of this apparatus in
tropical and/or moderate climates.
Cautions and Warnings
1. TO AVOID DAMAGE OF POWER CORD OR PLUG
• Do not modify or process the power cord or plug
arbitrarily.
• Do not bend or twist the power cord.
• Make sure to disconnect the power cord while
you hold the plug.
• Keep heating appliances as far as possible from
the power cord to prevent the cover vinyl from
melting.
• The mains plug, as a disconnection device, shall
remain readily accessible by the user.
• All-pole main switch shall remain readily
operable. (For products with power switch)
2. TO AVOID ELECTRICAL SHOCK
• Do not open the main body.
• Do not insert metal or inflammable objects inside
the product.
• Do not touch the power plug with wet hands.
• Disconnect the power cord in case of lightning.
• Unplug the power cable before you install the
aerial cable.
3. TO AVOID DAMAGE OF PRODUCT
• Do not use the product when it is out of order. If
you continue to use the product when defective,
this may cause serious damage. Make sure
to contact the customer service centre if the
product is out of order.
• Do not insert metal or alien substance into the
slots for the modules. It may cause damage to
the product and reduce its life span.
• Do not overly pile objects on the product. It may
cause cracks, deformation and discoloration.
4. TO AVOID DAMAGE OF HDD
• Do not move the product or turn the power off
suddenly while the hard disk drive is running.
• The company shall not be liable for any
corruption of data on the hard disk drive
caused by carelessness or misuse of the user.
GB4
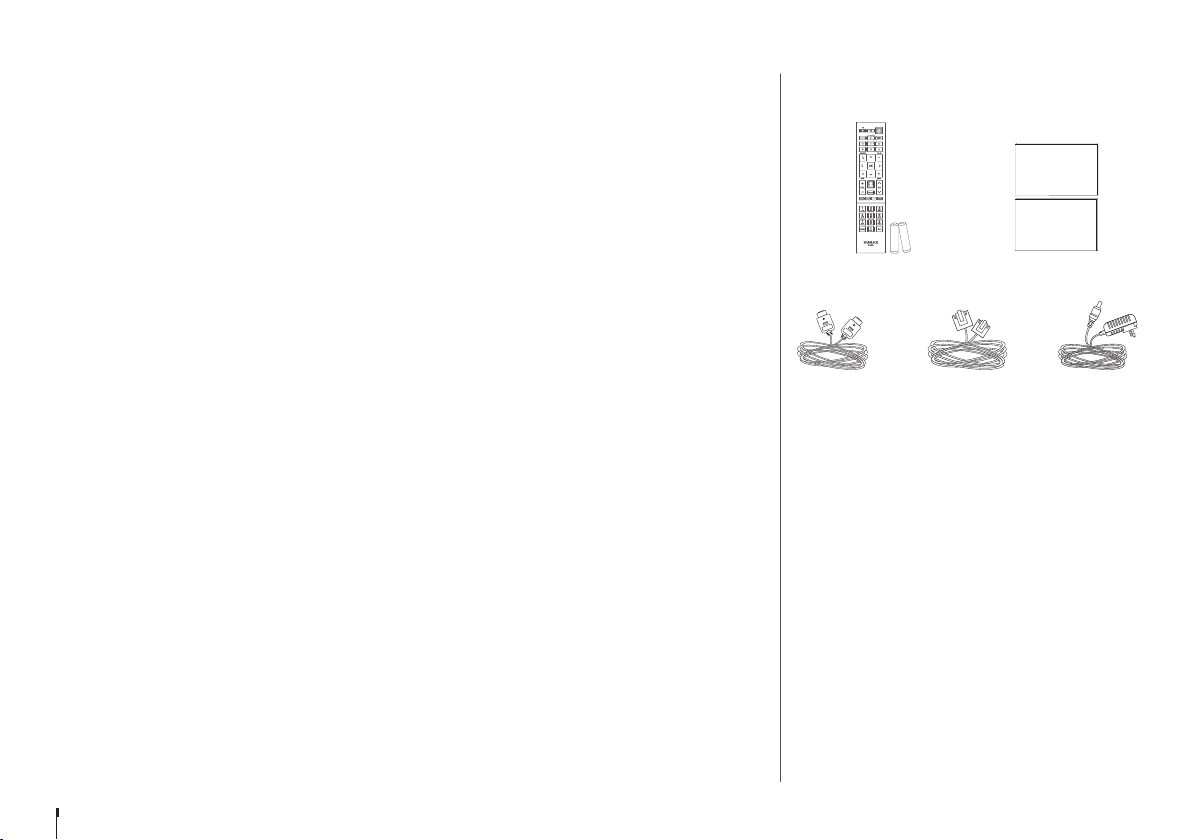
Accessories
Note: Accessories may vary according to area.
Contents
Contents & Accessories
For Your Safety ................................................................3
Contents & Accessories ..................................................4
Contents
Accessories
Quick Start Guide ...........................................................5
Product Overview
Connections
Remote Control
Wizard
Watching TV ....................................................................9
Home
Simple Guide
Programme Detail
Smart Search
TV Guide
Recording .........................................................................15
Instant Recording
Scheduled Recording
Recording Conflict
Playing Recorded Programmes
Media Center ...................................................................17
Direct Access to Media Files
Playing Media Files
Playing Files by Storage
On Demand .....................................................................21
Settings .............................................................................22
General Settings
Network Settings
PVR Settings
System Settings
Channel Settings
Appendix...........................................................................27
Trouble Shooting
HUMAX Customer Support
Glossary
Using the Universal Remote Control
Open Source Software Notice
User Manual
Quick Start Guide
User Manual
Quick Start Guide
Remote Control
/ Batteries
HDMI Cable AC Adaptor
User Manual
/Quick Start Guide
Ethernet Cable
GB5
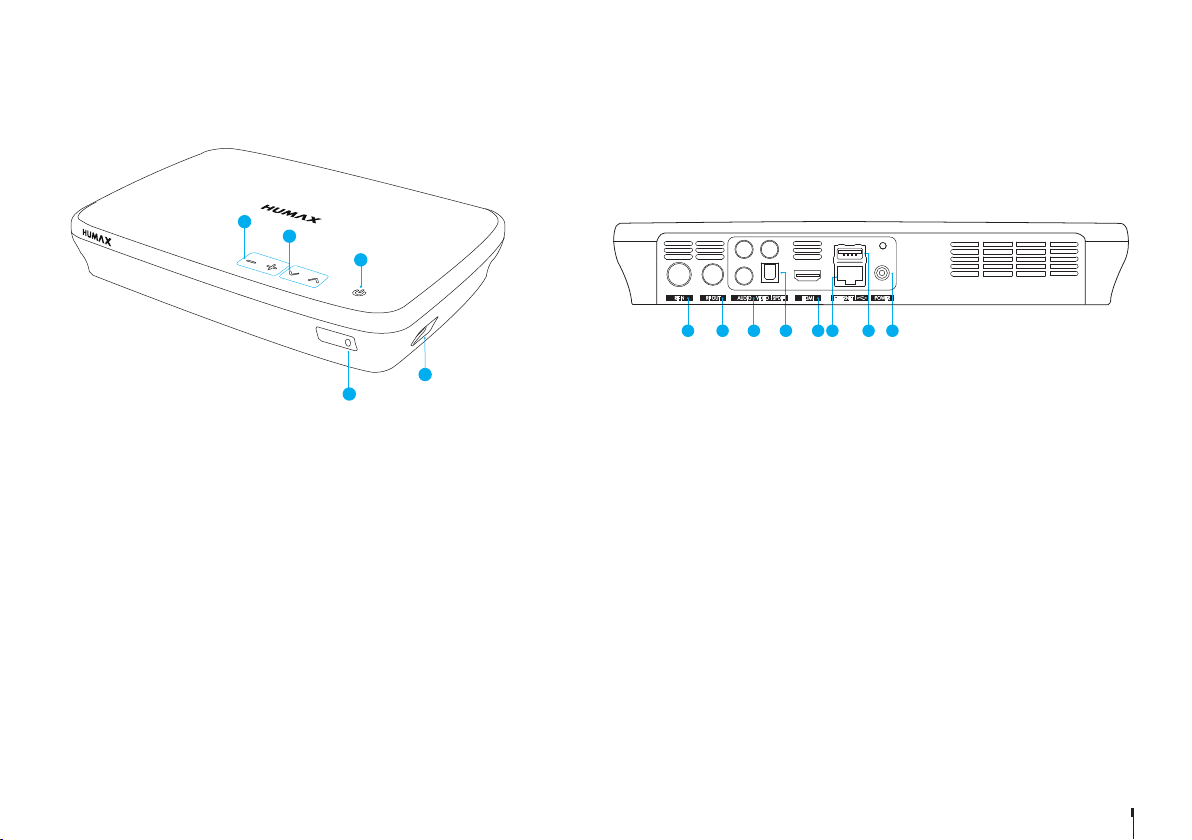
Product Overview
Quick Start Guide
1VOLUME: Changes the audio volume.
2 CHANNEL: Changes the channel or page.
3 STANDBY: Switches between operation and standby modes.
4USB: Connect a USB memory device.
5LED: Lights red in standby mode and blue in operation mode.
5
3
4
1
2
1RF IN: Connect to a TV antenna.
2 RF OUT: Connect to the TV or VCR using an RF cable.
3 VIDEO/AUDIO: Use a RCA cable to connect to the TV.
4SPDIF: Use an SPDIF cable to connect to the digital audio device.
5 HDMI: Use a HDMI cable to connect to the TV.
6 ETHERNET: Connect a LAN cable.
7 USB: Connect a USB memory device.
8 POWER: Connect the AC adaptor.
Note: The image may differ from the actual product.
1 2 3 4 5 6 7 8
L
R
GB6
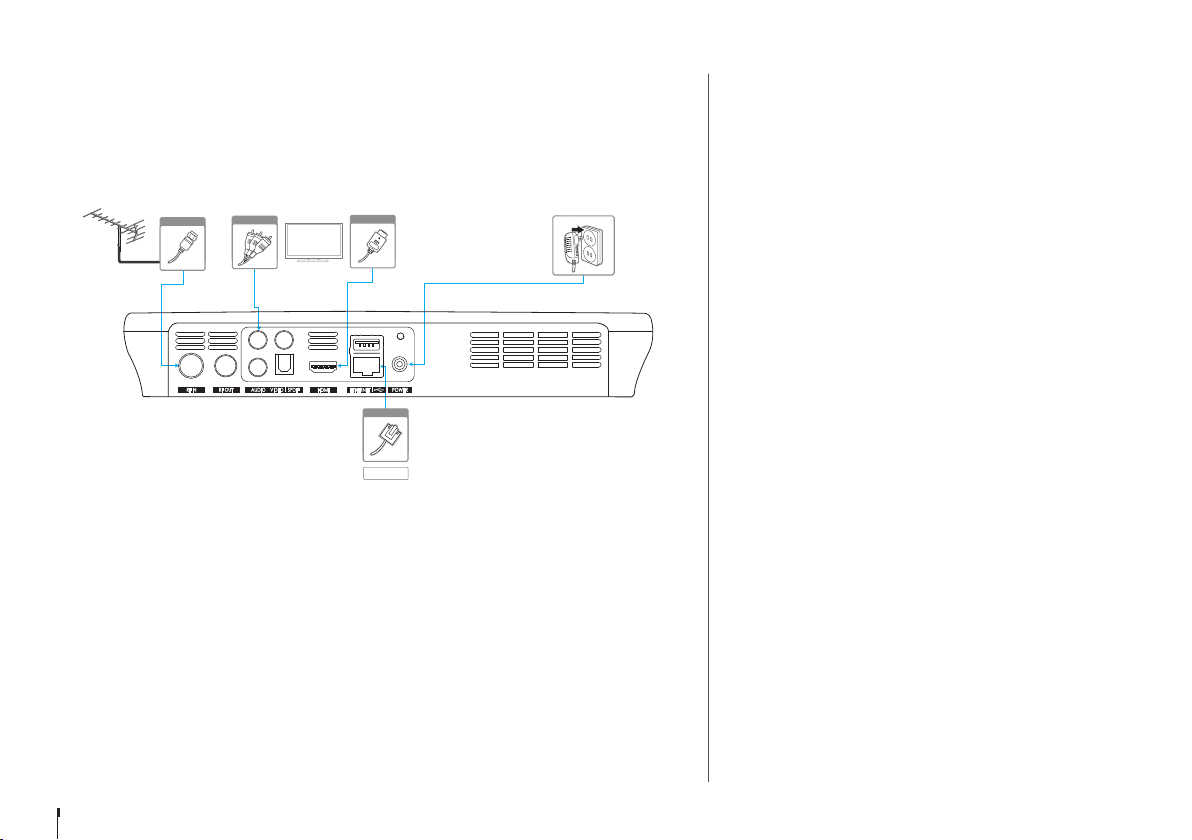
Connections
This section describes how to connect your product to match your particular devices and to
gain optimum signal quality.
Warning: Connect all devices before you plug any power cords into the wall outlet. Always turn off
the product, TV and other devices before you connect or disconnect any cables.
Note:
• If you encounter any problems setting up your product, please contact your local retailer
or HUMAX Customer Service.
• Connecting your TV directly to the audio/video output of the product will assure a more
vivid picture and enhance your viewing enjoyment.
HDMI CEC
HDMI CEC (Consumer Electronics Control) lets you to control the TV and HDMI CEC supported
devices through the HDMI cable.
If your TV supports HDMI CEC, it will turn on or off automatically when the product is turned
on or off.
Connecting the Antenna
Connect the aerial to the ANTENNA IN.
Connecting the TV
2-1 Using a HDMI cable
For the best picture quality, use a HDMI cable to connect to
the TV.
2-2 Using a RCA cable
Use a HDMI or RCA cable to connect to your TV set.
• For the best quality, use a HDMI cable.
• Use a RCA cable if you do not have a HDMI connection
on your TV set.
Connecting the Network
3-1 Connecting to the LAN
1. Use the Ethernet cable to connect the product and the
LAN router.
2. Set the options for the LAN.
(Go to HOME > SETTINGS > Network Settings to set the
network options)
3-2 Connecting to the Wireless LAN
Your product has a built-wireless network connection.
Go to HOME>SETTINGS> Network Settings>Configure
WLAN and set the options for the wireless LAN.
Note:
• We recommend the network connection over a direct
LAN.
• Make sure that the distance between the Wireless LAN
access point and the product is not too far away. This
may lower the quality of service.
Quick Start Guide
Aerial
1
TV
RCA Cable
2-2
HDMI
2-1
6
Router
3-1
Ethernet
L
R
GB7
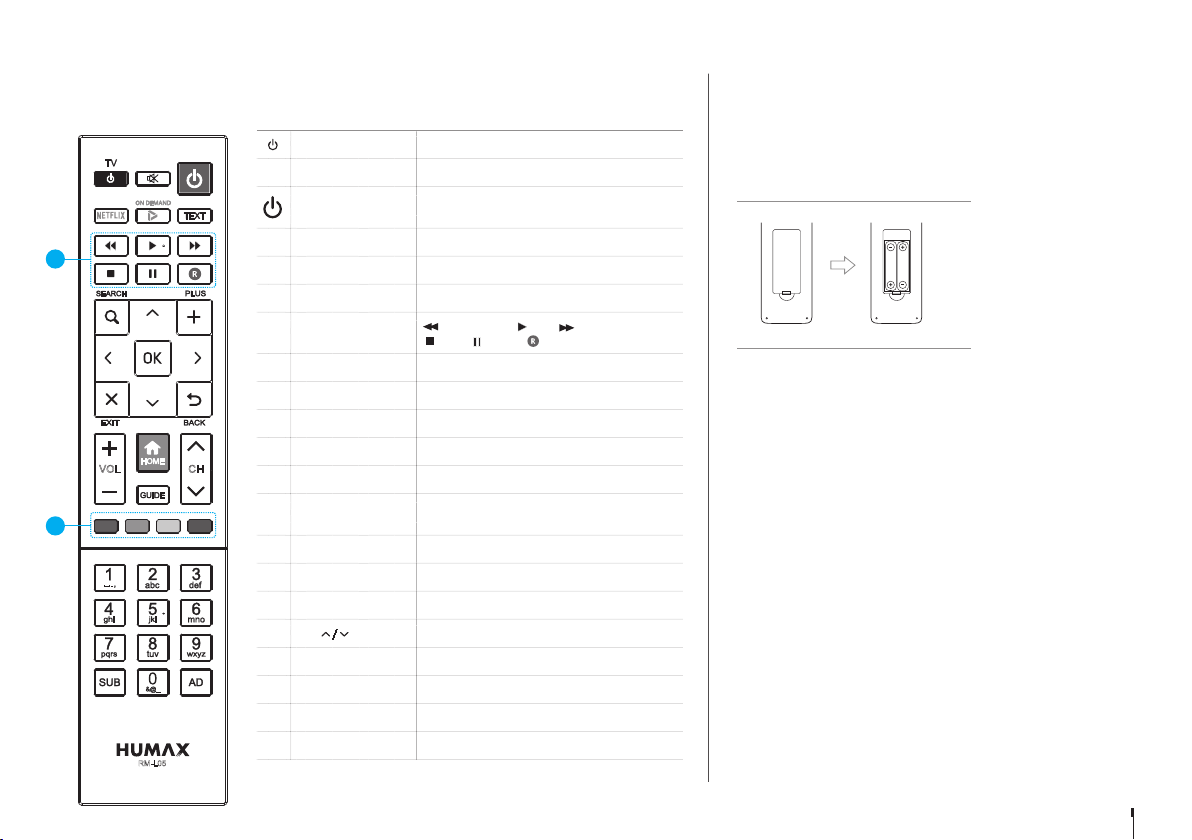
TV STANDBY Turns TV on/off
TV AV Switches the input source of the TV
STANDBY
Switches between operation and standby
modes
ON DEMAND Goes to ON DENAMD
TEXT Enters the digital text service
MUTE Mutes audio
1
Playback Control
Buttons
Fast Rewind, Play, Fast Forward,
Stop, Pause, Record
SEARCH Runs Smart Search
PLUS Displays option menus
ARROW Buttons Moves the cursor up, down, left or right
OK Selects a menu or confirms a selection
EXIT Exits all On-Screen Display (OSD) screens
BACK
Returns to the previous channel or the
previous screen
VOL +/- Changes the audio volume
HOME Displays the HOME menu
GUIDE Displays the programme guide
CH / Changes the channel or page
2
COLOUR Buttons For interactive applications
NUMERIC (0-9)
SUB Sets the subtitle language
AD Displays the audio description
Inserting Batteries
Insert the batteries matching the plus(+) and minus(-) at
each end.
Note: If the remote control batteries are low, the STANDBY
button and the TV STANDBY button will blink twice
whenever your press the HOME button.
Remote Control
Quick Start Guide
REC
REC
RM-L05
CHVOL
1
2
Battery
REC
REC
REC
REC
REC
1
1
GB8
Quick Start Guide
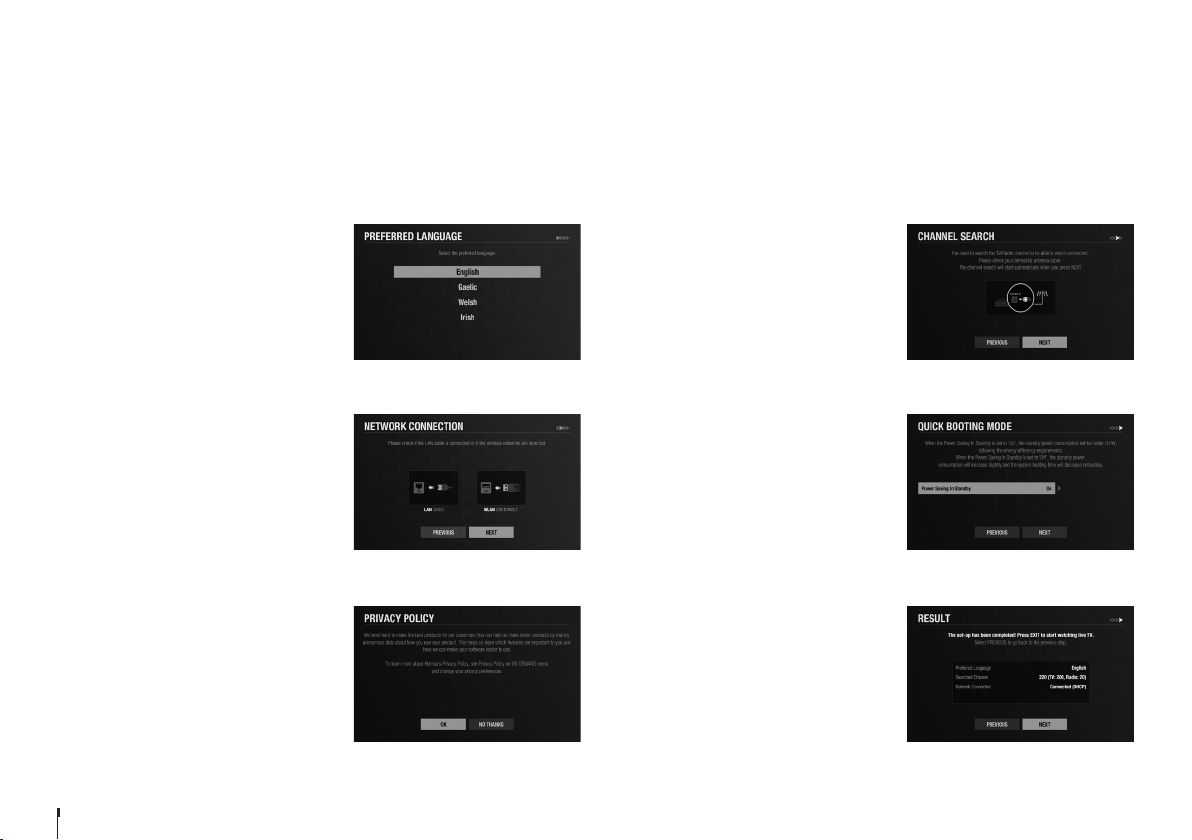
Wizard
The installation wizard operates automatically when you power on the product for the first time or do factory default in menu.
Note: If you exit the installation wizard without fully completing the channel searching procedure, you may not have all of the channels available. In this case, go to
HOME>SETTINGS>Channel Settings>Search Channels and search for more channels.
1. Preferred Language
Select a language for audio and subtitles
and press the OK button.
2. Network Connection
Make sure that the LAN cable is connected
to the Ethernet port or the wireless LAN is
connected. Configure the network setting.
3. Privacy Policy
Agree or disagree to share anonymous data
about how you use your products.
If you agree, this is very helpful for us to
make better products.
4. Channel Search
Set the search options and then search
channels. You can search channels
automatically or manually. Save the found
channels when the search is complete.
5. Quick Booting Mode
Set to On to decrease the standby power
consumption.
6. Result
The result of the installation wizard will
show. Select EXIT.
GB9
Watching TV
Watching Live TV
• When you have selected a programme from the Simple Guide press the OK
button to change to that channel.
• You can also enter the channel number directly.
Pausing and Rewinding Live TV (TSR)
Time Shifted Recording (TSR) allows you to pause a live programme and return later
where you left off. The TSR function temporarily records the programme you are
watching to the hard disk drive automatically for up to 2 hours.
Note:
• Pausing Live TV will work after 10 seconds of changing to a channel.
• Each time you change channels the TSR will clear and start again
To pause the programme
1. Press the PAUSE button.
2. Press the PLAY button to watch from the pausing point.
Pressing Pause starts a time gap between Live TV and the point you pressed
pause.
To watch missed scenes
1. Press the FAST REWIND button.
2. Press the PLAY button at the point where you want to start watching.
To skip scenes
Press the FAST FORWARD button when there is a time gap between the
current watching point and the live broadcasting point.
If you reach the live broadcasting point while fast forwarding, the programme
automatically plays at normal speed.
Home
You can go to the home menu by pressing the HOME button wherever you
are. From the home menu, you can reach On Demand, TV Guide, Recordings,
Media Center, and Settings.
• To see the recent list, press the q button.
You can easily go to the recently accessed contents or menus.
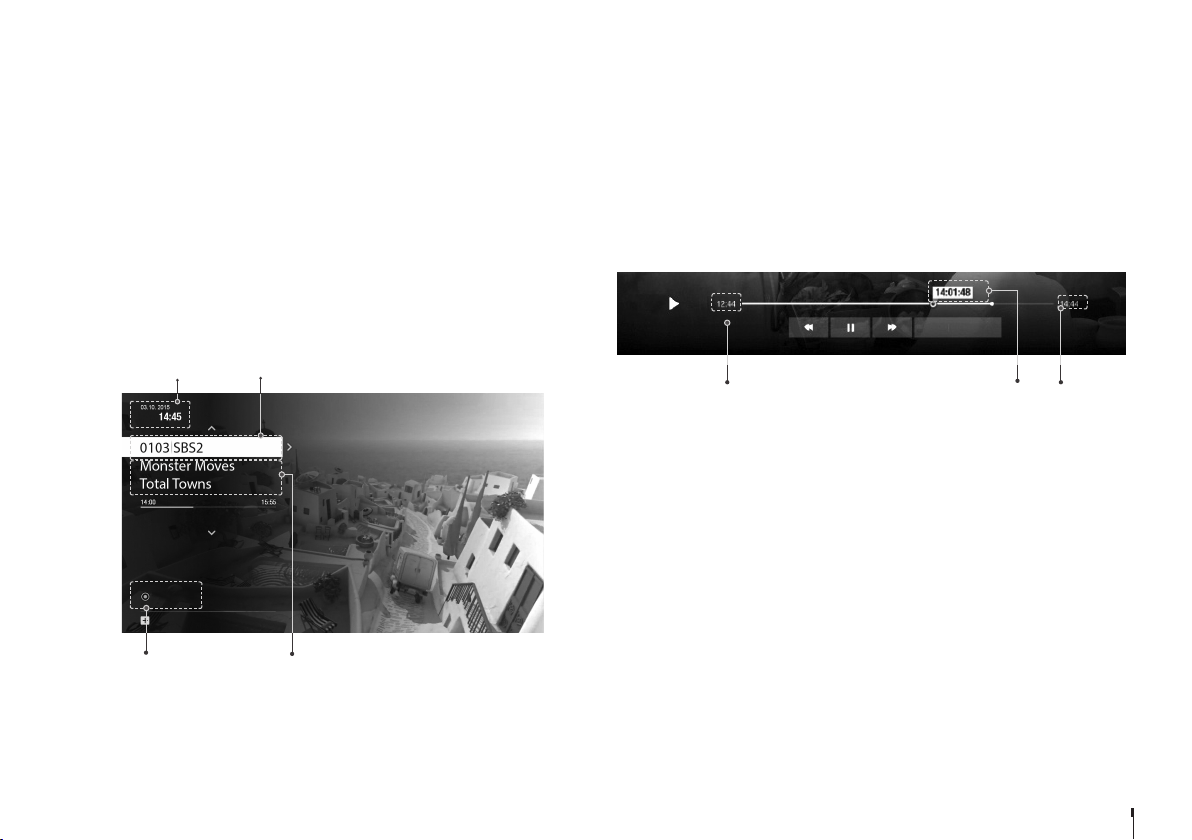
Simple Guide
You can change channels, see what’s on later or watch catch-up programmes
when available.
• Press the OK button while watching live TV to display Simple Guide.
• Press the p/q arrow buttons to display a channel list.
• Press the EXIT button to hide the Simple Guide.
GROUP - TV
Date and time
Number of Recordings
in progress
Programme name
Channel number and name
TUE
1 Recording
Start time Playing point
Total time
GO TO LIVE

GB10
Watching TV
Setting TV Options
• Press the PLUS button while watching live TV to change the resolution,
display format, switch on audio description, and subtitles.
• Press the SUB button to switch on subtitles.
• Press the AD button to switch on audio description.
Changing Channel Group
1. Press the OK button while watching live TV to display Simple Guide.
2. Press the PLUS button.
3. Select a channel group and press the OK button.
Seeing What’s On Later
1. Press the arrow button to see what’s on later.
2. Select a programme and press the OK button.
Programme detail appears. You can set recordings or reminders.
Watching Catch-Up Programmes
Press the arrow button to watch catch-up programmes.
Catch-up programmes are accessible only when the network is connected
and that programme is available on Catch-up from the broadcaster.
Catch-up programmes
On-air programme

GB11
Watching TV
Programme Detail
1. To find out more about the programme you are watching, press the
OK button.
2. Press the OK button again to display programme detail.
You can watch an episode of a catch-up programme or set reminders or
recordings for future programmes.
Episode Icons
Reminder (blue),
Scheduled recording (red)
Playback possible
Recording in progress
Series recording
Daily
Weekly
Channel number and name
Episodes
Running time, date, genre
Programme name
DRAMA
THU11 JAN
Skins
Episode 03, Season 24
SET REMINDER
RECORD THIS PROGRAMME
RECORD WHOLE SERIES
Programme Icons
HD programme
Parental guidance programme
Blocked by digital recording management
Encrypted programme
Locked programme
Dolby digital plus
Dolby Digital
Programme with audio description
Programme with subtitle
Split programme
HD
HD
G
HD
G
HD
ENC
G
HD
ENC
G
HD
ENC
G
HD
ENC
G
HD
AD
ENC
G
HD
AD
ENC
G
HD
AD
ENC
G

GB12
Watching TV
Smart Search
You can search your favourite programmes by entering a keyword.
• Press the SEARCH button and then enter a keyword.
Note: Enter at least three characters to search programmes or media files. If you
enter less than three characters, channels and Apps are searched.
Gossip Girl 5x14 : The
Backup Dan
Gossip Girl
Gossip Girl
Gossip Girl
Gossip Girl
TV Programme
TV Programme
TV Programme
TV Programme
TV Programme
Press ‘OK’ to enter a keyword
PREVIOUS
GB13
Seeing What’s on Later
Press the arrow button to see the next programmes.
Setting Reminders or Recordings
1. Select a programme and press the OK button.
2. Select an episode in the left column.
3. Select RECORD WHOLE SERIES, RECORD THIS PROGRAMME or SET
REMINDER and press the OK button.
Reminder (blue) Recording in process
Recording (red) Series recording
Note:
• If the programme conflicts with another programme, adjust the scheduling
appropriately. See page 16 for more information.
• If the channel is locked, you will be prompted to enter your password.
The default password is 0000. If you have forgotten your password, please
contact your local distributor.
Changing Programme Genre
• Press the PLUS button when the cursor is on a next programme.
• Select a genre and press the OK button.
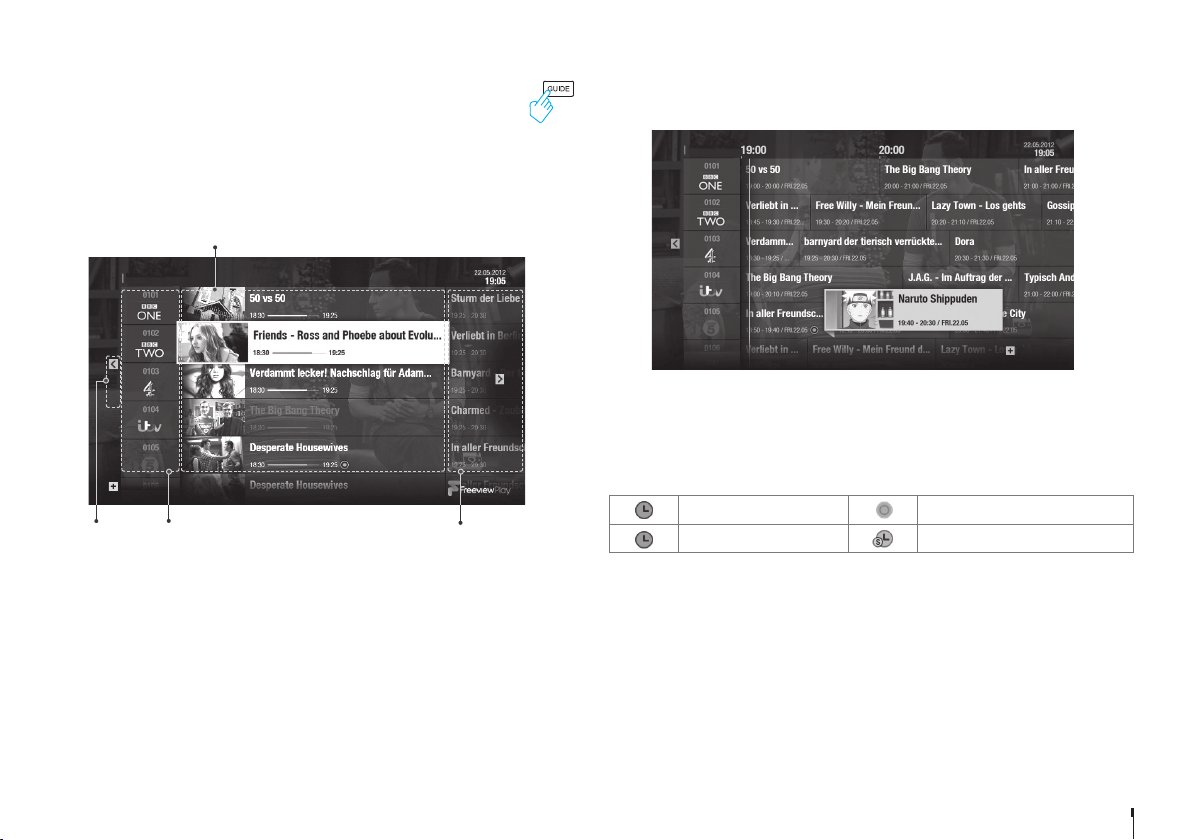
Watching TV
TV Guide
You can see the programme schedule of each channel, and schedule
recordings or reminders for future programmes.
• Press the GUIDE button.
• Use the arrow buttons on the remote control to navigate in the Guide.
• Select a programme from next or catch-up programmes and press the
OK button to display the programme details.
Watching Live TV
Select a programme and press the OK button or enter the channel number directly.
Note: Press the CH^/v button to change a page.
Changing Channel Group
1. Press the PLUS button.
2. Select the channel group and press the OK button.
Quick Navigation
1. To move to a certain date, long press the / arrow buttons.
2. Select a date and press the OK button.
Live TV
Catch-up
Next programmes
Channel number and name
TV GUIDE
FRI
GROUP - TV
CATCH-UP
ON-AIR
NEXT
FRI
GENRE- ALL
 Loading...