


LGB-17DTTV

LGB-17DTTV
LCD Digital and Analogue TV
LCD
Digital
and Analogue
TV

Caution
To reduce the risk of electric shock, do not remove cover(or back).
No user serviceable parts inside. Refer servicing to qualified service personnel.
Indicates a situation which, if not avoided, could damage the equipment or
other apparatus.
This symbol indicates dangerous voltage inside the LCD-TV that presents a
risk of electric shock or personal injury. Indicates a hazardous situation which,
if not avoided, could result in serious injury.
This symbol indicates important instructions accompanying the LCD-TV.
Read this manual carefully and make sure you understand the instructions provided.
For your safety, check what the result of each action will be. Throughout the whole
manual, pay special attention to the following marks that indicate hazardous situations.
Indicates additional information to the user to make the user aware of possible
problems and information of any importance to help the user to understand, to use
and to maintain the installation.
The information in this document is subject to change without notice.
Copyright (Copyright ཱྀ
ཱྀ
2005 HUMAX Corporation)
Not to be copied, used or translated in part or whole without HUMAX's prior
consent in writing except approval of ownership of copyright and copyright law.
Warranty
HUMAX does not have any responsibility for direct, indirect, accidental and other
damage caused by the use of the information contained in this manual.
Trademarks
VIACCESS
TM
is a trademark of France Telecom.
CryptoWorks(TM) is a trademark of Philips Electronics N.V.
Irdeto is a trademark of Mindport BV.
Nagravision is a registered trademark of KUDELSKI S.A.
Conax is a trademark of Telenor Conax AS.
'Dolby' and the double-D symbol are trademarks of Dolby Laboratories.
Manufactured under the license from Dolby Laboratories.
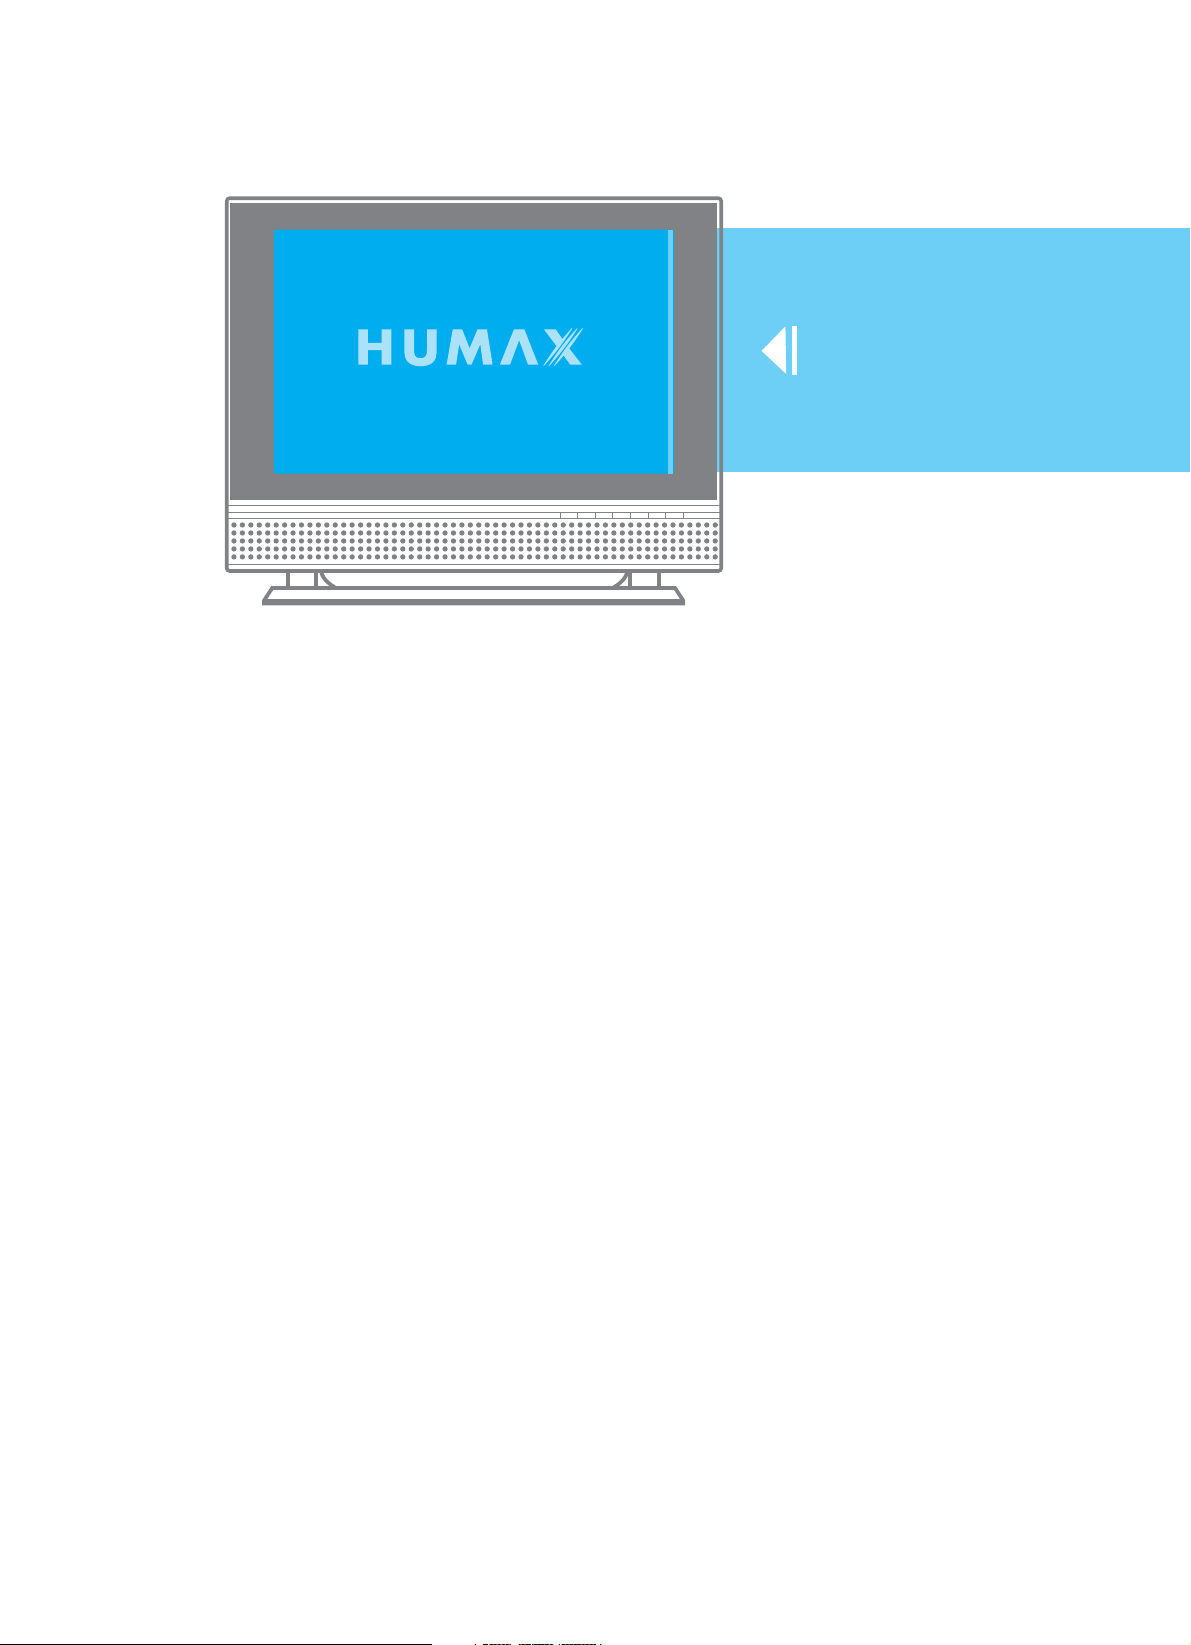
Thank you for purchasing a HUMAX LCD-TV. Please read this user manual
carefully in order to safely install, use and maintain the LCD-TV at maximum
performance. Keep this user manual next to your LCD-TV to ensure the best
performance possible.
2. Caution
Safety Instructions
3. Safety Instructions
This LCD-TV has been engineered and manufactured to assure your safety. You
can prevent serious electrical shock and other hazards by keeping in mind the
following:
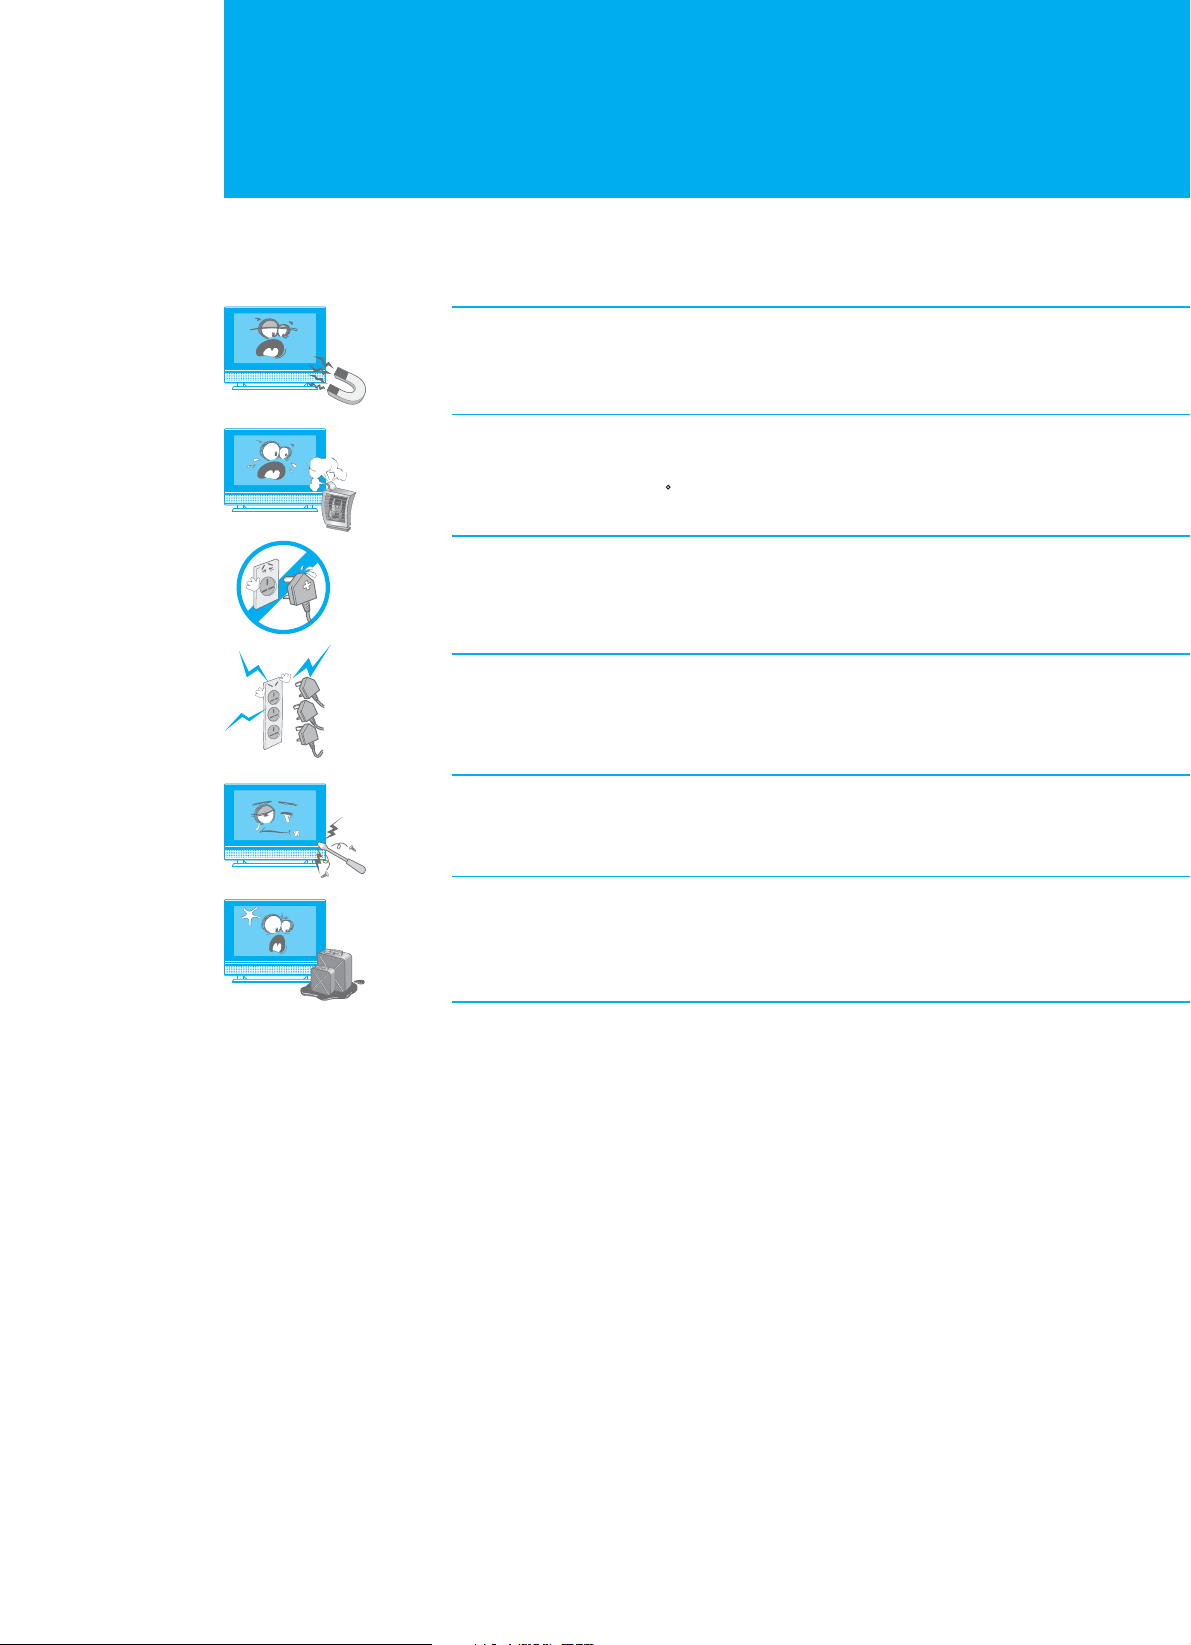
Do not place anything heavy, wet or magnetic on the LCD TV or the power
cord. Never cover the ventilation openings with any material and never touch
them with metalic or inflammable materials.
Avoid operating the LCD-TV in extreme heat, humidity or areas affected by dust.
+ Temperature : 41~95 F + Humidity : 30~80RH
Be sure to tum the LCD-TV off before plugging the power cord into the socket.
Make sure that the power cord and the other cords are securely and correctly
connected.
Overloaded AC outlets and extension cords are dangerous, as are frayed power
cords and broken plugs, which may cause electric shock or fire. Call your service
technician for replacement.
Do not use sharp tools such as a pin or a pencil near the LCD-TV, as they may
scratch the LCD surface.
Do not use a solvent, such a benzene, to clean the LCD-TV, as it will damage
the LCD surface.
The apparatus shall not be exposed to dripping or splashing.
Warning
1. Follow these directions in order not to damage the power cord or plug.
Do not modify or process the power cord or plug arbitrarily. Do not bend or twist
the power cord too much. Make sure to disconnect the power cord with the plug
held. Keep heating appliances as far as possible from the power cord in order to
prevent the cover vinyl from melting.
2. Follow these directions. Failure to follow one of them may cause electrical shock.
Do not open the main body. Do not insert metals or inflammable objects inside the
LCD-TV. Do not touch the power plug with wet hands. Disconnect the power cord
in case of lightning.
3. Do not use the LCD-TV when it is out of order. If you continue to use the
LCD-TV when defective, serious damage can be caused to it. Make sure to contact
your local LCD-TV distributor if the LCD-TV is out of order.
4. Please do not insert metal or alien substance into the slots for the modules and
smart cards. In doing so can cause damage to the LCD-TV and reduce its life span.

Contents
4. Contents - Analogue TV
Package Contents
Front Panel
Rear Panel
Remote Control
+ Inserting the Batteries
Mounting Device
+ Installing on the Wall
+ Convenient Movement
Connecting the External Equipment
+ Connecting to an Aerial
+ Using the SCART cable
+ Using the Audio/Video cable
+ Connecting to the Component Input
+ Connecting a PC
Watching TV
+ Switching On and Off
+ Viewing the Input Source
+ Changing Channels
+ Displaying Information
+ Choosing Your Language
Setting up Channels
+ Scanning Channels Automatically
+ Scanning Channels Manually
+ Fine Tuning Channel Reception
+ Adding and Erasing Channels
+ Assigning Names to Channels
+ Sorting the Stored Channels
Setting the Picture
+ Selecting the Picture Mode
+ Customizing the Picture Settings
+ Customizing the Picture Settings (PC mode)
+ Changing the Colour Tone
+ Adjusting the Colour (PC mode)
+ Changing the Picture Size
Setting the Sound
+ Selecting the Sound Mode
+ Customizing the Sound Settings
+ Changing the Sound Effect
+ Adjusting the Volume Automatically
Setting the Time
+ Setting the Current Time
+ Setting the TV On and Off Time
+ Setting the Sleep Time
+ Switching the TV Off Automatically
Setting up the PC Input
Teletext Feature
+ Using the Various Teletext Buttons
+ Displaying the Teletext Information
+ Selecting a Specific Teletext Page
+ Storing the Current Teletext Page into List
06
07
08
09
11
12
12
12
13
13
13
14
15
15
16
16
16
16
17
17
18
18
18
19
19
20
20
21
21
21
22
22
23
23
24
24
24
25
25
26
26
26
27
27
28
29
29
30
30
30
Before Using the TV
Setting Up the TV
Using the Analogue TV

Contents
5. Contents - Digital TV
Digital TV Channel Setup
Basic Operation
+ Switching Channel
+ Changing the Subtitle Language
+ Changing an Audio Language
+ Programme Information - Information Banner (I-Plate)
+ MHEG Application
Channel List
+ Displaying and Switching Channel List
+ Editing Channels
+ Editing Favourite Channels
Programme Guide
+ Viewing Programme Guide Information
+ Finding a Programme
+ Adding Reservations by Guide
Setting the Preferences
+ Parental Control
+ Local Setting
+ Miscellaneous Settings
Installation
+ Automatic Search
+ Manual Search
+ Default Setting
Software Upgrade
+ OTA (Over the Air)
+ Software Update from PC
System Information
+ Status
+ Signal Detection
+ Common Interface
Game
31
32
32
32
32
33
34
35
35
35
38
39
39
40
41
42
42
43
45
46
46
47
48
49
49
52
53
53
53
54
54
55
55
56
57
57
58
60
61
62
Using the Digital TV
Appendix
Menu Map
+ LCD TV Menu
+ Digital TV Menu
Troubleshooting
+ Troubleshooting
+ Error Message
Specification
Glossary
Service and Support
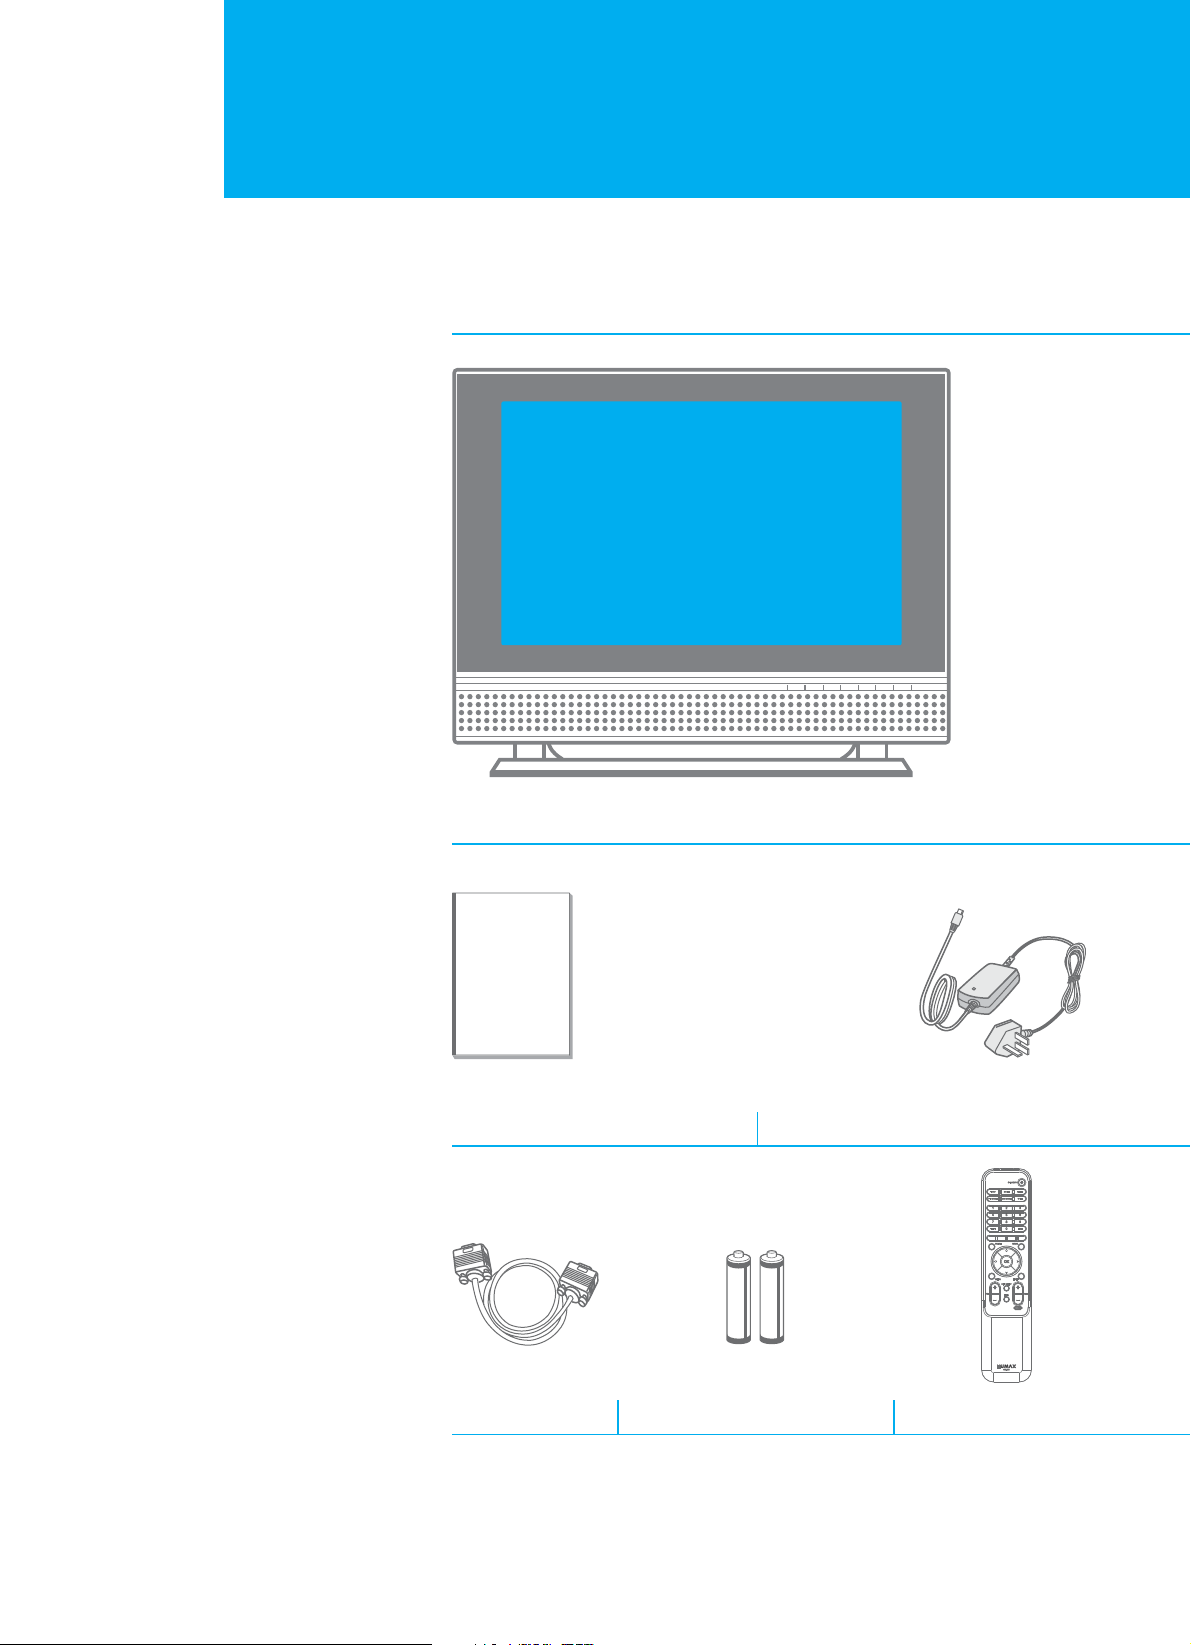
Package Contents
6. Package Contents
+ Please check all package contents before using your LCD-TV.
+ Package Contents may be different according to the area.
LCD - TV
User's Manual Power Cable/Adaptor
PC Cable Remote Control (x1)AAA Batteries (x2)
Front Panel
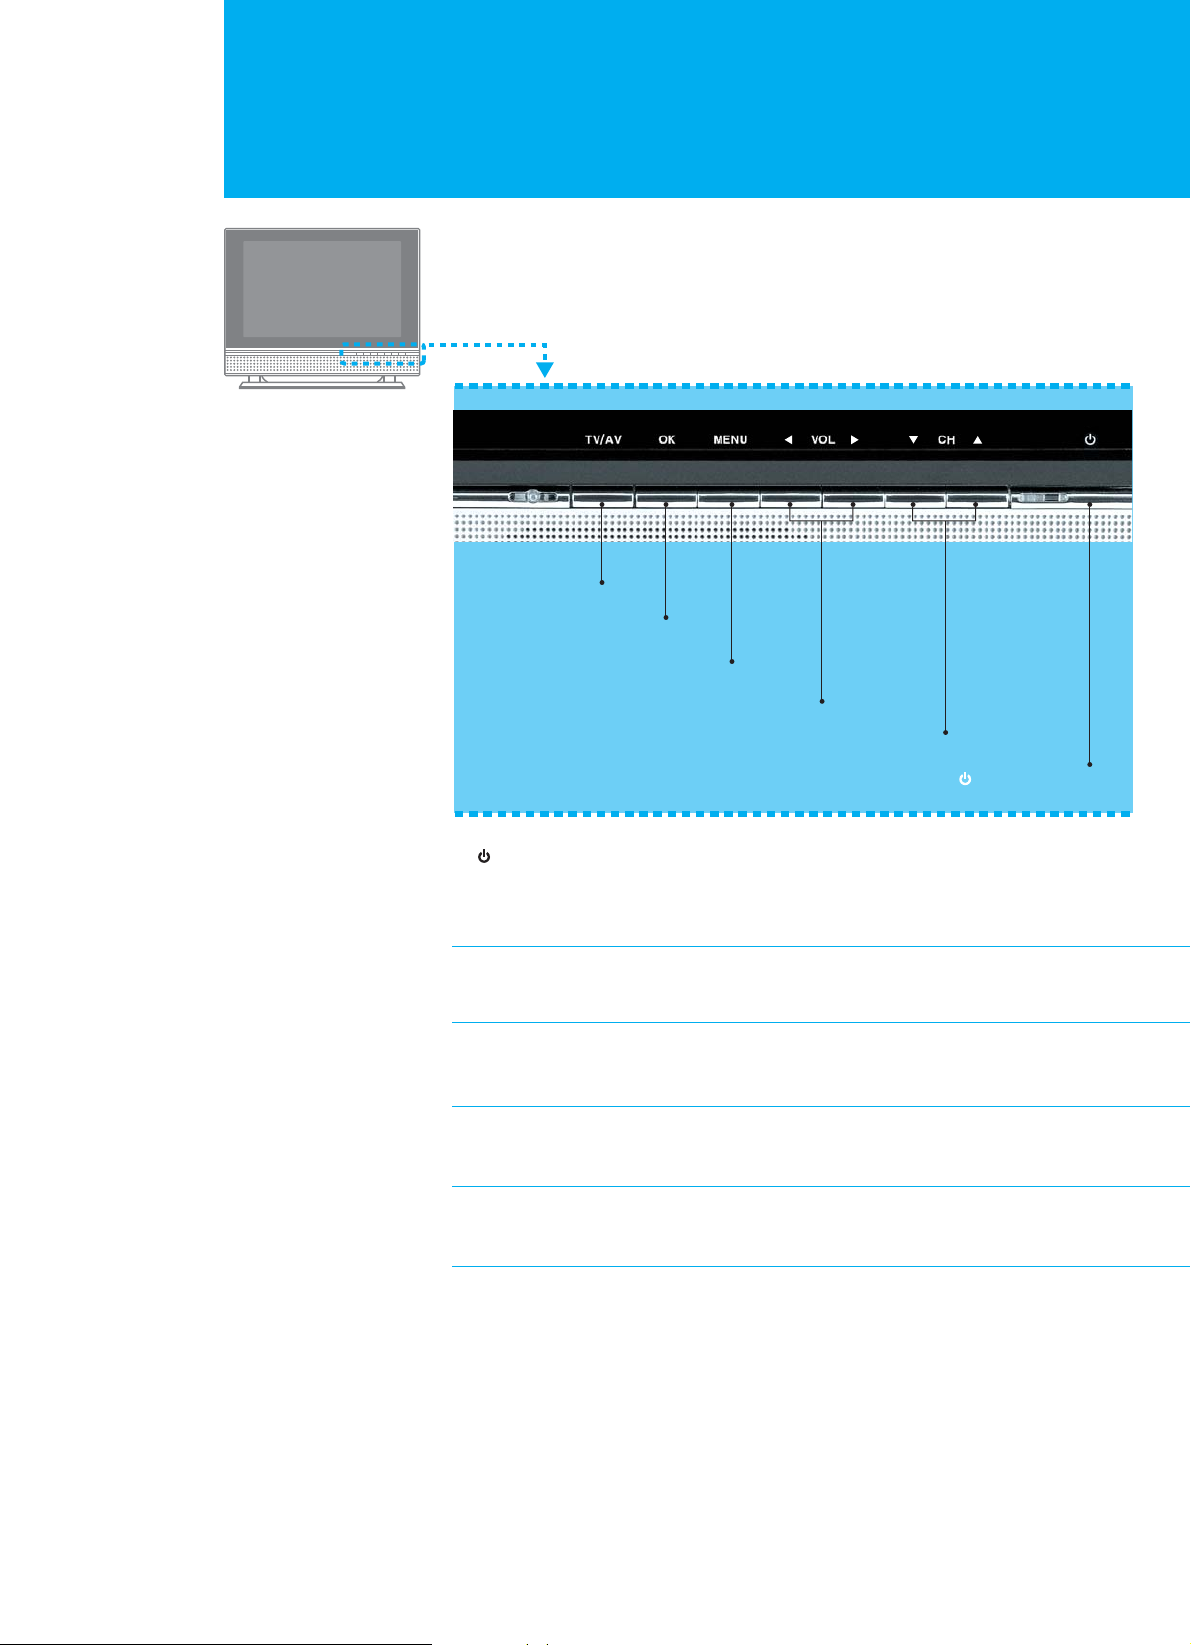
7. Front Panel
1. : STANDBY
Switches between Operation and Standby modes.
Displays Red colour when the set is in standby mode.
Changes to Green colour when the set is switched on.
2. GGCH
Selects a programme or a menu item.
3. ൖ VOL ൘
Adjusts the volume. Adjusts the menu setting.
4. MENU
Displays the menu.
5. OK
Selects a menu or confirms the selected operation.
6. TV/AV
Selects input signal (Digital TV, Analog TV, AV1, AV2, S-Video, Component, PC).
: STANDBY 1
GGCH G 2
ൖ VOL ൘G 3
MENU 4
OK 5
TV/AV 6
Green : Y
Blue : Pb
Red1 : Pr
White : Audio : L
Red2 : Audio : R
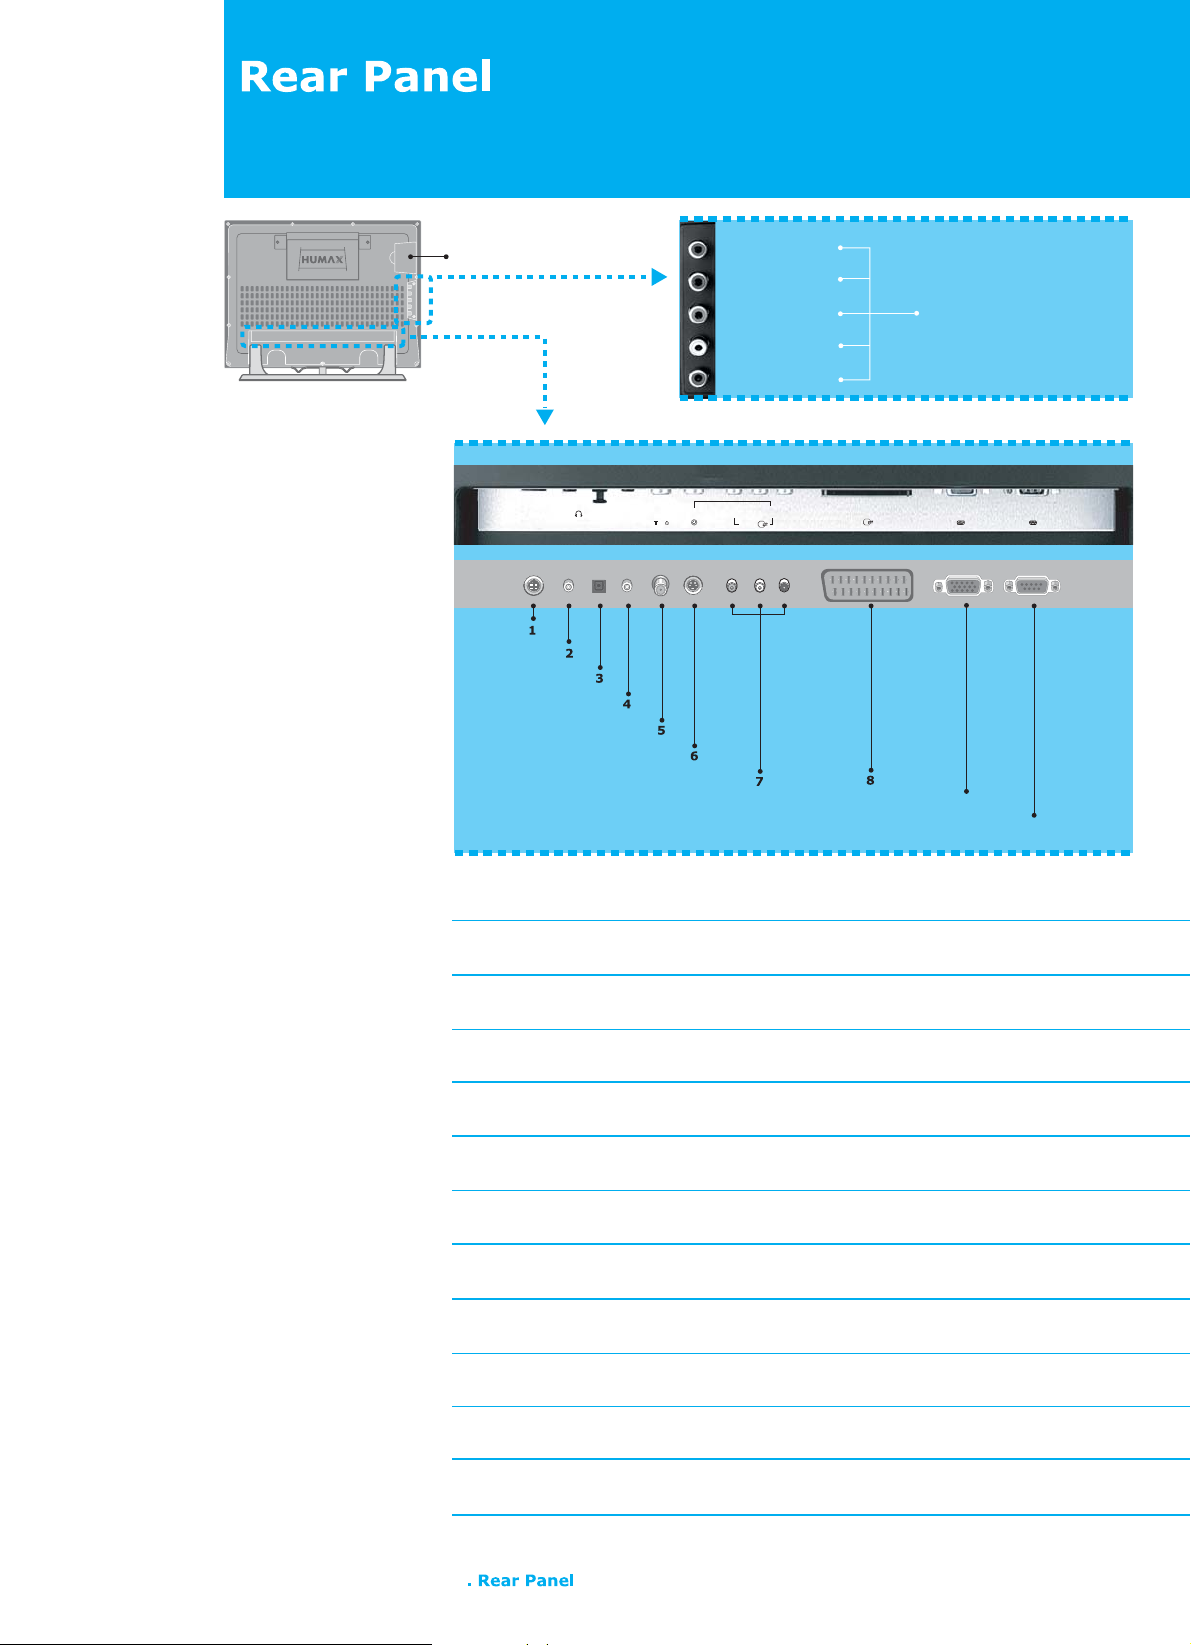
12 Common Interface
13 SMARTCARD SLOT
AV2
AV1
RS-232C
PC INPUT
11 COMPONENT
H/P
PC SOUND
DC 12V PC INPUTPC
SOUND
RS-232CS/PDIFH/P
S-VIDEO
VIDEO
ANT. IN
AV2
AV1
L-AUDIO-R
DC12V
S/PDIF
S-VIDEO
ANT. IN
9
10
1. DC12V
Connect the supplied DC power cord.
2. H/P (Headphone)
Connect to your headphone.
3. S/PDIF
Connect to Dolby digital decoder for the digital audio signal output.
4. PC SOUND
Connect to the audio output jack on your PC.
5. ANT. IN (Antenna In)
Connect to your aerial for digital and analogue TV signal.
6. S-VIDEO
Connect to an external device with S-Video output.
7. AV2 (RCA)
Connect for the video and audio input to external devices with RCA cable.
8. AV1 (SCART)
Connect for the video and audio input/output to external devices with SCART cable.
9. PC INPUT
Connect to the video output jack on your PC, using the PC cable supplied.
10. RS-232C
Connect to the RS-232C port on your PC for software upgrade.
11. COMPONENT INPUT
Connect to an external device with Component output, such as DVD.
12. COMMON INTERFACE
Use for one CA Module with a smart card.
13. SMARTCARD SLOT
Slot for Smartcard.
75
8
+/-
+ -
+/-
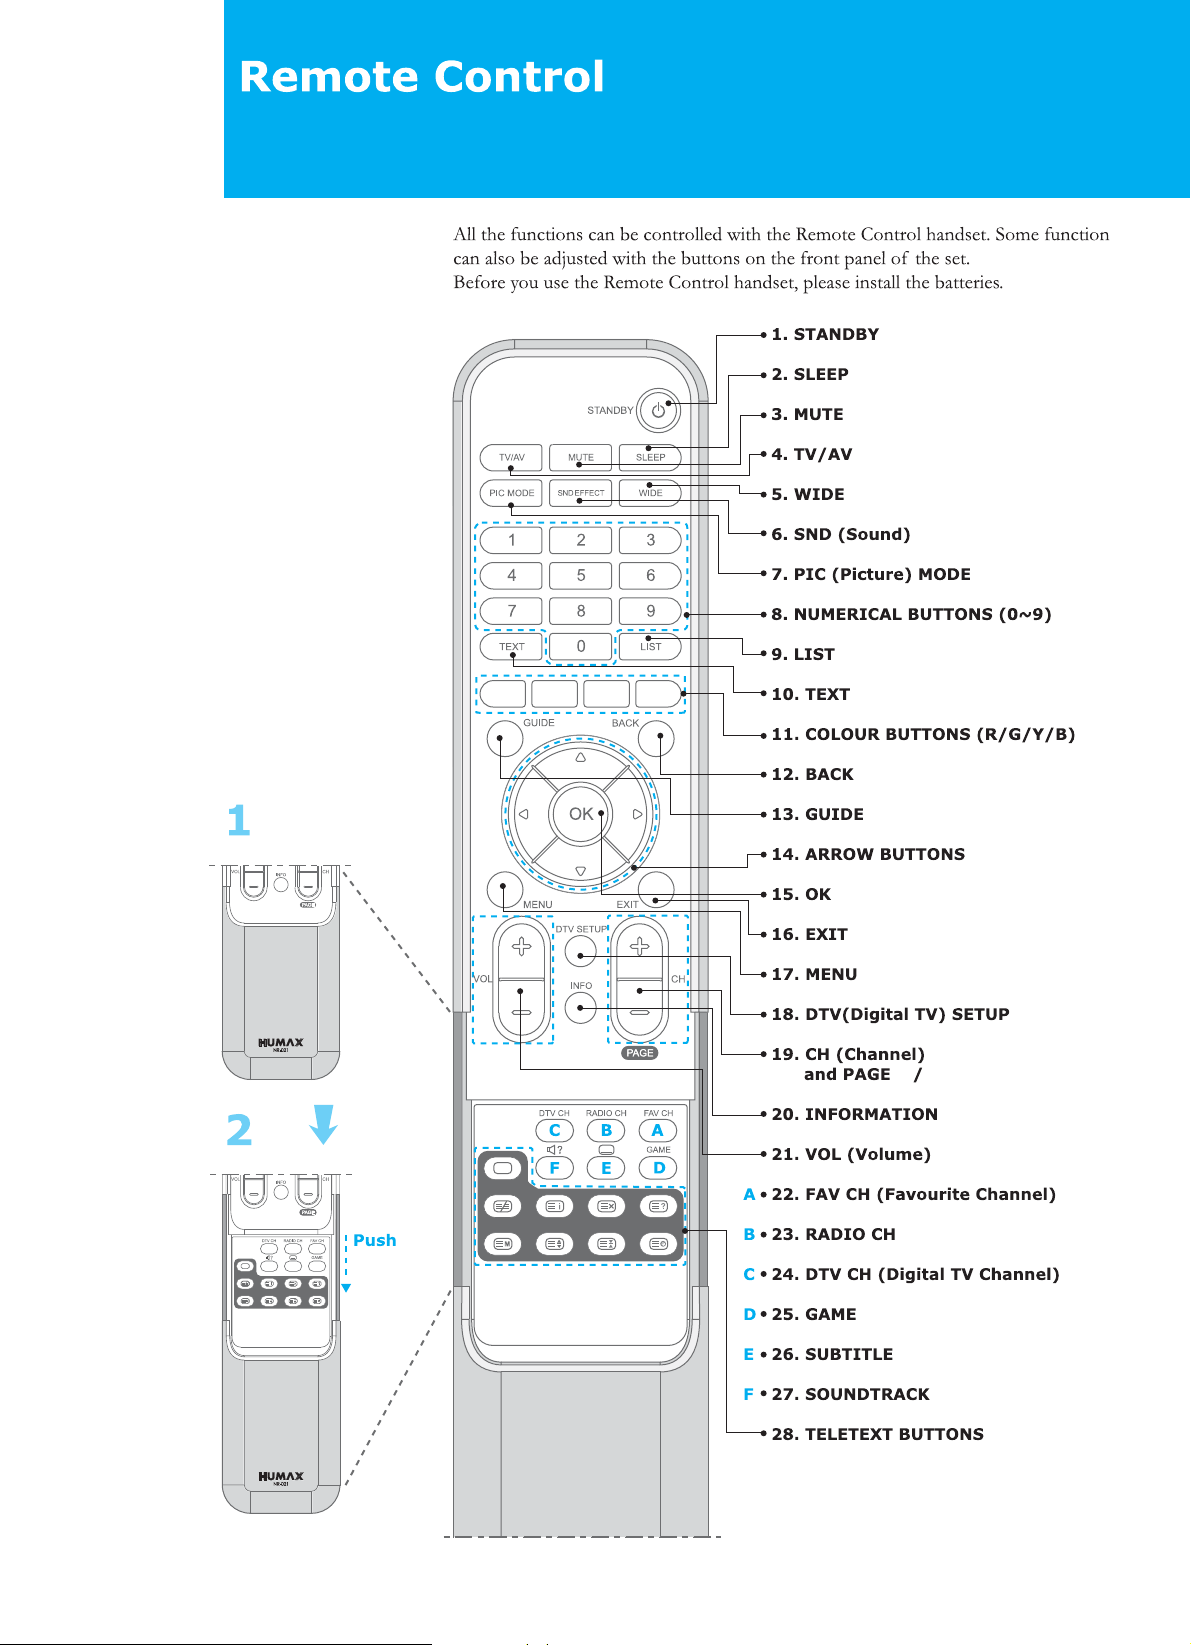
9. Remote Control
EFFECT
/AUDIO

Remote Control
10. Remote Control
1. STANDBY
Switches between Operation
and Standby modes.
2. SLEEP
Sets the sleep time.
3. MUTE
Mutes the audio.
4. TV/AV
Selects input signal between TV
and another signals.
5. WIDE
Sets the display format.
6. SND (Sound) MODE
Changes the sound mode.
7. PIC (Picture) MODE
Changes the picture mode.
8. NUMERICAL BUTTONS (0~9)
Enters a channel number or menu
option number.
9. LIST
Displays the channel list.
10. TEXT
Use the MHEG application
11. COLOUR BUTTONS (R/G/Y/B)
Selects colour keys for MHEG or EPG
in the Digital TV mode.
Selects color keys for teletext in the
Analog TV and Digital TV modes.
12. BACK
Returns to the previous menu and
screen.
13. GUIDE
Displays the Programme Guide.
14. ARROW BUTTONS ( , , , )
Moves the cursor to the up, down,
left or right menu option.
15. OK
Selects a menu, or confirms the
selected operation and displays the
channel list whilst watching a
programme.
16. EXIT
Exits the main menu or Guide
screen.
17. MENU
Displays the main menu.
18. DTV (Digital TV) Setup
Displays the DTV Setup menu in
the Digital TV mode.
19. CH +/- and PAGE +/-
Changes the Channel or Page.
20. INFORMATION
Displays the information about
the channel and programme.
21. VOL +/-
Adjusts the audio volume.
22. FAV (Favourite) CH
Displays the Favourite Channel
List in the Digital TV mode.
23. RADIO CH
Switches to digital Radio
channel.
24. DTV (Digital TV) CH
Switches to digital TV channel.
25. GAME
Displays the game menu.
26. SUBTITLE
Changes the subtitle language.
27. SOUNDTRACK/AUDIO
Lists alternative soundtracks
enable stereo, dual or mono
sound.
28. TETETEXT BUTTONS
Teletext Off
Used to deactivate teletext service.
Teletext On/Mix
Used to view the teletext information.
Used to overlap the teletext with the
broadcasting screen.
Index
Used to display the teletext index.
Cancel
Used to display the broadcast when
searching for a page.
Reveal
Used to reveal the hidden text.
Mode
Used to select the teletext mode.
(LIST/FLOF)
Size
Used to display the double-size letters.
Hold
Used to hold the teletext page.
Sub-Page
Used to display the teletext sub-page.
A
B
C
D
E
F
Remote Control
11. Remote Control
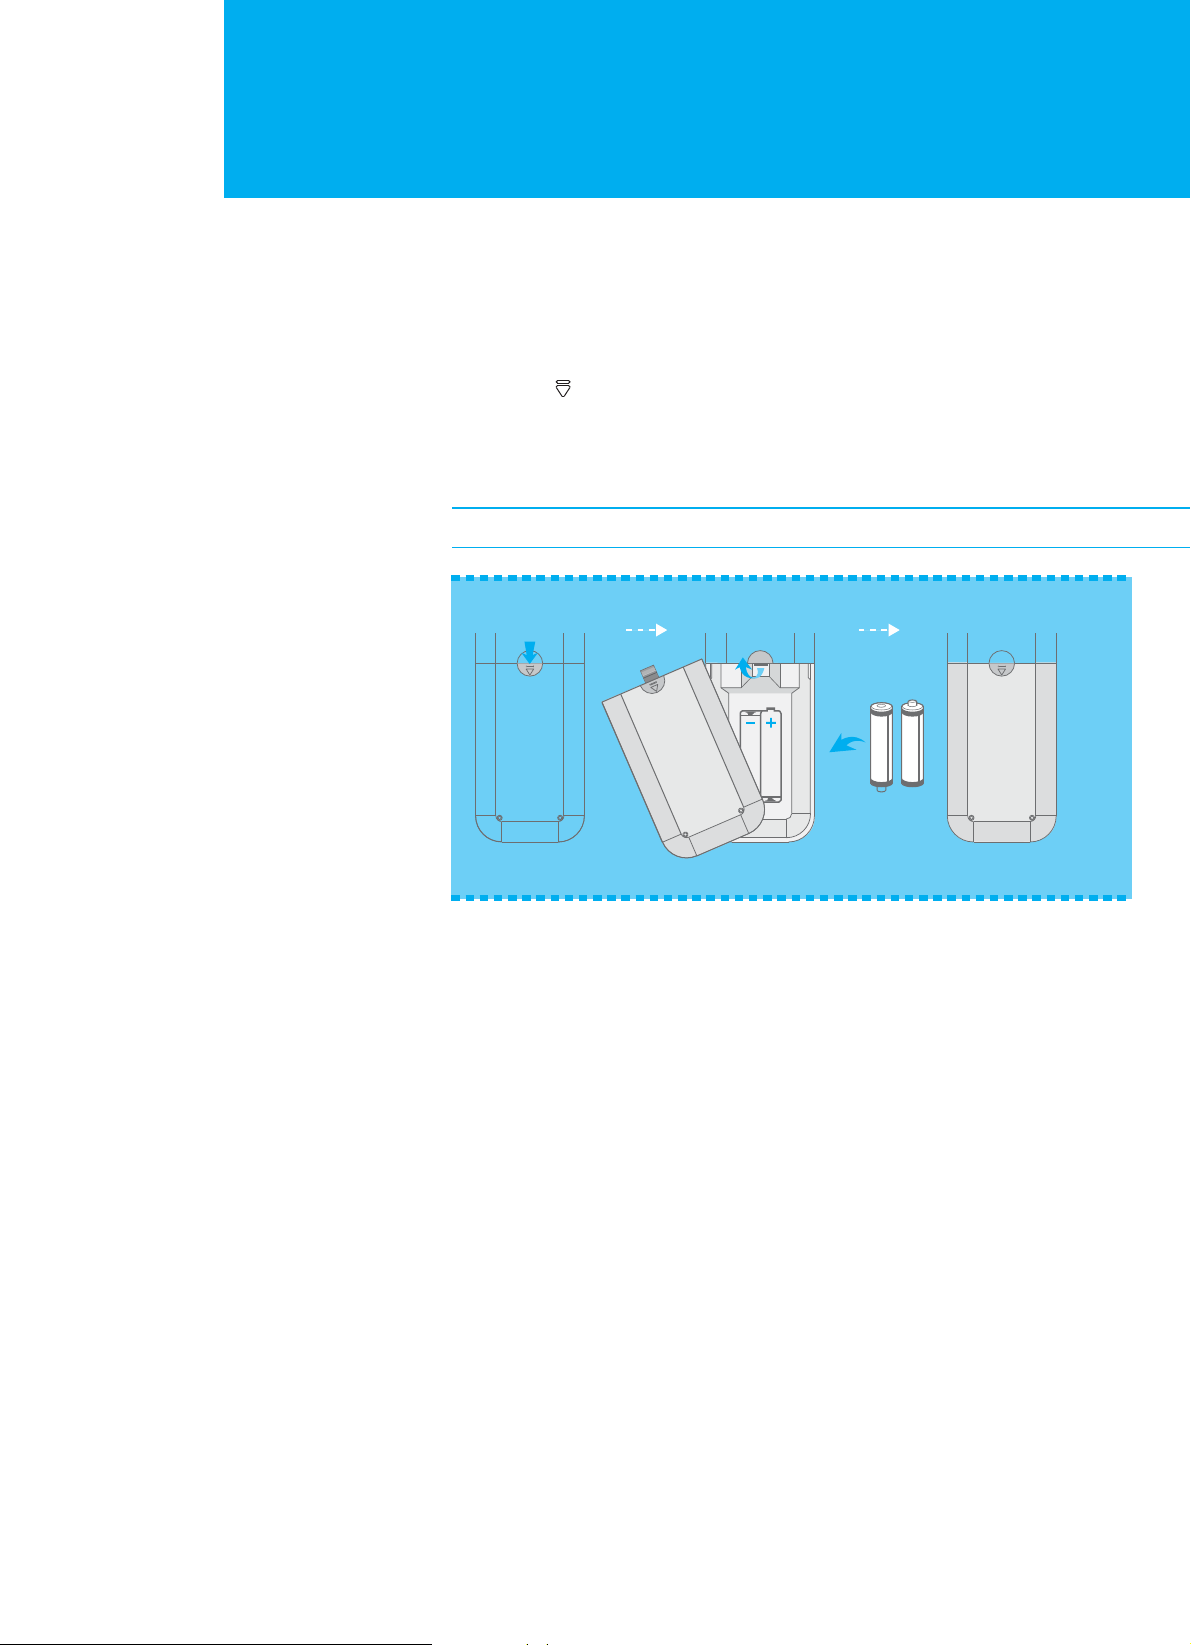
Inserting the Batteries into the Remote Control
You must insert or replace the batteries in the remote control when you:
+ Purchase the TV.
+ Find that the remote control is no longer operating correctly.
1. Remove the cover on the rear of the remote control by pressing the
symbol ( ) downwards and then pulling firmly to remove it.
2. Insert two AAA size 1.5V batteries ensuring that the "+" and "-" ends of the
batteries are correctly aligned.
3. Replace the cover.
Note : Do not mix battery types, i.e. alkaline and manganese.
12 3
Pull
Lock
Push
Insert
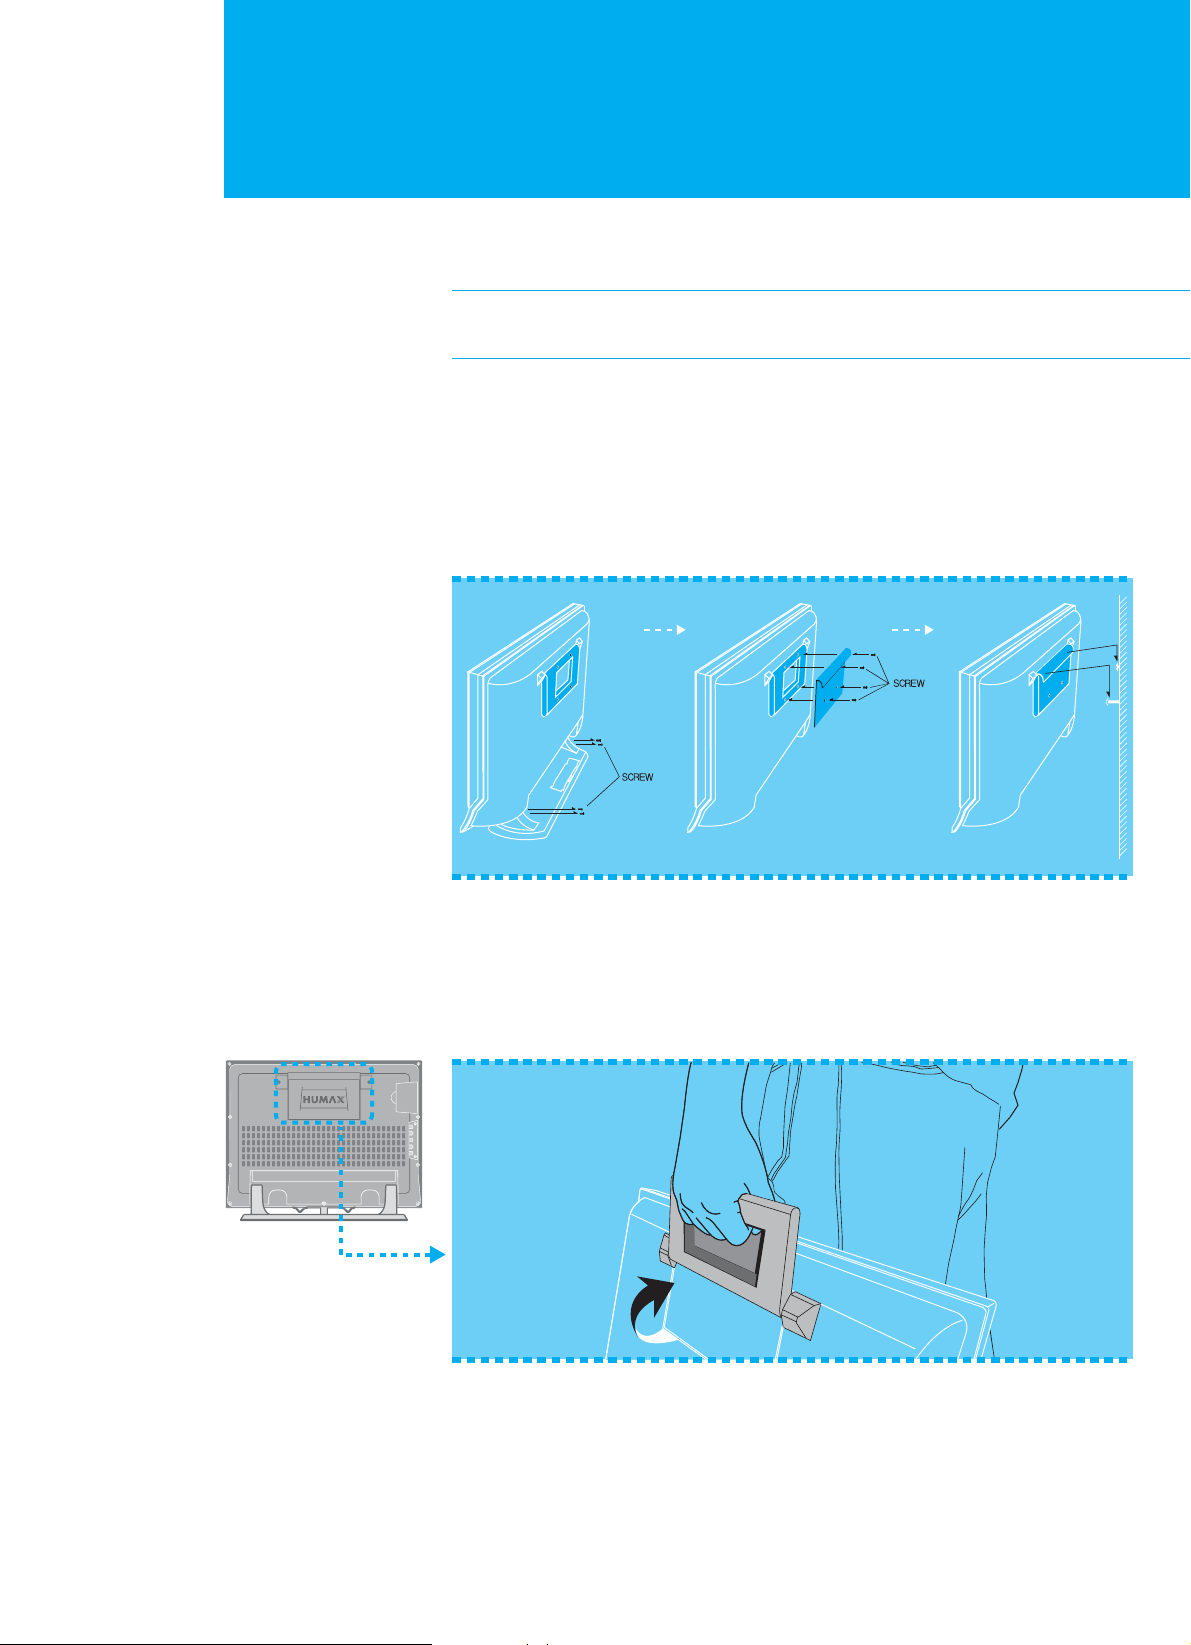
Mounting Device
12. Mounting Device
12 3
This describes how to set up the LCD-TV. Select the most appropriate procedure
depending on your requirements.
If you encounter any problem when setting up the LCD-TV, please contact
your local LCD-TV distributor.
Installing on the Wall
You can install the TV on the wall using a mounting bracket (sold separately).
To reduce the risk of damage from falling, this TV should be secured at all times.
Do not install on a weak surface such as plaster or foam board.
Before you install the TV on the wall, separate the LCD and stand-base.
Convenient Movement
You can move your LCD TV to other place conveniently.
Connecting the External Equipment
13. Connecting the External Equipment
VCR
Video Game
Device
Video Disc
player
Decorder Satellite
receiver
DVD player Camcorder
AV
DC 12V PC INPUTPC
SOUND
RS-232CS/PDIFH/P
S-VIDEO
VIDEO
ANT. IN
AV2
AV1
L-AUDIO-R
75
ANT. IN
DC 12V
PC
SOUND
S/PDIF
ANT. IN
H/P
75
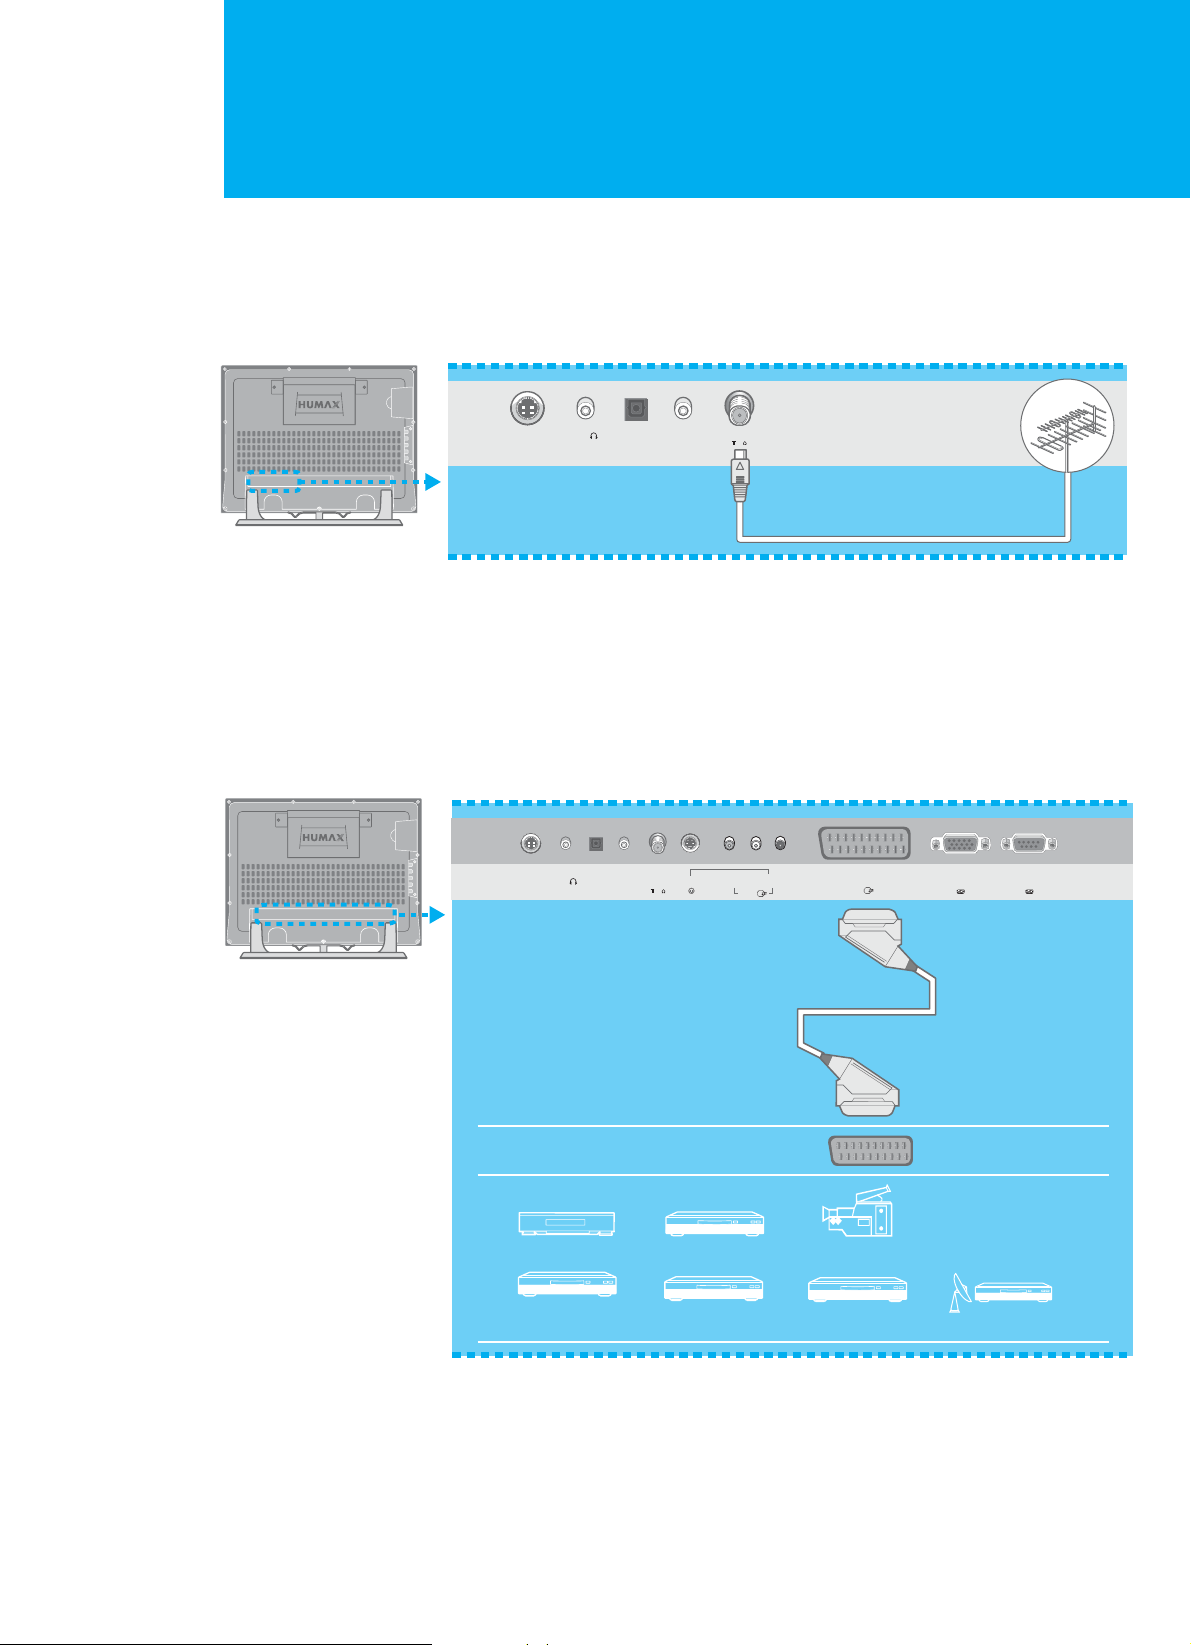
Connecting to an Aerial
To view the TV channels correctly, a signal must be received by the TV.
Connect the aerial or network input cable to the ANT.IN jack on the rear of the TV.
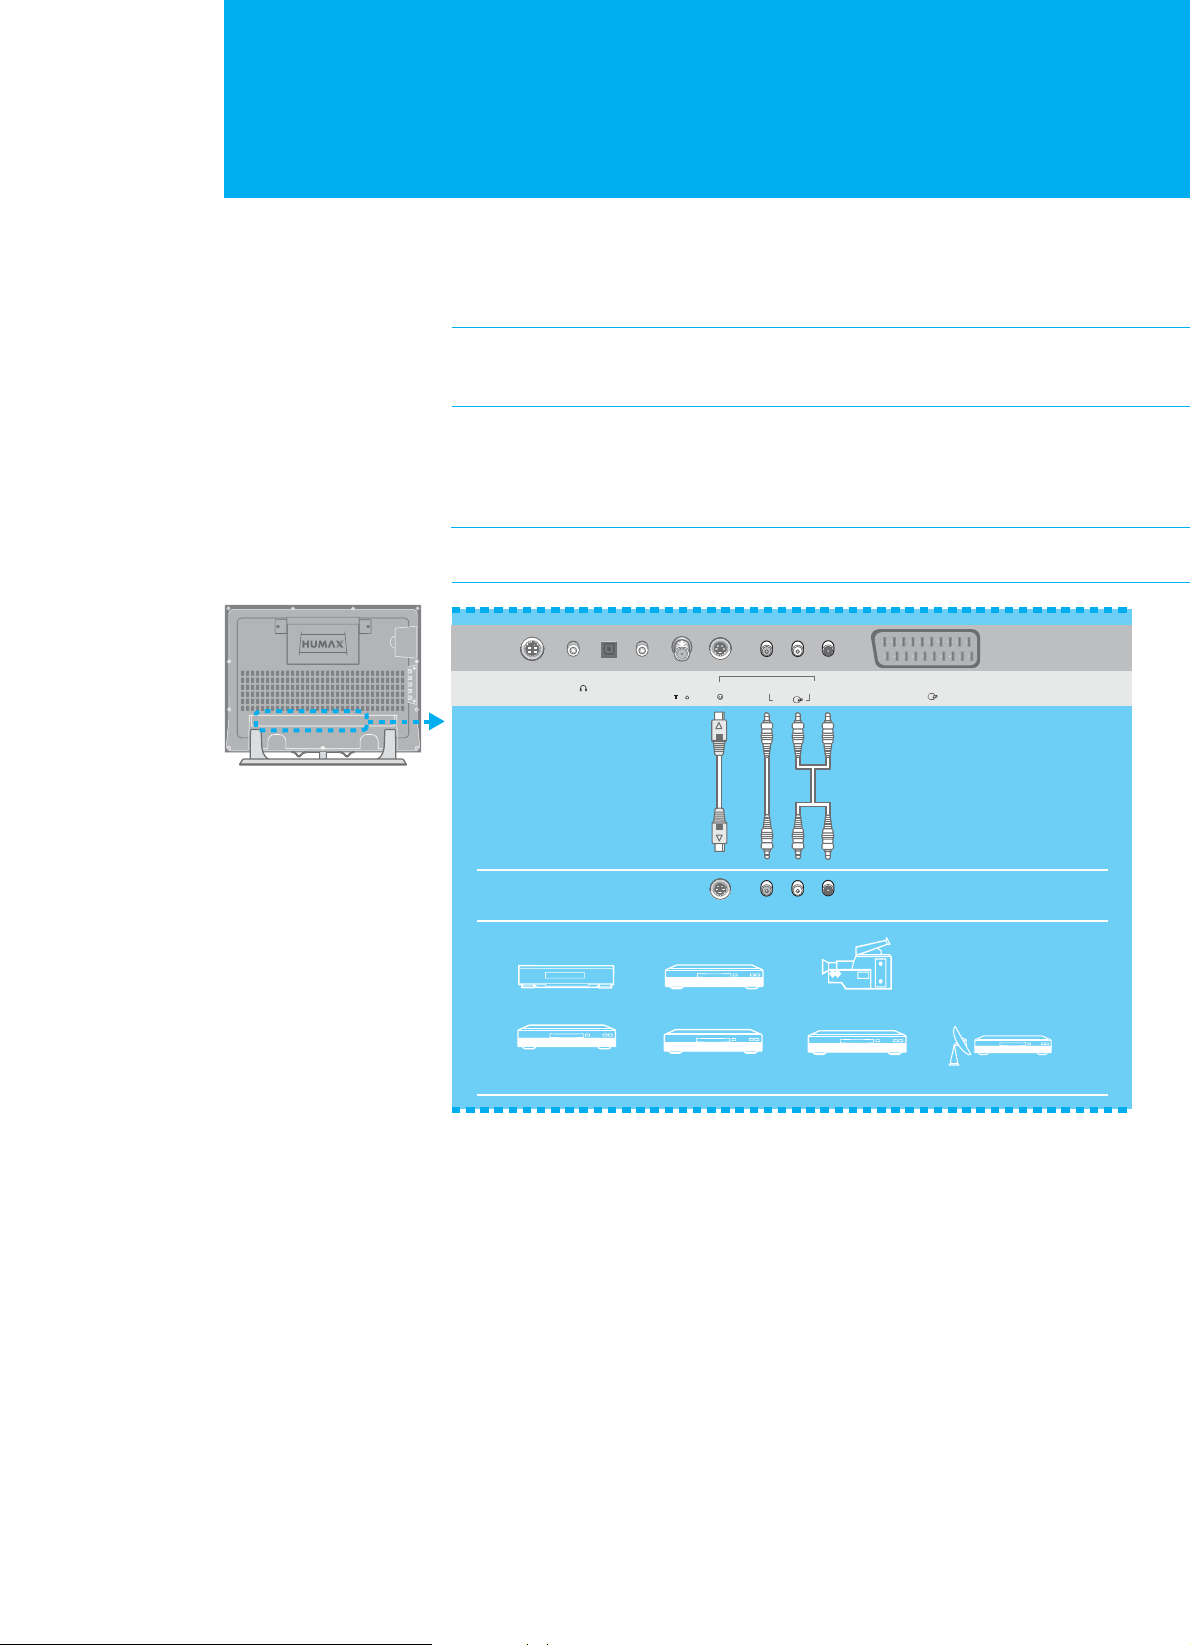
Using the SCART cable
1. Connect the SCART cable between the AV1 input jack on the TV and the video
output jack on the required equipment.
2. Turn the TV on, then press the TV/AV button to select AV1.
Connecting the External Equipment
14. Connecting the External Equipment
VCR
Video Game
Device
Video Disc
player
Decorder Satellite
receiver
DVD player Camcorder
DC 12V PC
SOUND
S/PDIFH/P
S-VIDEO
S-VIDEO
VIDEO
ANT. IN
AV2
AV1
L-AUDIO-R
YLR
75
Using the Audio/Video cable
1. Connect the video cable between the VIDEO (AV2) input jack on the TV and
the video output jack on the required equipment.
Note : For the equipment with an S-VIDEO jack, connect the S-Video cable
between the S-VIDEO input jack on the TV and the S-Video output jack
on the required equipment.
2. Connect the audio cable between the AUDIO-L/R (AV2) input jack on the TV
and the audio output jack on the required equipment.
3. Turn the TV on, then press the TV/AV button to select AV2.
Note : If you have connected the TV and the required equipment using an
S-Video cable, select S-Video
.
ൖor൘
Connecting the External Equipment
15. Connecting the External Equipment
Green : Y
Blue : P
b
Red1 : Pr
White : AUDIO : L
Red2 : AUDIO : R
R
L
Y
Pb
Pr
VCR
Video Game
Device
Video Disc
player
Decorder Satellite
receiver
DVD player Camcorder
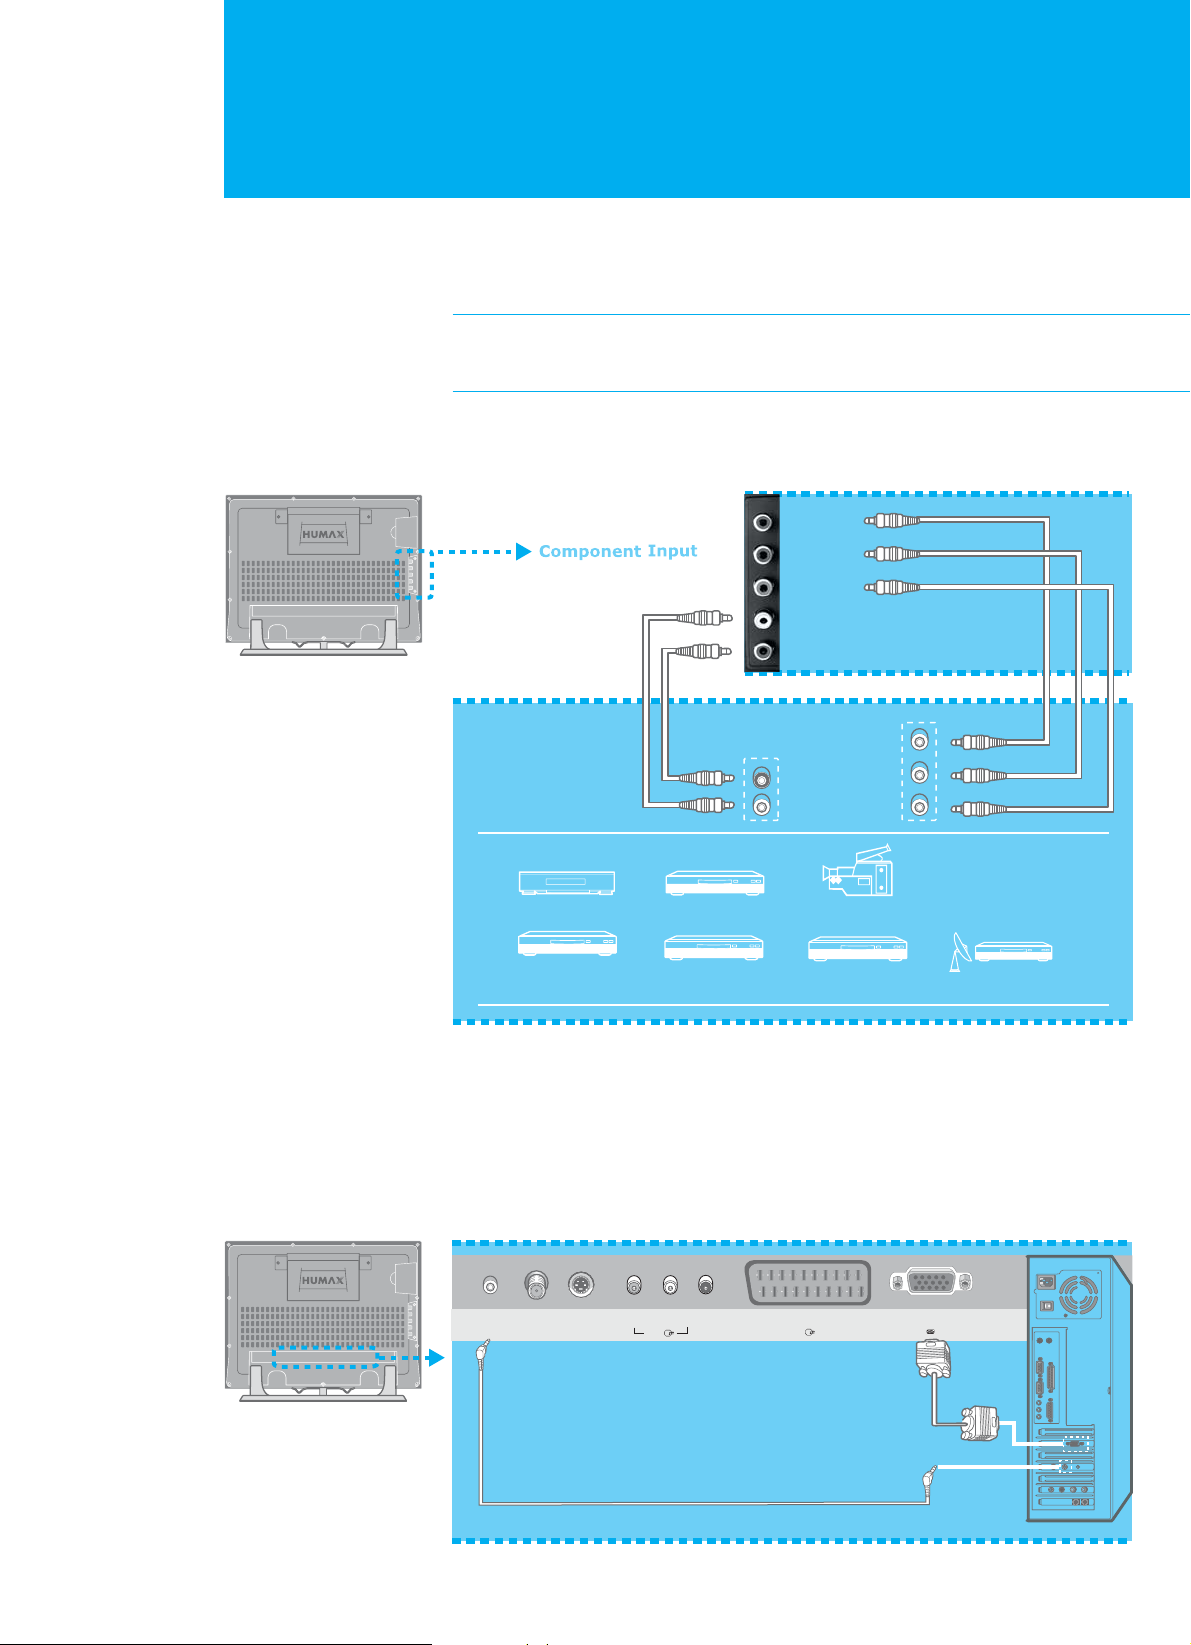
Connecting to the Component Input
1. Connect the video cable between the Component VIDEO (Y/Pb/Pr) input
jacks on the TV and the video output jacks on the required equipment.
Note : Depending on the manufacturer, the Y/Pb/Pr jacks may be
identified as Y/PB/PR, Y/B-Y/R-Y or Y/CB/CR. Component video
input support 480i/576i/480p/576p/720p resolution input.
2. Connect the audio cable between the Component AUDIO-L/R input jacks
on the TV and the audio output jacks on the required equipment.
3. Turn the TV on, then press the TV/AV button to select Component.
PC INPUT
PC SOUND
PC
SOUND
S-VIDEO
VIDEO
ANT. IN
AV2
AV1
L-AUDIO-R
PC INPUT
Connecting a PC
1. Connect the PC cable between the PC INPUT jack on the TV and the PC output
jack on the PC.
2. Connect the audio cable between the PC SOUND jack on the TV and the audio
output jack on the PC.
3. Turn the TV on, then press the TV/AV button to select PC.
Watching TV
16. Watching TV
Switching On and Off
1. Connect the power cord of the TV to a wall outlet.
2. Press the STANDBY, TV/AV or CH /Gbutton on the front of the TV or
press the STANDBY, TV/AV, CH-/CH+ or numeric (0~9) buttons on the
remote control to switch the TV on.
Note : To place the TV in standby mode, press the STANDBY button
again on the remote control or on the front of the TV.
It can be useful when you wish to interrupt viewing temporarily
(during a meal, for example).
3. To turn the TV power off, disconnect the power cord on the rear of the TV.
Note : Do not leave the TV in standby mode for too long (on holiday,
for example). Turn the TV off by disconnecting the power cord
on the rear of the TV.
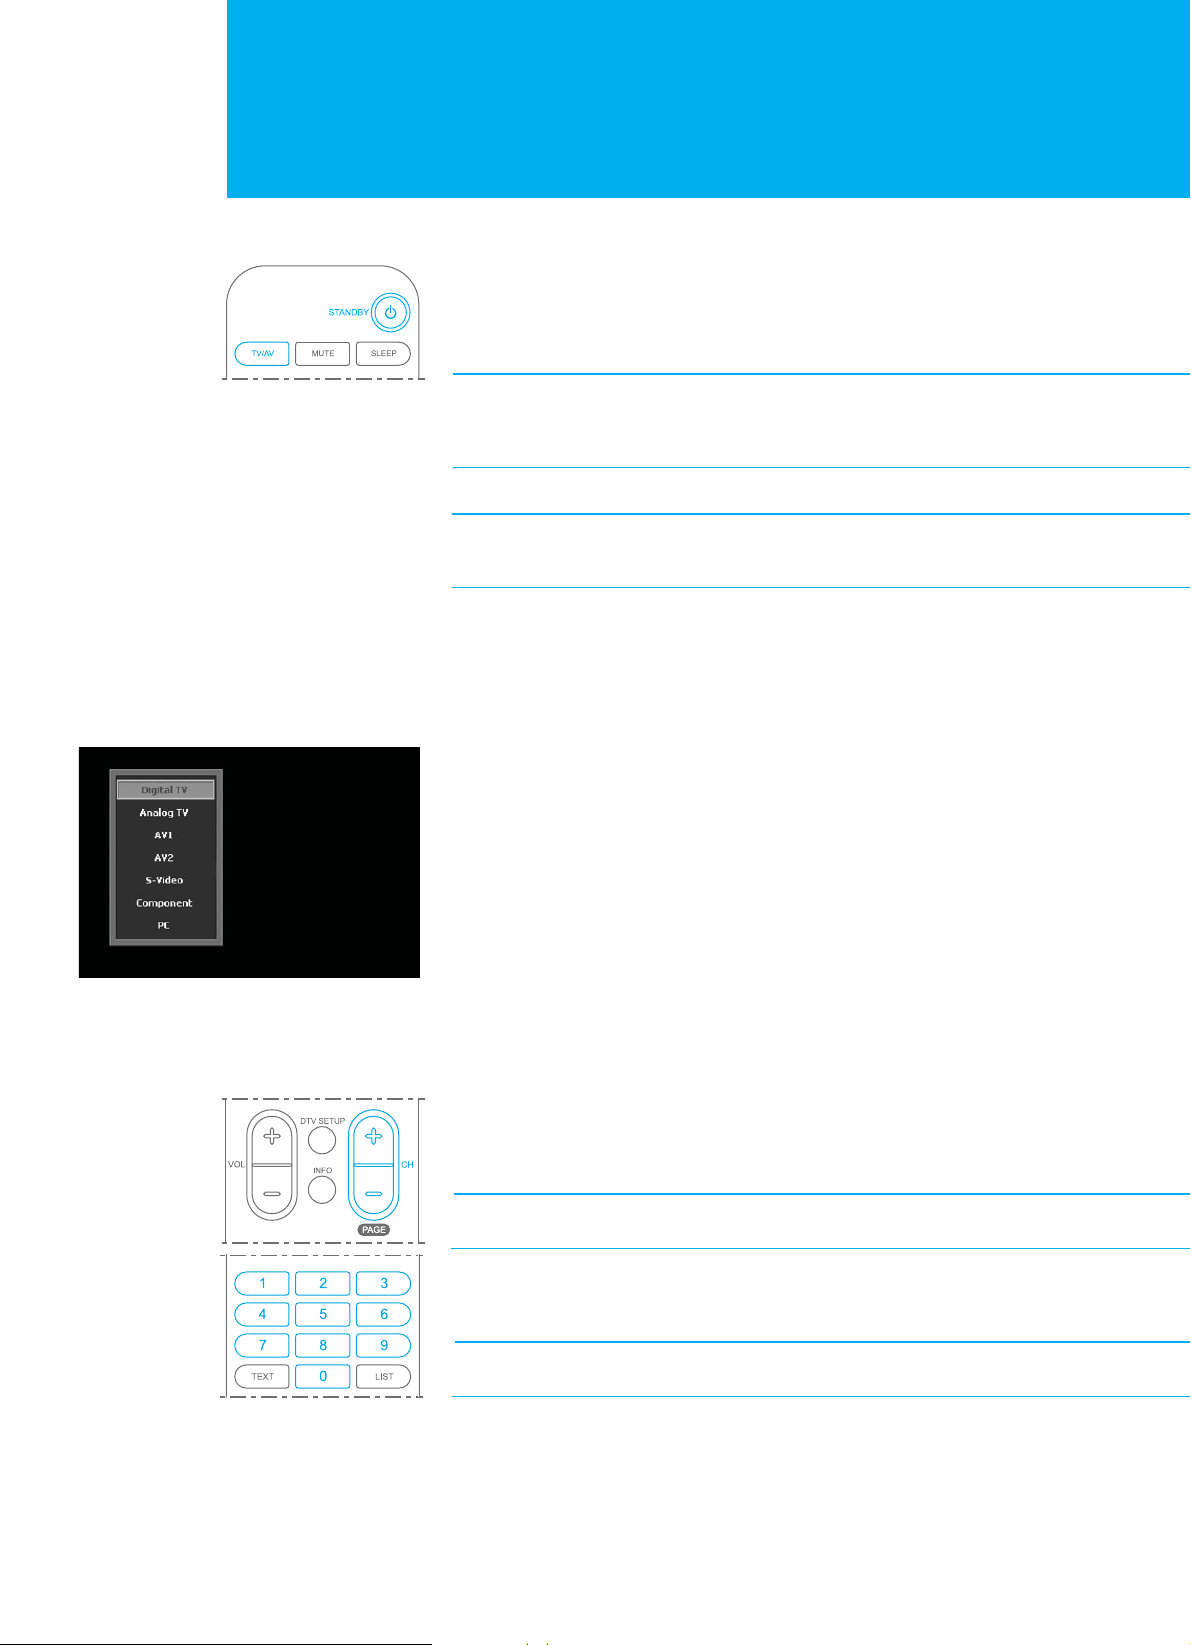
Viewing the Input Source
Once you have connected up your various audio and video systems, you can view
different sources by selecting the appropriate input.
1. Press the TV/AV button.
2. Press the Gor Gbutton to select required input source as followings.
Digital TV - Analog TV - AV1 - AV2 - S-Video - Component - PC
3. Press the OK button. It is switched to selected source.
Changing Channels
Using the CH-/CH+ buttons
Press the CH- () or CH+ () button. The TV changes channels in sequence.
You can select all channels that the TV has memorized.
Note : You can not select channels that were either erased or not
memorized.
Using the numeric (0~9) buttons
Press the numeric buttons to quickly tune to any channel.
Note : You can select all channels that were either erased or not
memorized.
Watching TV
17. Watching TV
Displaying Information
You can display the channel information and setting status you selected by
pressing the INFO button. Press it again to exit.
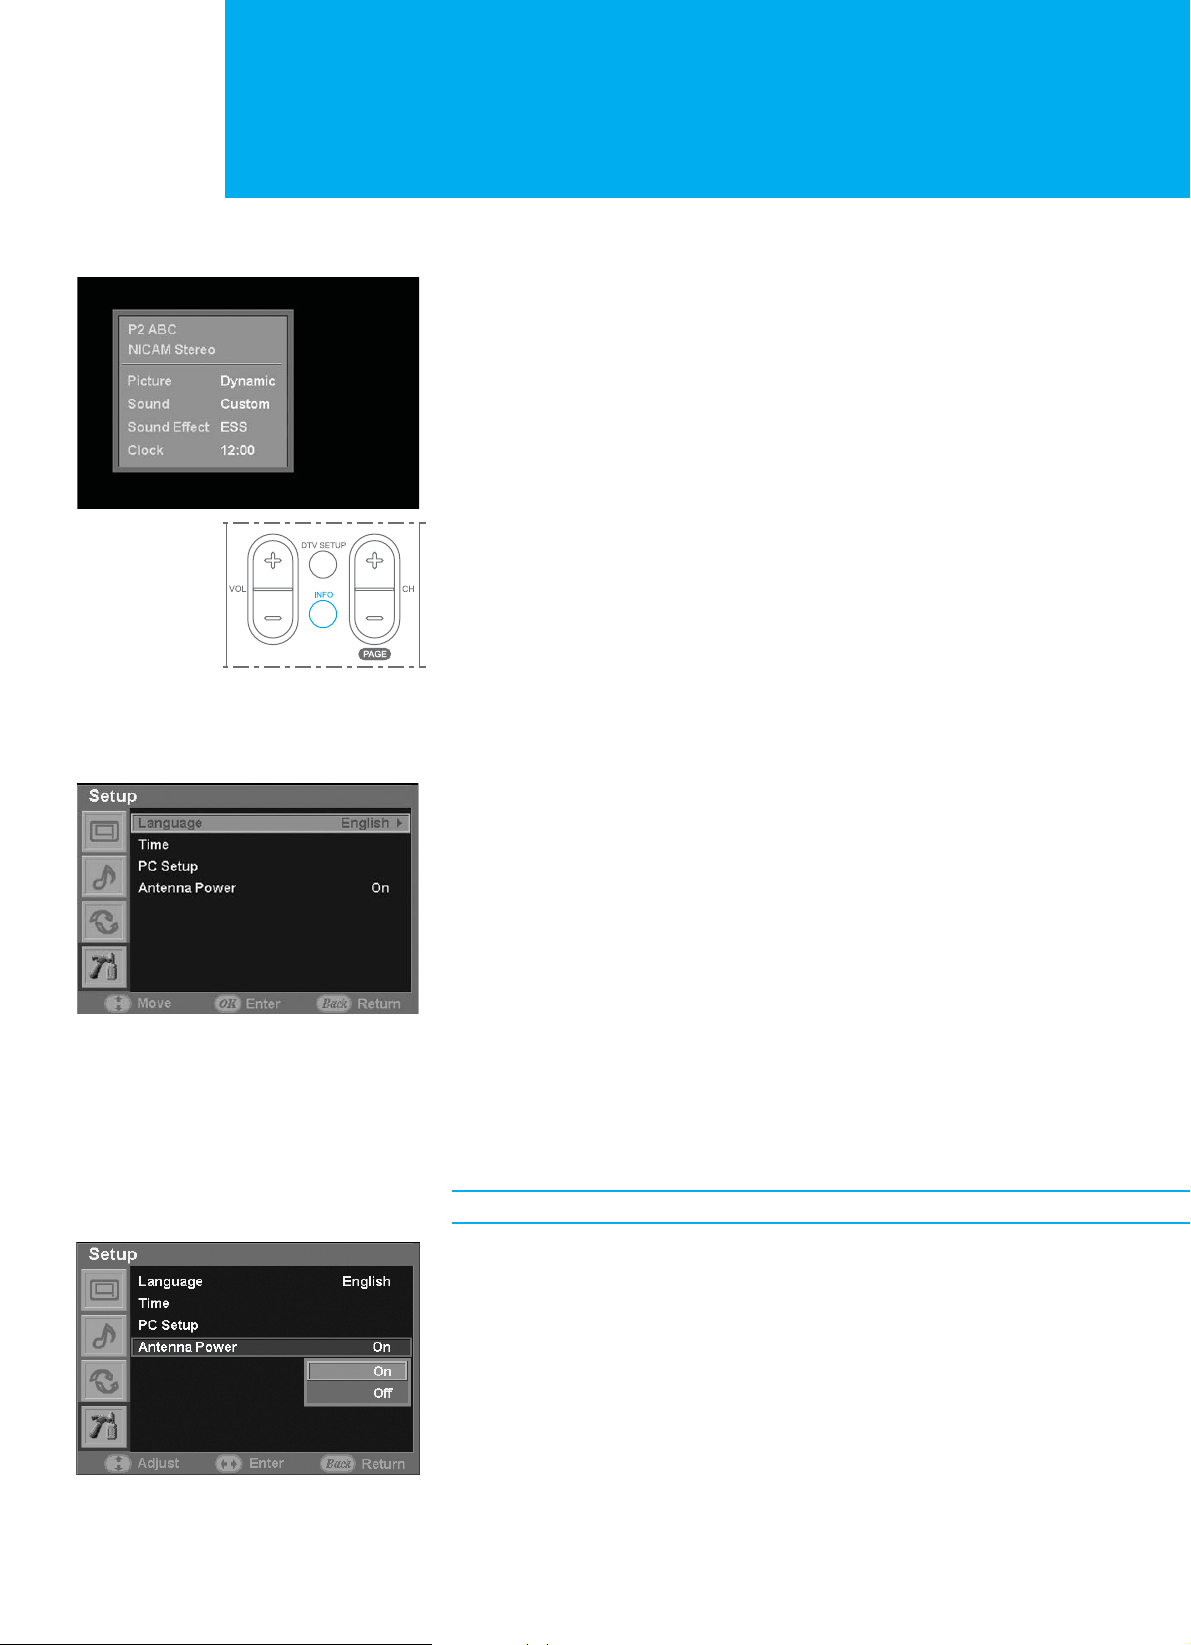
Choosing Your Language
When you start using your TV for the first time, you must select the language
which will be used for displaying menus and indications.
1. Press the MENU button.
2. Press the or button to move to Setup, then press the OK button.
The Language is selected.
3. Press the OK button again.
4. Press the ൖGor ൘ button to select required language.
Setting the Antenna Power
Note : It is enabled when an antenna is connected.
1. Press the MENU button.
2. Press the or button to move to Setup, then press the OK button.
3. Press the or button to move to Antenna Power, then press the OK button.
4. Press the or button to select required option (On or Off).
Setting up Channels
18. Setting up Channels
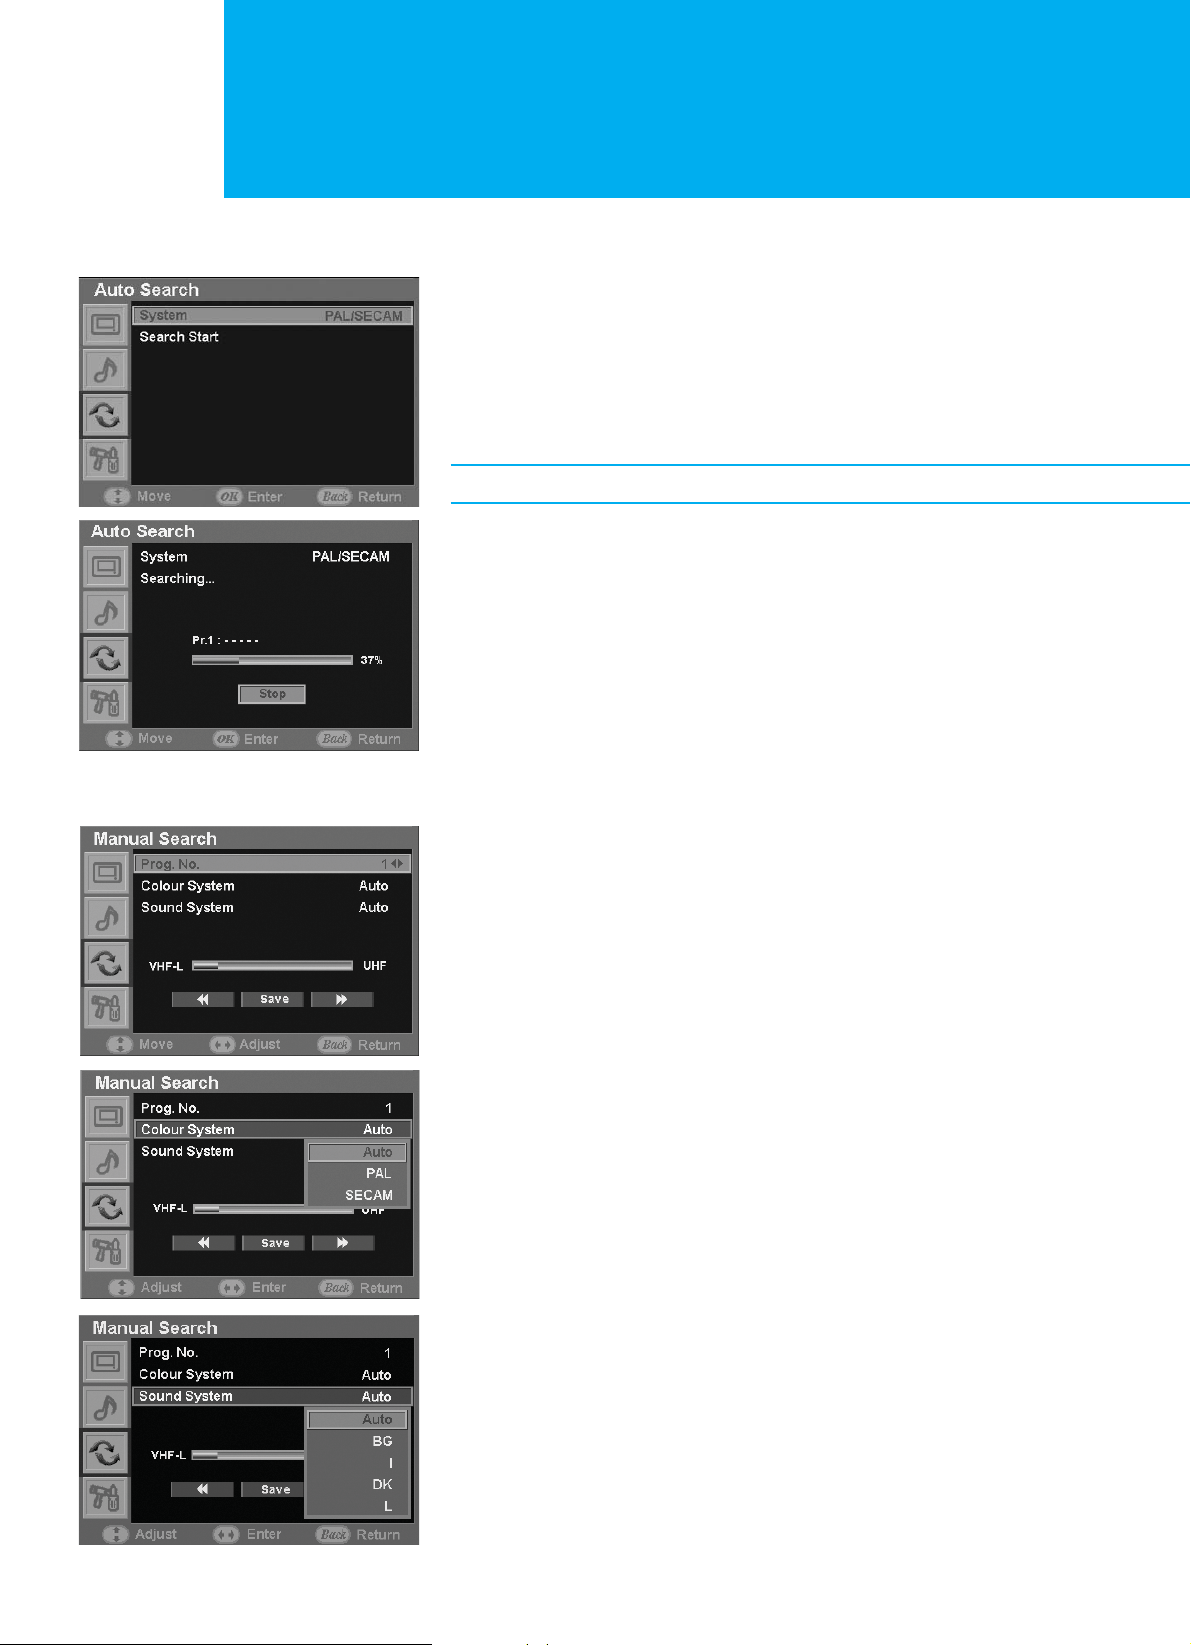
Scanning Channels Automatically
You can automatically scan channels for the frequency ranges available (availability
depends on your country).
1. Press the MENU button.
2. Press the or button to move to Channel, then press the OK button.
The Auto Search is selected.
3. Press the ൘GorGOK button again. The System is selected.
Note : In France, you can select the France by pressing the OK button.
4. Press the or button to move to Search Start, then press the OK button.
The scan starts. The scanned channels are automatically stored in the order.
If you want to stop, press the BACK button.
Scanning Channels Manually
You can choose whether or not to store each of the channels found and the
programme number of each stored channel which you wish to identify.
1. Press the MENU button.
2. Press the or button to move to Channel, then press the OK button.
3. Press the or button to move to Manual Search, then press the OK
button. The Prog. No. is selected.
4. Press the ൖGor ൘ button to select the programme number to be assigned.
If you do not know the programme numbers, move to Save by pressing
the or button and start the search by pressing the ൖGor ൘ button.
The tuner scans the frequency range until the first programme or the
programme that you selected is received on your screen.
5. Press the or button to move to Colour System, then press the OK
button.
6. Press the or button to select required broadcasting standard (Auto,
PAL, or SECAM), then press the ൖGor ൘Gbutton.
7. Press the or button to move to Sound System, then press the OK
button.
8. Press the or button to select required sound standard (Auto, BG, I,
DK or L), then press the ൖGor ൘
button.
9. Press the or button to move to Save, then press the OK button to
store your settings.
Setting up Channels
19. Setting up Channels
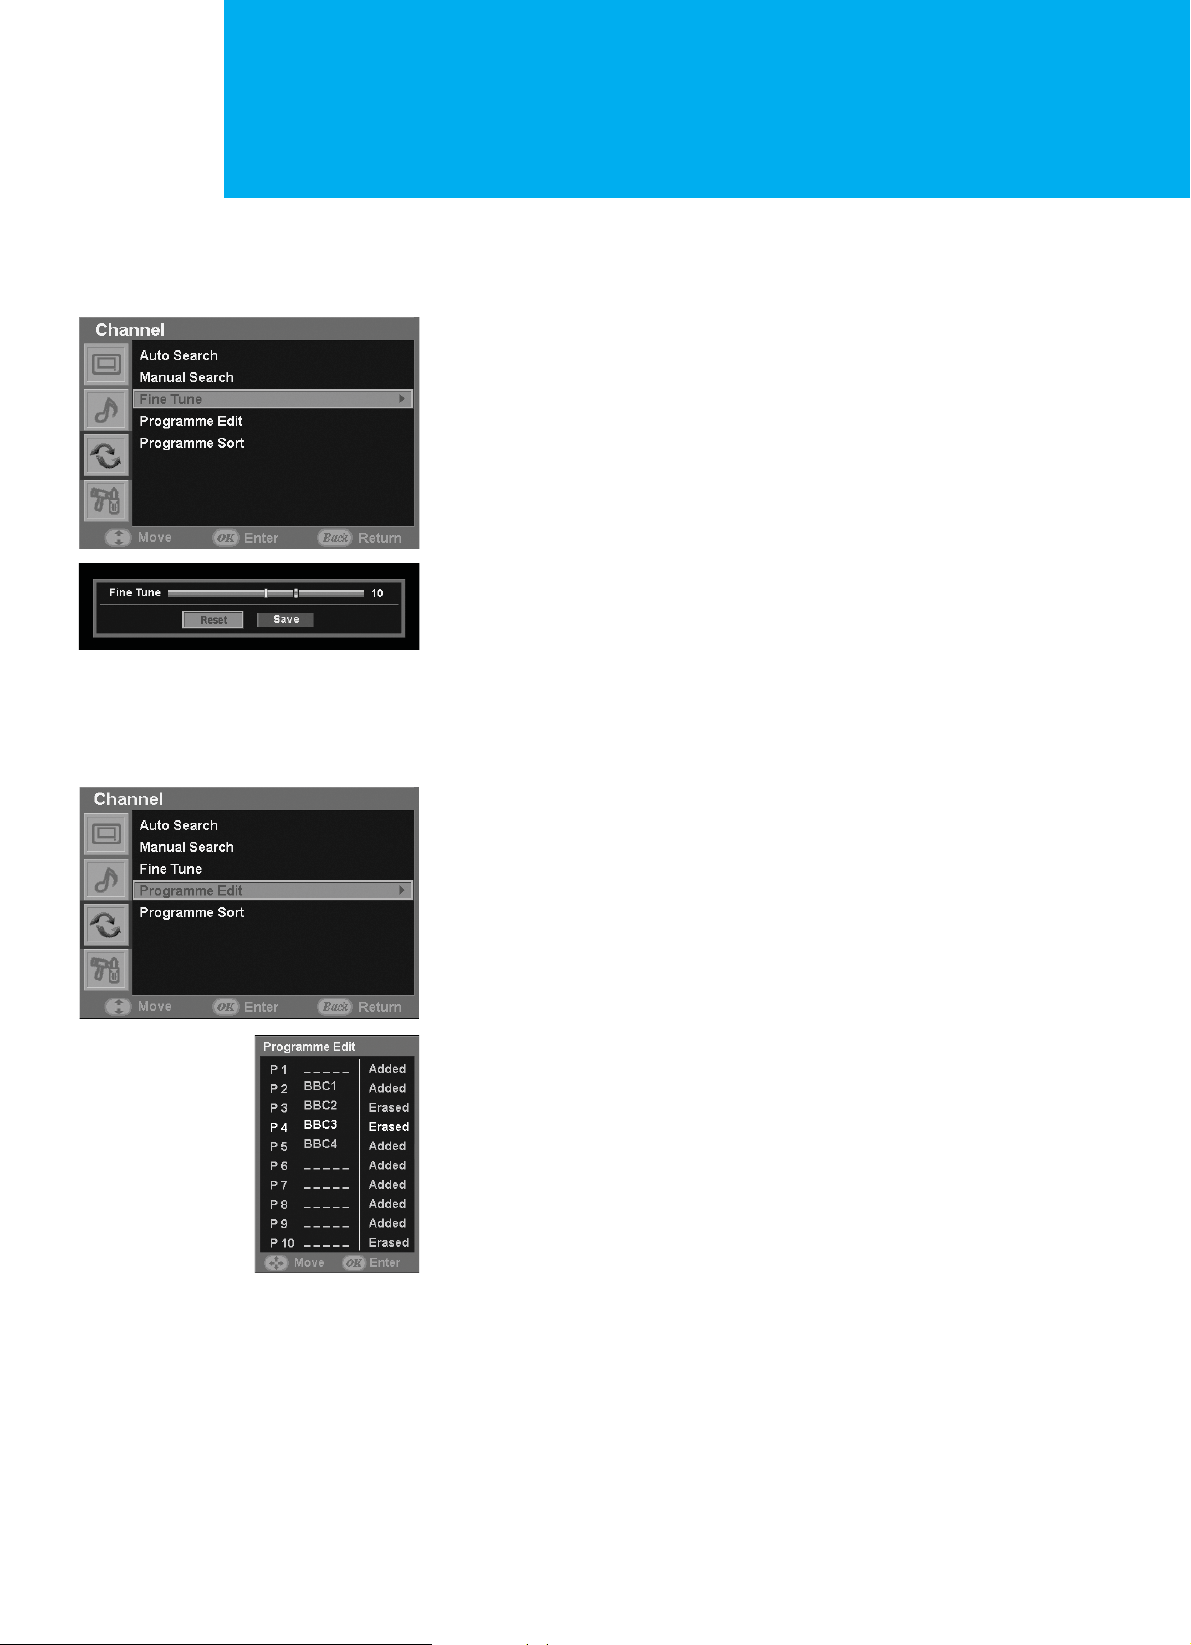
Fine Tuning Channel Reception
If the signal is weak or distorted, you may have to fine tune the channel manually.
1. Press the MENU button.
2. Press the or button to move to Channel, then press the OK button.
3. Press the or button to move to Fine Tune, then press the OK button.
4. Press the ൖGor ൘ button to obtain a good quality of the picture and sound
until you reach the optimal setting.
5. Press the button to move to Save, then press the OK button.
6. To reset the fine tuning to 0, move to Reset by pressing the ൖ button and
press the OK button.
7. Press the BACK button to return to the previous menu.
Adding and Erasing Channels
You can add channels that were not memorized or delete unwanted channels
from memory.
1. Press the MENU button.
2. Press the or button to move to Channel, then press the OK button.
3. Press the or button to move to Programme Edit, then press the OK
button.
4. Press the or button to select the programme to be added or erased,
then press the ൖGor ൘ button.
5. Press the OK button repeatedly to select Added or Erased.
6. Press the BACK button to return to the previous menu.
 Loading...