


HD Digital Receiver
User’s Manual
HD-FOX T2
The default password is 0000.
Notice
English
Thank you for purchasing a HUMAX product. Please read this user’s manual carefully to be able to safely install, use and maintain the product at maximum performance. Keep this user’s manual next to your product for future reference. The information in this user’s manual is subject to change without notice.
Copyright (Copyright © 2010 HUMAX Corporation)
Not to be copied, used or translated in part or whole without HUMAX’s prior consent in writing except approval of ownership of copyright and copyright law.
Warranty
The warranty does not cover parts which may become defective due to misuse of the information contained in this manual.
Meaning of Symbols
To reduce the risk of electric shock, do not remove cover (or back). No user serviceable parts inside. Refer servicing to qualified service personnel.
This symbol indicates dangerous voltage inside the product that presents a risk of electric shock or personal injury.
This symbol indicates important instructions accompanying the product.
Warnings, Cautions and Notes
Throughout the whole manual, pay special attention to the following marks that indicate hazardous situations.
Warning
Indicates a hazardous situation which could result in serious injury.
Caution
Indicates a situation which could damage the equipment or other apparatus.
Note
Indicates additional information to make the user aware of possible problems and information of any importance to help understand, use and maintain the installation.
1

Notice
‘WEEE’ Instructions
This product should not be disposed with other household wastes at the end of its working life. Please separate this from other types of wastes and recycle it responsibly to promote the sustainable reuse of material resources. This will prevent possible harm to the environment or human health from uncontrolled waste disposal.
Domestic users:
Please contact either the retailer where you purchased this product or their local government office for details of where and how they can take this item for environmentally safe recycling.
Business users:
Contact your supplier and check the terms and conditions of the purchase contract. This product should not be mixed with other commercial wastes for disposal.
Trademarks
•Manufactured under license from Dolby Laboratories.
Dolby and the double-D symbol are trademarks of Dolby Laboratories.
•HDMI, the HDMI Logo, and High-Definition Multimedia Interface are trademarks of registered trademarks of HDMI Licensing LLC.
This product incorporates copyright protection technology that is protected by U.S. patents and other intellectual property rights. Use of this copyright protection technology must be authorized by Macrovision, and is intended for home and other limited viewing uses only unless otherwise authorized by Macrovision. Reverse engineering or disassembly is prohibited.
2

Contents
|
|
|
English |
|
|
|
|
|
|
Notice |
1 |
Software Update |
39 |
|
Quick Start Guide |
4 |
Antenna Power |
40 |
|
Factory Default |
40 |
|||
1. Checking Accessories |
4 |
OTA (Over the Air) |
41 |
|
2. Product Overview |
4 |
System |
42 |
|
3. Connections |
8 |
|||
4. Powering On |
10 |
System Information |
42 |
|
5. Installation Wizard |
11 |
Signal Detection |
42 |
|
6. Menu Overview |
13 |
Power Management |
43 |
|
Basic Operation |
14 |
Network |
43 |
|
Appendix |
44 |
|||
Changing Channels |
14 |
|||
Volume / Mute / Audio |
14 |
Specification |
44 |
|
Display Format / Resolution |
15 |
Service and Support |
45 |
|
Programme Information (i-plate) |
16 |
Safety Warning |
46 |
|
Sleep Timer |
17 |
Trouble Shooting |
48 |
|
Subtitle |
17 |
Error Message |
50 |
|
Text and Interactive Services |
17 |
Glossary |
51 |
|
Channel List |
18 |
Remote Control Code List |
53 |
|
OPEN SOURCE SOFTWARE NOTICE |
79 |
|||
Changing Channels |
18 |
|
|
|
Editing Channels in Channel List |
19 |
|
|
|
Managing Channels |
20 |
|
|
|
Editing Channels |
20 |
|
|
|
Editing Favourite Channels |
22 |
|
|
|
TV Guide |
23 |
|
|
|
Watching Programmes |
23 |
|
|
|
Setting Reminders |
24 |
|
|
|
Finding Programmes |
25 |
|
|
|
Scheduling Reminders |
26 |
|
|
|
Media List |
27 |
|
|
|
Using Video List |
29 |
|
|
|
Using Music List |
30 |
|
|
|
Using Photo List |
31 |
|
|
|
Preferences |
33 |
|
|
|
Parental Control |
33 |
|
|
|
Language Setting |
34 |
|
|
|
Setting Power On/Off Timer |
34 |
|
|
|
Video Setting |
35 |
|
|
|
Audio Setting |
36 |
|
|
|
Screen Display |
37 |
|
|
|
Installation |
38 |
|
|
|
Automatic Search |
38 |
|
|
|
Manual Search |
39 |
|
|
|
|
|
|
3 |
Quick Start Guide
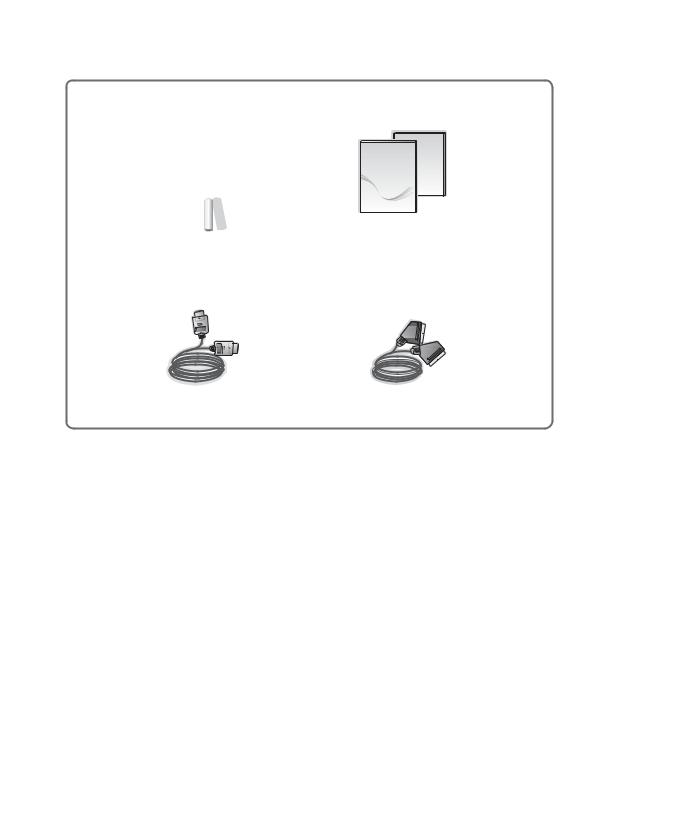
1. Checking Accessories
Quick Start Guide
User’s Manual
|
|
|
Manual & |
Remote Control |
|||
& Batteries |
Quick Start Guide |
||
HDMI Cable |
SCART Cable |
Note: The accessories may vary according to area.
2. Product Overview
Front Panel
STANDBY |
OK |
|
||||||||
Switches between operation and |
|
|||||||||
standby modes. |
|
|
MENU |
RESET |
||||||
|
|
|||||||||
|
|
|
Status Display |
|
|
|
|
|
Restart the receiver. |
|
|
|
|
|
|
|
|
|
|||
|
|
|
|
|
|
|
|
|
|
|
|
|
|
|
|
|
|
|
|
|
|
|
|
|
|
|
|
|
|
|
|
|
|
|
|
|
|
|
|
|
|
|
|
|
|
|
|
|
|
|
|
|
|
|
|
|
|
|
|
|
|
|
|
|
|
STANDBY/TV/RADIO LED |
TV/RADIO |
|
GUIDE |
The light is emitted when |
|
||
|
|
|
|
the product is in each mode. |
|
|
|
Arrows |
|
||
|
|
||
Note: The image shown may differ from the actual product.
4
Quick Start Guide
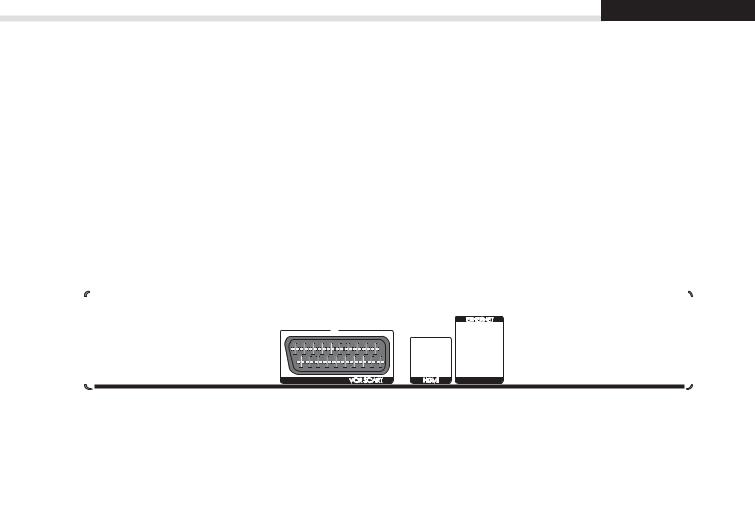
Rear Panel
|
|
|
|
|
|
|
|
|
|
|
|
|
|
|
|
VIDEO |
|
|
|
|
|
|
||||||||||||
ANTENNA IN |
Connect to the TV or VCR |
|
|
|
|
|
|
|||||||||||||||||||||||||||
Connect your main aerial. |
using an RCA cable. |
|
|
|
|
|
|
|||||||||||||||||||||||||||
ANTENNA OUT |
AUDIO |
|
|
|
|
|
|
|||||||||||||||||||||||||||
Connect to the TV or VCR using |
Connect to the TV or VCR |
|
|
|
|
|
|
|||||||||||||||||||||||||||
an RF cable. |
using an RCA cable. |
|
|
|
|
|
|
|||||||||||||||||||||||||||
|
|
|
|
|
|
|
|
|
|
|
|
|
|
|
|
|
|
|
|
|
|
|
|
|
|
|
|
|
|
|
|
|
|
|
|
|
|
|
|
|
|
|
|
|
|
|
|
|
|
|
|
|
|
|
|
|
|
|
|
|
|
|
|
|
|
|
|
|
|
|
|
|
|
|
|
|
|
|
|
|
|
|
|
|
|
|
|
|
|
|
|
|
|
|
|
|
|
|
|
|
|
|
|
|
|
|
|
|
|
|
|
|
|
|
|
|
|
|
|
|
|
|
|
|
|
|
|
|
|
|
|
|
|
|
|
|
|
|
|
|
|
|
|
|
|
|
|
|
|
|
|
|
|
|
|
|
|
|
|
|
|
|
|
|
|
|
|
|
|
|
|
|
|
|
|
|
|
|
|
|
|
|
|
|
|
|
|
|
|
|
|
|
|
|
|
|
|
|
|
|
|
|
|
|
|
|
|
|
|
|
|
|
|
|
|
|
|
|
|
|
|
|
|
|
|
|
|
|
|
|
|
|
|
|
|
|
|
|
|
|
|
|
|
|
|
|
|
|
|
|
|
|
|
|
|
|
|
|
|
|
|
|
|
|
|
|
|
|
|
|
|
|
|
|
|
|
|
|
|
|
|
|
|
|
|
|
|
|
|
|
|
|
|
|
|
|
|
|
|
|
|
|
|
|
|
|
|
|
|
|
|
|
|
|
|
|
|
|
|
|
|
|
|
|
|
|
|
|
|
|
|
|
|
|
|
|
|
|
|
|
|
|
|
|
|
|
|
|
|
|
|
|
|
|
|
|
|
|
|
|
|
|
|
|
|
|
|
|
|
|
|
|
|
|
|
|
|
|
|
|
|
|
|
|
|
|
|
|
|
|
|
|
|
|
|
|
|
|
|
|
|
|
|
|
|
|
|
|
|
|
|
|
|
|
|
|
|
|
|
|
|
|
|
|
|
|
|
|
|
|
|
|
|
|
|
|
|
|
|
|
|
|
|
|
|
|
|
|
|
|
|
|
|
|
|
|
|
|
|
|
|
|
|
|
|
|
|
|
|
|
|
|
|
|
|
|
|
|
|
|
|
|
|
|
|
|
|
|
|
English
ETHERNET
Connect a LAN cable.
USB Port
Connect a USB storage device. (XviD, MP3 or JPEG)
TV SCART
Connect to the TV using a TV SCART cable.
VCR SCART
Connect to the VCR or DVD using a VCR SCART cable.
HDMI
Connect to the TV using an HDMI cable.
SPDIF
Connect to the audio system using an S/PDIF cable. (digital audio)
Note: The image shown may differ from the actual product.
5
Quick Start Guide
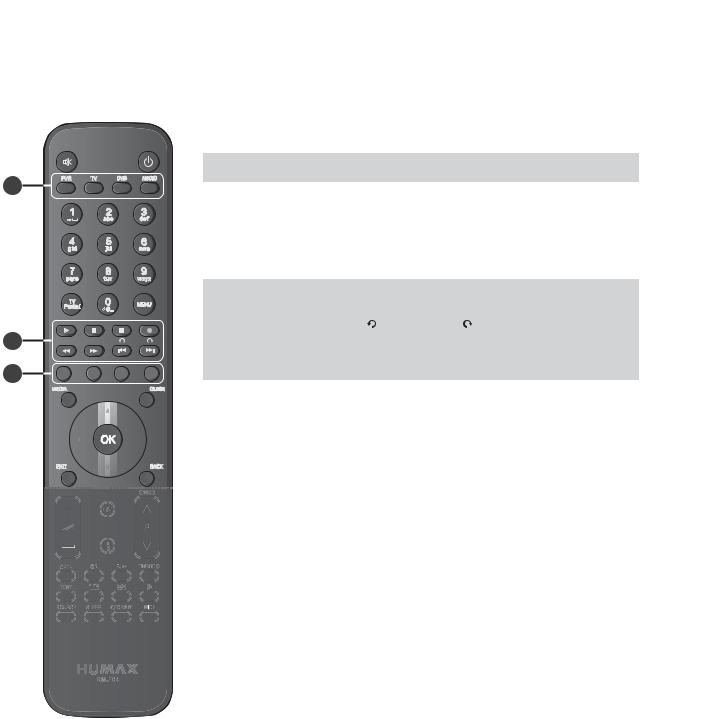
Remote Control
To control the product please make sure that the PVR mode is selected on the remote control.
|
MUTE |
Mutes audio |
|
STANDBY |
Switches between operation and standby modes. |
|
MODE |
Changes the mode of remote. |
1 |
NUMERIC |
(0-9) |
|
||
|
TV Portal |
Reserved for future functionality. |
|
|
Access to Humax TV Portal. |
|
MENU |
Displays the main menu. |
|
Playback |
Play, II Pause, Stop, Record (Reserved for future |
|
Control |
functionality) Rewind, Fast Forward, I Previous, |
|
Buttons |
I Next, Instant Replay, Skip |
2 |
COLOUR |
Colour keys for interactive applications. |
|
||
3 |
Buttons |
|
|
|
|
|
MEDIA |
Displays the media list. |
|
GUIDE |
Displays the programme guide. |
|
ARROW |
Moves the cursor up, down, left or right. |
|
Buttons |
|
|
OK |
Selects a menu or confirms. |
|
EXIT |
Exits all On-Screen Display (OSD) screens. |
|
BACK |
Returns to the previous screen. |
Note:
•The image shown may differ from the actual product.
•Some playback control buttons may not function depending on the contents.
6
Quick Start Guide
English
|
|
|
VOLUME |
Adjusts the audio volume. |
||||||
|
|
|
P /P |
Changes the channel or page. |
||||||
|
|
|
LIST |
Displays the channel list. |
||||||
|
|
|
||||||||
|
|
|
||||||||
|
|
|
i (Information) |
Displays the channel and programme information. |
||||||
|
|
|
OPT+ |
Displays the channels attributes. |
||||||
|
|
|
AUDIO |
Displays the audio list. |
||||||
|
|
|
SUB |
Displays the subtitle language list. |
||||||
|
|
|
TV/RADIO |
Switches between TV and radio modes. |
||||||
|
|
|
TEXT |
Enters the digital text service. |
||||||
|
|
|||||||||
|
|
|||||||||
|
|
|
SOURCE |
Controls the output of TV SCART. |
||||||
|
|
|
SLEEP |
Sets the sleep timer. |
||||||
|
|
|
V-FORMAT |
Sets the resolution of video. |
||||||
|
|
|
WIDE |
Sets the display format. |
||||||
|
|
|
|
|
|
|
|
|
|
Reserved for future functionality. |
|
|
|
|
|
|
|
|
|
|
Add Bookmark/Show Bookmark List. |
|
|
|
|
|
|
|
|
|
|
Slow Play |
|
|
|
|
|
|
|
|
|
|
|
|
|
|
|
|
|
|
|
|
|
|
|
|
|
|
|
|
|
|
|
|
|
|
|
|
|
|
|
|
|
|
|
|
Inserting Batteries
1.Press the hook upward and lift the battery cover off.
2.Insert the batteries (supplied) matching the plus(+) and minus(-) at each end.
3.Close the cover.
i
7

Quick Start Guide
3. Connections
This section describes how to connect your product to match your particular devices setup and to gain optimum signal quality. The product provides various interfaces to connect to the TV, VCR or other devices. Select the most appropriate procedure depending on the device you have.
Note: If you encounter any problems setting up your product, please contact your local retailer or Humax Customer Helpline.
|
TV SCART |
HDMI |
|
|
DVI Connecter |
RCA Cable |
SCART Cable |
HDMI Cable |
3 |
|
HDMI Cable |
|
|
|
|
2 |
|
|
1 |
|
4 |
5 |
SCART Cable |
Ethernet Cable |
S/PDIF Cable |
VCR SCART |
LAN |
Router
8

Quick Start Guide
English
Connecting the Antenna
Connect the aerial to the |
ANTENNA IN. |
Connecting the TV and VCR
You can select one of the following connections depending on the device you have.
TV with the HDMI connector;
For the best picture quality, connect the product and TV using a HDMI cable. When using a HDMI cable it is not necessary to also use a scart cable.
TV with the DVI connector;
For very good picture quality, connect the product and TV using a HDMI cable and a HDMI-to-DVI converter for video.
You will also require a RCA cable(Audio L/R) connected to the necessary connection(s) on your TV/Display for Audio.
Please refer to your TV/Display user manual for further information on the connections required for Audio.
TV with the SCART connector;
For good picture quality, connect the product and TV using a SCART cable (TV SCART).
TV with the SCART connector;
To output video and audio to an external recorder connect the product to the recorder using a SCART cable. (VCR SCART).
For additional audio connections you can either
1.Connect the product and TV using an RCA cable (Audio L/R).
2.When using the digital audio system, connect the product and the digital audio system using a S/PDIF cable.
Note: Connecting your TV directly to the audio/video output of the product will assure a more vivid picture and enhance your viewing enjoyment.
Connecting the Network
Connecting to the LAN;
Connect one end of the Ethernet cable to the receiver and the other end to the LAN router.
9
Quick Start Guide
4. Powering On
1. |
Connect the power cord of the product to a wall outlet. |
|
|||||||||||||
2. |
Power on by pressing the |
|
|
|
STANDBY button on the remote controlSTANDBYor the |
button at the front |
|||||||||
|
of the product. |
|
|
|
|
|
|
|
|
|
|||||
|
|
|
|
|
|
|
|
|
|
|
|
|
|
|
|
|
|
|
|
|
|
|
|
|
|
|
|
|
|
|
|
|
|
|
|
|
|
|
|
|
|
|
|
|
|
|
|
|
|
|
|
|
|
|
|
|
|
|
|
|
|
|
|
|
|
|
|
|
|
|
|
|
|
|
|
|
|
|
|
|
|
|
|
|
|
|
|
|
|
|
|
|
|
|
|
|
|
|
|
|
|
|
|
|
|
|
|
|
|
|
|
|
|
|
|
|
|
|
|
|
|
|
|
|
|
|
|
|
|
|
|
|
|
|
|
|
|
|
|
|
|
|
|
|
|
|
|
|
|
|
|
|
|
|
|
|
|
|
|
Note: To control the product please make sure that the PVR mode is selected on the remote control.
10

Quick Start Guide
English
5. Installation Wizard
When powering on your product for the first time after purchase or performing the factory default in menu, the installation wizard will operate automatically.
Note: If you exit the installation wizard without fully completing the channel searching procedure, you may not have all of the channels available. In this case, you can use the Settings > Installation menu to search for more channels.
1.Preferred Language
Select a language for audio and subtitle.
2.Display
Set the video output to your TV.
3.Automatic Search
Channel search will begin automatically. Save the found channels when the search is complete.
11
Quick Start Guide
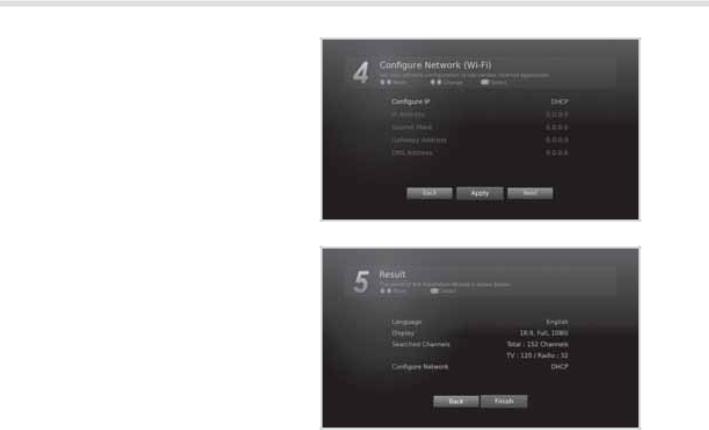
4.Configure Network
Configure the network settings to connect to your router. Please leave the Configure IP as DHCP if you are unsure of this setting.
5.Result
The result of the Installation Wizard is shown. Select Finish to exit the wizard.
12
Quick Start Guide
English
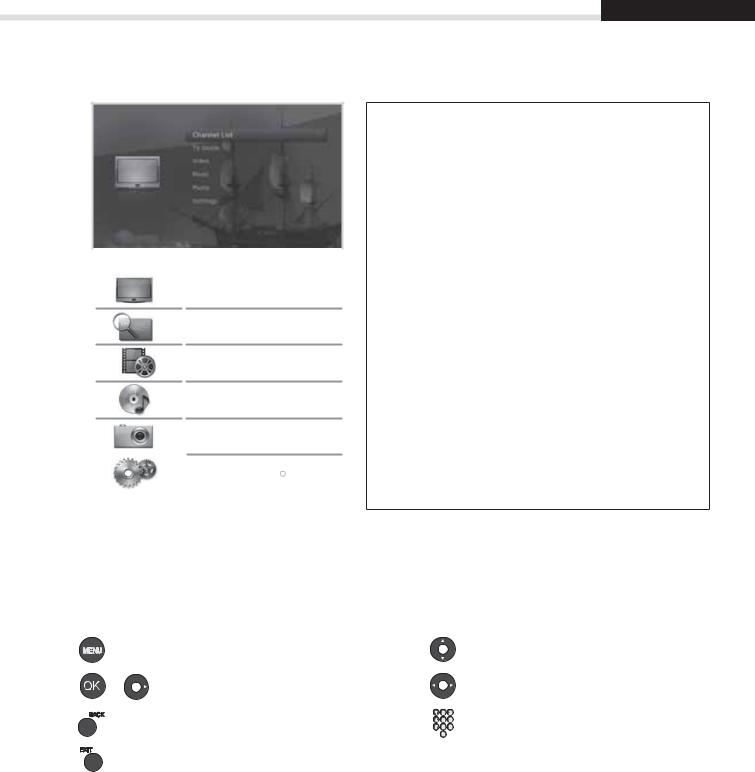
6. Menu Overview
Preferences |
|
• |
Parental Control |
• |
Language |
• |
Time |
• |
Video |
• |
Audio |
• |
Screen Display |
|
|
|
|
Edit Channels |
|
|
|
|
|
• |
Edit Favourite List |
|
|
|
|||
|
Channel List |
|
• |
Edit Channel List |
|
|
|
|
|
||
|
TV Guide |
|
Installation |
||
|
|
||||
|
|
||||
|
|
• |
Automatic Search |
||
|
|
|
|
||
|
Video |
|
• |
Manual Search |
|
|
|||||
|
|
• |
Software Update |
||
|
|
|
|
• |
Antenna Power |
|
|
|
|||
|
|
|
|||
|
Music |
|
• |
Factory Default |
|
|
Photo |
|
System |
||
|
|
||||
|
|
||||
|
|
• |
System Information |
||
|
|
|
|
||
|
Settings |
|
|
• |
Signal Detection |
|
|
|
• |
Power Management |
|
|
|
|
|||
|
|
|
|
• |
Network |
|
|
|
|||
How to Navigate
|
Displays the Menu OSD |
Moves among menus or options |
or |
Selects (Enters) a menu or confirms a selection |
Changes or adjusts the option |
|
Goes back to the previous screen |
Enters the number (0~9) |
|
Exit all On-Screen |
|
13
Basic Operation
Changing Channels
You can change the channels in several ways.
Press the P /P button.
Enter the channel number directly. (0-9)
Go to the channel list or TV guide and select a channel.
Note: Press the TV/RADIO button to switch between TV and radio channels.
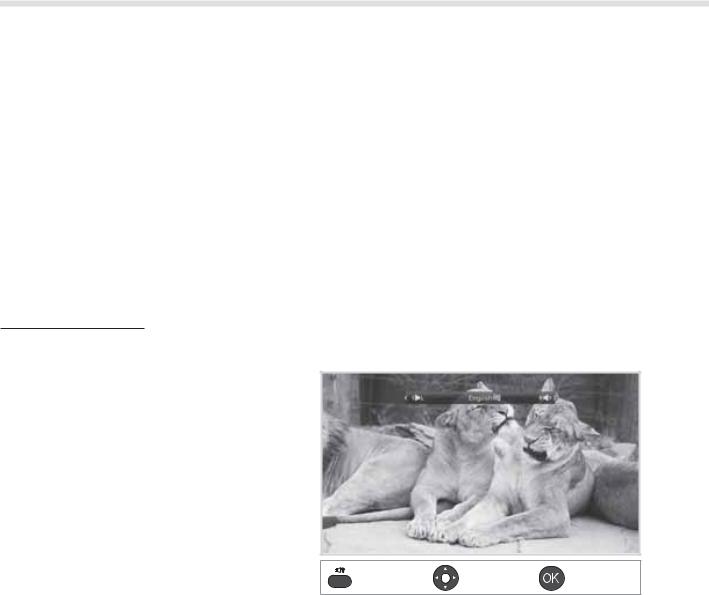
Volume / Mute / Audio
|
To adjust the audio volume, press the +/ - button. |
|
To mute the audio temporarily, press the MUTE button. |
Setting Audio Options
Audio options are available only when the programme supports multiple audio languages.
1. |
Press the AUDIO button. |
|
Each time you press this button, the audio |
|
language changes or the Audio Description |
|
soundtrack will be selected. |
2. |
Select the audio direction if available. |
Note:
•The mute button will not mute the audio if connected via the SPDIF connection, please control the volume via your Amplifier.
•The mute function remains set while you change channels.
•You cannot set the audio direction when the
programme is broadcast in Dolby Digital. |
Display |
Select |
Confirm |
14
Basic Operation
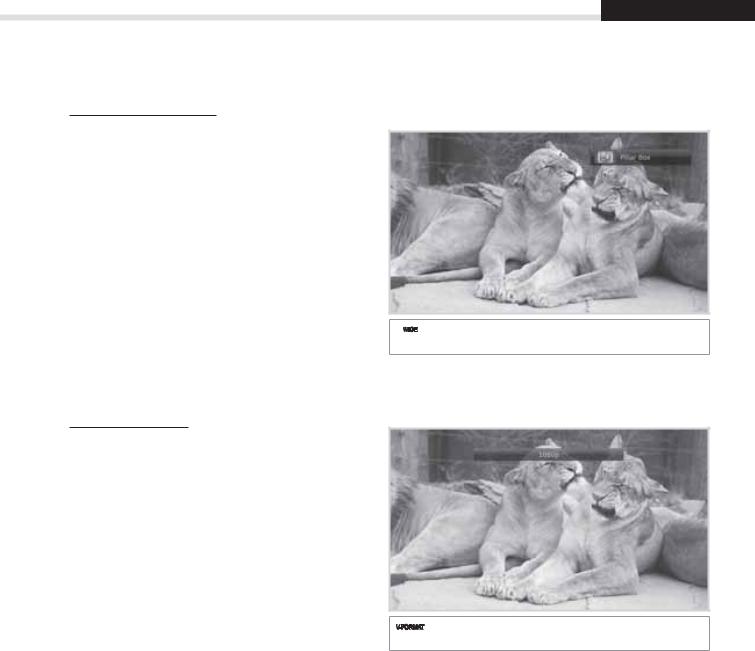
Display Format / Resolution
Setting Display Format
Press the WIDE button to set the display format according to the screen ratio.
Each time you press this button, the value changes.
Screen ratio 4:3: Auto - Letterbox 16:9 -
Letterbox 14:9 - Centre
Screen ratio 16:9: Auto – Pillar Box – Zoom
Note: Refer to Display Format |
for details. |
English
 Display
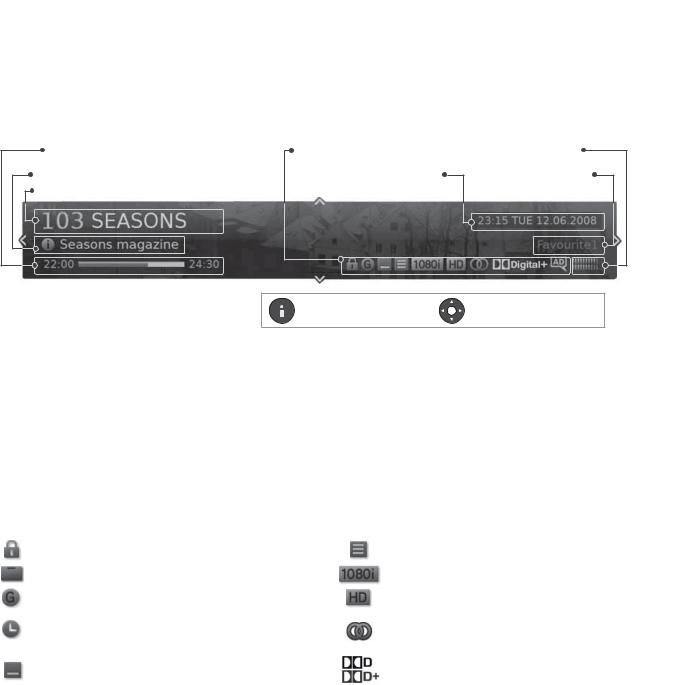
Setting Resolution
Press the V-FORMATbutton to set the resolution of the screen.
Each time you press this button, the value changes.
576i - 576p - 720p - 1080i - 1080p - Original
Note: When connected with a HDMI cable you may only be able to change to the resolutions that the TV supports..
 Display
15
Basic Operation
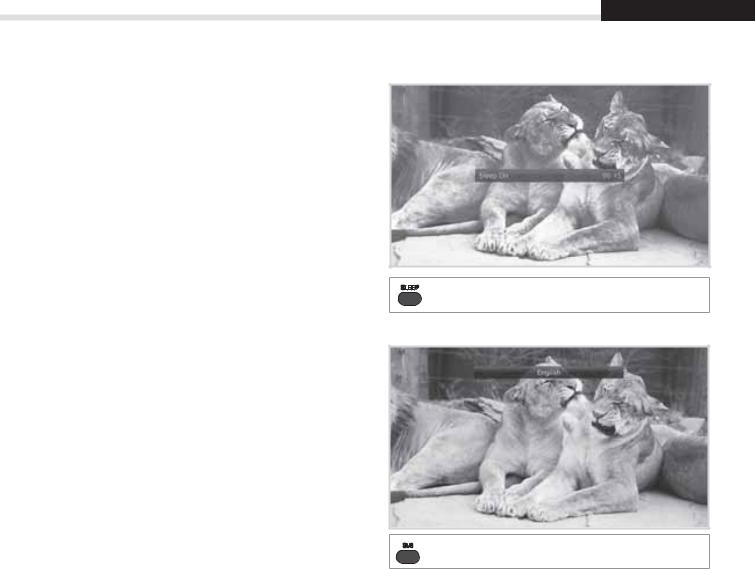
Programme Information (i-plate)
The i-plate is an information banner that is displayed for a certain period of time whenever you change channels. Press the i button while watching a progamme to display the i-plate. PressEXITthe button to hide.
Playing time |
Icons |
Signal strength and quality |
|
Programme name |
Current time and date |
Group name |
|
Channel number and name |
|
|
|
Display |
Navigation mode |
Viewing detailed programme information
Press the i button again while the i-plate is displayed.
Viewing previous/next programme information
Press the / button while the i-plate is displayed. Press the OK button to set reminders for future programmes.
Viewing programme information of other channels
Press the / button while the i-plate is displayed. Press the OK button to change to the selected channel.
Icons
The icons represent the information and services provided.
|
Locked programme |
|
Teletext |
|
|
|
|
|
Pay TV / encrypted programmes (CAS icons) |
|
Resolution |
|
|
|
|
|
Parental guidance programme |
|
HD programme |
|
|
|
|
|
Scheduled programme |
|
Multiaudio |
|
(Blue: Reminder) |
|
|
|
|
|
|
|
|
|
|
|
Subtitle |
|
Dolby Digital audio |
|
|
Dolby Digital Plus audio |
|
|
|
|
|
|
|
|
|
Note: Programme information is not displayed when there is no programme information.
16
Basic Operation
English
Sleep Timer
Press the SLEEP button to set the automatic turn off time.
Each time you press this button, the value changes.
Sleep Off - 10 - 20 - 30 - 60 - 90 - 120 minutes
Display
Subtitle
You can select the subtitle language when subtitle information is provided.
Press the SUB button.
Each time you press this button, the subtitle language changes.
Note:
•You can choose to always display the subtitle when available.
•The  icon appears when the DVB subtitle is supported.
Display
Text and Interactive Services
If your chosen channel has digital teletext features, you can access them. Teletext services often load automatically shortly after the digital teletext window is displayed. In which case, simply follow the on screen instructions. (Press colour buttons)
1.Press the TEXT button to access digital teletext.
2.Press the TEXT button again to return to normal viewing.
3.Press the P /P button to exit this service.
17
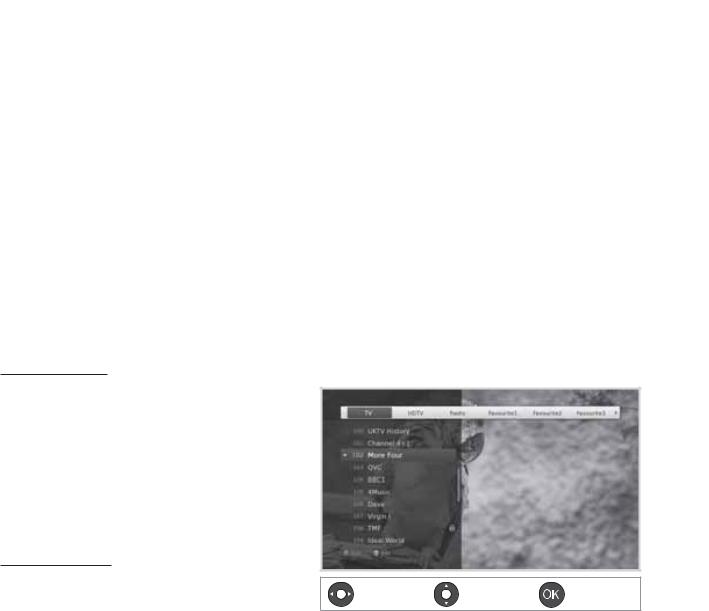
Channel List
The channel list will help you find the channel you want to watch quickly and easily.
You can access the channel list in several ways.
|
Press the LIST button. |
|
Press the MENU button and select Channel List . |
Changing Channels
Select the channel you want to watch and press the OK button. The displayed channel will change.
Note:
• : Locked channel,
  : Pay TV / encrypted programmes (CAS icons)
•Press the i button to view the detailed programme information.
•Press the LIST or EXIT button to exit.
Advanced Options
Changing Group
You can display the list of the selected channel group.
TV, HDTV, Radio, Favourite 1~5, Recent
1.Press the button.
2.Select a channel group.
3.Press the OK button.
Note: Press the TV/RADIO button to switch between TV and Radio groups.
Sorting Channels
Press the RED button to sort the list in numerical or alphabetical order.
Display/Change |
Select |
Confirm |
18
Channel List
English
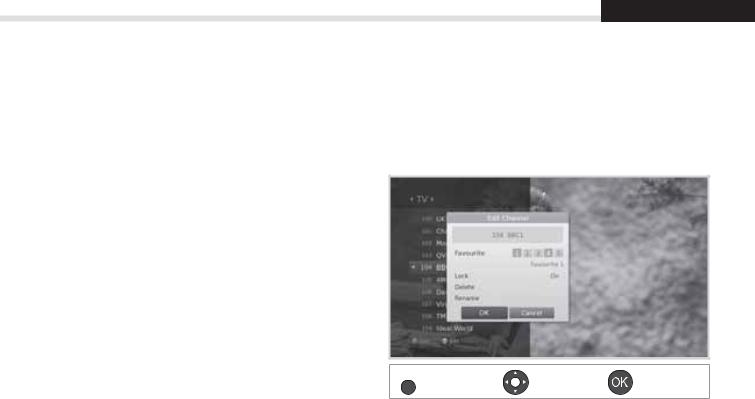
Editing Channels in Channel List
You can lock, delete or rename each channel in the channel list, as well as in menu. To edit the multiple channels, go to the Settings > Edit Channelsmenu.
Locking / Deleting / Renaming Channels
1.Select a channel you want to edit and press the GREEN button.
2.Select an option.
Lock: Select Onor |
Off. |
|
|
Delete: Press the |
OK button. |
|
Rename : Press the OK button and enter the |
|
|
name in the keyboard. |
|
3. |
Select OK to save and exit. |
Note: |
|
• |
Refer to Edit Channels for details |
•The default password is 0000. If you have forgotten your password, please contact Humax Customer Support.
GREEN Display |
Select |
Confirm |
Setting Favourite Channels
You can select your favourite channels and include them in the five favourite groups.
1. Select a channel and press the |
GREEN button. |
2.Select Favourite.
3.Select a favourite group you want to include the channel in and press the OK button.
To remove a channel from a favourite group, select the group and press the OK button again.
4.Select OK to save and exit.
19
Managing Channels
Editing Channels
The Edit Channel Listmenu will help you delete, move lock or rename multiple channels.
MENU Settings Edit Channels Edit Channel List
 Group name

 Marked / Total channels

 Function buttons
: Coloured button
Select |
Mark/Confirm |
Page up/down |
Note:
• : Locked channel,
  : Pay TV / encrypted programmes (CAS icons)
• Press the MENU or EXIT button to exit. Press theBACK button to return to the previous screen.
Deleting Channels
1.Select the channels using the / and OK button.
2.Press the RED button.
20

Managing Channels
English
Locking / Unlocking Channels
1.Select the channels using the / and OK button.
2.Press the BLUE button.
3. Select Lock. To unlock, select Unlock .
Renaming Channels
1. Select a channel to rename.
2. Press the BLUE button.
3. Select Rename .
4. Enter the name in the keyboard.
Advanced Options
Changing Group |
|
To list the channels of other groups, press the |
GREEN button and select a group you want. |
Note: Press the TV/RADIO button to switch between TV and Radio groups.
Changing Background
You can change the channel displayed in the background while editing.
1.Select the channel you want to watch.
2.Press the YELLOW button. The displayed channel will change.
Selecting / Releasing All Channels
1. |
Press the BLUE button. |
2. |
Select Select All . |
3. |
To release all, select Release All . |
21
Managing Channels
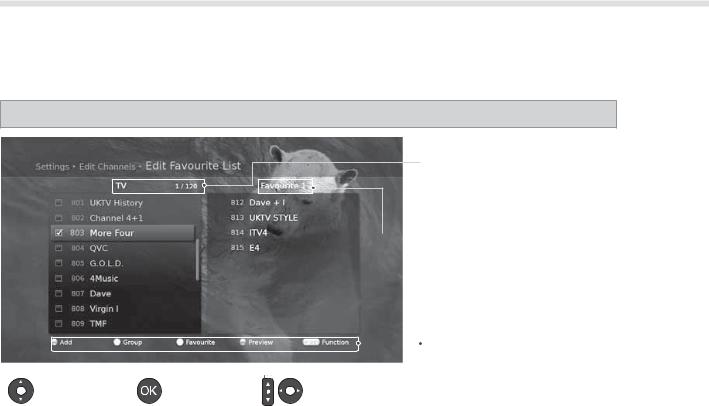
Editing Favourite Channels
The Edit Favourite Listmenu will help you add or remove channels from the favourite groups.
MENU Settings Edit Channels Edit Favourite List
 Group name
Marked / Total channels
 Favourite group name
|
|
|
|
|
|
|
Function buttons |
|
|
|
|
|
|
|
|
|
|
|
|
|
|
|
: Coloured or OPT+ button |
|
|
|
|
|
|
|
|
|
Select |
Mark/Confirm |
Page up/down |
|
|
||
|
|
|
|
|
|
||
Note: Press the MENU |
or EXIT |
button to exit. PressBACKthe button to return to the previous screen. |
|||||
Adding / Removing Favourite Channels |
|
|
|
|
|||
1. |
Press the YELLOW button and select the favourite group you want to edit. |
||||||
2. |
To add channels to the favourite list, select the channels you want to add using the / and OK |
||||||
|
button in the left column and then press the |
RED button. The added channels will appear in the right |
|||||
|
column. |
|
|
|
|
|
|
3. |
To remove channels from the favourite list, select the channels you want to remove in the right |
||||||
|
column and then press the |
RED button. |
|
|
|
|
|
Moving Channels |
|
|
|
|
|
|
|
1. |
Select the channels using the / and OK button. |
||||||
2. |
Press the GREEN button. |
|
|
|
|
|
|
3. |
Move the selected channels to the location you want using the / and OK button. |
||||||
Note: You can move the channels in the right column only.
22
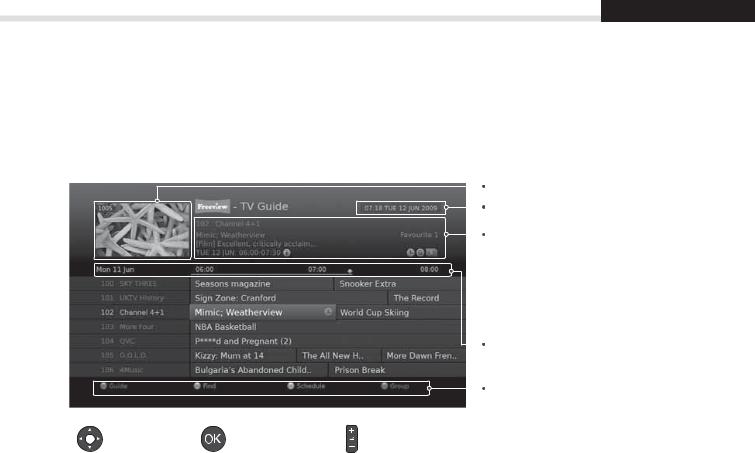
TV Guide
English
The TV guide is an on-screen guide of grid type which displays the programme information of channels in time and date order.
You can access the TV guide in several ways. |
|
||
|
Press the GUIDE |
button. |
|
|
Press the MENU |
button and select |
TV Guide . |
Note: Press the |
GUIDE or EXIT button to exit. PressBACKthe button to return to the previous screen. |
|||||
|
|
|
|
|
|
Preview |
|
|
|
|
|
|
|
|
|
|
|
|
|
Current time and date |
|
|
|
|
|
|
|
|
|
|
|
|
|
Information of the selected |
|
|
|
|
|
|
|
|
|
|
|
|
|
programme: channel number & name, |
|
|
|
|
|
|
programme name, simple information, |
|
|
|
|
|
|
favourite group, network type, and |
|
|
|
|
|
|
icons |
|
|
|
|
|
|
Time bar |
|
|
|
|
|
|
|
|
|
|
|
|
|
Function buttons |
|
|
|
|
|
|
|
|
|
|
|
|
|
: Coloured button |
|
|
|
|
|
|
|
Select |
Tune/Reserve |
Page up/down |
|
|
||
|
|
|
|
|
|
|
Note:
•Press the i button to view the detailed programme information.
• : Scheduled programme (Blue: Reminder)
 : Present time,
  : DRM(Digital Rights Management) icon
Watching Programmes
1.Select a programme and press the OK button. The programme will be displayed in the preview.
2.Press the OK button again to exit the TV guide and watch the programme.
23

TV Guide
Setting Reminders
1. |
Select a future programme and press the OK button. |
2. |
Select Reminder and press the OK button. |
|
Press the OK button again to cancel the reservation. |
|
The reserved programmes will be added automatically in Schedule . |
Note:
•If the programme is overlapped with another programme, adjust the reservation appropriately.
•If the channel is locked, you will be prompted to enter your password before watching.
The default password is 0000. If you have forgotten your password, please contact Humax Customer Support.
•In standby mode the product will switch on to the channel when the programme starts.
• You can reschedule reminders .(Refer to Scheduling Reminders |
.) |
Advanced Options
Quick Navigation
Press the / button to move to the previous/next programme.
Press the / button to jump back/ahead two hours.
Press the I / I button to move to the previous/next day.
Changing Group
To list the channels of other groups, press the |
BLUE button and select a group you want. |
Note:
•Press the TV/RADIO button to switch between TV and Radio groups.
• To search specific programmes, go to Find Programmes |
by pressing the GREEN button. (Refer to |
|
Finding Programmes |
.) |
|
24
TV Guide
English
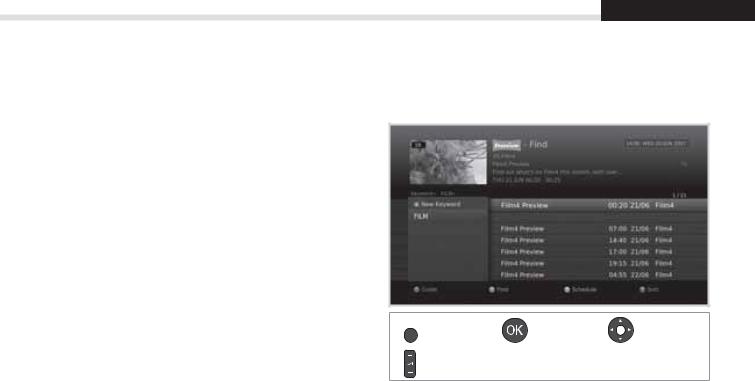
Finding Programmes
Find will help you find the programmes more specifically using the keyword or genre.
By Keyword
1. Press the GREEN button.
2.Select Keyword and press the button.
3.Select a keyword and press the OK button.
4. Press the YELLOW button to confirm.
Note: To enter a new keyword, select New Keyword .
By Genre
1. Press the GREEN button.
2.Select Genre and press the button.
3.Select a genre and press the OK button.
4.Select the specific genre and press the OK button. (if provided)
GREEN Display |
Confirm |
Select |
Page up/down
Note:
•Press the i button to view the detailed programme information.
• |
Press the OK button to watch a found programme. (Refer toChanging Channels |
.) |
|
• |
You can set reminders for future programmes. (Refer to Setting Reminders |
.) |
|
25
TV Guide
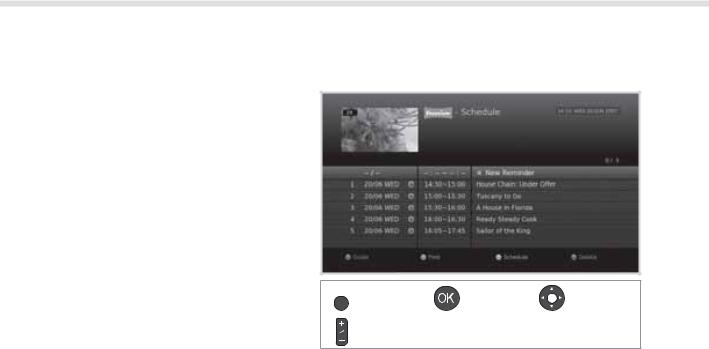
Scheduling Reminders
Schedule lists reminders and will help you manage them in more detail.
1. |
Press the YELLOW |
button. |
|
2. |
You can add, edit or delete your reminders. |
|
|
|
To add, select |
New Reminderand press the |
OK |
|
button. |
|
|
|
To edit, select a reminder and press the |
OK |
|
|
button. |
|
|
To delete, select a reminder and press the button.
3.Reminder will pop up. You can change the options you want using the / / / ,
NUMERIC(0~9) and OK buttons.
4.Select OK to save and exit.
Note: |
YELLOW Display |
Confirm |
Select |
• Press the i button to view the detailed |
Page |
|
|
programme information. |
|
|
|
up/down |
|
|
•You can easily set reminders in TV guide,
Find Programmes or i-plate navigation mode. (Refer to Setting Reminders, Find Programmes or
Programme Information)
26

Media List
You can playback video, music or photo files.
|
Press the MEDIA button. |
|
Go to MENU Video/Music/Photo. |
Switching Storage
1.Press the BLUE button to display the type of storage.
2.Select the storage type and press the OK button.
USB : Displays each partition of the USB.
Network: The DLNA server is searched. Select the type of the server.
Note:
•Only one USB icon will appear even when there are more than one USB.
•The network icon is displayed only when the network has been connected.
Switching Media
1.Press the YELLOW button to switch the media.
2.Select the media type and press the OK button.
Video, Music, Photo
English
MEDIA |
Select |
Confirm |
Enter 0~9 |
27 |
 Loading...