


Notice
Copyright (Copyright © 2006 HUMAX Corporation)
Not to be copied, used or translated in part or whole without HUMAX's prior consent in writing except approval of ownership of copyright and copyright law.
Warranty
This warranty does not cover parts which may become defective due to misuse of the information contained in this manual.
Trademarks
VIACCESS™ is a trademark of France Telecom.
CryptoWorks (TM) is a trademark of Philips Electronics N.V.
Irdeto is a trademark of Mindport BV.
Nagravision is a registered trademark of Kudelski S.A.
Conax is a trademark of Telenor Conax AS.
'Dolby' and the double-D symbol are trademarks of Dolby Laboratories.
Manufactured under license from Dolby Laboratories.
Thank you for purchasing a HUMAX product. Please read this user manual carefully to be able to safely install, use and maintain the product at maximum performance. Keep this user manual next to your product for future reference. The information in this document is subject to change without notice.
GB 1
Notice
Read this manual carefully and make sure you understand the instructions provided. For your safety, be aware of the following precautions.
Warnings, Cautions and Notes
Throughout the whole manual, pay special attention to the following marks that indicate hazardous situations.
•Warning
Indicates a hazardous situation which, if not avoided, could result in (serious) injury.
•Caution
Indicates a situation which, if not avoided, could damage the equipment or other apparatus.
•Note
Indicates additional information to make the user aware of possible problems and information of any importance to help understand, use and maintain the installation.
To reduce the risk of electric shock, do not remove cover (or back).
No user serviceable parts inside. Refer servicing to qualified service personnel.
This symbol indicates dangerous voltage inside the product that presents a risk of electric shock or personal injury.
This symbol indicates important instructions accompanying the product.
GB 2

Safety Warning
This product has been manufactured to comply with international safety standards. Please read the following safety precautions carefully.
Safety Instructions and Precautions
1.MAINS SUPPLY
90 - 250V AC 50/60Hz
Operate your product only from the type of power source indicated on the marking label.
If you are not sure of the type of power supply to your home, consult your local power company. Disconnect the product from the mains before you start any maintenance or installation procedures
2.OVERLOADING
Do not overload a wall outlet, extension cord or adapter as this may result in electric fire or shock.
3.LIQUIDS
The product should not be exposed to any liquids such as dripping or splashing. In addition, no objects filled with liquids, such as vase, should be placed on the apparatus.
4.CLEANING
Disconnect the product from the wall outlet before cleaning. Use a light damp cloth (no solvents) to dust the product.
5.VENTILATION
The slots on top of the product must be left uncovered to allow proper airflow the unit. Do not stand the product on soft furnishings or carpets. Do not stack electronic equipment on top of the product.
6.ATTACHMENTS
Do not use any unsupported attachments as these may be hazardous or cause damage the product.
7.CONNECTION TO THE CABLE TV SIGNAL AND TV
Connect all components before plugging any power cords into the wall outlet. Always turn off the product, TV and other components before you connect or disconnect any cables.
8.LOCATION
Place the product indoors to avoid exposing it to lightning, rain or sun. Do not place it near a radiator or heat register.
Make sure it has more than 10 cm clearance from any appliances susceptible to electromagnetic influences, such as a TV or a VCR.
Do not block the openings with any object and do not place the product on a bed, sofa, rug, or other similar surface.
If you place the product on a rack or bookcase, ensure that there is adequate ventilation and that you have followed the manufacturer's instructions for mounting.
Do not place the product on an unstable cart, stand, tripod, bracket or table from where it can fall. A falling product can cause serious injury to a child or adult and serious damage to the appliance
GB 3

Safety Warning
9.LIGHTNING, STORM, or NOT IN USE
Unplug the product from the wall outlet and disconnect the cable during a thunderstorm or when left unattended and unused for long periods of time. This will prevent damage to the unit due to lightning and power-surges.
10.EXTRANEOUS OBJECTS
Do not insert anything through the openings in the unit, where they can touch dangerous voltage points or damage parts
11.REPLACEMENT of PARTS
When replacement parts are required, be sure the service technician uses replacement parts specified by the manufacturer, or those that have the same characteristics as the original part.
Unauthorized substitution may result in additional damage to the unit.
Warning
1.Follow these directions in order to avoid damage of the power cord or plug.
Do not modify or process the power cord or plug arbitrarily.
Do not bend or twist the power cord.
Make sure to disconnect the power cord holding the plug.
Keep heating appliances as far as possible from the power cord in order to prevent the cover vinyl from melting.
The mains plug shall remain readily operable.
2.Follow these directions. Failure to follow any of them may cause electrical shock. Do not open the main body.
Do not insert metals or inflammable objects inside the product.
Do not touch the power plug with wet hands. Disconnect the power cord in case of lightning.
3.Do not use the product when it is out of order. If you continue to use the product when defective, a serious damage can be caused toit. Make sure to contact your local product distributor if the product is out of order.
4.Please do not insert metal or alien substance into the slots for the modules and
Smartcards. It may cause damage to the product and reduce its life span.
GB 4

Contents
1. Before Using the Product |
GB7 |
|
1.1 |
Package Contents |
** |
GB7 |
||
1.2 |
Front Panel |
GB8 |
1.3 |
Conditional Access |
GB9 |
1.4 |
Rear Panel |
GB10 |
1.5 |
Remote Control |
GB11 |
2. Setup |
|
GB13 |
2.1 |
Connecting the Cable |
** |
GB13 |
||
2.2 |
Powering On |
GB16 |
3. Installation Wizard |
GB17 |
|
3.1 Language |
** |
|
GB17 |
||
3.2 |
Channel Search |
GB17 |
3.3 |
Result |
GB18 |
4. Basic Operation |
GB19 |
|
4.1 |
Switching Channel |
** |
GB19 |
||
4.2 |
Volume Control |
GB19 |
4.3 |
Subtitle |
GB19 |
4.4 |
Audio |
GB20 |
4.5 |
Teletext |
GB20 |
4.6 |
Programme Information (i-plate) |
GB22 |
4.7 |
Option List |
GB24 |
5. Channel List |
GB26 |
|
5.1 |
Displaying and Switching Channel List |
** |
GB26 |
||
5.2 |
Edit Channels |
GB27 |
5.3 |
Edit Favourite Channels |
GB29 |
5.4 Channel Change Mode |
GB32 |
|
6. Programme Guide |
GB33 |
|
6.1 |
Viewing Programme Guide Information |
** |
GB33 |
||
6.2 |
Finding a Programme |
GB35 |
6.3 |
Viewing Reserved Programme |
GB36 |
GB 5

Contents
7. Setting Preferences |
GB38 |
|
7.1 |
Parental Control |
** |
GB38 |
||
7.2 |
Language Setting |
GB40 |
7.3 |
Time Setting |
GB42 |
7.4 |
Schedule |
GB43 |
7.5 |
A/V Control |
GB44 |
7.6 |
Miscellaneous Settings |
GB45 |
8. Installation |
GB47 |
|
8.1 |
Channel Search |
** |
GB47 |
||
8.2 |
Software Update |
GB49 |
8.3 |
Default Setting |
GB49 |
9. Software Update |
GB50 |
||
|
9.1 OTA (Over the Air) |
** |
|
|
GB50 |
||
10. |
System Information |
GB52 |
|
|
10.1 |
Status |
** |
|
GB52 |
||
|
10.2 |
Signal Detection |
GB53 |
|
10.3 |
Conditional Access |
GB53 |
|
10.4 |
Mail Messages |
GB53 |
11. Games |
|
GB54 |
|
12. Menu Map |
GB55 |
||
13. |
Troubleshooting |
GB56 |
|
|
13.1 |
Troubleshooting |
** |
|
GB56 |
||
|
13.2 |
Error Message |
GB58 |
14. |
Specification |
GB59 |
|
15. |
Glossary |
|
GB61 |
16. |
Service and Support |
GB62 |
|
GB 6
1. Before Using the Product
This chapter provides detailed instructions on the product and its accessories.
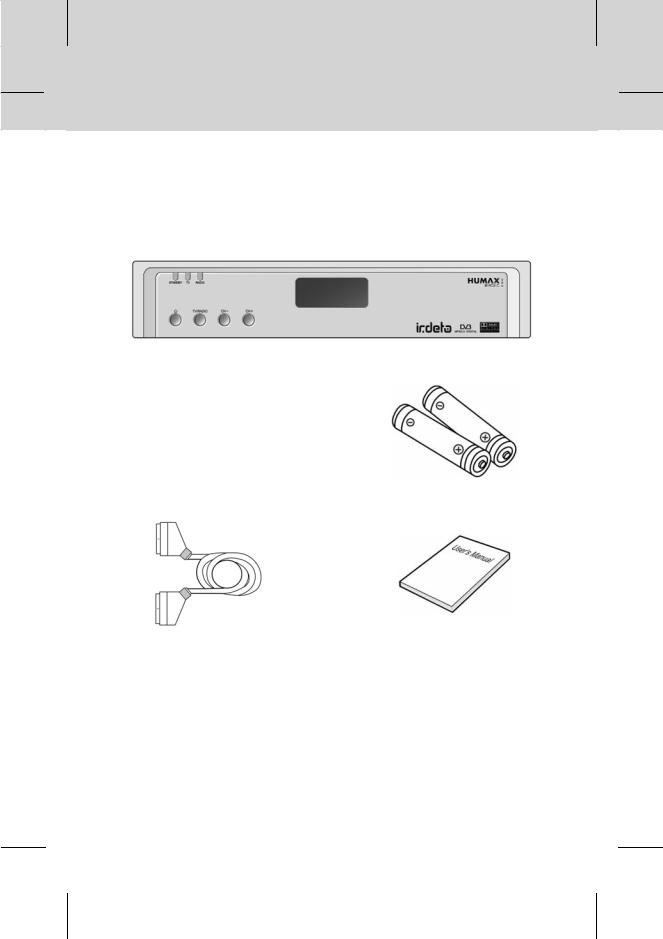
1.1 Package Contents
Please check all package contents before using the product.
Remote Control |
Batteries |
SCART Cable |
User's Manual |
Note:
•Faults may occur if the remote control is being left without a battery for a long time.
Always keep the battery inserted in the remote control.
•Package contents may vary according to area.
GB 7
1. Before Using the Product
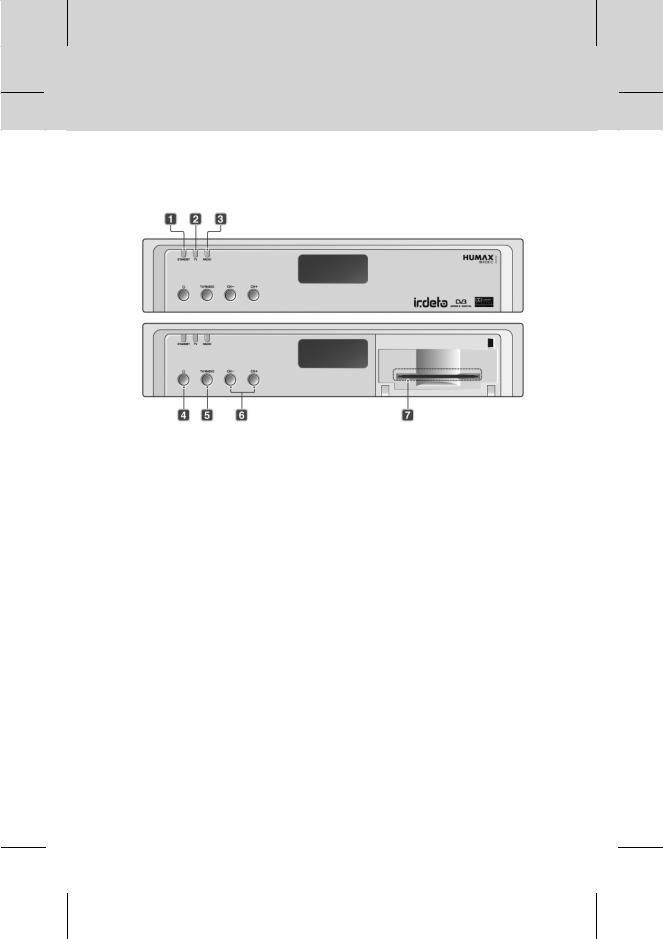
1.2 Front Panel
1.STANDBY LED
Red light is emitted when the product is in standby mode.
2.TV LED
Green light is emitted when the product is in TV mode.
3.RADIO LED
Amber light is emitted when the product is in radio mode.
4.STANDBY Button
Switches between operation and standby modes.
5.TV/RADIO Button
Switches between TV and radio.
6.CH-/CH+ Button
Moves the TV/radio channel up/down.
7.SMARTCARD SLOT
Slot for a Smartcard.
GB 8
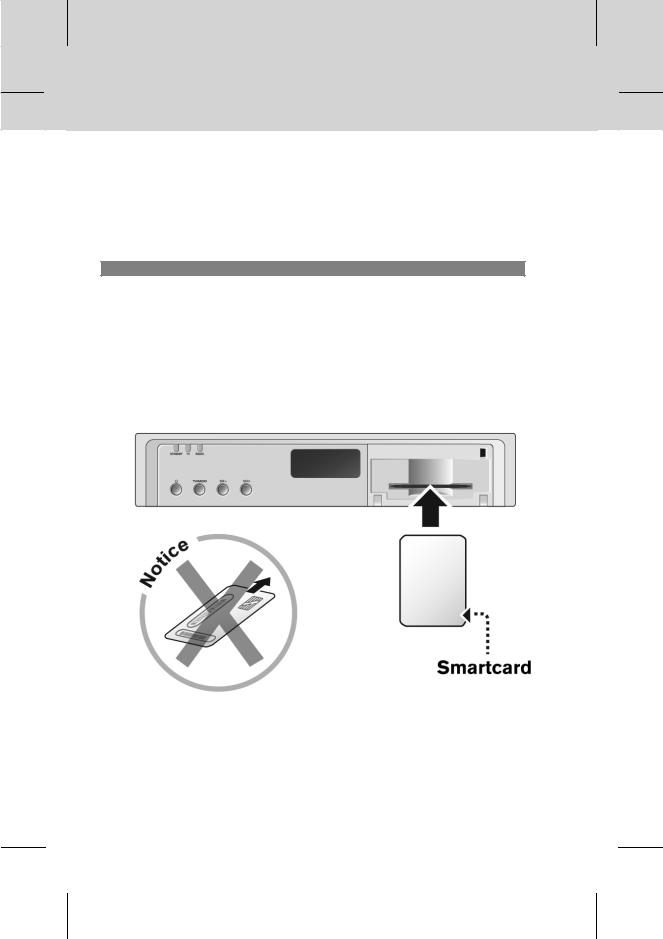
1.3 Conditional Access
Although some TV and radio channels are free to air, most TV and radio/music channels are available on a subscription basis and can only be enjoyed via a Conditional Access component.
The Conditional Access component is a removable Smartcard.
1. Inserting the Smartcard
The Smartcard looks similar to a credit card and is inserted into the slot behind the right-hand front flap of the product. A valid Smartcard entitles you to view and listen to all the channels you choose to subscribe to.
1.Open the right-hand flap on the front panel of the product. Swing it down wards to expose the card slot.
2.Hold the Smartcard horizontally with the electronic chip (small square-shaped, gold in colour) facing downwards.
3.Insert the Smartcard into the top slot until the card is completely in.
GB 9
1. Before Using the Product
1.4 Rear Panel
1.CABLE IN
Connects a cable to the CABLE input jack of the product.
2.TV/VCR
Connects the RF input jack of the TV/VCR to the product.
3.TV SCART
Connects to a TV SCART cable.
4.VCR SCART
Connects to a VCR SCART cable.
5.RS-232C
Connects to the PC to update the software programme of the product.
6.S/PDIF
Outputs the digital audio signals(S/PDIF).
GB 10
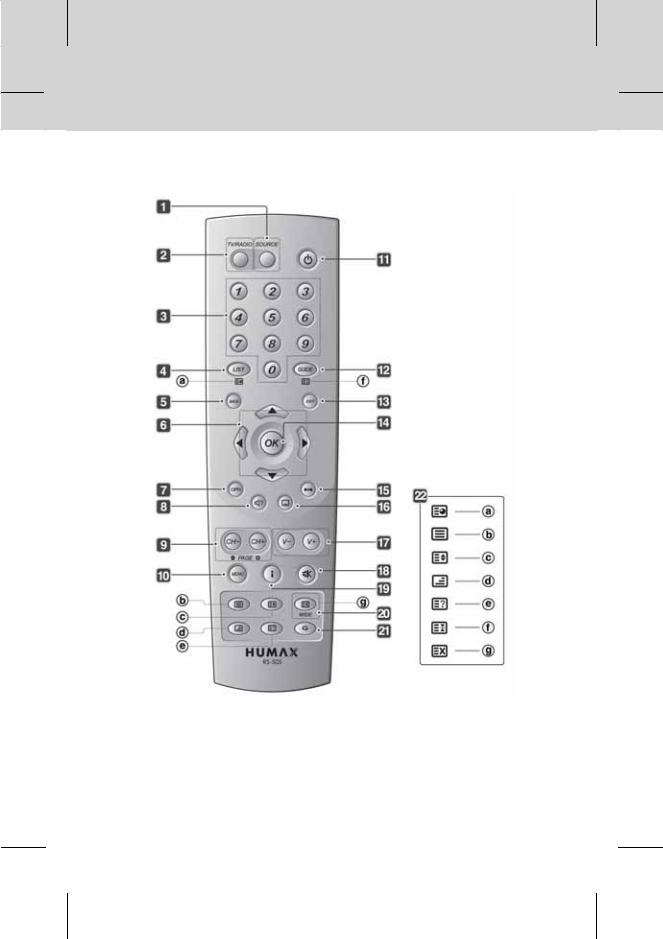
1.5 Remote Control
1. SOURCE
**
Controls the input of TV.
**
2. TV/RADIO
**
Switches between TV and radio modes.
3. NUMERIC(0~9) BUTTONS
**
Enters a TV/radio channel number or menu option number.
**
4. LIST
**
Displays the channel list.
GB 11

1. Before Using the Product
5. BACK
**
Returns to the previous menu and screen.
**
6. ARROW BUTTONS
**
Changes the channel or moves the cursor up, down, left or right.
**
7. OPT+ (OPTION)
**
Displays the channel attributes while watching a programme.
**
8. AUDIO
**
Displays the audio list.
**
9. CH-/CH+ or PAGE-/PAGE+
**
Changes the channel or page.
**
10. MENU
**
Displays the main menu.
**
11. STANDBY
**
Switches between operation and standby modes.
**
12. GUIDE
**
Displays the programme guide.
**
13. EXIT
**
Exits all On-Screen Display (OSD) screens.
**
14. OK
**
Selects a menu, or confirms the selected operation. And displays the channel list while watching a programme.
15. FREEZE
**
Freezes the TV screen you are watching. Play the audio continuously.
**
16. SUBTITLE
**
Displays the subtitle language list.
**
17. V-/V+
**
Adjusts the audio volume.
**
18. MUTE
**
Mutes or unmutes the audio temporarily.
**
19. i (INFORMATION/INDEX)
**
Displays the information about the channel and programme in normal viewing mode. Moves to the index page in teletext mode.
**
20. WIDE
**
Changes the display format.
**
21. G (Game)
**
Displays games.
**
22. TELETEXT
**
a.SUB-PAGE
Search the sub-page in teletext mode. If it is not in the teletext mode, display the current time.
b.TELETEXT ON/OFF
Switches between teletext and TV modes.
c.DOUBLE
Displays the text size as double size.
d.MIX
Adjusts transparency of teletext screen.
e.REVEAL
Displays the concealed information.
f.HOLD
Holds the current page not updating it.
g.CANCEL
Hides the teletext leaving only the page number.
GB 12
2. Setup
This chapter describes how to connect the product to the TV with the particular equipments for gaining optimum signal quality. The product provides various interfaces to connect to the TV, VCR or other devices. Select the most appropriate procedure depending on the equipment you have.
Note: If you encounter any problems setting up your product, please contact your local product distributor.
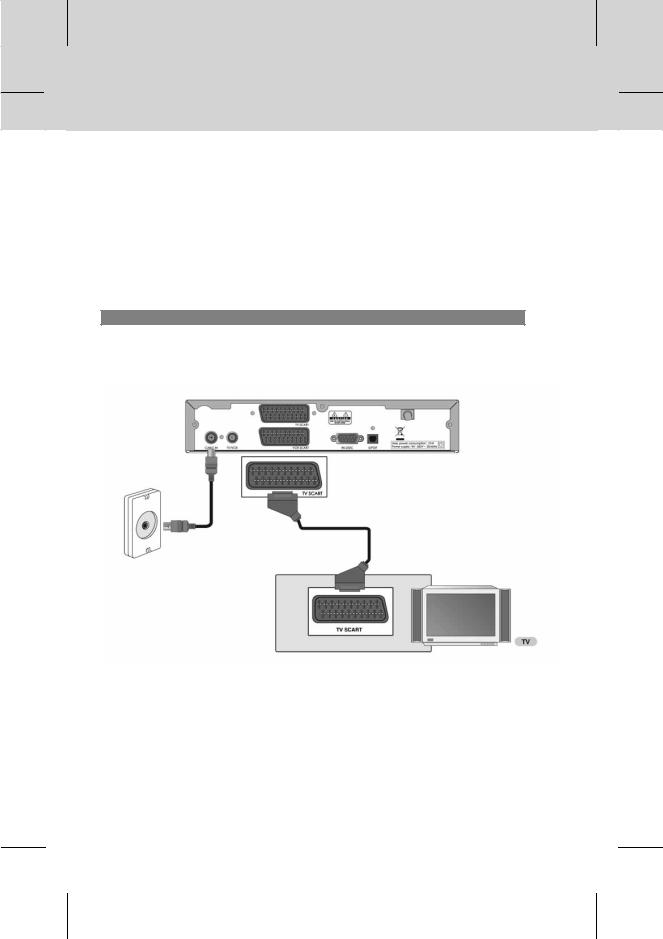
2.1 Connecting the Cable
1. Connecting TV
This is the most simple setup mode.
•Connect your CATV line to the CABLE IN socket on the product for receiving cable services.
•The TV SCART is connected as in the figure above.
GB 13
2. Setup
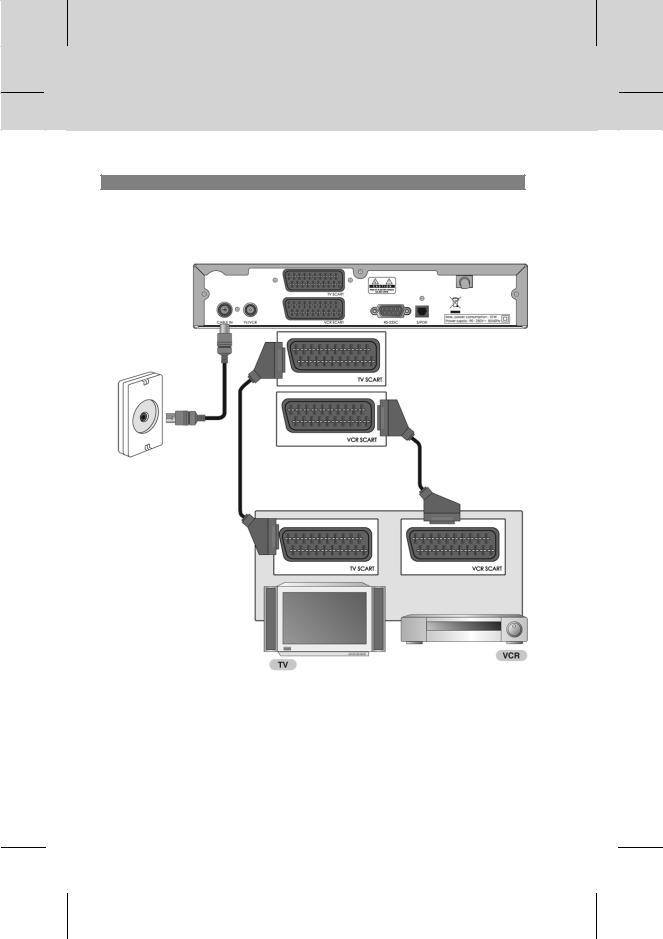
2. Connecting TV/VCR with 2 SCARTs
This is the optimal way to connect the product.
GB 14
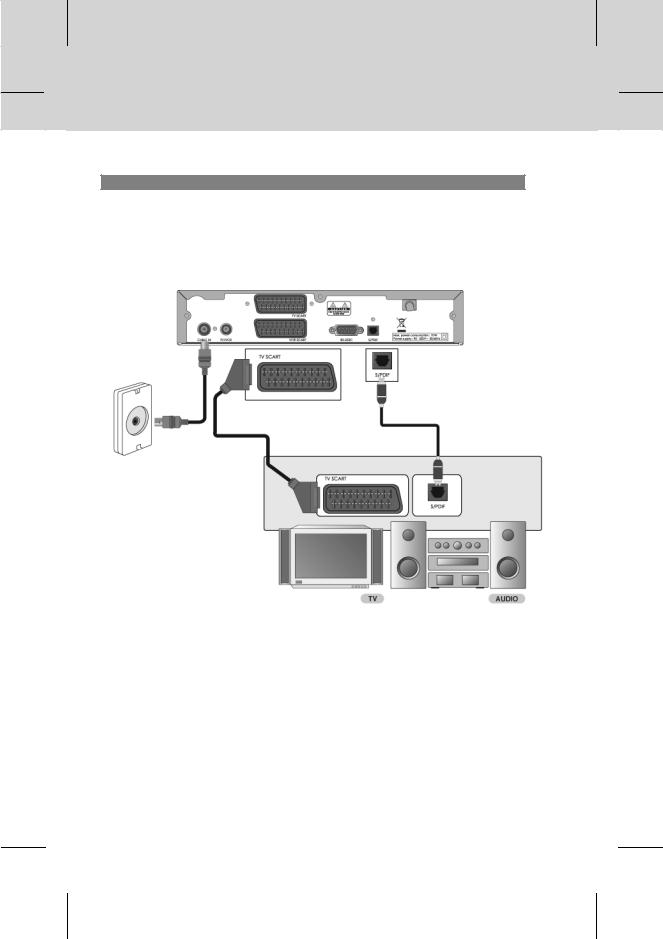
3. Connecting Hi-Fi system
If you wish to connect S/PDIF to the optical S/PDIF terminal and Dolby Digital decoder to listen to digital audio, connect as the following.
GB 15
2. Setup
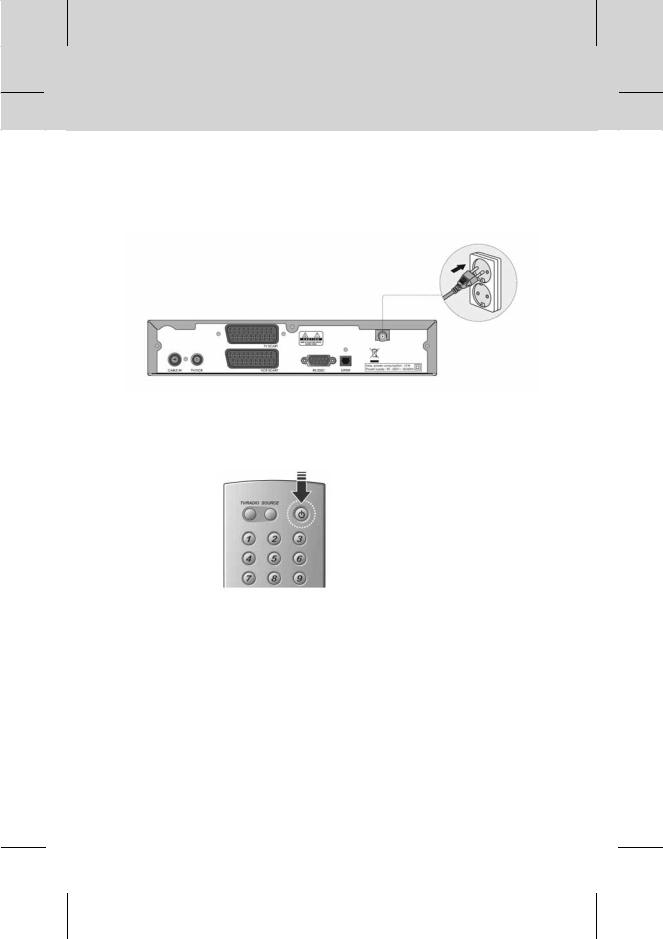
2.2Powering On
1.Connect the power cord of the product to a wall outlet.
2.Power on by pressing the STANDBY  button on the remote control or the STANDBY
 button on the front of the product.
GB 16
3. Installation Wizard
When powering on the product for the first time after purchasing, the installation wizard will operate automatically.
You can easily set-up using simple organisation and options, and watch the broadcasting after completing the set-up procedure. You can select items using the NUMERIC(0~9) buttons.
Note:
•If you press the BACK  button or select Back and press the OK
  button while running the installation wizard, you can return to the previous screen.
•The default password is 0000. If you have forgotten your password, please contact your local product distributor.
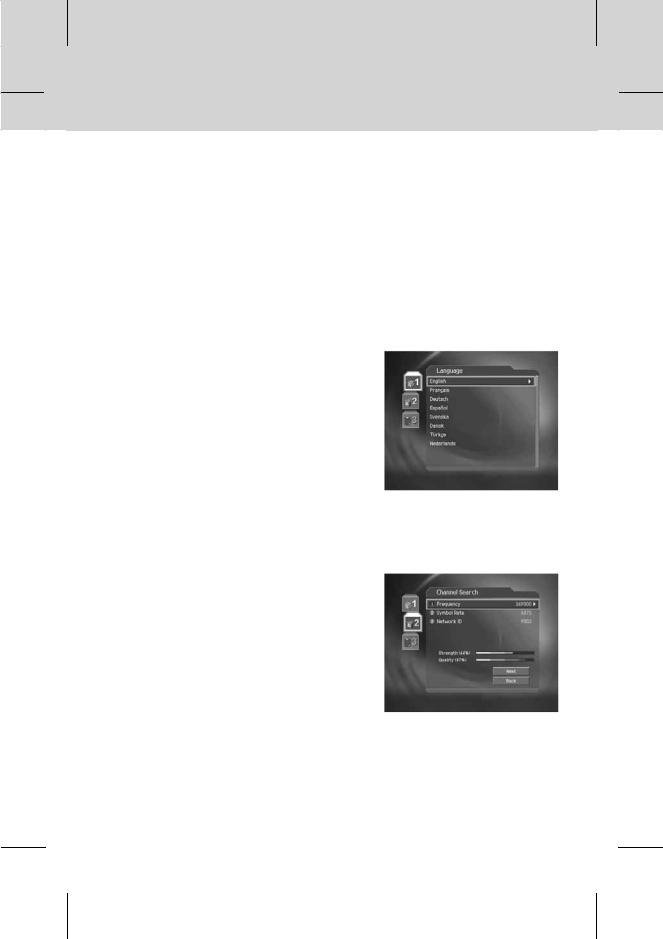
3.1Language
Select the appropriate language from the list using the  button and press the OK
  button to save the
selected language as a default language for menu, subtitle and audio.
3.2 Channel Search
You can search channels automatically or manually. If you select manual search, you have to set parameters for search.
•Frequency: Enter the frequency using the
NUMERIC(0-9) buttons and press the OK  button.
•Symbol Rate: Select the symbol rate using the
 button and press the OK
  or
or  button. If the required value is not listed, then select User Define and enter the value using the
NUMERIC(0~9) buttons.
•Network ID : Enter the network ID using the
NUMERIC(0-9) buttons and press the OK  button.
Select Next and press the OK  button to start channel search.
GB 17
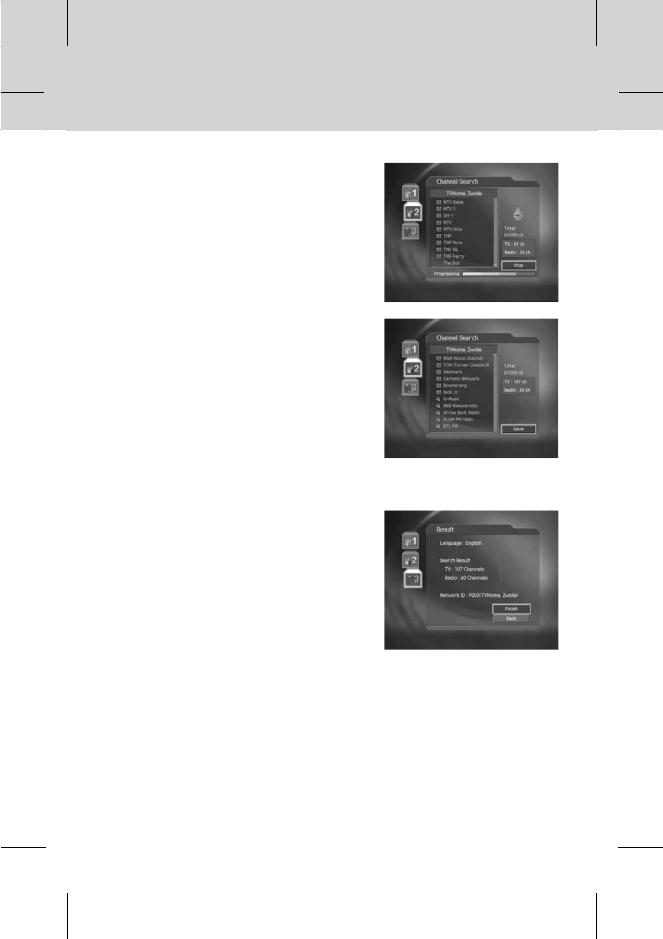
3. Installation Wizard
Please wait for finishing the channel search. If you want to stop the operation during search, press the OK
 button.
Select Save and press the OK  button to save the result and go to the next step.
3.3 Result
It displays the default language, country, time offset and channel search result.
Select Finish using the  button and press the OK
  button to complete the installation wizard.
GB 18
4. Basic Operation
This chapter describes functions such as switching channel, volume control and basic features for watching programmes.
4.1 Switching Channel
You can switch the current channel using one of the following methods.
1.Press the CH-/CH+  or
or  button.
2.Enter the channel number using the NUMERIC(0~9) buttons to move to the channel directly.
3.Press the TV/RADIO  button to switch between TV channel and radio channel.
Note: You can switch channel using the channel list or programme guide. For more information, please refer to Chapter 5. Channel List and 6 Programme Guide.
4.2Volume Control
1.Press the V-/V+  or
or  button to adjust the audio volume.
2.Press the MUTE  button to stop the audio temporarily.
Note: The mute function remains set while you switch channels.
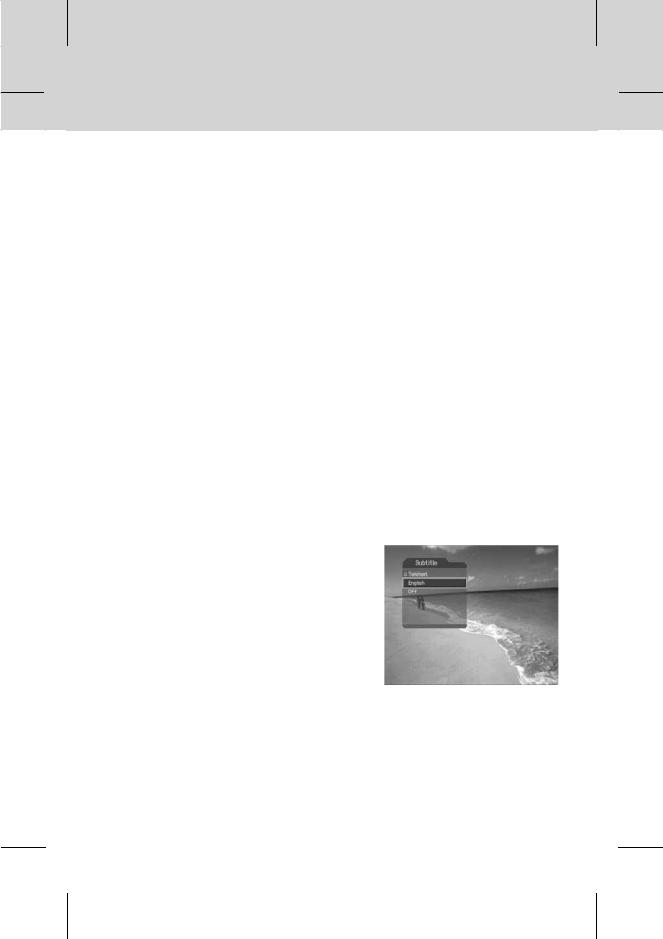
4.3 Subtitle
If the current programme provides subtitle information, you can select the language for the subtitle.
1.Press the SUBTITLE  button to display the subtitle language list.
2.Select a subtitle language using the  button and press the OK
  button. Then the subtitle will be displayed in the selected language at the bottom of the screen.
3.Select Off from the subtitle language list to hide subtitle from the screen.
Note: You can select a default subtitle language in MENU - Preferences - Language Setting
- Subtitle Language.
GB 19
 Loading...