

Page 1

HP Designjet Z3200 Photo Printer series
Quick reference guide
Page 2

Legal notices
The information contained herein is subject to
change without notice.
The only warranties for HP Products and services
are set forth in the express warranty statement
accompanying such products and services.
Nothing herein should be construed as
constituting an additional warranty. HP shall not
be liable for technical or editorial errors or
omissions contained herein.
USB 2.0 high-speed certified.
Trademarks
Adobe®, Adobe Photoshop® and Adobe®
PostScript® 3™ are trademarks of Adobe
Systems Incorporated.
Corel® is a trademark or registered trademark of
Corel Corporation or Corel Corporation Limited.
Energy Star® is a U.S. registered mark of the
United States Environmental Protection Agency.
Microsoft® and Windows® are U.S. registered
trademarks of Microsoft Corporation.
Page 3

Table of contents
1 Introduction
Safety precautions .......................................................................................... 1
HP Start-Up Kit ............................................................................................... 1
Your printer's documentation .......................................................................... 1
The front panel ................................................................................................ 2
Printer software ............................................................................................... 3
2 Personalizing the printer
Turn printer on and off .................................................................................... 5
Access the HP Printer Utility ........................................................................... 6
Access the Embedded Web Server ................................................................ 6
3 Paper handling
Load a roll onto the spindle ............................................................................. 8
Load a roll into the printer ............................................................................. 10
Unload a roll .................................................................................................. 13
Load a single sheet ....................................................................................... 14
Unload a single sheet ................................................................................... 17
4 Printing
Select print quality ........................................................................................ 19
Select paper size .......................................................................................... 20
Select margins options ................................................................................. 21
Preview a print .............................................................................................. 22
5 Color management
Color calibration ............................................................................................ 24
6 Maintaining the printer
Clean the exterior of the printer .................................................................... 27
Maintain the ink cartridges ............................................................................ 27
Update the firmware ..................................................................................... 27
7 Accessories
How to order supplies and accessories ........................................................ 29
8 Troubleshooting paper issues
ENWW iii
Page 4

The paper has jammed ................................................................................. 31
9 Troubleshooting print-quality issues
General advice .............................................................................................. 34
Horizontal lines across the image (banding) ................................................. 34
The whole image is blurry or grainy .............................................................. 36
Colors are inaccurate .................................................................................... 37
The image is clipped ..................................................................................... 38
10 Front-panel error messages
11 HP Customer Care
Introduction ................................................................................................... 43
Contact HP Support ...................................................................................... 43
12 Legal information
Hewlett-Packard Limited Warranty Statement .............................................. 45
Hewlett-Packard Software License Agreement ............................................ 48
Open source software ................................................................................... 49
Regulatory notices ........................................................................................ 50
iv ENWW
Page 5

1Introduction
Safety precautions
The following precautions ensure the proper use of the printer and prevent the
printer from being damaged. Follow these precautions at all times.
Use the power supply voltage specified on the nameplate. Avoid overloading
●
the printer's electrical outlet with multiple devices.
Ensure the printer is well-grounded. Failure to ground the printer may result in
●
electrical shock, fire and susceptibility to electromagnetic interference.
Do not disassemble or repair the printer yourself. Contact your local HP
●
Service Representative for service, see
Use only the electrical cord supplied by HP with the printer. Do not damage,
●
cut or repair the power cord. A damaged power cord has risk of fire and electric
shock. Replace a damaged power cord with an HP-approved power cord.
Do not allow metal or liquids (except those used in HP Cleaning Kits) to touch
●
the internal parts of the printer. Doing so may cause fire, electric shock or other
serious hazards.
Power off the printer and unplug the power cable from the power outlet in any
●
of the following cases:
When placing your hands inside the printer
◦
If there is smoke or an unusual smell coming from the printer
◦
If the printer is making an unusual noise not heard during normal
◦
operation
A piece of metal or a liquid (not part of cleaning and maintenance
◦
routines) touches internal parts of the printer
During a thunderstorm
◦
During a power failure
◦
HP Start-Up Kit
The HP Start-Up Kit is the CD that comes with your printer; it contains the printer's
software.
Your printer's documentation
You can read about how to use your printer in Using your printer and the Quick
reference guide. The most complete source of information is Using your printer,
which is available from
http://www.hp.com/go/z3200ps/manuals/. The Quick reference guide contains the
http://www.hp.com/go/z3200/manuals/ and
Introduction
Contact HP Support on page 43.
ENWW
Safety precautions
1
Page 6
Introduction
most commonly-needed information, and is provided as a printed manual with your
printer.
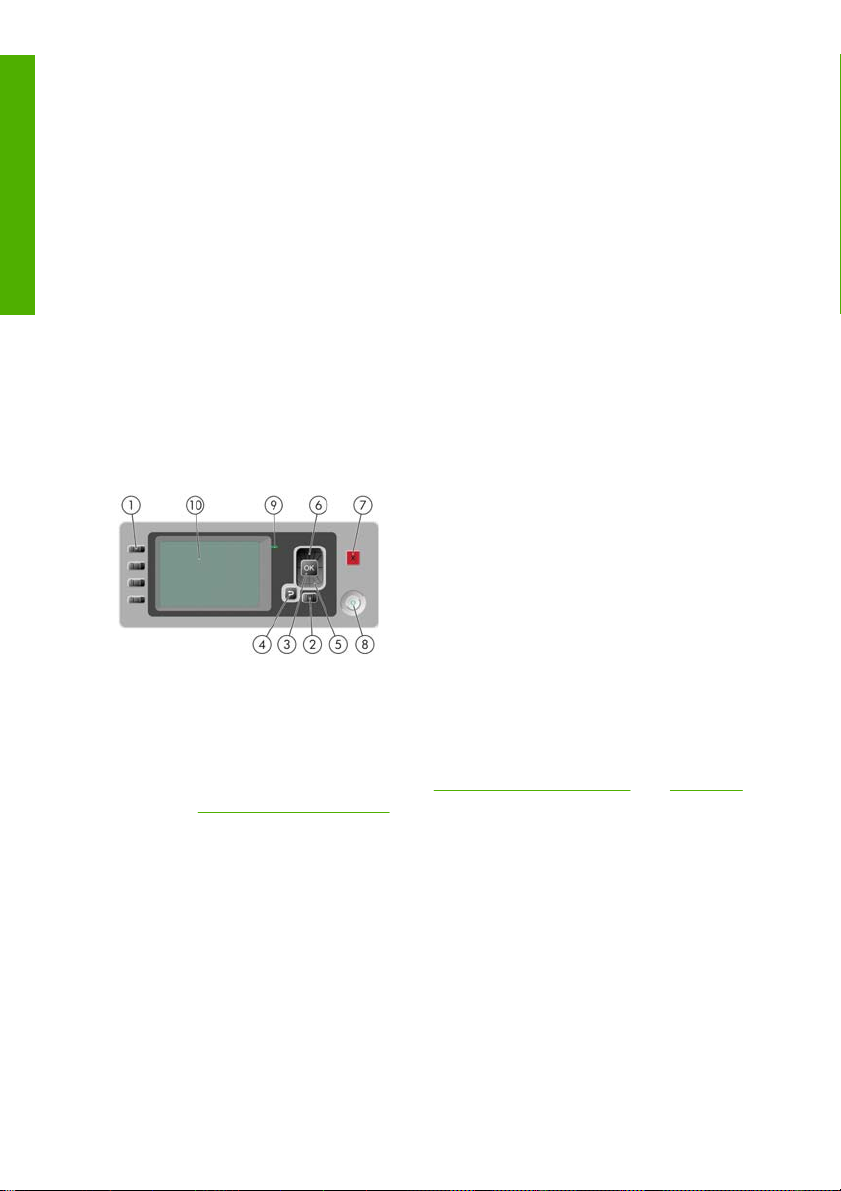
The front panel
Your printer's front panel is located on the front of the printer, in the center. It has
the following important functions:
●
●
●
●
●
●
The front panel has the following components:
1. Direct access keys:
2. Menu key - Press to return to the main menu of the front-panel display. If you
3. OK key - To confirm an action while in a procedure or interaction. To enter in
4. Back key - To go to the previous step in a procedure or interaction. To go to
5. Down key - To go down in a menu or option, or to decrease a value, for
Assists you in troubleshooting issues
Is used to perform certain procedures, such as cutting and unloading paper
Displays helpful animations to guide you through procedures
Displays up-to-date information about the status of the printer, such as the ink
cartridges, the printheads, the paper and the print jobs
Displays warning and error messages, when appropriate, along with audio
alerts to call attention to a warning or message
Can be used to change the values of printer settings and thus change the
operation of the printer. However, settings in the front panel are overridden by
settings in the printer drivers, see Using your printer.
First key: View ink levels, see Using your printer
●
Second key: View loaded paper, see Using your printer
●
Third key: Unload paper, see
●
single sheet on page 17
Fourth key: Form feed and cut, see Using your printer
●
are already on the main menu it displays the status screen.
a submenu in the menu. To select a value when given an option.
the upper level, or leave the option in the menu, or when given an option.
example when configuring the front-panel display contrast or the IP address.
Unload a roll on page 13 and Unload a
2 Chapter 1 Introduction ENWW
Page 7

6. Up key - To go up in a menu or option, or to increase a value, for example
when configuring the front-panel display contrast or the IP address.
7. Cancel key - To abort a procedure or interaction.
8. Power key - To turn the printer off or on, it also has a light to indicate the
printer's status. If the power key light is off the device is off. If the power key
light is blinking green, the device is starting up. If the power key light is green
on, the device is on. If the power key light is amber on, the device is in standby.
If the power key light is blinking amber, the device needs attention.
9. LED light - Indicates the printer's status. If the LED light is solid green, the
device is ready. If it is flashing green, the device is busy. If it is solid amber,
there is a system error. If it is flashing amber, the printer needs attention.
10. Front-panel display - Displays errors, warnings and information on using your
printer.
To highlight an item in the front-panel display, press the Up or Down key until the
item is highlighted.
To select an item in the front-panel display, first highlight it and then press the
OK key.
When this guide shows a series of front-panel display items like this: Item1 >
Item2 > Item3, it means that you should select Item1, then select Item2, then
select Item3.
Information about specific uses of the front panel can be found throughout this
guide.
Printer software
The following software is provided with your printer:
The PCL3 raster printer driver
●
The PostScript printer driver (Z3200ps only)
●
The HP Printer Utility, see
●
you to:
Manage the printer including color with the HP Color Center
◦
Manage the job queue (Z3200ps only), see Using your printer
◦
View the status of the ink cartridges, the printheads and the paper
◦
View job accounting information, see Using your printer
◦
Update the printer's firmware, see
◦
Access the HP Knowledge Center
◦
Change various printer settings (in the Settings tab)
◦
Perform calibrations and troubleshooting
◦
Introduction
Access the HP Printer Utility on page 6, allows
Update the firmware on page 27
ENWW
Printer software
3
Page 8

The Embedded Web Server runs in the printer and enables you to use a Web
Introduction
●
browser on any computer to check ink levels and printer status, see
Access
the Embedded Web Server on page 6
The Advanced Profiling Solution included on a separate DVD, to be installed
●
after other HP software (drivers and the HP Printer Utility)
4 Chapter 1 Introduction ENWW
Page 9
2 Personalizing the printer
Turn printer on and off
TIP: The printer can be left powered on without wasting energy. Leaving it on
improves response time and overall system reliability. When the printer has not
been used for a certain period of time (the default time is determined by Energy
Star), it saves power by going into sleep mode. However, any interaction with the
printer's front-panel display returns it to active mode, and it can resume printing
immediately. To change the sleep mode time, see Using your printer.
NOTE: In sleep mode, the printer performs maintenance service to the printheads
from time to time. This avoids long preparation times after long idle periods.
Therefore, it is strongly recommended to leave the printer powered on or in sleep
mode to avoid wasting ink and time.
The printer has three levels of power consumption.
Plugged in: the power cord is plugged into the back of the printer
●
Switched on: the switch at the back of the printer is in the on position
●
Powered on: the Power key on the front panel shows a green light
●
If you wish to turn the printer on or off or reset the printer, the normal and
recommended method is to use the Power key on the front panel.
Personal settings
ENWW
However, if you plan to store the printer indefinitely or the Power key does not seem
to work, you are recommended to power it off using the Power key, and then also
switch off the power switch at the rear.
Turn printer on and off
5
Page 10

To turn it back on, use the power switch at the rear.
When the printer is powered back on, it takes about three minutes to initialize and
check and prepare the printheads. Preparing the printheads takes about one minute
and 15 seconds. However, if the printer has been off for six weeks or more,
preparing the printheads could take up to an hour.
Access the HP Printer Utility
The HP Printer Utility enables you to manage your printer from a computer with a
USB connection or TCP/IP.
Under Windows, start the the HP Printer Utility from your desktop shortcut or
●
from Start > All Programs > Hewlett-Packard > HP Printer Utility > HP
Personal settings
Printer Utility. This launches the HP Printer Utility showing the printers
installed in the Printers and Faxes window.
Under Mac OS, launch the HP Printer Utility from your dock shortcut or by
●
selecting STARTUP_DISK > Library > Printers > hp > Utilities > HP Printer
Utility. This launches the HP Printer Utility Printer Selector showing the
printers installed in the Printer Setup Utility (Mac OS X 10.4) or Print & Fax
(Mac OS X 10.5 or later).
Select your printer and click Select. This launches the HP Printer Utility.
If you have followed these instructions but failed to get through to the HP Printer
Utility, see Using your printer.
Access the Embedded Web Server
The Embedded Web Server enables you to manage your printer remotely using an
ordinary Web browser running on any computer.
NOTE: To use the Embedded Web Server, you must have a TCP/IP connection
to your printer.
The following browsers are known to be compatible with the Embedded Web
Server:
Internet Explorer 6 or later for Windows
●
Netscape Navigator 6.01 or later
●
Mozilla 1.5 or later
●
Mozilla Firefox 1.0 or later
●
Safari 2 or later for Mac OS
●
To access the Embedded Web Server on any computer, open your Web browser
and give the address of your printer. You can find out the address of your printer
(starting with http:) from the front-panel display, by looking at the status screen.
6 Chapter 2 Personalizing the printer ENWW
Page 11

If you have followed these instructions but failed to get through to the Embedded
Web Server, see Using your printer.
Personal settings
ENWW
Access the Embedded Web Server
7
Page 12
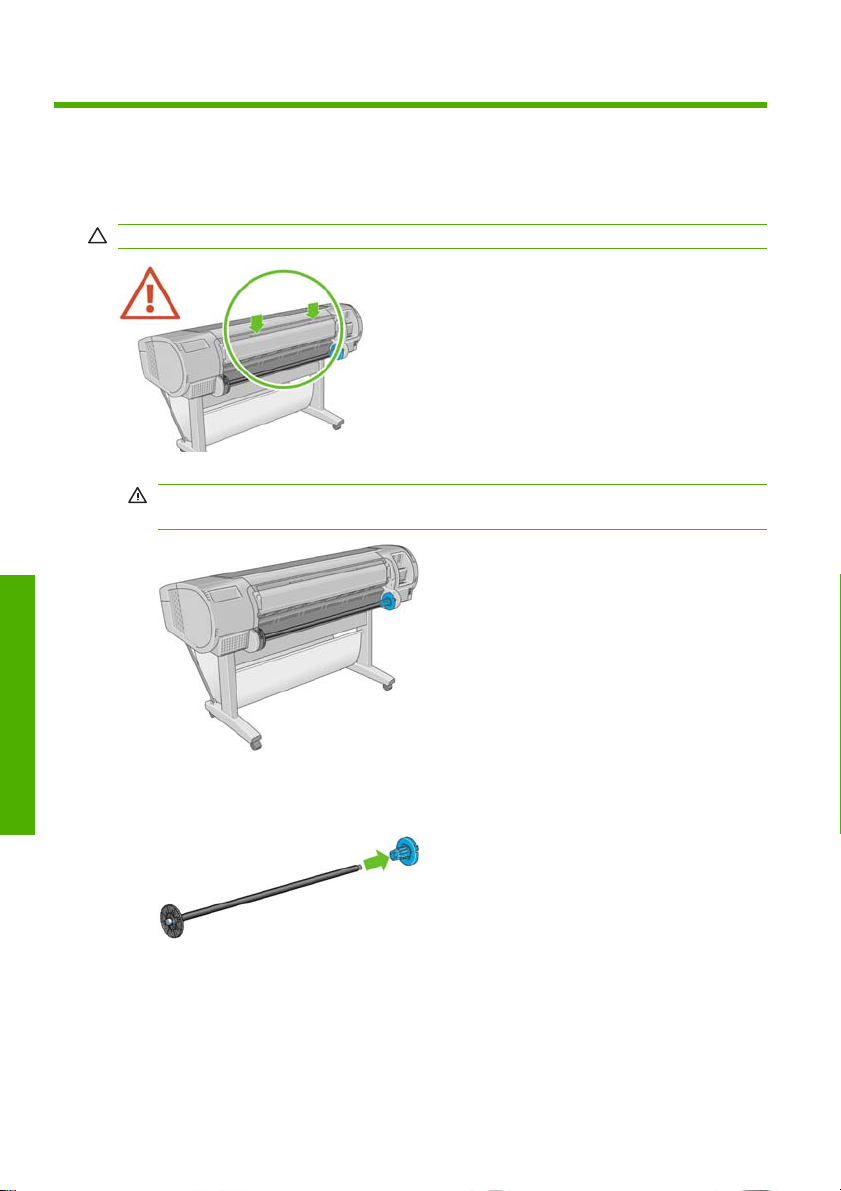
3 Paper handling
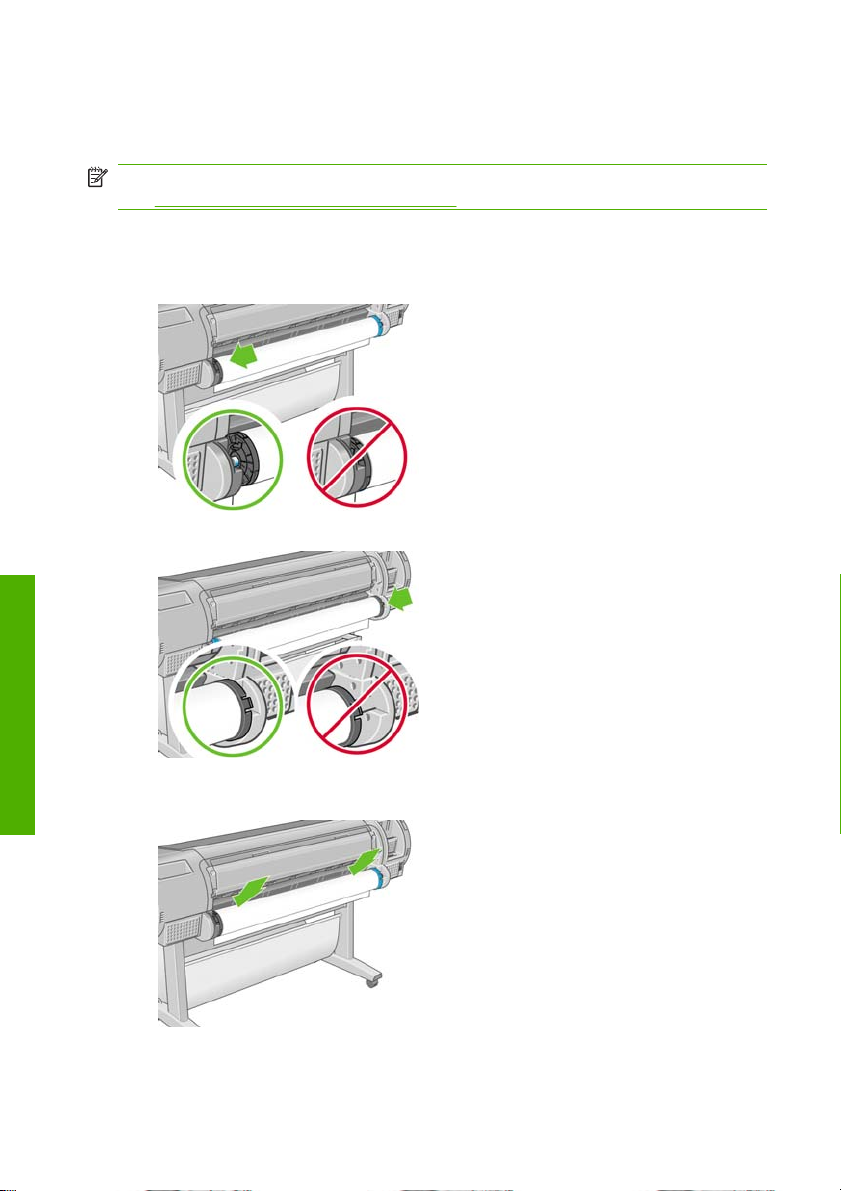
Load a roll onto the spindle
CAUTION: Ensure the sheet tray is closed.
1. Remove the right-hand end of the spindle from the printer, then the other end.
WARNING! Do not insert your fingers into the spindle supports during the
removal process.
Paper handling
2. The spindle has a stop at each end to keep the roll in position. The blue stop
can be removed to mount a new roll; it slides along the spindle to hold rolls of
different widths. Remove the blue paper stop from the end of the spindle.
8 Chapter 3 Paper handling ENWW
Page 13
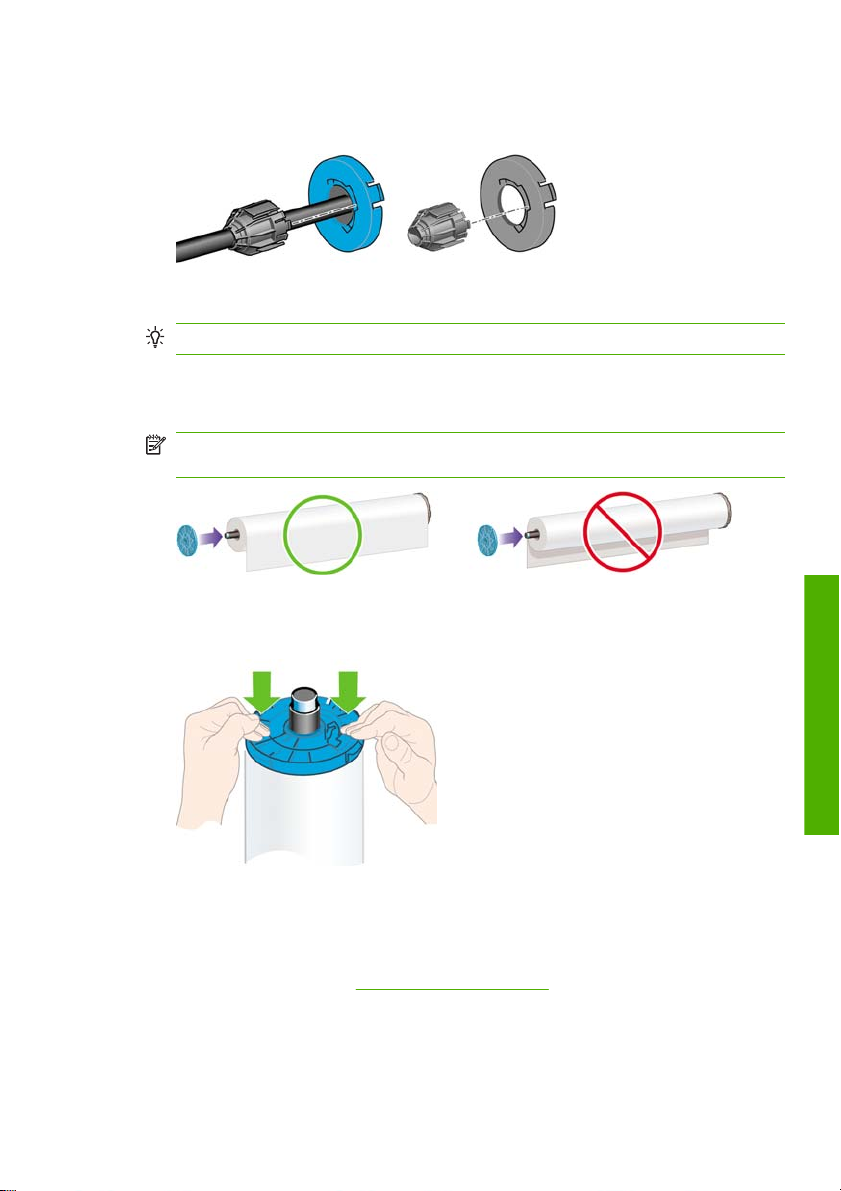
3. If your roll has a three-inch cardboard core, ensure that the core adaptors
supplied with the printer have been installed.
4. If the roll is long, rest the spindle horizontally on a table and load the roll on
the table.
TIP: You may need two people to handle a large roll.
5. Slide the new roll onto the spindle. Make sure the paper type is oriented as
shown. If it is not, remove the roll, turn it 180 degrees and slide it back on to
the spindle. There are labels on the spindle showing the correct orientation.
NOTE: From the back of the printer, the blue stop is fitted onto the right-hand
end of the spindle.
Ensure both ends of the roll are as close to the spindle stops as possible.
6. Put the blue paper stop onto the open end of the spindle, and push it towards
the end of the roll.
ENWW
7. Ensure the blue paper stop is pushed in as far as it goes, until both ends are
against the stops.
If you are a regular user of different paper types, you can change rolls more quickly
if you preload rolls of different paper types on different spindles. Extra spindles are
available for purchase, see
Accessories on page 29.
Load a roll onto the spindle
Paper handling
9
Page 14
Load a roll into the printer
There are two ways to load a roll. The easy loading procedure is recommended.
NOTE: To start these procedures you must have a roll loaded on the spindle.
Load a roll onto the spindle on page 8.
See
Easy loading procedure
1. Standing behind the printer, rest the spindle's black end on the left side roll
holder. Do not put the end completely into the roll holder.
2. Rest the blue end of the spindle on the right side roll holder.
Paper handling
3. With both hands, push the spindle into both roll holders at the same time. The
spindle snaps into place.
10 Chapter 3 Paper handling ENWW
Page 15
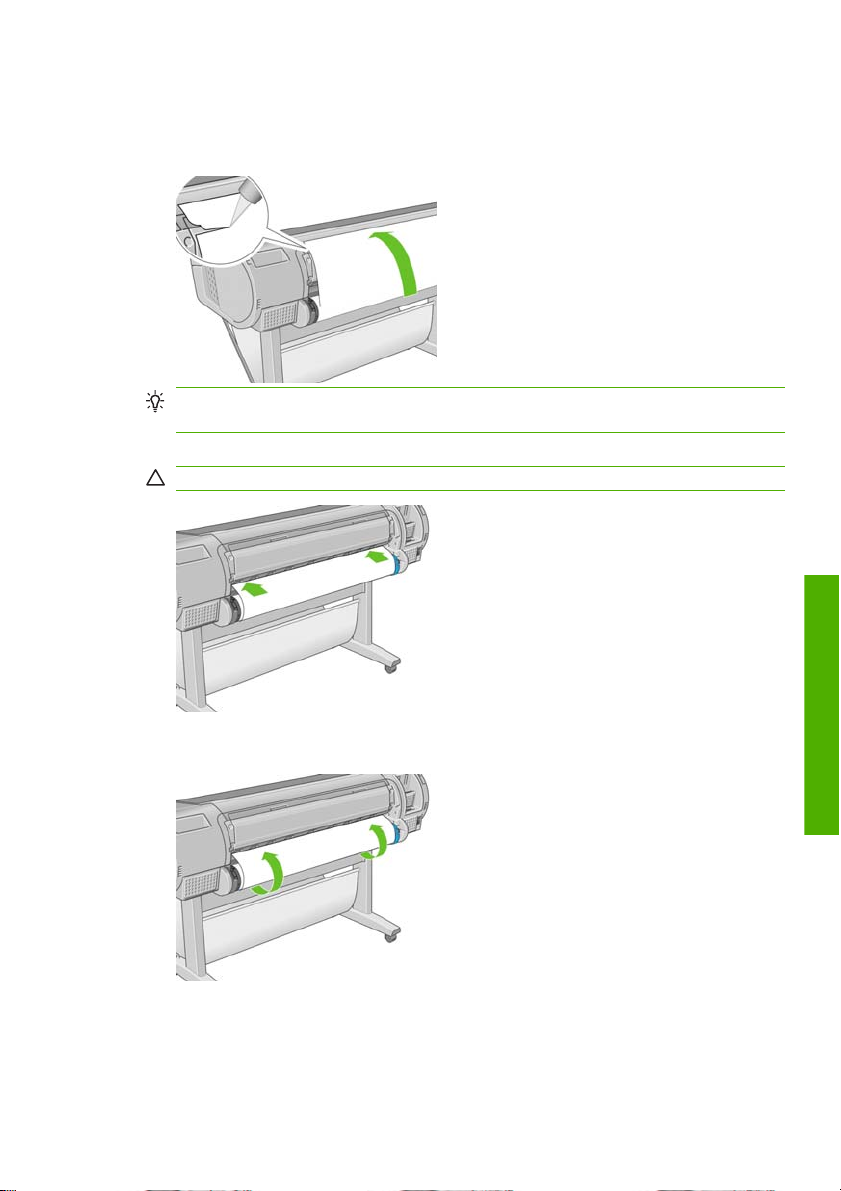
4. If the edge of the roll is torn (sometimes due to tape used to hold the end of
the roll) or not straight, pull the paper slightly beyond the cutting groove and
use a cutter to cut a straight edge.
TIP: Cut the paper as straight as possible, as uneven paper does not load
correctly.
5. Insert the edge of the paper into the feeder.
CAUTION: Do not push your fingers inside the printer's paper path.
ENWW
6. Roll the spindle into the feeder until you feel resistance. The printer detects
the paper and feeds it automatically into the printer.
Load a roll into the printer
Paper handling
11
Page 16
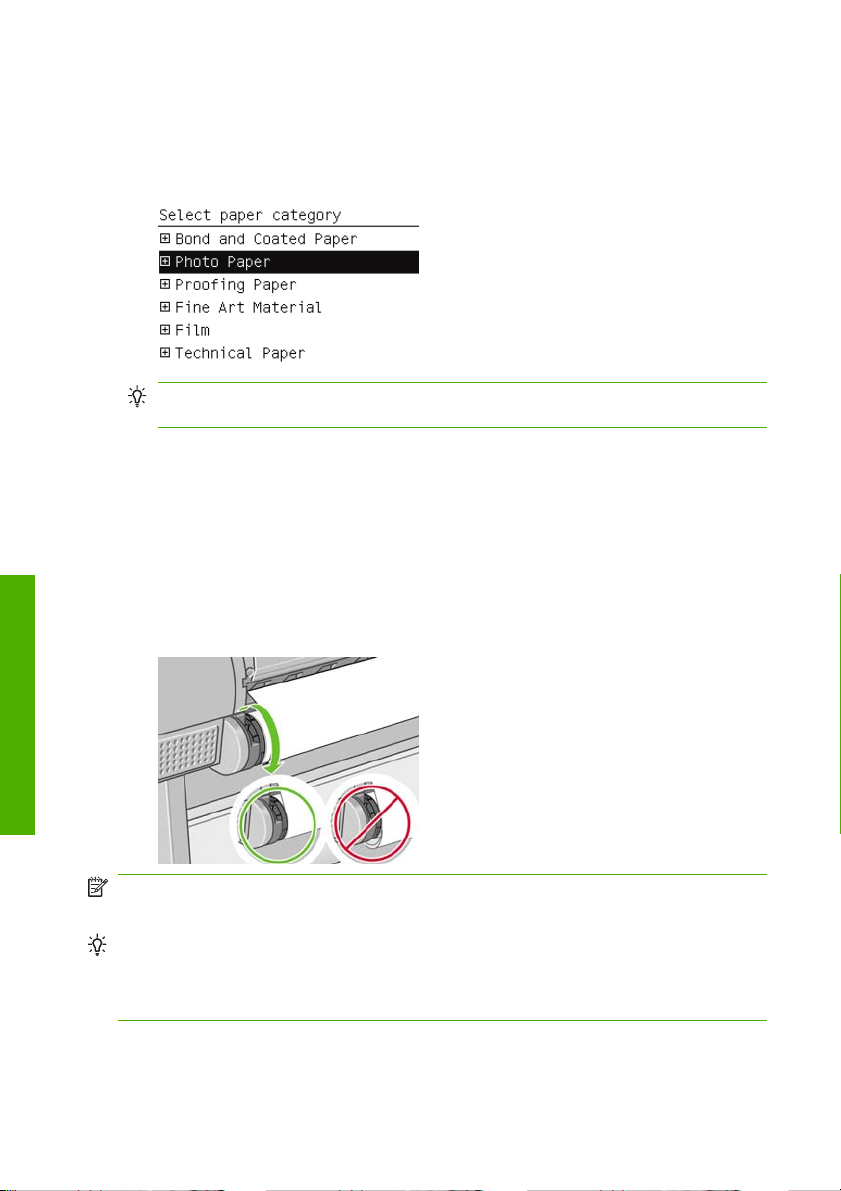
7. Once the paper is fed into the printer, the front-panel display asks if you are
loading a roll or a sheet. Select Roll with the Up and Down keys and press
OK.
8. Select your paper category and type.
TIP: If you have loaded a paper type whose name does not appear in the
paper list, see Using your printer.
9. The printer checks the alignment and measures the width. It cuts a strip off
the leading edge of glossy or satin paper to ensure perfect quality; other paper
types are not cut.
10. Look at the front panel; you may find some instructions there.
11. When the roll is aligned, the front panel displays the Ready message and the
printer is ready to print. If the roll is not aligned, follow the instructions on the
front-panel display.
12. If the paper is loose on the roll, lightly rewind from the end of the spindle until
Paper handling
tight.
NOTE: If you have an unexpected issue at any stage of the paper loading process,
see Using your printer.
TIP: When prints fall into the basket, they can be torn or marked by ink from other
prints. To avoid this, catch your prints as they are cut from the roll and do not stack
prints in the basket. Alternatively, turn off the automatic cutter, see Using your
printer, and use the Form feed and cut key to release your print.
12 Chapter 3 Paper handling ENWW
Page 17

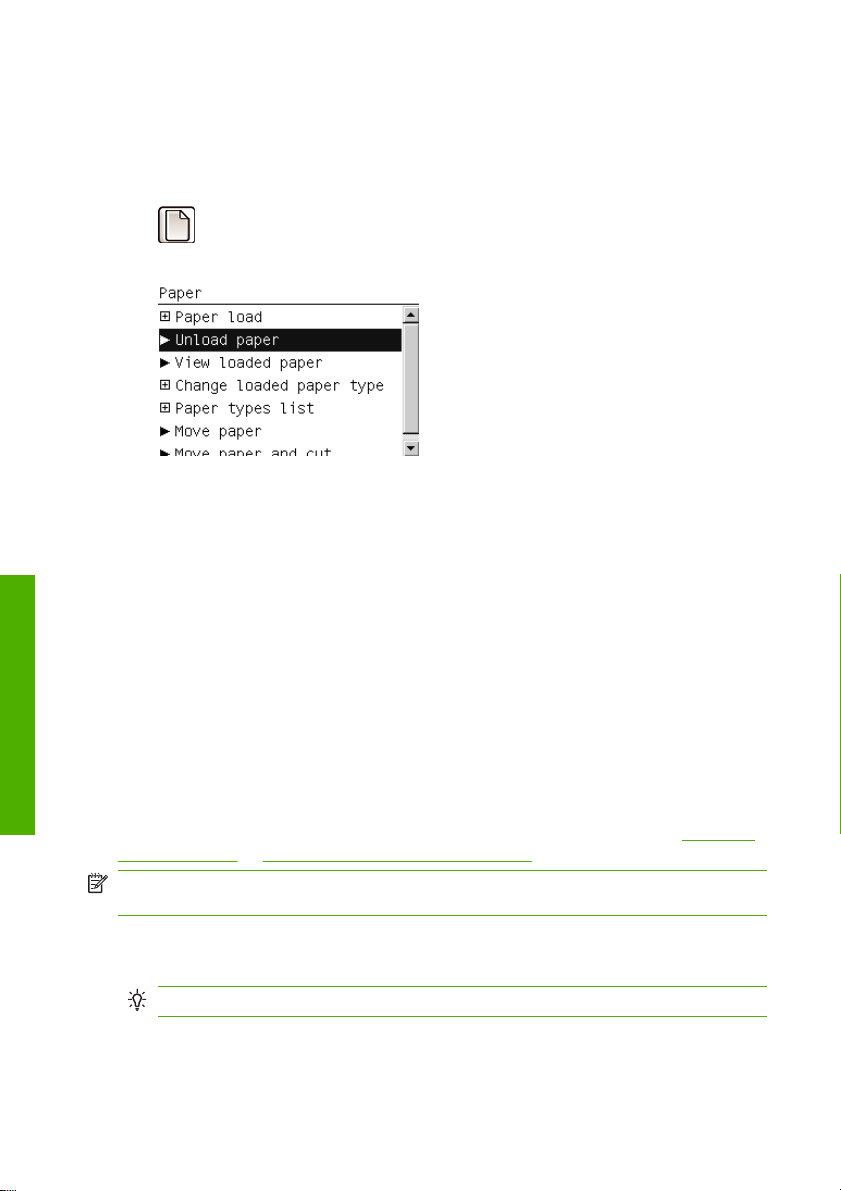
Paper menu procedure
As an alternative you can use the paper menu to start the paper loading process.
1. Follow steps one through five of the
2. Press the Menu key to return to the main menu, select the Paper menu icon
.
3. Select Paper load.
4. Select Load roll.
5. Continue with step 9 of the easy loading process (see Select your paper
category and type. on page 12).
Unload a roll
Before unloading a roll, check whether there is paper on the roll or whether the end
of the paper is no longer attached to the roll, and follow the appropriate procedure
as described below.
TIP: Do not touch the paper while the printer is printing, as this can cause print
quality defects.
Easy loading procedure on page 10.
Paper handling
Unload paper key procedure with paper on the roll
If there is paper on the roll, use the following procedure.
1. Press the Unload paper key on the front panel.
2. When prompted by the front-panel display, lift the blue lever on the left.
3. When prompted by the front-panel display, lightly rewind the paper from the
end of the spindle until removed from the printer.
4. When prompted by the front-panel display, lower the blue lever.
ENWW
Unload a roll
13
Page 18
Paper menu procedure with paper on the roll
If there is paper on the roll, you can also start the process from the paper menu in
the front panel's main menu.
1. Press the Menu key to return to the main menu, select the Paper menu icon
.
2. Select Unload paper.
3. Continue from step two of the Unload paper key process.
Roll out of paper procedure
If the end of the paper is no longer attached to the roll, use the following procedure.
1. If you have already started the unload process, press the Cancel key on the
front panel to cancel that procedure.
2. Lift the blue lever on the left. If the front panel displays a warning about the
Paper handling
lever, ignore it.
3. Pull out the paper from the printer. Pull from wherever the paper is accessible;
the back of the printer is recommended.
4. Lower the blue lever.
5. If the front panel displays a warning message, press the OK key to clear it.
Load a single sheet
There are two ways to load a sheet. The easy loading procedure is recommended.
Any loaded roll or sheet must be unloaded before loading a sheet, see
roll on page 13 or Unload a single sheet on page 17.
NOTE: For sheets thicker than 0.5mm, you must have space behind the printer
equal to the length of the sheet.
Unload a
Easy loading procedure
1. Standing in front of the printer, open the sheet tray.
TIP: If the tray is difficult to open, try opening from behind the printer.
14 Chapter 3 Paper handling ENWW
Page 19

2. Insert the sheet into the feeder. Load your sheet aligned with the load line and
insert until the paper cannot continue, with thicker sheets you feel resistance.
The printer detects the sheet in three seconds. A countdown begins on the
front-panel display.
CAUTION: Do not push your fingers inside the printer's paper path.
3. After the countdown, the paper feeds into the printer. Guide the sheet into the
printer; this is especially important with thicker papers.
4. The front-panel display asks whether you are loading a roll, a sheet with skew
check, or a sheet without skew check. Select Sheet, with skew check or
Sheet, without skew check with the Up and Down keys.
NOTE: The recommended option is Sheet, with skew check.
NOTE: If you load without a skew check, print previews may not work
properly. See
Preview a print on page 22.
5. Select your paper category and type.
ENWW
TIP: If you have loaded a paper type whose name does not appear in the
paper list, see Using your printer.
Load a single sheet
Paper handling
15
Page 20

6. If you selected Sheet in the Paper Load menu, the printer checks the
alignment and measures the sheet.
NOTE: Depending on the length of the sheet, it feeds out the front of the
printer.
If you selected Sheet, without skew check, you will need to align the sheet
manually.
7. If the paper has been loaded successfully, the front panel displays the
Ready message and the printer ready to print. If the paper is not straight, follow
the instructions on the front-panel display.
NOTE: When correctly loaded, the sheet is in the back of the printer.
NOTE: If you have an unexpected problem at any stage of the paper loading
process, see Using your printer.
Paper handling
Paper menu procedure
As an alternative you can use the paper menu to start the paper loading process
1. Perform step one of the easy loading procedure.
2. Press the Menu key to return to the main menu and select the Paper menu
icon
16 Chapter 3 Paper handling ENWW
.
Page 21

3. Select Paper load.
4. Select Sheet, with skew check or Sheet, without skew check.
NOTE: The recommended option is Sheet, with skew check.
NOTE: If you load without a skew check, print previews may not work
properly. See
5. Continue with step 5 of the easy loading procedure (see Select your paper
category and type. on page 15).
Preview a print on page 22.
Unload a single sheet
To unload a sheet without printing, use the Unload paper key or the paper menu
procedure.
To unload a single sheet after printing, you can simply pull the sheet free from the
front of the printer.
TIP: Do not touch the paper while the printer is printing, as this can cause print
quality defects.
Unload paper key procedure
1. Press the Unload paper key on the front panel.
2. The sheet unloads out the front of the printer, either catch it manually or allow
it to fall into the basket.
Paper handling
ENWW
Unload a single sheet
17
Page 22

Paper menu procedure
You can also unload a sheet from the paper menu.
1. Press the Menu key to return to the main menu and select the Paper menu
icon
2. Select Unload paper. The sheet unloads out of the front of the printer, either
catch it manually or allow it to fall into the basket.
Paper handling
.
18 Chapter 3 Paper handling ENWW
Page 23

4Printing
Select print quality
The printer has various print-quality options because best-quality printing requires
some loss of speed, while fast printing implies some reduction in print quality.
Therefore, the standard print-quality selector is a slider that allows you to choose
between quality and speed.
Alternatively, you can select from the custom options: Best, Normal and Fast.
There are also three supplementary custom options that may have an effect on print
quality: Maximum detail, More passes and Gloss enhancer. See Using your
printer.
NOTE: In the Windows driver dialog, the rendering and printing resolutions for
your job are displayed in the Paper/Quality tab. In the Mac OS Print dialog, they
are displayed in the Summary panel.
You can select print-quality options in the following ways:
In the Windows driver dialog: go to the Paper/Quality tab and look at the
●
Print Quality section. If you select Standard Options, you will see a simple
slider with which you can select speed or quality. If you select Custom
Options, you will see the more specific options described above.
In the Mac OS Print dialog (PostScript driver): go to the Image Quality
●
panel. If you select Standard quality options, you will see a simple slider with
which you can select speed or quality. If you select Custom quality options,
you will see the more specific options described above.
In the Mac OS Print dialog (PCL3 driver): go to the Paper Type/Quality
●
panel and select Paper. If you select Standard quality options, you will see a
simple slider with which you can select speed or quality. If you select
Custom quality options, you will see the more specific options described
above.
On the Embedded Web Server's Submit Job page (Z3200ps only):
●
select Basic settings > Print quality. If you then select Standard options,
you can choose between Speed and Quality. If you select Custom
options, you will see the more specific options described above.
●
Using the front panel: select the Setup menu icon
preferences > Print quality.
NOTE: If you have set the print quality from your computer, that overrides
the print-quality setting in the front panel.
, then Printing
Printing
ENWW
Select print quality
19
Page 24

NOTE: You cannot change the print quality of pages that the printer is already
receiving or has already received (even if they have not started to print yet).
Select paper size
The paper size can be specified in the following ways.
NOTE: The paper size specified here should be the paper size in which the
document was created. It is possible to rescale the document to a different size for
printing. See Using your printer.
In the Windows driver dialog: select the Paper/Quality tab, then select your
●
paper size from the Document Size list.
In the Mac OS Page Setup dialog: select your printer in the Format for popup
●
menu, then Paper Size.
On the Embedded Web Server's Submit Job page (Z3200ps only):
●
select Advanced settings > Paper > Page size > Standard.
●
Using the front panel: select the Setup menu icon
preferences > Paper > Select paper size.
NOTE: If you have set the paper size from your computer, that overrides the
paper size setting in the front panel.
Custom paper sizes
To choose a non-standard paper size not shown in the list of paper sizes:
Under Windows, there are three different ways:
●
◦
◦
Printing
◦
, then Printing
In the driver dialog, press the Custom button in the Paper/Quality tab,
then specify the name and the dimensions of your new paper size, then
click Save to save your new paper size. In the PostScript driver, to see
your new custom size in the list of custom sizes, you need to exit the
printer properties, then reenter them (and use the More button if
necessary).
NOTE: The driver will not allow you to create a paper size whose width
exceeds its length.
From the Start menu, select Printers and Faxes, then from the File
menu select Server Properties. In the Forms tab, check the Create a
new form box, specify the name and dimensions of the new form, then
click Save Form.
The PostScript driver (Z3200ps only) offers a special way of defining a
custom paper size for the current session only. Select the Advanced tab,
then Paper/Output > Paper Size. Select PostScript Custom Page
Size from the paper size list, then specify the paper dimensions, then
20 Chapter 4 Printing ENWW
Page 25

click OK to save the new dimensions of the PostScript Custom Page Size,
which appears in the list of custom sizes available in the Paper/Quality
tab. Your new page size is saved until you exit your current application,
after which the PostScript Custom Page Size remains in the list but
reverts to its default dimensions.
In the Mac OS Page Setup dialog: select Paper Size > Manage Custom
●
Sizes.
On the Embedded Web Server's Submit Job page (Z3200ps only):
●
select Advanced settings > Paper > Page size > Custom.
Select margins options
By default, the printer leaves a 5 mm margin between the edges of your image and
the edges of the paper (17 mm at the foot of a sheet of paper). However, you can
change this behavior in several ways.
In the Windows driver dialog: select the Paper/Quality tab and then the
●
Margins/Layout button.
TIP: In the Windows PostScript driver, make sure you have made the right
choice from the Document size list. You should select a 'no margins'
document size if you intend to use the Oversize, Clip Contents By
Margins or Borderless options.
In the Mac OS Print dialog (PostScript driver): select the Finishing panel
●
and then Layout.
In the Mac OS Print dialog (PCL3 driver): select the Paper Type/Quality
●
panel and then Layout.
On the Embedded Web Server's Submit Job page (Z3200ps only):
●
select Advanced settings > Paper > Layout/Margins.
You will then see at least some of the following options.
NOTE: Under Mac OS, the available margins options depend on the paper size
selected in the Page Setup dialog. For instance, for borderless printing you must
select a paper size name that includes the words “no margins”.
ENWW
Standard. Your image will be printed on a page of the size you have selected,
●
with a narrow margin between the edges of the image and the edges of the
paper. The image should be small enough to fit between the margins.
Oversize. Your image will be printed on a page slightly larger than the size
●
you have selected. If you cut off the margins, you will be left with a page of the
size you selected, with no margins remaining between your image and the
edges of the paper.
Clip Contents By Margins. Use this option when your image has white
●
borders and a size equal to that of the paper you have selected. The printer
Select margins options
Printing
21
Page 26

will use the white border for its margins and you will get a page of size equal
to that which is selected in the driver.
Borderless. Your image will be printed on a page of the size you have
●
selected, with no margins. The image is slightly enlarged to ensure that no
margin is left between the edges of the image and the edges of the paper. If
you select Automatically by Printer, this enlargement is done automatically.
If you select Manually in Application, you should ensure that the image size
in your application is slightly larger than the paper size. See also Using your
printer.
Preview a print
Previewing a print on the screen allows you to check the layout of the print before
printing, which may help you to avoid wasting paper and ink on a bad print.
NOTE: If you load sheet paper without a skew check, the printer does not measure
the length of the sheet, so the print preview will not be a reliable guide to the final
printout.
To preview a print under Windows, you have the following options:
●
Use your application's print preview option.
◦
Check the Show preview before printing option, which you can find in
◦
the driver's Printing Shortcuts tab, Paper/Quality tab and Features
tab. The preview is shown before printing; you can check the print settings
and the layout of the image, and then click Print to proceed with printing
or Cancel to cancel the job.
Printing
22 Chapter 4 Printing ENWW
Page 27

To preview a print under Mac OS, you have the following options:
●
Use your application's print preview option.
◦
Click the Preview button at the bottom of the Print dialog box. This is the
◦
basic print preview provided by Mac OS.
If you are using the PostScript driver, check the Show print preview
◦
option, which you can find in the driver's Printing dialog, in the
Finishing panel.
If you are using the PCL3 driver, click the PDF button at the bottom of
◦
the Print dialog box, then click HP Print Preview. This provides a preview
with more features, such as the ability to change paper size, paper type
and print quality, and to rotate the image. See below:
ENWW
NOTE: HP Print Preview is not available if you are using Adobe
InDesign, Adobe Illustrator, Adobe Reader or Apple Aperture.
To preview a print using the Embedded Web Server (Z3200ps only), select
●
Basic settings > Hold for preview.
Preview a print
Printing
23
Page 28

Color management
5 Color management
Color calibration
Color calibration enables your printer to produce consistent colors with the
particular printheads, inks and paper type that you are using, and under your
particular environmental conditions. After color calibration, you can expect to get
identical prints from any two different printers situated in different geographical
locations.
Calibration should be done in any of the following circumstances:
Whenever a printhead is replaced
●
Whenever a new paper type is introduced that has not yet been calibrated with
●
the current set of printheads
Whenever a certain amount of printing has been done since the last calibration
●
Whenever the printer has been turned off for a long period of time
●
Whenever the environmental conditions (temperature and humidity) change
●
significantly
The printer driver usually reminds you with an alert whenever you need to perform
color calibration, unless you have disabled the alerts. However, there will be no
alert if the environmental conditions change.
You should calibrate a paper type before creating its color profile; however, you can
later recalibrate without needing to recreate the color profile.
You can turn off color calibration from the front panel: select the Image Quality
Maintenance menu icon
case, the printer will use a default calibration set in the factory for all paper types.
If you later turn color calibration back on, it will still remember any calibrations that
you performed earlier.
24 Chapter 5 Color management ENWW
, then set Enable color calibration to OFF. In this
Page 29

Check calibration status
You can check the color calibration status of the currently loaded paper at any time
by pressing the View loaded paper key on the front panel. The status may be one
of the following:
PENDING: the paper has not been calibrated.
●
NOTE: Whenever you update the printer's firmware, the color calibration
status of all papers is reset to PENDING. See
on page 27.
OBSOLETE: the paper has been calibrated, but the calibration is now out of
●
date for one of the reasons mentioned above, and should be repeated.
OK: the paper has been calibrated, and the calibration is up to date.
●
N/A: this paper cannot be calibrated. The following paper types cannot be
●
calibrated: plain paper, transparent materials, and textured glossy paper (such
as HP Collector Satin Canvas). They can, however, be profiled.
Calibrate
You can start color calibration in the following ways:
From the printer driver alert that recommends calibration.
●
From the HP Color Center: select Paper Preset Management > Calibrate
●
Paper.
●
From the front panel: select the Image Quality Maintenance menu icon
then Calibrate color.
The calibration process is fully automatic and can be performed unattended after
you have loaded paper of the type you wish to calibrate—which should be A4, Letter
or any larger size.
Update the firmware
Color management
,
ENWW
Color calibration
25
Page 30

Color management
The process takes about 8–10 minutes and consists of the following steps.
1. A calibration test chart is printed, which contains patches of each ink used in
your printer.
2. The chart is allowed to dry for a period of time that depends on the paper type,
so that the colors have time to stabilize.
3. The chart is scanned and measured using the HP Embedded
Spectrophotometer.
4. From the measurements made by the spectrophotometer, the printer
calculates the necessary correction factors to apply for consistent color
printing on that paper type. It also calculates the maximum amount of each ink
that can be applied to the paper.
TIP: If color calibration fails, check whether a color is missing from the chart. A
missing color may be caused by a printhead problem: see Using your printer.
NOTE: Matte black is not used on glossy or satin papers, so that column of the
chart is not printed when calibrating those paper types.
26 Chapter 5 Color management ENWW
Page 31

6 Maintaining the printer
Clean the exterior of the printer
Clean the outside of the printer and all other parts of the printer that you regularly
touch as part of normal operation with a damp sponge or a soft cloth and a mild
household cleaner such as non-abrasive liquid soap.
WARNING! To avoid an electric shock, make sure that the printer is turned off
and unplugged before you clean it. Do not let water get inside the printer.
CAUTION: Do not use abrasive cleaners on the printer.
Maintain the ink cartridges
During the normal lifetime of a cartridge, no specific maintenance is required.
However, in order to maintain the best print quality, replace a cartridge when it
reaches its expiration date. The printer's front panel notifies you when any cartridge
reaches its expiration date.
You can also check a cartridge's expiration date at any time: see Using your
printer.
Update the firmware
The printer's various functions are controlled by software that resides in the printer,
otherwise known as firmware.
From time to time firmware updates will be available from Hewlett-Packard. These
updates increase the printer's functionality and enhance its features.
Firmware updates can be downloaded from the Internet and installed in your printer
in the following ways; you can choose whichever you find most convenient.
Using the HP Printer Utility for Windows, select your printer, the Support tab
●
and then Firmware Update.
Using the HP Printer Utility for Mac OS, select Firmware Update in the
●
Support group.
Using your printer's Embedded Web Server, select the Setup tab and then
●
Firmware update.
In each case, follow the instructions on your screen to download the firmware file
and store it on your hard disk. Then select the downloaded file and click Update.
Printer maintenance
ENWW
Clean the exterior of the printer
27
Page 32

If you experience very slow progress while uploading the firmware file to the printer,
the reason could be that you are using a proxy server. In that case, try bypassing
the proxy server and accessing the Embedded Web Server directly.
In Internet Explorer 6 for Windows, go to Tools > Internet Options >
●
Connections > LAN Settings, and check the Bypass proxy server for local
addresses box. Alternatively, for more precise control, click the Advanced
button and add the printer's IP address to the list of exceptions, for which the
proxy server is not used.
In Safari for Mac OS, go to Safari > Preferences > Advanced and click the
●
Proxies: Change Settings button. Add the printer's IP address or its domain
Printer maintenance
name to the list of exceptions, for which the proxy server is not used.
The firmware includes a set of the most commonly used paper presets. Extra paper
presets can be downloaded separately; see Using your printer.
28 Chapter 6 Maintaining the printer ENWW
Page 33

7 Accessories
How to order supplies and accessories
To order supplies or accessories for your printer, you can visit the appropriate Web
site (see below) or contact your local dealer.
Order ink supplies
To order online, please visit http://www.hp.com/go/z3200/supplies/ or
http://www.hp.com/go/z3200ps/supplies/. The correct names and part numbers of
the ink cartridges and printheads available for your printer are listed in Using your
printer.
Order paper
The following paper categories are currently available for use with your printer.
Photographic Paper
●
Proofing Paper
●
Fine Art Printing Material
●
Bond and Coated Paper
●
Technical Paper
●
Film (Technical and Graphic)
●
Backlit Material
●
Self-Adhesive Material
●
Banner and Sign Material
●
Fabric/Textile Material
●
Specific paper types are likely to change over the course of time. For the latest
information and to order online, see
http://www.hp.com/go/z3200ps/supplies/.
Non-recommended paper types
In many cases, paper types that HP does not support may nevertheless be
compatible with your printer. However, the following paper types are unlikely to give
satisfactory results:
Photo paper that swells
●
Brochure paper
●
http://www.hp.com/go/z3200/supplies/ or
Accessories
ENWW
How to order supplies and accessories
29
Page 34

Order accessories
To order online, please visit http://www.hp.com/go/z3200/accessories/ or
http://www.hp.com/go/z3200ps/accessories/. The correct names and part numbers
of the accessories available for your printer are listed in Using your printer.
Accessories
30 Chapter 7 Accessories ENWW
Page 35

8 Troubleshooting paper issues
The paper has jammed
When a paper jam occurs, you normally see the Possible paper jam message in
the front-panel display.
1. Power off the printer at the front panel and also switch it off at the rear.
2. Open the window.
3. Try to move the printhead carriage out of the way.
4. Lift the blue lever as far up as it goes.
ENWW
The paper has jammed
Paper issues
31
Page 36

5. Carefully remove any of the jammed paper that you can lift up and out from
the top of the printer.
6. Standing behind the printer, rewind the roll or pull the cut sheet from the printer.
If you cannot see the paper, return to the front of the printer and remove it from
the output tray.
CAUTION: Do not move the paper sideways, as it could damage the printer.
7. Carefully remove all small pieces of paper.
8. Lower the blue lever and close the transparent window.
Paper issues
32 Chapter 8 Troubleshooting paper issues ENWW
Page 37

9. Switch on the printer.
10. Reload the roll, or load a new sheet. See
Load a roll into the printer
on page 10 or Load a single sheet on page 14.
NOTE: If you find that there is still some paper causing an obstruction within the
printer, restart the procedure and carefully remove all pieces of paper.
ENWW
The paper has jammed
Paper issues
33
Page 38

Print-quality issues
9 Troubleshooting print-quality issues
General advice
When you have any print-quality problem:
To achieve the best performance from your printer, use only genuine
●
manufacturer's supplies and accessories, whose reliability and performance
have been thoroughly tested to give trouble-free performance and best-quality
prints. For details of recommended papers, see
Make sure that the paper type selected in the front panel is the same as the
●
paper type loaded into the printer. To check this, use the View loaded paper
key on the front panel. At the same time, check that the paper type has been
calibrated. Also make sure that the paper type selected in your software is the
same as the paper type loaded into the printer.
CAUTION: If you have the wrong paper type selected, you could experience
poor print quality and incorrect colors, and perhaps even damage to the
printheads.
Check that you are using the most appropriate print-quality settings for your
●
purposes (see
you have moved the print-quality slider to the 'Speed' end of the scale, or set
the custom quality level to Fast.
Check that your environmental conditions (temperature, humidity) are in the
●
recommended range. See Using your printer.
Check that your ink cartridges and printheads have not passed their expiration
●
dates: see
Avoid touching the paper while printing is in progress.
●
Printing on page 19). You are likely to see lower print quality if
Maintain the ink cartridges on page 27.
Horizontal lines across the image (banding)
If your printed image suffers from added horizontal lines as shown (the color may
vary):
Order paper on page 29.
34 Chapter 9 Troubleshooting print-quality issues ENWW
Page 39

1. Check that the paper type you have loaded corresponds to the paper type
selected in the front panel and in your software. To check on the front panel,
use the View loaded paper key.
2. Check that you are using appropriate print-quality settings for your purposes
(see
Printing on page 19). In some cases, you can overcome a print-quality
problem merely by selecting a higher print-quality level. For instance, if you
have set the Print Quality slider to Speed, try setting it to Quality; if you have
already set it to Quality, try selecting custom options and then More
Passes. If you change the print-quality settings, you may wish to reprint your
job at this point in case the problem has been solved.
3. Print the Image Diagnostics Print. See Using your printer.
4. If the printheads are working correctly, go to the front panel and press the View
loaded paper key to see the paper advance calibration status. If the status is
RECOMMENDED, you should perform paper advance calibration: see Using
your printer.
If the problem persists despite all the above actions, contact your customer service
representative for further support.
Print-quality issues
ENWW
Horizontal lines across the image (banding)
35
Page 40

Print-quality issues
The whole image is blurry or grainy
1. Check that the paper type you have loaded corresponds to the paper type
selected in the front panel and in your software. To check on the front panel,
use the View loaded paper key.
2. Check that you are printing on the correct side of the paper.
3. Check that you are using appropriate print-quality settings (see
on page 19). In some cases, you can overcome a print-quality problem merely
by selecting a higher print-quality level. For instance, if you have set the Print
Quality slider to Speed, try setting it to Quality; if you have already set it to
Quality, try selecting custom options and then More Passes. If you change
the print-quality settings, you may wish to reprint your job at this point in case
the problem has been solved.
4. If you are using gloss enhancer, you can reduce grain by turning off or reducing
the amount of gloss enhancer; see Using your printer. This can reduce the
gloss quality of the image; if you notice any problem, see Using your printer.
5. Try aligning the printheads. See Using your printer. After alignment, you may
wish to reprint your job in case the problem has been solved.
6. Go to the front panel and press the View loaded paper key to see the paper
advance calibration status. If the status is RECOMMENDED, you should
perform paper advance calibration: see Using your printer.
If the problem persists despite all the above actions, contact your customer service
representative for further support.
Printing
36 Chapter 9 Troubleshooting print-quality issues ENWW
Page 41

Colors are inaccurate
If the colors of your print do not match your expectations, try the following:
1. Check that the paper type you have loaded corresponds to the paper type
selected in the front panel and in your software. To check on the front panel,
use the View loaded paper key. At the same time, check the color calibration
status. If the status is PENDING or OBSOLETE, you should perform color
calibration: see
you may wish to reprint your job in case the problem has been solved.
2. Check that you are printing on the correct side of the paper.
3. Check that you are using appropriate print-quality settings (see
on page 19). If you have selected the Speed or Fast options, you may not get
the most accurate colors. If you change the print-quality settings, you may wish
to reprint your job at this point in case the problem has been solved.
4. If you are using application-managed colors, check that the color profile you
are using corresponds to the selected paper type. If you have doubts about
which color settings to use, see
to create a color profile, see Using your printer.
5. If you select application-managed colors in your application and printer-
managed colors in the printer driver, your results will be wrong. You should
manage colors in the application or in the printer, but not in both.
6. If the problem consists of color differences between your print and your
monitor, please follow the instructions in the “How to calibrate your monitor”
section of the HP Color Center. At this point, you may wish to reprint your job
in case the problem has been solved.
7. Print the Image Diagnostics Print. See Using your printer.
If the problem persists despite all the above actions, contact your customer service
representative for further support.
Color accuracy using EPS or PDF images in page layout applications
Page layout applications such as Adobe InDesign and QuarkXPress do not support
color management of EPS, PDF or grayscale files.
Color calibration on page 24. If you have made any changes,
Printing
Color management on page 24. If you need
Print-quality issues
ENWW
Colors are inaccurate
37
Page 42

Print-quality issues
If you have to use such files, try to ensure that the EPS, PDF or grayscale images
are already in the same color space that you intend to use later on in Adobe
InDesign or QuarkXPress. For instance, if your final goal is to print the job in a press
that follows the SWOP standard, convert the image into SWOP when you create it.
The image is clipped
Clipping normally indicates a discrepancy between the actual printable area on the
loaded paper and the printable area as understood by your software. You can often
identify this kind of problem before printing by previewing your print (see
a print on page 22).
Check the actual printable area for the paper size you have loaded.
●
printable area = paper size – margins
Check what your software understands to be the printable area (which it may
●
call "printing area" or "imageable area"). For example, some software
applications assume standard printable areas that are larger than those used
in this printer.
If you have defined a custom page size with very narrow margins, the printer
●
may impose its own minimal margins, clipping your image slightly. You may
want to consider using a larger paper size, or borderless printing (see
margins options on page 21).
If your image contains its own margins, you may be able to print it successfully
●
by using the Clip Contents by Margins option (see
on page 21).
If you are trying to print a very long image on a roll, check that your software
●
is capable of printing an image of that size.
You may have asked to rotate the page from portrait to landscape on a paper
●
size that is not wide enough.
If necessary, reduce the size of the image or document in your software
●
application, so it fits between the margins.
There is another possible explanation for a clipped image. Some applications, such
as Adobe Photoshop, Adobe Illustrator and CorelDRAW, use an internal 16-bit
coordinate system which means that they cannot handle an image of more than
32,768 pixels.
NOTE: An image 32,768 pixels long would print at a length of 54.61 in or 1.39 m
if you select Best or Quality in the driver, 109.23 in or 2.78 m if you select Fast,
Normal or Speed in the driver.
Preview
Select
Select margins options
38 Chapter 9 Troubleshooting print-quality issues ENWW
Page 43

If you try to print an image larger than this from these applications, the bottom of
the image may be clipped. To print the whole image, try these suggestions:
Try using the PostScript printer driver (Z3200ps only) to print your job, if you
●
have not already tried it.
The Windows PCL3 driver dialog includes an option called Max. application
●
resolution, which enables you to print successfully in this situation. You will
not normally need to change the default setting, which is Auto. However, you
can find the option in the Advanced tab, under Document Options > Printer
Features.
Save the file in another format, such as TIFF or EPS, and open it with another
●
application.
Use a RIP to print the file.
●
Print-quality issues
ENWW
The image is clipped
39
Page 44

10 Front-panel error messages
Occasionally you may see one of the following messages appear on the front-panel
display. If so, please follow the advice in the Recommendation column.
If you see an error message that does not appear here, and you feel in doubt about
the correct response, contact HP Support. See
on page 43.
Table 10-1 Text messages
Front-panel errors
Message Recommendation
[Color] cartridge has expired Replace the cartridge. See Using your printer.
[Color] cartridge is missing Insert a cartridge of the correct color. See Using
[Color] cartridge is out of ink Replace the cartridge. See Using your printer.
[Color] printhead #[n] error: not present Insert the correct printhead. See Using your
[Color] printhead #[n] error: please remove Remove the incorrect printhead and insert a new
[Color] printhead #[n] error: replace Remove the non-functional printhead and insert a
[Color] printhead #[n] error: reseat Remove and reinsert the same printhead, or try
Contact HP Support
your printer.
printer.
printhead of the correct type (color and number).
See Using your printer.
new printhead. See Using your printer.
cleaning the electrical connections. If necessary,
insert a new printhead. See Using your printer.
[Color] printhead #[n] out of warranty The printhead's warranty has ended, because of
the length of time it has been in operation or
because of the volume of ink used. See Legal
Information.
[Color] printhead #[n] warranty warning The printhead's warrant y may be invalidated by the
use of the wrong kind of ink. See Legal
Information.
40 Chapter 10 Front-panel error messages ENWW
Page 45

Table 10-1 Text messages (continued)
Message Recommendation
IO error Restart the printer. If the problem persists, contact
HP Support. See
on page 43.
IO warning Try again; if the problem persists, contact HP
Support. See
Paper advance calibration pending Perform paper advance calibration. See Using
your printer.
Paper too small to print paper advance calibration Unload paper and load larger paper.
Paper too small to scan paper advance calibration Unload paper and load larger paper.
Printhead alignment error: paper too small Unload paper and load larger paper.
Replace [color] cartridge Replace the cartridge. See Using your printer.
Reseat [color] cartridge Remove and reinsert the same cartridge. See
Using your printer.
Update: failed. Invalid file Make sure that you have selected the correct
firmware update file. Then try again to perform the
update.
Contact HP Support
Contact HP Support on page 43.
Front-panel errors
Table 10-2 Numerical error codes
Error code Recommendation
52:01 The printer needs internal cleaning. See Using your printer. If the problem
persists, contact HP Support. See
61:01 The file format is wrong and the printer cannot process the job. Check the
graphic language setting of your printer (see Using your printer). If you are
sending PostScript from Mac OS over a USB connection, select ASCII
encoding in both the driver and the application. Check for the latest firmware
and driver releases.
62, 63, 64, 65, 67 Check that the printer cables are well connected and the USB cable is of good
quality. Try again to print the same file. Make sure you are using the correct
driver for your printer. Update your printer's firmware. See
firmware on page 27.
ENWW 41
Contact HP Support on page 43.
Update the
Page 46

Table 10-2 Numerical error codes (continued)
Error code Recommendation
74.1 Try the firmware update again. If possible, try to update over a network if the
USB update failed. Do not try to use your computer while the update is in
progress. If the problem persists, contact HP Support. See
Support on page 43.
75 A printer maintenance kit is required. See Using your printer.
78 You may be trying to print borderless on a paper type that does not support
it. See Using your printer.
Contact HP
Front-panel errors
79 Restart the printer. If the problem persists, update your printer's firmware.
Update the firmware on page 27. If the problem still persists, contact HP
See
Support. See
81, 86, 87 There may be a paper jam. See The paper has jammed on page 31. If the
problem persists, contact HP Support. See
on page 43.
94, 94.1 Restart color calibration. See Color calibration on page 24.
98 There may be a printhead problem. See Using your printer.
any other codes Restart the printer. If the problem persists, contact HP Support. See Contact
HP Support on page 43.
Contact HP Support on page 43.
Contact HP Support
42 Chapter 10 Front-panel error messages ENWW
Page 47

11 HP Customer Care
Introduction
HP Customer Care offers award-winning support to ensure you get the most from
your HP Designjet, providing comprehensive, proven support expertise and new
technologies to give you unique end-to-end support. Services include setup and
installation, troubleshooting tools, warranty upgrades, repair and exchange
services, phone and Web support, software updates and self-maintenance
services. To find out more about HP Customer Care, please visit us at:
http://www.hp.com/go/graphic-arts/
or call us on the telephone (see
warranty:
http://register.hp.com/
Contact HP Support
HP Support is available to you by telephone. What to do before you call:
Review the troubleshooting suggestions in this guide.
●
Review the relevant driver documentation.
●
If you have installed third-party software drivers and RIPs, see their
●
documentation.
If you call one of the Hewlett-Packard offices, please have the following
●
information available to help us answer your questions more quickly:
The printer you are using (the product number and the serial number,
◦
found on the label at the back of the printer)
If there is an error code on the front panel, note it down; see
◦
error messages on page 40
The printer's Service ID: at the front panel, select the Information menu
◦
Contact HP Support on page 43). To register your
Front-panel
HP Customer Care
ENWW
icon
The computer you are using
◦
Any special equipment or software you are using (for example, spoolers,
◦
networks, switch-boxes, modems or special software drivers)
The cable you are using (by part number) and where you purchased it
◦
The type of interface used on your printer (USB or network)
◦
, then View printer information
Introduction
43
Page 48

Telephone number
Your HP Support telephone number is available on the Web: please visit
http://welcome.hp.com/country/us/en/wwcontact_us.html.
HP Customer Care
The software name and version you are currently using
◦
If possible, print out the following reports; you may be asked to fax them
◦
to the support center helping you: Configuration, Usage Report and “all
pages above” from Service Information (see Using your printer)
44 Chapter 11 HP Customer Care ENWW
Page 49

12 Legal information
Hewlett-Packard Limited Warranty Statement
HP product Limited Warranty Period
Printer and related HP hardware 1 year (from the date of purchase by the customer)
Software 90 days (from the date of purchase by the
customer)
Printhead Until the “end of warranty” date printed on the
product is reached, or 1000 cm³ of HP ink have
been cycled through the printhead, whichever
occurs first
Ink cartridge Until the genuine HP ink is depleted as indicated
by the printer, or the “end of warranty” date printed
on the product is reached, whichever occurs first
A. Extent of HP Limited Warranty
1. HP warrants to you, the end-user customer, that the HP hardware products
specified above will be free from defects in materials and workmanship during
the Limited Warranty Period specified above. The Limited Warranty Period
starts on the date of purchase. Your dated sales or delivery receipt, showing
the date of purchase of the product, is your proof of purchase date. You may
be required to provide proof of purchase as a condition of receiving warranty
service.
2. For software products, HP’s Limited Warranty applies only to a failure to
execute programming instructions during the Limited Warranty Period
specified above.
3. HP does not warrant that the operation of any product will be uninterrupted or
error free.
4. HP’s Limited Warranty covers only those defects that arise as a result of
normal use of the HP products, and does not cover any other problems,
including those that arise as a result of:
a. Improper or inadequate maintenance or modification
b. Software, interfacing, media, parts, or supplies not provided or supported
by HP
Legal information
ENWW
Hewlett-Packard Limited Warranty Statement
45
Page 50

c. Operation outside the product's specifications
d. Unauthorized modification or misuse
Routine printer maintenance operations in the HP Designjet Z3200 Photo
Printer series, such as cleaning and preventive maintenance services
(including parts contained in any preventive maintenance kit and HP service
engineer visits), are not covered by HP’s Limited Warranty.
5. HP IS NOT RESPONSIBLE FOR DAMAGE TO OR LOSS OF ANY FILES,
STORED ON THE HP PRINTER'S HARD DISK OR OTHER STORAGE
DEVICES. HP IS NOT RESPONSIBLE FOR THE RECOVERY OF LOST
FILES OR DATA.
6. For HP printer products, the use of a refilled or non-original HP consumable
product (ink, printhead or ink cartridge) does not affect either HP’s Limited
Warranty to you or any HP support contract with you. However, if printer failure
or damage is attributable to the use of a non-HP or refilled ink cartridge, HP
will charge its standard time and materials charges to service the printer for
the particular failure or damage.
7. If HP receives, during the applicable warranty period, notice of a defect in any
product that is covered by this Limited Warranty:
a. HP shall replace any defective HP software, media, or consumable
product that is covered by this Limited Warranty, and deliver another
product to you to replace the defective one.
b. HP, at its sole discretion, shall either repair on site or replace any
defective hardware product or component part. If HP elects to replace
any component part, HP will provide to you (i) a replacement part, in
return for the defective one, and (ii) remote part installation assistance,
if needed.
8. If HP is unable to repair or replace, as applicable, a defective product that is
covered by this Limited Warranty, HP shall, within a reasonable time after
being notified of the defect, refund the purchase price of the product.
9. HP shall have no obligation to replace or refund until you return the defective
components, parts, consumables, media and hardware products to HP. All
components, parts, consumables, media or hardware products removed
under this Limited Warranty become the property of HP. Notwithstanding the
Legal information
above mentioned, HP may waive the requirement for you to return the
defective component, part, consumable, media or hardware product.
10. Unless otherwise stated, and to the extent permitted by local law, HP products
may be manufactured using new materials or new and used materials
equivalent to new in performance and reliability. HP may repair or replace
products (i) with equivalent products to the products being repaired or replaced
46 Chapter 12 Legal information ENWW
Page 51

but which may have been subject to prior use; or (ii) with an equivalent product
to an original product that has been discontinued.
11. This Limited Warranty is valid in any country/region where HP or its authorized
service providers offer warranty service and HP has marketed the HP product
covered by this Limited Warranty. However, warranty service availability and
response time may vary from country/region to country/region. HP will not alter
form, fit, or function of the product to make it operate in a country in which it
was never intended to function for legal or regulatory reasons.
12. Contracts for additional services may be available for any authorized HP
service facility where the listed HP product is distributed by HP or an
authorized importer.
B. Limitations of warranty
TO THE EXTENT ALLOWED BY LOCAL LAW, NEITHER HP NOR ITS THIRD
PARTY SUPPLIERS MAKE ANY OTHER WARRANTY OR CONDITION OF ANY
KIND, WHETHER EXPRESS OR IMPLIED, WITH RESPECT TO THE HP
PRODUCTS, AND SPECIFICALLY DISCLAIM THE IMPLIED WARRANTIES OR
CONDITIONS OF MERCHANTABILITY, SATISFACTORY QUALITY, AND
FITNESS FOR A PARTICULAR PURPOSE.
C. Limitations of liability
TO THE EXTENT ALLOWED BY LOCAL LAW, EXCEPT FOR THE OBLIGATIONS
SPECIFICALLY SET FORTH IN THIS LIMITED WARRANTY, IN NO EVENT
SHALL HP OR ITS THIRD PARTY SUPPLIERS BE LIABLE FOR DIRECT,
INDIRECT, SPECIAL, INCIDENTAL, OR CONSEQUENTIAL DAMAGES
(INCLUDING ANY LOSS OF PROFITS OR SAVINGS), WHETHER BASED ON
CONTRACT, TORT, OR ANY OTHER LEGAL THEORY AND WHETHER
ADVISED OF THE POSSIBILITY OF SUCH DAMAGES.
D. Local law
1. This Limited Warranty gives you specific legal rights. You may also have other
rights which vary from state to state in the United States, from province to
province in Canada, and from country to country elsewhere in the world. You
are advised to consult applicable state, province, or national laws for full
determination of your rights.
2. To the extent that this Warranty Statement is inconsistent with local law, this
Warranty Statement shall be deemed modified to be consistent with such local
law. THE WARRANTY TERMS CONTAINED IN THIS LIMITED WARRANTY,
EXCEPT TO THE EXTENT LAWFULLY PERMITTED, DO NOT EXCLUDE,
RESTRICT, OR MODIFY AND ARE IN ADDITION TO THE MANDATORY
STATUTORY RIGHTS APPLICABLE TO THE SALE OF THIS PRODUCT TO
YOU.
Revision: April 11th, 2006
Legal information
ENWW
Hewlett-Packard Limited Warranty Statement
47
Page 52

Hewlett-Packard Software License Agreement
ATTENTION: USE OF THE SOFTWARE IS SUBJECT TO THE HP SOFTWARE
LICENSE TERMS SET FORTH BELOW. USING THE SOFTWARE INDICATES
YOUR ACCEPTANCE OF THESE LICENSE TERMS. IF YOU DO NOT ACCEPT
THESE LICENSE TERMS, YOU MUST RETURN THE SOFTWARE FOR A FULL
REFUND. IF THE SOFTWARE IS SUPPLIED WITH ANOTHER PRODUCT, YOU
MAY RETURN THE ENTIRE UNUSED PRODUCT FOR A FULL REFUND.
The following terms govern your use of the software integrated into your HP
Designjet Z3200 Photo Printer series, unless you have a separate agreement with
HP.
Definitions. HP Designjet Z3200 Photo Printer series software includes HP
software product (“the Software”) and Open Source Software components.
“Open Source Software” means various open source software components
including, but not limited to, Apache, Tomcat, and omniORB, licensed under terms
of applicable open source license agreements included in the materials relating to
such software (please see “Open Source Software” section below).
License Grant. HP grants you a license to Use one copy of the Software preinstalled in the HP Designjet Z3200 Photo Printer series. "Use" means storing,
loading, executing or displaying the Software. You may not modify the Software or
disable any licensing or control features of the Software.
Ownership. The Software is owned and copyrighted by HP or its third party
suppliers. Your license confers no title to, or ownership in, the Software and is not
a sale of any rights in the Software. HP's third party suppliers may protect their
rights in the event of any violation of these License Terms.
Copies and Adaptations. You may only make copies or adaptations of the
Software for archival purposes or when copying or adaptation is an essential step
in the authorized Use of the Software. You must reproduce all copyright notices in
the original Software on all copies or adaptations. You may not copy the Software
onto any public network.
No Disassembly or Decryption. You may not disassemble or decompile the
Software unless HP's prior written consent is obtained. In some jurisdictions, HP's
consent may not be required for limited disassembly or decompilation. Upon
Legal information
request, you will provide HP with reasonably detailed information regarding any
disassembly or decompilation. You may not decrypt the Software unless decryption
is a necessary part of the operation of the Software.
Transfer. Your license will automatically terminate upon any transfer of the
Software. Upon transfer, you must deliver the Software, including any copies and
related documentation, to the transferee. The transferee must accept these License
Terms as a condition to the transfer.
48 Chapter 12 Legal information ENWW
Page 53

Termination. HP may terminate your license upon notice for failure to comply with
any of these License Terms. Upon termination, you must immediately destroy the
Software, together with all copies, adaptations and merged portions in any form or,
if the Software is supplied integrated into the HP Designjet Z3200 Photo Printer
series, stop using the HP Designjet Z3200 Photo Printer series.
Export Requirements. You may not export or re-export the Software or any copy
or adaptation in violation of any applicable laws or regulations.
U.S. Government Restricted Rights. The Software and accompanying
documentation have been developed entirely at private expense. They are
delivered and licensed, as defined in any applicable DFARS, FARS, or other
equivalent federal agency regulation or contract clause, as either "commercial
computer software" or "restricted computer software", whichever is applicable. You
have only those rights provided for such Software and Documentation by the
applicable clause or regulation or by the HP standard software agreement for the
product involved.
Open Source Software. The Open Source Software is composed of individual
software components, each of which has its own copyright and its own applicable
license conditions. You must review the licenses within the individual packages to
understand your rights under them. The licenses can be found in the licenses folder
on the HP Start-Up Kit CD that came with your printer. Copyrights to the Open
Source Software are held by the copyright holders.
Open source software
Open source acknowledgments
This product includes software developed by the Apache Software Foundation
●
http://www.apache.org/).
(
The source code, object code, and documentation in the com.oreilly.servlet
●
package is licensed by Hunter Digital Ventures, LLC.
This software is based in part on the work of the Independent JPEG Group.
●
Regular expression support provided by the PCRE library package, which is
●
open source software written by Philip Hazel, and copyright by the University
of Cambridge, England. Source at
programming/pcre.
This software includes cryptographic software written by Eric Young
●
(eay@cryptsoft.com).
Open source written offer
In accordance with the GNU General Public License, the SMAIL General Public
License, and the Sleepy Cat software license, HP is providing you with this written
offer to receive on a CD-R, at the cost of $30, a complete machine-readable copy
of the source code corresponding to all the code distributed to you under a GNU
ftp://ftp.csx.cam.ac.uk/pub/software/
Legal information
ENWW
Open source software
49
Page 54

General Public License, SMAIL General Public License, and/or Sleepy Cat software
licenses. You can request this CD-R from your local HP support representative;
telephone numbers and e-mail addresses can be found at
z3200/support/ or http://www.hp.com/go/z3200ps/support/.
http://www.hp.com/go/
Regulatory notices
MSDS (Material Safety Data Sheet)
You can obtain current Material Safety Data Sheets for the ink systems used in the
printer by mailing a request to this address: Hewlett-Packard Customer Information
Center, 19310 Pruneridge Avenue, Dept. MSDS, Cupertino, CA 95014, U.S.A.
There is also a Web page:
productinfo/psis_inkjet.htm
Regulatory Model Number
For regulatory identification purposes, your product is assigned a Regulatory Model
Number. The Regulatory Model Number for your product is BCLAA-0608. This
regulatory number should not be confused with the marketing name (such as HP
Designjet printer) or product numbers (such as Z####X, where Z and X are any
single letter and # is any number).
Regulatory statements
European Union
Ecological
Sound (Germany)
Geräuschemission (Germany) LpA < 70 dB, am Arbeitsplatz, im Normalbetrieb,
nach DIN45635 T. 19.
Disposal of waste equipment by users in private households in the European Union
Legal information
contact your local city office, your household waste disposal service or the shop
where you purchased the product.
http://www.hp.com/hpinfo/community/environment/
This symbol on the product or on its packaging indicates that
this product must not be disposed of with your other household
waste. Instead, it is your responsibility to dispose of your waste
equipment by handing it over to a designated collection point
for the recycling of waste electrical and electronic equipment.
The separate collection and recycling of your waste equipment
at the time of disposal will help to conserve natural resources
and ensure that it is recycled in a manner that protects human
health and the environment. For more information about where
you can drop off your waste equipment for recycling, please
50 Chapter 12 Legal information ENWW
Page 55

U.S.A.
Electromagnetic compatibility (EMC)
FCC statements (U.S.A.)
The U.S. Federal Communications Commission (in 47 cfr15.105) has specified that
the following notices be brought to the attention of users of this product.
This device complies with part 15 of the FCC rules. Operation is subject to the
following two conditions: (1) this device may not cause harmful interference, and
(2) this device must accept any interference received, including interference that
may cause undesired operation.
Shielded cables: use of shielded data cables is required to comply with the Class
B limits of Part 15 of the FCC Rules.
CAUTION: Pursuant to Part 15.21 of the FCC Rules, any changes or
modifications to this equipment not expressly approved by the Hewlett-Packard
Company may cause harmful interference and void the FCC authorization to
operate this equipment.
Note
This equipment has been tested and found to comply with the limits for a Class B
digital device, pursuant to part 15 of the FCC Rules. These limits are designed to
provide reasonable protection against harmful interference in a residential
installation. This equipment generates, uses, and can radiate radio frequency
energy and, if not installed and used in accordance with the instructions, may cause
harmful interference to radio communications. However, there is no guarantee that
interference will not occur in a particular installation. If this equipment does cause
harmful interference to radio or television reception, which can be determined by
turning the equipment off and on, the user is encouraged to try to correct the
interference by one or more of the following measures:
Reorient the receiving antenna.
●
Increase the separation between the equipment and the receiver.
●
Connect the equipment into an outlet on a circuit different from that to which
●
the receiver is connected.
Consult your dealer or an experienced radio/TV technician.
●
For further information, contact:
Manager of Corporate Product Regulations
Hewlett-Packard Company
3000 Hanover Street
Palo Alto, CA 94304
(650) 857-1501
Legal information
ENWW
Regulatory notices
51
Page 56

Ecological
Information regarding Energy Star
To determine the ENERGY STAR® qualification status of this product, see
http://www.hp.com/go/energystar/.
ENERGY STAR and the ENERGY STAR trademark are registered U.S.
trademarks.
Attention California users
The battery supplied with this product may contain perchlorate material. Special
handling may apply. See
http://www.dtsc.ca.gov/hazardouswaste/perchlorate/ for
information.
Atención a los usuarios de California
La pila proporcionada con este producto puede contener perclorato. Podría requerir
manipulación especial.
Consulte
http://www.dtsc.ca.gov/hazardouswaste/perchlorate/ para obtener más
información.
Canada
Electromagnetic compatibility (EMC)
Normes de sécurité (Canada)
Le présent appareil numérique n’émet pas de bruits radioélectriques dépassant les
limites applicables aux appareils numériques de Classe B prescrites dans le
réglement sur le brouillage radioélectrique édicté par le Ministère des
Communications du Canada.
DOC statement (Canada)
This digital apparatus does not exceed the Class B limits for radio noise emissions
from digital apparatus set out in the Radio Interference Regulations of the Canadian
Department of Communications.
Korea
Legal information
Chapter 12 Legal information
52
ENWW
Page 57

Japan
Safety power cord warning
Taiwan
Ecological
This HP product contains a lithium battery located on an internal motherboard that
may require special handling at the end of its life.
China
Declaration of conformity
according to ISO/IEC 17050-1 and EN 17050-1
Declaration of conformity number: BCLAA-0608-05
Supplier’s name: Hewlett-Packard Company
Supplier’s address: Avenida Graells, 501
ENWW
08174 Sant Cugat del Vallès
Barcelona, Spain
Regulatory notices
Legal information
53
Page 58

declares that the product
Product name and model: HP Designjet Z3100/Z3200/Z2100 Photo printer series
HP Designjet T1100 printer series
HP Designjet T610 printer series
Regulatory Model Number
Product options: All
(1)
: BCLAA-0608
conforms to the following product specifications
Safety: IEC 60950-1:2001 / EN 60950-1:2001
CAN/CSA 60950-1-07 / UL 60950-1-2007
EMC: CISPR 22:2005 / EN 55022:2006 Class B
EN 55024:1998+A1:2001+A2:2003
EN 61000-3-2:2000 +A2:2005 / IEC 61000-3-2:2000 +A1:2001
+A2:2004
EN 61000-3-3:1995+A1:2001 / IEC 61000-3-3:1994 +A1:2001
FCC Title 47 CFR, Part 15 Class B
Additional information
The product herewith complies with the requirements of the Low-Voltage Directive
2006/95/EC and the EMC Directive 2004/108/EC, and carries the CE marking
accordingly. In addition, it complies with the WEEE Directive 2002/96/EC and RoHS
Directive 2002/95/EC.
This device complies with part 15 of the FCC Rules. Operation is subject to the
following two conditions:
This device may not cause harmful interference.
●
This device must accept any interference received, including interference that
●
Legal information
may cause undesired operation.
Notes:
1. The product is assigned a Regulatory Model Number which stays with the
regulatory aspect of the design. The Regulatory Model Number is the main product
identifier in the regulatory documentation and test reports; this number should not
be confused with the marketing name or the product numbers.
Chapter 12 Legal information
54
ENWW
Page 59

Vicenç Llorens
Product Regulations Manager
Sant Cugat del Vallès (Barcelona)
June 4th, 2008
Local contacts for regulatory topics only
EMEA contact: Hewlett-Packard GmbH, HQ-TRE, Herrenberger Strasse 140,
71034 Böblingen, Germany.
USA contact: Hewlett-Packard Company, Corporate Product Regulations
Manager, 3000 Hanover Street, Palo Alto, CA 94304, USA. Phone: (650) 857 1501.
http://www.hp.com/go/certificates/
ENWW
Regulatory notices
Legal information
55
 Loading...