


C-SERIES
REFERENCE GUIDE
Notice
The information in this guide is subject to change without notice.
COMPAQ COMPUTER CORPORATION SHALL NOT BE LIABLE FOR TECHNICAL OR EDITORIAL ERRORS OR OMISSIONS CONTAINED HEREIN; NOR FOR INCIDENTAL OR CONSEQUENTIAL DAMAGES RESULTING FROM THE FURNISHING, PERFORMANCE, OR USE OF THIS MATERIAL.
This guide contains information protected by copyright. No part of this guide may be photocopied or reproduced in any form without prior written consent from Compaq Computer Corporation.
© 1998 Compaq Computer Corporation. All rights reserved. Printed in Singapore.
Compaq is registered in the U.S. Patent and Trademark Office. Microsoft and Windows are registered trademarks of Microsoft Corporation.
The software described in this guide is furnished under a license agreement or nondisclosure agreement. The software may be used or copied only in accordance with the terms of the agreement.
Product names mentioned herein may be trademarks and/or registered trademarks of their respective companies.
REFERENCE GUIDE
C-Series Handheld PC
First Edition January 1998
Part Number 266667-001
Compaq Computer Corporation

CONTENTS
preface
BEFORE YOU BEGIN
For More Information........................................................................ |
xi |
For Updated Information.................................................................. |
xii |
Locating Information Quickly.......................................................... |
xii |
Ordering Software on Diskette........................................................ |
xiii |
Customer Registration..................................................................... |
xiii |
In North America ........................................................................ |
xiii |
Outside of North America........................................................... |
xiii |
Symbols and Conventions ............................................................... |
xiv |
chapter 1 |
|
GETTING STARTED |
|
Unpacking the Box .......................................................................... |
1-2 |
Setting Up for the First Time .......................................................... |
1-3 |
C-Series at a Glance ........................................................................ |
1-8 |
Screen and Left Side Components .............................................. |
1-8 |
Front and Right Side Components .............................................. |
1-9 |
Top and Rear Panel Components.............................................. |
1-10 |
Bottom Panel Components ....................................................... |
1-11 |
chapter 2 |
|
FORMING A PARTNERSHIP |
|
Step 1: Determine Computer Requirements ................................... |
2-2 |
Step 2: Install Windows CE Services.............................................. |
2-3 |
Step 3: Configure the Communications Port .................................. |
2-3 |
Using Windows NT Workstation................................................ |
2-3 |
Using Windows 95...................................................................... |
2-3 |
Step 4: Connect the Handheld PC to the Computer ........................ |
2-4 |
Step 5: Install the Compaq C-Series Software ................................ |
2-5 |
Contents L

chapter 3
USING THE KEYBOARD AND STYLUS
Special Keyboard Features ............................................................. |
3-2 |
Using the Application Launch Keys........................................... |
3-4 |
Using the Dual Brightness Backlight Button ............................. |
3-5 |
Using the Stylus .............................................................................. |
3-6 |
chapter 4 |
|
USING POWER |
|
Using Battery Power ....................................................................... |
4-2 |
Checking Battery Power Levels ................................................. |
4-2 |
Recognizing Low Battery Indicators.......................................... |
4-2 |
Conserving Battery Power.......................................................... |
4-4 |
Replacing Batteries ......................................................................... |
4-5 |
Replacing the Main Batteries ..................................................... |
4-6 |
Replacing the Backup Battery .................................................... |
4-9 |
Disposal and Recycling of Used Batteries.................................... |
4-11 |
Using AC Power ........................................................................... |
4-11 |
Connecting to AC Power.......................................................... |
4-12 |
Resetting Your C-Series Handheld PC ......................................... |
4-13 |
Performing a Normal Reset ...................................................... |
4-13 |
Performing a Full Reset............................................................ |
4-14 |
chapter 5 |
|
USING THE MODEM |
|
Safety Precautions for Modems...................................................... |
5-2 |
Connecting the Modem................................................................... |
5-3 |
Using an External Modem .............................................................. |
5-4 |
Connecting an External Modem................................................. |
5-4 |
Configuring and Using the External Modem ............................. |
5-4 |
Using the Modem to Access the Internet........................................ |
5-5 |
Browsing the Internet ................................................................. |
5-5 |
chapter 6 |
|
USING PC CARDS |
|
Supported PC Cards........................................................................ |
6-1 |
PC Card Software ........................................................................... |
6-2 |
Operating Guidelines ...................................................................... |
6-2 |
Inserting a PC Card......................................................................... |
6-3 |
Removing a PC Card ...................................................................... |
6-4 |
LE Contents

chapter 7
USING THE INFRARED FEATURE
Establishing an Infrared Connection ............................................... |
7-2 |
Step 1: Configure the Software................................................... |
7-2 |
Step 2: Set Up the Infrared Devices............................................ |
7-2 |
Step 3: Transfer Information....................................................... |
7-3 |
Printing with the IR Port ................................................................. |
7-4 |
chapter 8 |
|
USING COMPAQ SOFTWARE |
|
Using Voice Memo ......................................................................... |
8-2 |
Recording A Message ................................................................. |
8-3 |
Playing a Message....................................................................... |
8-3 |
Managing Messages.................................................................... |
8-4 |
Adjusting Audio Levels .............................................................. |
8-4 |
Using Internet Setup Utility ............................................................ |
8-5 |
Setting Up a Profile..................................................................... |
8-5 |
Getting On the Internet ............................................................... |
8-6 |
Using Internet Favorites Synchronizer............................................ |
8-7 |
Synchronizing Bookmarks.......................................................... |
8-7 |
Copying Bookmarks ................................................................... |
8-8 |
Using Dictionary Synchronizer ....................................................... |
8-9 |
Using the Backup and Restore Utilities ........................................ |
8-10 |
Using Compaq Backup and Restore ......................................... |
8-12 |
Using Compaq Flash Memory Manager................................... |
8-14 |
Using Compaq Enhanced Security................................................ |
8-16 |
Understanding the Password Levels ......................................... |
8-16 |
Setting Passwords ..................................................................... |
8-18 |
Using the Owner Control Panel Application................................. |
8-21 |
Controlling Volume....................................................................... |
8-21 |
Printing .......................................................................................... |
8-22 |
Supported File Types ................................................................ |
8-22 |
Printing Guidelines ................................................................... |
8-22 |
Printing from the Handheld PC................................................. |
8-23 |
Setting the Alarm .......................................................................... |
8-23 |
Contents LEE

chapter 9
CARING FOR YOUR COMPAQ C-SERIES
Routine Care ................................................................................... |
9-2 |
Travel Guidelines............................................................................ |
9-3 |
International Travel ........................................................................ |
9-3 |
Shipping Guidelines........................................................................ |
9-4 |
chapter 10 |
|
TIPS AND TROUBLESHOOTING |
|
Tips for Maximizing Performance................................................ |
10-1 |
Adjusting Memory.................................................................... |
10-1 |
Increasing the Data Transfer Speed.......................................... |
10-2 |
Troubleshooting ............................................................................ |
10-3 |
Solving Battery and Power Problems....................................... |
10-4 |
Solving Keyboard and Stylus Problems ................................... |
10-5 |
Solving Audio Problems........................................................... |
10-5 |
Solving Memory Problems....................................................... |
10-6 |
Solving PC Card Problems ....................................................... |
10-8 |
Solving Screen Problems.......................................................... |
10-9 |
Solving Communication Problems......................................... |
10-10 |
Solving Security Problems ..................................................... |
10-13 |
Servicing the C-Series ................................................................ |
10-14 |
Preparing for a Technical Support Call .................................. |
10-14 |
appendix A |
|
WORLDWIDE TELEPHONE NUMBERS ....................................................... |
A-1 |
appendix B |
|
HARDWARE SPECIFICATIONS................................................................. |
B-1 |
appendix C |
|
AGENCY REGULATORY NOTICES............................................................. |
C-1 |
INDEX................................................................................................. |
I-1 |
LEEE Contents

preface
BEFORE YOU BEGIN
Congratulations on your selection of the Compaq C-Series, the first professional handheld PC. Before using your C-Series, be sure to read this chapter for information about:
■documentation and online help
■customer registration
■symbols and conventions used in this guide
For More Information
References are provided as printed materials and as online information that is accessible from your handheld PC. In addition to this reference guide, the following printed references come with your handheld PC:
■Quick Setup card
■Accessories Flier
■Microsoft The Handheld PC Companion
■Important Safety Information
■Register Now card (North America only)
■Warranty and service information
Before You Begin NE

The following online and electronic references are also available.
Name: |
Location: |
|
|
Microsoft H/PC Help |
Handheld PC |
|
|
Microsoft Windows CE Services |
Microsoft Desktop Software for |
Help |
Windows CE CD (to be installed |
|
on your computer) |
|
|
Microsoft Handheld PC Home |
www.microsoft.com/windowsce/ |
Page |
hpc |
|
|
C-Series Home Page |
www.compaq.com/products/ |
|
handhelds |
|
|
For Updated Information
To learn about updates that may have occurred to your C-Series device after this document was printed, tap the Start menu on your handheld device, then tap My Documents and select
Compaq Updates.
NOTE: If no updated information is available, Compaq Updates will not appear on the screen.
Locating Information Quickly
To quickly find the information you’re looking for, use this table as a starting point.
To Find Information About: |
Look Here: |
|
|
Using your C-Series |
C-Series Reference Guide |
|
|
Using the Compaq software on |
C-Series Reference Guide |
your C-Series |
|
|
|
Using the Windows CE operating |
Microsoft The Handheld PC |
system and software on your |
Companion |
C-Series |
Microsoft H/PC Help |
|
|
|
|
Using Windows CE Services on |
Microsoft Windows CE Services |
your computer |
Help |
|
|
The latest information and offers |
C-Series Home Page |
for your C-Series device and |
(www.compaq.com/products/ |
accessories |
handhelds) |
|
|
NEE Before You Begin

Ordering Software on Diskette
If the computer on which you are installing Microsoft Windows CE 2.0 does not have a CD-ROM drive, you can purchase diskettes containing the Windows CE software necessary for operating your handheld PC.
To order Windows CE software diskettes, contact Compaq at 1-800-841-2761 (U.S. only) or fax a request to 510-327-4070.
NOTE: Some Windows CE applications (such as the Guided Tour and Exchange Update) are not available on diskette. To obtain these applications, visit the Microsoft web site at www.microsoft.com.
Compaq C-Series software is available only on CD-ROM.
Customer Registration
In North America
To receive the latest information on your C-Series handheld PC, as well as receive special offers on C-Series accessories and software, be sure to register with Compaq by completing and mailing the Register Now card included with your handheld PC.
Outside of North America
Outside of North America, use the Compaq Info Messenger service to obtain Internet and e-mail access to the latest software updates and service documentation for your C-Series.
Once you register with this free service at www.compaq.com/ infomessenger and build your profile(s), Info Messenger searches the Compaq web site and collects information specific to your handheld PC environment. Info Messenger then sends an e-mail alerting you when new and/or updated information is available on a Compaq customized web page.
Before You Begin NEEE

Symbols and Conventions
Some or all of the following format conventions may be used in this guide to distinguish elements of text:
■Names of keys are shown in bold type as they appear on the keyboard, for example, Ctrl, Backspace, Tab.
■Keys that you should press at the same time are represented by the key names and the plus (+) symbol, for example,
Ctrl+Alt+Delete.
■Commands are presented in lowercase, bold type as shown
here: install or a:\install.
■An arrow is used to separate icons or menu options that you
should select in succession; for example, tap
Start→Settings→Control Panel.
■When you need to type information without pressing the Enter key, you are directed to “type” the information.
■When you need to type information and press the Enter key, you are directed to “enter” the information.
WARNING:
! follow directionsTextcouldset offresultin thisin bodilymannerharmindicatesor lossthatof lifefailure. to
CAUTION: Text set off in this manner indicates that failure to follow directions could result in damage to equipment or loss of information.
IMPORTANT: Text set off in this manner presents clarifying information or specific instructions.
NOTE: Text set off in this manner presents commentary, sidelights, or interesting points of information.
NEL Before You Begin
chapter 1
GETTING STARTED
This chapter provides information about getting started with your C-Series handheld PC, such as:
■unpacking the box
■setting up for the first time
■learning about the handheld PC features
Getting Started 1-1

Unpacking the Box
Contents of the Box
Before setting up your handheld PC, be sure your shipping box includes the following items:
handheld PC AC Adapter
! stylus (housed in the handheld PC)
"auto-sync cable
#batteries (two AA alkaline or one rechargeable NiMH, depending on your C-Series model)
Not pictured:
■modem cable (available with some models)
■CD-ROM discs (2)
■documentation
NOTE: To order accessories that did not come with your C-Series model, refer to the Accessories Flier included in the shipping box.
1-2 Getting Started

Setting Up for the First Time
To set up your handheld PC for the first time, follow the instructions below. When it is ready to use, read “C-Series at a Glance” later in this chapter to learn more about the special features of your device.
1.Turn over the handheld PC.
2.Do one of the following:
■If your C-Series comes with AA alkaline batteries, follow the steps in the illustration below. Remove the main battery cover and install the batteries as illustrated below. Be sure the positive and negative end of each battery is correctly oriented.
CAUTION: Do not install AA alkaline batteries in C-Series models that have color screens. Install only a Compaqapproved rechargeable battery pack in these models.
Installing the Alkaline Batteries
Getting Started 1-3

■If your C-Series comes with a rechargeable NiMH battery pack, follow the steps in the illustration below. Be sure the flat side of the battery is facing in toward the battery compartment as indicated.
Installing the NiMH Battery Pack
1-4 Getting Started

3. Replace the main battery cover.
Replacing the Main Battery Cover
4. Pull out the backup battery tape to activate the backup battery.
Removing the Backup Tape
Getting Started 1-5

5.If using a rechargeable NiMH battery pack, connect the unit to AC power and allow the battery pack to charge for three hours. If using AA alkaline batteries, proceed to step 6.
6.Turn over the handheld PC and raise the lid.
Raising the Lid
1-6 Getting Started

7. Press the power button to turn on power.
Pressing the Power Button
8.Follow the instructions on the screen to complete the setup process.
9.To learn more about your handheld PC, take the Welcome Tour by pressing Fn+Alt.
Once setup is complete, you may want to connect your handheld PC to a computer and load valuable Compaq software. To do so, follow the instructions provided in Chapter 2, “Forming a Partnership.”
Getting Started 1-7

C-Series at a Glance
Your handheld PC is equipped with many convenient features that make using it quick and easy. This section familiarizes you with the location and function of these features.
Screen and Left Side Components
Screen and Left Side Components
Item |
Component |
Function |
|
|
|
|
Screen |
Displays on-screen information and |
|
interprets stylus taps. |
|
|
|
|
|
|
|
|
Modem |
Connects an RJ-11 modem cable |
|
connector |
(available on some models only). |
|
|
|
! |
PC Card slot |
Accepts a 16-bit Type I or Type II PC |
|
(PCMCIA) Card. For more on this |
|
|
|
|
|
|
feature, see Chapter 6, “Using PC |
|
|
Cards.” |
|
|
|
1-8 Getting Started
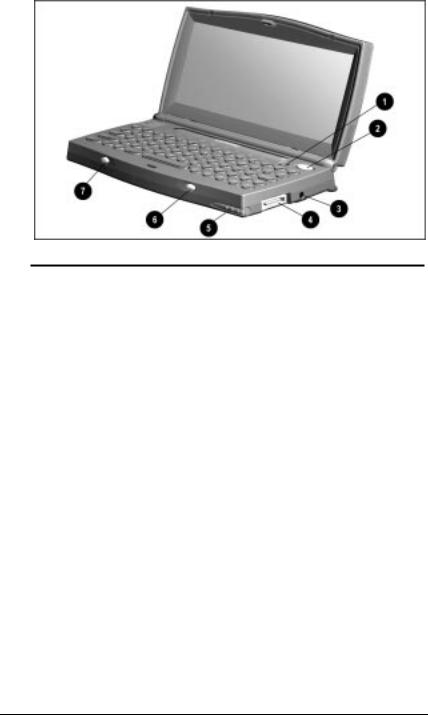
Front and Right Side Components
Front and Right Side Components
Item |
Component |
Function |
|
|
|
|
|
|
Dual brightness |
Provides increased lighting for better |
|
backlight button |
viewing of the screen. For more |
||
|
|||
|
|
information, see “Using the Dual |
|
|
|
Brightness Backlight Button” in Chapter 3. |
|
|
|
|
|
|
Power button |
Press once to turn on the device. Press |
|
|
|
again to turn off. |
|
|
|
|
|
! |
AC power |
Connects to external (AC) power via the |
|
connector |
AC Adapter. |
||
|
|||
|
|
|
|
" |
Serial connector |
Connects serial devices such as the auto- |
|
|
sync cable or a printer cable. |
||
|
|
||
|
|
|
|
# |
Stylus slot |
Holds and protects the stylus when stylus |
|
|
is not in use. |
||
|
|
||
|
|
|
|
$ |
Alarm button |
Press once to stop the alarm when it goes |
|
|
off. For instructions on using the alarm, |
||
|
|
||
|
|
see “Setting the Alarm” in Chapter 8. |
|
|
|
|
|
% |
Record button |
Press and hold this button while speaking |
|
|
into the microphone to record a voice |
||
|
|
||
|
|
memo. |
|
|
|
|
Getting Started 1-9
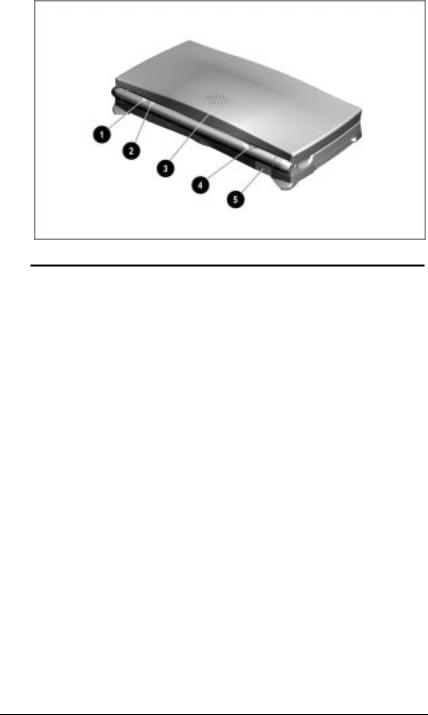
Top and Rear Panel Components
Top and Rear Panel Components
Item |
Component |
Function |
|
|
|
|
|
|
Battery charge |
■ Turns on when the optional |
|
light (amber) |
rechargeable NiMH battery pack is |
||
|
|||
|
|
being recharged; also turns on when |
|
|
|
the device is connected to external |
|
|
|
power |
|
|
|
■ Turns off when charging is complete. |
|
|
|
|
|
|
Alarm light |
■ Blinks once when the device is turned |
|
|
(green) |
on. |
|
|
|
■ Blinks continuously when an alarm |
|
|
|
you have set goes off. |
|
|
|
■ Turns off when you press the alarm |
|
|
|
button or stop the alarm through the |
|
|
|
software. |
|
|
|
|
|
! |
Speaker |
Produces sound for the alarm, playback of |
|
|
voice memos, and other audio effects. For |
||
|
|
||
|
|
information on setting the speaker level, |
|
|
|
see “Controlling Volume” in Chapter 8. |
|
|
|
|
|
" |
Microphone |
Speak into the microphone while pressing |
|
|
the record button to record a voice memo. |
||
|
|
||
|
|
Works whether device is open or closed. |
|
|
|
|
|
# |
Infrared (IR) port |
Allows for wireless infrared |
|
|
communication. |
||
|
|
||
|
|
|
1-10 Getting Started
Bottom Panel Components
Bottom Panel Components
Item |
Component |
Function |
|
|
|
|
Backup battery |
Contains the CR2032 lithium coin battery |
|
compartment |
which acts as a backup battery when the |
|
|
main batteries are drained or removed. |
|
|
|
|
Main battery |
Holds two AA alkaline batteries or a |
|
compartment |
rechargeable NiMH battery pack for |
|
|
supplying primary battery power to the |
|
|
device. |
|
|
|
! |
PC Card slot |
Accepts a Type I or Type II PC (PCMCIA) |
|
|
Card. For more on this feature, see |
|
|
Chapter 6, “Using PC Cards.” |
|
|
|
" |
PC Card eject |
Ejects a PC Card from the PC Card slot. |
|
lever |
|
|
|
|
# |
Reset button |
Restarts the operating system. |
|
|
CAUTION: Pressing the reset button will |
|
|
permanently delete all of your unsaved |
|
|
information. |
|
|
|
$ |
Expansion |
Contains the RAM module. Accepts |
|
compartment |
optional RAM upgrades. |
|
|
|
Getting Started 1-11

chapter 2
FORMING A PARTNERSHIP
Your C-Series handheld PC acts much like a “computer assistant”—it supplements the capabilities of your regularly used computer when you cannot be at your desk. The handheld PC does this through “partnering” with your regular computer. A partnership is the process of establishing a connection with your regularly used computer for the purpose of synchronizing and transferring data between the computer and the handheld PC.
Forming a partnership involves five steps, each of which is discussed in this chapter:
Step 1: Determine computer requirements
Step 2: Install Windows CE Services on the computer
Step 3: Configure the computer’s communications port
Step 4: Connect the handheld PC to the computer
Step 5: Install the Compaq C-Series software
Additional information on forming a partnership can be found in Microsoft’s Handheld PC Companion and in the Windows CE Services Help that you installed on your computer.
Forming a Partnership 2-1

Step 1: Determine Computer Requirements
Before establishing a partnership, be sure your computer meets the minimum configuration requirements listed below:
■486/33DX or higher processor
■Microsoft Windows 95 (or later) or
Windows NT Workstation 4.0 (or later)
■8 MB of memory (Windows 95)
12 MB of memory (Windows NT Workstation 4.0)
■10 MB of available hard disk space
■Available 9- or 25-pin serial port (adapter required for 25-pin serial port)
■CD-ROM drive
■VGA or higher resolution graphics card
■Microsoft Mouse or compatible pointing device
NOTE: Some third-party applications may have additional configuration requirements. Refer to the documentation included with these applications for more information.
2-2 Forming a Partnership

Step 2: Install Windows CE Services
Windows CE Services is the software that allows you to synchronize data between your handheld PC and your computer. Follow the steps below to install Windows CE Services on your computer.
IMPORTANT: Before installing this software, be sure your computer meets the minimum configuration requirements listed earlier in this chapter.
1.Insert the Microsoft CD into the computer’s CD-ROM drive. (If your computer does not have a CD-ROM drive, see “Ordering Software on Diskette” for information on obtaining Windows CE diskettes.)
2.Follow the instructions included with the CD and on the computer screen to install Windows CE Services and other software.
Step 3: Configure the Communications Port
Before connecting, you must configure your computer’s COM port so that it can communicate with your handheld PC.
NOTE: This procedure covers only the configuration for an autosync cable (serial cable) connection. For information on connecting with an infrared port, RAS, or network, refer to Chapter 7, “Using the Infrared Feature,” or see “Get Connected” in the Windows CE Services Help that you installed on your computer.
Using Windows NT Workstation
Select Start→Settings→Control Panel. Choose the Ports icon. Configure a COM port for your handheld PC with the following settings: 19200 baud, 8 data bits, 1 stop bit, no parity.
Using Windows 95
Select Start→Settings→Control Panel. Choose the System icon, then select the Device Manager tab. Configure a COM port for your handheld PC with the following settings: 19200 baud,
8 data bits, 1 stop bit, no parity.
Forming a Partnership 2-3

Step 4: Connect the Handheld PC to the Computer
Once Windows CE Services is installed on your computer and the communications port is configured, you are ready to connect your handheld PC to the computer. To do so, follow the steps below.
CAUTION: Route cords and cables so that they will not be walked on, tripped over, or pinched by items placed upon or against them. Pay particular attention to the power plug, electrical outlet, and the point where cords and cables exit the device.
1.Connect the 16-pin end of the auto-sync cable to the serial connector on your handheld PC .
2.Connect the 9-pin end of the auto-sync cable to the serial
connector on your computer . (Some computers may require a 9-to-25 pin adapter in order to connect the auto-sync cable).
Connecting the Handheld PC to a Computer
NOTE: The first time you connect your handheld PC to the computer, the New Partnership Wizard appears on the screen. Follow the instructions to establish a connection between the two devices. The next time you connect, your data will be synchronized automatically, provided that you accept the default settings.
IMPORTANT: Refer to The Handheld PC Companion for more information on establishing a connection and synchronizing data.
2-4 Forming a Partnership

Step 5: Install the Compaq C-Series Software
After connecting to the computer, follow the steps below to install the Compaq software. Some software will be installed on your computer and some on your handheld PC.
1.Insert the Compaq CD into the computer’s CD-ROM drive.
2.Follow the instructions included with the CD and on the computer screen to install the Compaq software.
IMPORTANT: To avoid draining the batteries, use external power whenever your handheld PC is connected to the computer.
Forming a Partnership 2-5

chapter 3
USING THE KEYBOARD
AND STYLUS
Your C-Series handheld PC contains several keys and buttons that perform special functions. This chapter describes the following features:
■special keyboard keys and buttons
■stylus functions
Using the Keyboard and Stylus 3-1
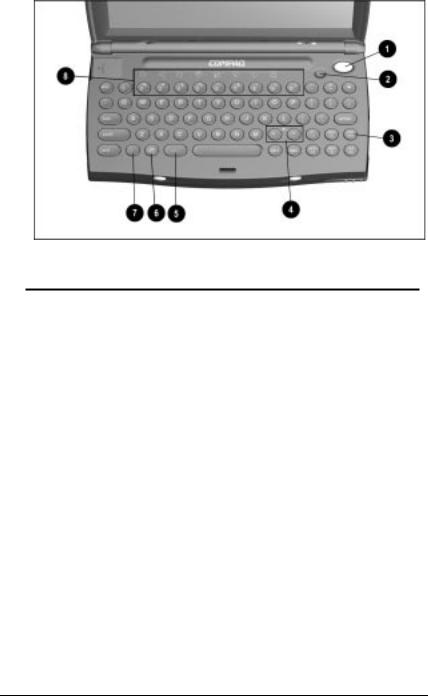
Special Keyboard Features
Special Keyboard Features
NOTE: Location and legends of keys vary by geographic region.
Item |
Component |
Function |
|
|
|
|
Power button |
Press once to turn on the device. Press |
|
|
again to turn off. |
|
Dual |
Provides increased lighting for better |
|
brightness |
viewing of the screen. For more |
|
backlight |
information, see “Using the Dual |
|
button |
Brightness Backlight Button” later in this |
|
|
chapter. |
! |
Caps |
When pressed with the Shift key, works |
|
Shift key |
like a Caps Lock key (produces capital |
|
|
letters or characters indicated on the |
|
|
upper section of the keys). |
|
|
NOTE: An icon appears in the status |
|
|
area of the taskbar when this function is |
|
|
on. |
" |
Contrast keys |
Press Alt + (<) to decrease contrast. |
|
(<) (>) |
Press Alt + (>) to increase contrast. |
|
|
Press Alt + both contrast keys |
|
|
simultaneously to recenter contrast. |
# |
Alt key |
Press in conjunction with the contrast |
|
|
keys to adjust screen contrast. |
|
|
Press in conjunction with the Fn key to |
|
|
start the Welcome Tour. |
|
|
May perform application-specific |
|
|
functions. |
|
|
Continued |
3-2 Using the Keyboard and Stylus

Continued
Item |
Component |
Function |
|
|
|
|
|
$ |
Windows key |
Press once to bring up the Start menu. |
|
|
|
||
|
|
|
|
% |
Fn key |
■ Press in conjunction with the |
|
|
number keys (2–9 and 0) to open |
||
|
|
||
|
|
applications quickly. |
|
|
|
■ Press in conjunction with the |
|
|
|
backlight button to toggle to a |
|
|
|
different backlight level |
|
|
|
(monochrome models only). |
|
|
|
■ Press in conjunction with the Alt key |
|
|
|
to start the Welcome Tour. |
|
|
|
|
|
& |
Application |
Press in conjunction with the Fn key to |
|
launch keys |
open applications quickly. For more on |
||
|
|||
|
|
this, see “Using the Application Launch |
|
|
|
Keys” in the following section. |
|
|
|
|
Using the Keyboard and Stylus 3-3
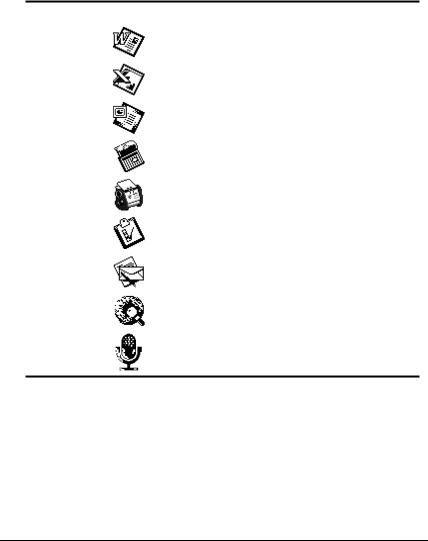
Using the Application Launch Keys
The application launch keys provide a fast and convenient way to get to many of your favorite programs. To start a program, hold down the Fn key and press the number key below the icon for the program you want to start. (For example, press Fn+2 to start Pocket Word.) For instructions on using a program once it’s started, see The Handheld PC Companion or the online Help included with the program.
The following table lists the application launch keys and their corresponding icons and programs.
Fn + Key |
Icon |
Program Launched |
|
|
|
2 |
|
Pocket Word |
|
|
|
3 |
|
Pocket Excel |
|
|
|
4 |
|
Pocket PowerPoint |
|
|
|
5 |
|
Calendar |
|
|
|
6 |
|
Contacts |
|
|
|
7 |
|
Tasks |
|
|
|
8 |
|
Inbox |
|
|
|
9 |
|
World Wide Web (www) |
|
|
|
0 |
|
Voice Memo |
NOTE: Once a program is open, pressing Fn + the application’s launch key will quickly switch you to that application.
3-4 Using the Keyboard and Stylus
 Loading...