


 Loading...
Vertigo XG & iTX Integration
User Manual
M852-9014-233
22 April 2013
www.miranda.com

Copyright Notice
© 2013 Miranda Technologies Partnership. All rights reserved.
Third Party Trademarks
All other brand names, product names or trademarks belong to their respective holders.
Usage Agreement
Please read the following terms and conditions carefully. By using the Vertigo XG & iTX Integration User Manual, you agree to the following terms and conditions:
Miranda Technologies Partnership hereby grants permission and license to owners of the Vertigo Suite and iTX software to use their product manuals for their own internal business use. Manuals for Miranda Technologies Inc. products may not be reproduced or transmitted in any form or by any means, electronic or mechanical, including photocopying and recording, for any purpose unless specifically authorized in writing by Miranda Technologies Partnership.
Miranda Technologies Partnership makes no warranty, either expressed or implied, including but not limited to any implied warranties of merchantability or fitness for a particular purpose, regarding these materials and makes such materials available solely on an “As-Is” basis.
In no event shall Miranda Technologies Partnership be liable to anyone for special, collateral, incidental, or consequential damages in connection with or arising out of purchase or use of these materials. The sole and exclusive liability to Miranda Technologies Partnership, regardless of the form of action, shall not exceed the purchase price of the materials described herein.
Miranda Technologies Partnership reserves the right to revise and improve its products at any time and without notice. This publication describes the state of this product at the time of its publication, and may not reflect the product at all times in the future. Thus, different versions of a manual may exist for any given product. Care should be taken to ensure that one obtains the proper manual version for a specific product serial number.
Information in this document is subject to change without notice and does not represent a commitment on the part of Miranda Technologies Partnership.
Government Use
The Software {and Documentation} is provided with RESTRICTED RIGHTS. Use, duplication or disclosure by the United States Government or any agency, department or instrumentality thereof is subject to the restrictions set forth in the Commercial Computer Software -- Restricted Rights clause at FAR 52.227-19 or the Commercial Computer Software -- Licensing clause at NASA FAR Supplement 1852.227-86.
Printed in Canada
Document Identification
•Title: Vertigo XG & iTX Integration User Manual
•Part number: M852-9014-233
•Software version: iTX v2.3 SP3
•Last revised: April 22, 2013

Document Revision History
After the original release date, this user manual may be updated with edits and then rereleased. The following table tracks the versions of this document.
Publication date |
Description |
|
|
October 30, 2012 |
Original publication of the document. |
|
|
December 5, 2012 |
Introduced a new document cover page design. |
|
|
April 9, 2013 |
Added a limitation statement to acknowledge the inability to |
|
perform traditional iTX squeeze-backs and PIP (page 1-4). |
|
|
April 22, 2013 |
• Added to the AUTOMATION DELAY setting’s description on |
|
page 2-9 that this setting’s value be set to at least 500ms |
|
when the Enable TS Commands setting (Timestamped |
|
Takes) is selected. |
|
• Changed the default value for Xplay’s Number of Devices |
|
setting from 20 to 9 on page 2-3. |
|
• Added a note on page 1-1 that identifies the versions of the |
|
Vertigo Suite and iTX software that support XG & iTX |
|
integration. |
|
|

TABLE OF CONTENTS
Integration of Vertigo XG & iTX .......................................................................................... |
1-1 |
Overview of the XG Inside workflow.................................................................................................. |
1-2 |
Overview of the downstream Vertigo XG workflow............................................................................ |
1-5 |
Configuration Procedures................................................................................................... |
2-1 |
XG Inside configuration procedures .................................................................................................. |
2-2 |
Installing ITXG Xmedia Suite Install on an iTX Output Server...................................................... |
2-3 |
Establishing a connection between TXPlay and Xplay................................................................. |
2-5 |
Adding an XG Inside device to the Xmedia Server’s Device Manager ......................................... |
2-6 |
Enabling auto-publishing on the Templates, Pages and/or Scenes categories............................ |
2-7 |
Installing and configuring the VertigoXG Desktop plugin.............................................................. |
2-8 |
External Vertigo XG and iTX configuration procedure..................................................................... |
2-10 |
Configuring Xplay’s keyers ......................................................................................................... |
2-11 |
Configuring Xplay to use automation to control the Vertigo XG.................................................. |
2-13 |
Adding the Vertigo XG device to the central XMS’s Device Manager ........................................ |
2-15 |
Configuring the Vertigo XG’s Dashboard settings for automation .............................................. |
2-16 |
Enabling auto-publishing on the Templates, Pages and/or Scenes categories.......................... |
2-17 |
Installing and configuring the VertigoXG Desktop plugin............................................................ |
2-19 |
VertigoXG Plugin: Adding XG Events to a Schedule........................................................ |
3-1 |
Procedural overview for creating an XG event .................................................................................. |
3-4 |
Browsing or searching for templates, pages or scenes on an Xmedia Server .................................. |
3-5 |
Creating a new page from a template................................................................................................ |
3-7 |
Adding a page to the VertigoXG Palette.......................................................................................... |
3-10 |
Opening and editing an existing page in the VertigoXG Viewer...................................................... |
3-11 |
Adding an unedited scene to the VertigoXG Palette ....................................................................... |
3-13 |
Updating a scene already listed on the VertigoXG Palette.............................................................. |
3-15 |
Creating a new scene based on an existing scene ......................................................................... |
3-16 |
Adding XG events to an iTX schedule............................................................................................. |
3-18 |
Editing the properties or content of a scheduled XG event ............................................................. |
3-20 |
Vertigo XG & iTX Integration User Guide |
TOC-1 |

1 INTEGRATION OF VERTIGO XG & ITX
The branding capabilities of a typical iTX playout channel can be enhanced by integrating Vertigo graphics events into the iTX playout schedule. Using the VertigoXG plugin, Vertigo XG events can be added to the iTX Desktop’s schedule as secondary graphics events and then inserted into the iTX program stream either using:
•the XG Inside as an option that integrates the XG Renderer directly within iTX Output Servers and iTX Playout Appliances
or,
•an external Miranda Vertigo XG device downstream of the iTX Output Server
This document provides you with an understanding of the two ways in which the Vertigo XG can be integrated into an iTX system, as well as how to install, configure and use the VertigoXG plugin. The iTX Desktop’s VertigoXG plugin allows you to create Vertigo graphics pages and add these pages, as well as Vertigo scenes to an ITX schedule for playout.
•“Overview of the XG Inside workflow” on page 1-2
•“Overview of the downstream Vertigo XG workflow” on page 1-5
•“XG Inside configuration procedures” on page 2-2
•“External Vertigo XG and iTX configuration procedure” on page 2-10
•“VertigoXG Plugin: Adding XG Events to a Schedule” on page 3-1
 NOTE
NOTE
The integration of the Vertigo XG and iTX is supported by the following versions of the iTX and Vertigo Suite software: iTX v2.3 SP3 or higher and Vertigo Suite v.4.8 or higher.
Vertigo XG & iTX Integration User Guide |
1-1 |

Integration of Vertigo XG & iTX
Overview of the XG Inside workflow
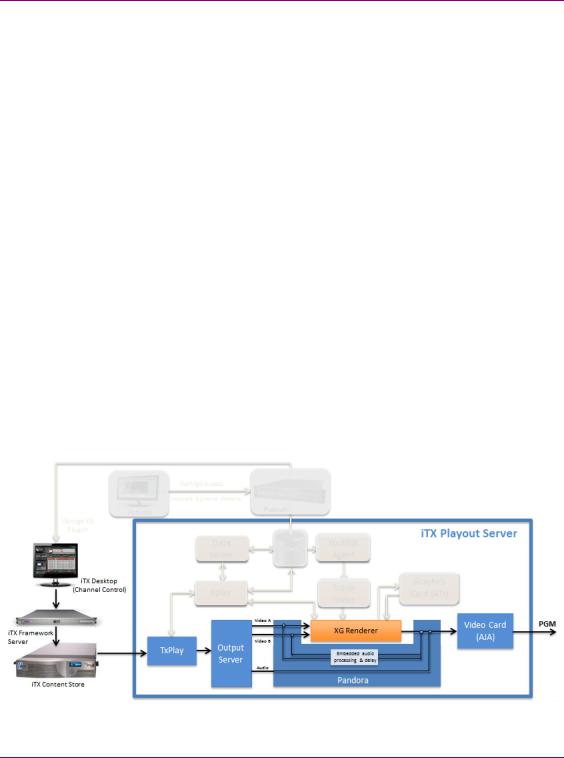
Figure 1-1 shows how iTX and the XG Inside components work together on an Output Server machine.
Figure 1-1. XG Inside signal path and workflow
Graphics preparation
Vertigo templates are created offline using the Vertigo Suite’s Xstudio application. The templates provide the layout, formatting and optional logic for controlling the graphics during playout. An advantage of using graphics templates is that unique instances of the graphics can be quickly created by changing the content elements, without having to recreate the layout and formatting. See the Xstudio User Manual for more information about using Xstudio to create Vertigo templates.
Once a template is created, it is saved to a Vertigo Xmedia Server. From there, the template and its associated graphics files are published to the Embedded Xmedia Server (EXMS) on the iTX Playout Server, where they become available for playout. The Xpublish Agent puts the graphics files in the Scene folder.
The VertigoXG plugin associated with the iTX Desktop allows users to browse the templates and pages stored on the Xmedia Server. Opening the template in the plugin allows users to edit the content of the template and save it as a graphics page on the Xmedia Server. The Xmedia Server then publishes the page and its associated graphics files to the Embedded Xmedia Server (EXMS) on the iTX Playout Server.
In addition to templates and pages, the VertigoXG plugin associated with the iTX Desktop also allows users to browse for standalone scenes stored on the Xmedia Server. Like the scene-side of a template, scenes contain the collection of graphic objects that will be displayed on air during playout. Standalone scenes are appropriate if the scene’s objects and playout do not require any control logic (static and/or timed playout). However, if the
1-2 |
Vertigo XG & iTX Integration User Guide |
Integration of Vertigo XG & iTX
scene’s objects are to be data driven or controlled during playout, the scene should be associated with a template. See the Xstudio User Manual for more information about using Xstudio to create standalone scene assets.
Processing and playout of video & graphics
Using the Vertigo XG plugin in the iTX Desktop, the graphics page and scenes can then be added to the channel’s schedule or timeline as a secondary event.
TXPlay controls schedule playout. It sends commands through the Output Server to the iTX Player (Pandora) to play out events at specified times. An event can feature one or two video sources, from which iTX produces an SDI or HD SDI output signal.
When an event includes a Vertigo page or scene, the iTX Player feeds the video streams to the XG Renderer. It always supplies two streams; if there is only one video source, one of the streams has blank frames.
Using the Oxtel protocol, TXPlay instructs Vertigo Xplay to cue and take the page or scene. Xplay processes the page/scene requirements and sends playout commands to the
XG Renderer.
The XG Renderer loads the page or scene and its associated graphics. The XG Renderer and the GPU renders the graphics with the video streams and passes a single rendered video stream back to the iTX Player, which combines this with the audio stream(s) for playout through the AJA video card.
The iTX Player does not pass any audio content to the XG Renderer. It de-embeds the audio content from the video streams, diverts it around the XG Renderer and then re-embeds it into the rendered video stream (after a delay to compensate for the render process).
For events that do not feature a Vertigo page or scene (XG Event), the video streams simply pass through the XG Renderer (figure 1-2).
Figure 1-2. For all other event types, the video streams pass through the XG Renderer
Vertigo XG & iTX Integration User Guide |
1-3 |

Integration of Vertigo XG & iTX
Limitations of the XG Inside
The following limitations currently apply to the integration of the Vertigo XG components in the iTX Output Server.
•The system can handle one or two video streams from any of the following source options: one video clip; two video clips; a live feed; a video clip and a live feed.
•The integration is suitable only for a single-channel iTX Output Server.
•Cel animations are only supported if they are in the Miranda VAF format. Uncompressed TGA sequences are likely to have an adverse affect on the performance of the Output Server.
•The XG Renderer plays out audio clips embedded in a Vertigo XG template; but it does not perform any audio mixing with content from the iTX Player, since this contains no audio stream. This means that Vertigo templates cannot modify the audio properties (e.g. volume levels) of the clips played out by iTX.
•Audio-level reduction (ducking) and sound effects cannot be controlled from the XG Renderer.
•The XG Renderer does not modify any AFD code in the video streams.
•The XG Renderer does not include caption or subtitle data in the video stream it returns to the iTX Player.
•The XG Renderer cannot pass SNMP data to the iTX system.
•Where there is only one video stream and the source is a live feed, only transitions that do not involve overlapping video streams are possible (e.g. cut-cut; fade out, followed by fade in).
•Since the XG Renderer is responsible for the compositing of PGM A and PGM B video, traditional iTX functionality for squeeze-backs and picture-in-picture (PIP) effects do not work.
1-4 |
Vertigo XG & iTX Integration User Guide |
Integration of Vertigo XG & iTX
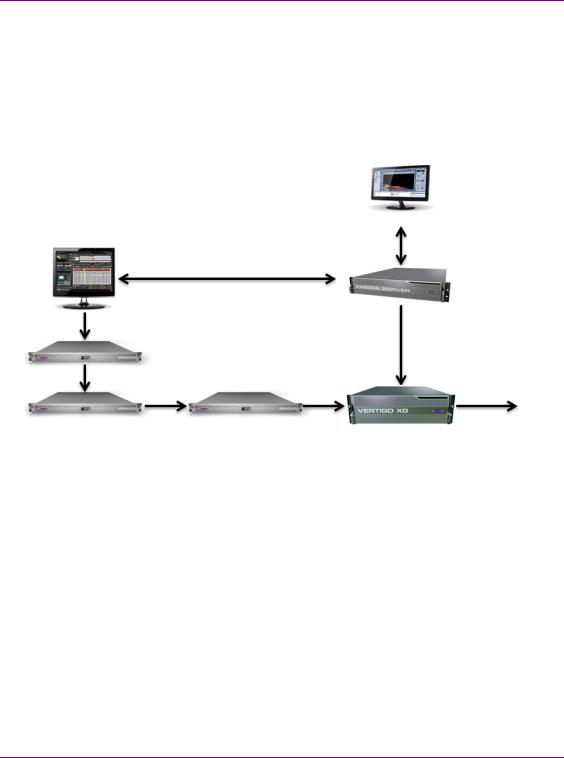
Overview of the downstream Vertigo XG workflow
Figure 1-3 demonstrates that in a downstream branding model, the iTX Output Server acts as an upstream video server, feeding video and audio content to the external Vertigo XG device. Meanwhile, graphics content is created and managed using the Vertigo Suite’s Xstudio and the Xmedia Server. iTX is the automation system that drives the playout schedule, including controlling the playout of graphics events from the Vertigo XG using Oxtel automation protocol commands.
Xstudio
Vertigo assets
(Templates & graphics elements)
VertigoXG Plugin
iTX Desktop
(Channel Control)
Publish
iTX Framework Server
PGM
iTX Content Store |
iTX Output Server |
Figure 1-3. System diagram of an external Vertigo XG device downstream of an iTX system
Graphics preparation
Vertigo templates are created offline using the Vertigo Suite’s Xstudio application. The templates provide the layout, formatting and optional logic for controlling the graphics during playout. An advantage of using graphics templates is that unique instances of the graphics can be quickly created by changing the content elements, without having to recreate the layout and formatting. See the Xstudio User Manual for more information about using Xstudio to create Vertigo templates.
Once a template is created, it is saved to a Vertigo Xmedia Server. From there, the template and its associated graphics files are published to the Embedded Xmedia Server (EXMS) on the Vertigo XG device, where they become available for playout.
The VertigoXG plugin associated with the iTX Desktop allows users to browse the templates and pages stored on the Xmedia Server. Opening the template in the plugin allows users to edit the content of the template and save it as a graphics page on the
Vertigo XG & iTX Integration User Guide |
1-5 |
Integration of Vertigo XG & iTX
Xmedia Server. The Xmedia Server then publishes the page and its associated graphics files to the Vertigo XG device.
In addition to templates and pages, the VertigoXG plugin associated with the iTX Desktop also allows users to browse for standalone scenes stored on the Xmedia Server. Like the scene-side of a template, scenes contain the collection of graphic objects that will be displayed on air during playout. Standalone scenes are appropriate if the scene’s objects and playout do not require any control logic (static and/or timed playout). However, if the scene’s objects are to be data driven or controlled during playout, the scene should be associated with a template. See the Xstudio User Manual for more information about using Xstudio to create standalone scene assets.
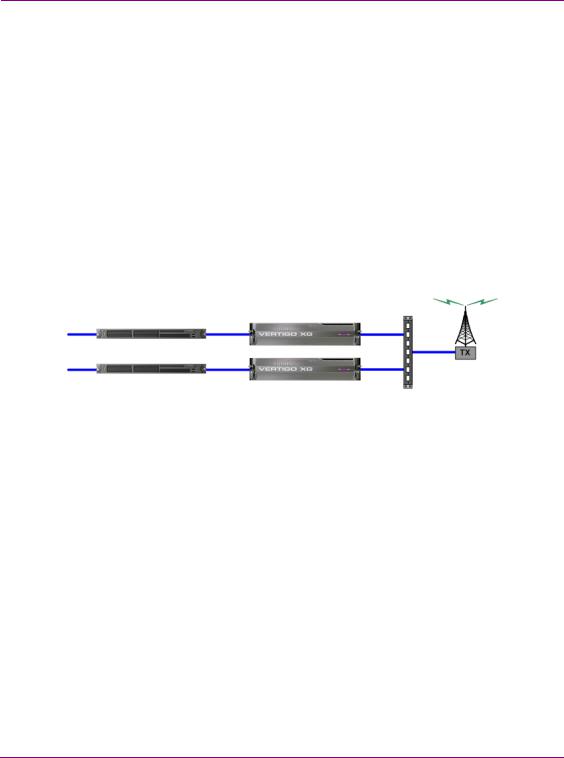
Processing and playout of video & graphics
For system resilience, we recommend an independent control setup where the backup channel is configured to use a different Vertigo XG device and commands are always sent from both the Main and Backup channels regardless of which one is Master.
Router
(controlled by iTX)
iTX Channel1
Controlled by Main Channel
iTX Channel1 - Backup |
Controlled by Backup Channel |
|
Using the Vertigo XG plugin in the iTX Desktop, graphics pages are added to the channel’s schedule or timeline as a secondary event.
TXPlay controls schedule playout. It sends commands through the Playout Server to the iTX Player (Pandora) to play out events at specified times. An event can feature one or two video sources, from which iTX produces an SDI or HD SDI output signal. The output signal is then fed to the Vertigo XG device’s input.
When an XG event (Vertigo page or scene) is encountered in the schedule, TXPlay uses the Oxtel protocol to instruct the Vertigo XG’s Xplay to cue and take the page or scene. Xplay processes the page requirements and sends playout commands to the XG Renderer.
The XG Renderer loads the page/scene and its associated graphics. The XG Renderer and the GPU renders the graphics with the video streams and outputs a single rendered video stream to air.
For events that do not feature a Vertigo page or scene (XG Event), the video streams simply pass through the Vertigo XG.
1-6 |
Vertigo XG & iTX Integration User Guide |
2 CONFIGURATION PROCEDURES
Integrating the Vertigo XG’s branding capabilities with the iTX automation playout system involves the coordination and configuration of several hardware and software components to ensure proper communication and operation.
This chapter provides information and instructions for how to add and setup the XG Inside option on an iTX Output Server or iTX Playout Appliance - Single channel. Similarly, instructions are also provided for how to configure a system that uses an external Vertigo XG downstream from an iTX Output Server.
•“XG Inside configuration procedures” on page 2-2
•“External Vertigo XG and iTX configuration procedure” on page 2-10
 NOTE
NOTE
The scope of this chapter does not include hardware installation, cabling and other systemlevel installation and configuration information and instructions. We recommend that you consult the Vertigo XG, Xmedia Server and iTX system installation and configuration documentation before attempting to configure your system for the integration of XG branding within an iTX system.
Vertigo XG & iTX Integration User Guide |
2-1 |

Configuration Procedures
XG Inside configuration procedures
XG Inside is an option for iTX Output Servers and iTX Playout Appliances that enhances the branding capabilities of an iTX playout channel by integrating the XG Renderer software directly within the iTX playout device.
As the system diagram on page 1-2 demonstrates, the integration of XG graphics rendering into an iTX system requires adding and configuring new software and hardware components to the system.
The following procedure provides instructions for installing and configuring the software components required for using the XG Inside option on an iTX Output Server or iTX Playout Appliance - Single channel:
Step # |
Task |
|
|
1 |
Install the “ITXG Xmedia Suite Install” software component on the iTX |
|
Output Server. |
|
See “Installing ITXG Xmedia Suite Install on an iTX Output Server” on page |
|
2-3 for complete instructions. |
|
*** This task should only be performed on iTX Output Servers. Proceed to the |
|
next task if you are configuring XG Inside on a iTX Playout Appliance since |
|
the software component is factory-installed on iTX Playout Appliances. *** |
|
|
2 |
Establish the connection between TXPlay and Xplay. |
|
See “Establishing a connection between TXPlay and Xplay” on page 2-5 for |
|
complete instructions. |
|
|
3 |
Add the XG Inside device to the Xmedia Server’s Vertigo Device |
|
Manager. |
|
See “Adding an XG Inside device to the Xmedia Server’s Device Manager” |
|
on page 2-6 for complete instructions. |
|
|
4 |
Enable auto-publishing on the Xmedia Server’s Templates, Pages |
|
and/or Scenes asset categories. |
|
See “Enabling auto-publishing on the Templates, Pages and/or Scenes |
|
categories” on page 2-7 for complete instructions. |
|
|
5 |
Install and configure the “Vertigo ITX Desktop plugin” on the client |
|
machine hosting the iTX Desktop application. |
|
See “Installing and configuring the VertigoXG Desktop plugin” on page 2-8 for |
|
complete instructions. |
|
|
2-2 |
Vertigo XG & iTX Integration User Guide |

Configuration Procedures
Installing ITXG Xmedia Suite Install on an iTX Output Server
The Vertigo Suite Installer’s ITXG Xmedia Suite Install software preset contains the XG Renderer and its associated components, which must be added to the iTX Output Server or iTX Playout Appliance - Single channel.
 NOTE
NOTE
The ITXG Xmedia Suite Install software component is factory-installed on all iTX Playout Appliance - Single channel devices. If you are adding and configuring the XG Inside option on an iTX Playout Appliance unit, do not reinstall it. Proceed to the next task in this configuration procedure.
To add the ITXG Xmedia Suite Install component to an iTX Output Server:
1.Ensure the iTX Server Controller is not running.
2.Acquire and run the latest version of the Vertigo Suite Installer (v.4.8 or later).
3.When the installation wizard requests you to select components, select the ITXG XMEDIA SUITE INSTALL preset configuration.
This preset will automatically install the following components on the Playout Server:
Xplay, Software CG, Vertigo ITXG, XpublishAgent, Dataserver, Clip Playback and Encoding (codecs) and Xmedia Server (EXMS).
4.Follow the wizard instructions and respond to the prompts to install all dependencies.
The wizard may prompt you to restart the machine to continue the installation (e.g. when an SQL database is created) and to complete the installation.
5.Restart the iTX Output Server machine when the wizard prompts you to.
The wizard takes a few minutes to complete the installation after the (final) restart.
The installer pre-configures most of the XG Inside components with the required settings.
•EXMS & XPA windows: No additional configuration required.
•iTXG Renderer Control Panel & Dashboard: No additional configuration required. Note that the RESOLUTION setting will be determined and automatically passed in by the iTX Output Server.
•Software CG Control Panel & Dashboard: No immediate configuration required. Note however that a valid CG license is required, which is sold separately.
•Xplay Settings are automatically configured for XG inside.
•SERVERS>XMEDIA SERVER IP ADDRESS> 127.0.0.1
•GENERAL>LAYOUT>MULTI-DEVICE
•GENERAL>NUMBER OF DEVICES>9
•LAYOUT>MULTI-DEVICE>PREVIEWONAIR
•AUTOMATION>AUTOMATION (NO MESSAGE BOXES)>SELECTED
•Xplay Automation Configuration (Tools>Configure Automation) is automatically configured with the Oxtel over TCP/IP protocol added to the iTXG device.
Vertigo XG & iTX Integration User Guide |
2-3 |
Configuration Procedures
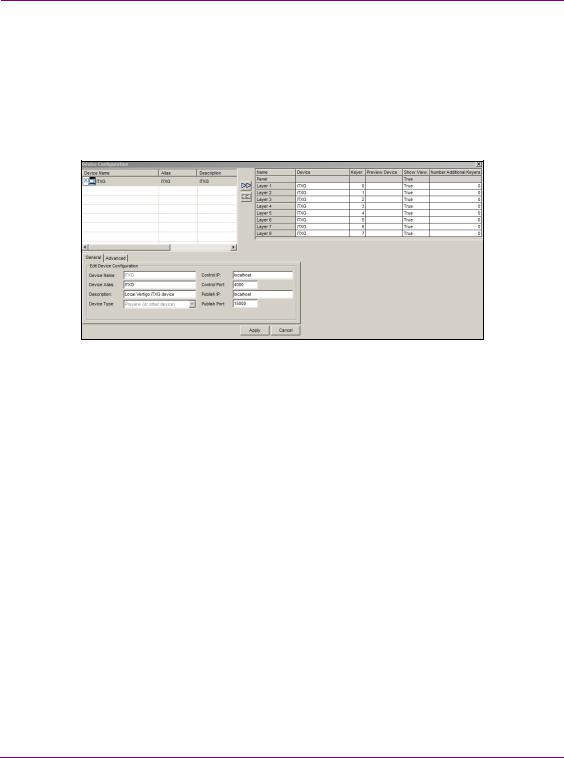
•EXMS Device Manager: An iTXG device is added and pre-configured in the EXMS’s Device Manager (Xplay>Tools>Device Manager). Figure 2-1 demonstrates that it is configured as:
•DEVICE TYPE: PREVIEW (OR OTHER DEVICE)
•CONTROL IP: LOCALHOST
•PUBLISH IP: LOCALHOST
•The ITXG device is also automatically assigned to each of the device layers in the Device Manager’s Active Device table.
Figure 2-1. The ITXG device is automatically added to the EXMS Device Manager
2-4 |
Vertigo XG & iTX Integration User Guide |
Configuration Procedures
Establishing a connection between TXPlay and Xplay
TXPlay controls the channel’s schedule playout. So when TXPlay encounters an XG event (graphics event) in the schedule, it communicates with Vertigo’s Xplay using the Oxtel protocol to instruct Xplay to cue and take the page.
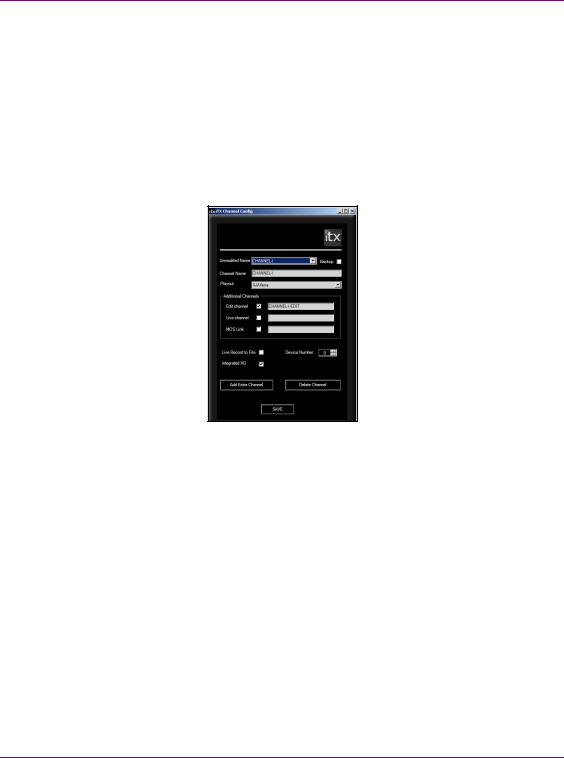
The relationship between TXPlay and Xplay must be configured by enabling the Integrated XG setting in the iTX Channel Config dialog. This setting adds Vertigo’s Xplay to the Server Controller Configuration tool, which then creates a relationship between TXPlay and Xplay.
1.Open the iTX Channel Config dialog box (figure 2-2) by double-clicking the TXPlay Config icon on the Output Server’s desktop.
Figure 2-2. Enable the Integrated XG setting
2.Enable the Integrated XG setting.
3.Click Save.
Vertigo XG & iTX Integration User Guide |
2-5 |
Loading...