


 Loading...
071-8721- 07
K2 Summit/Solo/Media Server
Field Kit Upgrade Instructions
This document applies to first generation K2 Summit Production Client, K2 Summit 3G Production Client, K2 Solo 3G Media Server, K2 Media Server, and Grass Valley Control Point PC.

Contents |
|
Upgrade instructions.................................................................................................................................... |
5 |
Safety Summaries.................................................................................................................................... |
5 |
Installing software and CPU carrier module upgrades................................................................................. |
6 |
Saving settings......................................................................................................................................... |
6 |
Replace CPU carrier module.................................................................................................................... |
7 |
Replace CompactFlash boot media.......................................................................................................... |
7 |
Reimage K2 Summit/Solo system............................................................................................................ |
8 |
Restore settings after generic reimage................................................................................................... |
10 |
Restore network configuration................................................................................................................ |
10 |
Create the Control Team..................................................................................................................... |
10 |
Name team and loopback................................................................................................................... |
14 |
Reorder adapters................................................................................................................................ |
15 |
Enhance network bandwidth................................................................................................................... |
16 |
Disable Large Send Offloads.............................................................................................................. |
16 |
Disable CPU Power Technology.......................................................................................................... |
17 |
Install the Discovery Agent on a K2 Summit/Solo system...................................................................... |
18 |
If you install software with SiteConfig..................................................................................................... |
18 |
Leave the embedded security solution Update mode......................................................................... |
19 |
Install software using SiteConfig......................................................................................................... |
19 |
Restore licensing................................................................................................................................. |
20 |
If you install software manually............................................................................................................... |
20 |
Install software manually..................................................................................................................... |
20 |
Leave the embedded security solution Update mode......................................................................... |
21 |
Restore licensing................................................................................................................................. |
21 |
Install Multi-Path I/O software................................................................................................................. |
22 |
Install the Fibre Channel card driver....................................................................................................... |
23 |
Install the LSI Fibre Channel card driver............................................................................................. |
24 |
Install the ATTO Fibre Channel card driver......................................................................................... |
25 |
Final steps for software and CPU carrier module upgrades................................................................... |
26 |
Install codec module upgrade.................................................................................................................... |
27 |
Replace codec module and power supplies........................................................................................... |
27 |
Upgrading a K2 Media Server to version 9.x.............................................................................................. |
29 |
Upgrading a Control Point PC.................................................................................................................... |
32 |
Re-image Control Point PC..................................................................................................................... |
32 |
Set BIOS prerequisites........................................................................................................................... |
32 |
Configure Virtual Machine...................................................................................................................... |
32 |
Setting up Windows on the Virtual Machine........................................................................................... |
34 |
Logging on to the Virtual Machine.......................................................................................................... |
34 |
License NetCentral on the Virtual Machine............................................................................................ |
35 |
Adding a license to the Virtual Machine.............................................................................................. |
36 |
Installing a two channel upgrade................................................................................................................ |
37 |
Installing the two channel codec license.................................................................................................... |
39 |
Requesting a license.............................................................................................................................. |
39 |
Adding a license..................................................................................................................................... |
40 |
Installing a MPEG/Multi-Cam codec option upgrade.................................................................................. |
41 |
K2 Summit System Procedures................................................................................................................. |
44 |
K2 Summit system procedures............................................................................................................... |
44 |
Carrier module removal....................................................................................................................... |
44 |
Power supply module removal............................................................................................................ |
45 |
20140204 |
K2 Summit/Solo/Media Server Field Kit Upgrade Instructions 3 |
Front bezel assembly removal K2 Summit.......................................................................................... |
45 |
CompactFlash boot media removal K2 Summit.................................................................................. |
46 |
Manage Embedded Security Update mode........................................................................................ |
47 |
K2 Solo Media Server procedures............................................................................................................. |
48 |
Front bezel removal K2 Solo................................................................................................................... |
48 |
CompactFlash boot media removal K2 Solo........................................................................................... |
48 |
Trademarks and Agreements..................................................................................................................... |
49 |
Trademarks............................................................................................................................................. |
49 |
JPEG acknowledgment........................................................................................................................... |
49 |
4 K2 Summit/Solo/Media Server Field Kit Upgrade Instructions |
20140204 |

Upgrade instructions
Use these installation instructions to upgrade your K2 system. Refer to the section in this document that applies to the upgrade kit that you received.
Upgrade kit |
Section |
K2-XDP2-CPU-FK |
Installing software and CPU carrier module upgrades on page 6. |
K2-XDP2-V9-FK |
Installing software and CPU carrier module upgrades on page 6. |
K2-XDP2-3G-FK |
Install codec module upgrade on page 27. |
K2-XDPSVR-V9-FK |
Upgrading a K2 Media Server to version 9.x on page 29. |
CP-XDPCP-V9-FK |
Upgrading a Control Point PC on page 32. |
K2-XDP2-2IO-FK |
Installing a two channel upgrade on page 37. |
K2-XDP2-AVC-2CH-FK |
Installing the two channel codec license on page 39. |
K2-XDP2-MPG2-MC-FK |
Installing a MPEG/Multi-Cam codec option upgrade on page 41. |
Safety Summaries
 WARNING: In order to avoid personal injury and prevent damage to this product and its peripheral products, be sure to review all safety and ESD precautions listed in the K2 product Service Manual.
20140204 |
K2 Summit/Solo/Media Server Field Kit Upgrade Instructions 5 |

Installing software and CPU carrier module upgrades
Tools and materials needed:
•Hardware as provided by upgrade kit. See descriptions below.
•Torx tool with T15 magnetic tip
This section provides instructions for the following field kits:
Upgrade Nomenclature |
Description |
K2-XDP2-CPU-FK |
Processor upgrade Field Kit. Includes updated Type III CPU carrier |
|
module required for advanced features such as ShareFlex. NOT |
|
AVAILABLE for K2-SOLO models. |
K2-XDP2-V9-FK |
K2 Summit / K2 Solo 9.x Upgrade Field Kit. Includes 9.x system |
|
software license, 16GB CompactFlash system drive with image, and |
|
16GB USB recovery flash drive with Acronis backup software and |
|
new Windows Embedded System 7 license with Embedded Security |
|
Solution. Requires Type II or Type III CPU carrier module. |
For any upgrade from a software version lower than 9.0 to a 9.x version, you must reimage the system and do all the steps as directed in the procedure to ensure the system is properly initialized.
 CAUTION: This system contains board-level components that must be protected from static dischargeandphysicalshock.Wearawriststrapgroundedtothesystemchassiswhenhandling system components.
Work through the tasks in this section sequentially.
Saving settings
Do this task for both software and CPU carrier module upgrade kits.
Before doing this task, on the 16GB USB Recovery Flash Drive that you received with the kit, write the serial number of the K2 Summit/Solo system to identify it as belonging to that individual system.
NOTE: Do not attempt to use a single Recovery Flash Drive on multiple systems. This can overwrite saved settings and lose the ability to restore settings on one or more systems. Also, software licensing requires one Recovery Flash Drive for each system.
1.If you are working on a K2 client SAN-attached system, record iSCSI bandwidth settings, so you can reconfigure after removing and readding to SAN.
2.Make sure you are logged in to the K2 Summit/Solo system with administrator privileges.
3.Connect the USB Recovery Flash Drive to a USB port on the K2 Summit/Solo system.
4.On the USB Recovery Flash Drive, navigate to the following location:
\tools\SaveRestoreScripts.
NOTE: Do not attempt to use the same Recovery Flash Drive on multiple systems.
20140204 |
K2 Summit/Solo/Media Server Field Kit Upgrade Instructions 6 |

Installing software and CPU carrier module upgrades
5. Run the following and wait for the process to complete:
ssave.bat
This saves current settings onto the USB Recovery Flash Drive in the \settings directory. 6. Disconnect the USB Recovery Flash Drive.
Next, do one of the following:
•If you are installing K2-XDP2-V9-FK on a K2 Summit 3G system with mSATA system drive, skip ahead and reimage.
•If you are installing K2-XDP2-V9-FK on a K2 Summit/Solo system with CompactFlash system drive, skip ahead and replace the CompactFlash boot media with the new larger 16GB CF.
•If you are installing K2-XDP2-CPU-FK on a K2 Summit system, replace the CPU carrier module.
Replace CPU carrier module
Do this task if installing K2-XDP2-CPU-FK on a K2 Summit system.
NOTE: Do not attempt to replace the CPU carrier module on a K2 Solo Media Server. K2-XDP2-CPU-FK does not apply to K2 Solo Media Server.
1.Shutdown the K2 Summit system.
2.Disconnect all power cables from the K2 Summit system.
3.Press the power button on the K2 Summit system to drain off power from boards.
4.Remove any cables connected to the CPU carrier module.
5.Replace the current CPU carrier module with the new CPU carrier module.
6.Reconnect cables to the CPU carrier module.
7.Reconnect power cables.
Next, do one of the following:
•If you are installing K2-XDP2-V9-FK on a K2 Summit 3G system with mSATA system drive, skip ahead and reimage.
•If you are installing K2-XDP2-V9-FK on a K2 Summit/Solo system with CompactFlash system drive, replace the CompactFlash boot media with the new larger 16GB CF.
Related Topics
Carrier module removal on page 44
Replace CompactFlash boot media
Do not do this task if:
•A K2 Summit 3G system with mSATA system drive. Do this task if:
•A K2 Summit/Solo system with CompactFlash system drive.
20140204 |
K2 Summit/Solo/Media Server Field Kit Upgrade Instructions 7 |

Installing software and CPU carrier module upgrades
Before doing this task, make sure the K2 Summit/Solo system is powered off.
1.Remove the front bezel assembly.
2.Replace the current CompactFlash boot media with the new CompactFlash boot media.
3.Replace the front bezel assembly.
Next, reimage the K2 Summit/Solo system.
Related Topics
Front bezel assembly removal K2 Summit on page 45
CompactFlash boot media removal K2 Summit on page 46
Front bezel removal K2 Solo on page 48
CompactFlash boot media removal K2 Solo on page 48
Reimage K2 Summit/Solo system
Do this task for both software and CPU carrier module upgrade kits.
Before doing this task, make sure that you have done the following:
•Saved settings using the ssave.bat script.
•Replaced hardware, as supplied by your upgrade kit.
•Reconnected cables.
•Back up the iSCSI-SVR (FSM TOE) licenses prior to reimage the file system server (FSM).
1.If you have not already done so, connect keyboard, monitor, and mouse.
2.Do the following:
a)Insert the Recovery Flash Drive into a USB port.
b)Restart the machine, or power on if currently shut down.
The machine boots from the Recovery Flash Drive, into a version of Windows stored on the drive.
A MS-DOS command window opens.
c)When prompted with a list of options, type 2 to select the Acronis option and then press Enter. The Acronis program loads.
3.In the Acronis main window, click Recovery. The Restore Data Wizard opens.
4.On the Welcome page, click Next.
5.On the Backup Archive Selection page, do the following:
a)In the tree view expand the node for Computer/SummitBoot9_0_2_1803(D:). This is the Recovery Flash Drive.
b)In the Images folder, select the correct version of the image file such as
Summit_WES7_7.0.13.tib.
c)Click Next.
6.On the Restoration Type Selection page, select Restore disks or partitions and then click Next.
7.On the Partition or Disk to Restore page, select MBR and Track 0 and then click Next.
8 K2 Summit/Solo/Media Server Field Kit Upgrade Instructions |
20140204 |

Installing software and CPU carrier module upgrades
8.On the Disk Selection page, select Disk 1 and then click Next.
NOTE: Verifycapacitytomakesureyouselectthebootmediacard(CompactFlashormSATA) and not a media drive. The boot media has a much smaller capacity and has an interface identified as "IDE (0) Primary Master".
9.On the Next Selection page, select Yes, I want to restore another partition or hard disk drive and then click Next.
10.On the Partition or Disk to Restore page, select (C:) and then click Next.
11.On the Restored Partitions Resizing page, select Yes, I want to resize partitions and then click
Next.
12.On the Restored Location page, select (C:) and then click Next.
NOTE: Verifycapacitytomakesureyouselectthebootmediacard(CompactFlashormSATA) and not a media drive. The boot media has a much smaller capacity and has an interface identified as "IDE (0) Primary Master".
13.On the Restored Partition Type page, select Active and then click Next.
14.Do one of the following:
•If the Restored Partition Size page does not appear. Skip ahead to the Next Selection page.
•If the Restored Partition Size page appears. Continue with the next step.
15.On the Restored Partition Size page, do one of the following:
•If Free space after reports 0 bytes, leave settings as they are. Click Next.
•If Free space after does not report 0 bytes, increase Partition size until Free space after reports 0 bytes. Click Next.
16.On the Next Selection page, select No, I do not and then click Next.
17.On the Restoration Options page, do not make any selections. Click Next.
18.On the “…ready to proceed…” page, verify that you are restoring the correct image to the correct location. Click Proceed.
19.On the Operation Progress page, observe the progress report.
20.When a message appears indicating a successful recovery, click OK.
21.Click Operations | Exit to exit the Acronis True Image program. The machine restarts automatically.
22.Remove the recovery media while the machine is shutting down.
23.Upon startup, wait for initialization processes to complete. This can take several minutes, during which time USB keyboard/mouse input is not operational. The system might automaticallyrestart. Do not attempt to shutdown or otherwise interfere with initialization processes.
24.When prompted, enter the K2 Summit system machine name. Make sure the name is identical to the name it previously had.
After start up, one or more device discovery windows can open. Allow processes to complete without interference. Refer to Release Notes for informaion on compatible driver versions. If a Fibre Channel card driver, ignore until instructed later in this process.
At first start up after reimage, the system is in Embedded Security Update mode by default.
Next, restore settings.
20140204 |
K2 Summit/Solo/Media Server Field Kit Upgrade Instructions 9 |

Installing software and CPU carrier module upgrades
Restore settings after generic reimage
Do this task for both software and CPU carrier module upgrade kits.
This task assumes that you have saved settings using ssave.bat before reimaging the K2 Summit/Solo system, and that the reimage (Acronis) process is complete.
NOTE: Do not attempt to use a single Recovery Flash Drive on multiple systems. This can overwrite saved settings and lose the ability to restore settings on one or more systems. Also, software licensing requires one Recovery Flash Drive for each system.
1.If you have not already done so, start up the K2 Summit/Solo system and log on with administrator privileges.
The administrator password is adminGV!.
2.Connect the USB Recovery Flash Drive to a USB port on the K2 Summit/Solo system.
3.From the USB Recovery Flash Drive, run the following and wait for the process to complete:
Tools\SaveRestoreScripts\srestore.bat
Next, restore network configuration.
Restore network configuration
Do this task for both software and CPU carrier module upgrade kits.
Work through the tasks in this section sequentially to restore the default network configuration. As you do so, refer to C:\ipconfig.txt for the complete listing of the network settings that the K2 Summit/Solo system had before reimaging.
Create the Control Team
NOTE: Team control ports only. Do not team media ports.
1.Open Network Connections, if it is not already open.
a)FromtheWindows Start menu,inthe Run or the Search programs and files box, type ncpa.cpl and press Enter.
10 K2 Summit/Solo/Media Server Field Kit Upgrade Instructions |
20140204 |
Installing software and CPU carrier module upgrades
2.In Network Connections, view Details and identify the adapter name that maps to Control Connection #1 and the adapter name that maps to Control Connection #2.
3.Right-click the adapter name that maps to Control Connection #1.
4.Select Properties, then click Configure. The Properties dialog box opens.
20140204 |
K2 Summit/Solo/Media Server Field Kit Upgrade Instructions 11 |
Installing software and CPU carrier module upgrades
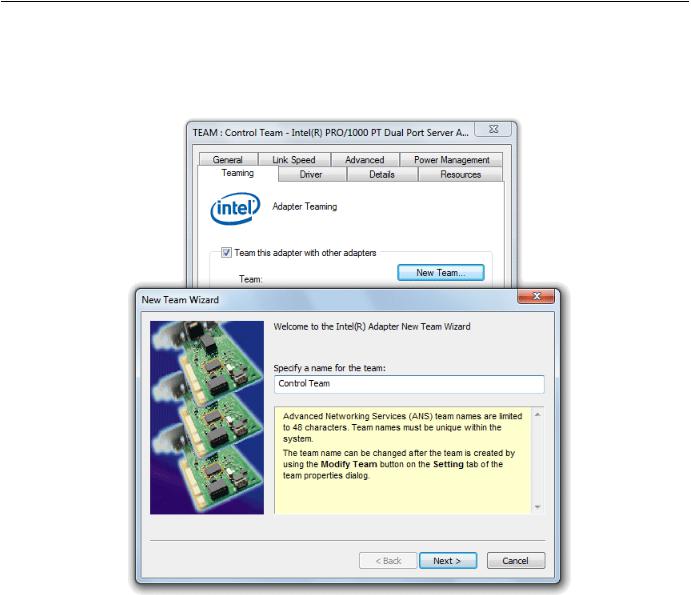
5. Select the Teaming tab.
6. Select Team this adapter with other adapters, then click New Team. The New Team Wizard opens.
12 K2 Summit/Solo/Media Server Field Kit Upgrade Instructions |
20140204 |
Installing software and CPU carrier module upgrades
7.Enter Control Team. Click Next.
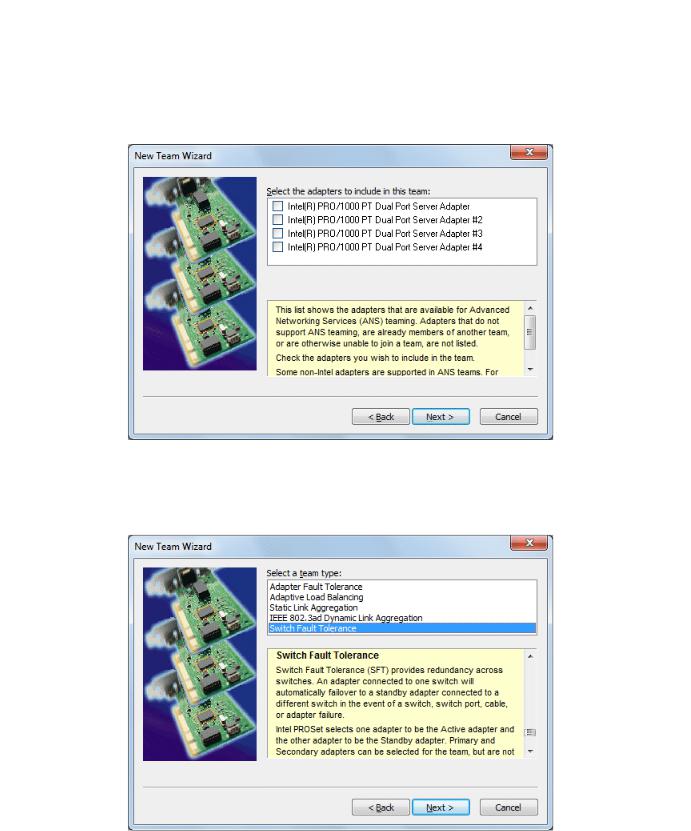
8.Select the check box for the adapter name that maps to Control Connection #1 and for the adapter name that maps to Control Connection #2. Click Next.
9.Select Switch Fault Tolerance. Click Next.
10.Click Finish and wait a few seconds for the adapters to be teamed.
20140204 |
K2 Summit/Solo/Media Server Field Kit Upgrade Instructions 13 |
Installing software and CPU carrier module upgrades
11.Open the Modify Team dialog box as follows:
a)In Device Manager | Network Adapters, right-click Control Team and select Properties. The Properties dialog box opens.
b)Select the Settings tab.
c)Click Modify Team. A dialog box opens.
12.On the Adapters tab, do the following:
a)Select the top entry, which is the adapter name that maps to Control Connection #1 and click
Set Primary.
b)Select the adapter name that maps to Control Connection #2 and click Set Secondary.
13.Click OK and OK and to close dialog boxes.
14.Restart the K2 Summit/Solo system.
If continuing with network configuration, your next task is to name team and loopback.
Name team and loopback
Before beginning this task, make sure of the following:
•Adapters are named
•The control team is created
1.On the Windows desktop right-click Start | Control Panel | Network and Sharing Center | Change adapter settings. The Network Connections window opens.
14 K2 Summit/Solo/Media Server Field Kit Upgrade Instructions |
20140204 |

Installing software and CPU carrier module upgrades
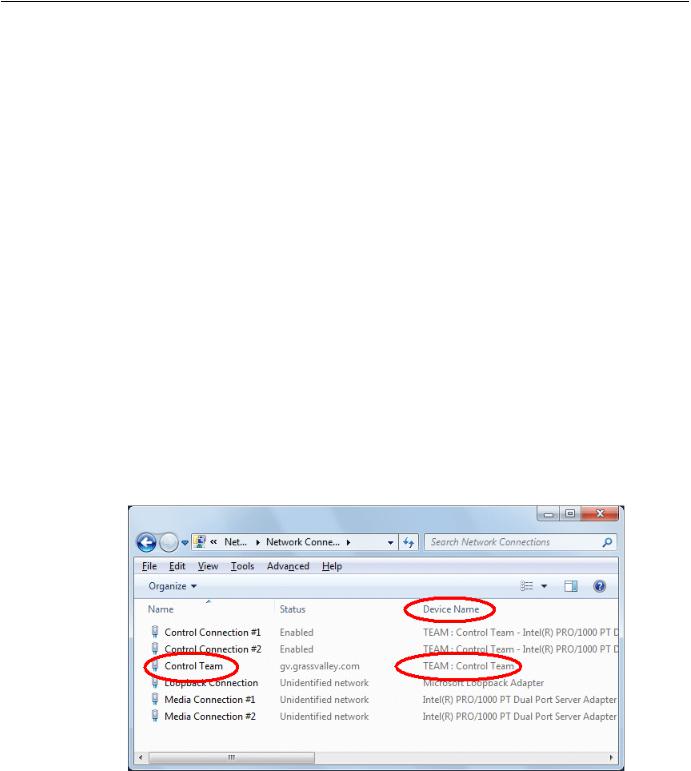
2.For the Control Team and the loopback, select adapter names in the “Device Name” column and rename them as follows:
a)Select the adapter name.
b)Select File | Rename to enter rename mode.
c)Type the name, as specified in the following table:
In the Device Name column, select this adapter name… |
And rename it as follows: |
TEAM : Control Team |
Control Team |
3.Do one of the following:
•If you intend to use SiteConfig for device discovery and IP address configuration, you do not need to set an IP address for the Control Team at this time. You are done with this procedure.
•If you are not using SiteConfig, set an IP address for the Control Team at this time. Use standard Windows procedures.
NOTE: Do not set IP addresses for the two Media Connections.
If continuing with network configuration, your next task is to reorder adapters.
Reorder adapters
Before beginning this task, make sure of the following:
•Adapters are named correctly
•The control team is created
•The team and loopback are named
1. |
Open Network Connections, if it is not already open. |
|
a) FromtheWindows Start menu,inthe Run or the Search programs and files box, type ncpa.cpl |
|
and press Enter. |
|
The Network Connections window opens. |
2. |
Select Advanced, then Advanced Settings… |
20140204 |
K2 Summit/Solo/Media Server Field Kit Upgrade Instructions 15 |
Loading...