


 Loading...
Step-by-Step Configuration
M926-3904-101
22 August 2013

Notices
Copyright & Trademark Notice
Copyright © 2012–2013, Miranda Technologies Partnership.. All rights reserved.
Belden, Belden Sending All The Right Signals, and the Belden logo are trademarks or registered trademarks of Belden Inc. or its affiliated companies in the United States and other jurisdictions. Miranda, Kaleido-IP, Kaleido-X16, and Kaleido-X are trademarks or registered trademarks of Miranda Technologies Partnership. Belden Inc., Miranda Technologies Partnership, and other parties may also have trademark rights in other terms used herein.
Terms and Conditions
Please read the following terms and conditions carefully. By using Kaleido multiviewer documentation, you agree to the following terms and conditions.
Miranda Technologies Partnership. (“Miranda”) hereby grants permission and license to owners of Kaleido multiviewers to use their product manuals for their own internal business use. Manuals for Miranda products may not be reproduced or transmitted in any form or by any means, electronic or mechanical, including photocopying and recording, for any purpose unless specifically authorized in writing by Miranda.
A Miranda manual may have been revised to reflect changes made to the product during its manufacturing life. Thus, different versions of a manual may exist for any given product. Care should be taken to ensure that one obtains the proper manual version for a specific product serial number.
Information in this document is subject to change without notice and does not represent a commitment on the part of Miranda.
Warranty information is available in the Support section of the Miranda Web site (www.miranda.com).
Title |
Kaleido-IP/Kaleido-X16 Cascade Step-by-Step Configuration |
Part Number |
M926-3904-101 |
Revision |
22 August 2013, 9:00 am |
ii

Kaleido-IP/Kaleido-X16 Cascade
Step-by-Step Configuration
This document explains how to connect two multiviewers—a Kaleido-IP and a Kaleido-X16
—in cascade mode, and how to configure and operate them as a single system. Both multiviewers must have the same Kaleido-X software version (6.40 or later).
Summary
Introduction . . . . . . . . . . . . . . . . . . . . . . . . . . . . . . . . . . . . . . . . . . . . . . . . . . . . . . . . . . . . . . . . . . . . . . . . . . 1
Physical Installation . . . . . . . . . . . . . . . . . . . . . . . . . . . . . . . . . . . . . . . . . . . . . . . . . . . . . . . . . . . . . . . . . . . 1
Cascade Configuration in XEdit . . . . . . . . . . . . . . . . . . . . . . . . . . . . . . . . . . . . . . . . . . . . . . . . . . . . . . . . 3
Cascade Upgrade . . . . . . . . . . . . . . . . . . . . . . . . . . . . . . . . . . . . . . . . . . . . . . . . . . . . . . . . . . . . . . . . . . . . . 6
Limitations . . . . . . . . . . . . . . . . . . . . . . . . . . . . . . . . . . . . . . . . . . . . . . . . . . . . . . . . . . . . . . . . . . . . . . . . . . . 10
Introduction
The number of sources that can be monitored concurrently on a single monitor wall display is limited by the number of inputs supported by your specific multiviewer model. One Kaleido-X16 multiviewer supports 16 inputs. One way to increase the number of inputs is to use more than one multiviewer to build the output to a single head, by configuring a multiviewer cascade. It is possible to configure up to three Kaleido-X16 or KMV-3901/3911 multiviewers as a cascade system. Depending on your purposes, you may wish to monitor both baseband and IP sources at once, on the same monitor wall display. This can be achieved by configuring a hybrid cascade system, involving one Kaleido-IP multiviewer and one Kaleido-X or Kaleido-X16 multiviewer.
With a Kaleido-IP/Kaleido-X16 Cascade system, the Kaleido-IP provides some parts of the monitor wall image, sends it to the Kaleido-X16, which adds some more elements to the output and then sends the resulting output to the monitor wall. Unlike the cluster, whose purpose is to increase the number of output heads in a room, the hybrid cascade not only increases the maximum number of inputs that can be displayed to a single head but also allows you to display both IP sources and baseband sources to the same head.
To configure your Kaleido-IP and Kaleido-X16 multiviewers as a cascade system, you need to physically connect one Kaleido-IP output to a DVI input on the Kaleido-X16 multiviewer. Then connect a display to the appropriate output on the Kaleido-X16. Once you have defined your cascade system and room in XEdit, you will be able to operate the cascade as a single multiviewer.
Physical Installation
To interconnect the Kaleido-IP and the Kaleido-X16 multiviewers in a cascade room with a single output head, you will need a good-quality DisplayPort-to-DVI cable, as short as possible. For a cascade room with two output heads, then you will need two such cables.
1

Physical Installation
To interconnect a Kaleido-IP and a Kaleido-X16 into a cascade
1 Connect one of the Kaleido-IP’s DisplayPort outputs to a DVI input on the Kaleido-X16.
2In the case of a cascade room with two output heads, connect the second DisplayPort output on the Kaleido-IP to the second DVI input on the Kaleido-X16.
Note: Although nothing prevents you from connecting any DisplayPort output to any DVI input, the recommended practice is to choose the most logical signal path, by connecting DP1 to DVI IN 1, and DP2 to DVI IN 2. Configuring your cascade system in XEdit will then be straightforward.
3Connect the appropriate HDMI outputs on the Kaleido-X16 to one or two monitor wall displays, depending on the multiviewer model (dual or single) and on your specific purposes.
2
Kaleido-IP/Kaleido-X16 cascade
Step-by-Step Configuration
Cascade Configuration in XEdit
Adding Multiviewers to a Cascade
The Kaleido-X software’s support for cascade systems is based on the cluster feature. Therefore, like a cluster, a cascade system must meet the following requirements:
•The multiviewers you wish to add to a Kaleido-IP/Kaleido-X16 cascade must have Kaleido-X software version 6.40 or later, and both cascade members must have the same version of the software.
•Each multiviewer you wish to add to a cascade must have a unique name.
•Do not change the system name of a multiviewer or its IP address, once it has been added to a cascade, if the other multiviewer is offline or otherwise unavailable. This would cause all head assignments to become unknown. If you must rename a multiviewer, or change its IP address, while the other member of the cascade is unavailable, remove it from the cascade configuration first, and then add it again after you made the required change. You will then need to reconfigure the head assignments for any room that includes display screens associated with the renamed multiviewer (see Repairing a Cascade Configuration on page 5).
•A multiviewer can only be part of one cascade or cluster system at any time. XEdit will not let you add a multiviewer that is already included in a different cascade or cluster system.
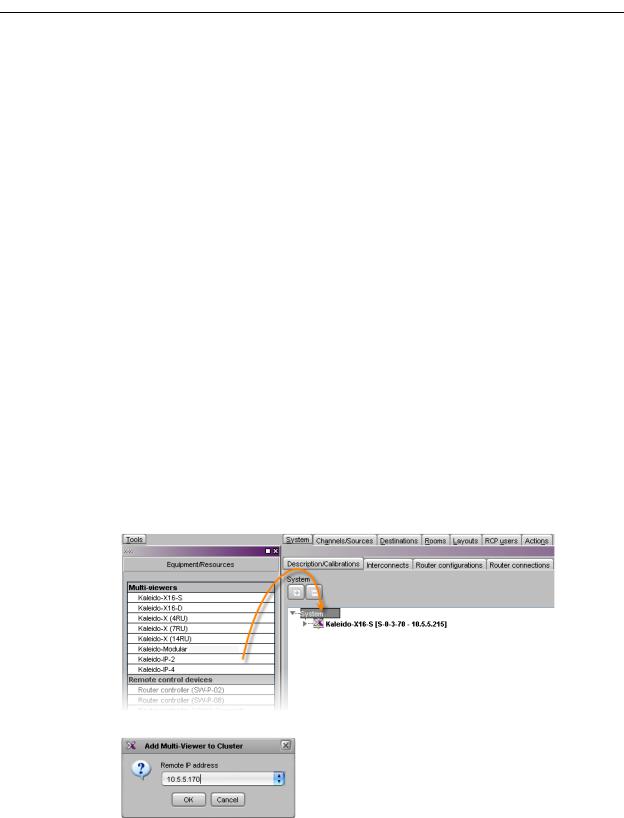
To add multiviewers to a cascade
1Open XEdit, and then click Connect on the Configure menu, to access the Kaleido-X16 (i.e. the multiviewer that will output directly to the monitor wall).
You can now create a cluster by adding the Kaleido-IP to your system configuration.
2In the equipment library, select any multiviewer type, and then drag it onto the root of the System hierarchical list.
The Add Multiviewer to Cluster window appears.
3
Loading...