


GB |
COOKER HOOD - User instructions |
SLO |
KUHINJSKA NAPA – Navodila za uporabo |
HR |
ISISNA NAPA – Upute za uporabu Pažljivo |
LV |
TVAIKU NOSŪCĒJS – Lietošanas instrukcija |
LT |
DŪMTRAUKIS – vartotojo instrukcijos |
UA |
BИTЯЖKA – Iнструкції з eкcплиуaтaції |
BG |
КУХНЕНСКИ АСПИРАТОР – Инструкция за употреба |
SK |
ODSÁVAČ PÁR - Návod na použitie |
SB |
ASPIRATOR - Uputstvo za upotrebu |
MK |
АСПИРАТОР - Упатство за употреба |

A B C
Fig.1
M
|
max 70 cm |
|
E |
|
M |
|
Fig.2 |
A |
B |
Fig.3
- 3 -

Fig.4 |
L |
 C
C 


Fig.6
Fig.8 |
A |
F |
b |
20 |
Fig.5 |
Fig.7 |
|
A |
|
B |
min 45 cm |
Fig.9 |
|
- 4 - |
|
K

Fig.10 |
Fig.12 |
K |
Fig.11 |
K |
C |
Fig.13 |
Fig.14
- 5 -

A |
B |
|
C |
D |
|||||
|
|
|
|
E |
|
|
|
|
|
|
|
|
|
|
|
|
|||
|
|
|
|
|
|
|
|
|
|
F
Fig.15
- 6 -

ENGLISH GB
GENERAL
Carefully read the following important information regarding installation safety and maintenance. Keep this information booklet accessible for further consultations.
The appliance has been designed for use in the ducting version (air exhaust to the outside – Fig.1B), filtering version (air circulation on the inside – Fig.1A) or with external motor (Fig.1C).
SAFETY PRECAUTION
1.Take care when the cooker hood is operating simultaneously with an open fireplace or burner that depend on the air in the environment and are supplied by other than electrical energy, as the cooker hood removes the air from the environment which a burner or fireplace need for combustion.The negative pressure in the environment must not exceed 4Pa (4x10⁻⁵ bar). Provide adequate ventilation in the environment for a safe operation of the cooker hood. Follow the local laws applicable for external air evacuation.
Before connecting the model to the electricity network:
-Control the data plate (positioned inside the appliance) to ascertain that the voltage and power correspond to the network and the socket is suitable. If in doubt ask a qualified electrician.
-If the power supply cable is damaged, it must be replaced with another cable or a special assembly, which may be obtained direct from the manufacturer or from the Technical Assistance Centre.
-This device must be connected to the supply network through either a plug fused 3A or hardwired to a 2 fase spur protected by 3A fuse.
2. Warning !
In certain circumstances electrical appliances may be a danger hazard.
A)Do not check the status of the filters while the cooker hood is operating
B)Do not touch bulbs or adjacent areas, during or straight after prolonged use of the lighting installation.
C)Flambè cooking is prohibited underneath the cooker hood
D)Avoid free flame, as it is damaging for the filters and a fire hazard
E)Constantly check food frying to avoid that the overheated oil may become a fire hazard
F)Disconnect the electrical plug prior to any maintenance.
G)This appliance is not intended for use by young children or infirm persons without supervision
H)Young children should be supervised to ensure they do not play with the appliance
I)There shall be adequate ventilation of the room when the rangehood is used at the same time as appliances burning gas or other fuels
L)There is a risk of fire if cleaning is not carried out in accordance with the instructions.
This appliance conforms to the European Directive EC/2002/96, Waste Electrical and Electronic Equipment (WEEE). By making
sure that this appliance is disposed of in a suitable manner, the user is helping to prevent potential damage to the environment or to public health.
The  symbol on the product or on the accompanying paperwork indicates that the appliance should not be treated as domestic waste, but should be delivered to a suitable electric and electronic appliance recycling collection point. Follow local guidelines when disposing of waste. For more information on the treatment, re-use and recycling of this product, please contact your local authority, domestic waste collection service or the shop where the appliance was purchased.
INSTALLATION INSTRUCTIONS
Assembly and electrical connections must be carried out by specialised personnel.
• Electric Connection Warning:
This is a class I, appliance and must therefore be connected to an effiecient earthing system.
The appliance must be connected to the electricity supply as follows:
BROWN = L live wire BLUE = N neutral
YELLOW / GREEN =  earth
earth
The neutral wire must be connected to the terminal with the N symbol while the YELLOW / GREEN, wire must be connected to the terminal by the earth symbol  .
.
Warning:
When connecting the appliance to the electricity supply, make sure that the mains socket has an earth connection.
After fi tting the ducted cooker hood, make sure that the electrical plug is in a position where it can be accessed easily.
If the appliance is connected directly to the electricity supply, an omnipolar switch with a minimum contact opening of 3 mm must be placed in between the two; its size must be suitable for the load required and it must comply with current legislation.
•If the hob is electric, gas, or induction, the minimum distance between the same and the lower part of the hood must be at least 45 cm.
If a connection tube composed of two parts is used, the upper part must be placed outside the lower part. Do not connect the cooker hood exhaust to the same conductor used to circulate hot air or for evacuating fumes from other appliances generated by other than an electrical source.
•In the case of assembly of the appliance in the suction version prepare the hole for evacuation of the air.
•We recommend the use of an air exhaust tube which has the same diameter as the air exhaust outlet hole. If a pipe with a smaller diameter is used, the efficiency of the product may be reduced and its operation may become noisier.
•Installation
Note: The appliance can be supplied with upper or back air outlet. This setting is pre-configured by the manufacturer, therefore it is not possible to change it during the installation
- 7 -

•Installation of models without decorative ducts Extractor hood
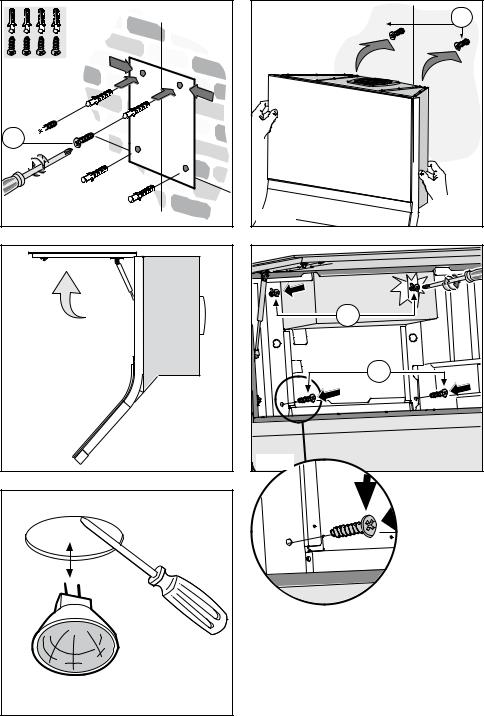
- Remove both grid E on the air outlet hole and lid M as shown in (Fig.2).
- Connect the hood to the flexible hose (not supplied) and the hose to the air exhaust hole previously prepared (Fig.3A/3B).
- Fix the lid once again.
•Optional accessories
This model may have decorative ducts as optional accessories - ask your retailer for information.
•Installation of models with decorative ducts
- Unclip the top cover
- Make sure the electrical power supply is within the measurements of the decorative connector.
- Unscrew and remove the four clips on the hood. Fig. 4
- Fix the bracket to the wall so that it is on the same axis as the hood using screws A (Fig.5) and resptecitng the distance from the duct piping shown in (Fig. 5 B).
- Connect flange C to the air exhaust hole using flexible hose
L (Fig.6).
- Position the chimneys on the hood as described in Fig.6 and fasten the parts using the (4) screws provided
- Pull out the top duct as far as the bracket and fix it using screws F (Fig.5).
•Filter hood
Please note:
The filters should be ordered as accessories from your retailer.
We offer 2 different types of kit which can be used to transform the EXTRACTOR hood into a FILTER hood, in accordance with the type of appliance model purchased. One kit contains extractable fi lters (Fig. 7) and the other contains circular filters (Fig. 8).
• Wall fixing
-Mark the position of the lower side of the hood on the wall (Fig.9A). Maintain the minimum distance required from the hob as shown in Fig.9B.
-Position the fixing template on the wall, making sure that the line coincides with the line previously made on the wall.
-Mark the fixing holes and cut them into the material (Fig.10).
-Fix the 2 top screws K and screw anchors (Fig.10), without tightening them completely.
-Hang the appliance to the wall on the two screws K
(Fig.11).
-Open the flap. (Fig.12)
-Fasten the two K screws completely and fix the hood in its final position with the screws C (Fig.13).
-Close the flap until it clicks into place and put the top cover back on.
-When carrying out the fixing operations, use only screws and screw anchors suited to the type of wall (e.g. reinforced concrete, plasterboard etc.).
-If the screws and screw anchors are supplied with the appliance, make sure that they are suited to the type of wall to which the hood must be fixed.
USE AND MAINTENANCE
• We recommend that the cooker hood is switched on before any food is cooked.
We also recommend that the appliance is left running for 15 minutes after the food is cooked, in order to thoroughly eliminate all contaminated air.
The effective performance of the cooker hood depends on constant maintenance; the anti-grease filter and the active carbon filter both require special attention.
•The anti-grease filter is used to trap any grease particles suspended in the air, therefore is subject to saturation (the time it takes for the filter to become saturated depends on the way in which the appliance is used).
-Topreventpotentialfirehazards,theanti-greasefiltersshould be washed a minimum of every 2 months (it is possible to use the dishwasher for this task).
- After a few washes, the colour of the filters may change. This does not mean they have to be replaced.
If the replacement and washing instructions are not followed, the anti-grease filters may present a fire hazard.
•The active carbon filters are used to purify the air which is released back into the room.
The filters are not washable or re-usable and must be replaced at least once every four months.
The active carbon filter saturation level depends on the frequency with which the appliance is used, the type of cooking performed and the regularity with which the anti-grease filters are cleaned.
•Clean the cooker hood frequently, both inside and outside, using a cloth which has been dampened with denatured alcohol or neutral, non-abrasive liquid detergents.
•The light on the cooker hood is designed for use during cooking and not for general room illumination.
Extended use of the light reduces the average duration of the bulb.
•Replacing halogen light bulbs (Fig. 14).
In order to replace the dichroic lamps, carefully remove the lamp from the lamp holder with the help of a small flat screwdriver or a similar tool. PLEASE NOTE! In doing this operation, please take care not to scratch the hood.
Replace the bulbs with new ones of the same type.
• Commands: (Fig.15)
NOTE: With this control it is possible to manage the appliance also with a remote control to be requested as accessory.
Power Button (A) = the on / off button switches on and off the whole hood (motor and lights).
By pressing the button the motor starts at 1st speed.
Fan Speed button (B) = From the OFF position, press once for the 1st speed, twice for the 2nd speed and three times for the 3rd speed. In order to activate the intensive speed, press the button for 5 seconds regardless of the status of the hood. For each speed only the led indicating the set speed will turn on. The intensive speed is indicated by the flashing of the led indicating speed 3. The duration of the intensive speed is 10 minutes; after this time the hood goes back to the last set speed.
In order to remove the intensive speed press the power button and the hood will switch off, or press the Fan speed button and the speed goes back to the previously set one. Speed of the hood with cyclic trend.
Light button (C)= There are three light levels: High, medium, low.
From the off position press once for the high level, twice for the medium level, three times for the low level and four times to turn the lights off.
- 8 -

The level of the lights has a cyclic trend: High, medium, low, off.
Timer button (D) = With any type of speed (excluding the intensive speed), by pressing the button, the timer function is activated for 15 minutes. After this time has elapsed the hood will turn off (motor and any light on).
Lights indicator (E) =The lights indicator will switch on when the lights are on at any level.
Filters indicator (F) = After 30 minutes of operation, the led of the filters indicator will switch on, not flashing indicating that the anti-grease filters have to be washed. To reset the function (with the hood off ), press the Fan speed button for 5 seconds. After this operation, the led of the filters indicator turns off and the setting of the 30 hours starts again from the beginning.
After 120 hours the led will flash continuously. This means that the carbon filters have to be replaced (if present). To reset the function (with hood off ) press the Fan speed button for 5 seconds. After this operation, the led of the indicator turns off and the setting starts again from the beginning
Clean air indicator (8).
With the hood off, press the Power button (1) for 5 seconds to activate the clean air function. This will switch on the motor at speed 1 for 10 minutes every hour. The light indicator will switch on without flashing and the led of the 1st speed will switch on. In the remaining 50 minutes the light indicator will flash. The function can be deactivated by pressing any button except for the lights one.
THE MANUFACTURER DECLINES ALL RESPONSIBILITY FOR EVENTUAL DAMAGES CAUSED BY BREACHING THE ABOVE WARNINGS.
SLOVENŠČINA SLO
SPLOŠNO
Pozorno preberite ta navodila, ker vsebujejo pomembne informacije o varnosti pri namestitvi, uporabi in vzdrževanju. Navodila shranite, da jih boste lahko ponovno prebrali, če bo potrebno. Naprava je narejena tako, da zrak izsesava (izsesavanje zraka v zunanjost – Slika 1B), filtrira (ponovno kroženje zraka – Slika 1A) ali ima zunanji motor (Slika 1C).
VARNOSTNA OPOZORILA
1. Bodite previdni, če hkrati delujeta kuhinjska napa in gorilnik ali ognjišče, ki sta odvisna od zraka v prostoru in se napajata iz energije, ki ni električna, ker napa med izsesavanjem jemlje prostoru zrak, ki ga gorilnik in ognjišče potrebujeta za gorenje. Negativni tlak v prostoru ne sme presegati 4 Pa (4x10⁻⁵ bar). Za varno delovanje kuhinjske nape mora biti prostor ustrezno prezračevan. Pri napah, ki izsesavajo zrak v zunanjost, morate upoštevati veljavne državne predpise.
Preden priključite model na električno omrežje:
- preglejte tablico s podatki (ki se nahaja v notranjosti naprave) in se prepričajte, da tlak in moč ustrezata omrežju in da je vtičnica prava. Če niste prepričani o njihovi ustreznosti, se
posvetujte z električarjem.
-Če je napajalni kabel poškodovan, ga morate zamenjati z novim ali s posebnim kablom, ki ga prodaja izdelovalec ali serviser.
-Napravo priključite na električni tok prek vtiča z varovalko 3A ali na dva dvofazna kabla, ki sta prav tako zaščitena z varovalko 3A.
2.Pozor!
Električne gospodinjske naprave so lahko v določenih okoliščinah nevarne.
A)Ne pregledujte filtrov, kadar je kuhinjska napa vključena
B)Če je osvetljava predolgo vključena, se ne dotikajte žarnic in mest ob njih, in sicer ne med njihovim gorenjem kakor tudi ne takoj po izklopu le-teh.
C)Pečenje hrane na plamenu pod napo je prepovedano
D)Preprečite prost plamen, ker lahko poškoduje filtre ali zaneti požar
E)Pri cvrtju bodite pozorni, da pregreto olje ne zagori
F)Preden začnete z vzdrževanjem, izključite kuhinjsko napo iz elektrike.
G)Naprava ni primerna za otroke ali osebe, ki potrebujejo oskrbo in nadzor.
H)Preverite, da se otroci ne igrajo z napravo.
I)Kadar napo uporabljate sočasno z drugimi napravami na plin ali drugačnimi gorivi, morate zagotoviti ustrezno zračenje prostora.
L)Če čiščenja nape ne opravite v skladu z navodili, obstaja tveganje požara.
Naprava je narejena v skladu z Direktivo 2002/96/ES o odpadni električni in elektronski opremi (WEEE). Da se preprečijo možni negativni vplivi na okolje in zdravje, je treba zagotoviti ustrezno odstranitev naprave.
Simbol  na napravi ali v priloženi dokumentaciji pomeni, da e tega izdelka ne sme odlagati kot gospodinjske odpadke, temveč ga je treba odpeljati na ustrezno deponijo odpadkov za reciklažo električnih in elektronskih naprav. Upoštevajte lokalne predpise o odlaganju odpadkov. Za dodatne informacije v zvezi z ravnanjem in reciklažo tega izdelka se obrnite na ustreznega lokalnega predstavnika, deponijo odpadkov ali prodajalca, pri katerem ste izdelek kupili.
NAVODILA ZA NAMESTITEV
Namestitev in električno priključitev lahko opravi le ustrezno usposobljeno osebje.
• Električna priključitev pozor:
Naprava spada v I. razred, zato mora biti ozemljena. Priključitev na električno omrežje je treba opraviti na naslednji način:
RJAVA = linija L MODRA = N nevtralna
RUMENA / ZELENA= ozemljitev
Kabel nevtralne barve se poveže na sponko z oznako N, RUMEN/ZELEN kabel pa na sponko poleg oznake za ozemljitev .
.
pozor:
Pri izvajanju električne priključitve preverite, da je vtičnica ozemljena. Po namestitvi nape preverite, da je vtičnica lahko dosegljiva. V primeru neposredne povezave na električno
- 9 -

mrežo je treba med napravo in mrežo namestiti večpolno stikalo, ki mora imeti med spoji najmanj 3 mm razmika, ustrezati mora napetosti in veljavnim predpisom.
•Med podporno površino gorilnih plošč na kuhalniku in najnižjim delom kuhinjske nape mora biti vsaj 45 cm razdalje. Če za povezavo uporabite dvo ali več delno spojno cev, mora biti zgornja cev nameščena na spodnjo. Ne povezujte odtočne cevi nape na cev, v kateri kroži topel zrak ali ki se uporablja za odtok dima naprav, ki se ne napajajo iz električne energije. Preden nadaljujete, snemite filter/protimaščobni filter (slika 6), da se omogoči lažja namestitev.
Če nameščate model za izsesavanje zraka, morate namestiti tudi cev za odtok zraka.
•Priporočena je uporaba cevi za odvajanje zraka istega premera, kot je odprtina za izhod zraka. Uporaba redukcijskega stikala lahko ovira učinkovitost naprave in poveča njeno glasnost.
•Namestitev
Opomba: Naprava je lahko opremljena z zgornjim ali spodnjim izhodom za zrak. To nastavitev opravi proizvajalec, zato je med namestitvijo ni mogoče spreminjati.
•Namestitev modelov brez estetskih dimnikov Model za izsesavanje zraka
- Odstranite rešetko E nad luknjo za izhod zraka in pokrov M, kot je prikazano (Sl.2).
- Povežite napo s prepogljivo cevjo (ni priložena), to pa z že narejeno luknjo za izsesavanje zraka (Sl.3A ali 3B).
- Ponovno pritrdite pokrov.
•Dodatna izbira
Temu modelu nape se lahko dodajo tudi estetski dimniki, ki jih dobite pri prodajalcu.
•Namestitev modelov z estetskimi dimniki
- Snemite pokrov.
- Napeljite električni napajalni kabel znotraj okrasnega spojnika.
- Odstranite štiri kline na napi, tako da odvijete vijake. Sl. 4 - Podporni element pritrdite na steno, tako da ga najprej poravnate z napo in ga zatesnite z vijakoma A (Sl. 5), pri čemer morate upoštevati označeno razdaljo od dimnika, kakor prikazuje Sl.5b.
- Preko upogljive cevi L povežite prirobnico C z odprtino za odvod zraka (Sl. 6).
- Postavite dimnike v ustrezen položaj v napi in jih pritrdite s štirimi vijaki. (Sl.6).
- Zgornji dimnik dvignite do klina in ga pritrdite z vijaki F
(Sl.5).
•Model s filtriranjem
Pozor!
Filtre je treba dodatno naročiti pri prodajalcu.
Če želite napo modela za IZSESAVANJE spremeniti v model za FILTRIRANJE ZRAKA, obstaja dvoje filtrov, pravokotni (Sl.7) in okrogli (Sl.8).
• Pritrditev na steno
-Označite spodnjo stranico nape na steno Sl.9A (upoštevajte minimalno razdaljo od kuhinjske površine Sl.9B).
-Položite vzorec za pritrjevanje na steno; bodite previdni, da je poravnan z označeno črto.
-Označite točke in izvrtajte luknje (Sl.10).
-Pritrdite zgornja vijaka K, vendar ne do konca, in vstavite
vložka v luknji (Sl. 10).
-Napravo prislonite na steno in jo obesite na vijaka
K.(Sl.11).
-Odprite vratca. (Sl.12)
-Pritrdite vijaka K do konca, za tem pa še vijaka C (Sl.13).
-Ponovno zaprite vratca.
-Za različne pritrditve uporabite vijake in zidne vložke, ki ustrezajo tipu stene (npr. betonska stena, mavčna stena itd.).
-Če so vijaki in zidni vložki priloženi izdelku, se prepričajte, da ustrezajo tipu stene, na katero boste pritrdili kuhinjsko napo.
UPORABA IN VZDRŽEVANJE
•Priporočeno je, da napravo vključite, preden začnete s kuhanjem. Po končanem kuhanju pustite napravo vključeno še 15 minut, da se zagotovi popoln odtok slabega zraka.
Dobro delovanje nape je odvisno od pravilnega in rednega vzdrževanja; posebej bodite pozorni pri protimaščobnemu filtru in filtru z aktivnim ogljem.
•Protimaščobni filter je namenjen zaustavljanju mastnih delcev, ki se dvigajo v zrak, zato se lahko bolj ali manj hitro zamaši, kar je odvisno od uporabe naprave.
Akrilni filter je prislonjen na rešetko in ga je treba zamenjati, kadar napis, ki se vidi skozi rešetko, spremeni barvo, in kadar se črnilo razlije; nov filter je treba namestiti tako, da se napis vidi skozi rešetko z zunanje strani nape.
Če akrilni filtri nimajo napisov ali so kovinski oziroma iz aluminijaste plošče, jih je treba vsak drugi mesec oprati, da se prepreči nevarnost morebitnega požara:
- Snemite filter z rešetke in ga operite z raztopino vode in tekočega blagega detergenta, tako da se umazanija odpusti.
- Temeljito izperite z mlačno vodo in pustite, da se posuši. Filtre iz kovine in/ali aluminijaste plošče lahko operete tudi v pomivalnem stroju. Po nekaj pranjih se barva filtrov iz aluminija ali aluminijaste plošče lahko spremeni. V takšnem primeru reklamacija in zahteva novih filtrov nista upravičena.
Če se ne upoštevajo navodila o menjavi in pranju filtrov, lahko protimaščobni filtri zagorijo.
•Filtri z aktivnim ogljem se uporabljajo za prečiščevanje zraka, ki ponovno kroži v prostoru. Filtrov ne smete prati ali čistiti, temveč jih je treba zamenjati vsaj vsake štiri mesece. Zasičenost aktivnega oglja je odvisna od časa uporabe naprave, tipa kuhinje in od pogostosti čiščenja protimaščobnega filtra.
•Ventilator in ostale površine redno čistite s krpo, namočeno v denaturiran alkohol ali tekoč blag detergent, ki ne poškoduje površin.
•Osvetljava je namenjena uporabi med kuhanjem in ne za daljše osvetljevanje prostorov.V primeru daljšega osvetljevanja bi se povprečno trajanje žarnice znatno zmanjšalo.
•Zamenjava halogenskih žarnic (Sl. 14).
Preden zamenjate barvne žarnice, žarnico previdno snemite z okova s pomočjo majhnega ravnega izvijača ali temu podobnim pripomočkom. POZOR! Bodite previdni, da ne poškodujete nape.
Žarnice zamenjajte z novimi istega tipa.
• Ukazne tipke (Sl.15):
POZOR: Ukazne tipke omogočajo nadzor naprave tudi z daljinskim upravljalnikom, ki ga morate dodatno kupiti.
Tipka za vklop/izklop (A)= Tipka za vklop in izklop nape (motor in luči).
- 10 -
 Loading...