


English

User’s Manual English
FCC STATEMENT
This device complies with Part 15 of the FCC Rules. Operation is subject to the following two conditions:
(1)This device may not cause harmful interference, and
(2)This device must accept any interference received, including interference that may cause undesired operation
Note: This equipment has been tested and found to comply with the limits for Class B digital devices, pursuant to Part 15 of the FCC rules. These limits are designed to provide reasonable protection against harmful interference in a residential installation. This equipment generates, uses and can radiate radio frequency energy and, if not installed and used in accordance with the instructions, may cause harmful interference to radio communications. However, there is no guarantee that interference will not occur in a particular installation. If this equipment does cause harmful interference to radio or television reception, which can be determined by turning the equipment off and on, the user is encouraged to try to correct the interference by one or more of the following measures:
 Reorient or relocate the receiving antenna
 Increase the separation between the equipment and receiver
 Connect the equipment into an outlet on a circuit different from that to which the receiver is connected
 Consult the dealer or an experienced radio/TV technician for help
Use of shielded cable is required to comply with Class B limits in Subpart B of Part 15 of the FCC rules. Do not make any changes or modifications to the equipment unless otherwise specified in the manual. If such changes or modifications should be made, you could be required to stop operation of the equipment.
2
TRADEMARK INFORMATION
 Microsoft® and Windows® are U.S. registered trademarks of Microsoft Corporation.
 Pentium® is a registered trademark of Intel Corporation.
 Macintosh is a trademark of Apple Computer, Inc.
 SDTM and MMCTM are trademarks.
 Other names and products may be trademarks or registered trademarks of their respective owners.
READ THIS FIRST
Notice:
1.Product design and specifications are subject to change without notice. This includes primary product specifications, software, software drivers, and user’s manual. This User Manual is a general reference guide for the product.
2.The product and accessories that come with your camera may be different from those described in this manual. This is due to the fact that different retailers often specify slightly different product inclusions and accessories to suit their market requirements, customer demographics, and geographical preferences. Products very often vary between retailers especially with accessories such as batteries, chargers, AC adapters, memory cards, cables, carrying cases/pouches, and language support. Occasionally a retailer will specify a unique product color, appearance, and internal memory capacity. Contact your dealer for precise product definition and included accessories.
3.The manufacturer assumes no liability for any errors or discrepancies in this user’s manual.
4.For driver updates, refer to our website.
3

User’s Manual English
WARNINGS
 Do not use this camera if it is emitting smoke (or an unusual odor), if it becomes unusually hot to the touch, produces a peculiar noise, or exhibits any other abnormal conditions. Operating the camera in any of these circumstances may cause a fire or an electrical shock. Stop using the camera immediately, turn the camera off and remove the batteries. Contact your dealer or authorized service facility for repairs. Never attempt to repair this camera by yourself, as this may be dangerous.
 Do not expose the camera to moisture and make sure no water gets into the camera. Take particular care when using the camera under extreme weather conditions, such as rain or snow, or when operating the camera at the beach on near water. Avoid using this camera in places subject to extreme moisture. Do not use the camera if water has entered the camera. Turn the camera off and remove the batteries. Contact your dealer or authorized service facility. Do not continue to use the camera as this may cause a fire or an electrical shock.
 Do not use the camera if any foreign objects have entered the camera. Turn the camera off, and remove the batteries. Contact your dealer or authorized service facility. Do not continue to use the camera as this may cause a fire or an electrical shock.
 Do not place the camera in an unstable location such as on a wobbly table or sloping surface where the camera may fall or tip over and cause injury. If the camera has been dropped or damaged, turn the camera off and remove the batteries. Contact your dealer or authorized service facility. Do not continue to use the camera as this may cause a fire or an electrical shock.
 Do not insert or drop metallic or other foreign objects into the camera through access points. This may cause a fire or an electrical shock.
 Do not attempt to modify this camera. Do not remove the camera casing. This may cause a fire or an electrical shock. Internal inspection and repairs should only be carried out by an authorized service facility.
 Never operate this camera in any way while driving a vehicle. This may cause a traffic accident.
4

CAUTIONS
 Do not place this camera in a location affected by oil fumes or steam, such as near a cooking stove or humidifier. This may cause a fire or an electrical shock.
 Do not leave this camera in a location subject to extremely high temperatures, such as in a sealed vehicle or in direct sunlight. Exposure to high temperatures may adversely affect the camera case and internal components and may cause a fire.
 Do not cover or wrap the camera with a cloth or quilt. This may cause heat to build up and distort the camera case and cause a fire. Always use the camera and accessories in wellventilated locations.
 Handle the camera carefully and do not expose the camera to shock or vibration. Handling the camera roughly may cause a malfunction.
 Do not use batteries other than those specified for use with your camera. Use of unsuitable batteries may result in the batteries splitting, or leaking and may cause a fire, injury, or soiling of the battery compartment.
 When placing the batteries into the camera, check the polarity markings on the batteries ( - and + ) to ensure that the batteries are inserted correctly. Incorrect battery polarity will result in camera inoperability and may result in the batteries splitting or leaking and causing a fire, injury, or soiling of the battery compartment.
 Remove the batteries if the camera will not be used for an extended period of time. The batteries may leak and cause a fire, injury or soiling of the battery compartment. If the batteries leak, clean and wipe the battery compartment carefully and install new batteries. Wash your hands carefully if you touch the battery fluid.
5

User’s Manual English |
|
Table of Contents |
|
Introduction........................................................................................ |
08 |
Package Contents |
|
Getting to Know the Camera................................................................ |
09 |
Front View |
|
Top View |
|
Rear View |
|
Bottom View |
|
Side View |
|
Image LCD Display Icons |
|
Input/Output Connectors |
|
Getting Started.................................................................................... |
11 |
Power - Inserting Batteries |
|
Using an AC Power Adapter |
|
Using a Memory Card |
|
Setting the Date and Time |
|
Attaching the Hand Strap |
|
Basic Operations................................................................................. |
13 |
Recording a Still Image |
|
Recording a Video Clip |
|
Viewing Still Image/ Video Clip |
|
On Image LCD Display |
|
On a TV Monitor |
|
Erasing Still Image/ Video Clip |
|
Erase One |
|
Erase All |
|
Setting Image Resolution and Quality |
|
Flash |
|
Digital zoom |
|
Self-Timer |
|
Slideshow Display |
|
Displaying Thumbnail Images |
|
Viewing Image Information |
|
Camera Menus.................................................................................... |
20 |
Record Menu
Setup
Image Size
Quality
EV Compensation
White Balance
6

Quick View
Movie Menu
Setup
White Balance
EV Compensation
Play Menu
Setup
Slide Show
Erase
Copy To Card
DPOF
Setup Menu
Factory Setup
Date/Time
Language
Sound
Format Media
Video Mode
USB Configuration
Auto Power Off
Light Frequency
Transferring Recorded Images to Your Computer................................ |
28 |
System Requirements for Computer
Step 1: Installing the USB Driver
Step 2: Connecting the Camera to Your Computer
Step 3: Downloading Images/Video Clips
Using the Camera as a PC Camera....................................................... |
30 |
System Requirements for Videoconferencing Step 1: Installing the PC camera driver
Step 2: Connecting the Camera to Your Computer
Step 3: Running Software Application (for example: Windows Netmeeting)
Specifications...................................................................................... |
32 |
7
User’s Manual English
Introduction
Thank you for the purchase of the digital camera. With the camera, you will live a whole new camera experience and make photo shooting more interesting and fun. Here below we will guide you through the whole picture taking process, please keep this manual on hand and enjoy your time.
Package Contents
Carefully unpack your camera and ensure that you have the following items:
Common Product Components:
Digital camera
USB cable
Video cable
Software CD-ROM
User’s manual
Camera strap
Common (Optional) Accessories:
Memory card
Camera pouch
AC power adapter
Batteries
Accessories and components vary by retailer.
8

Getting to Know the Camera
Front View
1. Viewfinder window
2.Lens
3.Self-timer indicator
4. Built-in flash
Top View
1. Shutter button
2. Hand strap holder
Rear View
1.  Power button
2.  Menu button
3.  Arrow button (up)
Self-timer button
4.  Arrow button (down)
 Flash button 5.
  OK button
Digital zoom button Thumbnail button
6.
 Mode button
7.Image LCD display
8.Viewfinder
9.LED indicator
1
Bottom View
1. Tripod socket
Side View
1. |
Battery/Card cover |
|
2. |
Terminal cover |
1 |
|
|
2 |
9
User’s Manual English
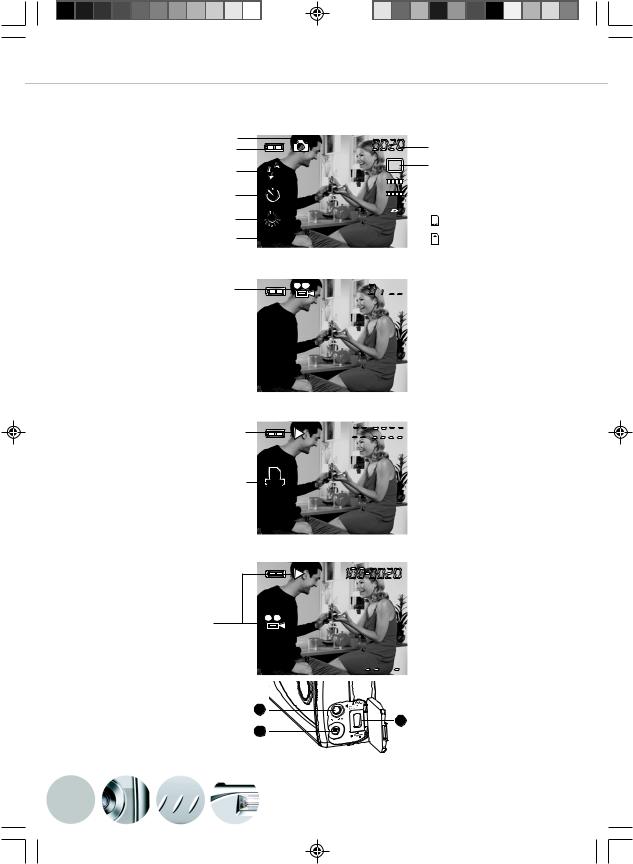
Image LCD Display Icons
Display icons-Still Image Record Mode:
Recording mode |
|
|
Remaining battery power |
|
|
Flash Mode |
|
|
Self-timer mode |
|
|
White balance |
|
|
(No indication: Auto) |
|
|
Exposure compensation setting |
+1.0ev |
|
(No indication: 0.0) |
||
|
||
Display IconsMovie Mode: |
|
|
Movie Mode |
|
Display IconsStill Image Playback Mode:
Playback Mode (Still image)
DPOF indicator
|
Possible number of shot |
L |
Image resolution |


 Image quality
 Card indicator
SD memory card
M Multi Media Card(MMC)
 :
:
 Possible recording time


 DCF Directory-file number
Display iconsVideo(movie) Playback Mode:
Playback Mode (Video clip)


 :
: 


Input/Output Connectors |
|
|
1.USB connector |
2 |
|
2.Video output connector |
||
1 |
||
|
||
3.AC adapter connector |
3 |
10
 Loading...