


Ranges
Free-Standing Electric
www.GEAppliances.ca
Safety Instructions . . . . . . . . . . . . . . . . . . . . . . . . . . . .2–5
Operating Instructions
Kitchen Timer . . . . . . . . . . . . . . . . . . . . . . . . . . . . . . . . . . . . . . . . . .18 Oven . . . . . . . . . . . . . . . . . . . . . . . . . . . . . . . . . . . . . . . . . . . . . . .13–30 Adjust Oven Thermostat . . . . . . . . . . . . . . . . . . . . . . . . . . . . . .19 Baking or Roasting . . . . . . . . . . . . . . . . . . . . . . . . . . . . . . . . . . . .14 Broiling, Broiling Guide . . . . . . . . . . . . . . . . . . . . . . . . . . . . . . . .15 Controls . . . . . . . . . . . . . . . . . . . . . . . . . . . . . . . . . . . . . . . . . . .11, 12 Convection Oven . . . . . . . . . . . . . . . . . . . . . . . . . . . . . . . . . .20–23 Lower Oven Drawer . . . . . . . . . . . . . . . . . . . . . . . . . . . . . . . . . . .30
Preheating . . . . . . . . . . . . . . . . . . . . . . . . . . . . . . . . . . . . . . . . . . . .14 Probe . . . . . . . . . . . . . . . . . . . . . . . . . . . . . . . . . . . . . . . . . . . . . . . . .17 Sabbath Feature . . . . . . . . . . . . . . . . . . . . . . . . . . . . . . . . . . . . . .28 Self-Cleaning . . . . . . . . . . . . . . . . . . . . . . . . . . . . . . . . . . . . . .24, 25 Special Features . . . . . . . . . . . . . . . . . . . . . . . . . . . . . . . . . .26–27 Timed Baking and Roasting . . . . . . . . . . . . . . . . . . . . . . . . . . .16 Warming Drawer . . . . . . . . . . . . . . . . . . . . . . . . . . . . . . . . . . . . .29 Surface Units . . . . . . . . . . . . . . . . . . . . . . . . . . . . . . . . . . . . . . . . 6–10 Cookware . . . . . . . . . . . . . . . . . . . . . . . . . . . . . . . . . . . . . . . . . . . . . .7
Knob-Controlled Models . . . . . . . . . . . . . . . . . . . . . . . . . . . .9–10
Care and Cleaning
Glass Cooktop . . . . . . . . . . . . . . . . . . . . . . . . . . . . . . . . . . . . . 36, 37 Lift-Off Oven Door . . . . . . . . . . . . . . . . . . . . . . . . . . . . . . . . . . . . .32 Light . . . . . . . . . . . . . . . . . . . . . . . . . . . . . . . . . . . . . . . . . . . . . . . . . . .35 Racks . . . . . . . . . . . . . . . . . . . . . . . . . . . . . . . . . . . . . . . . . . . . . . . . . . 33 Removable Warming Drawer/Lower Oven Drawer Pan . . . . . 34 Storage Drawer . . . . . . . . . . . . . . . . . . . . . . . . . . . . . . . . . . . . . . . . 34 Surfaces . . . . . . . . . . . . . . . . . . . . . . . . . . . . . . . . . . . . . . . . . . . . . . . 31
Troubleshooting Tips . . . . . . . . . . . . . . . . . . . . . . . . . 38–42 Accessories . . . . . . . . . . . . . . . . . . . . . . . . . . . . . . . . . . . . . . . . . 44
Consumer Support
Consumer Support . . . . . . . . . . . . . . . . . . . . . . . . . . . . . . . . . . . . 45 Ownership Registration . . . . . . . . . . . . . . . . . . . . . . . . . . . . . . . 46 Warranty . . . . . . . . . . . . . . . . . . . . . . . . . . . . . . . . . . . . . . . . . . . . . . 49
Write the model and serial numbers here:
Model # ________________
Serial # ________________
You can find them on a label behind the drawer or behind the lower oven door on the front of the range frame.
Owner’s Manual
PCB910
PCB940
PCB980
222D5749P016
Pub. No. 29-5918

Safety Instructions
Instructions
Operating
Consumer Support Troubleshooting Tips Care and Cleaning
IMPORTANT SAFETY INFORMATION.
READ ALL INSTRUCTIONS BEFORE USING.

 WARNING
Read all safety instructions before using the product. Failure to follow these instructions may result in fire, electric shock, serious injury or death.
ANTI-TIP DEVICE
To reduce the risk of tipping the range, the range must be secured by a properly installed anti-tip bracket. See installation instructions shipped with the bracket for complete details before attempting to install.
For Freestanding Ranges:
To check if the bracket is installed and engaged properly, remove the storage drawer or kick panel and look underneath the range to see that the leveling leg is engaged in the bracket. On models without a storage drawer or kick panel, carefully tip the range forward. The bracket should stop the range within 10.2 cm
(4 inches). If it does not, the bracket must be reinstalled. If the range is pulled from the wall for any reason, always repeat this procedure to verify the range is properly secured by the anti-tip bracket.
Never completely remove the leveling legs or the range will not be secured to the anti-tip device properly.
If you did not receive an anti-tip bracket with your purchase, call 1.800.561.3344 receive one at no cost. For installation
instructions of the bracket, visit. www.GEAppliances.ca
2

www.GEAppliances.ca

 WARNING GENERAL SAFETY INSTRUCTIONS
 Use this appliance for its intended purpose as described in this Owner’s Manual.
 Be sure your appliance is properly installed and grounded by a qualified installer in accordance with the provided installation instructions.
 Do not attempt to repair or replace any part of your range unless it is specifically recommended in this manual. All other servicing should be transferred to a qualified technician.
 Before performing any service, unplug the range or disconnect the power supply at the household distribution panel by removing the fuse or switching off the circuit breaker.
 Do not leave children alone³children should not be left alone or unattended in an area where an appliance is in use. They should never be allowed to climb, sit or stand on any part of the appliance.
 CAUTION: Do not store items of interest to children above a range or on the backguard of a range³children climbing on the range to reach items could be seriously injured.
 Use only dry pot holders³moist or damp pot holders on hot surfaces may result in burns from steam. Do not let pot holders touch hot surface units or heating elements. Do not use a towel or other bulky cloth in place of pot holders.
 Never use your appliance for warming or heating the room.
 Do not touch the surface units, the heating elements or the interior surface of the oven. These surfaces may be hot enough to burn even though they are dark in color.
During and after use, do not touch, or let clothing or other flammable materials contact the surface units, areas nearby the surface units or any interior area of the oven; allow sufficient time for cooling first. Other surfaces of the appliance may become hot enough to cause burns. Potentially hot surfaces include the cooktop, areas facing the cooktop, oven vent opening, surfaces near the opening and crevices around the oven door.
 Do not heat unopened food containers. Pressure could build up and the container could burst, causing an injury.
 Do not use aluminum foil to line the drip pans or anywhere in the oven, except as described in this manual. Misuse could result in damage to the range and shock or fire hazard.
 Avoid scratching or impacting glass doors, cooktops or control panels. Doing so may lead to glass breakage. Do not cook on a product with broken glass. Shock, fire or cuts may occur.
 Cook meat and poultry thoroughly³meat to at least an internal temperature of 71.1°C (160°F) and poultry to at least an internal temperature of 82.2°C (180°F). Cooking to these temperatures usually protects against foodborne illness.
 WARNING KEEP FLAMMABLE MATERIALS AWAY FROM THE RANGE.
 Do not store or use flammable materials in an oven or near the cooktop, including paper, plastic, pot holders, linens, wall coverings, curtains, drapes and gasoline or other flammable vapors and liquids.
 Never wear loose-fitting or hanging garments while using the appliance. These garments may ignite if they contact hot surfaces, causing severe burns.
 Do not let cooking grease or other flammable materials accumulate in or near the range. Grease in the oven or on the cooktop may ignite.
 Clean ventilating hoods frequently. Grease should not be allowed to accumulate on the hood or filter.
 WARNING IN THE EVENT OF A FIRE, TAKE THE FOLLOWING STEPS TO PREVENT THE FIRE FROM SPREADING:
 Do not use water on grease fires. Never pick up a flaming pan. Turn the controls off. Smother a flaming pan on
a surface unit by covering the pan completely with a well-fitting lid, cookie sheet or flat tray. Use a multi-purpose dry chemical or foam-type fire extinguisher.
 If there is a fire in the oven during baking, smother the fire by closing the oven door and turning the oven off or by using a multi-purpose dry chemical or foam-type fire extinguisher.
 If there is a fire in the oven during self-clean, turn the oven off and wait for the fire to go out. Do not force the door open. Introduction of fresh air at self-clean temperatures may lead to a burst of flame from the oven. Failure to follow this instruction may result in severe burns.
3
Operating
Support Consumer Tips Troubleshooting Cleaning and Care Instructions Operating Instructions Safety
Instructions

Safety Instructions
Instructions
Operating
Consumer Support Troubleshooting Tips Care and Cleaning
IMPORTANT SAFETY INFORMATION. READ ALL INSTRUCTIONS BEFORE USING.

 WARNING COOKTOP SAFETY INSTRUCTIONS
 Never leave the surface units unattended at medium or high heat settings. Boilovers cause smoking and greasy spillovers that may catch on fire.
 Never leave oil unattended while frying. If allowed to heat beyond its smoking point, oil may ignite, resulting in fire that may spread to surrounding cabinets. Use a deep fat thermometer whenever possible to monitor oil temperature.
 To avoid oil spillover and fire, use a minimum amount of oil when shallow pan-frying and avoid cooking frozen foods with excessive amounts of ice.
 Use proper pan size³select cookware having flat bottoms large enough to cover the surface heating element. The use of undersized cookware will
expose a portion of the surface unit to direct contact and may result in ignition of clothing. Proper relationship of cookware to surface unit will also improve efficiency.
 Only certain types of glass, glass/ceramic, earthenware or other glazed containers are suitable for cooktop service; others may break because of the sudden change in temperature.
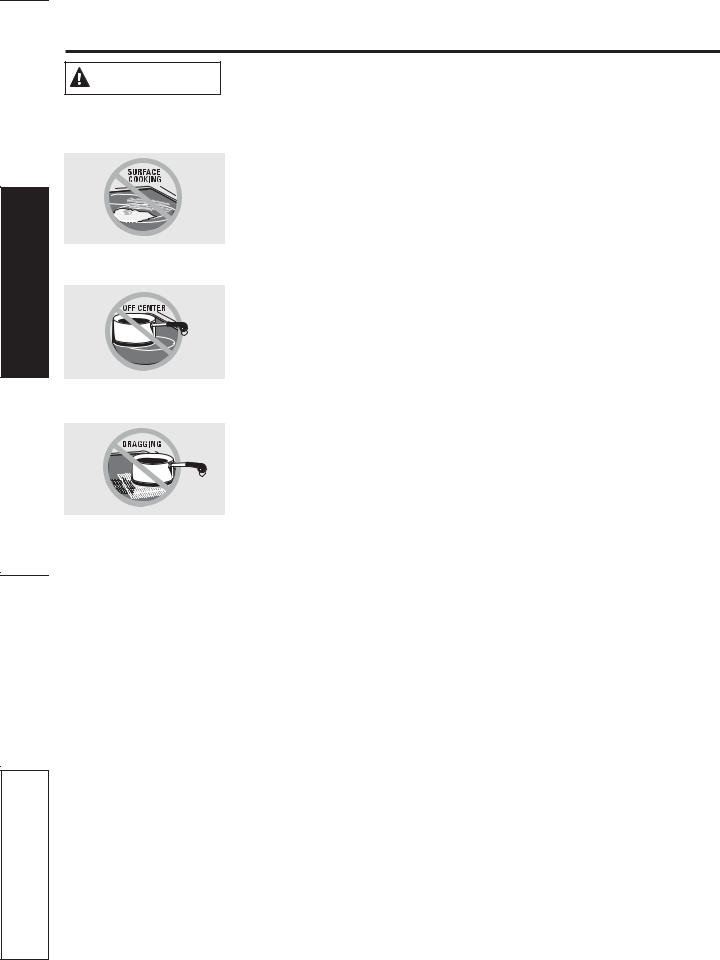
 To minimize the possibility of burns, ignition of flammable materials and spillage, the handle of a container should be turned toward the center of the range without extending over nearby surface units.
 When preparing flaming foods under a hood, turn the fan on.

 WARNING RADIANT COOKTOP SAFETY INSTRUCTIONS
 Use care when touching the cooktop. The glass surface of the cooktop will retain heat after the controls have been turned off.
 Do not cook on a broken cooktop. If glass cooktop should break, cleaning solutions and spillovers may penetrate the broken cooktop and create a risk of electric shock. Contact a qualified technician immediately.
 Avoid scratching the glass cooktop. The cooktop can be scratched with items such as knives, sharp instruments, rings or other jewelry and rivets on clothing.
 Do not place or store items that can melt or catch fire on the glass cooktop, even when it is not being used. If the cooktop is inadvertently turned on, they
may ignite. Heat from the cooktop or oven vent after it is turned off may cause them to ignite also.
 Use CERAMA BRYTE® ceramic Cooktop Cleaner and CERAMA BRYTE® Cleaning Pad to clean the cooktop. Wait until the cooktop cools and the indicator light goes out before cleaning. A wet sponge or cloth
on a hot surface can cause steam burns. Some cleaners can produce noxious fumes if applied to a hot surface. NOTE: Sugar spills are an exception.
They should be scraped off while still hot using an oven mitt and a scraper. See the Cleaning the glass
cooktop section for detailed instructions.
 Read and follow all instructions and warnings on the cleaning cream label.
4

www.GEAppliances.ca

 WARNING OVEN SAFETY INSTRUCTIONS
 Stand away from the range when opening the oven door. Hot air or steam which escapes can cause burns to hands, face and/or eyes.
 Keep the oven vent unobstructed.
 Keep the oven free from grease buildup. Grease in the oven may ignite.
 Place oven racks in desired location while oven is cool. If rack must be moved while oven is hot, do not let pot holder contact hot heating element in oven.
 When using cooking or roasting bags in the oven, follow the manufacturer’s directions.
 Pull the oven rack to the stop-lock position when loading and unloading food from the oven. This helps prevent burns from touching hot surfaces of the door and oven walls.
 Do not leave items such as paper, cooking utensils or food in the oven when not in use. Items stored in an oven can ignite.
 Do not use aluminum foil to line the oven bottom. Foil may trap or reflect heat, leading to a shock or fire hazard.

 WARNING SELF-CLEANING OVEN SAFETY INSTRUCTIONS
The self-cleaning feature operates the oven at temperatures high enough to burn away food soils in the oven. Follow these instructions for safe operation.
 Before operating the self-clean cycle, remove pans, shiny metal oven racks and other utensils from the oven. Only gray porcelain-coated oven racks may be left in the oven. Do not use self-clean to clean other parts, such as drip pans or bowls.
 Before operating the self-clean cycle, wipe grease and food soils from the oven. Excessive amount of grease may ignite, leading to smoke damage to your home.
 If the self-cleaning mode malfunctions, turn the oven off and disconnect the power supply. Have it serviced by a qualified technician.
 Do not clean the door gasket. The door gasket is essential for a good seal. Care should be taken not to rub, damage or move the gasket.
 Do not use oven cleaners. No commercial oven cleaner or oven liner protective coating of any kind should be used in or around any part of the oven.
 WARNING WARMING DRAWER/LOWER OVEN DRAWER SAFETY INSTRUCTIONS (some models)
 The purpose of the warming drawer is to hold hot cooked foods at serving temperature. Bacteria will grow in food while it is below 60°C (140°F). Do not put cold food in warming drawer. Do not heat food for more than 2 hours. Failure to follow these instructions may result in foodborne illness.
 Do not leave paper products, plastics, canned food or combustible materials in the drawer. They may ignite.
 Do not touch the heating element or the interior surface of the drawer. These surfaces may be hot enough to cause burns.
 Use care when opening the drawer. Open the drawer a crack and let hot air or steam escape before removing or replacing food. Hot air or steam that escapes can cause burns to hands, face and/or eyes.
 Do not use aluminum foil to line the warming drawer. Foil is an excellent heat insulator and will trap heat beneath it. This will upset the performance of the drawer and potentially cause a fire hazard.
5
Operating
Support Consumer Tips Troubleshooting Cleaning and Care Instructions Operating Instructions Safety
Instructions
Safety Instructions
Instructions
Operating
Consumer Support Troubleshooting Tips Care and Cleaning
For models with a glass cooktop.
FIRE HAZARD: Never leave the range unattended with the cooktop on medium WARNING or high settings. Keep flammable items away from the cooktop. Turn off all
controls when done cooking. Failure to follow these instructions can result in fire, serious injury or death.
NOTE: Throughout this manual, features and appearance may vary from your model.
Never cook directly on the glass. Always use cookware.
Always place the pan in the center of the surface unit you are cooking on.
Do not slide cookware across the control or cooktop surface because it can scratch the glass. The glass is scratch-resistant, not scratchproof.
About the radiant surface units
The radiant cooktop features heating units beneath a smooth glass surface.
Cooktop temperatures increase with the number of surface units that are on. With 3 or 4 units turned on, surface
temperatures are high. Always use caution when touching the cooktop.
An indicator light will come on when the surface unit is turned on.
The appropriate HOT SURFACE indicator light will glow when its corresponding radiant element is turned on and will remain on until the surface has cooled below 65.6°C (150°F).
NOTE:
Hot surface indicator light will:
 Stay on even after the unit is turned off.
 Glow brightly until the unit has cooled below 65.6°C (150°F).
NOTE: A slight odor is normal when a new cooktop is used for the first time. It is caused by the heating of new parts and insulating materials and will disappear in a short time.
NOTE: On models with light-colored glass cooktops, it is normal for the cooking zones to change color when hot or cooling down. This is temporary and will disappear as the glass cools to room temperature.
It is safe to place hot cookware from the oven or surface on the glass cooktop when the surface is cool.
Even after the surface units are turned off, the glass cooktop retains enough heat to continue cooking. To avoid overcooking, remove pans from the surface units when the food is cooked. Avoid placing anything on the surface unit until it has cooled completely.
 Water stains (mineral deposits) are removable using the cleaning cream or full strength white vinegar.
 Use of window cleaner may leave an iridescent film on the cooktop. The cleaning cream will remove this discoloration.
 Don’t store heavy items above the cooktop. If they drop onto the cooktop, they can cause damage.
 Do not use the surface as a cutting board.
6

Selecting types of cookware |
|
for glass cooktop models. |
www.GEAppliances.ca |
The following information will help you choose cookware which will give good performance on glass cooktops. See insert for cookware to use with induction cooktops.
Check pans for flat bottoms by using a straight edge.
Pans with rounded, curved, ridged or warped bottoms are not recommended.
Stainless Steel: recommended
Aluminum:
heavy weight recommended
Good conductivity. Aluminum residues sometimes appear as scratches on the cooktop but can be removed if cleaned immediately. Because of its low melting point, thin weight aluminum should not be used.
Copper Bottom: recommended
Copper may leave residues which can appear as scratches. The residues can be removed, as long as the cooktop is cleaned immediately. However, do not let these pots boil dry. Overheated metal can bond to glass cooktops. An overheated copper bottom pot will leave a residue that will permanently stain the cooktop
if not removed immediately.
Porcelain Enamel on Cast Iron: recommended if bottom of pan is coated
Porcelain Enamel on Steel: not recommended
Heating empty pans can cause permanent damage to cooktop glass. The enamel can melt and bond to the ceramic cooktop.
Glass-ceramic: not recommended
Poor performance. Will scratch the surface.
Stoneware: not recommended
Poor performance. May scratch the surface.
Cast Iron:
not recommended³unless designed specifically for glass cooktops
Poor conductivity and slow to absorb heat. Will scratch the cooktop surface.
NOTE: Follow all cookware manufacturer’s recommendations when using any type of cookware on the ceramic cooktop.
Do not place wet pans on the glass cooktop.
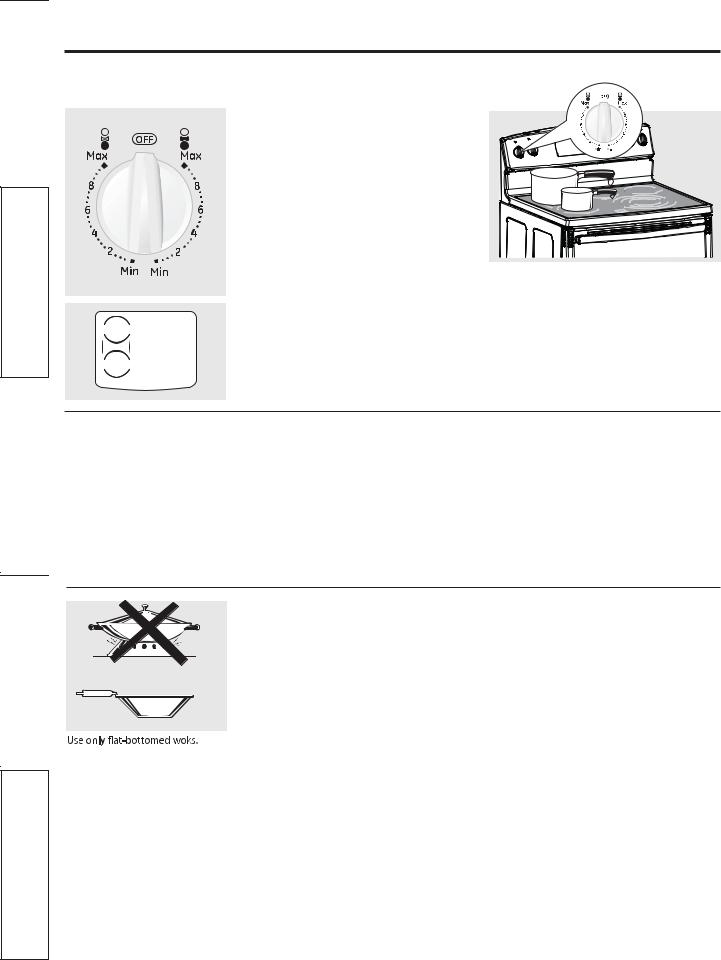
Do not use woks with support rings on the glass cooktop.
Use flat-bottomed woks on the glass cooktop.
For Best Results
 Place only dry pans on the surface elements. Do not place lids on the surface elements, particularly wet lids.
 Do not use woks that have support rings. This type of wok will not heat on glass surface elements.
 We recommend that you use only a flat-bottomed wok. They are available at your local retail store. The bottom of the wok should have the same diameter as the surface element
to ensure proper contact.
 Some special cooking procedures require specific cookware such as pressure cookers, deep-fat fryers, etc.
All cookware must have flat bottoms 7 and be the correct size.
Operating
Support Consumer Tips Troubleshooting Cleaning and Care Instructions Operating Instructions Safety
Instructions
Safety Instructions
Operating |
Instructions |
|
|
Consumer Support Troubleshooting Tips Care and Cleaning
|
|
|
|
FOOD POISON HAZARD: Bacteria may grow in food at temperatures below 60°C |
|
|
WARNING |
||
|
|
|
(140°F). |
|
|
|
|
|
• Always start with hot food. Do not use warm settings to heat cold food. |
|
|
|
||
|
|
|
|
• Do not warm food for more than 2 hours. |
|
|
|
|
Failure to follow these instructions may result in foodborne illness. |
|
|
|
|
|
|
|
|
|
Using the Warming Zone (on some models) |
|
|
|
|
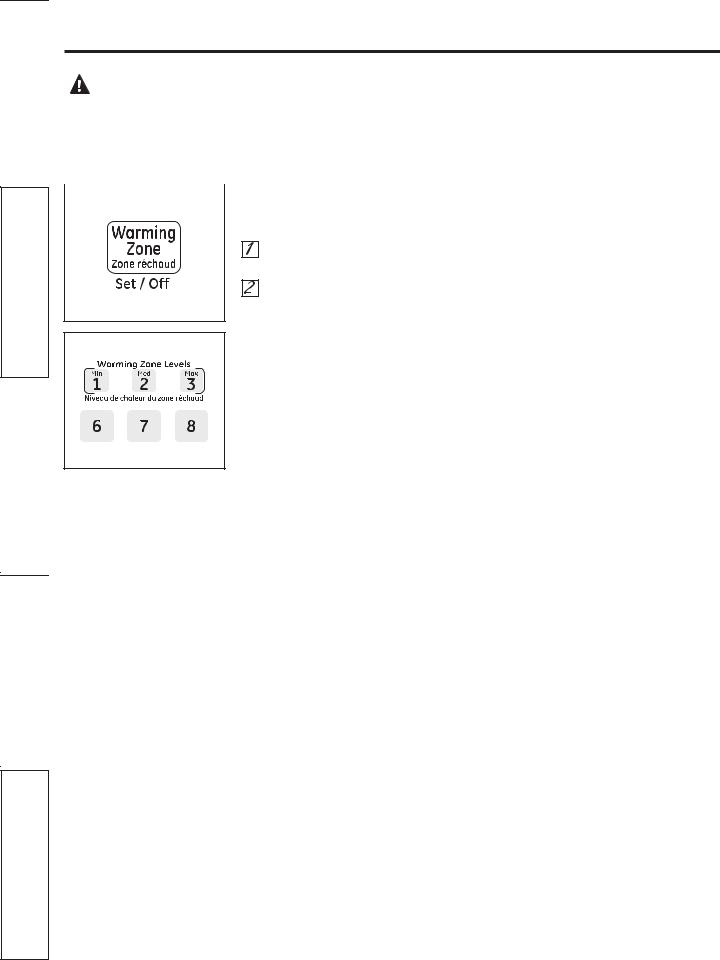
To use the WARMING ZONE:
Touch the WARMING ZONE SET/OFF pad.
Touch the 1 (LO), 2 (MED) or 3 (HI) pad to select the desired control setting. “WARMER ON” will be in the control display.
To turn off the WARMING ZONE:
Touch the WARMING ZONE SET/OFF pad.
NOTE: The CLEAR/OFF pad will not turn off the WARMING ZONE.
For best results, all foods on the WARMING ZONE should be covered with a lid or aluminum foil.
Always use pot holders or oven mitts when removing food from the WARMING ZONE, as cookware will be hot.
 Do not use plastic wrap to cover food. Plastic may melt onto the surface and be very difficult to clean.
 Use only cookware recommended for top-of-range cooking.
8
Using the surface units³Knob-controlled models. www.GEAppliances.ca
Throughout this manual, features and appearance may vary from your model.
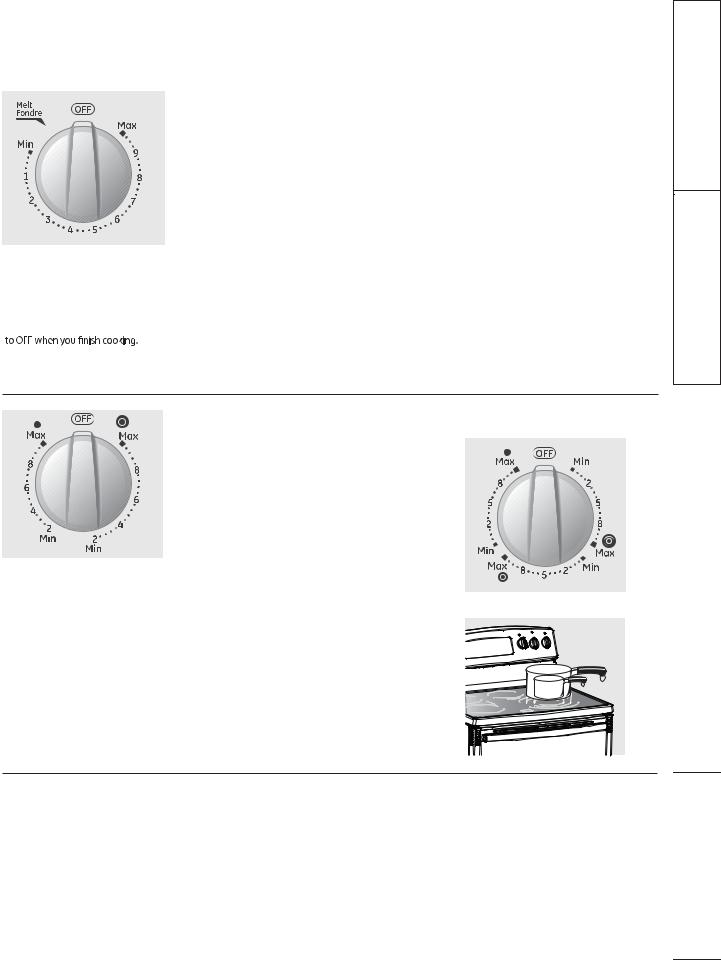
At both OFF and HI the control clicks into position. You may hear slight clickingsounds during cooking, indicating the control is maintaining your desired setting.
How to Set
Push the knob in and turn in either direction to the setting you want.
For glass cooktop surfaces:
A HOT COOKTOP indicator light,
on the cooktop, will glow when any radiant element is turned on. It will remain on until the surface is cooled to approximately 65.6°C (150°F).
Indicator light will:
 Come on when the unit is turned on or hot to the touch.
Be sure you turn the control knob |
|
Stay on even after the unit is turned off. |
|
||
|
|
Glow until the unit is cooled to |
|
|
|
|
|
approximately 65.6°C (150°F). |
Dual and Triple Surface Units and Control Knobs (on some models)
The surface unit has 2 or 3 cooking sizes to select from so you can match the size of the unit to the size of the cookware you are using.
On some models.
Models with a Triple Surface Unit only:
Temperature Limiter
Every radiant surface unit has a temperature limiter.
The temperature limiter protects the glass cooktop from getting too hot. It is normal for it to cycle when the cooktop is in use.
The temperature limiter may cycle the units off more frequently for a time if:
 The pan boils dry.
 The pan bottom is not flat.
 The pan is off-center.
  There is no pan on the unit.
9
Instructions Safety
Instructions |
Operating |
|
|
Support Consumer Tips Troubleshooting Cleaning and Care
Safety Instructions
Operating |
Instructions |
|
|
Consumer Support Troubleshooting Tips Care and Cleaning
Throughout this manual, features and appearance may vary from your model.
Models with a Bridge Burner only: |
Using the Bridge Burner (on some models) |
|
|
|
To use the bridge burner, turn the left-front |
|
control knob to the BRIDGE BURNER |
|
settings. |
|
For full bridge surface unit operation, |
|
also turn on the left-rear surface unit. |
|
To use only the front surface unit, turn |
|
the control knob to the FRONT BURNER |
|
settings. |
Home Canning Tips
Be sure the canner is centered over the surface unit.
Make sure the canner is flat on the bottom.
To prevent burns from steam or heat, use caution when canning.
Use recipes and procedures from reputable sources. These are available from manufacturers such as Ball® and Kerr®
Flat-bottomed canners are recommended. Use of water bath canners with rippled bottoms may extend the time required
to bring the water to a boil.
Wok Cooking
We recommend that you use only |
Do not use round-bottom woks. You could |
a flat-bottomed wok. They are available |
be seriously burned if the wok tipped over. |
at your local retail store. |
|
Do not use woks that have support rings. |
|
10

Using the oven controls. |
www.GEAppliances.ca |
Throughout this manual, features and appearance may vary from your model. See the control panel below that matches your model.
BROIL HI/LO Pad
Touch the BROIL HI/LO pad once for HI Broil.
To change to LO Broil, touch the BROIL HI/LO pad again. Touch the START pad.
When broiling is finished, touch the CLEAR/OFF pad.
BAKE Pad
Touch the BAKE pad.
Touch the number pads to set the desired oven temperature. Touch the START pad.
When baking is finished, touch the CLEAR/OFF pad.
CONVECTION COOK Pad
Touch the CONVECTION BAKE, or CONVECTION ROAST pad. Touch the number pads to set the desired oven temperature. Touch the START pad.
When cooking is finished, touch the CLEAR/OFF pad.
PROBE Pad
Touch when using the probe to cook food. See the Using the Probe section.
SELF CLEAN Pad
Touch to self-clean the oven.
See the Using the Self-Cleaning section.
OFF Pad
Touch to cancel ALL oven operations except the clock and timer.
11
Instructions Safety
Instructions |
Operating |
|
|
Support Consumer Tips Troubleshooting Cleaning and Care

Safety Instructions
Operating |
Instructions |
|
|
Consumer Support Troubleshooting Tips Care and Cleaning
START Pad
Must be touched to start any cooking or cleaning function.
OVEN LIGHT Pad
Touch to turn the oven lights on or off.
TIMER ON/OFF Pad
Touch to set the kitchen timer.
See the Using the Kitchen Timer section.
COOK TIME
Touch this pad and then touch the number pads to set the amount of time you want your food to cook. The oven will shut off when the cooking time has run out.
START TIME Pad
Use along with the COOK TIME or SELF CLEANpads to set the oven to start and stop automatically at a time you set.
CLOCK Pad
NOTE: When setting times, you are setting hours and minutes only. The lowest time you can set is one minute.
Touch the CLOCK pad. Touch the number pads. Touch the START pad.
The clock must be set to the correct time of day for the automatic oven timing functions to work properly. The time of day cannot be changed during a timed baking or self-cleaning cycle.
If your oven was set for a timed oven operation and a power outage occurred, the clock and all programmed functions must be reset. The time of day will flash in the
display when there has been a power outage.
12
CONTROL LOCKOUT Pad
Your control will allow you to lock out the touch pads and the cooktop so they cannot be activated when touched.
To lock the controls and cooktop:
Touch and hold the CONTROL LOCKOUT /RANGE LOCKOUT. pad for 3 seconds. The oven display will show “Loc on.”
To unlock the controls:
Touch and hold the CONTROL LOCKOUT /RANGE LOCKOUT. pad for 3 seconds. " The oven display will show " Off " ”
The CONTROL LOCKOUT mode affects all touch pads. No touch pads will work when this feature is activated.
WARMING DRAWER
The warming drawer will keep hot, cooked foods at serving temperature. Always start with hot food.
Touch the WARMING DRAWER pad. “WARMER ON” and “1” are lit on the display and “Set” begins to blink. On the number pads, touch 1 for Low, 2 for Medium or 3 for High. The display “1” changes corresponding to the number pad selected. The warming drawer starts automatically after you touch 1, 2 or 3. “WARMER ON” and the number remain lit. “Set” stops blinking.
On some models there are just.2 levels, 1 for Low and 2 for High. On some models, press START.
To cancel, touch the WARMING DRAWER pad.
NOTE: Touching the CLEAR/OFF pad does not turn off the warming drawer.
WARMING ZONE
Touch to keep hot, cooked food warm. See the Using the Warming Zone section.

Using the oven. |
www.GEAppliances.ca |
To avoid possible burns, place the racks in the desired position before you turn on the oven.
F
E
 D
D

 C
C
 B
B

 A
A

 R
R
The number of rack positions may vary by model.
T he oven has 6 rack positions.
It also has a special low rack position (R ) for extra large items, such as a large turkey.
Before you begin…
The racks have stops, so that when placed correctly on the supports, they will stop before coming completely out and will not tilt.
When placing and removing cookware, pull the rack out until it stops.
On some models, the bake heating element is under the oven floor. Do not place foods on the oven bottom for cooking.
To remove a rack, pull it toward you, tilt the front end up and pull it out.
To replace, place the end of the rack (stop-locks) on the support, tilt up the front and push the rack in.
 CAUTION
When you are using a rack in the lowest position (A), you will need to use caution when pulling the rack out. We recommend that you pull the rack out several inches and then, using two pot holders, pull the rack out by holding the sides of it. The rack is low and you could be burned if you place your hand in the middle of the rack and pull all the way out. Be very careful not to burn your hand on the door when using the rack in the lowest position (A).
Aluminum Foil
Do not use aluminum foil on the bottom |
A smaller sheet of foil may be used to |
of the oven. |
catch a spillover by placing it on a lower |
Never entirely cover a rack with aluminum |
rack several inches below the food. |
foil. This will disturb the heat circulation |
|
and result in poor baking. |
|
Extension Racks (on some models)
Extension racks have a frame that locks into the rack supports on both sides.
Once the frame is locked into place, always pull the rack out, by its upper front rail, to its full estension stop position, when placing or removing cookware. If extension racks are difficult to extend, lubricate the racks with the graphite lubricant provided with your
oven. Remove the rack from the oven, remove debris in the slide tracks with a paper towel, shake the graphite lubricant and place 4 small drops on the two bottom tracks of the left and right sides. Open and close the rack several times to distribute the lubricant.
To order additional graphite lubricant, read the Assistance and Accessories section at the beginning of this manual.
To Remove An Extension Rack;
1.Make sure the rack is pushed all the way into the oven.
2.Firmly holding onto both the upper and lower front rails, pull the rack toward you, tilt the front end up and pull the rack out.
To Replace An Extension Rack;
1.Place the curved end of the rack onto the rack supports.
2.Tilt the front of rack up and push the rack in.
If extension racks are difficult to replace or remove, wipe the oven rack supports with cooking oil. Do not wipe oil on the rack slides.
13
Instructions Safety
Instructions |
Operating |
|
|
Support Consumer Tips Troubleshooting Cleaning and Care

Safety Instructions |
Operating Instructions |
Care and Cleaning |
Troubleshooting Tips |
Consumer Support |
To avoid possible burns, place the racks in the desired position before you turn on the oven.
Do not place foods directly on the oven floor.
Preheating and Pan Placement
To avoid possible burns, place the racks in the desired position before you turn on the oven.
Preheat the oven if the recipe calls for it. Preheating is necessary for good results when baking cakes, cookies, pastries and breads.
If baking four cake layers at the same time, place two layers on rack C and two layers on rack E. Stagger pans on the rack so one is not directly above the other.
Baking results will be better if food is centered in the oven as much as possible. Angel food cake is the exception and should be placed on the bottom oven rack (position A). Follow package directions on prepackaged and frozen foods for pan placement. Pans should not touch each other or the walls of the oven. If you need to use two racks, stagger the pans so one is not directly above the other.
Leave approximately 3.8 cm (11ø2θ) between pans and from the front, back and sides of oven wall.
How to Set the Oven for Baking or Roasting
Touch the BAKE pad.
Touch the number pads until the desired temperature is displayed.
Touch the START pad.
The oven will start automatically.
When the oven reaches the selected temperature, the oven control will beep several times and the display will show the oven temperature.
NOTE: You will hear the convection fan (on some models) while the oven is
preheating. The fan will stop after the oven is preheated and the display shows your set temperature. This is normal.
To change the oven temperature during the BAKE cycle, touch the BAKE pad and then the number pads to get the new temperature.
Check food for doneness at the minimum time on the recipe. Cook longer if necessary.
Touch the CLEAR/OFF pad when baking is finished, and then remove the food from the oven.
14

Using the oven. |
www.GEAppliances.ca |
How to Set the Oven for Broiling
Door is not provided with broil position.
If your range is connected to 208 volts, rare steaks may be broiled by preheating the broiler and positioning the oven rack one position higher.
Use LO Broil to cook foods such as poultry or thick cuts of meat thoroughly without overbrowning them.
Place the meat or fish on a broiler grid in a broiler pan designed for broiling.
Follow suggested rack positions in the Broiling Guide.
Touch the BROIL HI/LO pad once for HI Broil.
To change to LO Broil, touch the BROIL HI/LO pad again.
Touch the START pad.
When broiling is finished, touch the CLEAR/OFF pad.
The size, weight, thickness, starting temperature
and your preference of doneness will affect
broiling times. This guide is based on meats at refrigerator temperature.
Broiling Guide
Preheat the broiler for 2 minutes to improve performance.
Food |
Doneness |
Type or |
Rack Position* |
Comments |
|
|
Thickness |
|
|
|
|
|
|
|
Beef |
Rare (60°C/140°F) |
Steaks - |
E or F (food should be |
Steaks less than 2.5 cm |
|
|
|
2.5 cm to 7.6 cm [1” to 3”] |
|
|
|
|
from broil element) |
to cook rare. They cook |
|
Medium |
Steaks –19 mm to |
E (food should be |
through before browning. |
|
(71.1°C /160°F) |
2.5 cm (3/4” to 1”) thick |
7.6 cm to 10.2 cm [3” to 4”) |
To prevent curling of |
|
|
|
thick from broil element) |
meat, slash fat at |
|
Well Done |
Steaks –19 mm to |
D or E (food should be |
2.5 cm (1”) intervals. |
|
(76.7°C/170°F) |
2.5 cm (3/4” to 1”) thick |
7.6 cm to 12.7 cm [3” to 5”] |
|
|
|
or Ground Beef Patties |
from broil element) |
|
Chicken |
|
Breast, boneless |
C (food should be |
|
|
|
|
20.3 cm to 22.9 cm [8” |
|
|
|
|
to 9”] from broil element) |
|
|
|
|
|
|
|
|
Breast, bone-in |
C (food should be |
|
|
|
|
17.8 cm to 20.3 cm [7” |
|
|
|
|
to 8”] from broil element) |
|
|
|
|
|
|
Fish Fillets |
|
13 mm to 2.5 cm |
D or E (food should be |
Handle and turn very |
|
|
(1/2” to 1”) thick |
7.6 cm to 15.2 cm [3” to 6”] |
carefully. |
|
|
|
from broil element) |
|
|
|
|
|
|
Pork Chops |
Well Done |
19 mm (3/4” to 1”) thick |
D (food should be |
To prevent curling |
|
(76.7°C / 170°F) |
|
15.2 cm to 17.8 cm [6” to 7”] |
of meat, slash fat at |
|
|
|
from broil element) |
2.5 cm (1”) intervals. |
|
|
|
|
|
*Use rack position A for the smaller, 2-rack-position oven.
15
Instructions Safety
Instructions |
Operating |
|
|
Support Consumer Tips Troubleshooting Cleaning and Care
 Loading...