


GE PCR06WATDSS, PCR06WATCSS, PCR06WATBSS, PCR06WATASS, PCR06BATGSS Owner’s Manual
...BEVERAGE CENTER & WINE CHILLER
SAFETY INFORMATION . . . . . . . . .3
USING THE APPLIANCE
Controls and Features: Beverage Center
Glass Shelves . . . . . . . . . . . . . . . . . . . . . . .5
Loading . . . . . . . . . . . . . . . . . . . . . . . . . . . .5
Temperature Control. . . . . . . . . . . . . . . . .5
Controls and Features: Wine Chiller
Wine Bottles. . . . . . . . . . . . . . . . . . . . . . . .6
Loading . . . . . . . . . . . . . . . . . . . . . . . . . . . .6
Temperature Control. . . . . . . . . . . . . . . . .6
Extension Drawers . . . . . . . . . . . . . . . . . . . . .7
Wood Drawer Fronts . . . . . . . . . . . . . . . . . . .7
Light . . . . . . . . . . . . . . . . . . . . . . . . . . . . . . . . .7
CARE AND CLEANING . . . . . . . . . . .8
INSTALLATION INSTRUCTIONS
Location . . . . . . . . . . . . . . . . . . . . . . . . . . . . . .9
Reversing Door Swing. . . . . . . . . . . . . . . . . 12
Leveling . . . . . . . . . . . . . . . . . . . . . . . . . . . . . 13
TROUBLESHOOTING TIPS. . . . . . 14
WARRANTY. . . . . . . . . . . . . . . . . . . . . . 17
CONSUMER SUPPORT . . . . . . . . . . 18
Write the model and serial numbers here:
Model #_________________
Serial # _________________
Find these numbers on a label on the ceiling inside the beverage center and wine chiller.
OWNER’S MANUAL &
INSTALLATION
INSTRUCTIONS
PCR06BATSS
PCR06WATSS
ENGLISH/FRANÇAIS/
ESPAÑOL
GE is a trademark of the General Electric Company. Manufactured under trademark license.
49-60466-4 12-17 GEA

THANK YOU FOR MAKING GE APPLIANCES A PART OF YOUR HOME.
Whether you grew up with GE Appliances, or this is your first, we’re happy to have you in the family.
We take pride in the craftsmanship, innovation and design that goes into every GE Appliances product, and we think you will too. Among other things, registration of your appliance ensures that we can deliver important product information and warranty details when you need them.
Register your GE appliance now online. Helpful websites and phone numbers are available in the Consumer Support section of this Owner’s Manual. You may also mail in the pre-printed registration card included in the packing material.
2 |
|
49-60466-4 |
IMPORTANT SAFETY INFORMATION READ ALL INSTRUCTIONS BEFORE USING
ATTENTION CONSUMER!
7KLV DSSOLDQFH LV GHVLJQHG IRU VWRULQJ DQG FRROLQJ EHYHUDJHV 'R QRW VWRUH SHULVKDEOH IRRGV LQ WKLV XQLW
WARNING To reduce the risk of fire, explosion, electric shock, or injury when using your refrigerator, follow these basic safety precautions:
Ŷ 7KLV UHIULJHUDWRU PXVW EH SURSHUO\ LQVWDOOHG and located in accordance with the Installation Instructions before it is used.
Ŷ 8QSOXJ WKH UHIULJHUDWRU EHIRUH PDNLQJ UHSDLUV replacing a light bulb, or cleaning.
NOTE: Power to the refrigerator cannot be disconnected by any setting on the control panel. NOTE: Repairs must be performed by a qualified Service Professional.
Ŷ 5HSODFH DOO SDUWV DQG SDQHOV EHIRUH RSHUDWLQJ
Ŷ 'R QRW VWRUH RU XVH JDVROLQH RU RWKHU IODPPDEOH vapors and liquids in the vicinity of this or any other appliance.
Ŷ 'R QRW VWRUH H[SORVLYH VXEVWDQFHV VXFK DV DHURVRO cans with a flammable propellant in this appliance.
Ŷ 'R QRW XVH DQ H[WHQVLRQ FRUG
Ŷ 7R SUHYHQW VXIIRFDWLRQ DQG HQWUDSPHQW KD]DUGV
WR FKLOGUHQ UHPRYH WKH IUHVK IRRG DQG IUHH]HU doors from any refrigerator before disposing of it or discontinuing its use.
Ŷ 7R DYRLG VHULRXV LQMXU\ RU GHDWK FKLOGUHQ VKRXOG QRW stand on, or play in or with the appliance.
Ŷ &KLOGUHQ DQG SHUVRQV ZLWK UHGXFHG SK\VLFDO VHQVRU\ or mental capabilities or lack of experience and knowledge can use this appliance only if they are supervised or have been given instructions on safe
XVH DQG XQGHUVWDQG WKH KD]DUGV LQYROYHG
Ŷ 7KLV DSSOLDQFH LV LQWHQGHG WR EH XVHG LQ KRXVHKROG and similar applications such as: staff kitchen areas
LQ VKRSV RIILFHV DQG RWKHU ZRUNLQJ HQYLURQPHQWV IDUP KRXVHV E\ FOLHQWV LQ KRWHOV PRWHOV EHG
EUHDNIDVW DQG RWKHU UHVLGHQWLDO HQYLURQPHQWV catering and similar non-retail applications.
|
To reduce the risk of injury when using your refrigerator, follow these basic safety |
||
CAUTION |
|||
precautions. |
|
||
Ŷ 'R QRW FOHDQ JODVV VKHOYHV RU FRYHUV ZLWK ZDUP |
Ŷ .HHS ILQJHUV RXW RI WKH ³SLQFK SRLQW´ DUHDV |
||
water when they are cold. Glass shelves and |
clearances between the doors and between the |
||
covers may break if exposed to sudden temperature |
doors and cabinet are necessarily small. Be careful |
||
changes or impact, such as bumping or dropping. |
closing doors when children are in the area. |
||
Tempered glass is designed to shatter into many |
Ŷ 7KLV XQLW LV GHVLJQHG IRU VWRULQJ DQG FRROLQJ |
||
small pieces if it breaks. |
EHYHUDJHV 'R QRW VWRUH SHULVKDEOH IRRGV LQ WKLV XQLW |
|
State of California Proposition 65 Warnings:
 WARNING This product contains one or more chemicals known to the State of California to cause cancer and birth defects or other reproductive harm.
INSTALLATION

 WARNING
 EXPLOSION HAZARD
.HHS IODPPDEOH PDWHULDOV DQG YDSRUV VXFK DV JDVROLQH DZD\ IURP UHIULJHUDWRU )DLOXUH WR GR VR FDQ UHVXOW LQ ILUH explosion, or death.
INFORMATION SAFETY
READ AND SAVE THESE INSTRUCTIONS
49-60466-4 |
3 |

SAFETY INFORMATION
IMPORTANT SAFETY INFORMATION READ ALL INSTRUCTIONS BEFORE USING
CONNECTING ELECTRICITY
WARNING |
|
Electrical Shock Hazard. |
'R QRW XVH DQ H[WHQVLRQ FRUG ZLWK WKLV DSSOLDQFH |
Plug into a grounded 3-prong outlet. |
|||
'R QRW UHPRYH WKH JURXQG SURQJ |
)DLOXUH WR IROORZ WKHVH LQVWUXFWLRQV FDQ UHVXOW LQ GHDWK |
||
'R QRW XVH DQ DGDSWHU |
fire, or electrical shock. |
||
Do not, under any circumstances, cut or remove the third (ground) prong from the power cord. For personal safety, this appliance must be properly grounded.
The power cord of this appliance is equipped with a 3-prong (grounding) plug which mates with a standard
SURQJ JURXQGLQJ ZDOO RXWOHW WR PLQLPL]H WKH SRVVLELOLW\ RI HOHFWULF VKRFN KD]DUG IURP WKLV DSSOLDQFH
Have the wall outlet and circuit checked by a qualified electrician to make sure the outlet is properly grounded.
If you have only a standard 2-prong wall outlet, it is your personal responsibility and obligation to have it replaced with a properly grounded 3-prong wall outlet.
NOTE: GFI (ground fault interrupter) is not recommended.
The appliance should always be plugged into its own individual electrical outlet which has a voltage rating that matches the rating plate.
This provides the best performance and also prevents overloading house wiring circuits which could cause a
ILUH KD]DUG IURP RYHUKHDWHG ZLUHV
Never unplug your appliance by pulling on the power cord. Always grip plug firmly and pull straight out from the outlet.
Immediately discontinue use of a damaged supply cord. If the supply cord is damaged, it must be replaced by a
TXDOLILHG VHUYLFH SURIHVVLRQDO ZLWK DQ DXWKRUL]HG VHUYLFH part from the manufacturer.
When moving the appliance away from the wall, be careful not to roll over or damage the power cord.
PROPER DISPOSAL OF THE BEVERAGE CENTER OR WINE CHILLER

 WARNING SUFFOCATION AND ENTRAPMENT HAZARD
)DLOXUH WR IROORZ WKHVH GLVSRVDO LQVWUXFWLRQV FDQ UHVXOW LQ GHDWK RU VHULRXV LQMXU\
IMPORTANT: Child entrapment and suffocation |
Before You Throw Away Your Old Appliance |
|
are not problems of the past. Junked or abandoned |
Ŷ Take off the door. |
|
UHIULJHUDWRUV RU IUHH]HUV DUH VWLOO GDQJHURXV HYHQ LI WKH\ |
Ŷ Leave the shelves in place so that children may not |
|
ZLOO VLW IRU ³MXVW D IHZ GD\V ´ ,I \RX DUH JHWWLQJ ULG RI \RXU |
easily climb inside. |
|
ROG UHIULJHUDWRU RU IUHH]HU SOHDVH IROORZ WKH LQVWUXFWLRQV |
||
|
||
below to help prevent accidents. |
|
Refrigerant and Foam Disposal:
'LVSRVH RI DSSOLDQFH LQ DFFRUGDQFH ZLWK )HGHUDO DQG /RFDO 5HJXODWLRQV )ODPPDEOH LQVXODWLRQ PDWHULDO XVHG requires special disposal procedures. Contact your local authorities for the environmentally safe disposal of your appliance.
READ AND SAVE THESE INSTRUCTIONS
4 |
49-60466-4 |

Controls and Features - Beverage Center
Temperature Control
The operating temperatures of the beverage center range from the low forties to the mid fifties. This appliance is not a refrigerator and does not maintain
WHPSHUDWXUHV OLNH D UHIULJHUDWRU EHORZ )
'R QRW LQVWDOO WKH EHYHUDJH FHQWHU ZKHUH WKH WHPSHUDWXUH ZLOO JR EHORZ ) & RU DERYH ) &
As with any refrigeration-type product, there is a slight temperature variance at different locations within the cabinet.
The coolest area will be in the lower part of the cabinet. The cooler area will be in the middle section.
The upper part of the cabinet is the warmest section.
When the temperature is adjusted, allow 24 hours for the
XQLW WR VWDELOL]H
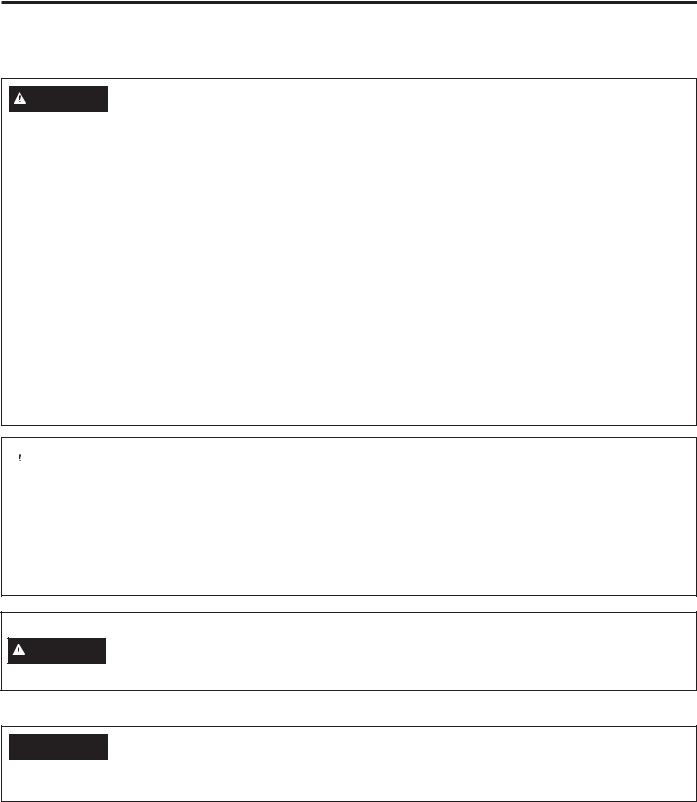
To set the control, turn it to the midpoint setting
DSSUR[LPDWHO\ ) 2QFH the beverage center is loaded, allow at least 24 hours before making any adjustments to the initial setting.
NOTES:
•This unit is designed for storing and cooling beverages. It is not intended for the storage of perishable foods.
•The lowest temperatures are found on the lower shelves/racks and toward the rear of the shelves/racks.
Glass Shelves
Tempered glass shelves in the beverage center unit are removable for easy cleaning or for storing larger items.
To remove a shelf, open the door completely to avoid potential damage to the gasket. Lift up on the back of the shelf slightly. Tilt the shelf to one side at an angle while
pulling forward. |
To remove, lift up on the |
Tilt the shelf at an angle |
|
back of the shelf |
while removing or replacing |
To replace a shelf, open the door completely to avoid |
|
|
potential damage to the gasket. Tilt the shelf to one side |
|
|
at an angle and slide toward the back wall, placing one |
|
|
side onto the shelf support. Place the other side onto |
|
|
the opposite shelf support. Ensure rear locking tabs are |
|
|
engaged. When installed properly, the shelf will not slide |
|
|
forward when gently pulled. |
|
|
Place in slots when replacing the shelf
Loading Tips and Suggestions
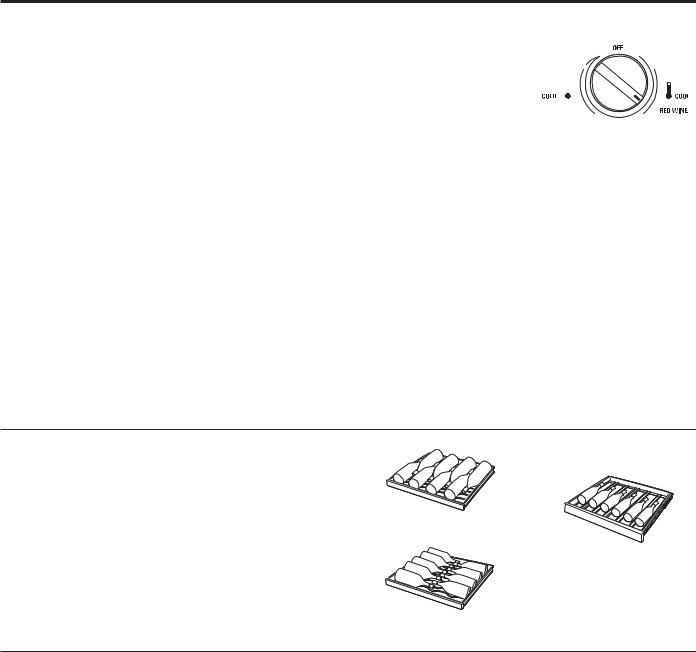
• The bottom two full extension drawers hold six bottles each and are loaded with necks facing the rear. Tall bottles should not be loaded on the bottom drawer because they may prevent the door from closing.
'R QRW DOORZ FKLOGUHQ WR FOLPE VWDQG RU KDQJ RQ WKH |
|
beverage center shelves or full extension drawers. |
|
They could seriously injure themselves and possibly |
Bottom drawer arrangement |
cause damage to the beverage center. |
|
&HQWHU%HYHUDJH)HDWXUHVDQG&RQWUROV APPLIANCE: THE USING
49-60466-4 |
5 |
USING THE APPLIANCE: &RQWUROVDQG)HDWXUHV:LQH&KLOOHU
Controls and Features - Wine Chiller
Temperature Control
The temperature range of the wine chiller is from the low forties to the mid sixties. This appliance is not a refrigerator and does not maintain temperatures like a
UHIULJHUDWRU EHORZ )
'R QRW LQVWDOO WKH ZLQH FKLOOHU ZKHUH WKH WHPSHUDWXUH ZLOO JR EHORZ ) & RU DERYH ) &
7KH 5(' :,1( VHWWLQJ ZLOO SURYLGH D WHPSHUDWXUH
RI DSSUR[LPDWHO\ ) & ZKLFK LV WKH RSWLPXP storage temperature for red wine.
The WHITE WINE setting will provide a temperature of
DSSUR[LPDWHO\ ) & ZKLFK LV WKH RSWLPXP VHUYLQJ temperature for white wine.
As with any refrigeration-type product, there is a slight temperature variance at different locations within the cabinet.
Temperatures at the bottom of the cabinet will be cooler than temperatures at the top of the cabinet.
Position your wine inventory accordingly (i.e. white wines
LQ WKH FRROHU ]RQHV DQG UHG LQ WKH ZDUPHU ]RQHV
To set the control, turn it
WR WKH 5(' :,1( VHWWLQJ
Once the bottles are loaded,
allow at least 24 hours before  making any adjustments to


 the initial setting.
NOTE: This unit is designed
for storing and cooling beverages. It is not intended for the storage of perishable foods.
Suggested storing and serving temperatures for wine
•If you plan to drink the wine in less than 2 months, use the appropriate red or white setting based on the wine type.
•If you plan to store the wine for more than 2 months, use the storing and serving guide below.
|
Red Wine |
White Wine |
Storing |
) & |
) & |
Serving |
Room Temperature |
|
|
) WR ) |
) WR ) |
|
(18°C to 22°C) |
& WR & |
Inserting Wine Bottles |
|
|
The top five full extension drawers each hold eight |
|
|
bottles, two deep with the necks alternating front to back |
|
|
or nine bottles, alternating with necks pointing inward. |
8 bottle arrangement |
|
The bottom two full extension drawers hold six bottles |
||
|
||
each and are loaded with necks facing the rear. Tall |
Bottom two drawers |
|
bottles should not be loaded on the bottom drawer |
||
|
||
because they may prevent the door from closing. |
|
|
|
ERWWOH DUUDQJHPHQW |
Loading Tips and Suggestions
•The bottles on the top full extension drawer, directly under the light, will be exposed to a slightly higher temperature when the light is on. Position your wines accordingly and remember to turn off the light when it is no longer needed.
.HHS ZLQHV WKDW \RX SODQ WR XVH IRU HYHU\GD\ GULQNLQJ and entertaining on the front half of the full extension drawers where labels are completely visible. Place wines for aging or longer term storage in the rear.
'R QRW DOORZ FKLOGUHQ WR FOLPE VWDQG RU KDQJ RQ the wine chiller full extension drawers. They could seriously injure themselves and possibly cause damage to the wine chiller.
6 |
49-60466-4 |
Controls and Features
Full Extension Drawers
All of the full extension drawers pull out so bottles can be conveniently added or removed.
Any of the full extension drawers can be removed to store larger bottles.
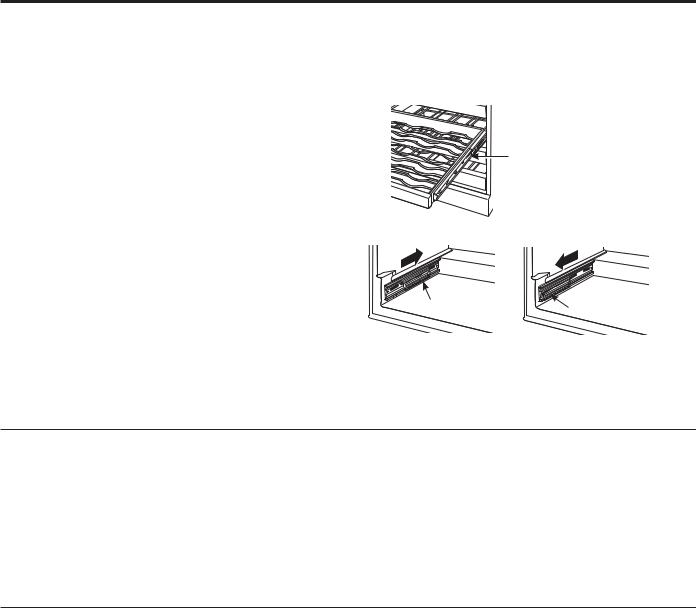
To remove:
1.Pull the full extension drawer out to the STOP position.
2.Push the tab on right drawer guide down while pulling the tab on left guide up, and pull the drawer out.
To replace:
1.Push the drawer slide arm back into the unit.
2.Pull the small slide sub-assembly completely forward.
3.Insert the sides of the drawer back into the guides.
4.Push until the tabs lock into place.
NOTE: Make sure the tabs on the full extension drawer guides are fully engaged before loading any bottles. Pull the drawers out all the way to the STOP position and push back in several times to make sure locking tabs are properly engaged.
Tab (push
tab down on
right drawer
guide, pull tab up on left drawer guide)
Sub-assembly |
Sub-assembly |
To replace, push drawer |
Pull small slide sub-assembly |
slide arm back into unit |
completely forward |
Wood Drawer Fronts
The full extension drawer fronts on the beverage center
DQG ZLQH FKLOOHU DUH XQILQLVKHG EHHFK ZRRG 'XULQJ XVH oil from hands may accumulate and stain the wood.
•The drawer fronts may be stained and sealed to match adjacent cabinetry. The tinted glass will make the stained wood appear darker. A true color match can be seen only when the door is opened.
•Apply the stain and sealer according to the manufacturer’s instructions. To avoid unpleasant odor, keep the door open to ventilate and allow the stain/ sealer to dry completely before using the product.
NOTE: Natural wood may vary slightly in grain and color.
Interior Light
The interior light makes it easy to view your wine and/ or beverage labels and enhances the display of your collection.
:KHQ WKH VZLWFK LV LQ WKH 2)) SRVLWLRQ WKH OLJKW FRPHV on only when the door is opened. When the switch is in the ON position, the light remains on continuously
IRU \RXU PD[LPXP YLHZLQJ SOHDVXUH )RU EHVW YLHZLQJ do not store a bottle on the top shelf directly under the light. Remember to turn off the light when it is no longer needed.
)HDWXUHVDQG&RQWUROV APPLIANCE: THE USING
49-60466-4 |
|
CARE AND CLEANING
Care and Cleaning
Cleaning the Outside

 WARNING
 Electrical Shock Hazard.
Unplug the beverage center or wine chiller before cleaning.
Keep the outside clean. The cabinet can be washed with mild soap and water. Rinse thoroughly with clean water. Never use abrasive scouring powders.
8VH D JODVV FOHDQHU RU PLOG VRDS DQG ZDWHU DQG D VRIW
FORWK WR FOHDQ WKH JODVV GRRU 'R QRW XVH DQ\ DEUDVLYH powders.
:LSH WKH FRQWUROV ZLWK D GDPS FORWK 'U\ WKRURXJKO\
'R QRW XVH FOHDQLQJ VSUD\V ODUJH DPRXQWV RI VRDS DQG water, abrasives or sharp objects on the panel—they can damage it. Some paper towels can also scratch the control panel.
'R QRW ZLSH WKH EHYHUDJH FHQWHU RU ZLQH FKLOOHU ZLWK D soiled dishcloth or towel. These may leave a residue
WKDW FDQ HURGH WKH SDLQW 'R QRW XVH VFRXULQJ SDGV powdered cleaners, bleach or cleaners containing bleach because these products can scratch and weaken the paint finish.
Stainless steel. The stainless steel doors and door handles (on some models) can be cleaned with
a commercially available stainless steel cleaner.
&OHDQHUV ZLWK R[DOLF DFLG VXFK DV %DU .HHSHUV )ULHQG
Soft Cleanser™ will remove rust, tarnish and small
EOHPLVKHV 8VH RQO\ D OLTXLG FOHDQVHU IUHH RI JULW DQG rub in the direction of the brush lines with a damp soft
VSRQJH 'R QRW XVH DSSOLDQFH ZD[ RU SROLVK RQ WKH stainless steel.
Cleaning the Inside
IMPORTANT: Unplug the beverage center or wine chiller before cleaning.
The vinyl door gasket may be cleaned with mild soap and water or a baking soda solution. Rinse well.
After cleaning the door gasket, apply a thin layer of paraffin wax or petroleum jelly to the door gasket at the hinge side. This helps keep the gasket from sticking and bending out of shape.
8VH D VOLJKWO\ GDPS FORWK RU VSRQJH ZKHQ FOHDQLQJ around switches, lights or controls.
8VH ZDUP ZDWHU DQG EDNLQJ VRGD VROXWLRQ DERXW D tablespoon (15 ml) of baking soda to a quart (1 liter)
RI ZDWHU 7KLV ERWK FOHDQV DQG QHXWUDOL]HV RGRUV
Thoroughly rinse and wipe dry.
Other parts of the beverage center or wine chiller unit—including the full extension drawers and glass shelves—can be cleaned the same way.
Do not use detergents, scouring powders, spray cleaners or other harsh chemicals to clean the interior.
 CAUTION 'R QRW FOHDQ JODVV VKHOYHV RU FRYHUV with warm water when they are cold. Glass shelves and covers may break if exposed to sudden temperature changes or impact, such as bumping or dropping. Tempered glass is designed to shatter into many small pieces if it breaks.
Drain Hole
Periodically check the drain hole and channel for any
debris. If the drain is blocked, condensation will not drain 'UDLQ KROH properly.
To check and clean the drain hole, remove the bottom two glass shelves or bottom two full extension drawers. Sweep a damp cloth along the channel in the back of the
EHYHUDJH FHQWHU 8VH D ILQJHU WR VZHHS DZD\ DQ\ GHEULV from the drain hole.
Light Bulb Replacement

 WARNING
 Electrical Shock Hazard.
Unplug the beverage center or wine chiller before replacing the light bulb.
To remove the light shield, push in the tab on the left side of the shield and lower it. Replace with a 15 watt
DSSOLDQFH EXOE RU ZDWW 8/ /LVWHG /(' /DPS RU FDOO
*( &$5(6 GXULQJ QRUPDO EXVLQHVV hours to order service part.
In the Event of a Power Failure
If the power fails, open the door as infrequently as possible to maintain the temperature.
8 |
49-60466-4 |
Installation |
Beverage Center |
Instructions |
and Wine Chiller |
|
|
Questions? Call 800.GE.CARES (800.432.2737) or Visit our Website at:
GEAppliances.com
BEFORE YOU BEGIN
Read these instructions completely and carefully.
• IMPORTANT – Save these instructions for local inspector’s use.
• IMPORTANT – Observe all governing codes and ordinances.
• Note to Installer – Be sure to leave these instructions with the Consumer.
• Note to Consumer – .HHS WKHVH
instructions for future reference.
• WARNING This appliance must be properly
JURXQGHG 6HH ³(OHFWULFDO 6XSSO\ ´
•If you received a damaged beverage center or wine chiller, you should immediately contact your dealer or builder.
•Skill Level – Installation requires basic mechanical skills. Proper installation is the responsibility of the installer. Product failure due to improper installation is not covered under the GE Appliance Warranty.
PRODUCT CLEARANCES
The beverage center and wine chiller is factory set
IRU D GRRU VZLQJ
When installed in a corner:
•Allow 4" min. clearance on the hinge side for the
GRRU VZLQJ DQG WR DOORZ UDFNV WR VOLGH RXW
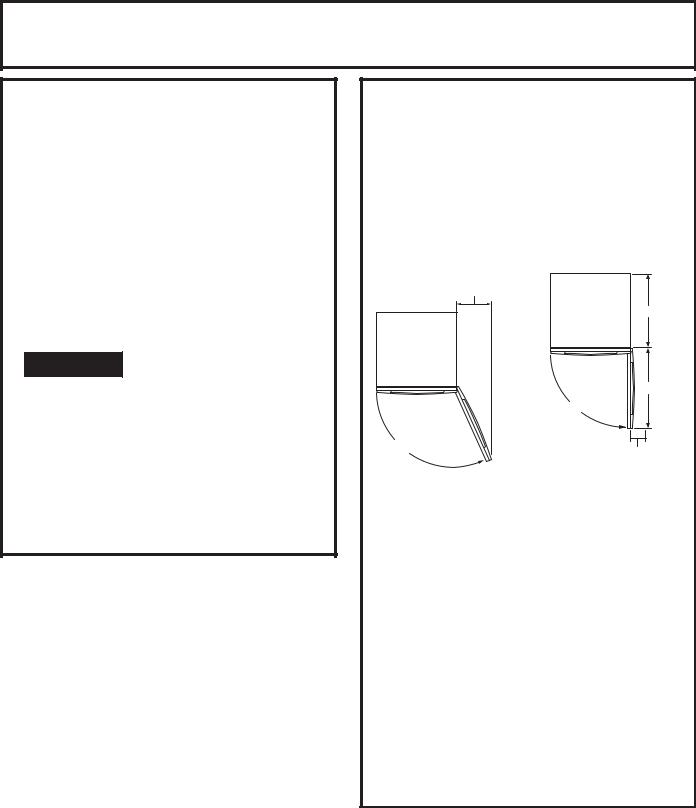
$OORZ PLQLPXP FOHDUDQFH RQ WKH KLQJH VLGH IRU D IXOO GRRU VZLQJ
'RRU 6ZLQJ
10" Minimum
to Wall
21-5/8"
|
23-5/8" |
|
90° |
110° |
4" Minimum |
|
to Wall |
•The door swing is reversible on all models. If desired, change the door swing before installation.
Choose the location:
•These products may be closed in on the top and three sides as long as the front is unobstructed for air circulation and proper access to the door.
•'R QRW LQVWDOO WKH UHIULJHUDWRU ZKHUH WKH
WHPSHUDWXUH ZLOO JR EHORZ ) & EHFDXVH it will not run often enough to maintain proper temperatures.
•'R QRW LQVWDOO WKH UHIULJHUDWRU ZKHUH WKH
WHPSHUDWXUH ZLOO JR DERYH ) & EHFDXVH LW will not perform properly.
•'R QRW LQVWDOO WKH UHIULJHUDWRU LQ D ORFDWLRQ H[SRVHG to water (rain, etc.) or direct sunlight.
•These products are not designed to be stacked one over the other.
INSTRUCTIONS INSTALLATION
49-60466-4 |
|
INSTALLATION INSTRUCTIONS
Installation Instructions
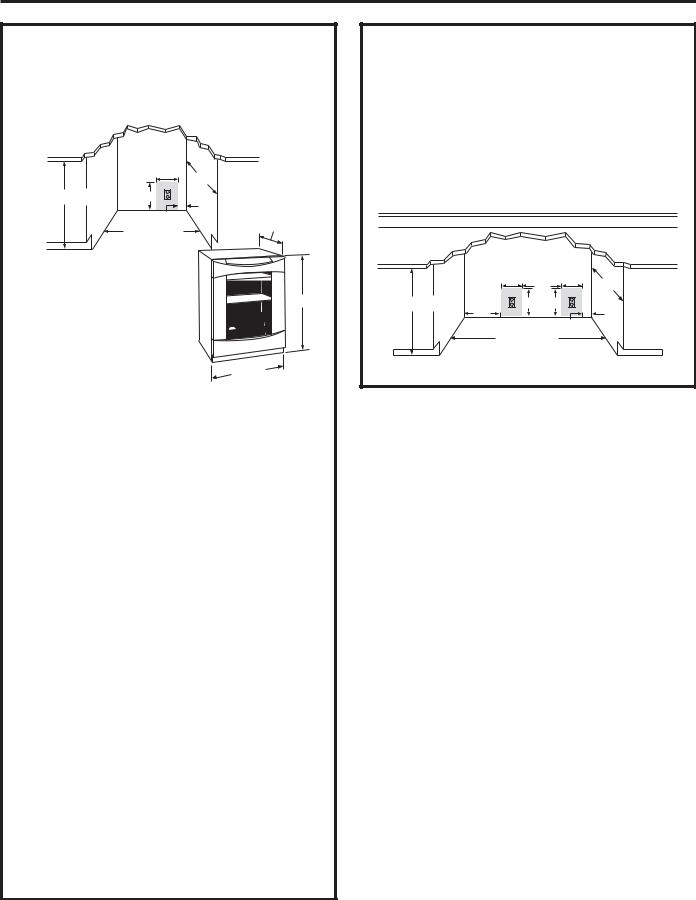
INSTALLATION SPACE
The beverage center and wine chiller can be a free-standing model or it can be built in using the cut-out dimensions below.
|
Locate |
|
|
|
Outlet |
|
|
|
10-1/2" |
|
|
|
24" |
|
|
34-1/2"-35" |
9" Max. |
|
|
|
1-1/2" |
25-1/2" |
|
|
24" Min. |
||
|
|
||
Product dimensions: |
|
|
|
+HLJKW PP |
|
||
:LGWK PP |
34-1/2" |
||
'HSWK PP |
|||
|
|||
Cut-out dimensions: |
|
|
|
+HLJKW ± ± PP |
|
||
:LGWK PP PLQLPXP |
23-3/4" |
||
'HSWK PP PLQLPXP |
|||
|
|||
The cutout depth should be 24”
The cutout dimensions shown allow for a full door swing and access to the pull-out racks when
LQVWDOOHG DV D EXLOW LQ LQ VWDQGDUG ´ GHHS FDELQHWV
7KH GRRU VKRXOG SURWUXGH ´ EH\RQG WKH
VXUURXQGLQJ FDELQHWV )RU HDV\ UHIHUHQFH WKH back edge of the pocket handle should protrude
D PLQLPXP RI ´ EH\RQG WKH IURQW HGJH RI WKH countertop.
,I LQVWDOOLQJ EHWZHHQ IUDPHOHVV FDELQHWV D ´ wide filler strip or side panel may be needed on hinge side. The filler strip will act as a spacer between the case and adjacent cabinet door swing. The width of the opening must include the filler panels. NOTE: The door should protrude
´ EH\RQG WKH VXUURXQGLQJ FDELQHWV
•The beverage center and wine chiller can be installed freestanding.
Additional Specifications
$ YROW +] RU DPS SRZHU VXSSO\ LV required. An individual properly grounded branch circuit or circuit breaker is recommended. Install a properly grounded 3-prong electrical receptacle recessed into the back wall as shown. Electrical must be located on rear wall as shown.
NOTE: GFI (ground fault interrupter) is not recommended.
SIDE-BY-SIDE INSTALLATIONS
Increase storage capacity by installing two beverage centers or wine chillers together. Or, for a complete refreshment center, install any two of these units together.
•A side-by-side installation requires at least a
´ ZLGH RSHQLQJ 1R WULP NLWV UHTXLUHG
•Products must operate from separate, properly grounded receptacles.
|
Locate |
|
Outlet |
|
10-1/2"14"10-1/2" 24" |
34-1/2"-35" |
9" 9" |
|
15" |
|
1-1/2" |
|
47-1/2" Min. |
|
49-60466-4 |
Installation Instructions
TOOLS REQUIRED
•#2 Phillips screwdriver
•Adjustable wrench
PARTS SUPPLIED
•Hardware for changing door swing
•Left and right side hinge covers
•Top screw hole cover
GROUNDING THE BEVERAGE CENTER AND WINE CHILLER
 WARNING
 Electrical Shock
Hazard. For personal safety, this appliance must be properly grounded.
The power cord of this appliance is equipped with a three-prong (grounding) plug which mates with a standard three-prong (grounding) wall receptacle
WR PLQLPL]H WKH SRVVLELOLW\ RI HOHFWULF VKRFN KD]DUG from this appliance.
Have the wall outlet and circuit checked by a qualified electrician to make sure the outlet is properly grounded.
Where a standard 2-prong wall outlet is encountered, it is your personal responsibility and obligation to have it replaced with a properly grounded 3-prong wall outlet.
'2 127 81'(5 $1< &,5&8067$1&(6 &87 25 5(029( 7+( 7+,5'*5281' 3521* )520 7+( 32:(5 &25'
'2 127 86( $1 $'$37(5 3/8* 72 &211(&7 7+( 5()5,*(5$725 72 $3521* 287/(7
'2 127 86( $1 (;7(16,21 &25' :,7+ 7+,6
APPLIANCE.
STAINING WOOD DRAWER FRONTS
The drawer fronts are unfinished beech wood.
'XULQJ XVH RLO IURP KDQGV PD\ DFFXPXODWH DQG stain the wood.
•The drawer fronts may be stained and sealed to match adjacent cabinetry. The tinted glass will make the stained wood appear darker. A true color match can be seen only when the door is opened.
•Apply the stain and sealer according to the manufacturer’s instructions. To avoid unpleasant odor, keep the door open to ventilate and allow the stain/sealer to dry completely before using the product.
1 REMOVE PACKAGING
•Remove corner blocks and foam drawer stops.
•Remove all packing material, tape and protective plastic coverings.
 WARNING 6PDOO REMHFWV DUH D FKRNH KD]DUG for children. Remove and discard any parts not used.
INSTRUCTIONS INSTALLATION
49-60466-4 |
11 |

INSTALLATION INSTRUCTIONS
Installation Instructions
2 REVERSE DOOR SWING

 WARNING )ROORZ DOO VWHSV ZKHQ UHYHUVLQJ
WKH GRRU VZLQJ )DLOXUH WR IROORZ WKHVH LQVWUXFWLRQV leaving off parts, or overtightening screws, can lead to the door falling off and result in injury and property damage.
SKIP THIS STEP IF DOOR SWING SUITS THE INSTALLATION
Parts Included:
•Top left case hinge
•Bottom left case hinge
•Left and right side decorative hinge cover
'HFRUDWLYH KLQJH VFUHZ KROH FRYHU
•Torx® driver bit
Tools Required:
•Phillips screwdriver
•Electric drill
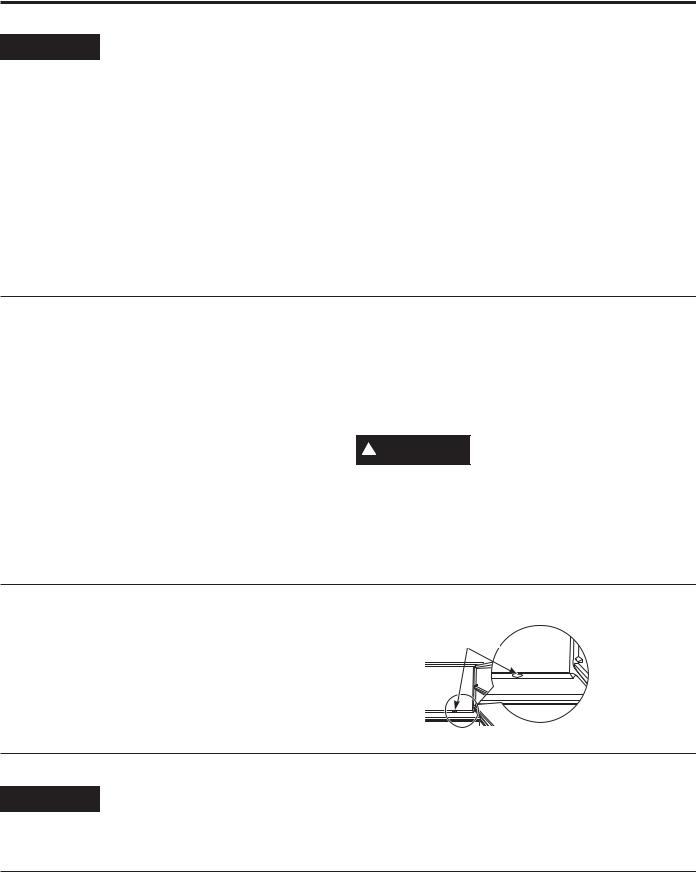
To remove the door:
)ODWWHQ WKH VKLSSLQJ FDUWRQ WR XVH DV D SDG
•Remove the 2 screws and the toekick. Set aside the screws and toekick for final installation.
8VH WKH VXSSOLHG 7RU[® bit and electric drill to remove the 3 screws holding the top case hinge. Lift off the hinge. (Screws will be used to install the new hinge.)
•Lift the door off the bottom case hinge.
•Remove the bottom case hinge pin and bracket.
To reinstall the door:
1.Remove the door stop and cam riser on the bottom right side of the door.
Install
3 Hinge
Screws
Remove
Top Hinge
Hinge
Pin and
Bracket
Door Stop
and Cam Riser
2. Remove the bottom fill plug on the bottom left side of the door.
3. Reinstall the original door stop and cam riser onto the bottom left side of the door.
4. Reinstall the bottom fill plug on the bottom right side of the door.
5. Remove the top fill plug on the top left side of the door.
6. Reinstall the top fill plug on the top right side.
7. Install the new supplied bottom case hinge pin and bracket onto bottom left side. Ensure plastic cam riser is on the case hinge pin.
8. Place the door onto the bottom case hinge.
9. Install the supplied left-hand top case hinge with the 3 original screws.
10. 6HOHFW WKH KLQJH FRYHU PDUNHG ZLWK DQ ³/´
11. Peel backing off the tape
inside the decorative hinge cover.
12. Press and snap the hinge cover into place.
13.Snap the screw hole cover into place on the opposite side.
IMPORTANT: Check to be sure screws are tight and that the door is straight and does not sag. The door should swing freely.
Install Toekick
The toekick has a cutout on the left and right sides.
1.Remove the plug on the left side and reinstall on the right side.
2.Install original screws and spacers. Install screws through the spacer standoff, toekick and into the base as shown.
|
Move Fill |
|
Plug to |
Spacer |
Right Side |
|
|
Standoff |
|
Remove
Hinge
12 |
49-60466-4 |

Installation Instructions
3 LEVEL
8VH DQ DGMXVWDEOH ZUHQFK WR WXUQ WKH OHYHOLQJ OHJV and raise or lower the product.
$GMXVW FDUHIXOO\ WKH SURGXFW VKRXOG EH OHYHO and plumb with cabinetry, and should align with adjacent toekick height.
Turn Right to Lower
Turn Left to Raise
If you skipped Step 2:
6HOHFW WKH KLQJH FRYHU PDUNHG ³5´ RU ³/´ depending on door swing.
•Peel backing off the tape inside the decorative hinge cover. Press and snap into position.
4CONNECT POWER
•Connect power cord plug to a properly grounded receptacle.
•Make sure power is on by opening the door to see if interior light turns on.
5SLIDE PRODUCT INTO THE CUTOUT
•Carefully slide the unit into the opening. Be careful not to entangle power cord.
0DNH FHUWDLQ WKDW WKH GRRU SURWUXGHV ´ EH\RQG the surrounding cabinets.
• Check again to be sure the unit is level.
6SET TEMPERATURE CONTROLS
•The temperature controls are preset. Refer to the Temperature Control section for more information. $OORZ KRXUV IRU WHPSHUDWXUH WR VWDELOL]H
INSTRUCTIONS INSTALLATION
49-60466-4 |
13 |

TROUBLESHOOTING TIPS
Normal operating sounds
Newer appliances sound different from older appliances. Modern appliances have more features and use newer technology.
|
|
|
HUMMM... |
|
||
|
|
|
|
|
|
|
|
|
|
WHOOSH... |
|
||
|
|
|
|
|||
Ŷ The new high efficiency compressor may run faster |
Ŷ You may hear the fans spinning at high speeds. |
|||||
and longer than your old appliance and you may |
||||||
hear a high-pitched hum or pulsating sound while it |
This happens when the appliance is first plugged in, |
|||||
is operating. |
when the doors are opened frequently or when large |
|||||
Ŷ 6RPHWLPHV WKH appliance runs for an extended |
amounts of beverages are added to the appliance. |
|||||
The fans help maintain desired temperatures. |
||||||
period, especially when the doors are opened |
||||||
Ŷ If door is open for over 3 minutes, you may hear the |
||||||
frequently. |
||||||
Ŷ <RX PD\ KHDU D ZKRRVKLQJ VRXQG ZKHQ WKH GRRUV |
fans come on in order to cool the appliance. |
|||||
Ŷ The fans change speeds in order to provide optimal |
||||||
FORVH 7KLV LV GXH WR SUHVVXUH HTXDOL]LQJ ZLWKLQ WKH |
||||||
appliance. |
cooling and energy savings. |
|||||
|
|
|
|
|||
|
|
CLICKS, POPS, |
WATER SOUNDS |
|||
CRACKS and CHIRPS |
Ŷ The flow of refrigerant through the appliance cooling |
|||||
|
|
|
|
|
||
Ŷ You may hear cracking or popping sounds when the |
coils may make a gurgling noise like boiling water. |
|||||
Ŷ A water dripping noise may occur as water from the |
||||||
appliance is first plugged in. This happens as the |
||||||
evaporator flows into the drain pan. |
||||||
appliance cools to the correct temperature. |
||||||
Ŷ Closing the door may cause a gurgling sound due to |
||||||
Ŷ Expansion and contraction of cooling coils during |
||||||
SUHVVXUH HTXDOL]DWLRQ |
||||||
and after defrost can cause a cracking or popping |
||||||
|
||||||
sound. |
|
|||||
|
|
|
|
|
|
|
14 |
49-60466-4 |

Troubleshooting tips ... Before you call for service
Problem |
Possible Causes |
What To Do |
Appliance does not |
Appliance may be in defrost |
7KLV LV QRUPDO &RPSUHVVRU GRHV QRW RSHUDWH IRU DERXW |
operate |
cycle. |
minutes when in defrost cycle. |
|
Appliance is unplugged. |
Push the plug completely into the outlet. |
|
The circuit breaker is tripped/ he |
Replace fuse or reset the breaker. |
|
fuse is blown. |
|
|
GFI outlet is tripped. |
Reset outlet. |
|
|
*), RXWOHW LV QRW UHFRPPHQGHG |
Vibration or rattling |
Appliance is on an uneven |
Adjust the leveling legs as shown in the Installation |
(slight vibration is |
surface. |
Instructions. |
normal) |
|
|
Motor operates for |
Normal when appliance is first |
Wait 24 hours for the appliance to completely cool down. |
long periods or cycles |
plugged in. |
|
on and off frequently |
|
|
Often occurs when large |
This is normal. |
|
|
amounts of wine or beverages |
|
|
are placed in the appliance. |
|
|
Door left open. |
Always make sure that the door is closed after opening. |
|
|
Check to see if a bottle is holding door open. |
|
Hot weather or frequent door |
This is normal. |
|
openings. |
|
|
Temperature control set at the |
Allow 24 hours for temperature to change. |
|
coldest setting. |
|
Compartment too |
Normal when appliance is first |
Wait 24 hours for the appliance to completely cool down. |
warm |
plugged in. |
|
|
Often occurs when large |
This is normal. |
|
amounts of wine or beverages |
|
|
are placed in the appliance. |
|
|
Temperature control not set cold |
See Temperature Control section. |
|
enough. |
|
|
Warm weather or frequent door |
See Temperature Control section. |
|
openings. |
|
|
Door left open. |
Always make sure that the door is closed after opening. |
|
|
Check to see if a bottle is holding door open. |
Appliance has odor |
Interior needs cleaning. |
See Care and cleaning. |
|
|
.HHS RSHQ ER[ RI EDNLQJ VRGD LQ DSSOLDQFH UHSODFH HYHU\ |
|
|
3 months. |
Door not closing |
Door gasket is sticking or folding |
Apply petroleum jelly or paraffin wax to the face of the |
properly |
over. |
gasket. |
|
The door is hitting an internal |
Adjust internal components to prevent interference. |
|
component inside the appliance. |
|
TIPS TROUBLESHOOTING
49-60466-4 |
15 |

TROUBLESHOOTING TIPS
Troubleshooting tips ... Before you call for service
Problem |
Possible Causes |
What To Do |
|
Moisture forms on outside |
Not unusual during periods of |
,I ERWKHUVRPH ZLSH VXUIDFH GU\ RWKHUZLVH |
|
of appliance |
high humidity. |
moisture will evaporate in time. |
|
|
Door left open. |
Always make sure that the door is closed after |
|
|
|
opening. |
|
|
|
Check to see if a bottle is holding door open. |
|
|
|
|
|
Frost or moisture collects |
Too frequent or too long door |
Appliance will dissipate moisture in time. If |
|
inside |
openings. |
bothersome, wipe surface dry. |
|
|
In humid weather, air carries |
Appliance will dissipate moisture in time. If |
|
|
moisture into appliance when |
bothersome, wipe surface dry. |
|
|
door is opened. |
|
|
|
Temperature control set at |
See Temperature Control section. |
|
|
coldest setting. |
|
|
Interior light does not |
Appliance is unplugged. |
Push the plug completely into the outlet. |
|
operate |
|
|
|
The circuit breaker is tripped / |
Replace fuse or reset the breaker. |
||
|
the fuse is blown. |
|
|
|
Light bulb needs replacing. |
See Care and Cleaning section. |
|
|
GFI outlet is tripped. |
5HVHW RXWOHW *), RXWOHW LV QRW UHFRPPHQGHG |
|
Hot air from bottom of |
Normal air flow cooling |
In the refrigeration process, it is normal for heat to |
|
appliance |
motor. |
be expelled in the area under the appliance. Some |
|
|
|
floor coverings are sensitive and will discolor at |
|
|
|
these safe and normal temperatures. |
|
Appliance never shuts off |
Adaptive defrost keeps |
This is normal. The appliance will cycle off after the |
|
but temperatures |
compressor running during |
|
|
Normal operation in extreme temperatures. |
|||
|
door openings. |
||
|
|
16 |
49-60466-4 |
GE Appliances Warranty
GEAppliances.com
For US Customers, DOO ZDUUDQW\ VHUYLFH LV SURYLGHG E\ RXU )DFWRU\ 6HUYLFH &HQWHUV RU DQ DXWKRUL]HG &XVWRPHU
Care® technician. To schedule service online, visit us at www.geappliances.com/service, or call GE Appliances at
*( &$5(6 3OHDVH KDYH \RXU VHULDO QXPEHU DQG \RXU PRGHO QXPEHU DYDLODEOH ZKHQ FDOOLQJ IRU service. In Canada, call 800.561.3344.
GE and PROFILE Series Models:
For the period of |
GE Appliances will replace |
One year |
Any part of the beverage center or wine chiller which fails due to a defect in materials or |
)URP WKH GDWH |
ZRUNPDQVKLS 'XULQJ WKLV limited one-year warranty, GE Appliances will provide, free of |
of the original |
charge, all labor and in-home service to replace the defective part. |
purchase |
|
PROFILE Series Models Only: |
|
For the period of |
GE Appliances will replace |
Five years |
Any part of the sealed refrigerating system (the compressor, condenser, evaporator and all |
)URP WKH GDWH |
FRQQHFWLQJ WXELQJ ZKLFK IDLOV GXH WR D GHIHFW LQ PDWHULDOV RU ZRUNPDQVKLS 'XULQJ WKLV limited |
of the original |
five-year sealed refrigerating system warranty, GE Appliances will also provide, free of |
purchase |
charge, all labor and related service to replace the defective part in the sealed refrigerating |
|
system. |
WARRANTY
What GE Appliances will not cover:
Ŷ 6HUYLFH WULSV WR \RXU KRPH WR WHDFK \RX KRZ WR XVH WKH Ŷ 5HSODFHPHQW RI WKH OLJKW EXOEV LI LQFOXGHG RU ZDWHU
product. |
filter cartridge, if included. |
Ŷ ,PSURSHU LQVWDOODWLRQ GHOLYHU\ RU PDLQWHQDQFH |
Ŷ 'DPDJH WR WKH SURGXFW FDXVHG E\ DFFLGHQW ILUH IORRGV |
Ŷ )DLOXUH RI WKH SURGXFW LI LW LV DEXVHG PLVXVHG RU |
or acts of God. |
used for other than the intended purpose or used |
Ŷ ,QFLGHQWDO RU FRQVHTXHQWLDO GDPDJH FDXVHG E\ |
commercially. |
possible defects with this appliance. |
Ŷ /RVV RI ZLQH GXH WR VSRLODJH |
Ŷ 3URGXFW QRW DFFHVVLEOH WR SURYLGH UHTXLUHG VHUYLFH |
Ŷ 5HSODFHPHQW RI KRXVH IXVHV RU UHVHWWLQJ RI FLUFXLW |
Ŷ 'DPDJH WR ILQLVK VXFK DV VXUIDFH UXVW WDUQLVK RU |
breakers. |
small blemishes not reported within 48 hours of |
Ŷ 'DPDJH FDXVHG DIWHU GHOLYHU\ |
delivery. |
EXCLUSION OF IMPLIED WARRANTIES
Your sole and exclusive remedy is product repair as provided in this Limited Warranty. Any implied warranties, including the implied warranties of merchantability or fitness for a particular purpose, are limited to one year or the shortest period allowed by law.
For US Customers: This warranty is extended to the original purchaser and any succeeding owner for products
SXUFKDVHG IRU KRPH XVH ZLWKLQ WKH 86$ ,I WKH SURGXFW LV ORFDWHG LQ DQ DUHD ZKHUH VHUYLFH E\ D *( $SSOLDQFHV $XWKRUL]HG 6HUYLFHU LV QRW DYDLODEOH \RX PD\ EH UHVSRQVLEOH IRU D WULS FKDUJH RU \RX PD\ EH UHTXLUHG WR EULQJ WKH
SURGXFW WR DQ $XWKRUL]HG *( $SSOLDQFHV 6HUYLFH ORFDWLRQ IRU VHUYLFH ,Q $ODVND WKH ZDUUDQW\ H[FOXGHV WKH FRVW RI shipping or service calls to your home.
Some states do not allow the exclusion or limitation of incidental or consequential damages. This warranty gives you specific legal rights, and you may also have other rights which vary from state to state. To know what your legal rights are, consult your local or state consumer affairs office or your state’s Attorney General.
Warrantor: GE Appliances, a Haier company
For Customers in Canada: This warranty is extended to the original purchaser and any succeeding owner for products purchased in Canada for home use within Canada. In-home warrant service will be provided in areas where it is available and deemed reasonable by Mabe to provide.
Warrantor Canada: MC Commercial, Burlington, Ontario, L7R 5B6
is date |
Staple |
obtain to needed |
.here receipt your |
.warranty the under service |
purchase original the of Proof |
|
|
49-60466-4 |
|
 Loading...