


PDWT585T30SS
GE PDWT585T30SS, PDWT585T10SS, PDWT580R30SS, PDWT580R10SS, PDWT505T30WW Owner’s Manual
...
GEAppliances.com
Safety Instructions ........... 2-5
Operating Instructions
Care and Cleaning ................. 17
Control Panel and Settings ........ 6 j 9
Display Lights ....................... 9
Loading Place Settings ............. 16
Loading the Racks ............. 14j 16
Recommended Dishwasher
Products ............................. 9
Using the Dishwasher .......... 10113
Troubleshooting Tips ...... 18-2o
Consumer Support
Consumer Support ................. 25
Warrantg .......................... 2/4
Stainless Steel
Tub Dishwashers
Write the model and serial
numbers here:
Model #
Serial #
Youcan find them on the tub wall
just insidethe door.
165D4700P389 49-55065 07-09 JR

IMPORTANT SAFETY INFORMATION
READ ALL INSTRUCTIONS BEFORE USING--
SAVE THESE INSTRUCTIONS
%
WARNING!
For your safety, the information in this manual must be followed to minimize the risk of fire,
explosion, electric shock, and to prevent property damage, personal injury, or death.
WARNING! WATER HEATER SAFETY
Undercertain conditions, hydrogen gas may be producedin a water heater that hasnot beenused for two
or more weeks. HYDROGENGAS ISEXPLOSIVE.
If the hot water has not been usedfor two or more weeks, preventthe possibility of damage or injury
by turning on all hot water faucets and allow them to run for severalminutes. Dothis before using any
electrical appliance connected to the hot water system.This simple procedure will allow any built-up
hydrogen gas to escape.Sincethe gas isflammable, do not smoke,use an open flame, or usethe appliance
during this process.
PROPER INSTALLATION AND MAINTENANCE
This dishwasher must be properly installed and located in accordance with the Installation Instructions
before it is used. If you did not receive an Installation Instructions sheet with your dishwasher, you can
receive one by visiting our website at GEAppliances.com.
• Connectthe dishwasher/appliance to a grounded
metal, permanent wiring system; or run an
equipment-grounding conductor with the circuit
conductors and connect to the equipment-
grounding terminal or leadof the appliance.
• Improper connection ofthe equipment-grounding
conductor can result ina riskof electric shock.
Checkwith a qualified electrician orservice
representative ifyou are indoubt whether the
appliance isproperly grounded.
• Disposeof discardedappliances and shipping
or packing material properly.
• Donot ottempt to repoir or reploceony port
of your dishwosherunlessit is specifically
recommended in this monuol.Allother servicing
should be referredto o quolified technicion.
• Tominimize the possibility of electric shock,
disconnect this opplionce from the power supply
beforeottempting ony mointenonce.
NOTE:Turningthe dishwasheroff doesnot
disconnecttheappliance from thepower supply.
Werecommend having o qualified technician
serviceyour appliance.
CAUTION: To prevent minor injury and property damage
• Contents washed inAnti-bacterial mode, if
available,may be hot to the touch. Usecore
before handling.
• Usinga detergent that is not
specifically designedfor
dishwashers will cause the
dishwasherto fill with suds.
• If your dishwosher isconnected to o woll [-_j
switch,ensure thot the switch is on prior
to use.
• On dishwosherswith electronic controls,
if you choose to turn the wall switch
off between wash cycles, allow 5-10 seconds after
turning the switch on beforetouching START/RESET
to allow the control to initialize.
• Non-Dishware Items: Donot wash items such
aselectronic air cleanerfilters, furnace filters
and paint brushes in your dishwasher.Damage
to the dishwasher and discoloration or staining
of the dishwasher may result.
• Closesupervisionis necessary ifthis appliance
isused by or near children.
• Load light, plastic items so they do not become
dislodgedand drop to the bottom of the
dishwasher-they might come into contact with
the heating element and bedamaged.
INFORMACION IMPORTANTEDE SEGURIDAD
LEA TODASLASINSTRUCCIONESANTESDE USAR--
GUARDEESTASINSTRUCCIONES
GEAppliances.com
%
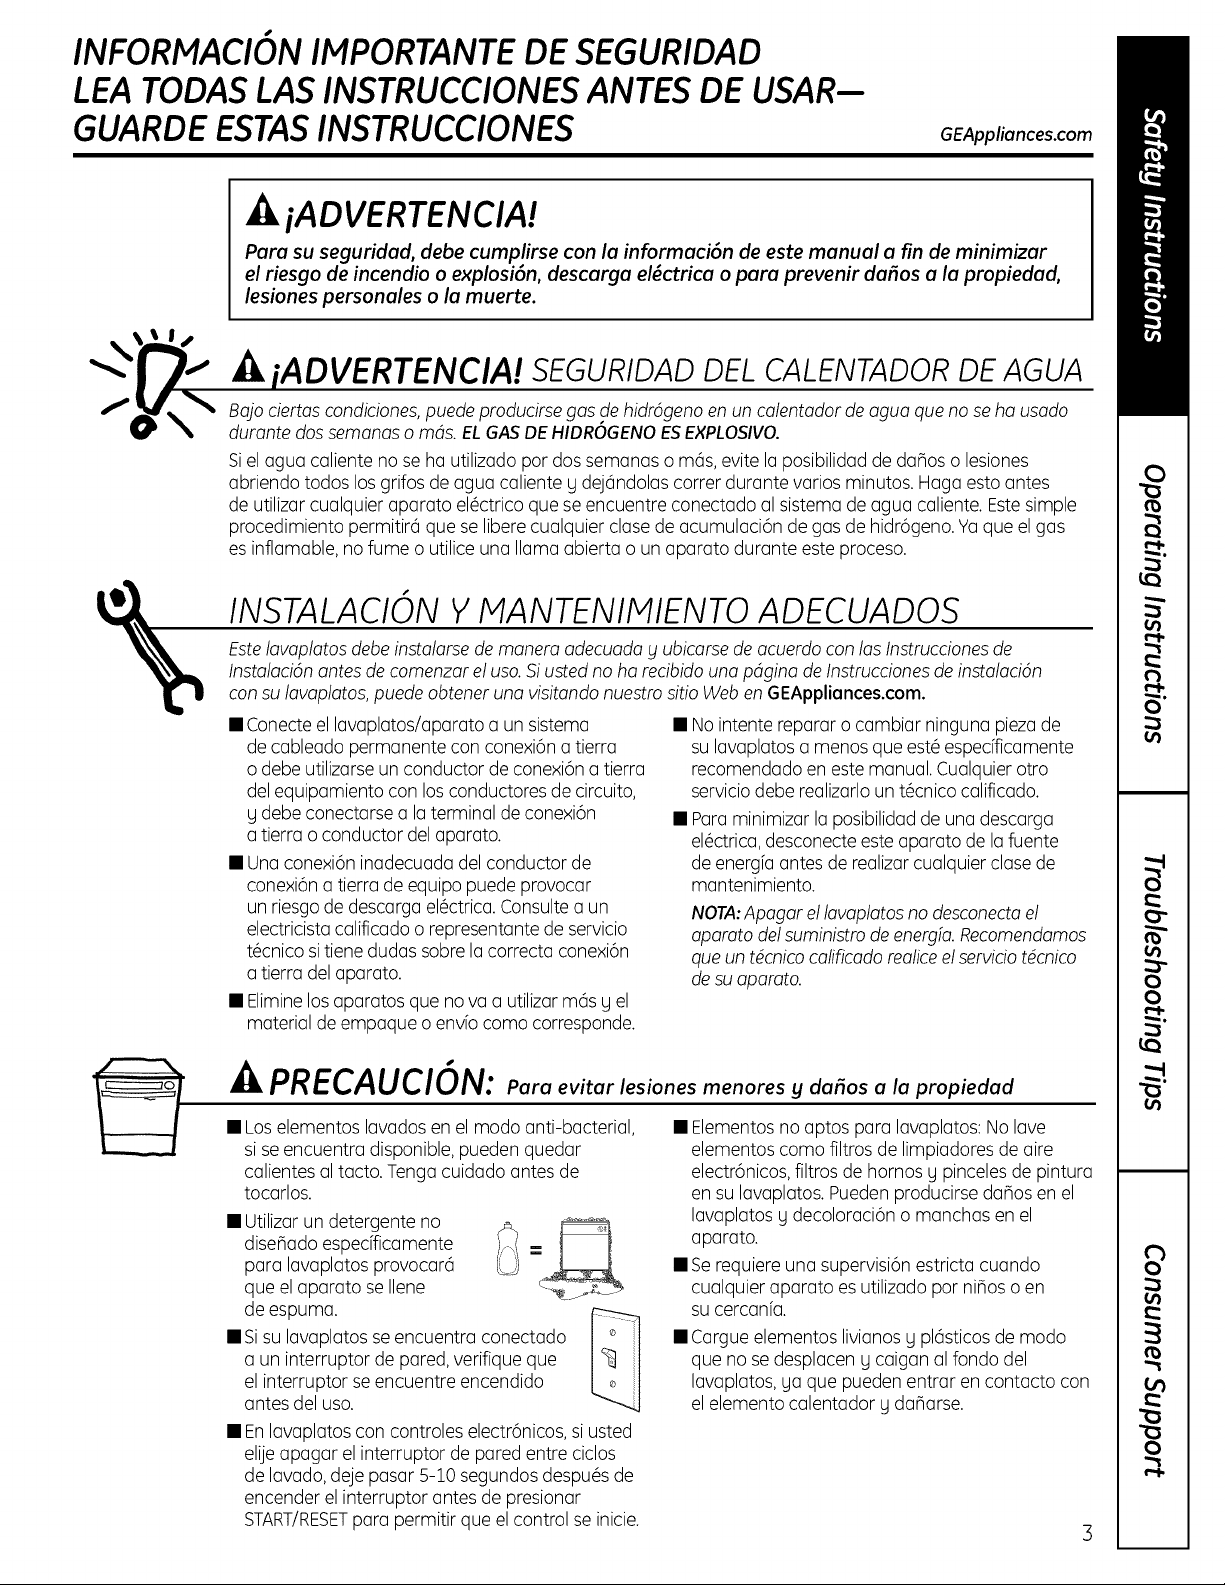
iADVERTENCIA!
Para su seguridad, debe cumplirse con la informaci6n de este manual a fin de minimizar
el riesgo de incendio o explosi6n, descarga el_ctrica o para prevenir dafios a la propiedad,
lesiones personales o la muerte.
iADVERTENCIA! SEGURIDAD DEL CALENTADOR DE AGUA
Bajo ciertas condiciones, puede producirse gas de hidr6geno en un calentador de agua que no se ha usado
durante dos semanas o mc_s.ELGAS DEHIDROGENO ES EXPLOSIVO.
Siel agua caliente no se ha utilizadopar dossemanas o m6s,evite laposibilidadde daflos o lesiones
abriendo todos losgrifos de agua caliente g dej6ndolas correr durante varios minutos. Haga esto antes
de utilizar cualquier aparato el_ctrico que seencuentre conectado al sistema deagua caliente. Estesimple
procedimiento permitir6 que selibere cualquier clase de acumulaci6n de gas de hidr6geno. Yaque elgas
es inflamable,no fume o utilice una llama abierta o un aparato durante este proceso.
INSTALACION Y MANTENIMIENTO ADECUADOS
Este lavaplatos debe instalarse de manera adecuada g ubicarse de acuerdo con los Instrucciones de
Instalaci6n antes de comenzar el usa Si usted no ha recibido una pdgina de Instrucciones de instalaci6n
con su lavaplatos, puede obtener una visitando nuestro sitio Web en GEAppliances.com.
• Conecteel lavaplatos/aparato a un sistema • Nointente reparar ocambiar ninguna piezade
de cableado permanente con conexi6n a tierra
o debe utilizarse un conductor deconexi6n a tierra
del equipamiento con los conductores decircuito,
g debe conectarse a la terminal de conexi6n
a tierra o conductor del aparato.
• Unaconexi6n inadecuada del conductor de
conexi6n a tierra de equipo puede provocar
un riesgo de descarga el@ctrica.Consultea un
electricistacalificado o representantede servicio
t@cnicosi tiene dudas sabrela correcta conexi6n
a tierra del aparato.
• Eliminelosaparatos que no va a utilizar m6s g el
material de empaque o env[o coma corresponde.
su lavaplatosa menos que est_ espec[ficamente
recomendado en este manual. Cualquier otro
serviciodebe realizarloun tOcnicocalificado.
Paraminimizar la posibilidadde una descarga
el@ctrica,desconecteeste aparato de lafuente
de energfaantes de realizarcualquier clasede
mantenimiento.
NOTA:Apagar ellavaplatosno desconectael
oparato del suministrode energia.Recomendamos
que un t@cnicocalificadorealiceel servido t@cnico
de suaparoto.
PRECAUCION: Para evitar lesiones menores g dafios a la propiedad
• Loselementos lavados en el modo anti-bacterial,
sise encuentra disponible,pueden quedar
calientes altacto. Tenga cuidado antes de
tocarlos.
• Utilizarun detergente no
diseBadoespec[ficamente
para lavaplatos provocar@
que el aparato seIlene
de espuma.
• Sisu lavaplatos seencuentra conectado
a un interruptor de pared,verifique que
el interruptor seencuentre encendido
antes del usa.
• Enlavaplatos con controles electr6nicos,si usted
elUeapagar el interruptor de pared entre ciclos
de lavado, deje pasar 5-10 segundos despu_sde
encender el interruptor antes de presionar
START/RESETpara permitir que el control se inicie.
• Elementosno aptos para lavaplatos: No lave
elementos coma flltros de limpiadores de aire
electr6nicos,filtros de hornos g pincelesde pintura
en su lavaplatos. Pueden producirse danos en el
lavaplatos g decoloraci6n omanchas en el
aparato.
• Serequiere una supervisi6nestricta cuando
cualquier aparato esutilizado par ninoso en
su cercanfa.
Cargueelementos livianos g pl6sticos de modo
que no sedesplacen g caigan al fondo del
lavaplatos, ga quepueden entrar en contacto con
el elemento calentador g da_arse.
3
IMPORTANT SAFETY INFORMATION
READ ALL INSTRUCTIONS BEFORE USING--
SAVE THESE INSTRUCTIONS
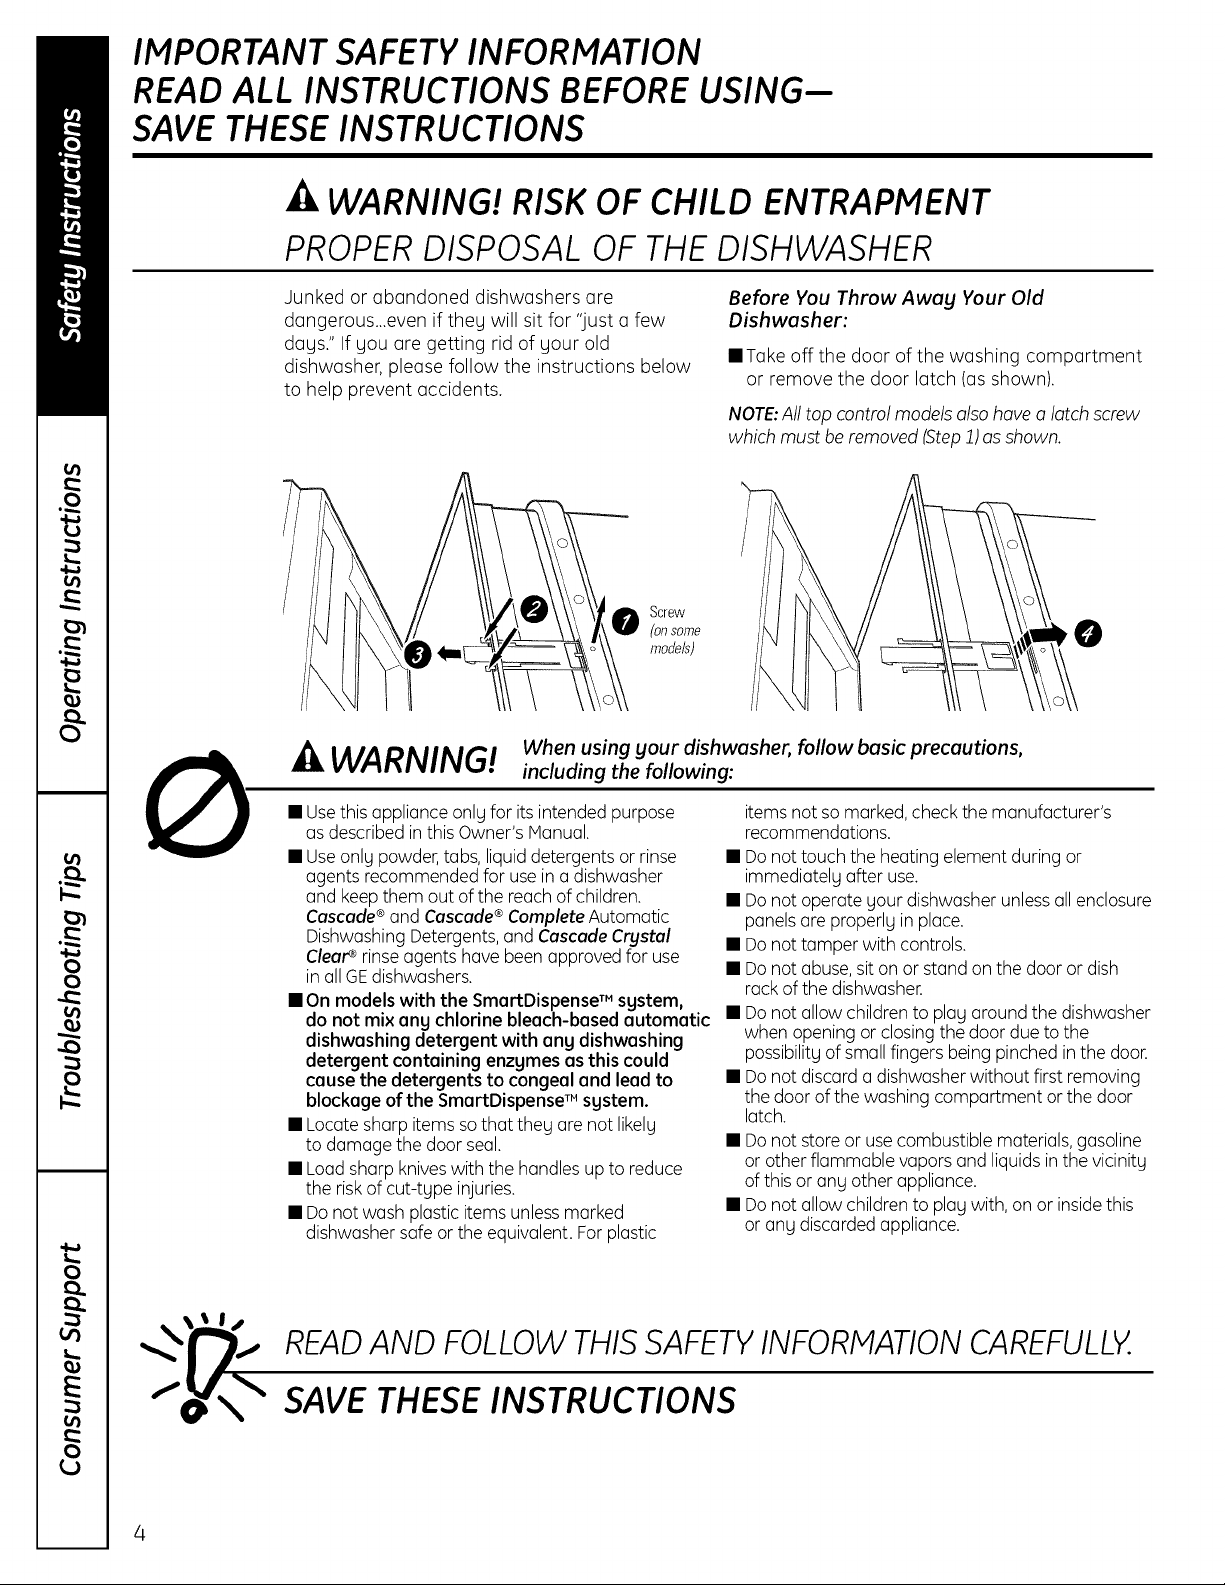
ik WARNING! RISK OF CHILD ENTRAPMENT
PROPER DISPOSAL OF THE DISHWASHER
Junked or abandoned dishwashers ore
dongerous...even if they will sit for "just o few
days." If you ore getting rid of your old
dishwasher, please follow the instructions below
to help prevent accidents.
Before You Throw Away Your Old
Dishwasher:
reTake off the door of the washing comportment
or remove the door latch (as shown).
NOTE:Alltop control models alsohaveo latch screw
which must be removed (StepJ)asshown.
Screw
(on some
models)
A
When using your dishwasher, follow basic precautions,
... WARNING! including the following:
• Use this appliance only for its intended purpose
as described in this Owner's Hanual.
• Use only powder, tabs, liquid detergents or rinse
agents recommended for use in a dishwasher
and keep them out of the reach of children.
Cascade ®and Cascade ® Complete Automatic
Dishwashing Detergents, and Cascade Crystal
Cleare rinse agents have been approved for use
in all GEdishwashers.
• On models with the SmartDispense TM sgstem,
do not mix eng chlorine bleech-besed eutometic
dishwashing detergent with ang dishwashing
detergent containing enzgmes us this could
cause the detergents to congeal end loud to
blockage of the SmartDispense TM sgstem.
• Locate sharp items so that they are not likely
to damage the door seal.
• Load sharp knives with the handles up to reduce
the risk of cut-type injuries.
• Do not wash plastic items unless marked
dishwasher safe or the equivalent. For plastic
items not so marked, check the manufacturer's
recommendations.
• Do not touch the heating element during or
immediately after use.
• Do not operate your dishwasher unless all enclosure
panels are properly in place.
• Do not tamper with controls.
• Do not abuse, sit on or stand on the door or dish
rack of the dishwasher.
• Do not allow children to play around the dishwasher
when opening or closing the door due to the
possibility of small fingers being pinched in the door.
• Do not discard a dishwasher without first removing
the door of the washing compartment or the door
latch.
• Do not store or use combustible materials, gasoline
or other flammable vapors and liquids in the vicinity
of this or any other appliance.
• Do not allow children to play with, on or inside this
or any discarded appliance.
READAND FOLLOWTHISSAFETYINFORMATIONCAREFULLY.
SAVE THESE INSTRUCTIONS
4
INFORMACION IMPORTANTEDE SEGURIDAD
LEA TODASLASINSTRUCCIONESANTESDE USAR--
GUARDEESTASINSTRUCCIONES
GEAppliances.com
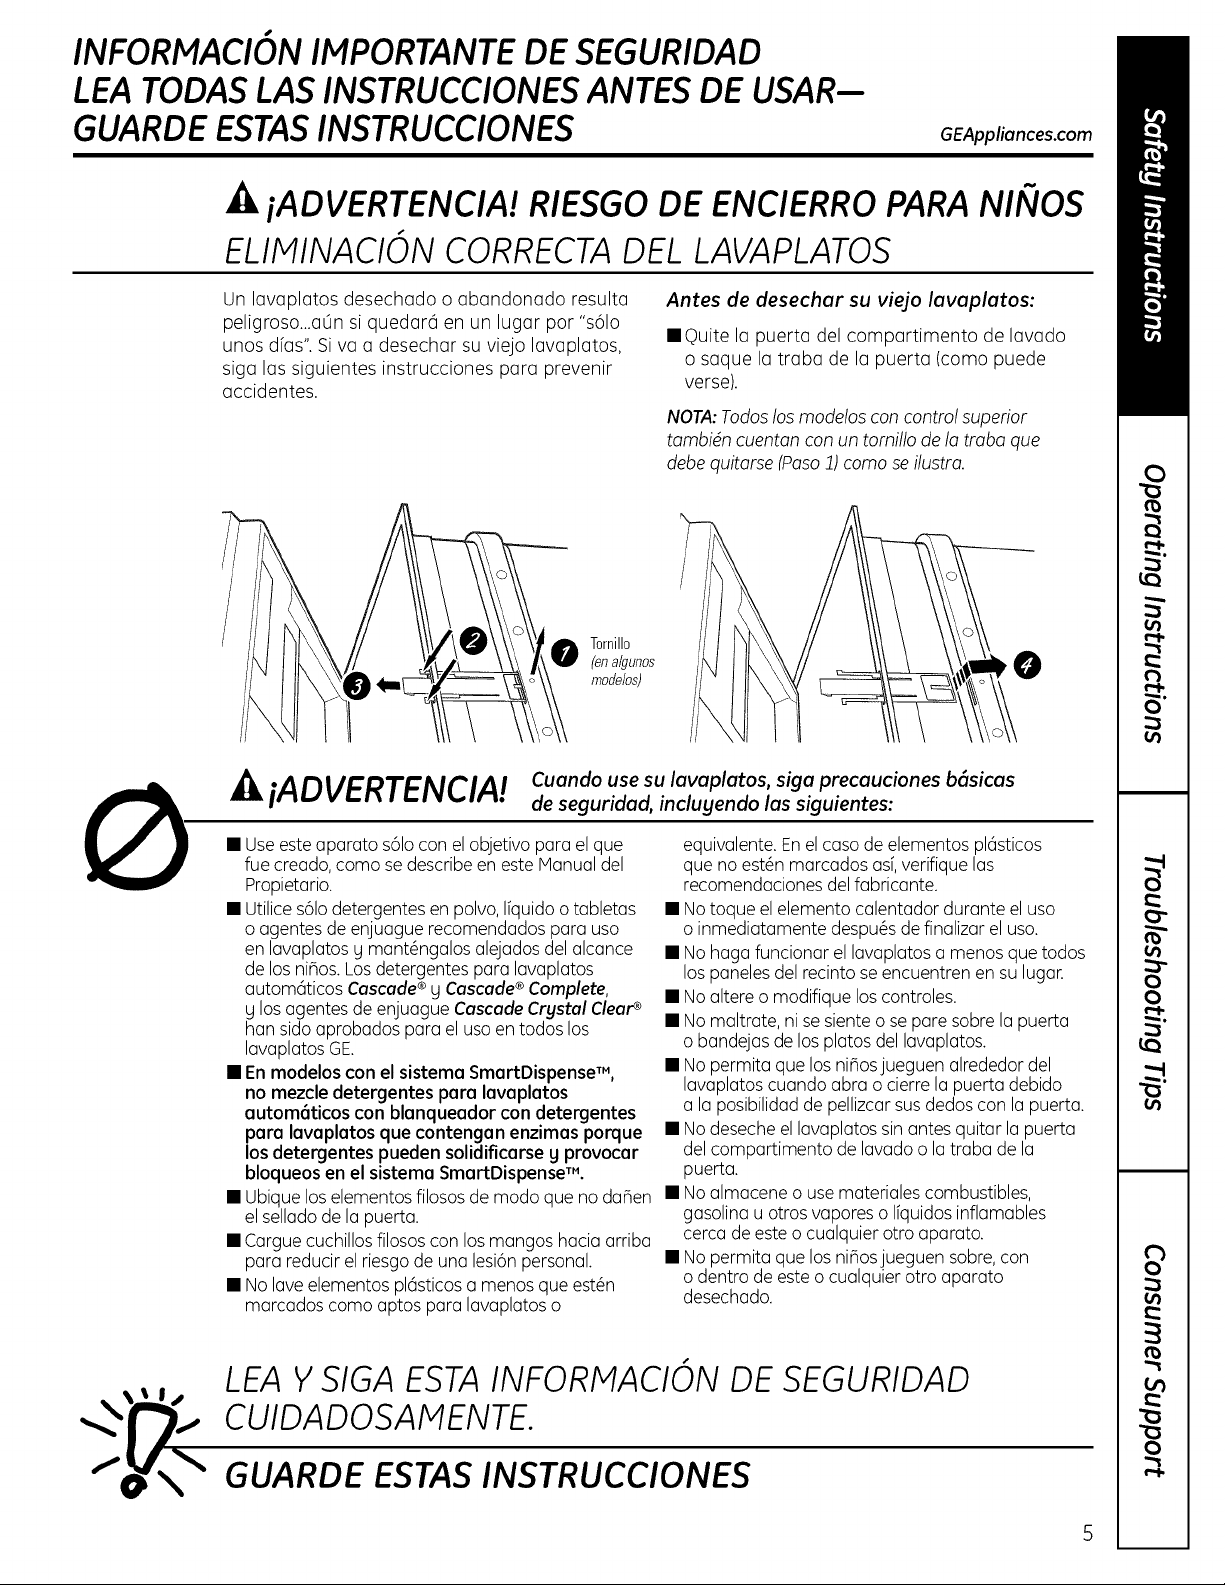
iADVERTENCIA! RIESGO DE ENCIERRO PARA NI_IOS
ELIMINACION CORRECTA DEL LAVAPLATOS
Un lavaplatos desechado o abandonado resulta
peligroso...aOn si quedar6 en un lugar por "s61o
unos dfas". Siva a desechar su viejo lavaplatos,
siga las siguientes instrucciones para prevenir
accidentes.
Antes de desechar su viejo lavaplatos:
• Quite la puerta del compartimento de lavado
o saque la traba de la puerta (como puede
verse).
NOTA:Todoslos modelos con control superior
tombidn cuenton conun tomillo de lo trobo que
debequitorse (Poso2)como seilustro.
Tornillo
(enalgunos
modelog
__Z_iADVERTENCIA! cuondousesuIovoplotos,sigoprecoucionesb_sicos
de seguridad, inclugendo los siguientes:
• Useesteaparato s61ocon elobjetivo para el que
fue creado,como sedescribeen este Manualdel
Propietario.
• Utilices61odetergentes en polvo,Ifquidoo tabletas
o agentes de enjuague recomendadospara uso
en lavaplatosg mant@ngalosalejadosdel alcance
de losniBos.Losdetergentes para lavaplatos
autom6ticos Cascade ®g Cascade ®Complete,
g losagentes de enjuague Cascade Crgstal Clear_
han sido aprobados para el uso en todos los
lavaplatosGE.
• En modelos con elsistemo SmortDispense TM,
no mezcle detergentes pore Iovoplotos
outom6ticos con blonqueodor con detergentes
pore Iovoplotos que contengon enzimos porque
los detergentes pueden solidificorse g provocor
bloqueos en el sistemo SmortDispenseTM.
equivalente.Enel casode elementospl6sticos
que no est@nmarcados asf,verifiquelas
recomendacionesdelfabricante.
• Notoque el elemento calentador durante el uso
o inmediatamente despu@sdefinalizar el uso.
• Nohaga funcionar el lavaplatosa menos que todos
lospaneles del recintose encuentren ensulugar.
• Noaltere o modifique loscontroles.
• Nomaltrate, ni se sienteo separe sobrela puerta
o bandejasde losplatos del lavaplatos.
• Nopermita que los niBosjueguen alrededordel
lavaplatoscuando abra o cierrela puerta debido
a la posibilidadde pellizcarsusdedoscon la puerta.
• Nodesecheellavaplatossin antes quitar lapuerta
del compartimento de lavado o latraba dela
puerta.
• Ubiqueloselementosfilososde modo que no daBen • Noalmacene o use materialescombustibles,
el selladode la puerta, gasolinau otrosvaporeso Ifquidosinflamables
• Carguecuchillosfilososcon losmangos hacia arriba cerca de esteo cualquier otro aparato.
para reducir el riesgode una lesi6npersonal. • Nopermita que los nihosjueguen sobre,con
• Nolaveelementos pl6sticosa menos que est_n odentro de este o cualquierotro aparato
marcados como aptos paralavaplatoso desechado.
LEA YSIGA ESTAINFORMACION DE SEGURIDAD
CUIDADOSAMENTE.
GUARDE ESTAS INSTRUCCIONES
5
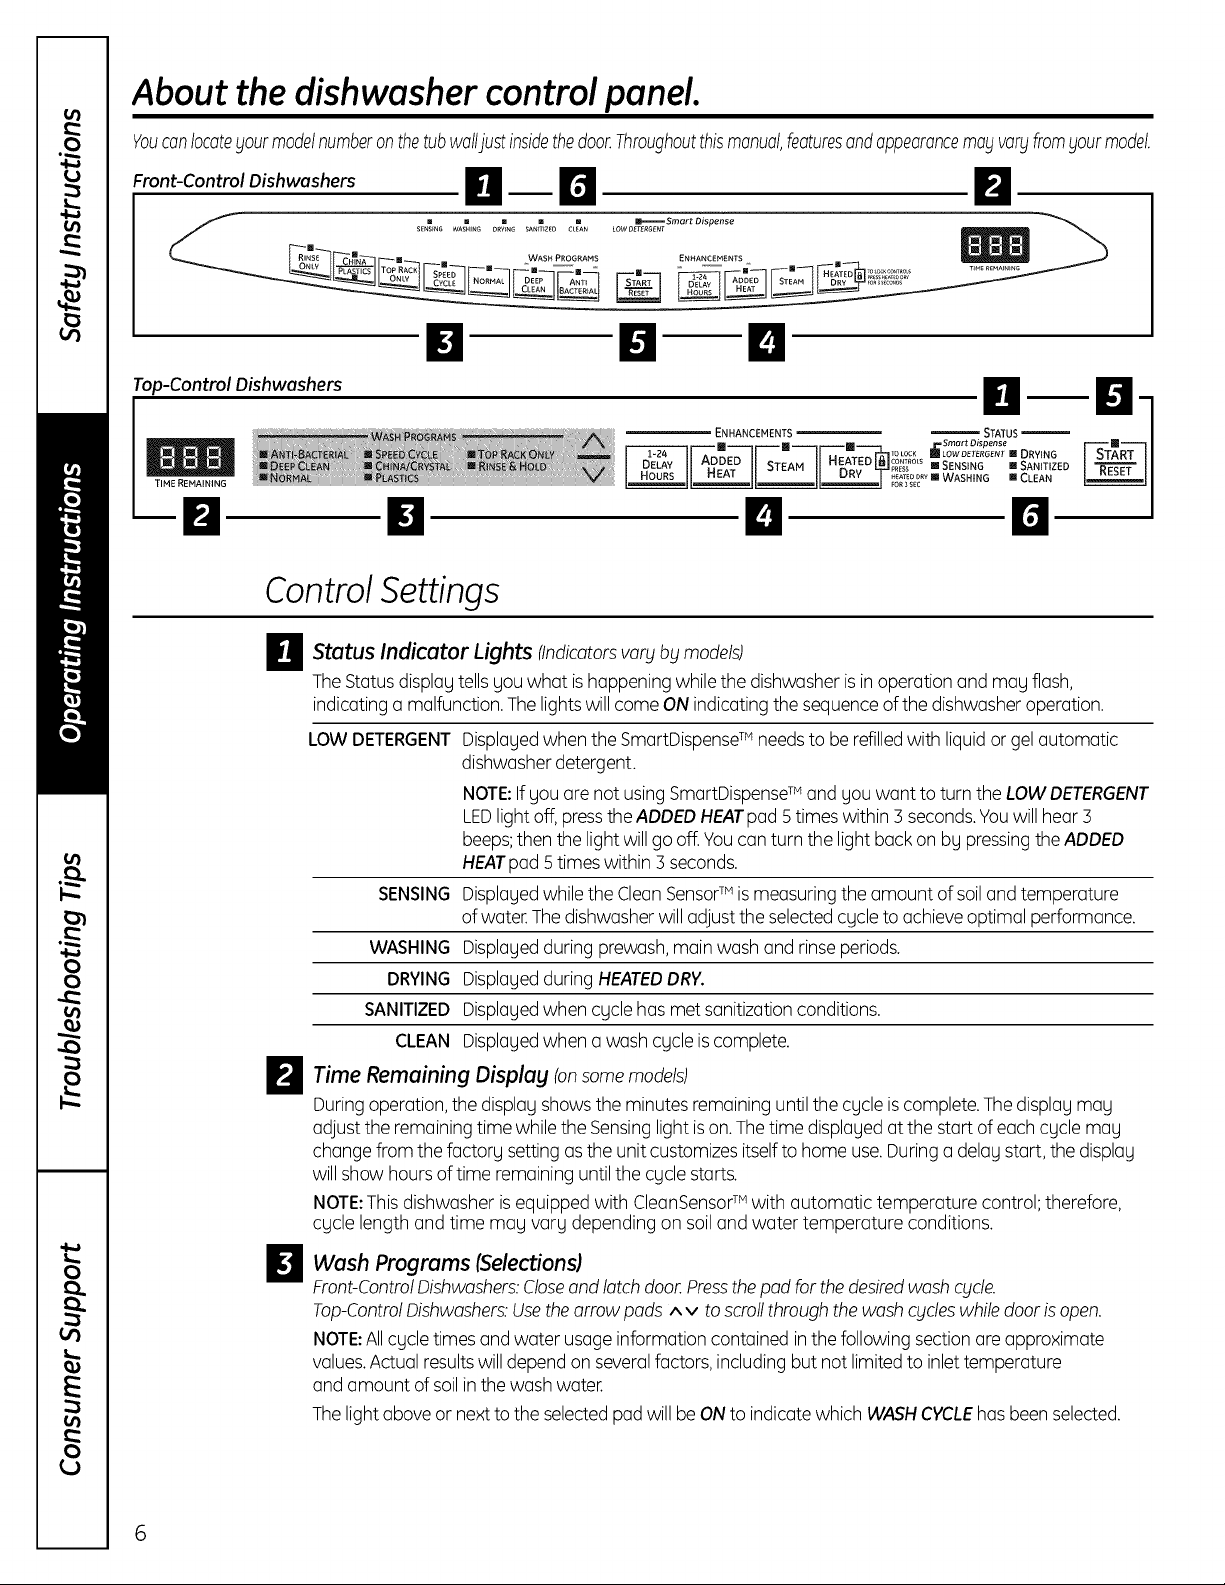
About the dishwasher control panel.
YoucanlocatebJourmodelnumberonthetubwalljustinsidethedoor.Throughoutthismanual,featuresandappearancemablva¢fromyourmodel.
Front-Control Dishwashers H _ D
[] [] [] [] []
SENSINGWASHING OrvtnG SANmZ_O cLeAN
RINSE C HIINA I WASH PROGRAMS
m
E......_Smart Dispense
LOW DETERGENT
ENHANCEMENTS _ J
I ODED STEAH DRY For_s_co_s
Top-Control Dishwashers
TIME REMAINING
lri ir.i it,!
lri
ENHANCEMENTS _ STATUS
I i [] Smart Dispense
__ "--'-lJJJ J---1 .r--_7 "''-Jr=_oLocK _LOWDETERGENTIDRYING
ADDED HEATED CONTROLS
l D-F_-,_V II AE ED I) STEAM II lie 'ED _L_prEss IISENSING IIISANITIZED
El El
ControlSettings
_ StatusIndicatorLights (Indicatorsvar_jb_jmodels)
TheStatus displagtellsgou what ishappeningwhile the dishwasher is inoperation and mayflash,
indicating a malfunction.Thelightswill come ONindicating the sequenceof the dishwasheroperation.
LOW DETERGENT
SENSING
WASHING
DRYING
SANITIZED
CLEAN
Displagedwhen the SmartDispenseTM needsto be refilledwith liquid or gelautomatic
dishwasherdetergent.
NOTE:Ifgou are not usingSmartDispenseTM and gou want to turn the LOW DETERGENT
LEDlightoff, presstheADDED HEATpad 5 timeswithin 3 seconds.Youwill hear3
beeps;then the lightwill go off.Youcan turn the light backon bgpressingtheADDED
HEATpad5 timeswithin 3 seconds.
Displagedwhilethe Clean SensorTM ismeasuring the amount of soiland temperature
of water.The dishwasherwilladjust the selectedcgcle to achieveoptimal performance.
Displagedduring prewash,main wash and rinseperiods.
Displagedduring HEATEDDRY.
Displagedwhen cgcle has met sanitizationconditions.
Displagedwhen a wash cgcleiscomplete.
_/_ Time Remaining Displag (onsomemodels)
El
Duringoperation,the displag showsthe minutes remaininguntil the cgcle iscomplete.Thedisplagmag
adjust the remainingtime while the Sensinglightison.Thetime displayed at the start of eachcgcle may
changefrom the factorg setting asthe unit customizes itselfto home use.Duringa delag start, the displag
willshow hoursof time remaining untilthe cgcle starts.
NOTE:Thisdishwasher is equipped with CleanSensorTM with automatic temperature control; therefore,
cgcle length and time mag varg depending on soil and water temperature conditions.
Wash Programs (Selections)
Front-ControlDishwashers:Closeand latch door.Pressthepod for the desiredwashcblcle.
Top-ControlDishwashers:Usethearrow pads A v toscrollthrough the wash cbldeswhile door isopen.
NOTE:Allcgcle times and water usageinformation contained in the following section are approximate
values.Actualresults willdepend on severalfactors,includingbut not limited to inlet temperature
and amount ofsoil in thewash water.
Thelight aboveor nextto the selected pad will beONto indicatewhich WASHCYCLEhasbeen selected.
GEAppliances.com
_ Wash (Selections)IcontinuedJ
Programs
ANTI-BACTERIAL/7.5-8.75 gal.,50-135 min.
SANIWASH
DEEPCLEAN
(onsome models)
COOKWARE/
POTS & PANS
(on some models)
NORMAL WASH
SPEEDCYCLE
(onsome models)
CHINA/CRYSTAL
LIGHT WASH
(on some models)
GLASSES
(onsome models)
PLASTICS
(on some models)
TOPRACKONLY
(onsome models)
RINSEAND HOLD
IRINSEONLY}
Thiscgcle ruisesthewater temperuture inthe finGIrinseto sunitizegour dishwure.
Thecgcle lengthwill varg dependingon the temperuture ofgour inletwuter.
NOTE:TheAnti-Bucteriulcgcle ismonitored for sunitizotionrequirements.Ifthe cgcle is
interrupted during or offer the muin wush portion or if the incoming water temperuture
isso low thut udequutewuter heutingcunnot be uchieved,the sunitizing conditionsmug
not be met. Inthesecuses,the sunitizedlight will not illuminote atthe end ofthe cgcle.
When usingthe Anti-Bucteriul cgcle,donot open the dishwusherdoor in thefinGIrinse.
NOTE:NSF-certifiedresidentialdishwashersare not intendedfor licensedfood
estublishments.
NOTE:Onlgthe Anti-Bucteriul cgcle husbeen designed to meet the requirements
of Section 6,NSF184 for soil removal and sunitizution efficucg.
10 gol., 115-135 min.
Thiscgcle ismeunt for heuvilg soiled dishesor cookwure with dried-on or buked-on soils.
Thiscgcle mug not remove burned-on foods. Evergdugdishesore sufe to be used inthis
cgcle.
NOTE:Onsome models,the STEAMenhoncement willbe automaticollg selectedwhen
the DEEPCLEANcgcleischosen,ond connot bede-selected.
8.75-10 gol.,75-140 min.
Thiscgcle ismeont for heovilg soiled dishesor cookwore with dried-on or boked-on soils.
Thiscgcle mog not remove burned-on foods. Evergdogdishesore sofeto be used in
this cgcle.
5.2gol.,60-90 min.
Thiscgcle isfor medium/heovilg soiled dishesond glGsswore.
Cgcle time ond woter usoge ore opproximote volues. Results will depend on
severol foctors, including but not limited to inlet temperoture, household woter
pressure ond omount of soil in the wosh woter.
7.5gol.,35-70 min.
Thiscgcle isfor evergdog dishesond glosswore.
7.5gol.,40-60 min.
Thiscgcle isfor lightlg soiledchino ond crgstol.
NOTE:Onsome models,this cgcle ond PLASTICSselectoriso toggle pod; push pod
to switch between this cgcle ond PLASTICS.
7.5gol.,40-75 min.
Thiscgcle isspecificollg designedfor glosses.
6.25-7.5 gol.,85-145 min.
Thelonger time for this cgcle includes o built-in drging portion thot is speciflcollg
designedto reduce the riskof melting plostic items ond improve plostic drging.
5-8.75 gol.,50-110 min.
Thiscgcle woshes lightlg soileddishes on the upper reck only.
2.5gol.,11 min.
Forrinsing portiol Ioodsthot will be woshed Ioter.Do not usedetergent with this cgcle.
About the dishwasher control panel.
D Enhancements
Thelight above the selected pad will be ON to indicate which ENHANCEMENThasbeen selected.
DELAYHOURS
Youcan delay the start of a wash cycle for up to 24 hours (dependingon model).
Pressthe DELAVSTARTpad to choose the number of hours you want to delay the start
of the cycle; then pressSTART/RESET.
Front-Control Dishwashers: The machine will count down and start automatically
at the correct time.
TEMP BOOST/
ADDED HEAT/
EXTRA HOT WASH
STEAM
(onsome models)
HEATED DRY
LOCK
RESET
ir.l
Top-Control Dishwashers: Afterclosing the door,the machinewill count down
and automatically start at the correct time.
NOTE:Tocancel the DELAVSTARTselection beforethe cycle begins,repeatedly press
the DELAVSTARTpad until the display isblank.
When selected,the cycle will run longer with heating element on to improve both wash
and dry performance.
NOTE:Cannot be selectedwith RINSEANDHOLDcycle.
Foruse with heavily soiled and/or dried-on, baked-on soils.Thisoption IvlUSTbe
selectedPRIORto starting the cycle. TheSTEAMoption adds 26 minutes to the
cycle time.
NOTE:Cannot be selectedwith RINSEANDHOLDcycle.
When HEATEDDRYis off,disheswill air dry.Top-control models have a fan that assists
the drying process.Thefan will run up to 4 hours affer the CLEANlight illuminates. If
desired,pressing any keypad will turn off the fan.
Light Off: Shuts off the drying heat option. Disheswill air dry naturally (front-control
dishwashers)or fan dry (top-control dishwashers)to save energy.
Light On:Turnsthe heater on for faster drying. Thiswill extend the total cycle time
between 8 and 58 minutes depending on the cycle selected.Ontop-control models,
a fan will continue to run up to 2 hours after the CLEANlight illuminates to assistthe
drying process.If desired,pressing any keypad will turn off the fan.
NOTE:Cannot be selectedwith RINSEAND HOLD cycle.
Youcan lockthe controlsto prevent any selections from being made. Or you can lock
the controls after you have started a cycle.
Children cannot accidentally start dishwasher bg touching pads with this option
selected.
Tounlock the dishwasher controls, pressand hold the HEATEDDRYpadfor 3 seconds.
Thelight above the lock pad will turn off. Tolock the dishwasher,pressand hold the
HEATEDDRYpad for 3 seconds.The light above the LOCI(pad will turn on.
Tochange a cycle offer washing starts...
Front-Control Dishwashers: Touchthe START/RESETpadto cancelthe cycle.
TheSTART/RESETlightwillflash while the water ispumped out if needed.Thistokes
approximately 2 minutes.
Top-Control Dishwashers: Open the door slowly to prevent splash-out.
Touchthe START/RESETpad to cancel the cycle. Ifthe START/RESETlight isflashing,
close the door until the water pumps out (thistokes approximately 2 minutes)
and the light stops flashing.
When the lightstops flashing, the dishwasher can be reprogrammed and restarted.
Start
Front-Control Dishwashers
Closeand latch the dishwasherdoor and select the cycle and desiredenhancements.Touch the
START/RESETpad one time to begin the cycle. Water fill begins immediately, and approximately
60 seconds later the wash action begins.
When the dishwasher door is fully closedand latched, the control panellights will display the last settings
you selected.If you don't want to change any of the settings,simply touch the START/RESETpad to
begin the cycle.
If the door isclosed,the indicator lightswill turn off ifthe START/RESETpad is not selectedwithin 5 minutes.
Toactivate the display,open and closethe door or pressany pad.
6EAppliances.com
E"j| Start (continued)
D
Top-Control Dishwashers
After selecting the cgcle and desiredenhancements, touch the START/RESETpod to reodg the
dishwasher to begin the cgcle.Closethe door to start the cgcle or begin the DELAVSTARTcountdown.
When the cgcle starts, the water fill begins and opproximotelg 60 secondslater the wash action begins.
Thedishwasher will olwogs displog gour lost selection and enhancements. If gou don't wont to change
the settings,simplg touch the START/RESETpod to reodg the dishwasher and closethe doorto begin
the cgcle.
ALL MODELS:Ifo power failure occurs NORMALand HEATEDDRYwill outomoticollg be programmed.
Make ong new selections and touch the START/RESETpodto begin the new cgcle.
When the door is opened,the indicator lights will turn off if the START/RESETpodisnot selectedwithin
5 minutes. To activate the displog,open and close the door ortouch ong pod.
Clean
Front-Control Dishwasher
TheCLEANlight will illuminate and o double beep will sound when o wash cgcleiscomplete. On some
models,the CLEANlight will turn off when the door isopened. On other models,the CLEANlight will
remain on until the door isopened and then relotched or untilong kegpod is pressedwhile the door
islatched shut.
Top-Control Dishwasher
TheCLEANlight will illuminate and a double beep will sound when a wash cgcle iscomplete. The CLEAN
light will remain on until the door isopened and then relatched or until any kegis pressed.
ALL MODELS:Toturn off the audible end-of-cycle signal (orre-activate it if it was previously turned off),
pressthe HEATEDDRYpad 5 times within 5 seconds.A triple beep will sound to indicate the end-of-cycle
beep option has been toggled.
Flashing display lights.
Status Indicator Lights
START/RESET
What It Means
Cycle has been interrupted by pressingthe START/RESETpad, or there
has been a power failure. Light will stop flashing after the dishwasher
automatically drains out the water.Thedishwasher will restart with NORMAL
and HEATEDDRYifthe interruption was the result of a power failure.
Recommended dishwasher products.
GErecommends the following products for use in its
dishwashers:
• Foryour manual detergent dispenser,Cascade®
powder, liquid or gel automatic dishwasher
detergents are approved.
• Forgour SmartDispenseTM Detergent Dispenser,use
onlg the recommended liquid automatic detergents
listed on page 12of this manual.
• Cascade Crystal Clear®rinseagents to remove
spots and prevent new film buildup on gour dishes,
glasses,flatware, cookware and plastic. Using rinse
agent alsoimproves drg performance.
• Cerama Bryte ®StainlessSteelAppliance Cleaner
to clean the exterior stainlesssteel panel of GEand
ProfileTM dishwashers (forstainlesssteel exterior
models onlg).
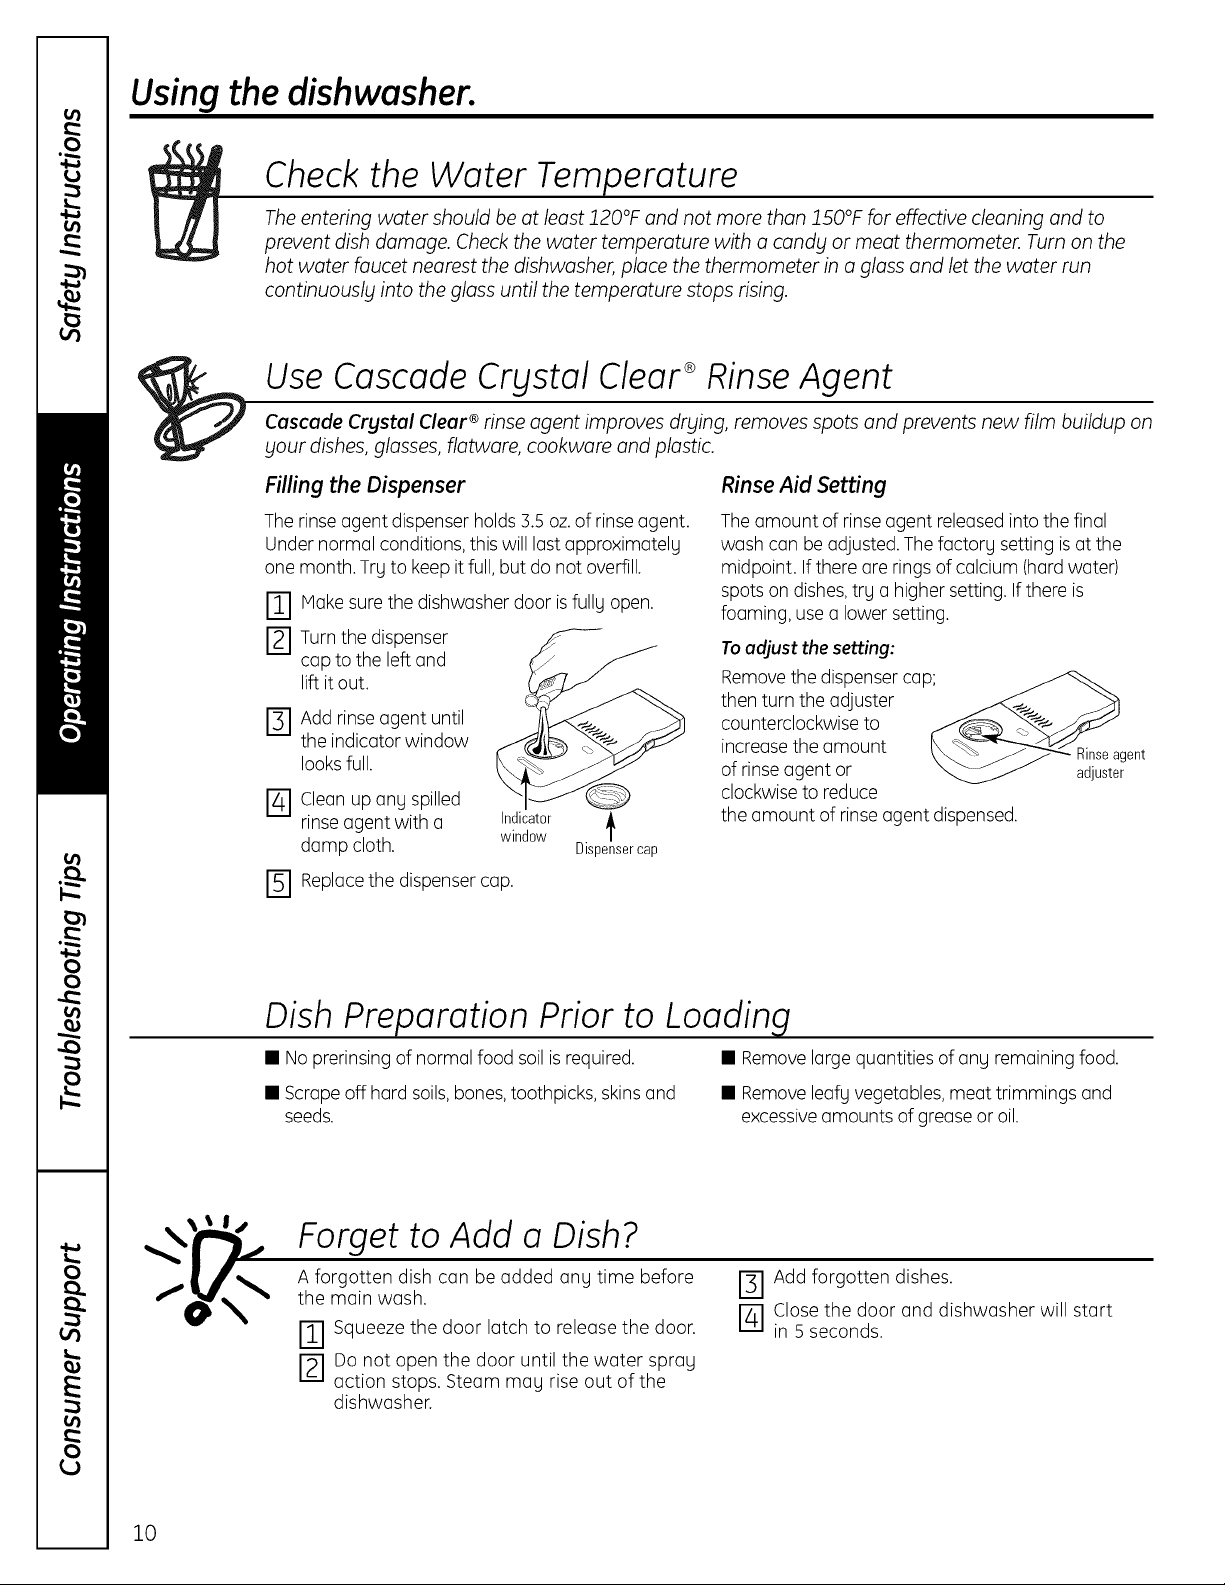
Using the dishwasher.
Check the Water Temperature
The entering water should be at least 120°F and not more than 150°F for effective cleaning and to
prevent dish damage. Check the water temperature with a candy or meat thermometer. Turn on the
hot water faucet nearest the dishwasher, place the thermometer in a glass and let the water run
continuously into the glass until the temperature stops rising.
Use Cascade Crystal Clear ®Rinse Agent
Cascade Crystal Clear ®rinse agent improves drying, removes spots and prevents new film buildup on
your dishes, glosses, flatware, cookware and plastic.
Filling the Dispenser Rinse Aid Setting
Therinse agent dispenser holds 3.5oz.of rinseagent.
Under normal conditions,this will last approximatelg
one month. Trg to keep it full,but do not overfill.
m
F2-1
Make surethe dishwasher door isfullg open.
Turnthe dispenser
cap to the left and
lift it out.
I-_1 Add rinseagent until
the indicator window
looks full.
[] Cleanup any spilled
rinseagent with a Indicator
damp cloth, window Dispensercap
Theamount of rinseagent releasedinto the final
wash can be adjusted.The factorg setting isat the
midpoint. Ifthere are ringsof calcium (hardwater)
spots on dishes,trg a higher setting. If there is
foaming, use a lower setting.
Toadjust the setting:
Removethe dispenser cap_
thenturntheadjuster
counterclockwise to
increase the amount \_ _'_ Rinseagent
of rinseagent or _ adjuster
clockwiseto reduce
the amount of rinse agent dispensed.
FI Replacethe dispenser cap.
Dish Preparation Prior to Loading
• Noprerinsing of normal food soilisrequired. • Removelarge quantities of any remaining food.
• Scrapeoff hard soils,bones,toothpicks, skinsand • Removeleafy vegetables, meat trimmings and
seeds, excessiveamounts of grease or oil.
Forget to Add a Dish?
A forgotten dish can be added ang time before
the main wash.
I-_1 Squeezethe door latch to release the door.
I-_1 Do not open the door until the water spray
action stops. Steam may rise out of the
dishwasher.
I-_1Add forgotten dishes.
[_-I Close the door and dishwasher will start
in 5 seconds.
10

GEAppliances.com
Manual Detergent Dispenser
Somemodelscomeequippedwithan automaticliquid
dishwasherdetergentdispenser(SmartDispenseTM) and
a manualdispenser.Youcanuseeitherofthesedispensers
butdon'tusebothatthesametime.
\
SmartDispense TM
Manual Detergent
Dispenser
Thecoverofthemanualdispenserwillopenduringthe
washcycle.IfyouareusingSmartDispenseTM, leavethe
coverofthe manualdispenseropenbeforestartingthe
cycle.
Forthemanualdispenser,Cascade®Automatic
DishwashingDetergentshavebeenapproved.Youmay use
powder,liquid,gelpacketsortabletsinthisdispenser.Itis
importantto keeppowdereddetergentsandtabletsfresh
anddrysothey don'tloseeffectiveness.Therefore,donot
putdetergentintothemanualdispenseruntilyou areready
towashdishes.
Forheavilysoiledloads,useabit moredetergent.Forwater
temperaturesabove140°F,useabitlessdetergent.
Medium Medium Extremely
Soft Soft Hard Hard
Forheavilysoiledloads,usetheDeepCleanorCookwarecycle.
DO NOTUSEHANDDISH DETERGENT
m
m
Filfing Manual Detergent Dispenser
Theamountofdetergentto usedependsonwhetheryour
waterishardor soft.Withhardwater,youneedextra
detergent.Withsoftwater,youneedlessdetergent.
Protectyourdishesanddishwasherby contactingyour
waterdepartmentandaskinghowhardyourwateris.
Twelveor moregrainsisextremelyhardwater.Awater
softenerisrecommended.Withoutit,limecanbuildup in
thewatervalve,whichcouldstickwhileopenandcause
flooding.Toomuchdetergentwithsoftwatercancause
a permanentcloudinessofglassware,calledetching.
Usetheinformationinthetablebelowasa guideto
determinetheamountofautomaticdishwasherdetergent
toplaceinthedispenser.
Whenusingautomaticdishwashingdetergentpackets
ortablets,simplyplaceoneinthemainwashsectionand
closethecover.
NOTE;Usingadetergentthatisnotspecificallgdesigned
fordishwasherswillcausethedishwasherto fillwithsuds.
Duringoperation,thesesudswillspillout ofthedishwasher
vents,coveringthekitchenfloorandmakingthefloorwet.
Becausesomanydetergentcontainerslookalike,store
thedishwasherdetergentina separatespacefromall
othercleaners.Showanyonewhomay usethedishwasher
thecorrectdetergentandwhereit isstored.
Whiletherewillbenolastingdamagetothe dishwasher,
yourdisheswillnotgetcleanusinga dishwashing
detergentthat isnotformulatedto workwith dishwashers.
Number
of Grains Detergent Cups to Fill
Lessthan 4 Fillcup to soft line (1/5 full)
/4to 8 Fillcup to medium soft line (2/5 full)
8 to 12 Fillcup to medium hard line
(completely full)
Greater Fillboth main wash cup
than 12 and pre wash cup
11
Using the dishwasher.
SmartDispense TÈDetergent Dispenser (some models)
Thisdishwashermay haveSmartDispensdM,a feature
which automaticallydispensesliquidautomatic
dishwasherdetergentinto eachcyclebasedon soillevel
and water hardness.Toutilizethe SmartDispensdM
DetergentDispenser,it mustfirst befilled.Althoughany
liquidor gelautomatic dishwashingdetergentcan be
usedinthe SmartDispensd_system,all liquidor gel
automatic dishwashingdetergentsare not the same.
Hostautomatic dishwashingdetergentsarechlorine
bleach-based(suchasCascade®)while otherscontain
enzymes(suchasCascadeComplete®).
Donot mixany chlorine bleach-basedautomatic
dishwashing detergent with any dishwashing
detergent containing enzymesas this could cause
the detergents to congealand lead to blockageof
the SmartDispenseT'system.
Checkthe detergent labelto determineif the detergent
ischlorine bleach-basedor one that contains enzymes.
It isrecommendedthat the sametype of detergent be
usedwhen refillingyour SmartDispenseTMsystem.
-&CAUTION! Absolutely do not add
powder detergent, tablets or any liquid soap
or detergent normally used for washing hands
or dishes in a sink. Only use liquid or gel
detergent specifically designed for use in
an automatic dishwasher.
,&iPRECAUCIGN!Bajo ninguna
circunstancia agregue detergente en polvo,
tabletas ojab6n o detergente Ifquido
normalmente utilizado para lavar manos o
platos en un fregadero. S61outilice detergente
Ifquido o en gel especificamente dise_ado para
utilizar en lavaplatos automdticos.
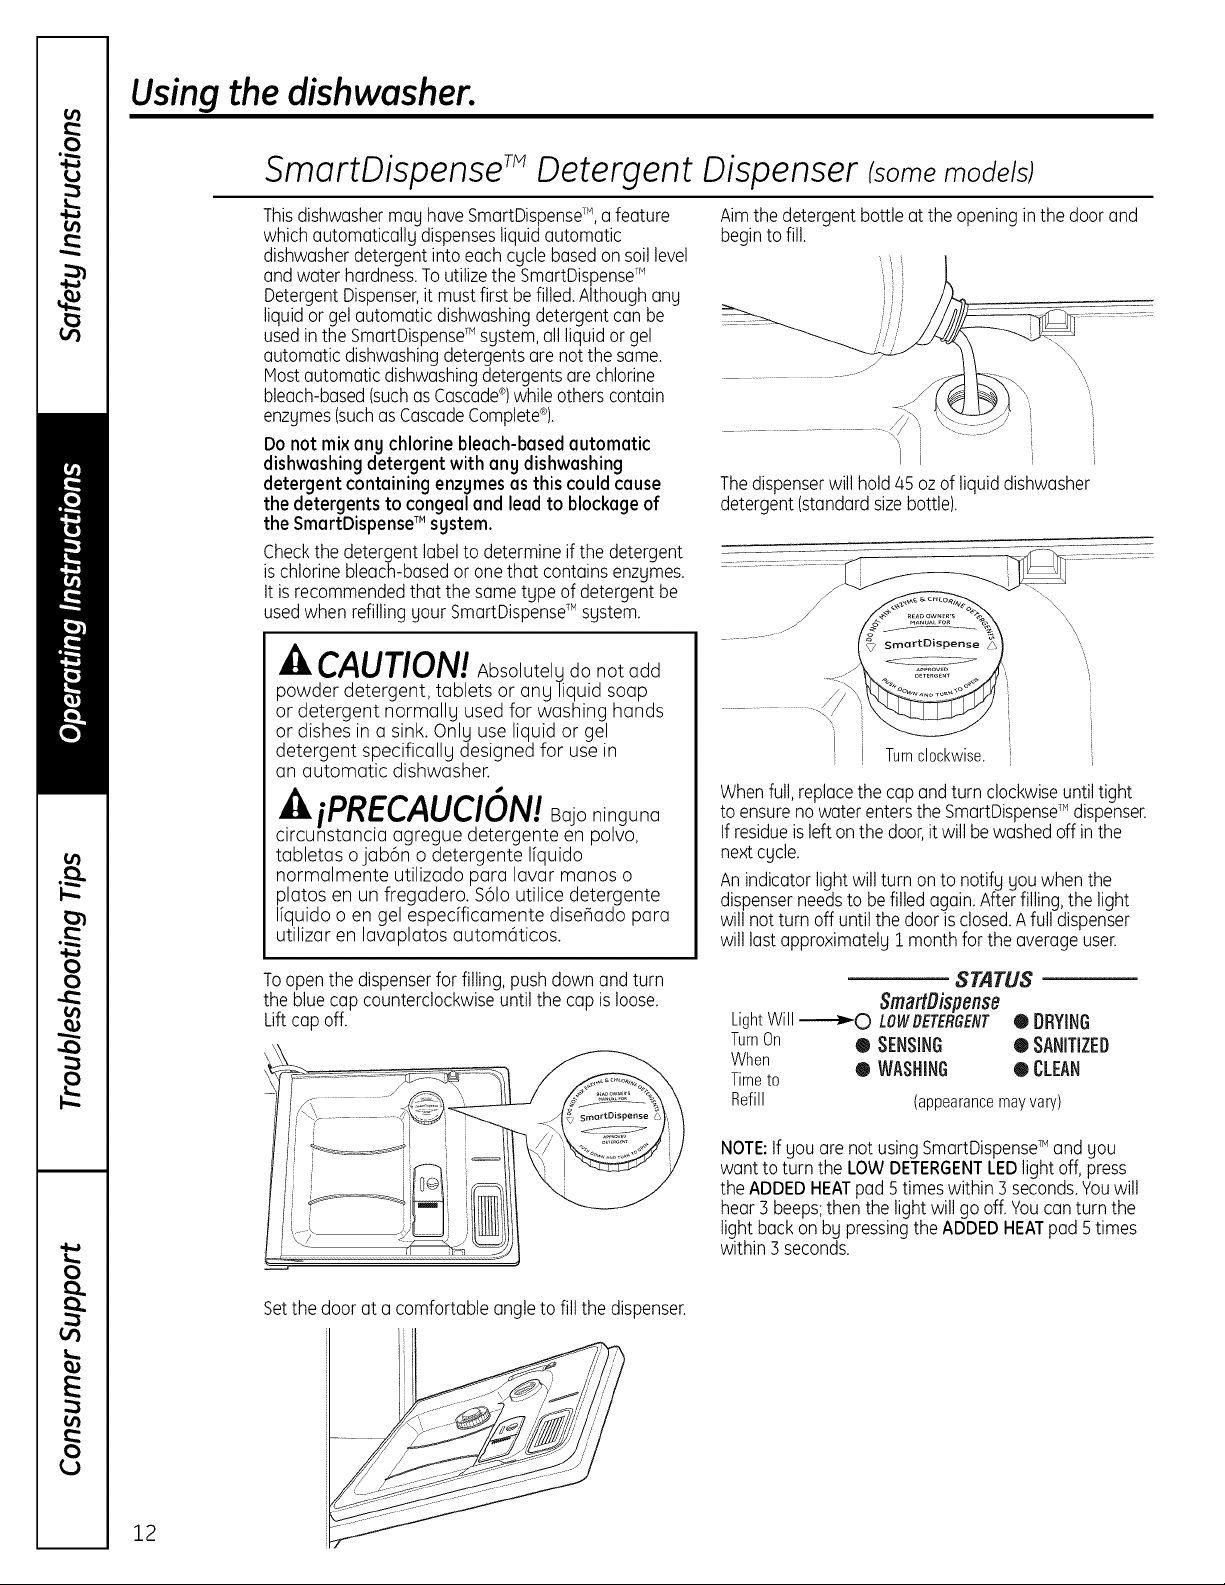
Aimthe detergent bottleat the openinginthe doorand
beginto fill.
................ / i [
,\
, i
Thedispenserwill hold/45ozof liquiddishwasher
detergent (standard size bottle).
-\
Turnclockwise.
[
i
i
i
Whenfull,replacethecap and turn clockwiseuntiltight
to ensurenowater entersthe SmartDispenseTMdispenser.
If residueislefton the door,itwill bewashedoff inthe
nextcycle.
Anindicatorlight willturn onto notify you whenthe
dispenserneedsto befilled again.Afterfilling,the light
willnot turn off untilthedoor is closed.Afull dispenser
willlast approximately1 monthfor theaverageuser.
Toopen the dispenserfor filling, pushdown and turn
the bluecap counterclockwiseuntil thecap isloose.
Liftcap off.
STATUS
SmartBispense
LightWill_ LOWBETERGENT0 DRYING
TurnOn • SENSING ® SANITIZED
When
® WASHING ® CLEAN
Timeto
Refill (appearancemayvary)
NOTE:Ifyou are notusing SmartDispenseTMand you
wantto turn the LOWDETERGENTLEDlightoff, press
the ADDEDHEATpad 5timeswithin Bseconds.Youwill
hearBbeeps;then the lightwill go off. Youcan turn the
lightbackon by pressingtheADDEDHEATpad 5 times
within Bseconds.
12
Setthe door at a comfortable angleto fill the dispenser.
GEAppliances.com
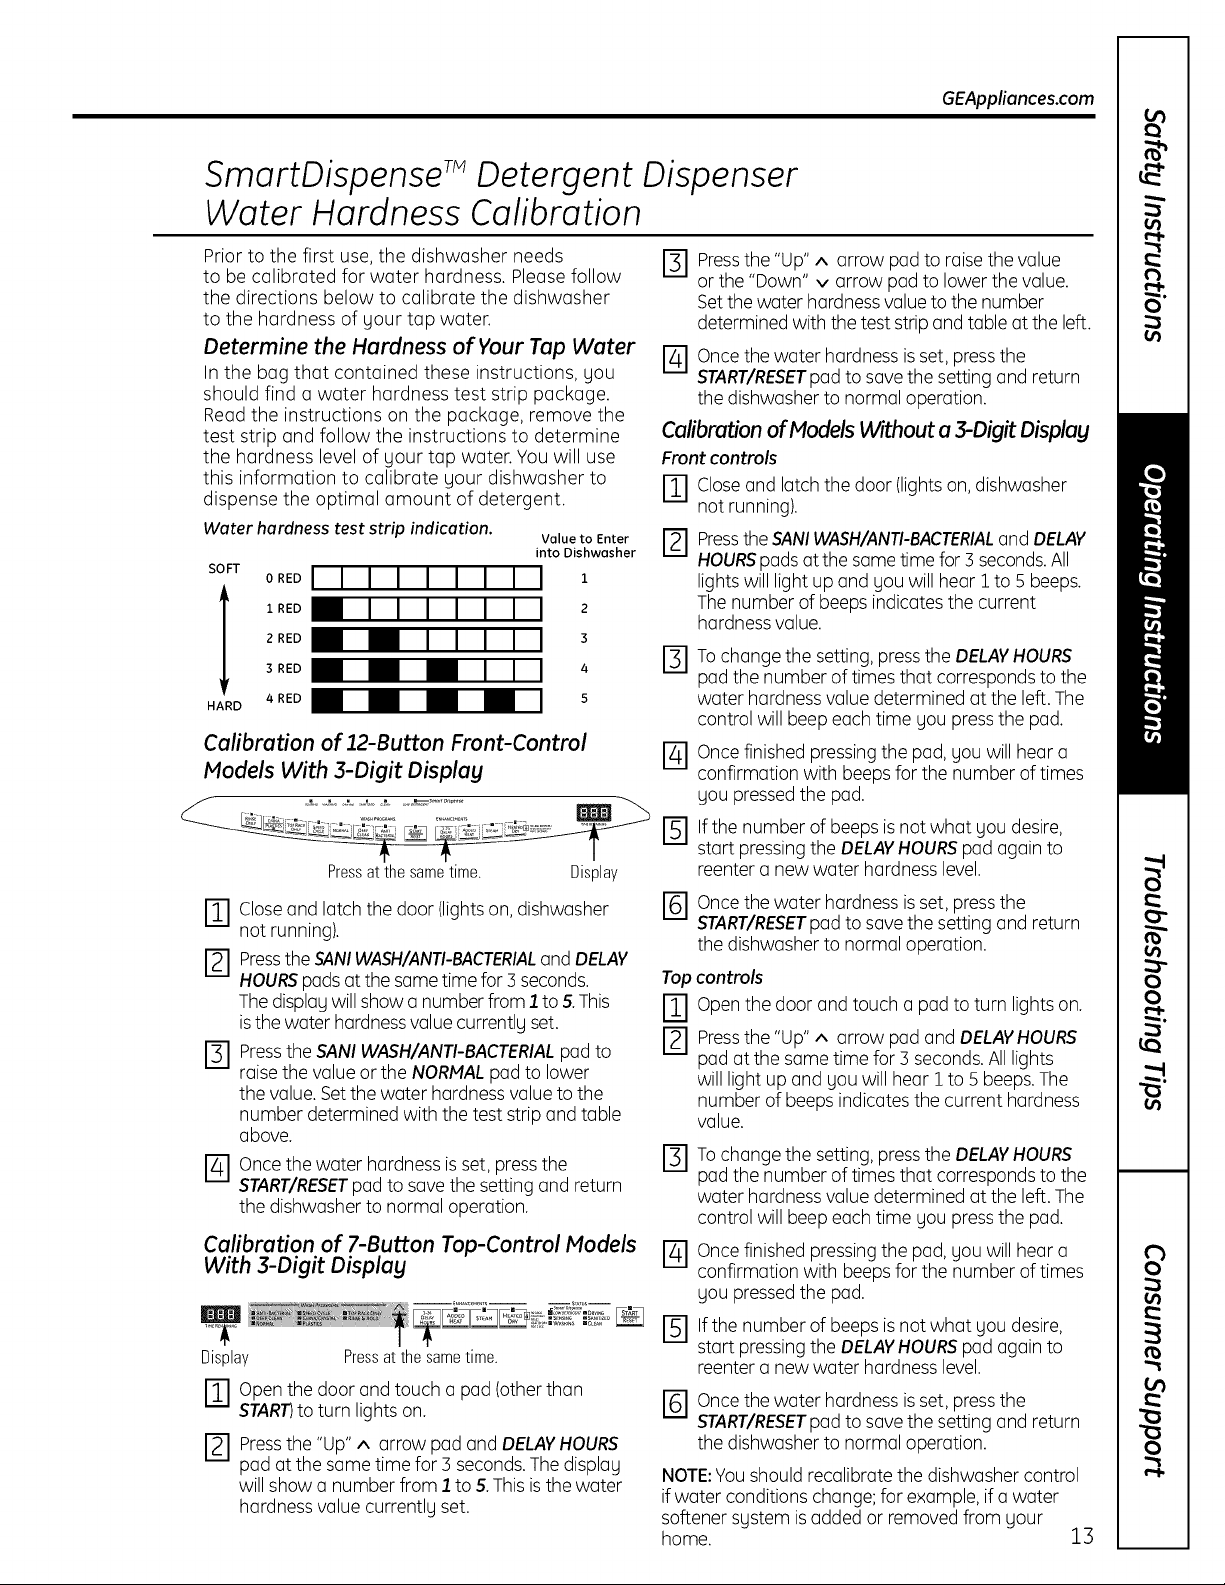
SmartDispense Detergent Dispenser
Water Hardness Calibration
Prior to the first use, the dishwasher needs
to be calibrated for water hardness. Pleasefollow
the directions below to calibrate the dishwasher
to the hardness of gour tap water.
Determine the Hardness of Your Tap Water
In the bag that contained these instructions, gou
should find a water hardness test strip package.
Readthe instructions on the package, remove the
test strip and follow the instructions to determine
the hardness level of gour tap water. You will use
this information to calibrate gour dishwasher to
dispense the optimal amount of detergent.
Water hardness test strip indication. Valueto Enter
into Dishwasher
SO FT
OREDII I I I I I I I 1
1 RED _ 2
2 RED _ 3
3 RED _ 4
HARD 4 RED _ 5
1-31Pressthe "Up" A arrow pad to raisethe value
or the "Down" v arrow pad to lower the value.
Setthe water hardnessvalue to the number
determined with the test strip and table at the left.
1-4-IOncethe water hardness isset, pressthe
START/RESETpad to save the setting and return
the dishwasher to normal operation.
Calibration of Models Without a 3-Digit Display
Front controls
[]
Calibration of 12-Button Front-Control _1
Models With 3-Digit Displag
Pressatthesametime. Display
I--A'I
m Closeand latch the door (lightson,dishwasher Ibl
i-,-i
not running).
_] Pressthe SANIWASH/ANTI-BACTERIALand DELAY
HOURSpadsat the sametime for 3 seconds. Top
Thedisplagwill show a numberfrom I.to 5.This FI
isthe water hardnessvalue currentlg set.
E] PresstheSANI WASH/ANTI-BACTERIALpad to 141
raisethe value or the NORMALpad to lower
the value. Setthe water hardnessvalue to the
number determined with the test strip and table
above.
@
@
Oncethe water hardness is set, pressthe
START/RESETpad to savethe setting and return
the dishwasherto normal operation.
Calibration of 7-Button Top-Control Models _1
With 3-Digit Displag
Closeand latch the door (lightson, dishwasher
not running).
PresstheSANIWASH/ANTI-BACTERIALand DELAY
HOURSpads atthe sametime for 3 seconds.All
lights will light up and gou will hear I to 5 beeps.
Thenumber of beeps indicates the current
hardness value.
............ P_¢ .................... -- m m m j,,,-,,_,_ ....
TT
Display Pressatthesametime.
FI"] Openthe door and touch a pad (otherthan
STAR#to turn lights on.
_] Pressthe "Up" A arrow pad and DELAYHOURS
pad at the same time for 3 seconds.The display
will show a number from 1 to 5.Thisis the water
hardnessvalue currently set.
Tochange the setting,press the DELAYHOURS
pad the number of times that correspondsto the
water hardnessvalue determined at the left. The
control will beep each time you pressthe pad.
Oncefinished pressingthe pad,gou will hear a
confirmation with beepsfor the number of times
gou pressedthe pad.
Ifthe number of beepsis not what gou desire,
start pressingthe DELAYHOURSpad again to
reenter a new water hardness level.
Oncethe water hardness is set, pressthe
START/RESETpad to save the setting and return
the dishwasher to normal operation.
controls
Open the door and touch a pad to turn lights on.
Pressthe "Up" A arrow pad and DELAYHOURS
pad at the same time for 5 seconds.All lights
will light up and gouwill hear I to 5 beeps.The
number of beeps indicatesthe current hardness
value.
Tochange the setting,press the DELAYHOURS
pad the number of times that correspondsto the
water hardnessvalue determined at the left. The
control will beep each time you pressthe pad.
Oncefinished pressingthe pad,gou will hear a
confirmation with beepsfor the number of times
gou pressedthe pad.
r_lf the number of beeps isnot what you desire,
start pressingthe DELAYHOURSpad again to
reenter a new water hardness level.
FI Oncethe water hardness isset, pressthe
START/RESETpad to save the setting and return
the dishwasher to normal operation.
NOTE:Youshould recalibrate the dishwasher control
if water conditions change;for example, if a water
softener sgstem is added or removed from gour
home. 13
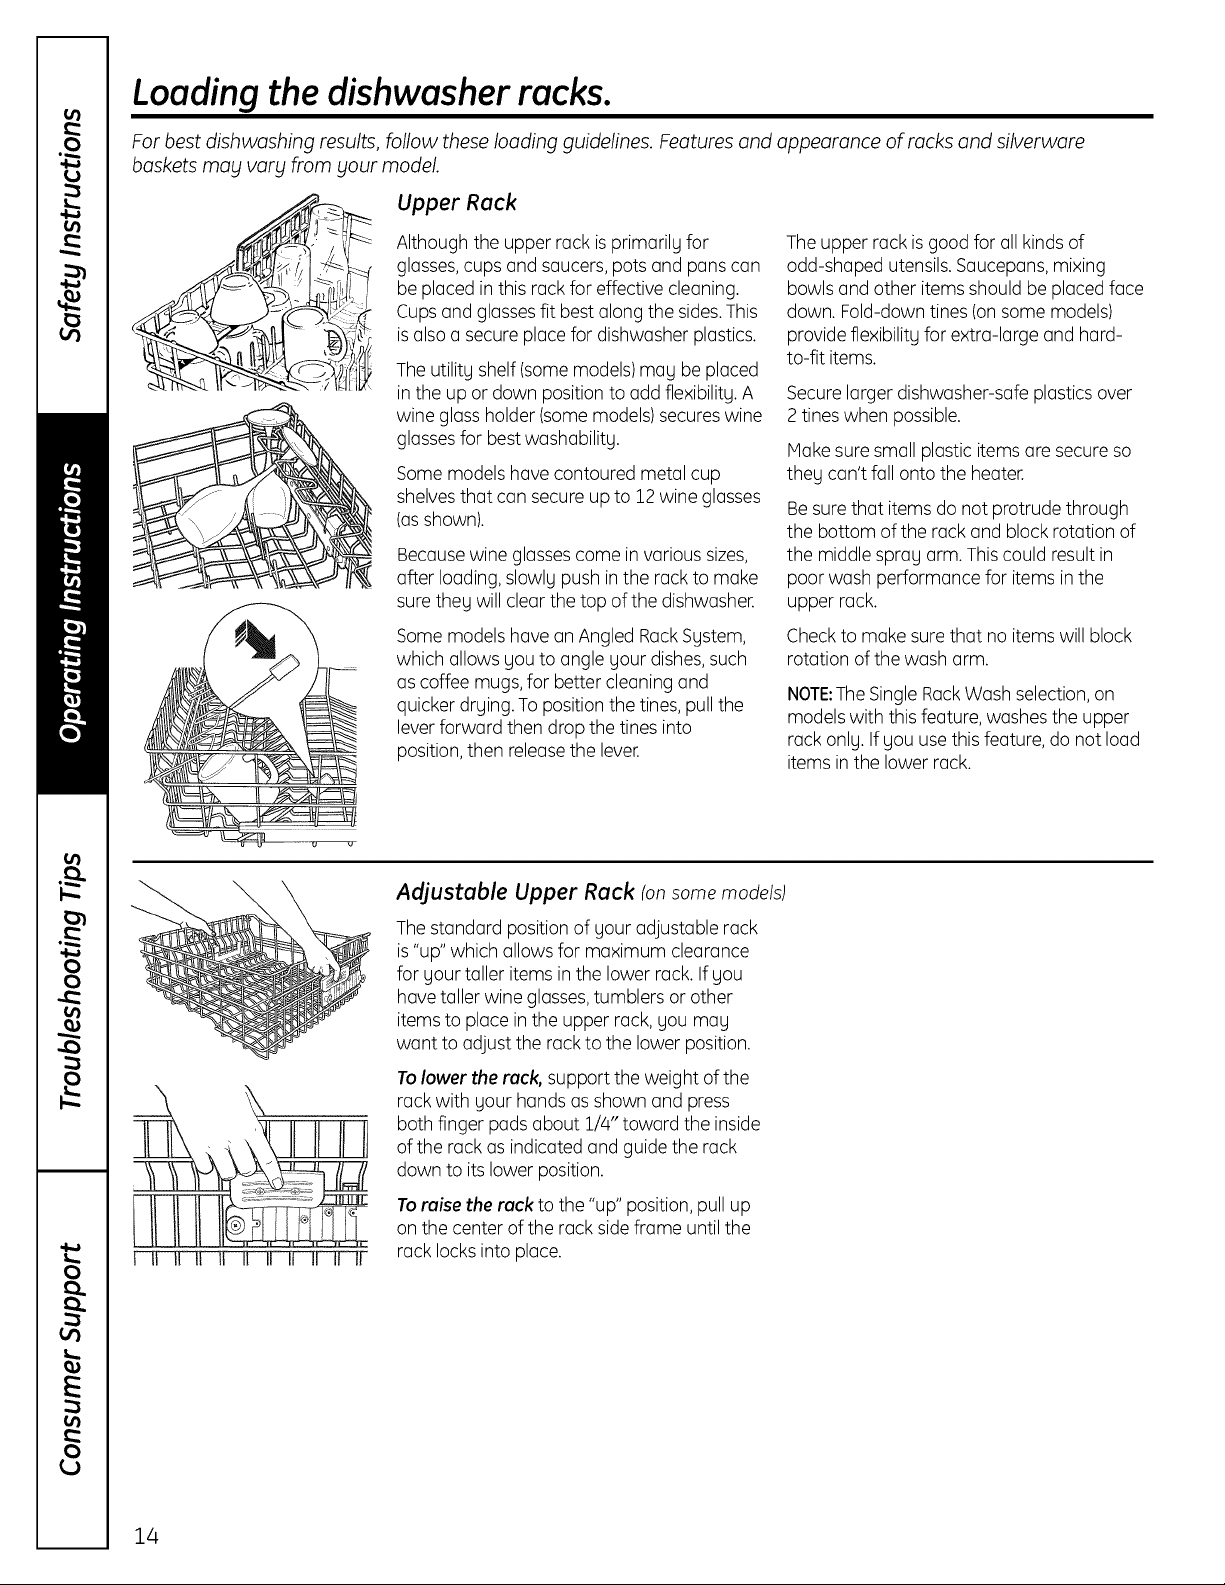
Loading the dishwasher racks.
For best dishwashing results, follow these loading guidelines. Features and appearance of racks and silverware
baskets may vary from your model.
Upper Rack
Although the upper rock isprimarily for
glosses,cups and saucers, pots and pans con
be placed in this rack for effective cleaning.
Cupsand glosses fit bestalong the sides.This
isalso a secure place for dishwasher plastics.
Theutility shelf (somemodels)may be placed
in the up or down position to add flexibility.A
wine glass holder (somemodels)secureswine
glassesfor best washability.
Somemodels hovecontoured metal cup
shelvesthat con secure up to 12wine glosses
(asshown).
Becausewine glossescome in various sizes,
offer loading, slowly push in the rock to make
surethey will clearthe top of the dishwasher.
Somemodels hoveon Angled RockSystem,
which allows you to angle your dishes,such
as coffee mugs,for better cleaning and
quicker drying. To position the tines,pull the
leverforward then drop the tines into
position,then releasethe lever.
The upper rock isgood for oil kinds of
odd-shaped utensils.Saucepans,mixing
bowls and other items should be placed face
down. Fold-down tines (onsome models)
provide flexibility for extra-large and hard-
to-fit items.
Securelarger dishwasher-safe plastics over
2 tines when possible.
Make suresmall plastic items ore secure so
they can't foil onto the heater.
Be surethat items do not protrude through
the bottom of the rack and block rotation of
the middle spray arm. This could result in
poor wash performance for items in the
upper rock.
Checkto make surethat no items will block
rotation of the wash arm.
NOTE:TheSingle RockWashselection,on
models with this feature,washes the upper
rock only. If you usethis feature, do not load
items in the lower rock.
Adjustable Upper Rack (onsomemodels)
Thestandard position of your adjustable rack
is"up" which allows for maximum clearance
for your taller items in the lower rack. If you
have taller wine glasses,tumblers or other
items to place inthe upper rack, you may
want to adjust the rack to the lower position.
Tolower the rack, support the weight of the
rock with your hands asshown and press
both finger pods about 1/4" toward the inside
of the rock as indicated and guide the rock
down to its lower position.
Toraise the rack to the "up" position,pull up
on the center of the rock sideframe until the
rock locks into place.
14

GEAppliances.com
Lower Rack
The lower rock is best used for plates, saucers
and cookware. Large items such as broiler
pans and baking rocks should go along the
left-hand side. Load plotters, pots and bowls
along the sides,incorners or in the back.The
soiledside of itemsshould face the center of
the rock. If necessarg,oversizedglossesand
mugs con be placedin the lower rock to
maximize loading flexibilitg.
Also,be careful not to let a portion of on item
such as a pot or dish handle extend through
the bottom rock.Thiscould blockthe wash
arm and cause poorwashing results.
Fold-down tines (onsome models)provide
flexibilitg for extra-large and hard-to-fit items.
Thetines mag be left inthe up position or
folded down to customize the lower rock.Do
not load large bowlsor pots facedown in the
front left-hand corner.Items loaded in this
manner could prevent proper operation of
the manual detergent cup.
One-piece basket (ell some models)
Three-piece basket (ell some models)
Don'tlet any
itemextendthrough
bottom.
Silverware Basket
Toload flatware, simplg pushthe adjustable
handle to either side(onsome models).Put
flatware in the removable basketwith fork
and knife handles up to protect gour hands.
Placespoons in the basketwith handles
down. Mix knives,forks and spoons sotheg
don't nesttogether. Distribute evenlg.Small
plastic items, such as measuring spoons and
lidsfrom small containers should go in the
bottom ofthe silverware basketwith the
silverware on top.
Theone-piece silverware basket (on some
models)con be placed in the front, right side
or back of the lower rock.
A varietg of options isavailable regarding
the three-piece silverware basket (onsome
models)in gour dishwasher.Thecomplete
basket isdesigned to fit onthe right sideof
the lower rock.Additionallg, each end of
the basket is removable to odd loading
flexibilitg to accommodate flatware and
lower rock capacitg needs.
Thelids of both end and middle baskets(on
some models)con be closedto contain small
items. Long items con be placed on the utilitg
shelf in the upper rock.Load flatware through
the slots in the silverware basket covers.
Toremove end baskets, grasp the basket at
opposite corners and slide apart.
15
 Loading...