


WELCOME . . . . . . . . . . . . . . . . . . . . . . . . . . . . . . . . . . . . . . . . . . . . . . . . . . . . . . .10
CONTROLLABLE UNITED STATES SUBMARINES . . . . . . . . . . . . . . . . . . . . . . . . . . . . . . . .10 CONTROLLABLE RUSSIAN SUBMARINES . . . . . . . . . . . . . . . . . . . . . . . . . . . . . . . . . . . . .10 MANUAL STRUCTURE – AN OVERVIEW . . . . . . . . . . . . . . . . . . . . . . . . . . . . . . . . . . . . . . .10
GAMEPLAY OVERVIEW . . . . . . . . . . . . . . . . . . . . . . . . . . . . . . . . . . . . . . . . . . . . .11
TERMS DEFINED . . . . . . . . . . . . . . . . . . . . . . . . . . . . . . . . . . . . . . . . . . . . . . . . . . . . . . .12 3D AND THE NAVIGATION MAP . . . . . . . . . . . . . . . . . . . . . . . . . . . . . . . . . . . . . . . . . . . . .13
WHAT YOU SEE ISN’T ALWAYS WHAT IS THERE! . . . . . . . . . . . . . . . . . . . . . . . . . . . . .13 3D VIEW IN A SUB GAME? . . . . . . . . . . . . . . . . . . . . . . . . . . . . . . . . . . . . . . . . . . . .14
OVERVIEW OF SHIP STATIONS . . . . . . . . . . . . . . . . . . . . . . . . . . . . . . . . . . . . . . . . . . . . .15
TASK BAR . . . . . . . . . . . . . . . . . . . . . . . . . . . . . . . . . . . . . . . . . . . . . . . . . . . . . . . .15 NAVIGATION . . . . . . . . . . . . . . . . . . . . . . . . . . . . . . . . . . . . . . . . . . . . . . . . . . . . . .15 SHIP CONTROL . . . . . . . . . . . . . . . . . . . . . . . . . . . . . . . . . . . . . . . . . . . . . . . . . . . .15 SONAR: BROADBAND . . . . . . . . . . . . . . . . . . . . . . . . . . . . . . . . . . . . . . . . . . . . . . .15 SONAR: NARROWBAND . . . . . . . . . . . . . . . . . . . . . . . . . . . . . . . . . . . . . . . . . . . . . .15 SONAR: DEMON . . . . . . . . . . . . . . . . . . . . . . . . . . . . . . . . . . . . . . . . . . . . . . . . . . .16 SONAR: ACTIVE . . . . . . . . . . . . . . . . . . . . . . . . . . . . . . . . . . . . . . . . . . . . . . . . . . . .16 SONAR: ACTIVE INTERCEPT . . . . . . . . . . . . . . . . . . . . . . . . . . . . . . . . . . . . . . . . . . .16 SONAR: SSP . . . . . . . . . . . . . . . . . . . . . . . . . . . . . . . . . . . . . . . . . . . . . . . . . . . . . .16 TMA . . . . . . . . . . . . . . . . . . . . . . . . . . . . . . . . . . . . . . . . . . . . . . . . . . . . . . . . . . . .16 FIRE CONTROL: TARGET DISPLAY . . . . . . . . . . . . . . . . . . . . . . . . . . . . . . . . . . . . . . .16 FIRE CONTROL: LAUNCH PANEL . . . . . . . . . . . . . . . . . . . . . . . . . . . . . . . . . . . . . . . .16 FIRE CONTROL: COUNTERMEASURE LAUNCHER (SEAWOLF ONLY) . . . . . . . . . . . . . . .16 FIRE CONTROL: WEAPON STORES . . . . . . . . . . . . . . . . . . . . . . . . . . . . . . . . . . . . . .17 RADAR . . . . . . . . . . . . . . . . . . . . . . . . . . . . . . . . . . . . . . . . . . . . . . . . . . . . . . . . . .17 RADIO/ESM . . . . . . . . . . . . . . . . . . . . . . . . . . . . . . . . . . . . . . . . . . . . . . . . . . . . . . .17 PERISCOPE/STADIMETER . . . . . . . . . . . . . . . . . . . . . . . . . . . . . . . . . . . . . . . . . . . . .17 UNDER ICE DISPLAY . . . . . . . . . . . . . . . . . . . . . . . . . . . . . . . . . . . . . . . . . . . . . . . .17
1

AUTO CREW ASSISTANCE . . . . . . . . . . . . . . . . . . . . . . . . . . . . . . . . . . . . . . . . . . . . . . . .18 MISSION STATUS . . . . . . . . . . . . . . . . . . . . . . . . . . . . . . . . . . . . . . . . . . . . . . . . . . . . . .18 ENDING A MISSION . . . . . . . . . . . . . . . . . . . . . . . . . . . . . . . . . . . . . . . . . . . . . . . . . . . . .18 MISSION DEBRIEF . . . . . . . . . . . . . . . . . . . . . . . . . . . . . . . . . . . . . . . . . . . . . . . . . . . . . .19
STATUS SCREEN . . . . . . . . . . . . . . . . . . . . . . . . . . . . . . . . . . . . . . . . . . . . . . . . . . .19 REPLAY SCREEN . . . . . . . . . . . . . . . . . . . . . . . . . . . . . . . . . . . . . . . . . . . . . . . . . . .19
MAIN MENU . . . . . . . . . . . . . . . . . . . . . . . . . . . . . . . . . . . . . . . . . . . . . . . . . . . . . .20
CHOOSE PLAYER NAME . . . . . . . . . . . . . . . . . . . . . . . . . . . . . . . . . . . . . . . . . . . . . . . . . .20 MISSIONS . . . . . . . . . . . . . . . . . . . . . . . . . . . . . . . . . . . . . . . . . . . . . . . . . . . . . . . . . . . .20
TRAINING MISSIONS . . . . . . . . . . . . . . . . . . . . . . . . . . . . . . . . . . . . . . . . . . . . . . . .22 SINGLE MISSIONS . . . . . . . . . . . . . . . . . . . . . . . . . . . . . . . . . . . . . . . . . . . . . . . . . .22 SAVED MISSIONS . . . . . . . . . . . . . . . . . . . . . . . . . . . . . . . . . . . . . . . . . . . . . . . . . .23
MISSION BRIEF . . . . . . . . . . . . . . . . . . . . . . . . . . . . . . . . . . . . . . . . . . . . . . . .23
WEAPONS LOADOUT . . . . . . . . . . . . . . . . . . . . . . . . . . . . . . . . . . . . . . . . . . . . . . . .24
CAMPAIGN . . . . . . . . . . . . . . . . . . . . . . . . . . . . . . . . . . . . . . . . . . . . . . . . . . . . . . . . . . .25
THE STAGE WAS SET . . . . . . . . . . . . . . . . . . . . . . . . . . . . . . . . . . . . . . . . . . . . . . . .25 RUSSIA RESURGENT . . . . . . . . . . . . . . . . . . . . . . . . . . . . . . . . . . . . . . . . . . . . . . . .26 CAMPAIGN ORGANIZATION . . . . . . . . . . . . . . . . . . . . . . . . . . . . . . . . . . . . . . . . . . . .26
MULTIPLAYER . . . . . . . . . . . . . . . . . . . . . . . . . . . . . . . . . . . . . . . . . . . . . . . . . . . . . . . . .27 MISSION EDITOR . . . . . . . . . . . . . . . . . . . . . . . . . . . . . . . . . . . . . . . . . . . . . . . . . . . . . . .28 PLAYER’S LOG . . . . . . . . . . . . . . . . . . . . . . . . . . . . . . . . . . . . . . . . . . . . . . . . . . . . . . . .28 OPTIONS . . . . . . . . . . . . . . . . . . . . . . . . . . . . . . . . . . . . . . . . . . . . . . . . . . . . . . . . . . . . .29
CHANGING HOT KEY ASSIGNMENTS . . . . . . . . . . . . . . . . . . . . . . . . . . . . . . . . . . . . .31 SAVING OPTIONS CHANGES AND RESTORING DEFAULTS . . . . . . . . . . . . . . . . . . . . . .32 NOVICE AND ADVANCED DEFAULTS . . . . . . . . . . . . . . . . . . . . . . . . . . . . . . . . . . . . .32
USNI REFERENCE . . . . . . . . . . . . . . . . . . . . . . . . . . . . . . . . . . . . . . . . . . . . . . . . . . . . . .32
USING THE BROWSER . . . . . . . . . . . . . . . . . . . . . . . . . . . . . . . . . . . . . . . . . . . . . . .32 PLATFORM-SPECIFIC INFORMATION . . . . . . . . . . . . . . . . . . . . . . . . . . . . . . . . . . . . .33
EXIT . . . . . . . . . . . . . . . . . . . . . . . . . . . . . . . . . . . . . . . . . . . . . . . . . . . . . . . . . . . . . . . .34
SHIP STATIONS . . . . . . . . . . . . . . . . . . . . . . . . . . . . . . . . . . . . . . . . . . . . . . . . . . .34
GENERAL INFORMATION . . . . . . . . . . . . . . . . . . . . . . . . . . . . . . . . . . . . . . . . . . . . . . . . .34
SELECTED OPTIONS . . . . . . . . . . . . . . . . . . . . . . . . . . . . . . . . . . . . . . . . . . . . . . . .34 SYSTEM MENU . . . . . . . . . . . . . . . . . . . . . . . . . . . . . . . . . . . . . . . . . . . . . . . . . . . .34 SEAWOLF BUTTON MATRIX . . . . . . . . . . . . . . . . . . . . . . . . . . . . . . . . . . . . . . . . . . .35 MANUAL DESCRIPTIONS . . . . . . . . . . . . . . . . . . . . . . . . . . . . . . . . . . . . . . . . . . . . .35
TASK BAR . . . . . . . . . . . . . . . . . . . . . . . . . . . . . . . . . . . . . . . . . . . . . . . . . . . . . . . . . . . .35
STATIONS MENU . . . . . . . . . . . . . . . . . . . . . . . . . . . . . . . . . . . . . . . . . . . . . . . . . . .36 ORDERS MENU . . . . . . . . . . . . . . . . . . . . . . . . . . . . . . . . . . . . . . . . . . . . . . . . . . . .36
FIRE TUBE . . . . . . . . . . . . . . . . . . . . . . . . . . . . . . . . . . . . . . . . . . . . . . . . . . . .36 NAVIGATE . . . . . . . . . . . . . . . . . . . . . . . . . . . . . . . . . . . . . . . . . . . . . . . . . . . .37 MASTS AND ANTENNAS . . . . . . . . . . . . . . . . . . . . . . . . . . . . . . . . . . . . . . . . . .37 COUNTERMEASURES . . . . . . . . . . . . . . . . . . . . . . . . . . . . . . . . . . . . . . . . . . . .38
2

HISTORY DISPLAY . . . . . . . . . . . . . . . . . . . . . . . . . . . . . . . . . . . . . . . . . . . . . . . . . |
.38 |
HISTORY SELECTION BUTTONS . . . . . . . . . . . . . . . . . . . . . . . . . . . . . . . . . . . . |
.38 |
HISTORY WINDOW . . . . . . . . . . . . . . . . . . . . . . . . . . . . . . . . . . . . . . . . . . . . . . |
39 |
MANEUVER SHORTCUTS AND GAME READOUTS . . . . . . . . . . . . . . . . . . . . . . . . . . . . |
39 |
DEPTH, COURSE AND SPEED . . . . . . . . . . . . . . . . . . . . . . . . . . . . . . . . . . . . . . |
39 |
KEEL . . . . . . . . . . . . . . . . . . . . . . . . . . . . . . . . . . . . . . . . . . . . . . . . . . . . . . . |
39 |
GAME TIME/PAUSE INDICATOR . . . . . . . . . . . . . . . . . . . . . . . . . . . . . . . . . . . . . |
40 |
TIME COMPRESSION SCALE . . . . . . . . . . . . . . . . . . . . . . . . . . . . . . . . . . . . . . . |
40 |
NAVIGATION STATION . . . . . . . . . . . . . . . . . . . . . . . . . . . . . . . . . . . . . . . . . . . . . . . . . . . |
40 |
2D MAP . . . . . . . . . . . . . . . . . . . . . . . . . . . . . . . . . . . . . . . . . . . . . . . . . . . . . . . . . |
41 |
MAP MENU . . . . . . . . . . . . . . . . . . . . . . . . . . . . . . . . . . . . . . . . . . . . . . . . . . . |
41 |
NAV MAP CONTACTS . . . . . . . . . . . . . . . . . . . . . . . . . . . . . . . . . . . . . . . . . . . . |
42 |
CONTACT SYMBOLS . . . . . . . . . . . . . . . . . . . . . . . . . . . . . . . . . . . . . . . . . . . . |
43 |
CONTACT MENU . . . . . . . . . . . . . . . . . . . . . . . . . . . . . . . . . . . . . . . . . . . . . . . |
45 |
OWNSHIP MENU . . . . . . . . . . . . . . . . . . . . . . . . . . . . . . . . . . . . . . . . . . . . . . . |
46 |
DATA DISPLAY INDICATOR (DDI) . . . . . . . . . . . . . . . . . . . . . . . . . . . . . . . . . . . . . . . . |
47 |
3D VIEW . . . . . . . . . . . . . . . . . . . . . . . . . . . . . . . . . . . . . . . . . . . . . . . . . . . . . . . . . |
48 |
3D VIEW CONTROLS . . . . . . . . . . . . . . . . . . . . . . . . . . . . . . . . . . . . . . . . . . . . |
48 |
DISABLING AND HIDING 3D . . . . . . . . . . . . . . . . . . . . . . . . . . . . . . . . . . . . . . . . |
49 |
PLAYING FROM THE NAV STATION . . . . . . . . . . . . . . . . . . . . . . . . . . . . . . . . . . . . . . |
50 |
ATTACKING SEA TARGETS FROM NAV . . . . . . . . . . . . . . . . . . . . . . . . . . . . . . . . |
50 |
LAUNCHING LAND ATTACK MISSILES FROM NAV . . . . . . . . . . . . . . . . . . . . . . . . . |
50 |
OWNSHIP WAYPOINTS . . . . . . . . . . . . . . . . . . . . . . . . . . . . . . . . . . . . . . . . . . . |
50 |
VOICE COMMANDS . . . . . . . . . . . . . . . . . . . . . . . . . . . . . . . . . . . . . . . . . . . . . |
51 |
SHIP CONTROL . . . . . . . . . . . . . . . . . . . . . . . . . . . . . . . . . . . . . . . . . . . . . . . . . . . . . . . . |
52 |
SHIP CONTROL TASKS . . . . . . . . . . . . . . . . . . . . . . . . . . . . . . . . . . . . . . . . . . . . . . . |
52 |
SEAWOLF: SHIP CONTROL STATION . . . . . . . . . . . . . . . . . . . . . . . . . . . . . . . . . . . . . |
53 |
688(I): SHIP CONTROL STATION . . . . . . . . . . . . . . . . . . . . . . . . . . . . . . . . . . . . . . . . |
55 |
AKULA: SHIP CONTROL . . . . . . . . . . . . . . . . . . . . . . . . . . . . . . . . . . . . . . . . . . . . . . |
57 |
SONAR STATIONS . . . . . . . . . . . . . . . . . . . . . . . . . . . . . . . . . . . . . . . . . . . . . . . . . . . . . . |
58 |
SONAR STATION SELECTION BUTTONS . . . . . . . . . . . . . . . . . . . . . . . . . . . . . . . . . . . |
59 |
ABOUT SONAR . . . . . . . . . . . . . . . . . . . . . . . . . . . . . . . . . . . . . . . . . . . . . . . . . . . . |
59 |
SONAR ARRAYS . . . . . . . . . . . . . . . . . . . . . . . . . . . . . . . . . . . . . . . . . . . . . . . . |
60 |
SONAR LIMITATIONS . . . . . . . . . . . . . . . . . . . . . . . . . . . . . . . . . . . . . . . . . . . . |
61 |
BROADBAND SONAR . . . . . . . . . . . . . . . . . . . . . . . . . . . . . . . . . . . . . . . . . . . . . . . . |
62 |
SEAWOLF AND 688(I): BROADBAND WATERFALL DISPLAYS . . . . . . . . . . . . . . . . . |
62 |
AKULA: BROADBAND CIRCULAR SSAZ DISPLAY . . . . . . . . . . . . . . . . . . . . . . . . . |
63 |
ASSIGNING TRACKERS . . . . . . . . . . . . . . . . . . . . . . . . . . . . . . . . . . . . . . . . . . . |
64 |
TOWED ARRAY CONTACTS . . . . . . . . . . . . . . . . . . . . . . . . . . . . . . . . . . . . . . . . |
65 |
SEAWOLF: BROADBAND STATION . . . . . . . . . . . . . . . . . . . . . . . . . . . . . . . . . . . |
65 |
688(I): BROADBAND STATION . . . . . . . . . . . . . . . . . . . . . . . . . . . . . . . . . . . . . . |
67 |
AKULA: BROADBAND STATION . . . . . . . . . . . . . . . . . . . . . . . . . . . . . . . . . . . . . |
68 |
3

NARROWBAND SONAR . . . . . . . . . . . . . . . . . . . . . . . . . . . . . . . . . . . . . . . . . . . . . |
.69 |
SEAWOLF: NARROWBAND SONAR . . . . . . . . . . . . . . . . . . . . . . . . . . . . . . . . . . |
.69 |
688(I): NARROWBAND SONAR . . . . . . . . . . . . . . . . . . . . . . . . . . . . . . . . . . . . . |
.72 |
AKULA: NARROWBAND SONAR . . . . . . . . . . . . . . . . . . . . . . . . . . . . . . . . . . . . |
.75 |
DEMON SONAR STATION . . . . . . . . . . . . . . . . . . . . . . . . . . . . . . . . . . . . . . . . . . . . |
.77 |
SEAWOLF DEMON DISPLAY . . . . . . . . . . . . . . . . . . . . . . . . . . . . . . . . . . . . . . |
.80 |
688(I) DEMON DISPLAY . . . . . . . . . . . . . . . . . . . . . . . . . . . . . . . . . . . . . . . . . |
.81 |
AKULA DEMON DISPLAY . . . . . . . . . . . . . . . . . . . . . . . . . . . . . . . . . . . . . . . . . |
.82 |
ACTIVE SONAR STATION . . . . . . . . . . . . . . . . . . . . . . . . . . . . . . . . . . . . . . . . . . . . |
.83 |
MEDIUM FREQUENCY (MF) ACTIVE SONAR . . . . . . . . . . . . . . . . . . . . . . . . . . . . |
.83 |
HIGH FREQUENCY ACTIVE SONAR (HFAS) . . . . . . . . . . . . . . . . . . . . . . . . . . . . . |
.83 |
USING MEDIUM FREQUENCY ACTIVE SONAR . . . . . . . . . . . . . . . . . . . . . . . . . . . |
.83 |
SEAWOLF AND 688(I): MF ACTIVE SONAR DISPLAYS . . . . . . . . . . . . . . . . . . . . . |
.83 |
AKULA: MEDIUM FREQUENCY ACTIVE SONAR DISPLAY . . . . . . . . . . . . . . . . . . . |
.84 |
ACTIVE SONAR CONTACTS . . . . . . . . . . . . . . . . . . . . . . . . . . . . . . . . . . . . . . . |
.84 |
SEAWOLF: ACTIVE SONAR STATION . . . . . . . . . . . . . . . . . . . . . . . . . . . . . . . . . |
.87 |
SEAWOLF: HIGH FREQUENCY ACTIVE SONAR . . . . . . . . . . . . . . . . . . . . . . . . . . |
.88 |
688(I): ACTIVE SONAR STATION . . . . . . . . . . . . . . . . . . . . . . . . . . . . . . . . . . . . |
.89 |
688(I): HIGH FREQUENCY ACTIVE SONAR . . . . . . . . . . . . . . . . . . . . . . . . . . . . . |
.90 |
AKULA: ACTIVE SONAR STATION . . . . . . . . . . . . . . . . . . . . . . . . . . . . . . . . . . . |
.91 |
AKULA: HIGH FREQUENCY ACTIVE SONAR . . . . . . . . . . . . . . . . . . . . . . . . . . . . |
.91 |
ACTIVE INTERCEPT SONAR STATION . . . . . . . . . . . . . . . . . . . . . . . . . . . . . . . . . . . . |
.91 |
ALL SUBS: BUTTONS AND LABELS . . . . . . . . . . . . . . . . . . . . . . . . . . . . . . . . . |
.92 |
SEAWOLF: ACTIVE INTERCEPT STATION . . . . . . . . . . . . . . . . . . . . . . . . . . . . . . |
.92 |
688(I) ACTIVE INTERCEPT STATION . . . . . . . . . . . . . . . . . . . . . . . . . . . . . . . . . |
.93 |
AKULA ACTIVE INTERCEPT STATION . . . . . . . . . . . . . . . . . . . . . . . . . . . . . . . . . |
.93 |
SSP SONAR STATION (SOUND SPEED PROFILE) . . . . . . . . . . . . . . . . . . . . . . . . . . . . |
.93 |
LAUNCHING AN XBT PROBE . . . . . . . . . . . . . . . . . . . . . . . . . . . . . . . . . . . . . . |
.94 |
SEAWOLF: SSP STATION . . . . . . . . . . . . . . . . . . . . . . . . . . . . . . . . . . . . . . . . . |
.94 |
688(I) SSP STATION . . . . . . . . . . . . . . . . . . . . . . . . . . . . . . . . . . . . . . . . . . . . |
.95 |
AKULA: SSP STATION . . . . . . . . . . . . . . . . . . . . . . . . . . . . . . . . . . . . . . . . . . . |
.95 |
UUV SONAR . . . . . . . . . . . . . . . . . . . . . . . . . . . . . . . . . . . . . . . . . . . . . . . . . . . . . |
.96 |
TARGET MOTION ANALYSES (TMA) STATION . . . . . . . . . . . . . . . . . . . . . . . . . . . . . . . . . . |
.96 |
HOW DOES TMA WORK? . . . . . . . . . . . . . . . . . . . . . . . . . . . . . . . . . . . . . . . . . . . . |
.97 |
THE TMA BOARD . . . . . . . . . . . . . . . . . . . . . . . . . . . . . . . . . . . . . . . . . . . . . . |
.98 |
THE TMA RULER . . . . . . . . . . . . . . . . . . . . . . . . . . . . . . . . . . . . . . . . . . . . . . |
.99 |
THE TMA DOT STACK . . . . . . . . . . . . . . . . . . . . . . . . . . . . . . . . . . . . . . . . . . . |
100 |
TMA ON RADAR, ACTIVE SONAR AND VISUAL CONTACTS . . . . . . . . . . . . . . . . . . . . . |
101 |
TMA ON PASSIVE SONAR AND ESM CONTACTS . . . . . . . . . . . . . . . . . . . . . . . . . . . . |
102 |
TMA ON UUV SENSOR CONTACTS . . . . . . . . . . . . . . . . . . . . . . . . . . . . . . . . . . . . . |
105 |
SEAWOLF: TMA STATION . . . . . . . . . . . . . . . . . . . . . . . . . . . . . . . . . . . . . . . . . . . . |
105 |
688(I) AND AKULA: TMA STATIONS . . . . . . . . . . . . . . . . . . . . . . . . . . . . . . . . . . . . . |
107 |
4

FIRE CONTROL SUITE . . . . . . . . . . . . . . . . . . . . . . . . . . . . . . . . . . . . . . . . . . . . . . . . . .108
BASIC LAUNCH PROCEDURES . . . . . . . . . . . . . . . . . . . . . . . . . . . . . . . . . . . . . . . .108 BASIC LAUNCH PROCEDURES FOR SEA TARGETS . . . . . . . . . . . . . . . . . . . . . . . . . .109 BASIC LAUNCH PROCEDURES FOR LAND TARGETS . . . . . . . . . . . . . . . . . . . . . . . . .109 BASIC LAUNCH PROCEDURES FOR UUVS . . . . . . . . . . . . . . . . . . . . . . . . . . . . . . . .110 BASIC LAUNCH PROCEDURES FOR MINES . . . . . . . . . . . . . . . . . . . . . . . . . . . . . . . .110 TACTICAL WEAPONS . . . . . . . . . . . . . . . . . . . . . . . . . . . . . . . . . . . . . . . . . . . . . . .110
SEAWOLF AND 688(I) WEAPONS . . . . . . . . . . . . . . . . . . . . . . . . . . . . . . . . . . .110 AKULA WEAPONS . . . . . . . . . . . . . . . . . . . . . . . . . . . . . . . . . . . . . . . . . . . . .111
STRATEGIC WEAPONS . . . . . . . . . . . . . . . . . . . . . . . . . . . . . . . . . . . . . . . . . . . . . .112
MINES: SEAWOLF AND 668(I) . . . . . . . . . . . . . . . . . . . . . . . . . . . . . . . . . . . . .112 MINES: AKULA . . . . . . . . . . . . . . . . . . . . . . . . . . . . . . . . . . . . . . . . . . . . . . . .112
COUNTERMEASURES . . . . . . . . . . . . . . . . . . . . . . . . . . . . . . . . . . . . . . . . . . . . . . .112
BASIC STEPS FOR LAUNCHING COUNTERMEASURES . . . . . . . . . . . . . . . . . . . . .112
PRESETS . . . . . . . . . . . . . . . . . . . . . . . . . . . . . . . . . . . . . . . . . . . . . . . . . . . . . . .113
ANTISHIP MISSILE PRESETS . . . . . . . . . . . . . . . . . . . . . . . . . . . . . . . . . . . . . .113 COUNTERMEASURE PRESETS (SEAWOLF ONLY) . . . . . . . . . . . . . . . . . . . . . . . .113 LAND ATTACK MISSILE PRESETS . . . . . . . . . . . . . . . . . . . . . . . . . . . . . . . . . . .113 MINE PRESETS . . . . . . . . . . . . . . . . . . . . . . . . . . . . . . . . . . . . . . . . . . . . . . .114 MISSILE-TORPEDO PRESETS . . . . . . . . . . . . . . . . . . . . . . . . . . . . . . . . . . . . . .114 ROCKET TORPEDO PRESETS . . . . . . . . . . . . . . . . . . . . . . . . . . . . . . . . . . . . . .114 TORPEDO PRESETS . . . . . . . . . . . . . . . . . . . . . . . . . . . . . . . . . . . . . . . . . . . .114 UUV PRESETS . . . . . . . . . . . . . . . . . . . . . . . . . . . . . . . . . . . . . . . . . . . . . . . .115
FIRE CONTROL MAP . . . . . . . . . . . . . . . . . . . . . . . . . . . . . . . . . . . . . . . . . . . . . . .115
CONTACTS WITH LINES OF BEARING . . . . . . . . . . . . . . . . . . . . . . . . . . . . . . . .115
SEAWOLF: FIRE CONTROL SUITE . . . . . . . . . . . . . . . . . . . . . . . . . . . . . . . . . . . . . .115
SEAWOLF: TARGET DISPLAY . . . . . . . . . . . . . . . . . . . . . . . . . . . . . . . . . . . . . .116 SEAWOLF: LAUNCH PANEL . . . . . . . . . . . . . . . . . . . . . . . . . . . . . . . . . . . . . . .118 SEAWOLF: COUNTERMEASURE LAUNCH PANEL . . . . . . . . . . . . . . . . . . . . . . . .120 SEAWOLF: WEAPON INVENTORY . . . . . . . . . . . . . . . . . . . . . . . . . . . . . . . . . . .121
688(I): FIRE CONTROL SUITE . . . . . . . . . . . . . . . . . . . . . . . . . . . . . . . . . . . . . . . . .121
688(I): TARGET DISPLAY . . . . . . . . . . . . . . . . . . . . . . . . . . . . . . . . . . . . . . . . .121 688(I): LAUNCH PANEL . . . . . . . . . . . . . . . . . . . . . . . . . . . . . . . . . . . . . . . . . .123 688(I): WEAPON INVENTORY . . . . . . . . . . . . . . . . . . . . . . . . . . . . . . . . . . . . . .124
AKULA: FIRE CONTROL SUITE . . . . . . . . . . . . . . . . . . . . . . . . . . . . . . . . . . . . . . . . .125
AKULA: TARGET DISPLAY . . . . . . . . . . . . . . . . . . . . . . . . . . . . . . . . . . . . . . . .125 AKULA: LAUNCH PANEL . . . . . . . . . . . . . . . . . . . . . . . . . . . . . . . . . . . . . . . . .127 AKULA: WEAPON INVENTORY . . . . . . . . . . . . . . . . . . . . . . . . . . . . . . . . . . . . .128
RADAR STATION . . . . . . . . . . . . . . . . . . . . . . . . . . . . . . . . . . . . . . . . . . . . . . . . . . . . . .129 RADIO ROOM/ESM STATION . . . . . . . . . . . . . . . . . . . . . . . . . . . . . . . . . . . . . . . . . . . . .131
RADIO MESSAGES . . . . . . . . . . . . . . . . . . . . . . . . . . . . . . . . . . . . . . . . . . . . . . . . .131 RECEIVING RADIO MESSAGES . . . . . . . . . . . . . . . . . . . . . . . . . . . . . . . . . . . . . . . .131
5

ELECTRONIC SUPPORT MEASURES (ESM) . . . . . . . . . . . . . . . . . . . . . . . . . . . . . . . |
.132 |
DETECTING AND CLASSIFYING CONTACTS WITH ESM . . . . . . . . . . . . . . . . . . . . . . |
.132 |
SEAWOLF: RADIO/ESM STATION . . . . . . . . . . . . . . . . . . . . . . . . . . . . . . . . . . . . . . . |
133 |
688(I): RADIO/ESM STATION . . . . . . . . . . . . . . . . . . . . . . . . . . . . . . . . . . . . . . . . . . |
134 |
AKULA: RADIO/ESM STATION . . . . . . . . . . . . . . . . . . . . . . . . . . . . . . . . . . . . . . . . . |
135 |
PERISCOPE AND STADIMETER STATIONS . . . . . . . . . . . . . . . . . . . . . . . . . . . . . . . . . . . . |
136 |
DETECTING CONTACTS WITH THE PERISCOPE . . . . . . . . . . . . . . . . . . . . . . . . . . . . . |
136 |
SEAWOLF: PERISCOPE STATION . . . . . . . . . . . . . . . . . . . . . . . . . . . . . . . . . . . . . . . |
138 |
688(I) PERISCOPE STATION . . . . . . . . . . . . . . . . . . . . . . . . . . . . . . . . . . . . . . . . . . |
139 |
AKULA: PERISCOPE STATION . . . . . . . . . . . . . . . . . . . . . . . . . . . . . . . . . . . . . . . . . |
140 |
STADIMETER STATION . . . . . . . . . . . . . . . . . . . . . . . . . . . . . . . . . . . . . . . . . . . . . . |
141 |
DETERMINING COURSE WITH STADIMETER . . . . . . . . . . . . . . . . . . . . . . . . . . . . |
141 |
SEAWOLF: STADIMETER STATION . . . . . . . . . . . . . . . . . . . . . . . . . . . . . . . . . . |
142 |
688(I): STADIMETER STATION . . . . . . . . . . . . . . . . . . . . . . . . . . . . . . . . . . . . . |
143 |
AKULA: STADIMETER STATION . . . . . . . . . . . . . . . . . . . . . . . . . . . . . . . . . . . . . |
144 |
CLASSIFYING A CONTACT USING THE STADIMETER . . . . . . . . . . . . . . . . . . . . . . |
144 |
UNDER ICE DISPLAY . . . . . . . . . . . . . . . . . . . . . . . . . . . . . . . . . . . . . . . . . . . . . . . . . . . |
145 |
SEAWOLF: UNDER ICE DISPLAY . . . . . . . . . . . . . . . . . . . . . . . . . . . . . . . . . . . . . . . |
145 |
688(I): UNDER ICE DISPLAY . . . . . . . . . . . . . . . . . . . . . . . . . . . . . . . . . . . . . . . . . . |
145 |
AKULA: UNDER ICE DISPLAY . . . . . . . . . . . . . . . . . . . . . . . . . . . . . . . . . . . . . . . . . . |
145 |
AUTO CREWMEN . . . . . . . . . . . . . . . . . . . . . . . . . . . . . . . . . . . . . . . . . . . . . . . . . . . . . . |
146 |
SONAR AUTO CREWMAN . . . . . . . . . . . . . . . . . . . . . . . . . . . . . . . . . . . . . . . . . . . . |
146 |
TMA AUTO CREWMAN . . . . . . . . . . . . . . . . . . . . . . . . . . . . . . . . . . . . . . . . . . . . . . |
147 |
FIRE CONTROL AUTO CREWMAN . . . . . . . . . . . . . . . . . . . . . . . . . . . . . . . . . . . . . . |
147 |
RADAR AUTO CREWMAN . . . . . . . . . . . . . . . . . . . . . . . . . . . . . . . . . . . . . . . . . . . . |
147 |
AUTO-HELMSMAN . . . . . . . . . . . . . . . . . . . . . . . . . . . . . . . . . . . . . . . . . . . . . . . . . |
148 |
SPECIAL OPERATIONS AND PROCEDURES . . . . . . . . . . . . . . . . . . . . . . . . . . . |
148 |
DEPLOYING AND RECOVERING SPECIAL FORCES . . . . . . . . . . . . . . . . . . . . . . . . . . . . . . |
148 |
TO LAUNCH SPECIAL FORCES TEAM . . . . . . . . . . . . . . . . . . . . . . . . . . . . . . . . . . . . |
148 |
TO RETRIEVE SPECIAL FORCES TEAM . . . . . . . . . . . . . . . . . . . . . . . . . . . . . . . . . . . |
149 |
DEPLOYING UUVS . . . . . . . . . . . . . . . . . . . . . . . . . . . . . . . . . . . . . . . . . . . . . . . . . . . . . |
149 |
TO LAUNCH A UUV . . . . . . . . . . . . . . . . . . . . . . . . . . . . . . . . . . . . . . . . . . . . . . . . . |
150 |
TO ENABLE UUV ACTIVE SONAR . . . . . . . . . . . . . . . . . . . . . . . . . . . . . . . . . . . . . . . |
150 |
LAYING MINES . . . . . . . . . . . . . . . . . . . . . . . . . . . . . . . . . . . . . . . . . . . . . . . . . . . . . . . |
150 |
TO LAY A MINEFIELD . . . . . . . . . . . . . . . . . . . . . . . . . . . . . . . . . . . . . . . . . . . . . . . |
151 |
DSRV RESCUES . . . . . . . . . . . . . . . . . . . . . . . . . . . . . . . . . . . . . . . . . . . . . . . . . . . . . . . |
151 |
UNDER ICE OPERATIONS . . . . . . . . . . . . . . . . . . . . . . . . . . . . . . . . . . . . . . . . . . . . . . . . |
152 |
TO SURFACE AND SUBMERGE UNDER THE ICE . . . . . . . . . . . . . . . . . . . . . . . . . . . . |
152 |
MULTIPLAYER . . . . . . . . . . . . . . . . . . . . . . . . . . . . . . . . . . . . . . . . . . . . . . . . . . .153
CONNECTING . . . . . . . . . . . . . . . . . . . . . . . . . . . . . . . . . . . . . . . . . . . . . . . . . . . . . . . .153 TO HOST AN IPX OR TCP/IP GAME . . . . . . . . . . . . . . . . . . . . . . . . . . . . . . . . . . . . . . . . .153
6

LOBBY . . . . . . . . . . . . . . . . . . . . . . . . . . . . . . . . . . . . . . . . . . . . . . . . . . . . . . . . .154 GAME ROOM: HOST OPTIONS . . . . . . . . . . . . . . . . . . . . . . . . . . . . . . . . . . . . . . . . .154
TO JOIN A IPX OR TCP/IP GAME . . . . . . . . . . . . . . . . . . . . . . . . . . . . . . . . . . . . . . . . . . .155
LOBBY . . . . . . . . . . . . . . . . . . . . . . . . . . . . . . . . . . . . . . . . . . . . . . . . . . . . . . . . .155 GAME ROOM: JOIN OPTIONS . . . . . . . . . . . . . . . . . . . . . . . . . . . . . . . . . . . . . . . . .155
MULTIPLAYER MATCHUP GAMES . . . . . . . . . . . . . . . . . . . . . . . . . . . . . . . . . . . . . . . . . .156 MULTIPLAYER OPTIONS . . . . . . . . . . . . . . . . . . . . . . . . . . . . . . . . . . . . . . . . . . . . . . . . .157
MULTIPLAYER DEFAULT SETTINGS . . . . . . . . . . . . . . . . . . . . . . . . . . . . . . . . . . . . .159
CHAT . . . . . . . . . . . . . . . . . . . . . . . . . . . . . . . . . . . . . . . . . . . . . . . . . . . . . . . . . . . . . .159 MULTIPLAYER WARNING AND ERROR MESSAGES . . . . . . . . . . . . . . . . . . . . . . . . . . . . . .160
MISSION EDITOR . . . . . . . . . . . . . . . . . . . . . . . . . . . . . . . . . . . . . . . . . . . . . . . . .161
GETTING STARTED . . . . . . . . . . . . . . . . . . . . . . . . . . . . . . . . . . . . . . . . . . . . . . . . . . . |
.162 |
CREATING A NEW MISSION . . . . . . . . . . . . . . . . . . . . . . . . . . . . . . . . . . . . . . . . . |
.162 |
EDITING AN EXISTING MISSION . . . . . . . . . . . . . . . . . . . . . . . . . . . . . . . . . . . . . . . |
162 |
IMPORTING SCENARIOS . . . . . . . . . . . . . . . . . . . . . . . . . . . . . . . . . . . . . . . . . . . . . |
162 |
MISSION CREATION . . . . . . . . . . . . . . . . . . . . . . . . . . . . . . . . . . . . . . . . . . . . . . . . . . . . |
163 |
MISSION MAP . . . . . . . . . . . . . . . . . . . . . . . . . . . . . . . . . . . . . . . . . . . . . . . . . . . . . . . . |
164 |
MAP READOUTS . . . . . . . . . . . . . . . . . . . . . . . . . . . . . . . . . . . . . . . . . . . . . . . . . . |
164 |
MAP CONTROLS: . . . . . . . . . . . . . . . . . . . . . . . . . . . . . . . . . . . . . . . . . . . . . . |
164 |
MISSION MAP MENU . . . . . . . . . . . . . . . . . . . . . . . . . . . . . . . . . . . . . . . . . . . . . . . |
165 |
OBJECT BUTTONS . . . . . . . . . . . . . . . . . . . . . . . . . . . . . . . . . . . . . . . . . . . . . . . . . . . . . |
166 |
ADD SUBMARINE OR SHIP . . . . . . . . . . . . . . . . . . . . . . . . . . . . . . . . . . . . . . . . . . . |
166 |
ADD GLOBAL GOAL . . . . . . . . . . . . . . . . . . . . . . . . . . . . . . . . . . . . . . . . . . . . . . . . |
166 |
ADD BUILDING . . . . . . . . . . . . . . . . . . . . . . . . . . . . . . . . . . . . . . . . . . . . . . . . . . . |
166 |
MISSION OBJECT MENU . . . . . . . . . . . . . . . . . . . . . . . . . . . . . . . . . . . . . . . . . . . . . . . . |
167 |
ADD TO FORMATION . . . . . . . . . . . . . . . . . . . . . . . . . . . . . . . . . . . . . . . . . . . . . . . |
167 |
UNLINK FROM FORMATION . . . . . . . . . . . . . . . . . . . . . . . . . . . . . . . . . . . . . . . . . . |
167 |
ADD ATTACHED GOAL . . . . . . . . . . . . . . . . . . . . . . . . . . . . . . . . . . . . . . . . . . . . . . |
168 |
ADD INFLIGHT AIRCRAFT . . . . . . . . . . . . . . . . . . . . . . . . . . . . . . . . . . . . . . . . . . . . |
168 |
ADD AIR STATION . . . . . . . . . . . . . . . . . . . . . . . . . . . . . . . . . . . . . . . . . . . . . . . . . |
168 |
ADD AIR CORRIDOR (AIRPORT) . . . . . . . . . . . . . . . . . . . . . . . . . . . . . . . . . . . . . . . . |
169 |
FLIGHT SCHEDULE . . . . . . . . . . . . . . . . . . . . . . . . . . . . . . . . . . . . . . . . . . . . . . . . |
169 |
EDITOR MENU . . . . . . . . . . . . . . . . . . . . . . . . . . . . . . . . . . . . . . . . . . . . . . . . . . . . . . . . |
170 |
MISSION MENU . . . . . . . . . . . . . . . . . . . . . . . . . . . . . . . . . . . . . . . . . . . . . . . . . . . |
170 |
EDIT MENU . . . . . . . . . . . . . . . . . . . . . . . . . . . . . . . . . . . . . . . . . . . . . . . . . . . . . . |
170 |
VIEW MENU . . . . . . . . . . . . . . . . . . . . . . . . . . . . . . . . . . . . . . . . . . . . . . . . . . . . . . |
172 |
ADD MENU . . . . . . . . . . . . . . . . . . . . . . . . . . . . . . . . . . . . . . . . . . . . . . . . . . . . . . |
173 |
OPTIONS MENU . . . . . . . . . . . . . . . . . . . . . . . . . . . . . . . . . . . . . . . . . . . . . . . . . . . |
174 |
SCENARIO BROWSER . . . . . . . . . . . . . . . . . . . . . . . . . . . . . . . . . . . . . . . . . . . . . . . . . . |
176 |
USING THE SCENARIO BROWSER . . . . . . . . . . . . . . . . . . . . . . . . . . . . . . . . . . . . . . |
176 |
ALL TAB . . . . . . . . . . . . . . . . . . . . . . . . . . . . . . . . . . . . . . . . . . . . . . . . . . . . . . . . |
177 |
GROUP TAB . . . . . . . . . . . . . . . . . . . . . . . . . . . . . . . . . . . . . . . . . . . . . . . . . . . . . . |
177 |
GOALS TAB . . . . . . . . . . . . . . . . . . . . . . . . . . . . . . . . . . . . . . . . . . . . . . . . . . . . . . |
177 |
7

SIDE TAB . . . . . . . . . . . . . . . . . . . . . . . . . . . . . . . . . . . . . . . . . . . . . . . . . . . . . . .178 TYPE TAB . . . . . . . . . . . . . . . . . . . . . . . . . . . . . . . . . . . . . . . . . . . . . . . . . . . . . . .178
OBJECT PROPERTIES PANEL . . . . . . . . . . . . . . . . . . . . . . . . . . . . . . . . . . . . . . . . . . . . .178
AIR CORRIDOR PROPERTIES . . . . . . . . . . . . . . . . . . . . . . . . . . . . . . . . . . . . . . . . . .179
PAGE ONE . . . . . . . . . . . . . . . . . . . . . . . . . . . . . . . . . . . . . . . . . . . . . . . . . . .179 PAGE TWO . . . . . . . . . . . . . . . . . . . . . . . . . . . . . . . . . . . . . . . . . . . . . . . . . .179
AIR STATION PROPERTIES . . . . . . . . . . . . . . . . . . . . . . . . . . . . . . . . . . . . . . . . . . .179
PAGE ONE . . . . . . . . . . . . . . . . . . . . . . . . . . . . . . . . . . . . . . . . . . . . . . . . . . .180
AIRPLANE PROPERTIES . . . . . . . . . . . . . . . . . . . . . . . . . . . . . . . . . . . . . . . . . . . . .180 AIRPORT PROPERTIES . . . . . . . . . . . . . . . . . . . . . . . . . . . . . . . . . . . . . . . . . . . . . .180
PAGE ONE . . . . . . . . . . . . . . . . . . . . . . . . . . . . . . . . . . . . . . . . . . . . . . . . . . .180 PAGE TWO . . . . . . . . . . . . . . . . . . . . . . . . . . . . . . . . . . . . . . . . . . . . . . . . . .181 PAGE THREE . . . . . . . . . . . . . . . . . . . . . . . . . . . . . . . . . . . . . . . . . . . . . . . . .181 PAGE FOUR . . . . . . . . . . . . . . . . . . . . . . . . . . . . . . . . . . . . . . . . . . . . . . . . . .181
BUILDING PROPERTIES . . . . . . . . . . . . . . . . . . . . . . . . . . . . . . . . . . . . . . . . . . . . .182
PAGE ONE . . . . . . . . . . . . . . . . . . . . . . . . . . . . . . . . . . . . . . . . . . . . . . . . . . .182 PAGE TWO . . . . . . . . . . . . . . . . . . . . . . . . . . . . . . . . . . . . . . . . . . . . . . . . . .182 PAGE THREE . . . . . . . . . . . . . . . . . . . . . . . . . . . . . . . . . . . . . . . . . . . . . . . . .182
HELICOPTER PROPERTIES . . . . . . . . . . . . . . . . . . . . . . . . . . . . . . . . . . . . . . . . . . .183 INFLIGHT AIRCRAFT PROPERTIES . . . . . . . . . . . . . . . . . . . . . . . . . . . . . . . . . . . . . .183
PAGE ONE . . . . . . . . . . . . . . . . . . . . . . . . . . . . . . . . . . . . . . . . . . . . . . . . . . .183 PAGE TWO . . . . . . . . . . . . . . . . . . . . . . . . . . . . . . . . . . . . . . . . . . . . . . . . . .183 PAGE THREE . . . . . . . . . . . . . . . . . . . . . . . . . . . . . . . . . . . . . . . . . . . . . . . . .183
MINE PROPERTIES . . . . . . . . . . . . . . . . . . . . . . . . . . . . . . . . . . . . . . . . . . . . . . . . .184
PAGE ONE . . . . . . . . . . . . . . . . . . . . . . . . . . . . . . . . . . . . . . . . . . . . . . . . . . .184 PAGE TWO . . . . . . . . . . . . . . . . . . . . . . . . . . . . . . . . . . . . . . . . . . . . . . . . . .184
SHIP PROPERTIES . . . . . . . . . . . . . . . . . . . . . . . . . . . . . . . . . . . . . . . . . . . . . . . . .184
PAGE ONE . . . . . . . . . . . . . . . . . . . . . . . . . . . . . . . . . . . . . . . . . . . . . . . . . . .184 PAGE TWO . . . . . . . . . . . . . . . . . . . . . . . . . . . . . . . . . . . . . . . . . . . . . . . . . .184 PAGE THREE . . . . . . . . . . . . . . . . . . . . . . . . . . . . . . . . . . . . . . . . . . . . . . . . .185 PAGE FOUR . . . . . . . . . . . . . . . . . . . . . . . . . . . . . . . . . . . . . . . . . . . . . . . . . .185
SUBMARINE PROPERTIES . . . . . . . . . . . . . . . . . . . . . . . . . . . . . . . . . . . . . . . . . . . .185
PAGE ONE . . . . . . . . . . . . . . . . . . . . . . . . . . . . . . . . . . . . . . . . . . . . . . . . . . .186 PAGE TWO . . . . . . . . . . . . . . . . . . . . . . . . . . . . . . . . . . . . . . . . . . . . . . . . . .186 PAGE THREE . . . . . . . . . . . . . . . . . . . . . . . . . . . . . . . . . . . . . . . . . . . . . . . . .187 PAGE FOUR: . . . . . . . . . . . . . . . . . . . . . . . . . . . . . . . . . . . . . . . . . . . . . . . . .188
8

TEXT LABEL PROPERTIES . . . . . . . . . . . . . . . . . . . . . . . . . . . . . . . . . . . . . . . . . . .188 WAYPOINT PROPERTIES . . . . . . . . . . . . . . . . . . . . . . . . . . . . . . . . . . . . . . . . . . . . .188
GOALS . . . . . . . . . . . . . . . . . . . . . . . . . . . . . . . . . . . . . . . . . . . . . . . . . . . . . . . . . . . . .189
GLOBAL GOAL . . . . . . . . . . . . . . . . . . . . . . . . . . . . . . . . . . . . . . . . . . . . . . . . . . . .189
DESTINATION GOAL (GLOBAL) . . . . . . . . . . . . . . . . . . . . . . . . . . . . . . . . . . . . .189 AUTOMATIC GOAL (GLOBAL) . . . . . . . . . . . . . . . . . . . . . . . . . . . . . . . . . . . . . .190
ATTACHED GOALS . . . . . . . . . . . . . . . . . . . . . . . . . . . . . . . . . . . . . . . . . . . . . . . . .190
DESTINATION GOAL (ATTACHED) . . . . . . . . . . . . . . . . . . . . . . . . . . . . . . . . . . .190 APPROACH GOAL (ATTACHED) . . . . . . . . . . . . . . . . . . . . . . . . . . . . . . . . . . . .190 KILL GOAL (ATTACHED) . . . . . . . . . . . . . . . . . . . . . . . . . . . . . . . . . . . . . . . . .191
GOAL OBJECT PROPERTIES PANEL PAGES . . . . . . . . . . . . . . . . . . . . . . . . . . . . . . .191
PAGE ONE . . . . . . . . . . . . . . . . . . . . . . . . . . . . . . . . . . . . . . . . . . . . . . . . . . .191 ADDITIONAL PAGE ONE OPTIONS FOR SPECIFIC GOAL TYPES . . . . . . . . . . . . . .192 PAGE TWO . . . . . . . . . . . . . . . . . . . . . . . . . . . . . . . . . . . . . . . . . . . . . . . . . .192 PAGE THREE . . . . . . . . . . . . . . . . . . . . . . . . . . . . . . . . . . . . . . . . . . . . . . . . .193 PAGE FOUR . . . . . . . . . . . . . . . . . . . . . . . . . . . . . . . . . . . . . . . . . . . . . . . . . .193 PAGE FIVE . . . . . . . . . . . . . . . . . . . . . . . . . . . . . . . . . . . . . . . . . . . . . . . . . . .194
GOAL PRECEDENCE . . . . . . . . . . . . . . . . . . . . . . . . . . . . . . . . . . . . . . . . . . . . . . . .194
DYNAMIC GROUPS . . . . . . . . . . . . . . . . . . . . . . . . . . . . . . . . . . . . . . . . . . . . . . . . . . . .195
CREATE DYNAMIC GROUP . . . . . . . . . . . . . . . . . . . . . . . . . . . . . . . . . . . . . . . . . . .195 EDIT DYNAMIC GROUP . . . . . . . . . . . . . . . . . . . . . . . . . . . . . . . . . . . . . . . . . . . . . .196
MISSION EDITOR HOTKEYS . . . . . . . . . . . . . . . . . . . . . . . . . . . . . . . . . . . . . . . . . . . . . .197 STARTING A CREATED MISSION . . . . . . . . . . . . . . . . . . . . . . . . . . . . . . . . . . . . . . . . . . .197
APPENDIX A: GLOSSARY OF ACRONYMS . . . . . . . . . . . . . . . . . . . . . . . . . . . . .198 APPENDIX B: GLOSSARY OF TERMS . . . . . . . . . . . . . . . . . . . . . . . . . . . . . . . . .200 APPENDIX C: TACTICS . . . . . . . . . . . . . . . . . . . . . . . . . . . . . . . . . . . . . . . . . . . .202 APPENDIX D: INDEX . . . . . . . . . . . . . . . . . . . . . . . . . . . . . . . . . . . . . . . . . . . . . .202 CREDITS . . . . . . . . . . . . . . . . . . . . . . . . . . . . . . . . . . . . . . . . . . . . . . . . . . . . . . . .203
This product has been rated by the Entertainment Software Rating Board. For information about the ESRB rating, or to comment about the appropriateness of the rating, please contact the ESRB at 1-800-771-3772.
For more information about this and other Electronic Arts games, visit www.eagames.com.
9

WELCOME
Sub Command puts you in control of the most advanced submarines in the world, allowing you to play single missions or the campaign from either a Russian or U.S. vantage point. Multiplayer missions pit you against players commanding the most capable submarines at sea—whether you chose to drive the pride of the U.S. Navy’s Submarine fleet or try your hand at commanding one of the finest Russian submarines.
As commanding officer, you can delegate Sonar, Radar, TMA (Target Motion Analysis) and Fire Control tasks to your auto crewmen or man all of the stations yourself.
Give orders to your crew via voice commands, use the handy menu commands from the Task Bar or mouse commands in the Navigation Station. The Task Bar allows you to change depth, speed and course from any of the ship’s stations.
Create your own missions in Sub Command’s robust Mission Editor. Information from the United States Naval Institute is available for all military ships and planes used in the game.
CONTROLLABLE UNITED STATES SUBMARINES
SEAWOLF CLASS: |
(SSN 21 class) This state-of-the-art U.S. attack submarine is the |
|
quietest nuclear powered submarine currently deployed by any |
|
country. With its superior stealth, a tactical speed higher than |
|
any other U.S. submarine, and its hardened sail, Seawolf stands |
|
ready to tackle missions as varied as the insertion of Special |
|
Forces to attacking Russian threats under the polar ice cap. |
IMPROVED LOS ANGELES CLASS: (688(I) class) The backbone of the fleet, " the 688(I) class sub is one of the quietest submarines in operation today and is armed with state-of-the-art weaponry. They are available in sufficient numbers to ensure availability for missions around the world. Import your favorite 688(I) Hunter/Killer missions for play in Sub Command. (See Mission Editor/Importing Scenarios on p. 162 of the manual.)
CONTROLLABLE RUSSIAN SUBMARINES
IMPROVED AKULA-I: |
Russia’s counterpart to the U.S. Los Angeles Class, the Improved |
|
Akula-I Class submarine is nearly as quiet as the 688(I). With six |
|
additional tubes external to the pressure hull, it is capable of |
|
carrying additional weapons or decoys. |
AKULA-II: |
The quietest nuclear powered Russian submarine in existence. At |
|
low speeds it is reported to be as quiet or quieter than the United |
|
States Improved Los Angeles class submarine. Also armed with |
|
six additional external tubes for weapons or countermeasures, |
|
the Akula-II is a formidable opponent. |
MANUAL STRUCTURE – AN OVERVIEW
This manual is divided into 9 sections. These are briefly outlined below.
GAMEPLAY OVERVIEW |
A brief overview of basic gameplay, an explanation of what is |
|
seen on the Navigation map and in the 3D View, as well as a |
|
brief description of all ship’s stations. |
10
MAIN MENU |
Change your player identity, start single and training missions |
|
and the campaign, how to use the reference browser, a |
|
description of the players log, a brief description of options and |
|
information on how to end the game. Mission Editor and |
|
Multiplayer are covered separately later in this manual. |
SHIP STATIONS |
The inner workings of all ship stations for all controllable |
|
submarines. Basic information about the purpose of each station |
|
is followed by a description of how that station works on each of |
|
the three controllable subs. (The Interior stations of the Akula-I |
|
improved and the Akula-II are identical. See Sonar |
|
Stations/Broadband Sonar on p. 62.) Making use of your auto |
|
crewmen is also covered. |
MULTIPLAYER |
Step-by-step instructions for hosting or joining a multiplayer Sub |
|
Command game. |
SPECIAL OPS AND PROCEDURES Instructions for launching and recovering Special Forces and the
|
DSRV, deploying UUVS, laying mines and operating under the ice. |
MISSION EDITOR |
In-depth instructions for using the Mission Editor to create and |
|
edit Sub Command Missions. |
APPENDIX A |
Glossary of Acronyms |
APPENDIX B |
Glossary of Terms |
APPENDIX C |
Tactics |
GAMEPLAY OVERVIEW
As the Commanding Officer of a submarine, you use the ship’s various sensors to detect other ships and subs. Once a contact is detected, you must establish the probable identity of the contact. Using the tools at your disposal, you can classify the contact to determine whether it is a neutral ship, an enemy ship or sub, a friendly contact or a pod of whales.
Your sub’s sensors include a sophisticated Sonar Suite that utilizes both active and passive sonar, Radar, Electronic Support Measures (ESM) and the periscope. ESM, the Stadimeter, and Narrowband sonar help you classify contacts. Target Motion Analysis (TMA) helps you to determine the bearing and range to the contact, as well as its course and speed. This information is needed to calculate an accurate firing solution when it becomes necessary to target a contact with a torpedo or missile from Fire Control.
In every mission you are assigned at least one task considered critical and must be completed to ensure a satisfactory mission outcome. These are laid out in the mission brief and identified as Critical Goals in Mission Status and in Mission Debrief. Some tasks are secondary in importance. These are identified as non-critical goals.
As Commanding Officer you must complete assigned tasks while keeping your submarine quiet enough to avoid detection and have the skill to evade destruction if you are detected. You can man all stations yourself or, if desired, you can use the auto crewmen to assist you with detecting, classifying and targeting contacts, but bear in mind they are not infallible!
11
TERMS DEFINED
■In this manual ‘click’ always refers to a left mouse click. Right mouse clicks are designated as ‘right-clicks’.
OK checkmark
■ The words OK and YES refer to this checkmark.
Cancel circle
■CANCEL and NO refer to the ‘Cancel’ circle.
■For simplicity, the Improved Akula-I and the Akula-II submarines are referred to simply as Akula in this manual. Their interfaces are identical. Their capabilities are slightly different.
■A contact is anything detected visually or by one of your ship’s sensors. A contact is sometimes referred to as a track. A contact, or track should not be confused with a tracker.
■A tracker is a device used to automatically follow an assigned sonar signal. When a tracker is assigned to a sonar contact, also called a track, periodic updates on the contact’s bearing are sent to TMA. A tracker is not a track, but it ‘tracks’ a track.
■Each sub interface refers to designated contacts with slightly different words. In this manual any reference to an alphanumeric designation, a Contact ID, or a Track ID refers to designations assigned when a contact is detected. This is a letter with a number appended (e.g. S01, E01, R01, V01). Any reference to a Sierra number refers to a Sonar contact. M or Master contacts are Merged contacts.
NOTE: The keyboard commands described in this manual refer to the default settings shipped with the game. If you have changed your hot key assignments in the Options>Controls page, the keyboard commands listed here may not be accurate.
12

3D AND THE NAVIGATION MAP
You begin every mission at the Navigation Station (Nav). If you so desire, you can play much of the game from here. The Navigation Station contains a 2D map of the battle space as well as a retractable 3D window and a Data Display Indicator (DDI) that displays information about the selected contact. For a full description of the Navigation Station and how to play the game from that perspective, see Ship Stations/Navigation Station on p. 40.
WHAT YOU SEE ISN’T ALWAYS WHAT IS THERE!
For those who like to jump right in and begin playing, we offer a word of warning about the 2D and 3D views on the Nav map. What you see on the 2D map and 3D view and read in the DDI is only as accurate as your analysis of the available information and your classification skills.
NOTE: It is possible to view the actual location of some or all platforms and buildings in a mission by using the Show Link Data, Show Dead Platforms and Show Truth Game Options. Be aware that the directions and information in this manual assume these Game page options and all auto crew are OFF. For information on the options mentioned see Main Menu/Options/Game on page 29. If you selected Novice settings at installation some of the above options are enabled and the descriptions in this manual will not always match your game experience.
Data Display Indicator (DDI)
Nav Map
Unknown/Unknown Contact
Symbol
Ownship Symbol
3D object for a contact of Unknown Type and Unknown Alliance
3D View
When you enter the game the symbol for Ownship, the sub you are commanding, is the only contact symbol that appears on the Nav map until one of your sensors detects a contact and you or your auto crew marks it. The exception to this is land targets. In some cases land targets appear on the Nav map as soon as the game starts. Land targets (as well as Link contacts) are marked with an alphanumeric designation that begins with the letter L. See Main Menu/Options/Game/Show Link Data on p. 30.
NOTE: If you have selected Novice option settings, you see the symbols for any friendly platforms in the area and your Sonar Auto Crewman begins reporting contacts. Selecting Novice settings enables the Show Link Data option.
Once the contact is marked or designated by one of your sensors, a symbol for the contact appears on the Nav map at the end of a line of bearing. You select a map symbol by clicking on it. (See Navigation Station/2D Map/Contact Symbols on p. 43.) When a contact is selected on the Nav map, a 3D object representing that contact appears in the 3D view. Until you classify the contact, only a large wire-frame bubble, or Area of Uncertainty, appears in the 3D view. The bubble extends above and below the water indicating that you have not yet classified it as a surface or subsurface
13

contact. Classification is explained in the Ship Stations chapter in the Navigation Station, Narrowband Sonar and Periscope and Stadimeter sections.) Once you give the contact a specific classification, the 3D object representing the specified class appears in the 3D window.
Beware! If you classify the contact incorrectly, what you see is not what is really there! For instance if you classify the contact as a cruise ship when it is actually a Russian Kirov class cruiser, the contact’s symbol on the Nav map is the symbol for a neutral surface ship. When the symbol is selected, a model of a cruise ship is seen in the 3D window and the DDI reports the contact as a cruise ship.
Until a specific range is designated for a contact, the contact’s symbol, usually the symbol for Unknown/Unknown (unknown platform type/unknown alliance), appears at the end of a line of bearing (LOB). The length of the LOB is a predetermined range and does not represent the actual range of the contact unless the contact is marked by Radar or Active Sonar. Since these sensors give a range as well as a bearing, the map symbol is placed at the end of a LOB at the range determined by the sensor.
Using TMA you can figure out the location of the contact with some degree of accuracy. In addition to the contact’s location, you can also develop a firing solution, or simply a solution, which consists of your best assessment of the contact’s bearing, range, speed and course. When you or your TMA Auto Crewman enters a solution for the contact from the TMA Station, the contact’s symbol on the Nav map shifts to the location designated in your solution and begins to move on the course and at the speed designated in the solution. When you click the contact’s symbol, all available information about the contact as classified or designated by you or your Sonar Auto Crewman appears in the Nav map’s DDI.
NOTE: If you give the contact a generic classification, for instance Neutral Surface, and no specific class is assigned, a wire frame of a generic surface ship appears in the 3D view. A generic classification is assigned with the Contact menu’s Designate Type/Alliance option. See Ship Stations/Navigation Station/Contact Menu on p. 45.
Again, be warned. What appears in 2D, 3D and the DDI is only as accurate as you are!
3D VIEW IN A SUB GAME?
Modern submariners do not yet have the luxury of windows. The only view submariners have of their physical surroundings is from the bridge or through the periscope. They must rely totally on their sonar sensors when below periscope depth. We understand that for many players the idea of 3D in a submarine game is at best a huge cheat. For that reason, 3D can be turned off in the Options>3D page and can be disabled by the host in a multiplayer game. This prohibits all players from viewing 3D in that game. See Main Menu/Options/3D on p. 30 and Multiplayer/Multiplayer Options on p. 157.
The 3D view is on by default in Sub Command and is visible in a retractable window on the Navigation map. For those of you who enjoy watching the results of your efforts in a 3D environment, the option is there. But be reminded that what you see in the 3D view may not be what is actually there! (See above.)
14

OVERVIEW OF SHIP STATIONS
All controllable submarines have the same stations. While each class has a different look and feel, the functionality of the stations is basically the same. What follows here is a brief description of the ship stations available in Sub Command. For detailed information on how to use each station, see the Ship Stations beginning on p. 34.
TASK BAR
The Task Bar is available at the bottom of all ship stations and provides a pop-up Stations Menu for switching to other ship stations and a pop-up Orders Menu for issuing common ship commands. In the Task Bar, you can also change depth, course and speed, and see a history of crew reports, radio messages and multiplayer chat messages.
NAVIGATION
You begin the game at the Navigation Station. It is here that you see a map of the battle space (The Nav Map). (You must scroll to see the entire space.) Once a contact is detected it appears as a symbol on the Nav map. You designate a contact’s classification from the Nav map using the contact’s right-click menu (Contact menu) although you must determine the correct classification from the Narrowband, ESM or the Periscope/Stadimeter stations. The Navigation screen also contains the 3D window for viewing selected contacts, and known information on selected contacts is available in the Data Display Indicator (DDI) area of the screen.
Using a combination of auto crew, the Task Bar, and voice and mouse menu commands it is possible to play much of the game from the Nav Screen. Information on playing the game from the Nav Station and using Voice Commands is found in this section.
SHIP CONTROL
In Ship Control you change and view the actual as well as the ordered depth, course and speed of your sub. The towed arrays are deployed in Ship Control and it is from here that you conduct an emergency blow, rig in the bow planes, ventilate, charge air banks and open and close the main ballast tanks. The trim display is also located in Ship Control. (You can change your course, speed and depth from any station using the Task Bar, Ownship menu and voice commands.)
SONAR: BROADBAND
Broadband is the default sonar function. It is used to detect and track broadband frequency noise emanated from surface ships and submarines. Biologics such as whales and shrimp can also be detected in broadband.
SONAR: NARROWBAND
The Narrowband function is used to detect and track narrowband frequency noise emanated from surface ships and submarines. The Narrowband Station is also used to classify contacts. The sound signature of a selected contact is compared to a library of known sound signatures. Only sources with similar signatures are presented to help determine the most likely sound source.
15

SONAR: DEMON
DEMON is an acronym for Demodulated Noise (DEMON). The DEMON Station is used to determine the contact’s speed. Here you can also determine the number of blades on the contact’s propeller, which can help you classify the contact.
SONAR: ACTIVE
In Active Sonar, a ping or a series of pings is transmitted. The resulting echoes from an object are used to determine that object’s bearing and range.
SONAR: ACTIVE INTERCEPT
The Active Intercept Display provides information on an entity that is transmitting active sonar pings. It gives information on the transmitting entity’s bearing, the interval between pings, the age of the last signal, and the signal strength. Knowing the signal strength might also assist you in determining the relative proximity of the active sonar source.
SONAR: SSP
The Sound Speed Profile (SSP) displays the speed at which sound is transmitted at various depths in the ocean at your current location. Water tends to form distinct layers of density. These layers affect sonar transmissions. Knowing the location of the layer in your area is important since the layer can affect your ability to detect enemy ships and subs and also helps you hide from them.
TMA
The Target Motion Analysis (TMA) function works in conjunction with the ship’s four major sensors. Using inputs from sonar, radar, ESM and periscope, TMA helps you determine a contact’s bearing, range, speed and course. This information is necessary for developing a target solution.
FIRE CONTROL: TARGET DISPLAY
The functions available on the Fire Control Stations vary from class to class. These differences are covered in the Ship Stations section of this manual. In general the Target Display panel is used to designate the contact you want to target and select the tube and weapon with which you want to attack the target. The weapon’s track can also be viewed on a map and certain weapons can be wire-guided, enabled or shut down from this station.
FIRE CONTROL: LAUNCH PANEL
From the Launch Panel the selected tube is flooded, pressure is equalized and the muzzle door is opened in preparation for the launch of the weapon. Depending on the class of submarine you are commanding, you may also enter weapon presets or launch countermeasures from this station.
FIRE CONTROL: COUNTERMEASURE LAUNCHER (SEAWOLF ONLY)
From here the countermeasure tube and the type of countermeasure to deploy is selected and launched. If you are commanding a 688(I) or an Akula there is no separate station for countermeasures. Countermeasures are launched from the Launch Panel.
16

FIRE CONTROL: WEAPON STORES
From here you can view the inventory of the weapons still available in your racks and those currently loaded in your tubes.
RADAR
Radar uses high frequency radio waves that are transmitted from the ship and reflected off objects to determine bearing and range. Bearing and range data, once appropriately marked, is then sent to the TMA Station and Navigation map for analysis. Use the radar to detect surface contacts, land, and low-flying objects.
RADIO/ESM
The Radio is your submarine’s link with the outside world. Messages may be received at any point in the mission and can include additional tasking or key intelligence updates. It is important to come to periscope depth and raise the radio antenna or deploy the wire at regular intervals during your mission.
The Electronic Support Measures (ESM) system is also available at this station. This passive system detects electromagnetic transmissions from other ships when the ESM mast is raised above the surface of the water. In addition to detecting the direction and signal level of radar transmissions from other ships, ESM also compares these signals to a database and identifies the source of the transmission.
PERISCOPE/STADIMETER
With the periscope you can detect and track contacts visually. You can also photograph a contact through the periscope for use in classifying the contact and determining its range and course with the Stadimeter. The Stadimeter can only be reached from the Periscope Station.
The Stadimeter accesses a library of known surface platforms and allows you to match the photos you take through the periscope with one in the library. With the exception of the contact’s speed, all information necessary for an accurate firing solution can be determined with the Stadimeter.
UNDER ICE DISPLAY
In addition to High Frequency Active sonar, which is useful for locating mines and for avoiding ice, ships also carry equipment especially designed to assist with locating variations in ice thickness. This is important when searching for an area that is safe to surface when under ice. The use of the Under Ice Displays to locate polynyas is discussed here. Directions for surfacing under the ice are found in Special Operations and Procedures/Under Ice Operations on p. 152.
17

AUTO CREW ASSISTANCE
If you are a newcomer to submarine warfare you may want to turn on your auto crewmen to assist you as you learn the inner workings of the ship’s stations. Even if you are an experienced player, when the action is hot and heavy you may want to activate one or two of the crew to assist you with some of the more difficult tasks. Auto crewmen are available for Sonar (he handles both Narrowband and Broadband), TMA, Fire Control and Radar. But remember, like humans, your auto crewmen are not perfect!
Auto crewmen are enabled in the Options menu (select Options>Crew) and by clicking on the label of the station for which an Auto Crewman is available. The label changes to inform you that the auto crewman is on duty. When an auto crew setting is available for a station, the cursor changes to a finger when over the station’s label. For specific information on individual Auto Crewmen, see
Ship Stations/Auto Crewmen on p. 146.
NOTE: If you selected Novice settings when you installed the game or from the Options>Crew page all auto crew are on by default.
MISSION STATUS
As you progress though the mission you can check the status of your goals and tasking at any point. The Mission Status screen provides your current score (in Single Missions only), the status of both critical and non-critical goals as well as a list of all platforms you have killed so far.
•Press sthen click Mission Status from the System menu.
•Click OK to return to the mission.
Sub Command Tip: Before ending a mission, visit the Mission Status screen to ensure you completed all of your critical and non-critical goals.
ENDING A MISSION
There are four ways to end a mission and enter Mission Debrief. Two ways offer you the opportunity to save your mission before exiting to Debrief.
To save a mission and exit to Debrief:
•Press sthen click SAVE AND EXIT on the System menu. The System menu can also be selected from the Nav Map menu. (Right-click the Nav map to access the Nav Map menu.)
•Press v+q+Sto display the Save dialog. When you exit the Save Dialog, you enter Mission Debrief.
To exit directly to Debrief:
•Press sthen click EXIT on the System menu.
•Press Q.
NOTE: You can save the game at any point during gameplay without exiting by selecting v+ S.
18

MISSION DEBRIEF
Two options are available in Mission Debrief: Status and Replay. By default Status information is displayed.
•Click REPLAY at the left of the screen to display the Replay screen.
•Click STATUS to return to the Mission Status information.
•Click OK to exit to the Main menu.
STATUS SCREEN
This screen displays the same status information that was visible in the Mission Status screen during gameplay. This information is also available in the Player’s Log after each mission. The final score for the mission as well as a list of goals and the final status of each is available along with the list of all platforms and buildings you destroyed during the mission.
REPLAY SCREEN
To view a replay of the mission just completed, click. A view of the battle space appears along with a set of controls. These work like VCR or tape recorder controls.
• Press q+Gto toggle the display of names on the Replay map.
19

MAIN MENU
From Sub Command’s Main menu you can:
■set your player name.
■select single, campaign or multiplayer missions.
■access the Mission Editor to create or edit your own scenarios.
■view U.S. Naval Institute data on the ships and weapons available in Sub Command.
■access the game’s options. In Options you adjust game, sound and 3D settings, and view or reassign hot key designations, and set multiplayer options.
From the main menu you can also view the record of your current game persona in the Player’s Log.
Enter Player Name
CHOOSE PLAYER NAME
To choose a player name:
1.Following the opening video, the Main menu appears.
2.Enter your Captain’s name in the Edit box at the upper right of the screen. Previously created Captain names appear in the drop-down list. If you have already created a name, click that name in the list. Your Captain’s careers are automatically tracked by the game. See Player’s Log on p. 28.
3.After you create or choose a player name for the mission, select the Main menu item you wish to access.
MISSIONS
Clicking on Missions in the Main menu takes you to the Missions screen. From here you select the type of mission you want to play, Training, Single or Saved and select a specific mission title. Single missions are shown by default. A brief description of the selected mission is available in the Mission Description window.
You must also select a submarine to command in the mission. This is done from the Submarine Selection window in the upper right corner. The submarines that are available to command differ from mission to mission so you must select the mission first. A tasking overview for the selected controllable submarine is seen in the Tasking Window. Tasking may be different depending on the submarine selected. Some missions have only one submarine available to command some have more. The submarine selection process is explained below.
20
Mission Selection Window
Submarine Selection Window
Choose Mission Type
Map of Mission Location
Mission Description Window |
Tasking overview |
|
Cancel |
|
OK |
The Submarine Selection Window
The Submarine Selection Window contains a graphic of the selected submarine class and two drop-down lists. The upper drop-down list is called the Controllable Sub Selector. The lower dropdown is the Specific Sub Selector.
Controllable Sub Selector
Specific Sub Selector
All missions have at least one controllable sub. If the mission designer has added more than one controllable sub to a mission each controllable sub is numbered and can be selected in the Controllable Sub Selector.
Some Controllable Subs offer the player a choice of submarine to command for a specific task. The options are explained below.
Controllable Sub Selector:
When a mission is selected you may see one, both or several each of the following options in the Controllable Sub Selector drop-down list:
CONTROLLABLE SUB: When Controllable Sub (no leading asterisk) is selected in the Controllable Sub Selector only one submarine is available to command. That sub name is the only one listed in the Specific Sub Selector. The tasking overview for this specific sub appears in the tasking window. There may be more than one Controllable Sub in a mission. Each controllable sub within a mission may be assigned different tasking.
21

*CONTROLLABLE SUB: When *Controllable Sub (with a leading asterisk) is selected the in the Controllable Sub Selector the Specific Sub Selector is enabled and the player can choose to command any submarine in the list. All of Sub Command’s controllable subs appear in the Specific Sub Selector list regardless of country. One sub name appears as default as designated by the mission designer.
NOTE: Missions with more than one controllable sub can be played as Multiplayer Missions. The number of controllable subs in a mission determines the number of players that can play that mission. A number appears in front of Mission titles in the Multiplayer Missions screen indicating the number of controllable subs in each mission.
Specific Sub Selector
The submarine name that appears in the Specific Sub Selector when you click OK is the submarine you command in the mission. When the Specific Sub Selector is enabled you can chose any submarine in the list. The tasking overview that appears in the Tasking Window applies to the sub selected.
TRAINING MISSIONS
To gain an understanding of how to use the most important ship stations and functionality in Sub Command, it is recommended you try the training missions before proceeding to the single missions or campaigns.
NOTE: The Training missions cover the Seawolf interface only. The other sub interfaces function similarly. Differences between the interfaces are covered in the Ship Stations chapter of this manual.
Training Mission 1: Covers the basic game interface and maneuvering procedures from the Task Bar and Ship Control.
Training Mission 2: Covers basic sonar operations.
Training Mission 3: Covers Target Motion Analysis (TMA) and targeting and launching weapons from Fire Control.
A description of a training mission can be viewed when you select its title in the Mission Title Selection List.
NOTE: Music, Sound effects, crew responses and all Auto Crew are disabled in Training Missions.
To begin a Training Mission:
■The steps for beginning a Training Mission are the same as those for starting a single mission except you must select Training at the left of the Missions screen and that you can only select a Seawolf submarine to drive from the Specific Sub Selector. The steps for starting a mission are listed in the Single Missions section below.
SINGLE MISSIONS
To begin a single mission:
1.In the Missions screen click SINGLE. Single Mission names appear in the Mission Title Selection List. Stars next to the mission name denote level of difficulty, from one star (easy) to four stars (most difficult).
22
2.Click the mission title of your choice. A description of the selected mission appears in the Mission Description window and a map of the battlespace appears in the Mission Location window. The tasking overview for the default controllable sub appears in the Tasking window. (Alternate tasking may be assigned to other controllable subs when they are available in a mission.)
3.Select an option from the Controllable Sub Selector drop-down. The drop-down contains the list of Controllable Subs available in the selected mission. If the drop-down is grayed out, only one controllable sub is available in the mission. See Submarine Selection Window on p. 21.
4.If the Sub Specific Selector is enabled you can chose to command any sub in the list otherwise the sub shown is the only sub available.
5.To see another available mission, select a different mission title.
6.Click CANCEL to return to the Main menu.
7.Click OK if you want to play the selected mission. The Mission Brief screen appears and displays complete tasking information.
SAVED MISSIONS
Single missions you save are accessed from the Saved menu on the Mission screen.
1.Click SAVED to display the names of all saved Single missions in the Mission Selection window.
2.Steps for loading a Saved mission are as follows:
■From the Missions screen, click SAVED. A list of Saved Games (if any have been saved) appears.
■Click on the mission you wish to continue, then click OK to load it.
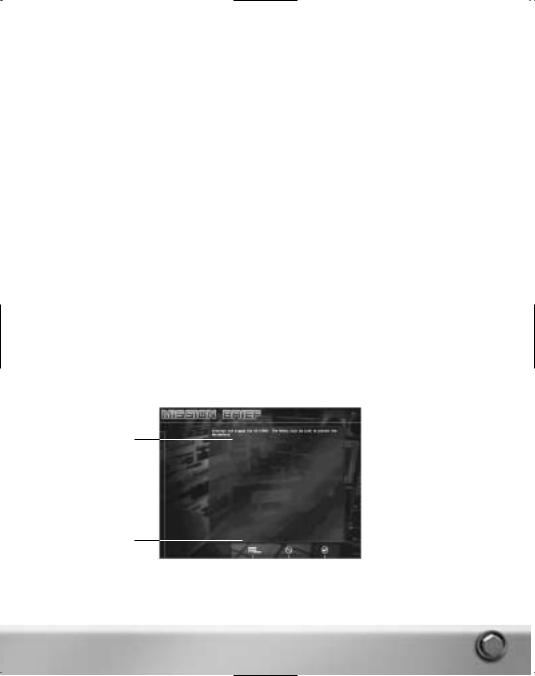
MISSION BRIEF
The Mission Brief screen provides the complete tasking brief and an opportunity to change your weapon loadout.
1.Click WEAPON LOADOUT at the bottom of the Mission Brief screen to review or alter your ship’s loadout to better suit your mission needs. See Weapon Loadout below.
2.Click OK to begin the mission, or click CANCEL to return to the Mission Selection screen.
Mission Brief
Weapon Loadout
23

WEAPON LOADOUT
Depending on your mission tasking you may need to alter your default loadout. If you are tasked to hunt down and destroy an enemy submarine, you don’t want your tubes full of land attack missiles and your racks full of anti-ship missiles. The time to change your loadout is before you get underway. From the Weapons Loadout screen you can change the weapons loaded in the tubes, change the number and type of stored weapons, and adjust the loadout of your countermeasures.
Tubes
Stores
Countermeasures
Information Window
The weapons available for each sub class vary but the method for changing the loadout is basically the same in each controllable submarine. The 688(I) class has an additional loadout screen to accommodate the vertical launch tubes and the Akula classes have an extra screen for their external tubes.
Whenever an item is selected in the drop-down list information about the selected item appears in the information window.
To change the loadout in torpedo and VLS tubes:
1.In the Mission Brief screen click WEAPON LOADOUT. The Tubes loadout screen appears. The current loadout is represented by numbered, colored dots on a wire frame representation of the ship’s hull. The numbers represent the tube number. The name of the weapon loaded in each tube is seen in the drop-down list associated with each tube number. The color of a dot on the wire frame coincides with the color assigned to represent each specific weapon.
2.Click the arrow in a weapon drop-down list associated with a specific tube and select a different weapon from the list to change the weapon loaded in that tube.
3.Change loadout in Stores or CMs (countermeasures) before clicking OK.
■In the 688(I) class, click VLS to alter the loadout in the ships Vertical Launch System (VLS) tubes. Changes are made as described above.
■In the Akula Classes, click INNER TUBES to change the loadout in the ship’s internal tubes. Click OUTER TUBES to change the loadout in the six tubes that are external to the pressure hull. Changes are made as described in the steps above.
4.Click OK to implement all of your changes and return to the Mission Brief screen.
5.Click CANCEL to ignore any changes you make on any of the screens and return to the Mission Brief screen.
24

To change the number and type of weapons stowed:
1.Click STORES. A screen showing the type of weapons that can be carried on your sub is displayed along with the number of weapons for each type currently stowed in the racks and in the tubes. Only rack stowed weapons can be changed on the Stores screen.
2.Click the right or left facing arrows associated with each weapon type to increase or decrease the number of that weapon stowed.
3.At the bottom of the Rack Stowed column a tally showing the number of weapons currently stowed is followed by the total number of weapons it is possible to stow on your submarine. For example if you are commanding a Seawolf class sub the numbers 48/52 means that there are currently 48 weapons stowed and it is possible to stow 52. You can add four more weapons before you reach your maximum.
4.Make the desired changes to all loadout screens before clicking OK.
•Click OK to implement your changes and return to the Mission Brief screen.
•Click CANCEL to ignore any changes you made on any of the screens and return to the Mission Brief screen.
To change the countermeasure loadout:
1.Click CMS at the left of the screen. A screen displaying the current countermeasure loadout is seen. The number of internal and external countermeasure tubes may vary depending on which sub class you are commanding.
2.Click the arrow in a countermeasure drop-down list associated with a specific countermeasure tube and select a different type of countermeasure from the list to change the countermeasure loaded in that tube.
3.Make the desired changes to all loadout screens before clicking OK.
■Click OK to implement your changes and return to the Mission Brief screen.
■Click CANCEL to ignore any changes on any of the screens and return to the Mission Brief screen.
NOTE: The changed loadout is attached to your player name and becomes your sub’s default loadout for all subsequent missions you play with that player name.
CAMPAIGN
Click the Campaign button to access the Campaign Selection Screen. From here you choose a side, select the submarine to command and go head to head with the best the enemy has to offer in the selected campaign mission.
THE STAGE WAS SET
The Russian Defense Minister: “A nuclear submarine fleet is the future of the armed forces. The number of tanks and guns will be reduced, as well as the infantry, but a modern navy is a totally different thing.”
CNO CONGRESSIONAL TESTIMONY: House National Security Committee Testimony, 1996 Defense budget, February 22, 1995:
“... The Russians today have six submarines at sea that are quieter than the 688(I)s, our best submarine. ... This is the first time since we put Nautilus to sea that they have had submarines at sea quieter than ours. As you know, quieting is everything in submarine warfare.”
But even as these words were spoken, the Soviet era had given way, and the submarine warriors had a few years to rest on their laurels.
25

RUSSIA RESURGENT
A new government has come to power in Russia with a promise of restoring the country to international prominence as a world superpower. Military units are being rebuilt through increased training, mass production of existing weapons, and research and development to provide new capabilities.
The leading edge of this activity is the Russian submarine force, which has suffered the least decline since the end of the cold war. Submarines are engaged in operations to gain intelligence about U.S. forces and to ensure U.S. submarines are not able to observe Russian exercises. The Russians are especially keen to enshroud the development of a new anti-air warfare missile.
The U.S. leadership in the Department of Defense, the State Department and the intelligence agencies has initiated actions to monitor Russian capabilities and determine their intentions. Submarines are critical assets for covertly gaining the required information.
Peacetime Rules of Engagement are still in force but as the Russians increase preparations, the encounters between the two countries become more frequent and the possibility of hostilities intensifies. The risk of an undeclared war beneath the surface increases with every encounter.
To combat the new capabilities of the Russian Improved Akula-I and Akula-II submarines, the U.S. fleet commissioned the Seawolf class submarine in the late 90s. While quieter and more capable than any nuclear submarine at sea, construction of the class was canceled for all but three vessels. Only two Seawolf class submarines are currently deployed. The 688(I) class remains the backbone of the U.S. submarine fleet.
Tensions are rising, and the premier submarines of the two navies must be the first instruments of national policy. However, a submarine is merely an extension of the wit, creativity and will to win of the Commanding Officer. If you have the skill, knowledge and character to command the world’s elite submarines, step up to the challenge of Sub Command.
CAMPAIGN ORGANIZATION
The campaign is divided into fourteen missions. You can elect to play all thirteen missions of the campaign as the commander of a Russian Akula class, a U.S. 688(I) or Seawolf class submarine. With minor exceptions (noted in the descriptions), the same missions are present in all three campaigns; only your perspective and goals and the capabilities of the submarine you command are changed. In each mission, one submarine has an offensive role and the other has a defensive role. The opposing force may have several submarines, but you have no friendly submarines. Regardless of the ship chosen, you have the same required missions, although the order is somewhat different.
In Sub Command, failure to achieve specific goals need not result in the necessity to replay the mission. There will, however, be mission-relevant consequences in future missions depending on whether or not you complete important goals as you go along.
The early missions require support of naval exercises in home waters and missions in enemy coastal waters for observation of enemy naval operations and insertion of Special Forces. Both submarine forces focus on an upcoming test of the new Russian anti-air missile in the early missions. If the Russians can deny U.S. forces’ knowledge of the characteristics of this weapon, then the Russian Northern Fleet will be much more effective when the battle is eventually joined.
26
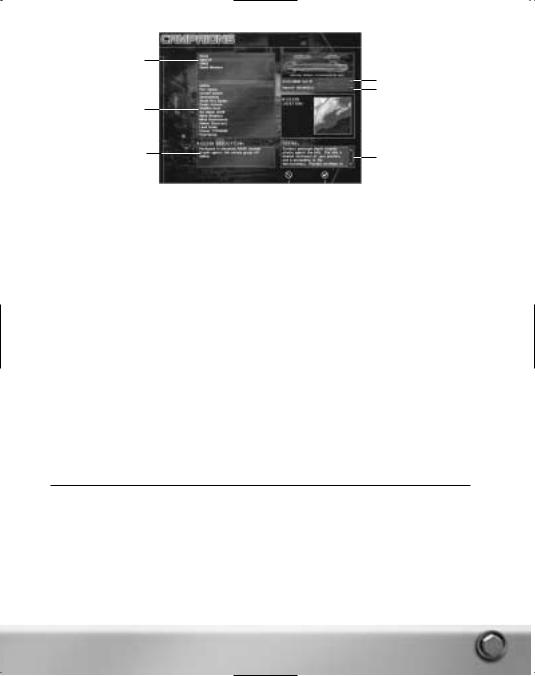
Campaign Selection Window
Controllable Sub Selector
Specific Sub Selector
Mission Selection Window
Mission Description
Tasking Overview
To begin the Campaign:
1.From the Main menu, click CAMPAIGN. The Campaign screen appears.
2.In the Campaign Selection Window click the name of the sub class you want to command for the campaign: Seawolf, 688(I) or Akula. Mission names appear in the Mission Selection window.
•To view saved campaign missions click Saved Missions. A list of saved campaign missions appears in the Mission Selection window.
3.Select the first (or next available) mission in Mission Selection window. A description appears in the Mission Description window. A tasking overview appears in the Tasking window.
4.In each Campaign only one sub is available to pilot. Your sub’s name is listed in the Specific Sub Selection window.
Note: To proceed to the next mission, you must successfully complete all the mission’s critical goals. Critical and non-critical goals are listed in the Mission Status screen during gameplay. Press ºduring gameplay to access the Mission Status screen or select Mission Status from the System menu.
5.Click OK to receive the Mission Briefing or click CANCEL to return to the Main menu.
6.The Mission Briefing is several pages long. Press r(default hot key) to move to the next page.
7.At the completion of the briefing the Mission Brief screen appears listing your tasking and offering you a chance to change your weapon loadout.
8.Click OK to start the mission or click CANCEL to return to the Campaign screen.
MULTIPLAYER
Up to eight players can link up via Internet or a local network to create alliances and engage in combat against human opponents or computer AI. For in-depth information, see Multiplayer on p.153.
Online gameplay for Sub Command will be available only through August 31, 2002 subject to online terms of use and all features may not be available at the time of purchase. Please check online at www.ea.com for more information and terms of use.
27

MISSION EDITOR
Custom build single or multiplayer missions anywhere in the world. Make your missions as simple or complex as you desire and include random events, groups and opponents so that the game plays differently each time it is played. You can place one controllable submarine or several in your scenario and play the game from different perspectives. Opponents and allies can be created from the navies of sixteen different countries. For in-depth information, see Mission Editor on p. 161.
PLAYER’S LOG
Sub Command maintains a log for all player names you create. The log displays every mission attempted by your current player name and the results of each are displayed when you select the name of a specific mission.
Player Name
Select Mission Type
Click Mission Title to view results
Missions are grouped by category.
1.At the left of the screen click the desired text to select the type of missions you want to view. A list of all mission titles of that type undertaken by your current persona is displayed. It may be necessary to scroll down to see all mission titles. Multiplayer mission results are viewed with the Single mission results.
2.Click a mission’s title to see the results of that mission. The information displayed is the same as that displayed on the Mission Debrief screen at the conclusion of that mission. Slightly different information appears depending on the Mission Type.
3.BACK TO GAME LISTING at the bottom of the mission information to return to the list of missions. You may need to scroll to view this text.
4.Click OK to return to the Main menu.
28

OPTIONS
Selecting Options from the Main menu displays the Options menu. The Game Options page displays by default. The text buttons at the left of the screen indicate the type of options that are available. Click the name of the Options page you wish to view. A green box around the text button indicates the selected options page.
Selected Option Page
Click to select Option Type
A check mark in a box associated with an option indicates the option is ON. GAME: Set Game and map control options. The following options are available:
Show Dead Platforms: When ON, all platforms that are 100% destroyed display in their actual locations on the Nav map and their actual identity is displayed in 3D View. Should the contact be killed by a platform other than Ownship, the contact symbol displays on the Nav map whether you have detected it or not.
If you have detected the contact, the contact’s symbol remains on the map moving at the course and speed designated in the TMA solution even after the actual ship or object is destroyed. This can result in seeing two symbols and two 3D models for the same contact when this option is on.
For example, assume you have a contact designated S01. You have a TMA solution on S01 that places it on bearing 235 at a range of 4000 yds but the contact is actually on bearing 239 at a range of 5000 yds. Additionally, you have classified S01 as a Krivak class frigate when it is actually a fishing boat. When you click S01 on the Nav map the 3D model of a Krivak appears in 3D view.
Now suppose that you fire a torpedo at S01 using your TMA solution. Because your solution is close to the actual location of the contact the torpedo picks up the actual contact and destroys it. If you are attached to the torpedo you will see it go right through your TMA solution in 3D because it is not in the actual location of the contact. The torpedo proceeds on to the actual location of the contact and kills it. A symbol for the contact immediately appears at the actual location of the platform on the Nav map and the model of the dead fishing boat appears in the 3D View if you select the symbol. Your S01 solution symbol and the Krivak model remain on the map until you go to the TMA station, select S01 and drop it.
If Show Dead Platforms is OFF, you never see in 3D what you have killed. Based on the sound of explosions and the loss of a signal on a given bearing you may assume that you have killed something. If you want to know for sure what you have killed without turning on this feature, go to the Mission Status screen and scroll down to the Kills section.
Show Truth: When ON, symbols for all objects in the mission display on the Nav map whether you have detected them or not. When a ‘truth’ contact is selected on the map accurate information
29

about the contact is seen in the Data Display Indicator and in the 3D view. The information in the DDI has a different format than that seen when Show Truth is OFF.
When ON no Contact IDs are seen in the TMA or Fire Control Drop-down lists. You can only engage Truth contacts from the Nav map using the Contact menu’s Engage With command or by shooting a Snapshot at the contact from the Fire Control Target Display.
Truth is OFF by default and must be enabled here or by using the keyboard command or the Nav Map menu. The default keyboard command is shown.
•Press v+q+Tto toggle the display of truth on the Navigation Map.
•From the Nav Map menu select Layers>Show Truth. Select Layers>Hide Truth to turn truth OFF again.
NOTE: A host in a multiplayer game can turn OFF the Show Truth capability so no players in the game can use it.
Show Link Data: When ON, friendly or allied contacts appear on the map as blue symbols of the correct platform type. Since this information is provided from your link to other ships and satellites, they are designated as Link reports and have an L designation on the Nav and Fire Control maps.
Clicking on an L contact on the map displays information in the DDI, in the 3D view and the location of the platform that is accurate as of the last Link report. Link data is reported on a time delay so the locations may not be exact but they are the locations with a high level of confidence. Link information is updated on the map as long as the option is ON.
If the Show Link Data option is ON when you leave a mission, it is also ON at the start of the next mission.
This option can also be set as follows:
•Press q+v+Ato toggle the display of Link Data for allied platforms and land sites.
•From the Nav Map menu select Layers>Show/Hide Link Data.
NOTE: L contacts do not display in the TMA Select drop-down list. Some land sites are designated during mission design as Auto Detect. A land site so designated is always visible and also has an L designation. It remains visible even if Hide Link Data is selected. L and L contacts do appear in the Fire Control Target list.
Fire Control Quick Launch: When ON the time it takes to unload and load weapons and countermeasures is reduced as follows:
■Weapon unload/load time drops from 16 – 18 minutes (depending on the sub) to approximately 35 seconds.
■Weapon load time drops from 8 – 9 minutes (depending on the sub) to 20 seconds.
■Countermeasure unload/load time drops from nearly 6 minutes to 14 seconds.
■Countermeasure load time drops from 3 minutes to 8 seconds.
Enable Tool Tips: When ON the name of the screen, button name or function and in some cases additional information displays when the cursor is held over game labels, buttons and entry fields.
3D: Set screen resolution and 3D effects and testing options. Select Disable 3D to completely disable 3D in a mission.
CREW: Activate or deactivate Auto Crewmen. When ON, Auto Crewmen perform specific game tasks as follows:
Radar Auto Crew: When ON, Radar Auto Crewman marks and updates all Radar contacts as long as the Radar is on.
TMA Auto Crew: When ON, TMA Auto Crewman merges contacts, performs TMA assessment, and enters Firing Solutions for all designated contacts.
30
 Loading...