


 Loading...
P3PC-3052-03ENZ0
fi-5950 Image Scanner
Operator's Guide
Function
Hopper Height
Thin 
Power
Thickness
 Thick
Thick
Sendto
Scan

INTRODUCTION
Thank you for purchasing the fi-5950 Image Scanner.
The fi-5950 is an image scanner designed to scan various documents in large quantities.
This document describes the basic operation methods to perform scanning by using ScandAll PRO. The version of ScandAll PRO bundled with this product is subject to change without notice, in which case the screenshots captured in this document may differ from the actual displayed image.
For more information about ScandAll PRO, refer to the separate [ScandAll PRO User's Guide].
The fi-5950 has the following features.
Improvement of color scanning speed (105 sheets or 210 pages per minute) with high resolution (300dpi)
By the newly-developed high speed CCD and high speed image processing circuit, scanning speed (A4 color, 300dpi) of 105 sheets/210 pages per minute) is improved. Now you can scan a large amount of documents which is about 100,000 sheets a day!
Efficient pre-processing and post-processing!
This scanner is able to scan mixed documents stables of papers of different color, density, size and thickness. This makes the scanning process even simpler and economic, since you no not have to sort out the documents before scanning any more!
Furthermore, this scanner is equipped with an "Elevator" Stacker, moving automatically into the appropriate height, according to the amount of loaded documents. This will make the documents be easily and elegantly handled and also increases your scanning efficiency!
Prevention of data loss because of improved multi feed detection
This scanner is equipped with ultrasonic multi feed detection sensors, which detect reliably the feeding of 2 or more documents together into the scanner. Those multi feed can also be detected surely, when scanning documents of different thickness, size, color or density. This will help you to increase your efficiency, since the data loss caused by multi feed is detected immediately. This gives you the opportunity to correct the scanning without too much troubles and loss of time.
High image processing function
The automatic detection function of this scanner is able to detect if the loaded documents are color or monochrome and according to the detection the appropriate settings will be automatically chosen for the image creation. Since the scanner does this automatically, you do not have to set the image settings each time before scanning.
i

Preand Post imprinter option can be installed
In today's document business, imprinters provide a vital tool for archiving, controlling and verification processes. For this scanner, you can select two optional types of imprinters, depending on your needs. The Pre-Imprinter Option prints information on the front side of the documents prior to the scanning. When using Pre-imprinter, the printed information will also be stored on the generated image. The Post-Imprinter on the other hand, will print after the scanning on the back sides of your documents. So only the originals, and not the images, will contain the imprint.
Centralized management of multiple scanners
The bundled "Scanner Central Admin Agent" application allows you to manage multiple scanners together, for example, to update the scanner settings and drivers, as well as to monitor the operating status of each scanner.
About this manual
The manual provides the following information.
1. NAMES AND FUNCTIONS OF PARTS
This chapter describes names and functions of parts.
2. BASIC OPERATIONS
This chapter describes basic scanner operations and basic document scanning.
3.SCANNING VARIOUS TYPES OF DOCUMENTS
This chapter describes how to scan various types of documents.
4.DAILY CARE
This chapter describes how to clean the scanner.
5. REPLACING CONSUMABLES
This chapter describes how to replace consumables.
6. SOLVING COMMON PROBLEMS
This chapter describes how to remedy document jams, other trouble, and items to check before contacting the agent where you bought the scanner, and how to check device labels.
7. ADF DOCUMENT SPECIFICATIONS
This chapter describes documents that can be used with this scanner.
ii

8. SCANNER SETTINGS
This chapter explains the how settings can be done for the scanner using the Software Operation Panel.
9. OPTIONS
This chapter describes the options available for this product.
10.SCANNER SPECIFICATIONS
This chapter lists the scanner specifications.
The “Getting Started” is supplied to this Scanner.
This guide contains necessary information for getting started the scanner, also read the Getting Started.
1. PREPARING THE SCANNER
This chapter describes how to prepare the scanner for use.
2. INSTALLATION OF THE SCANNER
This chapter describes how to install and connect the scanner, and how to install the scanner application.
We hope that this manual is useful in taking full advantage of the fi-5950 Image Scanner features.
Trademarks
Microsoft, Windows, Windows Server, Windows Vista, and SharePoint are either registered trademarks or trademarks of Microsoft Corporation in the United States and/or other countries.
ISIS is a registered trademark or trademark of EMC Corporation in the United States. Kofax and VRS are either registered trademarks or trademarks of Kofax, Inc.
Other company names and product names are the registered trademarks or trademarks of the respective companies.
iii

How Trademarks Are Indicated In This Manual
References to operating systems (OS) are indicated as follows:
Product |
Indication |
|
Windows® 2000 Professional |
Windows 2000 |
Windows (*1) |
Windows® XP Professional, |
Windows XP |
|
Windows® XP Professional x64 Edition, |
|
|
Windows® XP Home Edition |
|
|
Windows Server® 2003 Standard Edition, |
Windows |
|
Windows Server® 2003 Standard x64 Edition, |
Server 2003 |
|
Windows Server® 2003 R2 Standard Edition, |
|
|
Windows Server® 2003 R2 Standard x64 Edition |
|
|
Windows Vista® Home Basic (32/64-bit), |
Windows Vista |
|
Windows Vista® Home Premium (32/64-bit), |
|
|
Windows Vista® Business (32/64-bit), |
|
|
Windows Vista® Enterprise (32/64-bit), |
|
|
Windows Vista® Ultimate (32/64-bit) |
|
|
Windows Server® 2008 Standard (32/64-bit), |
Windows |
|
Windows Server® 2008 R2 Standard |
Server 2008 |
|
Windows® 7 Home Premium (32/64-bit), |
Windows 7 |
|
Windows® 7 Professional (32/64-bit), |
|
|
Windows® 7 Enterprise (32/64-bit), |
|
|
Windows® 7 Ultimate (32/64-bit) |
|
|
Windows Server® 2012 Standard (64-bit) |
Windows |
|
|
Server 2012 |
|
|
|
|
Windows® 8 (32/64-bit), |
Windows 8 |
|
Windows® 8 Pro (32/64-bit), |
|
|
Windows® 8 Enterprise (32/64-bit) |
|
|
Microsoft® Office SharePoint® Portal Server 2003 |
SharePoint Server |
|
Microsoft® Office SharePoint® Server 2007 |
|
|
Microsoft® SharePoint® Server 2010 |
|
|
*1 Where there is no distinction between the different versions of the above operating system, the general term “Windows” is used.
iv

Manufacturer
PFU LIMITED
International Sales Dept., Imaging Business Division, Products Group
Solid Square East Tower, 580 Horikawa-cho, Saiwai-ku, Kawasaki-shi Kanagawa 212-8563, Japan Phone: (81-44) 540-4538
©PFU LIMITED 2010-2013
■Preface
Safety Precautions
The attached "Safety Precautions" manual describes important details for users to use this product safely and correctly. Read the Safety Precautions thoroughly before you start using this product.
Warning Indications Used In This Manual
This manual uses the following indications to ensure safe and correct use of this product, and to prevent possible danger and injury to the Operator and other persons.

 WARNING
This indication alerts operators to an operation that, if not strictly observed, may result in severe injury or death.

 CAUTION
This indication alerts operators to an operation that, if not strictly observed, may result in safety hazards to personnel or damage to equipment.
v

Symbols Used In This Manual
This manual uses the following symbols in explanations in addition to warning indications.
ATTENTION
This symbol alerts operators to particularly important information. Be sure to read this information.
This symbol alerts operators to helpful advice regarding operation.
HINT
Screen Examples In This Manual
The screen examples in this manual are subject to change without notice in the interest of product improvement.
If the actual displayed screen differs from the screen examples in this manual, operate by following the actual displayed screen while referring to the User's Manual of the scanner application you are using.
The screen examples used in this manual are of the TWAIN driver, ISIS driver, and ScandAll PRO (image scanning application).
The Operator Panel Language Display
Apart from English, the operator panel can also display French, German, Italian, Spanish, and Chinese (Simplified). In this manual, the language display of the operator panel is shown in English.
vi

CONTENTS
INTRODUCTION .......................................... |
i |
|
Preface ................................................................................. |
v |
|
1 NAMES AND FUNCTIONS OF PARTS....... |
1 |
|
1.1 |
Names and Functions of Parts ...................................... |
2 |
1.2 |
Operator panel ............................................................... |
5 |
2 BASIC SCANNER OPERATIONS............... |
7 |
|
2.1 |
Turning the Scanner ON /OFF ....................................... |
8 |
2.2 |
Opening and Closing the Hopper ................................ |
10 |
2.3 |
Opening and Closing ADF ........................................... |
12 |
2.4 |
Opening and Closing Top Cover ................................. |
14 |
2.5 |
Setting the Hopper Height ........................................... |
15 |
2.6 |
Loading Documents on the Hopper ............................. |
17 |
2.7 |
Setting up the Stacker ................................................. |
22 |
2.8 |
Using the Document smoother .................................... |
27 |
2.9 |
Setting the Paper Thickness ........................................ |
29 |
2.10 Scanning Documents ................................................. |
30 |
|
2.11 |
Starting Scanning with Button .................................... |
35 |
2.12 Feeding Documents Manually ................................... |
36 |
|
2.13 |
Configuring the Scan Settings ................................... |
43 |
2.14 |
Before Using [Scan] / [Send to] button ...................... |
60 |
2.15 Resuming from Power Saving Mode ......................... |
62 |
|
2.16 |
Image Scanning Application ...................................... |
63 |
2.17 Centralized Management of Scanners ...................... |
64 |
|
3 SCANNING VARIOUS TYPES OF |
|
|
DOCUMENTS ............................................ |
67 |
|
3.1 |
Double Sided Scanning ............................................... |
69 |
3.2 |
Scanning Documents Longer than A3 ......................... |
70 |
3.3 |
Scanning Documents with different widths .................. |
72 |
3.4 |
Excluding a Color from the image (drop out color) ...... |
75 |
3.5 |
Skipping blank Pages .................................................. |
78 |
3.6 |
Scanning the Image Brighter ....................................... |
81 |
3.7 |
Detecting Multifeeds .................................................... |
84 |
3.8 |
Correcting skewed Documents .................................... |
86 |
3.9 |
Setting Auto Correction for Document Page |
|
Orientations ................................................................. |
88 |
|
vii

|
3.10 |
Multi Image Output .................................................... |
91 |
|
3.11 Color/monochrome Auto Detection ............................ |
94 |
|
|
3.12 |
Not detecting Multifeed for fixed format ..................... |
97 |
4 |
DAILY CARE............................................ |
105 |
|
|
4.1 |
Cleaning Materials and Areas Requiring Cleaning .... |
106 |
|
4.2 |
Cleaning the Pad ....................................................... |
108 |
|
4.3 |
Cleaning the Rollers (using the cleaning sheet) ........ |
109 |
|
4.4 |
Cleaning the Rollers (with a lint-free cloth) ................ |
112 |
|
4.5 |
Cleaning the Transport path and the sensors ............ |
116 |
5 |
REPLACEMENT OF CONSUMABLES ... |
121 |
|
|
5.1 |
Consumables and Replacement Cycle ...................... |
122 |
|
5.2 |
How to check and reset the Consumable/Cleaning |
|
|
Counter ...................................................................... |
123 |
|
|
5.3 |
Replacing the Pad ..................................................... |
127 |
|
5.4 |
Replacing the Pick Roller ........................................... |
128 |
|
5.5 |
Replacing the Separator Rollers ................................ |
130 |
|
5.6 |
Replacing the Brake Roller ........................................ |
133 |
6 |
SOLVING COMMON PROBLEMS .......... |
135 |
|
|
6.1 |
Clearing Document Jams .......................................... |
136 |
|
6.2 |
Error messages of the Operator panel ...................... |
138 |
|
6.3 |
Troubleshooting ......................................................... |
142 |
|
6.4 |
Before Contacting a Service Provider ........................ |
155 |
|
6.5 |
Labels on the Scanner ............................................... |
157 |
7 |
DOCUMENT SPECIFICATIONS.............. |
159 |
|
|
7.1 |
Document Size .......................................................... |
160 |
|
7.2 |
Document Quality ...................................................... |
161 |
|
7.3 |
Maximum Document Loading Capacity ..................... |
164 |
|
7.4 |
Hole-punching Prohibited Areas ................................ |
165 |
|
7.5 |
Multifeed Detection Conditions .................................. |
166 |
|
7.6 |
Background Color Areas ............................................ |
168 |
|
7.7 |
Job Separation Sheet ................................................ |
169 |
|
7.8 |
Scanning Mixed Documents ...................................... |
170 |
viii
8 SCANNER SETTINGS............................. |
173 |
|
8.1 |
Scanner Settings ...................................................... |
175 |
8.2 |
Power saving setting .................................................. |
190 |
8.3 |
Offset/Scan scale ....................................................... |
191 |
8.4 |
Multifeed Detection .................................................... |
193 |
8.5 |
Multifeed detection when scanning in manual feed |
|
|
mode .......................................................................... |
198 |
8.6 |
Page Edge Filler (ADF) .............................................. |
199 |
8.7 |
Dropout Color ............................................................ |
201 |
8.8 |
Pre-Pick ..................................................................... |
202 |
8.9 |
Page Edge Filler |
|
|
(Automatic Page Size Detection) .............................. |
203 |
8.10 |
Intelligent Multifeed Function ................................... |
205 |
8.11 |
Paper feeding retry times ......................................... |
206 |
8.12 |
Retaining current paper thickness after Power off ... |
207 |
8.13 |
Cleaning Cycle ......................................................... |
208 |
8.14 |
Life counter setting .................................................. |
209 |
8.15 |
Document clearance setting .................................... |
210 |
8.16 |
Thin Paper Mode ..................................................... |
211 |
8.17 |
Soft Pick Setting ...................................................... |
212 |
8.18 |
Paper Jam Detection ............................................... |
213 |
8.19 |
AutoCrop Boundary ................................................. |
214 |
8.20 |
Auto Color Detection ................................................ |
215 |
8.21 |
Alarm Setting ........................................................... |
216 |
8.22 |
Jam Detection Outside of Scannable Area When |
|
|
Transporting paper ................................................... |
217 |
8.23 |
Imprinter Selection ................................................... |
218 |
8.24 |
Timeout for Manual Feeding .................................... |
219 |
8.25 |
Scan Setting for Document with Tab ....................... |
220 |
8.26 |
Paper Stop Position at Multifeed Error .................... |
221 |
8.27 |
Overscan Control ..................................................... |
222 |
9 OPTIONS ................................................. |
225 |
|
9.1 |
Options ...................................................................... |
226 |
9.2 |
fi-590PRF (Pre-imprinter) .......................................... |
227 |
9.3 |
fi-590PRB (Post-imprinter) ......................................... |
228 |
9.4 |
Other Options ............................................................ |
229 |
ix

10 SCANNER SPECIFICATIONS................. |
231 |
|
10.1 |
Basic Product Specifications ................................... |
232 |
10.2 |
Installation Specifications ........................................ |
234 |
10.3 |
Dimensions .............................................................. |
236 |
INDEX ............................................................................ |
|
IN-1 |
x

1 NAMES AND FUNCTIONS OF PARTS
This chapter describes names and functions of various parts of the scanner.
1.1 |
Names and Functions of Parts.............................................. |
2 |
1.2 |
Operator panel ........................................................................ |
5 |
1
1.1 Names and Functions of Parts
This section describes the names of parts.
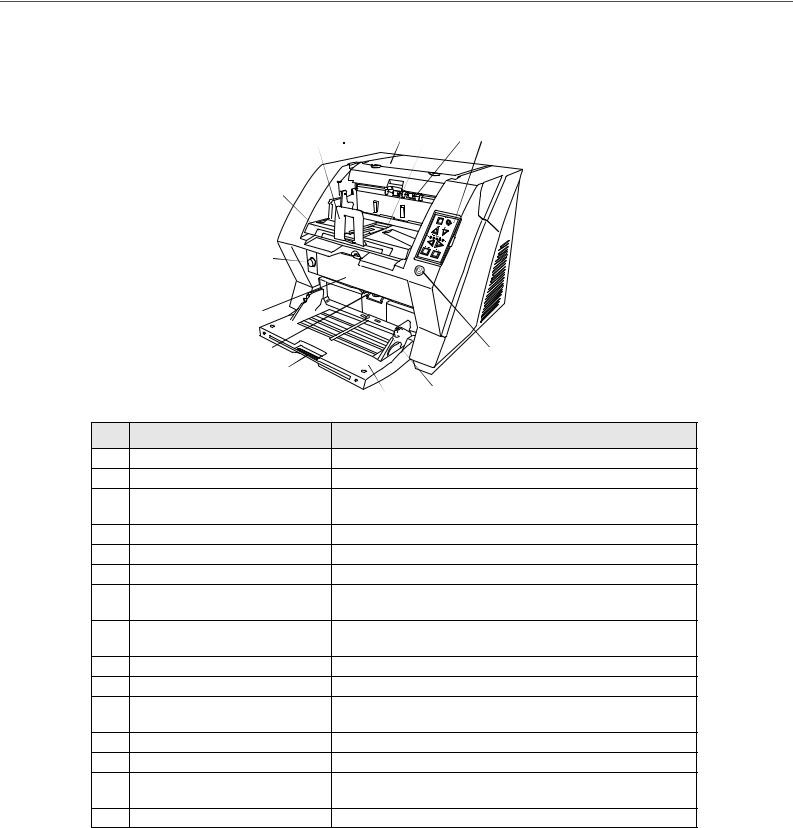
■ Front side
|
1 |
2 |
3 |
4 |
5 |
6 |
|
7 |
|
|
|
|
|
|
8 |
|
|
|
|
|
|
9 |
|
|
|
|
|
|
10 |
|
|
|
|
|
|
11 |
|
|
|
|
15 |
|
|
|
|
|
|
|
|
12 |
|
|
|
|
|
|
|
|
13 |
14 |
|
|
|
|
|
|
|
|
|
No. |
Name |
|
|
|
|
Function |
1 |
Stopper |
Prevents ejected documents from dropping off the scanner. |
||||
2 |
Stacker side guide |
For aligning ejected documents to a certain width. |
||||
3 |
Top cover |
Cover to access the consumables storage box and Post-Imprinter |
||||
|
|
option (sold separately). |
|
|||
4 |
Stacker |
Documents will be ejected into the Stacker after scanning. |
||||
5 |
Ejector |
For ejecting the documents after scanning. |
||||
6 |
Operator panel |
For operating the scanner. |
|
|||
7 |
Stacker extension |
For scanning long documents. Pull the extension out according to |
||||
|
|
the document’s length. |
|
|||
8 |
ADF cover |
Open the cover for cleaning the inner parts of the ADF or for |
||||
|
|
replacing consumables. |
|
|||
9 |
ADF cover open button |
Button used to open the ADF |
||||
10 |
Pre-imprinter cover |
For the Pre imprinter option |
||||
11 |
ADF |
The documents loaded onto the Hopper will be fed sheet by sheet |
||||
|
(Automatic document feeder) |
for scanning. |
|
|
|
|
12 |
Hopper extension |
Pull the Hopper extension out for loading long documents. |
||||
13 |
Hopper |
Documents to be scanned are loaded onto the Hopper. |
||||
14 |
Hopper side guides |
Sheet Guides used to make sure that the paper to be scanned is |
||||
|
|
fed into the scanner straight, avoiding skew. |
||||
15 |
Power button |
Switch the scanner ON&OFF. |
||||
2 |
|
1.1 Names and Functions of Parts |
|
||
|
|
|

■ Rear side
1
2
3 4 5 6 7 8
No. |
Name |
Function |
|
|
|
1 |
Main power switch |
For switching the power supply ON/OFF. |
|
|
|
2 |
Power connector |
For connecting the AC cable. |
|
|
|
3 |
SCSI ID Switch |
Sets the scanner’s SCSI ID. |
|
|
|
4 |
SCSI connector |
For connecting the SCSI cable. |
|
|
|
5 |
USB connector |
For connecting the USB cable. |
|
|
|
6 |
Extended memory |
For connecting an extension memory (sold separately). For details see |
|
slot |
section 9.4. |
|
|
|
7 |
VRS Board (optional) |
For connecting the VRS board (optional) to use Kofax VRS |
|
slot |
(optional). |
|
|
For details, refer to “9.1 Options” on page 226. |
|
|
|
8 |
Extended slot |
A spare slot for a third party board |
|
|
|
1 |
PARTS OF FUNCTIONS AND NAMES
1.1 Names and Functions of Parts |
|
3 |
|
||
|
|
|

■ Removable Parts
1
2
3
4
5
 Function
|
|
Hopper Height |
Thin |
Power |
Thickness |
|
|
Thick |
Sendto |
|
Scan |
|
|
No. |
Name |
Description |
|
|
|
1 |
Document smoother |
Attached when the stacker position is set to align the ejected document by |
|
|
the leading edge (see page 24), or when scanning documents with different |
|
|
widths (see page 72). |
|
|
|
2 |
Pick Rollers |
Rollers that pick the paper from the hopper into the ADF. This is a con- |
|
|
sumable item. |
|
|
|
3 |
Separator rollers |
Roller used to help separate the paper as the feeding begins. This is a con- |
|
|
sumable item. |
|
|
|
4 |
Brake rollers |
Roller used to help separate the paper as the feeding begins. This is a con- |
|
|
sumable item. |
|
|
|
5 |
Pad |
Separation Pad used to help separate the paper as the feeding begins. This |
|
|
is a consumable item. |
|
|
|
4 |
|
1.1 Names and Functions of Parts |
|
||
|
|
|
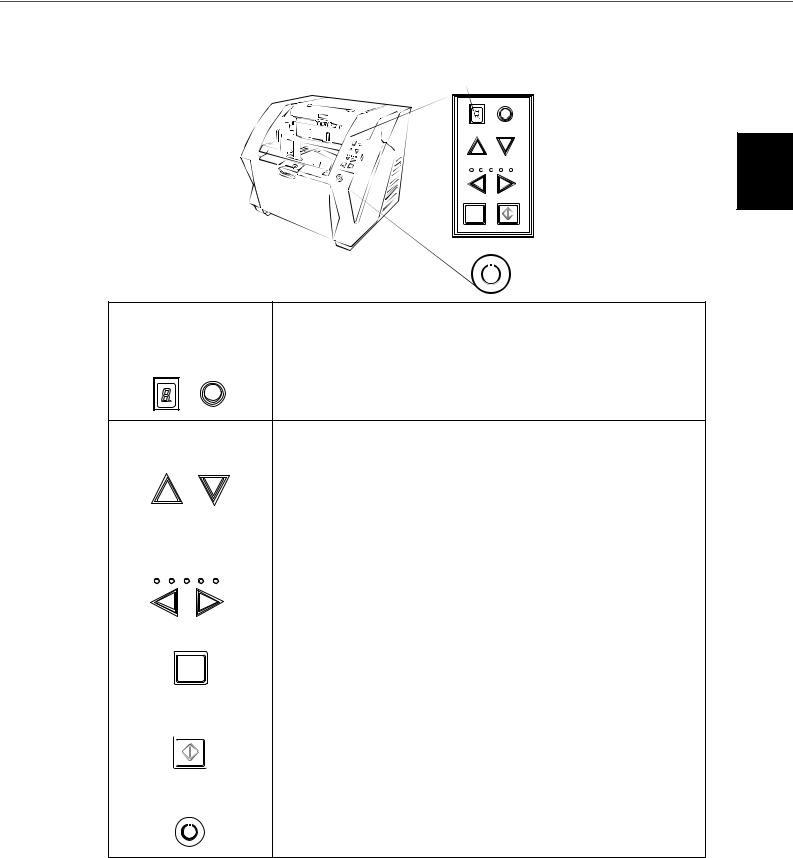
1.2 Operator panel
The operator panel is located on the right side of the scanner. The panel consists of a Function Number Display, buttons and LEDs.
Function number display
|
Function |
|
Hopper Height |
Hopper Height |
|
P |
|
owerThickness |
|
Sendto |
Paper Thickness |
Scan |
|
Thin |
Thick |
Scan
|
|
|
|
|
|
Name |
Function |
|
|
|
|
Function Number dis- |
Shows the status of the scanner. |
|
play and Function button |
For details, refer to "Indications on the Function Number Display" (page 6). |
|
Function
Hopper height |
|
Use these buttons to adjust the height of the Hopper to the Upper/Middle/ |
|||
adjustment button |
Lower Positions. |
||||
|
|
|
|
|
The hopper moves automatically to the right position after recieving a scan- |
|
Hopper Height |
|
ning command. However, this may cause a delay before the actual scanning |
||
|
|
|
|
|
starts. To avoid unnecessary waiting time, it is recommended to set the hop- |
|
|
|
|
|
per height prior to scanning. For details, refer to “2.5 Setting the Hopper |
|
|
|
|
|
|
|
|
|
|
|
Height” on page 15. |
|
|
|
|
|
|
Document thickness |
Use this buttons, to set the paper thickness of the documents. |
||||
adjustment button |
(Normally no need to change from the default setting) |
||||
|
Paper Thickness |
|
For details, refer to “2.9 Setting the Paper Thickness” on page 29. |
||
Thin |
Thick |
|
|||
|
|
|
|
|
|
[Send to] button |
|
Use this button to start linked application. |
|||
|
|
Sendto |
|
When this button is pressed at manual feed mode, the scanning stops immedi- |
|
|
|
|
|
|
ately. |
|
|
|
|
|
(* About the settings, refer to section “2.14 Before Using [Scan] / [Send to] |
|
|
|
|
|
button” on page 60, or the TWAIN Driver help.) |
|
|
|
|
|
|
[Scan] button |
|
Use this button to start linked application. |
|||
|
|
Scan |
|
When this button is pressed during scanning operation, the scanning is can- |
|
|
|
|
|
|
celled. |
|
|
|
|
|
(* About the settings, refer to section “2.14 Before Using [Scan] / [Send to] |
|
|
|
|
|
button” on page 60, or the TWAIN Driver help.) |
|
|
|
|
|
|
Power button |
|
Use this button to turn the power ON/OFF. |
|||
|
|
|
|
|
When the power is turned on, the button is illuminated in blue. |
|
|
|
|
|
|
1 |
PARTS OF FUNCTIONS AND NAMES
1.2 Operator panel |
|
5 |
|
||
|
|
|
HINT
Operator Panel Overlays sheets in French, German, Italian, Spanish and Chinese (Simplified) are provided with the scanner. To change the overlay, open the plastic cover of the Operator Panel.
Scan
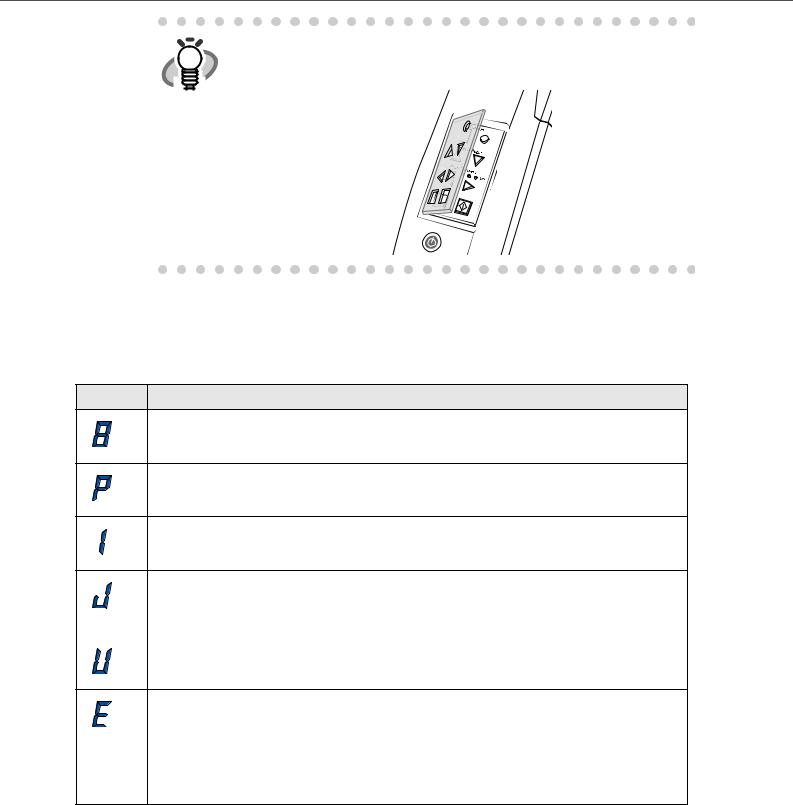
■ Indications on the Function Number Display
The following shows the indications on the Function Number Display.
No. |
Descriptions |
|
Lights only one time upon turning on the scanner. |
|
Indicates that the scanner has been turned ON and is being initialized. |
Indicates that initialization has been completed successfully.
This status is called “Ready Status”.
|
Indicates that a temporary error (that users can solve) has occurred during the initialization or |
|
scanning of documents. |
|
“J” or “U” and an error number (1, 2, 4, 6, 8, 0) are displayed alternately. |
or |
To return the scanner to the ready status (“1”), press the “Scan” or “Send to” button while the error |
|
is indicated. |
Indicates that a device alarm (that users can not solve) has occurred during the initialization or scanning of documents.
“E” and an alarm number (0, 2 to 9, and A, c, d, F, 10 to 12, 15 to 19, 1A, 1b) are indicated alternately.
To return the scanner to the ready status (“1”), press the “Scan” or “Send to” button.
If this alarm occurs, turn the power off and then on again. If the alarm is indicated after turning on the power again, contact your service engineer.
6 |
|
1.2 Operator panel |
|
||
|
|
|

2 BASIC SCANNER
OPERATIONS
This chapter describes basic scanner operations.
This chapter explains operations using the screens of Windows XP. Depending on your OS, your PC's screen shots and the operation may be different from this manual. Be aware that when the TWAIN driver, or the ISIS driver is updated, the screens and operations noted in this chapter may be changed slightly. In this case, refer to the User's Guide provided with the update.
2.1 |
Turning the Scanner ON /OFF ............................................... |
8 |
|
2.2 |
Opening and Closing the Hopper ....................................... |
10 |
|
|
|
||
2.3 Opening and Closing ADF................................................... |
12 |
||
|
|
||
2.4 Opening and Closing Top Cover......................................... |
14 |
||
|
|
|
|
2.5 |
Setting the Hopper Height ................................................... |
15 |
|
|
|
||
2.6 Loading Documents on the Hopper.................................... |
17 |
||
|
|
|
|
2.7 |
Setting up the Stacker.......................................................... |
22 |
|
|
|
||
2.8 Using the Document smoother ........................................... |
27 |
||
|
|
|
|
2.9 |
Setting the Paper Thickness ............................................... |
29 |
|
|
|
||
2.10 Scanning Documents......................................................... |
30 |
||
|
|
||
2.11 Starting Scanning with Button .......................................... |
35 |
||
|
|
|
|
2.12 |
Feeding Documents Manually........................................... |
36 |
|
|
|
|
|
2.13 |
Configuring the Scan Settings .......................................... |
43 |
|
|
|
|
|
2.14 |
Before Using [Scan] / [Send to] button ............................ |
60 |
|
|
|
||
2.15 Resuming from Power Saving Mode ................................ |
62 |
||
|
|
|
|
2.16 |
Image Scanning Application ............................................. |
63 |
|
|
|
|
|
2.17 |
Centralized Management of Scanners.............................. |
64 |
|
7

2.1 Turning the Scanner ON /OFF
■ Turning the Power ON
ATTENTION
When SCSI interface is used, turn on the scanner power first. Turn on the PC when the scanner displays “1” on the Function number display.
1.Press “I” side of the main power switch located on the back of the scanner.
OFF ON
2.Open the Hopper.
HINT
•Refer to “2.2 Opening and Closing the Hopper” on page 10 to open the Hopper.
•Be sure to open the Hopper before turning on the scanner by the Power button.
3.Press the Power button on the Operator panel.
The power turns on and the Power button lights up.
During initialization, the Function No. Display changes from “8” --> “P” to “1” in order. When “1” shows, it means the scanner is ready.
 Function number display
Thin


Sendto
Scan
8 |
|
|
|
|
|
|
|
|
|
|
|
|
|
|
|
|
|
|
|
|
|
|
2.1 Turning the Scanner ON /OFF |
|
|
|
|
|
|
|
|
|
|
|
|
|
|
|
|
|
|
||
|
|
|
|
|
|
|
|
|
|
|
■ Turning the Power OFF
Hold the Power button for at least two seconds.
Thin


Sendto
Scan
The Power button light goes off and the scanner becomes disconnected.
|
|
If the scanner will not be used for an extended period, turn off the scanner’s |
||||||||||||
|
|
|||||||||||||
HINT |
|
main power switch on the back and unplug the power cable. |
||||||||||||
|
|
|
|
|
|
|
|
|
|
|
|
|
|
|
|
|
|
|
|
|
|
|
|
|
|
|
|
|
|
|
|
|
|
|
|
|
|
|
|
|
|
|
|
|
|
|
|
|
|
|
|
|
|
|
|
|
|
|
|
|
|
|
|
|
|
|
|
|
|
|
|
|
|
|
|
|
|
|
|
|
|
|
|
|
|
|
|
|
|
|
|
|
|
|
|
|
|
|
|
|
|
|
|
|
|
|
|
|
|
|
|
|
|
|
|
|
|
|
|
|
|
|
|
|
|
|
|
|
|
|
|
|
|
|
ON OFF
2 |
OPERATIONS SCANNER BASIC
2.1 Turning the Scanner ON /OFF |
|
9 |
|
||
|
|
|

2.2 Opening and Closing the Hopper
■Opening the Hopper
1.Hold the centrer of the upper part of the Hopper.
 Function
Hopper Height
Thin 
Send to
Power |
Thickness |
|
 Thick
Thick
Scan
2.Flip down the Hopper gently.
Height
Thin 
Power Thickness
 Thick
Thick
Send to
Scan
 Function
Hopper Height
Thin 
Send to
Power |
Thickness |
|
 Thick
Thick
Scan
10 |
|
2.2 Opening and Closing the Hopper |
|
||
|
|
|
■Closing the Hopper
1.Remove the document if there is any on the Hopper.
2.Slide the extension in the Hopper.
Hopper extension
3.Restore the original position of the hopper if the height of Hopper is adjusted.
Lower the hopper to the bottom by pressing the button. (Refer to “2.5 Setting the Hopper Height” on page 15)
4.Close the Hopper.
|
Function |
|
|
Function |
|
|
|
|
|
|
Hopper Height |
|
|
Hopper Height |
|
|
|
|
|
|
P |
Thin |
Power |
Thickness |
Thin |
owerThick |
|
|
|
|
ness |
|
|
Thick |
|
Thick |
|
|
|
Sendto |
|
Send to |
|
Scan |
Scan |
|
|
||
|
|
|
|
2 |
OPERATIONS SCANNER BASIC
ATTENTION
Push the hopper until it’s securely locked in place.
|
|
|
|
|
|
|
|
|
|
|
|
|
|
|
|
|
|
|
|
|
|
|
|
|
|
|
|
|
|
|
|
|
|
|
|
|
|
|
|
|
|
|
|
|
|
|
|
|
|
|
|
|
|
|
|
|
|
|
|
|
|
|
|
|
|
|
|
|
|
|
|
|
|
|
|
|
|
|
|
|
|
|
|
|
2.2 Opening and Closing the Hopper |
|
11 |
||||||||||||||||||||||||||||||
|
||||||||||||||||||||||||||||||||||||||||||||||||||||||||||
|
|
|
|
|
|
|
|
|
|
|
|
|
|
|
|
|
|
|
|
|
|
|
|
|
|
|
|
|
|
|
|
|
|
|
|
|
|
|
|
|
|
|
|
|
|
|
|
|
|
|
|
|
|
|
|
|
|
|

2.3 Opening and Closing ADF
■Opening ADF
1.Remove the document if there is any on the stacker.
 Function
Hopper Height
Thin 
Power Thickness
 Thick
Thick
Send to
Scan
2.Press the ADF cover open button.
 Function
Hopper Height
Thin 
PowerThickness
 Thick
Thick
Sendto
Scan
The cover is slowly opened.
12 |
|
2.3 Opening and Closing ADF |
|
||
|
|
|

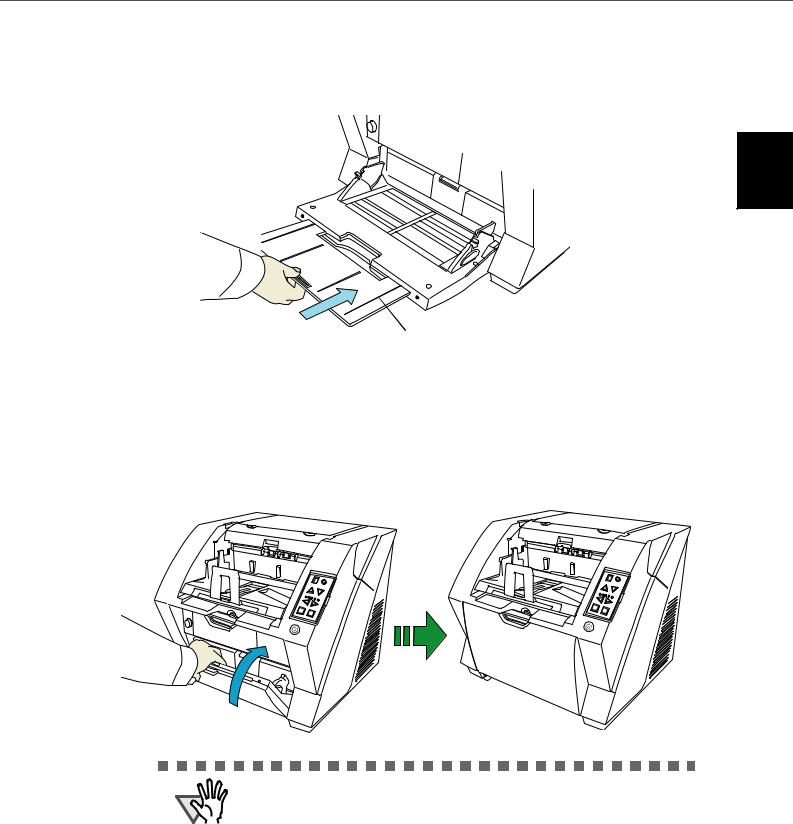
■Closing ADF
1.Hold the ADF cover with both hands and press it down slowly.
Press the ADF cover until it is fixed.
• When closing the ADF, make sure that nothing is left inside the ADF.
ATTENTION
• Be careful not to have your fingers caught.
2 |
OPERATIONS SCANNER BASIC
2.3 Opening and Closing ADF |
|
13 |
|
||
|
|
|

2.4 Opening and Closing Top Cover
Under the Top cover, there are a storage tray for storing the consumables and cleaning goods and a space for installing the Post-Imprinter. When you use the tray or access the Post-Imprinter, open the top cover as follows.
■ Opening the Top Cover
Press the tabs of the Top cover and open the top cover.
Tab
Top cover |
Top cover |
|
Storage tray |
Space for installing the Post-Imprinter
■ Closing the Top cover
Close the Top cover and press lightly until it is fixed with the tab.
14 |
|
2.4 Opening and Closing Top Cover |
|
||
|
|
|

2.5 Setting the Hopper Height
When there is no alarm (the function number display is showing “1”), the Hopper height can be adjusted. When the scanning load is not very heavy, setting the hopper higher will shorten the time it moves to the feeding position.
• Do not touch the hopper when it is being adjusted. Your finger(s) may
ATTENTION
be pinched.
•Do not load anything onto the hopper when it is moving. If something gets into the mechanism, the scanner may be damaged.
•Do not place anything under the hopper. The hopper may collide with it and become damaged.
|
|
|
|
|
|
|
|
|
• Do not press the [Hopper Height] button ( |
|
|
) when the hopper is |
|
|
||||||||||||||||||||||||||||||||||||||||
|
|
|
|
|
|
|
|
|
|
closed. The hopper may be damaged. |
|
|
|
|
|
|
|
|
|
|
|
|
|
|
|
|
|
|
||||||||||||||||||||||||||
|
|
|
|
|
|
|
|
|
|
|
|
|
|
|
|
|
|
|
|
|
|
|
|
|
|
|
|
|
|
|
|
|
|
|
|
|
|
|
|
|
|
|
|
|
|
|
|
|
|
|
|
|
|
|
|
|
|
|
|
|
|
|
|
|
|
|
|
|
|
|
|
|
|
|
|
|
|
|
|
|
|
|
|
|
|
|
|
|
|
|
|
|
|
|
|
|
|
|
|
|
|
|
|
|
|
|
|
|
|
Adjustment is not possible when:
•The scanner is scanning
•The hopper is closed.
•When using Software Operation Panel (see page 175).
Three hopper heights are available and the corresponding capacities are as follows.
High: |
Up to 100* sheets |
Middle: |
Up to 300* sheets |
Low: |
Up to 500* sheets |
*: Estimated using paper of 80g/m2 (20lb).
High
Middle
Low
2 |
OPERATIONS SCANNER BASIC
HINT
Depending on the thickness of the document, the loading capacity differs. Refer to “7.3 Maximum Document Loading Capacity” on page 164.
|
2.5 Setting the Hopper Height |
|
15 |
|
|
||
|
|||
|
|
|
|

The adjustment is done by using the Operator Panel on the scanner.
|
|
|
Function |
|
|
Hopper Height |
|
|
|
Function |
|
|
|
Hopper Height |
|
Thin |
Power |
Thickness |
|
|
|
Thick |
|
Send to |
|
Scan |
|
|
|
|
|
|
|
Paper Thickness |
|
|
|
Thin |
Thick |
|
|
Send to |
Scan |
When you press the |
button, the hopper is raised one step higher.(Low |
When pressing the |
button, the hopper is lowered one step lower.(High |
Middle High)
Middle Low)
Immediately after the scanner is turned on, the Hopper is initially set to Low.
HINT
16 |
|
|
|
|
|
2.5 Setting the Hopper Height |
|||
|
||||
|
|
|
|
|

2.6 Loading Documents on the Hopper
■Preparing the Document
1.Align both edges of the documents.
|
|
For how to scan the document with different widths, refer to “3.3 Scanning |
|
|
|
HINT |
|
Documents with different widths” on page 72. |
|
|
|
|
|
|
|
|
|
2.Fan the documents.
1)Take a stack of documents about 15mm to 20mm thick (1/2 to 3/4 inch).
2)Hold both ends and bend the documents into an arch.
15 to 20mm
3)Firmly holding the document with both hands, bend back the document as follows so that the bent section rises up in the middle of the document as follows.
4)Repeat steps 1) to 3) for a few times.
5)Rotate the document 90 degrees, and fan again.
3.Align the leading edges of the documents.
2 |
OPERATIONS SCANNER BASIC
2.6 Loading Documents on the Hopper |
|
17 |
|
||
|
|
|
■ Setting the Document
There are 2 ways to set documents on the hopper.
(1)Set the document at the center of the hopper (mainly for document of equal size pages).
(2)Set the document by either side of the hopper (mainly for document of different size pages, or you want to align the document by the side instead of the center line).
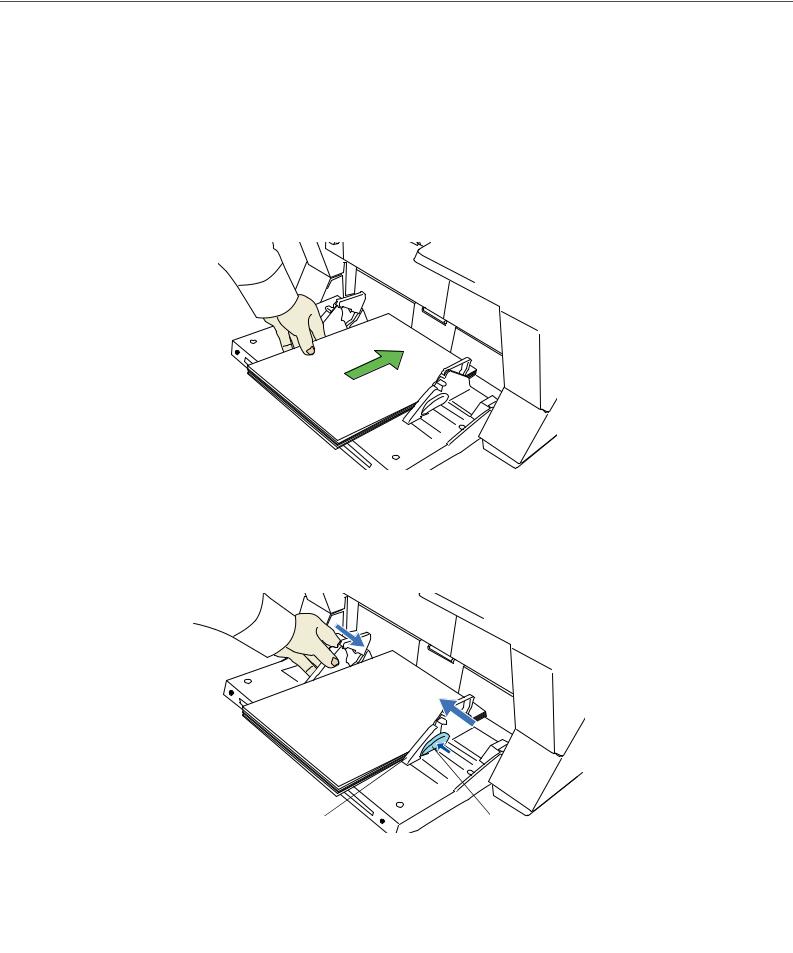
(1)Setting the document at the center of the hopper
1.Load the document on the hopper.
Place the document face-up on the hopper.
2.Adjust the Side guides to the document width.
Pressing the lock lever, slide the Side guides so that they contact the document sides.
If there is space between the document edges and the guides, the scanned images may be skewed.
Side guide |
Lock lever |
18 |
|
2.6 Loading Documents on the Hopper |
|
||
|
|
|
Loading...