FUJITSU E17-6 User Manual [fr]

Monitor
Erste Schritte / Getting Started
SCENICVIEW E17-6 GL
Deutsch, English, Français, Español, Português, Italiano, Svenska, Nederlands, Dansk, Suomi, Pycckий, Norsk, Eesti keel, Ελληνικά, Lietuviškas, Latviski, Polski, Slovensko, Slovenský, Česky, Magyar
Sie haben ...
... technische Fragen oder Probleme?
Wenden Sie sich bitte an
unseren Help Desk (siehe Garantieheft).
Aktuelle Informationen zu unseren Produkten, Tipps, Updates usw. finden Sie im Internet: http://www.fujitsu-siemens.com
Are there ...
... any technical problems or other questions you need clarified?
Please contact
our Help Desk (see Warranty Booklet).
The latest information on our products, tips, updates, etc., can be found on the Internet under: http://www.fujitsu-siemens.com
SCENICVIEW E17-6 GL
¾¾¾¾¾¾¾¾¾¾¾¾¾¾¾¾¾¾¾¾¾¾¾¾¾¾¾¾¾¾¾¾¾¾¾¾¾¾¾¾¾¾¾¾¾¾¾¾¾¾¾¾¾¾¾¾¾¾¾¾¾¾¾¾¾¾¾¾¾¾¾¾¾¾¾¾¾¾¾
Technical data
Dimensions and weight (LCD monitor) |
|
Visible diagonals: |
43 cm (17”) |
Screen size : |
338 mm x 270 mm |
Dimensions (W x H x D) |
|
incl. monitor base : |
377 mm x 392 mm x 176 mm |
Dimensions box (W x H x D): |
421 mm x 424 mm x 152 mm |
Weight : |
approx. 4,9 kg |
Dot pitch : |
0,264 mm |
Maximal resolution : |
1280 x 1024 pixels |
Electrical data |
|
Video: |
analogue, positive, 0.7 Vpp, 75 Ω |
Synchronisation : |
Seperate Synch. TTL, positive or negative |
Horizontal frequency: |
30 kHz …. 81 kHz |
Refresh rate: |
55 Hz …. 76 Hz |
Maximum pixel rate: |
135 MHz |
Power supply: |
switches automatically |
|
100 V – 240 V, 50 Hz – 60 Hz, 0.9 A max. |
Total power consumption: |
< 45 W |
|
< 2 W in the energy-saving modes |
|
(standby mode, suspend mode and Off mode) |
Environmental conditions |
|
Environment class 3K2, IEC 721 |
|
Operating range: |
5 °C …. 35° C |
Humidity: |
20 % …. 85 % |
Condensation must be avoided. |
|
Preset operating modes
The picture position and size have been set set to optimum values at the factory for the operating modes listed above.
Horizontal frequency |
Refresh rate |
Display resolution |
31.5 kHz |
70 Hz |
720 x 400 |
31.5 kHz |
60 Hz |
640 x 480 |
37.5 kHz |
75 Hz |
640 x 480 |
37.9 kHz |
60 Hz |
800 x 600 |
46.9 kHz |
75 Hz |
800 x 600 |
48.4 kHz |
60 Hz |
1024 x 768 |
60.0 kHz |
75 Hz |
1024 x 768 |
64.0 kHz |
60 Hz |
1280 x 1024 |
79.9 kHz |
75 Hz |
1280 x 1024 |

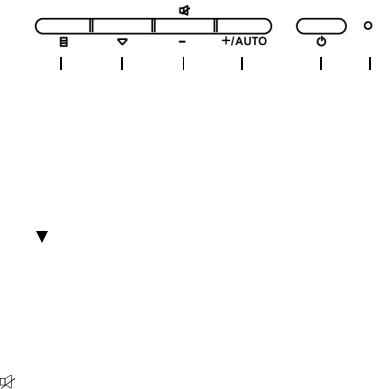
USER CONTROLS
3 4 5 6 1 2
Front Panel Controls
1. |
Power Switch |
:To turn ON or OFF the power. |
2. |
Power LED |
:Lights up to indicate the power is turned ON. |
3. |
Select MENU :To exit and enter OSD menu. |
|
4. |
Select |
:To move downward in the OSD Item. |
|
|
:To enter the digital video mode menu,and choose the different |
|
|
digital video mode which has independent brightness control |
|
|
when OSD is not displayed. |
5. |
- |
:To decrease the value of the parameter in the OSD, which has |
|
|
been selected for adjustment. |
-:Choose the previous OSD MENU page.
:Act as Speaker ON/OFF hot key when OSD is not displayed.
6. + :To increase the value of the parameter in the OSD, which has been selected for adjustment.
+:Choose the next OSD MENU page.
+(AUTO) :Act as AUTO adjustment hot key when OSD is not displayed.

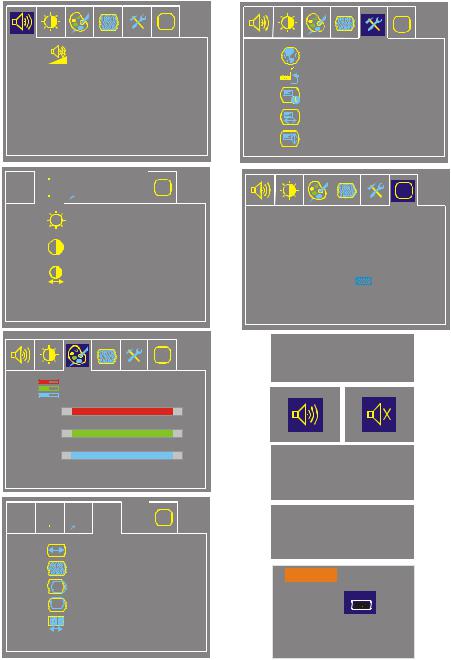
Basic Sections of a OSD Screen
i |
i |
Volume |
Language |
|
Factory Preset |
|
OSD Turn Off |
|
OSD Left/Right |
|
OSD Down/Up |


 i
i
Brightness
Contrast
Auto Contrast
|
|
i |
|
5000K 6500K 7500K 8200K 9300K |
|
Red |
- |
+255 |
Green |
- |
+ 255 |
Blue |
- |
+255 |


 i
i
H. Size
Fine
Left/Right
Down/Up
Auto Adjust
i
1280 x 1024 75Hz
Auto Adjust
Proceeding...
D-SUB
No Signal
D-SUB
Check Video Cable
 Standard
Text
D-SUB
Movie
Gaming
Photo
Sport

Standard OSD Operation
1.Press MENU key to activate the OSD menu, when OSD is not displayed.
2.Use Select  key to move down through the menu cyclically. The parameter will be highlighted when selected.
3.Then use + or - to increase or decrease the value of the parameter, or make selection between different options.
4.To quit the OSD screen at any time during the operation, press MENU key. If no keys are pressed for a time period, the OSD automatically disappears.
5.When OSD is not displayed, press + key to start Auto-Adjust.
6.When OSD is not displayed, press - key to turn speaker ON/ OFF.
7.When OSD is not displayed, press  key to enter the digital video mode menu, and choose the different digital video mode which has independent brightness control.
OSD Function Description |
|
----------------------------------------------------------------------------------------------- |
|
∙ Volume |
To increase or decrease the sound. |
----------------------------------------------------------------------------------------------- |
|
∙ Brightness |
To increase or decrease the brightness. |
∙ Contrast |
To increase or decrease the contrast. |
∙ Auto Contrast |
Press “+” key to start auto analog contrast. |
----------------------------------------------------------------------------------------------- |
|
∙ Color Temperature |
Press “-” or “+” to select 5000, 6500, 7500, |
|
8200, 9300 and USER. Only when selecting |
|
USER, you can make adjustments to the R/ |
|
G/B content, otherwise not. |
----------------------------------------------------------------------------------------------- |
|
∙ H. Size |
To increase or decrease the size of image. |
∙ Fine |
To increase or decrease the snow noise of |
|
the image. |
∙ Left / Right |
To move the screen toward left or right. |
∙ Down / Up |
To move the screen upward or downward. |

∙ Auto Adjust Press “+” to turn on this function. The AutoAdjust will automatically adjust V-Position,H- Position, Clock, and Clock-Phase , the whole process takes about 5seconds.
-----------------------------------------------------------------------------------------------
∙ Language Select among English, French, Italian, German, Spanish, Russian, Dutch & Swedish.
∙Factory Preset To return the monitor to its default settings.
∙OSD Turn Off To adjust the period of OSD auto turn-off time.
∙OSD Left / Right To move the OSD position horizontally on the
screen.When the “+” key is pressed, the OSD control menu will move to the right side of the screen.Likewise when the “-” key is pressed,the OSD control menu will move to the left side.
∙ OSD Down / Up To move the OSD position vertically on the screen.When the “+” key is pressed, the OSD control menu will move to the up side of the screen. Likewise when the “-” key is pressed,the OSD control menu will move to the lower side.
-----------------------------------------------------------------------------------------------
∙ Information Indicates the current resolution, V-Frequency.
-----------------------------------------------------------------------------------------------

SCENICVIEW E17-6 GL
Erste Schritte
Getting Started
Ausgabe Januar 2007 January 2007 edition
Deutsch
Magyar
Русский
English TCO
Norsk
Français
WEEE
Eesti keeles
Español
Ελληνικά
Português
Lietuviškas
Italiano
Latviski
Svenska
Polski
Nederlands
Slovensko
Dansk
Slovenský
Suomi
Česky

VESA, DDC und DPMS sind eingetragene Warenzeichen der Video Electronics Standards Association.
Alle Rechte vorbehalten, insbesondere (auch auszugsweise) die der Übersetzung, des Nachdrucks, der Wiedergabe durch Kopieren oder ähnliche Verfahren.
Zuwiderhandlungen verpflichten zu Schadenersatz.
Alle Rechte vorbehalten, insbesondere für den Fall der Patenterteilung oder GM-Eintragung.
Liefermöglichkeiten und technische Änderungen vorbehalten.
Keine Haftung für Inhalt und Druckfehler.
Copyright © Fujitsu Siemens Computers GmbH 2005
VESA, DDC and DPMS are registered trademarks of Video Electronics Standards Association.
All rights, including rights of translation, reproduction by printing, copying or similar methods, even of parts are reserved.
Offenders will be liable for damages.
All rights, including rights created by patent grant or registration of a utility model or design, are reserved.
Delivery subject to availability. Right of technical modification reserved.
No liability for content and printing error.

Inhalt |
|
Einleitung........................................................................................................................................... |
1 |
Weitere Informationen ............................................................................................................... |
1 |
Wichtige Hinweise ............................................................................................................................. |
2 |
Sicherheitshinweise ................................................................................................................... |
2 |
Netzleitung................................................................................................................................. |
3 |
Transport ................................................................................................................................... |
3 |
Reinigung .................................................................................................................................. |
4 |
CE-Kennzeichnung.................................................................................................................... |
4 |
Überprüfen der Lieferung................................................................................................................... |
4 |
Anschließen des Bildschirms............................................................................................................. |
5 |
Bedienen des Bildschirms ................................................................................................................. |
6 |
Fehlerbehandlung.............................................................................................................................. |
7 |
Montage des Bildschirmfußes............................................................................................................ |
9 |
Ausgabe 1 |
Deutsch |

Einleitung
In diesem Handbuch finden Sie wichtige Informationen, die Sie für die Inbetriebnahme Ihres LCDBildschirms benötigen.
Für die Ansteuerung des LCD-Bildschirms ist eine Grafikkarte (Bildschirm-Controller) mit VGASchnittstelle erforderlich. Der Bildschirm verarbeitet die Daten, die ihm von der Grafikkarte geliefert werden. Für die Einstellung der Modi (Auflösung und Bildwiederholfrequenz) ist die Grafikkarte bzw. die zugehörige Treiber-Software zuständig.
Wenn Sie den Bildschirm das erste Mal in Betrieb nehmen, sollten Sie die Bildschirmanzeige optimal an die verwendete Grafikkarte anpassen und Ihren Bedürfnissen entsprechend einstellen.
Zielgruppe
Um die beschriebenen Arbeiten auszuführen, müssen Sie kein "Fachmann" sein. Beachten Sie aber unbedingt die Sicherheitshinweise in der Betriebsanleitung des Computers und in diesem Handbuch!
Bei Problemen wenden Sie sich bitte an Ihre Verkaufsstelle oder unseren Help Desk.
Darstellungsmittel
In diesem Handbuch werden folgende Darstellungsmittel verwendet.
!Funktionsfähigkeit Ihres Geräts oder die Sicherheit Ihrer Daten gefährdet ist.
ikennzeichnet zusätzliche Informationen und Tipps.
►kennzeichnet einen Arbeitsschritt, den Sie ausführen müssen.kennzeichnet Hinweise, bei deren Nichtbeachtung Ihre Gesundheit, die
"Anführungszeichen" kennzeichnen Kapitelnamen und Begriffe, die hervorgehoben werden sollen. Diese Schrift kennzeichnet Dateinamen und Menüpunkte.
Diese Schrift stellt Bildschirmausgaben dar.
Weitere Informationen
Wie Sie Auflösungen und Bildwiederholfrequenzen einstellen, entnehmen Sie bitte den Dokumentationen Ihrer Grafikkarte bzw. der dazugehörigen Treiber-Software.
Ausgabe 1 |
Deutsch - 1 |
 Loading...