


EXPANDED OWNER’S MANUAL
CONTENTS
Introduction |
1 |
Control Panel |
2 |
Presets Basics |
3 |
Editing and Saving Presets |
4 |
Accessing Preset Contents |
4 |
Editing and Saving Amplifier Control Settings |
4 |
Changing the Amplifier Model in a Preset |
7 |
List of Mustang LT25 Amplifier Models |
8 |
Editing and Saving Effects Control Settings |
9 |
Replacing, Adding and Deleting Effects |
10 |
Setting Delay Times with the Tap Button |
12 |
List of Mustang LT25 Effect Models |
13 |
Menu Functions |
15 |
Tuner |
16 |
Footswitch |
17 |
Settings |
18 |
Restore |
18 |
Auxiliary Input and Headphone Output |
19 |
USB Port |
19 |
Specifications |
20 |
INTRODUCTION
This expanded owner’s manual is a thorough user’s guide to the features and functions of the Mustang LT25 amplifier.
As a complement to the Mustang LT25 Quick Start Guide that comes with each amplifier, this manual presents a detailed look at the amp’s versatile features. This includes navigation and modification of the onboard presets, and comprehensive descriptions of the amplifier and effect models. It also includes illustrated step- by-step instructions for using Mustang LT25’s onboard tuner, footswitch, USB port and other functions.
While this expanded manual presents the most current version of the amplifier, also check back for updated manual versions that will serve as even more helpful guides as Mustang LT25 and its capabilities evolve.
Be sure to check fender.com/firmware/support regularly for firmware updates that improve and enhance the Mustang LT25 experience.
1

CONTROL PANEL
The Mustang LT25 top control panel consists of an INSTRUMENT INPUT, five CONTROL KNOBS, a DISPLAY WINDOW, an ENCODER wheel, four UTILITY pushbuttons, a FOOTSWITCH INPUT, an AUXILIARY INPUT (1/8”), a HEADPHONE OUTPUT (1/8”), a TAP LIGHT and a USB PORT.
A.FOOTSWITCH (“FTSW”): Connect optional single-button footswitch here (page 17).
B.INPUT: Plug instrument in here.
C.AUXILIARY INPUT, HEADPHONE OUTPUT: 1/8” auxiliary input for connecting external audio devices, and 1/8” output for headphone use (page 19). Headphone output disables speaker.
D.GAIN: Affects gain setting in each preset.
E.VOLUME: Affects individual volume of each preset.
F.TREBLE: Affects treble tone setting in each preset.
G.BASS: Affects bass tone setting in each preset.
H.MASTER VOLUME: Controls actual overall volume.
I.DISPLAY WINDOW: Shows preset in use, preset contents and parameters, and other functions (i.e., tuner and other menu functions).
J.ENCODER: Rotary control with press-switch function. For viewing, selecting and adjusting Mustang LT25 presets, controls and other functions.
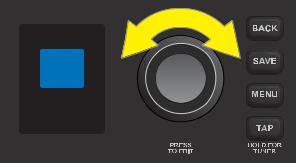
K.UTILITY BUTTONS
BACK: Returns user to the previous screen or original preset screen.
SAVE: For saving preset modifications, renaming presets and saving presets to a new location. MENU: For accessing tuner, footswitch and other functions (page 15).
TAP: For setting delay times (page 12) and accessing built-in tuner (page 16).
L.TAP LIGHT: Flashes in time with delay effects.
M.POWER: Turns amplifier on and off.
N.USB PORT: Amp connection point for USB audio recording (page 19).
O.IEC POWER INLET (REAR PANEL; NOT SHOWN): Using the included power cord, connect to a grounded outlet in accordance with the input power voltage and frequency specified at the power inlet.
2
PRESET BASICS
Mustang LT25 features 30 sequentially numbered presets. Each preset consists of an amplifier and one or more effects (or, in some cases, no effects). Note that when turning the amplifier on, the default active preset is always factory preset 01. Further, 20 additional presets are available when using the “REPLACE” feature (page 7).
To scroll through presets, turn the ENCODER; whichever preset is displayed becomes active:
 05
05 
DREAMY
Mustang LT25’s 30 original factory presets are:
01 |
FENDER CLEAN |
11 |
ROYAL MAJESTY |
21 |
TOUCH WAH |
02 |
SILKY SOLO |
12 |
SUPER ROCK |
22 |
CLASSIC ROCK |
03 |
BLUES LEAD 1 |
13 |
SUPER DRYCLEAN |
23 |
POLICE THE AREA |
04 |
VINTAGE TREMOLO |
14 |
POWER PUNCH |
24 |
VH BROWN SOUND |
05 |
DREAMY |
15 |
CLEAN DELAY |
25 |
YOU TOO ANTHEM |
06 |
COUNTRY PICKING |
16 |
ROCK STRUM |
26 |
PINK OF THE MOON |
07 |
STRIPES FUZZ |
17 |
LITTLE CHAMP |
27 |
TORTURED TELE |
08 |
THRASH OVERKILL |
18 |
PHASER SWIRL |
28 |
SKATE PUNK |
09 |
JAZZ AMP |
19 |
60S FUZZ |
29 |
SPACE TRAVEL |
10 |
OCTOBOT |
20 |
MYTHIC CRUNCH |
30 |
ACOUSTIC SIM |
Additionally, 20 more presets are available using the “REPLACE” function described on page 7. These are:
31 TAME PSYCH |
38 |
EARLY ZZ |
45 |
BRIGHT PRINCE |
|
32 |
OLD 15 SPEAKER |
39 |
ANGRY CHAMP |
46 |
DESERT ROCK |
33 |
SURF MUSIC |
40 |
HEAVY SHOEGAZE |
47 |
ROOTS RHYTHM |
34 |
GATED METAL |
41 |
HER RHAPSODY |
48 |
CHOPPY DELUXE |
35 |
ROCK A BILLY |
42 |
BLUES LEAD 2 |
49 |
ELECTRIC LOVE |
36 |
POST PUNK |
43 |
MODERN METAL |
50 |
SWEEPING FLANGER |
37 |
DOOM AND GLOOM |
44 |
SLOW SPIN |
|
|
3

EDITING AND SAVING PRESETS
Presets can be easily edited and, if desired, renamed and saved in place or saved in a different location. The controls of each amplifier type can be adjusted, or an amp model can be replaced with a different one. Similary, various effects controls can be adjusted, or effects can be removed from or added to a preset.
When a preset is active, the box containing its number is blue, indicating that no edits have been made. Once an edit is made, the box containing the preset number turns red and the preset title screen will read“UNSAVED”. When edits are saved, the preset number box returns to blue and the“UNSAVED”title clears.
ACCESSING PRESET CONTENTS
To access the contents of a preset, press the ENCODER. From the top down, the DISPLAY WINDOW will then show the number and name of the preset, the amplifier type in use, and four boxes that organize the effects used for that preset (if any). These effects category boxes are labeled STOMP (stompbox), MOD (modulation), DELAY and REV (reverb). When first accessing preset contents, the preset name and amplifier type are highlighted in blue:
PRESET NAME AND NUMBER  AMPLIFIER TYPE
EFFECTS CATEGORY BOXES
12 SUPER RO...
AMPLIFIER 80S ROCK
STOMP MOD
DELAY REV
Select the amp model or one of the effects category boxes by turning and pressing the ENCODER. The active selection is then highlighted in blue:
12 SUPER RO...
AMPLIFIER 80S ROCK
STOMP MOD
DELAY REV
EDITING AND SAVING AMPLIFIER CONTROL SETTINGS
To edit and save individual control settings of a preset’s amplifier model, first select the amp model by pressing the ENCODER on it. The DISPLAY WINDOW will then show a list of controls for the amp model in use:
12 SUPER RO... |
80S ROCK |
|||
AMPLIFIER |
GAIN |
7.3 |
||
80S ROCK |
VOLUME |
4.1 |
||
|
|
|||
STOMP |
MOD |
TREBLE |
5.8 |
|
DELAY |
REV |
MIDDLE |
4.5 |
|
BASS |
6.4 |
|||
|
|
|||
4
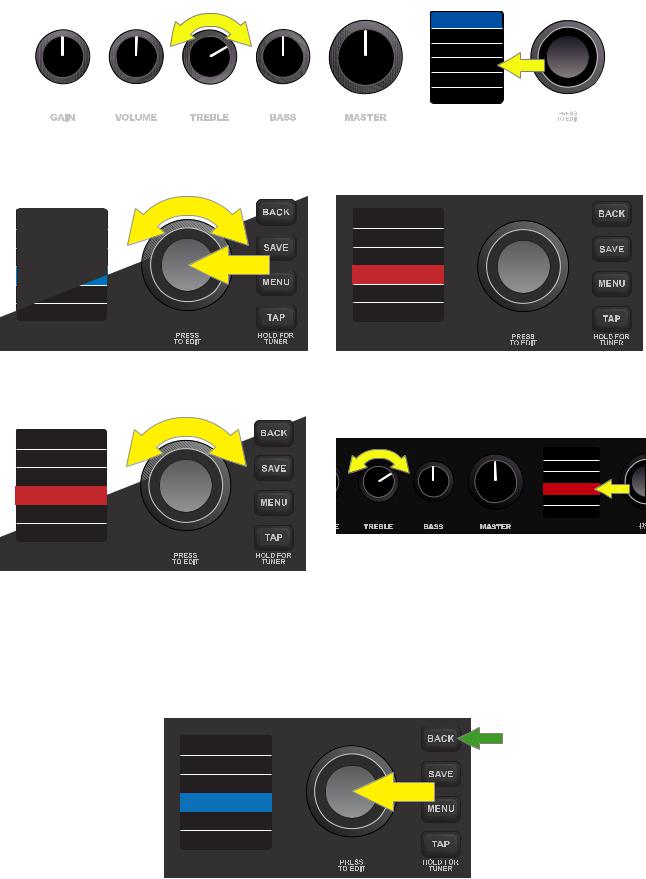
There are two ways to adjust an amp control knob setting. A control parameter that corresponds to an actual physical knob on the control panel can be adjusted simply by turning the physical control knob until the desired value is reached in the DISPLAY WINDOW. In the example below, the amp model’s TREBLE setting is adjusted by turning the physical TREBLE control knob on the control panel:
80S ROCK
GAIN 7.3
VOLUME 4.1
TREBLE 7.9
MIDDLE 4.5
BASS 6.4
Alternately, select a control parameter by turning and pressing the ENCODER; its surrounding box will turn from blue to red:
80S ROCK
GAIN 7.3
VOLUME 4.1
TREBLE 5.8
MIDDLE 4.5
BASS 6.4
80S ROCK
GAIN 7.3
VOLUME 4.1
TREBLE 5.8
MIDDLE 4.5
BASS 6.4
The control can then be adjusted by turning the ENCODER or by turning a corresponding physical control knob on the control panel (if present*):
80S ROCK
GAIN |
7.3 |
80S ROCK |
||
GAIN |
7.3 |
|||
|
|
|||
VOLUME |
4.1 |
VOLUME |
4.1 |
|
TREBLE |
7.9 |
TREBLE |
7.9 |
|
MIDDLE |
4.5 |
|||
MIDDLE |
4.5 |
|||
BASS |
6.4 |
|||
BASS 6.4
* Note that for control parameters such as MIDDLE that have no corresponding physical knob on the control panel, this is the only method of adjustment.
At this point, press the ENCODER or the BACK utility button (green arrow) to accept the adjusted control values. Pressing BACK returns the user to the preset contents screen; pressing the ENCODER lets the user continue making controls setting changes, and the box surrounding the control setting will return to blue. When control setting edits are complete, press the SAVE utility button to save the changes to the preset.
80S ROCK
GAIN 7.3
VOLUME 4.1
TREBLE 7.9
MIDDLE 4.5
BASS 6.4
5
 Loading...