


Mustang Floor

MUSTANG FLOOR
MUSTANG FLOOR
BY
FENDER
®
™
ADVANCED OWNER'S MANUAL
ADVANCED OWNER'S MANUAL
MUSTANG
™
FLOOR
Contents
Contents
Getting Started! . . . . . . . . . . . . . . . 2
Data Wheel . . . . . . . . . . . . . . . . . . 2
Footswitch Modes . . . . . . . . . . . . . . 3
Tap/Tuner . . . . . . . . . . . . . . . . . . 3
Amplifier Menus . . . . . . . . . . . . . . . 4
Effects Menus . . . . . . . . . . . . . . . . 4
Expression Pedal . . . . . . . . . . . . . . . 5
EXP-1 and MS-4 . . . . . . . . . . . . . . . 6
Saving Presets . . . . . . . . . . . . . . . . 7
Utility Menus . . . . . . . . . . . . . . . . . 7
Output Jacks . . . . . . . . . . . . . . . . . 8
Aux/Phone Jacks . . . . . . . . . . . . . . . 8
Insert Loop . . . . . . . . . . . . . . . . . . 9
USB Port . . . . . . . . . . . . . . . . . . . 9
MIDI . . . . . . . . . . . . . . . . . . . . . 9
Factory Restore & Firmware Update . . . . . 9
FAQ . . . . . . . . . . . . . . . . . . . . . 9
MIDI Appendix . . . . . . . . . . . . . . . .10
Getting Started!
Getting Started!
USB EXP-1/
MS-4
GROUND
LIFT
PHONESAUX IN XLR OUTLEVELUNBALANCED OUT MIDI
RL
RL
OUT IN
INSERT LOOPINPUT POWER
SEND RETURN
I
0
13 4 52
The basic Mustang™ Floor setup:
1. Plug the supplied power adapter into a grounded outlet.
2. Press the POWER switch to the "1" position to turn the Mustang
Floor on.
3. Plug your guitar into the INPUT jack.
4. Connect the input of your guitar amplifier or PA system to the
L UNBALANCED OUT jack –OR– plug your headphones into the
PHONES jack.
5. Turn the LEVEL knob to at least halfway up.
The LEVEL knob controls the output level of all the analog
outputs on the Mustang Floor, including the UNBALANCED
OUT jacks, the XLR OUT jacks and the PHONES jack.
6. Turn on your PA system or guitar amplifier –OR– put on your
headphones and start exploring the Mustang Floor!
7. Be sure to power off your amplifier (or PA) before powering
down the Mustang Floor.
The Mustang Floor is fully integrated with Fender® FUSE™
software which allows you to configure and operate the
Mustang Floor with ease from your computer. You can use
Fender FUSE to download free presets from Fender artists;
backup and restore presets for different occasions; and
customize the Mustang Floor in ways not available from the
Mustang Floor alone.
Please download the latest version of
Fender FUSE, free of charge from
fuse.fender.com.
Data Wheel
Data Wheel
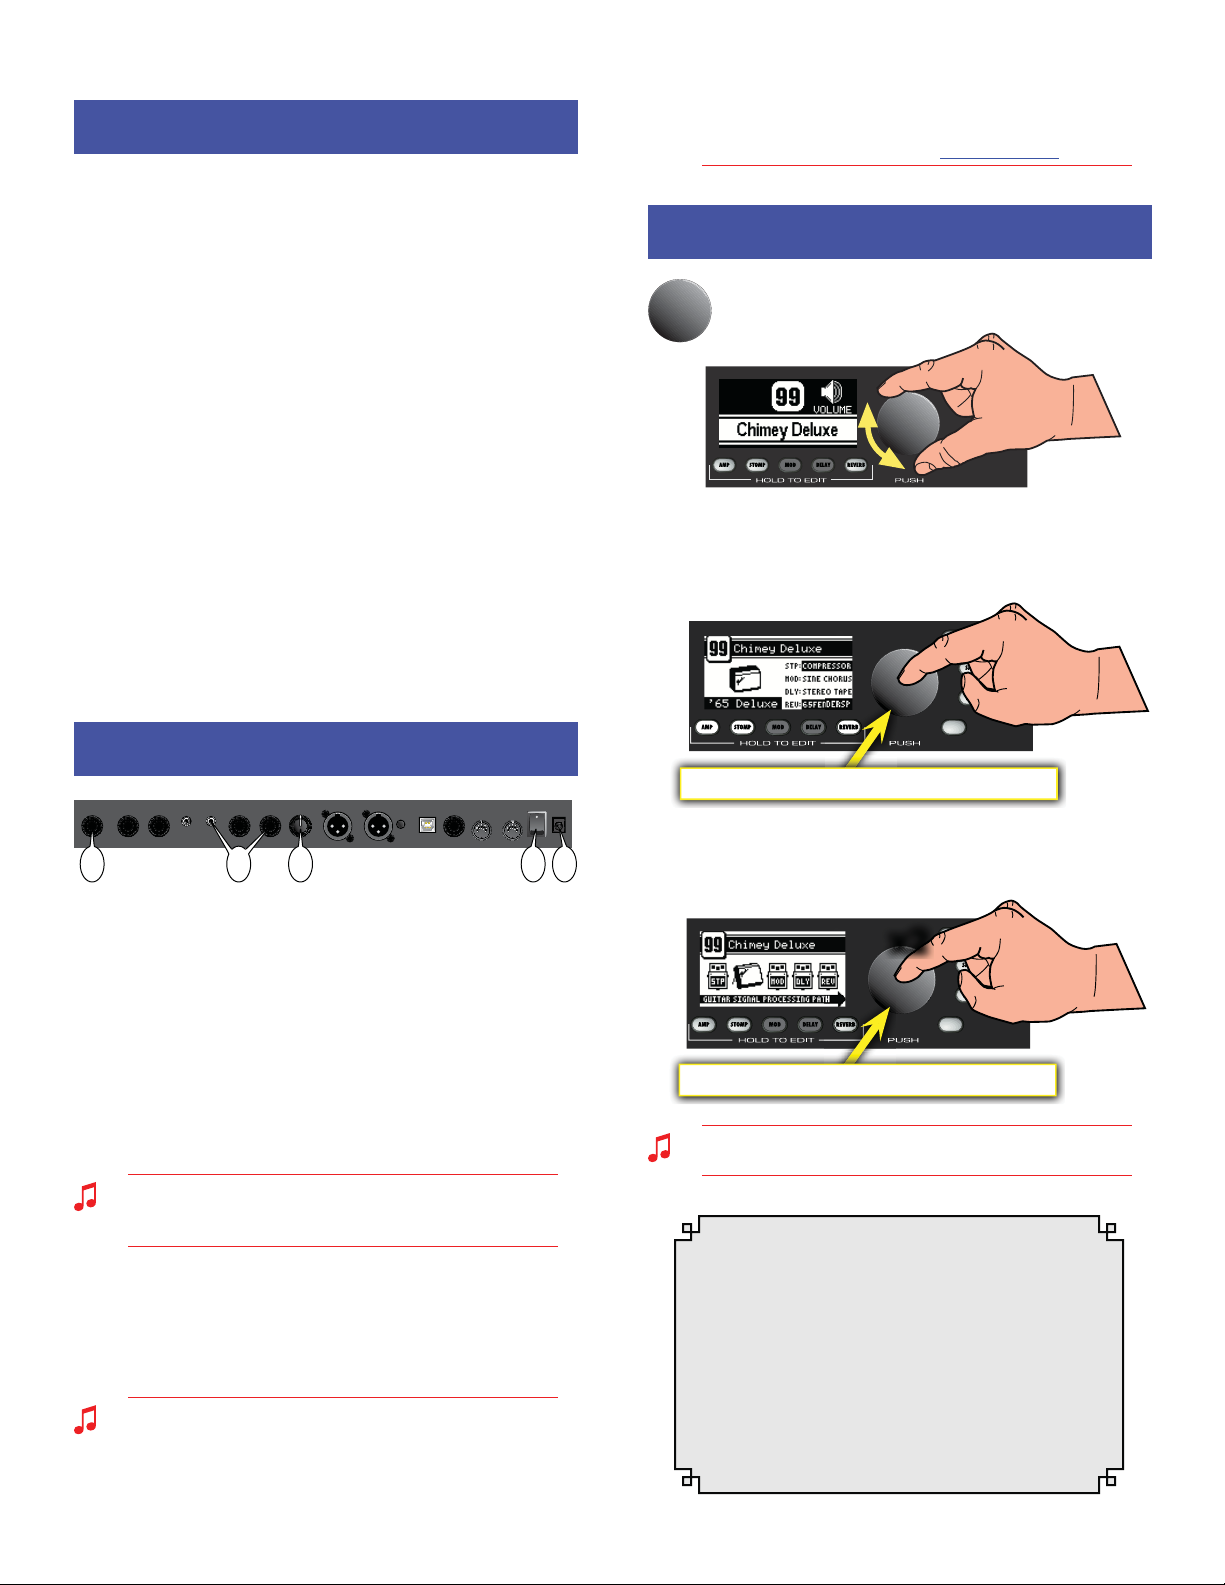
Turn the big DATA WHEEL to select presets in play mode
(press the EXIT button, if lit, to return to play mode):
Press the DATA WHEEL to see basic information about the current
preset, such as the current amplifier model and the effects
assigned under each of the four effect categories:
PEDAL
Push to view the Preset Information screen
Press the DATA WHEEL a second time to see where each effect is
located in the guitar signal processing path:
PEDAL
Push twice to view the Signal Path screen
x2
You can change the order of effects in the signal path to create
unique sounds using Fender FUSE software.
The DATA WHEEL has many functions! Enter any
edit mode by pressing one of the buttons below
the screen and the DATA WHEEL is used to navigate
and edit in the menu currently being displayed.
Depending on the menu, you will press or turn the
DATA WHEEL to select items and adjust settings,
as described in this manual and shown on screen.
Using the DATA WHEEL is intuitive, but if you ever
get lost, just press EXIT to return to play mode.
2
MUSTANG
™
FLOOR
Footswitch Modes
Footswitch Modes
Press the MODE button to switch between PRESET and
FX SELECT modes:
PRESET Mode
MODE
PRESET / FX SELECT
In PRESET mode the green LED lights up and the
bottom five footswitch buttons (0•5, 1•6, 2•7, 3•8, 4•9)
are used to select presets from the current bank of
five presets. Press the BANK/PRESET buttons to select
different banks of five presets to choose from, then
press one of the numbered footswitch buttons to
select a preset from the bank as displayed on screen.
STOMPINSERT MOD DELAY REVERB
TAP/TUNERMODE
PRESET / FX SELECT
BANK / PRESET
0
U
52
U
73
U
84
U
91
U
6
R
E
E
E
E
VE
VE
VE
E
R
R
ELA
A
ELA
Y
Y
Y
Y
D
T
TOM
OM
OM
T
P
P
SE
SE
SE
T
R
Select Presets from the current Bank
Select Preset Banks
FX SELECT Mode
MODE
PRESET / FX SELECT
In FX SELECT mode the red LED lights up and the
bottom five footswitch buttons (INSERT, STOMP,
MOD, DELAY, REVERB) are used to select/bypass
effects for the current preset (the INSERT button
selects/bypasses external effects connected to the
INSERT LOOP jacks). Press the BANK/PRESET buttons
to select presets up ordown, one at a time.
STOMPINSERT MOD DELAY REVERB
TAP/TUNERMODE
PRESET / FX SELECT
BANK / PRESET
0
U
52
U
73
U
84
U
91
U
6
ELA
LA
LA
Y
Y
O
O
OM
P
R
Select / bypass Ef fects
Select Presets
Each FX Select footswitch button will function only when an
effect is assigned to that category for the current preset. See
Effect Menus on page 4 to choose effects.
Tap / Tuner
Tap / Tuner
TAP/TUNER
Use the TAP / TUNER button to:
•Tap in delay time or modulation rate effect settings
•Activate the on-board guitar tuner
TAP Button
When either a delay or modulation effect is active, the LED next to
the TAP/TUNER button will blink in sync with the effect time/rate
setting (modulation rates can have up to 12 second intervals and
the LED may blink infrequently). If both a delay and modulation
effect are active simultaneously, the LED will blink in sync with the
delay effect and the TAP/TUNER button will only control the delay
time setting (you can bypass the delay effect temporarily if you
want to use the TAP/TUNER button to set the modulation rate).
You can use the effect settings menus or Fender FUSE to set
delay time and modulation rates more precisely.
Using TAP to set effect time/rate settings:
1. Select a delay or modulation effect that causes the TAP/TUNER
LED to blink, using the effects menus (see "Selecting Effects"
under Effects Menus, page4).
2. Press the TAP/TUNER button rhythmically (twice minimum)
in time with the desired interval. If you press the TAP/TUNER
button only once, the interval will be set to the maximum
value. You can see the maximum/minimum values for the
current effect in the effect settings menu (see page 5).
Watch the actual time/rate TAP values change while you are
tapping them in, by opening the effect settings menu!
TUNER Button
The Mustang™ Floor has a built-in Tuner mode that displays a
chromatic guitar tuner on screen.
To use the Tuner:
1. Press and hold the TAP/TUNER button until the Tuner screen
appears.
2. Strike any single string on your guitar and watch the screen.
The note of the string being tuned is displayed along with a
fine tuning needle:
3. Turn the tuning peg on your guitar until the fine tuning needle
indicates the string is in tune, as shown above.
4. Press EXIT or TAP/TUNER to exit from the Tuner.
3
MUSTANG
™
FLOOR
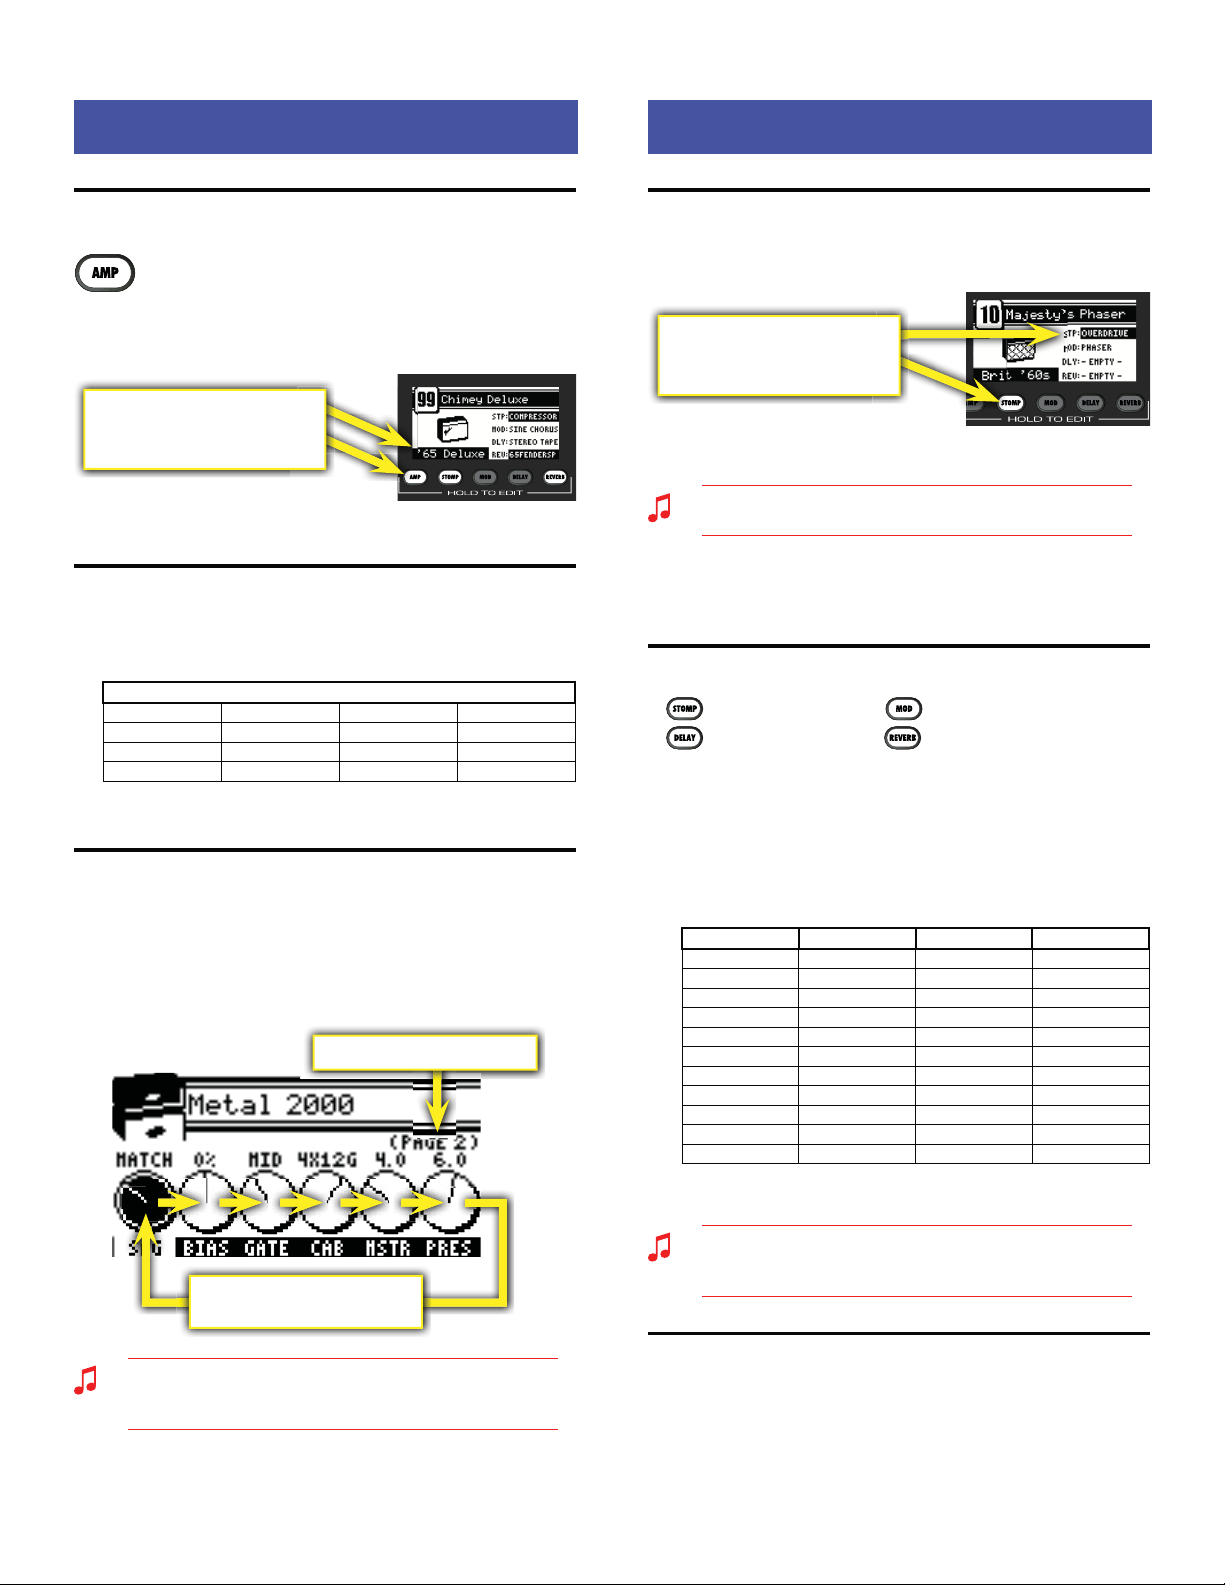
Amplifier Menus
Amplifier Menus
Bypassing Amp Settings
You can turn on or off (bypass) all amp settings that
have been selected for the current preset by pressing
the AMP button.
The amp menus contain amplifier modeling
selections, and settings for a variety of parameters such as tone,
gain, volume, and speaker cabinet simulation.
The Amp name is highlighted and
the AMP button lights up when
Amp settings are active
Preset Information screen
Selecting Amplifier Models
1. Press and hold the AMP button until the amp menu opens.
2. Turn the DATA WHEEL to select one of 13 amplifier models:
AMP MODELS
'57 Deluxe '65 Prince ton Britis h '60s Americ an '90s
'59 Bassma n '65 Twin Reverb Britis h '70s Metal 20 00
'57 Champ Super-Sonic (Burn) British '80s Studio Preamp
'65 Delu xe Reverb
3. Press EXIT to return to play mode.
Adjusting Amplifier Settings
1. Press and hold the AMP button until the amp menu opens.
2. Press the DATA WHEEL one or more times until the setting that
you want to adjust is highlighted, then turn the DATA WHEEL
to adjust the setting. (Press the DATA WHEEL repeatedly to
access "Page 2" of the amplifier settings. )
"PAGE 2" of the Amp settings
Press the DATA WHEEL repeatedly
to select the next Amp setting
You can hold down the AMP button and turn the DATA WHEEL
to scroll through settings faster! To de-select a highlighted
amp setting, press and hold the AMP button momentarily.
3. Press EXIT to return to play mode.
Effects Menus
Effects Menus
Bypassing Effects
You can turn on or off (bypass) effects that have been selected for
the current preset by pressing the corresponding effect button.
The Effect name is highlighted and
the Effect button lights up when an
effect is active
Preset Information screen
Effects can also be bypassed (turned on-off) using the
footswitch buttons when in FX SELECT mode.
Effects that are shown on screen as "–EMPTY–" can not be
activated until an effect has been selected in that category (see
Selecting Effects, below).
Selecting Effects
— Stompbox effects — Modulation effects
— Delay effects — Reverb effects
To select Effects:
1. Press and hold one of the four effects buttons to open the
effects menu.
2. Turn the DATA WHEEL to select one of the corresponding
effects:
STOMPBOX MODULATION DELAY REVERB
Overdrive Sine Chorus Mono Delay Small Hall
Wah Triangle Chorus Mono Echo Filter Large Hall
Touch Wah Sine Flan ger Stereo Ec ho Filter Small Roo m
Fuzz Triangle Flanger Multitap Delay L arge Room
Fuzz Touch Wah Vibratone Ping Pong Delay Small Plate
Simple Compressor Vintage Tremolo Ducking Delay Large Plate
Compressor Sine Tremolo Reverse Delay Ambient
Ring Modulator Tape Delay Arena
Step Filter Stereo Tape Delay Fender '63 Spring
Phaser Fender '65 Spring
Pitch Shifter
3. Press EXIT to return to play mode.
You can switch to a different effects category at any time, even
while you are in the effects selection menus, by pressing and
holding a different Effects button.
Adjusting Effect Settings
1. Press and hold one of the four effect buttons (STOMP, MOD,
DELAY, REVERB) to open the corresponding effects menu.
2. Turn the DATA WHEEL to select the effect you want to work
with.
4
 Loading...