


ENGLISH - PAGES 6-7
ESPANOL - PAGINAS 8-9
FRANÇAIS - PAGES 10-11
ITALIANO - PAGINE 12-13
DEUTSCH - SEITEN 14-15
16-17

IMPORTANT SAFETY INSTRUCTIONS
INSTRUCCIONES DE SEGURIDAD IMPORTANTES
This symbol warns the user of dangerous voltage le vels localized within the
enclosure.
This symbol ad vises the user to read all accompanying literature for safe operation
of the unit.
∆ Read, retain, and follow all ins tructions. Heed all warnings.
∆ Only connect the power supply cord to an earth grounde d AC receptacle in accordance with the
voltage and frequenc y ratings listed under INPUT POWER on the rear p anel of this product .
∆ WARNING: To prevent damage, fire or shock hazard, do not expose this unit to rain or
moisture.
∆ Unplug the power supply cord b efore cleaning the unit exterior (use a damp cloth only). Wait
until the unit is completely dry before reconnecting i t to power.
∆ Maintain at least 6 inches (15.25 cm) of unobstruc ted air space behind the unit to allow for
proper ventilat ion and cooling of the uni t.
∆ This product should be located away from heat sources such as radiators, heat re gisters, or
other produc ts that produce heat .
∆ This produc t may be equipped with a polarized plug (one blade wider than the other). This is
a safety feature. If you are unable to insert the plug into the outlet, contact an electrician to
replace your obsolete outlet. Do not defeat the safet y purpose of this plug.
∆ Protect t he power supply cord from being pinc hed or abraded.
∆ This produc t should only be us ed with a cart or stand that is recommended by the
manufacturer.
∆ The power supply cord of this product should be unplugged from the ou tlet when left unus ed
for a long period of time, or during electr ical storms.
∆ This product should be serviced by qualified service personnel when: the power supply cord or
the plug has been damaged; or objects have fallen, or liquid has been spilled onto the product;
or the product has been exposed to rain; or the product does not appear to operate normally or
exhibits a marked change in performance; or the product has been dropped, or the enclosure
damaged.
∆ Do not drip nor splash liquids, nor place liquid filled containers on the unit.
∆ CAUTION: No user ser viceable parts inside, refer ser vicing to qualified personnel only.
∆ Fender® amplifiers and loudspeaker sys tems are capable of producing very high sound
pressure levels which may cause temp orary or permanent hearing damage. Use care when
setting and adjusting volume levels during use.
∆ Hazardous voltages may be present within the cabinet even when the power switch is of f and
the power cord is conne cted. Therefore, disconne ct the power cord from the rear panel power
inlet before servic ing. The power inlet must remain readily operable.
FCC COMPLIANCE STATEMENT: This equipment has been tested and found to comply with the
limits of Part 15 of the FCC Rules. These limits are designed to provide reasonable protection against
harmful interference in a residential installation. This equipment generates, uses and can radiate
radio frequency energy and, if not installed and used in accordance with the instructions, may
cause harmful interference to radio communications. However, there is no guarantee that interference will not occur in a particular installation. If this equipment does cause harmful interference
to radio or television reception, which can be determined by turning the equipment o and on,
the user is encouraged to try to correct the interference by one or more of the following measures:
•Reorient or relocate the receiving antenna. •Increase the separation between the equipment and
receiver. •Connect the equipment into an outlet on a circuit dierent from that to which the receiver
is connected. •Consult the dealer or an experienced radio/TV technician for help.
Este símbolo advier te al usuario que en el interior de la carcasa hay niveles
peligrosos de voltaje.
Este símbolo advier te al usuario que lea toda la documentación adjunta para
utilizar la unidad con seguridad.
∆ Lea las atentamente instruccione s y sígalas al pie de la letra. Tenga en cuenta todas las
instrucciones.
∆ Conecte únicamente el cable de aliment ación eléctr ica a una toma de CA de acuerdo con las
especif icaciones de voltaje y frecuencia que se indican en la potencia de entrada INPUT POWER
del panel posterior de este producto.
∆ ADVERTENCIA: Para evitar daños, incendios y desc argas eléctricas, no exponga esta unidad
a la lluvia ni a la humedad.
∆ Antes de limpiar el e xterior de la unidad, des conecte el cable de alimentación (utilícese
únicamente un paño húmedo). Deje que la unidad se seque completamente antes de volver a
conectar la a la corriente.
∆ Para una ventilación y refrigeración adecuadas, deje un espacio mínimo de 15.25 cm detrás de
la unidad.
∆ Este produc to deberá estar situado lejos de fuentes de calor tales como radiadores, registros de
calefacción u otros productos que generen calor.
∆ Es p osible que es te producto esté equipado con un enchufe polarizado (un blade más ancho
que el otro). Es ta es una función de seguridad. Si no pue de introducir el enchuf e dentro de la
toma de corriente, póngase en contacto con un electricista para que la cambie ya que podría
estar anticuada. No anule el propósito de seguridad de este enchufe.
∆ Tenga cuidado de que el cable de alimentación no se pinche ni se ero sione.
∆ Este pro ducto sólo se debe utilizar con el sopor te recomendado por el fabricante.
∆ El cable de alimentación de este producto deb erá estar desconectado de la toma de corriente
cuando no se vaya a utilizar durante un período de tiempo largo o en caso de tormenta
eléctrica.
∆ Este producto deberá ser reparado por personal cualificado si: el cable de aliment ación o el
enchufe e stán dañados, ha c aído algún objeto o se ha derramado líquido encima, el producto
ha e stado expuesto a la lluvia, no f unciona normalmente o muestra signos de cambio en el
rendimiento, ha suf rido algún golpe o la caja esta dañada.
∆ Evite que gote en o salpiquen líquidos y no coloque recipientes con líquidos sobre la unidad.
∆ PRECAUCIÓN: Contiene piezas cuyo mantenimiento no lo puede realizar el usuario, sino sólo
personal c ualificado.
∆ Los amplificadores y altavoces Fender ® pueden producir niveles de presión acústica muy
elevados, que pue den provocar daños temporales o per manenetes en el oído. Utilice la
precaución al ajustar el volumen nivela.
∆ Es posible que haya cargas eléctricas peligrosas dentro de la caja, aunque se haya apagado,
mientras esté conec tado el cable de alimentación. Por tanto, se debe desconectar el cable de
alimentación del panel posterior antes de proceder a su reparación o mantenimiento. L a toma
de corriente debe permanecer prepar ada para su funcionamiento.

Importanti Istruzioni per la Sicurezza
Wichtige Sicherheitshinweise
Questo simbolo indica che si av visa l'utente della pres enza di livelli di tensione
pericolosi all'inter no della struttura.
Questo simbolo indica che si consiglia all'utente di leggere tutta la documentazione
allegata ai f ini del funzionamento sicuro dell'unità.
∆ Leggere, conser vare e seguire le istruzioni. Osser vare le avvertenze.
∆ Collegare il cavo di alimentazione solo a una presa c.a. con messa a terr a conforme ai requisiti
di tensione e f requenza indicati sull'etichetta INPUT P OWER del pannello posteriore di questo
prodotto.
∆ AVVERTIMENTO: Per evitare danni, risc hi di incendi o scosse elettriche, non esporre quest a
unità alla pio ggia o all'umidità.
∆ Scollegare il c avo di alimentazione prima di pulire l'esterno dell'unità (usare solo un
panno umido). Attendere che l'unità sia completamente asciut ta prima di ricolle garla
all'alimentazione.
∆ Lasciare almeno 15.25 cm di spazio libero dietro all'unità per consentirne il corret to
raff reddamento tramite ventilaz ione.
∆ Questo prodotto va collocato lontano da fonti di calore come radiatori, unità di riscaldamento
o altri prodotti c he producono calore.
∆ Questo prodotto può essere dotato di spina polarizzata (con poli grandi). Si tratta di una
misura di sicurezza. S e non si riesce a inser ire la spina nella presa, far sostituire la presa
obsoleta ad un elet tricista. Non eliminare la spina di sicurezza.
∆ Proteggere il cavo di alimenta zione da danni e abrasioni.
∆ Questo prodotto deve essere usato solo con un carrello o con un supporto consigliato dal
produttore.
∆ Il cavo di alimentazione di que sto prodotto deve essere scolle gato dalla presa quando il
prodotto non viene usato per lunghi periodi o durante le tempeste ele ttromagnetiche.
∆ La manutenzione per il prodotto deve essere eseguita da personale di assistenza qualificato
nei casi seguenti: danno del cavo o della spina di alimentazione; caduta di oggetti o di liquido
sul prodotto; esposizione del prodotto alla pioggia; funzionamento anomalo del prodotto o
marcata variazione delle prestazioni del prodotto; caduta del prodotto; danno della stru ttura
del prodot to.
Dieses Symbol w arnt den Benutzer vor gefähr lichen Spannungen innerhalb des
Gehäuses.
Dieses Symbol bedeutet für den Benutzer, dass er für einen sicheren Bet rieb des
Geräts die gesamte begleitende Dokumentation le sen muss.
∆ Befolgen Sie sämtliche Sicherheit shinweise und bewahren Sie sie auf. Beachten Sie alle
Warnungen.
∆ Das Netzkabel muss an eine geerde te Netzsteckdose angeschlossen werden, die die auf der
Rückseite des Verstärkers unter INPUT POWER ange gebene Spannung und Frequenz liefer t.
∆ WARNUNG: Setzen Sie dieses Gerät niemals Regen oder Feuchtigkeit aus, um Beschädigung,
Brandentwicklung und elektrische Schläge zu vermeiden.
∆ Ziehen Sie den Netzste cker, bevor Sie das Gehäuse des Geräts reinigen (verwenden Sie zum
Reinigen nur ein feuchtes Tuch). Stecken Sie den Netz stecker erst wieder ein, wenn das Gerät
vollständig getrocknet ist.
∆ Halten Sie hinter dem Gerät einen Freiraum von minde stens 15.25 cm ein, damit eine
ausreichende B elüftung gewährleistet ist.
∆ Der Verstärker darf nicht in der Nähe von Wärmequellen wie Heizkörper n oder anderen
wärmeerzeugenden Geräten aufgestellt werden.
∆ Diese s Produkt ist mö glicherweis e mit einem unvertausch baren Stecker ausgestat tet
(unterschiedlich breite Pole). Dabei handelt es sich um eine Sicherheitsvorrichtung. Wenn Sie
den Stecker nicht in die Steckdo se stecken können, lassen Sie Ihre alte Steckdose von einem
Elektriker auswechseln. Zerstören Sie nicht die Sicherheit sfunktion des Steckers.
∆ Das Netz kabel darf nicht eingeklemmt oder abgescheuer t werden.
∆ Das Produkt sollte nur mit vom Hersteller empfohlenen Karren oder Ständer n ver wendet
werden.
∆ Bei Gewitter oder wenn das Gerät längere Zeit nicht gebraucht wird, sollte der Netzs tecker
gezogen werden.
∆ In folgenden Fällen sollte das Gerät repariert werden, und zwar ausschließlich von qualifizierten
Technikern: Schäden an Net zkabel o der -stecker; Besch ädigung durc h her abfallende
Gegens tände, ausgelaufene F lüssigkeit oder Regen; Funktionsstörungen o der deu tlich
veränderte s Betriebsverhalten; Beschädigung durch Herunterfallen; Sc häden am Gehäuse.
∆ Non disporre alcun contenitore riempito di liquido sul prodotto.
∆ ATTENZIONE: Non contiene parti riparabili dall'utente: fare eseguire la manutenzione
soltanto da personale qualificato.
∆ I sistemi di amplificazione e gli altiparlant i Fender® sono in grado di produrre livelli di
pressione acus tica molto alti che possono provocare danni temporanei o permanenti all'udito.
Prestare attenzione all'impo stazione e regolaz ione dei livelli di volume durante l'uso.
∆ All'interno dell'apparecchiatura possono essere presenti livelli di tensione pericolosi anche
quando l'interru ttore dell'alimentazione è disinserito ma il cavo di alimentazione è collegato.
Si raccomanda, perciò, di staccare tale cavo dalla pres a dell'alimentazione posta sul pannello
posteriore prima di eseguire qualsiasi intervento di manutenzione. La presa dell'alimentazione
deve, tut tavia, rimanere sgombra e pronta per l'uso in qualunque momento.
∆ Setzen Sie das Gerät keiner tropfenden oder spritzenden Flüssigkeit aus; stellen Sie keine mit
Flüssigkeit gefüllten Behälter auf dem Gerät ab.
∆ VORSICHT: Im Gerät sind keine zu war tenden Teile. Reparaturarbeiten dür fen nur von
qualifizier ten Technikern durchgeführ t werden.
∆ Fender®-Verst ärker und Lautsprecher können sehr hohe Lauts tärkepegel erzeugen, die
vorüberg ehende od er dauerhafte Gehörschäden verur sachen können. Gehen Sie beim
Einstellen bz w. Re gulieren der Lautstärke vorsichtig vor.
∆ Im Gehäuse können auch im ausgeschalteten Zustand gefährliche Spannungen auftreten, wenn
das Ne tzkabel eingesteckt ist. Ziehen Sie daher das Netzkabel au s der Net zanschlussbuchse
auf der Rückseite des Geräts bevor Sie War tungs- oder Reparaturarbeiten vornehmen. Die
Netzanschlussbuchse muss stets frei zugänglich bleiben.
Instruções Importantes de Segurança
Este símbolo adverte o usuário da presença de níveis perigosos de voltagem dentro
da caixa.
Este símbolo adverte o usuário de que toda literatura que vem acompanhada deste
aparelho deverá ser lida para um manuseio seguro do mesmo.
∆ Leia, conserve na memória e siga todas as instruções. Observe todas as advertências.
∆ Conecte o cabo de força somente à uma saída de corrente com terminal de terra e cujas
voltagem e freqüência correspondam ao indicado no INPUT POWER no painel traseiro deste
produto.
∆ ADVERTÊNCIA: Para evitar danos, incêndio ou choque elétrico, não permita que este aparelho
seja exposto à chuva ou umidade.
∆ Desconecte o cabo de energia antes de limpar a superfície exterior deste aparelho (use um pano
úmido somente). Espere até que esteja completamente seco para reconecta-lo.
∆ Durante a operação: Mantenha pelo menos 15.25cm de espaço livre por detrás desta unidade
para permitir uma correta ventilação e refrigeração da mesma.
∆ Este produto deve estar localizado longe de fontes de calor tais como radiadores, aquecedores
ou outros aparelhos que produzam calor.
∆ Este aparelho pode estar equipado com um plug polarizado (uma extremidade mais larga que
a outra). Esta é uma medida de segurança. Se você não conseguir inserir o plug na saída, entre
em contato com um eletricista para substituir sua saída ultrapassada. Não anule o propósito de
segurança deste plug.
∆ Evite que o cabo de alimentação fique retorcido ou esmagado.
∆ Este produto deve ser usado somente com um suporte ou carreta que tenham sido
recomendados pelo próprio fabricante.
∆ Desconecte o cabo de alimentação deste aparelho da saída quando este não for ser utilizado
durante um longo período de tempo ou durante tempestades elétricas.
∆ Este aparelho deve ser revisado por técnicos especializados quando: o cabo de alimentação ou
o plug forem danificados; objetos caírem sobre ele ou líquidos forem derramados no aparelho;
ou o produto tiver sido exposto à chuva; ou o produto não parecer operar corretamente ou se for
observada alguma alteração evidente em sua performance; ou se o aparelho for derrubado, ou
a caixa danificada.
∆ Não derrame ou espirre líquidos, nem coloque objetos que os contenham sobre este aparelho.
∆ AVISO: Manutenção e/ou reparo de quaisquer partes integrantes desde produto não devem ser
realizadas por usuários, encaminhe o serviço somente a técnicos especializados.
∆ Os sistemas de amplificadores e auto-falantes Fender® têm capacidade para produzir altíssimos
níveis de pressão de som os quais podem causar perda temporária ou permanente de audição.
Seja prudente ao definir e ajustar os níveis de volume durante a utilização.
∆ Es posible que haya cargas eléctricas peligrosas dentro de la caja, aunque se haya apagado,
mientras esté conectado el cable de alimentación. Por tanto, se debe desconectar el cable de
alimentación del panel posterior antes de proceder a su reparación o mantenimiento. La toma
de corriente debe permanecer preparada para su funcionamiento.
Frontman™ 65R Amplifier
INP UTS
1 2
VOLUME
TREBLE BASSMID
VOLUME
TREBLE BASSMID
DRIVE
REVERB
FOOT
SWITCH
PRE
OUT
PWR
IN
FE ND E R MU S IC AL IN ST R UM E NT S
CH SELECT MID
CONTOUR
MORE DRIVE
TREBLE
MID BASS
INPUTS
1 2
VOLUME
TREBLE BASS
DRIVE
VOLUME
REVERB
CH SELECT
FOOT
SWITCH
PRE
OUT
PWR
IN
FE N DE R M US IC A L I NS TR U ME NT S
MID
CONTOUR
Your new Frontman 65R amplifier delivers world–class
Fender® tone and world–standard Fender® quality:
• 65W output power into 8 ohms
• Selectable Normal and Drive channels with
independent volume and tone controls
• MID-CONTOUR button furnishes many different
variations in distortion—from Rock to Blues to Metal
to whatever!
• Classic Fender® spring Reverb
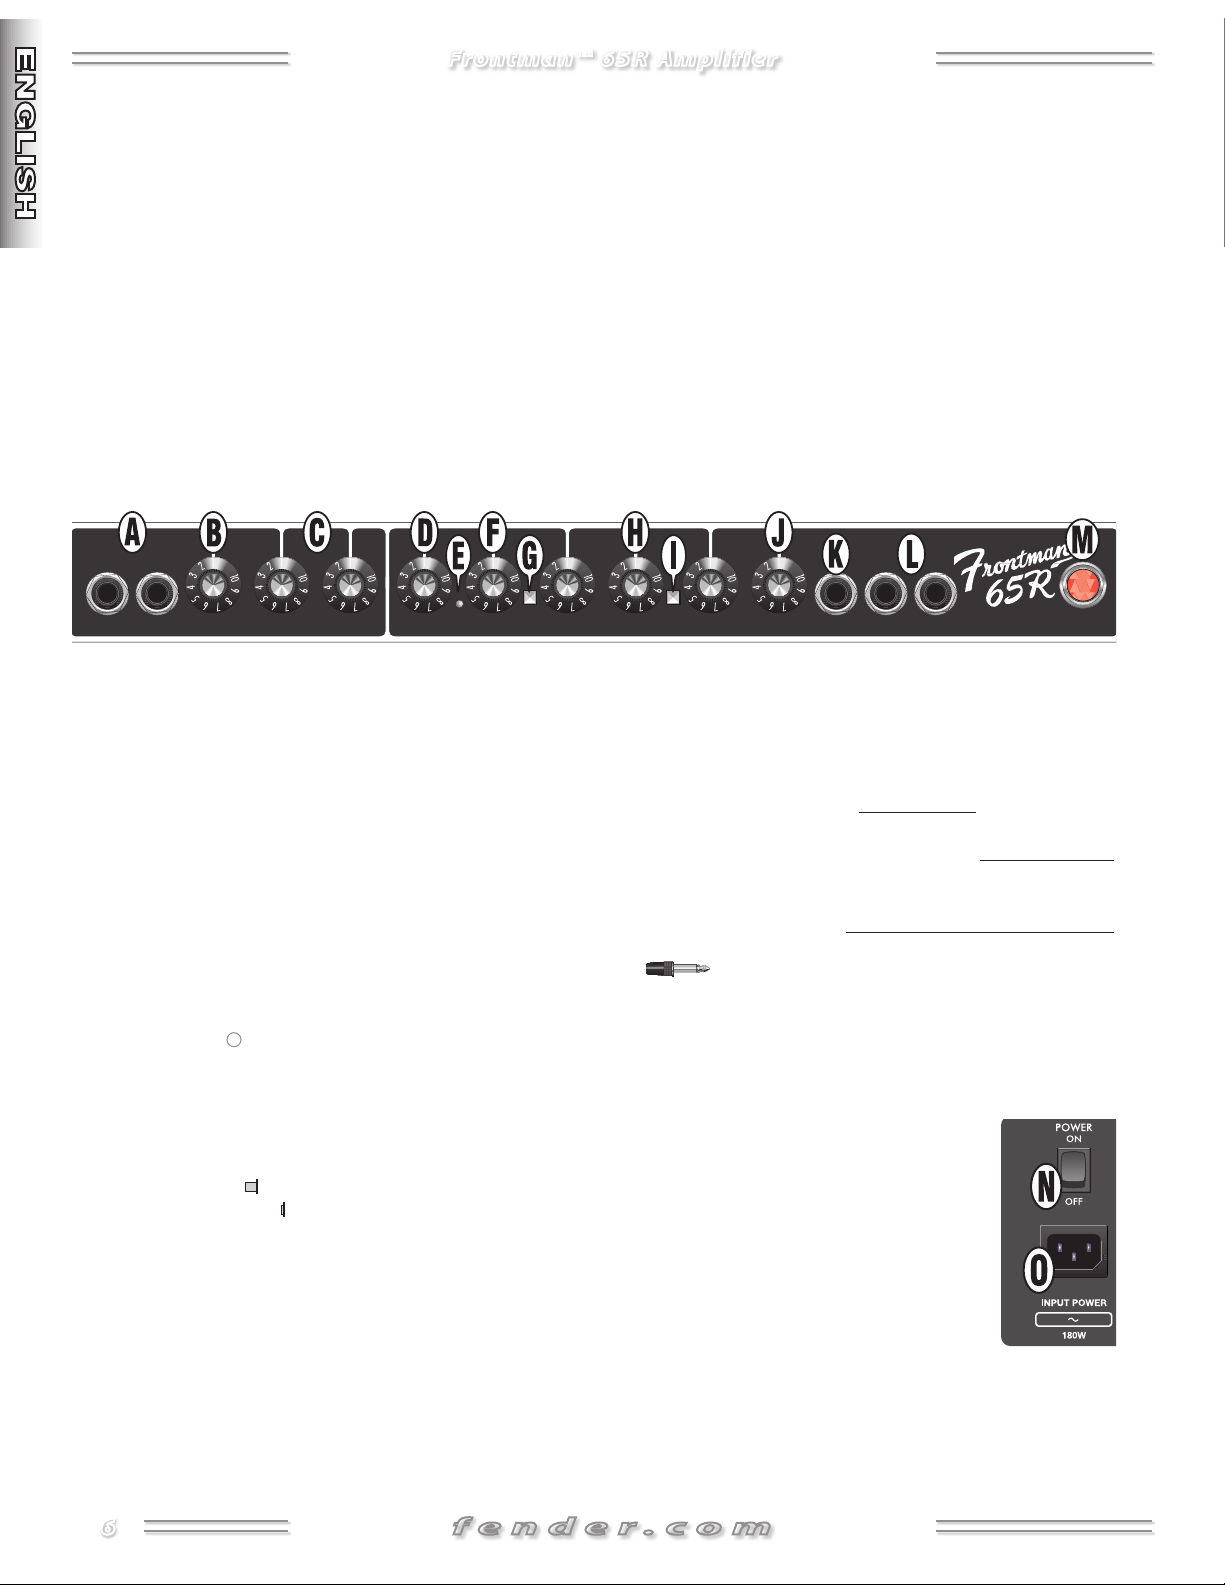
A. INPUT - Plug your guitar in here. INPUT 1 is
normal sensitivity for most guitars, INPUT 2 is
lower sensitivity for guitars with high output (active)
pickups.
• Fender
®
“touch-sensitive” circuit design simulates
the feel of tube distortion
• PRE-AMP OUT and POWER-AMP IN jacks allow you
to connect external effects devices, other amplifiers or
sound/recording equipment to your FM 65R
• FOOTSWITCH jack for use with the 1-button Fender®
footswitch (included). The footswitch provides remote
channel selection
Thank you for choosing Fender®—The World’s most
popular instrument amplifiers—since 1946
K. FOOTSWITCH - Connect the 1-button Fender®
footswitch (included) at this jack to enable remote
channel selection. When plugged in, the footswitch
overrides the CH SELECT button.
B. VOLUME - Adjusts the loudness of the Normal
channel.
C. TREBLE/BASS - Adjusts the high- and low-frequency
tones of the Normal channel.
D. DRIVE - Adjusts the distortion level in the Drive
channel. Use together with VOLUME-{F} to adjust
the overall loudness of the Drive channel.
E. CHANNEL INDICATOR LED OFF n Normal channel is active
Ôn
LED ON
Drive channel is active
F. VOLUME - Adjusts the loudness of the Drive channel
together with DRIVE {D}.
G. CHANNEL SELECT
Button OUT selects the Normal channel
Button IN selects the Drive channel
H. TREBLE/MID/BASS - Adjusts the high-, middle-,
and low-frequency tones of the Drive channel.
I. MID-CONTOUR - Activates a “scooped” midrange
EQ useful for modern distortion sounds in the Drive
channel.
L. PRE OUT/PWR IN - (1) Effects Loop - Connect PRE
OUT to an effects device input, then connect the
effects device output to PWR IN. (2) Multiple Amps
- Connect the primary unit’s PRE OUT to the auxiliary
unit’s PWR IN. The primary unit is used to control
all auxiliary amps. (3)‑Recording or Reinforcement
- Connect PRE OUT to sound equipment’s input.
Both jacks use a TS (Tip-Sleeve) standard
type plug for connections. PRE OUT includes
onboard tone shaping.
M. POWER INDICATOR - Lights up when the amplifier
is on.
N. POWER
- Switches the amplifier on
and off.
O. POWER CORD SOCKET - Connect
the included power supply cord in
accordance with the voltage and
frequency ratings listed on the rear
panel of your amplifier.
J. REVERB - Adjusts the Reverb level for both
channels.
6
f e n d e r . c o m

Frontman™ 65R Amplifier
TYPE: PR 557
PART NUMBER: 2316000010 (120V, 60Hz) US
2316000910 (120V, 60Hz) US DS
2316001910 (110V, 60Hz) TW
2316003910 (240V, 50Hz) AUS
2316004910 (230V, 50Hz) UK
2316005910 (220V, 50Hz) ARG
2316006910 (230V, 50Hz) EUR
2316007910 (100V, 50Hz) JPN
2316009910 (220V, 60Hz) ROK
POWER REQUIREMENTS: 180W
POWER OUTPUT: 65W RMS into 8Ω @ 5%THD
PRE-AMP OUTPUT IMPEDANCE: 1kΩ
POWER-AMP INPUT IMPEDANCE: 10kΩ
SENSITIVITY: 620mV for 65W into 8Ω @1kHz
FUSES: (100V) F4A 250V
(110V–120V) F3.15A 250V
(220V–230V) F2A 250V
(240V) T2A 250V
FOOTSWITCH: 1-Button (P/N 0994052000), Channel Select
SPEAKER COMPLEMENT: One 8Ω, 12” Special Design “SOUND TESTED” driver
DIMENSIONS HEIGHT: 16.8 in (42.8 cm)
WIDTH: 18.75 in (47.8 cm)
DEPTH: 9.0 in (23.0 cm)
WEIGHT: 32.0 lb (14.4 kg)
Product specifications are subject to change without notice.
f e n d e r . c o m
7
Frontman™ 65R Amplifier
INP UTS
1 2
VOLUME
TREBLE BASSMID
VOLUME
TREBLE BASSMID
DRIVE
REVERB
FOOT
SWITCH
PRE
OUT
PWR
IN
FE ND E R MU S IC AL IN ST R UM E NT S
CH SELECT MID
CONTOUR
MORE DRIVE
TREBLE
MID BASS
INPUTS
1 2
VOLUME
TREBLE BASS
DRIVE
VOLUME
REVERB
CH SELECT
FOOT
SWITCH
PRE
OUT
PWR
IN
FE N DE R M US IC A L I NS TR U ME NT S
MID
CONTOUR
El nuevo amplificador Frontman 65R proporciona el
estándar de calidad mundial de Fender® y el sonido
líder en el mundo de Fender®:
• Potencia de salida de 65 W a 8 ohmios
• Canales Normal y Drive seleccionables con controles
de tono y volumen independientes
• El botón MID-CONTOUR permite variar de numerosas
formas la distorsión – ¡de Rock a Blues, a Metal y a lo
que sea!
• Efecto envolvente Spring Reverb clásico de Fender®
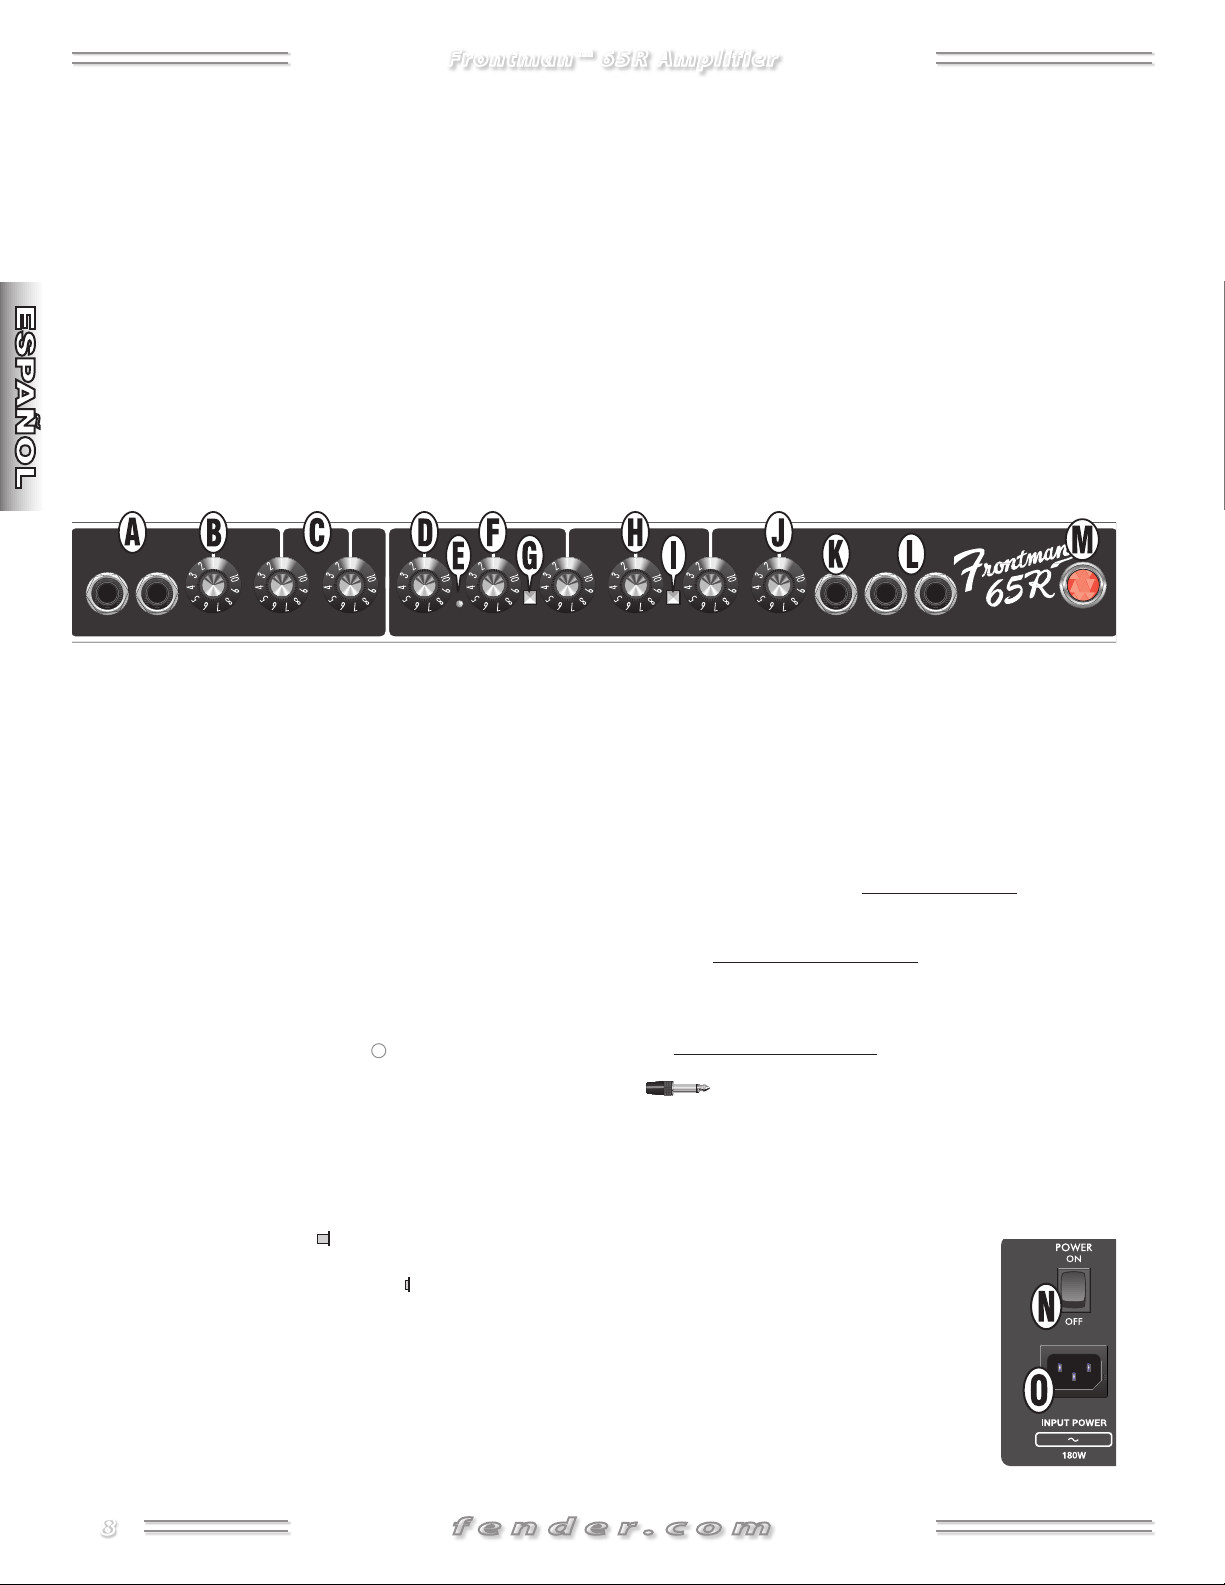
A. INPUTS (ENTRADAS)
– Conecte aquí su guitarra.
La entrada 1 tiene una sesibilidad normal y se utiliza
para la mayoría de las guitarras; la entrada 2 tiene
una sensibilidad menor y se utiliza para guitarras con
convertidores de alta potencia (activos).
B. VOLUME (VOLUMEN) – Permite ajustar el volumen
del canal Normal.
• El circuito “táctil” de Fender
®
estimula la sensación
de distorsión de las válvulas
• Los conectores PRE-AMP OUT y POWER-AMP IN permiten conectar dispositivos de efectos externos, otros
amplificadores o equipos de sonido/grabación al FM
65R
• Conector de pedal FOOTSWITCH para utilizar un
pedal de 1 botón de Fender® (incluido). El pedal
permite seleccionar el canal de forma remota
®
Gracias por elegir Fender
– Los amplificadores de in-
strumentos más populares del mundo – desde 1946
J. REVERB – Ajusta el nivel del efecto reverb de ambos
canales.
K. FOOT SWITCH (PEDAL) – Conecte aquí un con-
mutador de pedal de 1 botón de Fender® (incluido)
para poder controlar de forma remota la selección de
canales. Cuando el pedal está conectado, prevalece
sobre el botón CH SELECT.
C. TREBLE/BASS – Permite ajustar las frecuencias de
agudos y graves del canal Normal.
D. DRIVE – Permite ajustar el nivel de distorsión del
canal Drive. Se utiliza junto con el botón VOLUME-{F}
para ajustar el volumen general del canal Drive.
E. INDICADOR DE CANAL –
Indicador LED APAGADO
n
El canal Normal
está activado
Indicador LED ENCENDIDO
Ôn
El canal Drive está
activado
F. VOLUME (VOLUMEN) – Permite ajustar el volumen
del canal Drive junto con DRIVE {D}.
G. CH SELECT (SELECCIÓN DE CANAL) –
Botón HACIA FUERA selecciona el canal
Normal
Botón pulsado HACIA DENTRO selecciona el
canal Drive
H. TREBLE/MID/BASS – Permite ajustar las frecuen-
cias de agudos, medios y graves del canal Drive.
I. MID-CONTOUR (CONTORNO MEDIO) – Activa un
ecualizador de rango medio “scooped”, útil para
sonidos modernos de distorsión en el canal Drive.
L. PRE OUT/PWR IN – (1) Bucle de efectos – Conecte
la salida PRE OUT a la entrada de un dispositivo de
efectos, y la salida del dispositivo de efectos a PWR
IN. (2) Varios amplificadores – Conecte la salida
PRE OUT de la unidad principal a la entrada PWR
IN de la unidad auxiliar. La unidad principal se utiliza
para controlar todos los amplificadores auxiliares.
(3)-Grabación o refuerzo – Conecte la salida PRE
OUT a la entrada del equipo de sonido.
Ambos conectores utilizan conexiones del
tipo TS (Tip-Sleeve) estándar. PRE OUT
incluye modificación de sonido incorporada.
M. INDICADOR DE ENCENDIDO – Se ilumina cuando
el amplificador está encendido.
N. POWER (ENCENDIDO) – Permite
encender y apagar el amplificador.
O. ENCHUFE PARA EL CABLE DE
CORRIENTE – Conecte el cable de
corriente incluido de acuerdo con la
frecuencia y el voltaje indicados en el
panel posterior del amplificador.
8
f e n d e r . c o m

Frontman™ 65R Amplifier
TIPO: PR 557
NÚMERO DE REFERENCIA: 2316000010 (120 V, 60 Hz) EE.UU.
2316000910 (120 V, 60 Hz) EE.UU. DS
2316001910 (110 V, 60 Hz) TW
2316003910 (240 V, 50 Hz) AUS
2316004910 (230 V, 50 Hz) RU
2316005910 (220 V, 50 Hz) ARG
2316006910 (230 V, 50 Hz) EUR
2316007910 (100 V, 50 Hz) JPN
2316009910 (220 V, 60 Hz) COR
CONSUMO DE CORRIENTE: 180 W
POTENCIA DE SALIDA: 65 W RMS en 8-Ω @ 5%THD
IMPEDANCIA DE SALIDA DEL PREAMPLIFICADOR: 1 kΩ
ENTRADA DE IMPEDANCIA: 10 kΩ
AMPLIFICADOR PRINCIPAL
SENSIBILIDAD: 620 mV para 65 W en 8-Ω @1 kHz
FUSIBLES: (100V) F4A 250V
(110V–120V) F3.15A 250V
(220V–230V) F2A 250V
(240V) T2A 250V
CONMUTADOR DE PEDAL: De 1 botón (N/R 0994052000), selección de canal
COMPLEMENTO DE ALTAVOZ: Un altavoz de 8-Ω, 12" Special Design “SOUND TESTED”
DIMENSIONES ALTO: 16,8 pulgadas (42,8 cm)
ANCHO: 18,5 pulgadas (47,8 cm)
FONDO: 9,0 pulgadas (23,0 cm)
PESO: 32,0 lb (14,4 kg)
Las especificaciones del producto están sujetas a cambios sin previo aviso.
f e n d e r . c o m
9

Frontman™ 65R Amplifier
INP UTS
1 2
VOLUME
TREBLE BASSMID
VOLUME
TREBLE BASSMID
DRIVE
REVERB
FOOT
SWITCH
PRE
OUT
PWR
IN
FE ND E R MU S IC AL IN ST R UM E NT S
CH SELECT MID
CONTOUR
MORE DRIVE
TREBLE
MID BASS
INPUTS
1 2
VOLUME
TREBLE BASS
DRIVE
VOLUME
REVERB
CH SELECT
FOOT
SWITCH
PRE
OUT
PWR
IN
FE N DE R M US IC A L I NS TR U ME NT S
MID
CONTOUR
Le nouvel amplificateur Frontman 65R allie la qualité
supérieure Fender® au son Fender® mondialement
reconnu-:
• Puissance de sortie 65-W sous 8 ohms.
• Canaux clair et saturé sélectionnables avec des
réglages de volume et de tonalité indépendants.
• Le bouton MID-CONTOUR permet de nombreuses
variations dans la distorsion – du rock au blues en
passant par le métal-!
• Spring Reverb (Réverbération à ressort) Classic
Fender®.
A. INPUT – Branchez votre guitare ici. INPUT 1 est une
entrée de sensibilité normale pour la plupart des
guitares, INPUT 2 est une entrée de sensibilité plus
faible pour les guitares équipées de micros à sortie
élevée (actifs).
B. VOLUME – Permet de régler le volume du canal
Normal.
C. TREBLE/BASS-: – Permet de régler le niveau des
fréquences hautes et basses du canal Normal.
D. DRIVE – Permet de régler le niveau de distorsion
du canal Drive. À combiner avec VOLUME-{F} pour
régler le volume général du canal Drive.
E. INDICATEUR DE CANAL –
DEL éteinte n Le canal Normal est actif
DEL allumée
Ôn
Le canal Drive est actif
F. VOLUME – Permet de régler le volume du canal
Drive et du DRIVE {D}.
G. CHANNEL SELECT –
Bouton en position OUT Permet de sélectionner
le canal Normal.
Bouton en position IN Permet de sélectionner le
canal Drive.
H. TREBLE/MID/BASS – Permet de régler le niveau
des fréquences hautes, moyennes et basses du
canal Drive.
I. MID-CONTOUR – Permet d’activer l’égaliseur pour
des sons «-plus agressifs-». Cette option est très
utile pour les sons à distorsion modernes du canal
Drive.
10
• La conception «-tactile-» du circuit Fender
l’impression de percevoir une distorsion du tube.
• Les prises PRE-AMP OUT et POWER-AMP IN vous
permettent de raccorder des appareils à effets
externes, d’autres amplificateurs ou des équipements
son/enregistrement à votre FM 65R.
• Prise FOOTSWITCH pour l’utilisation d’une pédale
Fender® à un bouton (fournie). Une pédale permet la
sélection à distance de canaux.
Merci d’avoir choisi Fender® – Les amplificateurs les
plus populaires – depuis 1946.
J. REVERB – Permet d’ajuster le niveau d’effet reverb
pour les deux canaux.
K. FOOTSWITCH – Connectez la pédale Fender® à un
bouton (fournie) à cette prise pour activer la sélection
à distance de canaux. Lorsqu’elle est branchée, la
pédale prime sur le bouton CH SELECT.
L. PRE OUT/PWR IN – (1) Boucle d’effets – Raccordez
la prise PRE OUT à la prise d’entrée d’une boîte
d’effets, puis la prise de sortie de ce processeur
à la prise PWR IN. (2) Amplificateurs multiples
– Raccordez la prise PRE OUT de l’unité principale à
la prise PWR IN de l’unité auxiliaire. L’unité principale
est utilisée pour régler toutes les unités auxiliaires.
(3)-Enregistrement ou mixage – Raccordez la prise
PRE OUT à la prise d’entrée du matériel son.
Les connexions à ces deux prises se font
avec des fiches standard TS (6,35 mm). PRE
OUT dispose d’une modélisation du son intégrée.
M. INDICATEUR DE TENSION – S’allume lorsque
l’amplificateur est sous tension.
N. POWER – Permet de mettre l’amplificateur sous
tension et hors tension.
O. PRISE DU CORDON D’ALIMEN-
TATION – Branchez le câble d’alimen-
tation fourni selon la tension et la
fréquence indiquées sur le panneau
arrière de l’amplificateur.
f e n d e r . c o m
®
donne
Frontman™ 65R Amplifier
TYPE-: PR 557
NUMÉRO DE PIÈCE-: 2316000010 (120-V, 60-Hz) US
2316000910 (120-V, 60-Hz) US DS
2316001910 (110-V, 60-Hz) TW
2316003910 (240-V, 50-Hz) AUS
2316004910 (230-V, 50-Hz) UK
2316005910 (220-V, 50-Hz) ARG
2316006910 (230-V, 50-Hz) EUR
2316007910 (100-V, 50-Hz) JPN
2316009910 (220-V, 60-Hz) ROK
ALIMENTATION ÉLECTRIQUE-: 180-W
PUISSANCE DE SORTIE-: 65-W RMS sous 8-Ω à 5%-DHT
IMPÉDANCE DE SORTIE DU PRÉAMPLIFICATEUR-: 1-kΩ
ENTRÉE D’AMPLIFICATEUR IMPÉDANCE-: 10-kΩ
DE PUISSANCE
SENSIBILITÉ-: 620-mV pour 65-W sous 8-Ω à 1-kHz
FUSIBLES-: (100V) F4A 250V
(110V–120V) F3.15A 250V
(220V–230V) F2A 250V
(240V) T2A 250V
FOOTSWITCH-: 1 bouton (N° de pièce 0994052000), sélection de canal
HAUT-PARLEURS INTÉGRÉS-: Un pilote 8-Ω, 12” Special Design, testé selon des critères audio
DIMENSIONS HAUTEUR-: 16,8 pouces (42,8 cm)
LARGEUR-: 47, 8-cm (18,75-pouces)
PROFONDEUR-: 23,0-cm (9,0 pouces)
POIDS-: 14,4-kg (32,0-lb)
Les spécifications du produit sont susceptibles de changer sans préavis.
f e n d e r . c o m
11
Frontman™ 65R Amplifier
INP UTS
1 2
VOLUME
TREBLE BASSMID
VOLUME
TREBLE BASSMID
DRIVE
REVERB
FOOT
SWITCH
PRE
OUT
PWR
IN
FE ND E R MU S IC AL IN ST R UM E NT S
CH SELECT MID
CONTOUR
MORE DRIVE
TREBLE
MID BASS
INPUTS
1 2
VOLUME
TREBLE BASS
DRIVE
VOLUME
REVERB
CH SELECT
FOOT
SWITCH
PRE
OUT
PWR
IN
FE N DE R M US IC A L I NS TR U ME NT S
MID
CONTOUR
Il nuovo amplificatore Frontman 65R offre il suono e la
qualità Fender® famosi in tutto il mondo.
• 65-W di potenza a 8 Ohm
• Canali Normal e Drive selezionabili con controlli di
volume e tono indipendenti
• Pulsante MID-CONTOUR per molte diverse varianti di
distorsione, dal Rock al Blues al Metal e oltre!
®
• Classico reverbero a molle Fender
• Progetto di circuito Fender® “sensibile al tocco”, per
simulare la sensazione della distorsione a valvole
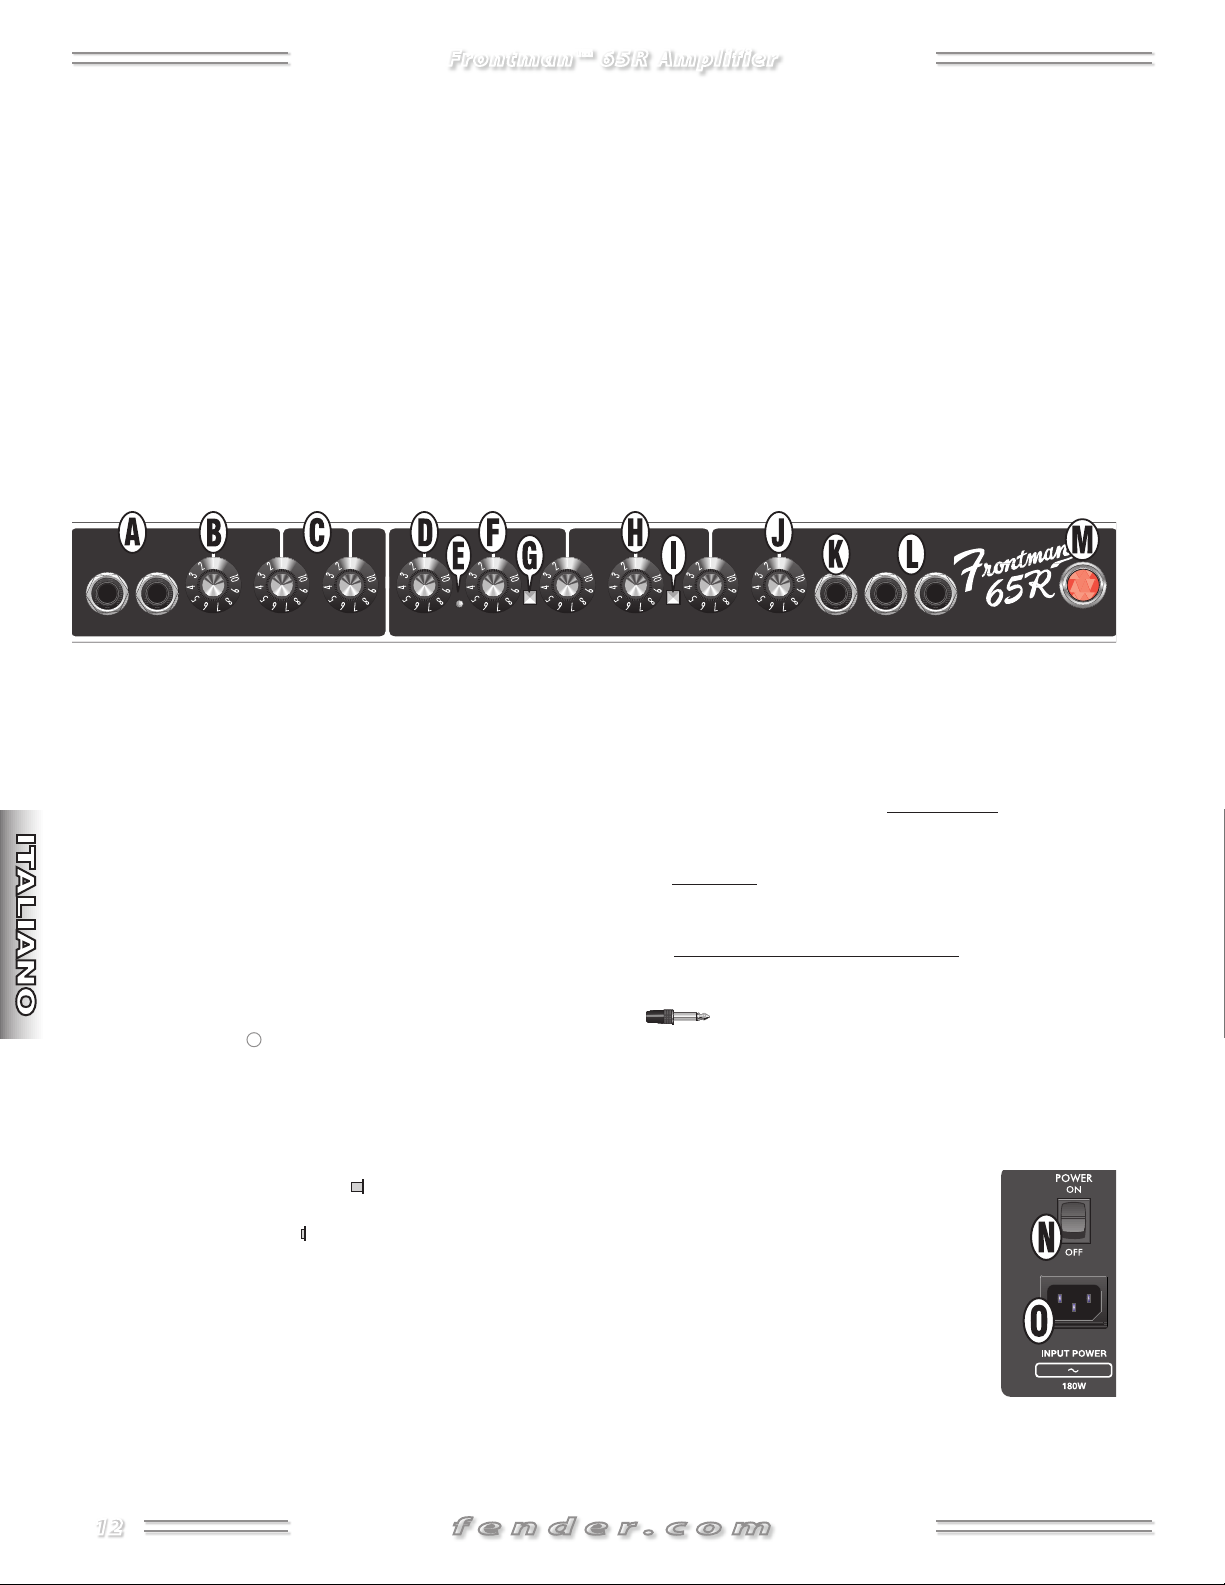
A. INPUT – Collegare qui la chitarra. L’INPUT 1 è un
ingresso a sensibilità normale per la maggior parte
delle chitarre, l’INPUT 2 è un ingresso a sensibilità
inferiore per chitarre con pickup attivi di grande
potenza.
B. VOLUME – Regola il volume del canale Normal.
C. TREBLE/BASS – Regola il livello dei toni di alta e
bassa frequenza del canale Normal.
D. DRIVE – Regola il livello di distorsione del canale
Drive. Utilizzarlo insieme a VOLUME-{F} per impostare
il volume generale del canale Drive.
E. LED DI CANALE –
LED spento n Canale Normal attivo
Ôn
LED acceso
Canale Drive attivo
F. VOLUME – Regola il volume del canale Drive insieme
a DRIVE {D}.
G. CH SELECT
–
Pulsante NON PREMUTO seleziona il canale
Normal
Pulsante PREMUTO
H. TREBLE/MID/BASS – Regola il livello dei toni di
seleziona il canale Drive
alta, media e bassa frequenza del canale Drive.
I. MID-CONTOUR – Attiva un EQ di media frequenza
“forte” utile per un sound di distorsione moderno nel
canale Drive.
• Jack PRE-AMP OUT e POWER-AMP IN per il
collegamento di apparecchiature di effetti esterne,
altri amplificatori o apparecchiature di registrazione/
amplificazione all’ampli FM 65R
• Jack FOOTSWITCH da usare con un pedale Fender®
a un pulsante (incluso). Il pedale permette la selezione
di canale da remoto.
Grazie per avere scelto Fender® – Gli amplificatori più
famosi del mondo, dal 1946.
K. FOOTSWITCH – Collegare il pedale Fender® a
un pulsante (incluso) a questo jack per abilitare
la selezione remota di canale. Quando il pedale è
collegato, esclude il pulsante CH SELECT.
L. PRE OUT/PWR IN – (1) Loop effetti – Collegare
PRE OUT a un ingresso del dispositivo effetti, quindi
collegare l’uscita del dispositivo effetti a PWR IN.
(2) Più ampli – Collegare PRE OUT dell’unità primaria
a PWR IN dell’unità ausiliaria. L’unità primaria si
usa per controllare tutti gli amplificatori ausiliari.
(3)-Registrazione o amplificazione – Collegare PRE
OUT all’ingresso dell’apparecchiatura di amplificazione.
Entrambi i jack utilizzano uno spinotto
standard TS per le connessioni. PRE OUT
include l’adattamento dei toni incorporato.
M. SPIA DI ALIMENTAZIONE
– Illuminata quando
l’amplificatore è acceso.
N. POWER – Spegne e accende
l’amplificatore.
O. PRESA CAVO DI ALIMENTAZIONE
– Collegare il cavo di alimentazione fornito a una presa conforme ai requisiti
di tensione e frequenza indicati sul
pannello posteriore dell’amplificatore.
J. REVERB – Regola il livello dell’effetto di reverbero
per entrambi i canali.
12
f e n d e r . c o m

Frontman™ 65R Amplifier
TIPO: PR 557
NUMERO DI PARTE: 2316000010 (120-V, 60Hz) US
2316000910 (120-V, 60-Hz) US DS
2316001910 (110-V, 60-Hz) TW
2316003910 (240-V, 50-Hz) AUS
2316004910 (230-V, 50-Hz) GB
2316005910 (220-V, 50-Hz) ARG
2316006910 (230-V, 50-Hz) EUR
2316007910 (100-V, 50-Hz) JPN
2316009910 (220-V, 60 Hz) ROK
REQUISITI DI ALIMENTAZIONE: 180-W
POTENZA IN USCITA: 65-W RMS per 8-Ω al 5-% di THD
IMPEDENZA DI USCITA PREAMPLI: 1-kΩ
INGRESSO AMPLIFIC. IMPEDENZA: 10-kΩ
DI POTENZA
SENSIBILITÀ: 620-mV per 65-W a 8-Ω @1-kHz
FUSIBILI: (100V) F4A 250V
(110V–120V) F3.15A 250V
(220V–230V) F2A 250V
(240V) T2A 250V
PEDALE: a un pulsante (N/P 0994052000), selezione canale
COMPLEMENTO SPEAKER: Uno speaker da 8-Ω Special Design da 12 pollici, driver “SOUND TESTED”
DIMENSIONI ALTEZZA: 42,8 cm (16,8 pollici)
LARGHEZZA: 47,8 cm (18,75 pollici)
PROFONDITÀ: 23.0 cm (9 pollici)
PESO: 14,4 kg (32 libbre)
Le specifiche dei prodotti sono soggette a modifica senza preavviso.
f e n d e r . c o m
13

Frontman™ 65R Amplifier
INP UTS
1 2
VOLUME
TREBLE BASSMID
VOLUME
TREBLE BASSMID
DRIVE
REVERB
FOOT
SWITCH
PRE
OUT
PWR
IN
FE ND E R MU S IC AL IN ST R UM E NT S
CH SELECT MID
CONTOUR
MORE DRIVE
TREBLE
MID BASS
INPUTS
1 2
VOLUME
TREBLE BASS
DRIVE
VOLUME
REVERB
CH SELECT
FOOT
SWITCH
PRE
OUT
PWR
IN
FE N DE R M US IC A L I NS TR U ME NT S
MID
CONTOUR
Ihr neuer Frontman 65R-Verstärker liefert Ihnen den
Weltklasse-Fender®-Sound und die weltweit führende
Fender®-Qualität:
• 65-W Ausgangsleistung an 8-Ohm
• Normal- und Drive-Kanal mit unabhängiger Lautstärke- und Klangregelung frei wählbar
• MID-CONTOUR-Knopf bietet viele unterschiedliche
Varianten der Verzerrung – für Rock, Blues, Metal und
vieles mehr!
• Klassischer Fender ®-Federhall
A. INPUT (Eingang) – Anschlussbuchse für die Gitarre.
INPUT 1 ist der Standardeingang für fast alle
Gitarren; INPUT 2 ist ein weniger empfindlicher
Eingang für Gitarren mit aktiven Tonabnehmern
(hohe Ausgangsleistung).
B. VOLUME – Regelt die Lautstärke des Normal-
Kanals.
• Die Touch-Sensitive-Schaltung von Fender
®
erzeugt
ein Röhrenverzerrungs-Feeling
• Über die PRE-AMP OUT- und POWER-AMP INBuchsen können Sie externe Effektgeräte, andere Verstärker oder sonstiges Sound-/Aufnahme-Equipment
an Ihren FM-65R anschließen
• FOOTSWITCH-Anschlussbuchse für einen 1-KnopfFußschalter von Fender® (mitgeliefert). Der Fußschalter
ermöglicht die externe Kanalauswahl.
Vielen Dank, dass Sie sich für einen Fender® entschieden
haben – den weltweit beliebtesten Verstärker seit 1946
J. REVERB – Regelt die Intensität des Reverb für beide
Kanäle.
K. FOOTSWITCH – Anschlussbuchse für einen 1-Knopf-
®
Fußschalter (mitgeliefert) von Fender
zur externen
Kanalauswahl. Ist der Fußschalter angeschlossen,
übersteuert er die Einstellungen des CH SELECTReglers.
C. TREBLE/BASS – Regelt die Höhen und Tiefen des
Normal-Kanals.
D. DRIVE – Regelt die Verzerrung des Drive-Kanals. In
Verbindung mit VOLUME-{F} können Sie hiermit die
Gesamtlautstärke des Drive-Kanals einstellen.
E. KANALANZEIGE –
n
LED AUS
LED AN
NORMAL-Kanal ist aktiv
Ôn
Drive-Kanal ist aktiv
F. VOLUME – Regelt zusammen mit DRIVE {D} die
Lautstärke des Drive-Kanals.
G. CHANNEL SELECT –
Taste nicht gedrückt wählt den Normal-Kanal
aus
Taste gedrückt wählt den Drive-Kanal aus
H. TREBLE/MID/BASS – Regelt die Höhen, Mitten und
Tiefen des Drive-Kanals.
I. MID-CONTOUR – Aktiviert einen aggressiven
„scooped“ Equalizer für die Mitten, der moderne
verzerrte Sounds auf dem Drive-Kanal liefert.
L. PRE OUT/PWR IN – (1) Effekt-Loop – Schließen
Sie PRE OUT an den Eingang eines Effektgeräts
an und den Ausgang des Effektgeräts an PWR IN.
(2)-Mehrere Verstärker – Schließen Sie PRE OUT
des Primärgeräts an PWR IN des Zusatzgeräts an.
Alle Zusatzverstärker werden über das Primärgerät
gesteuert. (3)-Aufnahmegerät oder Mischpult
– Schließen Sie PRE OUT an den Eingang von
zusätzlichem Equipment an.
Der Anschluss erfolgt standardmäßig über
6,3-mm-Mono-Klinkenstecker. PRE OUT
enthält die integrierte Klangregelung.
M. BETRIEBSANZEIGE – Leuchtet, wenn der Verstärker
eingeschaltet ist.
N. POWER – Schaltet den Verstärker ein
und aus.
O. NETZKABELANSCHLUSS – Schlie-
ßen Sie das mitgelieferte Netzkabel
gemäß der auf der Rückseite des
Geräts angegebenen Spannung und
Frequenz an.
14
f e n d e r . c o m

Frontman™ 65R Amplifier
TYP: PR 557
ARTIKELNUMMER: 2316000010 (120-V, 60-Hz) US
2316000910 (120-V, 60-Hz) US DS
2316001910 (110-V, 60-Hz) TW
2316003910 (240-V, 50-Hz) AUS
2316004910 (230-V, 50-Hz) UK
2316005910 (220-V, 50-Hz) ARG
2316006910 (230-V, 50-Hz) EUR
2316007910 (100-V, 50-Hz) JPN
2316009910 (220-V, 60-Hz) ROK
STROMVERSORGUNG: 180-W
AUSGANGSLEISTUNG: 65-W RMS an 8-Ω bei 5-% THD (Gesamtverzerrung)
AUSGANGSIMPEDANZ VORSTUFE: 1-kΩ
ENDSTUFENEINGANG: IMPEDANZ: 10-kΩ
SCHALLDRUCK: 620-mV für 65-W an 8-Ω bei 1-kHz
SICHERUNGEN: (100V) F4A 250V
(110V–120V) F3.15A 250V
(220V–230V) F2A 250V
(240V) T2A 250V
FUSSSCHALTER: 1-Knopf (ART.-NR 0994052000), Kanalauswahl
LAUTSPRECHERAUSSTATTUNG: Ein 8-Ω-Special Design-12"-Lautsprecher „SOUND GETESTET“
ABMESSUNGEN HÖHE: 42,8-cm (16,8-in)
BREITE: 47,8-cm (18,75-in)
TIEFE: 23,0-cm (9,0-in)
GEWICHT: 14,4-kg (32,0-lb)
Die technischen Daten des Produkts können jederzeit ohne vorherige Ankündigung geändert werden.
f e n d e r . c o m
15

INP UTS
1 2
VOLUME
TREBLE BASSMID
VOLUME
TREBLE BASSMID
DRIVE
REVERB
FOOT
SWITCH
PRE
OUT
PWR
IN
FE ND E R MU S IC AL IN ST R UM E NT S
CH SELECT MID
CONTOUR
MORE DRIVE
TREBLE
MID BASS
INPUTS
1 2
VOLUME
TREBLE BASS
DRIVE
VOLUME
REVERB
CH SELECT
FOOT
SWITCH
PRE
OUT
PWR
IN
FE N DE R M US IC A L I NS TR U ME NT S
MID
CONTOUR
Frontman
Frontman™ 65R Amplifier
16
f e n d e r . c o m

Frontman™ 65R Amplifier
2316000010 (120-V, 60-Hz) US
2316000910 (120-V, 60-Hz) US DS
2316001910 (110-V, 60-Hz) TW
2316003910 (240-V, 50-Hz) AUS
2316004910 (230-V, 50-Hz) UK
2316005910 (220-V, 50-Hz) ARG
2316006910 (230-V, 50-Hz) EUR
(100V) F4A 250V
(110V–120V) F3.15A 250V
(220V–230V) F2A 250V
(240V) T2A 250V
2316007910 (100-V, 50-Hz) JPN
2316009910 (220-V, 60-Hz) ROK
(230-V,
f e n d e r . c o m
17


A PRODUCT OF:
FENDER MUSICAL INSTRUMENTS CORP.
CORONA, CA USA
Fender® and Frontman™ are trademarks of FMIC.
© 2007 FMIC. All rights reserved. P/N 763CAX008
REV A
 Loading...